
:max_bytes(150000):strip_icc():format(webp)/Google-Cloud-Next-59a9cb4a03e644389e2ffa9939c420f8.jpg)
Live Deepfakes Made Easy How to Download and Make Your Own Live Model
Live Deepfakes Made Easy: How to Download and Make Your Own Live Model
DeepFace Live offers you an opportunity to swap your face for someone else’s when streaming or making video calls. By swapping your face in real-time, you can present yourself in videos in any way you like. With the recent development made by DeepFaceLab, you get accurate and quality face-swapping, create realistic live models, and live up to the hype withDeepFace Live . In this article, we provide an overview ofDeeepFace Live and provide simple guides for downloading the application to your PC and creating your first live model.
Part 1: What is DeepFace Live
Deepface Live refers to a real-time face-swapping application, which allows you to swap faces during video calls and streaming.
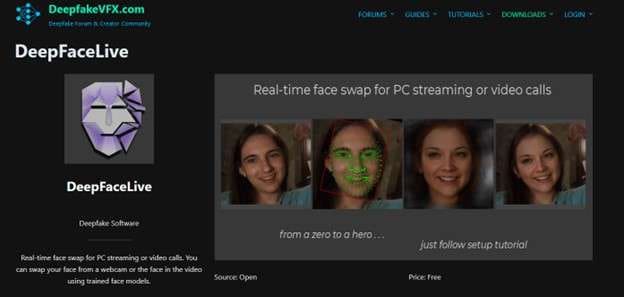
Using Deepface Live allows you to superimpose your face onto someone else’s in real-time. With Deepface Live, you can:
- Swap your face with that of a celeb: Quickly and easily have a conversation with your friends and family while looking like your favorite actor or actress.
- Create Prank or Funny Videos: WIth Deepface Live, you can create all sorts of prank or funning videos, such as giving a speech or singing a song.
- Make it Look Like You Are in a Different Place: Deepface Live allows you to superimpose your face onto the body of someone else so you can appear like you are in a different location.
Part 2: Download DeepFace Live the Easy Way: A Step-by-Step Guide
Downloading and installing DeepFace Live is quite straightforward. Make sure you have Python installed on your system, and follow the steps in any of the two methods to download DeepFace Live.
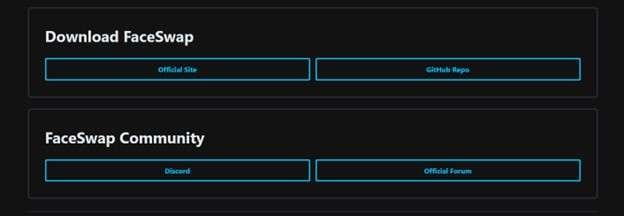
Method 1: Access from the official website
Step 1 Visit theofficial Deepfakevfs website with your browser

Step 2 Scroll down to the Download section
Then locate the section with the Face Swap download links. From the available download options select the version that suits your operating system the best. You can the option to download a Windows or Linux version.
Step 3 Click the Download button to initiate the process
Install the software by running the downloaded file by locating the installation file on your PC and running it to start the installation process. Then follow the on-screen instructions until you complete the installation process.
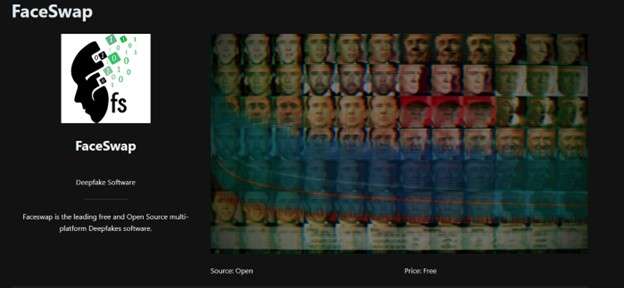
Method 2: Access from Github
An alternative process to installing Deepface Live is accessing it from GitHub. The process is pretty much simple and involves only a few steps.
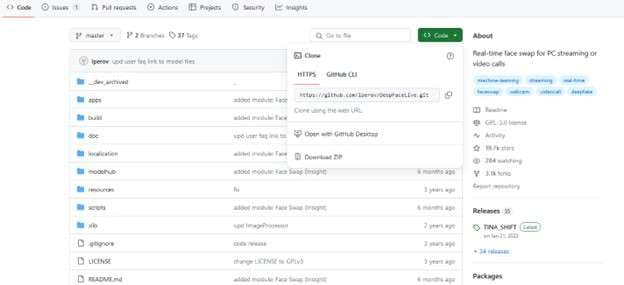
Step 1 Visit the GitHub repository
Using a browser on your PC, visit the GitHub repository and navigate toDeepFace Live.
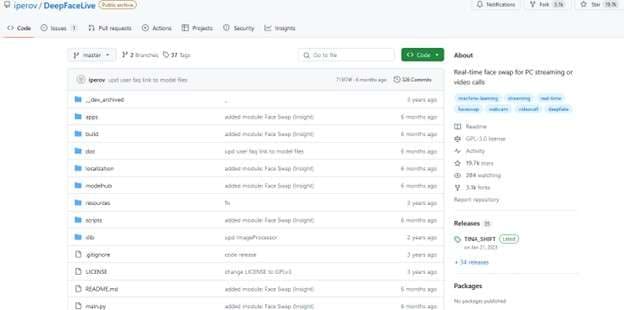
Step 2 Click the Code Button
Found on the top right corner of the repository page, the greed Code button allows you to select what you want to do with the code. On the pop-up menu that appears, select the “Download Zip” option. This will allow you to download the compressed file that contains the Deepface Live code.
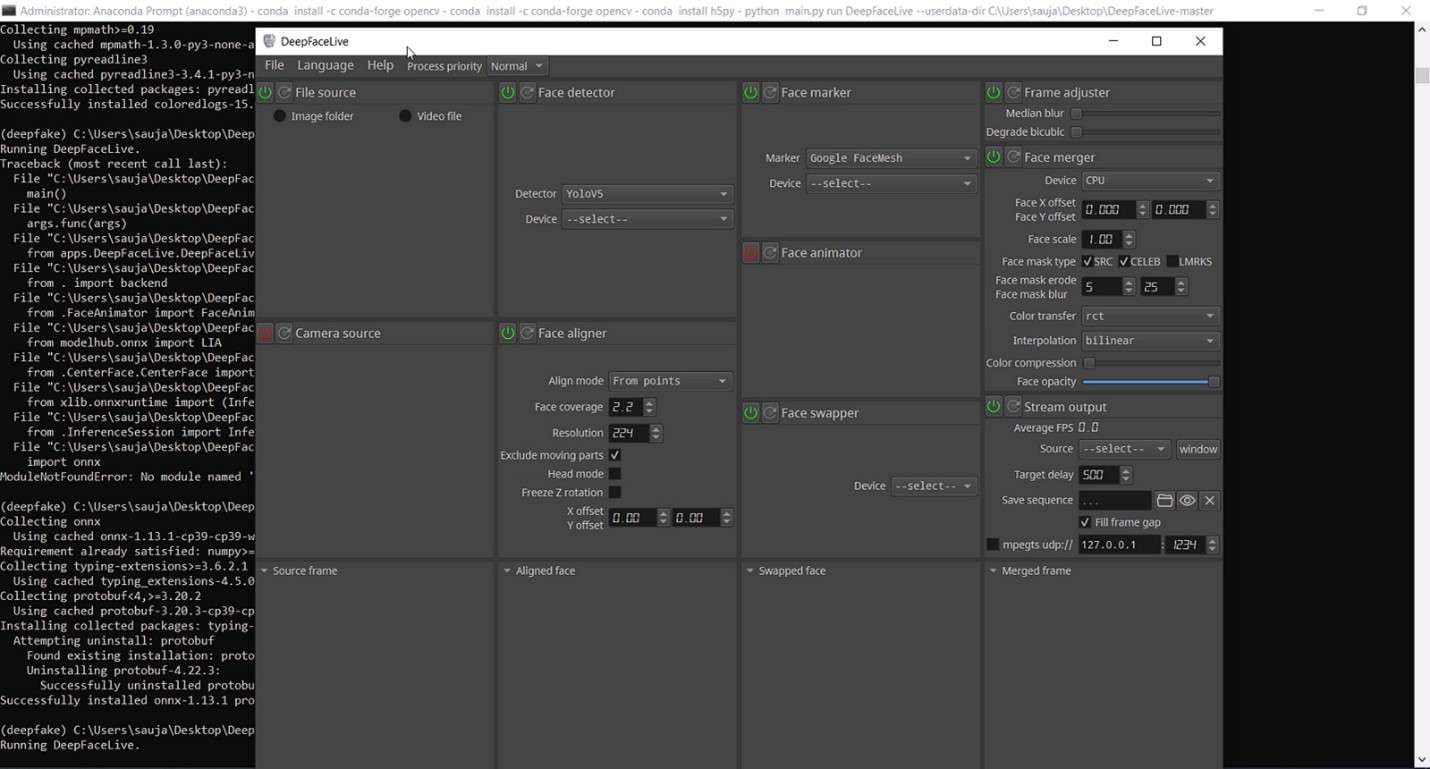
Step 3 Install and Rin the Application
After downloading the Zip file to your PC, extract its content to a desired location. Open the command prompt or a terminal and navigate to the extruded Deepface Live direction. Then, use the command “pip install -r requirements.txt” to install the required dependencies on your PC. After installing all the dependencies, run DeepFace Live on your PC using the command “python main.py. ”
Part 3: Build Your Live Model: Easy Tutorial
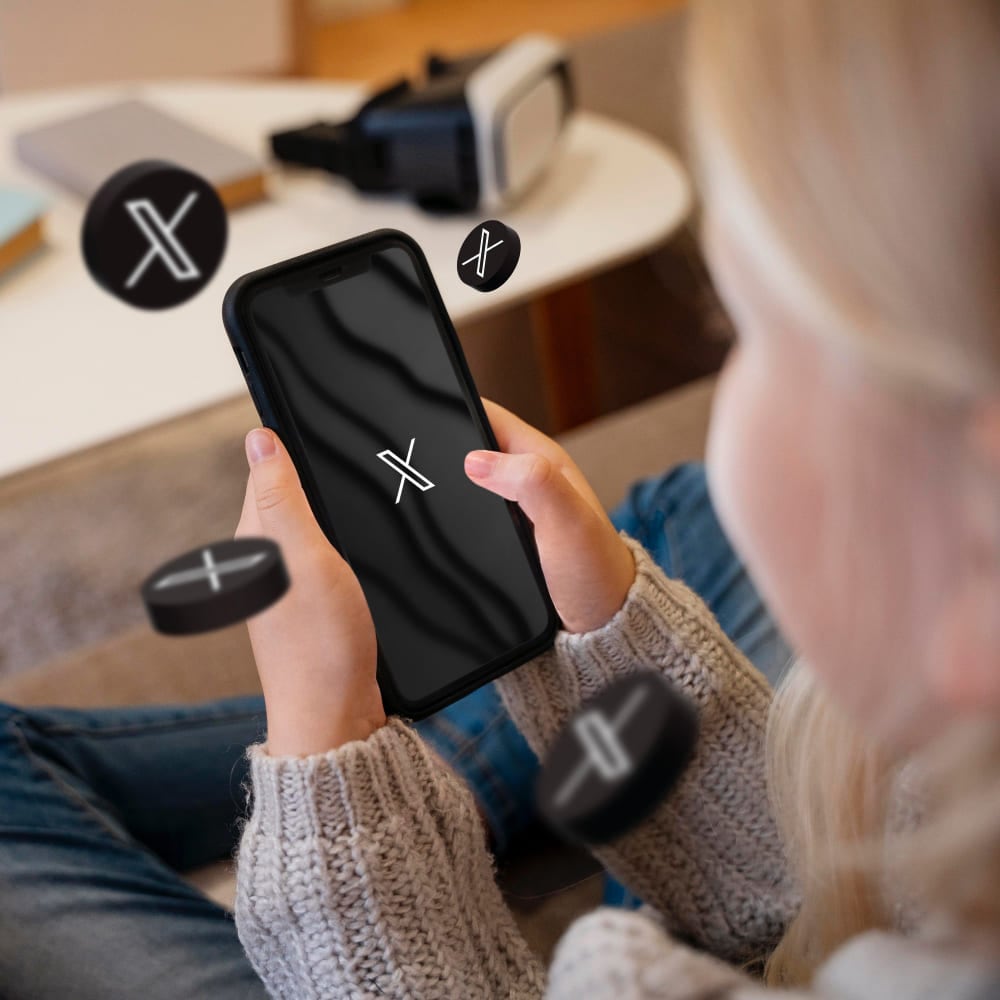
Creating customizedDeepFace Live models can be an exciting experience. It allows you to bring your imagination with real-time interaction. However, with the Deepfake issues and concerns among viewers, you may need a safe alternative to engage your audience with. You will want to engage your audience while assuring them that the information they are getting is authentic.
![]()
Get Started Online Free Download
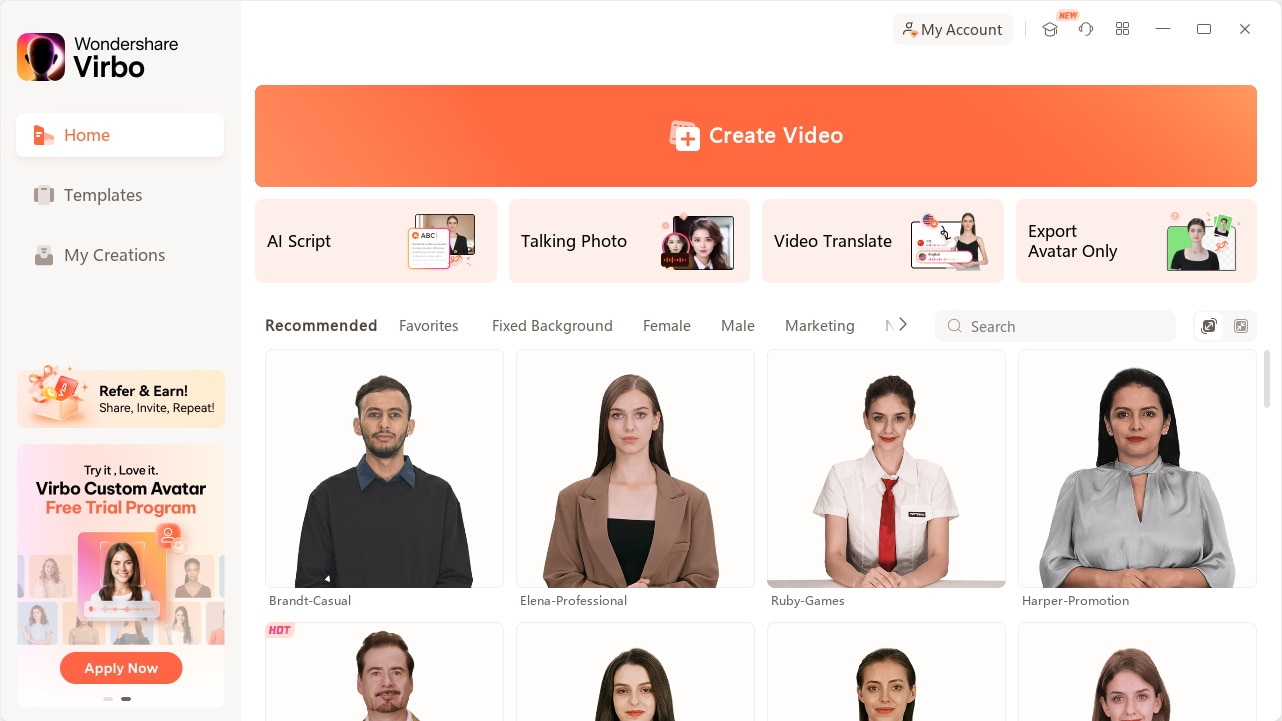
Virbo Live is designed to give users the ultimate AI streamer experience. You can host live shopping with an AI streamer, saving the time and cost of generating such content or hiring a human streamer. With Virbo, you get access to multi-lingual AI-driven avatars or Vtubers that will interact with your viewers in real time. Transform their live experience while boosting your revenue.
Virbo Live allows you to broadcast your stream on platforms like Facebook Live and YouTube using OBS on each platform. In some platforms like TikTok and Shopee, you can use the official live tools like TikTok Live Studio to stream your Avatar.
01 Equipment Requirement:
You can use Virbo Live with any device that supports live streaming. This can be your PC or mobile device with decent storage and access to high-speed internet. The major equipment requirements include:
- Computer Requirements : Make sure your computer is properly configured with Stereo Mix or other virtual sound cards.
- Network Requirements: Your internet speed should be at least 5Mbps for smooth live streaming.
- Browser Requirements : While most browsers are supported, it is recommended to use the latest Chrome browser for optimal and stable performance.
Once you have checked on all theequipment requirements , you can go ahead to create your first AI-powered stream. Here are the steps to follow to create an AI streamer and set it up for interactions with your viewers:
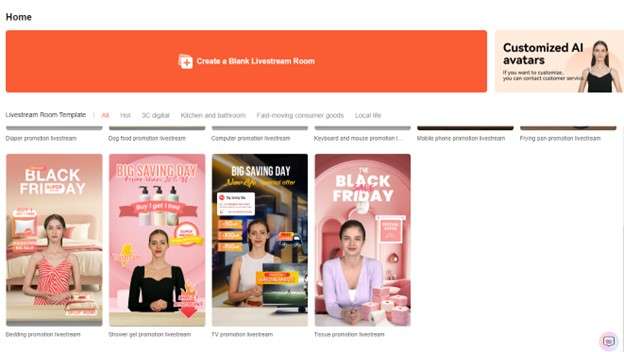
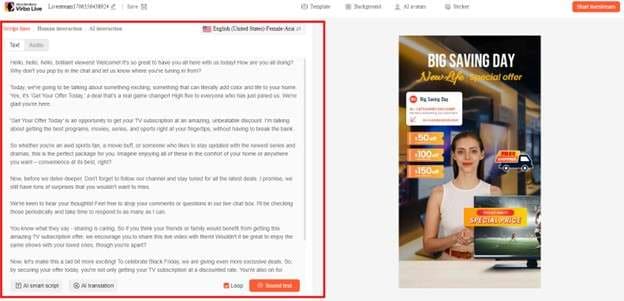
Step 1 Create a Live Shopping Rooms
On theVirbo Live page , select “Create a Blank Livestream Room” or choose a template of choice from the available options to create a new livestream room.
Get Started Online Free Download
Step 2 Choose AI Streamers and Background
Add a virtual streamer of choice to your live stream room from the virtual host library.Virbo Live provides a wide range of AI avatars and backgrounds to suit your needs. You can also customize the avatar and background the way you like, and add stickers to enhance your viewers’ experience.
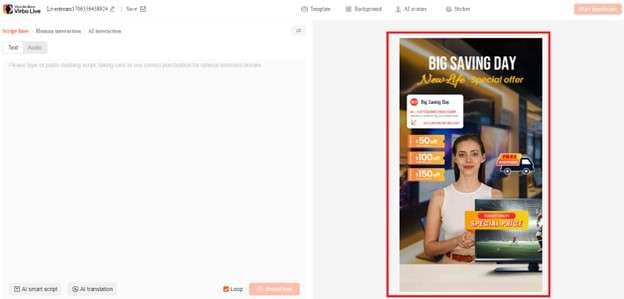
Step 3 Enter Text or Voice
With the avatar set, you need to upload your audio or enter a script with all the necessary details. Virbo Live allows you to automate this step with the AI smart scriptwriter and AI translator. Simply enter basic details about your product, and the Smart AI Scriptwriter will generate a fully detailed script for the avatar. Be sure to specify the language that you want to use and the desired tone for a more accurate script.
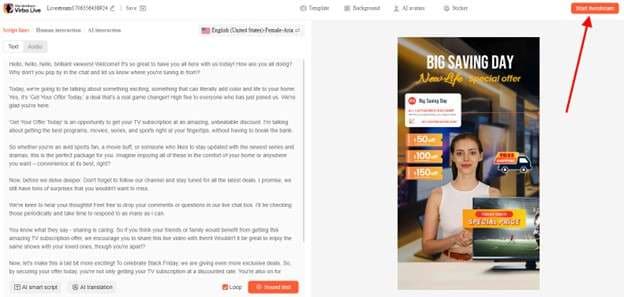
Step 4 Start Live Streaming
After choosing your AI Avatar and generating or adding a script, click “Start Live Streaming”. This allows you to AI stream your Avatar through OBS software, and allow the Avatar to interact with your audience on platforms like Facebook Live and YouTube.
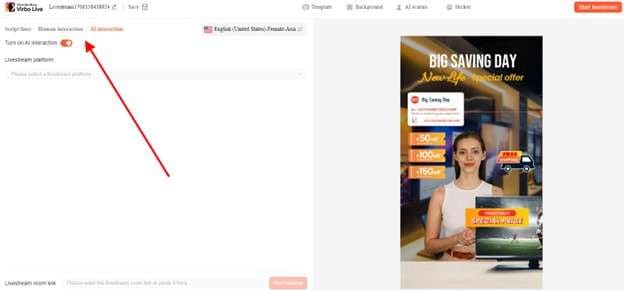
Step 5 Interact With the Audience
AI streamer from Virbo Live will do more than present your information to the audience. It will also interact with them seamlessly by responding to questions and providing additional information.
Conclusion
Deepface Live allows you to experiment with different faces when streaming live videos. You can present your videos as a celeb or even appear as if you are in a different location. While theDeepFace Live application can give you an incredible experience, you may have to deal with some ethical issues associated with Deepfake scandals. For this reason, we highly recommend usingVirbo Live as a safe alternative. It allows you to create AI-powered avatars that can seamlessly interact with your audience without negative repercussions.
Top 5 Best Tools to Convert Text to Audio Online for Free
TTS (text-to-speech) converters are widely used to make written content accessible for visually impaired individuals. Moreover, professionals use TTS converters to produce voiceovers and narrations for their creative content. This helps in converting text to speech with great efficiency. It not only saves you time but also helps in making correct pronunciations of any language.
Thus, if you are interested inconverting text to voice online for free , this article is for you. In this article, you can discover the best TTS converters that can help you convert your written script into a high-quality voice. Hence, let’s jump into the details.
Part 1: The Benefits of Using the Text to Speech Online Converters
TTS converters can immensely benefit you in various fields. To learn the key advantages of text-to-speech converters, proceed to the following section:
1. Ensures Enhanced Reading and Saves Time
Many people don’t have significant time to read books or written content. In such a case, TTS tools canconvert text into voice online . This can enhance your reading experience while saving time. If the text is lengthy or complex, you can listen to the converted voice for your ease. It will help you understand the information more quickly. Thus, TTS converters are essential to offer an enriched reading experience.
2. Supports Diverse Languages and Accents
Most of the TTS tools support multiple common languages. If you want to make your content accessible to a diverse audience, TTS converters play a huge role. Such converters help people from different backgrounds access the content in their respective languages.
Furthermore, TTS converters provide accurate accents and pronunciations of every language. This can be an advantage for language learners and trainers. Thus, you can rely on TTS converters to pronounce complex terms in the correct pronunciation.
3. Helps in Proofreading
Once you have created your script, you may need to proofread it. In this case, TTS can help you with effective proofreading. While listening to your written content, you can find out errors and grammatical mistakes. After discovering the mistakes, you can edit your document in an accurate way. Hence, TTS converters can help improve the quality of your text documents.
4. Allows Voice Customization
Popular TTS converters come with many options for customization. For example, you can select desired pitch, tone, and voice quality from the options. The customizable options can help in producing voiceovers and narrations in your desired way.
Furthermore, to make the generated voice professional, you can also insert pauses in the required time. Hence, TTS converters help users to make their speech appealing and professional.
Part 2: Detailed Overview of the 5 Best Text-to-Speech Online Tools
Do you want the best tools toconvert text to audio online for free? Check the following section for the top-notch TTS converters with their key features.
1. Voicemaker
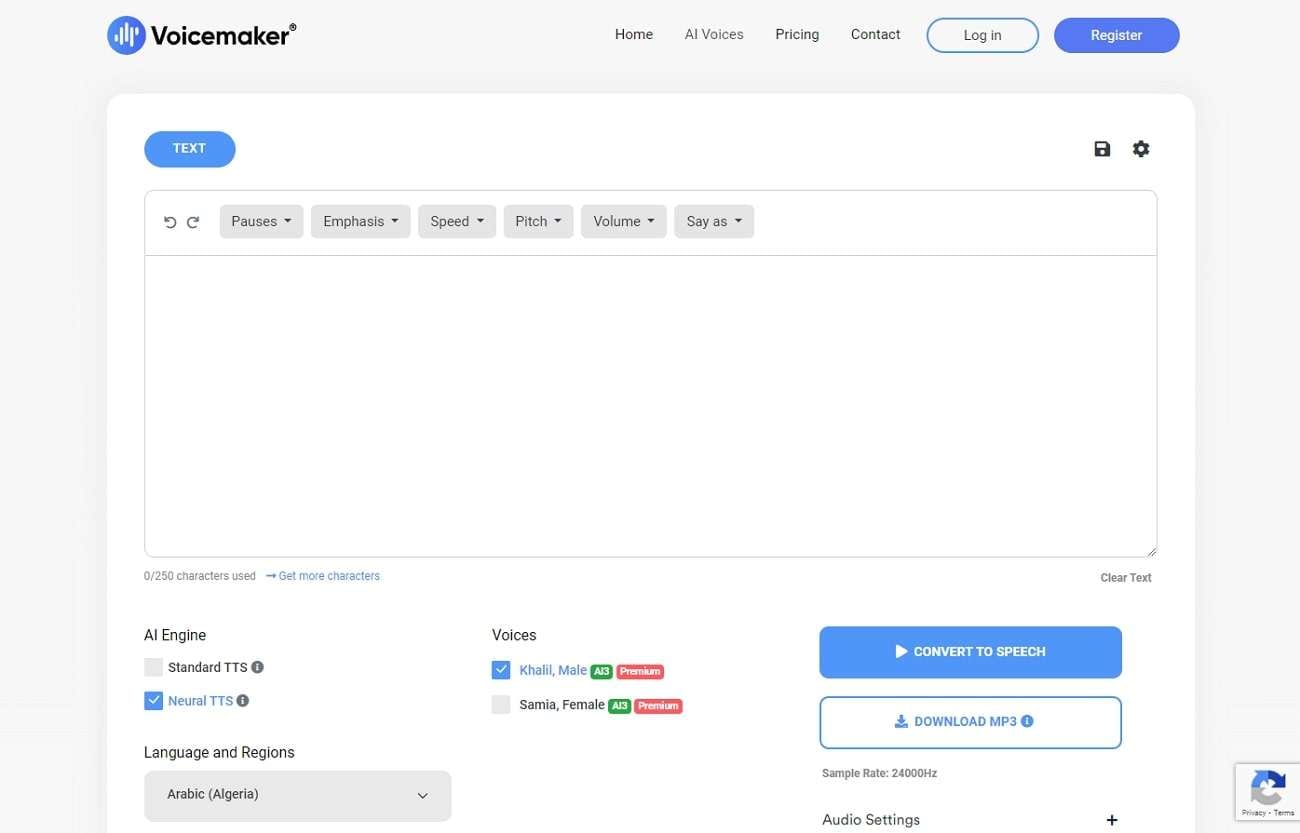
Voicemaker is a professional tool to convert text into the desired voice. It provides several options to produce a desired voice through customization. With this tool, you can explore more than 1000 AI voices with the best audio quality. The AI voices of this text-to-speech converter are available in more than 130 languages.
On its interface, you can find two options for its AI Engine: Standard TTS and Neural TTS. Both options offer different functions and voices. Voicemaker also offers multiple voice effects. For instance, you can add breathing, soft, angry, empathetic, and other voice effects with one click. You can also specify the sample rate from audio settings through this tool. Hence, it’s a complete TTS converter for professionals.
Key Features
- This tool supports three output audio formats: MP3, OGG, and WAV.
- From the settings, you can manage pauses, speed, and volume of your voice according to your desire.
- You can directly share the audio files from this tool to multiple platforms. For example, you can upload the generated voice to Facebook, Instagram, TikTok, YouTube, etc.
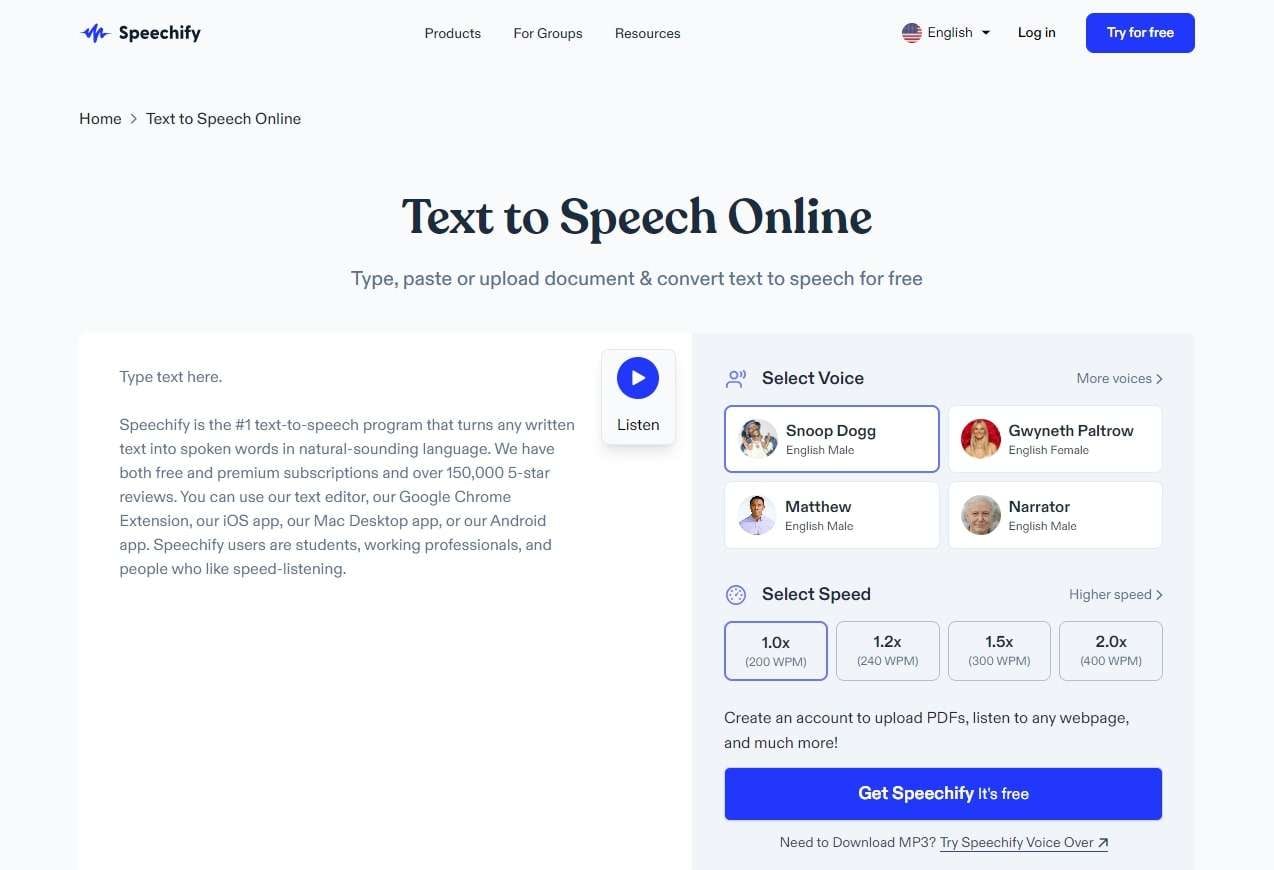
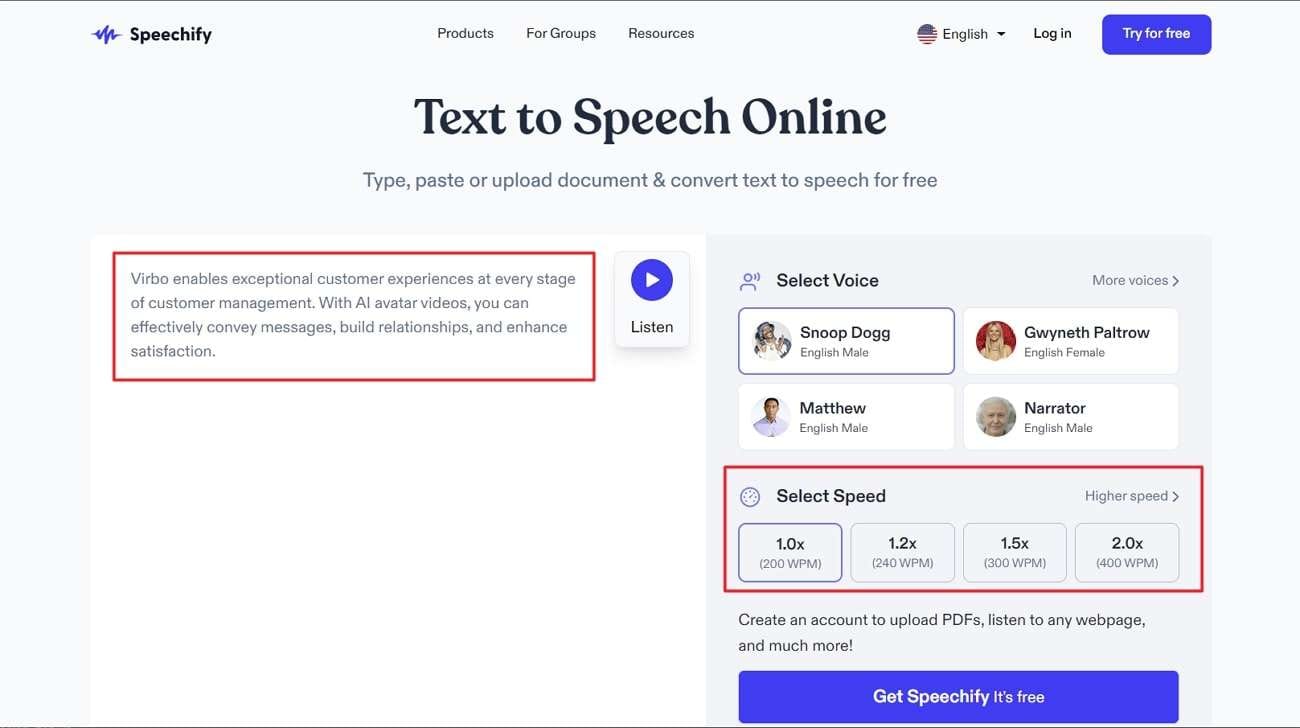
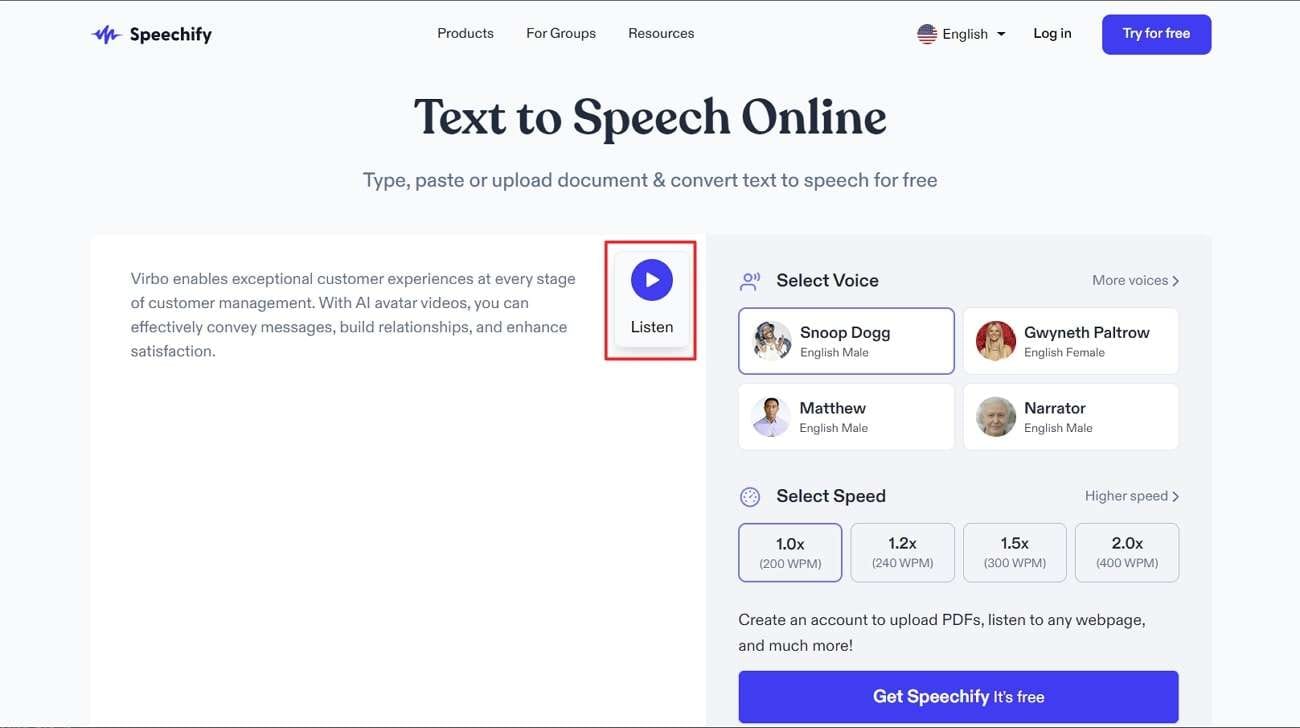
2. Speechify
Speechify is a famous tool that can assist you inconverting text to speech online for free . With this tool, you can type, paste, and upload text easily. It consists of natural TTS voices you can select according to your desire. It can boost your productivity by reading lengthy documents, Google Docs, and any textual content. Moreover, it supports more than 30 languages available in unique voices.
Once you have converted the text into speech, you can download the audio files to your system. Moreover, you can use Speechify on both your desktop and smartphone devices. It also offers its Google Chrome extension.
Key Features
- Using Speechify, you can increase the reading speed of your text to 9X faster. It can help you in listening to the words faster for your training.
- It also offers the official celebrity voices of Snoop Dogg and Gwyneth Paltrow.
- Once you have saved anything on Speechify library, it will be synced across your every device.
3. Media.io
Media.io is known for its high-quality performance for editing audio files. The TTS converter of Media.io functions to provide you with high-end audio results. It allows you to insert up to 1500 words at a time for conversion. Moreover, you can discover realistic human voices that you can select for the conversion. Most importantly, it has a friendly interface that can encourage beginners.
This tool uses AI technology toconvert text to speech online . Therefore, you won’t find errors in the generated voice. Once you have converted the text into speech, you can download the audio in MP3 file format.
Key Features
- The customization options in Media.io let you generate the AI voice of your choice. You can select the output language, pitch, and reading speed.
- You can edit your AI voice by trimming, splitting, and cutting. Moreover, you can adjust the volume of the voice, preferably.
- io offers many tools to edit your voiceover. It contains a voice changer, voice recorder, and voice visualizer.
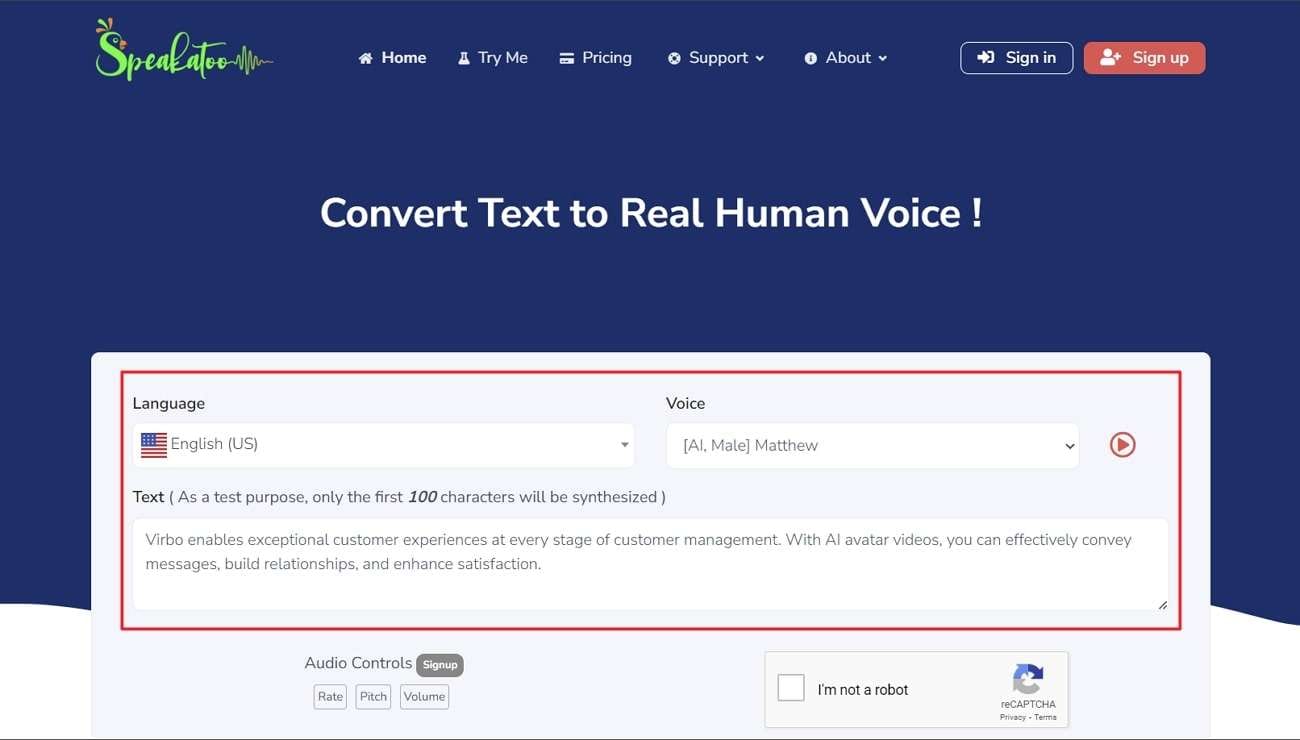
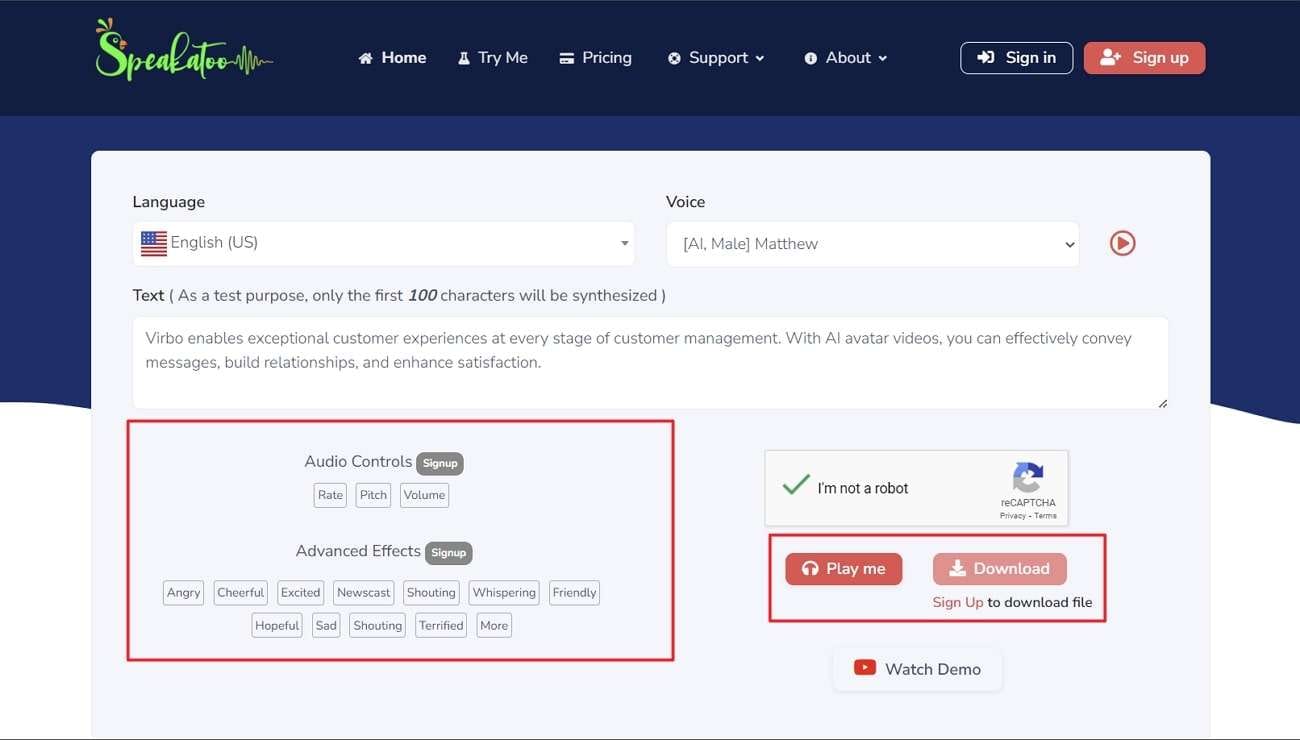
4. Speakatoo
Do you want an all-rounder TTS converter? Speakatoo is a simple yet effective TTS converter comprising various features. It supports over 120 languages to reach a diverse audience. You can also explore over 850 AI voices on this tool. Furthermore, it supports multiple audio file formats. After conversion, you can download the audio file in FLAC, OGG, MP4, and MP3.
Along with downloading the audio file, you can also share its link across many platforms. With advanced AI technology and neural training, you can create high-end AI voices through it. Hence, you must try this tool toconvert text into voice online .
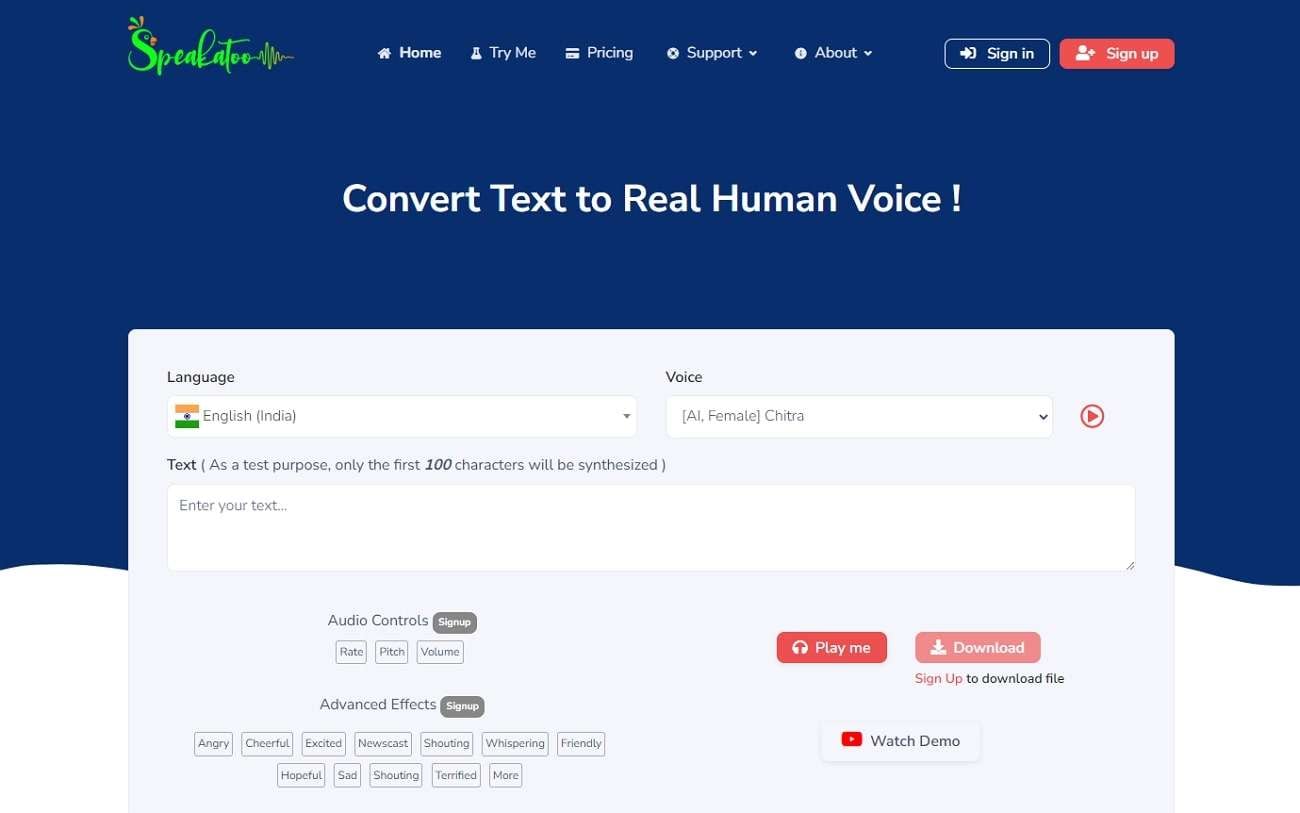
Key Features
- On this tool, you can use multiple audio controls like rate, pitch, and volume. Using such controls, you can produce your desired voice easily.
- This tool can add auto inflections in the audio to make your voice realistic. Furthermore, this will help to convey human emotions in the best possible way.
- Using this tool, you can add breathing effects and pauses to your voice. It will make your AI voice more natural.
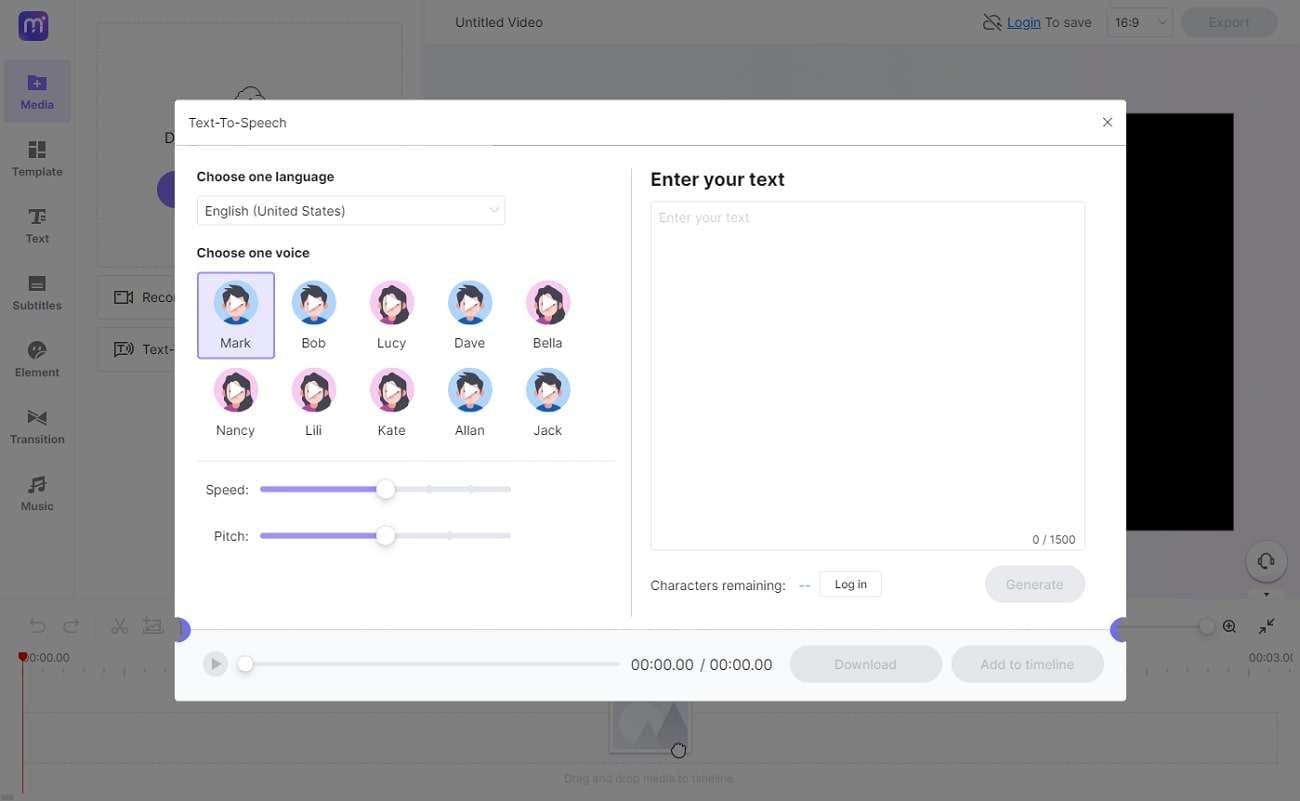
5. PlayHT
PlayHT is an advanced TTS converter you can rely on for commercial use. It supports over 60 languages and 800 AI voices. The AI voices are available for both genders in distinct voice styles. The supported audio file formats are MP3 and WAV. If you want to create a unique AI voice, you can explore diverse languages and accents in its interface.
Furthermore, the conversion speed of this tool is impressive. Within a few minutes, you can listen to the generated AI voice without errors or mistakes. This tool uses efficient machine learning models to provide the best results. Hence, you should try PlayHT to make high-end AI voices.
Key Features
- To make your voice dynamic, you can add stress and emphasis to certain phrases. It will add a professional touch to your AI voice.
- PlayHT allows you to use multiple voices in the same audio file. It can be ideal for creating voiceovers of movies and dramas.
- This tool lets you collaborate with your team members in a comfortable environment. You can invite your colleagues to create voiceovers together.
Bonus Tip: The Most Recommended AI Text to Speech Generator for Offline Platforms
Do you want a TTS converter that can function across offline platforms?Virbo is an advanced tool available on Windows, iOS, and Android devices. You can also use its online version from any web browser. The text-to-speech function of Virbo lets you produce professional AI voices in your desired tone and speaking style. Moreover, it supports more than 120 AI voices in clear audio quality.
Get Started Online Free Download
After selecting the gender, you can explore multiple attires to produce an AI voice. It will help in choosing a perfect accent for your desired language. Furthermore, you can specify the tone of the AI voice from the given options. For example, you can select mature, explanation, natural, native, and other tones.
Virbo also provides AI Avatars that you can use as virtual presenters in your videos. Thus, this tool is a must-have to generate quality AI voices with additional features.
Wrapping Up
TTS converters can help you in various professional fields. Using such tools, you can create accurate voiceovers and narrations for movies and games. Moreover, you can learn new languages through TTS converters.
In this article, we have discussed the famous tools toconvert text into voice online . For a more advanced tool, you can navigate to Virbo. It’s an AI-supported software that can create flawless AI voices from your text.
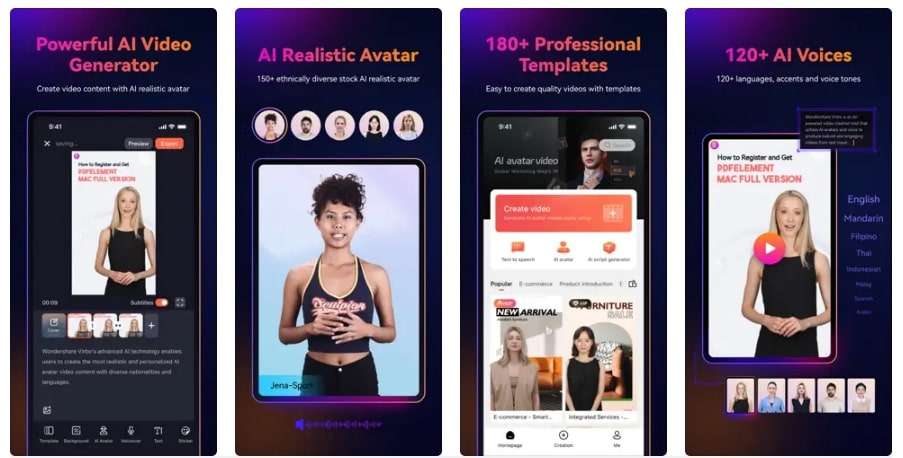
Create Videos with an AI Script Generator
Create videos with an AI script generator
You can complete your video creation using Virbo’s AI Script Generator tool. The specific steps are as follows:
01 Generate your script with AI
Step 1: Add the keywords and basic information for the script you want to prepare. Proceed to the “Key selling points” section for important information in the video.
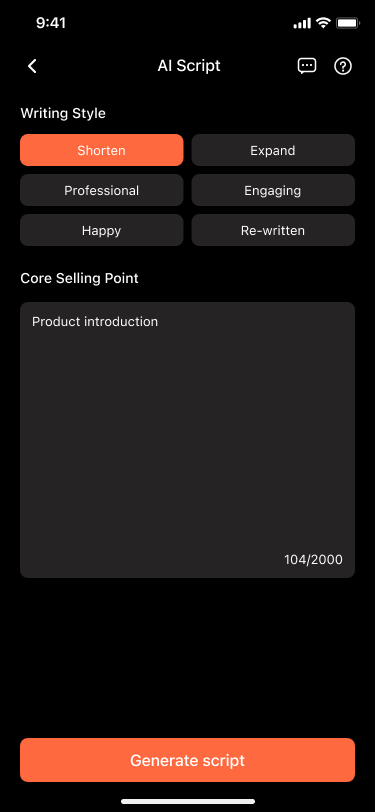
Step 2: After providing all information, select the “Generate script” button on the bottom to start the process.
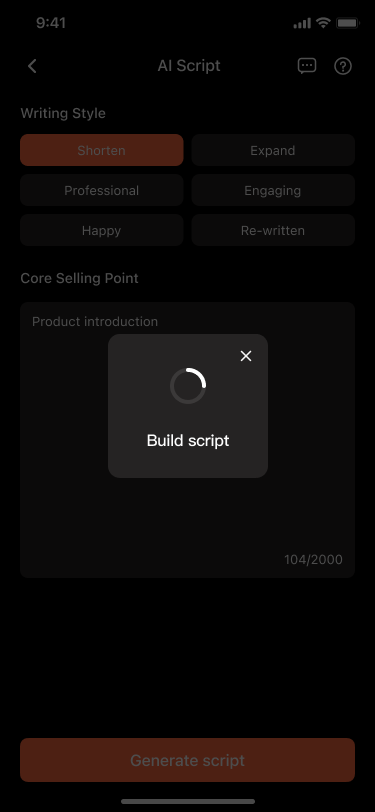
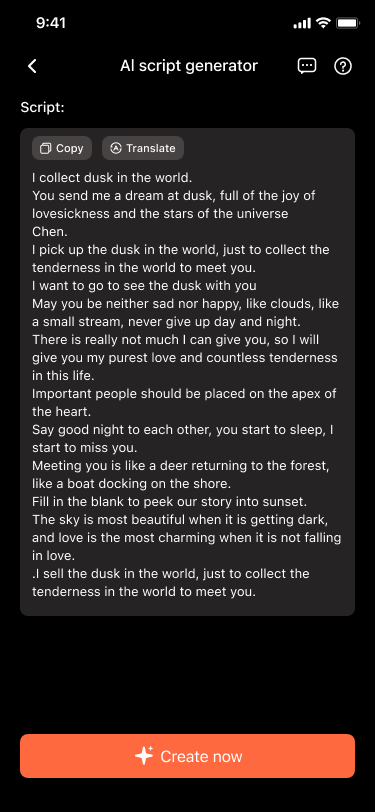
Step 3: It takes time to complete, but once finished, the script will be displayed on the next screen. You can make specific edits to the script as desired. Then, proceed to select the “Create video” button to generate an AI video based on the script.
02 Create AI videos based on the script
Step 1: Upon clicking the “Create video” button, you will be directed to the AI video creation screen, where you can choose your preferred avatar.
Step 2: At the same time, you can customize the template style, video background, voiceover , and text style. Additionally, you can add stickers and music. If you are satisfied with the result, you can proceed to export the final video.
Note
Please note that free users are limited to exporting videos of up to 30 seconds in duration. Should you exceed this limit, upgrading to the premium version is required to export longer videos.
01 Generate your script with AI
Step 1: Add the keywords and basic information for the script you want to prepare. Proceed to the “Key selling points” section for important information in the video.
Step 2: After providing all information, select the “Generate script” button on the bottom to start the process.
Step 3: It takes time to complete, but once finished, the script will be displayed on the next screen. You can make specific edits to the script as desired. Then, proceed to select the “Create video” button to generate an AI video based on the script.
02 Create AI videos based on the script
Step 1: Upon clicking the “Create video” button, you will be directed to the AI video creation screen, where you can choose your preferred avatar.
Step 2: At the same time, you can customize the template style, video background, voiceover , and text style. Additionally, you can add stickers and music. If you are satisfied with the result, you can proceed to export the final video.
Note
Please note that free users are limited to exporting videos of up to 30 seconds in duration. Should you exceed this limit, upgrading to the premium version is required to export longer videos.
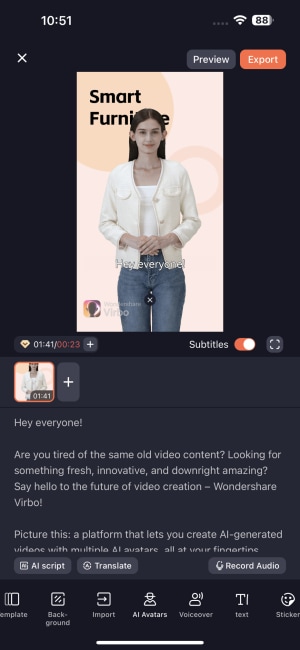
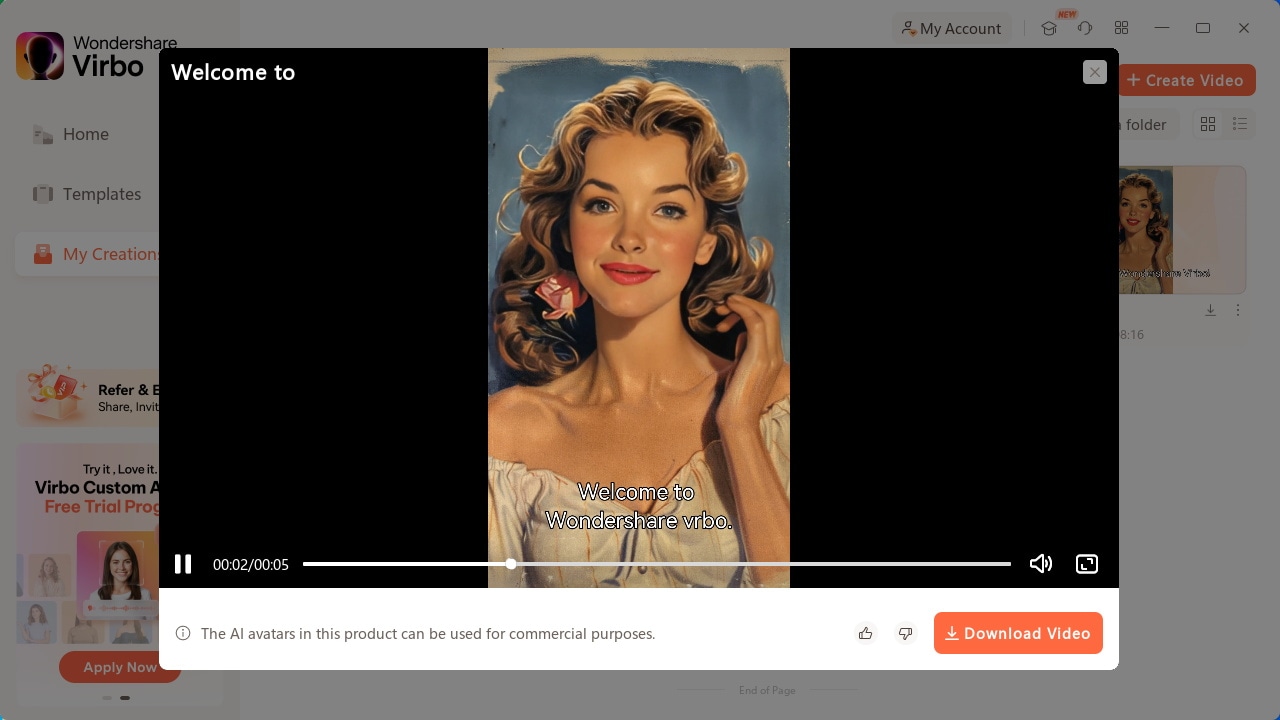
Talking Photo | Wondershare Virbo
Talking Photo
Have you ever wanted to create a video using your favorite photos to express your ideas? Virbo’s Talking Photo can fulfill your wish! This feature allows you to make photos speaking or even generate videos using preset images or photos uploaded from your device. By following our instructions, you will quickly learn how to operate.
02Use Your Still Photos to Create Videos
Way 1: Simply Bring Your Photos to Life with 2 Steps
Simply input your script (or use Virbo’s AI feature to generate one), choose the voice-over, and export the video to achieve the desired effect! You can also record audio online or upload your own recordings to make your photos speak.
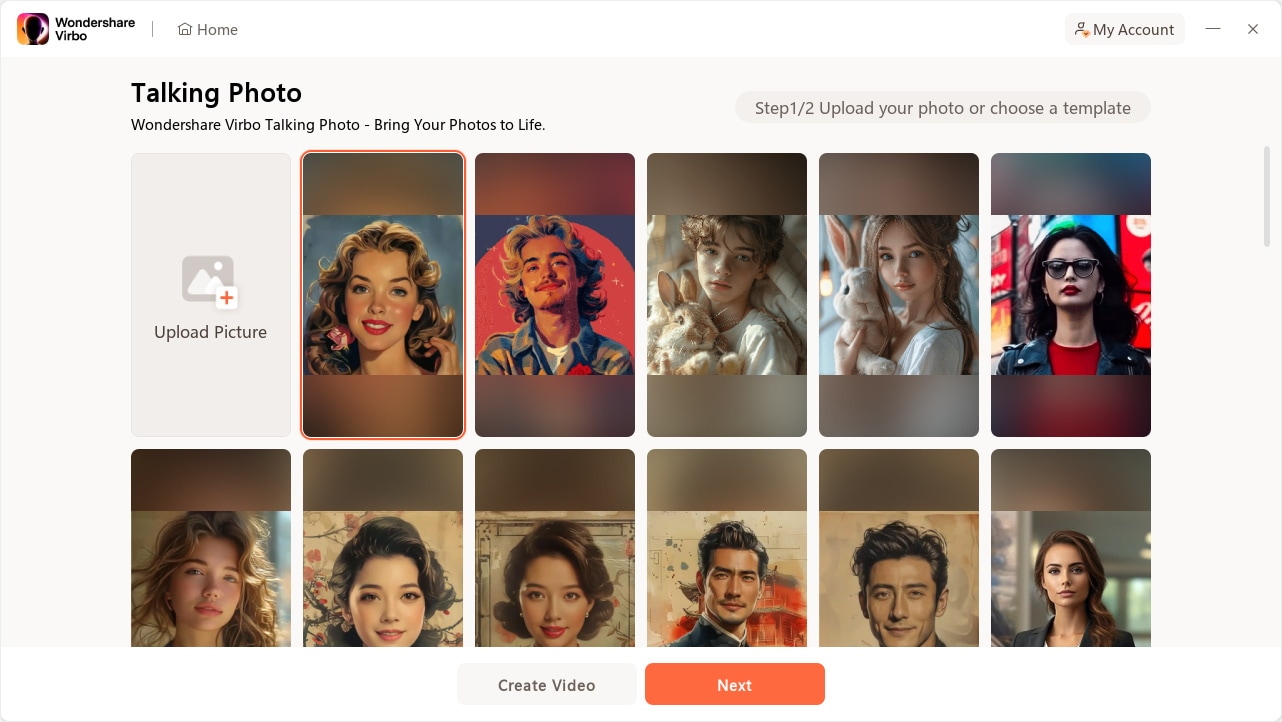
Step 1. Choose Talking Photo
Download and install Wondershare Virbo on your computer and click “Talking Photo” to bring photos to life.
Make Photos Speak Make Photos Speak
Click Talking Photo
Pick a template or click “Upload Picture” to upload your own picture and tap “Next”.
Create Next Button
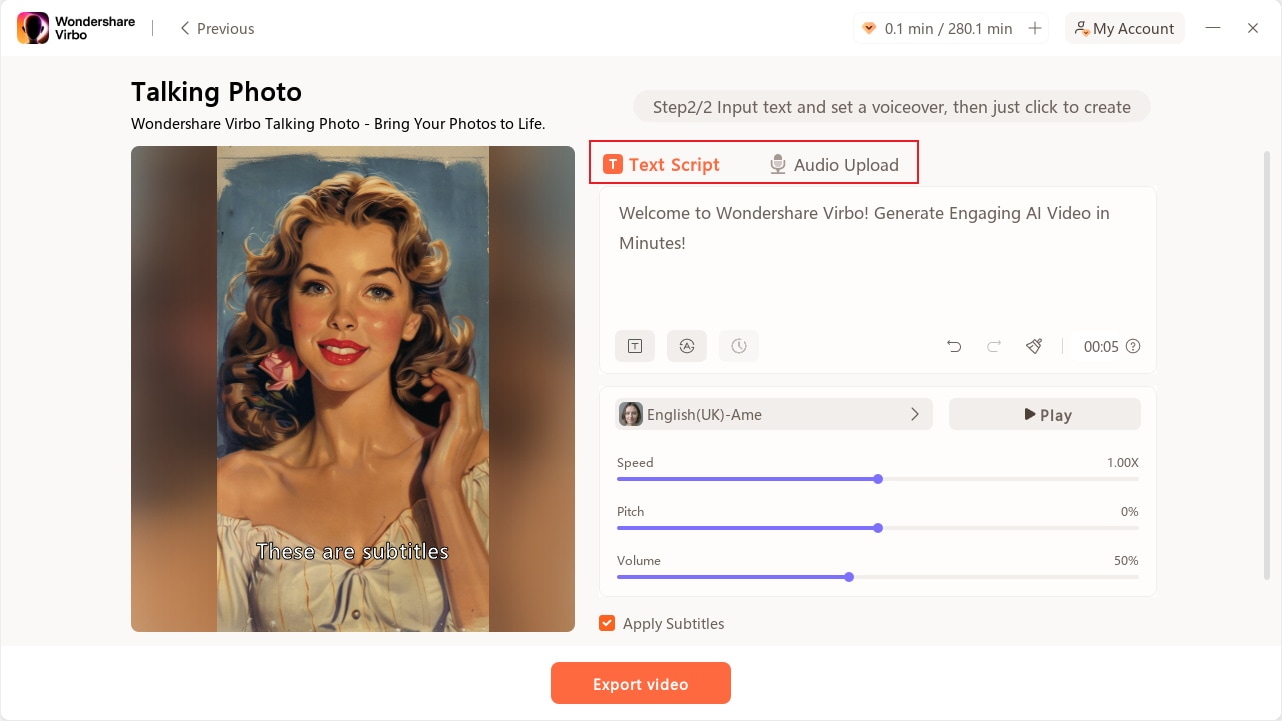
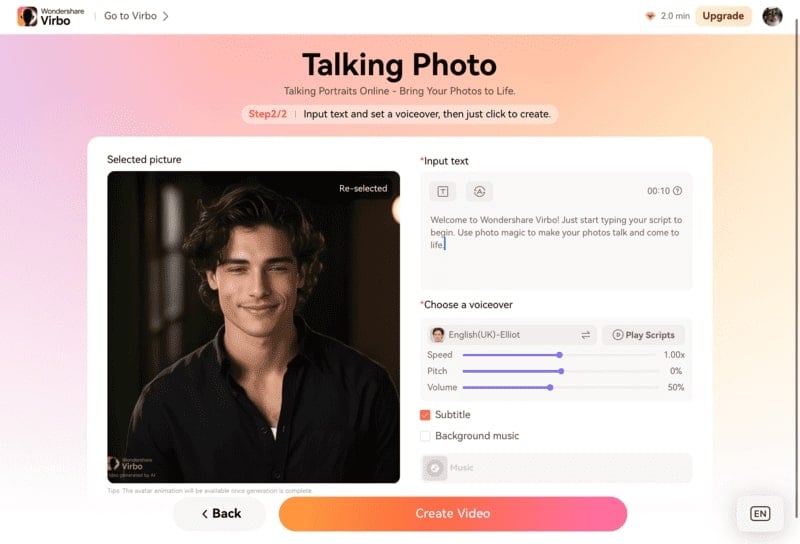
Step 2. Input Text and Set A Voiceover
Enter your voiceover script or click the ‘Audio Upload’ to import an audio file as the voiceover.
Input Script
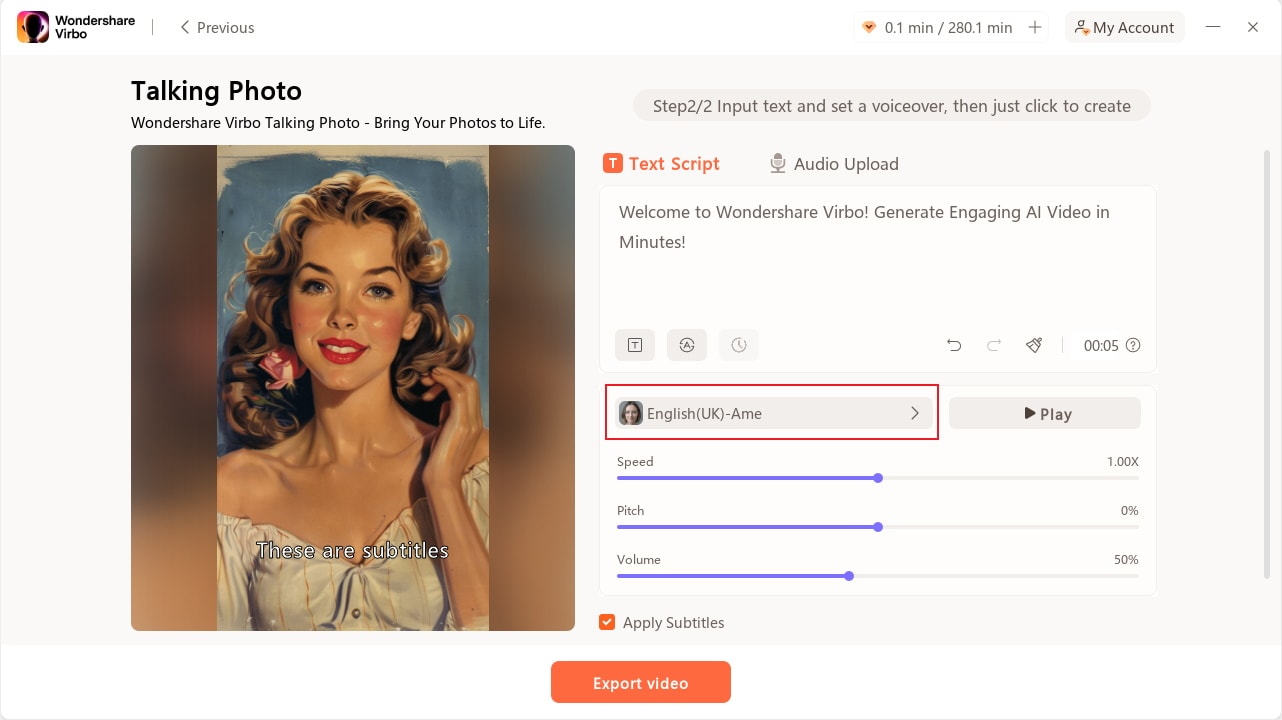
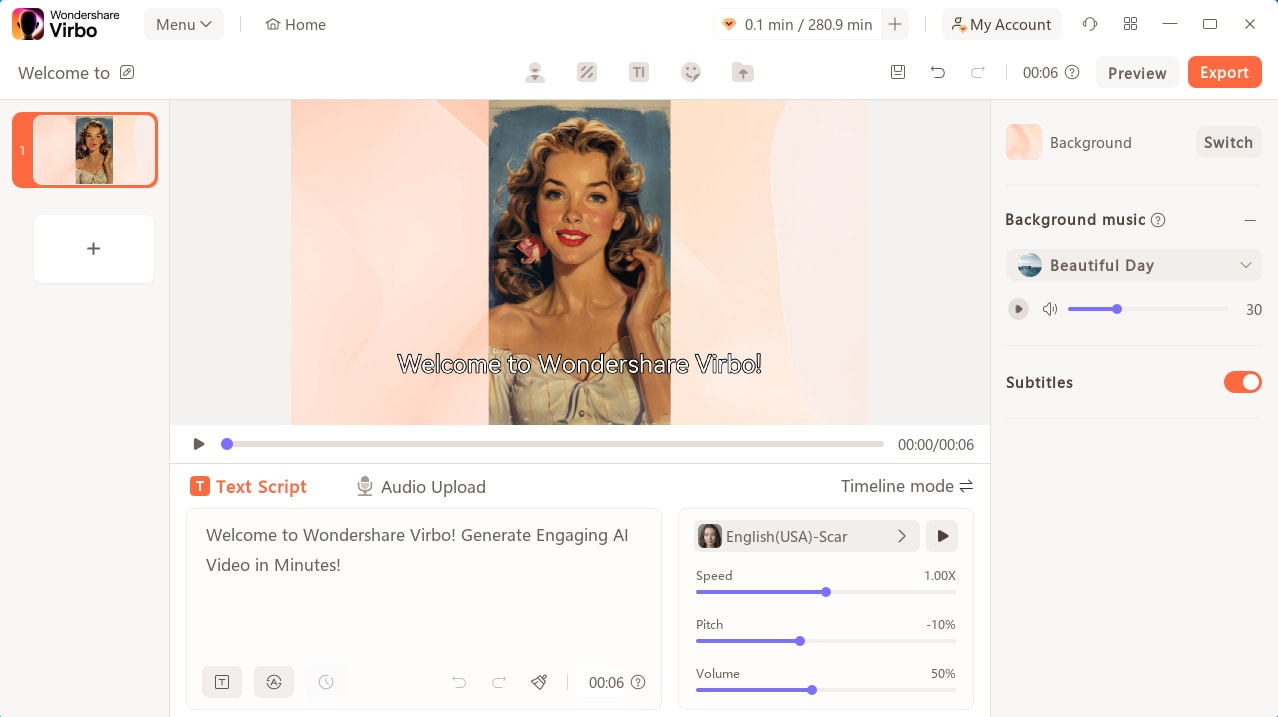
After entering your voiceover script, you can customize the language, and adjust playback speed, pitch, and volume.
Edit Voiceover
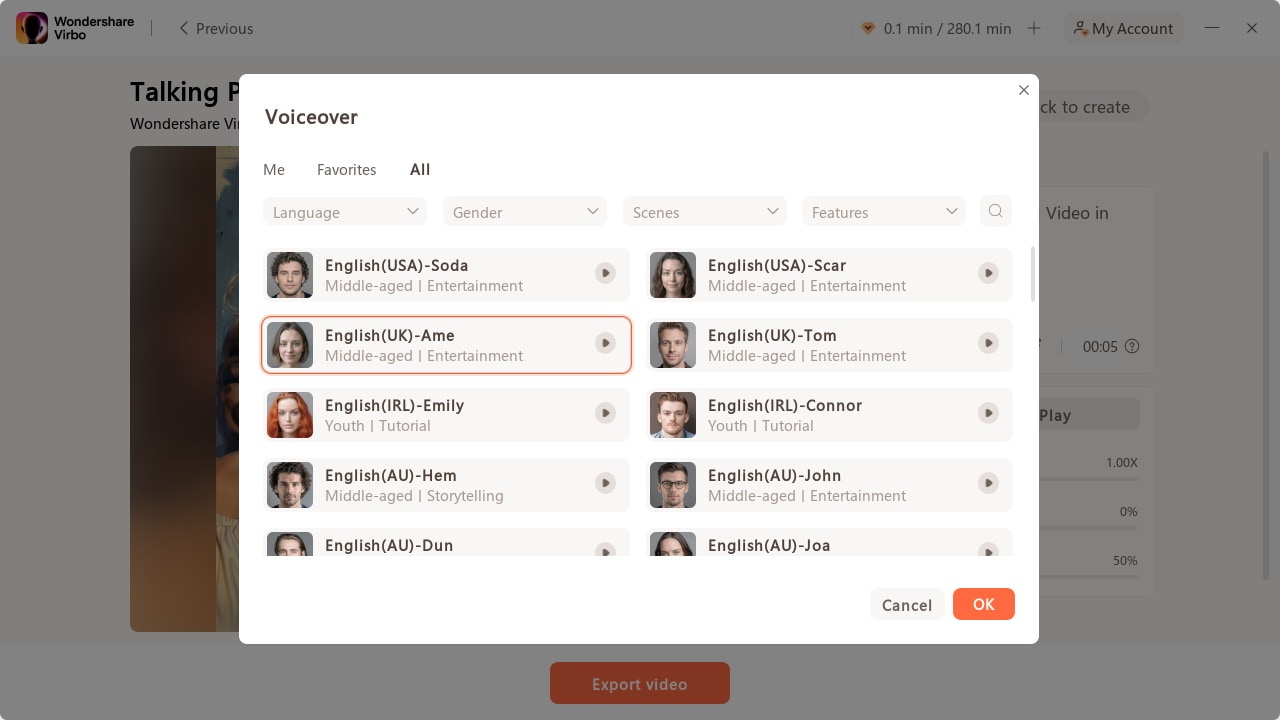
Choose Voiceover
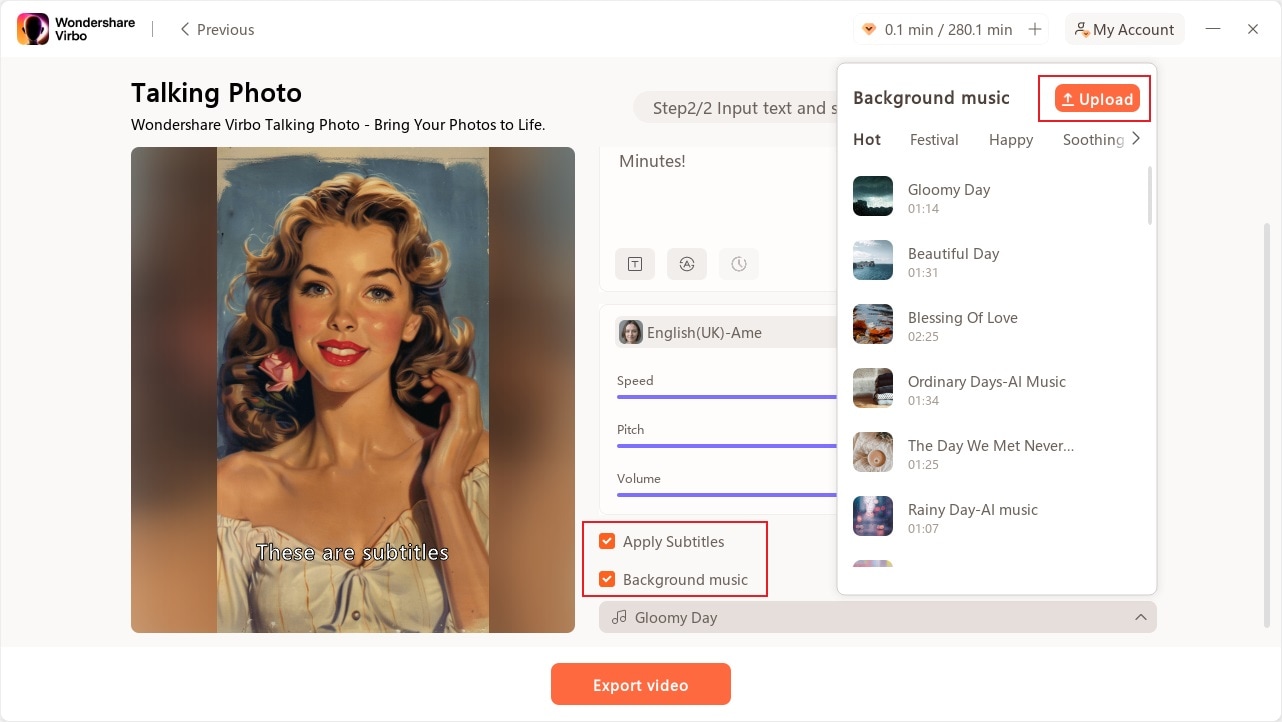
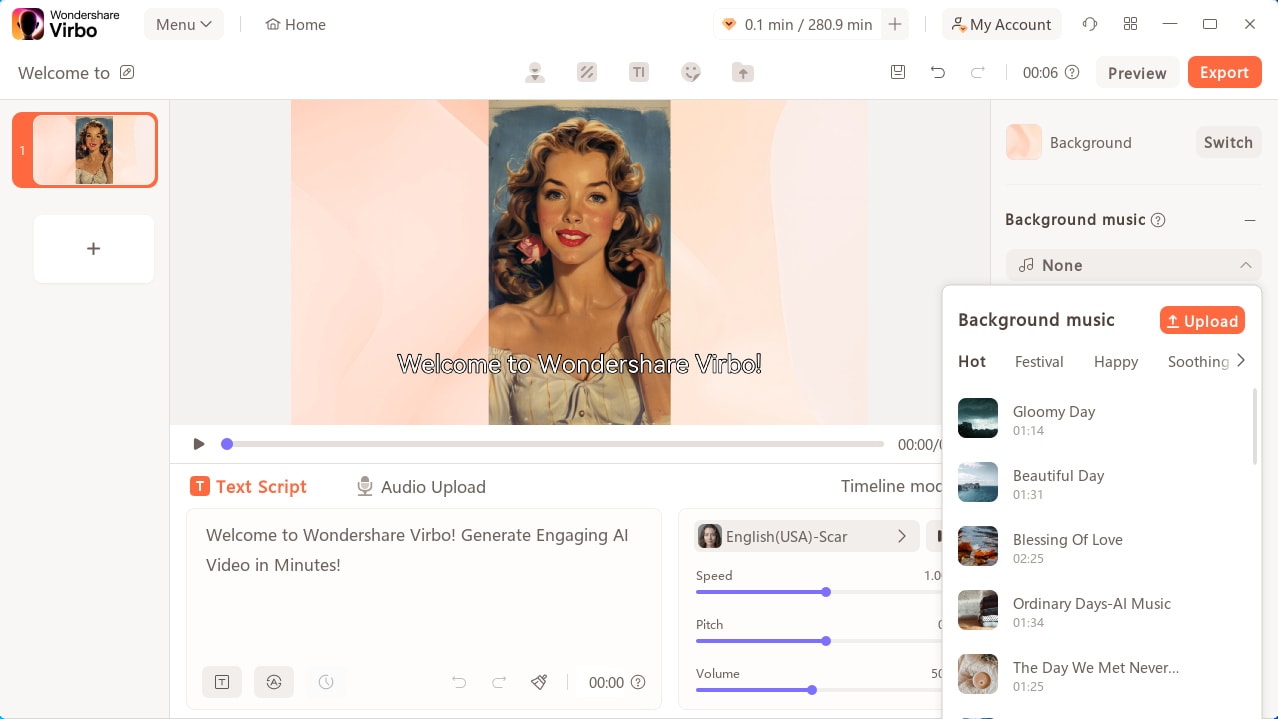
Check “Background Music” to add or upload background music, or add subtitles by checking “Apply Subtitles”.
Apply Subtitles And Add Background Music
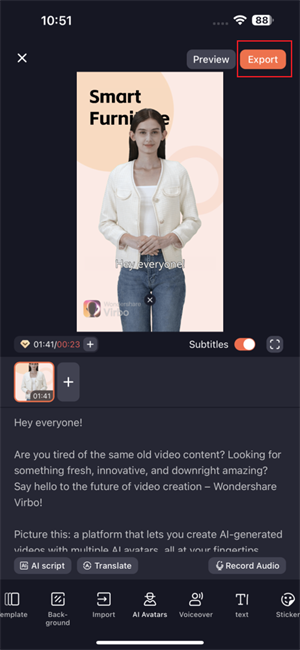
Step 3. Export Talking Photo
Now, you can click “Export Video” to export the talking photo. Wait for export successfully and then you will see it under “My Creations”.
Download Talking Photo
Make Photos Speak Make Photos Speak
Way 2: Use Your Still Photos to Create Videos
Want to create videos with your photo? You can view the following steps:
Step 1. Create a project
After clicking “Talking Photo” on the homepage, pick an image you desire or click “+” to upload an image and tap “Create Video” to start creating a new video.
Generate AI Video Free Generate AI Video Free
Create Video
Step 2. Edit video
Type/paste your voiceover script or click “Audio Upload” to upload/extract/record the audio as video script. You can choose different languages and adjust speed, pitch, and volume at the operation bar. You can also switch the background, add background music, or add subtitles.
Edit Video
Step 3. Export video
Click preview to check the effect of your video. Once you are satisfied with the whole video, click “Export” to generate the video.
Export Video
The generated video will be shown on “My Creations”. You can view it and click “Download Video” to save it to your computer.
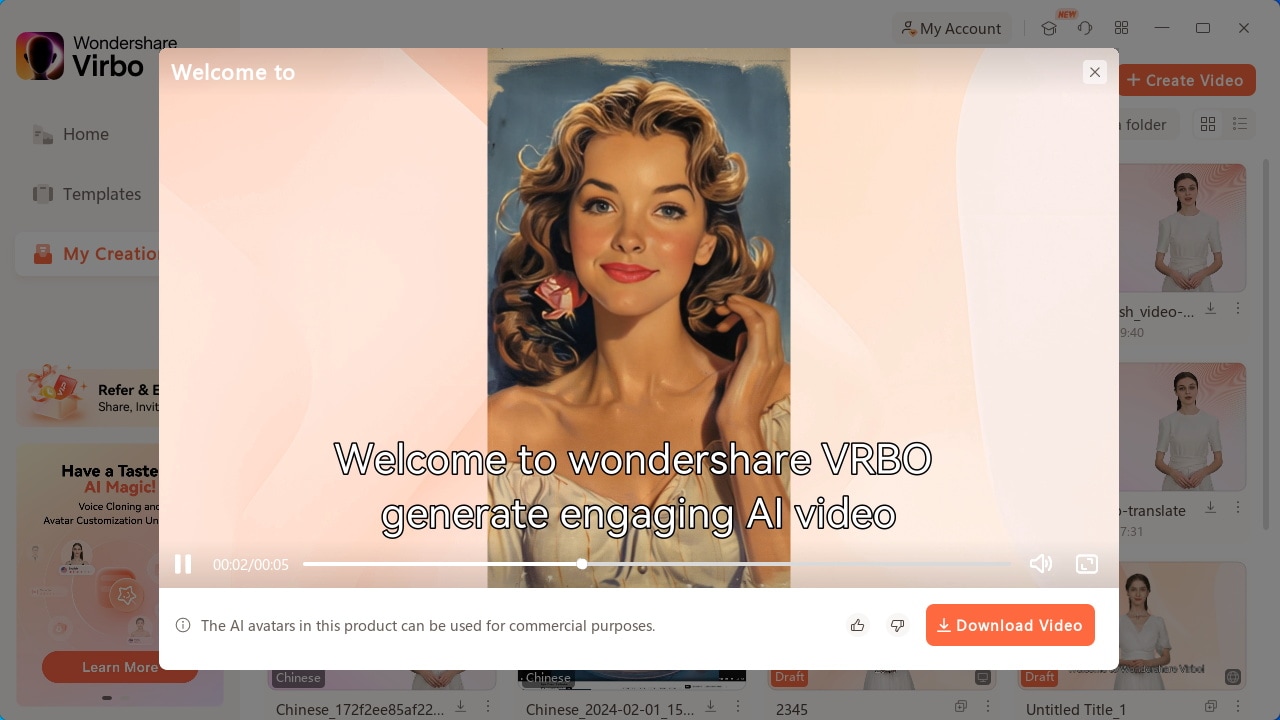
Download Video
Generate AI Video Free Generate AI Video Free
02Use Your Still Photos to Create Videos
Way 1: Simply Bring Your Photos to Life with 2 Steps
Simply input your script (or use Virbo’s AI feature to generate one), choose the voice-over, and export the video to achieve the desired effect! You can also record audio online or upload your own recordings to make your photos speak.
Step 1. Choose Talking Photo
Download and install Wondershare Virbo on your computer and click “Talking Photo” to bring photos to life.
Make Photos Speak Make Photos Speak
Click Talking Photo
Pick a template or click “Upload Picture” to upload your own picture and tap “Next”.
Create Next Button
Step 2. Input Text and Set A Voiceover
Enter your voiceover script or click the ‘Audio Upload’ to import an audio file as the voiceover.
Input Script
After entering your voiceover script, you can customize the language, and adjust playback speed, pitch, and volume.
Edit Voiceover
Choose Voiceover
Check “Background Music” to add or upload background music, or add subtitles by checking “Apply Subtitles”.
Apply Subtitles And Add Background Music
Step 3. Export Talking Photo
Now, you can click “Export Video” to export the talking photo. Wait for export successfully and then you will see it under “My Creations”.
Download Talking Photo
Make Photos Speak Make Photos Speak
Way 2: Use Your Still Photos to Create Videos
Want to create videos with your photo? You can view the following steps:
Step 1. Create a project
After clicking “Talking Photo” on the homepage, pick an image you desire or click “+” to upload an image and tap “Create Video” to start creating a new video.
Generate AI Video Free Generate AI Video Free
Create Video
Step 2. Edit video
Type/paste your voiceover script or click “Audio Upload” to upload/extract/record the audio as video script. You can choose different languages and adjust speed, pitch, and volume at the operation bar. You can also switch the background, add background music, or add subtitles.
Edit Video
Step 3. Export video
Click preview to check the effect of your video. Once you are satisfied with the whole video, click “Export” to generate the video.
Export Video
The generated video will be shown on “My Creations”. You can view it and click “Download Video” to save it to your computer.
Download Video
Generate AI Video Free Generate AI Video Free
Finest Text-to-Speech Male Voice Tools for Natural Output
In recent years, mostly female voices were utilized in the text-to-speech feature. However, male voices are also reliable options to utilize in the text-to-speech features. This can help you in ensuring preferences and inclusivity. In this article, we will discuss top-class text-to-speech male voice tools. In addition, we will guide you about using the built-in voice-to-text feature of Mac.
Part 1: Innovative Online Tools for Text-to-Speech Male Voice
Getting confused while selecting a reliable text-to-speech male tool is still here. After careful evaluation, we have gathered the best-in-class tools for converting text to speech. Jump below to get into the tools right away:
1. Speechify
If you want to make readings more efficient and accessible, this online tool covers you. With it, you can listen to your choice’s content rather than read it. This text-to-speech male tool incorporates AI algorithms through which you can easily listen to various music. Above all, it has some fantastic features that enhance your reading experience.
You can also use its voice-over studio to create human-quality voices with customization. You can use this tool to turn any type of text into speech. It also comprehends 30+ premium voices along fastest listening speed, which is 1.1 and more. It can also skip ads, citations, or footers automatically in speech.
How to Convert Text into Speech with Speechify
The procedure of converting text into speech with Speechify is not as complicated as you think. You can even turn Telugu text-to-speech male voice online with this. Feel free to follow the steps instructed below to accomplish this task:
Step 1: Initially, launch Speechify text-to-speech online tool on your browser and import the text of your choice. Following this, go to “Select Speed” and manage it accordingly.
Step 2: Next, choose “Select Voice” and choose a male voice that fits your need. To convert speech into text, click the “Listen” icon and listen to your text as speech.
2. Speakatoo
With this advanced text-to-speech male voice tool, you can convert text into 120+ languages. It can also generate high-quality text in multiple formats, such as OGG, MP3, and MP4. Moreover, it also has a wide array of AI-based features and API integrations. You can also get SSML support with this exclusive tool.
The audio control lets you control several metrics of audio to optimize functionality. In addition, it also incorporates the breathing pause, which makes your speech more realistic. One of the best things is it has 700+ male and female voices.
What is the Procedure to Turn Text to Speech with Speakatoo
Speakatoo has an optimized quality procedure to turn text into voice. To accomplish this task with ease, you can follow the steps given here:
Step 1: Open your browser and search for Speakatoo. Once you are on the main page, go to “Language” and select the language of your choice. Next, click “Voice” and choose the voice you like. In the “Text” section, you can enter text in the text box.
Step 2: To proceed, manage the “Audio Controls” and “Advanced Effects”. Finally, hit the “Play me” button. You can also click “Download” to download the speech.
Part 2: Powerful and Advanced AI Voices Generator for Windows, Android, and iOS
Virbo is an amazing AI voice tool through which you can convert text into 120+ voices and languages. All the voices are realistically humane, so you don’t have to worry about that. Besides that, the interface of Virbo is quite optimistic, making your work easier.
It also has blazing-fast data processing speech, which also streamlines your workflow efficiency. You can also use this tool on multiple devices without any restrictions.
Generate Engaging
AI Video in Minutes!
Easily convert text into professional spokesperson videos in over 120+ voices & languages in minutes.
Generate AI Video Free Generate AI Video Now


Key Features of Virbo
- It supports multinational AI avatars to make impressive videos. You can also select both male and female avatars.
- There are endless assets in Virbo which include royalty-free music and templates. You can use them at your convenience.
- Using its AI Script feature, you can generate impressive scripts for best-in-class videos.
How to Convert Text to Speech with Virbo
By following the straightforward steps listed below, you can convert text to speech male without any issues:
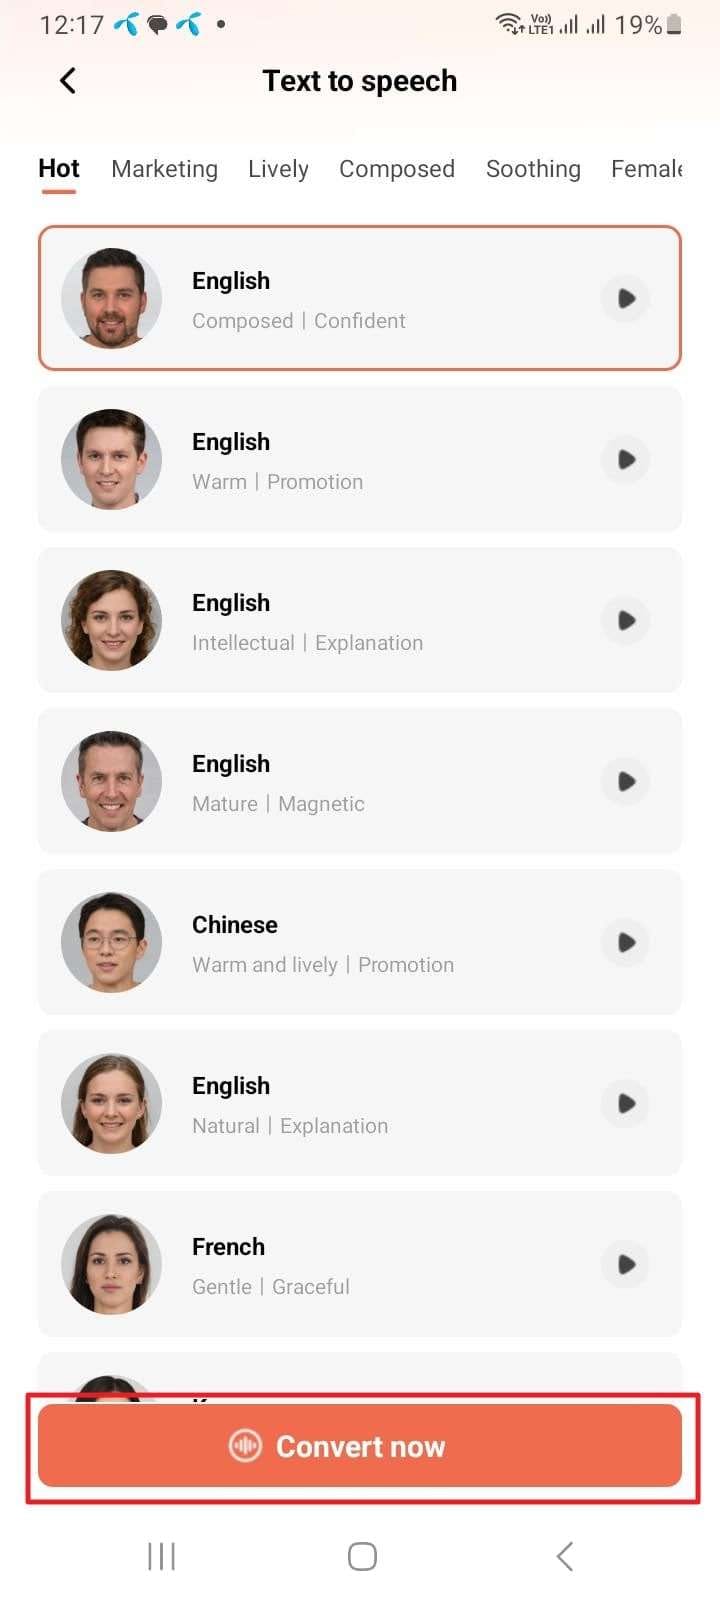
Step 1: Open Virbo and Access Feature
To start, open Virbo on your device and select the “Text to Speech” feature from the main interface. Next, select the style and voice for a speech from the next screen and hit the “Convert Now” button.
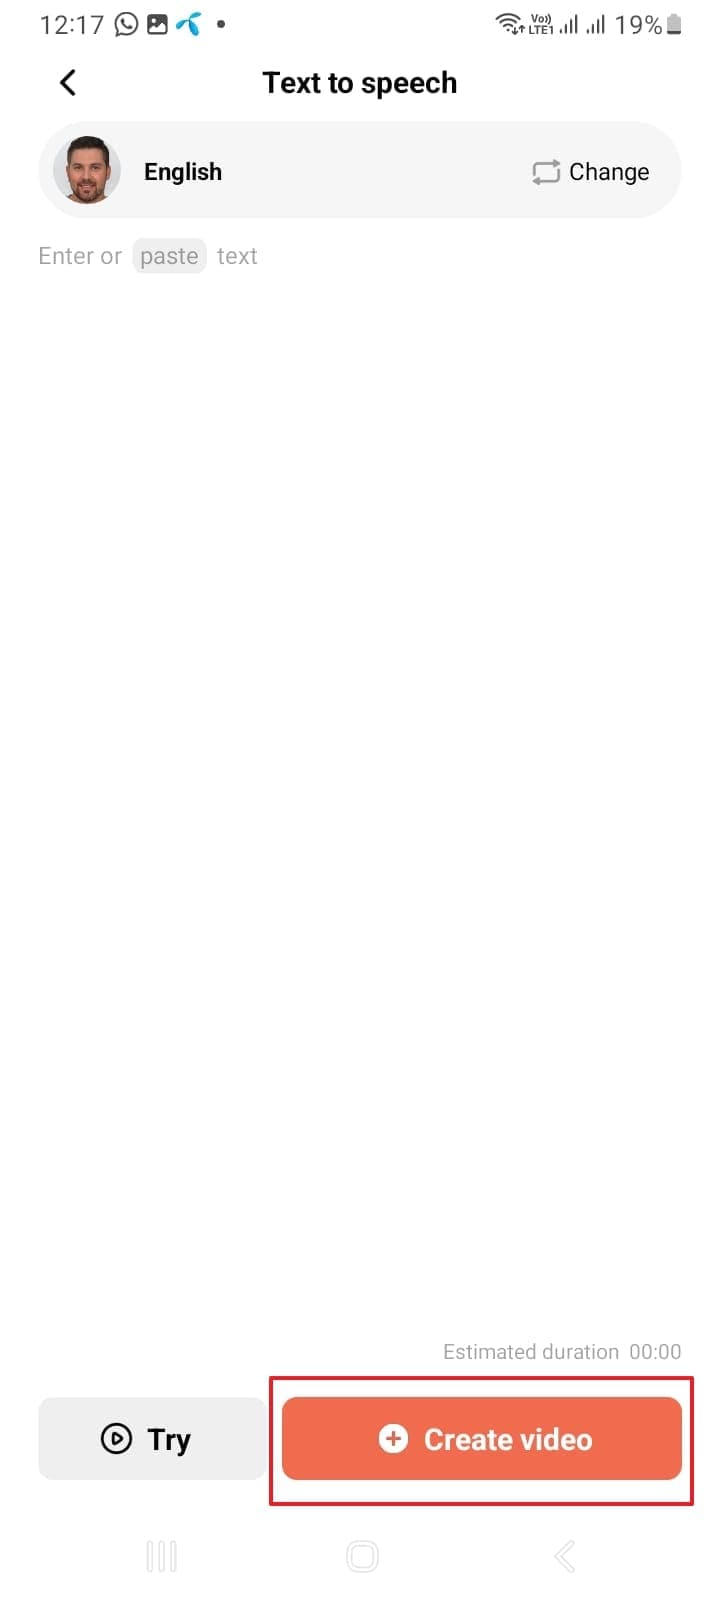
Step 2: Start Convert Text to Speech
To proceed, paste the text in the “Text to Speech” interface and tap the “Create Video” button. Select the dimension from the orientation options of Virbo, such as Portrait Video and Landscape Video, and hit the “Create Now” button. Wait a few moments and then download the video on the device.
Part 3: How to Use the In-Built Text-to-Voice Feature of MacBook
Mac users mainly have no idea that they can use the in-built text-to-speech male feature of Mac. If you are a Mac user that also has no idea about using this feature, this part is for you. Follow the instructions given below to use this amazing feature with ease:
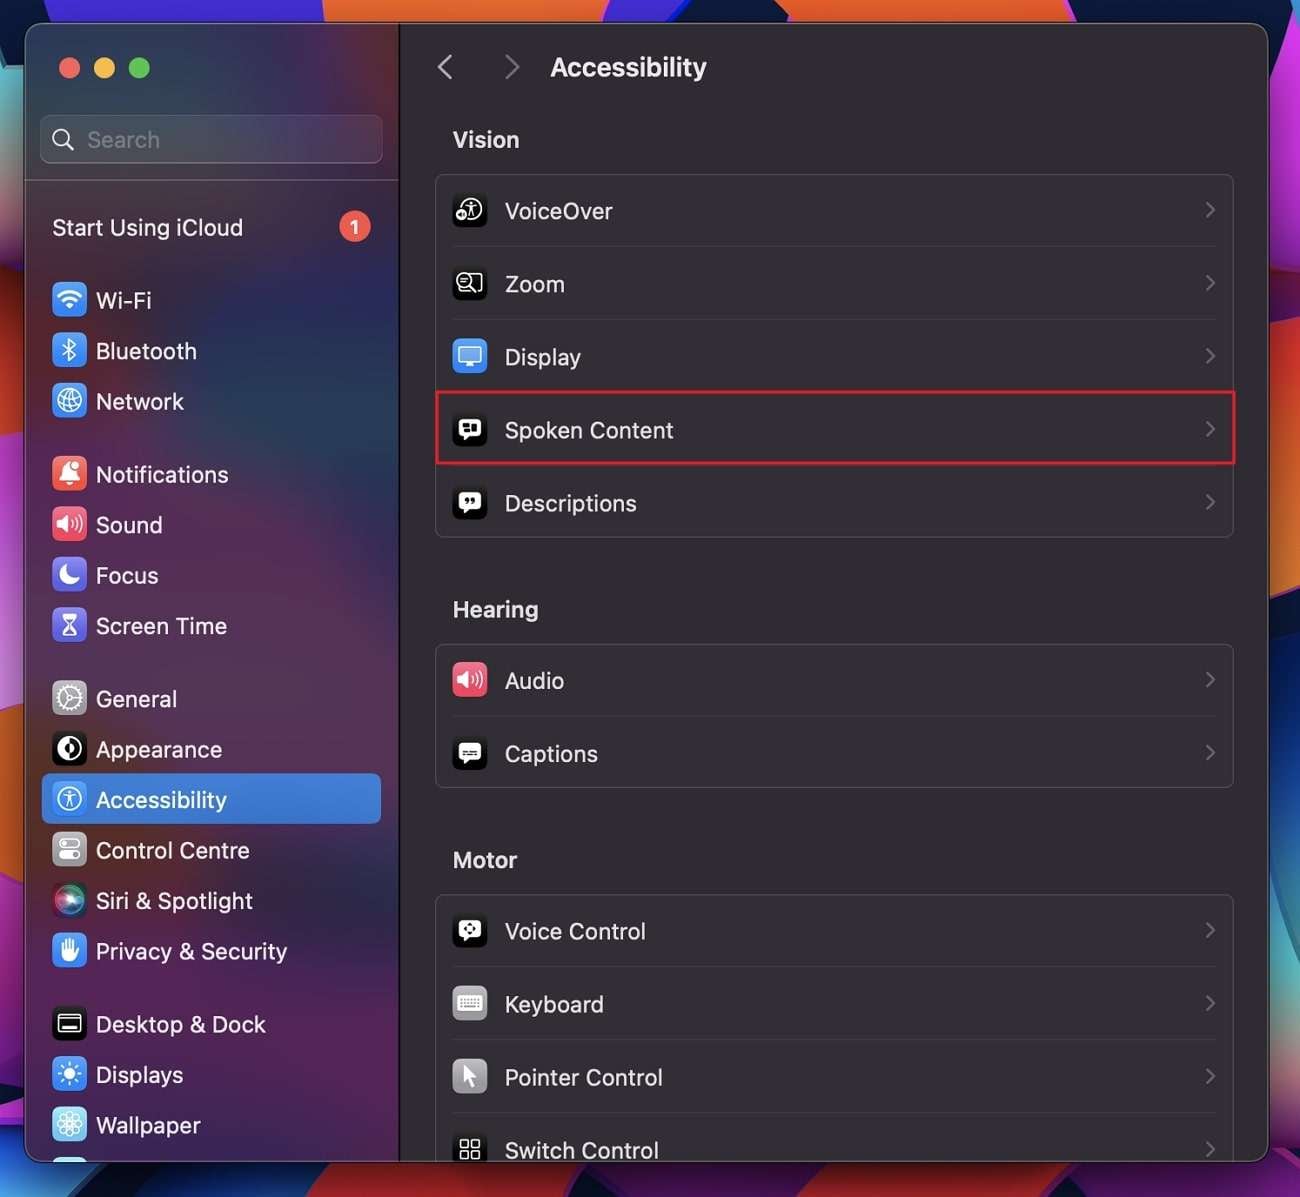
**Step 1:**Start your Mac and click the “Apple” icon to locate and access the System Settings. Afterward, go into the “Accessibility” settings and click the “Spoken Content” option.
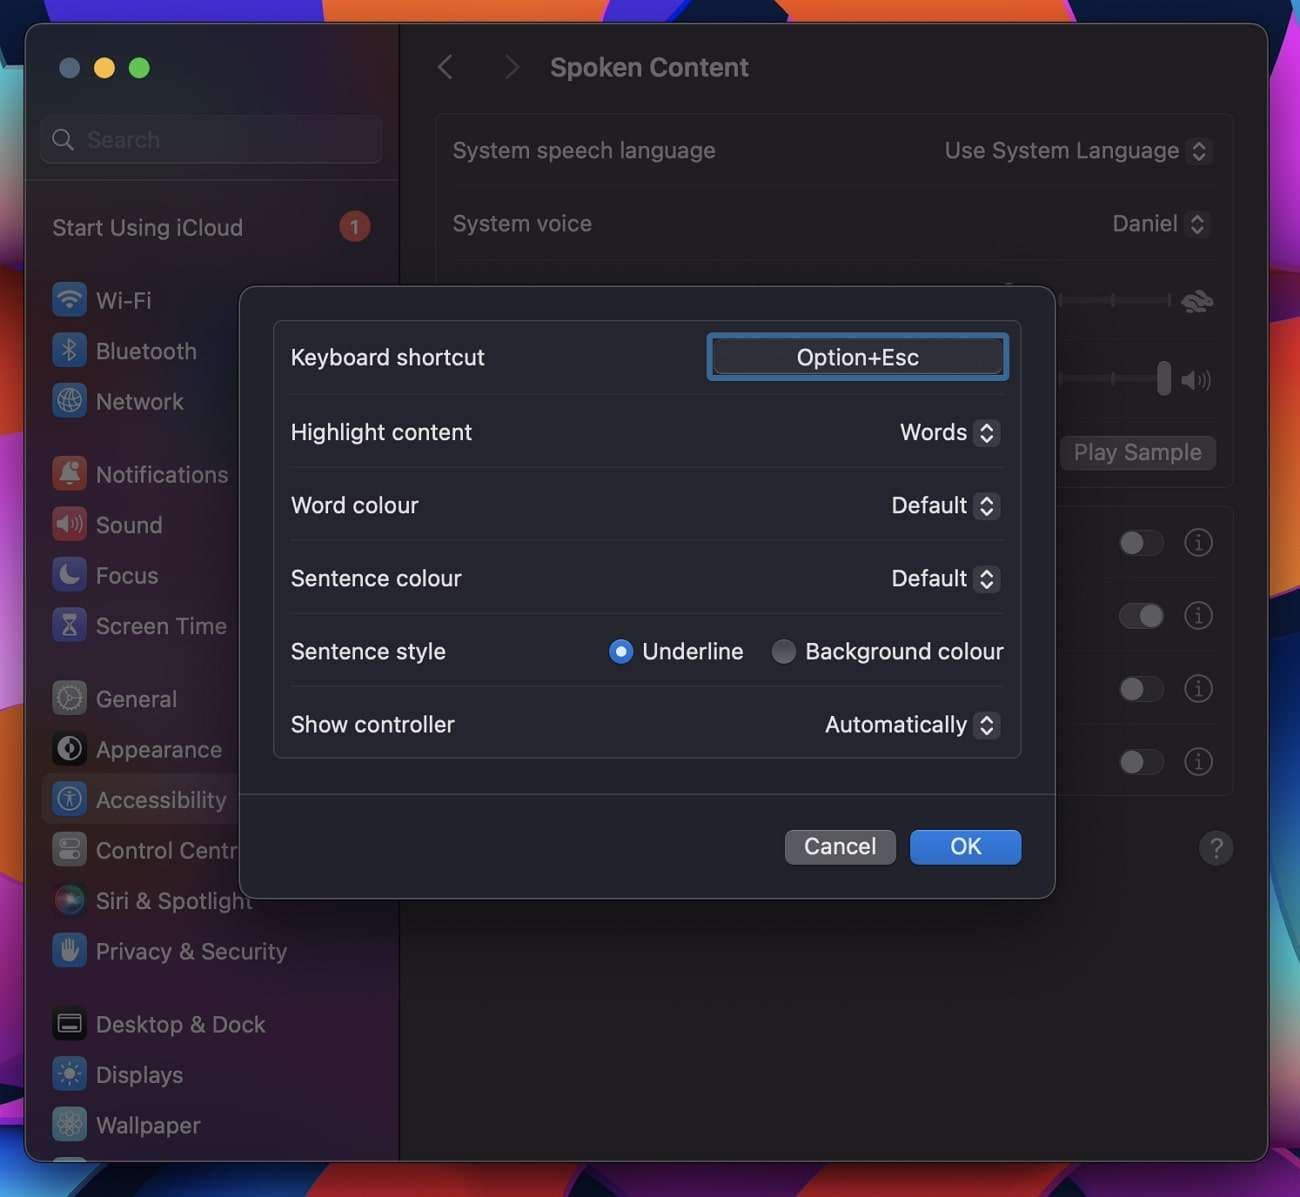
**Step 2:**Next, locate “Speak Selection” and enable it. You can also select the “Info” icon for managing settings such as Highlight Content, Word Content, Show Controller, and more. Finally, confirm the settings by pressing the “OK” button.
Wrapping Up
As stated in this article, you can easily use the innovative text-to-speech male voice software. This can turn any type of text into male voices without any issue. The online tools that can help you with this are Speechify and Speakatoo.
You can also use the most recommended Windows, Android, or iOS tool, Virbo. It has some fantastic features you can learn from the above discussion. Moreover, if you are a Mac user, you can use its built-in text-to-speech feature by following the steps discussed in this article.
2024 Easy Steps to Translate Video on Twitter
Do you want people around the world to watch your videos on Twitter? What about those who might want to watch but don’t speak your language? Without video translation, you’re missing out on reaching many potential viewers.**Translating Twitter videos lets you connect with audiences from different cultures and languages.
Translated videos also lead to better engagement. Viewers are more likely to watch accurately translated videos on Twitter. If your video has a bad translation, you could lose viewers. Translations help more people to understand your content. That way, they will have a chance to share your video. This leads to higher engagement with viewers worldwide.
If you have videos that need translating, we’re here to help and guide you through the process.
Part 1. Why Translate Twitter Video?
Twitter has a vast user base worldwide. It offers an unparalleled opportunity to connect with diverse audiences. But the language barrier often stands as a significant obstacle.**Translating Twitter videos addresses this challenge head-on. By offering many benefits beyond mere language comprehension.
Here’s some benefit of translating video:
- Accessibility to diverse audiences
When you translate videos on Twitter, you’re breaking down language barriers. So everyone, no matter their language, can understand your content. This means more people connect with you, opening to diverse communities worldwide.
- Increased reach and engagement
Translating videos helps you reach more people on Twitter. If your content speaks different languages, more viewers can engage with it. Making your message go further and have more impact.
- Building a more inclusive online community
By translating your videos, you’re making Twitter a more welcoming place for everyone. Regardless of their language. This builds a stronger community where diverse voices are valued and heard.
Part 2. Are There Built-in Translation Features on Twitter for Video?
Twitter has limited features in terms of translation. Currently, Twitter only allows the translation of text within tweets. There are no built-in features for translating video content directly on the platform. But, you can enable closed captions to aid in understanding video content.
Here are the steps to turn on closed captions videos on Twitter:
- Step 1. Open the Twitter app or website and find the video tweet that you want to watch with closed captions. This tweet could be in your timeline or a user’s profile.
- Step 2. Tap the video’s thumbnail to play the video.
- Step 3. Tap on the three dots at the top right of the screen to bring up the video player controls.

- Step 4. Look for the closed captions (CC) icon on the video player controls. It usually appears as a small icon with the letters “Captions” or “CC” inside a rectangle. Tap on this icon to turn on closed captions.
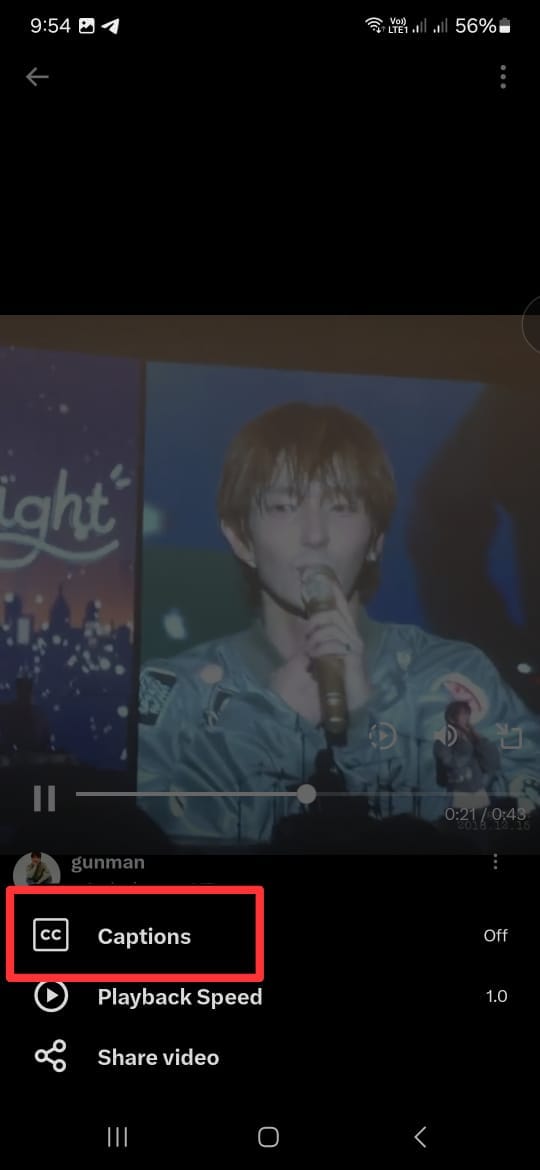
- Step 5. Once closed captions are enabled, watch the video as usual. You should see text at the bottom of the screen that provides a written transcription of the audio content.
However, closed captions on Twitter are not perfect. Not every video on Twitter shows this feature. That’s why this feature is not a popular option for many users.
Part 3. How to Translate Twitter Video With Twitter Translator Bots
Users must use external tools such as bot accounts and AI video translators to translate videos on Twitter. These tools can help translate video content on Twitter. Making it more accessible to diverse audiences. While**Twitter video translation features are limited, alternative methods can overcome these language barriers.
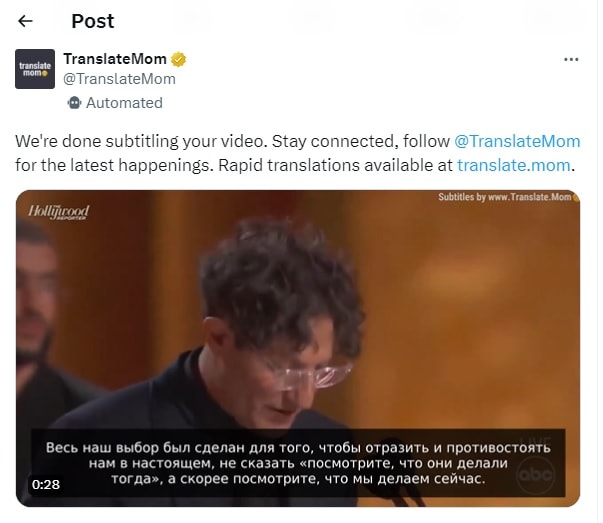
Using bot accounts on Twitter to translate videos involves a few steps:
- Step 1. Find a Translation Bot Account
Look for bot accounts on Twitter specifically designed for translation purposes. Some of them are @TranslateMom, @Translatevidapp, and @vidtranslator. These accounts are programmed to translate video to text-based content automatically.
- Step 2. Follow the Bot Account
Once you’ve found a suitable translation bot account, they usually require you to follow them to receive the translations.
- Step 3. Tag the Bot Account
When you find a video tweet you want to translate, reply to that tweet and tag the translation bot account. You can mention the bot account’s username and request a translation.
- Step 4. Wait for Translation
The translation bot account will automatically respond to your tweet with the translated text. Depending on the bot’s processing time and availability, this may take a few moments.
- Step 5. Review the Translations
Once you receive the translation, review it to ensure accuracy and readability. Remember that automated translations may not always be perfect. So, use your judgment to assess the quality of the translation.
Another option that you have to translate videos on Twitter is using AI Video Translator. There are many software that have AI Video Translator features. But if you want to use those tools without installing anything, the next section will discuss how to do it online.
Part 4. How to Translate Twitter Video With AI Video Translator
One standout tool to**translate twitter videos online is by usingWondershare Virbo Video Translator . This tool is designed to translate videos and give users accessibility across linguistic boundaries.
Virbo’s Video Translator stands out as the go-to solution for several reasons. Its advanced AI algorithms ensure accurate and natural translations and preserve the essence and tone of the original content. Moreover, its user-friendly interface makes it easy to translate videos with just a few clicks.
Key features of Virbo’s Video Translator include:
- Automatic Translation
Virbo uses cutting-edge AI technology to automatically translate video content, eliminating the need for manual transcription and translation.
- Multiple Language Support
Virbo supports a wide range of languages. Enables creators to reach diverse audiences worldwide.
- Customization Option
You can customize translations to suit your preferences, adjusting language style and tone settings.
- Subtitle Integration
Virbo integrates translated subtitles into the video, ensuring a seamless viewing experience for viewers.
To translate Twitter videos using Virbo Video Translator, you can follow these simple steps:
- Step 1. Go to Wondershare Virbo and select “Generate AI Video Online.”

Get Started Online Free Download
- Step 2. Log in or create a new account.
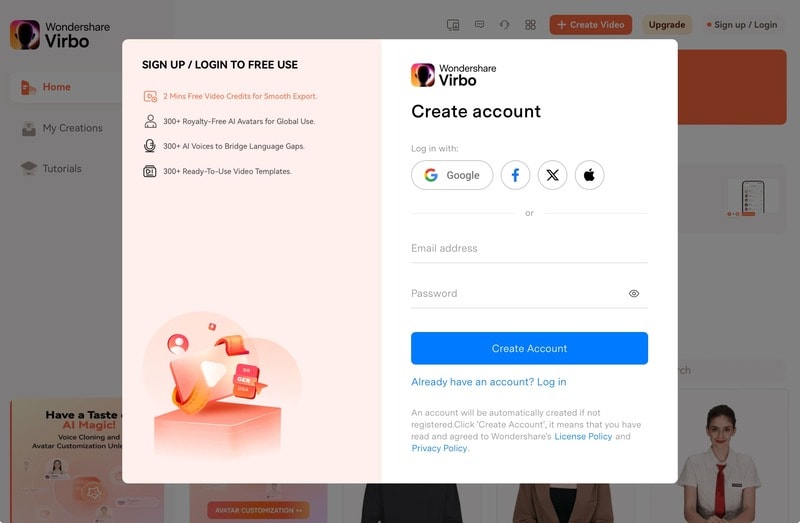
- Step 3. Open the Video Translate feature.
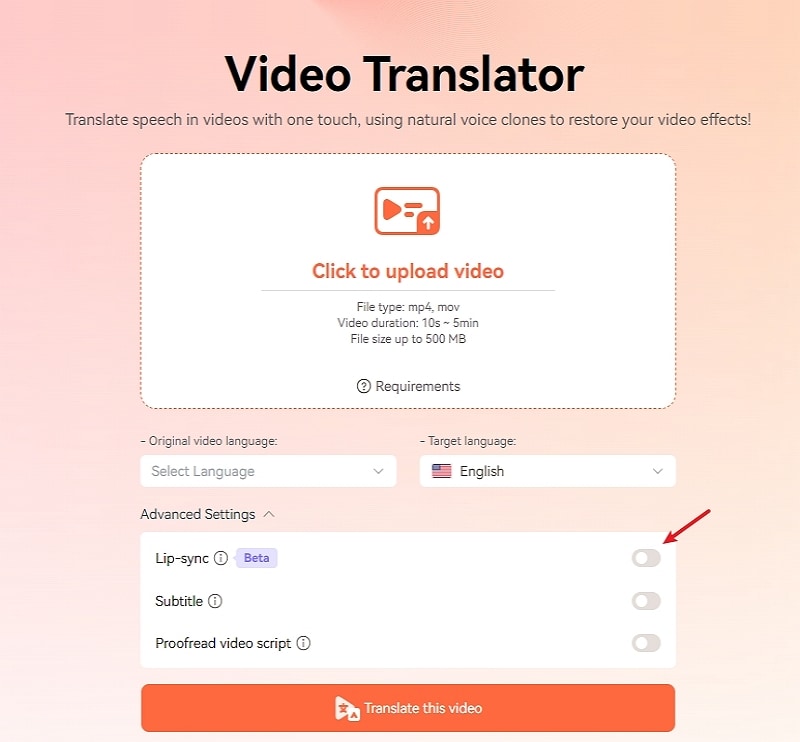
- Step 4. Upload the video you want to translate. Specify the original language and choose the target language. You can activate the Lip Sync feature for accurate audio translation aligned with lip movements or enable the Subtitle feature.
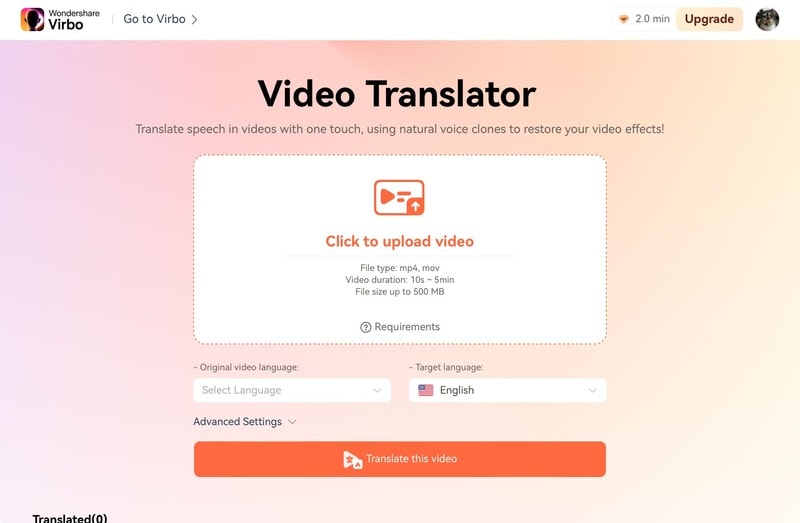
- Step 5. Click “Translate this video”, then the system will translate the audio and synchronize it with the video. Note that processing time may vary depending on the video’s duration and complexity.
Using Virbo’s Translation tool makes translating Twitter’s video online easier. It helps you reach more people and break through language barriers effortlessly. With Virbo’s smart AI technology, connecting with a worldwide audience is simple and leaves a significant impact.
Conclusion
Translating videos on Twitter is not just about overcoming language barriers. It’s about expanding your reach, fostering inclusivity, and enhancing engagement. Translating the video makes your content accessible to diverse audiences worldwide. Hence, it creates a more connected and vibrant online community.
While Twitter’s built-in translation feature is limited, other tools exist. For example, you can use translation bot accounts or AI Video Translators. One of the best solutions is using the AI Video Translator tool by Wondershare Virbo. These tools are easy to use and help you connect with people worldwide.
So, if you want your Twitter videos to reach a wider audience and make a more significant impact, try Virbo’s Video Translator tool. It’s simpler than you think, and it’s worth it.
Create Lip Sync TikTok Videos Without Installing Any App
TikTok has transformed the social media landscape through its short-form video content. They encourage users to make creative content using popular audio clips. Which enables them to entertain, gain recognition, and contribute to the platform.
Lip-syncing is a big part of what makes TikTok popular. Many users post lip-syncing videos that imitate voices from songs, movies, or trending audio clips. This art of lip-syncing has become an essential element of TikTok’s culture. Now, you might wonder**how to lip-sync on TikTok videos. This article will teach us how to make it effortlessly.
Part 1. Why Do People Lip Sync on TikTok?
Lip-syncing involves mimicking the words or vocals of an existing audio track. TikTok users take this concept to new heights by lip-syncing popular songs or clips. Lip-sync is appealing because it lets people get creative and reach a large audience.
Here are a few reasons why people engage in**lip sync TikTok :
- Self-expression: Lip-sync allows users to embody their favorite artists or characters by showcasing their personality and creativity.
- Entertainment: Many users lip-sync to entertain followers. They offer comedic performances, heartfelt renditions, or engaging storytelling.
- Virality: TikTok’s algorithm favors engaging content and well-executed lip-sync videos. They have the potential to go viral, rapidly gaining likes, shares, and followers.
Part 2. How to Make Lip Sync Video on TikTok
Here’s the step-by-step guide on how to lip sync on TikTok and captive your followers:
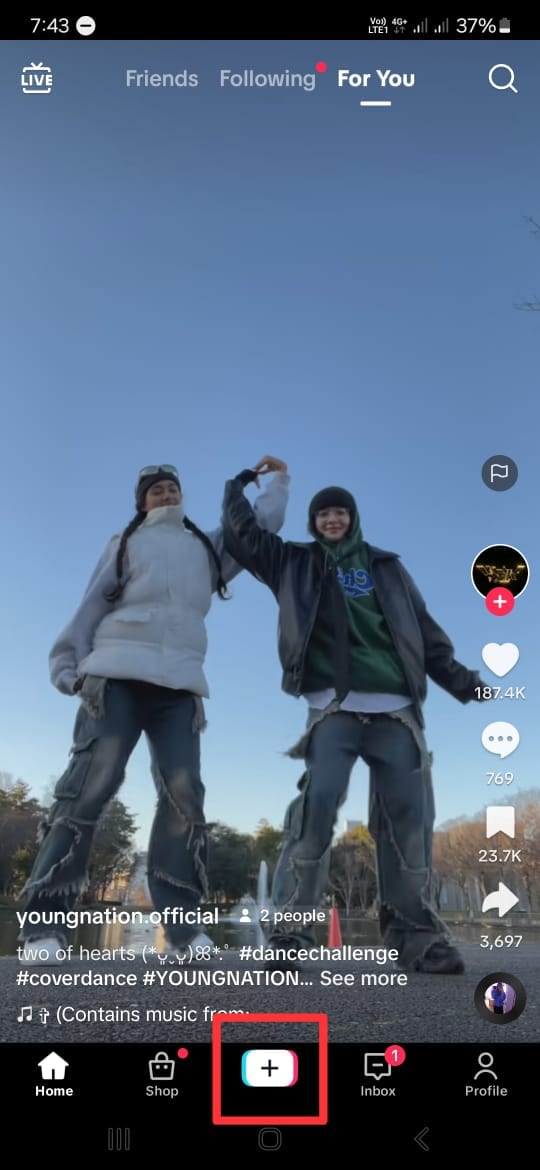
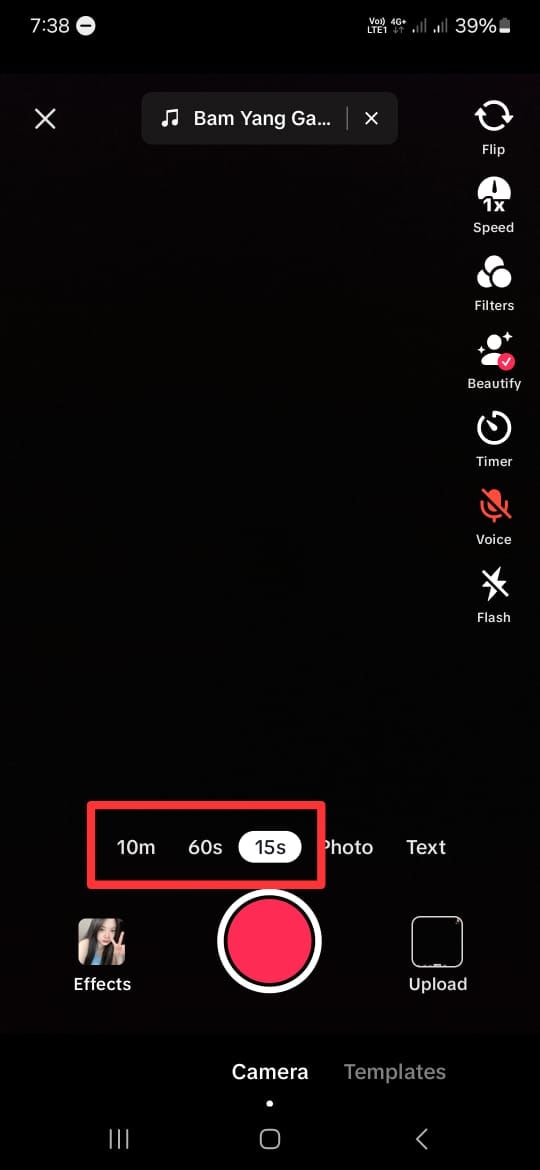
- Step 1. Open the TikTok app and tap the “+” button.
Start with opening the TikTok app on your phone. Then, tap the “+” button at the bottom of your screen to make a new video.
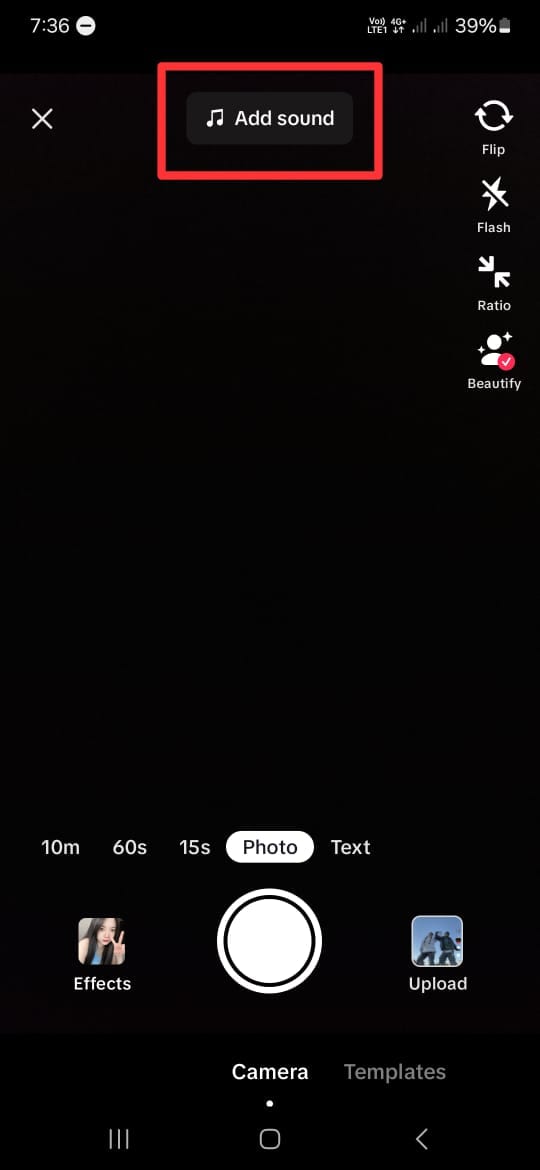
- Step 2. Add a song that you want to lip-sync to.
Next, click “Add Sound” with the musical note icon at the top of the screen. If you have a specific song in mind, you can find it by searching it on the search tab. Then, tap the song and click the check icon beside it.
- Step 3. Choose the duration and the part of the song.
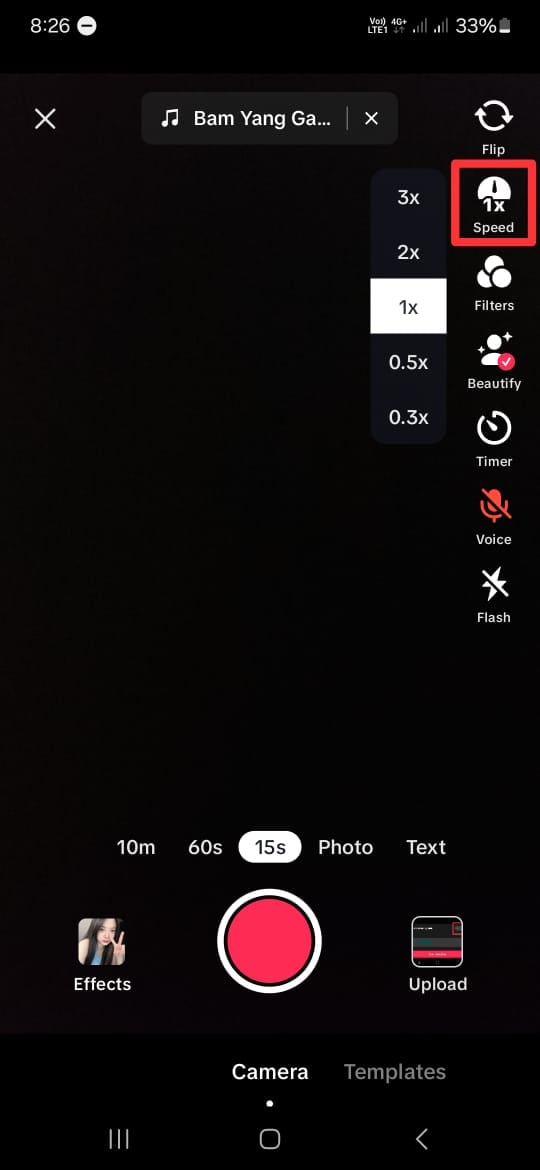
After choosing the song you want, you will return to the recording screen. Here, select your video duration at the bottom of the screen. You can choose between 10 minutes, 60 seconds, and 15 seconds. Remember that the duration of the songs on TikTok is usually only 30 to 60 seconds.
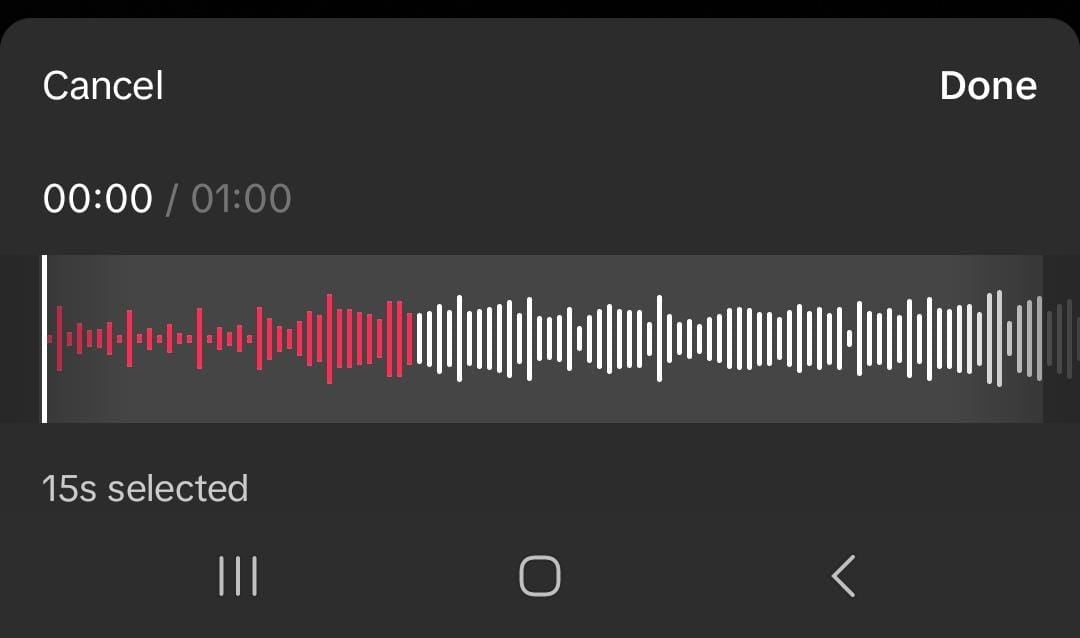
- Step 4. Choose the part of the song.
TikTok allows you to change the part of the song when lip-sync. However, the duration of the video should be less than the duration of the chosen song.
To do this, click on the song’s name at the top of your screen. Then, the bottom of your screen will display your chosen song. Tap the scissor icon and slide the playback to change the part of the song. Click “Done” once you have finished editing.
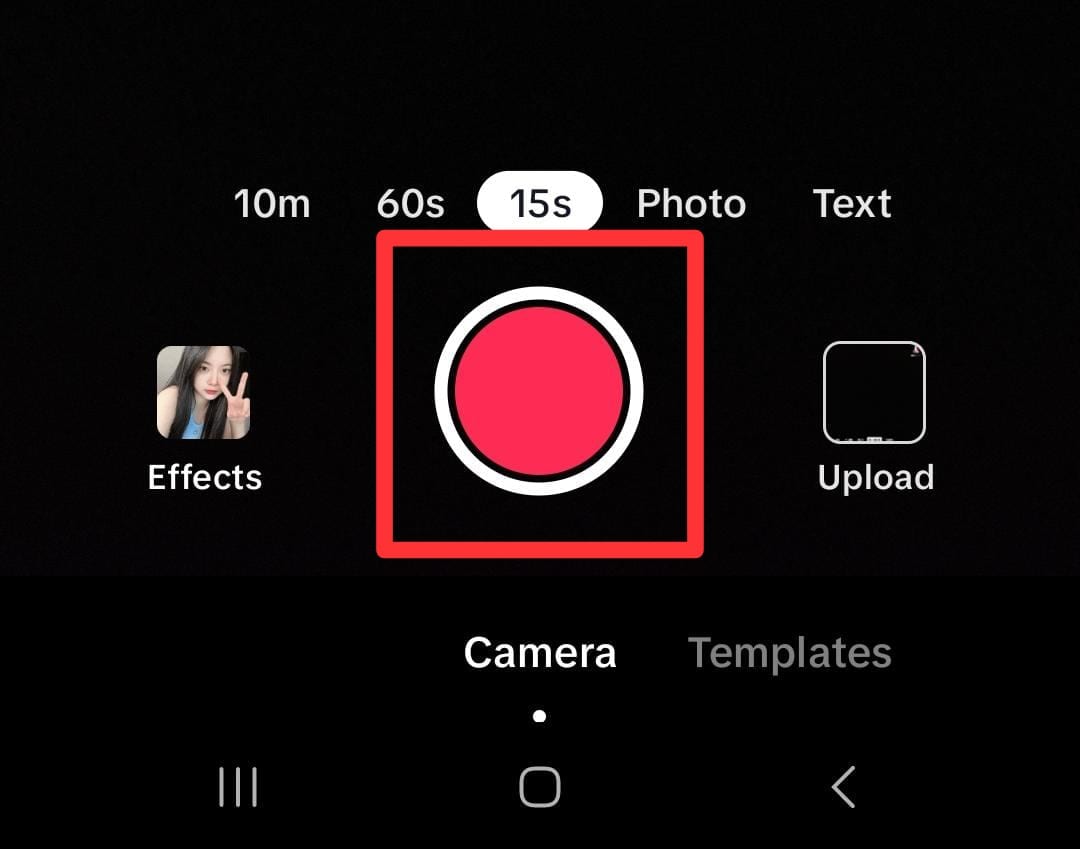
- Step 5. Tap on the red button.
If you are ready to record, tap the red button at the bottom of your screen. Then TikTok will play the chosen part of the song and record your lip-sync simultaneously. You can pause and continue the recording by clicking the same red button.
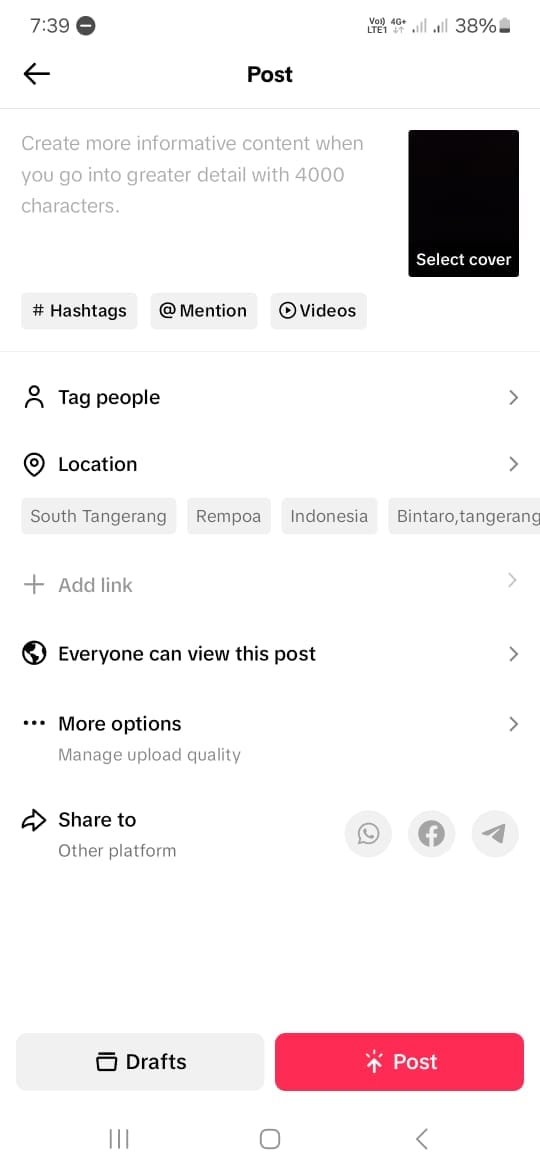
- Step 6. Post the video.
If you are satisfied with the results of your edits, click Next to proceed to the posting stage. Here, you can write a description and any other information you want. Click Post to share your lip-sync video to TikTok.
Creating a video on TikTok by lip-syncing is a fun and creative way to express yourself and connect with others. By following the steps above, you can create a lip-sync video on the TikTok app with ease. Keep in mind that by using these steps, you need to memorize the sentences and understand the beat of the chosen songs.
Part 3. How to Make Lip Sync Video Without Memorizing the Words
Making a**TikTok lip-sync video can be challenging because you must remember and match the words with the music. But there are three simple methods to make it easier.
Method 1: Record at slower speed
You can slow the speed down while recording instead of trying to keep up with the song. This technique lets you hear, understand, and follow the words more easily.
Here’s how to slow down the recording:
- Step 1. Follow steps 1 to 4 from the step-by-step guide in Part 2.
Start by following the first to fourth steps from the guide in Part 2 above.
- Step 2. Set the speed record slower.
On the recording screen, click on the Speed icon on the right side of the screen. To make it slower, choose 2x or 3x. This step will make your recording time 2 or 3 times longer than it should be.
- Step 3. Tap on the red button.
Once you tap the red button, TikTok will play the song slower and record your lip-sync simultaneously. Repeat this step to help you memorize the lyrics and the beat of the songs.
Once you’re comfortable, switch back to normal speed for the final recording. This method will save time and improve accuracy.
Method 2: Purposely delay mouthing the words
While lip-syncing videos may vary in style and pacing, this technique can prove particularly useful for slower rhythms. Moreover, mastering the art of mouth sync on TikTok can elevate the overall production value of lip-syncing videos.
Using the timer feature will give you a slight lag between lip movements and audio playback. Then, it lets creators ensure more precise synchronization during editing. Here’s how to lip-sync on TikTok more easily:
- Step 1. Follow steps 1 to step 4 from the step-by-step guide in Part 2.
Like Method 1, you can start by following the first to fourth steps from the guide in Part 2 above.
- Step 2. Delay the recording
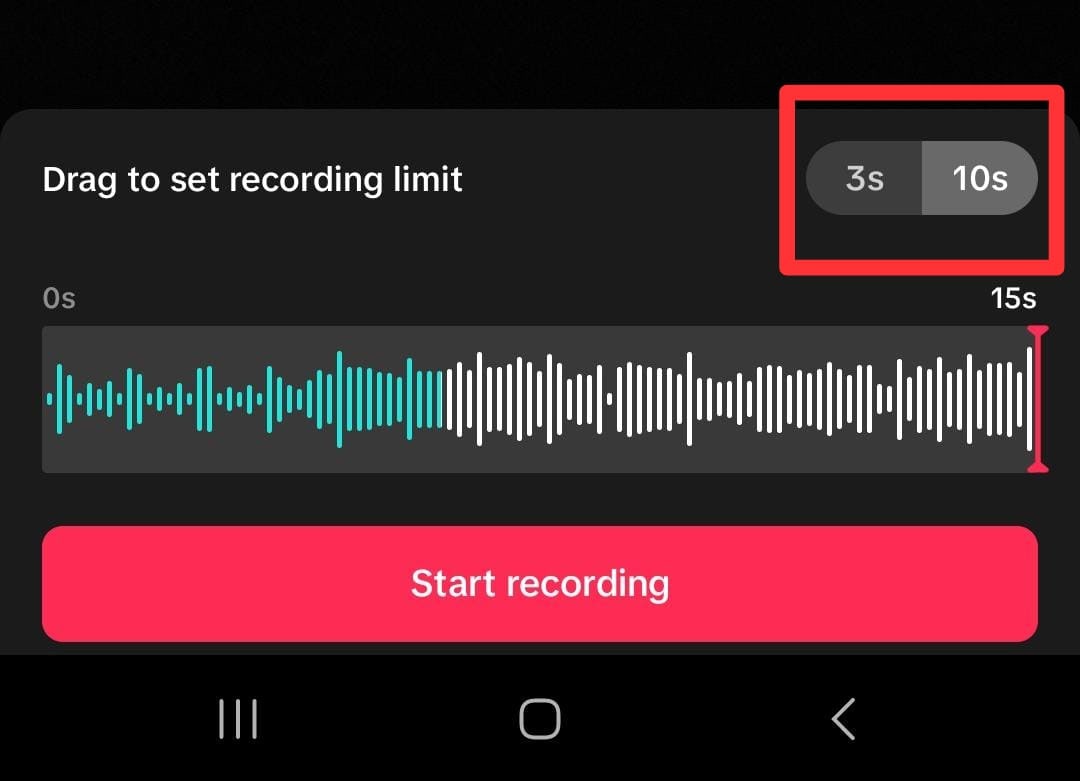
On the recording screen, click on the Timer icon on the right side of the screen. Here, you can set the timer to 3 to 10 seconds to delay the recording’s start. You can also drag and set the recording limit if you want.
- Step 3. Start the recording
Then click “Start recording” to record the video with the timer on.
Method 3: Use a Photo Talking Tool
Next, consider using a Talking Photo feature by Wondershare Virbo. This method is for you who want to create engaging TikTok lip-sync videos without memorizing the words.
Virbo’s Talking Photo feature tool lets you upload a portrait of your photo and then make it appear as though it is speaking along with the audio. You do not have to install the app because you can use this feature online on their official website.
Here’s how to use Wondershare Virbo - Photo Talking feature to create a TikTok lip-sync video:
- Step 1. Start a new project.
Open the Wondershare Virbo website and tap the talking photo function to start a new project.
Get Started Online Free Download
- Step 2. Upload a portrait.
Tap “Upload Photo”, then upload a picture you want to use by following the instructions.
- Step 3. Edit and export.
Insert the text and adjust the voice settings. If you want to insert your own audio, you can use Wondershare Virbo for mobile or Desktop to upload or record your audio. Then, tap “Generate Video” to export.
Now, you have successfully made your own TikTok lip-sync video. You can upload it to TikTok and share it with your followers. For more detailed instructions, you can see how to useVirbo’s Photo Talking tool .
Part 4: How To Lipsync Your Video to Any Language Using AI Video Translator
In today’s globalized world, reaching audiences in different languages is important for effective communication. Thanks to technological advancements, there is a tool that can help you translate video content.
Wondershare Virbo – Video Translator offers seamless solutions to translate video content into various languages with AI. Virbo ensures high-quality translations that maintain the integrity and impact of your original message.
How to lipsync TikTok videos to any language with Wondershare Virbo - Video Translator:
- Step 1. Go to Virbo’sofficial website , then click Generate AI Video Online.

Get Started Online Free Download
- Step 2. Log in or create an account.

- Step 3. Then, navigate to the Video Translator tool on the Virbo’s homepage.

- Step 4. Upload the video.
Once inside the Video Translator interface, upload the video file you wish to translate. Select the original video language and the preferred target language from the available options. Additionally, enable the Lip Sync feature to ensure that the translated audio aligns perfectly with the lip movements in the video.
- Step 5. Click “Translate this video” to start translating the video.
Virbo’s Video Translator will use its advanced algorithms to translate the audio and synchronize it with the video seamlessly. Depending on the length and complexity of the video, the translation process may take some time.
Conclusion
Lip-syncing on TikTok has become a significant aspect of TikTok culture. It helps users show their creativity, entertain people, and maybe even become famous. Making**mouth sync TikTok videos usually means remembering lines and matching them to music, but there’s an easier way with Wondershare Virbo’s Talking Photo tool. This tool allows you to upload a portrait and sync it with audio without remembering the lines.
Also, Wondershare Virbo has a Video Translator tool that allows you to translate videos seamlessly into any language. This translator tool helps you communicate with people worldwide and maintain the original message.
Also read:
- Updated The Most Direct Guide to Learning How to Clone Your Voice
- Best 5 AI Voice Generators Online (Supports All Browsers) for 2024
- Updated 2024 Approved Voicemod AI Review Transforming Your Voice in Real Time
- New In 2024, A Basic Guidebook To Live Selling in Todays Digital World
- Updated 2024 Approved What Is AI Generated Text?
- Updated Top 10 Free and Best Text-to-Speech Generators for 2024
- 2024 Approved Best 5 Quandale Dingle Voice Generators
- New 2024 Approved Maximize Your User Engagement With Instagram Live Shopping Expert Tips
- Updated 2024 Approved Finest Text-to-Speech Male Voice Tools for Natural Output
- A Complete Guide of Top 7 Video Language Translators
- Updated Best 4 Eminem Voice Generator Apps for PC, Mac, Mobile, and Online
- New Users Guide How To Create Photo Talking Videos With the Best Tools for 2024
- In 2024, A Basic Guidebook To Live Selling in Todays Digital World
- New Coqui Voice Cloning The Ultimate Solution to Streamline Audio Content for 2024
- Revealing Translation Methods Netflix Subtitle Software Comprehensive Guide for 2024
- New What Is AI Text to Video?
- Diverse Template for 2024
- Updated AI Avatar | Wondershare Virbo Online
- Create AI Avatar Video with AI Avatar | Wondershare Virbo Online for 2024
- Updated In 2024, Common Platforms
- Updated Text To Speech | Wondershare Virbo Online for 2024
- Updated Maximize Yandex Translate in Video Translation and Beyond for 2024
- Updated Best Video Language Changers to Make Your Videos Accessible for 2024
- New Exploring the Magic of AI Selfie Generators
- In 2024, Effective Ways To Fix Checkra1n Error 31 From iPhone 12 Pro Max
- How to Turn Off Google Location to Stop Tracking You on Asus ROG Phone 7 Ultimate | Dr.fone
- In 2024, The Complete Guide to Motorola Moto G13 FRP Bypass Everything You Need to Know
- In 2024, How to Unlock SIM Card on Oppo A58 4G online without jailbreak
- In 2024, How To Fix Apple ID Verification Code Not Working From iPhone 11 Pro
- A Detailed VPNa Fake GPS Location Free Review On Infinix Hot 40 Pro | Dr.fone
- Possible ways to recover deleted files from Xiaomi Redmi Note 12T Pro
- How To Transfer Data From iPhone 14 To Other iPhone 12 Pro Max devices? | Dr.fone
- 3uTools Virtual Location Not Working On Samsung Galaxy S23? Fix Now | Dr.fone
- A Quick Guide to Asus ROG Phone 8 Pro FRP Bypass Instantly
- Full Guide How To Fix Connection Is Not Private on Itel S23+ | Dr.fone
- Title: Live Deepfakes Made Easy How to Download and Make Your Own Live Model
- Author: Sam
- Created at : 2024-05-19 03:34:48
- Updated at : 2024-05-20 03:34:48
- Link: https://ai-voice-clone.techidaily.com/live-deepfakes-made-easy-how-to-download-and-make-your-own-live-model/
- License: This work is licensed under CC BY-NC-SA 4.0.
