
:max_bytes(150000):strip_icc():format(webp)/Horserace-56ca33a85f9b5879cc4bcc6e.jpg)
Revealing Translation Methods Netflix Subtitle Software Comprehensive Guide for 2024
Revealing Translation Methods: Netflix Subtitle Software Comprehensive Guide
Subtitle translation on Netflix plays a pivotal role in enhancing the global viewership experience. With Netflix’s expansive reach across diverse linguistic demographics, accurateNetflix translation ensures accessibility and inclusivity for audiences worldwide. Subtitles not only cater to non-native speakers but also serve the needs of the deaf and hard-of-hearing community fostering a more comprehensive viewing environment.
The importance of precise translation lies in preserving the nuances of dialogue, cultural references, and context, thus maintaining the authenticity of the content. To address this, various software tools and methods, includingNetflix subtitles translator , are employed, leveraging technology and human expertise to ensure high-quality translations. In this article, we will explore various software and methods for translating subtitles on Netflix effectively.
Part 1: Difficulties Lies in Netflix Subtitle Translation

Translating subtitles for Netflix is a multifaceted endeavor that extends beyond linguistic conversion. It entails delicately navigating cultural nuances, balancing precision with sensitivity, and encapsulating dialogue essence within tight constraints.
As Netflix expands globally, high-qualitytranslation Netflix becomes crucial for a seamless viewing experience. To deepen comprehension, here are the complexities inherent inNetflix subtitle translation :
●Preserving Cultural Nuances
This involves accurately conveying cultural references, humor, and idiomatic expressions while ensuring they resonate with the target audience. It requires translators to understand the cultural context deeply to maintain the authenticity of the content.
●Balancing Linguistic Accuracy and Cultural Sensitivity
Achieving a balance between linguistic precision and cultural relevance is crucial to avoid misinterpretations or causing offense. Translators must ensure that their translations accurately reflect the original meaning while remaining sensitive to cultural differences.
●Interpreting Context
Understanding the context of dialogues and scenes is essential for translation accurately. This is particularly challenging when cultural context significantly influences meaning which requires translators to grasp subtle nuances and implications.
●Time Constraints and Character Limits
Subtitles must be concise and displayed within limited screen space. Translators face the challenge of conveying meaning efficiently without sacrificing accuracy under strict time and space constraints.
●Technical Challenges
Translators often work with specific software and must adhere to technical guidelines provided by Netflix. This includes subtitles formatting and timing, which requires proficiency in technical aspects alongside linguistic skills.
●Maintaining Consistency
Consistency in terminology, style, and tone across episodes or seasons is essential for a seamless viewing experience. Translators need to ensure that their translations remain coherent and consistent throughout the content.
●Adapting to Language Evolution
Languages evolve over time, and translators need to stay updated with contemporary usage and emerging expressions. This requires ongoing education awareness of linguistic trends to ensure translations remain relevant and accurate.
Part 2: How to Translate Netflix Subtitle Using a Dedicated Tool - Wondershare Virbo
Netflix subtitle translation can indeed feel daunting at first, with its complexities and nuances. However, fear not, for withWondershare Virbo as your trusted companion, what may initially seem like a daunting task quickly transforms into a smooth and ultimately rewarding experience.

Get Started Online Free Download
In this guide, we will demonstrate how Virbo’s user-friendly interface and advanced features make translating Netflix subtitles a breeze. Follow the instructions outlined below:
- Step 1: Simply open your browser and enterWondershare Virbo into the search bar. If you don’t have an account yet, you can create one by following the registration process. If you already have an existing account, log in using your credentials.

Get Started Online Free Download
- Step 2: After logging in to your account, navigate to the top of the page and click on theFeature option. From there, selectAI Video Translate.

- Step 3: You’ll find instructions on how to use the Video Translate feature of Wondershare Virbo. Scroll down and locate two buttons: Free Download and Translate Video Online. Click on theTranslate Video Online button.

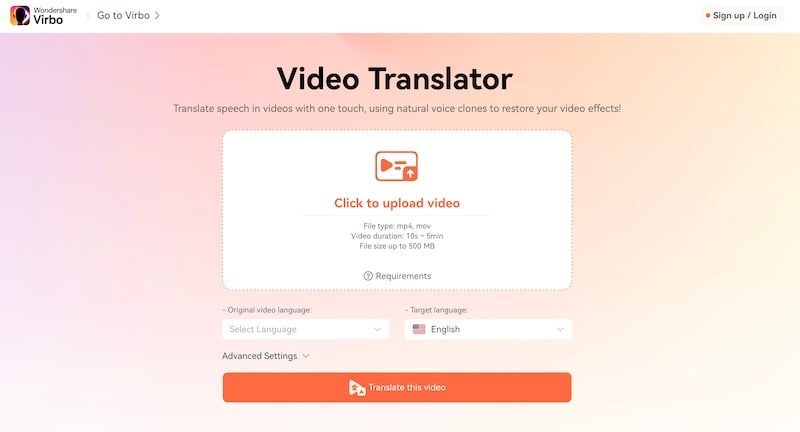
- Step 4: Select theUpload Video icon and choose the video from your local files by clickingOpen . Allow some time for the video to upload.

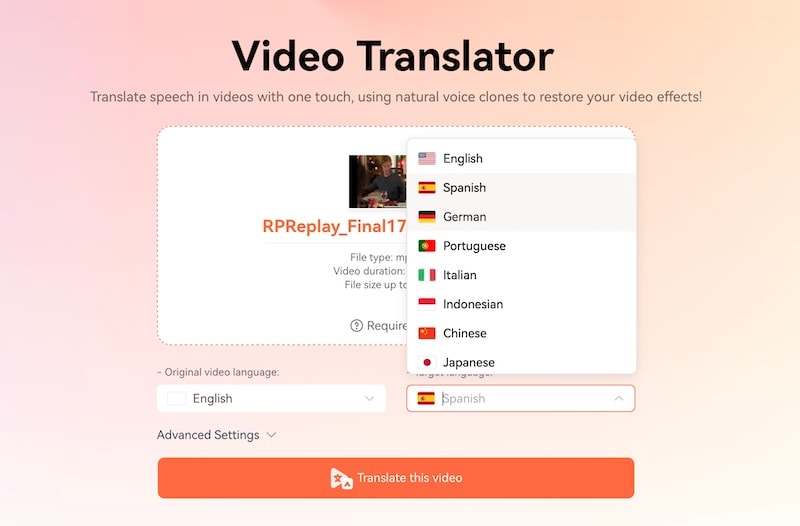
- Step 5: Once the video has been uploaded successfully, choose the original video language from the dropdown menu on the left.

- Step 6: Following that, proceed to select the target language from the dropdown menu on the right.

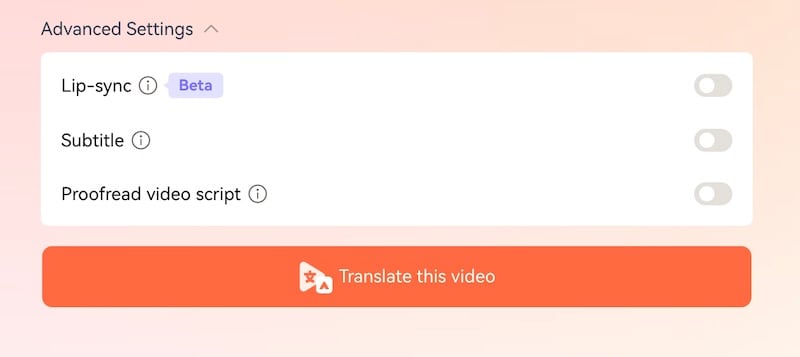
- Step 7: Click on the dropdown menu for Advanced settings, then toggle on both Subtitle and Proofread video script options. Below, click theTranslate the video button.
_Note: If the video primarily showcases one individual’s frontal face, you can also enable Lip-sync by toggling it on.

- Step 8: Wait until the loading process is complete. Once done, review the subtitles to ensure they meet the standards. If necessary, you can edit them before clicking theSave button.

- Step 9: Once you’ve finished reviewing or editing, click on theTranslate video button and wait until the video has been successfully translated.

- Step 10: To access the translated video for download, simply click on theDownload video button below.

Part 3: What Are The Methods and Tips for Effective Netflix Subtitle Translation?

Netflix, a renowned entertainment platform, offers a wide range of shows and movies to audiences worldwide. Subtitles play a crucial role in ensuring that viewers from different language backgrounds can enjoy the content. In this section, we will discuss various methods and techniques aimed at enhancing the quality of subtitle translation on Netflix.
●Maintaining Context, Tone, and Style
Translating subtitles requires more than just converting words. Translators must grasp the content of each dialogue and scene to accurately convey the intended meaning. They consider factors like character emotions, background information, and narrative flow to ensure the translated subtitles resonate with viewers. Consistency in tone and style across subtitles maintains the immersive experience for the audience to ensure they remain engaged with the content.
●Handling Cultural References and Idiomatic Expressions
Cultural references and idiomatic expressions are integral parts of language and storytelling. However, they can be challenging to translate accurately, especially when the cultural context differs between languages. Translators need to carefully adapt these elements to ensure they make sense to the target audience while staying true to the original intent of the content.
●Adapting Linguistic Nuances
Languages have their own unique nuances and subtleness that may not have direct equivalents in other languages. Translators must navigate these differences skillfully to preserve the richness and depth of the original dialogue. This involves understanding linguistic nuances such as wordplay, sarcasm, metaphor, and finding appropriate equivalents in the target language.
●Utilizing Translation Tools and Technology
Translation software and tools can significantly streamline the subtitle translation process, improving efficiency and consistency. However, these tools are not reliable and require human oversight. Translators leverage technology to enhance their workflow while also relying on their linguistic expertise and cultural awareness to produce high-quality translations.
●Collaboration and Peer Review
Collaboration with fellow translators and subject matter experts is invaluable in ensuring the quality of consistency of subtitle translations. Peer review allows translators to receive constructive feedback, identify potential errors or inconsistencies, and refine their translations accordingly. This collaborative approach helps maintain the overall quality of subtitle translations and ensures that the final product meets the highest standards.
●Cultural Sensitivity and Awareness
Cultural sensitivity is paramount in subtitle translation, as translations that disregard cultural norms or sensitivities can lead to misunderstandings or offense. Translators must conduct thorough research into the cultural context of the source material and seek feedback from native speakers to ensure that their translations are respectful, accurate, and culturally appropriate.
By embracing these best practices, translators can effectively bridge linguistic and cultural barriers that will ensure Netflix subtitles resonate with diverse audiences worldwide.
Conclusion
In this comprehensive guide toNetflix subtitle translation , we’ve explored the intricate process of making content accessible across languages. We’ve discussed the hurdles faced by translators, from preserving cultural nuances to maintaining linguistic precision. Subtitle translation transcends mere word conversion; it is about facilitating seamless viewer immersion across diverse linguistic backgrounds. The significance of Netflix subtitle translation cannot be understated—it promotes inclusivity and cultural exchange, enriching the global viewing experience.
ThroughWondershare Virbo’s Video Translate feature , the translation process is simplified. By embracing translation initiatives, individuals can bridge linguistic barriers and foster a more connected world.
Voicemod AI Review Transforming Your Voice in Real Time
Voice modulation tools like Voicemod AI have become trendy nowadays. With voice-changing software, you can transform your voice into a celebrity, monster, or any other character and prank your friends online. This technology can also be helpful with video narrations and gaming, where you don’t need to reveal your voice. But to achieve that, you must research the best voice modulation program. So, in this post, we want to introduce you to how to useVoicemod AI voices to sound differently on video games, VoIP apps, video narrations, and more. You’ll also know the best alternative to this AI-powered program.
Part I. A Quick Overview of Voicemod AI
Voicemod AI is a Windows/Mac program designed to change your voice in real-time. This software packs a range of AI voices to change your persona in your online interactions. With this program, you can sound almost like anything, including monsters, chipmunks, males, females, children, celebrities, and more. Even better, Voicemod has frequent updates with new AI voices.
So, where can you use the AI voices on this program? Voicemod is a pretty flexible program that allows you to achieve quite a lot. That’s because this program will modulate your voice in real-time, allowing you to shake things up on Discord group chats, Skype video calls, Steam gaming sessions, and other applications. You can even use it to create unique YouTube content and carve out your brand.
Part II. Features and Capabilities
You must be asking yourself why we singled out Voicemod AI of all the AI voice modulation programs out there. The thing is that Voicemod comes with special features that can make your voice stand out in the group. Also, this tool is designed to give you a seamless voice-changing session. Let’s look at some of its shining points!
1. Real-time voice modulator
Voicemod allows you to process voices in real-time, making it the ideal software for streaming on Twitch or making fun calls on Zoom. The AI voice generator has been extensively trained by voices from professional actors to give you human-like narrations. You only need to connect your mic to stream content withVoicemod AI voice . We’ll show you how to do that in this guidepost.
2. Extensive variety of voice effects
Voicemod comes with more than 100 voice effects, with this voice-changing software adding more voices with new updates. The massive library of voice effects and sound modification features means you’ll get unlimited experience with Voicemod. It’s one of the few programs that allows you to modify your voices with reverb, pitch, chorus, vocoder, and other customization features.
3. Create custom voices on VoiceLab
You can exploit the VoiceLab tool on your Voicemod Pro account to generate custom voices. With it, you can create voices from scratch by combining different audio effects and processors like reverb, pitch shifter, filter, and more. Once you have made a custom voice, proceed to name it, add an avatar, and add it to the voice control panel. This is an excellent way to create unique voices you cannot find anywhere else.
Below is how to change your voice with Voicemod AI:
Step 1. Install Voicemod on your Windows 7/10/11 PC or Mac computer and run it.

Step 2. Once you have installed the program successfully, open the sound settings to choose your input and output sound devices.

Step 3. Ensure that theVoice Changer toggle at the bottom of the Voicemod home window is enabled. Then, click theVoicebox tab and choose one of the sound effects. Speak to your microphone to listen, preview, and possibly change the new voice.

Step 4. If the voice is working, head to the application or browser tab where you want to apply the voice effect to start streaming. That’s it!
Note: Remember to select the “Voicemod Virtual Audio Device (WDMI)” on the application on which you’ll stream the sound effect. For example, if you’re using Twitch, click Settings, choose Audio, then select this sound input device.
Part III. Real User Experience
So, what was our user experience withAI Voicemod ? To be honest, Voicemod is one of the best if not the best, voice modulator programs. We were impressed by how easily it picks up sounds on our microphone. The range of voice effects and customization options is also impressive, to say the least. And yes, the platform itself looks stylish and modern.
But this program’s main drawback comes from its major strength. Although Voicemod is a feature-rich program, beginners might feel intimidated at first. You may need to follow the developer’s guide to connect your microphone appropriately and customize the sound settings. Overall, Voicemod isn’t for green hands, although it’s fun to use once you get the hang of it.
Part IV. Pricing and Plans
Although Voicemod is free, you must upgrade to the Pro version to unlock all the voice effects and capabilities. Thankfully, the Voicemod subscription plan is one of the most competitive. You can opt for the One-Time Payment at**$59.00** , although the program often has50% off for new installations. You can also choose the Annual plan of**$23.88** or the 3-month plan of**$11.97** .
Below are some of the advantages you’ll get with Voicemod Pro:
- Design your unique voices from scratch with VoiceLab.
- Unlimited MP3 and WAV audio uploads.
- Complete Voicebox with 80+ pre-made voice effects.
- Receive new voices and themed soundboards every month.
- Unlock all AI voice filters.

Bonus Tips: Try the Best Alternative to Voicemod AI - Virbo
Voicemod might stand out as one of the best voice-changing software around. But, this program has a few drawbacks, primarily complex usability. Also, Voicemod only works with audio files and live microphone recordings. This begs the question: what if you want to add a voice effect to a video and share it online?
In that case, Wondershare Virbo is the best alternative to Voicemod AI. With this AI-backed desktop program, you can create video templates with 150+ free avatars and 120+ voiceovers. It’s the best tool for creating videos with unique voice effects for digital marketing, online classes, tutorials, and other uses. This tool also supports tens of languages and can convert texts to audio overlays.
Follow these steps to create a video with AI voiceover on Wondershare Virbo:
Step 1. Download and install Wondershare Virbo on your PC, then click theAvatar button. The installation process should take just a few seconds.

Get Started Online Free Download
Step 2. After choosing a video template, proceed to select the narration language. This program supports English, Arabic, French, Portuguese, and more.

Step 3. Next, tap theAudio Scripts button, then chooseOnline Recording to begin recording live voiceover on your video template. You can also upload a pre-recorded MP3/WAV file or extract audio from MP4.

Step 4. Preview the video and change the sound effects by choosing a new avatar if needed. If satisfied, tapExport to save your video template with AI voice. That was easy, right?

Note: Virbo transforms texts into voice overlays by simply entering your Text Scripts. This makes it an excellent tool to create unique videos if you have voice problems.
Final Words
Now it’s time to try everything you have learned in this guidepost. WithVoicemod , you can transform your live voices on multiple gaming and voice apps. However, we advise you to upgrade to the Pro plan to unlock this tool’s full capabilities. And don’t forget to check outWondershare Virbo to create videos with unique AI voices. Give it a try!
SRT Subtitle Translation: Tools and Techniques
In a multilingual world, the single largest barrier to effective communication is language. Nobody knows all the languages spoken around the world, do they? What to do to break this barrier of communication? In the domain of audiovisual content such as on YouTube, we leverage subtitles to break that barrier. How? By using online SRT translation software to autotranslate SRT file into the language of our audience. Sounds fascinating? Read on to learn how to translate SRT online yourself!

Part 1: Why Is Using Online SRT Translation Tools Recommended?
You might be wondering why you would translate SRT subtitles online when you can do them yourself. The simple answer is that you cannottranslate SRT subtitles online and reach a global audience by yourself. You might know one language, or two, or maybe five or ten. Twenty? Okay, you might know 20 languages. According to UNESCO World Atlas of Languages (UNESCO WAL) there are over 7000 languages in use. You certainly do not need to know or translate into those many.
To reach a global audience of 195 countries (193 recognized by UN) you only need a handful, and you might be able to get by with what you know. But, how about using an online SRT file translator to get the job done faster, more accurately, and in a greater number of languages than you can? This way, you free up your time to do more important tasks than being a translator!
- Online SRT translation is fast.
- Online SRT translation is efficient and timesaving.
- Online SRT translation is accurate (depending on chosen tool).
- Online SRT translation translates into many more languages than we know.
- Online SRT translation allows us to reach a larger audience.
- Content engagement shoots up due to wider availability of subtitles.
- User retention rate increases as a larger number of users can connect with your content due to subtitles in their native language.
Part 2: Top Online SRT Translation Tools
What are the top SRT translation tools online available to us today? Let’s dive into them and give you a gist and their pros and cons!
2.1: Translate Subtitles
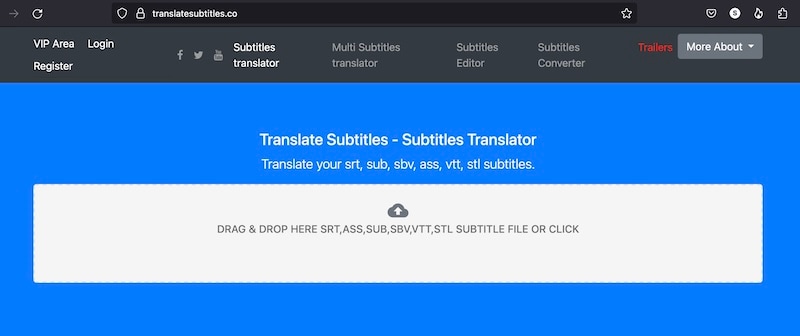
One of the best online SRT translate tools, Translate Subtitles is an online SRT translator that is easy and intuitive to use. We are classifying the features into Pros and Cons.
Pros
- Supports 6 subtitle formats (srt, sub, sbv, ass, vtt, and stl) for translation.
- Can translate into all languages that Google Translate supports.
- Can translate 20 files at once.
- Free to use.
Cons
- Uses Google Translate, so it is as good or bad as Google Translate.
- Supports file size up to 1 MB only.
2.2: Subtitles Translator
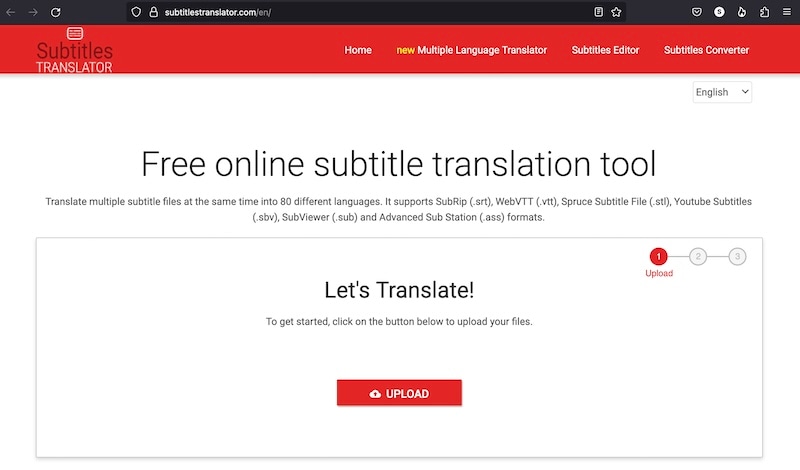
Subtitles Translator is another powerful online subtitle translator you can use, with features similar to Translate Subtitles.
Pros
- Can translate 20 files at once.
- Supports the same 6 file formats as Translate Subtitles (srt, sub, sbv, ass, vtt, and stl).
- Provides a subtitle converter to convert between subtitle formats.
- Provides a subtitle editor you could use to make changes.
Cons
- Maximum file size supported is 1 MB only.
2.3: Maestra AI
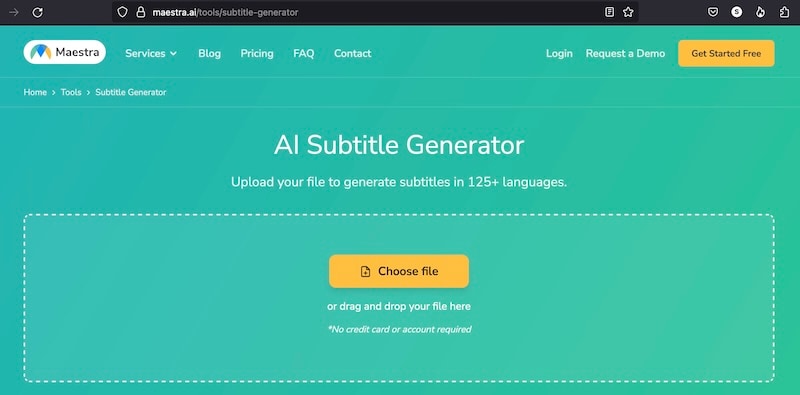
Maestra is one of the most powerful subtitle translators online. Its feature list will have you drooling over it, but it does not come without its cons. Here are the pros and cons of Maestra.
Pros
- Support for over 125 languages.
- Easy to use and fast subtitle translator.
- Subtitle editor available to make changes.
Cons
- Pricing could be a turn-off for some users.
2.4: VEED.IO

VEED.IO is a popular subtitle translation online software that offers better accuracy than some of the other competitors as its unique selling point.
Pros
- Better accuracy than some other online SRT translation tools.
- Subtitle can be downloaded in a different subtitle format.
- Direct upload of files from YouTube is possible.
Cons
- Can be expensive to use owing to features you might not need.
2.5: Media.io
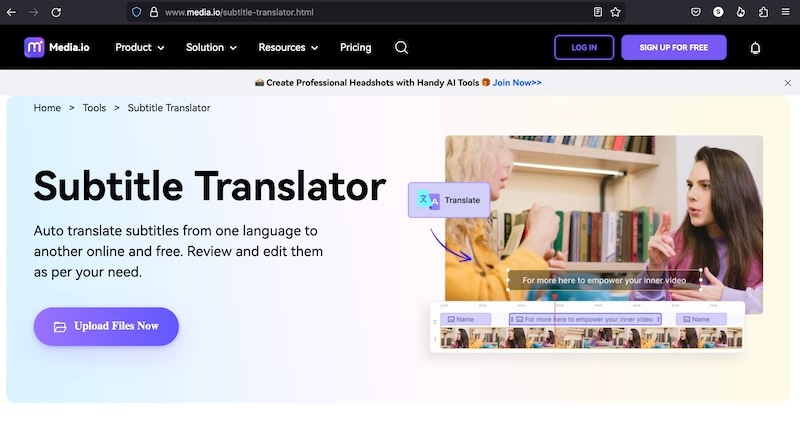
Media.io is a product from Wondershare Company, which means that it has all the hallmarks every other Wondershare product comes with – legendary ease of use married with unparalleled power. What can Media.io do for you?
Pros
- Media.io supports 127 languages.
- Translated subtitles match the audio/ video automatically.
- Rich subtitle editor offers the best way to edit, customize and stylize subtitles.
- Included video editor offers a full spectrum of useful features such as the ability to add music, elements, logos, voiceovers, etc.
- Powered by AI (artificial intelligence) for leading accuracy.
Cons
- Free version limited to a file size of 250 MB.
2.6: smartcat
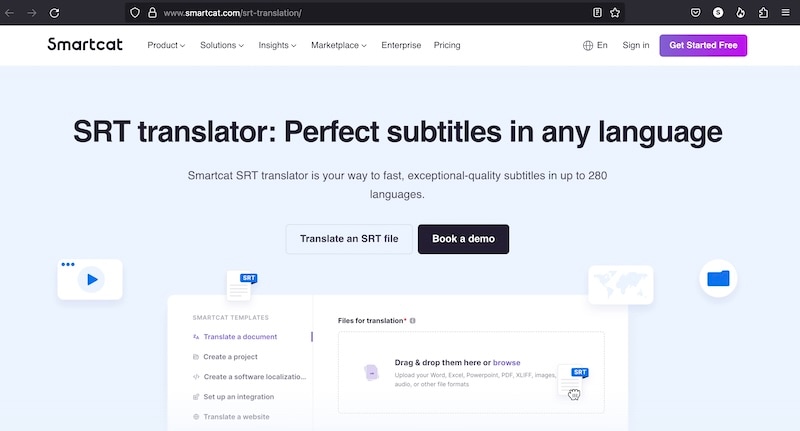
Smartcat deserves a special mention in the online srt translation space due to its support for 280 languages. Yes, you read that right. It supports those many languages! Here are some pros and cons of Smartcat.
Pros
- Support for over 280 languages!
- Over 90% accuracy rate.
- Ability to collaborate with people to edit subtitles.
- Sharing is possible.
Cons
- There is an intriguing word count limit of 150,000 words per year for translation.
Part 3: How To Choose The Best Tool To Translate SRT File
Now, with all those options looking rather equally viable, how do you choose? Do you just pick one and go? Well, yes and no. If you just want to see how things work, any of those options is going to serve as a good measure. However, when you want totranslate SRT subtitles online in a more professional way wherein your reputation and image are on the line, you want the best of the best. Here is how to choose just the right online subtitle translation tool for you.
3.1: Ease of Use
How easy is an online subtitle translation software to use? Most online SRT translation tools boast a simple, 3-step process. You will not find much variance here, because it is just a simple upload, translate, and download process.
3.2: Editing Features
Online SRT subtitles translator software may provide you with editing features. These editing features can be used to differentiate between products and are worth looking into. If one online editor does not have something that the other offers, clearly the other is your tool, other factors notwithstanding.
3.3: Format Support
Most software totranslate SRT online support a number of subtitle formats. However, one or two might not support the format you want to use, so check the number of formats supported before using an online tool to translate SRT subtitles.
3.4: Translation Accuracy
When translating subtitles online, you want an online SRT translation tool with the highest possible accuracy to have a reasonable surety with respect to the quality of the translated subtitles. You do not want to appear immature and unprofessional due to poor quality of subtitles, do you?
3.5: Data Privacy
Now this one is KEY. No matter how good that online SRT translator AI tool is, you do not want to use it for your subtitles if that tool does not afford you a rock-solid data privacy. When you upload SRT to an online SRT translation software, what does that software do with your file afterwards? Does it store it forever? How is the communication between your device and their server happening? These are important questions that need clear answers for any user, but especially so when translating sensitive content or proprietary content.
Part 4: How To Use An Online SRT Translation Tool To Translate SRT Online
Let’s get down to using an online SRT translation tool to translate an SRT file online. We will use Media.io for the purpose.
Step 1: Launch the online subtitle translator tool and click Subtitles from the sidebar.

Step 2: Click Upload Subtitle File and upload your subtitles. Subtitles will be loaded and shown.
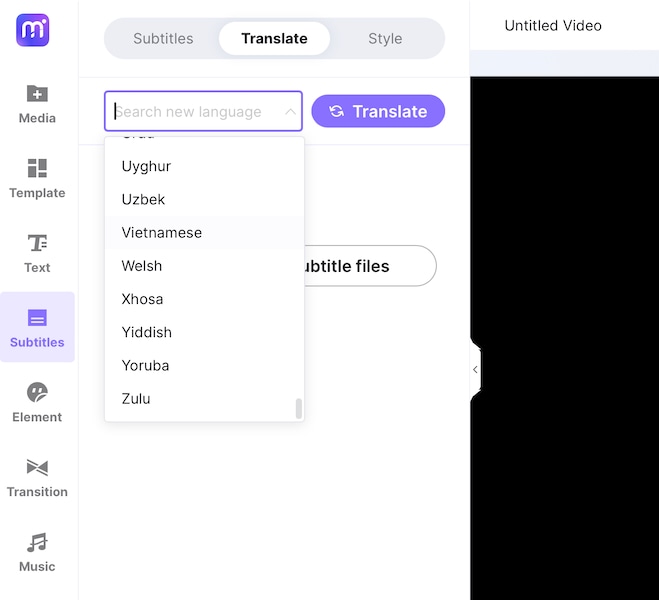
Step 3: In the tab above, click Translate and select a target language from the dropdown and click Translate.
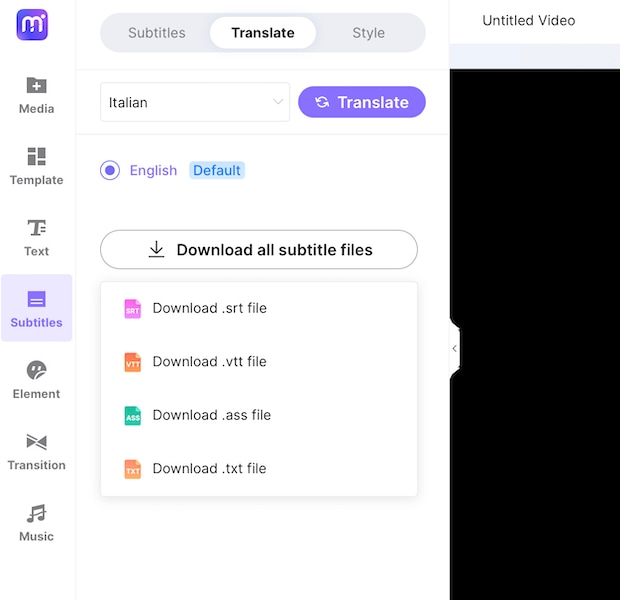
Step 4: When the subtitles are translated, download the subtitles in the format you want. That’s it!
Bonus Tip: Translate Video To Any Language Of Your Choice With Virbo
Apart from subtitles, what about videos? Can we translate videos online easily? Yes! There is just the tool for that, too!
Wondershare Virbo: The Ultimate Online Video Translator
Wondershare Virbo was designed and developed with you in mind. It is by far the easiest way to translate videos online. Here are the steps to use Wondershare Virbo to translate your videos online.
Translate Video Online Download APP Now Free Download
Step 1: Go to the Wondershare Virbo Online website.
Sign In with Google, Facebook, Twitter or Apple ID, or use your existing Wondershare Account. Else, create a new Wondershare Account and proceed.
Step 2: Add a video to translate. Then, choose the original video language and the target translation language, that is, the new language you want to translate your video to.
Step 3: Click Translate. When the process is over, save the translated video to a location of your choice.
ADVANCED FEATURES
Wondershare Virbo comes with 3 advanced features:
- You can use the power of AI to create perfectly lip-synced videos in line with the target language. Try it to believe it!
- Enable Subtitle option to burn the translated subtitles directly into the video. This should only be done if there are no subtitles already present in the video.
- Enabling Proofread Video Script option automatically parses and proofreads the video script for more accurate video translation.
Translate Video Online Download APP Now Free Download
Conclusion
Gone are the days when you had to make separate videos for every language you wanted your videos to be in and had to hire linguists to proofread and check your subtitle files in case you were using subtitles in different languages for your videos. Today, you can auto translate subtitles online using any of the freely available online SRT translation tools. However, this guide shows you how to select the right tool for you, and as bonus, gives you an easy-to-use tool to translate videos into any language easily!
Installation and Registration
For iOS
1. System Requirements
To consume Virbo for iOS, you need to fulfill the following requirements. The overall speed and performance of the tool are entirely based on the device, its memory, and storage space. The following are the minimum system requirements:
- System: Requires iOS 13.0 or later.
- Equipment: Can work with iPhone 7+ or later models.
- Available Space: 9MB of free space (200MB preferable)
2. Download and Installation
- Launch the App Store on your iOS device and look for “Wondershare Virbo” in the Search toolbar.
- Tap the “Get” button against the tool from the results.
- Continue to select the “Install” button that appears on the pop-up window to proceed with the installation.
- As it is installed, choose “Open” to launch the program.
- Once it launches, you need to accept the “Privacy Policy” and “End User License Agreement” by tapping the “Agree” button.
For Android
1. System Requirements
To use Wondershare Virbo on your Android device, you must fulfill the following requirements. As stated before, the speed and performance of the program are entirely based on the device, its memory, and available space:
- System: Android 7.0 (Nougat) and later.
- Required Chipset: ARMEABI-V7A, ARM64-V8A
- Available Space: 200MB of Storage Space is needed.
2. Download and Installation
- You need to select the download link that appears on your Android smartphone.
- The installation package will download on your device, which can be tapped for further installation.
- To start using Virbo, select the “Agree” option against the “Privacy Policy” and “End User License Agreement” for the tool.
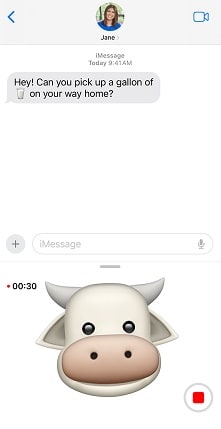
Easy Tutorial How to Record and Send Talking Emoji for iPhone
Have you noticed the animated emojis in your friends’ messages on iPhone and wondered how to use them yourself? ThisiPhone talking emoji is called Animoji or animated memoji. You can make it talk by recording it on your iPhone.
For those who love to spend their time texting and chatting, this feature can really help add a fun element to your conversations. Just imagine your friends receiving a video of your voice emanating from your animated avatar! If you are curious, let’s seehow to make talking emoji on iPhone .
Part 1. What is iPhone Talking Emoji or Animoji?
Animoji is an Apple feature that transforms specific emoji icons into short, customized animations using your facial expressions and voice. Using Apple’s Face ID facial recognition system, this Apple talking emoji turns you into an animated character that copies your expressions and speech in real time.
You can make and share Animoji with other Apple users through the Messages app. There are over 25 of these iPhone talking emojis available, including your own avatar, poop, panda, pig, robot, and ghost that can mirror your facial expressions.

Part 2. How Does iPhone Talking Emoji Work?
Ever tried those fun Snapchat lenses? Thetalking emoji on Apple devices works in a similar fashion to Snapchat lenses. But instead of relying on custom masks from Snapchat, it uses popular emojis.
Animoji takes advantage of the TrueDepth camera system and the iPhone’s internal chip to use Face ID technology. Apple first introduced Face ID in 2017 with the iPhone X. Now, all newer iPhone models come equipped with Face ID.
So you can use and make Animoji on iPhone X or later. You can also use it on the iPad Pro 11-inch or the iPad Pro 12.9-inch (3rd generation) and newer models.
Part 3. How To Make Talking Emoji Using iPhone Recording
Creating your owntalking emoji for iPhone is a straightforward and enjoyable process. With just a few simple steps, you can bring your digital avatar to your messages and add a fun personalized touch to the conversation.
Follow these steps onhow to make talking emoji on iPhone :
Step 1: Launch the Messages app on your iPhone and either start a new message or select an existing conversation.
Step 2: Within the message, tap the Plus icon and select “More” from the menu options.
Step 3: Next, tap the Memoji button and choose “New Memoji” from the subsequent menu.
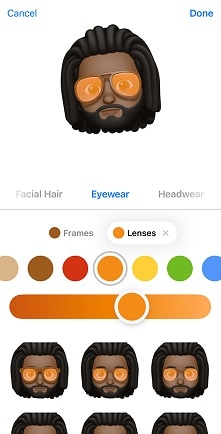
Step 4: Time to let your creativity flow! Start customizing your Memoji by adjusting various features such as skin tone, hairstyle, eyes, facial hair, accessories, and more to personalize it to your liking.
Step 5: After creating your personalized Memoji, find and tap the Memoji button (depicted as a smiling face) on the message. Swipe left to browse and select your Memoji for recording.
Step 6: With your chosen Memoji in place, tap the Record button to commence recording your message. You have a maximum of 30 seconds to record your Animoji. Once done, tap Stop, and then send the animated video with your voice recording to your friend.
Part 4. Recommend: Make iPhone Emoji Photo Talks By Third-Party Tool Directly
Aside from recording an Animoji, you can also make aniPhone talking emoji from an image withWondershare Virbo . If you feel inconvenient to record your Memoji, you just have to upload your Memoji image, add your audio recording, and Virbo will handle the rest.
Virbo is a versatile video editing tool designed for crafting short videos featuring realistic avatars using AI-generated content (AIGC) technology. One of its standout features is the capability to generate speaking avatars from images through its Photo Talking feature.
Virbo Photo Talking features include:
- Make your Memoji talk from an image
- Ability to voiceover and add your own voice
- Cross-platform compatibility on online, desktop, and mobile applications
- Natural animation and lip synchronization
How to make talking emoji on iPhone easily from an image:
Step 1: Start a New Project
Once you’ve installedWondershare Virbo , open the app and choose the Talking Photo feature to begin making your Memoji talk.
Get Started Online Free Download
Step 2: Upload Your Memoji Photo
Select “Upload a photo” and pick the Memoji image saved in your camera roll.

Step 3: Customize and Export Your Talking Memoji Video
Enter your desired text and choose a voiceover from the provided options below to create the audio for your video. Alternatively, you can record your own voice by selecting “record audio.”

Once you’ve finished editing your video, click “Generate Video” to export your creation. If you need assistance with creating your talking Memoji, you can refer to the video tutorial to maketalking emoji for iPhone .
Conclusion
iPhone talking emoji , also known as Animoji, is a feature that uses Apple’s facial recognition technology to animate emoji characters using the user’s facial expressions and voice. This feature was introduced with the iPhone X and has since been expanded to include various emoji characters, including animals, aliens, and even robots.
Users can record short video messages or take photos with these animated emoji characters and send them to their friends to add a fun touch to their communication. You can also use Wondershare Virbo’s Photo Talking feature to make thisApple talking emoji talk from an image.
Launching Your Live Room
Launching Your Live Room
Explore step-by-step instructions on decorating your space, uploading local images and videos, adding engaging AI interactions, etc. Elevate your streaming experience and captivate your audience with a seamlessly executed live room. Dive into our comprehensive guide now!
02Uploading Local Images and Videos
07AI Intelligent Script Generation
11Starting/Ending the Live Broadcast
Decorating Your Live Room
Decoration Guidance
- Click on the product homepage and create a blank live room to initiate a new live session.

Create a blank live room
- Upon creating a blank live room, the live room editing page will open. The left side serves as the operation area, the right side as the canvas area, and the materials area is located above.

Livestream room navigation
- Click on the templates to use pre-designed combinations of background, virtual hosts, and stickers.

Select a template
- Customize the background from the background library. During the live broadcast, only one background can be used.

Livestream room customization
- Choose a virtual host from the virtual host library. Only one virtual host can be used during the live session.
![]()
Choose a virtual host
- Add stickers from the sticker library. Multiple stickers can be used during the live broadcast.
- After selecting materials, adjust their position and size in the canvas area. Right-click to modify layers, copy, or delete materials.
Uploading Local Images and Videos
Upload background images or videos
- Upload: Click Background -> Upload Background -> Select file to upload. Materials will be displayed in “My Background” after uploading.

Upload Background
- Apply: Click Background -> My Background, then click on the material to use it on the canvas.
- Delete: Hover over the material and click the delete icon to remove it.

Delete Background
Note
Background upload requirements:
- Image and video dimensions should be 9:16
- Image formats: JPG/JPEG/PNG
- Video formats: MP4/MOV
- Resolution should not exceed 1080P
- Video duration should not exceed 30 minutes
- File size should not exceed 1GB
Upload sticker images or videos
- Upload: Click Sticker -> Upload Sticker -> Select file to upload. Materials will be displayed in “My Sticker” after uploading.

Upload Sticker
- Apply: Click Sticker -> My Sticker, then click on the material to use it on the canvas.
- Delete: Click Sticker -> My Sticker, hover over the material, click the delete icon to remove it.

Delete Sticker
Note
Sticker upload requirements:
- Image and video dimensions are flexible.
- Image formats: JPG/JPEG/PNG
- Video formats: MP4/MOV
- Resolution should not exceed 1080P
- Video duration should not exceed 30 minutes
- File size should not exceed 1GB
Text-Driven Live Room
Script Guidance
- Input script text: Copy and paste your script into the script dialogue box.

Text Scripts Inset
- Choose a matching tone: Click the voice-over entrance above, select a suitable tone, and preview it.
- Preview: Click the “Preview” button below the text to listen.
Audio-Driven Live Room
Audio Guidance
- Upload audio: Click Script -> Audio -> Upload local voice and upload the local file.

Upload Audio
- Preview audio: After uploading, click to preview the audio.

Preview Audio
- Audio sorting: Hold and drag to sort the audio files.

Audio sorting
- Audio sorting: Hold and drag to sort the audio files.

Modifying Live Room Name
Method Guidance
- Method 1: Click the edit button in the upper-left corner of the edit page to rename the live room.

Rename Livestream Room
- Method 2: Product homepage -> My Live Rooms -> Click on the more options for an individual live room -> Choose Rename.
Adding AI Identification
Step Guidance
- On the live room editing page, click on the checkbox before the AI identification to enable or disable it.
AI Intelligent Script Generation
Generation Guidance
- Click the “AI Intelligent Script” button below the script, a popup will appear.
- Enter your product name (mandatory), selling points (optional), promotional information (optional), select language and style, then click generate.

AI Script
- The generated result can be further modified, click “Use” to add it to the script dialogue box.
AI Translation
Translation Guidance
- Click the “AI Translation” button below the script, a popup will appear.
- Place the text to be translated on the left, click the middle arrow to select the language for translation (e.g., English), and click translate.

AI Translation
- The generated result can be further modified, click “Use” to add it to the script dialogue box.

AI Translation Result
Manual Interaction
Microphone Interaction
- Operational Flow:
- Click Manual Interaction -> Microphone, and select the microphone device.
- Speak into the microphone and observe the sound wave status.
- Open “Start Live,” wait for the appearance of the virtual host image, and click “Open Mic Takeover.” The virtual host’s mouth will be closed, and your voice will drive the virtual host to speak.
- After speaking, click “End Takeover,” and the virtual host will resume reading the scripted dialogue.
- Click Manual Interaction -> Microphone, and select the microphone device.
- Grant Browser Microphone Access:
- Google Chrome:
*Open Chrome, click the settings icon in the top right.
* Click “Settings,” open the settings page. Select “Privacy and Security” and then click “Site Settings.”
*Enter the site settings page, click “Microphone.”
* On the microphone authorization page, select that the site can request the use of your microphone.
* After these settings, when the browser needs to use the camera or microphone, a device request box will pop up on the page. Select “Allow.” - Mozilla Firefox:
*Open Firefox, click the settings icon in the top right, and click “Settings.”
* Open the settings page, click “Privacy & Security,” and find “Microphone Permissions.” Click “Settings” next to “Microphone.”
*Enter the settings page, add the site that requests the use of your microphone to the list, and click “Save Changes.”
* After these settings, when the browser needs to use the camera or microphone, a device request box will pop up on the page. Select “Allow.” - Sogou Browser:
*Open Sogou Browser, click the settings icon in the top right, and click “Options.”
* Open the options page, click “Advanced,” find “Privacy - Browsers on the Mac System:
*Locate “System Preferences” on your Mac dock and click the icon. Once opened, find “Security & Privacy” and click to open.
* On the “Security & Privacy” page, select “Privacy,” then click on “Microphone” and set the applications that need to use the microphone to “Allow.”
- Google Chrome:
Text Interaction
- Click on “Artificial Interaction” and enter interaction scripts in the input box below.
- Click “Add Text” to add it to the interaction list. After starting the live broadcast, each interaction script will have a send button.

Text Interactionn
- Click “Send” to trigger the AI to speak according to the interaction script.
Intelligent Interaction
Note
The current intelligent interaction feature only supports Alibaba International. If you are streaming on other platforms, you can skip this step.
Setting Entrance
- On the live broadcast page, click on “Intelligent Interaction,” select the live platform, and the supported intelligent interaction features will be randomly displayed.
Q&A Library Settings
- Creating a New Q&A:
- On the product homepage, click on Q&A Library - Add Q&A, and a popup window will appear.
- Fill in the rule name, keywords, reply text, and upload a reply video. Click Save.
Note
Rule Name: Name the rule for easy identification.
Keywords: If a viewer’s question in the live room contains any of these keywords, it will trigger the AI to answer.
Reply Content: You can add up to 5 replies. Include variables like [Viewer’s Nickname] and [Viewer’s Country] for personalized responses.
Sequential Reply: Replies in sequence when triggered.
Random Reply: Randomly selects a reply when triggered.
Reply Video: If configured, the video will be displayed at the specified position until the AI’s reply ends.
- Adjusting Q&A Activation Status:
- Click Q&A Library - Switch to close or open the Q&A rule. When closed, the Q&A rule will not take effect after the live broadcast starts.
- Turning on Q&A Library Switch in the Live Room:
- On the live broadcast editing page, click Intelligent Interaction - Platform, select “Alibaba International,” and turn on the Q&A Library switch. This must be done after starting the live broadcast and capturing the barrage for the function to work.
Greeting Rules Settings
- Greeting Content: You can add up to 5 replies, including variables like [Viewer’s Nickname] and [Viewer’s Country].
- Sequential Reply: Replies in sequence when triggered.
- Random Reply: Randomly selects a reply when triggered.
- On the live broadcast editing page, click Intelligent Interaction - Platform, select “Alibaba International,” turn on the Greeting switch, and click the edit icon to open the editing window. Fill in the reply text and click Save.
Sending Business Cards and Product Catalogs
- On the live broadcast editing page, click Intelligent Interaction - Platform, select “Alibaba International,” turn on the “Send Business Cards” switch, and turn on the “Send Product Catalogs” switch.
Note
These functions will only take effect after starting the live broadcast and capturing the barrage.
How to Start Live Barrage Capture
- Start Broadcasting in Virbo Live
- Follow the steps for “Start/End Broadcast” on the live broadcast editing page.
- Install the Plugin in Chrome
- Ensure Chrome is up to date, then download the plugin from the provided link . After downloading, unzip locally.
- Configure the Plugin in Chrome
- Open Chrome, go to Settings - Extensions - Manage Extensions, enable Developer mode, click “Load Unpacked,” and select the unzipped folder. Enable “Allow in incognito mode” in the plugin details.
- Copy the Live Control Page Link
- Copy the link of your live control page (web version) from the live platform. Paste the link into the live broadcast editing page under Intelligent Interaction - Live Room Link Input, then click “Start Capturing.”
Note
Alibaba International currently supports automatic Q&A, automatic greetings, automatic business card sending, and automatic product catalog sending. You can turn on the corresponding switches and then configure the detailed settings for each item.
Starting/Ending the Live Broadcast
Starting the Live Broadcast
- On the live broadcast editing page, click “Start Broadcasting.”
- The AI live broadcast window will appear shortly after, displaying the AI live broadcast.
Using Your Broadcasting Partner or OBS
Note
Keep the AI live broadcast window open on the desktop during the broadcast, or it will not broadcast properly.
- Open your broadcasting partner or OBS, add a window, select the Wondershare VVB (Live Version) live window.
- Click “Start Broadcasting.” Use Alt + mouse to crop out the web bar or use the zoom function to remove it.
- During the live broadcast, you can only modify the “Artificial Interaction” function; other broadcast settings cannot be changed.
Ending the Broadcast
- When concluding the live broadcast, initiate the termination of the live stream on the platform’s broadcasting partner first, followed by clicking the “End Live” button on Virbo Live to finalize the shutdown process.
02Uploading Local Images and Videos
07AI Intelligent Script Generation
11Starting/Ending the Live Broadcast
Decorating Your Live Room
Decoration Guidance
- Click on the product homepage and create a blank live room to initiate a new live session.
Create a blank live room
- Upon creating a blank live room, the live room editing page will open. The left side serves as the operation area, the right side as the canvas area, and the materials area is located above.
Livestream room navigation
- Click on the templates to use pre-designed combinations of background, virtual hosts, and stickers.
Select a template
- Customize the background from the background library. During the live broadcast, only one background can be used.
Livestream room customization
- Choose a virtual host from the virtual host library. Only one virtual host can be used during the live session.
![]()
Choose a virtual host
- Add stickers from the sticker library. Multiple stickers can be used during the live broadcast.
- After selecting materials, adjust their position and size in the canvas area. Right-click to modify layers, copy, or delete materials.
Uploading Local Images and Videos
Upload background images or videos
- Upload: Click Background -> Upload Background -> Select file to upload. Materials will be displayed in “My Background” after uploading.
Upload Background
- Apply: Click Background -> My Background, then click on the material to use it on the canvas.
- Delete: Hover over the material and click the delete icon to remove it.
Delete Background
Note
Background upload requirements:
- Image and video dimensions should be 9:16
- Image formats: JPG/JPEG/PNG
- Video formats: MP4/MOV
- Resolution should not exceed 1080P
- Video duration should not exceed 30 minutes
- File size should not exceed 1GB
Upload sticker images or videos
- Upload: Click Sticker -> Upload Sticker -> Select file to upload. Materials will be displayed in “My Sticker” after uploading.
Upload Sticker
- Apply: Click Sticker -> My Sticker, then click on the material to use it on the canvas.
- Delete: Click Sticker -> My Sticker, hover over the material, click the delete icon to remove it.
Delete Sticker
Note
Sticker upload requirements:
- Image and video dimensions are flexible.
- Image formats: JPG/JPEG/PNG
- Video formats: MP4/MOV
- Resolution should not exceed 1080P
- Video duration should not exceed 30 minutes
- File size should not exceed 1GB
Text-Driven Live Room
Script Guidance
- Input script text: Copy and paste your script into the script dialogue box.
Text Scripts Inset
- Choose a matching tone: Click the voice-over entrance above, select a suitable tone, and preview it.
- Preview: Click the “Preview” button below the text to listen.
Audio-Driven Live Room
Audio Guidance
- Upload audio: Click Script -> Audio -> Upload local voice and upload the local file.
Upload Audio
- Preview audio: After uploading, click to preview the audio.
Preview Audio
- Audio sorting: Hold and drag to sort the audio files.
Audio sorting
- Audio sorting: Hold and drag to sort the audio files.
Modifying Live Room Name
Method Guidance
- Method 1: Click the edit button in the upper-left corner of the edit page to rename the live room.
Rename Livestream Room
- Method 2: Product homepage -> My Live Rooms -> Click on the more options for an individual live room -> Choose Rename.
Adding AI Identification
Step Guidance
- On the live room editing page, click on the checkbox before the AI identification to enable or disable it.
AI Intelligent Script Generation
Generation Guidance
- Click the “AI Intelligent Script” button below the script, a popup will appear.
- Enter your product name (mandatory), selling points (optional), promotional information (optional), select language and style, then click generate.
AI Script
- The generated result can be further modified, click “Use” to add it to the script dialogue box.
AI Translation
Translation Guidance
- Click the “AI Translation” button below the script, a popup will appear.
- Place the text to be translated on the left, click the middle arrow to select the language for translation (e.g., English), and click translate.
AI Translation
- The generated result can be further modified, click “Use” to add it to the script dialogue box.
AI Translation Result
Manual Interaction
Microphone Interaction
- Operational Flow:
- Click Manual Interaction -> Microphone, and select the microphone device.
- Speak into the microphone and observe the sound wave status.
- Open “Start Live,” wait for the appearance of the virtual host image, and click “Open Mic Takeover.” The virtual host’s mouth will be closed, and your voice will drive the virtual host to speak.
- After speaking, click “End Takeover,” and the virtual host will resume reading the scripted dialogue.
- Click Manual Interaction -> Microphone, and select the microphone device.
- Grant Browser Microphone Access:
- Google Chrome:
*Open Chrome, click the settings icon in the top right.
* Click “Settings,” open the settings page. Select “Privacy and Security” and then click “Site Settings.”
*Enter the site settings page, click “Microphone.”
* On the microphone authorization page, select that the site can request the use of your microphone.
* After these settings, when the browser needs to use the camera or microphone, a device request box will pop up on the page. Select “Allow.” - Mozilla Firefox:
*Open Firefox, click the settings icon in the top right, and click “Settings.”
* Open the settings page, click “Privacy & Security,” and find “Microphone Permissions.” Click “Settings” next to “Microphone.”
*Enter the settings page, add the site that requests the use of your microphone to the list, and click “Save Changes.”
* After these settings, when the browser needs to use the camera or microphone, a device request box will pop up on the page. Select “Allow.” - Sogou Browser:
*Open Sogou Browser, click the settings icon in the top right, and click “Options.”
* Open the options page, click “Advanced,” find “Privacy - Browsers on the Mac System:
*Locate “System Preferences” on your Mac dock and click the icon. Once opened, find “Security & Privacy” and click to open.
* On the “Security & Privacy” page, select “Privacy,” then click on “Microphone” and set the applications that need to use the microphone to “Allow.”
- Google Chrome:
Text Interaction
- Click on “Artificial Interaction” and enter interaction scripts in the input box below.
- Click “Add Text” to add it to the interaction list. After starting the live broadcast, each interaction script will have a send button.
Text Interactionn
- Click “Send” to trigger the AI to speak according to the interaction script.
Intelligent Interaction
Note
The current intelligent interaction feature only supports Alibaba International. If you are streaming on other platforms, you can skip this step.
Setting Entrance
- On the live broadcast page, click on “Intelligent Interaction,” select the live platform, and the supported intelligent interaction features will be randomly displayed.
Q&A Library Settings
- Creating a New Q&A:
- On the product homepage, click on Q&A Library - Add Q&A, and a popup window will appear.
- Fill in the rule name, keywords, reply text, and upload a reply video. Click Save.
Note
Rule Name: Name the rule for easy identification.
Keywords: If a viewer’s question in the live room contains any of these keywords, it will trigger the AI to answer.
Reply Content: You can add up to 5 replies. Include variables like [Viewer’s Nickname] and [Viewer’s Country] for personalized responses.
Sequential Reply: Replies in sequence when triggered.
Random Reply: Randomly selects a reply when triggered.
Reply Video: If configured, the video will be displayed at the specified position until the AI’s reply ends.
- Adjusting Q&A Activation Status:
- Click Q&A Library - Switch to close or open the Q&A rule. When closed, the Q&A rule will not take effect after the live broadcast starts.
- Turning on Q&A Library Switch in the Live Room:
- On the live broadcast editing page, click Intelligent Interaction - Platform, select “Alibaba International,” and turn on the Q&A Library switch. This must be done after starting the live broadcast and capturing the barrage for the function to work.
Greeting Rules Settings
- Greeting Content: You can add up to 5 replies, including variables like [Viewer’s Nickname] and [Viewer’s Country].
- Sequential Reply: Replies in sequence when triggered.
- Random Reply: Randomly selects a reply when triggered.
- On the live broadcast editing page, click Intelligent Interaction - Platform, select “Alibaba International,” turn on the Greeting switch, and click the edit icon to open the editing window. Fill in the reply text and click Save.
Sending Business Cards and Product Catalogs
- On the live broadcast editing page, click Intelligent Interaction - Platform, select “Alibaba International,” turn on the “Send Business Cards” switch, and turn on the “Send Product Catalogs” switch.
Note
These functions will only take effect after starting the live broadcast and capturing the barrage.
How to Start Live Barrage Capture
- Start Broadcasting in Virbo Live
- Follow the steps for “Start/End Broadcast” on the live broadcast editing page.
- Install the Plugin in Chrome
- Ensure Chrome is up to date, then download the plugin from the provided link . After downloading, unzip locally.
- Configure the Plugin in Chrome
- Open Chrome, go to Settings - Extensions - Manage Extensions, enable Developer mode, click “Load Unpacked,” and select the unzipped folder. Enable “Allow in incognito mode” in the plugin details.
- Copy the Live Control Page Link
- Copy the link of your live control page (web version) from the live platform. Paste the link into the live broadcast editing page under Intelligent Interaction - Live Room Link Input, then click “Start Capturing.”
Note
Alibaba International currently supports automatic Q&A, automatic greetings, automatic business card sending, and automatic product catalog sending. You can turn on the corresponding switches and then configure the detailed settings for each item.
Starting/Ending the Live Broadcast
Starting the Live Broadcast
- On the live broadcast editing page, click “Start Broadcasting.”
- The AI live broadcast window will appear shortly after, displaying the AI live broadcast.
Using Your Broadcasting Partner or OBS
Note
Keep the AI live broadcast window open on the desktop during the broadcast, or it will not broadcast properly.
- Open your broadcasting partner or OBS, add a window, select the Wondershare VVB (Live Version) live window.
- Click “Start Broadcasting.” Use Alt + mouse to crop out the web bar or use the zoom function to remove it.
- During the live broadcast, you can only modify the “Artificial Interaction” function; other broadcast settings cannot be changed.
Ending the Broadcast
- When concluding the live broadcast, initiate the termination of the live stream on the platform’s broadcasting partner first, followed by clicking the “End Live” button on Virbo Live to finalize the shutdown process.
Top 6 Celebrity Text to Speech AI Voice Generators You May Like
In the era of technological wonders, where innovation seems boundless, the fusion of artificial intelligence and celebrity culture has given rise to an intriguing phenomenon: Celebrity Text to Speech (TTS) AI Voice Generators. The allure of these generators lies in their ability to breathe life into digital content with the familiar voices of well-known personalities. From enhancing entertainment experiences to revolutionizing accessibility tools, thesetext to speech celebrity voices have carved a unique niche in the digital realm.
In this article, we embark on a journey to explore the realm of celebrityTTS AI voice generators, focusing on the top 6 that have captured the imagination of users worldwide. This article is your compass to navigate through the fascinating world of AI-powered voices and discover the generators that might just become your new favorites.
Part 1: Why Do People Prefer Celebrity AI Voices
Imagine having renowned actors, singers, or public figures lend their voices to your digital creations. The convenience and novelty that celebrity AI voices bring to the table are truly unparalleled.Celebrity voice generator online tools allow for efficient content creation, audio narration, and accessibility adaptations. Without these tools, crafting engaging content could be a time-consuming endeavor, especially for individuals with limited access to resources like voice-over professionals. In a world where content consumption is diversifying across platforms, the availability of celebrity AI voices empowers creators to make their projects stand out.
The utility of celebrity AI voices isn’t limited to entertainment alone. Imagine a visually impaired individual using a screen reader equipped with the soothing voice of a beloved actor, or a corporate presentation infused with the authoritative tones of a prominent public figure. These generators have the potential to elevate efficiency across various scenarios, be it creating audiobooks, delivering presentations, or enhancing the accessibility of digital content for those with disabilities. Such applications make these AI voice generators not just novel but transformative.
Part 2: Top 6 Celebrity Text to Speech AI Voice Generators
Ready to meet the stars of the AI voice world? Let’s explore the 6hottest text to speech celebrity voices free onlinegenerators that are turning text into celebrity speech magic .
1. Virbo
Virbo emerges as a shining star in the constellation ofcelebrity text to speech free online generators. It offers a seamless experience, boasting a wide array of voices from diverse celebrities, ensuring there’s a perfect match for every project. You can pick from more than 100 voices, like Morgan Freeman, Donald Trump, Kim Kardashian, and Elon Musk. You can even mix different voices to make something new.
With an intuitive interface, users can craft natural-sounding audio by simply typing the desired text. Virbo sets the bar high with its lifelike inflections and tones, making your content come alive. Whether you want a voiceover for videos, podcasts, stories, games, or presentations, Virbo stands as a perfect choice.

Get Started Online Free Download
Compatibility of Virbo
- Windows, Mac, Linux, Android, and iOS
Key Features of Virbo
- It has really good voices that sound like real people, thanks to smart AI.
- It’s easy to use for everyone.
- You can try it for free and make voiceovers with up to 500 characters each month.
- If you want more, there are cheap plans for unlimited characters and access to all voices.
- Businesses can even get a special service to make their own custom voices.
Operational Process of Virbo
- Go to the website and make a free account.
- Choose a voice from the list or search for the celebrity you want.
- Write your words in the box and click “Generate.”
- Wait a bit, and you can listen to a part of your audio.
- Save the audio or share it on social media.
2. Resemble AI
Resemble AI is another website fortext to celebrity voice generators that helps you make voices that sound real, using famous people’s voices. You can pick from more than 50 voices, like Barack Obama, Emma Watson, Arnold Schwarzenegger, and Beyoncé. You can even make your own special voice by giving a recording of your voice or someone else’s.
If you want to make things more interesting, fun, or educational, Resemble AI is perfect.

Compatibility of Resemble AI
- Windows, Mac, Linux, Android, and iOS
Key Features of Resemble AI
- It has voices that sound really good and natural, because of super-smart AI.
- You can change the voice’s sound in many ways, like pitch, speed, feeling, accent, and style.
- You can try it for free and make voiceovers with up to 1000 characters every month.
- If you want more, there are plans with fair prices for unlimited characters and access to all voices.
- Businesses can even get a special service to make professional voices for their projects.
Operational Process of Resemble AI
- Go to the website and make a free account.
- Choose a voice from the list or send your own voice recording.
- Write your words in the box and click “Synthesize.”
- Wait a little, and you can listen to a part of your audio.
- Save the audio or share it on social media.
3. Voicery
Voicery is atext to celebrity voice platform that helps you make really good voice recordings using famous people’s voices. You can pick from more than 40 voices, like Leonardo DiCaprio, Jennifer Aniston, Dwayne Johnson, Oprah Winfrey, and more. You can also change how the voice sounds by adjusting things like tone, feelings, and style to match what you want.
If you want to add fun, personality, or power to your content, Voicery is a great choice.

Compatibility of Voicery
- Windows, Mac, Linux, Android, and iOS
Key Features of Voicery
- Voices that sound really natural and great, thanks to super-smart AI.
- It’s easy to use, and you can change the voice the way you like.
- You can try it without paying, and you get 500 characters to play with each month.
- If you want more, there are plans with good prices for as many characters as you need and access to all the voices.
- Businesses can even get a special service for really good voiceovers.
Operational Process of Voicery
- Go to the website and make a free account.
- Choose a voice from the list or find your favorite celebrity using the search bar.
- Put your words in the box and click “Synthesize.”
- Wait a short while, and you can listen to a part of your audio.
- Save the audio or share it on social media
4. Wombo
Wombo is a fun celebrity TTS app that lets you make funny videos using famous people’s faces and voices. You can pick from more than 30 voices, like Justin Bieber, Taylor Swift, Spongebob Squarepants, Darth Vader, and more. You can even use your own face or someone else’s.
Wombo is great for anyone who wants to make funny videos with famous faces and voices. Whether you want to make yourself or someone else laugh, Wombo can help.

Compatibility of Wombo
- Android and iOS devices
Key Features of Wombo
- Videos that are really funny and fun, thanks to special AI technology.
- It’s simple and easy to enjoy for everyone.
- It’s a free app, and you can use it as much as you want with all the voices.
- The videos you make don’t have any watermarks or ads.
- They always make the app better with new voices and stuff.
Operational Process of Wombo
- Open the app and let it use your camera and microphone.
- Choose a face from the gallery or take a selfie or someone’s photo.
- Pick a voice from the list or search for the celebrity or character you want.
- Tap “Wombo” and wait a little.
- Watch the video and have a good laugh.
- Keep the video or share it on social media.
5.Voiceful
Voiceful is acelebrity text to speech free app that helps you make really great voice recordings using famous people’s voices. You can pick from more than 20 voices, like Tom Hanks, Emma Stone, Will Smith, Ellen DeGeneres, and more. You can also use your own voice or make the app read your text out loud.
Voiceful is perfect if you want to make awesome voice recordings with famous voices. Whether you want to make your things more interesting, creative, or impressive, Voiceful can help.

Compatibility of Voiceful
- Android devices
Key Features of Voiceful
- Voice recordings that sound amazing and real, thanks to smart AI.
- It’s quick and easy to use, and anyone can learn it.
- The app is free, and you can use it as much as you want with all the voices.
- The audio you make doesn’t have any watermarks or ads.
- They often make the app better with new voices and improvements.
Operational Process of Voiceful
- Open the app and let it use your microphone and storage.
- Choose a voice from the list or find your favorite celebrity or person using the search bar.
- Record your voice or put your text in the box and click “Convert.”
- Wait a bit and listen to a part of your audio.
- Keep the audio or share it on social media.
6. Voicemod
Voicemod is a coolcelebrity voice generator text to speech online app that lets you turn your voice into different famous people and characters. You can choose from more than 100 voices, like Billie Eilish, Ariana Grande, Batman, Harry Potter, and more. You can even make your own special voice by changing the voice effects and filters.
Voicemod is great if you want to have fun by changing your voice into famous voices and characters. Whether you want to play tricks on your friends, add excitement to your chats, or express yourself differently, Voicemod is your go-to option.

Compatibility of Voicemod
- Android and iOS devices
Key Features of Voicemod
- Voice changes that are fun and sound real, thanks to amazing AI.
- The app is easy to use and lots of fun for everyone.
- It’s a free app, and you can use all the voices as much as you want.
- The audio you make doesn’t have any watermarks or ads.
- They always make the app better with new voices and stuff.
Operational Process of Voicemod
- Open the app and let it use your microphone and camera.
- Choose a voice from the collection or find your favorite celebrity or character using the search bar.
- Tap the microphone icon and start talking.
- Listen to how your voice changes in real time.
- Keep the audio or share it on social media.
Part 3: Hot FAQs about the Celebrity Text to Speech AI Voice Generators
Q1. Are These Generators for Commercial Use?
Yes, most offer commercial licenses. Review terms for compliance.
Q2. How Accurate Are AI Celebrity Voices?
They’re authentic but might lack nuances. AI improves realism.
Q3. Are These Generators Accessible?
Yes, they aid visually impaired users with lifelike narration.
Q4. Can I Customize AI Voices?
Yes, adjust pace, tone, and emphasis for your needs.
Q5. What Devices Work with These Generators?
They’re compatible with Android, iOS, and browsers.
Conclusion
Celebrity text to speech voices are amazing tools that combine human expression and technological innovation. They offer many benefits for entertainment, accessibility, education, and content creation. As we end this guide on the top six Celebrity Text to Speech AI Voice Generators, remember that the fusion of human voices and artificial intelligence shows the endless potential of the future. Explore the world of audio synthesis, and unleash your creativity with the voices of your favorite stars.
Also read:
- New 2024 Approved How to Make an Explainer Video Step by Step Guide
- 10 Best Free AI Video Generators with Innovative and Advanced Algorithms for 2024
- 2024 Approved Kya Aap Video Call Kar Sakty Ho Translate Any Hindi Video Into English
- New In 2024, Create Talking Cartoon Images Using Top Tools
- In 2024, What Is an AI Voice Generator? | Wondershare Virbo Glossary
- New How To Create Video From Text Easily Step-by-Step
- 2024 Approved Best Video Translator App for PC Cannot Miss
- In 2024, Best Hatsune Miku AI Voice Generators for All Times
- Updated 2024 Approved The Best Text-to-Speech Online Tools To Use
- What Is an AI Presentation Maker?
- Updated In 2024, Live Shopping in China Major Changes in the Industry
- 2024 Approved All About Kapwing Video Translation
- 2024 Guide How to Attract More NFL Viewers for Your Sports Live Streaming Channel
- Updated In 2024, AI Avatars | Online
- Updated In 2024, How To Use CapCut Translate to Transform Video Content
- Easy Tutorial How To Make a Talking Cartoon Video Step-by-Step for 2024
- 2024 Approved Ever-Changing Era of AI Video Translation A Reality to Be Fulfilled
- New How to Create Marketing Videos Ultimate Guide
- New What Is an AI Art Generator for 2024
- Updated 2024 Approved Top 6 Mickey Mouse Voice Generators Providing Efficient Results
- New What Is an AI Headshot Generator? | Wondershare Virbo Glossary
- New Elevate Your Content with the Best Free Video Translator Apps
- Updated Best Video Translator App for PC Cannot Miss
- Updated Live Shopping Success Secrets Unveiling Strategies From Real Case Studies
- Introduction | Wondershare Virbo
- In 2024, The Best Translator to Translate Videos Online
- New What Is AI Influencer for 2024
- In 2024, Top 10 AI Avatar Video Generators
- Top 5 Viral Video Marketing Techniques For Big Sellers for 2024
- 2024 Approved Boost Sales with Live Shopping Learn Winning Strategies From Top Brands
- How to Screen Share Mac to Apple iPhone 13 mini? | Dr.fone
- Life360 Circle Everything You Need to Know On Xiaomi Redmi Note 12T Pro | Dr.fone
- Fix Cant Take Screenshot Due to Security Policy on Nubia Red Magic 8S Pro | Dr.fone
- How to Check Distance and Radius on Google Maps For your Xiaomi 13 Ultra | Dr.fone
- The way to recover deleted contacts on Pop 8 without backup.
- In 2024, How Can Poco C51Mirror Share to PC? | Dr.fone
- Can't open MOV files on Motorola G24 Power
- In 2024, How To Bypass iCloud By Checkra1n Even On iPhone 6 Plus If Youve Tried Everything
- Top 4 SIM Location Trackers To Easily Find Your Lost Oppo Find X7 Device
- How does the stardust trade cost In pokemon go On Apple iPhone 6 Plus? | Dr.fone
- How to Factory Reset ZTE Blade A73 5G If I Forgot Security Code or Password? | Dr.fone
- What is Geo-Blocking and How to Bypass it On Apple iPhone XS? | Dr.fone
- Fixes for Apps Keep Crashing on Realme GT Neo 5 | Dr.fone
- How To Restore Missing Messages Files from Pova 5
- Realme Narzo 60 Pro 5G Not Connecting to Wi-Fi? 12 Quick Ways to Fix | Dr.fone
- How to Send and Fake Live Location on Facebook Messenger Of your Motorola Moto G14 | Dr.fone
- Play Store Stuck on Downloading Of Honor X8b? 7 Ways to Resolve | Dr.fone
- Title: Revealing Translation Methods Netflix Subtitle Software Comprehensive Guide for 2024
- Author: Sam
- Created at : 2024-04-17 22:05:31
- Updated at : 2024-04-18 22:05:31
- Link: https://ai-voice-clone.techidaily.com/revealing-translation-methods-netflix-subtitle-software-comprehensive-guide-for-2024/
- License: This work is licensed under CC BY-NC-SA 4.0.
