
:max_bytes(150000):strip_icc():format(webp)/trends_MontyRakusen_Getty-5a4aa079482c5200362b0987.jpg)
Updated What Is AI Pixel Art Generator for 2024
What Is AI Pixel Art Generator?
Introduction:
In the realm of digital artistry, the fusion of artificial intelligence and visual aesthetics has given rise to innovative tools that redefine creativity. One such remarkable advancement is the AI pixel art generator. By merging the precision of AI algorithms with the nostalgic charm of pixel art, this technology opens up new horizons for artists, designers, and enthusiasts alike.
What Is Pixel Art?
Pixel art is a form of digital art that harks back to the early days of computing. It employs deliberate low-resolution design, using small, individual blocks or pixels to craft intricate images. Each pixel is meticulously chosen to create detailed visuals, often evoking a sense of nostalgia and simplicity.
What Is AI Pixel Art Generator?
The AI pixel art generator is a cutting-edge tool that harnesses the power of artificial intelligence to automate the creation of pixel art. By analyzing patterns, color schemes, and artistic styles present in existing pixel art or reference images, these generators can produce stunning pixel art pieces with impressive accuracy and efficiency.
The Main Purpose of Pixel Art Generator:
The primary goal of a pixel art generator is to simplify the often labor-intensive process of creating pixel art. Traditional pixel art demands painstaking attention to detail, pixel by pixel. AI pixel art generators alleviate this burden by swiftly generating complex designs while retaining the charm and uniqueness of handcrafted pixel art.
What Is AI Pixel Art Generator Used For?
- Gaming Industry: AI pixel art generators are widely employed in game development to create character sprites, environment assets, and animations. They enable game developers to efficiently generate pixel art content that aligns with the desired aesthetic.
- Graphic Design: Graphic designers use AI pixel art generators to swiftly generate pixel-based logos, icons, and illustrations. This streamlines the design process and maintains a consistent pixelated style.
- Art and Animation: Artists leverage AI pixel art generators to experiment with new styles, generate base artwork, or as a reference for manual creations. It serves as a valuable tool for both novice and seasoned artists.
Types of Pixel Art Generators:
- Style Imitation: These generators analyze existing pixel art to replicate a particular artistic style in new creations.
- Upscaling: Some AI generators enhance the resolution of low-res images, adding detail to pixel art without sacrificing its original essence.
- Pattern Recognition: These generators identify recurring patterns and structures in pixel art, assisting in the creation of intricate designs.
List of Best AI Pixel Art Generators:
- DALL-E Pixel: Inspired by OpenAI’s DALL-E, this generator creates pixel art from text prompts, merging textual creativity with visual representation.
- Pixela: Known for its user-friendly interface, Pixela uses AI to transform reference images into pixel art masterpieces.
- Pixelmash: A versatile tool offering features like dynamic lighting effects and animation capabilities, enabling the creation of advanced pixel art.
- DeepArt.io: Although primarily focused on general art styles, DeepArt.io can also produce pixel art pieces using its AI algorithms.
- Pix2Pix: While originally designed for image-to-image translation, Pix2Pix can also generate pixel art by converting rough sketches into polished designs.
Conclusion:
The emergence of AI pixel art generators exemplifies the harmonious fusion of human creativity and technological prowess. By streamlining the creation process and unlocking new possibilities in digital design, these tools stand as a testament to the boundless potential of AI in the creative realm. As the technology evolves, we can only anticipate even more breathtaking and unique pixel art creations that blur the line between human ingenuity and artificial intelligence.
Best Hatsune Miku AI Voice Generators for All Times
Hatsune Miku, the iconic virtual idol, has inspired creators worldwide with her unique voice. The emergence of Hatsune Miku voice generators has provided you with a new platform to easily transform text into Miku AI voice.
In this article, we’ll explore the top 4 Hatsune Miku voice generators that support making a realistic Miku ai voice. Delve into the world of Hatsune Miku now!
Part 1: What To See In A Hatsune Miku Voice Generator
Every music lover can fall in love with this quality-optimized software. Miku voice generator has tons of beneficial improvements that attract users. However, there are a few things that you need to see before selecting a voice generator integrated with Hatsune Miku. Some of them are discussed here for you:
1. Language and Voice Support
Before selecting a Hatsune Miku voice generator , you need to ensure that it supports a wide array of languages and voices. If a tool allows you to choose the tone and accent of an AI-generated voice, then it is also a wonderful thing.
2. Customizing Metrics
It can be problematic if you select a tool that comprehends no customizing metrics. It should let you convert, trim, and equalize the audio. You can also add breaks in the audio to maintain the humane touch.
3. Formats of Audio
It is evident that not all people can work with MP3. Sometimes, you have to work on other file formats, and eventually, you need to use a tool that is compatible with versatile formats . Thus, avoid selecting a tool that only works with a few numbered audio formats. This will save you from facing any restrictions and limitations.
4. Accuracy and Quality
The voice generator you are going to select should have the potential to create a voice that resembles Hatsune Miku. It should output a youthful tone that can engage more listeners. Some of the Japanese phrases and words can be hard to pronounce. Thus, select a tool with powerful algorithms so it can pronounce the words correctly.
Generate Engaging
AI Video in Minutes!
Easily convert text into professional spokesperson videos in over 120+ voices & languages in minutes.
Generate AI Video Free Generate AI Video Now


Part 2: Who is The One Behind The Voice Of The Hatsune Miku
The voice of Hatsune Miku has fanatic popularity all across the globe. Youngsters to older adults, everyone is really into this angelic voice. You must be curious to discover the personality that is hidden behind Hatsune Miku. So, the girl who can turn over the world with her surprising vocals is Sakiko Fujita.
She was born on the 19th of October 1984. As the name indicates, she is a Japanese voice actress. She doesn’t stop with Hatsune Miku as she also has endless astonishing projects. Her first project debuted in 2005, in which she worked with Akahori Gedou Rabuge, Shuffle, and other projects as a voice actress.
Her voice has also been the main factor of several projects such as Tokimeki Memorial Only Love, Gakuen Utopia Manabi Straight, Akiba-Chan, Heaven’s Lot Property, YuruYuri, etc. You can also find her voice in several games, which include Rune Factory Oceans, Street Fighter X Takken, Digimon World: Next Order, and much more.
Part 3: The Top 4 Voice Changer Tools With Hatsune Miku Voice Supported
The number of voice-changing tools that are integrated with Hatsune Miku is unlimited. However, you have to select the best among them to optimize your performance and productivity. For this reason, we will introduce the best-in-class and most reliable tools among them. So, let’s get into the Miku voice generator without any further delay:
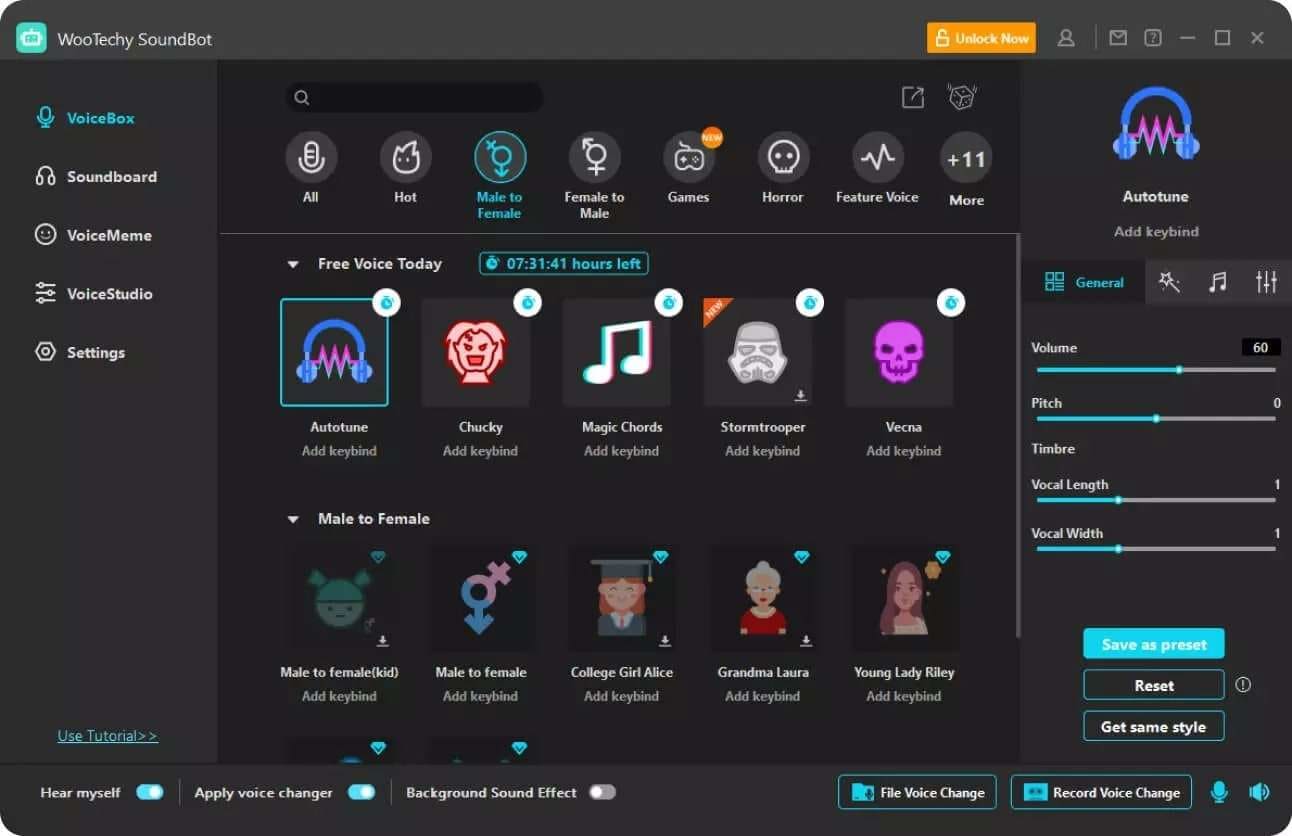
1. WooTechy Soundbot
This is one of the intuitive Hatsune Miku voice generator tools. By using this tool, you can change the voice with more than 250 voice filters. You can also customize the quality and other metrics of voice in a limited time. It also has the potential to work with recorded audio and change the voice in them in lossless quality.
Whenever a new voice is added to them, you can get updated with it eventually. There are 600 plus voice effects in it which you can use anytime. You can also make hilarious memes by using its 200-plus meme voices.
Key Features
- It has endless voice styles for all characters, such as celebrity voice, Ghostface voice, male/female voice, and more.
- You can also use this tool to create voices for anime, robots, games, and other virtual projects. It gives you the opportunity to play sound in multiple ways.
- WooTechy Soundbot can export your audio in multiple formats and share it on platforms like Facebook, TikTok, and more.
Compatibility
- Windows
Pricing Plan
| Duration | Price |
|---|---|
| Quarter Plan | $12.95 |
| One Year Plan | $19.95 |
| Lifetime Plan | $39.95 |
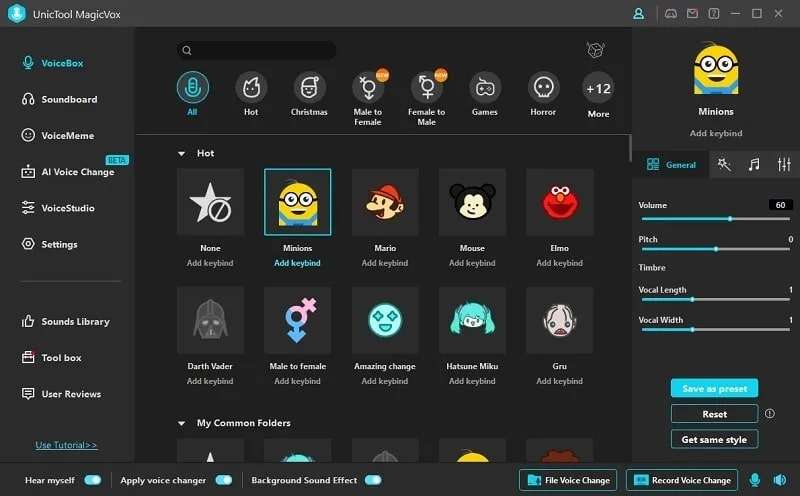
2. UnicTool MagicVox
It is also a premium-grade voice generator that shows integrations with Hatsune Miku voice. Using this Miku voice generator free, you can convert your voice to any character you like. It also lets you show your idea to the world intuitively. Moreover, it has 400+ specialized dynamic voice effects, making it a unique tool. You can be anything you want, from an anime girl to a little girl.
With just a few taps, you can create deep fake voices to upgrade your performance. You can also change your voice on other platforms with this. These platforms Amy includes YouTube, Discord, VRChat, Google Meet, etc.
Key features
- Using its AI Voice Cloning feature, you can create a realistic quality voice replica of any person without any issue.
- Its voice studio allows you to create unique voices that you can customize to display your identity.
- You can also use hotkeys to control the voice metrics. It also comprehends Keybinds and noise reduction algorithms which add perfection to your voice.
Compatibility
- Windows
Pricing Plan
| Duration | Price |
|---|---|
| 1-Year Plan | $19.95 |
| 1-Month Plan | $8.95 |
| 1-Quarter Plan | $12.95 |
| Lifetime Plan | $39.95 |
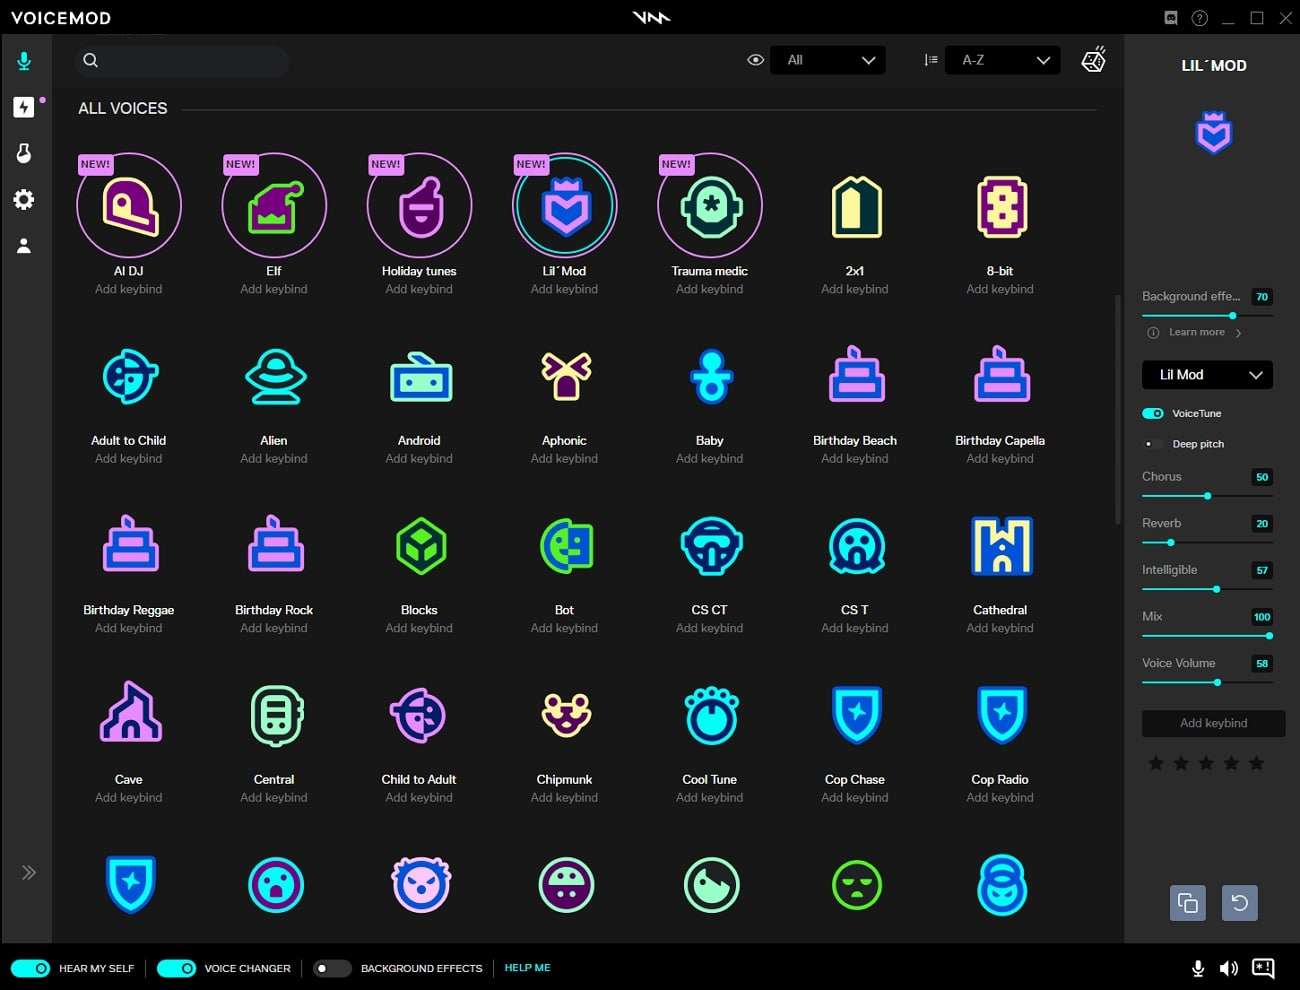
3. Voicemod
It is one of the perfect choices through which you can express your emotions in your voice. This real-time Hatsune Miku voice generator also helps you build the sonic identity for versatile platforms. You can also use it to change the voices in real time on several applications such as Zoom, Skype, Roll20, Us, WhatsApp Desktop, and more.
Every person, such as content creator, gamer, streamer, and VTuber can use this tool to change their voices. It also aids in maintaining anonymity on several platforms.
Key Features
- It has endless AI voices which have the potential to speak clearly without any slurring and rushing. It also ensures that there are no background noises in the audio.
- You can also use this tool to create captivating songs. It also lets you select a voice per your song’s theme.
- Using its in-built storyboard, you can access the presets of sounds or create your storyboard.
Compatibility
- Windows
- macOS
Pricing Plan
| Duration | Price |
|---|---|
| Quarterly Plan | $11.97 |
| Annual Plan | $23.88 |
| Lifetime Plan | $29.00 |
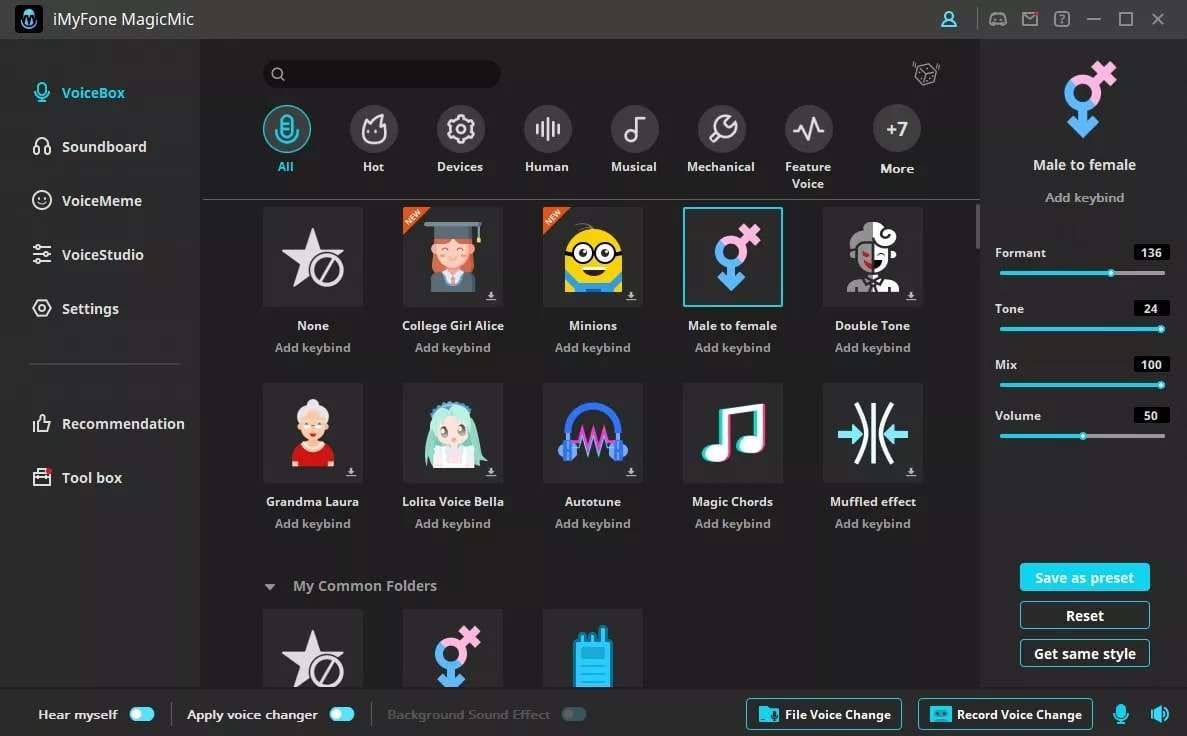
4. iMyFone MagicMic
iMyFone MagicMic also holds its name higher in the best-in-class Hatsune Miku voice generators list. With this, you can change your voice in real time in diversified ways. It has more than 225 AI Voice Filters which can also optimize your performance. There are also more than 600 voice effects that can turn simple voices into cinematic-quality voices.
You can also customize the voice to give a more personalized experience to the listeners. It also lets you adjust the voice metrics, which is quite beneficial.
Key Features
- There are specialized Keybinds and keyboard shortcuts in it, which can help you in saving time and effort.
- You can record the audio without interruptions and edit it in several ways. It also assists the users in live streaming communications.
- Adding customized voiceovers, pranking your friends, and becoming an online tutor with AI voice is also possible with this.
Compatibility
- Android
- iOS
- Windows
- Mac
Pricing Plan
| Duration | Price |
|---|---|
| Monthly | $16.99 |
| Lifetime | $74.99 |
| Yearly | $59.99 |
Bonus Tip: Efficient and Blazing Fast AI Powered Text To Speech Tool
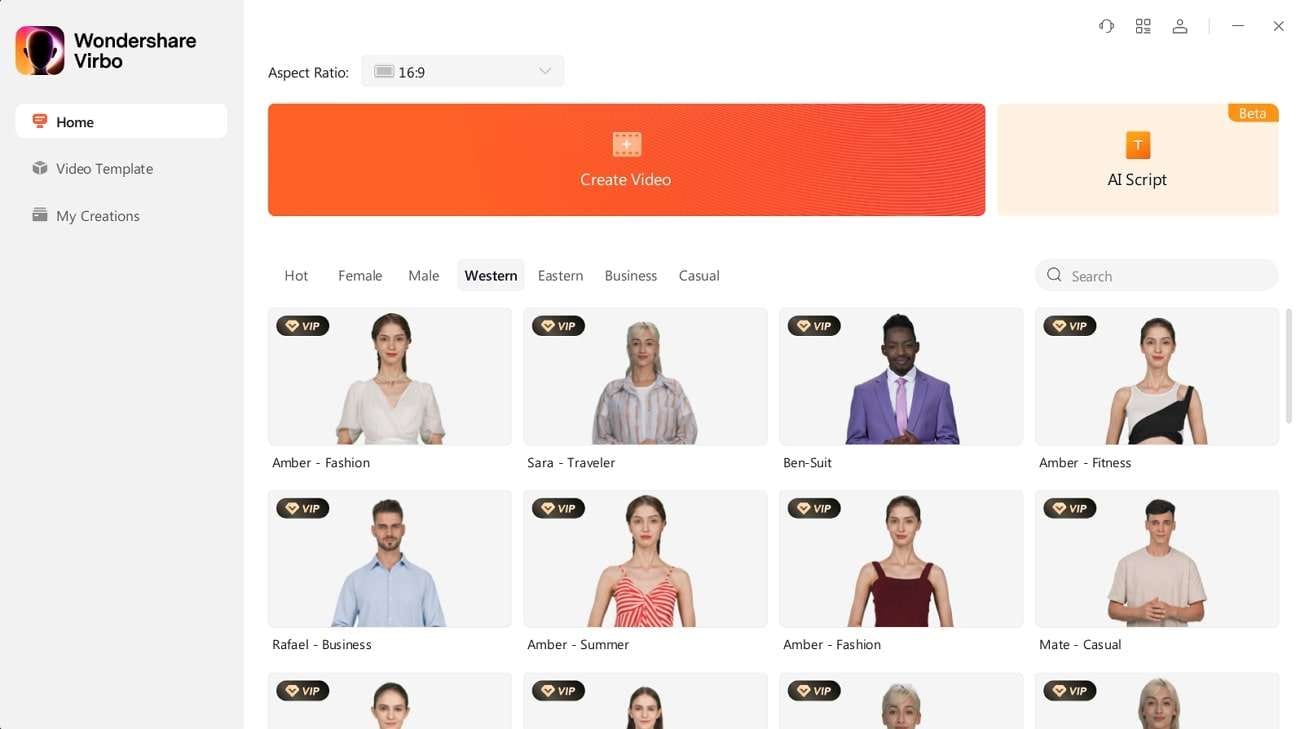
Virbo is one of the most famous and reliable AI-powered software to convert text into amazing quality speech. You have to select the speech style and enter the text. Following this, Virbo will handle the rest for you. It also has 300+ voices and languages, making your work easier than ever. You can also use its 300-plus AI Avatars for creating digitally assisted videos.
One of the best things about Virbo is it has the potential to create amazing quality scripts with its AI Script generator. The interface of Virbo is well structured, so you will not face any difficulty using it. Moreover, you can also access its built royalty-free music and templates. This can help you boost productivity flawlessly.
Generate Voice Online Download APP Now Free Download
Powerful features of Virbo
- Text to Speech
- Cost-effectiveness
- Clear Audio Quality
- Spoken by Realistic Avatars
- 300+ Accents & Languages
Conclusion
To draw the final curtain, the popularity of Hatsune Miku is drastically increasing daily. There are numerous Hatsune Miku voice generators present on the web. You can select the desired voice generator that fits your needs. However, there are a few things that you need to keep in mind before choosing a tool. Some of the most valuable ones are discussed.
Furthermore, if you need to learn about the tools that work perfectly as Hatsune Miku voice generator free, the above discussion can also help you. You have also discovered a fantastic AI text-to-speech converter in the bonus part.
Generate Voice Online Download APP Now Free Download
Exploring The Best Text-to-Speech Online Tools To Use
As the name indicates, you can use the text-to-speech tool for converting text into speech. This feature is being integrated into several operating systems and AI tools because of its high demand. Moreover, there are both online and offline tools, but users prefer to go with online tools due to their accessibility.
Over time, the number of text-to-speech online tools is increasing drastically. This discussion aims to provide reliable text-to-speech tools so you can use this with ease. In addition, we will also provide use cases that will tell you about the usability of these tools effectively.
Part 1: What are the Use Cases of Text to-Speech Online Tools
Online text-to-voice tools have made work easier than ever. With this tech-savvy tool, you can accomplish your task in a limited time without any issues. Some of the cases where these exceptional tools can assist you in reliable ways are discussed here:
1. Assistive for Impaired Individuals
By using the TTS online tools, individuals who cannot see can read whatever they wish with ease. It also plays a vital role in making digital content accessible to impaired persons. They can also understand the written text in spoken form with this. Moreover, it can help the reader with various platforms such as emails, documents, and more. This is very beneficial for visually impaired individuals.
2. Education and Learning
These amazing tools are widely utilized in the e-learning domains. Every educational software, along with the digital textbook, incorporates the feature of text-to-speech in their software. It can also help in reading out the assignments and other study material. Through this, you can learn your study material in an effective way.
3. Multilingual Communication
Text-to-speech online tools also help you with multilingual support. You can learn how to pronounce words in other languages. It can also read the translated text out loud for you. This is particularly helpful for language learners and tourists.
4. Digital Assistance and Entertainment
It is an essential component of voice-activated technologies. AI-powered virtual assistants like Alexa and Siri also integrate this feature. Through this, they convert text-based information into natural speech. The AI bots in homes and cars’ voice responding systems also have this fantastic feature. Moreover, gaming applications also use it to tell the storyline of the characters.
Part 2: The Best 5 Text-to-Speech Online Tools
Diversified text-to-voice online apps can confuse a person when choosing one. For this reason, you need to rely on the available resources to get the work done. This part will introduce and discuss the best-in-class text-to-speech online tools. A few of them are also known as the best text-to-speech online free software. You can find more about them from the below detailed discussion:
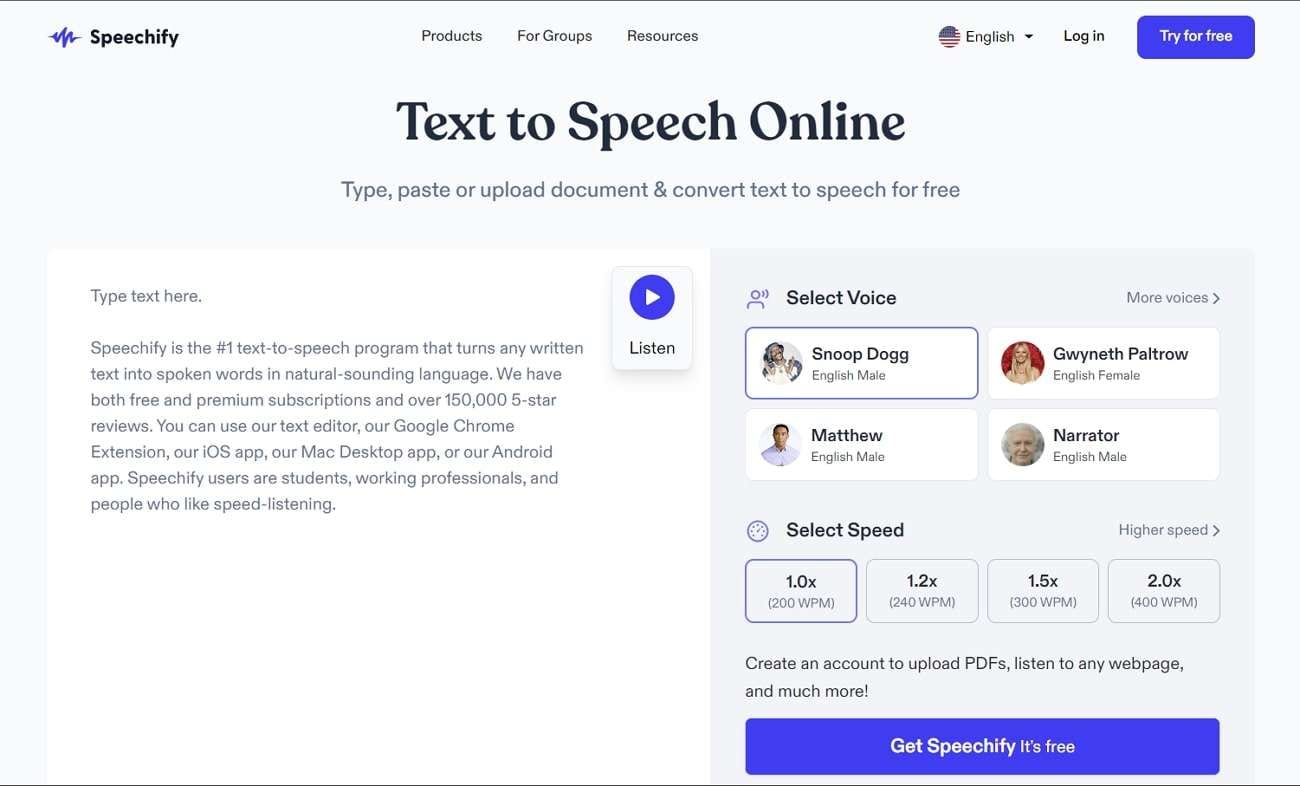
1. Speechify
Speechify is one of the best programs through which you can turn written text into spoken words. Moreover, this TTS online tool has the potential to do this with precise accuracy. You can also select a voice of your choice in this. It has 30+ humane reading voices, along with 15+ languages. Moreover, Speechify has several types of voices, which include Snoop Dogg, Matthew, Gwyneth Paltrow, and many more.
In addition, it also lets you customize the speed of speech. You can also use built-in speed formats such as 1.0x, 1.2x, 1.5x, and 2.0x. You can also play and pause the audio anytime. It also has an advanced skipping and importing feature, along with note-taking tools. The OCR technology of Speechify can also help you with text extraction.
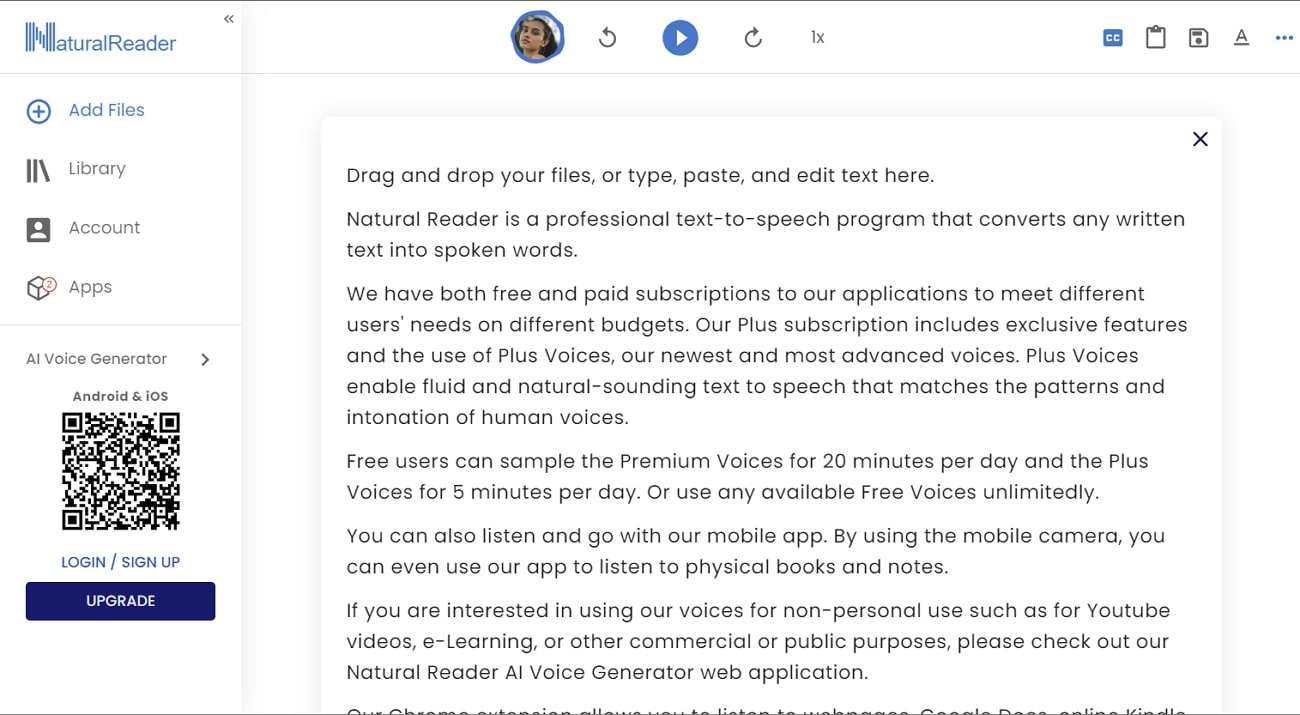
2. NaturalReader
It is one of the most reliable text-to-speech online tools on the web. NaturalReader gives you a wide array of options when it comes to voices. For example, you can select Jane for eBooks and stories. On the other hand, Eric can read news articles for you. Moreover, you have the option to choose the language of your choice. You can also select the voice as per emotions and style.
It may include sadness, unfriendliness, anger, excitement, and more. This TTS online tool also consists of multiple languages such as Italian, Japanese, Korean, Dutch, and many more. As for reading content, you can add a file of your choice or access one from its library. It has several intuitive features, such as a pronunciation editor, audio file creation, OCR technology, etc.
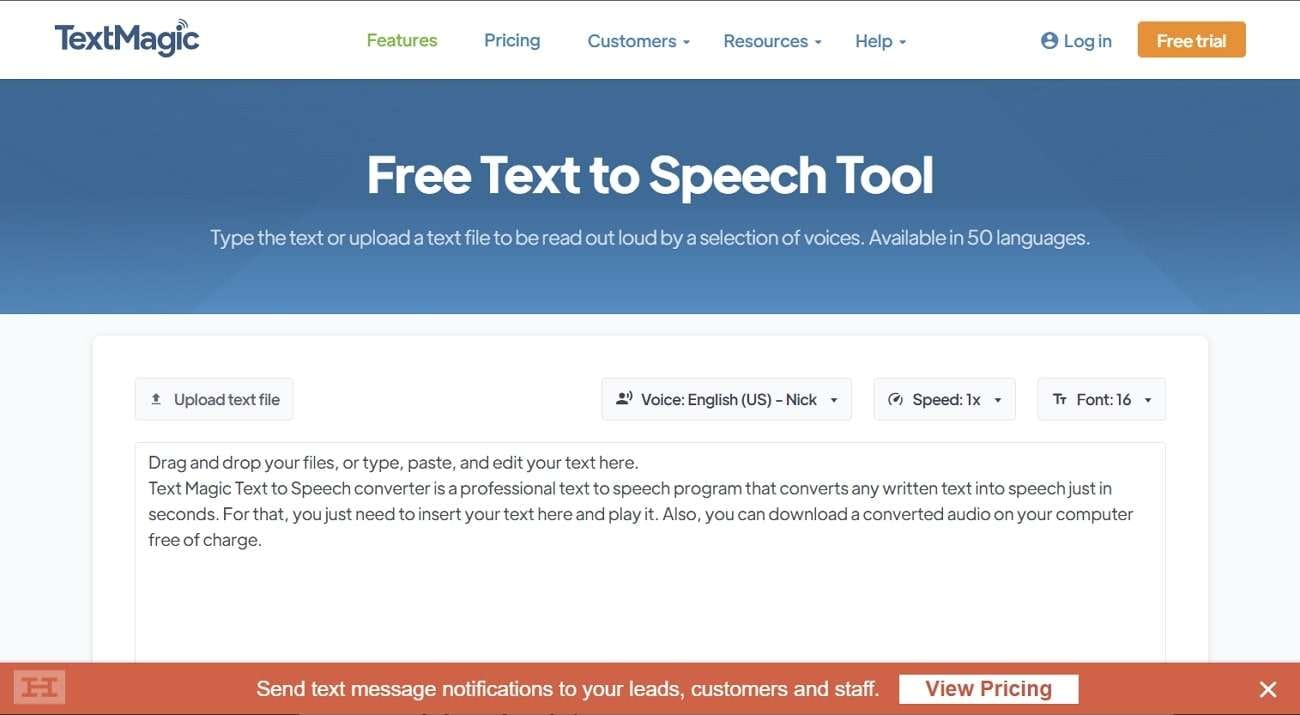
3. TextMagic
This is an easy-to-use TTS online tool and has optimized-level functionality. You can use this tool to pre-record the audio so you can send those texts anytime, anywhere. It also lets you schedule the sending time of SMS so you will not face any difficulties. Above all, you can work on 50+ languages with this. It also allows you to upload the text file, select voice with language, manage speed, and you are good to go.
Moreover, you can also select the languages based on the region, such as Southeast Asia, Middle Asia, Europe, North America, and more. No matter if you want to provide assistive content for Dyslexic patients or visually impaired people, this tool can help you with every task.
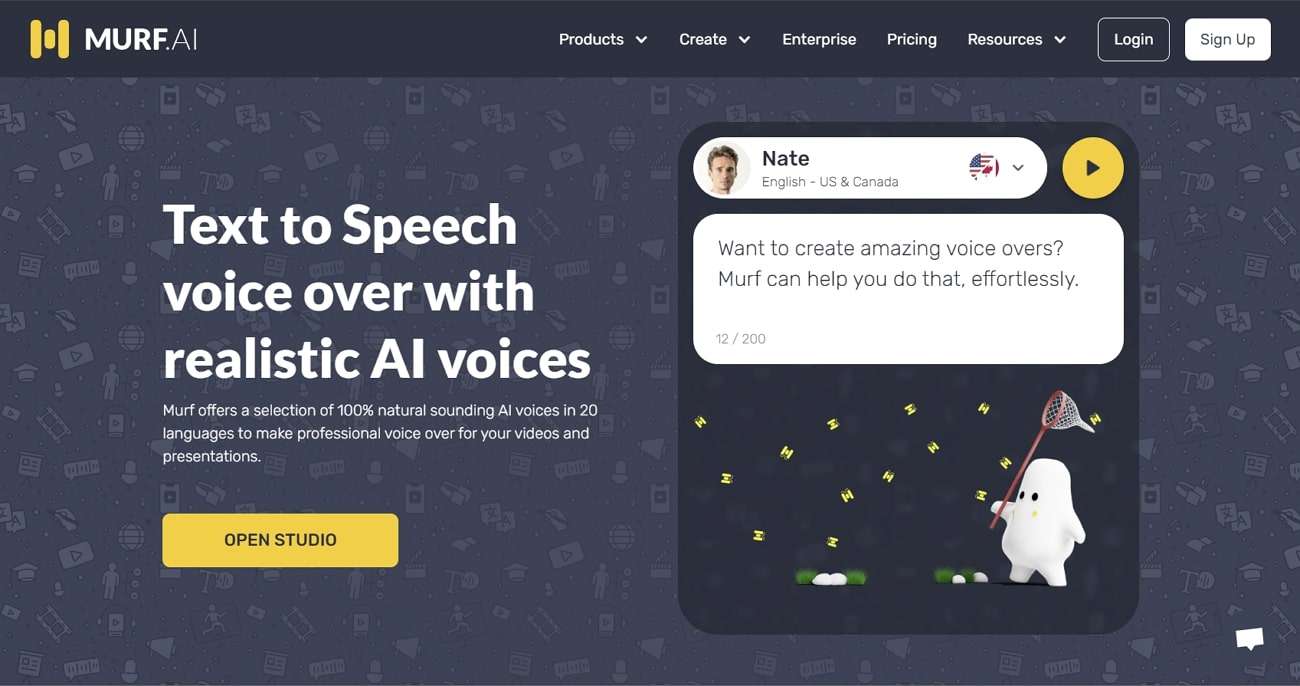
4. Murf.ai
This intuitive tool never fails to amaze users with its high functionality and optimized key features. Murf.ai’s TTS online tool lets you use its AI-enabled voices of real people without any issue. Whether you are a product developer, educator, or marketer, this exclusive tool can help you with all. You can select the voice of your choice, manage speed, control its pitch, and insert pause wherever you want.
One of the best things about this tool is it has more than 120 text-to-speech voices that you can use in 20+ languages. There is a specialized video maker through which you can add a video or image of your choice and sync it with speech.
5. Voicemaker
Voicemaker gives you diversified options to manage the text-to-speech task in multiple ways. You can add pauses wherever you want and select slow, fast, or medium speeds. Along with this, you can also choose the type of volume from the options of x-soft, soft, medium, loud, and x-loud. You can also select the language and region as per your need.
Moreover, it also has two AI Engines, which include Standard TTS and Neural TTS. You also have an opportunity to add voice effects to the speech. This can help in making your videos more outclass and engaging.

Bonus Tip: The Best AI Text to Speech Generator with Multilingual Voices
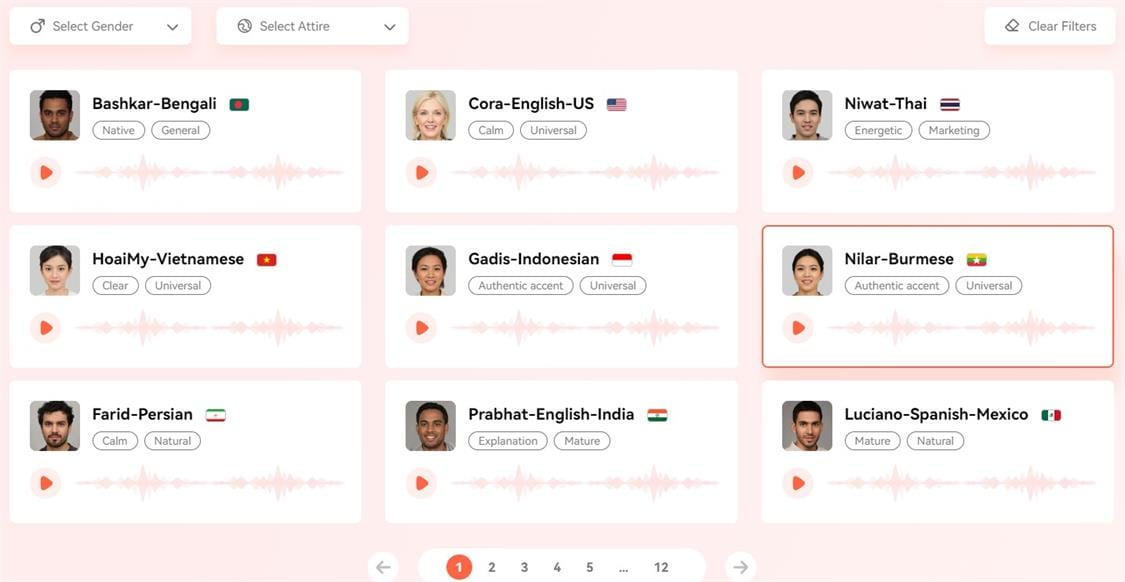
Do you have text that you wish to convert into speech with ease? No worries, because Virbo can help you with this. No matter what type of text you have, it can turn into speech without making any mistakes. In addition, it can also deliver realistic and lifelike performances for you.
There are several types of multilingual voices in it. You can also select the voices by gender or attire. Moreover, it can make copyright-free speeches for you. The audio quality is quite humane and optimized. So, you don’t have to worry about this part in addition. You can also manage the accent to upgrade the quality of your videos.
Key Features of Virbo
- Virbo is a cost-effective tool that also incorporates platform support. You can even use its single premium account on several platforms with ease.
- With Virbo, you can create realistic-looking AI avatar videos . You can also select the orientation of the videos.
- The AI Script feature is handy because you can write scripts on any topic to make videos that engage users easily.
Generate Engaging
AI Video in Minutes!
Easily convert text into professional spokesperson videos in over 120+ voices & languages in minutes.
Generate AI Video Free Generate AI Video Now
Conclusion
In the following article, you have learned all about text-to-speech online tools. Several use cases explain the productivity values of these tools. You can also use the above-discussed top 5 TTS online tools. As for the bonus tip, it has provided the most recommended tool for accomplishing the task of converting text into speech.
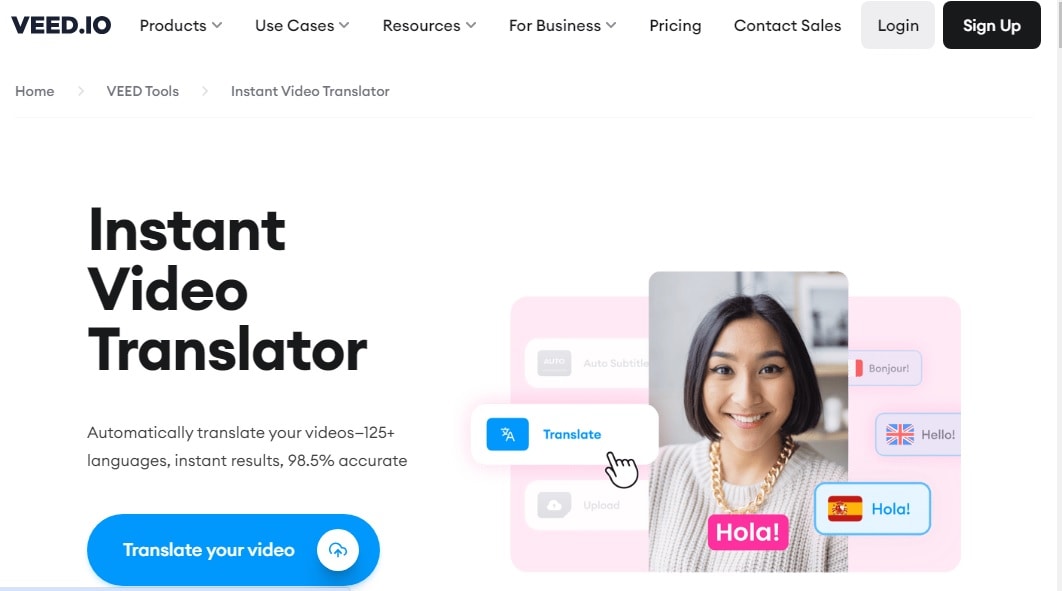
Translate Videos and Subtitles with Veed.io
If you are a multilingual content creator, having a tool like Veed in your arsenal can be pretty useful. It can quickly and accurately translate your videos online. Such translated content can allow you to reach a much wider audience and engage with them in a better way. It’s a powerful tool that can simplify the process of adding subtitles, transcriptions, and translations to your video content. In this article, we will explain how you can utilize Veed io translate feature to stay on top of your game.
Part 1. Veed Translate: Unlocking Language Diversity
Translating videos and adding captions to your YouTube videos makes your content more accessible. You can make content suitable for more social platforms and engage even more audiences. Below are some useful tips for unlocking language diversity with the Veed video translate feature.
Seamless integration with YouTube and other social media platforms
Veed supports seamless integration with all popular social media platforms. With this tool, you can import your videos from YouTube for quick translation, share your translated video directly to Facebook, optimize your video content for TikTok, and do so much more. This ensures you can optimize your content for maximum social media engagement and reach a wider audience.
Contextually relevant and accurate translations
Veed has a fantastic 98.5% accuracy rate when it comes to translations. This means Veed is actually a great alternative to tools like Google Translate that don’t always provide contextually relevant output. It automatically transcribes the audio in your videos into simple text. Afterwards, it synchronizes the generated text with your videos, ensuring accurate and well-timed translations.
Fantastic Editing Tools
Veed gives you complete creative control over the type of content you want to produce and how. It offers a range of editing tools to enhance your video creation process. For instance, it lets you change and customize the font style. You can use fun fonts, spacing, size, colors, etc. You can also add animations and visuals, incorporate templates and do so much more.
Multi-language support and translation service
Veed supports multiple languages. To be more specific, Veed translations are available in 125+ different languages of the world. This makes it easy for you to reach a global audience by creating content that resonates with a diverse audience.
Professional quality output with easy sharing options
Once you are done with your video, you can export it in multiple different formats. For instance, it supports SRT and VTT subtitle files. You can export the text as an SRT file for easy sharing and upload on other platforms, including social media, websites and podcasts etc. There’s also a screen recording option which lets you create pro-grade videos with the help of voiceovers and CC feature.
Generate Engaging
AI Video in Minutes!
Easily convert text into professional spokesperson videos in over 120+ voices & languages in minutes.
Generate AI Video Free Generate AI Video Now
Part 2. Veed.io Translate Video: Step-by-Step Tutorial
Let’s take a look now at the step-by-step tutorial to translate a video with Veed. Note: For this Veed io translate guide, we will be translating a video using Veed on mobile.
Step 1 Launch Veed and Import Your Video
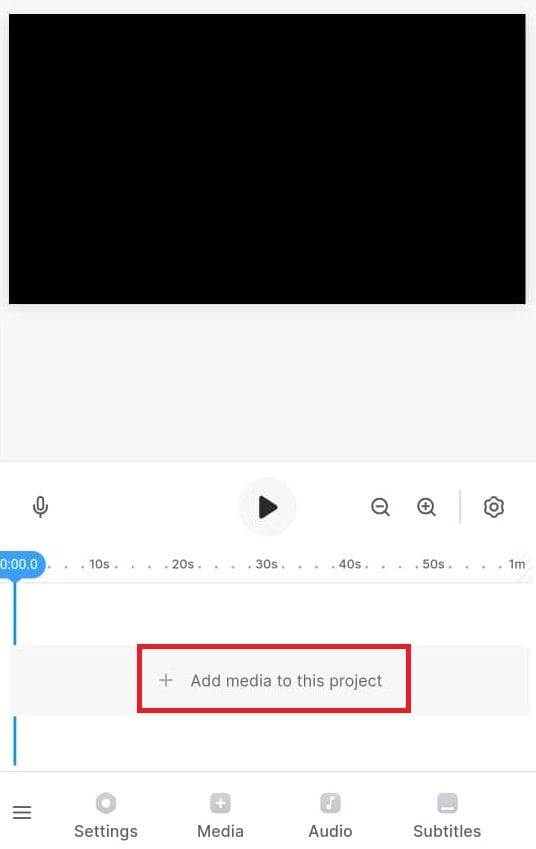
Start Veed and click on the big Add media to this project button you see in the middle. You can add audio, video, or subtitle files to the Veed platform and edit them if you want.
Step 2 Go To Project Settings
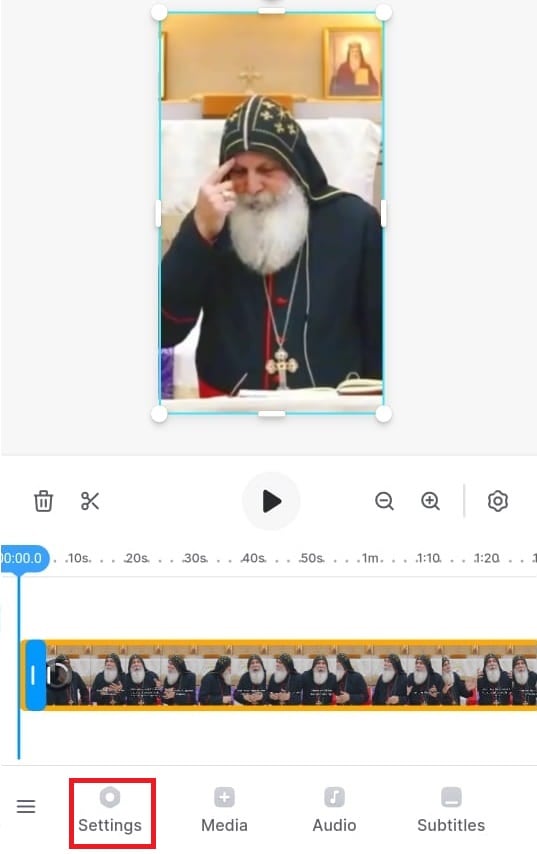
Next, go to your project’s settings by clicking the Settings button on the bottom left corner of the screen.
Step 3 Translate your Voice
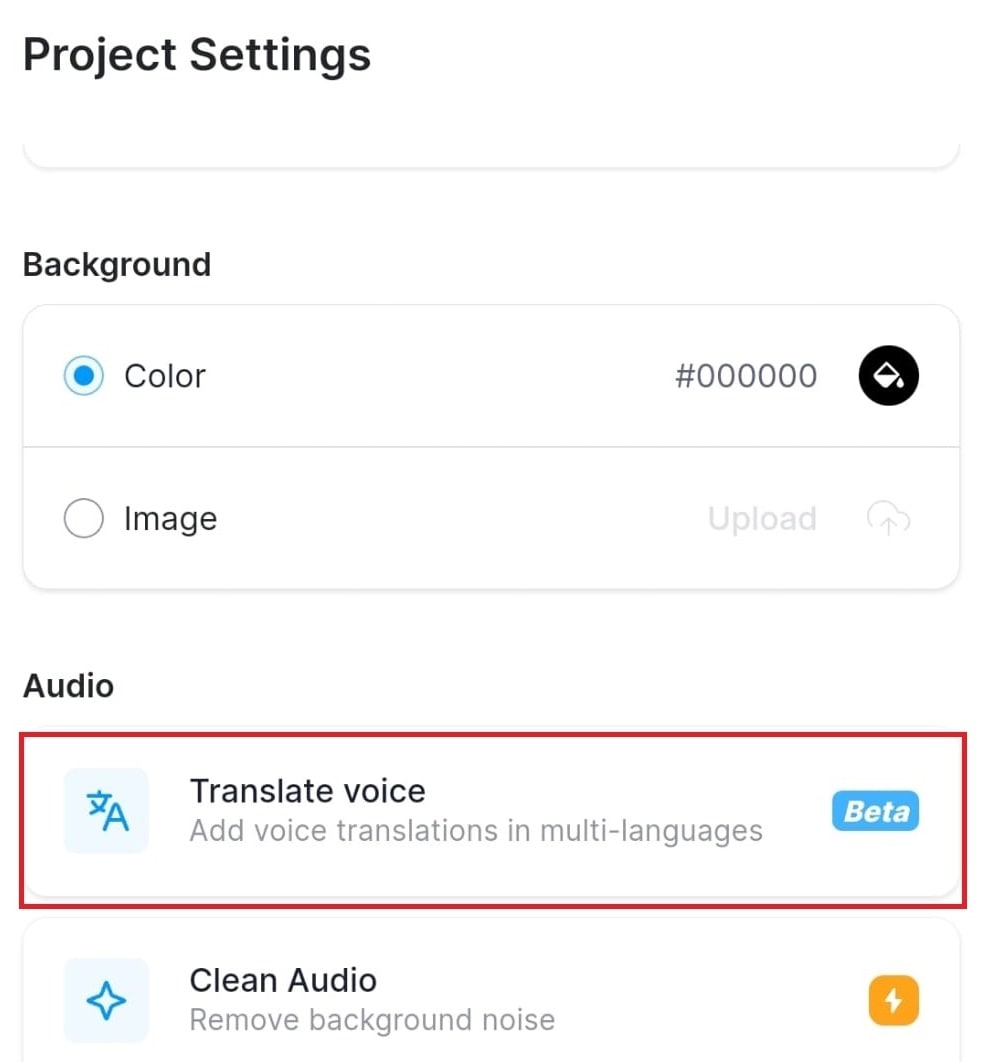
Next, click on the Translate Voice button. Note: Veed supports multiple languages. It lets you translate and then add these translations in multiple languages.
Step 4 Check Your Translation Settings
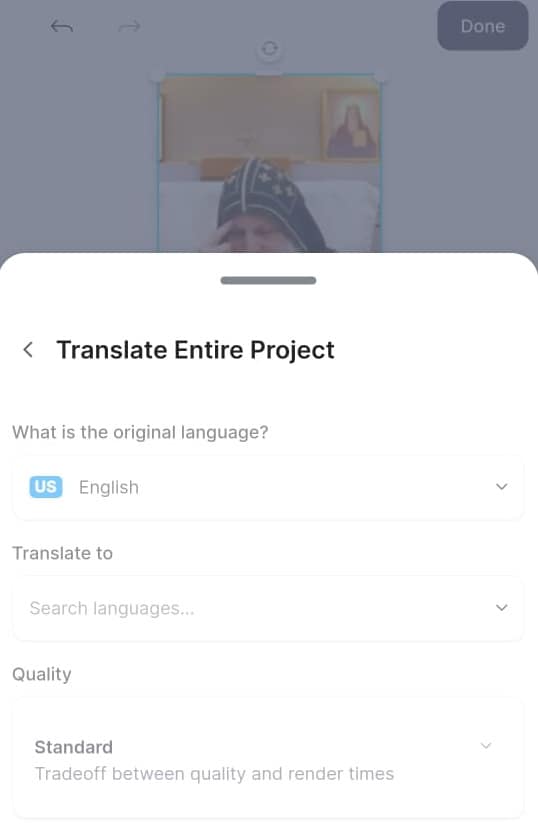
Veed automatically detects the language in the video. So, take a look at all the other settings, like the language you want to translate into and content quality and click Translate. Veed will start generating the translation in your preferred language.
Part 3: The Best Alternative to Veed.io
If you are not satisfied with the features of Veed.io, we have a better solution for you. Wondershare Virbo will prove to be the best alternative to theVeed.io translation tool. Using this advanced tool, you can select from multiple languages to get the desired translations. To carry out the translation process, you can import videos in two different formats, MP4 and MOV.
Other than video translation, users will also be able to carry out subtitle translations using this tool. Plus, this tool offers much more than translation capabilities. You can also utilize this Veed.io translate video alternative to create customized AI videos for different purposes.
Key Features of Wondershare Virbo
- Users will be able to use the lip-sync feature to create translated narrations that match the video.
- Using its talking photo functionality, you can add AI voiceovers in any language to your photos.
- Virbo provides you with an AI script feature to generate writings in multiple languages.
Advantages
- Veed.io provides very restricted minutes of translation under its subscription plans compared to Wondershare Virbo.
- Using the online version of Wondershare Virbo, you can proofread and edit the translated script.
- Veed.io is not available for offline use in Windows operating systems. However, Virbo delivers an efficient offline platform for video translation.
Translate Video Online Download APP Now Free Download
How to Translate Videos With This Veed.io Alternative
You have understood how Virbo is better than the Veed.io translation tool. Let’s analyze the method you can use to translate videos using this tool.
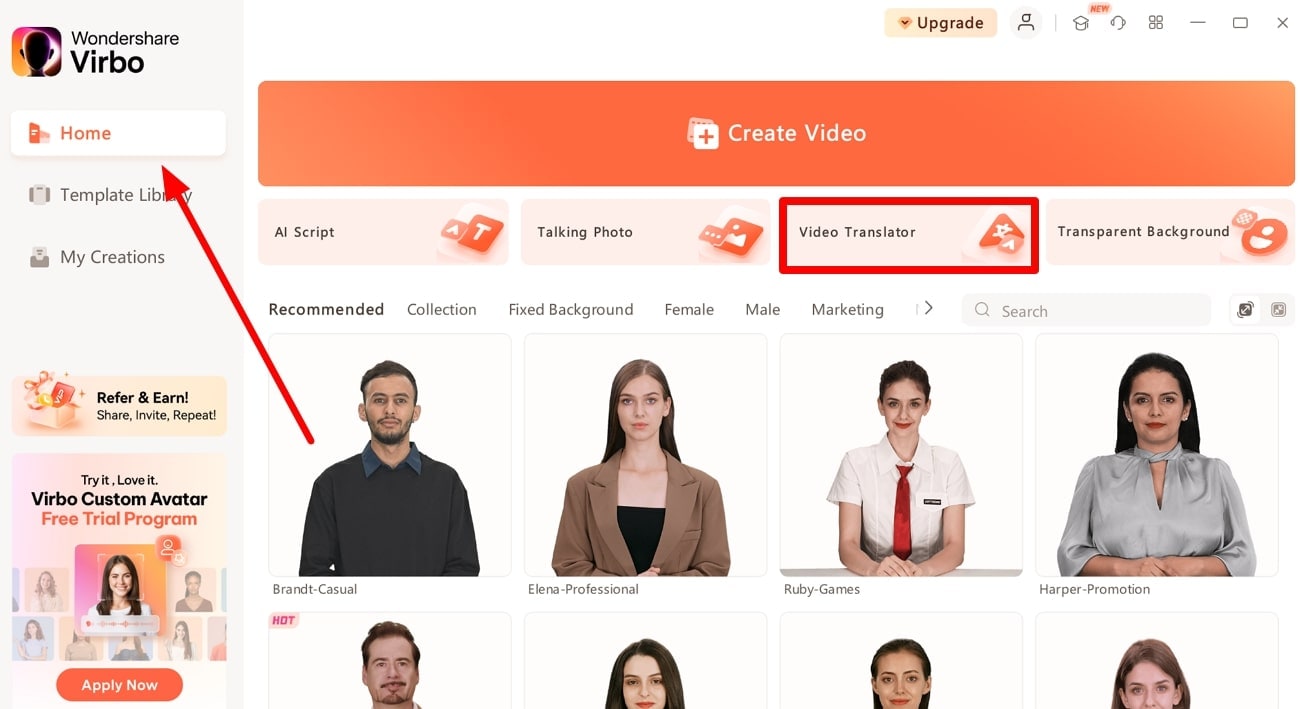
Step 1 Enter the Video Translator Feature from the Home Tab
Once you download Virbo from its official website, launch this Veed.io alternative on your computer. Next, hit the “Video Translator” button from its main interface after accessing the “Home” tab.
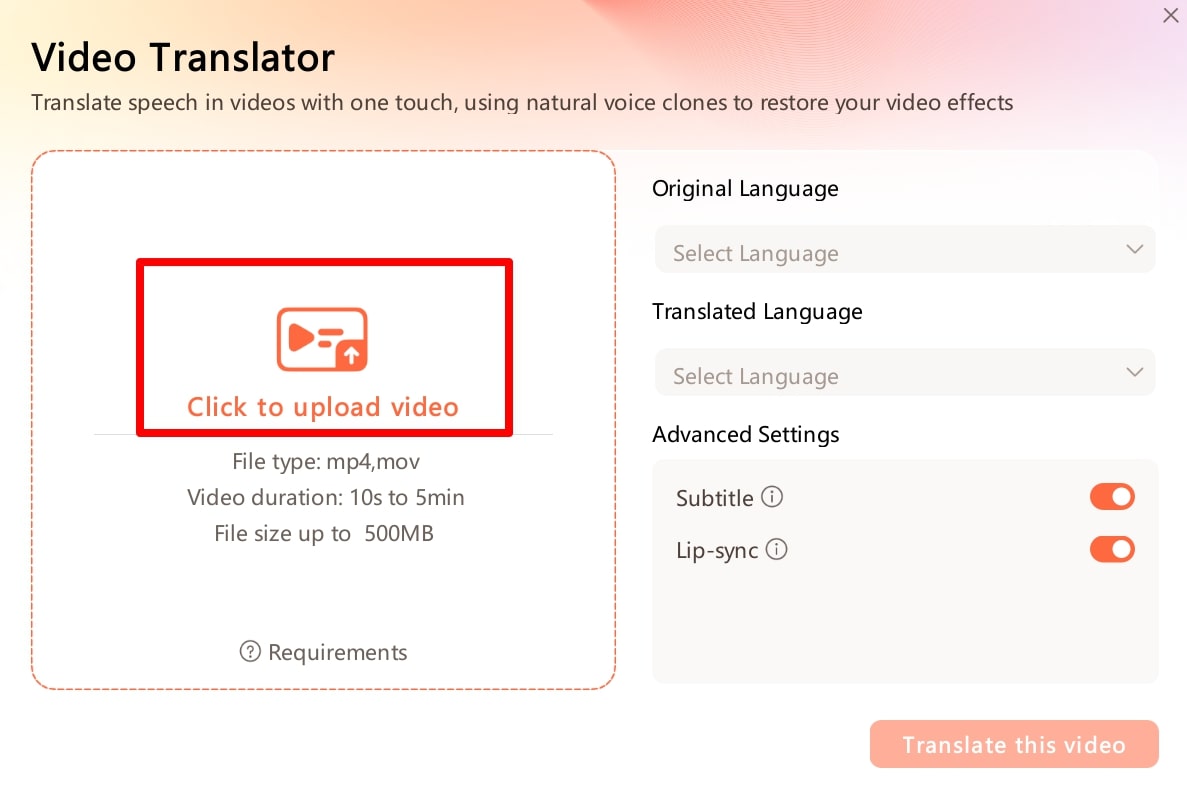
Step 2 Import Your Video to Start the Video Translation Process
Upon entering this feature, click on the “Click to Upload Video” option to add your desired video to the tool. However, there is only an option to import MP4 or MOV videos that are under 5 minutes in length.
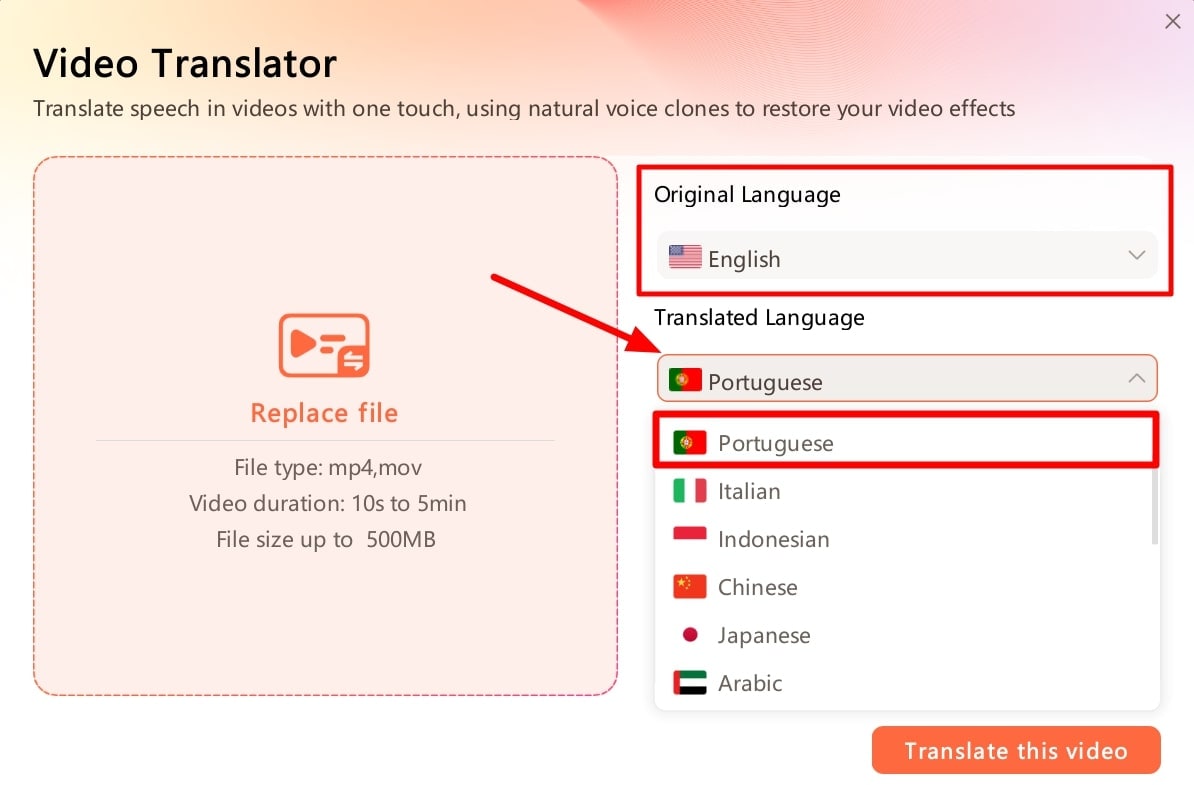
Step 3 Choose the Original and Translated Languages
After importing the video, select the original language of your video from the “Original Language” dropdown menu. Afterward, access the “Translated Language” dropdown menu to choose your desired translation language.
Step 4 Optimize the Advanced Video Translation Settings
Now, you can adjust the advanced settings for your video translation process. For this purpose, turn on the Subtitle option to get the video subtitles translated along with the audio. Also, enable the Lip-Sync option to generate translated audios that align with the video. Finally, hit the Translate This Video button to get your desired translated video.

Translate Video Online Download APP Now Free Download
Part 4. FAQs about Veed.io Subtitle Translation
1. How can I easily translate a video into English or any other language?
You can easily translate a video to 125+ languages of the world, including English, with an online video translator like Veed or Wondershare Virbo.
2. Are Veed translations accurate?
Veed has an accuracy percentage of 98.5, which is fantastic for an online tool. In fact, it is higher than many translation software out there.
3. Can I translate an audio file with Veed?
Yes, of course! You can easily upload any audio file in mp3 format to Veed. It will automatically translate and let you download the text file.
4. How can I download my content after it has been translated?
Simply click on the Download button when you finish the translation process. It takes just one click!
5. What makes Veed different from others?
Veed has many one-click features. For instance, auto subtitles, translations, social media formatting, templates, video compression, etc are all available in one simple click.
6. Can Veed translate subtitles?
Yes, Veed also supports translating subtitles. Simply upload your subtitle file in SRT format and leave the rest to Veed. Veed io subtitle translationis just as accurate as its video translation feature.
7. Is Veed good for editing?
Veed has many exceptional features that make content creation easy. But, it cannot replace a full-fledged video editor or help you create a new video from scratch. This is its biggest disadvantage. If you want to create a video, you can try to use Wondershare Virbo.
Conclusion
All said, Veed is a fantastic tool that makes translation into multiple languages as easy as possible. You can use the Veed translate feature to translate your video content into 125+ languages of the world, making it accessible to a larger audience. Videos in local languages get more engagement than those without because people can closely relate with the content. By adding captions in other languages, you can engage audiences from those countries, Veed supports an extensive range of content creators with their creative projects. What should you do if you want to create a video from scratch or want to try another alternative to translate video? Just try Wondershare Virbo!
Translate Video Online Download APP Now Free Download
Best 10 Animated Explainer Video Examples
There are a ton of explanatory videos available online. There is no need to inspect every one of them since it is impossible to do so. The finest animated explainer videos may be seen and examined to learn the key points and takeaways that will assist you in producing your own masterpiece. We’ve compiled the top 10 animation explainers in this guide. Find out your favorite one here.
Part 1: Best 10 Animated Explainer Video Examples
Videos may be used as a tool to grow an audience’s loyalty, enhance conversions, or draw in new clients. It’s a fantastic approach to increase brand recognition and customer loyalty. To learn how other companies have created explainer films, we advise viewing some of the greatest ones currently available. These 10 explainer video examples are ones we recently came across and would want to share with you. Let’s think about these wonderful videos and why we love them without further ado.
1. Microsoft Office 365
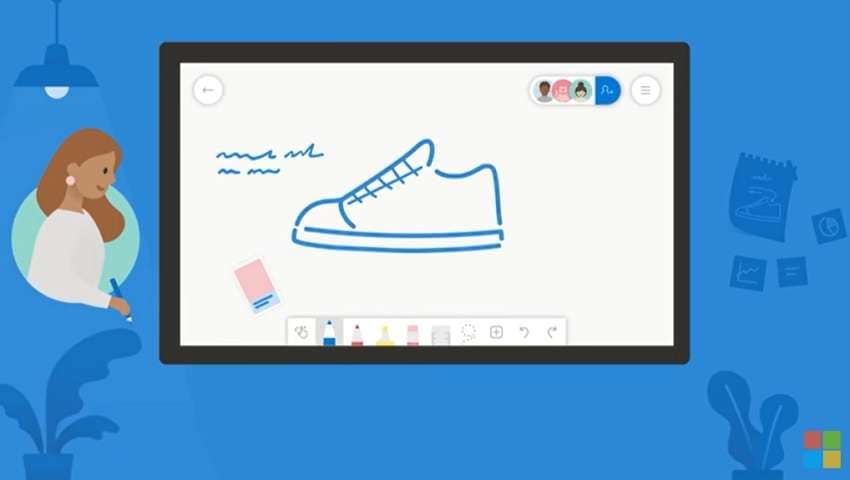
Although Microsoft does not need an introduction, its services or products do. The full functionality of Office 365 is described in this video. We are aware that the simplicity of this video animation is precisely what we like about it. The explainer film made by the Microsoft team is the ideal example of what one should include.
With the help of amazing characters, this 30-second animation showcases Microsoft Whiteboard’s advantages and shows how to use it. The reason In a Nutshell is at the top of our list of the best animated explainer films is because they consistently provide the most aesthetically attractive videos.
2. Making Teamwork Click
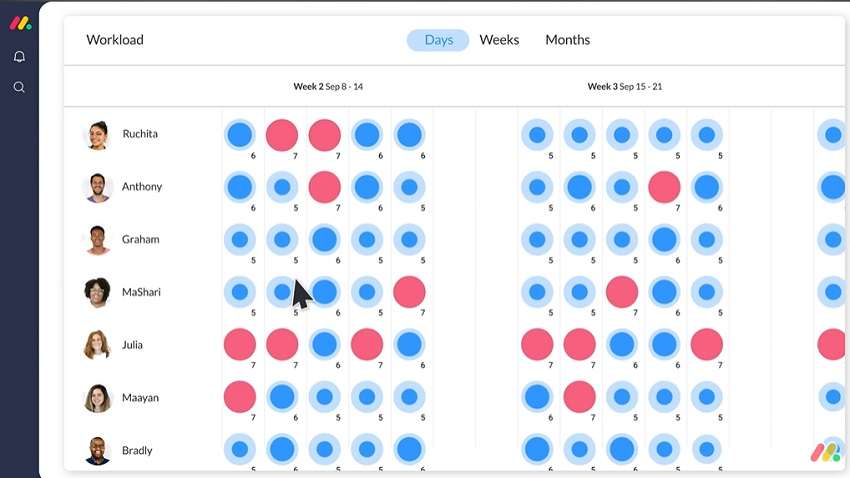
You know why this is one of the finest explanation videos we’ve ever seen? the animated explainer backdrop. There is no question about the quality of the animation, but pay attention to how the music precisely reflects the development of the narrative and gives it a new depth without interfering with the narration.
Each year, businesses produce tens of thousands of explainer films, some of which are excellent and some of which are among the greatest ever made. Making Teamwork Click is just one of them. The basic backdrop and figures used here wonderfully complement the animation, which keeps your focus on the app.
3.Ahrefs
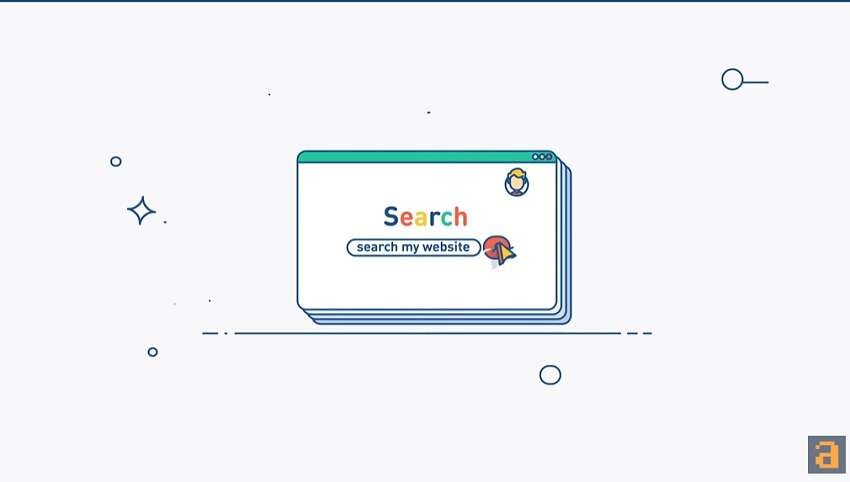
Ahrefs is a collection of SEO tools. In terms of managing SEO, the video demonstrates how to utilize and benefit from the tool. An adorable and enjoyable animation goes horizontally to the right as the pieces in the Ahrefs explanation video leap up and down on the screen. Cool cinematography with a horizontal pan to the right, cute effects, and smooth transitions. There is creative typography on it.
Ahrefs has effectively disproven the notion that a company’s brand is too corporate for animated explainer films. This animated software demo film demonstrates that combining stylish transitions with educational material is a pretty smart concept. We believe that this video’s straightforwardness makes the use of animation ideal for the message it is trying to express.
4. McDonald’s Going Tech
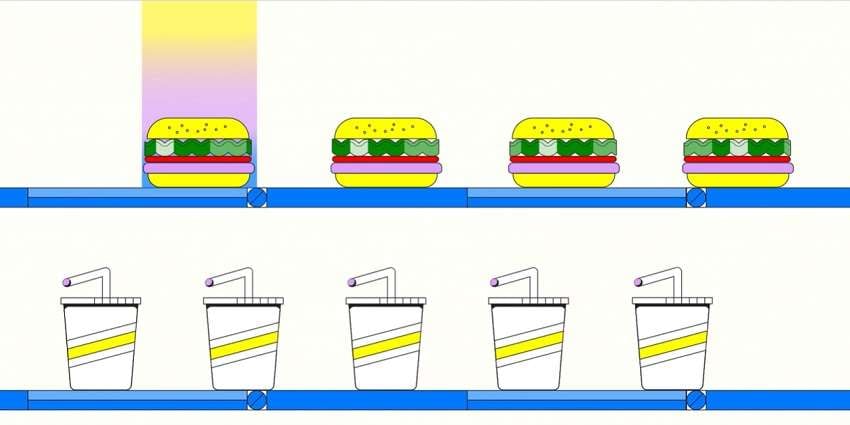
This explainer video is in a distinct manner. Although it’s difficult to construct an animated explanation video, McDonald’s smooth animation makes it seem possible. To help users understand how to redeem offers on the McDonald’s app, a humorous, daring character-driven explainer video animation was produced. The basic backdrop and figures used here wonderfully complement the animation, which keeps your focus on the app.
Since videos that make viewers feel something are quite popular, we had to include this one on our list. Videos that evoke emotion in the viewer tend to be very popular, which is why we had to have this video on our list.
5. Purina One
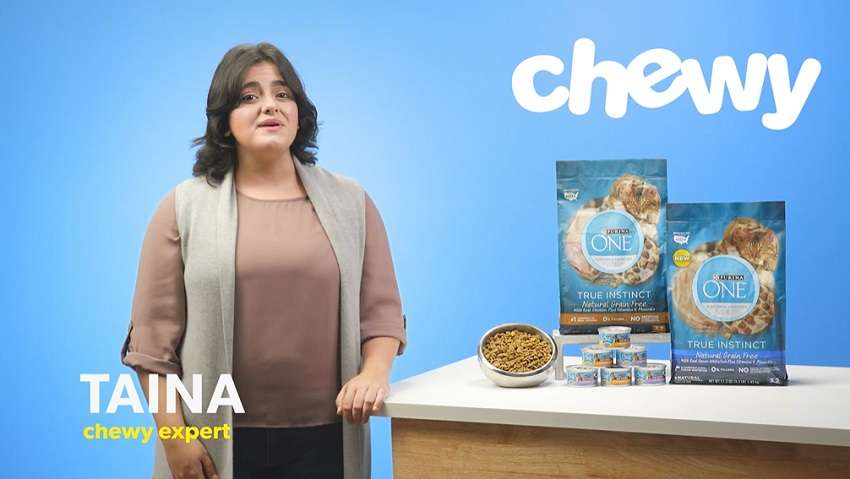
The greatest illustrated characters are those that are specifically made for a company. While the voiceover promotes Purina cat food, the cat and its owner are amicable and attractive to look at. We’re certain that this is one of our greatest animated explainer films since it has a properly written narrative, a lively vocal, and eye-catching image.
Your video marketing plan won’t be the same after you comprehend the power of videos and can determine if a certain video is beneficial or not. Acknowledging your errors also helps. This explainer film is the ideal demonstration of what a 2D animated explainer video looks like. Despite the app’s specialized purpose, its designers continue to convey their essential points via 2D animation. And it looks fantastic!
6.Meet Asana

Explainer videos that are animated give you a lot of creative flexibility. Just take a look at this example’s fantastic style; it is so distinctive that the writing is immediately unforgettable. This proves that your video style can be customized to meet your tone and image regardless of the sector you work in.
When it comes to producing the best animation, these people consistently outperform the competition, particularly when animation is used to promote the introduction of their most recent goods. In this film, live-action footage is mixed with quirky animated text and graphics.
7.Slack for Sales Teams
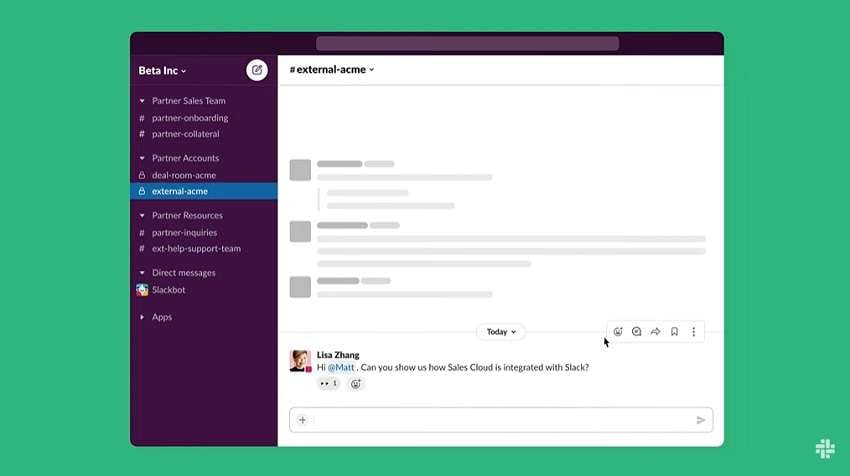
This next video was produced by the Slack team. This is another contender for the best explainer video that explains the ins and outs of intangible things using animated characters or objects for marketers. The usage of the brand’s colors to make this item instantly recognized and memorable improves it even more.
The Slack marketing team done a terrific job of simplifying their sophisticated software solution into an engaging explanation film. The Slack team produced an animated explainer film that is both true to their brand and appropriate for a current audience by combining their chosen color scheme with contemporary iconography and smooth transitions.
8. HonestGorilla Explainer Video

Next, we have an excellent example of 2D video animation. This animated film was made for HonestGorilla, an energy firm that encourages customers to compare energy providers rather than just choosing the first one they see. It’s funny, educational, and snappy; everything a good video animation should be.
Each scenario in this film is realistic, with animation serving merely as a supplemental technique. Because of its vibrant visual aesthetic and amazing level of information, it is straightforward, peaceful but intriguing, and stunning.
9. Cisco Communication Network
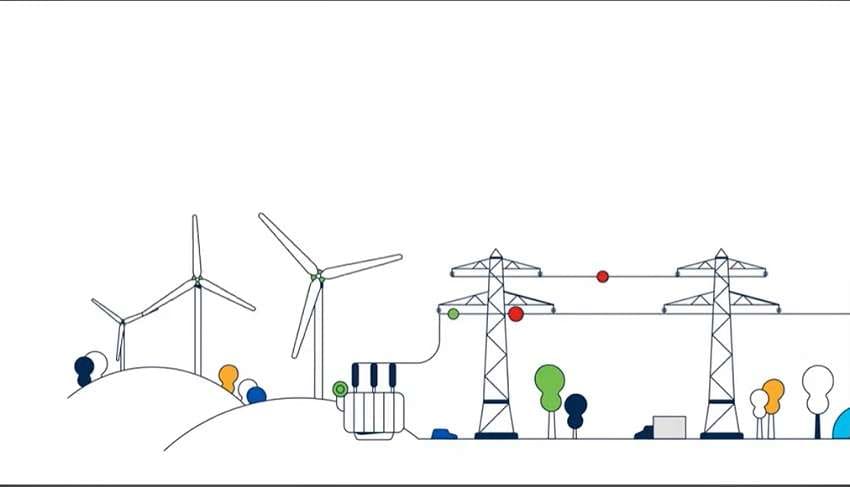
It’s not a simple task to describe a digital grid’s operation and make it obvious how consumers might profit from it. Nevertheless, the people at Cisco are able to do so effectively because of the educational effectiveness of explainer films. This clip does a great job of taking us on a trip while clearly articulating the issue it answers as well as the solution itself.
We are interested in the footage at all times. This animated explainer movie serves as an example of an excellent piece of content that can be utilized for business websites as well as other social media platforms.
10. Hellosign
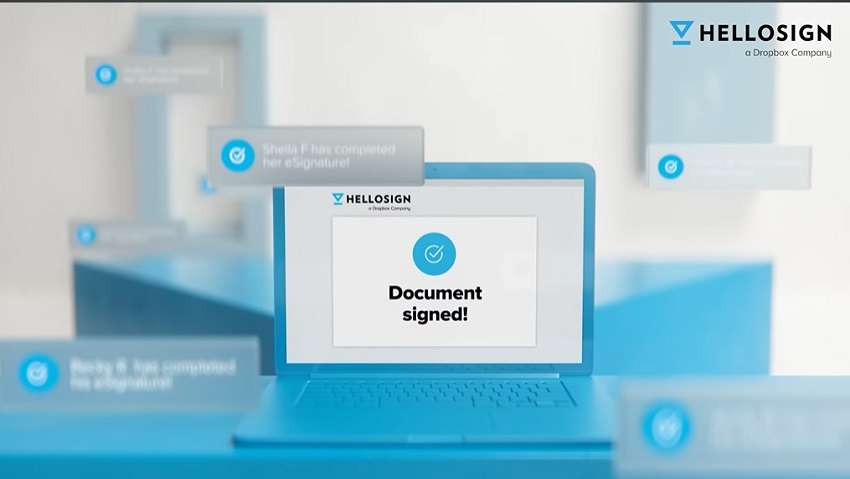
When you have a strong CTA, sometimes less is more! HelloSign, an eSignature provider, has opted to highlight exactly the key benefit of their offer in this explainer video sample. In this method, they may quickly pique interest and effectively express their point. The Call-To-Action at the conclusion, which urges the viewer to test out the program, is what really seals the deal.
The art style is mostly composed of a violet color scheme, which is complimented by other hues that are often connected to the idea of data.
Part 2: Bonus Tip for Making Animated Explainer Videos
If you’re here, you presumably already know about all the wonderful advantages of animated explainer video maker for reaching audiences and persuading viewers to take action. However, before you begin producing your own assets, you must be aware of the finest tool at your disposal in order to complete the explainer films successfully. In that lieu, we’veVirbo as the top-notch animated explainer video production tool.
Get Started Online Free Download
Virbo comes with a set of AI-based features that can make your animated explainers compelling as well as creative at its level best. We hope that you’ve noted your Favorite animated explainer since each of the above-mentioned videos has something to teach and provide inspiration for future work. After that, Virbo is your key to making one you liked the most.
Here are some of its characteristics that you should know before proceeding with your animated explanation video making.
Key Features:
Add Voiceover and Music:

With Virbo, you can select a voice actor who is appropriate for your video, and then add sound and music to complete the piece. It also supports AI-backed voices and automated scripting that you can utilize to captivate your audience with favorite voiceovers.
Template Customizations:
Various genres and around 150+ types of animation templates are available in Virbo. You may produce in your animated explainers in stop motion, 3D, or 2D. Even if it might have a serious or comedic context, Virbo provides you the way for it. Simply, choose a theme that appeals to your organization and customize it accordingly.
Widely Supportable:

Virbo makes sure you can create your animated explainers’ videos from any operating system device. It has a seamless support for Windows, Mobile and online users.
Share with All Audiences:
The best place to start is by choosing a certain demographic since it will help you keep your message on target. Talking of which, Virbo gives you the audacity to share your animated explainers with audiences around the internet. It gives you a vast exporting and sharing options to share your videos on-the-go.
Make an AI-powered CTA:
The most successful explainer films feature a strong call to action. With Virbo, you can make sure the action you want people to do is obvious. Whether you want the viewers to visit your website, subscribe, or fill out a form, you can count on 180+ Virbo templates along with royalty-free music.
Conclusion:
It’s difficult to start from zero when making animated video explainers, particularly if you’ve never done it before. You need inspiration, and there is no greater source of it than animated explainer video production companies that have been using this kind of videos for some time. The aforementioned examples have shown that there are several methods to create the tone of your explanation.
No matter what sector of company ownership you are in, whether SaaS, healthcare, technology, real estate, education, or non-profit, an animated explainer film will pay for itself. We’d say you’re in luck if you came on this article after searching the web for the finest explainer videos. Furthermore, whichever animated explainer you’ve decided to work on, Virbo makes it handy for you to create it. Try it out and get started with your explainer video production.
Launching Your Live Room
Launching Your Live Room
Explore step-by-step instructions on decorating your space, uploading local images and videos, adding engaging AI interactions, etc. Elevate your streaming experience and captivate your audience with a seamlessly executed live room. Dive into our comprehensive guide now!
02Uploading Local Images and Videos
07AI Intelligent Script Generation
11Starting/Ending the Live Broadcast
Decorating Your Live Room
Decoration Guidance
- Click on the product homepage and create a blank live room to initiate a new live session.

Create a blank live room
- Upon creating a blank live room, the live room editing page will open. The left side serves as the operation area, the right side as the canvas area, and the materials area is located above.

Livestream room navigation
- Click on the templates to use pre-designed combinations of background, virtual hosts, and stickers.

Select a template
- Customize the background from the background library. During the live broadcast, only one background can be used.

Livestream room customization
- Choose a virtual host from the virtual host library. Only one virtual host can be used during the live session.
![]()
Choose a virtual host
- Add stickers from the sticker library. Multiple stickers can be used during the live broadcast.
- After selecting materials, adjust their position and size in the canvas area. Right-click to modify layers, copy, or delete materials.
Uploading Local Images and Videos
Upload background images or videos
- Upload: Click Background -> Upload Background -> Select file to upload. Materials will be displayed in “My Background” after uploading.

Upload Background
- Apply: Click Background -> My Background, then click on the material to use it on the canvas.
- Delete: Hover over the material and click the delete icon to remove it.

Delete Background
Note
Background upload requirements:
- Image and video dimensions should be 9:16
- Image formats: JPG/JPEG/PNG
- Video formats: MP4/MOV
- Resolution should not exceed 1080P
- Video duration should not exceed 30 minutes
- File size should not exceed 1GB
Upload sticker images or videos
- Upload: Click Sticker -> Upload Sticker -> Select file to upload. Materials will be displayed in “My Sticker” after uploading.

Upload Sticker
- Apply: Click Sticker -> My Sticker, then click on the material to use it on the canvas.
- Delete: Click Sticker -> My Sticker, hover over the material, click the delete icon to remove it.

Delete Sticker
Note
Sticker upload requirements:
- Image and video dimensions are flexible.
- Image formats: JPG/JPEG/PNG
- Video formats: MP4/MOV
- Resolution should not exceed 1080P
- Video duration should not exceed 30 minutes
- File size should not exceed 1GB
Text-Driven Live Room
Script Guidance
- Input script text: Copy and paste your script into the script dialogue box.

Text Scripts Inset
- Choose a matching tone: Click the voice-over entrance above, select a suitable tone, and preview it.
- Preview: Click the “Preview” button below the text to listen.
Audio-Driven Live Room
Audio Guidance
- Upload audio: Click Script -> Audio -> Upload local voice and upload the local file.

Upload Audio
- Preview audio: After uploading, click to preview the audio.

Preview Audio
- Audio sorting: Hold and drag to sort the audio files.

Audio sorting
- Audio sorting: Hold and drag to sort the audio files.

Modifying Live Room Name
Method Guidance
- Method 1: Click the edit button in the upper-left corner of the edit page to rename the live room.

Rename Livestream Room
- Method 2: Product homepage -> My Live Rooms -> Click on the more options for an individual live room -> Choose Rename.
Adding AI Identification
Step Guidance
- On the live room editing page, click on the checkbox before the AI identification to enable or disable it.
AI Intelligent Script Generation
Generation Guidance
- Click the “AI Intelligent Script” button below the script, a popup will appear.
- Enter your product name (mandatory), selling points (optional), promotional information (optional), select language and style, then click generate.

AI Script
- The generated result can be further modified, click “Use” to add it to the script dialogue box.
AI Translation
Translation Guidance
- Click the “AI Translation” button below the script, a popup will appear.
- Place the text to be translated on the left, click the middle arrow to select the language for translation (e.g., English), and click translate.

AI Translation
- The generated result can be further modified, click “Use” to add it to the script dialogue box.

AI Translation Result
Manual Interaction
Microphone Interaction
- Operational Flow:
- Click Manual Interaction -> Microphone, and select the microphone device.
- Speak into the microphone and observe the sound wave status.
- Open “Start Live,” wait for the appearance of the virtual host image, and click “Open Mic Takeover.” The virtual host’s mouth will be closed, and your voice will drive the virtual host to speak.
- After speaking, click “End Takeover,” and the virtual host will resume reading the scripted dialogue.
- Click Manual Interaction -> Microphone, and select the microphone device.
- Grant Browser Microphone Access:
- Google Chrome:
*Open Chrome, click the settings icon in the top right.
* Click “Settings,” open the settings page. Select “Privacy and Security” and then click “Site Settings.”
*Enter the site settings page, click “Microphone.”
* On the microphone authorization page, select that the site can request the use of your microphone.
* After these settings, when the browser needs to use the camera or microphone, a device request box will pop up on the page. Select “Allow.” - Mozilla Firefox:
*Open Firefox, click the settings icon in the top right, and click “Settings.”
* Open the settings page, click “Privacy & Security,” and find “Microphone Permissions.” Click “Settings” next to “Microphone.”
*Enter the settings page, add the site that requests the use of your microphone to the list, and click “Save Changes.”
* After these settings, when the browser needs to use the camera or microphone, a device request box will pop up on the page. Select “Allow.” - Sogou Browser:
*Open Sogou Browser, click the settings icon in the top right, and click “Options.”
* Open the options page, click “Advanced,” find “Privacy - Browsers on the Mac System:
*Locate “System Preferences” on your Mac dock and click the icon. Once opened, find “Security & Privacy” and click to open.
* On the “Security & Privacy” page, select “Privacy,” then click on “Microphone” and set the applications that need to use the microphone to “Allow.”
- Google Chrome:
Text Interaction
- Click on “Artificial Interaction” and enter interaction scripts in the input box below.
- Click “Add Text” to add it to the interaction list. After starting the live broadcast, each interaction script will have a send button.

Text Interactionn
- Click “Send” to trigger the AI to speak according to the interaction script.
Intelligent Interaction
Note
The current intelligent interaction feature only supports Alibaba International. If you are streaming on other platforms, you can skip this step.
Setting Entrance
- On the live broadcast page, click on “Intelligent Interaction,” select the live platform, and the supported intelligent interaction features will be randomly displayed.
Q&A Library Settings
- Creating a New Q&A:
- On the product homepage, click on Q&A Library - Add Q&A, and a popup window will appear.
- Fill in the rule name, keywords, reply text, and upload a reply video. Click Save.
Note
Rule Name: Name the rule for easy identification.
Keywords: If a viewer’s question in the live room contains any of these keywords, it will trigger the AI to answer.
Reply Content: You can add up to 5 replies. Include variables like [Viewer’s Nickname] and [Viewer’s Country] for personalized responses.
Sequential Reply: Replies in sequence when triggered.
Random Reply: Randomly selects a reply when triggered.
Reply Video: If configured, the video will be displayed at the specified position until the AI’s reply ends.
- Adjusting Q&A Activation Status:
- Click Q&A Library - Switch to close or open the Q&A rule. When closed, the Q&A rule will not take effect after the live broadcast starts.
- Turning on Q&A Library Switch in the Live Room:
- On the live broadcast editing page, click Intelligent Interaction - Platform, select “Alibaba International,” and turn on the Q&A Library switch. This must be done after starting the live broadcast and capturing the barrage for the function to work.
Greeting Rules Settings
- Greeting Content: You can add up to 5 replies, including variables like [Viewer’s Nickname] and [Viewer’s Country].
- Sequential Reply: Replies in sequence when triggered.
- Random Reply: Randomly selects a reply when triggered.
- On the live broadcast editing page, click Intelligent Interaction - Platform, select “Alibaba International,” turn on the Greeting switch, and click the edit icon to open the editing window. Fill in the reply text and click Save.
Sending Business Cards and Product Catalogs
- On the live broadcast editing page, click Intelligent Interaction - Platform, select “Alibaba International,” turn on the “Send Business Cards” switch, and turn on the “Send Product Catalogs” switch.
Note
These functions will only take effect after starting the live broadcast and capturing the barrage.
How to Start Live Barrage Capture
- Start Broadcasting in Virbo Live
- Follow the steps for “Start/End Broadcast” on the live broadcast editing page.
- Install the Plugin in Chrome
- Ensure Chrome is up to date, then download the plugin from the provided link . After downloading, unzip locally.
- Configure the Plugin in Chrome
- Open Chrome, go to Settings - Extensions - Manage Extensions, enable Developer mode, click “Load Unpacked,” and select the unzipped folder. Enable “Allow in incognito mode” in the plugin details.
- Copy the Live Control Page Link
- Copy the link of your live control page (web version) from the live platform. Paste the link into the live broadcast editing page under Intelligent Interaction - Live Room Link Input, then click “Start Capturing.”
Note
Alibaba International currently supports automatic Q&A, automatic greetings, automatic business card sending, and automatic product catalog sending. You can turn on the corresponding switches and then configure the detailed settings for each item.
Starting/Ending the Live Broadcast
Starting the Live Broadcast
- On the live broadcast editing page, click “Start Broadcasting.”
- The AI live broadcast window will appear shortly after, displaying the AI live broadcast.
Using Your Broadcasting Partner or OBS
Note
Keep the AI live broadcast window open on the desktop during the broadcast, or it will not broadcast properly.
- Open your broadcasting partner or OBS, add a window, select the Wondershare VVB (Live Version) live window.
- Click “Start Broadcasting.” Use Alt + mouse to crop out the web bar or use the zoom function to remove it.
- During the live broadcast, you can only modify the “Artificial Interaction” function; other broadcast settings cannot be changed.
Ending the Broadcast
- When concluding the live broadcast, initiate the termination of the live stream on the platform’s broadcasting partner first, followed by clicking the “End Live” button on Virbo Live to finalize the shutdown process.
02Uploading Local Images and Videos
07AI Intelligent Script Generation
11Starting/Ending the Live Broadcast
Decorating Your Live Room
Decoration Guidance
- Click on the product homepage and create a blank live room to initiate a new live session.
Create a blank live room
- Upon creating a blank live room, the live room editing page will open. The left side serves as the operation area, the right side as the canvas area, and the materials area is located above.
Livestream room navigation
- Click on the templates to use pre-designed combinations of background, virtual hosts, and stickers.
Select a template
- Customize the background from the background library. During the live broadcast, only one background can be used.
Livestream room customization
- Choose a virtual host from the virtual host library. Only one virtual host can be used during the live session.
![]()
Choose a virtual host
- Add stickers from the sticker library. Multiple stickers can be used during the live broadcast.
- After selecting materials, adjust their position and size in the canvas area. Right-click to modify layers, copy, or delete materials.
Uploading Local Images and Videos
Upload background images or videos
- Upload: Click Background -> Upload Background -> Select file to upload. Materials will be displayed in “My Background” after uploading.
Upload Background
- Apply: Click Background -> My Background, then click on the material to use it on the canvas.
- Delete: Hover over the material and click the delete icon to remove it.
Delete Background
Note
Background upload requirements:
- Image and video dimensions should be 9:16
- Image formats: JPG/JPEG/PNG
- Video formats: MP4/MOV
- Resolution should not exceed 1080P
- Video duration should not exceed 30 minutes
- File size should not exceed 1GB
Upload sticker images or videos
- Upload: Click Sticker -> Upload Sticker -> Select file to upload. Materials will be displayed in “My Sticker” after uploading.
Upload Sticker
- Apply: Click Sticker -> My Sticker, then click on the material to use it on the canvas.
- Delete: Click Sticker -> My Sticker, hover over the material, click the delete icon to remove it.
Delete Sticker
Note
Sticker upload requirements:
- Image and video dimensions are flexible.
- Image formats: JPG/JPEG/PNG
- Video formats: MP4/MOV
- Resolution should not exceed 1080P
- Video duration should not exceed 30 minutes
- File size should not exceed 1GB
Text-Driven Live Room
Script Guidance
- Input script text: Copy and paste your script into the script dialogue box.
Text Scripts Inset
- Choose a matching tone: Click the voice-over entrance above, select a suitable tone, and preview it.
- Preview: Click the “Preview” button below the text to listen.
Audio-Driven Live Room
Audio Guidance
- Upload audio: Click Script -> Audio -> Upload local voice and upload the local file.
Upload Audio
- Preview audio: After uploading, click to preview the audio.
Preview Audio
- Audio sorting: Hold and drag to sort the audio files.
Audio sorting
- Audio sorting: Hold and drag to sort the audio files.
Modifying Live Room Name
Method Guidance
- Method 1: Click the edit button in the upper-left corner of the edit page to rename the live room.
Rename Livestream Room
- Method 2: Product homepage -> My Live Rooms -> Click on the more options for an individual live room -> Choose Rename.
Adding AI Identification
Step Guidance
- On the live room editing page, click on the checkbox before the AI identification to enable or disable it.
AI Intelligent Script Generation
Generation Guidance
- Click the “AI Intelligent Script” button below the script, a popup will appear.
- Enter your product name (mandatory), selling points (optional), promotional information (optional), select language and style, then click generate.
AI Script
- The generated result can be further modified, click “Use” to add it to the script dialogue box.
AI Translation
Translation Guidance
- Click the “AI Translation” button below the script, a popup will appear.
- Place the text to be translated on the left, click the middle arrow to select the language for translation (e.g., English), and click translate.
AI Translation
- The generated result can be further modified, click “Use” to add it to the script dialogue box.
AI Translation Result
Manual Interaction
Microphone Interaction
- Operational Flow:
- Click Manual Interaction -> Microphone, and select the microphone device.
- Speak into the microphone and observe the sound wave status.
- Open “Start Live,” wait for the appearance of the virtual host image, and click “Open Mic Takeover.” The virtual host’s mouth will be closed, and your voice will drive the virtual host to speak.
- After speaking, click “End Takeover,” and the virtual host will resume reading the scripted dialogue.
- Click Manual Interaction -> Microphone, and select the microphone device.
- Grant Browser Microphone Access:
- Google Chrome:
*Open Chrome, click the settings icon in the top right.
* Click “Settings,” open the settings page. Select “Privacy and Security” and then click “Site Settings.”
*Enter the site settings page, click “Microphone.”
* On the microphone authorization page, select that the site can request the use of your microphone.
* After these settings, when the browser needs to use the camera or microphone, a device request box will pop up on the page. Select “Allow.” - Mozilla Firefox:
*Open Firefox, click the settings icon in the top right, and click “Settings.”
* Open the settings page, click “Privacy & Security,” and find “Microphone Permissions.” Click “Settings” next to “Microphone.”
*Enter the settings page, add the site that requests the use of your microphone to the list, and click “Save Changes.”
* After these settings, when the browser needs to use the camera or microphone, a device request box will pop up on the page. Select “Allow.” - Sogou Browser:
*Open Sogou Browser, click the settings icon in the top right, and click “Options.”
* Open the options page, click “Advanced,” find “Privacy - Browsers on the Mac System:
*Locate “System Preferences” on your Mac dock and click the icon. Once opened, find “Security & Privacy” and click to open.
* On the “Security & Privacy” page, select “Privacy,” then click on “Microphone” and set the applications that need to use the microphone to “Allow.”
- Google Chrome:
Text Interaction
- Click on “Artificial Interaction” and enter interaction scripts in the input box below.
- Click “Add Text” to add it to the interaction list. After starting the live broadcast, each interaction script will have a send button.
Text Interactionn
- Click “Send” to trigger the AI to speak according to the interaction script.
Intelligent Interaction
Note
The current intelligent interaction feature only supports Alibaba International. If you are streaming on other platforms, you can skip this step.
Setting Entrance
- On the live broadcast page, click on “Intelligent Interaction,” select the live platform, and the supported intelligent interaction features will be randomly displayed.
Q&A Library Settings
- Creating a New Q&A:
- On the product homepage, click on Q&A Library - Add Q&A, and a popup window will appear.
- Fill in the rule name, keywords, reply text, and upload a reply video. Click Save.
Note
Rule Name: Name the rule for easy identification.
Keywords: If a viewer’s question in the live room contains any of these keywords, it will trigger the AI to answer.
Reply Content: You can add up to 5 replies. Include variables like [Viewer’s Nickname] and [Viewer’s Country] for personalized responses.
Sequential Reply: Replies in sequence when triggered.
Random Reply: Randomly selects a reply when triggered.
Reply Video: If configured, the video will be displayed at the specified position until the AI’s reply ends.
- Adjusting Q&A Activation Status:
- Click Q&A Library - Switch to close or open the Q&A rule. When closed, the Q&A rule will not take effect after the live broadcast starts.
- Turning on Q&A Library Switch in the Live Room:
- On the live broadcast editing page, click Intelligent Interaction - Platform, select “Alibaba International,” and turn on the Q&A Library switch. This must be done after starting the live broadcast and capturing the barrage for the function to work.
Greeting Rules Settings
- Greeting Content: You can add up to 5 replies, including variables like [Viewer’s Nickname] and [Viewer’s Country].
- Sequential Reply: Replies in sequence when triggered.
- Random Reply: Randomly selects a reply when triggered.
- On the live broadcast editing page, click Intelligent Interaction - Platform, select “Alibaba International,” turn on the Greeting switch, and click the edit icon to open the editing window. Fill in the reply text and click Save.
Sending Business Cards and Product Catalogs
- On the live broadcast editing page, click Intelligent Interaction - Platform, select “Alibaba International,” turn on the “Send Business Cards” switch, and turn on the “Send Product Catalogs” switch.
Note
These functions will only take effect after starting the live broadcast and capturing the barrage.
How to Start Live Barrage Capture
- Start Broadcasting in Virbo Live
- Follow the steps for “Start/End Broadcast” on the live broadcast editing page.
- Install the Plugin in Chrome
- Ensure Chrome is up to date, then download the plugin from the provided link . After downloading, unzip locally.
- Configure the Plugin in Chrome
- Open Chrome, go to Settings - Extensions - Manage Extensions, enable Developer mode, click “Load Unpacked,” and select the unzipped folder. Enable “Allow in incognito mode” in the plugin details.
- Copy the Live Control Page Link
- Copy the link of your live control page (web version) from the live platform. Paste the link into the live broadcast editing page under Intelligent Interaction - Live Room Link Input, then click “Start Capturing.”
Note
Alibaba International currently supports automatic Q&A, automatic greetings, automatic business card sending, and automatic product catalog sending. You can turn on the corresponding switches and then configure the detailed settings for each item.
Starting/Ending the Live Broadcast
Starting the Live Broadcast
- On the live broadcast editing page, click “Start Broadcasting.”
- The AI live broadcast window will appear shortly after, displaying the AI live broadcast.
Using Your Broadcasting Partner or OBS
Note
Keep the AI live broadcast window open on the desktop during the broadcast, or it will not broadcast properly.
- Open your broadcasting partner or OBS, add a window, select the Wondershare VVB (Live Version) live window.
- Click “Start Broadcasting.” Use Alt + mouse to crop out the web bar or use the zoom function to remove it.
- During the live broadcast, you can only modify the “Artificial Interaction” function; other broadcast settings cannot be changed.
Ending the Broadcast
- When concluding the live broadcast, initiate the termination of the live stream on the platform’s broadcasting partner first, followed by clicking the “End Live” button on Virbo Live to finalize the shutdown process.
Top 5 Udemy Subtitle Translation Tools for Seamless Auto Translations
One of the most common problems Udemy users encounter is that a course is not in their native language. However, even though Udemy provides captions, many courses might not provide subtitles in your language.
That’s why you need aUdemy subtitle translator that will allow you to watch a course or video in your native language with subtitles that you can actually understand. So, let’s discover the top five best Udemy subtitle translators and how they work.
Part 1. Can YouTranslate the Udemy Subtitle?
Translating subtitles on Udemy might not be directly possible, but there are workarounds. As long as you are using Google Chrome and watching courses on the website, you can use Udemy dual subtitle apps from the Chrome app store and incorporate them in your browser to get auto-translation of whatever video you are watching.
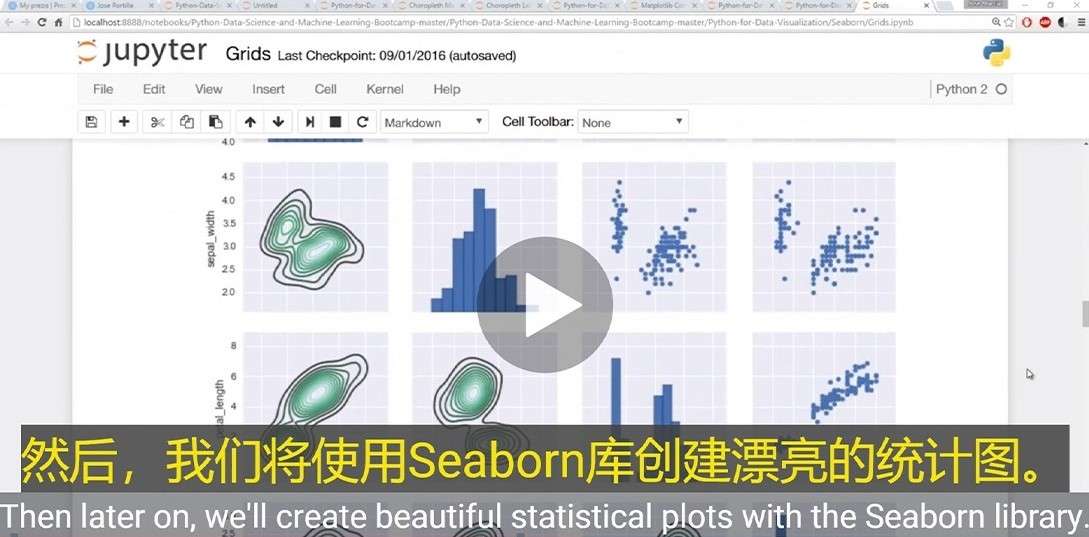
Many dual subtitle tools are available on the market, but in this blog, we are covering the top five totranslate Udemy subtitles . Let’s say that you have bought a course on Web Development.
With the right use of AI, Machine Learning, and advanced algorithms, these tools set you up for success so you can learn any course of your liking, regardless of which language it is in. So, let’s uncover these tools and their key features.
Part 2. 5 Best Udemy Subtitle Translators
1. Udemy Dual Subtitles - Subtitles Translator
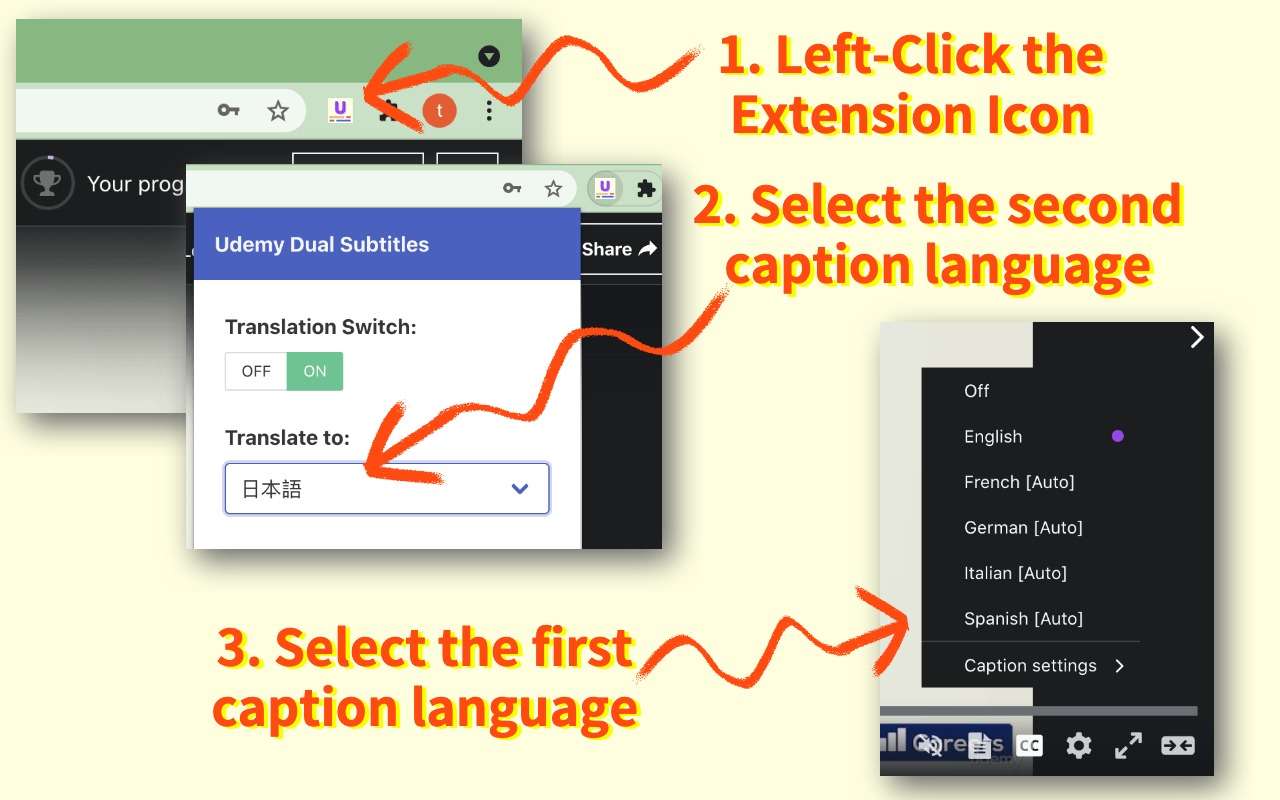
When it comes toUdemy translating subtitles , there are a lot of things you might have a problem with. First, you might not even have the language you are looking for. Secondly, the format isn’t the most pleasing. And lastly, you cannot display bilingual subtitles to take your learning to the next level.
That’s whereUdemy Dual Subtitles comes in. It is a Chrome extension that will work on Google Chrome and Microsoft Edge. Its main prowess is displaying bilingual subtitles so you can learn in the most optimal way possible.
Moreover, Udemy Dual Subtitles expands Udemy’s original subtitles to show duals so you can easily understand what’s going on the screen. It can translate Udemy’s official subtitles into all widely used languages; switching them is a piece of cake.
Here are some of the features it offers:
Key Features
- Versatile Translation: Translate Udemy subtitles in most languages that are commonly used around the globe
- Easy-To-Use: No need to set up every time. Just install the plugin to Chrome and get started right away
- Custom Styling: Udemy subtitle translator with custom styling abilities
- Bilingual Languages: Supports and displays dual subtitles to make learning easier and more effective
- Downloading Subtitles: You can download subtitles by using the Udemy Dual Subtitles tool
Pros
- Makes understanding courses easier
- Supports a plethora of languages
- Allows custom styling for better viewing
- Very good customer support
Cons
- Can cause occasional glitches
2. Udemy Subtitles Translator - Yakuu

Yakuu is another popular Udemy subtitle translator that enables learning from anywhere in the world. It virtually features all the languages and does real-time translation in a way that feels natural and easier to look at.
Moreover, just like other subtitle translating tools, it enables Udemy’s subtitles to be translated and to be shown in dual-subtitle mode, meaning learning will be easier than ever. It also supports all display modes including full screen and paging, without breaking down or messing up the subtitles.
All the features specified in Yakuu cater to the needs of users who are looking for a translation of subtitles. Moreover, it easily lets you translate the subtitles with three simple steps and doesn’t even require a bit of setup like many other services.
Key Features
- Responsive Subtitles: Allows responsible subtitles to be displayed in full or auto-paging mode
- Bilingual Subtitle Support: You can seamlessly switch between single and dual language subtitles at the same time
- Three-Step-Process: Download the tool, install it on Chrome, and simply pin to the toolbar to leverage the benefits
Pros
- Automatically display translated subtitles in the local language
- No need for a hierarchical menu selection
- Learn anywhere in any language for free
Cons
- It doesn’t support custom styling of subtitles
3. Udemy Subtitles Translator with Custom Style
When it comes to subtitles, some people like custom styling to make them easier to read. While you can adjust Udemy’s default subtitles, they are quite limited. With theUdemy Subtitles Translator tool, you have the ability to leverage Google Translate, which will show real-time updates.
All you need to do is install the subtitle, open the Udemy course, click Transcript, and click the Google Translate plugin that will translate everything to you in real time so you can enjoy your favorite course in your language.
Being a tool that is run by Google Translate, you have a lot of accuracy. Google Translate supports most languages available in the world with precision that we have never seen before. So, if you want one of the best Udemy subtitle translators, then this tool will give you the feature to enjoy your favorite course while understanding it a bit better.
Key Features
- Google Translate Support: Has Google Translate in the background to do the translation
- Custom Subtitles: You can stylize the subtitles according to your need
- Fast and Lightweight: Provides enhanced accessibility to Udemy users
Pros
- Great tool for non-English speaker people
- Quite accurate and on-point
- Allows customization of subtitles so you can customize colors, positioning, and the next
Cons
- Sometimes it doesn’t work properly
4. Udemy Double Subtitle

Double subtitles are quite popular when it comes to learning something new. Thankfully,Udemy Double Subtitle is one of the best tools to provide you with dual subtitles and translations that would make learning easier for you.
Let’s say that you already know some English but you are a Korean native. By using Udemy Double Subtitle, you can add both English and Korean to make everything even easier for you.
One thing to note is that whenever you enable a subtitle, you might need to reload the webpage for the tool to work. Overall, it is a great tool for you if you are looking to translate subtitles and learn in a way that’s more immersive.
Here are some of the features of the Udemy Double Subtitle tool.
Key Features
- Dual Subtitles: Supports dual subtitles to be displayed at once
- Fast and Efficient: The tool is lightweight and can display accurate results
- Privacy Protection: The developer doesn’t take your data, which means it is protected
Pros
- Great for learning and enhancing accessibility
- Works fastly and efficiently
- Enabling the tool takes less time
Cons
- Less languages available
5. SubTrans
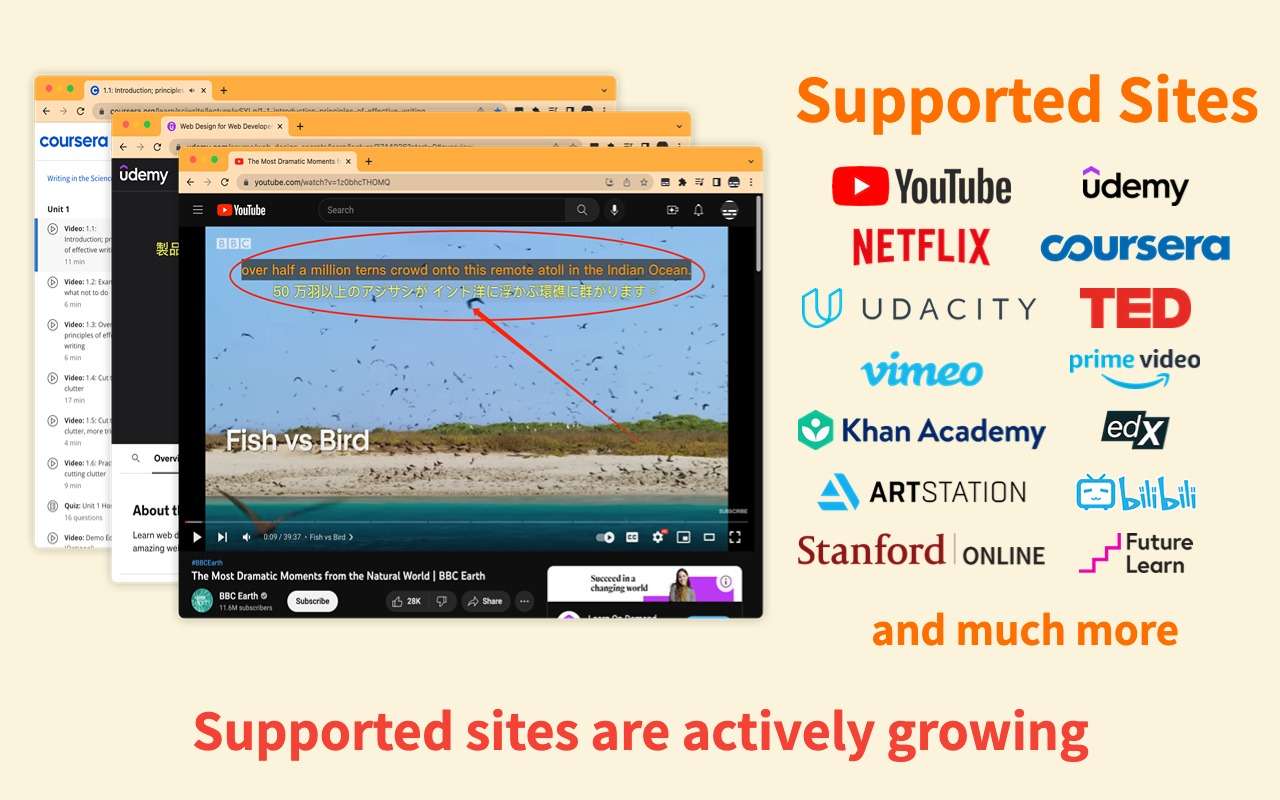
SubTrans is a general subtitle translator for a plethora of sites. Aside from Udemy, it can work on YouTube, Netflix, Coursera, TED, Khan Academy, and many more. The list of sites they support is ever-growing, and the developers are actively working to enhance the functionality of their tools.
SubTrans displays bilingual subtitles and can be used for as many video sites as possible. It can translate subtitles into almost all languages and also allows customization that is at the next level. From font size, colors, weight, and opacity to background, you can change anything in SubTrans.
Moreover, one of the best features of SubTrans is its ability to delay the subtitles. Hence, even if you feel like the subtitles don’t match, you can manually adjust them.
Key Features
- External Subtitles Support: You can also import external subtitles to be displayed on the videos
- Timestamp Control: In case the subtitles don’t go well, you can advance or delay them
- Styling Options: You can stylize almost every aspect of the subtitles
Pros
- No need to set every time
- Supports external subtitles
- Adjustable timestamp
- Display bilingual languages
Cons
- Only 30 minutes is free per month
Part 3. Translate Videos in Another Language using Virbo
Do you want to translate the entire video into another language besides subtitles? If so,Wondershare Virbo can help you as it’s an AI-powered video translator. It can be used as anUdemy subtitle translator and provides perfect video translations. It’s a cross-compatible platform that is available to use on online browsers and desktop applications. You can upload videos of up to 500MB within 10 seconds to 5-minute duration for smooth video translation.
Prominent Features of Virbo - Video Translation
- Diverse Languages: This software supports more than 20 diverse languages for video translation. This means you can learn any language course.
- Subtitles: Apart from translating videos, Virbo has anUdemy translate subtitles While translating videos, you can effortlessly enable this feature to get subtitles in videos. Notably, it is preferred to upload videos without subtitles to ensure the quality of the output video.
Translate Video Online Download APP Now Free Download
3.1 Why Choose Wondershare Virbo
Several platforms are available for video translation, some of which are discussed above. Now, let us help you make your selection by highlighting some of the benefits of Virbo. Delve into this part and learn why choosing Virbo will significantly assist you in learning courses.
- Breaking Language Barrier: International students with language difficulties in learning can get relief from Virbo. You can download your course content and translate it into your native language.
- Language Learning: Subtitles in the videos that Virbo provides can help you learn a new language. It enables you to understand the pronunciation of words and take notes while watching.
- Research Students: Virbo may help research students accurately quote or rephrase key points of the video. By translating, you understand the speakers’ intended meaning to cite in your research.
- Cross-Platform Support: Virbo is available for Windows, Web, and Mobile.
3.2 How to Translate the Udemy Subtitles Using Virbo?
To learn the Udemy course in a non-native language, follow these simplified instructions to translate the subtitles with the highest accuracy:
Step 1: Upload Your Udemy Course Video
Open the online version of Wondershare Virbo - Video Translator on your web browser. Hit the “Click to Upload Video” option and upload your Udemy video in Virbo.
Translate Video Online Download APP Now Free Download
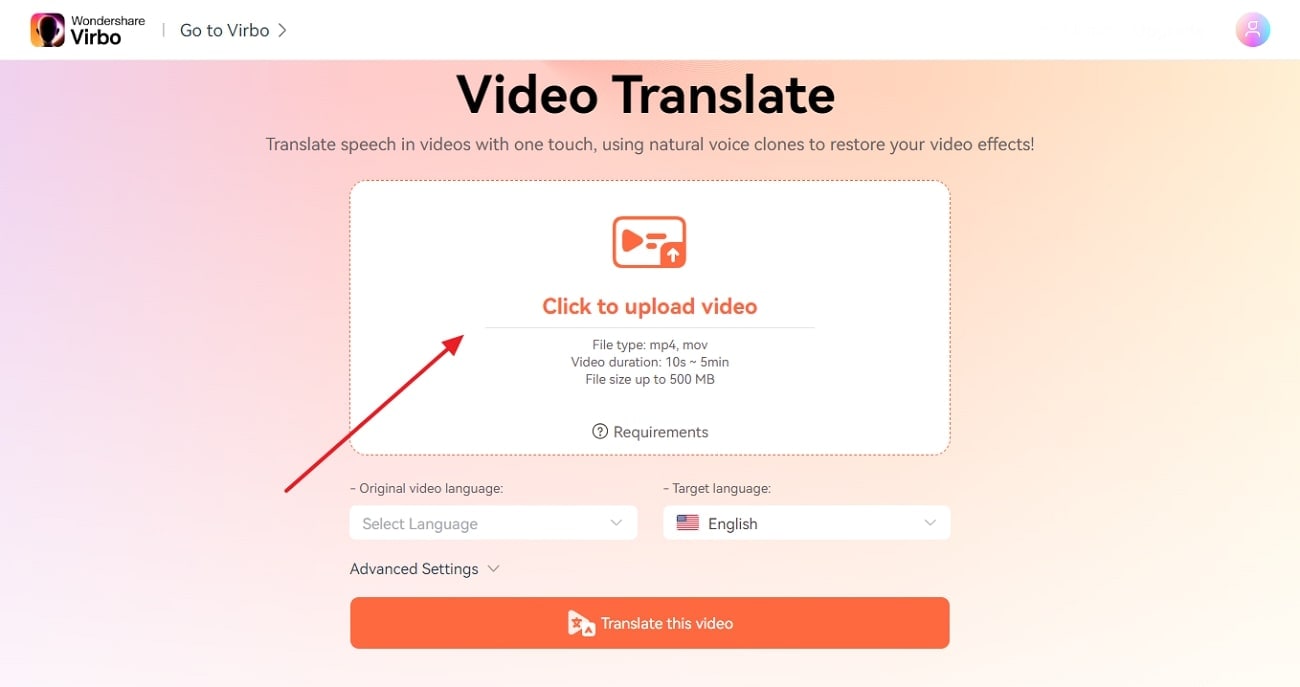
Step 2: Customize the Translation Settings
Move down and choose “Original Video Language” and “Target Language” using their lists. Then, tap the downward icon of “Advanced Settings” and get multiple options later. From there, toggle the “Subtitles” option to generate translated subtitles in the video.
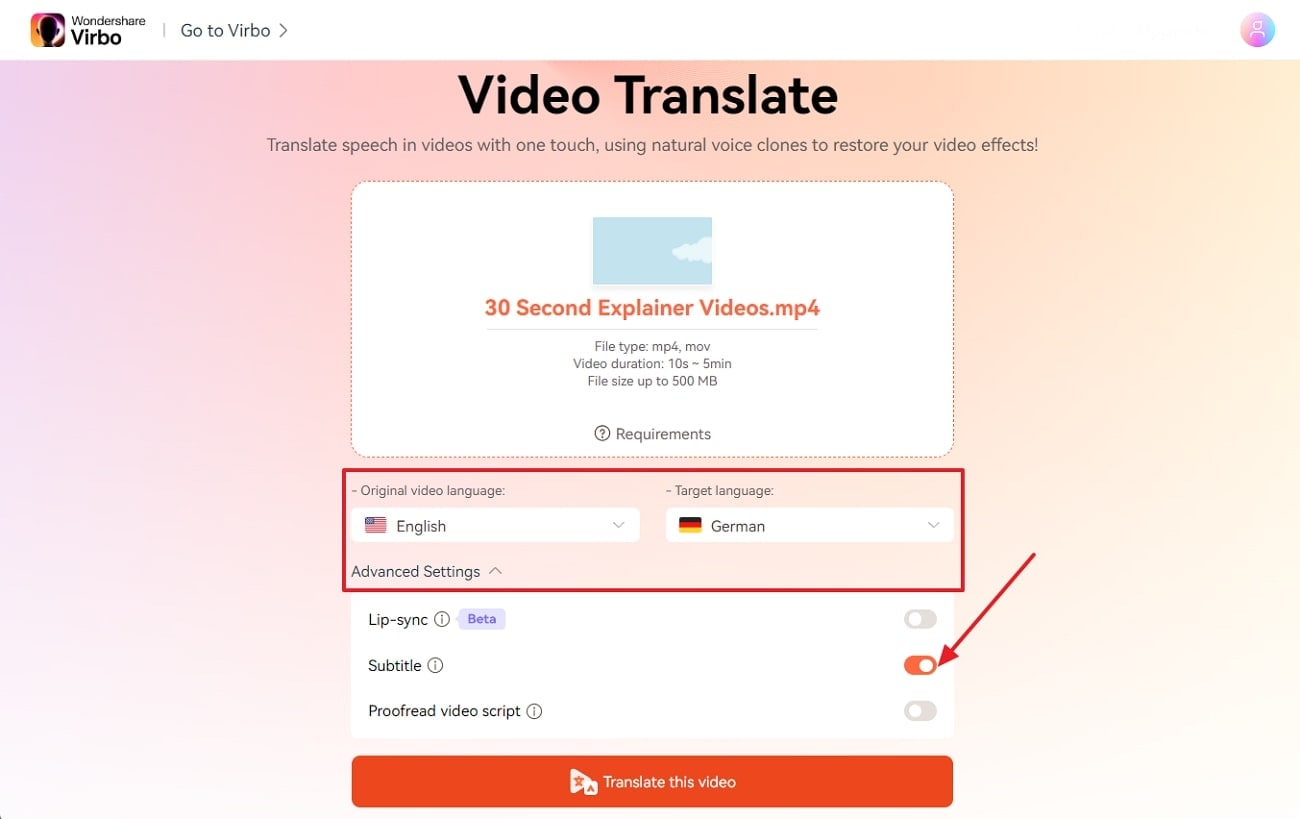
Step 3: Initiate the Udemy Video Subtitles Translation
Upon setting the video translation parameters, press the “Translate the Video” button and let AI analyze. Finally, you will get your Udemy course video with translated subtitles in your target language.
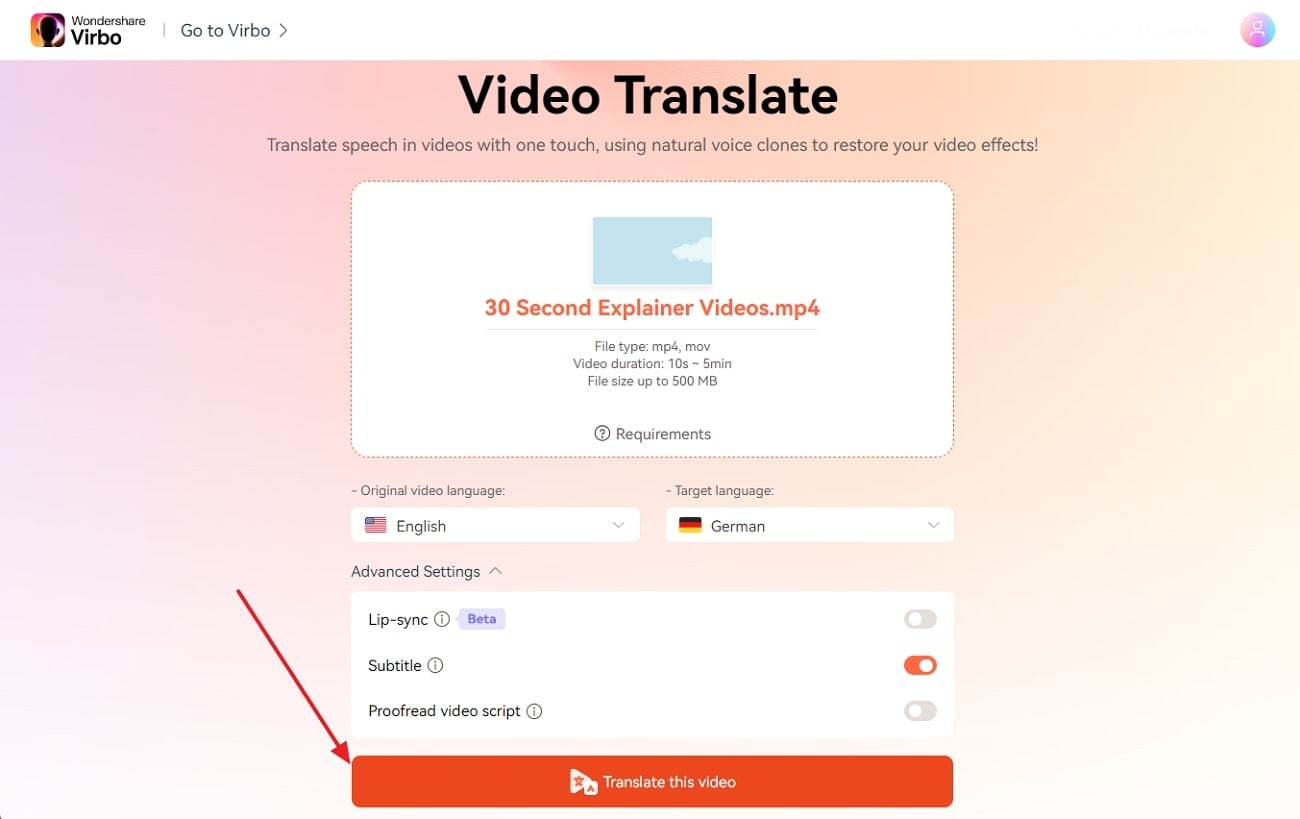
Translate Video Online Download APP Now Free Download
Bonus Tip: What Virbo Can Do If You Want to Create a Udemy Course You Own?
- AI Script Generator: If you lack some course creation ideas, Virbo has an AI script generator. It can help you brainstorm ideas about Udemy courses by providing compelling scripts within seconds. All you need to do is provide text instructions and set certain parameters for exact results.
- AI Avatar: Virbo eliminates the need for human presenters, cameras, and equipment to create a course. It has AI avatars from diverse ethnicities, genders, regions, attire, and ages. These life-like avatars can create educational videos with the script you provided and AI voices.
- AI Voice: This feature of Virbo works as a text-to-speech converter that has expressive AI-generated voices. It can narrate your Udemy course with captivating voiceovers in different accents and tones. Hence, enjoy high-quality audio in various languages from thisUdemy subtitle translator .
Create Video Online Download APP Now Free Download
Part 4. FAQs about Udemy Subtitle Translator
1. How do I add subtitles to the Udemy course?
You can create subtitles from scratch using a simple text editor like Notepad or TextEdit. You need to follow the .vtt format for subtitles, which involves specifying the timing and text of each subtitle line. This option requires more effort but gives you complete control over the accuracy and style of your subtitles. You can also use Wondershare Virbo, which can generate subtitles automatically when you use this tool to translate videos.
2. How to add auto translate on any video
Auto translation can be achieved by using various tools. One of the best tools for auto-translation is Wondershare’s Virbo. It allows you to add translated captions in various languages to any video of your choice. Upload your video, choose the translation option and then select “Translate” and choose the desired language. You can also edit the generated subtitles before exporting them.
3. Is there any AI tool for translation?
There are many AI tools for translation. Tools like Google Translate, DeepL, Virbo, and Veed IO help you translate videos, audio, or text to generate new media. The accuracy of these tools is high, which can help companies generate AI videos to further target the international market.
4. How to generate AI videos for educational content?
The first step is scripting, where you need to get the script ready for your educational video. Secondly, you need an AI-powered tool for generating the voice-over. You can use Virbo which will not only generate voice but video as well. Lastly, once you add the script, the software will create a video for you that you can test and then roll out in the digital world.
Final Verdict
Udemy is one of the largest e-learning platforms with hundreds of thousands of high-quality courses catering to audiences from all over the world. However, most courses will be in English since it is predominantly an English service.
But use Udemy subtitle translation tools like the ones we have mentioned above. You can easily and effectively learn courses in your own language by translating the subtitles into your native tongue.
Translate Video Online Download APP Now Free Download
Also read:
- In 2024, Top List Best 10 Android & iOS Voice Cloning Apps Selected
- Updated Everything You Want To Know About Kapwing Video Translation for 2024
- New 2024 Approved SRT Subtitle Translation Tools and Techniques
- Updated Facebook Live Shopping A Comprehensive Guide for 2024
- 2024 Approved A Detailed Review & Alternatives of VOCALOID6 Voice Generator
- Access All Matches Free World Cup Live Streaming Options for 2024
- 2024 Approved Demystifying AI Game Generators | Wondershare Virbo Glossary
- In 2024, Device/Network/Browser Requirements
- Updated The Ever-Changing Era of AI Video Translation A Reality to Be Fulfilled
- New How To Translate Video From Japanese to English Online?
- Updated Revolutionize Creative Tasks With Proficiency AI Voice Cloning for 2024
- Updated Ultimate Guide to Shopee Livestream Selling Maximize Profits for 2024
- In 2024, How to Translate TikTok Videos Top 5 Auto Translate Tools
- New Material Preparation | Virbo AI Live Stream for 2024
- New 2024 Approved Translate Live Video Making It Possible With The Best Tool
- 5 Top Realistic Text to Speech AI Voice Generators You May Like for 2024
- The Most Straightforward Guide to Learning How to Clone Your Voice
- New What Is an AI Text Generator?
- Revolutionizing Communication Real-Time AI Voice Changer
- New Best Narrator Voice Generators
- What Is an AI Script Generator? | Wondershare Virbo Glossary for 2024
- New In 2024, What Is an AI Editor?
- New Top List Best 5 Tools for Creating Talking Avatars for 2024
- New 2024 Approved Easy Guide How To Make Talking Head Videos
- New The Best Text-to-Audio Converters of All Times
- New 2024 Approved Top 10 Robotic Voice Generators
- New 2024 Approved Breaking Language Barriers Elevate Your Content with the Best Free Video Translator Apps
- New Easy Ways to Translate TikTok Videos for 2024
- New In 2024, Top 4 Elon Musk Voice Generator Programs to Make You Sound Like the Billionaire
- New Cloning Voices in Real-Time With Top GitHub Repositories for 2024
- Updated Revolutionize Creative Tasks With Proficiency AI Voice Cloning
- Updated How To Create Video From Text Easily Step-by-Step
- What Is AI Text to Video? | Wondershare Virbo Glossary
- Best 4 Elon Musk Voice Generators to Make You Sound Like the Billionaire
- Updated In 2024, The Ultimate Guide to Generating Speech in Different Languages With the Best Tools
- 2024 Approved The Top 10 AI Avatar Generators
- Updated 2024 Approved Maximize Your User Engagement With Instagram Live Shopping Expert Tips
- New In 2024, Exploring the Finest Text-to-Speech Male Voice Tools for Natural Output
- In 2024, Breakthrough How to Make A Picture Speak
- Updated A Comprehensive List of The Top SpongeBob Voice Generators
- How To Convert Video Voice to Text Online for Free for 2024
- 2024 Approved 12 Must-Try Best Voice Cloning Tools to Use
- New 2024 Approved How To Create AI-Powered Videos Using Synthesia Avatar and Voices
- Updated 2024 Approved Translate Audio/Video Content From Spanish to English and Vice Versa
- Updated A Detailed Guide To Stream to Instagram With an RTMP
- Updated In 2024, Best 5 Quandale Dingle Voice Generators
- New In 2024, Top 7 Ways to Promote Twitch Stream
- 2024 Approved AI Avatars | Online
- Updated In 2024, Master Deepface Live Download and Train Your Live Model
- Updated In 2024, How to Generate Videos From Text with AI
- In 2024, The Ultimate Guide to Get the Rare Candy on Pokemon Go Fire Red On Realme GT Neo 5 SE | Dr.fone
- Hassle-Free Ways to Remove FRP Lock on Tecno Camon 20 Premier 5Gwith/without a PC
- How To Delete iCloud Account Remove Your Apple ID Permanently From iPhone 14 Plus
- In 2024, Everything You Need to Know about Lock Screen Settings on your Realme GT Neo 5
- Best Anti Tracker Software For Realme C53 | Dr.fone
- Is Your iPhone 11 in Security Lockout? Proper Ways To Unlock | Dr.fone
- Calls on Vivo V30 Lite 5G Go Straight to Voicemail? 12 Fixes | Dr.fone
- Repair damaged, unplayable video files of G54 5G on Mac
- In 2024, 10 Fake GPS Location Apps on Android Of your Samsung Galaxy S24+ | Dr.fone
- How to retrieve erased music from Honor
- How To Restore Missing Call Logs from HTC U23
- In 2024, How to Track WhatsApp Messages on Vivo Y100 Without Them Knowing? | Dr.fone
- How do i sign a Word 2019 electronically
- In 2024, Will Pokémon Go Ban the Account if You Use PGSharp On Huawei Nova Y71 | Dr.fone
- What is Geo-Blocking and How to Bypass it On Poco F5 5G? | Dr.fone
- In 2024, The 6 Best SIM Unlock Services That Actually Work On Your Oppo K11 5G Device
- Can I recover permanently deleted photos from Nord 3 5G
- How to Check Distance and Radius on Google Maps For your Oppo Find X6 Pro | Dr.fone
- In 2024, How to use Pokemon Go Joystick on Oppo A79 5G? | Dr.fone
- In 2024, Unova Stone Pokémon Go Evolution List and How Catch Them For Samsung Galaxy S24+ | Dr.fone
- How to get the dragon scale and evolution-enabled pokemon On Samsung Galaxy M34 5G? | Dr.fone
- 8 Solutions to Fix Find My Friends Location Not Available On Apple iPhone 15 Pro | Dr.fone
- The Best iSpoofer Alternative to Try On Realme C33 2023 | Dr.fone
- How to Transfer Apple iPhone 15 Pro Data to iPhone 12 A Complete Guide | Dr.fone
- In 2024, 7 Ways to Unlock a Locked Oppo A2 Phone
- In 2024, How to Fake GPS on Android without Mock Location For your Samsung Galaxy A05s | Dr.fone
- 9 Solutions to Fix Itel A60 System Crash Issue | Dr.fone
- In 2024, The Best iSpoofer Alternative to Try On Tecno Pova 5 | Dr.fone
- In 2024, iPhone Is Disabled? Here Is The Way To Unlock Disabled iPhone 13 Pro
- Unlock android phone if you forget the Tecno Spark 10 4G password or pattern lock
- 4 Ways to Transfer Music from Realme C67 5G to iPhone | Dr.fone
- How to get back lost contacts from Nokia XR21.
- Best Methods for Itel S23 Wont Turn On | Dr.fone
- In 2024, 3 Facts You Need to Know about Screen Mirroring Vivo Y200 | Dr.fone
- How To Reset the Security Questions of Your Apple ID On Your Apple iPhone 13 Pro Max
- In 2024, How to Migrate Android Data From Xiaomi 13 Ultra to New Android Phone? | Dr.fone
- How To Unlock Stolen Apple iPhone XS Max In Different Conditionsin | Dr.fone
- In 2024, Apple ID is Greyed Out From Apple iPhone 14 Pro Max How to Bypass?
- In 2024, How to Unlock Samsung Galaxy F34 5G Phone Pattern Lock without Factory Reset
- In 2024, Planning to Use a Pokemon Go Joystick on Honor 90 Lite? | Dr.fone
- 4 Solutions to Fix Unfortunately Your App Has Stopped Error on Vivo S18 Pro | Dr.fone
- In 2024, How to Change GPS Location on OnePlus Open Easily & Safely | Dr.fone
- How to retrieve erased videos from Lava Blaze 2 5G
- How to unlock a disable iPhone 6s using itunes
- In 2024, 2 Ways to Transfer Text Messages from Samsung Galaxy M34 5G to iPhone 15/14/13/12/11/X/8/ | Dr.fone
- In 2024, Does Life360 Notify When You Log Out On Xiaomi Redmi 12? | Dr.fone
- Title: Updated What Is AI Pixel Art Generator for 2024
- Author: Sam
- Created at : 2024-05-19 03:35:15
- Updated at : 2024-05-20 03:35:15
- Link: https://ai-voice-clone.techidaily.com/updated-what-is-ai-pixel-art-generator-for-2024/
- License: This work is licensed under CC BY-NC-SA 4.0.
