
:max_bytes(150000):strip_icc():format(webp)/178665671_HighRes-56a532a83df78cf77286de1b.jpg)
Updated Registration and Login for 2024
Registration and Login | Virbo AI Live Stream
Registration and Login
Streamline your access and enhance your user experience with step-by-step guides on seamless registration and secure login processes. Elevate your streaming journey with Virbo AI Live Streaming. Get started now!
02Logout
Registration and Login
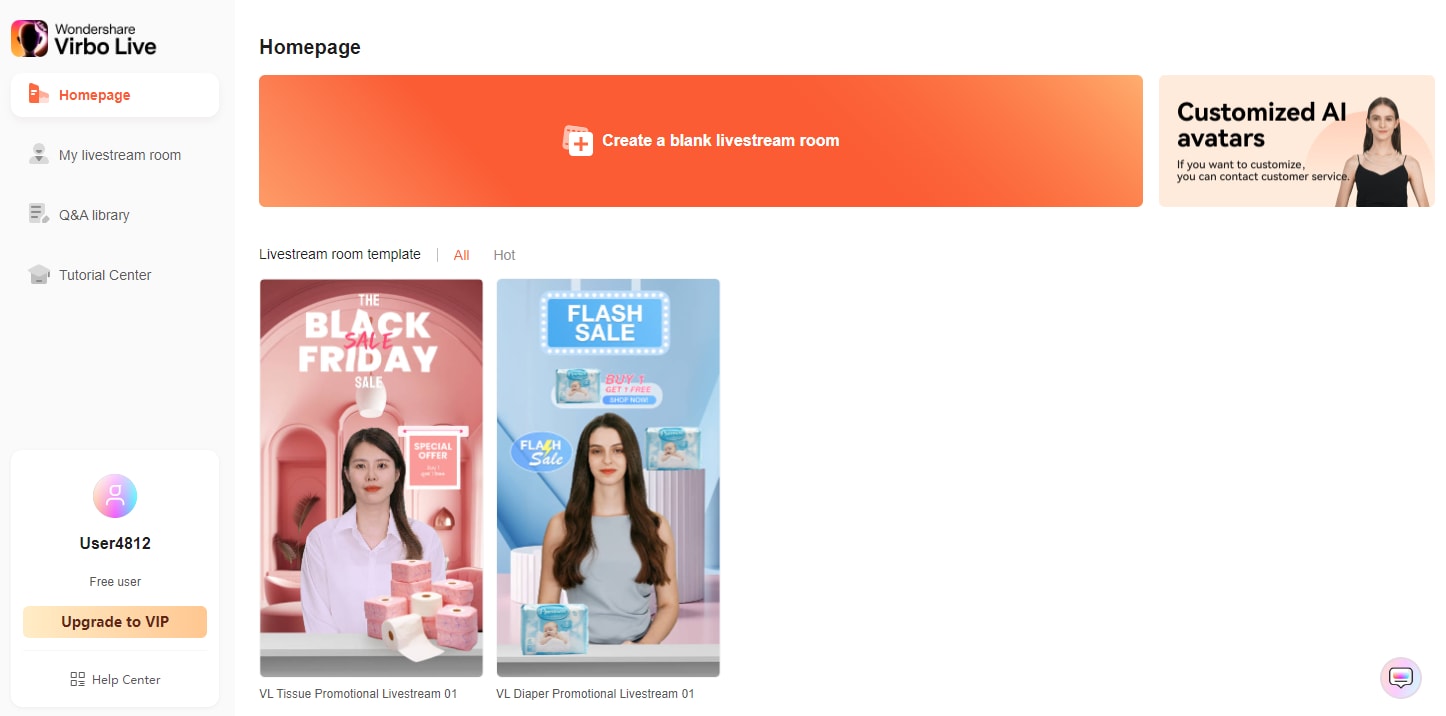
1 To commence your journey, kindly navigate to the product homepage where you can initiate the process by completing your account login.
Login
2 Embrace the convenience of multiple login methods available, encompassing traditional email login and the seamless integration of Google authentication.
Logout
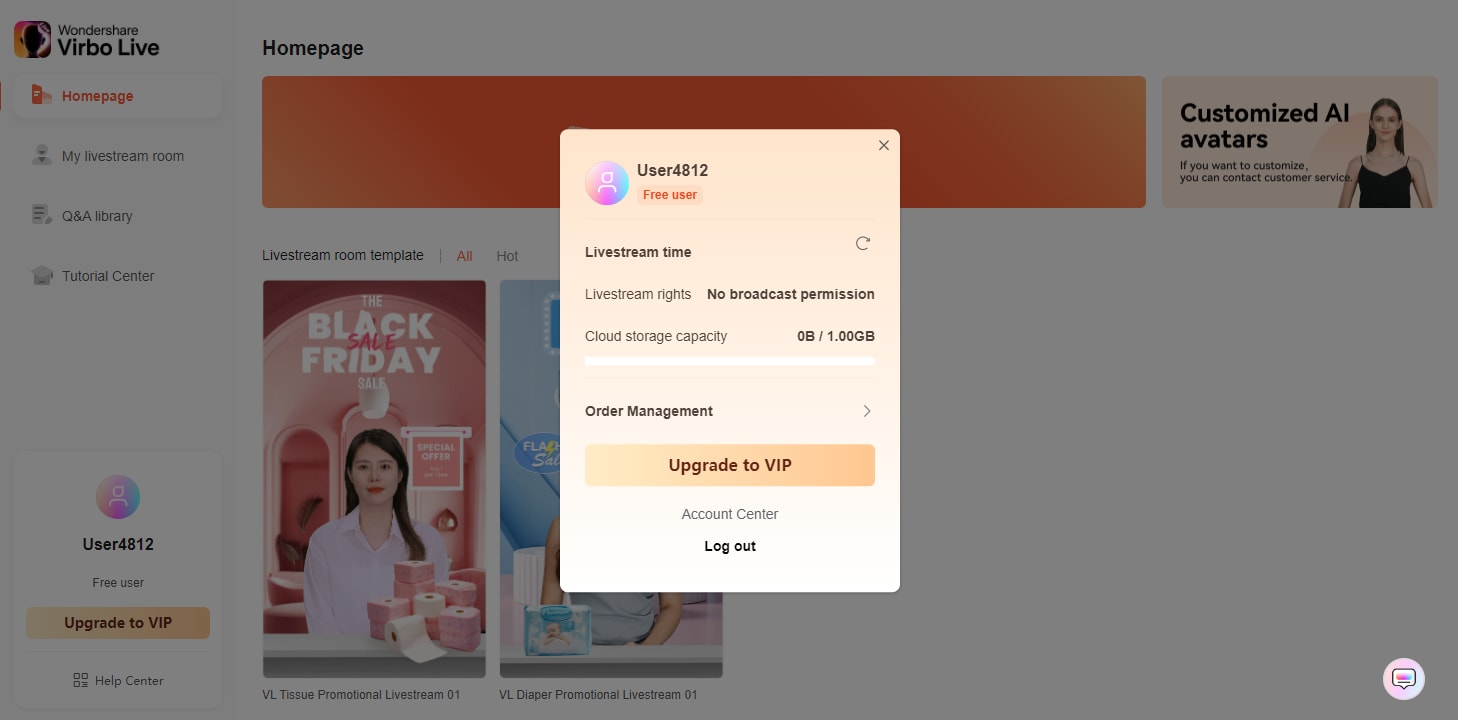
1Click on the user profile picture at the bottom left corner of the product homepage.
2In the pop-up window, simply click on “Logout.”
Logout
Authorization Refresh
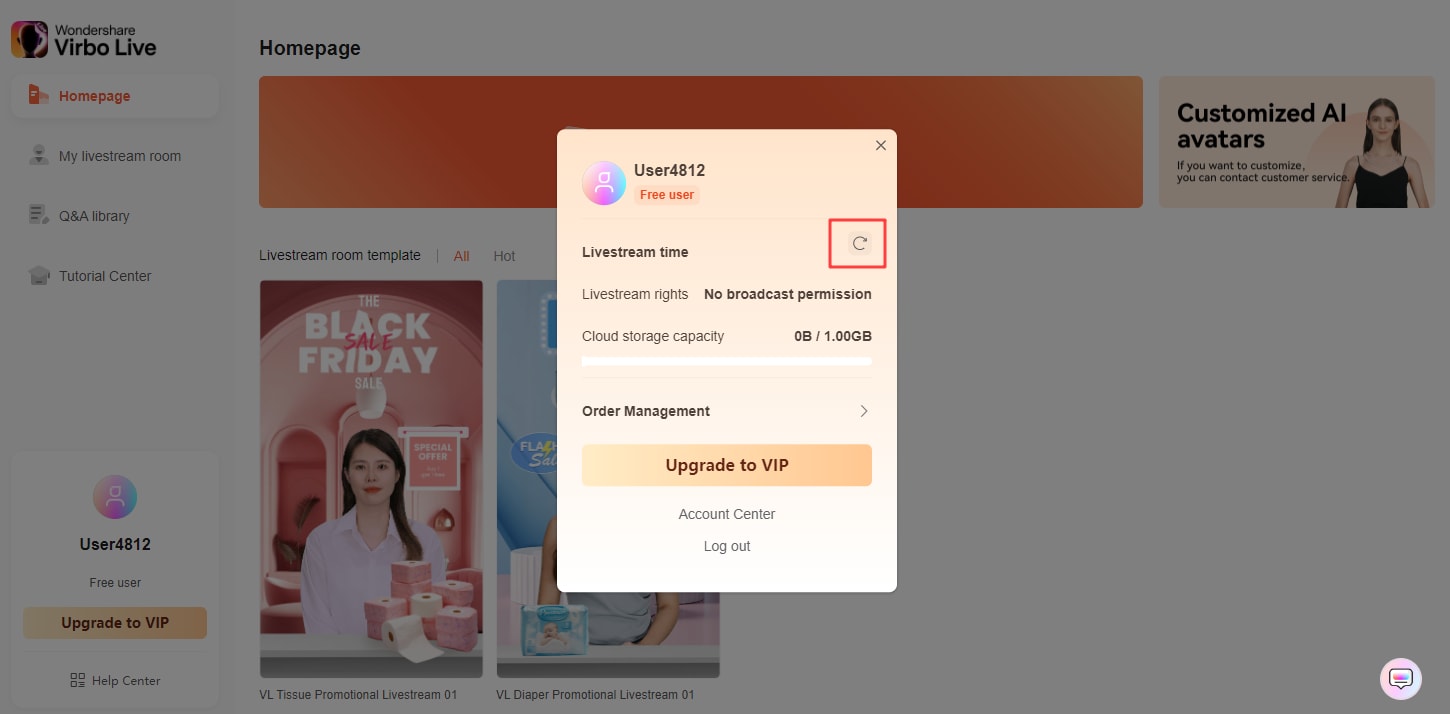
1To refresh your authorization, click on the user profile picture at the bottom left corner of the product homepage. In the pop-up window, next to “Rights Details,” click on the “Refresh” icon. This will renew your authorization.
Authorization Refresh
02Logout
Registration and Login
1 To commence your journey, kindly navigate to the product homepage where you can initiate the process by completing your account login.
Login
2 Embrace the convenience of multiple login methods available, encompassing traditional email login and the seamless integration of Google authentication.
Logout
1Click on the user profile picture at the bottom left corner of the product homepage.
2In the pop-up window, simply click on “Logout.”
Logout
Authorization Refresh
1To refresh your authorization, click on the user profile picture at the bottom left corner of the product homepage. In the pop-up window, next to “Rights Details,” click on the “Refresh” icon. This will renew your authorization.
Authorization Refresh
An Ultimate Guide of Best Narrator Voice Generators
Having a fascinating and engaging voice is essential in the field of voiceover and narration. But not everybody has a suitable accent for narrating. Anarrator voice generator might be beneficial in this situation. It is a very advanced piece of software that can convert words into a voice-over that sounds realistic, doing away with the need for a human narrator.
The narrator’s voice generator can modify and control the voice qualities. Makers can change the artificial voice’s pitch, speed, and tone to meet the demands of their production. The narrator’s voice generator will probably play a crucial role for everyone involved in audio production.
Part 1: Why do you need a narrator voice generator
Whether you need a deep, authoritative voice for media or a warm, welcoming tone for an e-learning module, anarrator voice generator may provide the ideal voice for the content. It will help you in the following ways:
1. Efficiency and Time-saving
Using a narrator voice generator helps you save time. With a few clicks of a button, you can quickly create the voiceover rather than wait for a human narrator to record and deliver it. It is also beneficial for tasks that have a limited amount of time and demand regular updates. The narrator’s voice generator rapidly converts text into spoken words, saving the content makers a lot of time.
2. Cost-Effectiveness
When compared to voice actors, using a narrator voice generator may significantly decrease costs. Professional voice actors deliver customized narration of the highest caliber, but their services can be expensive, especially for projects requiring a lot of audio. While a narrator voice generator automates the translating of text process into voiceover, it provides a more affordable alternative.
3. Multilingual Support
The voice generator can provide a wide range of voices and accents for each language with multilingual support, making the narration more engaging and authentic to the target viewers. This functionality is particularly beneficial for producing content with a worldwide audience, such as e-learning courses, audiobooks, language study resources, and marketing campaigns.
4. Consistency
A narrator voice generator guarantees professionalism and consistency. The generated voiceover consist of a uniform caliber and tone, avoiding the variations that can arise from using several human narrators. It ensures that your material maintains a high level of professionalism and improves the user experience overall.
Part 2: 5 Consideration for choosing a narrator voice generator
Your narrator’s voice is essential for your audience to have an interesting and professional audio experience. We’ll look into a few crucial considerations to keep in mind while choosing anarrator voice generator . The possibilities of using a narrator voice recorder are diverse, ranging fromstorytelling voice generators toGoogle translate male voice generators .
1. Voice Quality and Naturalness
An engaging and professional audio experience depends on the voice quality and naturalness of the generated voice. To select the voice that perfectly meets the requirements of your project, look for a voice generator that provides a variety of voice choices. It should be clear, with natural pronunciation and the right pitch and tone. Your listeners will be more likely to stay interested in your videos, lectures, or audiobooks if you have a natural voice.
2. Multilingual Support
If you are creating content in several languages or have an international audience, it’s essential to pick anarrator voice generator with multilingual support. Check that the voice generator covers the languages you will be working with and that generated sounds seem natural in each language. A sense of reality is added to your project by keeping the availability of many accents within each language in mind.
3. Pronunciation Accuracy
It’s important to pronounce words correctly, especially when using technical or industry-specific terminology. Look for a voice generator that can pronounce words and phrases correctly and has an extensive pronunciation dictionary. Some voice generators also enable you to modify the pronunciation and allow you to adjust your generated sound according to your particular requirements.
4. Intonation and Emphasis
Spoken language needs to use emphasis and intonation to express the emotions, meaning, and context of a statement. The rise and fall of the pitch during speech is intonation, and it is used to convey a variety of attitudes, feelings, and intentions. Both factors help the narrator’s voice generator effectively deliver the information. The narrator’s voice generator must be able to modify intonation and emphasis to provide natural speech.
5. Commercial use
Voice generators are widely used by both people and businesses to generate sound files for many kinds of commercial uses, including marketing and advertising, e-learning, and training. However, it’s essential to be familiar with the narrator voice generator’s license terms and conditions to ensure agreement to usage rights and intellectual property regulations.
Part 3: Best 3 narrator voice generators you must try
We will look at 3 of the best narrator voice generators that are a must-try for everyone to improve the sound because of their excellent voice quality and flexibility.
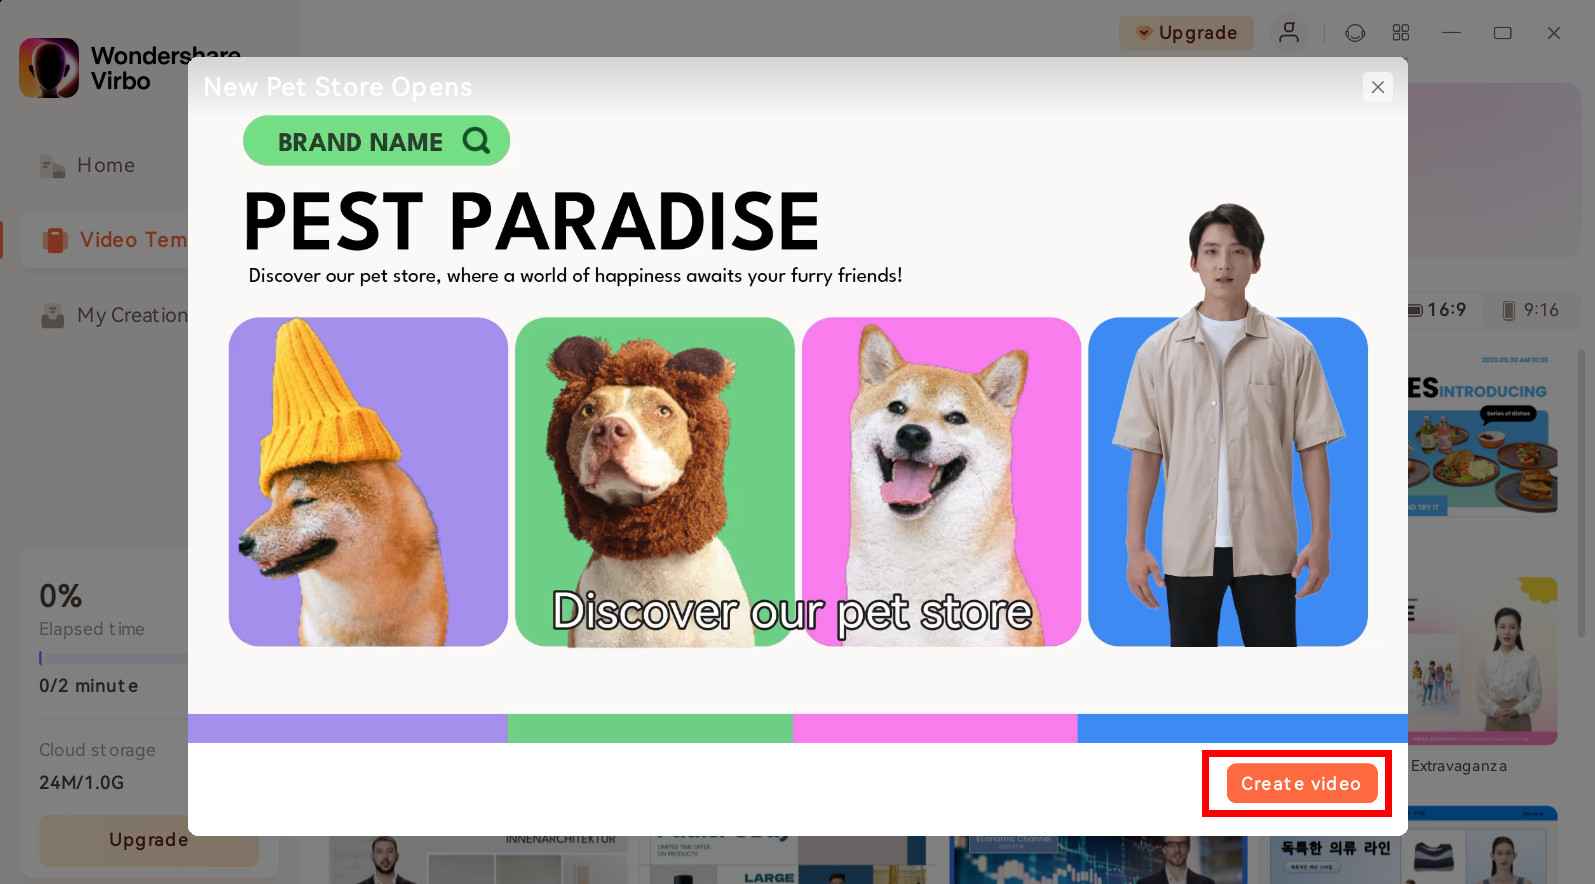
1.Virbo
With Virbo, your video dreams may come true with the best narrator voice ever! Whether you’re a professional or a beginner, Virbo has come with seamless cross-platform compatibility. Create incredible videos on Windows, macOS, Android, or Linux with one account and without compatibility issues. You get access to an abundance of more than 180+ video templates. Virbo also offers you an enormous amount of music that is available 100% royalty-free.
Your videos will be more real and entertaining than ever before with Virbo’s seamless text-to-speech translation in over 120+ languages. Virbo’s AI script generator boosts creativity to a new level. Enter your keywords, and ChatGPT will create a comprehensive script for your video. With this innovative function, which is only available on mobile devices, you can let your imagination run wild wherever you are.
Step-by-Step Guide For Using Virbo
Step 1: Install Virbo and launch it
Go to the official website of Virbo and click on free download. Open the .exe file and click on the install button. Wait until the installation is finished. Click on sign in to make an account on it.
Generate Engaging
AI Video in Minutes!
Easily convert text into professional spokesperson videos in over 120+ voices & languages in minutes.
Generate AI Video Free Generate AI Video Now
google-play ](https://app.adjust.com/1187btki%5F11xz9mlt ) app-store ](https://app.adjust.com/1187btki%5F11xz9mlt )

Step 2: Create a video or select any template
Click on the home button to create a video or if you want a video for your business, social media, advertisement, etc. Then click on the video template, and you will get various templates according to your need.

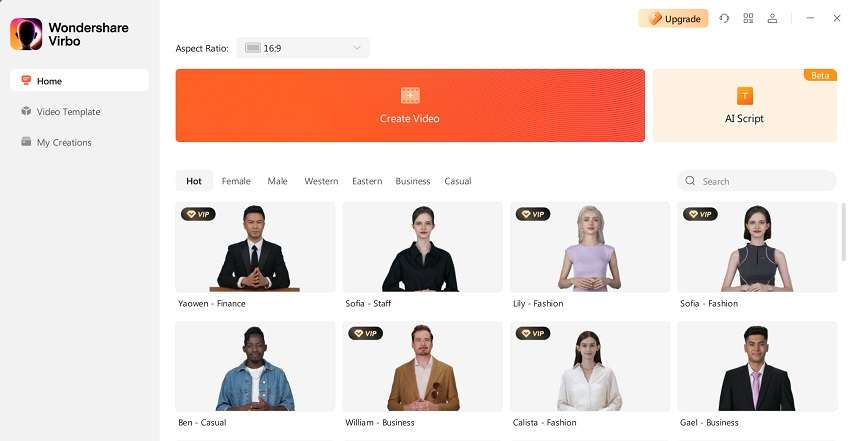
Step 3: Add avatars to your video
After clicking on create videos, add an avatar to your video. You can select male, female, western, casual, etc avatars for your video. You can apply the same avatar to the overall storyboard, or you can also change it.
![]()
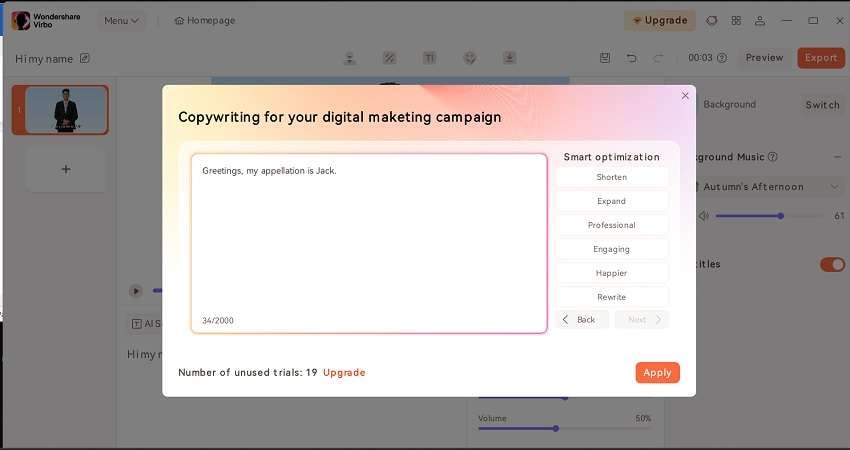
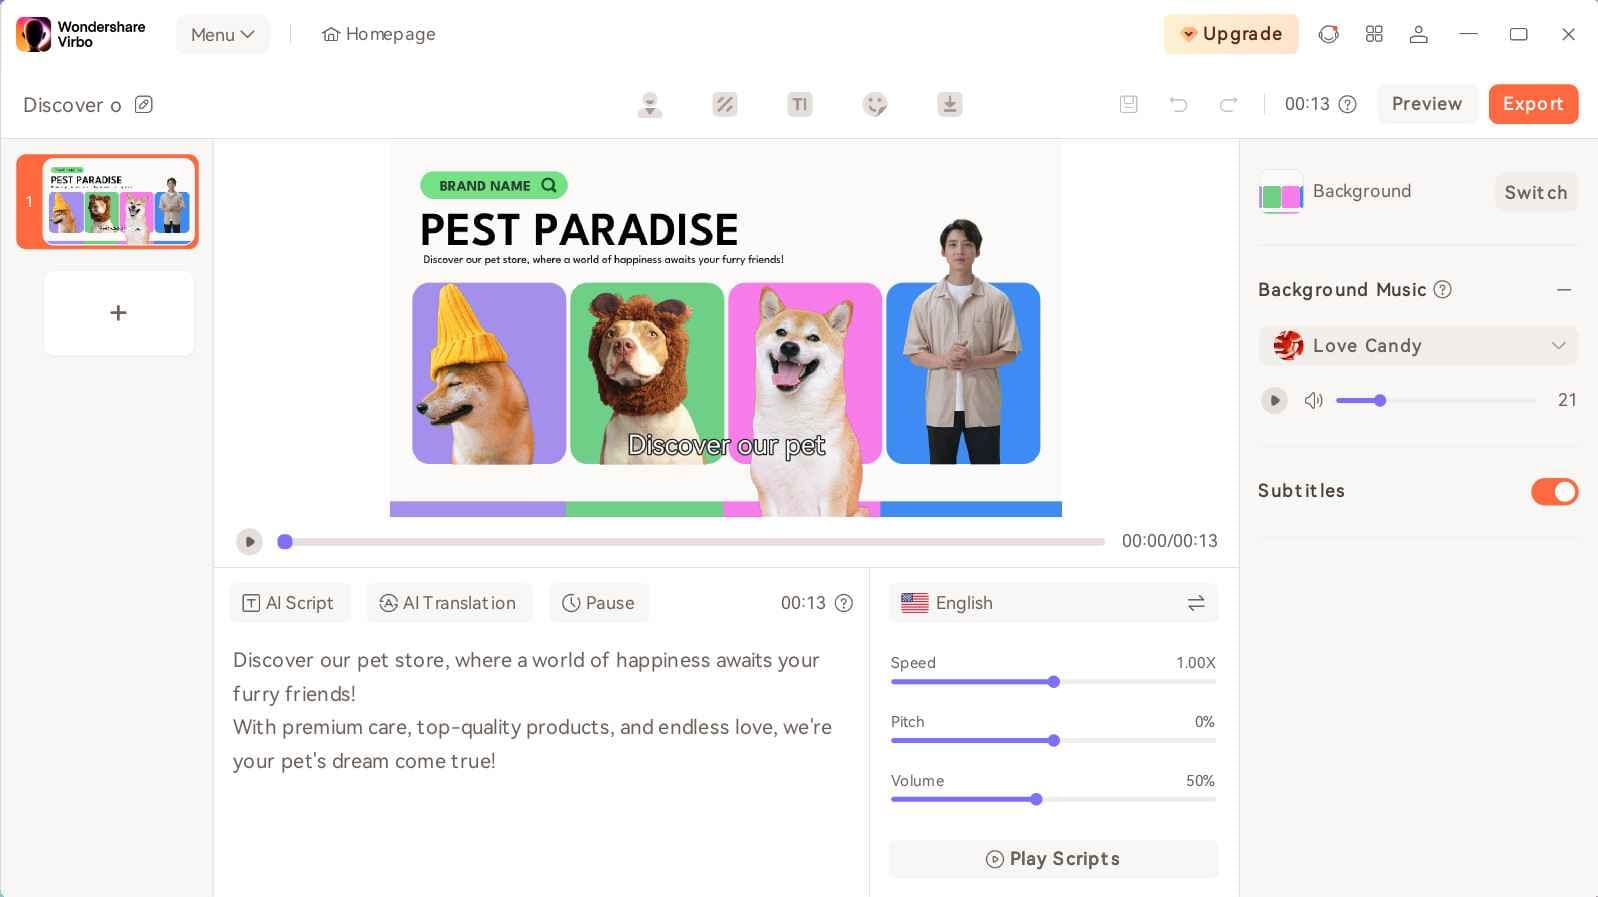
Step 4: Make a script for your video
Click on the AI script a dialogue box will appear. Write your script in the box and optimize the text in any form like professional, engaging, shortened, expand, etc. Click on the apply button to apply it on the video.

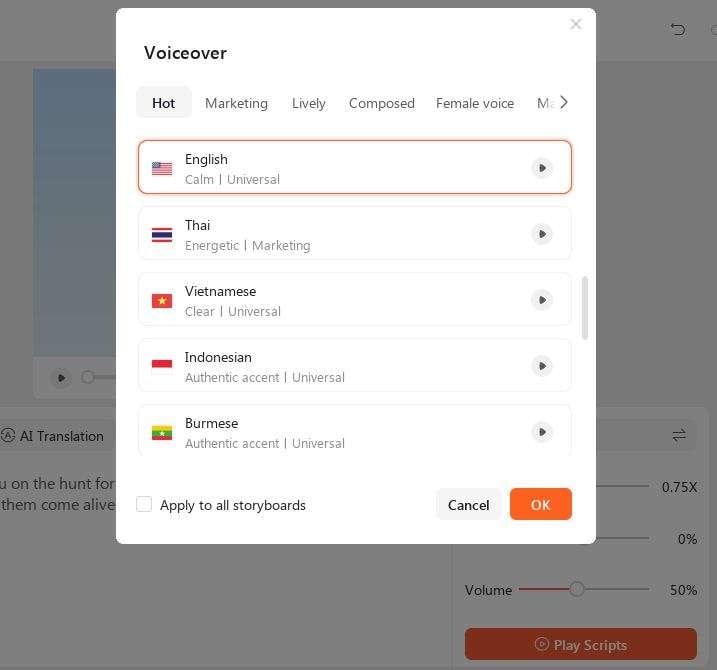
Step 5: Adjust the accent and other settings
You can see further setting options on the right side of the script box. You can adjust the speed, pitch, and volume of the voice. Select the accent of the voice as per your requirement.
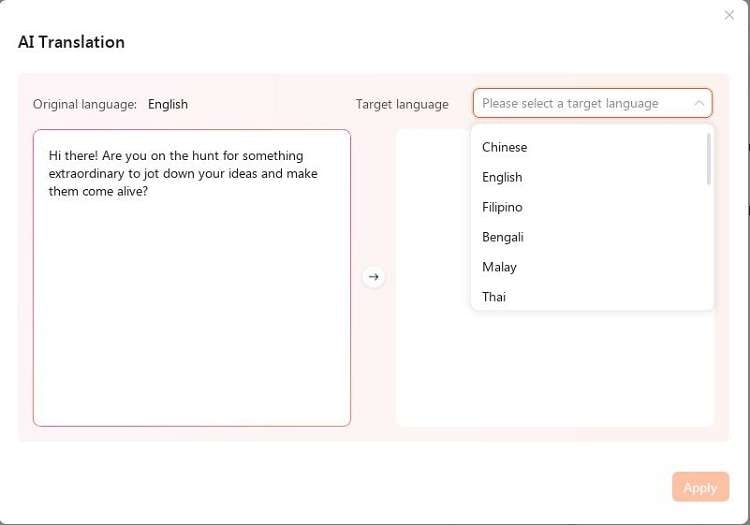
Step 6: Translate your script
If you want to translate the script into other languages, click on AI translation, then select your desired language and translate it.
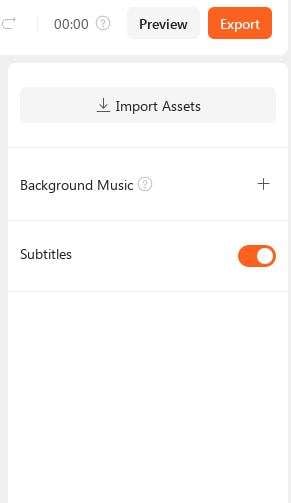
Step 7: Add subtitles and export the video
You can enable the subtitles and add background music to your video. Preview your video and click on the export button. It takes a few minutes to export the video.
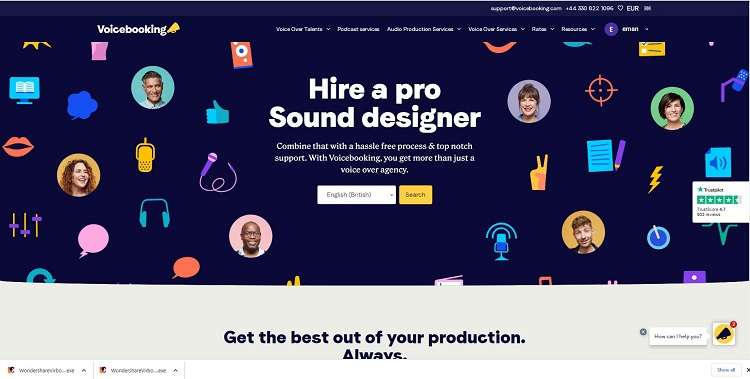
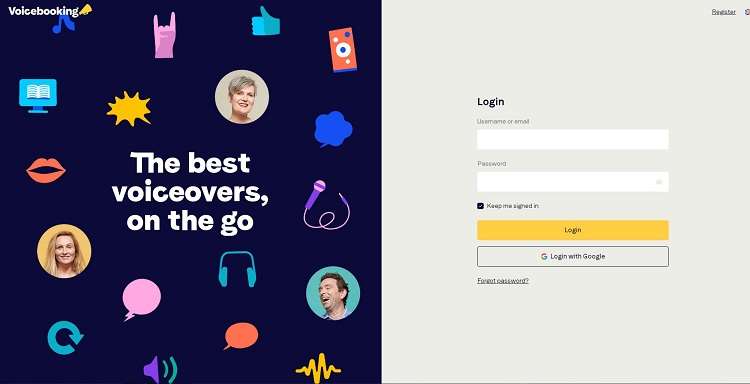
2. Voicebooking
Voicebooking is an essential time-saving tool whether you’re a content producer, creating captivating Instagram reels, or a company planning a series of ads and memes for TikTok. Voice booking is astorytelling voice generator that provides a diverse range of female and male voiceover options, which are available in different languages. You can quickly emphasize specific phrases and include pauses in your text with this tool, improving the overall narration quality.
Step-by-Step Guide For Using Voicebooking
Step 1: Go to the website and make an account
Go to Voicebooking and sign up there to access its features. The software is available for free trial. Since it is a web-based tool, there is no need to download any software.
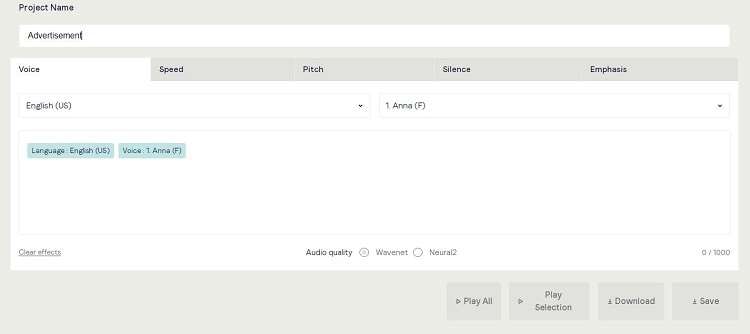
Step 2: Give a name to your project
Give your project a name to get started. Select the language you want to use and the voice that best matches the tone and style of your project. Then time to enter your script into the text area.
Step 3: Adjust the pitch and speed of the voice
Make the voice unique. Test the narration’s pitch and speed, and make any necessary adjustments. Make sure the voice is the ideal fit for your project.

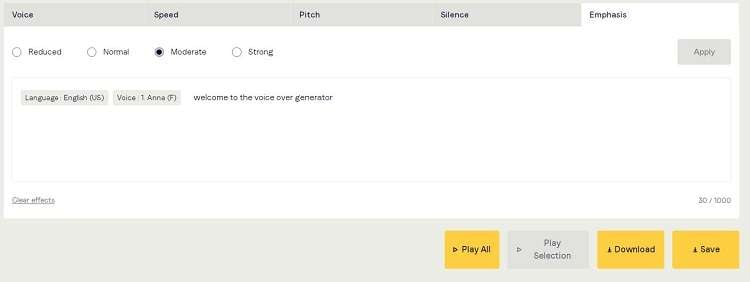
Step 4: Add emphasis to your narration
Emphasize specific words or phrases to add raise to your narration. Different intensity levels, such as normal, moderate, and strong, are available. Choose the emphasizes level, then select the text and click on apply.
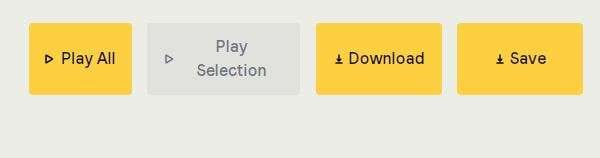
Step 5: Verify and download the voice
Give your voiceover a final try to make sure everything is in order once you’ve become satisfied. Download it if it sounds good.
3. Speechify
Text may be easily turned into voiceovers with the help of Speechify’s comprehensive technology. With more than 200 superior voices at your fingertips, you can give your projects a genuine. Discover more than 20 distinct languages to engage with people around the world and deliver your message with local precision. You can modify the pitch, tone, and speed of the narrated voice, providing them with granular control over the audio output.
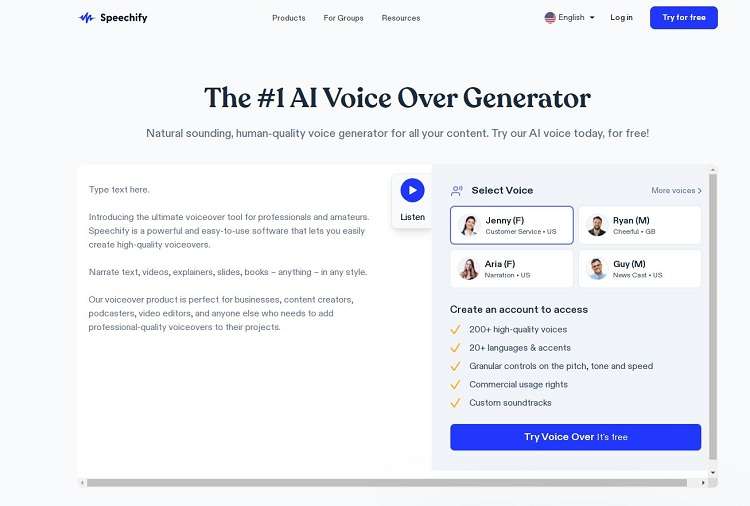
Step-by-Step Guide For Using Speechify
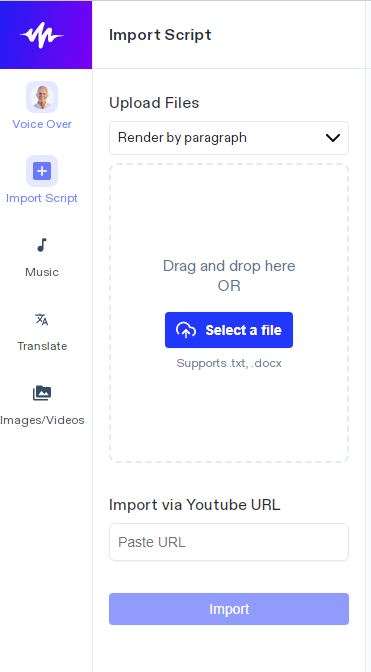
Step 1: Enter and import your script
Visit the Speechify website to get started with the voiceover, then select “Try for Free.”. By selecting “Import Script,” you can easily import your script from your device or enter your script manually. You can also import YouTube URLs.
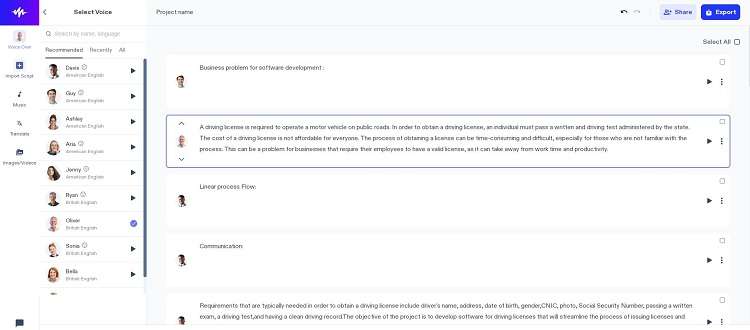
Step 2: Select the voice-over for your projec t
Select the perfect narrative voice by selecting “Voice Over” and then “Voice.” Discover the ideal match for your project among over 200 high-quality voices in more than 20 languages. Customize the speed of voice according to your taste.
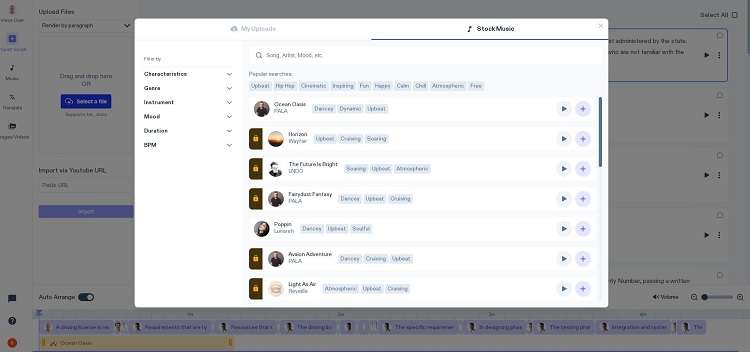
Step 3: Add translations and music to your script
Click on music and choose the music from stock or upload from media. Adjust the background music according to your script. You can also add multiple music to each block of script.
Step 4: Export your project
After completing all the editing, click on the export button to download your project.
Conclusion
In this article, we discussed the importance of a narrator voice generator, emphasizing its efficiency, cost-effectiveness, support for multiple languages, and consistency, it provides to video development. We have also looked at the essential factors to take into account while choosing the best narrator voice generator for your projects.
We provided a list of some of the top voice-over tools for narrators. Wondershare Virbo comes out as the best option among them for generators. With its user-friendly interface, compatibility for several platforms, and availability of more than 180 video templates.
Right Moves to Use TTS in Descript
Content creators often struggle with time-consuming tasks like crafting scripts and narrations. Here, Descript text-to-speech emerges as a game changer in the video editing scene. Its features have become crucial in automating voiceovers, generating scripts, and ensuring accessibility.
Users must understand the effective use of TTS to ensure a smooth editing process. As we explore the range of TTS tools, this article focuses onDescript TTS, the top performer in the market.
Part 1: Text-to-Speech in Descript: A Review
Availability: Windows, Mac, and Online
While exploring TTS technology, it becomes clear that these tools come in many forms. They offer unique automation options to convert written content into spoken words.Descript AI text-to-speech , in particular, differentiates itself with its strong features. Its entire project creation process includes user-generated scripts or content generated through AI.
Whether you choose to write out your ideas or rely on AI, Descript changes the input into speech. It brings the content to life through the application of advanced AI algorithms. This direct transition from written script to spoken words showcases the tool’s efficiency.
Moreover, it offers realistic AI-powered text-to-speech to simplify podcast and video production. You can create voice clones or use stock AI voices for quick audio generation. The creation of these dubbed voices is without recording or editing. With the natural speech patterns training, it delivers lifelike intonations and pauses. Also, it allows you to customize vocal styles for various settings and emotions.
Other Top-Notch Features of Descript
1.Overdub
If you want to correct your mistakes or enhance a specific part of an audio track, you don’t need to re-record it. The Overdub feature enables you to record an extra soundtrack with AI voice cloning. It allows users to type what they meant to say without a time-consuming editing process. Plus, the tool ensures users fully own their AI voice for easy sharing with others.
2.Regenerate
The irritating background noise or unmatched tone can make your videos imperfect. Descript’s Regenerate feature restores your audio by fixing errors. The tool uses AI technology to match your tone and regenerate a lifelike sound in a few clicks. It eliminates dull dialogues and background noises available in your videos and podcasts.
3.Remove Filler Words
Filler words and verbal hesitations can impact the presentation by distracting listeners. Descript’s feature to cut filler words addresses this need with a quick solution. You can remove words like “ums,” “uhs,” and “you knows” with it. Removing fillers empowers you to present a compelling audio presence.
4.Studio Sound
The “Studio Sound” feature removes background noise, enhances speech, and mimics studio-quality recording. It tackles echo and imperfections in the audio and video editing. You can isolate voices and regenerate audio quality by removing unwanted noise. Users can use it in different recording environments to create professional-sounding content.
Pricing Plans
After exploringDescript text to speech with other features, let’s discuss how much it costs. It has different options to fit what you need to make it accessible for everyone:
| Plans | Price |
|---|---|
| Descript Creator | $12 per user/month |
| Descript Pro | $24 per user/month |
Part 2: TTS Function in Descript: Getting Aware of the Operations
Imagine you’ve put much effort into writing the script, ensuring every word is right. But the idea of recording audio seems a bit overwhelming. That’s where theDescript text-to-speech feature finds its application. It can turn your written script into captivating audio with simple steps. Let’s explore the easy steps to see magic and give life to your video scripts:
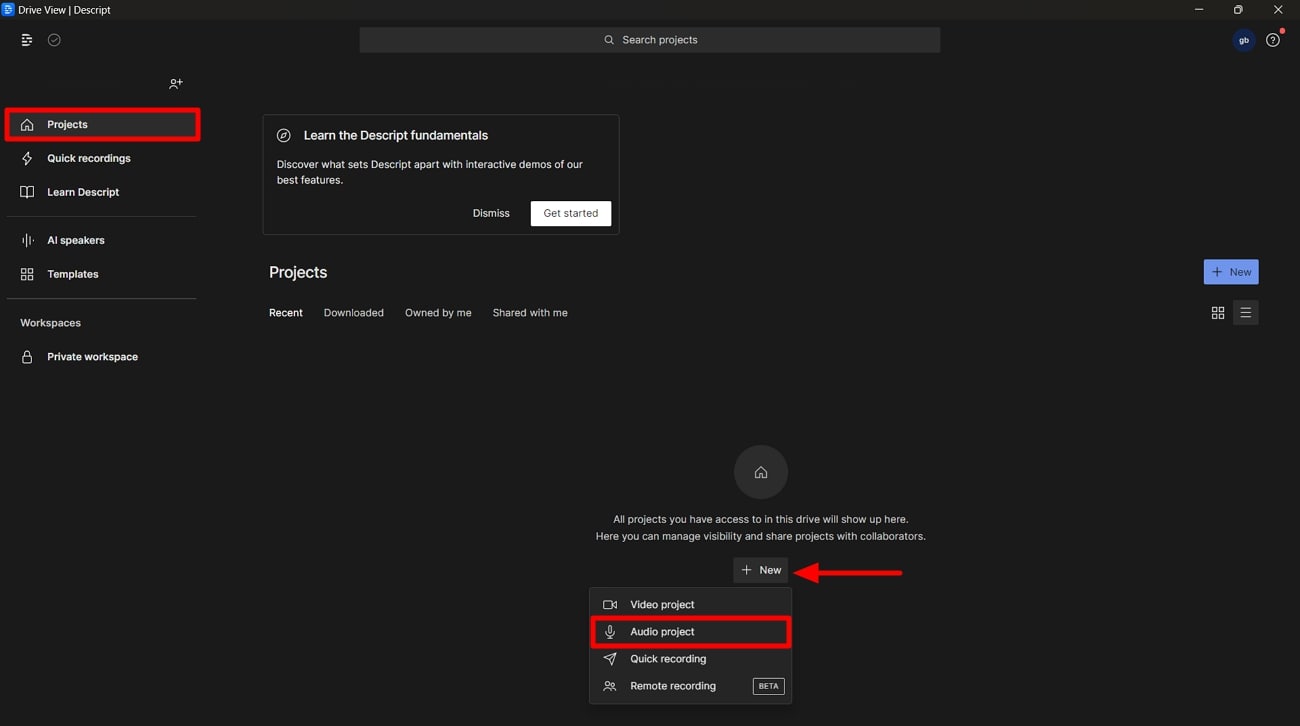
Step 1 Create an Audio Project
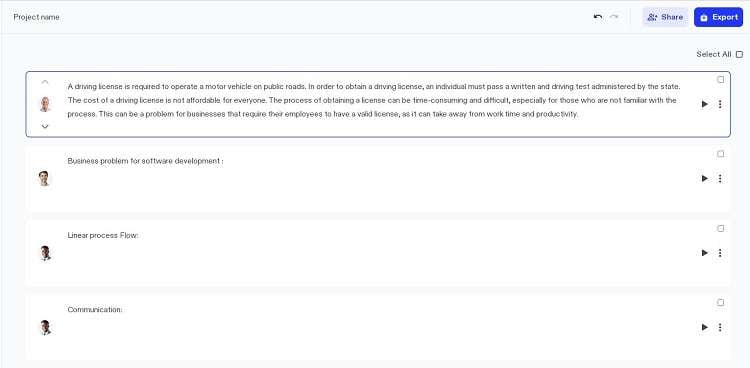
First, visit the official website of Descript, download the tool, and open it on your devices. On the tool’s dashboard, head to the left toolbar and click the “Projects” tab. On the upcoming window, tap on the “New” button. Now, you’ll find a dropdown menu; choose “Audio Project” among the available features. Then, you’ll find a new screen to do your audio projects.
Step 2 Generate the Script
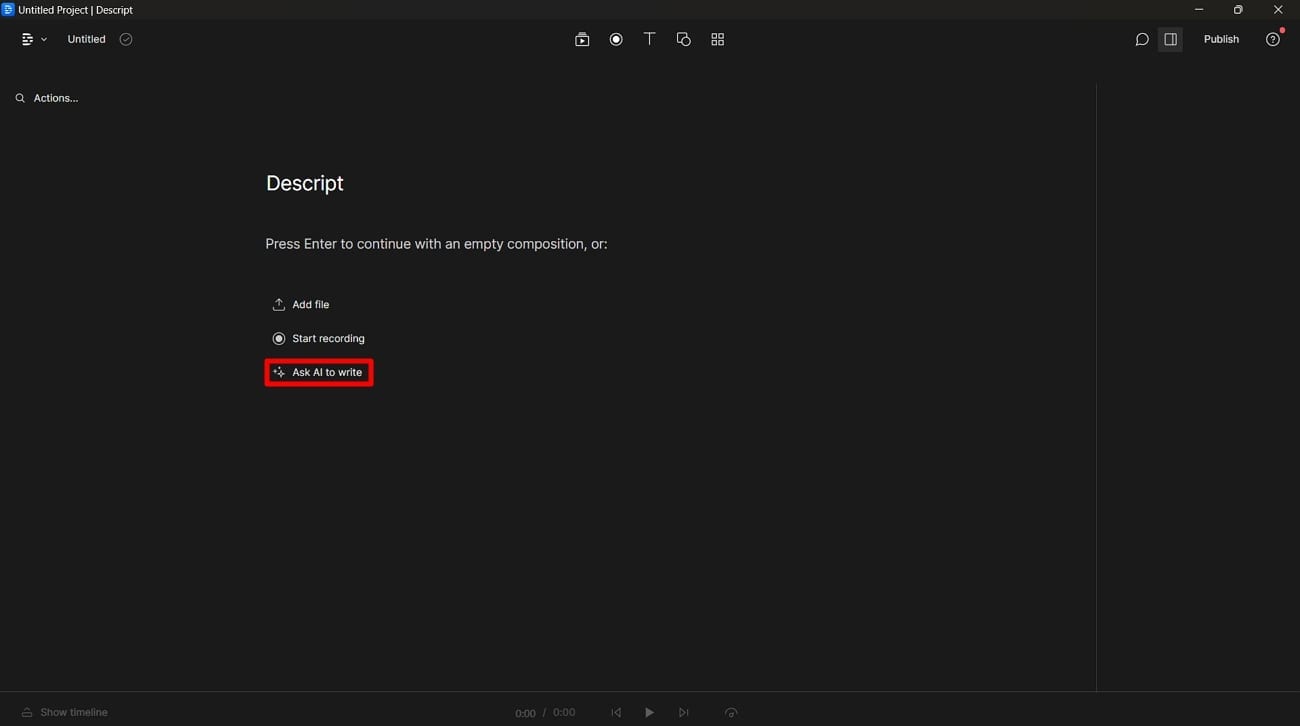
Start writing your script to generate lifelike voices. However, if you want to write a script yourself, press “Enter.” In contrast, if you want to get an AI-generated script, choose the “Ask AI to Write” option.
Step 3 Employ AI to Polish Your Script
After clicking this button, a dialog box will appear on the screen. Now, write what you want AI to do in the prompt box and select the “Enter” key. You can specify your output of a whole script, an outline, or brainstorming ideas for your content. Moreover, you can ask AI to refine the result to get the required answer. Finally, choose the “Add to Script” option to use it for your videos.
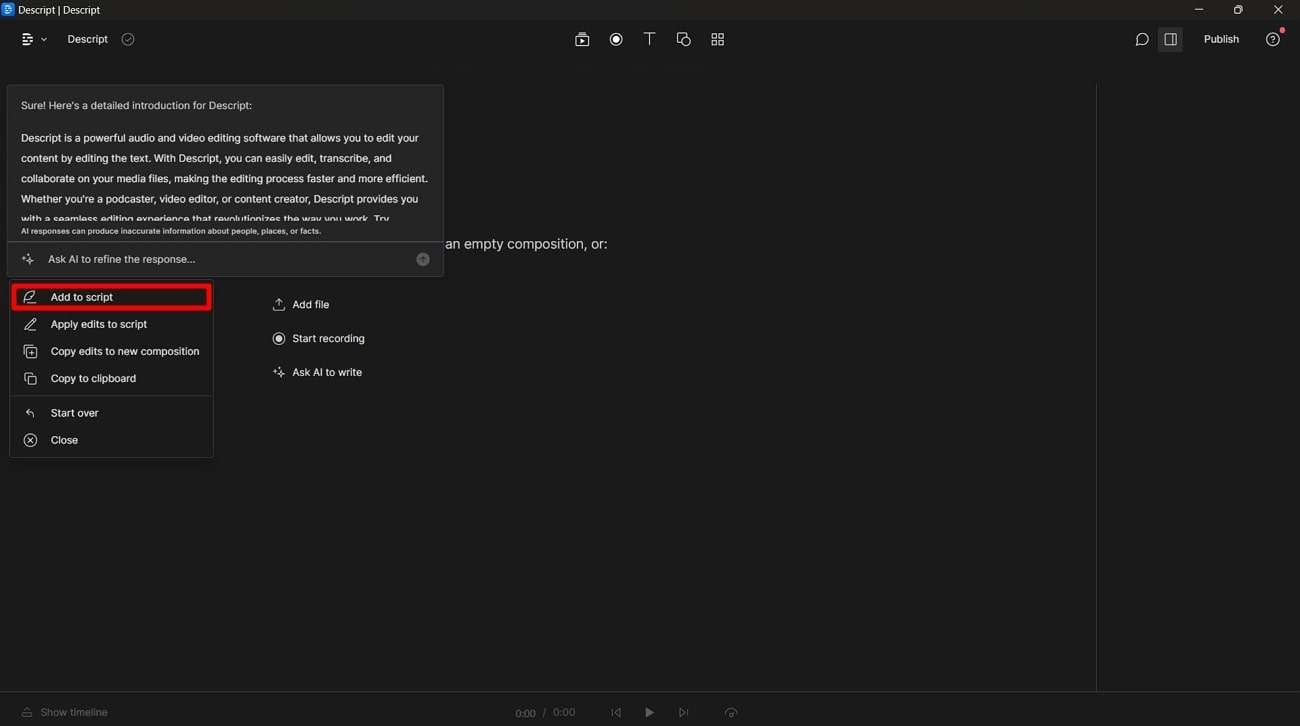
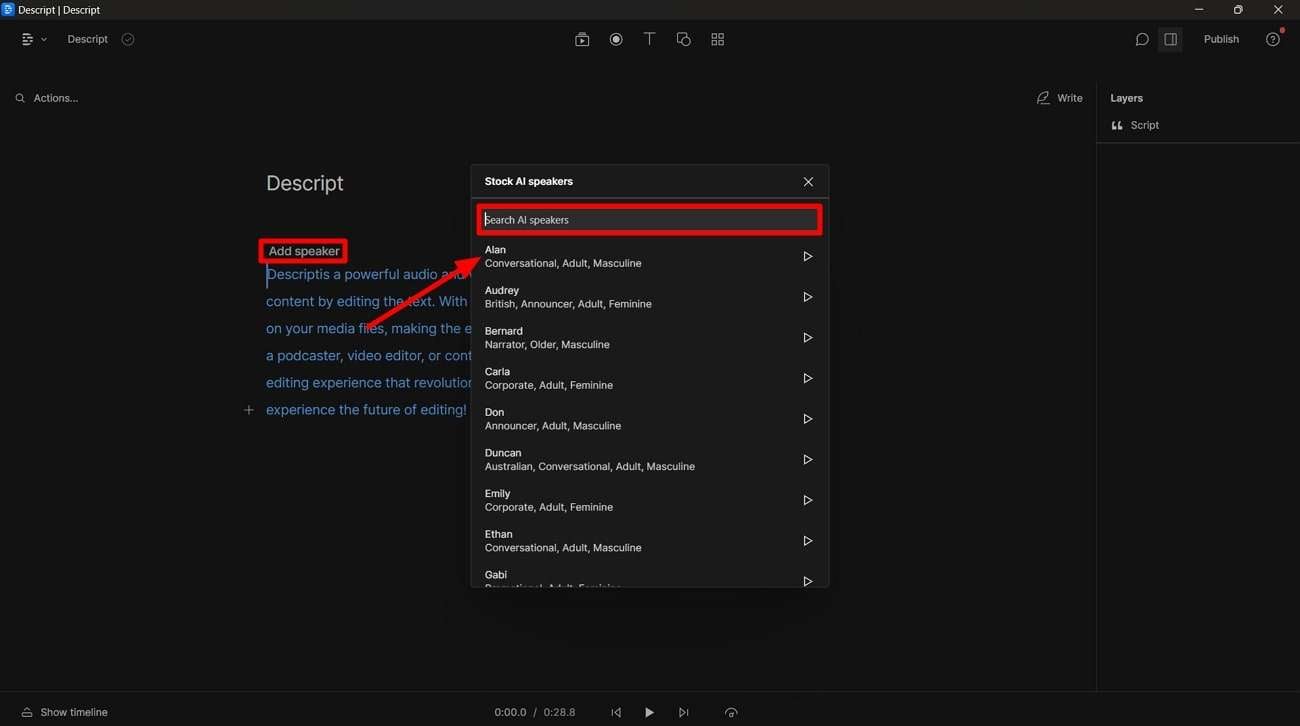
Step 4 Add Speaker to Your Project
In the next step, the chosen script will appear on the screen. Now, hit the “Add Speaker” button to select the speaker you want to produce voices for your videos. You can opt for the “Browse Stock AI Speakers” to choose among the speakers offered by the tool. Later, navigate to the bottom of the screen and tap on the “Play” icon to preview the recording.
Conclusion
In conclusion, users are now familiar withDescript TTS, where efficiency and creativity come together. Descript offers an understanding of the possibilities of TTS and stands out as a leader. This article discusses the features it offers at an affordable pricing plan. Plus, the easy-to-follow steps help you convert written text into customized voices. Due to its cross-platform adaptability, you can use it on Windows, Mac, and even online.
Ultimate Guide to Shopee Livestream Selling: Maximize Profits
Live videos are becoming crucial for promoting and selling stuff in today’s online market. This trend is especially prevalent in Southeast Asian countries like China, Singapore, and Malaysia. People in these regions utilize live-streaming platforms and tools to promote their products. This guide explores one of these platforms called**Shopee Livestream .
We will explain how Shopee’s live videos work to help you create content that will interest people. Keep reading to learn how to be aShopee live seller to sell things better with this platform and other live-streaming tools.

Part 1. A Review on Shopee Livestream: Learning the Basics
Shopee offers a platform for sellers to host interactive video streaming sessions within its app. This feature lets sellers connect with their audience in real-time to build a stronger bond. It is functional in the Philippines, Indonesia, Thailand, and other Southeast Asian countries. With millions of active users on this forum, sellers have the opportunity to boost sales.
Through this platform, users can get their orders delivered to their door without paying any extra shipping fees. This shopping platform allows you to talk directly to sellers while you shop. You can enjoy fun playing games and free stuff for an exciting shopping experience. Also, sellers and buyers get safe payment choices to ensure reliability.

Live Shopping Features Available on Shopee
With Shopee’s live-streaming service, there are many cool features to improve online shopping. Let’s explore the features oflive selling in Shopee to see how this platform works:
- Livestream call lets the host answer viewer questions and stream with others using audio or video.
- It has business insights that show live stream data to improve your live selling based on clicks and orders.
- Different prize popups throughout the stream encourage viewers to follow your shop.
- The orange bag icon lets the host show products during the stream.
- Hosts can open a sharing panel to share the live stream on Instagram, WhatsApp, or Facebook.
It’s essential to note that you also need to use the smartphone app to operate theShopee live show fully. This way, you can get a seamless and optimized experience across Shopee. It makes it easy to watch live streams and buy/sell things whenever you want.

Part 2. Some Basic Guidelines To Perform Live Shopping in Shopee
When startinglive shopping at Shopee , it is essential to follow the rules to have a good time. This means you have to do what Shopee says when you’re selling things or buying them on the platform. Let’s explore theseguidelines to ensure a better shopping experience:
- You can only add up to 500 products to the orange bag during one livestream.
- Sellers can’t use phrases like “Add to Orange Bag” or “Send PM” to share links. It is prohibited during the stream or on social media outside the Shopee app.
- If you have multiple shops, each shop needs its livestream. Also, ensure the items you promote fit within the live stream frame.
- Do not upload content with sensitive information, harassment, or cyberbullying.
- Users can’t use music they don’t own the rights to during their live shopping. Instead, you should use music that is free for anyone to use.
- You can rearrange the products and edit details like price discounts before you go live.
Part 3. The Simple Guide to Using the Live Shopping Service of Shopee
With the rise of online shopping, Shopee streamlines the process for its users. Users can performlive selling in Shopee through mobile apps and desktops. The friendly interface allows you to showcase things in real-time. Let’s discuss a step-by-step guide to elevate your online shopping experience.
Steps of Live Shopping in the Shopee Mobile App
Before starting the process, download the Shopee mobile app on your smartphone. Afterward, pass the eligibility test for being the seller. Next, you need to prepare the required equipment to go for a livestream. To start your Shopee Live, you can follow these steps.
- Step 1. After launching the app on your phone, head to the “Me” tab. Within this tab, press the “Live Streaming” option and then tap on the “Create Stream” feature.

- Step 2. In the upcoming screen, tap “Add a Title” to type in the label. You can also add a description as desired. Next, click the “Add Cover” button below the shopping bag to upload an image of 500x500. Then, hit “Add Related Products” to feature the desired products during a live session.

- Step 3. Once you’ve made changes, press the “Next” button at the bottom. This action will give you a 3-second preview of your video. Proceed by clicking on “Go Live” to stream your video. Now, all your followers get a notification to join the session.

Steps of Live Shopping on Shopee Live Desktop
In addition to the mobile app, you can also utilizeShopee live commerce on your Desktop. In the following section, you’ll find detailed instructions for live streaming on PCs:
- Step 1. First, launch your livestream software, such as OBS, on your desktop. Then, make the required changes for live streaming in the tool settings.
- Step 2. Then, head to the Shopee Live website and sign in with your relevant country page. To create streaming, provide all the details, including the cover photo and title. Now, hit the “Add Related Products” button to insert your desired ones in a live stream. Finally, click the “Next” button to proceed with this livestream generation.

- Step 3. Upon reaching a new window, copy the generated link and Stream key through the app and paste it into OBS. This facilitates the transition of streaming between the software and the Shopee website. After adjusting the settings, select the “Go Live” button to start showcasing your products.

Part 4. Make Livestreaming Selling Efficient With Wondershare Virbo Live
LikeShopee’s live selling tool, many other platforms offer live shopping. However, not all of them provide the comprehensive features needed to set up livestream events across multiple channels. This is whereWondershare Virbo Live stands out. It offers an all-in-one solution to manage a livestream selling system online with exclusive tools. Users can benefit from its ability to carry out continuous 24/7 broadcasting without interruptions.
Its AI-driven avatars or VTubers reduce the dependence on large human teams. You can customize your own AI avatar in different outfits and poses to build a unique identity. The customizable feature of the Q&A repository responds to customer’s queries quickly to engage them. Its compatibility with social platforms makes it the perfect tool to create videos to sell across any platform.
Features of Wondershare Virbo Live You Should Consider
- AI translation allows users to talk to viewers in their preferred language without a language barrier.
- You can also utilize AI for script generation to create interactive live streams.
- Users can simply write text or speak during the live stream to stimulate the AI streamer to respond accordingly.
Get Started Online Free Download
Steps of Creating a Stream Room via Wondershare Virbo Live
If you want to optimizethe Shopee live stream, Wondershare Virbo Live can help you with its diverse features. Here are the simple steps to follow for boosting sales through AI-generated avatars:
- Step 1. Get the Tool Online To Create a Blank Livestream Room
First, access the Wondershare Virbo Live website online to enter the primary interface. Now, hit the “Create Stream Room Now” button from the left side to enter a new window. Here, head to the top and press the “Create a Blank Livestream Room” button.

Get Started Online Free Download
- Step 2. Pick and Personalize Your Preferred AI Avatars and AI Backgrounds
In the next step, you’ll be directed to a new window. Click on the “AI avatars” tab, which opens a dialogue box. You’ll find presets of avatars to choose from according to your needs. Afterward, switch the tab by tapping “Background” to modify the product’s outlook. Also, add “Stickers” according to the promotion you are offering against your product.

- Step 3. Generate Scripts for Your Livestreaming Session
After picking the avatar and background, locate the text box on the left side of the window. Now, type in the preferred text or utilize AI-generated scripts. Conversely, you can also use the services of “Human Interaction,” where you only have to add a microphone for live interaction in the “Microphone” section.

- Step 4. Initiate Live Streaming To Display Your Products on Any Platform
Once you’ve made your desired changes, hit the “Start livestream” button from the top right. By doing so, you can livestream on your preferred platform, such as Shopee.

Conclusion
All in all,Shopee’s live selling is changing how businesses reach customers. Throughout the article, we provide you with a genuine review of Shopee and how it operates. However, to streamline your livestreams, you need an AI tool like Wondershare Virbo Live. It is perfect for businesses looking to boost their sales through engaging live streams.
Best 10 Animated Explainer Video Examples
There are a ton of explanatory videos available online. There is no need to inspect every one of them since it is impossible to do so. The finest animated explainer videos may be seen and examined to learn the key points and takeaways that will assist you in producing your own masterpiece. We’ve compiled the top 10 animation explainers in this guide. Find out your favorite one here.
Part 1: Best 10 Animated Explainer Video Examples
Videos may be used as a tool to grow an audience’s loyalty, enhance conversions, or draw in new clients. It’s a fantastic approach to increase brand recognition and customer loyalty. To learn how other companies have created explainer films, we advise viewing some of the greatest ones currently available. These 10 explainer video examples are ones we recently came across and would want to share with you. Let’s think about these wonderful videos and why we love them without further ado.
1. Microsoft Office 365
Although Microsoft does not need an introduction, its services or products do. The full functionality of Office 365 is described in this video. We are aware that the simplicity of this video animation is precisely what we like about it. The explainer film made by the Microsoft team is the ideal example of what one should include.
With the help of amazing characters, this 30-second animation showcases Microsoft Whiteboard’s advantages and shows how to use it. The reason In a Nutshell is at the top of our list of the best animated explainer films is because they consistently provide the most aesthetically attractive videos.
2. Making Teamwork Click
You know why this is one of the finest explanation videos we’ve ever seen? the animated explainer backdrop. There is no question about the quality of the animation, but pay attention to how the music precisely reflects the development of the narrative and gives it a new depth without interfering with the narration.
Each year, businesses produce tens of thousands of explainer films, some of which are excellent and some of which are among the greatest ever made. Making Teamwork Click is just one of them. The basic backdrop and figures used here wonderfully complement the animation, which keeps your focus on the app.
3.Ahrefs
Ahrefs is a collection of SEO tools. In terms of managing SEO, the video demonstrates how to utilize and benefit from the tool. An adorable and enjoyable animation goes horizontally to the right as the pieces in the Ahrefs explanation video leap up and down on the screen. Cool cinematography with a horizontal pan to the right, cute effects, and smooth transitions. There is creative typography on it.
Ahrefs has effectively disproven the notion that a company’s brand is too corporate for animated explainer films. This animated software demo film demonstrates that combining stylish transitions with educational material is a pretty smart concept. We believe that this video’s straightforwardness makes the use of animation ideal for the message it is trying to express.
4. McDonald’s Going Tech
This explainer video is in a distinct manner. Although it’s difficult to construct an animated explanation video, McDonald’s smooth animation makes it seem possible. To help users understand how to redeem offers on the McDonald’s app, a humorous, daring character-driven explainer video animation was produced. The basic backdrop and figures used here wonderfully complement the animation, which keeps your focus on the app.
Since videos that make viewers feel something are quite popular, we had to include this one on our list. Videos that evoke emotion in the viewer tend to be very popular, which is why we had to have this video on our list.
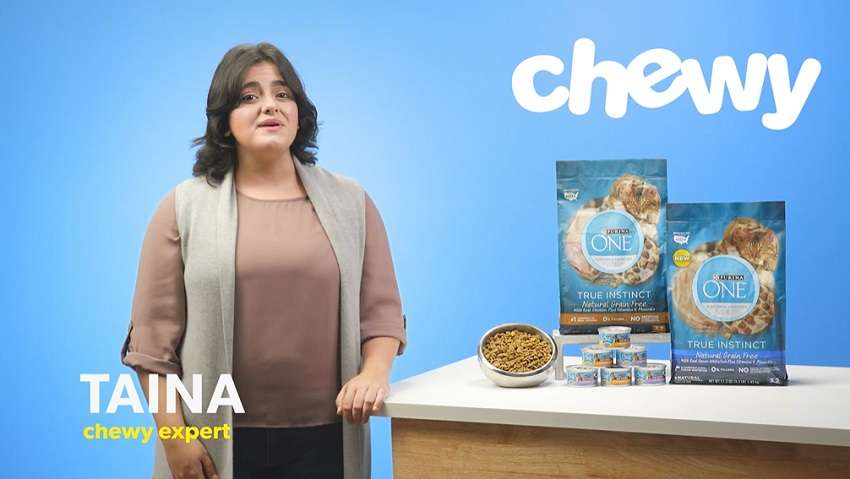
5. Purina One
The greatest illustrated characters are those that are specifically made for a company. While the voiceover promotes Purina cat food, the cat and its owner are amicable and attractive to look at. We’re certain that this is one of our greatest animated explainer films since it has a properly written narrative, a lively vocal, and eye-catching image.
Your video marketing plan won’t be the same after you comprehend the power of videos and can determine if a certain video is beneficial or not. Acknowledging your errors also helps. This explainer film is the ideal demonstration of what a 2D animated explainer video looks like. Despite the app’s specialized purpose, its designers continue to convey their essential points via 2D animation. And it looks fantastic!
6.Meet Asana

Explainer videos that are animated give you a lot of creative flexibility. Just take a look at this example’s fantastic style; it is so distinctive that the writing is immediately unforgettable. This proves that your video style can be customized to meet your tone and image regardless of the sector you work in.
When it comes to producing the best animation, these people consistently outperform the competition, particularly when animation is used to promote the introduction of their most recent goods. In this film, live-action footage is mixed with quirky animated text and graphics.
7.Slack for Sales Teams
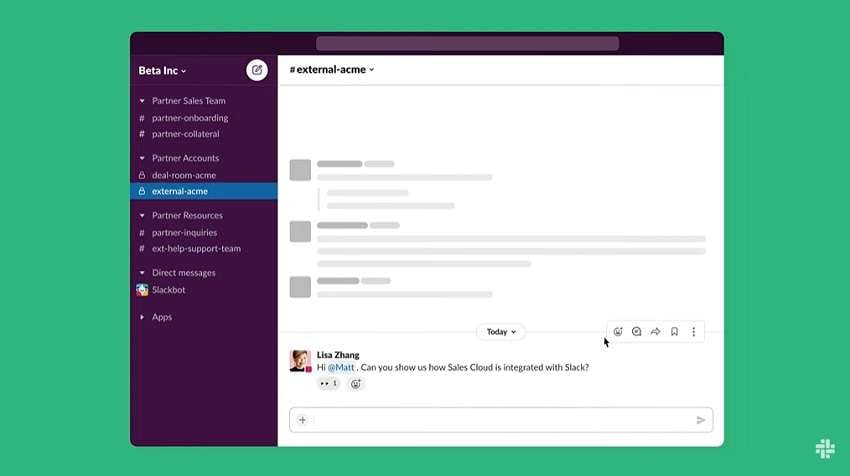
This next video was produced by the Slack team. This is another contender for the best explainer video that explains the ins and outs of intangible things using animated characters or objects for marketers. The usage of the brand’s colors to make this item instantly recognized and memorable improves it even more.
The Slack marketing team done a terrific job of simplifying their sophisticated software solution into an engaging explanation film. The Slack team produced an animated explainer film that is both true to their brand and appropriate for a current audience by combining their chosen color scheme with contemporary iconography and smooth transitions.
8. HonestGorilla Explainer Video

Next, we have an excellent example of 2D video animation. This animated film was made for HonestGorilla, an energy firm that encourages customers to compare energy providers rather than just choosing the first one they see. It’s funny, educational, and snappy; everything a good video animation should be.
Each scenario in this film is realistic, with animation serving merely as a supplemental technique. Because of its vibrant visual aesthetic and amazing level of information, it is straightforward, peaceful but intriguing, and stunning.
9. Cisco Communication Network
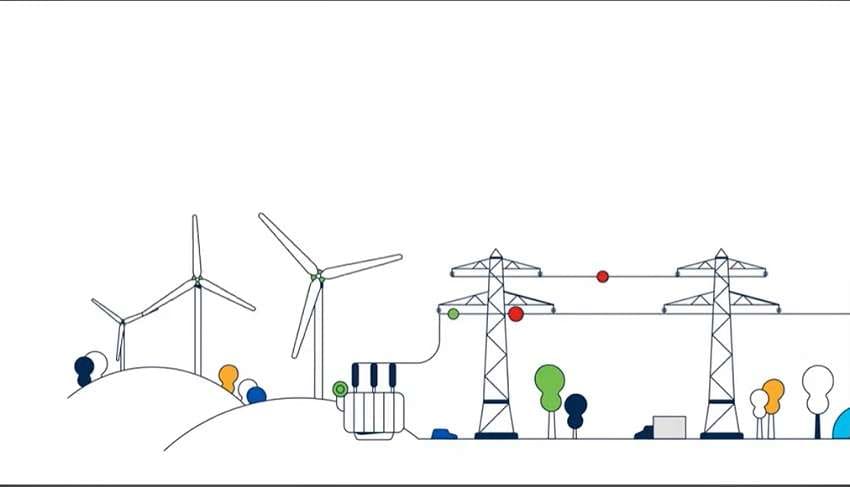
It’s not a simple task to describe a digital grid’s operation and make it obvious how consumers might profit from it. Nevertheless, the people at Cisco are able to do so effectively because of the educational effectiveness of explainer films. This clip does a great job of taking us on a trip while clearly articulating the issue it answers as well as the solution itself.
We are interested in the footage at all times. This animated explainer movie serves as an example of an excellent piece of content that can be utilized for business websites as well as other social media platforms.
10. Hellosign
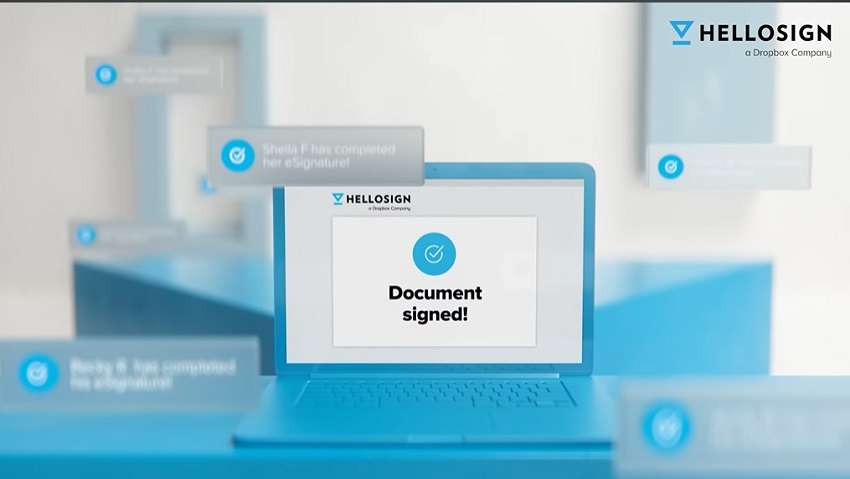
When you have a strong CTA, sometimes less is more! HelloSign, an eSignature provider, has opted to highlight exactly the key benefit of their offer in this explainer video sample. In this method, they may quickly pique interest and effectively express their point. The Call-To-Action at the conclusion, which urges the viewer to test out the program, is what really seals the deal.
The art style is mostly composed of a violet color scheme, which is complimented by other hues that are often connected to the idea of data.
Part 2: Bonus Tip for Making Animated Explainer Videos
If you’re here, you presumably already know about all the wonderful advantages of animated explainer video maker for reaching audiences and persuading viewers to take action. However, before you begin producing your own assets, you must be aware of the finest tool at your disposal in order to complete the explainer films successfully. In that lieu, we’veVirbo as the top-notch animated explainer video production tool.
Get Started Online Free Download
Virbo comes with a set of AI-based features that can make your animated explainers compelling as well as creative at its level best. We hope that you’ve noted your Favorite animated explainer since each of the above-mentioned videos has something to teach and provide inspiration for future work. After that, Virbo is your key to making one you liked the most.
Here are some of its characteristics that you should know before proceeding with your animated explanation video making.
Key Features:
Add Voiceover and Music:

With Virbo, you can select a voice actor who is appropriate for your video, and then add sound and music to complete the piece. It also supports AI-backed voices and automated scripting that you can utilize to captivate your audience with favorite voiceovers.
Template Customizations:
Various genres and around 150+ types of animation templates are available in Virbo. You may produce in your animated explainers in stop motion, 3D, or 2D. Even if it might have a serious or comedic context, Virbo provides you the way for it. Simply, choose a theme that appeals to your organization and customize it accordingly.
Widely Supportable:

Virbo makes sure you can create your animated explainers’ videos from any operating system device. It has a seamless support for Windows, Mobile and online users.
Share with All Audiences:
The best place to start is by choosing a certain demographic since it will help you keep your message on target. Talking of which, Virbo gives you the audacity to share your animated explainers with audiences around the internet. It gives you a vast exporting and sharing options to share your videos on-the-go.
Make an AI-powered CTA:
The most successful explainer films feature a strong call to action. With Virbo, you can make sure the action you want people to do is obvious. Whether you want the viewers to visit your website, subscribe, or fill out a form, you can count on 180+ Virbo templates along with royalty-free music.
Conclusion:
It’s difficult to start from zero when making animated video explainers, particularly if you’ve never done it before. You need inspiration, and there is no greater source of it than animated explainer video production companies that have been using this kind of videos for some time. The aforementioned examples have shown that there are several methods to create the tone of your explanation.
No matter what sector of company ownership you are in, whether SaaS, healthcare, technology, real estate, education, or non-profit, an animated explainer film will pay for itself. We’d say you’re in luck if you came on this article after searching the web for the finest explainer videos. Furthermore, whichever animated explainer you’ve decided to work on, Virbo makes it handy for you to create it. Try it out and get started with your explainer video production.
Diverse Template
Template
Virbo’s template feature collects a wide range of ready-made and exquisite video templates for users to choose from, eliminating the hassle of creating videos from scratch. With just a few simple clicks, you can easily create a sophisticated video that guarantees your satisfaction.
Step 1. Choose Template
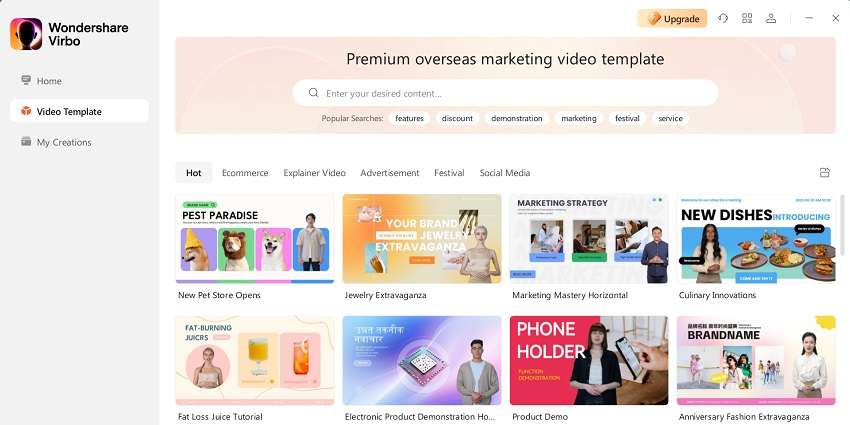
On the main interface of Virbo, you can click on the “Video Template” tab to switch to the template display area. Above the templates, there are six categorized sections: Hot, Ecommerce, Explainer Video, Advertisement, Festival, and Social Media.
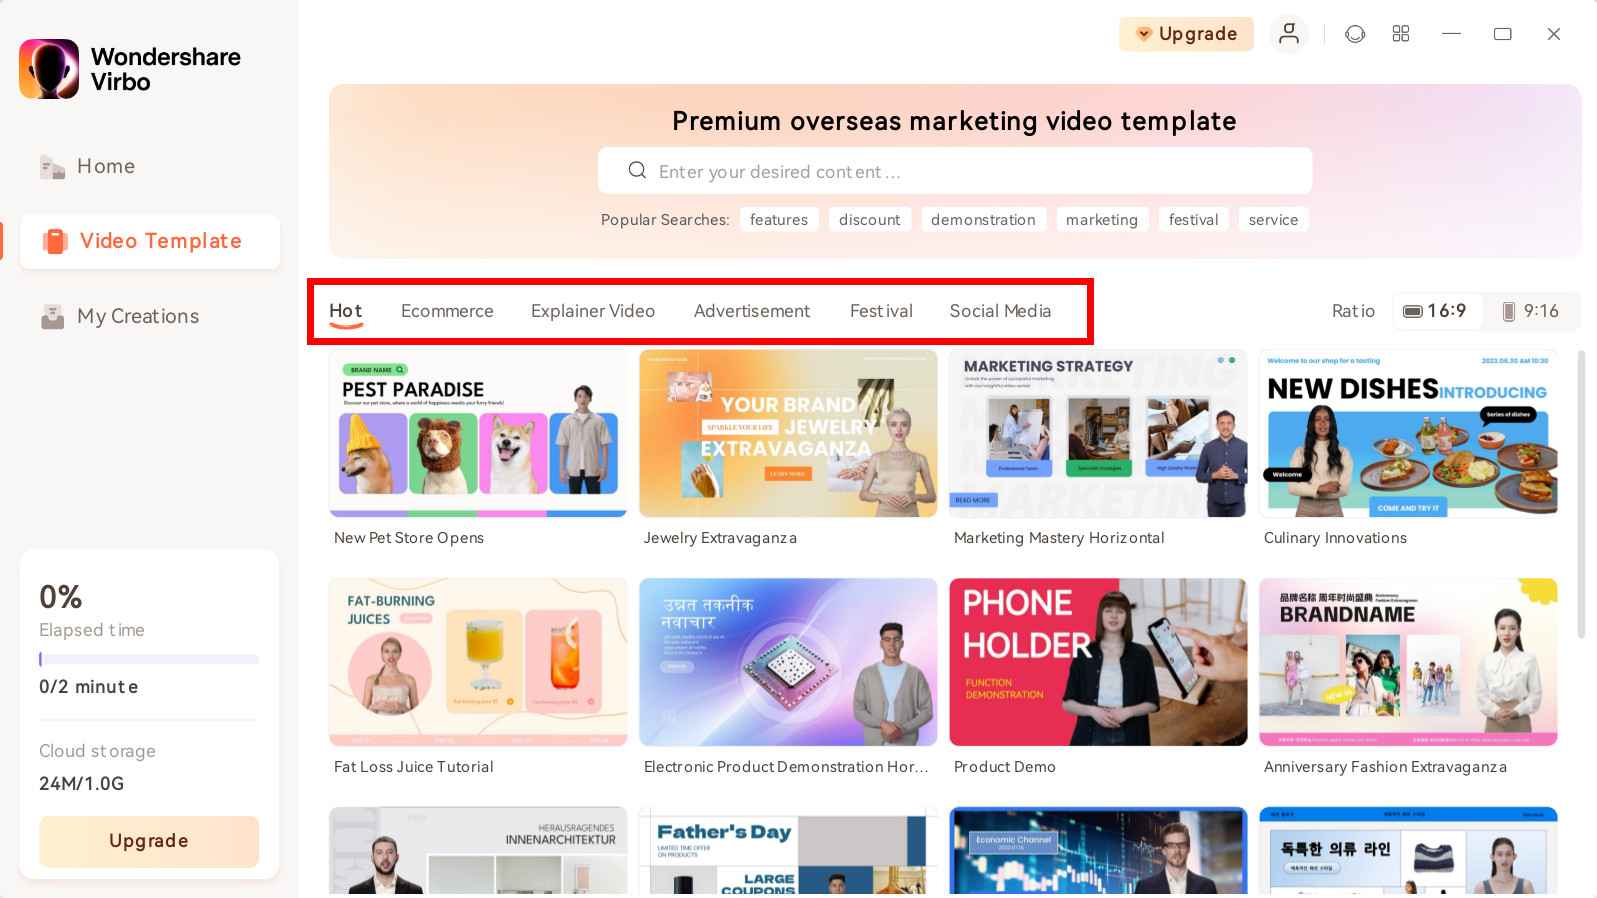
Choose Template
There is also a ratio selection switch beside it, where you can choose your preferred video aspect ratio.

Choose Aspect Ratio
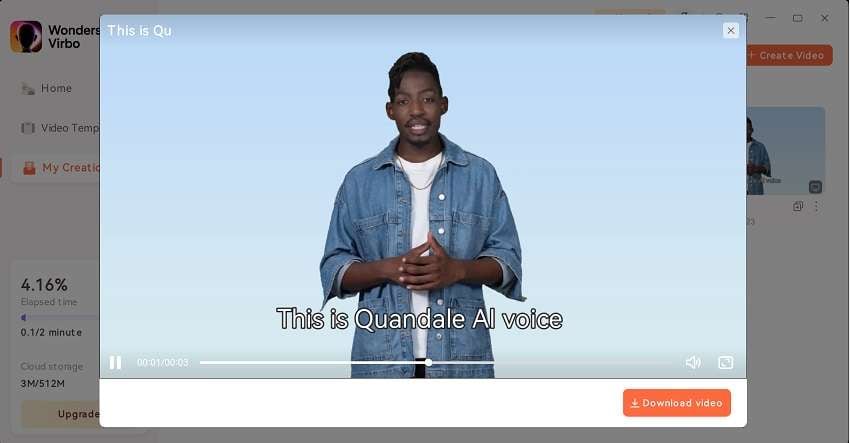
Step 2. Create Video
After selecting your preferred template, click and preview it. Then, in the bottom right corner, click the “Create Video” button to proceed to the editing interface.
Create Video
Step 3. Edit Video
In the editing interface, you can enter the script text and adjust elements like voiceover and avatar. You can also change the background and add stickers, among other options.
Edit Video
FAQs about Diverse Templates
1Are These Avatars Based On Real Humans?
Yes, these avatars are all based on video footage using real actors.
2Can the Generated Videos with Digital Presenter Be Used for Commercial Purposes?
For free users, videos are not allowed to be used for commercial purpose. For subscribed users, all materials provided in the software are commercially available, and the produced videos containing digital humans are also available for commercial use. Subscribe now>
3Can I Control Avatars’ Gestures or Expressions?
For personalized avatars on Virbo, you can enjoy the liberty to craft gestures and expressions to your liking. Click now to explore Virbo’s Customization Service!
Step 1. Choose Template
On the main interface of Virbo, you can click on the “Video Template” tab to switch to the template display area. Above the templates, there are six categorized sections: Hot, Ecommerce, Explainer Video, Advertisement, Festival, and Social Media.
Choose Template
There is also a ratio selection switch beside it, where you can choose your preferred video aspect ratio.
Choose Aspect Ratio
Step 2. Create Video
After selecting your preferred template, click and preview it. Then, in the bottom right corner, click the “Create Video” button to proceed to the editing interface.
Create Video
Step 3. Edit Video
In the editing interface, you can enter the script text and adjust elements like voiceover and avatar. You can also change the background and add stickers, among other options.
Edit Video
FAQs about Diverse Templates
1Are These Avatars Based On Real Humans?
Yes, these avatars are all based on video footage using real actors.
2Can the Generated Videos with Digital Presenter Be Used for Commercial Purposes?
For free users, videos are not allowed to be used for commercial purpose. For subscribed users, all materials provided in the software are commercially available, and the produced videos containing digital humans are also available for commercial use. Subscribe now>
3Can I Control Avatars’ Gestures or Expressions?
For personalized avatars on Virbo, you can enjoy the liberty to craft gestures and expressions to your liking. Click now to explore Virbo’s Customization Service!
Mastering Facebook Live: Your Complete Guide to Successful Streaming
A lot of people consume Facebook Live content as it provides a fun experience for the audience. Today, Facebook Live is being displayed across all genres. From gaming, vlogging, and sports, to basically anything under the Sun, going live on Facebook has become a new trend.
However, even to this date, a lot of users are confused about how to livestream on Facebook. That is why we have created this guide so you canlivestream on Facebook without any hassle.
Part 1: Easy-to-follow Step Guidance to Start Facebook Live
Facebook Live video is one of the most sought-after features of all time. Not only does it help creators connect with their audience but it lets them generate more revenue, ultimately bringing more money to their account.
Moreover, it is an awesome way to reach a broader audience and let people discover your content in real-time. A lot of people are confused abouthow to use Facebook Live because the methods to use it on the mobile app, the web, and Creator Studio are all different.
So, let’s talk about how togo live on Facebook. Before you start, you should understand that you can live stream to your page, group, profile, and event using the Facebook app or using a camera and streaming software.
01 How to go live on Facebook using a phone
As we have already discovered, you can go live on your Facebook page, group, profile, and event from anywhere in the world. The best way to go about life in the modern world is to use the Facebook app which is available on both Android and iOS.
Here is a complete guide on how to useFacebook Live streaming services on your mobile.
Step 1 Choosing where to go live (Personal Profile, Group, or Page)
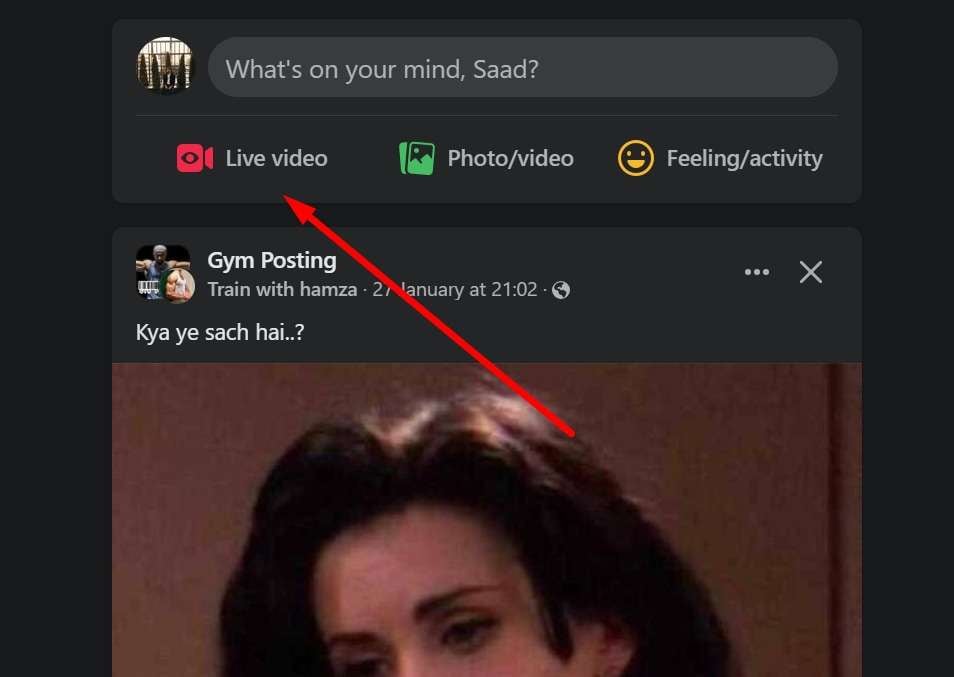
The first step is choosing where you want to live. Ask yourself where are you trying to go live. Is it on your personal profile, a Facebook page that you own, or in some group? Navigate to wherever you want to go live.
Step 2 Going live
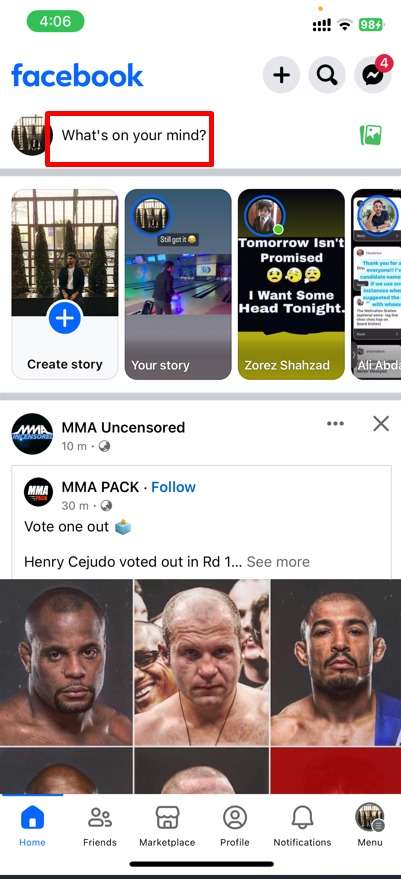
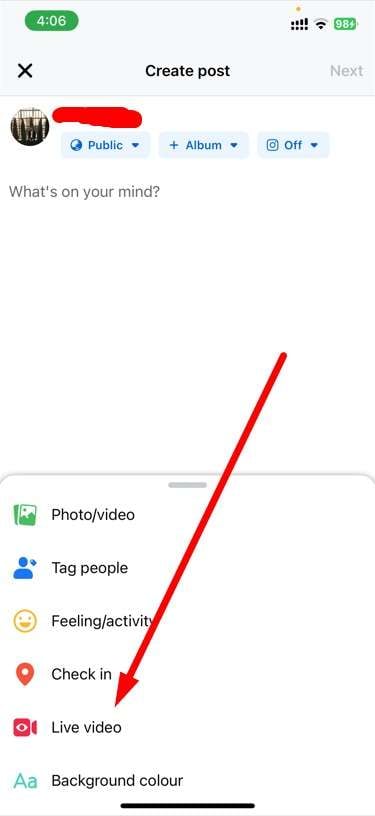
Let’s say that you want to go live on your personal Facebook profile. Then, you need to click on the Facebook app, and click onWhat’s on your mind? SelectLive Video which will be an option available. Now, you will start to see that new features will appear and you will need to set details about your livestreams in the next step.
Step 3 Setting live stream details and going live
Now you will need to give Facebook access to your camera and microphone, add a description to your video, set effects of your liking, and adjust everything accordingly. You can also invite your friends to join and watch the live video. So set those options and click onGo Live.
Step 4 Finishing the live stream
Once you have completed the live stream, simply click theFinish button to end your broadcast. In just a couple of minutes, your livestream will be ready in the form of a video.
02 How to go live on Facebook using the web
When you use the web version of Facebook, you will be redirected toLive Producer , which is a tool that allows you to use higher-end production equipment and streaming software. This happens on both laptops and PCs.
If you are aFacebook live streamer and want to go live using the web, then follow these steps.
Step 1 Find the Live video option on Facebook
Firstly, you will need to be logged in to your Facebook account. Once you are logged in, at the top of the News Feed, click on theWhat’s on your mind section and click on the three dots action button. There, you will findLive Video which will ultimately redirect you to Live Producer. So click on it.
Step 2 Setting up livestream
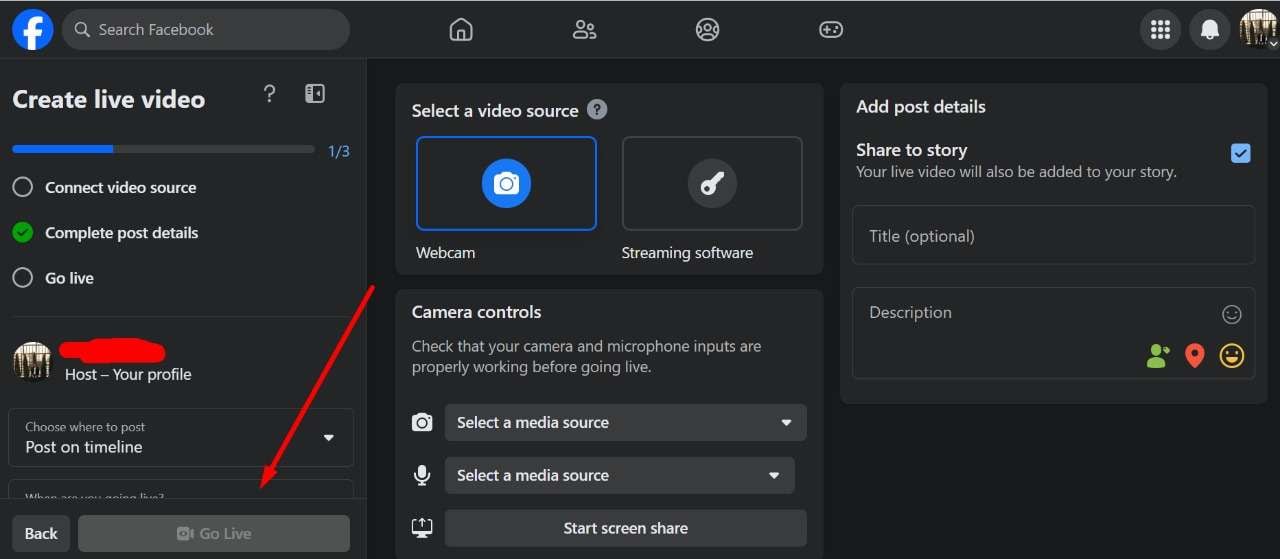
Once you are on Facebook Live Producer, you can add your title, and description, choose the equipment, and set a lot of things right on your Facebook account. You can do this before the live stream starts which is great because you can start live in a professional manner.
Step 3 Start your live stream on Web
Once everything is good to go, simply click onGo Live and you will be able to share your story with the rest of the world. You can also end the live stream whenever you like.
Part 2: Selected Tool to Elevate Your Facebook Live Experience
If you want to take yourFacebook streaming to the next level, then you should tryVirbo Live . Virbo is an all-in-one AI platform that allows users to create high-quality content with 300+ voices and a plethora of powerful features.
Virbo Live aims to transform the live experience by adding AI into play and improving traditional Facebook live streaming. Using Virbo Live is simple. You need to create a live shopping room where you can create a room or simply select a template. Then, you can choose the AI models and background. You can also choose the text and the voice that you want to be played during the live stream. And lastly, you can interact with your audience in the most user-friendly way possible.
For Facebook live streaming,Virbo Live is one of the most amazing tools that is transforming traditional boring live shopping into an AI-driven shopping experience. Let’s discover some of the features related to Facebook Live.
Features ofVirbo Live
- Cost-effective: When it comes to going live on Facebook using the traditional method, you will need a lot of equipment like a camera, mic, and more. With Virbo Live, you don’t need anything because everything is handled by AI.
- 24/7 broadcasting: The regular Facebook live stream can be interrupted but with Virbo Live, you get continuous 24/7 broadcasting without interruptions.
- Live shopping made it easier: Virbo Live makes it easier for brands to showcase their products in the most user-friendly way possible. You can have the AI describe everything as your product gets bought by the audience.
Part 3: FAQs about Facebook Live
1. How do you get to Facebook Live?
You geta live stream on Facebook by using the live streaming feature. To do that, you either need to have a PC, Android, or iOS device. If you are on PC, you can simply log in to Facebook Web. But on mobile devices, you need to have the Facebook app or the Creators app downloaded to go live.
2. Can you watch Facebook Live without an account?
Facebook live videos are public, meaning you can watch them on any device as long as you have the internet. Moreover, Facebook live videos don’t require an active Facebook account to be played as they are usually public.
3. Is Facebook Live stream free?
Yes,Facebook live streaming is 100% free, meaning you don’t have to pay a penny to use any of the features. However, if you use a third-party tool, then you might need to pay to get some features unlocked.
4. Is YouTube Live better than Facebook Live?
Both YouTube Live and Facebook Live are perfect for streaming. However, if your goal is monetization and making money, then using YouTube Live would be better. However, if you want to interact with your audience and make your community grow, then Facebook Live is the best choice.
Conclusion
Facebook streams are a fun and engaging way to interact with the audience. In this guide, we have covered a complete guide that you can follow to get live on your Facebook and reach a broader audience.
And if you want to take your Facebook live streaming to the next level, then a tool like Virbo AI will be perfect for businesses that want to bring in more revenue and reach a bigger audience.
Also read:
- What Is AI Background Generator for 2024
- New In 2024, Must-Read Learn From Deepfake Scandals & Protect Your Stream
- Updated 2024 Approved Ultimate Guide to Translating YouTube Videos Without CC
- New 2024 Approved The Most Straightforward Guide to Learning How to Clone Your Voice
- Transform YouTube Live with These Must-Know Secrets
- New A Detailed and Trustworthy Review of Murf.ai AI Text-to-Speech Tool for 2024
- Handling Exceptions | Virbo AI Live Stream for 2024
- In 2024, Diverse Templates | Wondershare Virbo Online
- Updated A Detailed Review of Murf.ai AI Text-to-Speech Tool
- In 2024, Tips for Perfecting Your Talking Face Content A Complete Guide
- New Best Options Top Live Streaming Platforms According to Types for 2024
- Chrome Video Translators Top 5 Video Translation Chrome Extensions
- New In 2024, Complete Guide of Top Video Language Translators
- AI Video Translation
- New 2024 Approved The Top English Voice Generator To Convert Text Into Desired Accent
- Unveiling the Secrets of Shopee Livestream Selling System
- Updated In 2024, 7 Best Real Time Video Translation Apps
- New Demystifying AI Game Generators From Definition to Distinction
- New 8 Types of Explainer Videos with Examples for 2024
- Realistic AI Avatars
- Updated In 2024, Introduction of Wondershare Virbo
- New What Are AI Tools? | Wondershare Virbo Glossary
- Updated Guide to Promoting Music Videos on YouTube
- Updated 2024 Approved What Is an AI Video Editor? | Wondershare Virbo Glossary
- Updated Top 10 AI-Talking Avatars Revolutionizing Communication for 2024
- 2024 Approved Create AI Video with AI Avatar | Wondershare Virbo
- Updated In 2024, SRT Subtitle Translation Tools and Techniques
- In 2024, Preparation to Beat Giovani in Pokemon Go For Honor 90 GT | Dr.fone
- Additional Tips About Sinnoh Stone For Samsung Galaxy A34 5G | Dr.fone
- OnePlus Nord N30 5G ADB Format Tool for PC vs. Other Unlocking Tools Which One is the Best?
- Authentication Error Occurred on Honor 90 GT? Here Are 10 Proven Fixes | Dr.fone
- How to Reset a Samsung Galaxy A14 4G Phone That Is Locked | Dr.fone
- How to Track WhatsApp Messages on Nokia C110 Without Them Knowing? | Dr.fone
- 9 Solutions to Fix Process System Isnt Responding Error on Infinix Hot 40 Pro | Dr.fone
- Set Your Preferred Job Location on LinkedIn App of your Tecno Spark 20 Pro+ | Dr.fone
- Bypass iPhone 13 mini activation lock without previous owner
- Does Life360 Notify When You Log Out On Oppo Find X6 Pro? | Dr.fone
- 10 Free Location Spoofers to Fake GPS Location on your OnePlus Nord CE 3 Lite 5G | Dr.fone
- In 2024, How to Fake GPS on Android without Mock Location For your Tecno Phantom V Flip | Dr.fone
- In 2024, How To Stream Anything From Xiaomi 14 Pro to Apple TV | Dr.fone
- In 2024, New Multiple Ways How To Remove iCloud Activation Lock From your iPhone 8
- In 2024, Top 10 Password Cracking Tools For Realme 12 Pro 5G
- In 2024, How Many Attempts To Unlock Apple iPhone 8 Plus
- How to Downgrade Apple iPhone 11 Pro without Losing Any Data? | Dr.fone
- Proven Ways in How To Hide Location on Life360 For Vivo Y77t | Dr.fone
- How to restore wiped messages on Tecno Spark 10 4G
- In 2024, How To Unlock a Xiaomi Redmi Note 13 5G Easily?
- Which is the Best Fake GPS Joystick App On Vivo G2? | Dr.fone
- Bricked Your OnePlus 11 5G? Heres A Full Solution | Dr.fone
- Top 15 Augmented Reality Games Like Pokémon GO To Play On Honor Magic 6 Pro | Dr.fone
- Title: Updated Registration and Login for 2024
- Author: Sam
- Created at : 2024-05-19 03:35:04
- Updated at : 2024-05-20 03:35:04
- Link: https://ai-voice-clone.techidaily.com/updated-registration-and-login-for-2024/
- License: This work is licensed under CC BY-NC-SA 4.0.
