
:max_bytes(150000):strip_icc():format(webp)/how-to-set-up-speech-to-text-on-android-0-928c48ab121248f9aa543a136d971f9a.jpg)
Updated In 2024, Launching Your Live Room
Launching Your Live Room
Launching Your Live Room
Explore step-by-step instructions on decorating your space, uploading local images and videos, adding engaging AI interactions, etc. Elevate your streaming experience and captivate your audience with a seamlessly executed live room. Dive into our comprehensive guide now!
02Uploading Local Images and Videos
07AI Intelligent Script Generation
11Starting/Ending the Live Broadcast
Decorating Your Live Room
Decoration Guidance
- Click on the product homepage and create a blank live room to initiate a new live session.

Create a blank live room
- Upon creating a blank live room, the live room editing page will open. The left side serves as the operation area, the right side as the canvas area, and the materials area is located above.

Livestream room navigation
- Click on the templates to use pre-designed combinations of background, virtual hosts, and stickers.

Select a template
- Customize the background from the background library. During the live broadcast, only one background can be used.

Livestream room customization
- Choose a virtual host from the virtual host library. Only one virtual host can be used during the live session.
![]()
Choose a virtual host
- Add stickers from the sticker library. Multiple stickers can be used during the live broadcast.
- After selecting materials, adjust their position and size in the canvas area. Right-click to modify layers, copy, or delete materials.
Uploading Local Images and Videos
Upload background images or videos
- Upload: Click Background -> Upload Background -> Select file to upload. Materials will be displayed in “My Background” after uploading.

Upload Background
- Apply: Click Background -> My Background, then click on the material to use it on the canvas.
- Delete: Hover over the material and click the delete icon to remove it.

Delete Background
Note
Background upload requirements:
- Image and video dimensions should be 9:16
- Image formats: JPG/JPEG/PNG
- Video formats: MP4/MOV
- Resolution should not exceed 1080P
- Video duration should not exceed 30 minutes
- File size should not exceed 1GB
Upload sticker images or videos
- Upload: Click Sticker -> Upload Sticker -> Select file to upload. Materials will be displayed in “My Sticker” after uploading.

Upload Sticker
- Apply: Click Sticker -> My Sticker, then click on the material to use it on the canvas.
- Delete: Click Sticker -> My Sticker, hover over the material, click the delete icon to remove it.

Delete Sticker
Note
Sticker upload requirements:
- Image and video dimensions are flexible.
- Image formats: JPG/JPEG/PNG
- Video formats: MP4/MOV
- Resolution should not exceed 1080P
- Video duration should not exceed 30 minutes
- File size should not exceed 1GB
Text-Driven Live Room
Script Guidance
- Input script text: Copy and paste your script into the script dialogue box.

Text Scripts Inset
- Choose a matching tone: Click the voice-over entrance above, select a suitable tone, and preview it.
- Preview: Click the “Preview” button below the text to listen.
Audio-Driven Live Room
Audio Guidance
- Upload audio: Click Script -> Audio -> Upload local voice and upload the local file.

Upload Audio
- Preview audio: After uploading, click to preview the audio.

Preview Audio
- Audio sorting: Hold and drag to sort the audio files.

Audio sorting
- Audio sorting: Hold and drag to sort the audio files.

Modifying Live Room Name
Method Guidance
- Method 1: Click the edit button in the upper-left corner of the edit page to rename the live room.

Rename Livestream Room
- Method 2: Product homepage -> My Live Rooms -> Click on the more options for an individual live room -> Choose Rename.
Adding AI Identification
Step Guidance
- On the live room editing page, click on the checkbox before the AI identification to enable or disable it.
AI Intelligent Script Generation
Generation Guidance
- Click the “AI Intelligent Script” button below the script, a popup will appear.
- Enter your product name (mandatory), selling points (optional), promotional information (optional), select language and style, then click generate.

AI Script
- The generated result can be further modified, click “Use” to add it to the script dialogue box.
AI Translation
Translation Guidance
- Click the “AI Translation” button below the script, a popup will appear.
- Place the text to be translated on the left, click the middle arrow to select the language for translation (e.g., English), and click translate.

AI Translation
- The generated result can be further modified, click “Use” to add it to the script dialogue box.

AI Translation Result
Manual Interaction
Microphone Interaction
- Operational Flow:
- Click Manual Interaction -> Microphone, and select the microphone device.
- Speak into the microphone and observe the sound wave status.
- Open “Start Live,” wait for the appearance of the virtual host image, and click “Open Mic Takeover.” The virtual host’s mouth will be closed, and your voice will drive the virtual host to speak.
- After speaking, click “End Takeover,” and the virtual host will resume reading the scripted dialogue.
- Click Manual Interaction -> Microphone, and select the microphone device.
- Grant Browser Microphone Access:
- Google Chrome:
*Open Chrome, click the settings icon in the top right.
* Click “Settings,” open the settings page. Select “Privacy and Security” and then click “Site Settings.”
*Enter the site settings page, click “Microphone.”
* On the microphone authorization page, select that the site can request the use of your microphone.
* After these settings, when the browser needs to use the camera or microphone, a device request box will pop up on the page. Select “Allow.” - Mozilla Firefox:
*Open Firefox, click the settings icon in the top right, and click “Settings.”
* Open the settings page, click “Privacy & Security,” and find “Microphone Permissions.” Click “Settings” next to “Microphone.”
*Enter the settings page, add the site that requests the use of your microphone to the list, and click “Save Changes.”
* After these settings, when the browser needs to use the camera or microphone, a device request box will pop up on the page. Select “Allow.” - Sogou Browser:
*Open Sogou Browser, click the settings icon in the top right, and click “Options.”
* Open the options page, click “Advanced,” find “Privacy - Browsers on the Mac System:
*Locate “System Preferences” on your Mac dock and click the icon. Once opened, find “Security & Privacy” and click to open.
* On the “Security & Privacy” page, select “Privacy,” then click on “Microphone” and set the applications that need to use the microphone to “Allow.”
- Google Chrome:
Text Interaction
- Click on “Artificial Interaction” and enter interaction scripts in the input box below.
- Click “Add Text” to add it to the interaction list. After starting the live broadcast, each interaction script will have a send button.

Text Interactionn
- Click “Send” to trigger the AI to speak according to the interaction script.
Intelligent Interaction
Note
The current intelligent interaction feature only supports Alibaba International. If you are streaming on other platforms, you can skip this step.
Setting Entrance
- On the live broadcast page, click on “Intelligent Interaction,” select the live platform, and the supported intelligent interaction features will be randomly displayed.
Q&A Library Settings
- Creating a New Q&A:
- On the product homepage, click on Q&A Library - Add Q&A, and a popup window will appear.
- Fill in the rule name, keywords, reply text, and upload a reply video. Click Save.
Note
Rule Name: Name the rule for easy identification.
Keywords: If a viewer’s question in the live room contains any of these keywords, it will trigger the AI to answer.
Reply Content: You can add up to 5 replies. Include variables like [Viewer’s Nickname] and [Viewer’s Country] for personalized responses.
Sequential Reply: Replies in sequence when triggered.
Random Reply: Randomly selects a reply when triggered.
Reply Video: If configured, the video will be displayed at the specified position until the AI’s reply ends.
- Adjusting Q&A Activation Status:
- Click Q&A Library - Switch to close or open the Q&A rule. When closed, the Q&A rule will not take effect after the live broadcast starts.
- Turning on Q&A Library Switch in the Live Room:
- On the live broadcast editing page, click Intelligent Interaction - Platform, select “Alibaba International,” and turn on the Q&A Library switch. This must be done after starting the live broadcast and capturing the barrage for the function to work.
Greeting Rules Settings
- Greeting Content: You can add up to 5 replies, including variables like [Viewer’s Nickname] and [Viewer’s Country].
- Sequential Reply: Replies in sequence when triggered.
- Random Reply: Randomly selects a reply when triggered.
- On the live broadcast editing page, click Intelligent Interaction - Platform, select “Alibaba International,” turn on the Greeting switch, and click the edit icon to open the editing window. Fill in the reply text and click Save.
Sending Business Cards and Product Catalogs
- On the live broadcast editing page, click Intelligent Interaction - Platform, select “Alibaba International,” turn on the “Send Business Cards” switch, and turn on the “Send Product Catalogs” switch.
Note
These functions will only take effect after starting the live broadcast and capturing the barrage.
How to Start Live Barrage Capture
- Start Broadcasting in Virbo Live
- Follow the steps for “Start/End Broadcast” on the live broadcast editing page.
- Install the Plugin in Chrome
- Ensure Chrome is up to date, then download the plugin from the provided link . After downloading, unzip locally.
- Configure the Plugin in Chrome
- Open Chrome, go to Settings - Extensions - Manage Extensions, enable Developer mode, click “Load Unpacked,” and select the unzipped folder. Enable “Allow in incognito mode” in the plugin details.
- Copy the Live Control Page Link
- Copy the link of your live control page (web version) from the live platform. Paste the link into the live broadcast editing page under Intelligent Interaction - Live Room Link Input, then click “Start Capturing.”
Note
Alibaba International currently supports automatic Q&A, automatic greetings, automatic business card sending, and automatic product catalog sending. You can turn on the corresponding switches and then configure the detailed settings for each item.
Starting/Ending the Live Broadcast
Starting the Live Broadcast
- On the live broadcast editing page, click “Start Broadcasting.”
- The AI live broadcast window will appear shortly after, displaying the AI live broadcast.
Using Your Broadcasting Partner or OBS
Note
Keep the AI live broadcast window open on the desktop during the broadcast, or it will not broadcast properly.
- Open your broadcasting partner or OBS, add a window, select the Wondershare VVB (Live Version) live window.
- Click “Start Broadcasting.” Use Alt + mouse to crop out the web bar or use the zoom function to remove it.
- During the live broadcast, you can only modify the “Artificial Interaction” function; other broadcast settings cannot be changed.
Ending the Broadcast
- When concluding the live broadcast, initiate the termination of the live stream on the platform’s broadcasting partner first, followed by clicking the “End Live” button on Virbo Live to finalize the shutdown process.
02Uploading Local Images and Videos
07AI Intelligent Script Generation
11Starting/Ending the Live Broadcast
Decorating Your Live Room
Decoration Guidance
- Click on the product homepage and create a blank live room to initiate a new live session.
Create a blank live room
- Upon creating a blank live room, the live room editing page will open. The left side serves as the operation area, the right side as the canvas area, and the materials area is located above.
Livestream room navigation
- Click on the templates to use pre-designed combinations of background, virtual hosts, and stickers.
Select a template
- Customize the background from the background library. During the live broadcast, only one background can be used.
Livestream room customization
- Choose a virtual host from the virtual host library. Only one virtual host can be used during the live session.
![]()
Choose a virtual host
- Add stickers from the sticker library. Multiple stickers can be used during the live broadcast.
- After selecting materials, adjust their position and size in the canvas area. Right-click to modify layers, copy, or delete materials.
Uploading Local Images and Videos
Upload background images or videos
- Upload: Click Background -> Upload Background -> Select file to upload. Materials will be displayed in “My Background” after uploading.
Upload Background
- Apply: Click Background -> My Background, then click on the material to use it on the canvas.
- Delete: Hover over the material and click the delete icon to remove it.
Delete Background
Note
Background upload requirements:
- Image and video dimensions should be 9:16
- Image formats: JPG/JPEG/PNG
- Video formats: MP4/MOV
- Resolution should not exceed 1080P
- Video duration should not exceed 30 minutes
- File size should not exceed 1GB
Upload sticker images or videos
- Upload: Click Sticker -> Upload Sticker -> Select file to upload. Materials will be displayed in “My Sticker” after uploading.
Upload Sticker
- Apply: Click Sticker -> My Sticker, then click on the material to use it on the canvas.
- Delete: Click Sticker -> My Sticker, hover over the material, click the delete icon to remove it.
Delete Sticker
Note
Sticker upload requirements:
- Image and video dimensions are flexible.
- Image formats: JPG/JPEG/PNG
- Video formats: MP4/MOV
- Resolution should not exceed 1080P
- Video duration should not exceed 30 minutes
- File size should not exceed 1GB
Text-Driven Live Room
Script Guidance
- Input script text: Copy and paste your script into the script dialogue box.
Text Scripts Inset
- Choose a matching tone: Click the voice-over entrance above, select a suitable tone, and preview it.
- Preview: Click the “Preview” button below the text to listen.
Audio-Driven Live Room
Audio Guidance
- Upload audio: Click Script -> Audio -> Upload local voice and upload the local file.
Upload Audio
- Preview audio: After uploading, click to preview the audio.
Preview Audio
- Audio sorting: Hold and drag to sort the audio files.
Audio sorting
- Audio sorting: Hold and drag to sort the audio files.
Modifying Live Room Name
Method Guidance
- Method 1: Click the edit button in the upper-left corner of the edit page to rename the live room.
Rename Livestream Room
- Method 2: Product homepage -> My Live Rooms -> Click on the more options for an individual live room -> Choose Rename.
Adding AI Identification
Step Guidance
- On the live room editing page, click on the checkbox before the AI identification to enable or disable it.
AI Intelligent Script Generation
Generation Guidance
- Click the “AI Intelligent Script” button below the script, a popup will appear.
- Enter your product name (mandatory), selling points (optional), promotional information (optional), select language and style, then click generate.
AI Script
- The generated result can be further modified, click “Use” to add it to the script dialogue box.
AI Translation
Translation Guidance
- Click the “AI Translation” button below the script, a popup will appear.
- Place the text to be translated on the left, click the middle arrow to select the language for translation (e.g., English), and click translate.
AI Translation
- The generated result can be further modified, click “Use” to add it to the script dialogue box.
AI Translation Result
Manual Interaction
Microphone Interaction
- Operational Flow:
- Click Manual Interaction -> Microphone, and select the microphone device.
- Speak into the microphone and observe the sound wave status.
- Open “Start Live,” wait for the appearance of the virtual host image, and click “Open Mic Takeover.” The virtual host’s mouth will be closed, and your voice will drive the virtual host to speak.
- After speaking, click “End Takeover,” and the virtual host will resume reading the scripted dialogue.
- Click Manual Interaction -> Microphone, and select the microphone device.
- Grant Browser Microphone Access:
- Google Chrome:
*Open Chrome, click the settings icon in the top right.
* Click “Settings,” open the settings page. Select “Privacy and Security” and then click “Site Settings.”
*Enter the site settings page, click “Microphone.”
* On the microphone authorization page, select that the site can request the use of your microphone.
* After these settings, when the browser needs to use the camera or microphone, a device request box will pop up on the page. Select “Allow.” - Mozilla Firefox:
*Open Firefox, click the settings icon in the top right, and click “Settings.”
* Open the settings page, click “Privacy & Security,” and find “Microphone Permissions.” Click “Settings” next to “Microphone.”
*Enter the settings page, add the site that requests the use of your microphone to the list, and click “Save Changes.”
* After these settings, when the browser needs to use the camera or microphone, a device request box will pop up on the page. Select “Allow.” - Sogou Browser:
*Open Sogou Browser, click the settings icon in the top right, and click “Options.”
* Open the options page, click “Advanced,” find “Privacy - Browsers on the Mac System:
*Locate “System Preferences” on your Mac dock and click the icon. Once opened, find “Security & Privacy” and click to open.
* On the “Security & Privacy” page, select “Privacy,” then click on “Microphone” and set the applications that need to use the microphone to “Allow.”
- Google Chrome:
Text Interaction
- Click on “Artificial Interaction” and enter interaction scripts in the input box below.
- Click “Add Text” to add it to the interaction list. After starting the live broadcast, each interaction script will have a send button.
Text Interactionn
- Click “Send” to trigger the AI to speak according to the interaction script.
Intelligent Interaction
Note
The current intelligent interaction feature only supports Alibaba International. If you are streaming on other platforms, you can skip this step.
Setting Entrance
- On the live broadcast page, click on “Intelligent Interaction,” select the live platform, and the supported intelligent interaction features will be randomly displayed.
Q&A Library Settings
- Creating a New Q&A:
- On the product homepage, click on Q&A Library - Add Q&A, and a popup window will appear.
- Fill in the rule name, keywords, reply text, and upload a reply video. Click Save.
Note
Rule Name: Name the rule for easy identification.
Keywords: If a viewer’s question in the live room contains any of these keywords, it will trigger the AI to answer.
Reply Content: You can add up to 5 replies. Include variables like [Viewer’s Nickname] and [Viewer’s Country] for personalized responses.
Sequential Reply: Replies in sequence when triggered.
Random Reply: Randomly selects a reply when triggered.
Reply Video: If configured, the video will be displayed at the specified position until the AI’s reply ends.
- Adjusting Q&A Activation Status:
- Click Q&A Library - Switch to close or open the Q&A rule. When closed, the Q&A rule will not take effect after the live broadcast starts.
- Turning on Q&A Library Switch in the Live Room:
- On the live broadcast editing page, click Intelligent Interaction - Platform, select “Alibaba International,” and turn on the Q&A Library switch. This must be done after starting the live broadcast and capturing the barrage for the function to work.
Greeting Rules Settings
- Greeting Content: You can add up to 5 replies, including variables like [Viewer’s Nickname] and [Viewer’s Country].
- Sequential Reply: Replies in sequence when triggered.
- Random Reply: Randomly selects a reply when triggered.
- On the live broadcast editing page, click Intelligent Interaction - Platform, select “Alibaba International,” turn on the Greeting switch, and click the edit icon to open the editing window. Fill in the reply text and click Save.
Sending Business Cards and Product Catalogs
- On the live broadcast editing page, click Intelligent Interaction - Platform, select “Alibaba International,” turn on the “Send Business Cards” switch, and turn on the “Send Product Catalogs” switch.
Note
These functions will only take effect after starting the live broadcast and capturing the barrage.
How to Start Live Barrage Capture
- Start Broadcasting in Virbo Live
- Follow the steps for “Start/End Broadcast” on the live broadcast editing page.
- Install the Plugin in Chrome
- Ensure Chrome is up to date, then download the plugin from the provided link . After downloading, unzip locally.
- Configure the Plugin in Chrome
- Open Chrome, go to Settings - Extensions - Manage Extensions, enable Developer mode, click “Load Unpacked,” and select the unzipped folder. Enable “Allow in incognito mode” in the plugin details.
- Copy the Live Control Page Link
- Copy the link of your live control page (web version) from the live platform. Paste the link into the live broadcast editing page under Intelligent Interaction - Live Room Link Input, then click “Start Capturing.”
Note
Alibaba International currently supports automatic Q&A, automatic greetings, automatic business card sending, and automatic product catalog sending. You can turn on the corresponding switches and then configure the detailed settings for each item.
Starting/Ending the Live Broadcast
Starting the Live Broadcast
- On the live broadcast editing page, click “Start Broadcasting.”
- The AI live broadcast window will appear shortly after, displaying the AI live broadcast.
Using Your Broadcasting Partner or OBS
Note
Keep the AI live broadcast window open on the desktop during the broadcast, or it will not broadcast properly.
- Open your broadcasting partner or OBS, add a window, select the Wondershare VVB (Live Version) live window.
- Click “Start Broadcasting.” Use Alt + mouse to crop out the web bar or use the zoom function to remove it.
- During the live broadcast, you can only modify the “Artificial Interaction” function; other broadcast settings cannot be changed.
Ending the Broadcast
- When concluding the live broadcast, initiate the termination of the live stream on the platform’s broadcasting partner first, followed by clicking the “End Live” button on Virbo Live to finalize the shutdown process.
Best 5 TikTok Voice Generators You Should Try
TikTok text to speech generators are becoming a more widely used tool for producing voiceovers in a variety of applications. These computer systems transform written text to speech that may be altered to seem younger, older, or more accented. TikTok voice generator are commonly used to make speech simulations for virtual assistants, audiobooks, and videos because to their capacity to produce realistic voice simulations.
Fortunately, you no longer need to record your own or other people’s speech. Now, text can be directly converted into speech using AI voice generator. You may utilize a variety of AI voice generators for your personal or professional needs. However, some are superior than others. In this article, we’ll evaluate the overall effectiveness, usability, and features of three top AI voice generation software.
Taking this further, here are the finest five AI based TikTok voice over generators. Let’s get to know these tools so you can decide the best fit.
Part 1. Use Text to Speech Generator on TikTok
If you’ve ever navigated through TikTok, you may have noticed the artificial voice that sometimes goes with subtitles. The text-to-speech option is a fantastic method to give your movies some more context, utilize a voiceover if you’re not confident narrating yourself, and more. As an accessibility tool, text-to-speech enables TikTok producers to add an automatic voice to read aloud subtitles that have been typed down.
Steps to Use Text to Speech Generator on TikTok:
Let’s delve into the steps required to use TikTok’s text to speech generator:
Step 1. To use text-to-speech on your next TikTok, just record or submit a video as normal up to the point of editing. For text to be added to your video, use the “+” symbol.
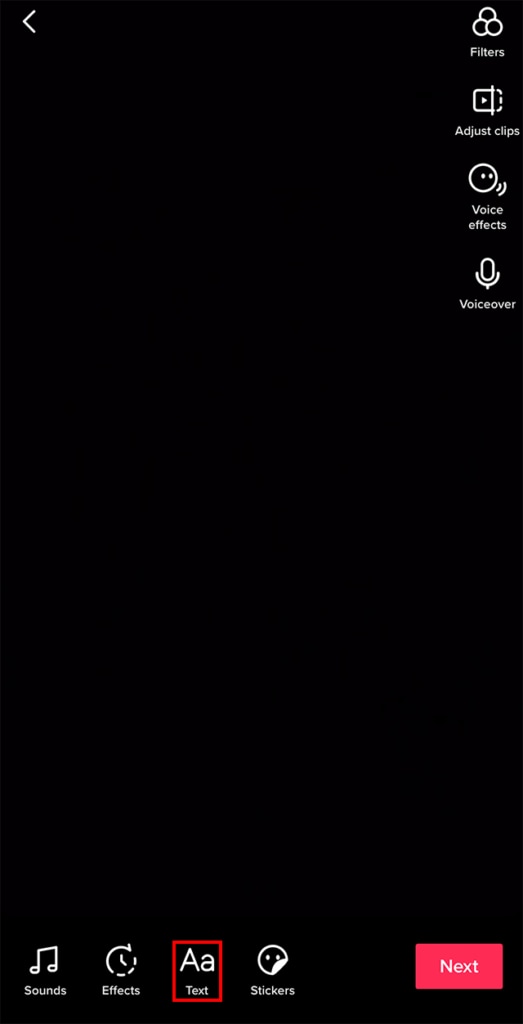
Step 2. In the next step, click the symbol from the left that resembles a talking head to choose text-to-speech. Once you’ve chosen the symbol, a little tick should appear next to it to show that text-to-speech has been implemented.

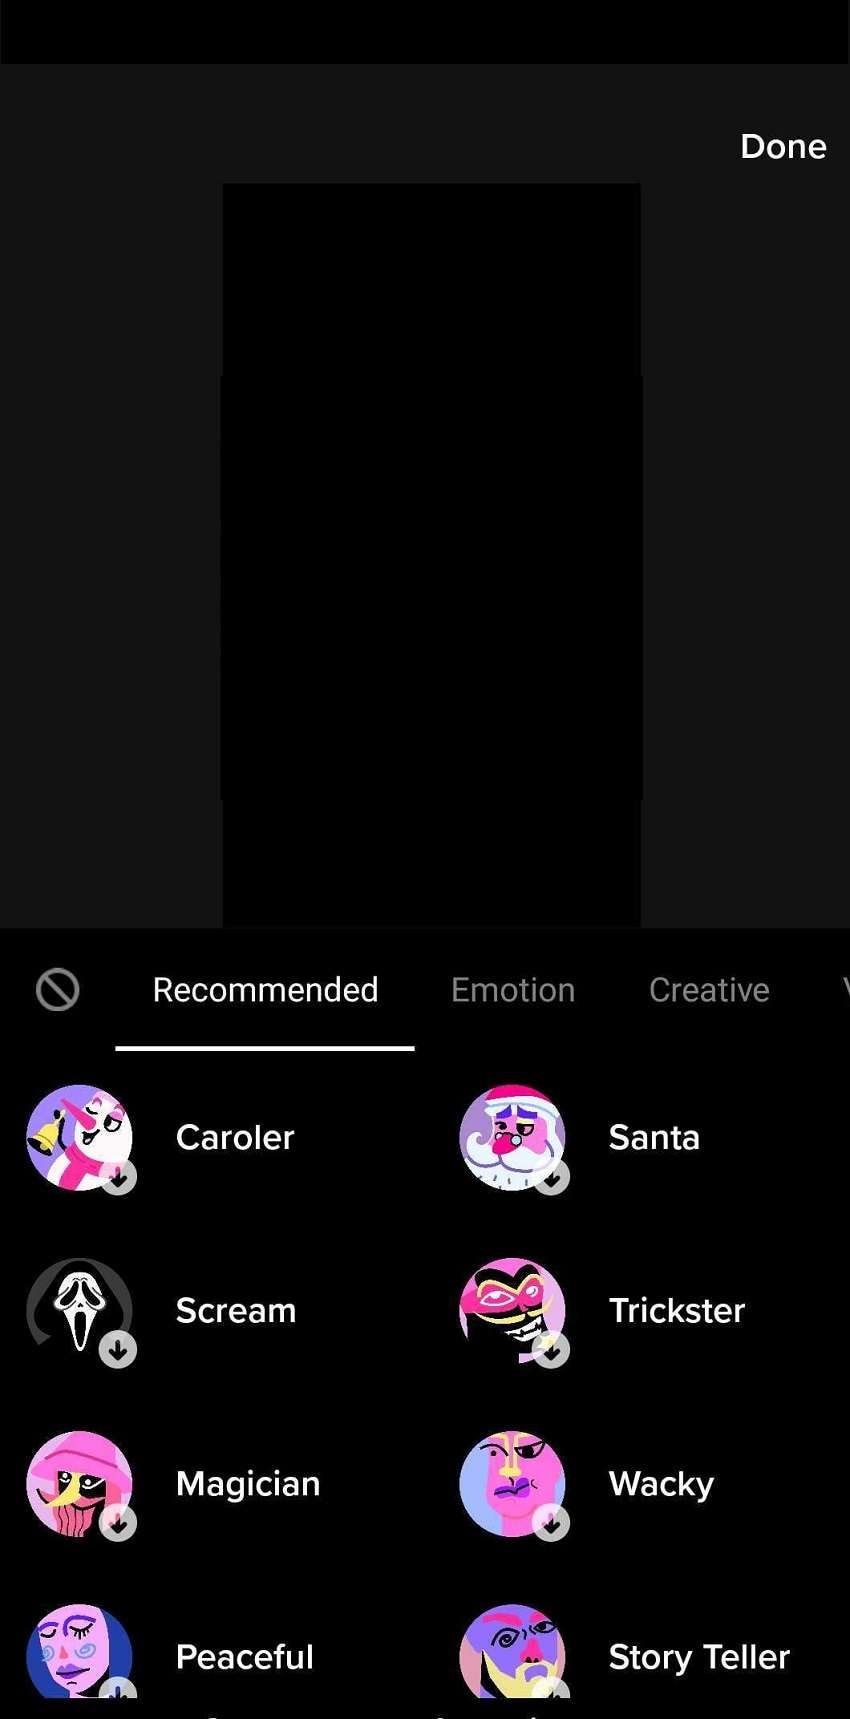
Step 3. After selecting your text, pick Change voice from the drop-down menu. Then, you’ll witness a collection of the most well-known voices.
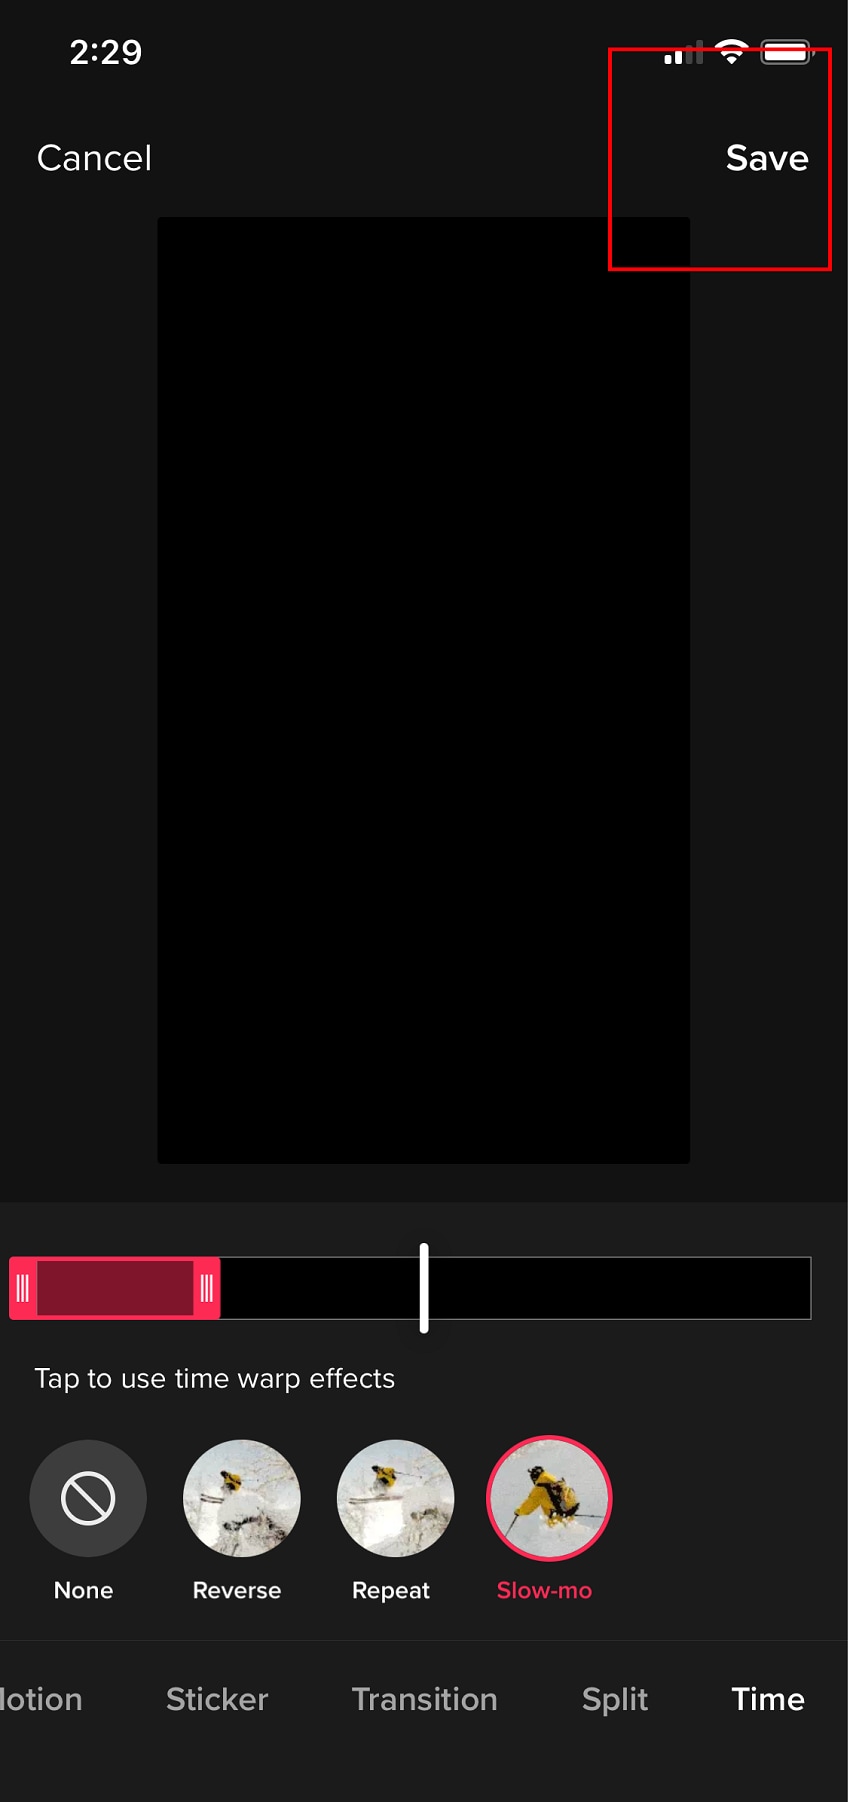
Step 4: After choosing your preferred voice, clickSave in the upper right corner. Save the audio clip if you like the way it sounds so you may use it in next videos.
Part 2. Try best 5 TikTok voice generators
Are you curious as to how you may utilize this functionality. We have five excellent examples that demonstrate how businesses just like yours are currently using TikTok text-to-speech.
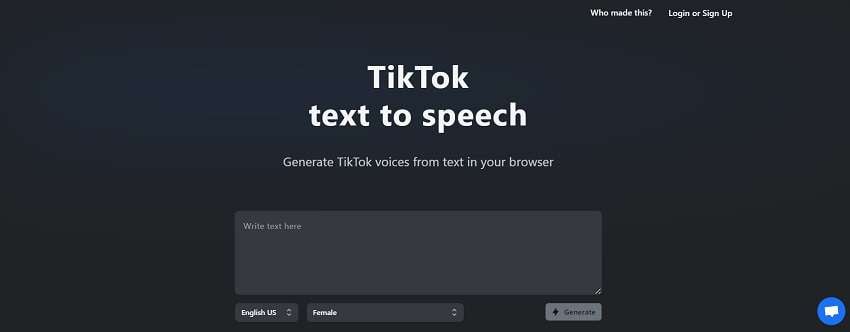
1.TikTokTTS
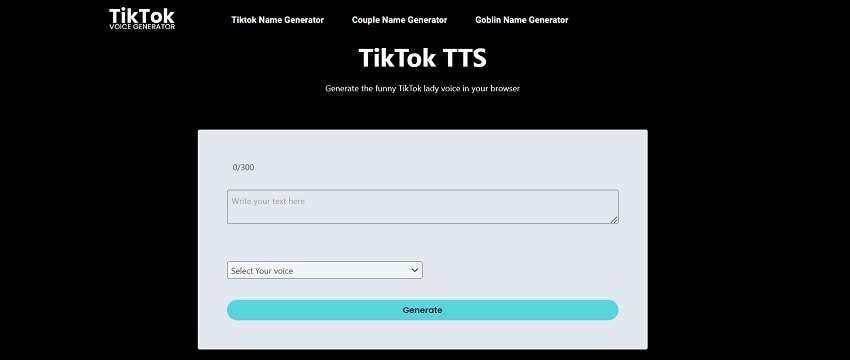
The Text-to-Speech function on TikTok is a fantastic accessibility feature for persons who have reading and vision problems as well as a tool for producing entertaining video. It’s not as difficult as it seems to add text-to-speech to a TikTok video, and it only takes a few minutes of your time. Just make use of the TikTok smartphone app. If you’re searching for an AI speech generation tool, TikTok is a fantastic solution.
Its robust online text-to-speech editor makes it simple to turn your content into audio. The audio may then be modified by adding different speech patterns and pronunciations. The process of converting input text into audio is often real-time, requiring just a few minutes. In addition, TikTok gives users the option to customize pre-existing speech models or choose from a library of them to get the desired outcomes.
Key Features
- You can create conversation-like voiceovers by using different voices;
- TikTokTTS has a large library of languages, accents, and AI voices;
- You can customize and use emotional speaking styles;
- With TikTokTTS, you can turn your text into audio and video with an AI presenter;
- You can also listen to the AI voice narrating your text before creating the audio and video;
2.TikTok Voice Generator
TikTok Voice Generator is ideal for you if you’re interested in utilizing AI for voiceover projects but still want to utilize your own voice. You may upload, write, talk, and create your very own AI voice using the web-based platform, which is built from your genuine voice. While it does provide a variety of voices for you to choose from, TikTok Voice Generator may assist you in creating a voice that is genuinely distinctive.
From text or your own speech, you may create your own AI voice using TikTok Voice Generator. You may generate unique and customized audio for your next piece of content using their editor, which enables you to add inflections, emotions, and language conversions.
Key Features
- TikTok Voice Generator supports unlimited projects, users, and audio downloads,
- It has a quick voice cloning online,
- It supports real-time caption generation for more accessible videos.
- You can generate and produce unique AI voices using your audio recordings.
3.Speechify
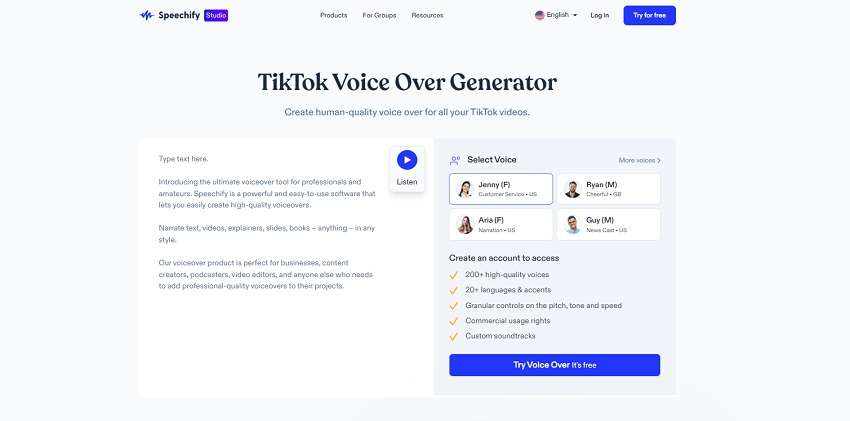
Speechify converts written text into high-quality, natural-sounding audio. Voice speed may be changed, and you can choose from a number of voices and dialects, among other options. Speechify can import documents from a variety of sources. It allows you a great deal of control over the voices themselves in addition to enabling you to create believable AI voices.
Additionally, Speechify merges many Voice AI technologies into a single, user-friendly program for robotic voices. The Speechify platform can highlight text while it is being read, if that is what you prefer. You have complete control over every aspect of speech, including language choice, accent, pace, and intonation. Additionally, the UI is user-friendly, so getting started won’t be difficult.
Key Features
- Speechify produces voiceovers of the highest caliber in a variety of languages;
- It is compatible with Apple and Android devices as well as Chrome;
- Speechify has advanced tools for highlighting, taking notes, and importing
- You can also generate robotic voices using AI-based cutting-edge technology.
- Speechify can modify playback and listening rates to boost output
4.Text to Speech Robot

For individuals seeking excellent AI-generated voice, Text to Speech Robot is a fantastic solution. The tool is simple to use and delivers excellent outcomes. Additionally, it provides a wealth of customizing possibilities, enabling users to produce synthetic voices that sound authentic and genuine. The user interface is simple to use and contains all the tools you want for editing both audio and visual content.
Using Text to Speech Robot, you can choose from a variety of male and female voices on Robot platform to create the ideal voice for your project. In order to convert text into computer-generated audio recordings that may be utilized for podcasts, videos, and other media, it makes use of advanced artificial intelligence technologies.
Key Features
- Text to Speech Robot enables you to adjust the synthesized voice’s pitch and pace.
- Both the editor and app are simple to use.
- The generated voice quality by Text to Speech Robot is really good.
- It regularly refreshes its voice collection, giving you access to the newest and best voices.
5.Wavel.AI
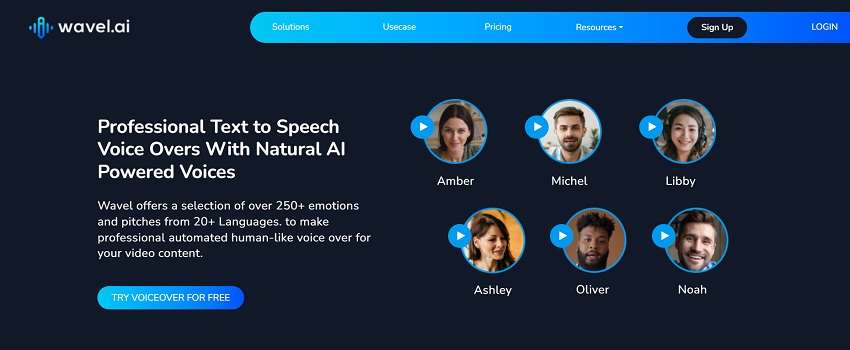
One of the greatest tools for AI voice generating in video making is Wavel.ai. From the convenience of your online browser, the editor enables you to cut, combine, import, and record video clips. Their text-to-speech function lets you input text and create AI-generated voiceovers for your video projects in addition to editing videos. You can also modify the speed, cut, and clip the audio created after inputting your text in the Wavel.ai editor.
To assist you make accessible videos for your audience, you may also use your voice to produce subtitles. The most sophisticated tools for modifying and utilizing AI voices are not available on Wavel.ai since it is not a platform that generates AI voices independently. However, the platform might help individuals who want the option of AI-generated voiceovers for their videos.
Key Features
- It can control voice speed, style, pitch, and volume.
- ai has 250+ emotions pre-installed and ready-to-use in voiceovers
- ai provides real-time feedback is provided through the Speaker Coach tool to enhance voiceovers.
- It can generate real-time subtitles to make videos that are more accessible.
Part 3. Impacts on TikTok Content Creation
AI voice generators will only grow and broaden as AI technology develops more. By include the TikTok voice generator in your video marketing plan, you’re making an investment in a flexible, scalable solution.
1. Virality and Trending Content
Utilizing the TikTok voice generator, you may modify your voiceovers to better appeal to the tastes of your target audience. Around 88% of users, according to TikTok research, believe that sound is a crucial component of the TikTok experience. Hence paving the way to create a viral content using TikTok text to speech generator.
2. Influencer and Creator Utilization
TikTok’s voiceover generator feature makes it simple for content producers to make sure their videos appeal to a larger audience while also offering a more inclusive experience overall. With the use of TikTok’s voice over feature, users may offer an instruction or narrate a tale via their video without having to actually talk. It works well as a means of conveying a message without manually documenting it.
3. Accessibility and User Experience
The text to speech tool on TikTok enables producers to produce material in a variety of languages and dialects as well as to add various voice effects to make the video more engaging and interesting. This enables content producers to reach a larger audience and make their work more accessible and enjoyable for all users.
Bonus Tips – Your best text to speech generator for TikTok
Considering the bonus top to create text to speech using the easiest tool, Virbo is your best bet. The Virbo Text-to-Speech is one of them. Because it saves video makers from having to record their own voiceovers or utilize third-party text-to-speech applications, TikTok is one of the most popular editing tools. You don’t need any training or specialized expertise to utilize Virbo Text to Speech because of its user-friendly interface.
Get Started Online Free Download
If you often have difficulties with TikTok’s native text-to-speech feature, then Virbo is the tool you should look for. It is an AI-based software available for both Windows and Mac OS. In addition to text to speech generator, Virbo provides you additional functionality and freedom to record innovative voiceovers for your TikTok videos that are of a high quality.
Key Features
Here are some of the top-notch features of Virbo that makes it stand out from the competitors:
- Accessibility:
It is accessible on different devices. Virbo makes sure that users who may have trouble recording their own voiceovers or those with speech-related problems can still participate in content production by offering an automated voice function.
- Engagement:
Virbo text-to-speech generator can offer a distinctive element to your TikTok text to speech videos thereby boosting engagement and shareability.
- Productivity:
By instantaneously converting text input into voice, Virbo’s text-to-speech function streamlines the video production process, saving you a ton of time.
- Handy Usage:
With Virbo, you can utilize the ready-to-use voiceover templates to generate your favorite TikTok voiceover. It has a variety of genres as well as characters to be chosen from.
- Creativity:
Virbo TikTok voice generator gives you the option to choose from a variety of voices and accents in place of your own voice, giving you more creative options.
- Video Editing:
Virbo enables you to edit your TikTok videos in addition to TikTok voiceovers. It has Avatar editor as well as text editor to polish your TikTok videos handily.
Generate Engaging
AI Video in Minutes!
Easily convert text into professional spokesperson videos in over 120+ voices & languages in minutes.
Generate AI Video Free Generate AI Video Now
google-play ](https://app.adjust.com/1187btki%5F11xz9mlt ) app-store ](https://app.adjust.com/1187btki%5F11xz9mlt )

Conclusion
The sophistication of AI speech generators is rising, and a number of businesses claim that their AI is appropriate for voice cloning. TikTok currently boasts more than one billion monthly active users, making it one of the most widely used social media platforms globally. Even while the technology is still in its infancy, it’s not impossible to picture a day when artificial intelligence-generated sounds are almost indistinguishable from human voices!
Although there are numerous AI speech generators available, the ones we’ve selected here have the greatest functionality, adaptability, and usability. It might be challenging to choose the best solution given the wide range of choices. Virbo is superior than the other two TikTok voice generators because of its adaptability, wealth of AI voices and resources, and simplicity of sharing.
Build Your AI Twitch Streamer with Animated Avatars
The rise ofAI streamers has transformed how people consume content. With AI slowly becoming a normal part of life, many tasks can now easily be automated. Among the key players in this resolution is Twich AI. Originally launched in 2001, Twitch has been a go-to for streaming live videos. However, the recent development allows users to stream with realistic avatars. In this article, we explore the evolution of AI Twitch streamers and how Virbo can help you become a better streamer.
Part 1: Create Better AI Shows on Twitch With Virbo’s AI Streamer
AI-powered shows on Twitch have great potential, but they require effort to stand out. You must understand the needs of your audience and create a streamer they can resonate with. It is also important to consider how viewers will be interacting with the AI streamer.
01 What is a Twitch AI streamer?
Twitch AI streamer is a live stream on the Twitch platform where the person on the screen is an AI-powered avatar rather than a human. The AI streamer Twitch platform is known to be engaging and allows viewers to interact with an avatar of their choosing.
![]()
The AI avatar in Twitch can be manifested in several ways:
- Virtual AI Streamers : An animated 2D or 3D avatar is controlled by an AI program to play games or respond to chat messages in real-time. The avatar can engage in basic conversations either in text messages or synthesized voice. Common examples include AtheneLive and Neuro-sama.
- AI-Powered Stream Assistants: The A avatar acts as a co-host or helper alongside a human streamer. They can analyze chat messages and offer insights, play music, generate live graphs, respond to cues, and add overlays to enhance the stream.
- Deepfake Streamers: This option uses Deepfake technology to create virtual avatars that mimic the voice and appearance of specific human streamers. Although still considered a controversial approach with some ethical concerns, Deepfake streamers offer an exceptional experience to twitch streamer AI viewers.
The AI streamers on Twitch have become quite popular within a short time because of several reasons. The novelty of watching an AI interact and entertain is one of the reasons people are so curious about the platform. They get a glimpse into the future content creation and just how much AI will offer. AI streamers are also more engaging and can interact heavily with the chat without tiring. They can respond to questions and adapt their content based on viewer feedback. Some viewers find this to be a unique way of consuming content and creating a dynamic experience.
02 How can Virbo become your AI Twitch streamer?
The use of AI in streaming videos has become popular and widely accepted. Creators who leverage the power of AI can produce content that is more relevant and valuable to their audience. Virbo Live has put in place vital features needed to become a successful AI Twitch streamer. You can create your AI streamer with less effort and offer your audience quality content.
![]()
Get Started Online Free Download
Powerful Features of Virbo asAI Twitch streamer
- Realistic AI-driven Avatars : Keep your audience engaged with AI streamers or Vtubers that mimic natural movements perfectly.
- Multiple Languages and Accents : Integrate the right language and accent for your specific audience
- AI Translation : Effortlessly translate your text into multiple languages and appropriate voices to match various audiences
- AI Live Shopping Script Generation : Generate a script for your AI streamer automatically to make sure it does not miss a thing
- Customizable Q&A Repository : Create a personalized Q&A database to allow AI streamer to connect with your audience in a smarter way
- Microphone Integration for Voice-Driven AI : Get your AI-powered avatar to speak in real-time by connecting and speaking into the microphone
- Interaction Through Text : Trigger and get your AI streamer to speak what is in your text
Part 2: Creating AI Streamers on Twitch: Step-by-Step Guide
Creating AI streamers on Twitch can be an exciting experience. You can create content on the go and keep your viewers engaged at all times. However, Virbo Live offers you an easy way to create AI streamers that will keep your Twitch audience engaged. With Virbo, the process is faster and requires less effort because most steps are automated.
Equipment requirement
Before creating your AI show Twitch, you need to make sure your equipment can stream effectively and that your internet speed is fast enough. Some of theequipment requirements for building your AI streamer include:
- Computer Requirements : Make sure your computer is configured well with Stereo Mix or other virtual sound cards and is running smoothly
- Network Requirements: Make sure your average network speed is at least 5Mbps for smooth live streaming.
- Browser Requirements : It is recommended that you use the latest Chrome browser for optimal and stable performance.
Once you have confirmed that your computer is in a good state, you can head over to Virbo Live and create an AI streamer for your Twitch show. The process is easy and takes only a few steps.
Step 1 Create a Live Shopping Rooms
Visit the Virbo Live and log in. Click “Create a Black Livestream Room” to get started. Alternatively, you can select a template of choice from the available ones to create a new live room.
![]()
Get Started Online Free Download
Step 2 Choose AI Streamers and Background
From the virtual host library, choose an AI avatar that you would like to use as your virtual streamer. Add the avatar to your live room and customize it as desired. You can change the avatar’s position, appearance, and even the background to match your Twitch show.
![]()
Step 3 Enter Text or Voice
With the AI streamer ready, it is time to add in the content. You can upload your audio or enter a script that the AI Avatar for the avatar. Virbo Live also allows you to automatically generate a script using the AI smart scriptwriter. On the other hand, the AI translator allows you to effortlessly translate your script to match your audience.
![]()
Step 4 Start Live Streaming
After preparing your AI Avatar with the content, you can go ahead and live stream it on Twitch. Click Start Live Streaming in the top right corner and choose the OBS software to live stream on Twitch.
![]()
Step 5 Interact With the Audience
Virbo Live allows your AI streamer to actively interact with your audience. Make sure you turn on this feature once your avatar has gone live.
![]()
Part 3: Future Integrations of Virbo Live and Twitch to Elevate Streaming Experience
The integration of Virbo Live and Twitch creates an opportunity to elevate the streaming experience. The fusion of AI streamers and Twitch will likely revolutionize the streaming landscape. By creating immersive and interactive experiences. Both viewers and creators will benefit from the exciting possibilities brought about by this integration:
For Viewers:
- Personalized Content Curation: AI will analyze viewing habits and recommend streams tailored to the viewer’s interests by predicting what you’ll enjoy before you know it.
- Interactive AI Companions: The AI co-host will analyze chats and offer witty commentary alongside the streamer.
- Dynamic Stream Overlays: AI will generate real-time overlays that react to viewer interactions and emotions, adding a layer of dynamism and personalization to the viewing experience.
- Immersive Virtual Worlds: AI will power dynamic virtual environments that react to the stream’s content.
For Streamers:
- AI-powered Production Assistant: An AI assistant will handle scene transitions and managing overlays freeing up streamers to focus on creating engaging content.
- AI-driven Content Generation: AI will generate creative in-game challenges, adding an element of improvisation and keeping the stream fresh.
- Enhanced Audience Engagement: AI will analyze chat sentiment to suggest conversation starters or engaging activities based on viewer interests.
- Stream Performance Insights: AI will analyze viewer engagement metrics and provide actionable insights to streamers.
Conclusion
The rise of AI streamers has significantly affected the way creators produce content and viewers receive it. AsAI Twitch streamers become more popular, Virbo Live is helping content creators develop more engaging content for their audience. It is important to ensure that the AI streamer can engage effectively with the audience and offer them valuable experience. WithVirbo Live , you can create a highly responsive AI streamer that will leave your audience entertained and engaged.
Get Started Online Free Download
How To Make Your Memoji Talk? Get Creative With Your Messaging
If you are an iPhone user, you must have been familiar with Memoji – the digital avatars you often see in your messages. iPhone users usually use Memoji to match their personality and mood, then send them to their contacts.
While Memojis are often seen as static images, you can also record a message using animated Memojis. This will give your friends a delightful surprise when they receive a video of your voice synced perfectly with your Memoji’s expressions.
So, next time you want to send a message to your friends, try to use animated Memojis. First,learnhow to make your Memoji talk here.
Part 1. What is Memoji on iPhone?
Memoji is a digital avatar feature introduced by Apple, available on iPhone and iPad models as long as they support FaceID. You can create your own personalized Memoji that closely resembles your appearance, down to specific details like facial features, hairstyles, accessories, and more.
Once you’ve crafted your Memoji, you can use it across various Apple platforms and apps. For instance, you can use them in FaceTime calls to replace your face with your Memoji or in Messages to send either Memoji ortalking Memoji recordings.
Memoji compatibilities:
Memoji’s compatibility is supported on iOS 12 and newer operating systems, including the iPhone X, iPhone 11, iPhone 12, and later. As for iPads, Memoji functionality is available on the iPad Pro 11-inch or the iPad Pro 12.9-inch (3rd generation) and newer models.

Part 2. How To Easily Make Your Own Memoji on iPhone
Before we get intohow to make your Memoji talk , let’s prepare and make your own Memoji on iPhone first. To create your own Memoji that truly captures your essence, you’ll want to customize it to closely resemble yourself or any characters you had in mind.
Here’s how to make and customize your own Memoji on iPhone:
Step 1: Open the Messages app on your iPhone. Then, compose a new message or open a conversation.
Step 2: In the message, tap the Plus button located to the left of the text field and tap “More” from the list of options.
Step 3: Now, tap the Memoji button and select “New Memoji” from the next menu.
Step 4: This is where the fun begins! Customize the various features of your Memoji to your heart’s content. You have the flexibility to adjust elements such as skin tone, hairstyle, eyes, facial hair, accessories, and more to ensure that your Memoji is a true reflection of yourself.

Take your time to fine-tune each detail until you’re satisfied with the result. Once you’ve completed customizing your Memoji, you’re ready to show its charm across your Apple devices.
Part 3. How To Record and Send Your Memoji on iPhone
Now that you’ve created my personalized Memoji, you may want to ask “how do I make my Memoji talk ”. You can do so by recording with your Memoji and sharing it with your friends. Recording with Memoji can be a fun and creative way to express yourself in your communication.
Follow these straightforward steps on how to record and send your Memoji on iPhone:
Step 1: Make sure that you have a compatible iPhone device as mentioned in Part 1 to access the Memoji feature.
Step 2: Open the Messages app on your iPhone device, and start a new message by tapping Compose. You can also locate and select an existing conversation.
Step 3: While composing your message, tap the Plus button and select “More” from the menu.
Step 4: Locate and tap the Memoji button (which looks like a smiling face). Swipe left to choose the Memoji you want to use for recording.
Step 5: After selecting your Memoji, tap the Record button to start recording your message. You have up to 30 seconds to express yourself. Tap Stop when finished, then send it to your friend. They will receive your Memoji message as an animated video, complete with your voice recording.

But if you want to share yourtalking Memoji outside of the Messages app, you can save the recording to your camera roll and then share it through other messaging apps or social media platforms.
Part 4. How To Make Your Memoji Image Talks
Besides recording your Memoji, you can also animate and maketalking Memoji from a photo using Wondershare Virbo. This is the perfect way if you find recording and sending your own Memoji awkward. Just toss in your Memoji image, and Virbo will do the rest.
Virbo is a multi-purpose video editing tool tailored for producing short videos featuring lifelike avatars using AIGC technology. One of its key features is the ability to generate speaking avatars from images with its Photo Talking feature.
Virbo Photo Talking features include:
- Extensive collection of more than 300 AI avatars for free
- A diverse selection of more than 300 AI voices
- Take advantage of user-friendly tutorials
- Cross-platform compatibility on online, desktop, and mobile applications
- Natural animation and lip synchronization
How to make Memoji talk on iPhone with Wondershare Virbo:
Step 1: Create a new project
After installingWondershare Virbo , launch the application and select the Talking Photo feature to make yourtalking Memoji .

Get Started Online Free Download
Step 2: Import your Memoji photo
Tap on “Upload a photo” and select the Memoji picture saved on your camera roll.

Step 3: Customize and export your talking Memoji video
Input your desired text and select a voiceover from the options provided below to generate the audio for your video. Alternatively, you can also record your own voice by selecting “record audio”. After completing the video editing process, click on “Generate Video” to export your creation.

If you need help withhow to make your Memoji talk , you can refer to the video tutorial.
Conclusion
Memoji is a feature introduced by Apple that allows you to create personalized animated characters, or “Memoji,” which can your facial expressions and movements. These Memojis can be created to resemble you or any character you desire. You can use it in Messages, FaceTime calls, and even as stickers in other apps.
In case you wonder, “How to make my Memoji talk ?” you can achieve it by either recording a video with the Memoji while speaking or you can turn your Memoji image and make it talk using Wondershare Virbo. Virbo’s Photo Talking feature is a user-friendly tool that lets you animate your Memoji image with ease by syncing it with recorded audio.
Get Started Online Free Download
What Is an AI Art Generator? | Wondershare Virbo Glossary
Part 1. What is an AI art generator?
An AI art generator is a software or system that utilizes artificial intelligence techniques to create or assist in creating art. It uses machine learning algorithms, and intense learning models, to analyze and understand various artistic styles, designs, and patterns. By training on large datasets of existing artwork, an AI art generator learns to generate new, original artwork that imitates or extends upon the available styles.
AI art generators can produce various art forms, including paintings, drawings, digital art, and multimedia installations. They can generate artwork from scratch or assist artists by providing suggestions, enhancing creative workflows, and exploring new possibilities. AI art generators can also be used as tools for artistic exploration, enabling artists to experiment with different styles, combinations, and variations.
The generated art results from a collaboration between the AI system and the artist or user. The AI provides suggestions and inspirations or even autonomously creates art pieces based on given parameters or prompts. The artist or user can refine, modify, or incorporate the generated artwork into their creative process.
AI art generators have sparked new debates and discussions around the definition of art, creativity, and the role of machines in artistic expression. They are a fascinating example of how artificial intelligence can be applied in artistic creation, pushing the boundaries of traditional artistic practices and opening up new avenues for creative exploration and innovation.
Part 2. What are the applications and development directions for AI art generators?
The usage types of AI art generators encompass a wide range of creative applications and possibilities. Some of the notable usage types include:
01of 07 Artistic Assistant
AI art generators can serve as creative companions, providing artists with artistic styles, techniques, and suggestions to expand and explore their creative endeavors.
02of 07 Style Transfer
AI art generators can apply the style of one artwork to another, creating unique synthesized pieces that showcase style transformation and fusion.
03of 07 Artwork Generation
AI art generators can generate entirely new artworks from scratch, leveraging learned patterns and features from an extensive collection of existing artworks to produce unique creations.
04of 07 Creative Inspiration
AI art generators can inspire artists with generated artwork, sparking new ideas and encouraging artistic exploration and experimentation.
05of 07 Art Education and Learning
AI art generators can be utilized in art education and learning, offering sample artworks, practice exercises, and learning resources to help students understand and study different artistic styles and techniques.
06of 07 Art Evaluation and Research
AI art generators can be used for the evaluation and research of artworks, generating a large volume of artwork to aid in assessing quality, style, and trends.
07of 07 Digital Art and Virtual Reality
AI art generators can combine digital art and virtual reality technologies, creating interactive digital artworks and immersive virtual reality experiences.
These usage types demonstrate the diverse applications of AI art generators in art, driving artistic innovation, exploration, and the fusion of art and technology.
Part 3. Which AI art generators are available on the market?
Those mentioned above are just a few examples of their application directions. Here are some well-known specific AI art generators that have gained recognition and popularity in the field:
1. Midjourney
Midjourney is a groundbreaking AI art generator that pushes the boundaries of artistic expression. Powered by advanced machine learning algorithms, Midjourney combines artificial intelligence and creativity to produce mesmerizing artwork. With it, artists and enthusiasts can embark on a unique artistic journey. By simply providing a starting point, such as a basic sketch or a written description, Midjourney’s intelligent algorithms take over, transforming the input into a stunning piece of art. Whether it’s a painting, illustration, or even a digital sculpture, Midjourney’s AI generates astonishing visual creations that captivate and inspire.
2. Deep Dream
Developed by Google, Deep Dream is an AI art generator that uses deep neural networks to generate surreal and abstract images. It has gained attention for its ability to produce visually mesmerizing and dream-like compositions.
3. Prisma
Prisma is a popular mobile app that utilizes AI algorithms to transform photos into artistic renditions. With its wide range of artistic filters and styles, Prisma has become a favorite among users who want to effortlessly add a creative touch to their photos.
4. Runway
Runway is a versatile AI art generator tool that offers a wide range of models and functionalities for artists and creators. From generating unique visuals to exploring style transfer and animation, Runway empowers users to experiment and push the boundaries of their artistic creations.s
These well-known AI art generators exemplify AI technology’s capabilities and impact on art. They have opened up new avenues for artistic expression, allowing artists and enthusiasts to explore and create with greater creativity and innovation.
5. DeepArt.io
DeepArt.io is a widely recognized AI art generator that allows users to transform their photos into artistic styles inspired by renowned artists and various artistic movements. It has become a go-to platform for individuals looking to create unique and visually captivating artworks.
Installation and Registration
For iOS
1. System Requirements
To consume Virbo for iOS, you need to fulfill the following requirements. The overall speed and performance of the tool are entirely based on the device, its memory, and storage space. The following are the minimum system requirements:
- System: Requires iOS 13.0 or later.
- Equipment: Can work with iPhone 7+ or later models.
- Available Space: 9MB of free space (200MB preferable)
2. Download and Installation
- Launch the App Store on your iOS device and look for “Wondershare Virbo” in the Search toolbar.
- Tap the “Get” button against the tool from the results.
- Continue to select the “Install” button that appears on the pop-up window to proceed with the installation.
- As it is installed, choose “Open” to launch the program.
- Once it launches, you need to accept the “Privacy Policy” and “End User License Agreement” by tapping the “Agree” button.
For Android
1. System Requirements
To use Wondershare Virbo on your Android device, you must fulfill the following requirements. As stated before, the speed and performance of the program are entirely based on the device, its memory, and available space:
- System: Android 7.0 (Nougat) and later.
- Required Chipset: ARMEABI-V7A, ARM64-V8A
- Available Space: 200MB of Storage Space is needed.
2. Download and Installation
- You need to select the download link that appears on your Android smartphone.
- The installation package will download on your device, which can be tapped for further installation.
- To start using Virbo, select the “Agree” option against the “Privacy Policy” and “End User License Agreement” for the tool.
AI Video Translation
Video Translator
With Virbo, you do not need to manually type out subtitles or hire a translator to translate your videos. Now, you can use AI to automatically create subtitles and subtitle translations in English, Malay, Thai, Vietnamese, Indonesian, French, German, Italian, Russian, Spanish, Portuguese, Chinese, Korean, Japanese, Arabic, and many more languages!
Get to Know AI Video Translation
Localize effortlessly, reaching diverse audiences. Virbo Video Translator effortlessly translates your video content into over 20 languages, bridging language gaps and expanding your audience reach. An affordable solution for those seeking worldwide content accessibility!
For Win 7 or later(64-bit)
Language Option
As of now, the Video Translator feature supports the following languages:
- Original Video Languages: English, French, Spanish , German, Portuguese, Italian, Japanese, Indonesian, Chinese , Arabic, Filipino, Korean, Hindi, Russian, Vietnamese, Burmese, Urdu, Thai, Burmese, Bangla, Dutch, Turkish, Croatian, Polish, Swedish, Romanian, Czech, Greek, Finnish, Malay, Slovenian, Danish, Tamil, Ukrainian.
- Translated Languages: English, French, Spanish, German, Portuguese, Italian, Japanese , Indonesian, Chinese, Arabic, Filipino, Korean, Hindi, Russian , Dutch, Turkish, Polish, Swedish, Bulgarian, Romanian, Czech, Greek, Finnish, Malay, Slovak, Danish, Tamil, Ukrainian.
We will continue to update and iterate on the functionality, so stay tuned for support for more languages and additional features in the future.
For Win 7 or later(64-bit)
Step 1. Download Wondershare Virbo
First, download and install the Wondershare Virbo.
For Win 7 or later(64-bit)
Step 2. Select Video Translator
When you have installed the Virbo AI video generator, click to launch it and go to the “Video translator “ tab.
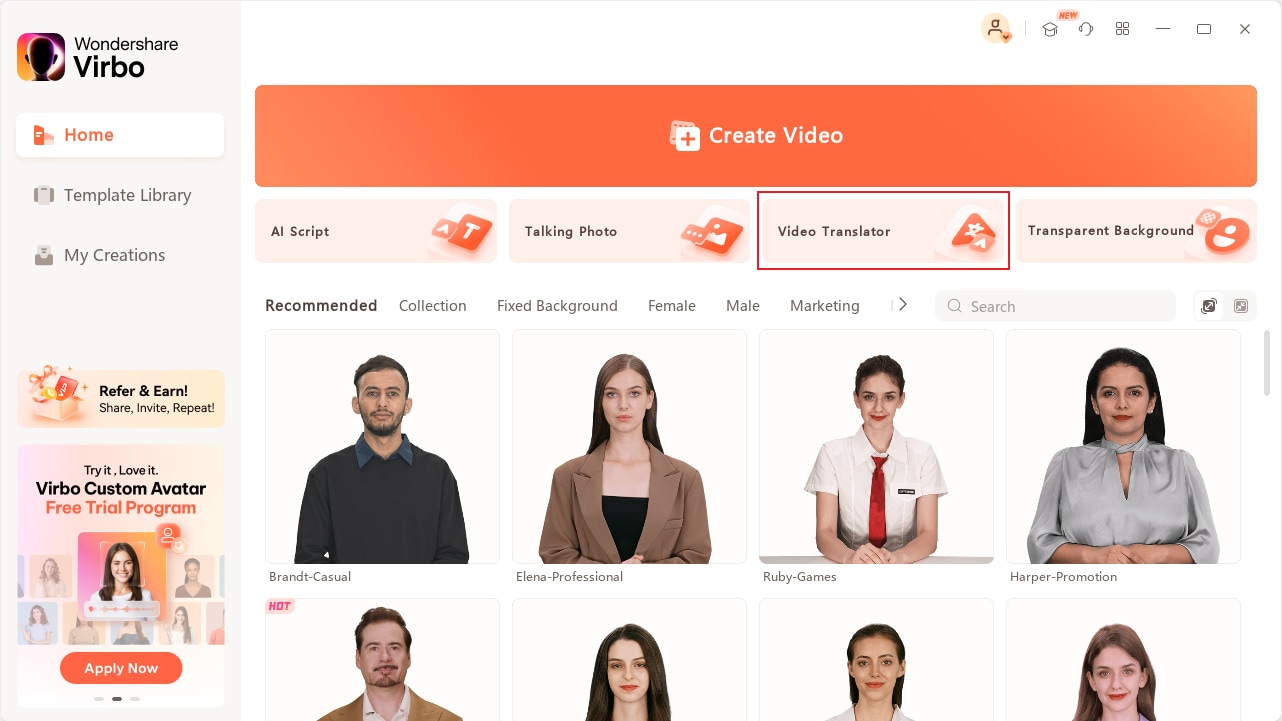
Select Video translator
Step 3. Upload You Video
A pop-up window will appear, and you must follow the prompts to get started with your video translation! Before uploading your original video file, here are some tips you must bear in mind:
- The recommended video duration and format is a 10s-2min MP4 file.
- Uploaded videos should contain authentic voices. The translation function is only affected by human voices.
- Video translation only supports voiceover content. You can not translate the songs or any BGM in the video.
- Avoid any background noise or music, as they can reduce the quality of the audio output.
- The video resolution must be between 480x480 and 1920x1920.
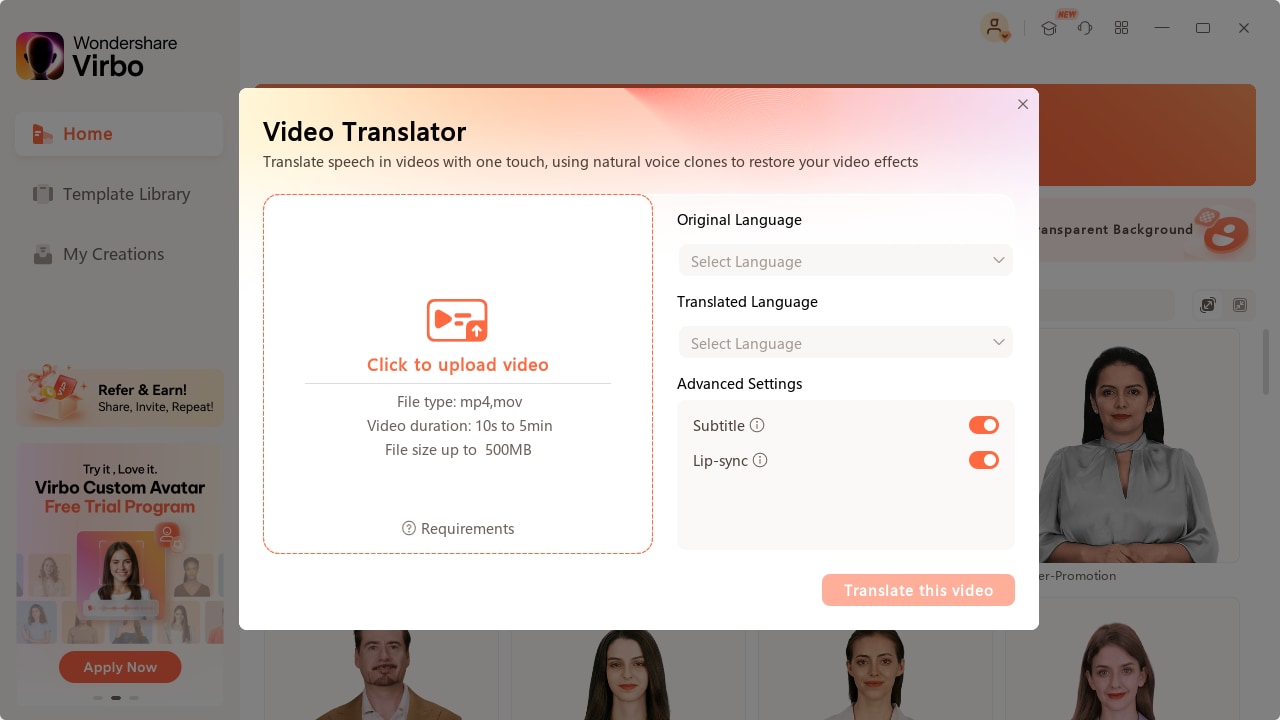
Upload You Video
Step 4. Select Desired Language
When everything is ready, select the original language for your video, and select your target language and the audio accent or voice style you like.
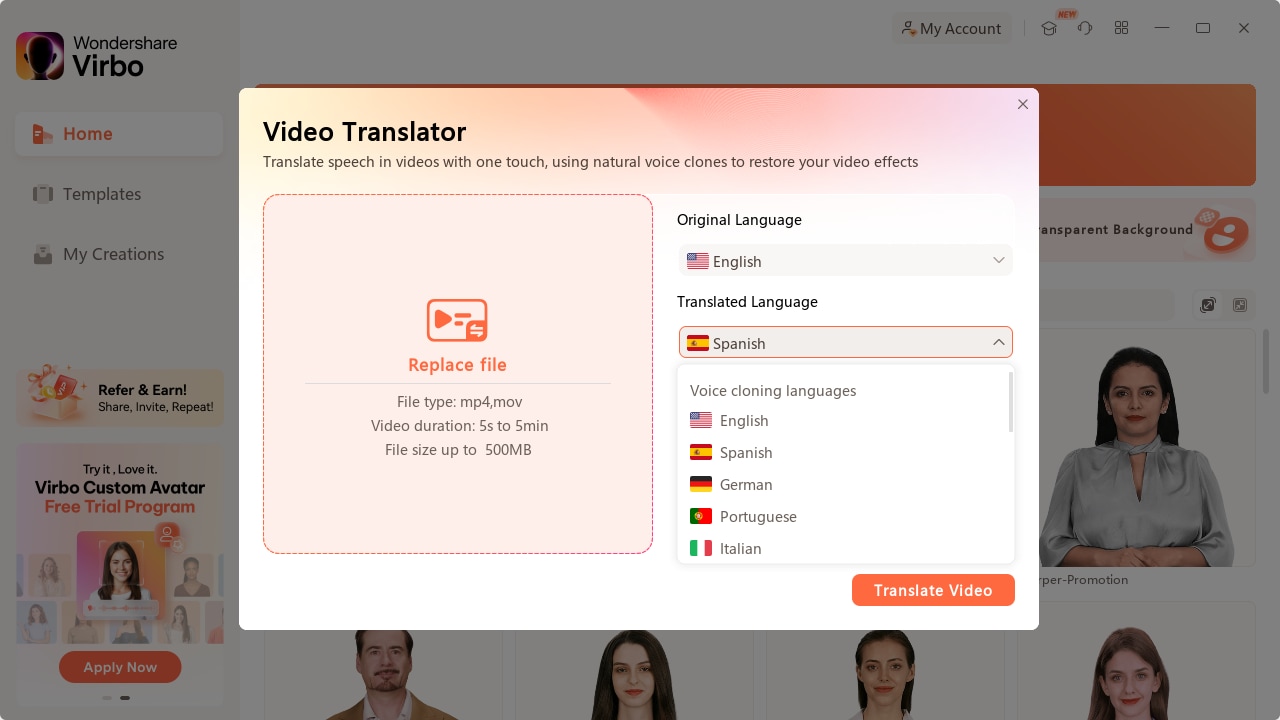
Select Video translator
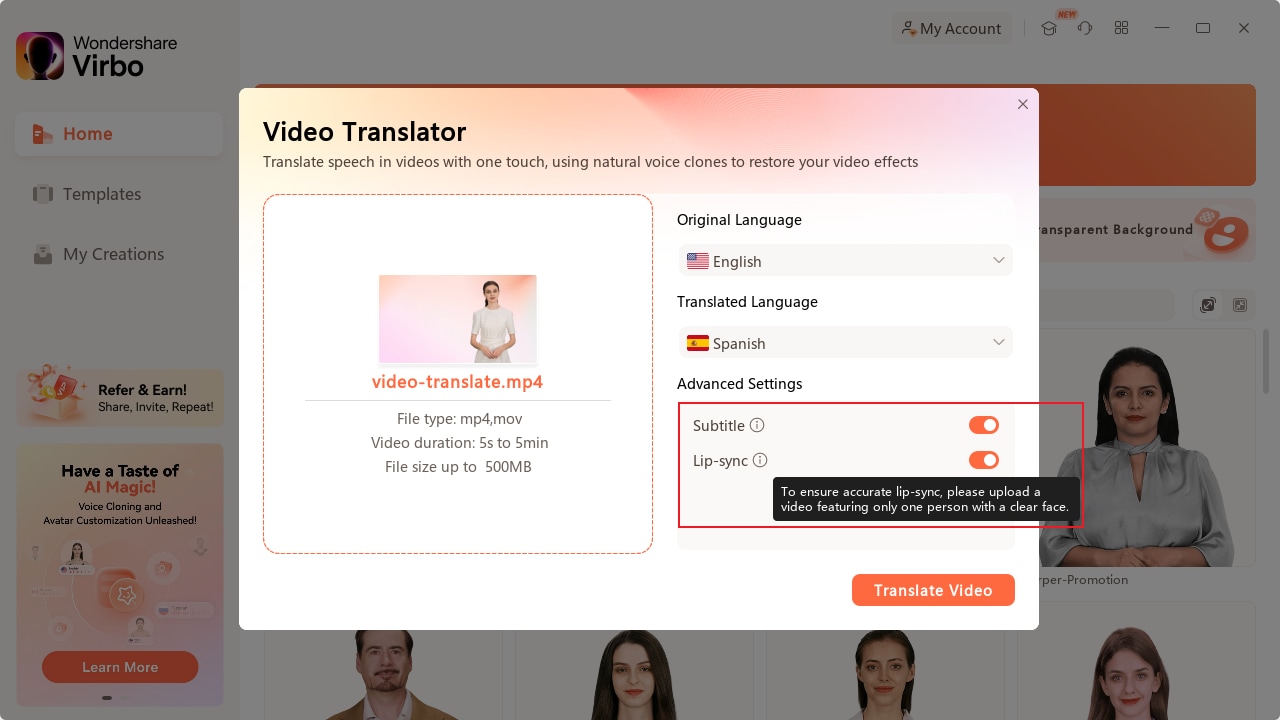
Step 5. Pick Advanced Features (Optional)
If you want to show the target translated subtitles in your video, you can keep this “AI generator for translated subtitles” enabled.As well as the second one, if you want to keep the original BGM, please turn this feature on.
By following these steps, you can quickly start your video translation. The video translation process will take some time, and at the same time, you can continue with your new video creation.
Select Video translator
Step 6. Export Video
Once you are satisfied with the effect of the whole video, click “Export” to generate the video. In this way, a brand new video using Virbo AI avatar is created.
Warm Tips about Video Translator
Explore a deeper understanding of Virbo Video Translator by delving into the following blog posts . These articles offer comprehensive insights, providing you with information about the features, capabilities, and benefits of Virbo’s cutting-edge video translation technology.
Translate Live Videos to English
Translate Video from English to Arabic
Online Auto Subtitle Translators
Get to Know AI Video Translation
Localize effortlessly, reaching diverse audiences. Virbo Video Translator effortlessly translates your video content into over 20 languages, bridging language gaps and expanding your audience reach. An affordable solution for those seeking worldwide content accessibility!
For Win 7 or later(64-bit)
Language Option
As of now, the Video Translator feature supports the following languages:
- Original Video Languages: English, French, Spanish , German, Portuguese, Italian, Japanese, Indonesian, Chinese , Arabic, Filipino, Korean, Hindi, Russian, Vietnamese, Burmese, Urdu, Thai, Burmese, Bangla, Dutch, Turkish, Croatian, Polish, Swedish, Romanian, Czech, Greek, Finnish, Malay, Slovenian, Danish, Tamil, Ukrainian.
- Translated Languages: English, French, Spanish, German, Portuguese, Italian, Japanese , Indonesian, Chinese, Arabic, Filipino, Korean, Hindi, Russian , Dutch, Turkish, Polish, Swedish, Bulgarian, Romanian, Czech, Greek, Finnish, Malay, Slovak, Danish, Tamil, Ukrainian.
We will continue to update and iterate on the functionality, so stay tuned for support for more languages and additional features in the future.
For Win 7 or later(64-bit)
Step 1. Download Wondershare Virbo
First, download and install the Wondershare Virbo.
For Win 7 or later(64-bit)
Step 2. Select Video Translator
When you have installed the Virbo AI video generator, click to launch it and go to the “Video translator “ tab.
Select Video translator
Step 3. Upload You Video
A pop-up window will appear, and you must follow the prompts to get started with your video translation! Before uploading your original video file, here are some tips you must bear in mind:
- The recommended video duration and format is a 10s-2min MP4 file.
- Uploaded videos should contain authentic voices. The translation function is only affected by human voices.
- Video translation only supports voiceover content. You can not translate the songs or any BGM in the video.
- Avoid any background noise or music, as they can reduce the quality of the audio output.
- The video resolution must be between 480x480 and 1920x1920.
Upload You Video
Step 4. Select Desired Language
When everything is ready, select the original language for your video, and select your target language and the audio accent or voice style you like.
Select Video translator
Step 5. Pick Advanced Features (Optional)
If you want to show the target translated subtitles in your video, you can keep this “AI generator for translated subtitles” enabled.As well as the second one, if you want to keep the original BGM, please turn this feature on.
By following these steps, you can quickly start your video translation. The video translation process will take some time, and at the same time, you can continue with your new video creation.
Select Video translator
Step 6. Export Video
Once you are satisfied with the effect of the whole video, click “Export” to generate the video. In this way, a brand new video using Virbo AI avatar is created.
Warm Tips about Video Translator
Explore a deeper understanding of Virbo Video Translator by delving into the following blog posts . These articles offer comprehensive insights, providing you with information about the features, capabilities, and benefits of Virbo’s cutting-edge video translation technology.
Translate Live Videos to English
Translate Video from English to Arabic
Online Auto Subtitle Translators
Also read:
- Updated 2024 Approved A Brief Review of CapCut Translate With Alternative
- Translate Videos and Subtitles with Veed.io for 2024
- Exploring The Best Text-to-Speech Online Tools To Use
- 2024 Approved Best 10 Free Video Translators to Mitigate Translation Risks
- Top 5 Viral Video Marketing Techniques For Big Sellers
- 2024 Approved Top List Best Livestream Shopping Apps Of
- Updated How to Stream on Twitch The Ultimate Guide for 2024
- What Are AI Tools?
- Updated Best 10 Free and Best Text-to-Speech Generators
- Best 10 Free Video Translators to Mitigate Translation Risks
- New Revealing Translation Methods Netflix Subtitle Software Comprehensive Guide for 2024
- In 2024, Never Miss a Moment With Free World Cup Live Streaming
- New Top 10 AI Script Generators
- Updated Ready To Dive Into Photo Talking Videos? Heres What You Need To Know for 2024
- Updated Top 10 Streaming Services Worth a Try
- Top 10 Free AI Voice Generators to Use in Daily Life for 2024
- New In 2024, Top 10 Free AI Voice Generators to Use in Daily Life
- 2024 Approved What Is an AI Video Generator? | Wondershare Virbo Glossary
- New 2024 Approved What Is an AI Text Generator? | Wondershare Virbo Glossary
- Updated 2024 Approved Registration and Login | Virbo AI Live Stream
- Updated In 2024, Creating AI Videos With Templates
- New What Is an AI Avatar? | Wondershare Virbo Glossary for 2024
- Updated 2024 Approved Best 10 Free AI Voice Generators to Use in Daily Life
- The Ultimate Guide to Online Video Marketing
- What Is AI Voice Over?
- Voice Cloning in Descript Features, Guide & Alternatives
- In 2024, Maximizing Yandex Translate in Video Translation and Beyond
- Free MSNBC Live Online Stream for the Latest Shows for All Devices for 2024
- In 2024, Best Toolbox to Translate YouTube Videos to English Subtitles
- How to Define AI Video? | Wondershare Virbo Glossary
- Google Play Services Wont Update? 12 Fixes are Here on Realme GT 3 | Dr.fone
- My Videos Arent Playing on Infinix Note 30i – What Can I Do? | Dr.fone
- Remove the lock of OnePlus 12R
- Identify malfunctioning drivers with Windows Device Manager on Windows 11/10/7
- Strategies for Apps That Wont Download From Play Store On Honor 70 Lite 5G | Dr.fone
- In 2024, How to Unlock Nubia Z50S Pro Bootloader Easily
- In 2024, How to Bypass Activation Lock on iPhone 12 Pro Max or iPad?
- How to Track Vivo V30 Location by Number | Dr.fone
- In 2024, How to Come up With the Best Pokemon Team On Samsung Galaxy S24 Ultra? | Dr.fone
- 6 Ways to Change Spotify Location On Your Vivo V27 | Dr.fone
- How to Unlock Poco M6 Pro 5G Pattern Lock if Forgotten? 6 Ways
- In 2024, How to Change Lock Screen Wallpaper on Poco F5 Pro 5G
- How to Reset a Samsung Galaxy S24+ Phone that is Locked?
- A Detailed Guide on Faking Your Location in Mozilla Firefox On Lava Yuva 3 | Dr.fone
- A Perfect Guide To Remove or Disable Google Smart Lock On Poco C51
- Apple iPhone 6s Asking for Passcode after iOS 17/14 Update, What to Do?
- Forgot Pattern Lock? Heres How You Can Unlock Oppo Find N3 Pattern Lock Screen
- In 2024, Top 11 Free Apps to Check IMEI on iPhone 11 Pro Max
- Title: Updated In 2024, Launching Your Live Room
- Author: Sam
- Created at : 2024-05-19 03:35:10
- Updated at : 2024-05-20 03:35:10
- Link: https://ai-voice-clone.techidaily.com/updated-in-2024-launching-your-live-room/
- License: This work is licensed under CC BY-NC-SA 4.0.
