
:max_bytes(150000):strip_icc():format(webp)/samsungvoiceassistant-1c59910bc4614b2a8531fc5b7a754e7d.jpg)
Updated In 2024, Best 7 Ways to Promote Twitch Stream
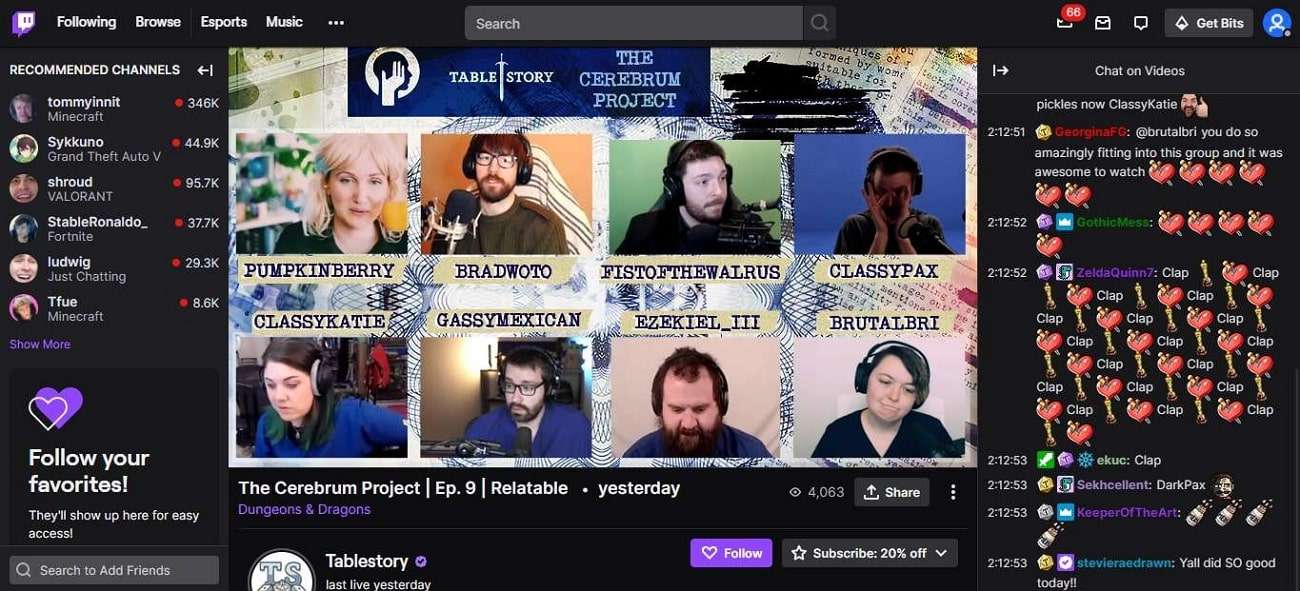
Best 7 Ways to Promote Twitch Stream
Twitch is one of the biggest platforms where people can come live and stream whatever they want. There are tons ofTwitch-promoted channels on the web that never fail to amaze users with their higher functionality. This lets you interact with others and makes your life more entertaining.
Whether you want to stream games, talk shows, travel, food, or events, this streaming service can help you. If you are getting bored, you can also watch other people’s streams to get entertained. In this article, we will guide you on how you canadvertise Twitch streams .
Part 1: Why is Promoting Twitch Stream Important?
There are tons of benefits that you can accomplish throughTwitch stream promotions . Don’t worry if you have no idea about these benefits. The below-given discussion will help you in this matter:

1. Reach a Wider Audience
With Twitch stream promotions, you can attract a huge array of viewers. It may also attract strangers that can be turned into your followers. By this, your channel will be discovered by tons of people in time. It will not only enhance the exposure of your videos but can also grow your viewer base.
2. Connect with the Community
It is one of the greatest ways to connect with other community members. This will engage the Twitch community actively and build collaborative relationships with streamers. Viewers and influencers can also collaborate with you for better opportunities. You can also rely on this for a supportive network and overall growth.
3. Better Visibility and Community
You can also rely onTwitch-promoted channels to get better visibility. Twitch has millions of users, so you don’t have to worry about anything. Moreover, it also opens the way for attracting viewers that can turn into potential users. It can also build a credible community for you. Above all, you can also meet people with the same interests as yours.
4. Networking and Brand Awareness
With improved networking, you can experience better brand awareness. Above all, with better networking, you can get on the better side of viewers. It also helps in giving unique ideas about the content creators. With the algorithm of Twitch, you can get famous and achieve your dreams of being famous in a limited time.
Part 2: How to Promote Twitch Stream?
Now that you know that Twitch holds unlimited benefits, you must be curious to promote your content on Twitch. Don’t lose hope here because it is not as difficult as you think. Some of the ways through which you canadvertise Twitch stream s are listed here:
1. Social Media Engagement
You have to ensure the beneficial usability of social media platforms. This may include Facebook, Twitter, and Instagram. It also opens the way for profitable interaction, which helps in conversions. You can also share details about your streaming to get organic users.
Moreover, creating eye-catching content to entice viewers to your channel is also possible with this. Thus, social media engagement is the critical element for driving organic traffic to your streams. With this, you can also generate considerable revenue.
2. Networking with Other Streamers
There are obviously other streamers than you that have tons of organic followers. However, you can connect and collaborate with them to get more viewers on your streams. You can also collaborate with fellow streamers to experience multiplayer games.
Furthermore, higher exposure to your streaming videos can also be achieved with it. Not only Twitch, but you can also share your videos on other platforms with this type of networking. It also helps in increasing the likelihood of gaining a higher number of viewers in a natural way.
3. Consistency and Quality
Consistency and quality are the key elements of creating the bestTwitch stream promotions . You have to ensure consistency in the videos to optimize professionalism. In addition, you can create a schedule of streaming and offer collaboration beforehand. This will help in building anticipation and opening gates for potential customers and subscribers.
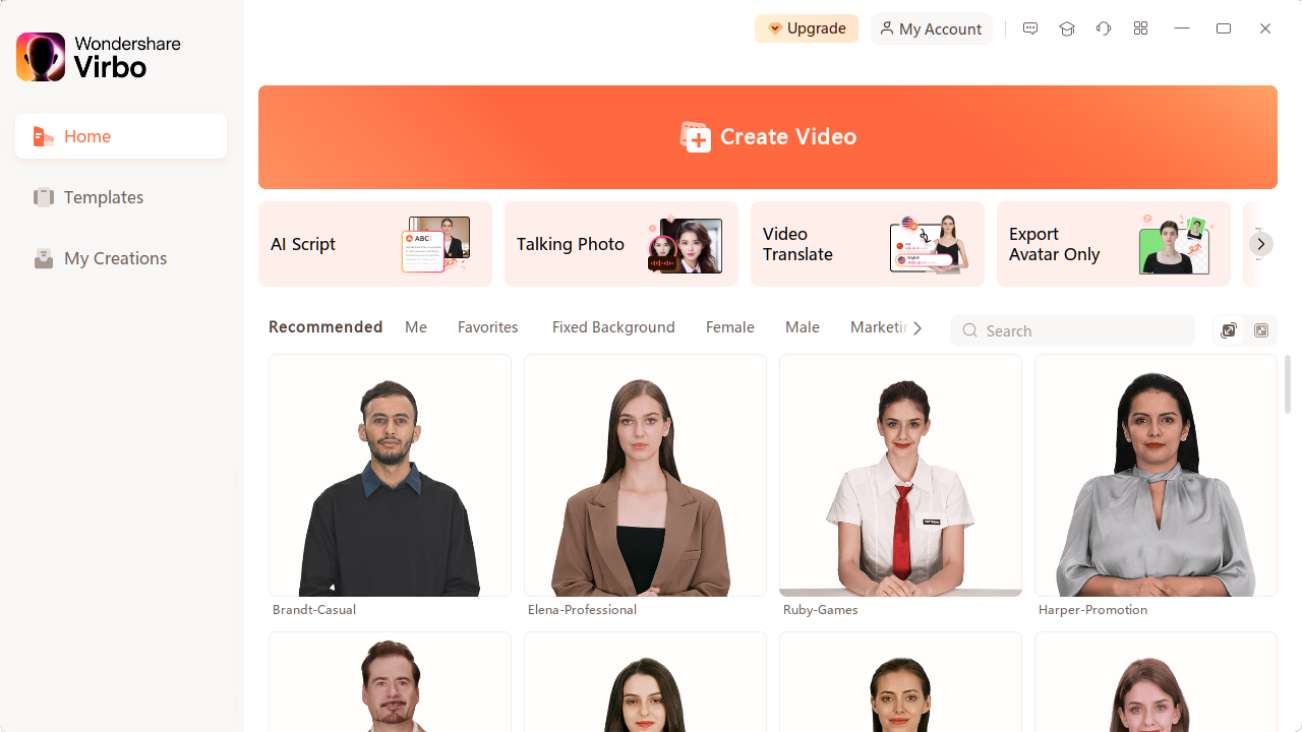
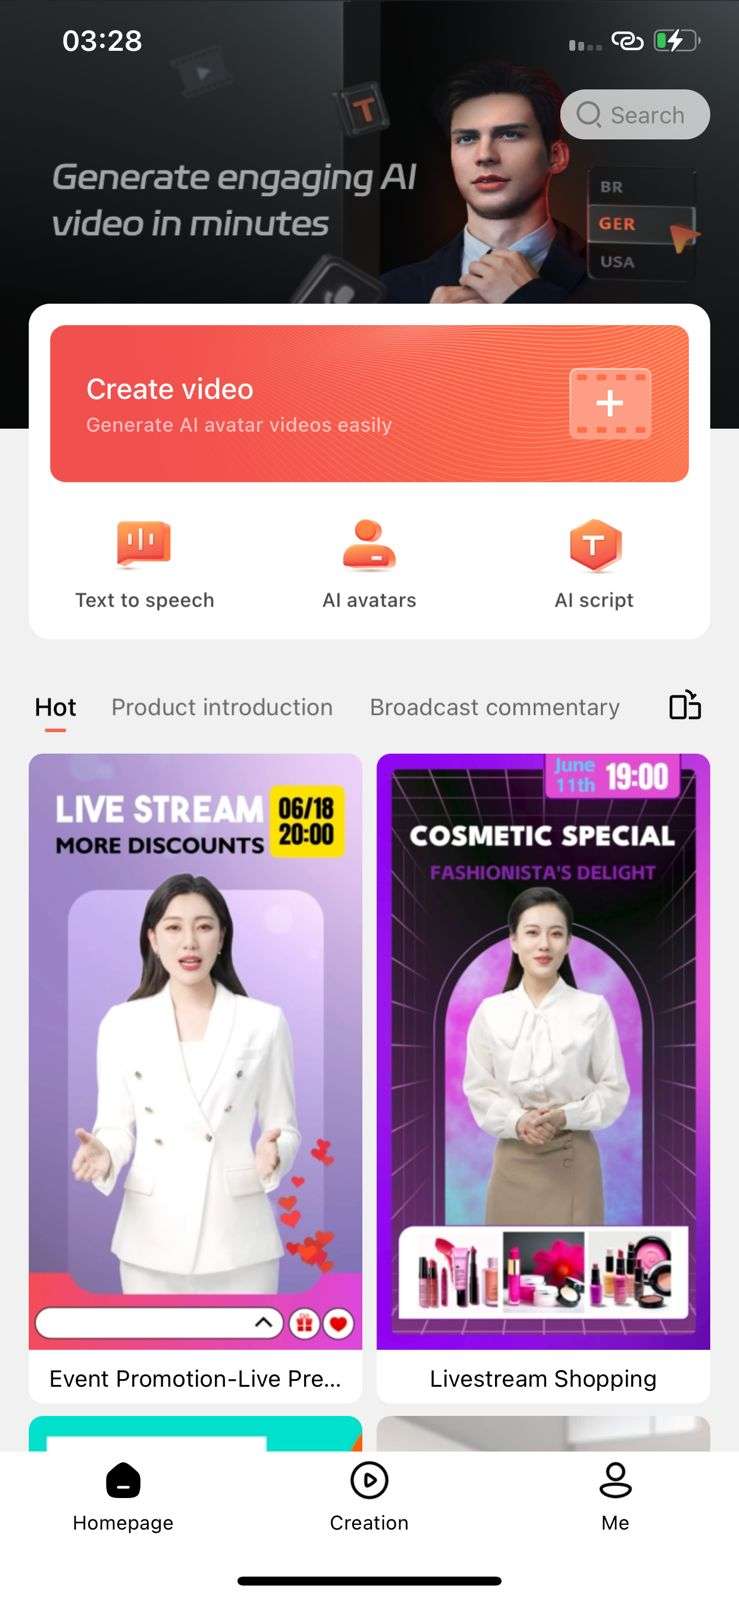
To create consistent and high-quality AI videos, you can useVirbo . It is an AI-powered tool that can generateTwitch-promoted channel videos for you. Above all, you can even addvirtual YouTubers to the videos with this. In addition, it is a very reliable and easy-to-use tool, so you can even use it without mastering any skill.
Virbo is available on several platforms, such as Windows, Android, and iOS, and you can use its single premium account on all devices. Moreover, it provides cloud storage to store your work that you can access and edit from any device.
Get Started Online Free Download
Key Features
- There are more than 150+ AI Avatars in Virbo, and you can also select them by age or ethnicity.
- Virbo also offers commercial stock for users, which includes 180+ templates and royalty-free music.
- The AI Voice of Virbo can optimize the quality and usability of text-to-speech videos. You can also customize the language and accent.
- With the AI Script feature, you can create and optimize scripts for generating the best video content.
4. Engage with Chat
You have to enhance your engagement on chats to boost your streaming engagement. You can also do live chats with streaming, which can help you show your intuitive side. This also keeps the viewer engaged with your content for effective results.
By chatting, you can resolve the viewers’ queries and invite them to your streaming channel. Furthermore, real-time interaction with viewers also encourages community building. It also makes the viewers feel valued and preferred.
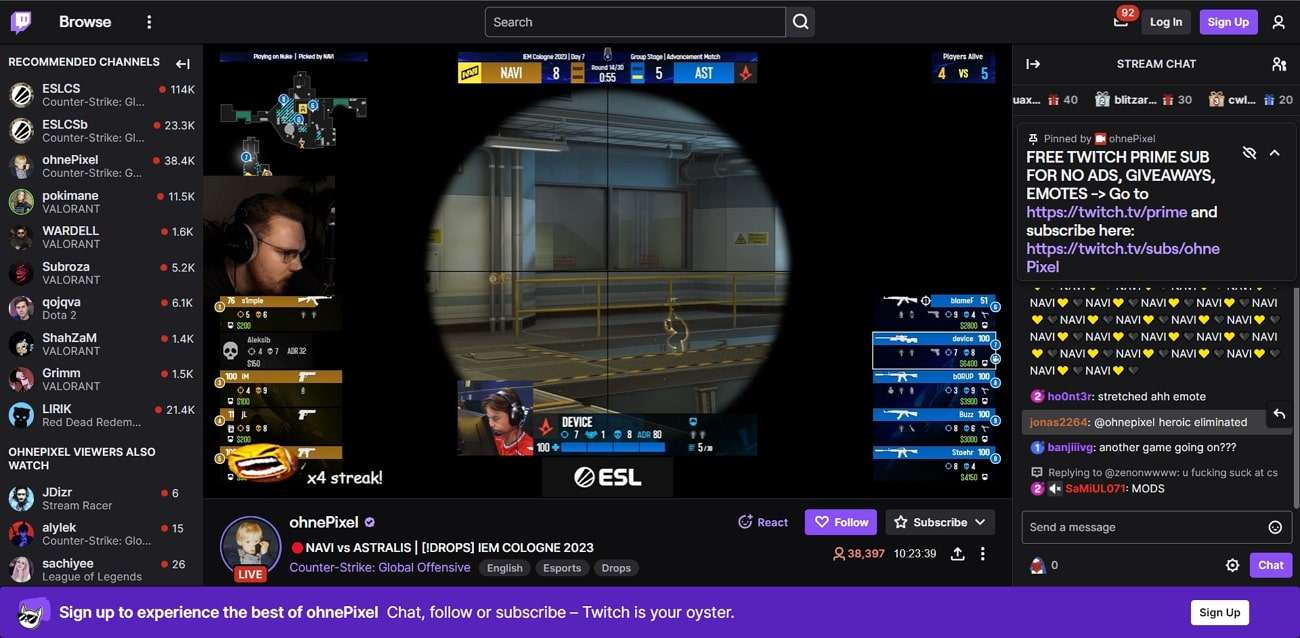
5. Utilizing Twitch Features Effectively
Twitch is a feature-rich tool, and you have to use the features effectively to get the most out of it. For example, you can personalize the titles to show the theme of streaming in an interactive way. You can also use tags and other categories to optimize the discoverability of streaming videos.
Above all, Twitch can help you in adding relevant keywords. Through the relevant keywords, you can enhance the reach of streaming videos to a further extent. The chances of visibility of your content with potential subscribers also increase with this.
6. Cross-Platform Promotion
One of the best and most effective things about Twitch is it lets you optimize cross-platform video sharing. By this, you will be able to extend the reach of your videos on other platforms. Moreover, this often includes Discord, YouTunbe, personal websites, and more.
Additionally, you can create compelling highlights of your streaming videos and share them on other social platforms. It will entice the viewers to visit yourTwitch-promoted channels .
7. Participating in Twitch Communities and Events
You can engage with the Twitch community to show yourself as an approachable streamer. Find the communities relevant to your streams and share your streaming videos with them. This also helps you to participate in another event. Moreover, it often incorporates collaboration, charity streams, etc.
Adopting this technique also opens the way for establishing connections with like-minded streamers to improve and enhance streaming. You can also increase the number of views of your streams with this.
Conclusion
In a nutshell, you can use theTwitch streaming promotion to stream whatever you want. Twitch is a feature-rich and optimized quality platform. You can also use this streaming platform for promotional purposes because it has endless benefits.
A few of them are given above for your easy understanding. Alongside this, we have also provided the steps for conducting Twitch streams. You can follow them to remove any complications. If you want to create videos with virtual YouTuber assistance, consider using Virbo.
You May Also Ask
1.How much does it cost to be promoted on Twitch?
The rates of Twitch promotion can vary accordingly. It also helps you with nontraditional marketing strategies, which encompass Twitch influencers. However, the rate of Twitch promotion can range from $2 to $10 per impression.
2.How much does a streamer make per Twitch bit?
In an estimated value, the Twitch streamer earns $0.01 for every Twitch bit. This can convert into great revenue if you have a considerable number of followers.
3.Do people generally donate bits or subs to Twitch channels?
You can expect donations of bits in the live streams. Moreover, Twitch bits will act as almost 50% of your total earnings. Through this, you can also achieve a greater number of followers and grow your channel. You can even gain more subscribers and viewers, which can work as your primary source of income.
Create An AI Avatar Video
Create An AI Avatar Video
1. Create a New Project
Wondershare Virbo provides a system for the rapid generation of AI avatar videos through its multiple directions of creating new projects. You can create a new AI project on Virbo in the following ways:
- Creating an entirely new project.
- Creating the project with the help of AI avatars.
- Creating the project with the help of a recording integrated through “Text-to-Speech.”
- Creating a project using the option of generating an AI script.
- Creating a project with the aid of existing AI-generated templates.
2. Editing the Project
The AI video generation tool can be utilized for enhancing videos by editing them through AI-generated scripts, AI avatars, voiceovers, and storyboarding. Learn how Virbo makes it easy to edit a video on the platform:
2.1 Input Scripts
Step 1: As you lead into the Video Creation page from the main screen of the tool, select the “Script” area appearing under the video. You will be directed into the “Text Editing Mode” for the video.
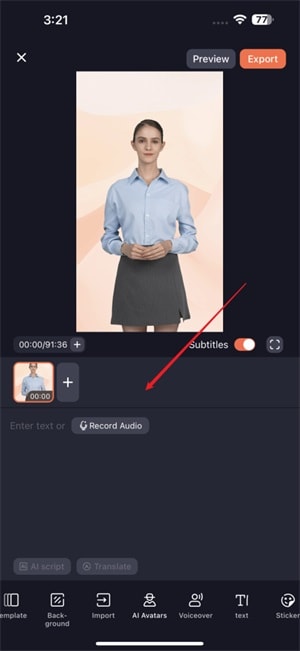
Step 2: Type in the text or paste it on the provided space that you want to be rehearsed by the AI Avatar.
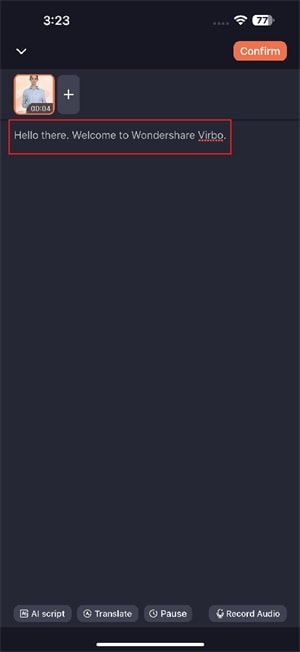
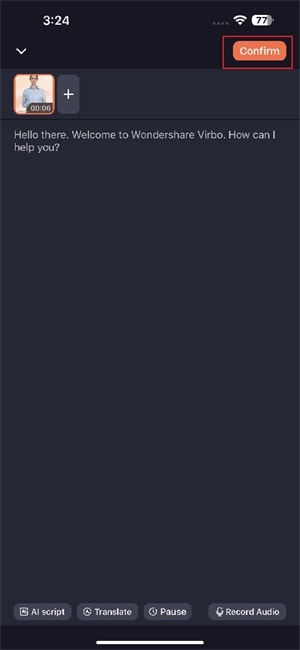
Step 3: As the text is added, tap the “Confirm” button on the top-right to exit the text editing mode.
2.2 Using AI Avatars
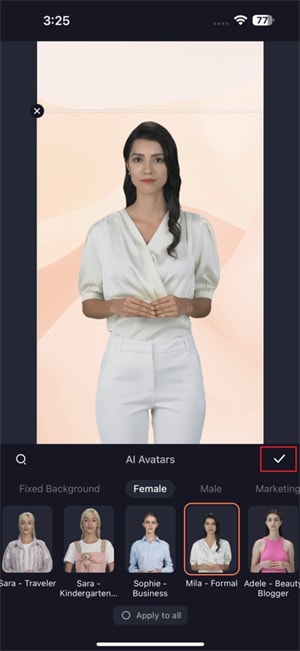
Step 1: Once you find yourselves on the video creation page, navigate to the “AI Avatars” section at the bottom of the screen.
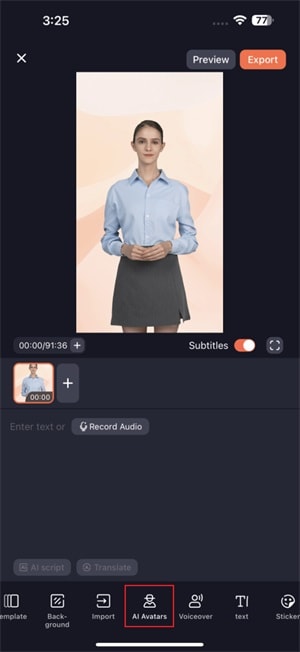
Step 2: You can navigate through the multiple categories available on the screen and select your respective AI avatar. This will help you preview the respective AI avatar.
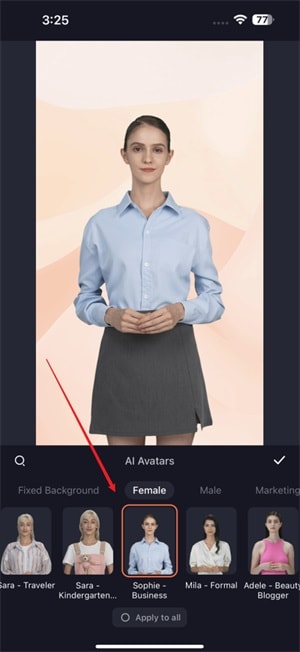
Step 3: As you are satisfied with your choice, tap the “tick” icon on the right side of the screen to apply the AI avatar to the video.
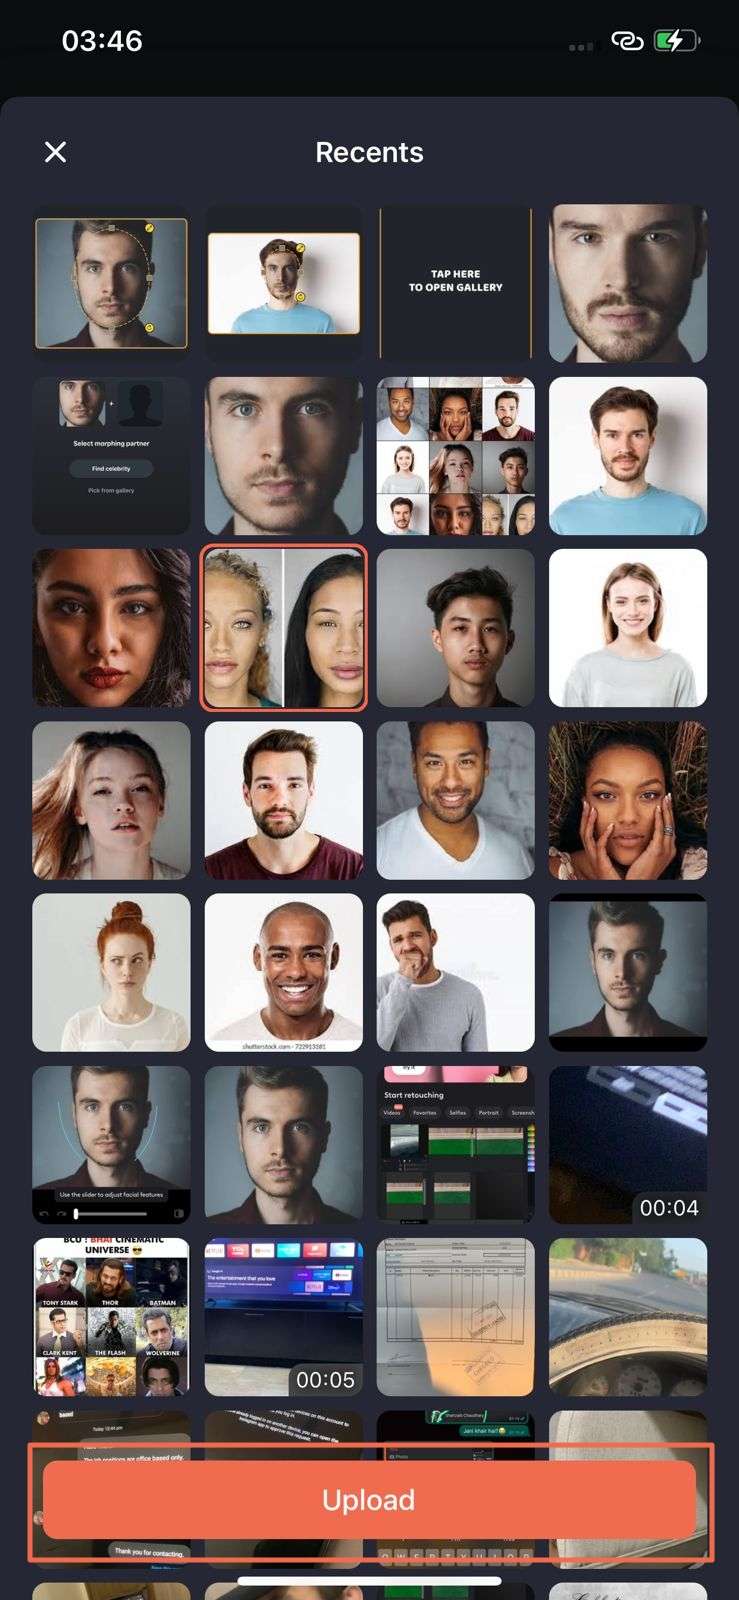
2.3 Adding Videos/Images
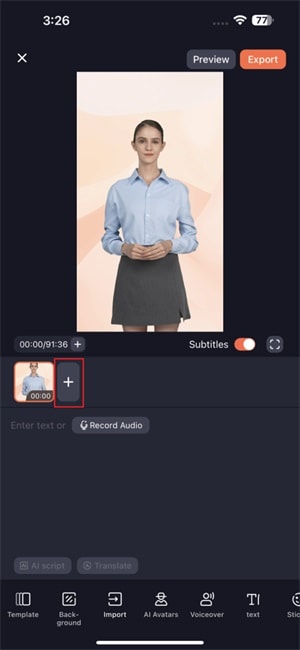
Step 1: If you intend to add any image or video to your video, select the “Import” icon on the bottom. You will be led into the media selection window, where you can select your required media.
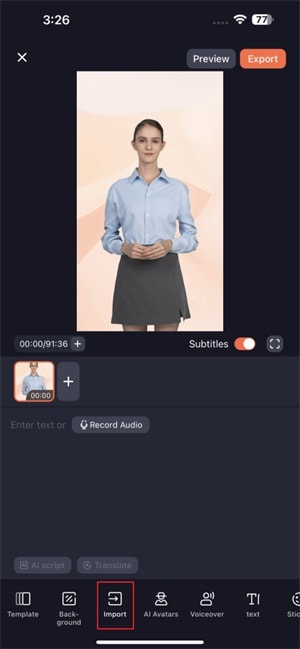
Step 2: As you select your respective media, select the “Upload” button for uploading it on the video panel.
2.4 Editing Storyboards
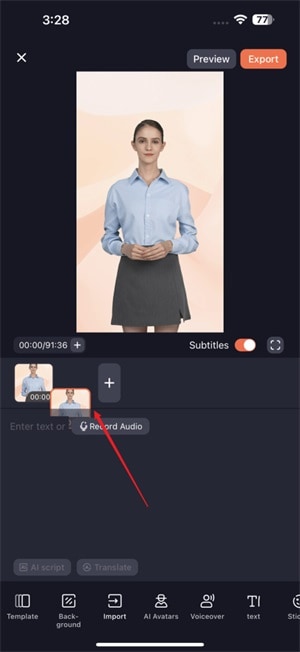
Step 1: For those who wish to add more storyboards to their video, select the “+” button on the video editing panel for adding a storyboard. After adding it, you can utilize the available digital characters, voiceovers, backgrounds, and other elements available.
Step 2: If you want to make some particular edits to the storyboards, tap on a specific storyboard and select the option of “Copy” or “Delete.”

Step 3: To change the sequence of the storyboards, press any storyboard to enter the adjusting mode. This helps you change the order of the added storyboards in the video.
3. Preview and Export Video
3.1 Previewing AI Video
Step 1: After performing all respective edits on the video, you can have it previewed with the “Preview” button on the top-right corner.
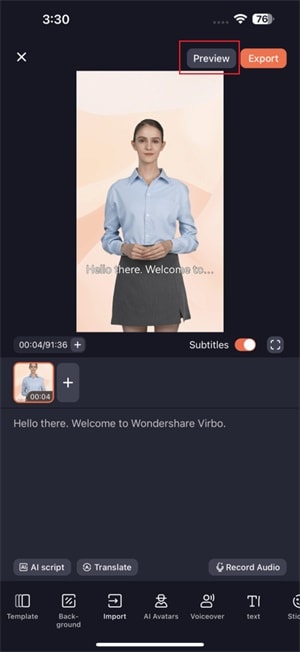
Step 2: For facilitating faster video previews, the AI model shows frames as images during the preview.
3.2 Exporting AI Video
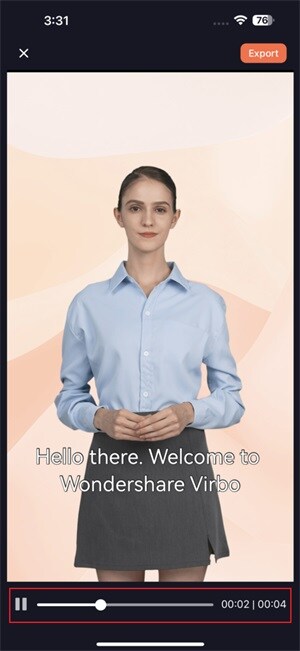
Step 1: As you successfully preview the video, select the “Export” button on the top-right to proceed with saving the video.
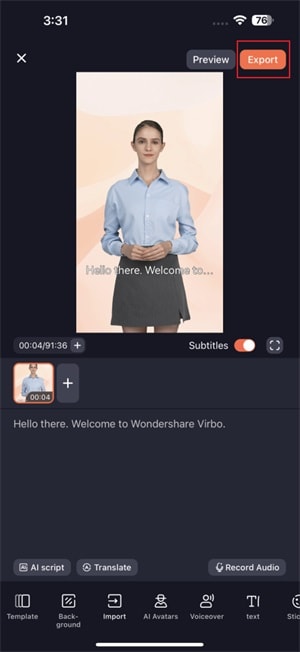
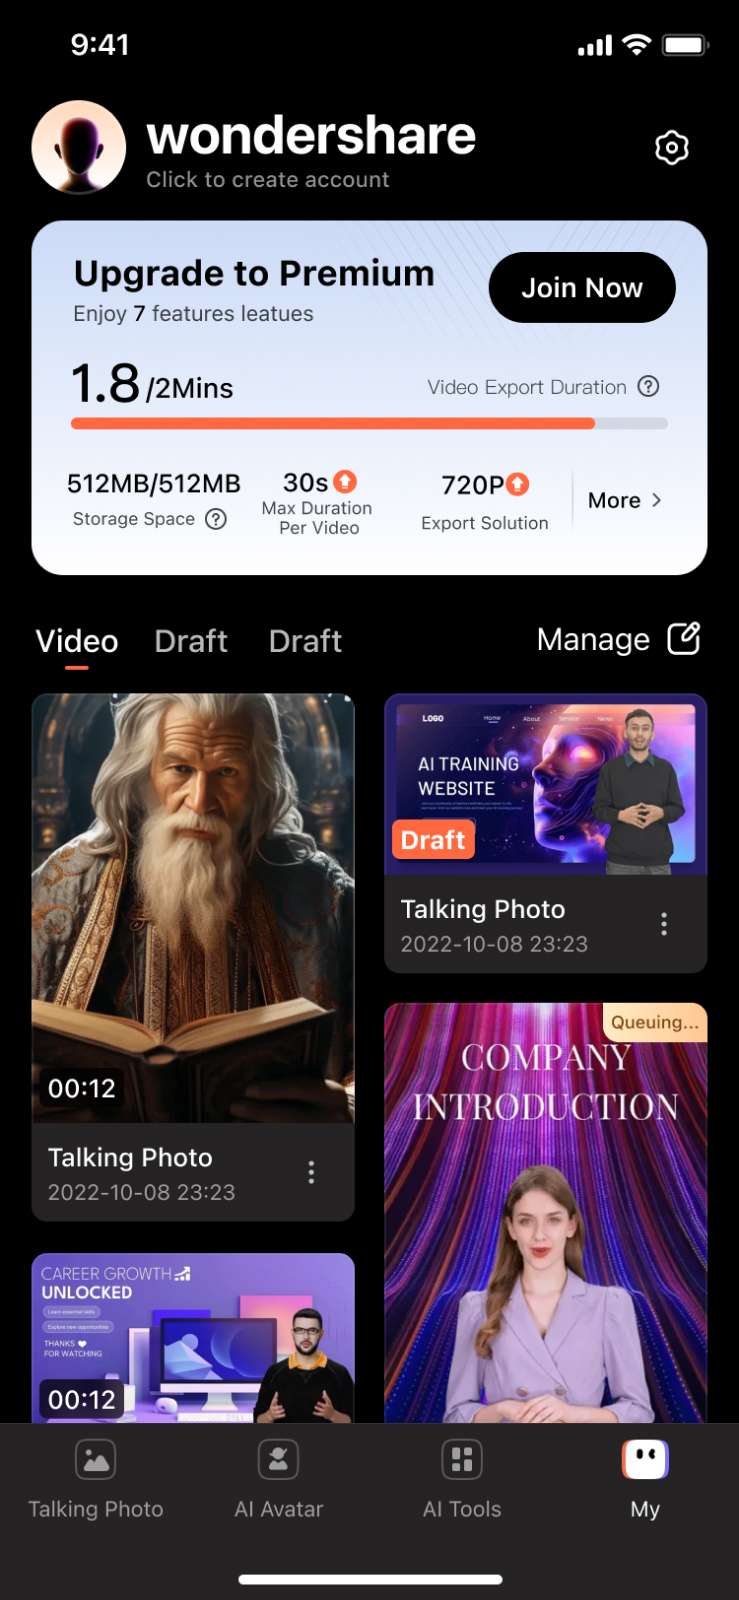
Step 2: Once the video is exported after a while, you can find it in the “Creation” section. Lead into the particular section from the home screen and lead into the “Video” tab. It can be viewed within the application or from the gallery of your smartphone.
1. Create a New Project
Wondershare Virbo provides a system for the rapid generation of AI avatar videos through its multiple directions of creating new projects. You can create a new AI project on Virbo in the following ways:
- Creating an entirely new project.
- Creating the project with the help of AI avatars.
- Creating the project with the help of a recording integrated through “Text-to-Speech.”
- Creating a project using the option of generating an AI script.
- Creating a project with the aid of existing AI-generated templates.
2. Editing the Project
The AI video generation tool can be utilized for enhancing videos by editing them through AI-generated scripts, AI avatars, voiceovers, and storyboarding. Learn how Virbo makes it easy to edit a video on the platform:
2.1 Input Scripts
Step 1: As you lead into the Video Creation page from the main screen of the tool, select the “Script” area appearing under the video. You will be directed into the “Text Editing Mode” for the video.
Step 2: Type in the text or paste it on the provided space that you want to be rehearsed by the AI Avatar.
Step 3: As the text is added, tap the “Confirm” button on the top-right to exit the text editing mode.
2.2 Using AI Avatars
Step 1: Once you find yourselves on the video creation page, navigate to the “AI Avatars” section at the bottom of the screen.
Step 2: You can navigate through the multiple categories available on the screen and select your respective AI avatar. This will help you preview the respective AI avatar.
Step 3: As you are satisfied with your choice, tap the “tick” icon on the right side of the screen to apply the AI avatar to the video.
2.3 Adding Videos/Images
Step 1: If you intend to add any image or video to your video, select the “Import” icon on the bottom. You will be led into the media selection window, where you can select your required media.
Step 2: As you select your respective media, select the “Upload” button for uploading it on the video panel.
2.4 Editing Storyboards
Step 1: For those who wish to add more storyboards to their video, select the “+” button on the video editing panel for adding a storyboard. After adding it, you can utilize the available digital characters, voiceovers, backgrounds, and other elements available.
Step 2: If you want to make some particular edits to the storyboards, tap on a specific storyboard and select the option of “Copy” or “Delete.”
Step 3: To change the sequence of the storyboards, press any storyboard to enter the adjusting mode. This helps you change the order of the added storyboards in the video.
3. Preview and Export Video
3.1 Previewing AI Video
Step 1: After performing all respective edits on the video, you can have it previewed with the “Preview” button on the top-right corner.
Step 2: For facilitating faster video previews, the AI model shows frames as images during the preview.
3.2 Exporting AI Video
Step 1: As you successfully preview the video, select the “Export” button on the top-right to proceed with saving the video.
Step 2: Once the video is exported after a while, you can find it in the “Creation” section. Lead into the particular section from the home screen and lead into the “Video” tab. It can be viewed within the application or from the gallery of your smartphone.
Top 10 AI Avatar Generators
In this content-driven world, everyone needs to market their videos effectively. The AI avatar generators are the commonly used tools for this purpose. We aim to provide reliable information on AI avatar tools in today’s discussion.
You will discover the 10 top-rated tools for creating realistic-looking avatar videos in this article. Along with this, you will also get to know the benefits of using AI avatar creators. Thus, read this enriched article and get the information you wish to know.
Generate AI Avatar Online Generate AI Avatar Now Generate AI Avatar Now
Part 1: What is AI Avatar?
Day by day, the trend of creating AI avatar-integrated videos is increasing drastically. These avatars are making significant contributions to various videos. It is essential for businesses to keep up with the pace of technological incorporations. AI avatars are part of this tech revolution. You can represent your business and industry in several fields with the help of avatars powered by artificial intelligence.
In today’s world, AI avatars are human-like bots powered by technical AI algorithms. They also comprehend natural language understanding along with stimulation technologies. These avatars learn, communicate, and behave like humans. Moreover, they can also realistically mimic human expressions. You can get assistance from an AI avatar maker to create the best avatars.
These computer-generated characters can work like humans, and you can also use them as your virtual assistant. Other than this, there are several forms of AI-generated avatars. This may include voice assistance, chatbots, and animated characters. They are a true example of leveraging the powers of artificial intelligence.
Generate AI Avatar Online Generate AI Avatar Now Generate AI Avatar Now
Part 2: Benefits and Applications of AI Avatar Generators
You must be wondering why it’s important to use AI-generated avatars in videos. These avatars hold profitable benefits and can boost the productivity of your videos. To know more about the benefits and applications of avatars, jump below:
1. Realistic and Customizable Avatars
With AI avatar generators, you can create realistic-looking avatars. Moreover, several tools let you customize the avatars as per your needs and demands. You can also use avatars to represent your personality on virtual platforms. Accessibility, stimulation, and research inclusivity are also part of AI avatars.
2. Enhanced User Engagement and Personalization
AI avatars let you boost user engagement in several ways. You can personalize their impression and gestures and can build community with them. Besides this, you can also use avatars for social interaction along with personalized recommendations. It also helps in ensuring your personality is private and maintaining psychological well-being.
3. Diversified Industrial Applications
You can also get benefits from AI-generated avatars in multiple applications and fields. Marketing, customer support, and advertising are among the most common platforms for the usability of AI avatars. The avatars can also help you in teaching something new to other people.
Virtual conferences and events are also commonly taking assistance from AI avatars. Moreover, healthcare, communication, social media, marketing research, testing, fashion, and other e-commerce industries rely on avatars.
4. Virtual and Augmented Reality
AI-generated avatars hold significant potential when it comes to virtual and augmented reality. You can give an immersive, realistic experience to the users and make the user experience more upgraded. In addition to this, you can also stimulate guidance and manage meetings and conferences with this. Storytelling and entertainment are also part of this.
Part 3: Top 10 AI Avatar Generators in 2024
Many AI avatar generators claim to be the best when it comes to creating realistic avatars. However, you need to be aware of the best AI avatar generator tools. For this reason, this section will introduce and discuss the optimistically impressive tools for creating AI-generated avatars.
Top 10 AI Avatar Generators
1. Virbo
Virbo is an AI-powered AI avatar generator that you can use on several platforms. The interface of Virbo is quite aesthetic, along with the highlighted features and buttons. With this navigable interface, you can use Virbo without facing complexities. It also comprehends the blazing fast processing speed through which you can accomplish your task in minimum time.
It also offers 100 GB of cloud storage that allows users to store their projects. With this built-in cloud storage, you can also synchronize your projects into several devices. In addition to this, you can also export videos in 1080p quality with this.
Compatibility of Virbo
- Windows, Android, iOS
Key Features of Virbo
- As it supports all the major operating systems, you can use it on several devices without issues. You can also use its paid version on several platforms easily.
- This tool also integrates multinational AI avatars. You can also select avatars based on age and ethnicity.
- It also integrates the versatility of commercial stock and templates. You can select from 180 plus templates and royalty-free music.
- There is a diversified range of natural AI voices, which are present in more than 120 languages. This is also very helpful for using the text-to-speech feature.
- Virbo also shows incorporation with ChatGPT, which lets you use the script generator in the most advanced manner. Moreover, you can also optimize the script in its Windows version.
Pros
- It has 24/7 customer support, so you can get your queries solved at any time without issues.
- You can even create a 2-minute-long video by using this intuitive tool.
Cons
- The VIP assets are limited to the paid version, so you cannot use them without buying the premium version.
Generate Engaging
AI Video in Minutes!
Easily convert text into professional spokesperson videos in over 120+ voices & languages in minutes.
Generate AI Video Free Generate AI Video Now


2. Dawn AI – Avatar Generator [Android | iOS ]
Do you want to create your mesmerizing avatars? No worries because this AI Avatar tool lets you make realistic avatars of yourself. With this avatar AI generator, you can customize your avatar’s looks. Whether you want to have a vampire, curly, clown, mermaid, or cowboy avatar, this mobile can help you.
![]()
Compatibility of Dawn AI
- Android: 6.0 and above
- iPhone: 14.0 and above
Key Features of Dawn AI
- It has a huge array of avatar templates, and you can also search for the templates using keywords.
- You can also create avatars of yourself as the opposite gender. For example, a female can create a male avatar of herself.
- This app has an endless avatar style, often including anime, kodak films, fine art, impressionism, Pixar, and more.
Pros
- It creates avatars of optimized quality, and all the avatars created with this tool are riveting.
- It has a delightful user interface along with straightforward procedures. This is quite a beneficial thing for users.
Cons
- This app has a few bugs and sometimes works slowly. It can be a major lagging factor for the users.
3. Facetune – AI Photo/Video Editor [Android | iOS ]
With this premier-grade photo and video editor, you can generate optimized quality AI avatars without issues. Not only this, but it can also edit or retouch your media content. You can apply the effect to all the video frames by editing one frame. In addition, you can remove all the scars, blemishes, and spots from the face of the generated avatar.
![]()
Compatibility of Facetune – AI Photo/Video Editor
- Android: 7.0 and above
- iPhone: 14.0 and above
Key Features of Facetune – AI Photo/Video Editor
- With Facetune – AI Photo/Video Editor, you can reshape your face, add virtual makeup, and smoothen the skin.
- If you have any unwanted object, pet, or stranger in the photo, you can use this tool to remove that from the pictures and videos.
- It also lets you change your hair color in photos and videos. You can also enhance your selfies with its pro selfie editing feature.
Pros
- This AI avatar creator allows you to customize every bit of your picture and video visuals.
- There are tons of effects and filters in it which can make your media content more innovative and trendier.
Cons
- This app has uncountable irritating ads that can interrupt your workflow efficiency.
4. Photoleap – AI Art Photo Editor [Android | iOS ]
Using this innovative app, you can let your imagination run wild and create outclass AI avatars. Just add the text prompt on whatever you want, and it will create that for you. With this AI avatar maker, you can also turn your selfies into avatars. Moreover, it also lets you manage the style of the avatars. You can also animate yourself with paintings and cartoons.
![]()
Compatibility of Photoleap – AI Art Photo Editor
- Android: 8.0 and above
- iPhone: 15.0 and above
Key Features of Photoleap – AI Art Photo Editor
- Enhancing picture quality by adding refreshing colors and bright smiles is also possible.
- It has the potential to replace boring backdrops with attractive photos. You can also add 3D motions in the background.
- You can also use this feature to enhance the quality of old pictures and deblurring them effectively.
Pros
- You can also use this tool for transforming interior and landscape pictures into intuitive art.
- If you have a pencil sketch, you can convert it into real-life pictures without any issues.
Cons
- This app frequently crashes, especially when the load is quite heavy. So, you can face problems in this part.
5. Voi – AI Avatar Portrait Maker [Android | iOS ]
This is one of the most popular applications for creating AI avatars because you can even create a couple of avatars with this. It lets you work on multiple pictures to create and share art with the world. There are endless avatar styles in this, which gives you diversified options. You can even select the theme of your avatar from the options of hero, fantasy, anime, etc.
![]()
Compatibility of Voi – AI Avatar Portrait Maker
- Android: 7.0 and above
- iPhone: 12.0 and above
Key Features of Voi – AI Avatar Portrait Maker
- It accepts prompt instructions so you can write about how you want your avatar to look.
- Using this innovative tool, you can turn yourself into a movie or a video game character.
- Changing background as per the theme of the avatar is also a specialty of Voi – AI Avatar Portrait Maker.
Pros
- The interface of this tool is quite navigable, so you can use it without complications.
- It integrates the blazing fast processing speed through which you can turn pictures into avatars in a limited time.
Cons
- Some features are limited to the paid version, which can be a major limitation of Voi – AI Avatar Portrait Maker.
6. Arta – AI Art & Avatar Maker [Android | iOS ]
You can turn your ideas into reality using this pro-level AI avatar maker. It can turn prompt instructions into breathtaking pictures in no time. For making personalized AI avatars, you can also use your images. Moreover, it can also turn the sketches into Picasso-level paintings.
![]()
Compatibility of Arta – AI Art & Avatar Maker
- Android: 10.0 and above
- iPhone: 15.0 and above
Key Features of Arta – AI Art & Avatar Maker
- It can turn simple clips into outclass videos that blur the lines between reality and fantasy.
- There are tons of AI styles to choose from. You can go with the style that can express your true idea.
- The specialized AI art gallery never lets you get demotivated. By visiting this library, you can get inspiration from other artists.
Pros
- Not only humans, but you can also turn pictures of your pets into avatars.
- You can search for trendy styles, and if you like the style, click the Try This Prompt button to use it directly.
Cons
- This app sometimes compromises the quality of the AI pictures, so you cannot rely on it for professional use.
7. DemoCreator AI Avatar
Whether you want to create interactive presentations or YouTube videos, this tool can help you. You can create avatars that mimic your facial expressions and movements using this AI avatar creator. It also has tastefully designed AI models, so you do not have to invest much time in it.
![]()
Compatibility of DemoCreator AI Avatar
- Windows, Mac
Key Features of DemoCreator AI Avatar
- Using its video editor, you can modify your video to several extents. This includes resizing, cropping, splitting, merging, batch processing, and more.
- This tool can create presentations, online video courses, and live-stream presentations.
- It can also record screen, voice, webcam, and other things. You can also schedule recordings and draw on the screen.
Pros
- This tool can create market-level videos, and you can also highlight your professionalism through this.
- You can access this tool on various platforms like GoToMeeting, Google Meet, Skype, and more.
Cons
- Android and iPhone devices cannot download this software from Play Store or App Store.
8. Media.io AI Avatar Generator
Do you wish to create the most realistic-looking avatar of yourself? No need to worry because you can use this exceptional avatar AI generator. With this, you can create avatars from simple pictures in dozens of styles. Moreover, it also lets you manage facial expressions that fit your needs. You can create various avatars with it, such as Disney, Barbie, Simpson, Glacier Bay, and League of Legends.
![]()
Compatibility of Media.io AI Avatar Generator
- Online
Key Features of Media.io AI Avatar Generator
- It has several video tools, such as a watermark remover, video converter, video editor, etc. You can use them to make videos more proficient.
- The AI image enhancer lets you enhance the overall quality of an image without compromising its context and layouts.
- You can also remove the irritating backgrounds from the picture with its AI watermark remover.
Pros
- You can create avatars with this tool and compress their sizes without compromising the quality.
- The image sharpener lets you sharpen the quality of an image, and you can also use them to sharpen AI avatar pictures.
Cons
- It is an online based platform, so you cannot use it without any internet access.
9. Prequel – AI Avatar Editor [Android | iOS ]
Prequel – AI Avatar Editor is also a famous AI avatar generator. You can add several looks to one picture with the help of this tool. It also encompasses many templates that make your work easier than ever. Not only an avatar, but you can also turn your pictures into cartoons with this.
![]()
Compatibility of Prequel – AI Avatar Editor
- Android: 7.0 and above
- iPhone: 13.0 and above
Key Features of Prequel – AI Avatar Editor
- It has 800+ effects along with 30+ custom fonts. You can use the stock library of this app according to your desired goal.
- This app also supports D3D effects for creating the best pictures. You can also adjust the tune and contrast of your image.
- You can also create Giphy text and animated stickers. The built-in music can also help you in making media files more attractive.
Pros
- It lets you adjust and control every parameter of both photos and videos.
- You can create authentic intros with this and add retro effects without issues.
Cons
- Some users have complained that the developers are removing most of their favorite effects.
10. Fotor
This amazing AI avatar maker also holds its name higher in the list of avatars making tools. It has diversified professionally made avatars that can make your work easier. You can also use these avatars to represent your brand and services. In addition, it can create avatars on several domains, such as gaming and VTuber.
![]()
Compatibility of Fotor
- Online, Windows, Mac, Android, iOS
Key Features of Fotor
- By using Fotor, you can crop, sharpen, and resize images. It also helps you crop photos and add borders to them.
- You can also blur the background of the photos, merge images, and make intuitive colleges in no time.
- This tool can generate social media content such as Instagram posts, Facebook cover, etc.
Pros
- Fotor has several AI tools such as AI Art Generator, AI Face Generator, AI Image Generator, and more.
- With Fotor, you can make avatars in all domains. This may include movies, gaming, and other things.
Cons
- This tool can be pretty slow sometimes and compromise the users’ productivity.
Conclusion
To wrap things up, it can be said that you can take assistance from the AI avatar maker to create realistic avatars. In this article, we have discussed the top tools for creating AI avatars. You also discovered the compatibility, pros, cons, and features above. In short, using AI avatars can help increase your online presence and boost user engagement in no time.
Generate Engaging
AI Video in Minutes!
Easily convert text into professional spokesperson videos in over 120+ voices & languages in minutes.
Generate AI Video Free Generate AI Video Now
FAQs About AI Avatar Generators
1. How do AI avatar generators work?
The AI avatars work on artificial intelligence in addition to machine learning; It integrates large data sets to be trained upon. Several deep-learning models are utilized to train the avatars. After this comes the creation of 3D models that represent the visuals of avatars, the developer then works on fine-tuning the model and improvises details. Furthermore, refinement helps eliminate errors and mistakes.
2. What are the future prospects for AI avatars?
Regarding the prospect of AI avatars, it can be said that they are quite promising. Day by day, the avatars are enhancing personalization and details to understand user preferences. Emotional intelligence, along with multimodal interaction, is also getting refined. The AI avatars will also be able to work on several industry-standard applications and understand human emotions.
3. Are AI avatars capable of natural language processing?
Luckily, the answer is yes. The AI avatars have deep learning models that help them in training about how to process natural language. They also encompass an NLP technique that allows them to analyze the meaning and context behind the user statement. The avatars can interpret multiple forms of languages with increased accuracy and sophistication.
4. How do AI avatars improve customer service?
As you know, AI avatars can ensure 24/7 availability. This helps in having improved customer service along with reassuring prompts. Users can also get instantaneous responses from the AI avatars, enhancing scalability.
8 Best Multi-Subtitles Translators You Shouldn’t Miss
Reaching a global audience depends on having a reliablemulti-subtitle translator . It ensures inclusivity and accessibility across diverse cultures and languages. It plays a role in bridging linguistic gaps. They make content understandable and relatable.
By using such tools, creators can broaden their viewer base. You can also foster connection and understanding worldwide. The following section delves into a curated list of 8 potent apps that excel in translating multiple subtitles. Each app helps create seamless communication and engagement across linguistic barriers. Read on to learn more.

Part 1. Top 8 Multi-Subtitles Translators for a Wider Reach
Discover the ultimate tools to expand your content’s global impact. These translators unlock the potential to increase your reach with audiences. Here are the top 8 apps that cantranslate multiple subtitles , starting with a powerful AI-assisted app.
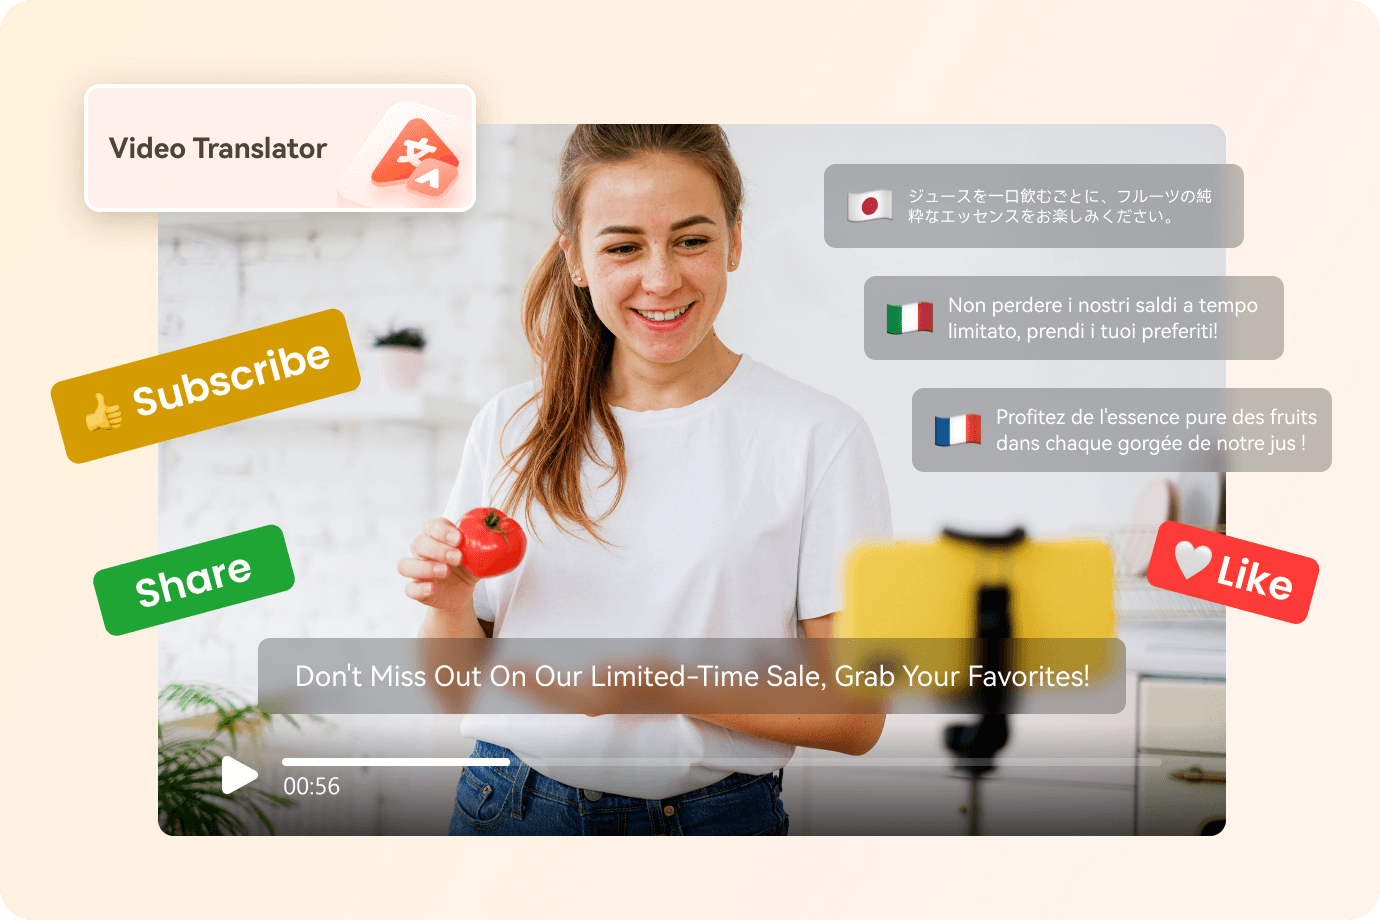
Wondershare Virbo – AI-Powered Video Translator
Wondershare Virbo takes advantage of cutting-edge AI technology to revolutionize video translations. It’s one of the top multi-subtitle translators in 2024, empowering creators to reach global audiences easily. Here are its key features:
Get Started Online Free Download
- AI Video Translations. Virbo translates video content into over 20 languages. It can easily translate your videos into English, Spanish, Mandarin, French, German, and more.
- AI Avatars. The app uses 300+ realistic avatars to personalize your video presentations and translations.
- AI Voice. Virbo provides natural-sounding voiceovers in many languages, ensuring an immersive viewing experience.
- AI Script . It simplifies the translation process by transcribing and translating video scripts in real time.
Virbo caters to various use cases, including:
- Building stronger customer loyalty
You can tailor marketing messages to specific language demographics. It’s easy to create deeper connections and loyalty among diverse customer bases.
- Standing out in social media
You can create attention-grabbing content thanks to multilingual subtitles. The tool allows you to differentiate from competitors and expand your reach globally.
- Boosting digital marketing
Virbo enhances the effectiveness of your digital marketing campaigns. It helps you deliver localized content that resonates.
Translate Subtitles – Free Translation Service
Subtitles Translator is an easy-to-use free online tool. The app is designed to transform subtitle files into different languages with ease. It’s one of the top solutions for seamless subtitle translation available today. Here’s what themulti-subtitle translator app offers:

- Subtitle language transformation. You can convert subtitle files into various languages. Translate Subtitles allows you to translate in various languages. It includes Danish, Dutch, Hindi, Hebrew, and more.
- Multi-language translation services. Enjoy more translation options for converting subtitle files between different languages. You can edit translated text and download in-progress files for easy editing.
VEED.IO – Free Subtitle Converter
VEED.IO is another solution for expanding your video’s reach to a global audience. It offers a seamless online platform that automates the translation process. With its intuitive interface, reaching diverse viewers has never been easier. Here’s why it’s a game-changer:

- Automated transcription tool. Achieve 95% accuracy with VEED.IO’s automated transcription tool. It ensures precise subtitles for your videos.
- Flexible translation options . The app offers multilingual subtitles in over 100 languages. It includes English, Spanish, French, and Chinese, catering to diverse audiences worldwide.
- Easy customization. You can change the text translations as needed. Either add them as subtitles or download them as TXT files for offline editing.
Nikse – Subtitle Edit Online
Nikse Subtitle Edit Oline is a free multi-subtitle translator. The free online platform simplifies the process of translating subtitles into many languages. Below are the key features of the app:

- Translation and synchronization . You can translate subtitles into different languages. Use Google Translate, Yandex Translate, or other integrated tools to convert subtitle languages.
- Many output formats. Save your subtitle files in various formats, including STL, XML, TXT, and more.
SubtitleBee – Automatic Translator
SubtitleBee is an AI-powered solution for effortless transcription and translation of video content. The app focuses on enhancing your reach and global engagement. With its intuitive interface, SubtitleBee simplifies the process of translating multiple subtitles. Here’s what makes it stand out:

- Automated subtitling . Add subtitles to your videos with SubtitleBee’s automated tool for improved accessibility.
- Customizable styling. Elevate your subtitles with super-titles and customize font styles. Include various font choices and colors, ensuring visual consistency with your brand.
- Personalized branding. Enhance your video’s identity by customizing subtitles with your brand’s logo.
Flixier – Fast and Simple Subtitle Translator
Flixier is your ultimate online video editing and collaboration platform. The app is designed to help you create and translate subtitles. This multi-subtitle translator empowers you to enhance accessibility for your global audience. Let’s delve into its features:

- Automated subtitle generation . Take advantage of Flixier’s automated subtitle generation feature to save time and effort.
- Precise manual adjustments. Fine-tune your subtitles by making manual adjustments, ensuring optimal readability.
- Google Fonts integration. Enhance the visual appeal of your subtitles by integrating Google Fonts.
Nova AI – Multilingual Translator
Nova AI is a trusted companion for automatic transcription and translation services. It changes the way you engage with audio and video content. Nova AI ensures accurate translations. It can translate multiple subtitles in one go, making it effortless to expand the reach of your content. Here’s what sets it apart:

- Extensive language support . Translate subtitles between 75 different languages. Connect with diverse audiences worldwide.
- Convenient download options. Access your translated text in TXT and SRT formats. Easily integrate them with your video content.
- Video editing and subtitle sync. Use Nova AI’s video editing and subtitle sync features to fine-tune your content.
Subly – AI Subtitle Translator
Subly allows you to create and translate subtitles in minutes. With Subly’s AI subtitle translator, you can easily translate multiple subtitles into many languages. Here’s why Subly stands out:

- Seamless subtitle translation. Translate subtitles into 73 languages with ease.
- Automatic video translation. Experience automated video translation, simplifying the process of creating multilingual content.
- Secure online access. Enjoy peace of mind with Subly’s secure online access. It protects your data throughout the translation process.
Part 2. How To Use the Best Multi-Subtitle Translator
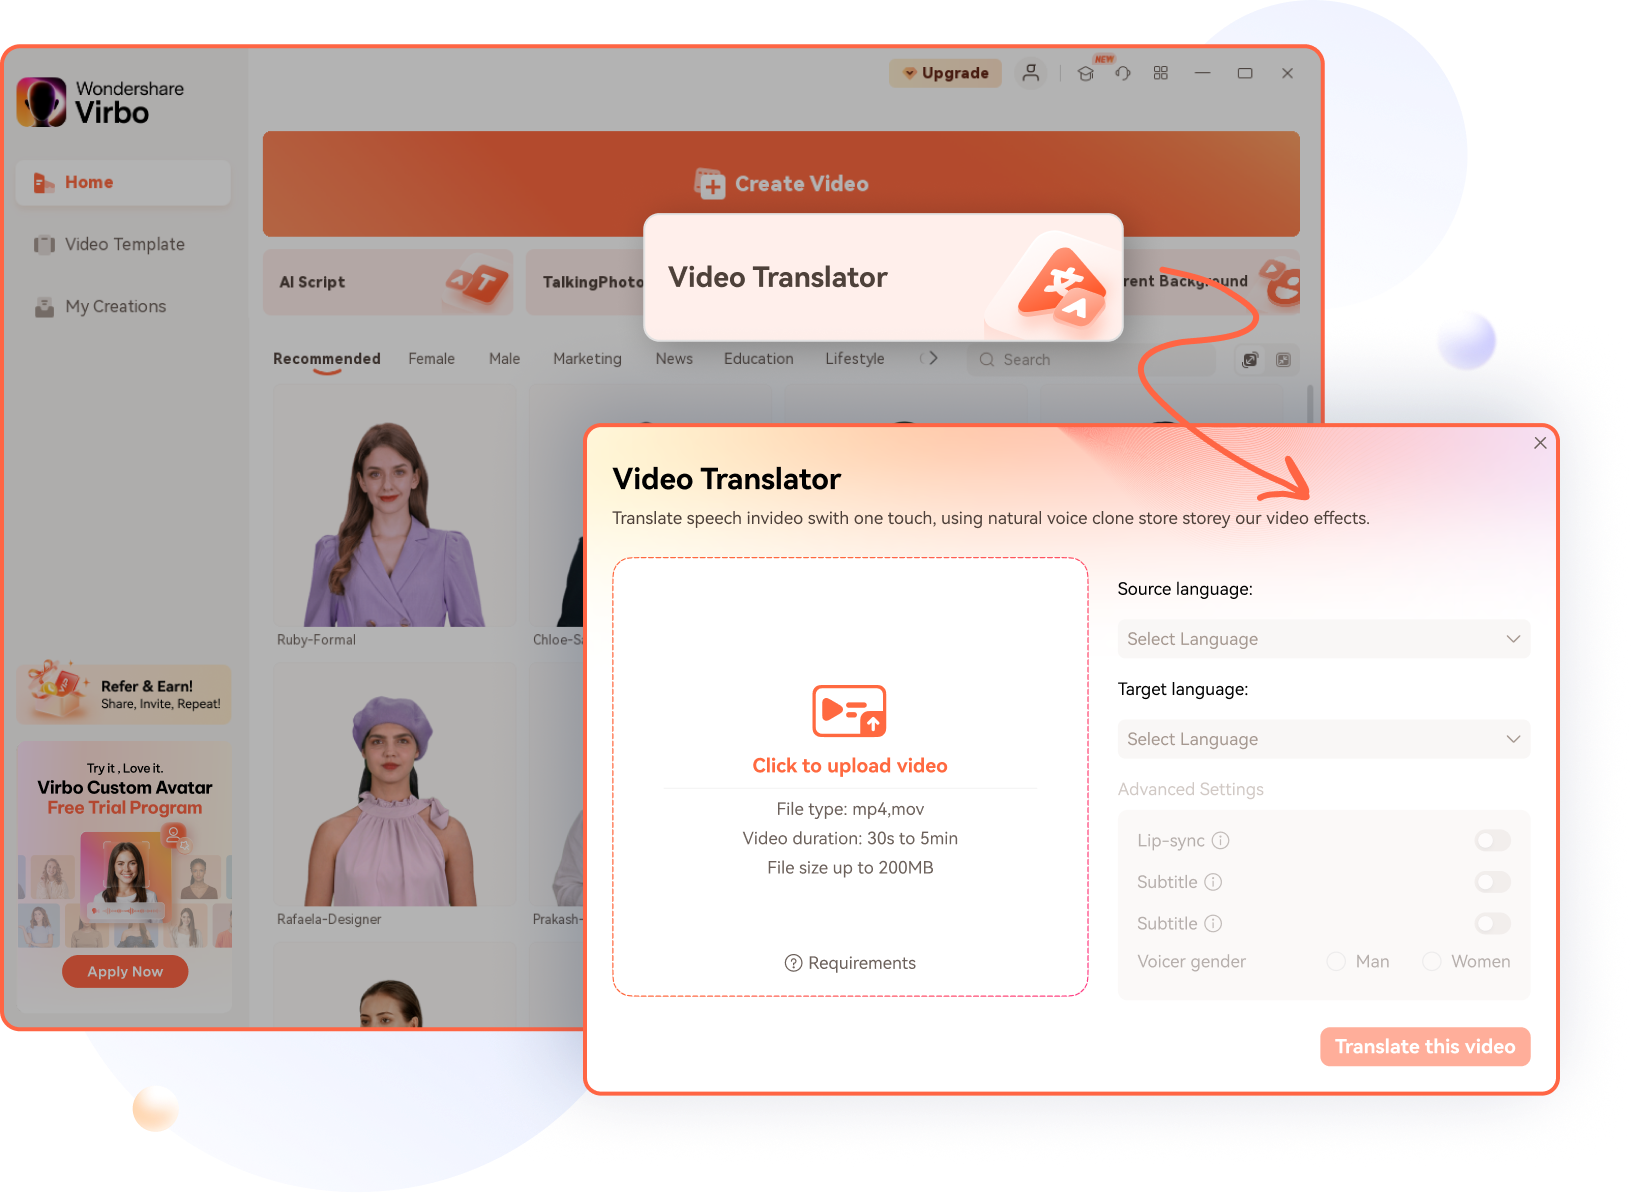
This section guides you through the process of using amulti-subtitle translator . With the top 8 translator tools outlined above, Virbo is the most suitable example. The platform offers streamlined and speedy translations, making applying the same principles to other tools easy. Follow the steps to simplify all your multi-translation needs:
- Step 1: Start by downloading and installing Virbo on your device. Log in with your Wondershare, Google, Facebook, Twitter, or Apple account. Or, use theVirbo online tool if downloading is not your ideal option. Click theVideo Translator button to start the process.
Get Started Online Free Download
- Step 2: Upload the video that you want to translate. Configure the translation settings according to your preferences. Choose the target languages and subtitle format. You can also add lip-sync if you prefer. Next, click onTranslate Video .

- Step 3: Once Virbo finishes generating translated subtitles, you can preview the AI-translated video. When you’re satisfied, download or export the translated video with subtitles.

These simple steps in Virbo can expand your reach to a global audience. The straightforward process makes it easy to use. Mastering Virbo will prepare you to use other translators if needed.
Conclusion
Using a multi-subtitle translator will separate you from the pack. It enhances content accessibility and global reach for you to find success. With tools like Virbo, creators can effortlessly translate many subtitles. You can make sure your content reaches diverse audiences worldwide.
By embracingmultilingual subtitles , creators can break language barriers. It can foster inclusivity and allow you to connect on a deeper level. For impactful, multilingual content creation, consider Virbo as your go-to solution. It empowers you to unlock the full potential of your videos and engage audiences across the globe.
Narakeet Review: Text to Speech Convenient Voice Maker
In a world where content consumption is constantly evolving, having innovative tools at your disposal to enhance the accessibility and engagement of your content is essential. One such tool that has gained significant popularity in recent times is Narakeet text to speech – a versatile Text to Speech (TTS) voice maker.
In this article, we will delve into the intricacies of Narakeet, exploring its features, functionality, and how it can revolutionize the way you deliver content. Whether you’re a content creator, educator, or simply someone seeking efficient ways to communicate ideas, this article will provide valuable insights into Narakeet’s offerings.
Part 1: What is Text to Speech Narakeet?
Narakeet is a powerful TTS platform designed to transform written content into engaging audiovisual presentations. Whether it’s turning blog posts into engaging videos or creating captivating educational materials,Narakeet text to speech simplifies the process by seamlessly converting text into speech.
Compatibility of Narakeet
- Narakeet is compatible with PowerPoint, Google Slides and Keynote formats.
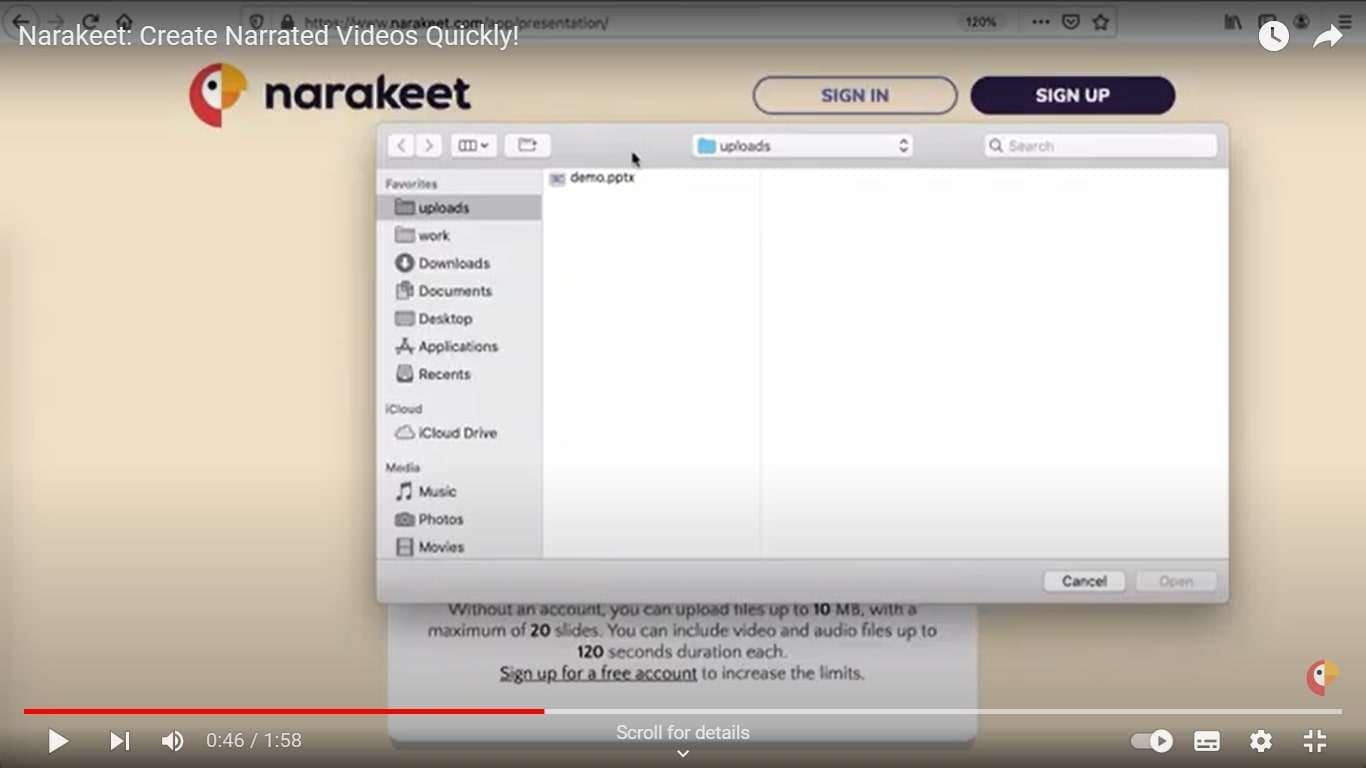
- You can upload your presentation file to the web app or use a link to your online presentation.
- Narakeet will automatically detect the language of your text and choose a suitable voice for it. You can also change the voice manually if you prefer.
Key Features of Narakeet
- Narakeet has a large collection of natural-sounding voices in different accents and genders. You can preview the voices before choosing one for your video.
- It can generate subtitles for your video based on your notes. You can edit the subtitles, change their font, size and color, and choose whether to show them on the video or as a separate file.
- The app add background music to your video from its library of royalty-free tracks. You can select a music genre, mood and intensity, and adjust the volume of the music.
- Narakeet text to speech allows you to trim, crop, rotate and resize your video, as well as add transitions, effects and filters. You can also adjust the brightness, contrast and saturation of your video.
- It can capture your presentation slides as video segments and combine them into a single video file. You can also upload your own images, videos or audio files to enhance your video.
- The versatile app can add subtitles to your video based on your speaker notes. You can customize the font, size, color and position of the subtitles.
- Narakeet can produce videos in high-definition quality, up to 1080p. You can also choose from different aspect ratios, such as 16:9, 4:3 or 1:1.
- It has a built-in media library that offers hundreds of royalty-free images, videos and music tracks that you can use in your video. You can also search for media by keywords or categories.
- The app comes with a powerful text to speech engine that can generate realistic and natural voices for your video. You can choose from over 600 voices in 90Narakeet languages such as Narakeet text to speech Bengali, Narakeet text to speech Urdu along with several others; and accents. You can also adjust the pitch, speed, volume and tone of the voice.
Pricing of Narakeet
- Narakeet has a free plan that lets you create up to 5 videos per month with a watermark and a maximum length of 5 minutes.
- The paid plans start from $9 per month and offer more features, such as longer videos, no watermark, custom branding, higher resolution and more voices.
Narakeet text to speech free is a convenient tool for creating narrated videos with TTS. It can be useful for making educational videos, tutorials, presentations, explainer videos, marketing videos and more.
Part 2: How Does Narakeet Work?
Creating captivating videos withNarakeet text to speech is a seamless process that allows you to transform your written script and presentation slides into an engaging audiovisual experience. Here’s a detailed breakdown of each step.
Step 1
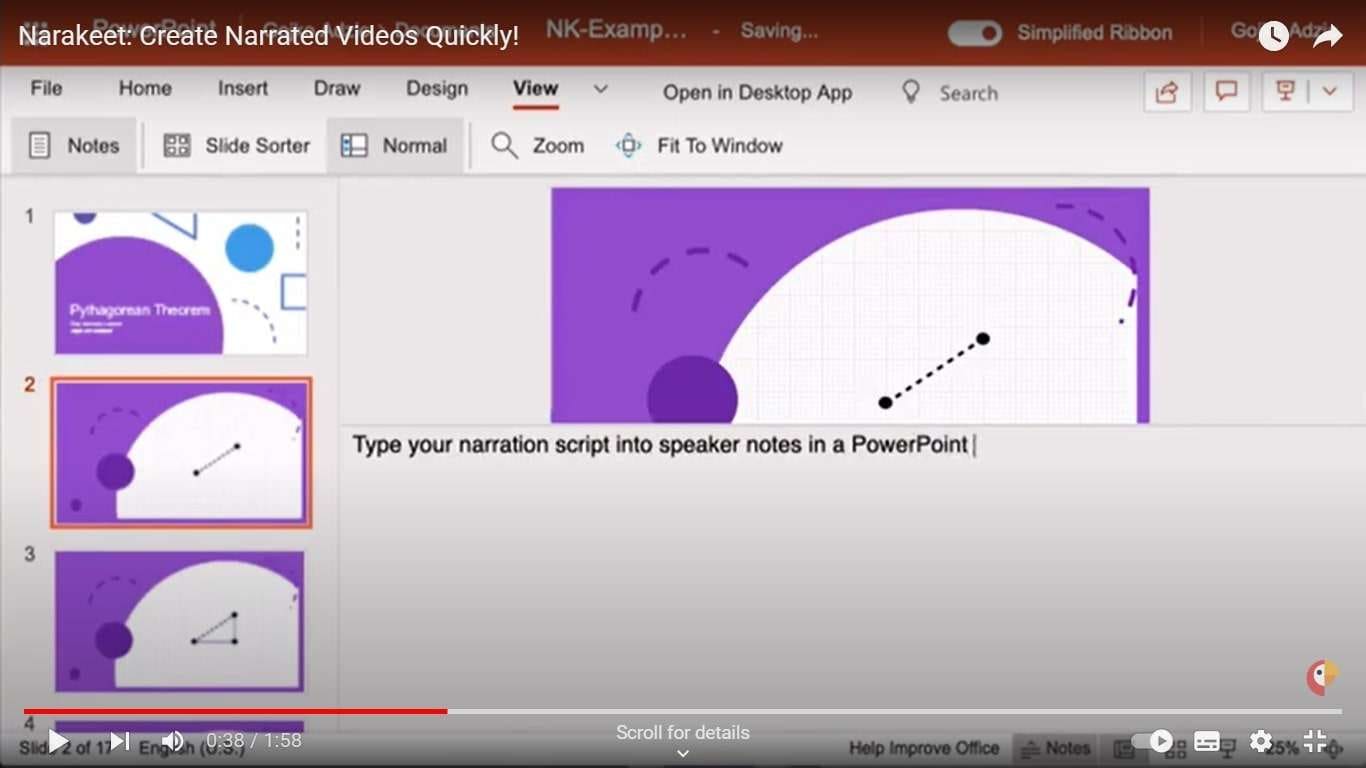
To start the process, you’ll need a script that outlines the content of your video. You can create this script using Markdown, a versatile formatting language that supports various elements like headings, lists, links, and images. Markdown provides a structured way to organize your content. Alternatively, if you have a presentation in PowerPoint, Google Slides, or Keynote, you can use the speaker notes section to write your script. This way, you’re aligning your visual content with the spoken narration.
Step 2
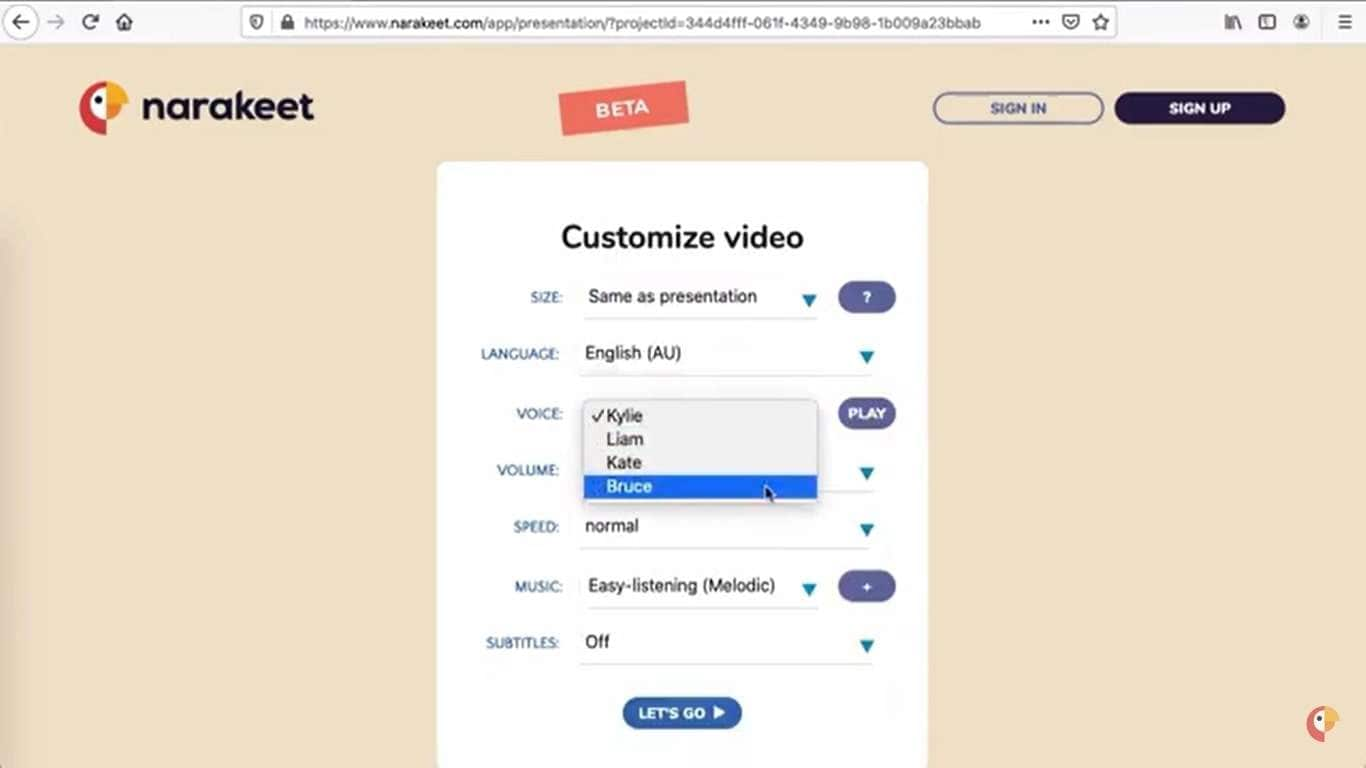
Narakeet offers an impressive array of over 600 voices in 90Narakeet languages and accents. After preparing your script, you can select a voice that best matches the tone and theme of your content. The platform allows you to preview the chosen voice, giving you a glimpse of how your narration will sound. Furthermore, you can fine-tune the voice’s pitch, speed, volume, and tone to create a customized auditory experience that resonates with your audience.
Step 3
If you have a presentation with slides, you can upload it to Narakeet as PDF files. Narakeet’s smart technology automatically segments each slide and synchronizes them with the voiceover. This integration ensures that the visual elements align seamlessly with the spoken content. Besides presentation slides, you can also enhance your video by uploading your images, videos, or audio files. This versatility allows you to create a visually rich video that keeps your audience engaged.
Step 4
Narakeet’s online editor provides a range of tools to refine your video’s visual and auditory aspects. You can trim video segments to eliminate unnecessary content, crop and rotate visuals for optimal framing, and even apply zoom effects to emphasize specific elements. Adding transitions and effects can enhance the overall flow and visual appeal of your video. Moreover, you can incorporate subtitles and background music to reinforce your message and create a more immersive experience. Adjusting the order, duration, and timing of each slide ensures that your video maintains a coherent and engaging narrative.

Step 5
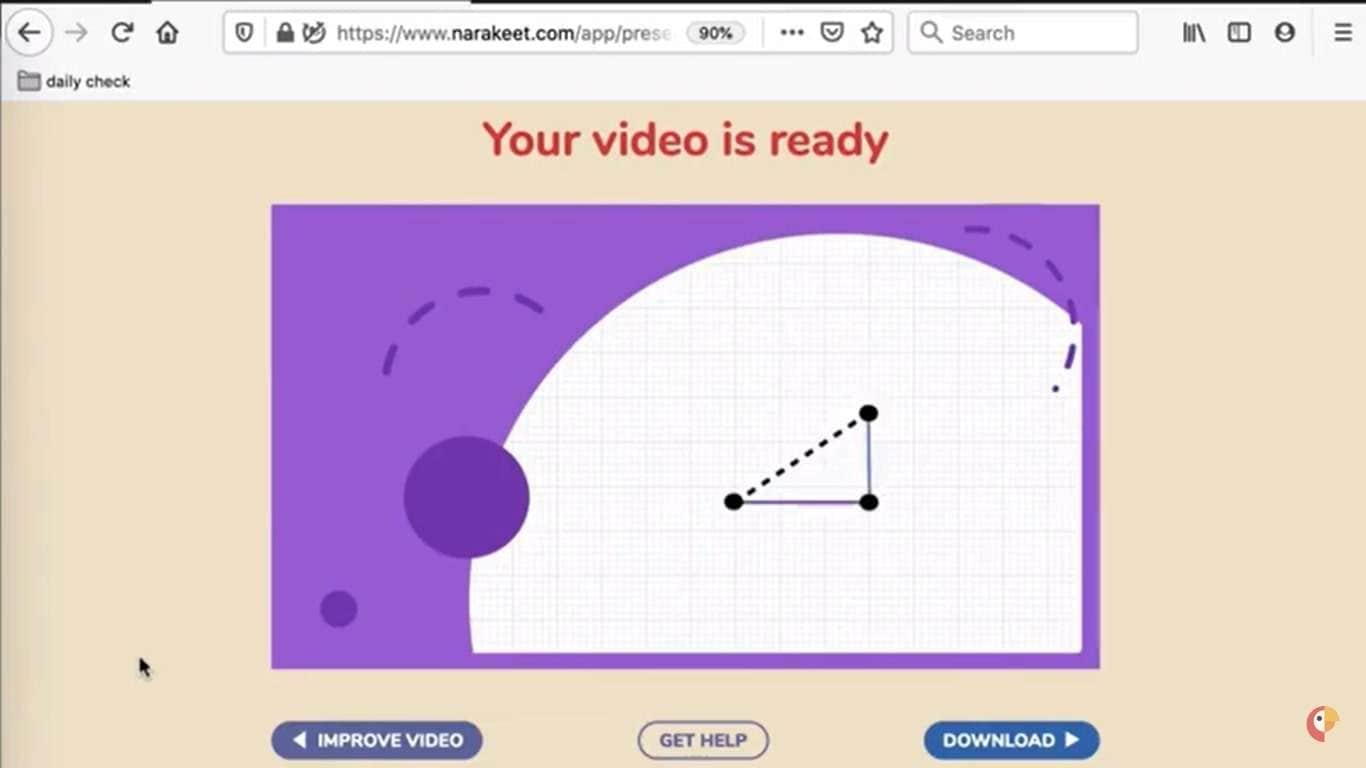
Once you’re satisfied with your video, Narakeet offers various options for distribution. You can download your video as an MP4 file, suitable for sharing on social media platforms, websites, or other mediums. Alternatively, Narakeet provides direct integration with platforms like YouTube and Vimeo, allowing you to share your content seamlessly. Furthermore, you can export your video as an audio file or a subtitle file, broadening the ways you can engage your audience.
All in all,Narakeet text to speech streamlines the process of creating compelling videos by transforming scripts and presentations into dynamic audiovisual content. By following these detailed steps, you can harness the power of Narakeet’s features to produce videos that effectively communicate your message and captivate your audience. Whether you’re an educator, marketer, or content creator, this amazing app provides a versatile and user-friendly platform to elevate your content creation efforts.
Part 3: Bonus Tip: A Best Text to Speech Online AI Tool You May Need
You have just learned how to use theNarakeet text to speech app, which can turn your text into videos. This is a handy feature that can help you with many tasks. However, you might wonder if there is a better way to convert text to speech, one that can offer you more options and flexibility. Well, there is, and it is called Virbo, one of the best text to speech apps for all your tasks.
One of the best alternative ways to convert your text into engaging and professional videos isVirbo . It is an AI avatar video generator that can create spokesperson videos in minutes. It is is a product of Wondershare, a leading software company that offers various tools for video editing, data recovery, PDF editing and more. The app is available on Windows, iOS and Android devices, and you can use it for various purposes, such as education, marketing, entertainment and more.
Get Started Online Free Download
Virbo isn’t like ordinary text-to-speech tools. It’s a versatile platform that gives you a lot of control. It has many features that help you create unique voices for your written content, making it sound more interesting and accessible.
Functions of Virbo
- With Virbo, you can enter your text on the website, and it will turn your words into a voice. Virbo can also read text from files or web links, making it easy to listen to written content.
- Virbo has over 100 different voices to choose from. Each voice has its own language, accent, gender, and age. You can pick the voice that matches your content’s style and essence.
- Once you choose a voice, you can customize it. You can change its speed, pitch, volume, and pauses. You can adjust sliders to make the voice sound unique, or use special symbols and commands to control how it sounds.
- You can listen to a preview of your voice creation on the website before you do anything else. If you like it, you can download it as an MP3 file to use in your projects. Whether you’re using it for personal or business purposes, Virbo gives you full access to your voice creation.
Key Features of Virbo
- Virbo uses advanced AI technology to make voices that don’t sound robotic. It understands the context, meaning, and even emotions in the text. This helps it create voices that sound like real humans. Plus, Virbo learns from its interactions, so it keeps getting better over time.
- It supports many languages and accents, like English, Spanish, French, Chinese, and Japanese. You can easily switch between languages by typing the language code.
- The app offers different types of voices for different purposes, like storytelling, teaching, podcasts, and games. Each voice category is made to fit a specific role.
- It lets you add emotions to the voice. You can make it sound happy, sad, angry, calm, and more. By typing emotions in brackets, you can make the voice express different feelings.
With Virbo, your text becomes a canvas, and the voice you create is like a brushstroke that adds life to your words. You can explore and experiment with different voices, taking your written content on an exciting journey beyond just reading.
Conclusion
Narakeet text to speech stands out as an exceptional Text to Speech voice maker that simplifies the process of creating engaging audiovisual content. Whether you’re a content creator looking to repurpose your articles or an educator striving to make learning more accessible, Narakeet’s intuitive interface, customization options, and compatibility with various content formats make it a valuable addition to your toolkit. By exploring Narakeet’s features and learning how to use it effectively, you can unlock a new realm of content creation possibilities, enhancing the way you connect with your audience.
And for those seeking alternative tools, Virbo provides an excellent option to further expand your TTS capabilities. Embrace these tools, and empower your content with the magic of AI-driven narration and presentation.
Design Cartoon Images With the Best Tools
Cartoon conversation images are a modern technique to convey messages effectively. People stick around because they learn best by seeing things in books or social media. Also, people like cartoons because they tell stories in pictures that are easy to understand and enjoy.
Cartoons have come a long way, from cave paintings and symbolic drawings to AI-powered conversational videos. This article will teach you the best ways to create chatting cartoon images.
Part 1. Make Realistic Talking Cartoon Conversation Avatars With Wondershare Virbo
Standing out as an influencer today can be difficult since you should always look for new trends to boost engagement. If you’re struggling to stay on top of the rapidly changing trends, Wondershare Virbo is clearly right here for you. It allows you to add audio clips to your photos to engage people emotionally and send personal messages.
You can also add personalized background music to your talking cartoon images and give your viewers a unique experience. Virbo’s talking photo feature has made static images a thing of the past. This new feature gives you high-quality AI audio to send your message as clearly as possible. Thus, you can go viral with this amazing tool in just a few simple steps.
Top Features of Wondershare Virbo
- Virbo Talking Photo offers you a wide range of high-quality avatars to bring to life. If that is not enough, you can upload any image you would like to convert to the avatar.
- The text-to-speech feature of this tool allows you to transform your text into an audio message in several languages and accents.
- You can also upload your voice as an audio clip. Within a few seconds, you can have your own talking images cartoon.
Steps of Using the Talking Photo Feature in Wondershare Virbo
Wondershare Virbo makes your life easier with its various features. You can easily create and edit videos with its Talking Photo feature. If you want to interact with the audience globally, follow the steps to create AI-avatar videos:
Step 1. Open the Platform and Select Talking Photo
First, open Wondershare Virbo to enter its interface. Once you open the platform, hit the “Talking Photo” feature in the “Home” tab.
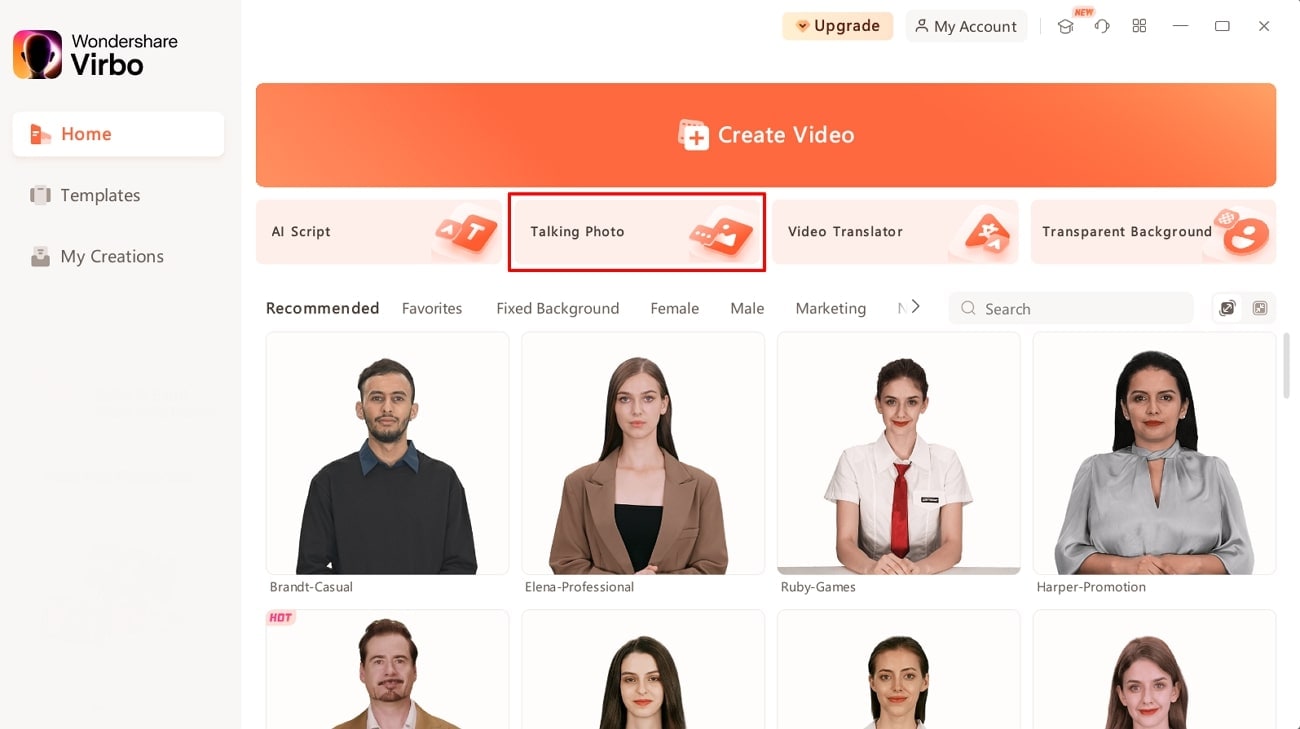
Get Started Online Free Download
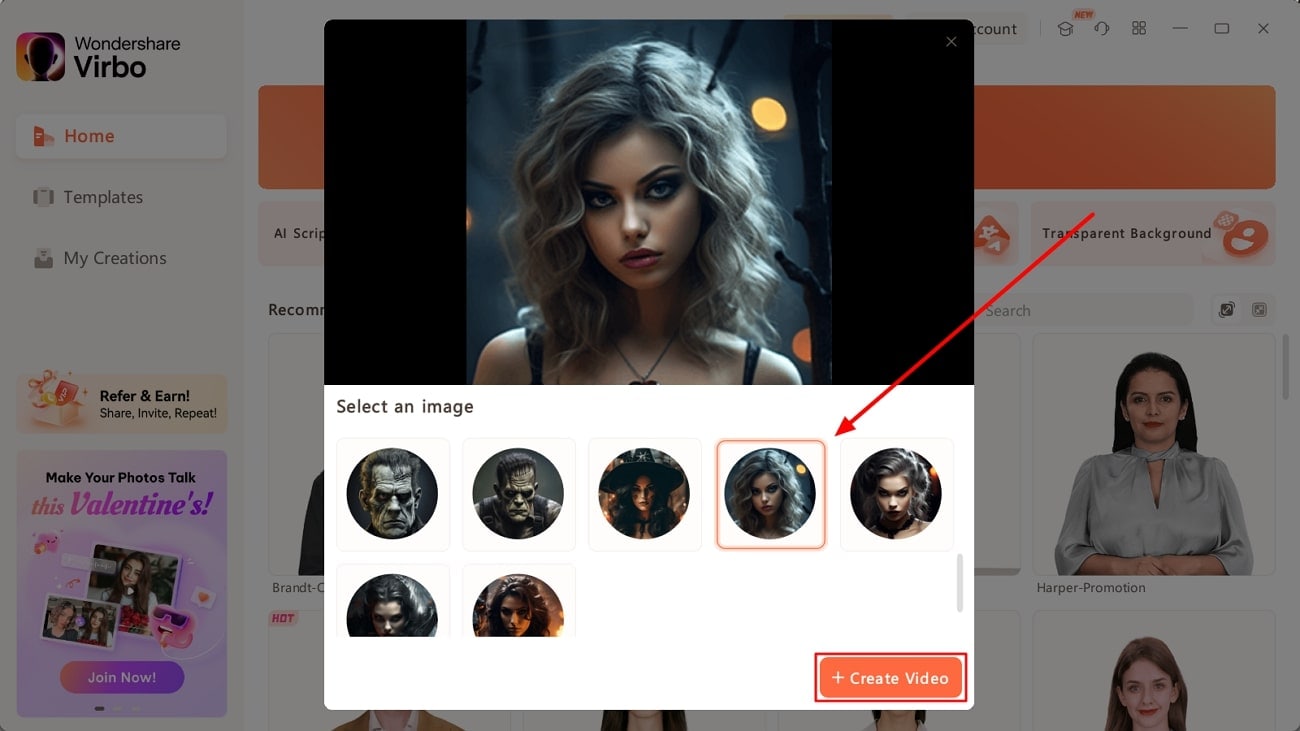
Step 2. Import the Image for Creating Video
After clicking the feature, a window will pop up on your device with the “Select an Image” option. Here, select the image of your choice and click on the “Create Video” option below to generate a video.
Step 3. Write a Script for Your Video
Once you pick the avatar, locate the text box on the left side of the window. Write an engaging script to convey a message through your realistic, talking animated avatars.
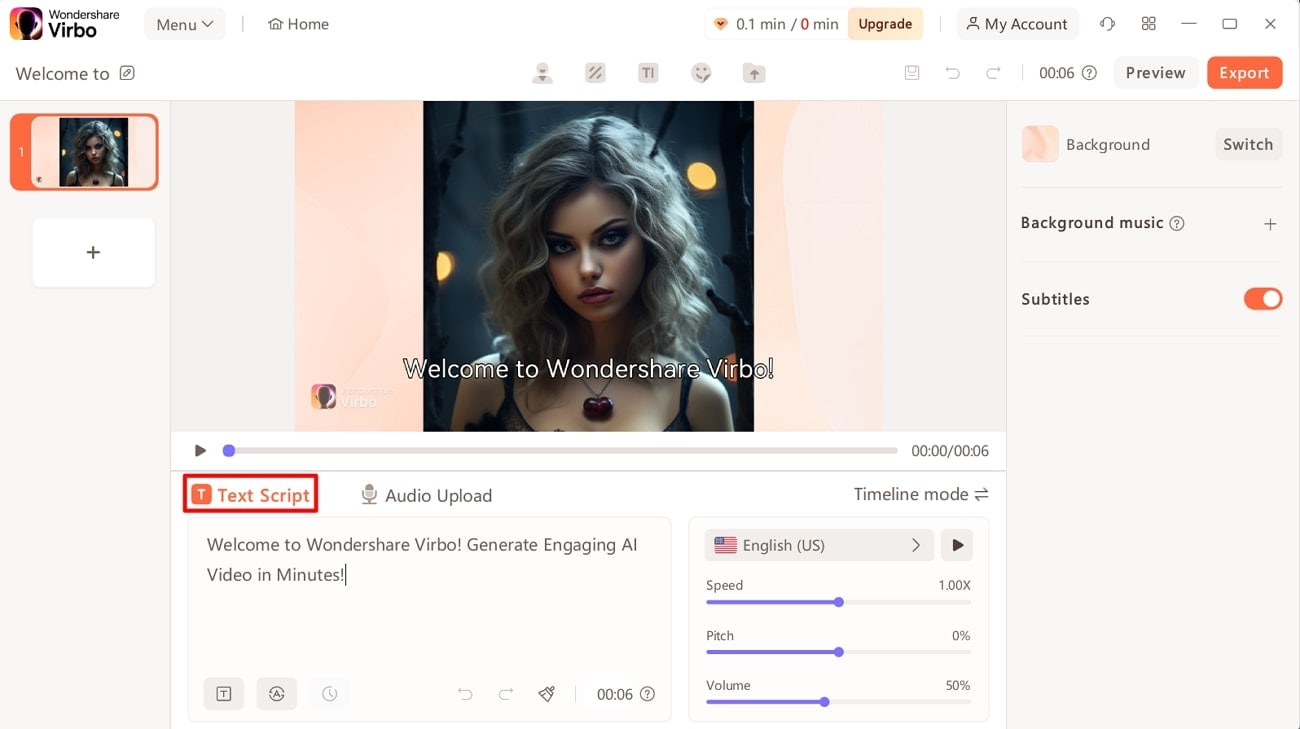
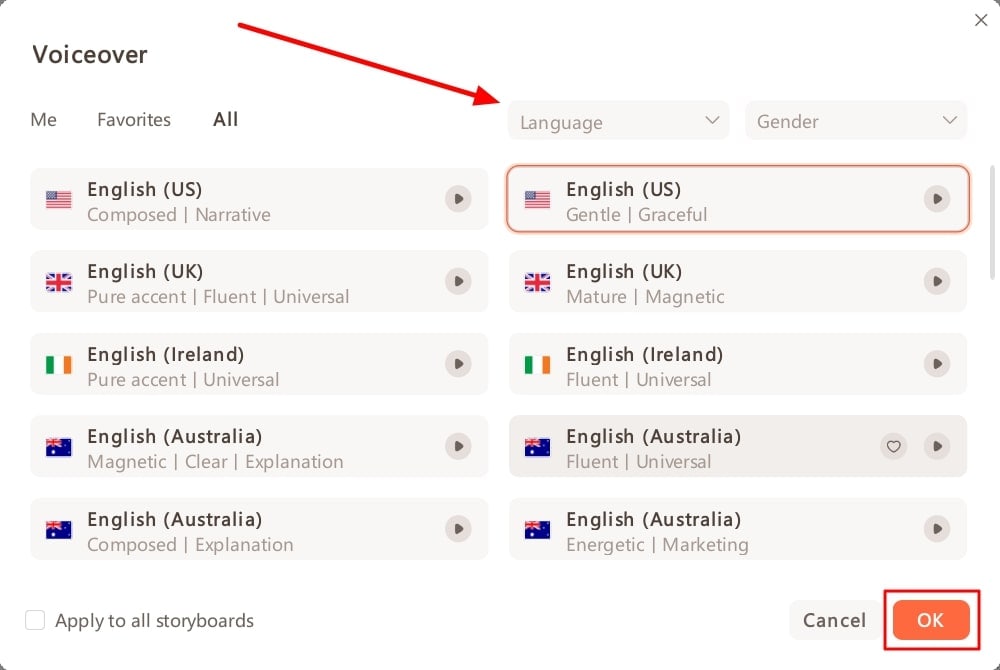
Step 4. Select Your Desired Language and Accent for Creating a Realistic Avatar
Start by clicking on the language menu to access a set of settings. Within this window, select the gender for the voiceover from the dropdown menu. Afterward, you’ll be able to choose your preferred language and accent. Upon making these selections, click the “OK” button to proceed.
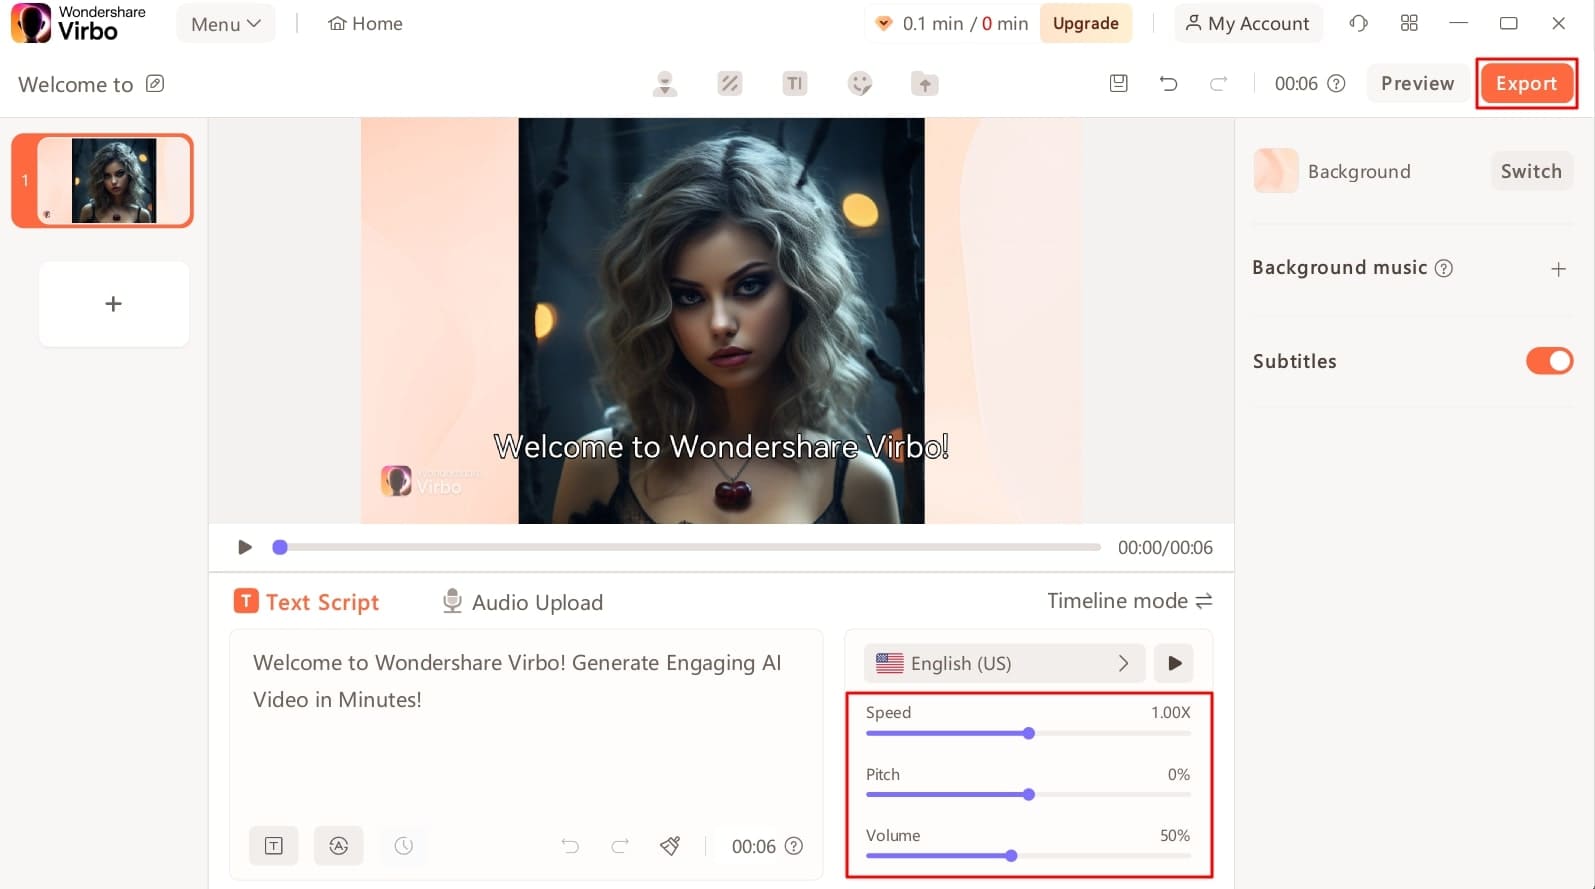
Step 5. Customize the Settings and Export the Talking Animated Video
Now, fine-tune the voiceover’s speed, pitch, and volume using the sliders. Once adjustments are complete, you can save this realistic animated video by clicking the “Export” button.
Part 2. How To Make Chatting Cartoon Images With Side Faces?
As we discussed, chatting cartoon images have emerged as vital for engaging with the audience. However, it is not easy to generate side pose animated images using conventional tools. Users can face difficulty in finding a tool to create such images. Nevertheless, you don’t have to worry about this problem, as we have identified a suitable tool for you.
If you are also looking to create speaking cartoon images, Kapwing can prove to be a handy tool in this regard. This tool’s animated video maker feature offers thousands of side-face animations and effects to make content more interesting.
Key Features of Kapwing
- You can simply prompt AI to generate side pose animated videos.
- It allows you to set custom backgrounds for your talking cartoon images.
- Kapwing even allows users to make creative memes with its built-in meme generator.
Guide To Make Side Face Chatting Cartoons via Kapwing
With the simple interface of this tool, you can bring your character to life in no time. Follow the steps below and make a perfect animation of conversation cartoon images.
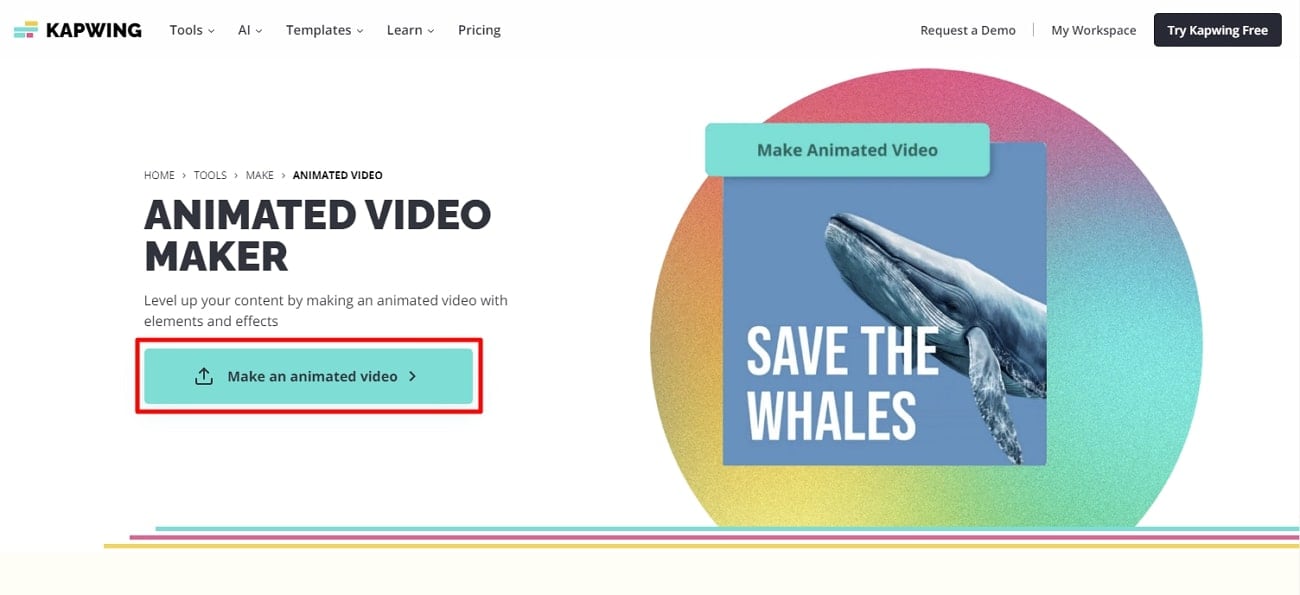
Step 1. After accessing the Kapwing website, select the “Animated Video Maker” feature from the “Tools” section. Click the “Make an animated video” button to launch the editing interface.
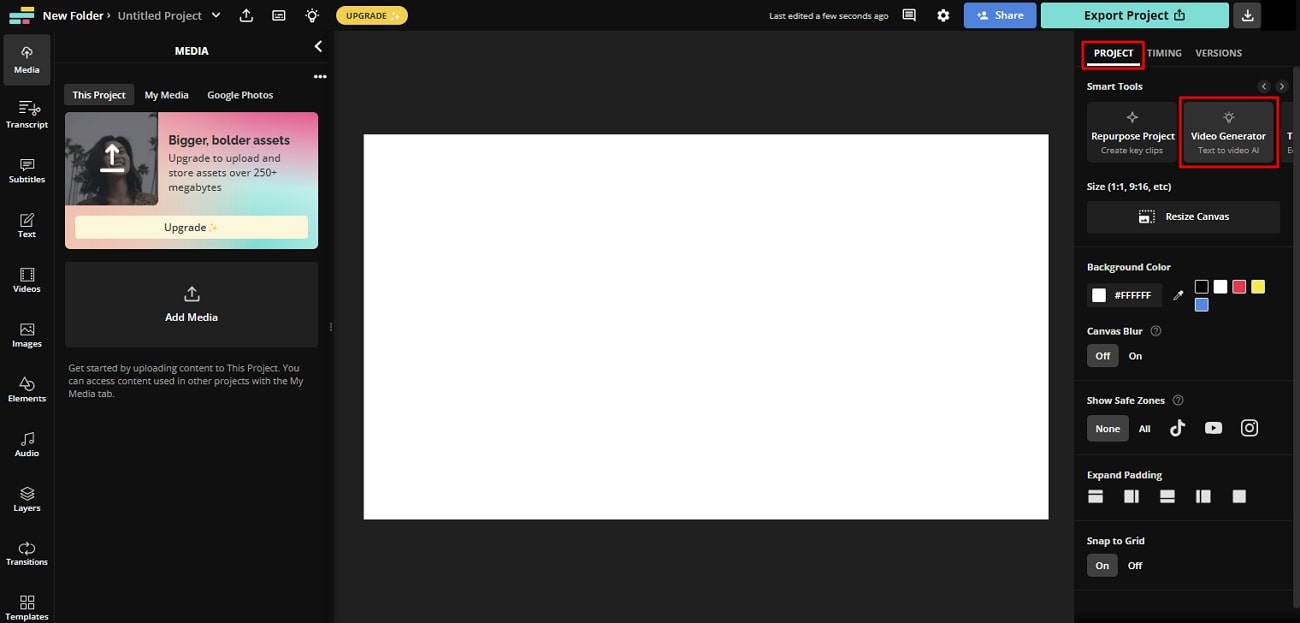
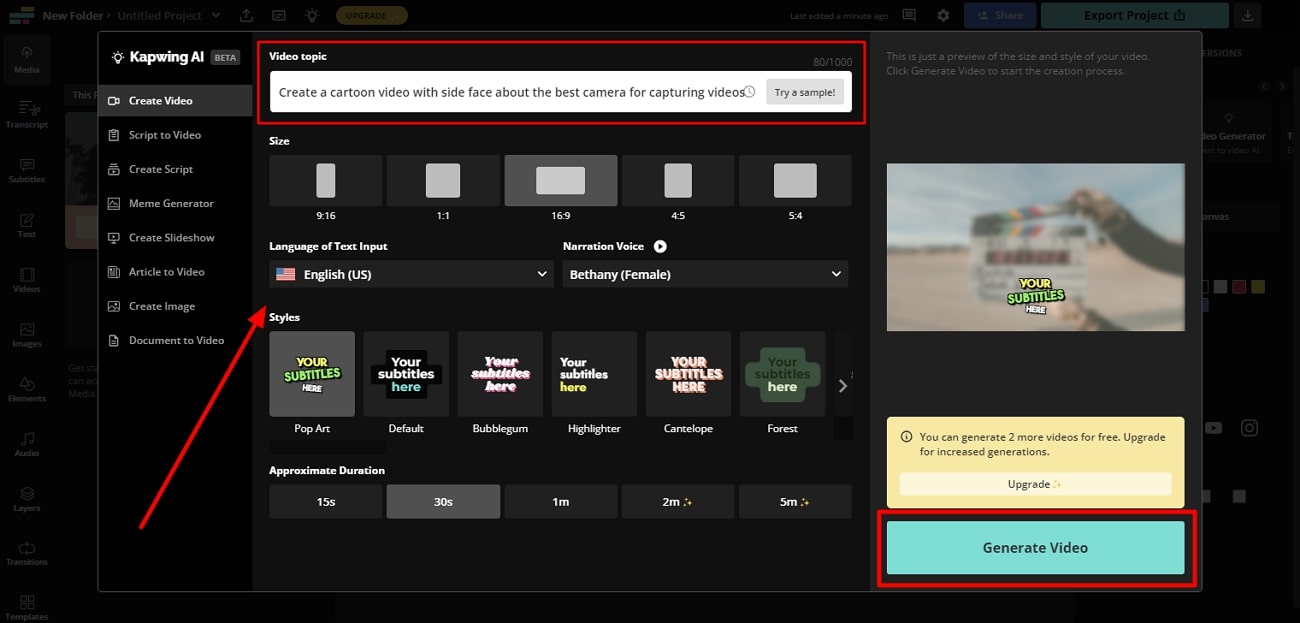
Step 2. Once you get to the editing interface, select the required canvas aspect ratio for your project. Then, head to the “Smart Tools” section from the “Project” tab and choose the “Video Generator” feature.
Step 3. Type the relevant command in the prompt box to generate a video for side-face chatting cartoons. You can also set the language, voice, and video duration. Once you’ve set all the respective parameters, click the “Generate Video” button.
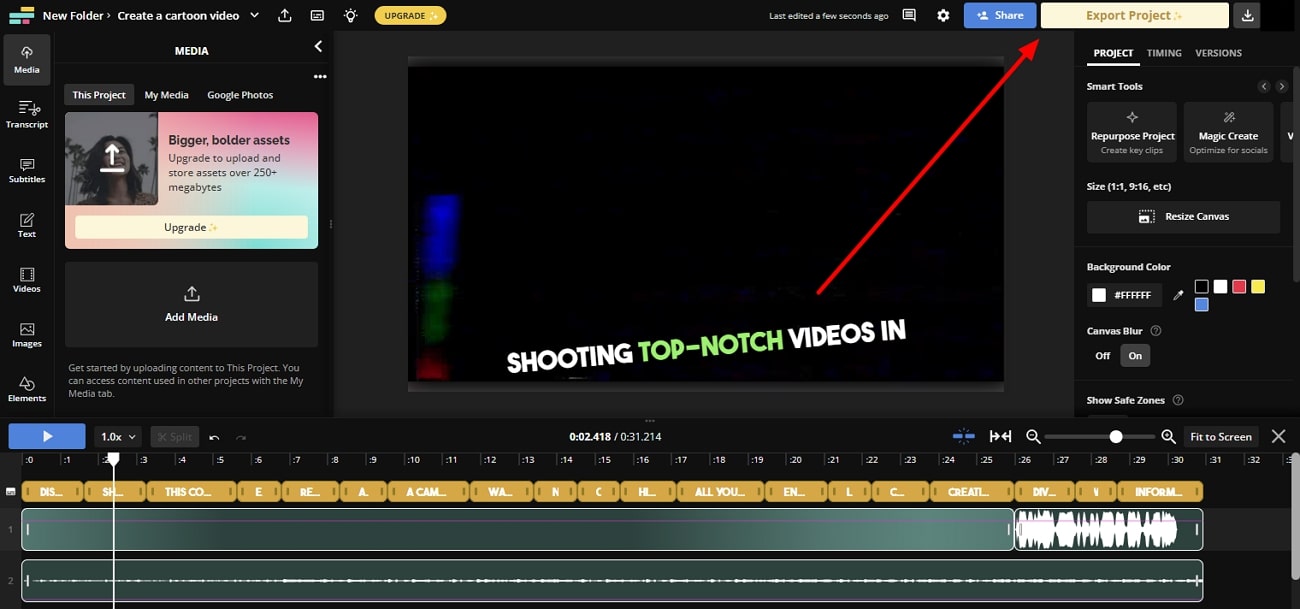
Step 4. After that, a pop-up window will appear to show the generating process. When it ends, click the “Export” button to save your project to your device. You can also share it across social media using the “Share” button.
Part 3. How To Make Chatting Cartoon Images With Simple Lines?
Brush Ninja is an online animation maker that helps to showcase your creativity. It has a pack of innovative features to turn you into an artist. You can make hand-drawn animations with multiple frames. Also, you can create desired GIFs with ease and confidence. It is one of the best open-source libraries for creating vector drawings with digital brushes.
Key Features of Brush Ninja
- With the online editor of Brush Ninja, you can draw and paint freely.
- Users can explore different brushes and colors to make 2D speaking cartoon images.
- This tool allows you to introduce multiple frames and sound effects for appealing animations.
Steps To Create Animations With Brush Ninja
Want to add animations to your casual or working tasks? Follow these steps individually to create impressive animations using the Brush Ninja tool:
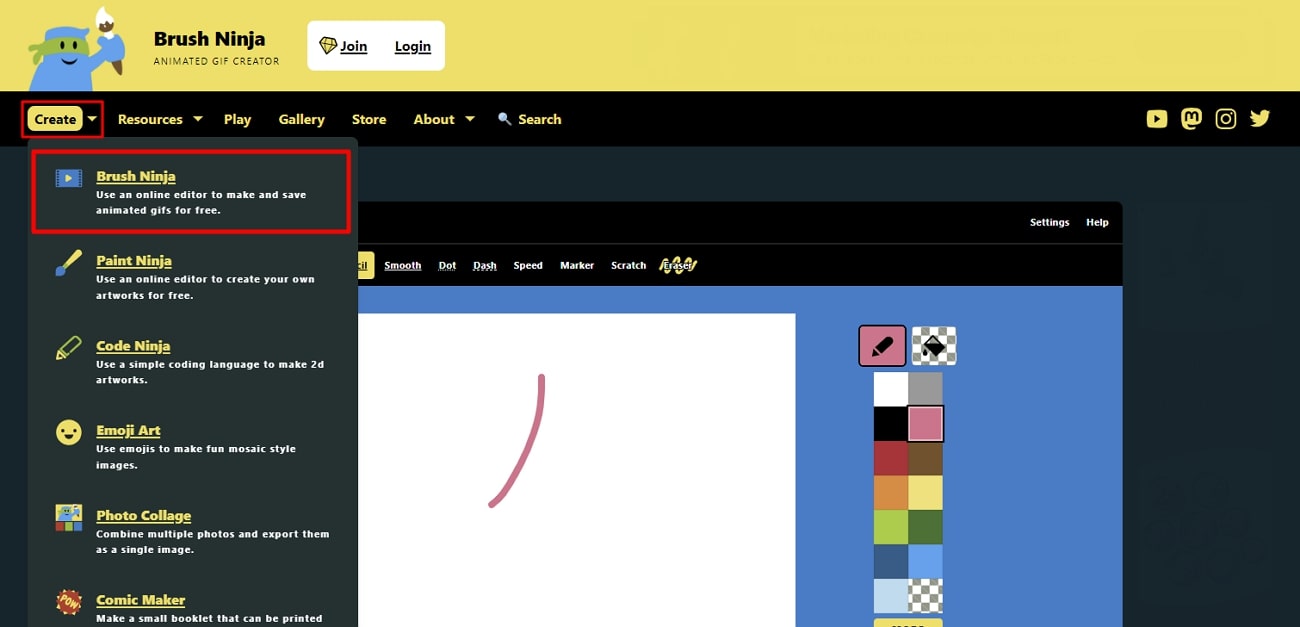
Step 1. Initially, visit the official website of the Brush Ninja tool. On the site’s main interface, click on the “Create” dropdown option to see available free art tools. Then, select the “Brush Ninja” tool from the list.
Step 2. After going into the tool, select “Brush Type” from the given options, including pencil, marker, and more. Then, set the “Brush Size” from tiny to huge size options on the left side. After that, choose “Brush Color” from the available colors on the right side.
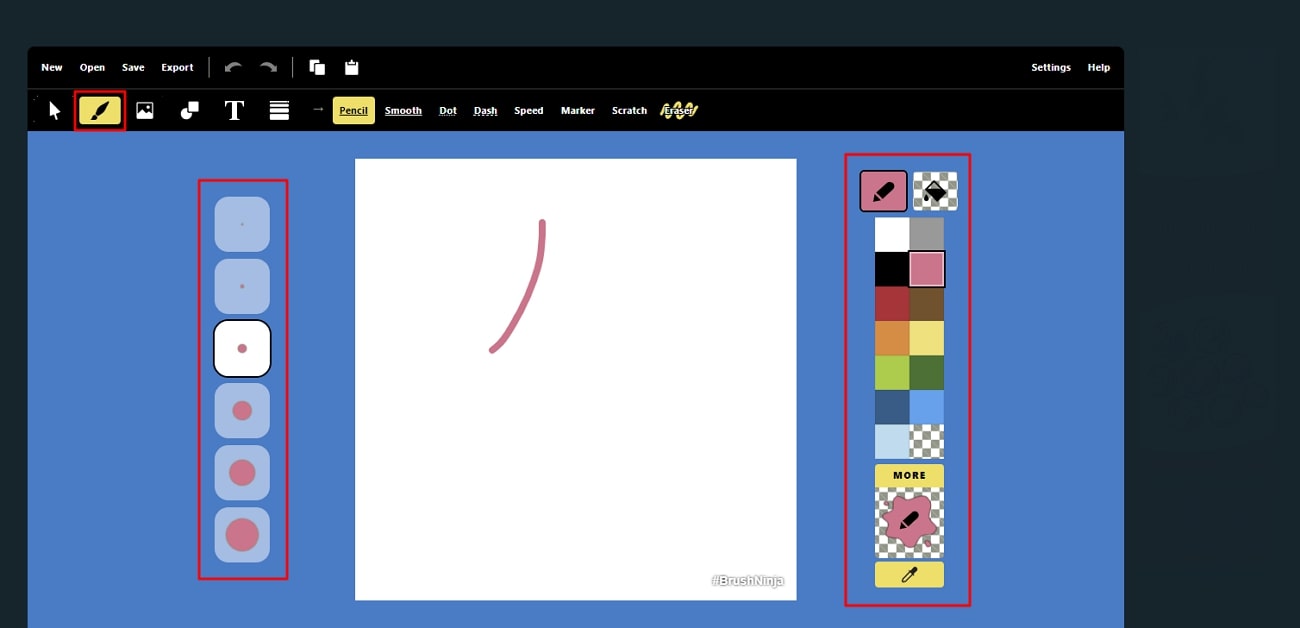
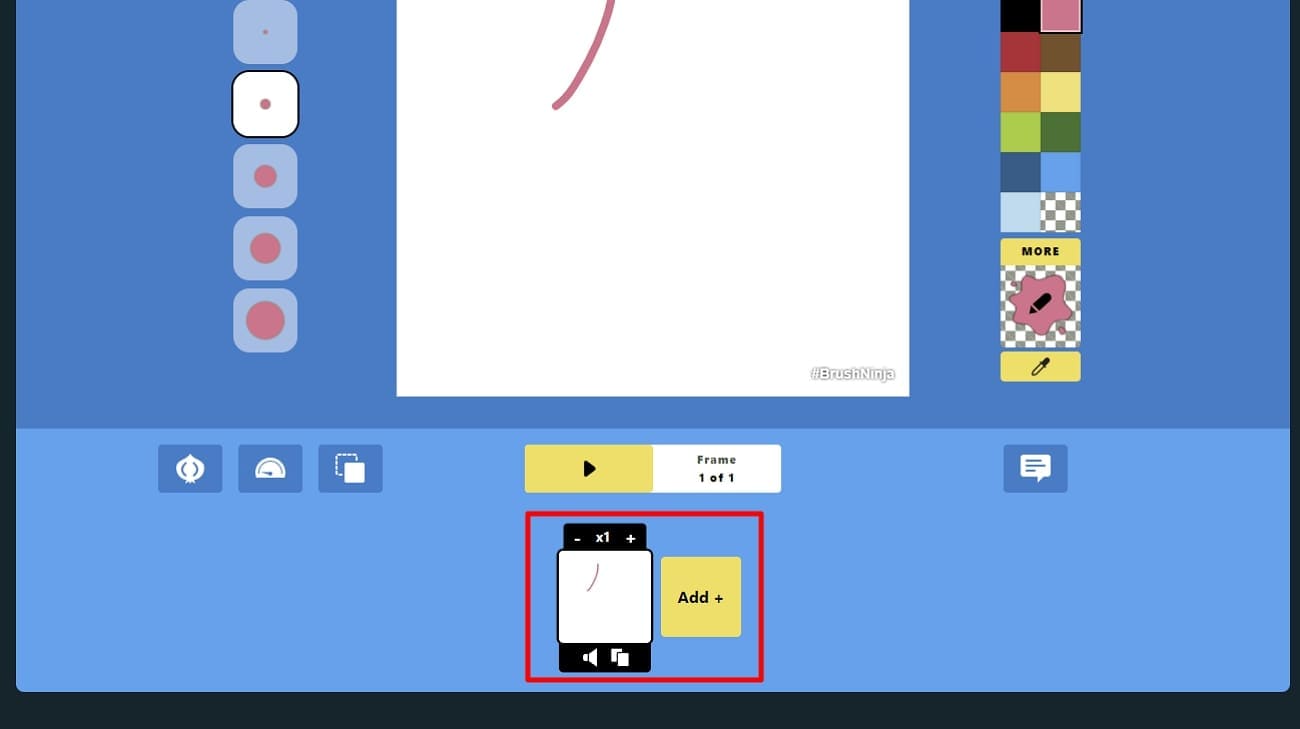
Step 3. With these selections, draw on the white canvas. Scroll slightly and hit the “Add +” button to add more frames. Also, you can check or delete them from the display. Moreover, there is also an option to duplicate frames.
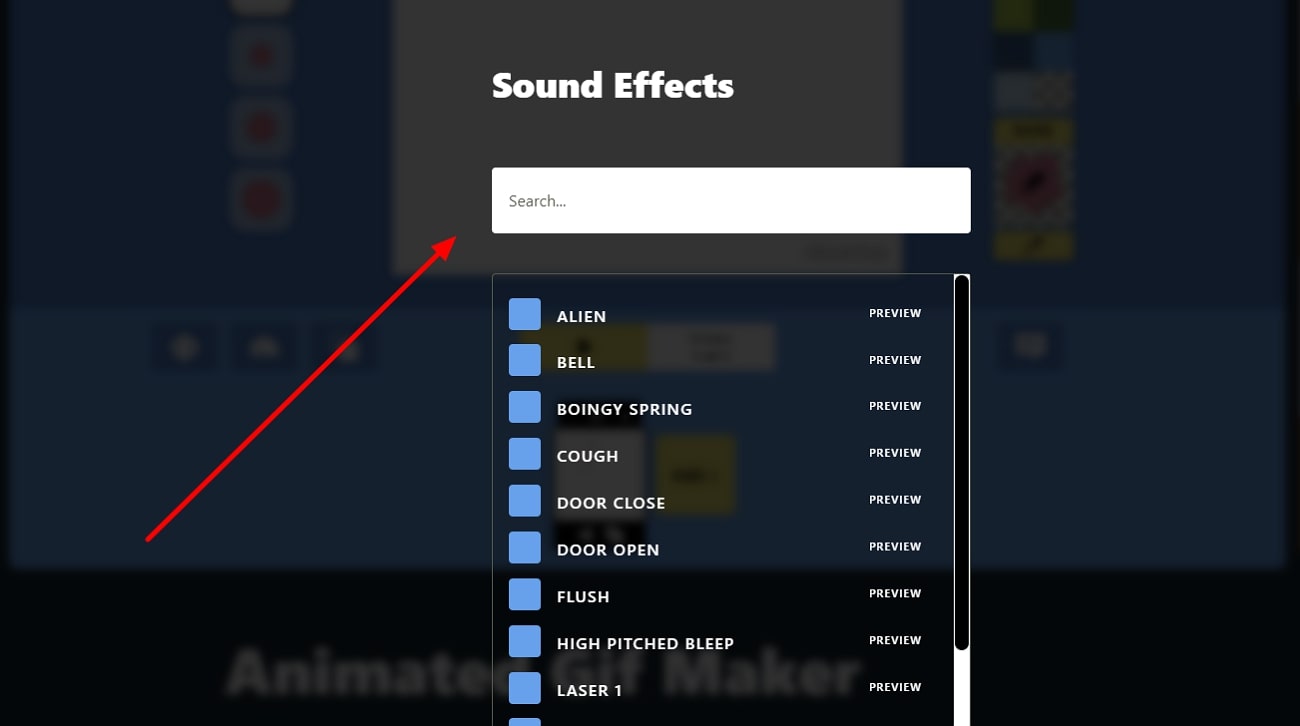
Step 4. Then, it is time to add sound effects. For that, click on each frame’s “Sound” icon. In the “Sound Effects,” you can select the best-suited option for each frame. You can also listen to these sound effects before exporting.
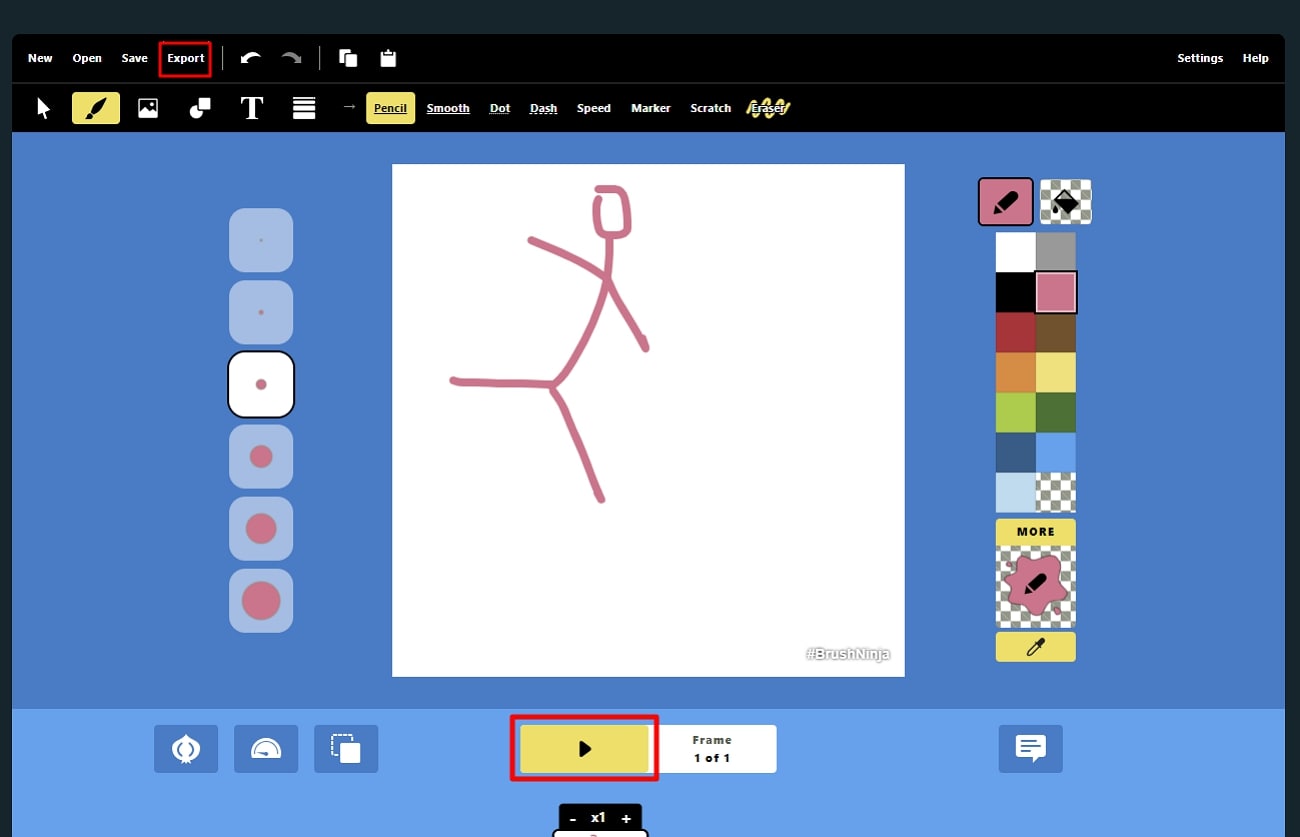
Step 5. Lastly**,** you can preview your creation by clicking the “Play Animation” icon. If everything is fine, hit the “Export” option in the tool’s top bar to save the animation.
Conclusion
All in all, cartoon conversation images are a popular form of visual entertainment everyone enjoys. This guide has discussed some of the effective tools to create talking cartoon images. Moreover, we have introduced you to the creativity of making side-face conversations and hand-drawn animations.
However, if you want to cartoonize your content with a professional touch, Wondershare Virbo is the ultimate choice. This tool provides users with realistic AI avatars to generate cartoon images that satisfy their artistic sense.
Eric Miller Eric Miller Apr 16, 24 Share article: Eric Miller Apr 16, 24 Share article:_ ](https://tools.techidaily.com/wondershare/virbo/download/)[](javascript:;)
You May Also Like
A Detailed Guide To Stream to Instagram With an RTMP
Professionals and content creators now use different social media platforms for live streaming. There are many big names on these platforms, such asInstagram . Instagram is one of the most-used networks, with over 2 billion monthly active users. Using this live-stream platform is always a plus for companies and individuals.
However, the discussion is abouthow to stream to Instagram with an RTMP . This detailed guide helps you in usingRTMP Instagram for live streaming. Furthermore, you will also learn about a recommended tool that offers AI-powered features for broadcasting.
Part 1. Some Rules and Requirements To Understand Before Live Streaming on Instagram
Like every platform, Instagram has some protocols for broadcasting content to global audiences. Therefore, learning the rules and requirements before going live on Instagram is necessary. First, your account should be at least 30 days old; otherwise, they can restrict your stream.
There is a rule that you can go live for 4 hours per stream without retakes. This length was increased from 60 minutes in the recent update. Also, you can repost a live video on your profile if it is more than 15 minutes long. Instagram allows you to schedule a stream from 1 hour to 90 days in advance.
The initial requirement ofInstagram Live RTMP is that your content be respectful and updated. Additionally, you need to set your stream to 1920x1080 resolution on a vertical camera. Meanwhile, Instagram gives leverage on the number of followers so that you can start with minimum viewers. Also, there is no need to have a business account for live streaming.
Part 2. How To Live Stream to Instagram With an RTMP?
Setting high-quality live streams encourages people to tune into your broadcast. For this purpose, you need a seamless encoder likeOBS . Unfortunately, Instagram doesn’t officially support third-party encoders. To solve this query, you need an effective solution.
Therefore, the following steps guide streaming on Instagram with an RTMP (Real-Time Messaging Protocol). You will also learn how to set the required parameters in this comprehensive guide:
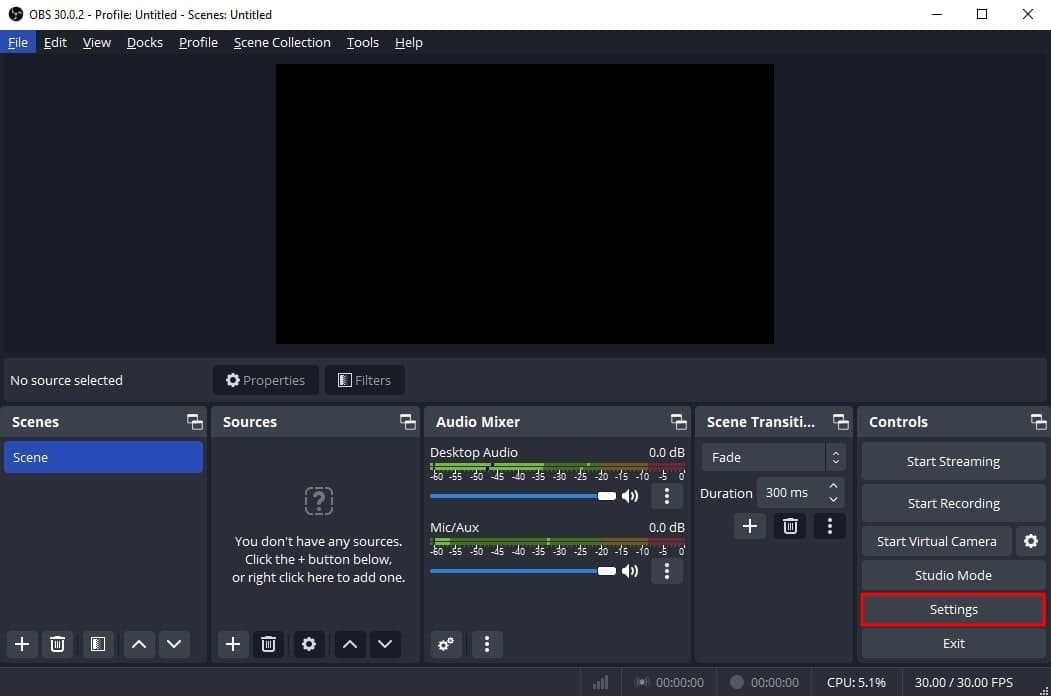
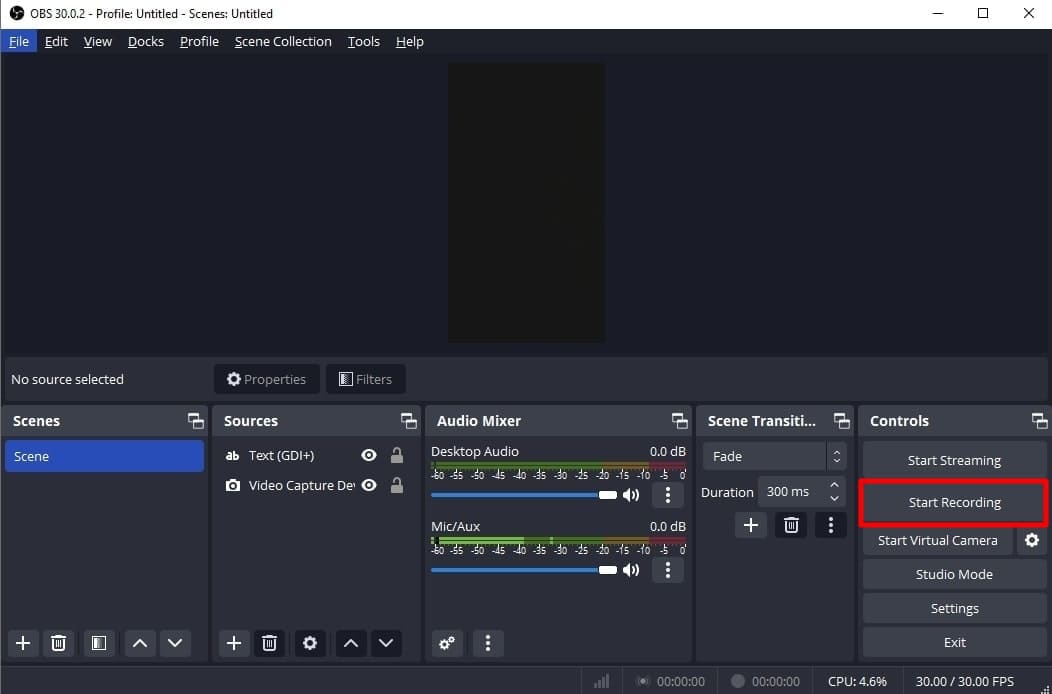
- Step 1. Start with downloading and launching OBS Studio on your PC. The first thing to do is set up vertical camera dimensions forRTMP Instagram live streaming. To access the settings window, hit the “Settings” option in the “Controls” panel.
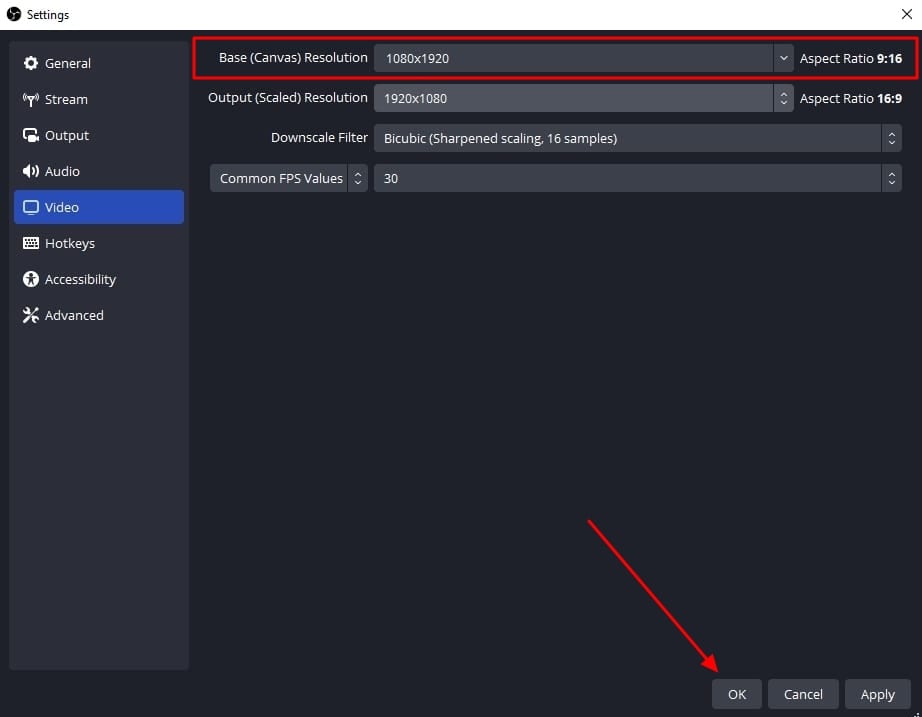
- Step 2. Look for the “Video” tab in the “Settings” window that opens. After that, enter “1080x1920” in the “Base (Canvas) Resolution” bar. Similarly, add a “1080x1920” value in the “Output (Scaled) Resolution” bar to set a 9:16 aspect ratio for vertical display. Then, hit the “OK” button to apply these changes to your Instagram streams.
- Step 3. After that, you need to add external sources to the scene. Click on the “+” icon in the “Scenes” panel or rename the scene. Once the scene is created, hit the “+” icon of the “Sources” panel. Then, select the “Video Capture Device” option from the menu and rename the device to your liking. After that, choose the video capture device from the “Device” dropdown and hit the “OK” option. Similarly, you can select the “Audio Input Capture” option to introduce an audio device.

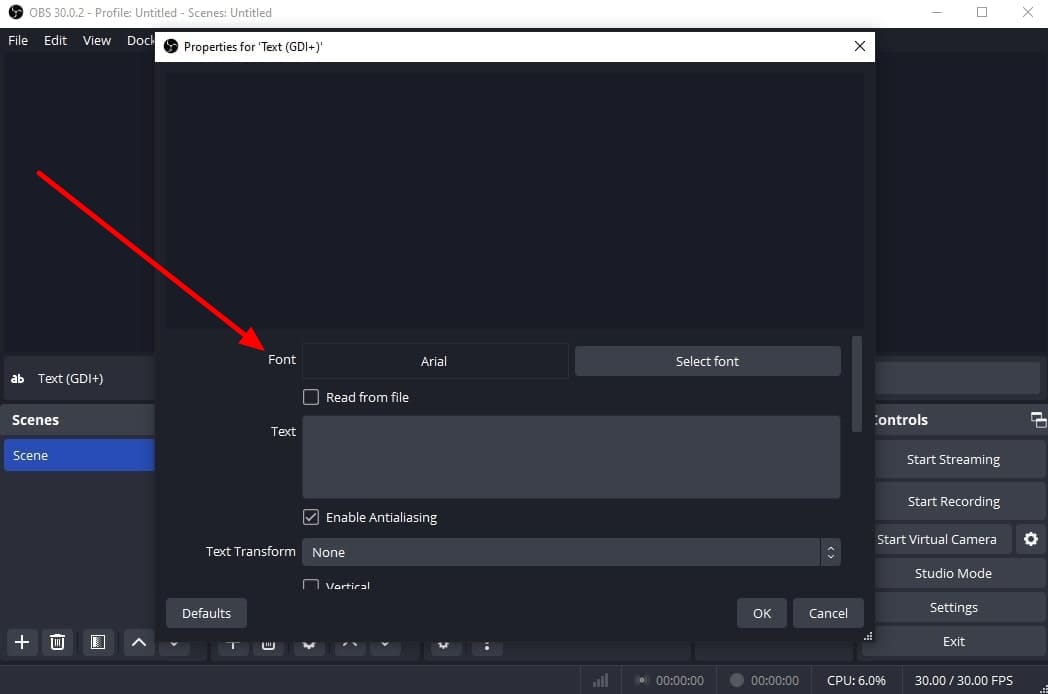
- Step 4. To add text overlays on your stream, hit the “+” icon again in the “Sources” panel. Choose the “Text (GDI+)” option and rename your overlay. On the next window, insert your text in the “Text” box. Then, click the “Select Font” button and choose your required font style and size. Additionally, you can change font color, opacity, alignment, background, and more. After customizing the text, hit the “OK” button to save the overlay in the sources section.
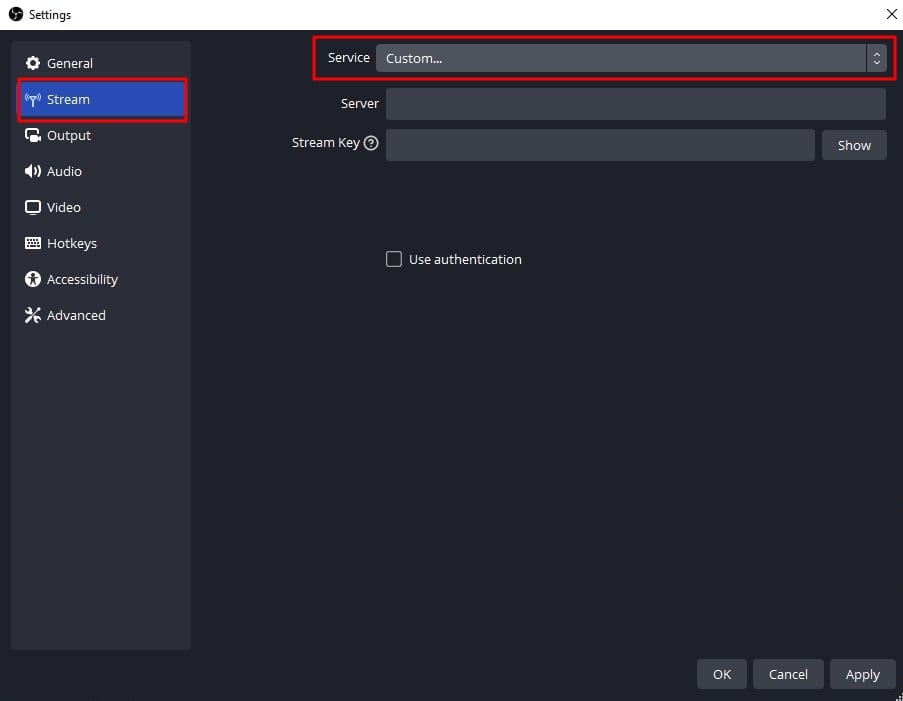
- Step 5. Afterward, select the “Stream” option in the settings window of OBS Studio. Set the “Service” to “Custom” from the dropdown. Then, you need to enter the server and stream key to proceed.
- Step 6. To get the server and stream key, visitrtmp.in on your browser. On the main interface of thisInstagram RTMP , hit the “GO LIVE ON INSTAGRAM” widget. Then, it asks you to log in to your Instagram account.
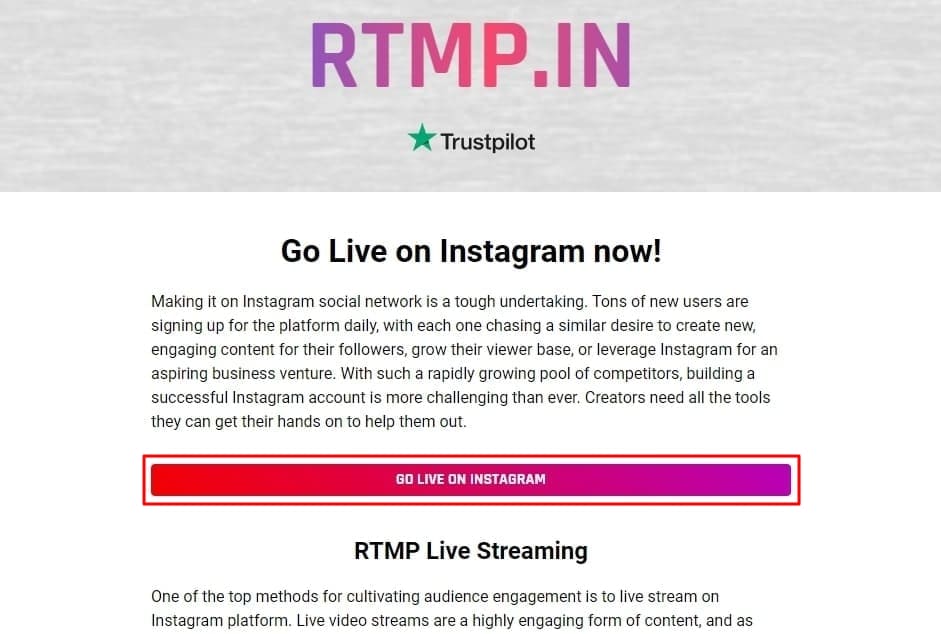
- Step 7. Once you’re logged in, it gives you a stream server URL and Stream key. First, copy the Server link and return to the OBS Studio software. Then, paste the link in the “Server” bar. After that, open the RTMP site again and hit the “Create New Broadcast” option.
You can also give a name to your broadcast in the “Broadcast Title” bar. After creating the broadcast, it shows the “Stream Key,” which you can copy. Then, move again to the OBS Stream setting panel and paste the key in the “Stream Key” bar. Lastly, hit the “Apply” option to save all these settings for your stream.

- Step 8. After getting ready, choose the “Start Streaming” option from the “Controls” panel. It starts your stream with selected parameters. To stop the stream, you can select the “Stop Streaming” option.
Part 3. How To Attract a Better Audience During Live Streaming on Instagram?
OBS Studio is an efficient software but offers limited functionality when it comes to engaging streams. Thus, you need an advanced solution that can help you reach global audiences through live streaming. For this purpose,Wondershare Virbo Live becomes an unsung hero for you. It provides AI-powered functions that help to start creative streams and generate more leads.
Moreover, the handy controls of Wondershare Virbo Live allow you to customize live streams to your requirements. Therefore, you can start streaming for different purposes, such as marketing, brand awareness, and more. Additionally, it allows you to set automatic responses and create a Q&A database to keep your audience engaged. Plus, it allows you to select creative AI avatars with different poses and outfits.
Key Features of Virbo Live
- You can choose different templates and backgrounds for a stunning streaming appearance.
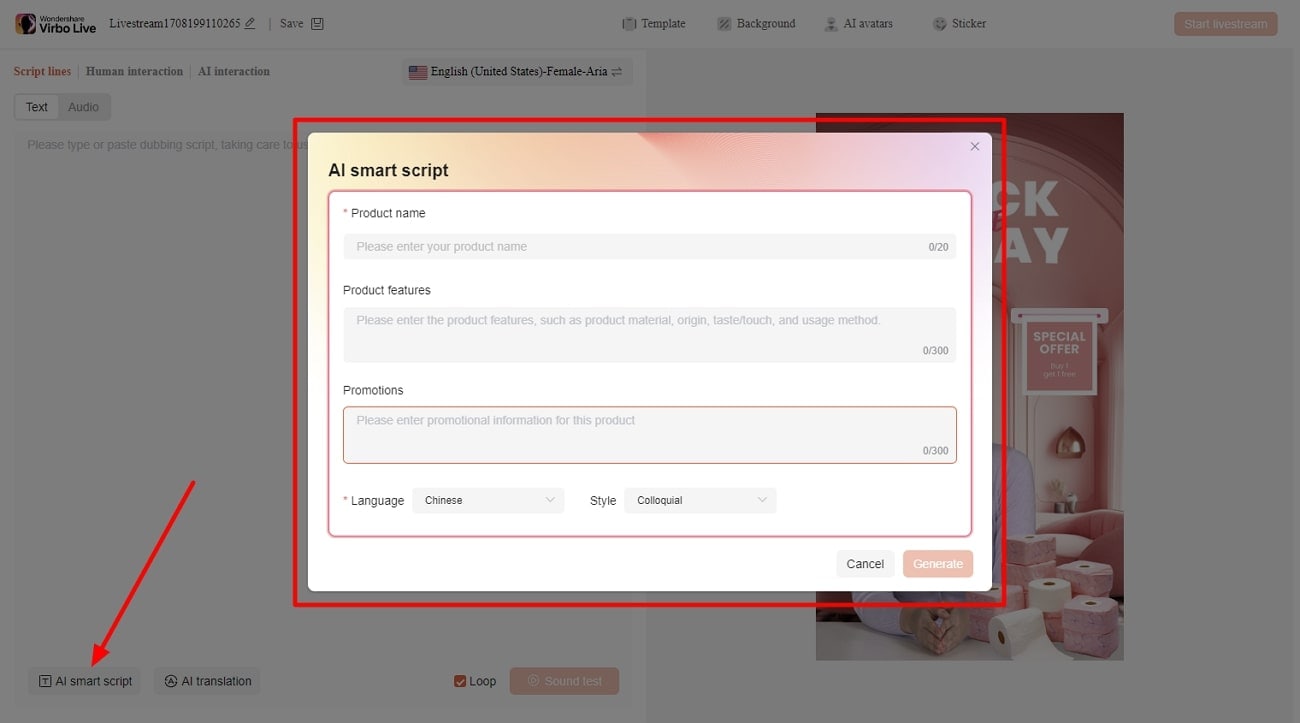
- Users can write or generate scripts manually using the AI Smart Script feature. For this, they need to add prompts according to the script’s purpose.
- This tool helps to translate scripts into multiple languages and accents. Also, you can get dubbed audio in different AI voices.
Simple Guide To Start Live Streaming Using Wondershare Virbo Live
Many live streaming tools exist, but Wondershare Virbo Live provides more controls. Now, the thing is how to create a live stream room with this tool. For this, follow the given steps one by one to start live streaming with Virbo Live:
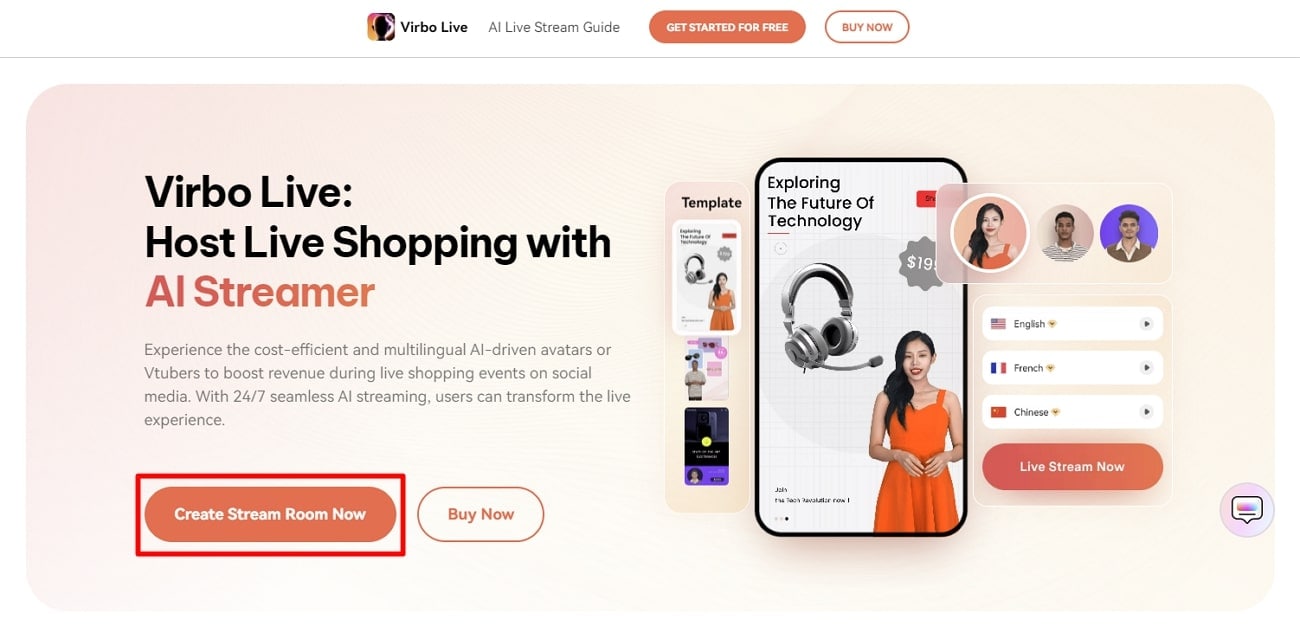
- Step 1. Visit the Official Site To Create a Stream Room
First,open theofficial website of Wondershare Virbo Live tool on your device. Navigate to the window and hit the “Create Stream Room Now” button. Upon doing that, it takes you inside the main interface of the tool.
Get Started Online Free Download
- Step 2. Advance To Create a Blank Livestream Room
Once you get to the tool’s home screen, select the “Create a Blank Livestream Room” option. Then, you can try different customization features to make your livestream room look stunning.

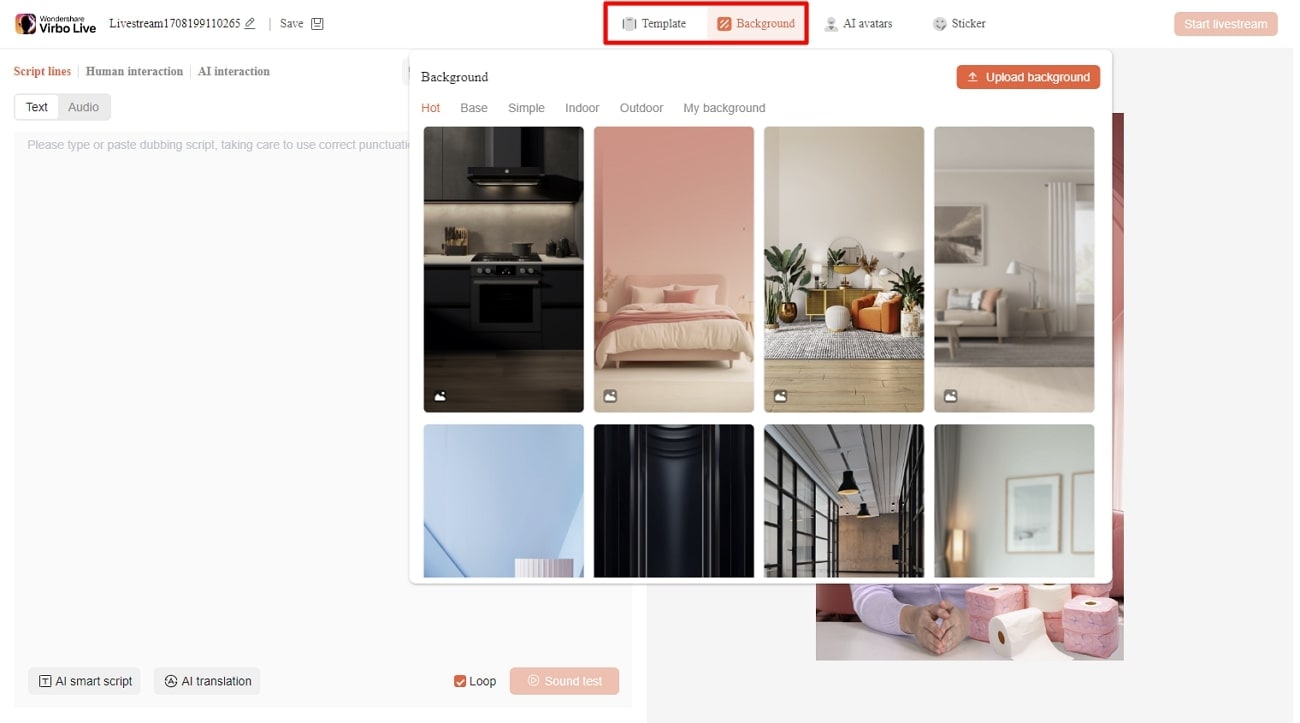
- Step 3. Customize Your Livestream Template and Background
After that, click on the “Template” tab to explore different templates. Choose a template that suits live streaming needs. Furthermore, open the “Background” tab from the same window to check exciting background options. You can select different backgrounds from variating categories in the same window.
- Step 4. Add Script or Use AI Script Generator
Then, you need to provide the script for translation or dubbing. Select the “Text” given in the left side section for this. It provides a text box to type or paste your script text. Choose the “AI Smart Script” option from the bottom left corner if you don’t have a script. Add prompts there, and it will generate your scripts instantly.
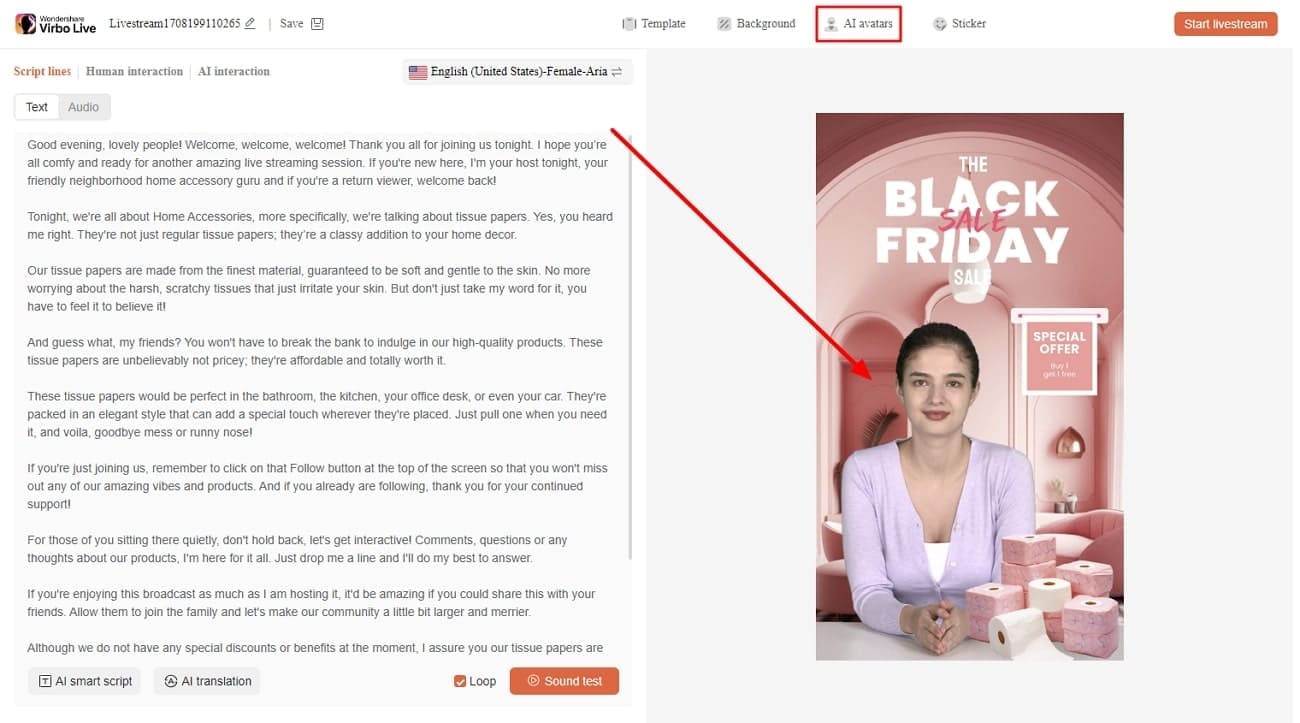
- Step 5. Select Creative AI Avatars According to Requirement
Select the “AI avatars” tab to unveil creative avatars. There is also a whole range of AI avatars to choose from. After selecting the one that suits your motive, you can preview your selected AI avatar before launching the stream.
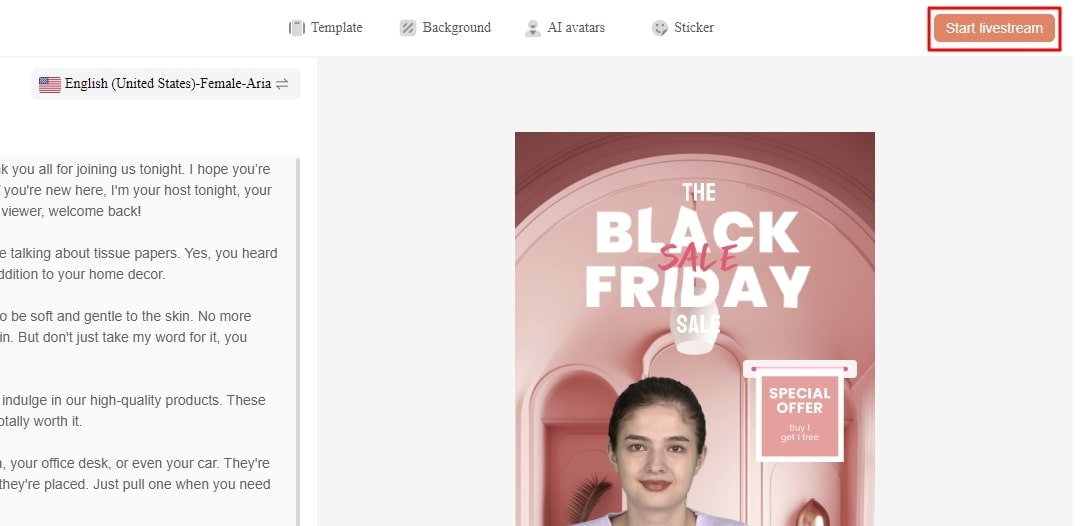
- Step 6. Start Your Livestream With All Selections
After finalizing all the options, you canproceed to start your stream. Select the “Start livestream” option from the top right corner in the same window.
Conclusion
Conclusively, this article intends to provide information about rules and requirements for live streaming on Instagram. You also learnedhow to live stream to Instagram with an RTMP like OBS Studio. Tools like Wondershare Virbo Live simplify your live streams with AI integration. Also, you can make your broadcast exciting for viewers by using different interactive elements.
Also read:
- New What Is an AI Presentation Maker for 2024
- New Translate Video Speech to Text with Speech-to-Text Converters for 2024
- New In 2024, AI Script | Wondershare Virbo
- New What Is an AI Voice Generator? | Wondershare Virbo Glossary for 2024
- What Is AI Text to Video? | Wondershare Virbo Glossary for 2024
- Updated What Is AI Marketing? | Wondershare Virbo Glossary
- In 2024, Top 10 Talking Photo Online Tools You Have To Try
- Updated A List of The Top SpongeBob Voice Generators
- Updated How to Create Funny Talking Avatars Using Oddcast Text to Speech Tech for 2024
- What Is an AI Video Editor? | Wondershare Virbo Glossary
- Updated Create AI Avatar Video with Template | Wondershare Virbo Online for 2024
- Updated A Guide to Unlock Descript Text-to-Speech Features in Detail for 2024
- Updated In 2024, Update 6 Best Voice Changers You Cant Miss
- New How to Create Funny Talking Avatars Using Oddcast Text to Speech
- Updated 2024 Approved 9 Best French Video Translators Online and Download Options
- Updated AI Avatars | Online for 2024
- New Top 5 Tools to Convert Text to Audio Online for Free
- New Top 5 AI Voice Generators Online (Supports All Browsers)
- In 2024, Design Cartoon Images With the Best Tools
- In 2024, What Is AI Pixel Art Generator?
- New Best 5 Viral Video Marketing Techniques For Big Sellers for 2024
- Updated The Best Text Voice Generators for All Platforms for 2024
- Updated Create An AI Avatar Video for 2024
- Exploring AI Face Generators | Wondershare Virbo Glossary
- Updated Make Your Pictures Speak Online With the Best Tools Recommended
- Updated In 2024, Create AI Video with AI Avatar | Wondershare Virbo
- New 8 Types of Explainer Videos with Examples
- New 2024 Approved Create AI Avatar Video with AI Script
- In 2024, How To Access and Watch Nonstop NBA Live Stream Free Online
- Updated In 2024, Best 5 AI Movie Script Generators
- AI Voice | Wondershare Virbo Online
- New A Guide to Unlock Descript Text-to-Speech Features in Detail
- 2024 Approved The Best Tools to Convert Text to MP3 With the Best Natural Voices
- Elevate Your Content with the Best Free Video Translator Apps
- What Is Talking Avatar? | Wondershare Virbo Glossary
- New Review of LazLive Live Selling Platform With Guide
- In 2024, Master Deepface Live Download and Train Your Live Model
- Maximize Yandex Translate in Video Translation and Beyond for 2024
- In 2024, AI Translation | Online
- Updated 2024 Approved The Best Tools to Convert Text to MP3 With the Best Natural Voices
- In 2024, Maximize Your User Engagement With Instagram Live Shopping Expert Tips
- In 2024, Step-by-Step Guide How to Translate TikTok Videos
- What Is an AI Text Generator?
- New 2024 Approved The Ultimate Guide to Generating Speech in Different Languages With the Best Tools
- What Is ChatGPT? | Wondershare Virbo Glossary
- Updated Design Cartoon Images With the Best Tools for 2024
- 2024 Approved Exploring The Best Text-to-Speech Online Tools To Use
- Updated Top 10 AI Avatar Generators
- New What Is an AI Tool? | Wondershare Virbo Glossary for 2024
- Universal Unlock Pattern for Vivo V30 Pro
- In 2024, How To Remove the Two Factor Authentication On Apple iPhone 15 Pro Max
- Solved Warning Camera Failed on Vivo G2 | Dr.fone
- In 2024, How To Track IMEI Number Of Vivo S17e Through Google Earth?
- Simple ways to get recent calls back from Xiaomi Redmi Note 13 Pro+ 5G
- Solutions to restore deleted files from Nokia 130 Music
- In 2024, Complete Tutorial Sending Photos From Apple iPhone 11 to iPad | Dr.fone
- In 2024, How To Use Special Features - Virtual Location On Apple iPhone 14 Pro? | Dr.fone
- Set Your Preferred Job Location on LinkedIn App of your Vivo X90S | Dr.fone
- In 2024, How to Mirror Your Realme 11 Pro+ Screen to PC with Chromecast | Dr.fone
- Is GSM Flasher ADB Legit? Full Review To Bypass Your Infinix Smart 8 Phone FRP Lock
- In 2024, Apple iPhone 13 Backup Password Never Set But Still Asking? Heres the Fix
- Complete Tutorial to Use VPNa to Fake GPS Location On Samsung Galaxy M34 5G | Dr.fone
- In 2024, The 6 Best SIM Unlock Services That Actually Work On Your Vivo V29e Device
- How To Unlock a Motorola Moto G04 Easily?
- How and Where to Find a Shiny Stone Pokémon For Tecno Pop 7 Pro? | Dr.fone
- 4 Most-Known Ways to Find Someone on Tinder For Vivo V30 Lite 5G by Name | Dr.fone
- Android Screen Stuck General Oppo A78 Partly Screen Unresponsive | Dr.fone
- Life360 Circle Everything You Need to Know On Realme 11X 5G | Dr.fone
- In 2024, How To Activate and Use Life360 Ghost Mode On Honor X9a | Dr.fone
- 4 Ways to Fix Android Blue Screen of Death On Realme Narzo 60x 5G | Dr.fone
- 3 Easy Ways to Factory Reset a Locked Apple iPhone 7 Plus Without iTunes | Dr.fone
- In 2024, Additional Tips About Sinnoh Stone For Apple iPhone 6s Plus | Dr.fone
- How to Transfer Data After Switching From Samsung Galaxy F54 5G to Latest Samsung | Dr.fone
- How to Change Location On Facebook Dating for your Oppo Reno 8T 5G | Dr.fone
- Simple ways to get lost videos back from GT 10 Pro
- In 2024, How to Reset Apple ID and Apple Password From iPhone 11 Pro
- In 2024, How to Reset your Realme GT Neo 5 Lock Screen Password
- Can Life360 Track Or See Text Messages? What Can You Do with Life360 On Lava Storm 5G? | Dr.fone
- In 2024, 10 Free Location Spoofers to Fake GPS Location on your Nubia Red Magic 9 Pro | Dr.fone
- How to Mirror PC to Apple iPhone 11? | Dr.fone
- 6 Fixes to Unfortunately WhatsApp has stopped Error Popups On Oppo A78 | Dr.fone
- In 2024, 4 solution to get rid of pokemon fail to detect location On Vivo S17 | Dr.fone
- Title: Updated In 2024, Best 7 Ways to Promote Twitch Stream
- Author: Sam
- Created at : 2024-05-19 03:35:05
- Updated at : 2024-05-20 03:35:05
- Link: https://ai-voice-clone.techidaily.com/updated-in-2024-best-7-ways-to-promote-twitch-stream/
- License: This work is licensed under CC BY-NC-SA 4.0.
