
:max_bytes(150000):strip_icc():format(webp)/AnneParkShedloskytvOS-2d4178dd6b7d46a08c34ab8b750fe23e.jpg)
Updated In 2024, A Guide on Starting Private Live Streams on YouTube
A Guide on Starting Private Live Streams on YouTube
In today’s digital age, live streaming has become a powerful tool for connecting with audiences in real-time. This method has especially been crucial for businesses looking to get into live selling or gamers wanting to stream their games. But say, for example, that you want to keep your stream private, accessible only to select viewers; how do you do that?
Here’s where private live streaming comes in. This option allows you to share your content with specific individuals, ensuring a more intimate and controlled environment. This guide will teach you how to set upprivate YouTube streams and give you special tips to let AI help you with your streams with Wondershare Virbo.

Part 1: What Do You Need To Get Started With YouTube Private Live Streaming?
Before diving into the exciting world of private live streaming, here is the equipment to ensure a smooth and seamless experience.
- YouTube account. First things first, you’ll need a YouTube account. This is your gateway to the platform and your key to unlock the world of live streaming.
- A capable PC. Next, prepare your PC and the command center for your private stream. While specific requirements vary depending on the complexity of your stream, here are some general recommendations:
- Processor: Intel Core i5 or equivalent (or newer)
- RAM: 8GB or more
- Graphics Card: Dedicated GPU recommended for enhanced performance
- Internet Connection: A stable and fast internet connection with sufficient upload bandwidth (consider at least 3 Mbps for standard definition)
- A streaming tool. Now, you’ll need a streaming tool to capture your video and audio and send it live to YouTube.Wondershare Virbo is recommended, especially for live-selling purposes. Other options include OBS and similar stream apps for other purposes.
With these essential elements in place, you’re on your way to launching your private YouTube adventure.
Part 2: How To Start a Private YouTube Live Stream?
Ready to share your talents or ideas with a select audience? Dive into the steps to create aprivate live stream on YouTube by following the guide below. It’s pretty straightforward.
- Step 1: Access YouTube Studio.Head to your YouTube Studio page (studio.youtube.com) and log in using your Google account linked to your YouTube channel.
- Step 2: Prepare for live streaming**.** ClickCreate in the top left corner of the Studio dashboard, and selectGo Live from the dropdown menu. Alternatively, click the camera icon next to your profile picture and chooseGo Live.

- Step 3: Now, set your visibility. Before starting your broadcast, ensure your stream is private. Under theVisibility setting, click the dropdown menu and choosePrivate . This option restricts viewership to individuals you specifically invite.

- Step 4: There are two methods existing for inviting viewers:
- Email Invitations: Click onShare Privately and enter the email addresses of individuals you wish to grant access. You can also choose to notify them via email.
- Link sharing: Although not recommended for complete privacy, you can copy the stream link and share it directly with trusted individuals. Remember, anyone with the link can access the stream, even uninvited guests.

- Step 5: Once everything is set and your viewers are invited, clickGo Live to launch your private YouTube stream. Remember, only invited individuals using their YouTube accounts can view your content.
Additional Tips for Private YouTube Live Streams
Here are some additional tips that you can follow before starting aprivate YouTube stream :
- Test streaming. Consider using a test stream before inviting viewers to ensure everything runs smoothly.
- Giving guidelines to your viewers. Encourage guests to use their YouTube accounts for optimal viewing experience and security. Further, you can add house rules, especially for more intimate streams or live selling/auctions.
- Exploring advanced privacy settings. Explore advanced privacy settings within YouTube Studio for further control over viewer permissions.
- Using AI . Tools like Wondershare Virbo can help integrate AI into your private YouTube streams. This way, you won’t always have to glue your eyes on your stream. Discover more about this feature in the following section.
By following these steps and keeping privacy in mind, you can effectively host engaging live streams on YouTube, connecting with your chosen audience in a controlled and intimate setting. Remember to personalize your content, interact with your viewers, and enjoy the unique experience of private live streaming.
Part 3: Breaking the Limitations of Live Streams With Wondershare Virbo
Live streaming constantly evolves, offering creators new ways to connect with audiences. While traditional live streams require your physical presence, imagine having an engaging and interactive stream running 24/7, even when you’re not there. This is great, especially forprivate YouTube streams , where the need to engage the select viewers becomes more apparent.
EnterWondershare Virbo , a revolutionary tool that leverages AI to create realistic and captivating live streams around the clock.
Introducing Wondershare Virbo
Gone are the days of relying solely on manual effort to keep your audience engaged. Virbo Live transcends these limitations, offering:
Get Started Online Free Download
- 24/7 content delivery. Whether taking a break or focusing on other tasks, Virbo Live ensures your stream continues with AI-powered content, keeping viewers entertained and informed.
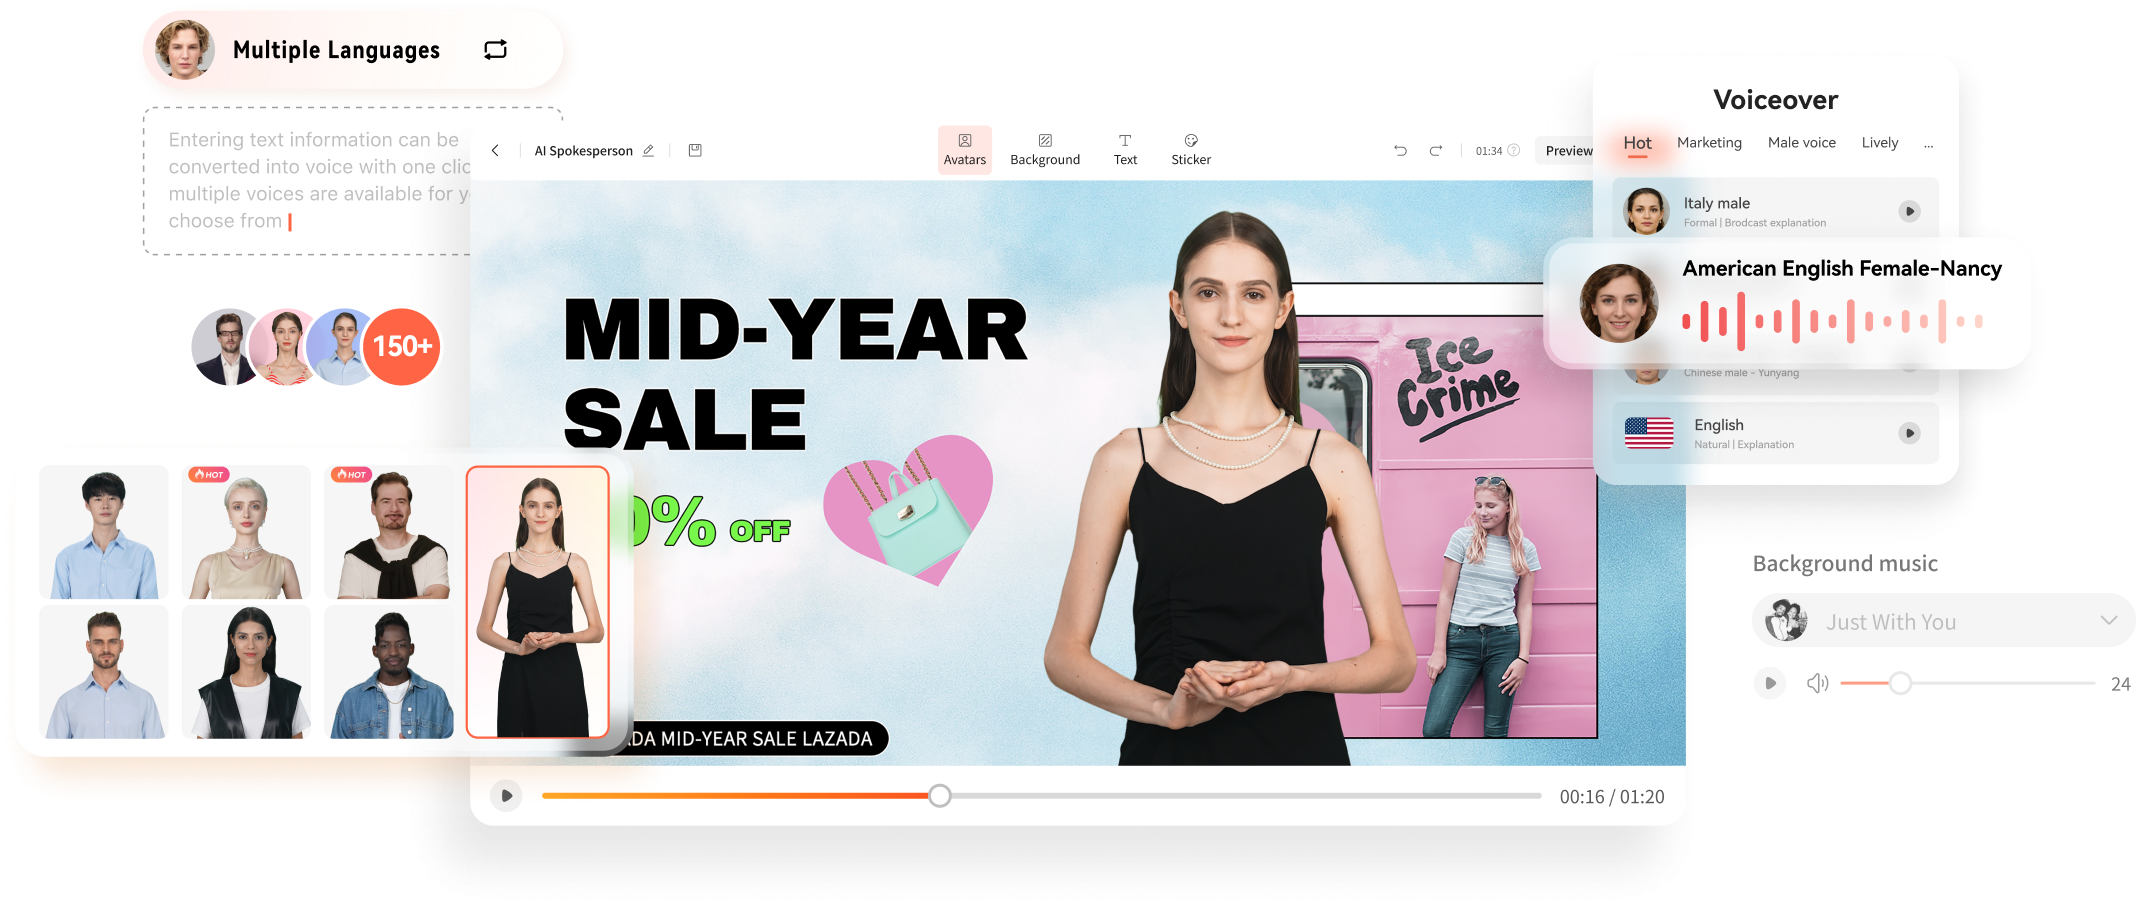
- Virtual host template library. No more scrambling for guest hosts or struggling with solo presentations. Virbo Live’s diverse library of 150+ customizable AI avatars can be your virtual co-host, presenter, or even a captivating character, interacting with viewers, answering questions, and conducting interviews.
- Content creation is made easy with templates. Forget starting from scratch. Virbo Live provides 180+ professionally designed video templates across various themes and styles, saving you time and effort. Plus, enjoy a library of royalty-free music to add the perfect soundtrack.
- Engaging AI voices. Bring your content to life with 120 AI voices, offering a variety of tones and accents, ensuring your message resonates with a global audience.
Integrating AI into Your Live Stream
Adding Virbo Live to your existing setup is simple and intuitive. Add Virbo as a live OBS window and use the YouTube stream key. Here’s a step-by-step guide:
- Step 1: InstallWondershare Virbo or access the web app.
Get Started Online Free Download
- Step 2: ClickCreate a Blank Livestream Room to customize your stream’s interface.

- Step 3: Choose from templates, backgrounds, AI avatars, and stickers to create a visually engaging environment.

- Step 4: UnderScript Lines , write the script your AI host will deliver throughout the stream. UseAI Interaction to set responses for specific questions andHuman interaction for actual responses from your end.

- Step 5: Once everything is set, clickStart Livestream and connect it to your preferred platform through OBS. Paste your streaming key for seamless integration.
Use-Cases for Wondershare Virbo and Private YouTube Live Streaming
Virbo Live empowers you to explore new avenues in content creation. Imagine using it for:
- E-commerce shopping. Showcase products with AI hosts demonstrating their features and answering customer questions in real-time, even outside business hours.
- Educational live tutorials. Host interactive learning experiences with AI tutors delivering engaging lectures and responding to student inquiries.
- Live Q&A sessions. Let your AI host manage large-scale Q&A sessions and field questions and keep the conversation flowing smoothly.
With Wondershare Virbo Live, the possibilities are endless. Unleash your creativity, explore new ways to connect with your audience, and experience the power of 24/7private YouTube streams . Remember, this is just a starting point – personalize your content, experiment with different features, and discover the unique potential Virbo Live brings to your streaming journey.
Conclusion
In today’s digital age, live streaming has become a powerful tool for connecting with audiences in real-time. YouTube live streaming offers a versatile platform to share your passions and connect with a select group of viewers. This article has guided you through setting up aprivate live stream on YouTube , ensuring your content reaches only your guests.
Remember, key considerations include enabling private streaming within YouTube Studio, inviting viewers via email or link sharing, and personalizing your content to create an engaging experience. If you want to take your live streams to the next level, consider Wondershare Virbo, a user-friendly tool designed to simplify private live streaming on YouTube with the help of AI.
Guide to Promoting Music Videos on YouTube
YouTube is one of the well-known platforms that has a promising audience globally. Many musicians and artists use YouTube for self-promotion. The influencing power of YouTube helps musicians to reach their targeted audience from all over the world. Therefore, it’s important topromote music videos on YouTube. By doing so, viewers can interact and enjoy your music videos through comments, likes, and shares.
If you are willing topromote music on YouTube , you are at the right place. This article will discuss a comprehensive guide to promoting music videos on YouTube to gain maximum viewership. Thus, keep reading this article to fetch authentic guidelines and tools for promoting music videos on YouTube.
Part 1: Why Promoting Music Video is Important?
Music video promotion on YouTube is essential for musicians and artists. This platform can provide musicians an excellent opportunity to showcase their talent through music videos. To learn the benefits of promoting music videos on YouTube, read the following points:
1. Attracts Vast Audience Through Visuals
Without a second thought, it can be stated that YouTube is a massive platform worldwide. It has a vast audience, as this platform is recognized in many countries. Therefore, you can connect with diverse people through your music videos on YouTube. This will help you in connecting with many people without going anywhere.
Moreover, the chances of gaining viewership on your music videos increase on YouTube to a great extent. The reason is that you can present your music videos through attractive visual storytelling. A well-produced music video can hook your audience thoroughly.
2. Financial Opportunities
YouTube also helps artists to get financial benefits. You can not only pursue your passion through YouTube but also gain monetary benefits. Once you have gained sufficient subscribers and viewership on the YouTube channel, you can earn money through it. WithYouTube ads music , you can generate a handsome income by sitting at home. Thus, YouTube helps people to become financially independent and strong.
3. Easy to Discover
YouTube algorithms function to promote music videos to people regularly. Once you have posted a music video on YouTube, it can be visible to various viewers. This platform lets you insert relevant keywords in your YouTube titles and descriptions for effective promotion. Thus, you can gain viewership on your music videos regularly.
4. Analytics and Feedback
Do you know that YouTube offers data and analytics on every music video performance? With data and analytics, you can analyze audience demographics on your YouTube channel. This will help you understand the current preferences of your viewers. Moreover, YouTube provides relevant information about watch times on your YouTube channel to help you modify your content.
Furthermore, you can generate feedback from your audience through comments. It will assist you in enhancing your music videos. Resultantly, you can engage more viewers through your music videos by bringing constant improvements.
5. Create Trends and Ensures Cross Promotion
You can become a trendsetter if you successfully showcase your unique talent throughmusic video promotion . YouTube displays trending videos separately to get a spotlight from a maximum number of people. Moreover, YouTube videos can be shared on multiple platforms like Facebook, Instagram, WhatsApp, etc. Thus, you can create a strong fan base by posting music videos on YouTube.
Part 2: Ultimate Guide to Promoting Music Videos on YouTube
Do you want topromote music videos on YouTube successfully? Read this section carefully to learn the valuable tactics for effective music video promotion on YouTube.
1. Reach Your Audience
Targeting your audience is essential to ensure high viewership on your music video. To do so, you have to research your audience demographics, such as age, gender, and location. It would help to understand your audience’s preferences, current demands, and interests. You can use the YouTube Analytics tool to analyze your audience’s behavior.
After knowing the needs of your viewers, ensure to produce relevant content. Furthermore, you should construct a schedule to upload your YouTube videos. You can pick a time when most people are free and want entertainment. This will help in reaching your targeted audience at the right time.
2. Create a Compelling Profile
Apart frompromoting music videos , creating an attractive profile on YouTube is also significant. To make your identity highlighted and accepted, it would be ideal to generate a complete YouTube profile. First, select a unique yet relevant YouTube channel name. The name should compellingly display your true identity. Afterward, you should pay attention to your channel art by uploading attractive banners.
Your YouTube profile picture also plays a key role in attracting viewers. Thus, select a high-quality profile picture that matches the personality of your YouTube channel. Afterward, you can produce a channel trailer to intrigue your viewers. You should also create engaging custom thumbnails for YouTube videos to get click baits. Moreover, provide complete information in your channel’s “About” section.
3. Apply Proficient Video Editing Skills
Once you have produced a music video, it’s time to edit the raw footage. To cast a professional impression, you should know how to experiment with video editing. Thus, you should learn the basics of video editing through online classes or professional help. This will help you adjust your video’s settings to remove flaws from your music videos.
Most importantly, you should try reliable video editing software. To achieve quality results, you can try Wondershare Filmora . This tool has multiple AI features that can boost editing efficiency by automating manual tasks. Moreover, it has a friendly interface that can help beginners and inexperienced individuals. Thus, you can practice on Filmora to edit your YouTube music videos.

4. Add Engaging Elements
For effectiveYouTube music promotion , you should add engaging elements to your video. Your video should engage the viewers so that they can share it on other platforms. If you are hesitant to present your music video, you can use virtual YouTube presenters. For this, the best available tool isVirbo . This tool contains tons of AI Avatars with different attires that can present your music videos with natural human voices.
Virbo can produce engaging AI videos within a few minutes. This video avatar creator is compatible with Windows, Android, iOS, and Web Browsers. It uses advanced AI technology to complete your given tasks automatically. With cost-effective resources on this tool, you can make your music videos engaging through this tool. Therefore, you must try Virbo to get instant results without putting in a manual effort.

Get Started Online Free Download
Key Features
- Multi-National AI Avatars: Virbo comprises more than 150 AI Avatars of multiple nationalities. The avatars are available in both genders with different age ranges and attires.
- Various Supported AI Voices: You can select AI voices for your avatar from more than 120 options. The AI voices are available in all common languages and diverse accents. You can also choose the tone of the AI voice.
- Generate YouTube Titles and Descriptions: With the integration of ChatGPT in Virbo, you can create YouTube titles and descriptions automatically. By inserting relevant keywords and product details, the tool can produce attractive YouTube descriptions.
- Free Assets and Templates: This AI-powered tool consists of built-in templates and free assets that you can utilize for your videos. Moreover, they are free and can easily be used for video enhancement.
5. Make Connection with Your Viewers
Bridging the gap with your viewers helps in building a strong YouTube community. You should respond to the comments under your video to communicate with your viewers. You can also create a Q&A video to answer the common queries of your audience. Live chats and sessions also play a key role in effective communication.
Furthermore, you can collaborate with other YouTubers to connect with more people. You can plan exciting activities with other YouTubers so that viewers can enjoy them to their fullest. Also, you should post your other social media links, such as Instagram, Facebook, and Twitter, under the YouTube description. This will help you gain followers on all your social media platforms.
6. Enhance YouTube SEO
You should enhance your YouTube SEO game to gain maximum visibility for your music videos. By executing YouTube SEO strategies, you canpromote music videos effortlessly. First, research common keywords people use to find YouTube videos of their interest. You can get help from tools like TubeBuddy and Google Keyword Planner . Afterward, insert the famous keywords in YouTube titles and descriptions smartly.
Moreover, you should also use tags wisely so that YouTube can comprehend the context of your video. This will help YouTube algorithms to increase the visibility of your music video. You should also add closed captions to your music video, which can lead to improved YouTube SEO. Also, you should create playlists on your YouTube channel to organize your music videos. It will allow viewers to navigate to your content.
Conclusion
YouTube music promotion can help in reaching a maximum number of people globally. To become a famous musician, you should know the techniques to promote music videos on YouTube. This article taught you the importance of attractive storytelling, YouTube SEO, and other essential factors for music video promotion.
You can also add AI virtual presenters to your YouTube music videos through Virbo. Hence, consider this article to get complete guidelines for YouTube music video promotion.
You May Also Ask
1.Can you do free promotion of music videos on YouTube?
Yes, you can do free YouTube music video promotion by using organic methods. These methods include sharing music videos on social media, optimizing the SEO of titles and descriptions, and interacting with the audience in the comment section.
2. Should you buy likes and views to market YouTube music videos?
There are various ways of buying views and likes for YouTube music videos, but it is not recommended. This is because YouTube has powerful advanced algorithms to detect fake or purchased likes or views.
Create Lip Sync TikTok Videos Without Installing Any App
TikTok has transformed the social media landscape through its short-form video content. They encourage users to make creative content using popular audio clips. Which enables them to entertain, gain recognition, and contribute to the platform.
Lip-syncing is a big part of what makes TikTok popular. Many users post lip-syncing videos that imitate voices from songs, movies, or trending audio clips. This art of lip-syncing has become an essential element of TikTok’s culture. Now, you might wonder**how to lip-sync on TikTok videos. This article will teach us how to make it effortlessly.
Part 1. Why Do People Lip Sync on TikTok?
Lip-syncing involves mimicking the words or vocals of an existing audio track. TikTok users take this concept to new heights by lip-syncing popular songs or clips. Lip-sync is appealing because it lets people get creative and reach a large audience.
Here are a few reasons why people engage in**lip sync TikTok :
- Self-expression: Lip-sync allows users to embody their favorite artists or characters by showcasing their personality and creativity.
- Entertainment: Many users lip-sync to entertain followers. They offer comedic performances, heartfelt renditions, or engaging storytelling.
- Virality: TikTok’s algorithm favors engaging content and well-executed lip-sync videos. They have the potential to go viral, rapidly gaining likes, shares, and followers.
Part 2. How to Make Lip Sync Video on TikTok
Here’s the step-by-step guide on how to lip sync on TikTok and captive your followers:
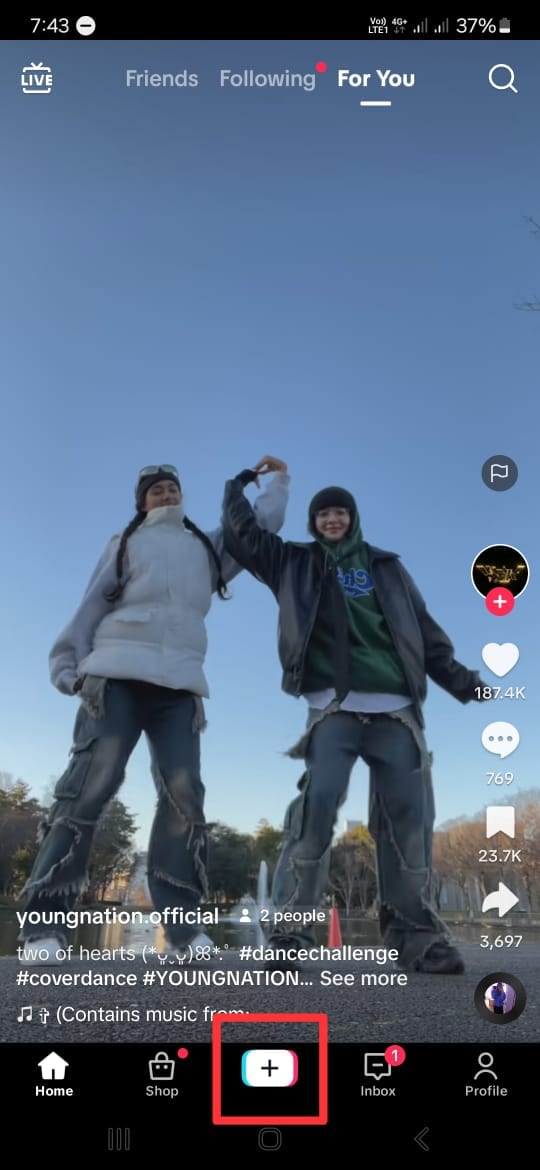
- Step 1. Open the TikTok app and tap the “+” button.
Start with opening the TikTok app on your phone. Then, tap the “+” button at the bottom of your screen to make a new video.
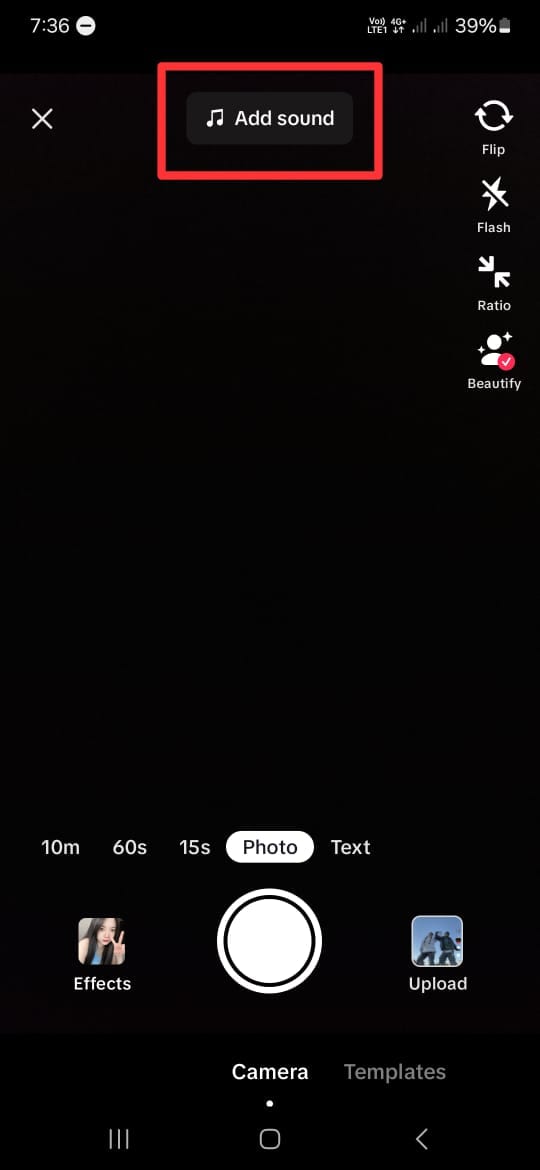
- Step 2. Add a song that you want to lip-sync to.
Next, click “Add Sound” with the musical note icon at the top of the screen. If you have a specific song in mind, you can find it by searching it on the search tab. Then, tap the song and click the check icon beside it.
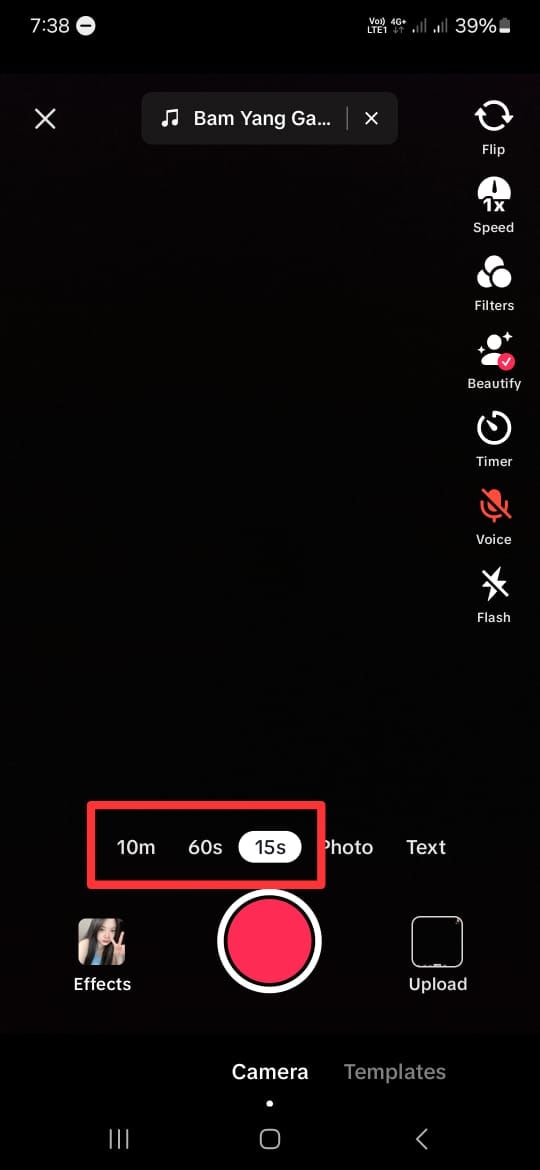
- Step 3. Choose the duration and the part of the song.
After choosing the song you want, you will return to the recording screen. Here, select your video duration at the bottom of the screen. You can choose between 10 minutes, 60 seconds, and 15 seconds. Remember that the duration of the songs on TikTok is usually only 30 to 60 seconds.
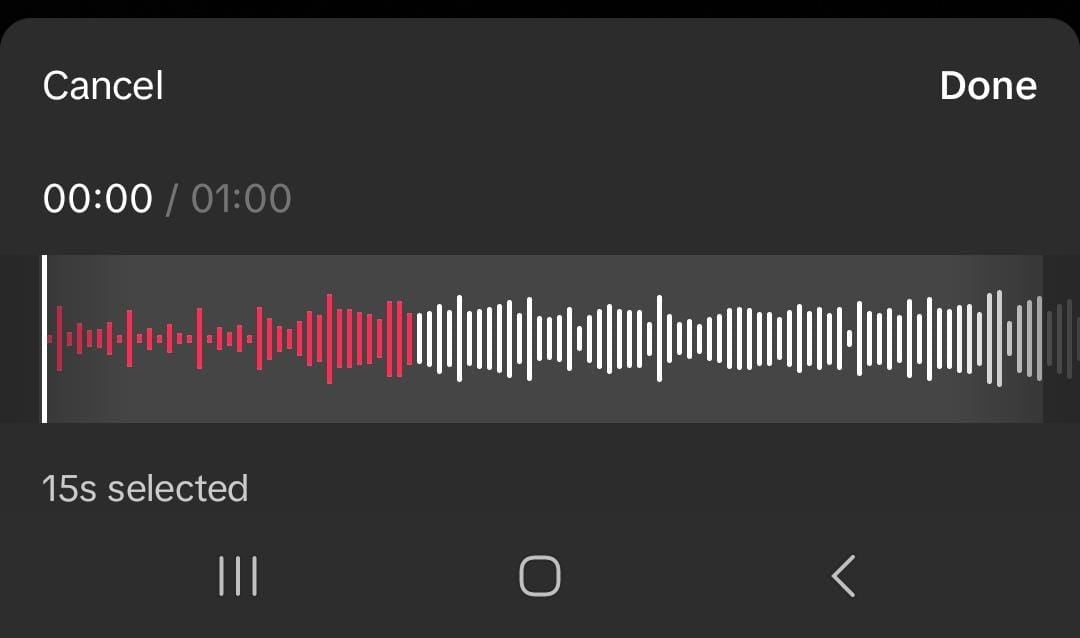
- Step 4. Choose the part of the song.
TikTok allows you to change the part of the song when lip-sync. However, the duration of the video should be less than the duration of the chosen song.
To do this, click on the song’s name at the top of your screen. Then, the bottom of your screen will display your chosen song. Tap the scissor icon and slide the playback to change the part of the song. Click “Done” once you have finished editing.
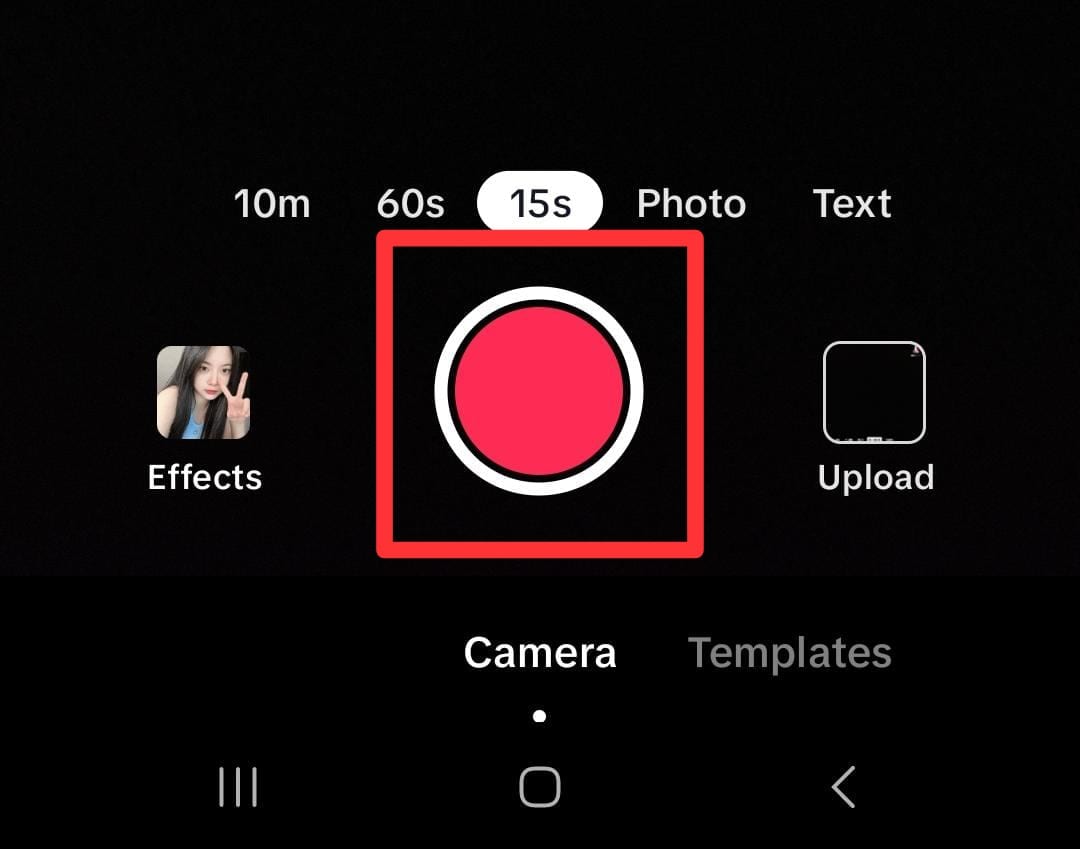
- Step 5. Tap on the red button.
If you are ready to record, tap the red button at the bottom of your screen. Then TikTok will play the chosen part of the song and record your lip-sync simultaneously. You can pause and continue the recording by clicking the same red button.
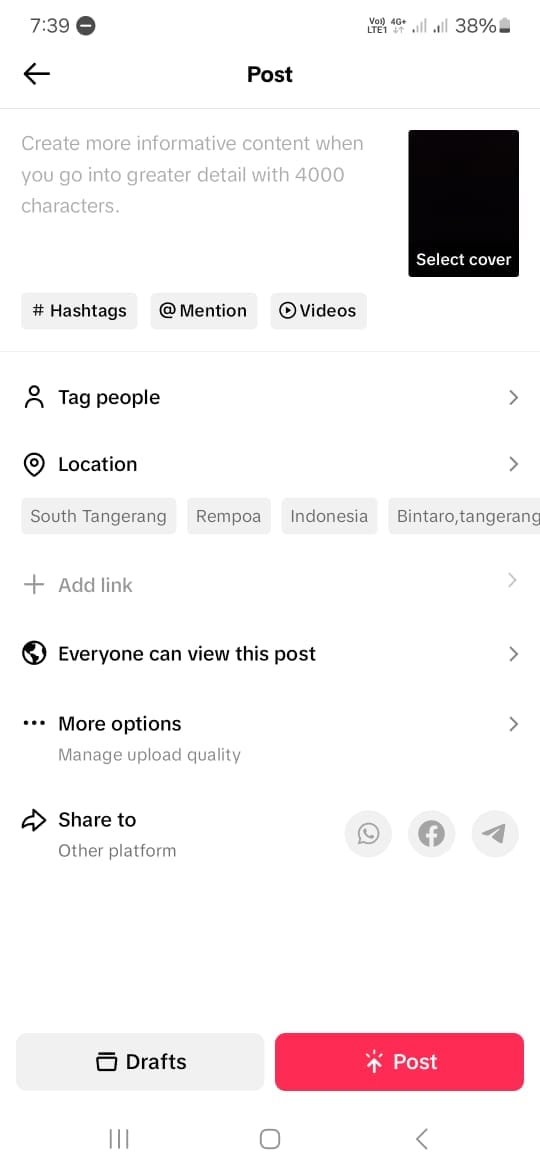
- Step 6. Post the video.
If you are satisfied with the results of your edits, click Next to proceed to the posting stage. Here, you can write a description and any other information you want. Click Post to share your lip-sync video to TikTok.
Creating a video on TikTok by lip-syncing is a fun and creative way to express yourself and connect with others. By following the steps above, you can create a lip-sync video on the TikTok app with ease. Keep in mind that by using these steps, you need to memorize the sentences and understand the beat of the chosen songs.
Part 3. How to Make Lip Sync Video Without Memorizing the Words
Making a**TikTok lip-sync video can be challenging because you must remember and match the words with the music. But there are three simple methods to make it easier.
Method 1: Record at slower speed
You can slow the speed down while recording instead of trying to keep up with the song. This technique lets you hear, understand, and follow the words more easily.
Here’s how to slow down the recording:
- Step 1. Follow steps 1 to 4 from the step-by-step guide in Part 2.
Start by following the first to fourth steps from the guide in Part 2 above.
- Step 2. Set the speed record slower.
On the recording screen, click on the Speed icon on the right side of the screen. To make it slower, choose 2x or 3x. This step will make your recording time 2 or 3 times longer than it should be.
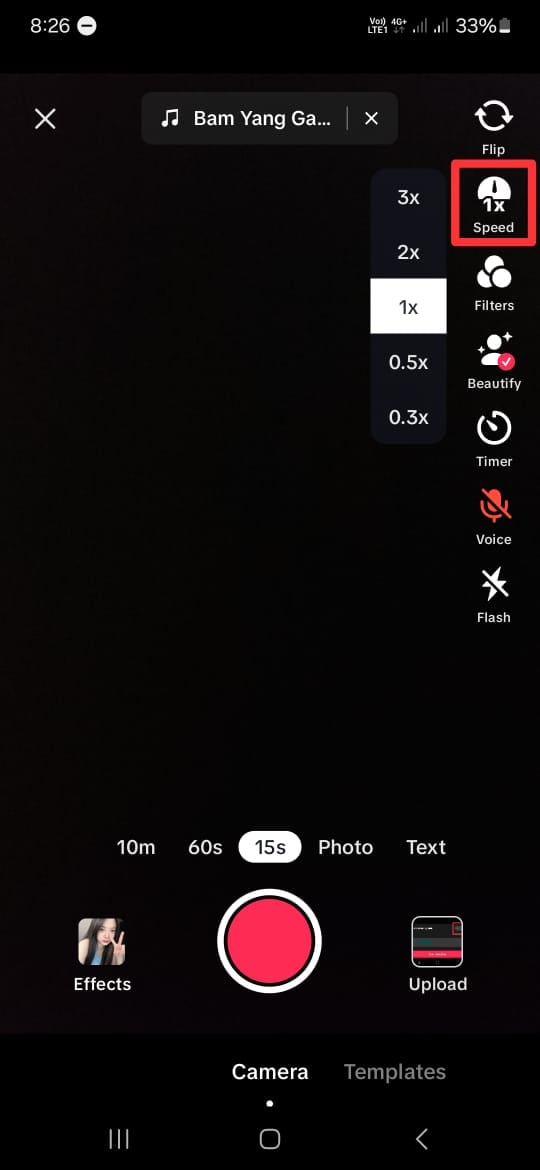
- Step 3. Tap on the red button.
Once you tap the red button, TikTok will play the song slower and record your lip-sync simultaneously. Repeat this step to help you memorize the lyrics and the beat of the songs.
Once you’re comfortable, switch back to normal speed for the final recording. This method will save time and improve accuracy.
Method 2: Purposely delay mouthing the words
While lip-syncing videos may vary in style and pacing, this technique can prove particularly useful for slower rhythms. Moreover, mastering the art of mouth sync on TikTok can elevate the overall production value of lip-syncing videos.
Using the timer feature will give you a slight lag between lip movements and audio playback. Then, it lets creators ensure more precise synchronization during editing. Here’s how to lip-sync on TikTok more easily:
- Step 1. Follow steps 1 to step 4 from the step-by-step guide in Part 2.
Like Method 1, you can start by following the first to fourth steps from the guide in Part 2 above.
- Step 2. Delay the recording
On the recording screen, click on the Timer icon on the right side of the screen. Here, you can set the timer to 3 to 10 seconds to delay the recording’s start. You can also drag and set the recording limit if you want.
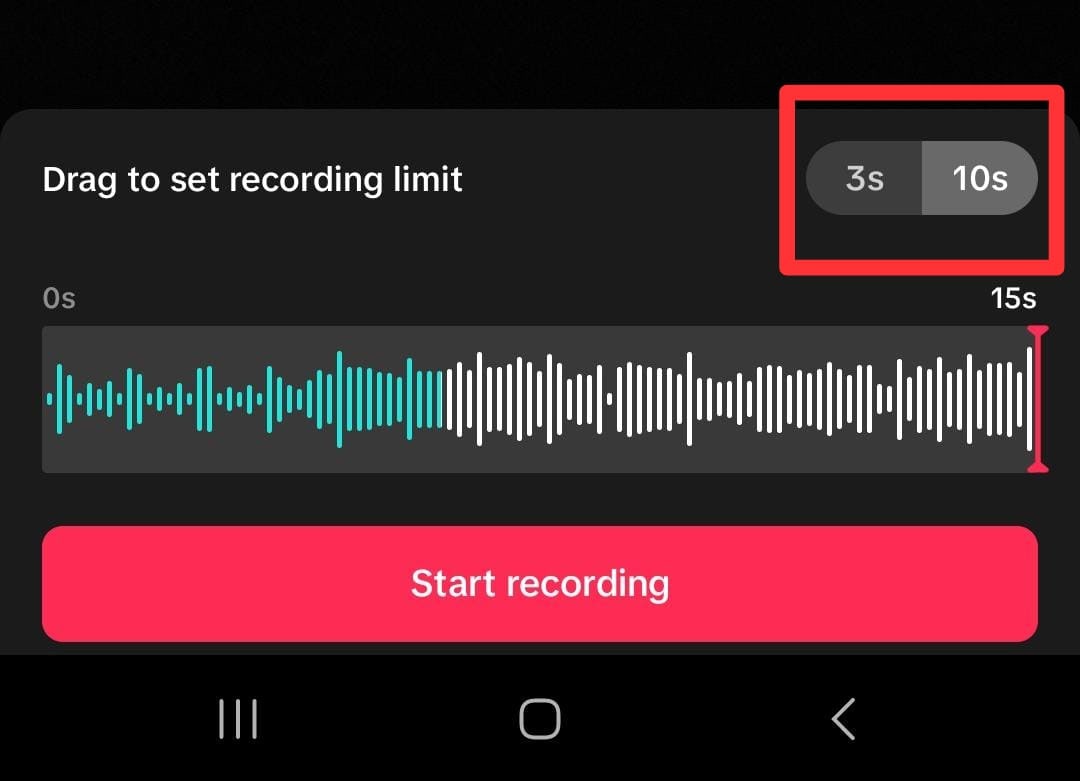
- Step 3. Start the recording
Then click “Start recording” to record the video with the timer on.
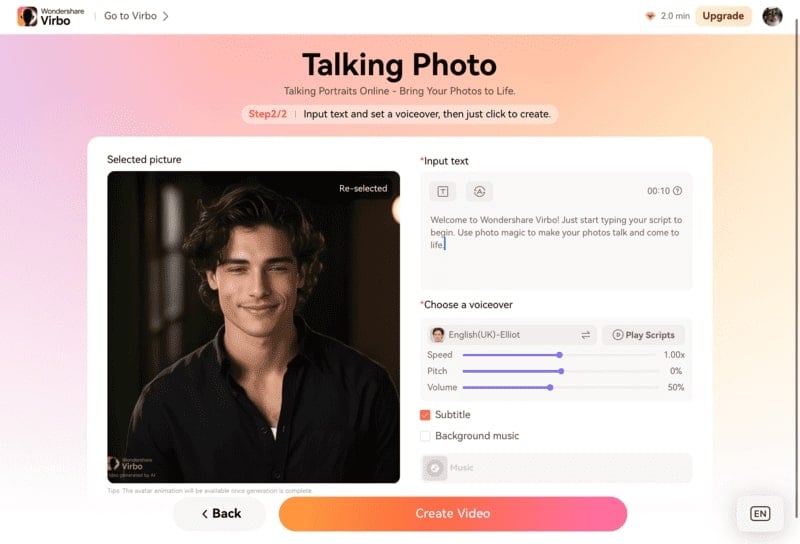
Method 3: Use a Photo Talking Tool
Next, consider using a Talking Photo feature by Wondershare Virbo. This method is for you who want to create engaging TikTok lip-sync videos without memorizing the words.
Virbo’s Talking Photo feature tool lets you upload a portrait of your photo and then make it appear as though it is speaking along with the audio. You do not have to install the app because you can use this feature online on their official website.
Here’s how to use Wondershare Virbo - Photo Talking feature to create a TikTok lip-sync video:
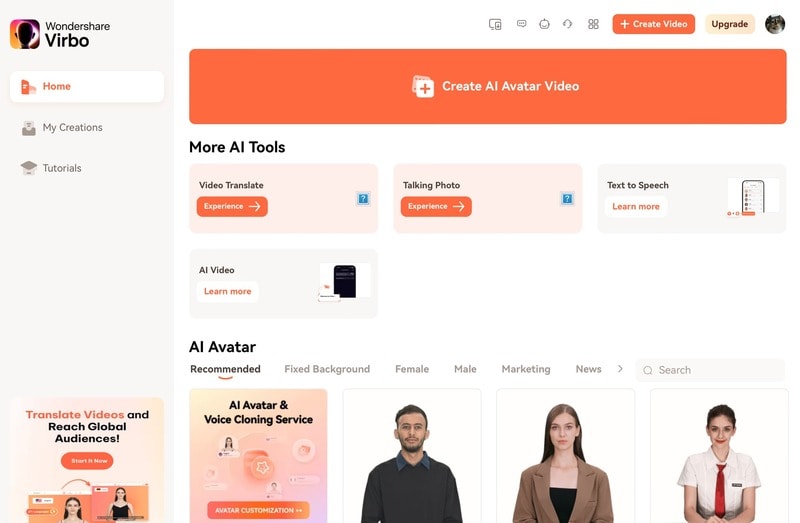
- Step 1. Start a new project.
Open the Wondershare Virbo website and tap the talking photo function to start a new project.
Get Started Online Free Download
- Step 2. Upload a portrait.
Tap “Upload Photo”, then upload a picture you want to use by following the instructions.
- Step 3. Edit and export.
Insert the text and adjust the voice settings. If you want to insert your own audio, you can use Wondershare Virbo for mobile or Desktop to upload or record your audio. Then, tap “Generate Video” to export.
Now, you have successfully made your own TikTok lip-sync video. You can upload it to TikTok and share it with your followers. For more detailed instructions, you can see how to useVirbo’s Photo Talking tool .
Part 4: How To Lipsync Your Video to Any Language Using AI Video Translator
In today’s globalized world, reaching audiences in different languages is important for effective communication. Thanks to technological advancements, there is a tool that can help you translate video content.
Wondershare Virbo – Video Translator offers seamless solutions to translate video content into various languages with AI. Virbo ensures high-quality translations that maintain the integrity and impact of your original message.
How to lipsync TikTok videos to any language with Wondershare Virbo - Video Translator:
- Step 1. Go to Virbo’sofficial website , then click Generate AI Video Online.

Get Started Online Free Download
- Step 2. Log in or create an account.

- Step 3. Then, navigate to the Video Translator tool on the Virbo’s homepage.
- Step 4. Upload the video.
Once inside the Video Translator interface, upload the video file you wish to translate. Select the original video language and the preferred target language from the available options. Additionally, enable the Lip Sync feature to ensure that the translated audio aligns perfectly with the lip movements in the video.
- Step 5. Click “Translate this video” to start translating the video.
Virbo’s Video Translator will use its advanced algorithms to translate the audio and synchronize it with the video seamlessly. Depending on the length and complexity of the video, the translation process may take some time.
Conclusion
Lip-syncing on TikTok has become a significant aspect of TikTok culture. It helps users show their creativity, entertain people, and maybe even become famous. Making**mouth sync TikTok videos usually means remembering lines and matching them to music, but there’s an easier way with Wondershare Virbo’s Talking Photo tool. This tool allows you to upload a portrait and sync it with audio without remembering the lines.
Also, Wondershare Virbo has a Video Translator tool that allows you to translate videos seamlessly into any language. This translator tool helps you communicate with people worldwide and maintain the original message.
How to Create Funny Talking Avatars Using Oddcast Text to Speech
In the ever-evolving landscape of digital communication, avatars have emerged as captivating tools that add a dash of fun and personalization to our online interactions. Among the pioneers in this domain,Oddcast TTS has emerged as a standout player, offering a remarkable Text to Speech (TTS) technology that brings avatars to life with hilarious and engaging voices.Oddcast text to speech offers a free online demo that lets you choose from hundreds of characters, languages, and voices, and customize your avatar’s appearance, expressions, and movements.
In this article, we will show youOddcast TTS demo to create your own funny talking avatars in a few easy steps. You will be able to make your avatars say anything you want, and share them with your friends or audience in no time after reading this post.
Part 1: What is Oddcast Text to Speech?
Oddcast is a company that specializes in text to speech (TTS) technology and solutions for web developers and content creators.Oddcast online TTS is a technology that converts text into natural sounding speech. It offers two types of TTS products: a cloud based API for developers that enables real-time audio in any online app or website, and a downloadable mp3 audio for games, apps, tutorials or videos.
Compatibility of Oddcast
- Compatible with various platforms and languages, such as HTML5, Flash, JavaScript, PHP, ASP.NET, and more
- Supports over 25 languages and 200 voices to choose from
Functions of Oddcast
- Can be used to create talking avatars, interactive learning materials, e-books, quizzes, games, cartoons, podcasts, ads, presentations, demos, voice assistance, and more
Key Features of Oddcast
- Oddcast comes with high quality and natural sounding speech, unlike some other TTS products that sound robotic or unnatural,Oddcast voice sounds like a real human voice that can convey emotions and expressions.
- The app has customizable pitch, speed, volume, and effects that you can apply to your speech. You can adjust these settings to make your speech sound more realistic, humorous, dramatic, or any other way you want.
- Oddcast supports for SSML (Speech Synthesis Markup Language) that allows you to have advanced control over your speech. You can use SSML tags to add pauses, emphasis, breaks, or other effects to your speech.
- It offers easy integration with online tools and websites. You can use Oddcast with any online app or website that supports audio playback. You can also use it with the free online demo that lets you create talking avatars in a few easy steps.
- It comes with affordable pricing plans and free trial options. You can choose from different plans depending on your usage and budget. You can also tryOddcast DJ voice tag for free before you buy it.
Limitations of Oddcast
- Requires an internet connection for the cloud based API
- Has a limit of 1000 characters per request for the downloadable mp3 audio
- Has a limit of 60 seconds per audio for the free online demo
Part 2: How to Create Funny Talking Avatars Using Oddcast Text to Speech Tool?
Creating amusing talking avatars withOddcast online is an exciting endeavor that requires a blend of creativity and technical know-how. Here’s a step-by-step guide to get you started:
Step 1
To start creating your funny talking avatar, you need to visit the Oddcast TTS demo page ofOddcast Text to Speech Tool. This is a free online tool that lets you create and download talking avatars in a few easy steps. You can access this page from any web browser on your computer or mobile device.

Step 2
Once you are on the online demo page, you will see a list of characters on the left side of the page. These are the avatars that you can choose from to create your funny talking avatar. You can browse the characters by category, such as animals, celebrities, cartoons, etc. You can also search for a specific character by typing their name in the search box at the top of the list. For example, if you want to create a funny talking avatar of Donald Trump, you can type “Trump” in the search box and select his character from the list.

Step 3
After you select a character, you will see their image on the right side of the page. This is where you can customize their appearance and voice settings. Below the character image, you will see an “Edit” button that allows you to change their hair, eyes, mouth, clothes, accessories, and background. You can click on this button and use the sliders and buttons to adjust these features as you like. For example, if you want to make your character look more funny, you can change their hair color, eye shape, mouth expression, etc.

Step 4
Next to the “Edit” button, you will see two drop-down menus that allow you to choose a language and a voice for your character. You can select from over 25 languages and 200 voices thatOddcast Text to Speech Tool supports. You can also listen to a sample of each voice by clicking on the speaker icon next to the menu. For example, if you want to create a funny talking avatar of Donald Trump in Spanish, you can select “Spanish” from the language menu and “Jorge” from the voice menu.

Step 5
Below the language and voice menus, you will see four sliders that allow you to adjust the pitch, speed, volume, and effects of your character’s voice. You can use these sliders to make your character sound more funny or realistic. For example, if you want to make your character sound more high-pitched or low-pitched, you can move the pitch slider to the left or right. If you want to make your character sound more fast or slow, you can move the speed slider to the left or right. If you want to make your character sound more loud or soft, you can move the volume slider to the left or right. If you want to add some effects to your character’s voice, such as echo or reverb, you can move the effects slider to the left or right.

Step 6
Below the sliders, you will see a box where you can type or paste your text that you want your character to say aloud. You can use up to 1000 characters per request for this box. You can also use SSML (Speech Synthesis Markup Language) tags to add some pauses, emphasis, or other effects to your speech. SSML is a standard way of controlling how text is spoken by a speech synthesizer. You can use SSML tags by enclosing them in angle brackets (< >). For example, if you want to add a pause of half a second between two words, you can use the tag

Step 7
After you type or paste your text in the box, you can click on the “Say It” button below it to hear your character speak your text aloud. You will also see your character’s expressions and movements change according to your text. For example, if your text contains some punctuation marks or emoticons, such as ! ? :) :( etc., your character will show some corresponding emotions and gestures on their face and body.

Step 8
To save or share your funny talking avatar, you can click on the “Download” or “Share” buttons below your character image. The Oddcast voice “Download ” button allows you to download your avatar as anOddcast text to speech mp3 audio file or a video file that contains both audio and visual elements of your avatar. The “Share” button allows you to share your avatar via email, Facebook, Twitter, or embed code that you can copy and paste on any website that supports HTML code.
That’s it! You have created your own funny talking avatar usingOddcast Text to Speech Tool. You can now use it for any purpose that suits your needs and preferences.
Part 3: Bonus Tip: An Awesome Alternative to Oddcast You May Like
WhileOddcast Text to Speech Tool is a great tool for creating funny talking avatars, some of you might be wondering if there are any other online tools that can do the same or even better. Well, the answer is yes! There is an awesome alternative to Oddcast that you should definitely check out - and it’s Virbo.
Wondershare Virbo is an AI video and voice generator that enables you to create stunning and engaging videos with realistic avatars and natural voices in over 120 languages and accents. You can use Wondershare Virbo for various purposes, such as marketing, education, entertainment, social media, voice assistance, and more.
Key Features of Virbo
- Choose from over 150 realistic avatars that can mimic your facial expressions and gestures
- Use ready-made templates that suit your video theme and style
- Adjust the pitch, speed, volume, and effects of the voice
- Use the built-in script editor with smart suggestions and tips
- Access a rich library of royalty-free assets
- Use the app on both desktop and mobile devices
Functions of Virbo
- Create AI video with realistic avatars and natural voices
- Convert text into speech in over 120 languages and accents
- Customize avatar appearance, clothing, accessories, and background
- Use ready-made templates or edit them as you like
- Access royalty-free images, videos, music, sound effects, and fonts
- Export video in various formats and resolutions

Get Started Online Free Download
Conclusion
Creating funny talking avatars is a fun and creative way to express yourself, entertain others, or promote your brand. With Oddcast TTS Tool, you can easily create and download talking avatars for free in a few simple steps. You can also customize their language, voice, and emotions to suit your needs and preferences.
But if you want to take your video creation to the next level, you should definitely try out Virbo. This is an amazing AI video and voice generator that lets you create stunning and engaging videos with realistic avatars and natural voices in over 120 languages and accents. You can also access a range of royalty-free assets and customizable templates to make your video stand out from the crowd.
Whether you want to create videos for marketing, education, entertainment, social media, voice assistance, or any other purpose, Wondershare Virbo is the perfect tool for you. You can use it on both desktop and mobile devices, and export your video in various formats and resolutions.
Don’t miss this opportunity to unleash the power of AI to create awesome videos with Wondershare Virbo. Sign up for a free account today and start creating your first AI video in minutes. You will be blown away by the results!
Best YouTube Video Into Text Converters
We all are familiar with YouTube, and it wasn’t long ago when it introduced captions for videos. These captions assisted as subtitles and were great for making content inclusive. However, about accuracy, YouTube’s inbuilt feature wasn’t the best fit. An advanced method of adding captions is to convert YouTube videos into text .
Editors can use many online and desktop tools totranslate YouTube videos into text . They bring accuracy via automatic speech recognition (ASR) and natural language processing (NLP). They provide content access on a broader level, help with SEO ranking and more. This article discusses the leading tools for this purpose and their importance.
Part 1. What is The Breakdown of a Perfect Translated Document?
A factor to consider whentranslating YouTube videos into text is precise translation. The flawless interpretation of speech is important to maintain the essence of video. While translating, it should keep the style, intent, cultural and ethical content norms. This section will elaborate on the factors that form the basis of a good, translated document:
- Precision and Uniformity: There are no grammatical or factual errors in the translation. The tool must maintain the context and essence of the content. The translation should be natural while avoiding any awkward encounters. Moreover, the tone and writing style should be consistent throughout the document.
- Cultural Boundaries: The tone or words must not violate cultural norms and ethics. Some cultures are sensitive to specific content, while to some, it is no big deal. Hence, the translator should have background information on target cultures.
- Relevant Jargon and Expressions: Vast training data helps comprehend the content better. This involves the use of industry-specific jargon and terminologies. In addition, idiomatic expressions also elevate content and attract target audience.
- Proofread and Finalized: It can bring clarity through well-structured and well-managed sentences. Another way of maintaining clarity is by correcting grammatical and spelling errors. The translated content must be proofread and well-formatted to rule out any mistakes. Using headings, sub-headings, bullet points, and formatting elements does the trick.
- Uphold Local Standards: To relate with the audience, adopting the local language is important. The translator must gather some insights into regional or cultural norms. This will help in the translation of content in an effective and preferred way.
- Legal and Ethical Boundaries: Upholding legal and ethical boundaries is important in all documents. If the video contains any medical records, it is essential to keep them confidential. In case of sensitive information, a translator must follow legal and ethical considerations.
- Requirements and Review: To achieve perfection, try finding a native translator for proofreading. The translator should follow any specific instructions provided by the client. This covers word count, file format, or reference materials. Besides, deadlines should be followed in handling translation to clients. Through the process, the translator must uphold communication with the client.
Part 2. What Should a Good Video-to-Text Converter Contain?
There are many features to consider in a goodconvert YouTube video into text tool. A premium video converter must have an automatic speech recognition (ASR) system. It should also analyze and comprehend human language. Here are the essential components of a decentconvert YouTube video into text tool:
1. High Accuracy and Adaption
The translation tool should have advanced technology working at the back end. The technology must ensure high accuracy and adaption to new information. Maintaining accuracy is important to maintain the right meaning of content. The software must be capable of recognizing and adapting new languages and phrases.
2. Multilingual Provision
YouTube content is not bound to specific regions, as anyone can access it. Hence, the translation tool must be compatible with multiple languages. This not only provides global access to content but also increases its reach.
3. Multi-Speech and Timestamps Identification
The tool toconvert YouTube videos into text must have high recognition abilities. This helps with podcasts or videos with multiple speakers. In such cases, a good tool will recognize these voices and transcribe them separately. In addition, the tool should be able to identify specific time lapses of speech. It makes it convenient to align and find the transcript with the video.
4. Text Formatting and Correction
Thesetools to translate YouTube videos into text should maintain the text’s format. There should be room for accuracy and alignment. The tool must automatically add punctuation marks, capitalization, and rearrange text.
5. Live Transcription
The tool you are using must be efficient enough to transcribe speech as it happens. News and Broadcasting channels, seminars, and live webinars benefit from it. It helps people comprehend content better with readable captions and more.
6. Noise Recognition and Advancements
The system should be able to detect background noises and adapt to different acoustics. It should detect and eliminate the background noises instead of transcribing them. In addition, it should keep upgrading to adapt to evolving language patterns.
7. API Integration and Editing Options
The translator tool must offer an application programming interface (API) for broader access. This will enable the tool’s integration into various software and applications. In addition, it should offer editing options afterward, like eliminating or adding text.
8. Multiple Files and Format Support
This tool must support multiple input and output formats for both audio and video. In addition, it should keep upgrading and adding popular and new formats. Moreover, it must be able to handle work at a larger scale via batch processing. Batch processing allows one to cope with work pressure by transcribing many files at a time.
Part 3: Top-Rated YouTube Video to Text Converters
Let’s move forward while remembering an idealtranslate YouTube videos into text tool. In this section of the article, we’ll explore some cutting-edge tools. Theseconvert YouTube videos into text-free tools are influencing the industry. Without further delay, find the advantages and disadvantages of these tools here:
1. VEED.io
Toconvert YouTube videos into text online, VEED.io provides the right platform. Users can transcribe a video in 100 languages with appropriate terminologies. Content creators on YouTube can make their content searchable via transcription. Transcriptions extracted from this tool are accurate and proofread. Its ability to provide multilingual transcripts helps in learning other conversational languages.

Key Features
- With its timeline editing interface, it makes adding and manual subtitles easy.
- Users can upload a pre-existing subtitle file to translate it into other languages.
- Supports multiple input and output text formats like SRT, VTT, and more.
2. Flixier
Being a content writer is tiring, and listening to a complete YouTube video to transcribe adds to it. You canconvert YouTube videos into text-free or upload the subtitles for it. The editing interface is simple and accessible to anyone with or without experience. Its high-end ASR technology and algorithms add accuracy to your content. To employ this tool, there is no need to download or subscribe to any plans.

Key Features
- Avoid the process of downloading a YouTube video and start by copy-pasting a link.
- From the transcribed text, you can generate voiceovers in other languages.
- You can avail the option of the manual script option or edit the video afterward.
3. Happy Scribe
If you want totranslate YouTube videos into text using the latest technology, this is your tool. With its multilingual support and high accuracy, it crafts professional transcripts. Once you enter its editing interface, creating a transcript is an easy process. The process is straightforward: login and choose the option to start transcribing.

Key Features
- You can import a YouTube video from a device, URL, Google Drive, and more.
- With its Glossary feature, you can search for specific words or jargon to ensure their accuracy.
- The tool can create and add typical subtitles or translated subtitles to your videos.
4. Rask AI
Exploring tools toconvert YouTube videos into text free while retaining its integrity? Then, this is the most accessible and vast tool for that purpose. It qualifies to maintain the cultural and grammatical accuracy of content. In addition, the tool masters in transcribing a YouTube video in 60+ languages. Moreover, it has tailored the user interface according to content and user preferences.

Key Features
- You can transform a transcript into various text formats within this tool.
- It enriches your content’s SEO through searchable transcripts and subtitles.
- The tool can turn transcribed text into Google Docs and configure it afterward.
5. Maestra
Do you want to increase your YouTube content reach and broaden your channel? Then thistranslates YouTube video into text tool is at your rescue. The tool not only transcribes video but also generates captions and adds them to your video. Along with being a transcriber, it acts as a translator too. With its multilingual support, it generates multi-language captions for YouTube videos.

Key Features
- Boosts productivity by enabling you to add a YouTube video link for transcription.
- Users can elevate the auto-generated transcript afterward and export it to multiple formats.
- It saves time, boosts SEO ranking, and enhances accessibility in all environments simultaneously.
6. 360converter.com
This is one of the most straightforward tools toconvert YouTube videos into text-free . Users can start by accessing the tool and pasting a YouTube video URL. For enhanced and efficient transcriptions, users can also employ its offline version. The tool not only saves time through rapid conversion but also proofreads the content.

Key Features
- Users can search for specific words pre-transcription for accurate conversion.
- The offline tool saves time and maximizes productivity by supporting batch transcription.
- It also qualifies as a real-time transcription tool for maximum accessibility.
7. Notta
Maximize your YouTube content’s organic reach using this online converter named Notta. It transcribes your text, which you can later use to make your content searchable. In addition, the tool provides 98.86% accurate transcribed results in just 3 steps. With its cutting-edge algorithms, it can transcribe hours-long videos in 5 minutes. The tool can be accessed across platforms to ensure synchronized working.

Key Features
- With its expertise, you can upload multiple formats of audio and video content.
- To use Notta as a learning opportunity, you can transcribe a text in 104 languages.
- It employs high-end security systems to ensure your data’s privacy and safety.
8. Kapwing
Use this tool to transcribe a pre-posted YouTube video or a video you are going to post. This tool can transcribe a video using a URL, Google Drive, and Google Photos. With thistranslate YouTube video-to-text tool, transcribe a video without errors. The tool automatically eliminates grammatical or spelling mistakes.

Key Features
- Along with transcribing YouTube videos, it can attach captions in it.
- Convert YouTube video into text in multiple text format support like SRT, TXT, or VVT.
- Users can also transcribe videos from other social platforms like LinkedIn.
Part 4: How to Translate Youtube Video?
While discussingconverting YouTube videos into text free , let’s see an alternative.Wondershare Virbo is the best alternative powered by AI to serve multiple purposes. With its specialized AI capabilities, it can create avatars, voiceovers, and scripts. What makes it unique is its seamless accessibility across platforms like Windows, Android, and more.
Wondershare Virbo – Video Translator Innovation
One of the notable integrations of this tool is its Video Translator feature. This tool facilitates users toconvert YouTube videos to text or captions. The tool cannot transcribe a video. However, it can generate subtitles in the chosen language. It supports video translation and subtitle generation in 20+ languages.
Moreover, users can translate a video into other languages using the original video voice. For now, this feature supports time durations ranging from 10 seconds to 5 minutes. Users have the flexibility to experiment with the background settings of their videos within this feature.
Steps to UseVirbo ’s Video Translator Feature
Let’s move forward now that you are aware of this tool and its amazing feature that concerns us. In this section, the focal point will be accessing and employing this feature. Following are the steps totranslate YouTube videos into text within this software:
Translate Video Online Download APP Now Free Download
Step 1: Access Tool and Lead into Video Translate Feature
On accessing Virbo Online, hit the “Video Translator” button under the “More AI Tools” section.

Step 2: Adjust Video Translation Settings After Video Upload
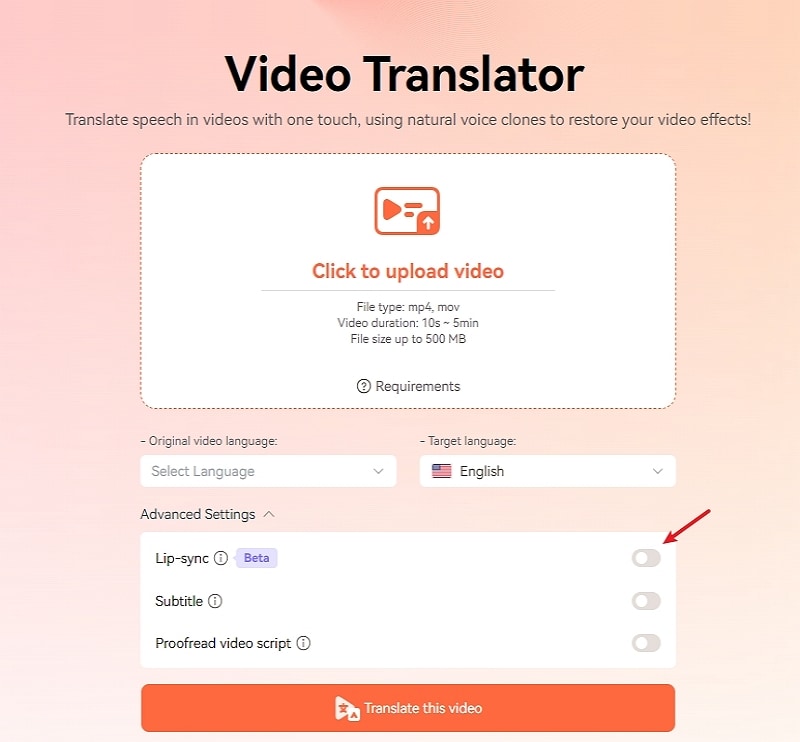
Upload your desired video after accessing the “Video Translator” window. Next, you have to choose the original and translated language for translation. Enable the “Proofread Video Script,” “Lip Sync,” and “Subtitle” options. After completing all these settings, click on the Translate the Video button.

Step 3: Finish the Video Translation After Proofreading Subtitles
Afterward, a new window with translated subtitles will appear on your screen. On this window, rectify any mistakes in the translated text. And you can also copy the original/translated video script. Finally, hit the “Translate Video” button to translate the video.

Translate Video Online Download APP Now Free Download
Conclusion
Boosting YouTube content and elevating your career as a content creator is now possible. Users canconvert YouTube videos into text using the above-mentioned tools. These tools are easy to employ and have multiple options other than this. An alternative tool to generate captions in multiple languages is Virbo.
It automatically adds captions and voiceovers to broaden the accessibility of your content. All in all, the tool is a good catch in the realm of these converters. We recommend you try this accurate and productive tool totranslate YouTube videos into text .
Translate Video Online Download APP Now Free Download
Essential Tools for Creating Dynamic Talking Avatars
Avatars have become crucial in many different industries in the last few years. Whether it is customer support or entertaining people, avatars connect businesses with their audience in a better way. As technology gets better, we’re witnessing a remarkable evolution in avatars.
Read this article to learn some freetalking avatar makers you can use. Also, we’ll explore the finest tool to use this innovative technology while joining in the fun for diverse purposes.
![]()
Part 1. Recommended: Finest Talking Avatar Creation With Wondershare Virbo
Wondershare Virbo stands out as an exceptional tool for creating talking avatars. It offers a comprehensive solution for crafting high-quality avatars on a single platform. The tool is versatile, showing compatibility with various devices and operating systems. This groundbreaking tool lets you bring your static photo into a dynamic storyteller.
Plus, it lets you add voice clips to your photos to make them interactive. Its talking feature adds emotion, explanation, or personalized messages to your visual content. Users can transform old pictures into captivating stories with personalized voice clips. With the support of a wide range of accents, you can create talking avatars that resonate with the global audience.
Highlighted Features of Wondershare Virbo
- The text-to-speech feature converts text into spoken language for smooth
- Users can elevate the mood and atmosphere with personalized background music within the Talking Photo feature.
- Its versatile AI avatars and clear audio quality ensure that your voiceovers are crisp and clear.
Pricing Plans
- Monthly Plan: $9.9
- Essential Yearly Plan: $19.9
- Pro Yearly Plan: $199
Step-by-Step Guide to Using the Talking Photo Feature in Wondershare Virbo
Wondershare Virbo ensures a seamless experience for its users in talking avatar creation. The process is as simple as it can customize your talking photos. Follow the below-mentioned detailed steps to use thisAI-speaking avatar creator :
Step 1. Download Virbo and Access Its Talking Photo Feature
Begin by downloading and installing this AItalking avatar maker on your devices. Afterward, launch the tool on your system and access its dashboard. Click the “Talking Photo” button among the available options here.
![]()
Get Started Online Free Download
Step 2. Select AI Avatar or Import Your Photo
A mini window will pop up on the screen, allowing you to select from preset images. You can also import the picture by browsing your system. Once you’ve selected, you’ll be directed toward a new window.
![]()
Step 3. Generate Script Using AI
Head to the bottom left in the upcoming window and hit the “AI Script” icon. Type the script in the text box and optimize it with AI features. Afterward, press the “Apply” button from the right bottom to use it for talking avatar.
![]()
Step 4. Make Adjustments in Language and Gender
After creating a script, it is time to customize its language. Tap on the “Language” button, which opens a pop-up window. Clicking on the “Language” dropdown menu allows you to choose your preferred language. You can opt for either male or female by choosing the “Gender” dropdown menu. Later, click on the “OK” button to proceed with the process.
![]()
Step 5. Modify the Voiceover Characteristics and Export the Video
Next, personalize the qualities of voiceover under the language section. Here, you can modify the “Speed,” “Pitch,” and “Volume” as needed. You can preview the video you’ve customized by tapping on the “Play” icon. Finally, navigate toward the top left corner of the window and press the “Export” button to save it.
![]()
Pricing Plans
- Monthly Plan: $9.9
- Essential Yearly Plan: $19.9
- Pro Yearly Plan: $199
Part 2. Alternatives: Other Talking Avatar Creator Tools for Enhanced Content
Previously, we have discussed the best tool to generate talking AI avatars. However, if you want to try out some alternatives to Wondershare Virbo, we have a solution. For this purpose, we’ve enlisted some othertalking avatar creators to help you in getting results to your satisfaction:
1.Akool
Akool is a comprehensive generative AI platform available for creators and innovators. Its intuitive features allow users to materialize ideas quickly for diverse marketing and advertising needs. You can upload JPEG and PNG images of less than 30MB for each picture on the tool. Plus, the picture should be clear as it does not detect blurry, overexposure, and side faces.
![]()
Pros
- With film-level quality outputs, it ensures high-quality visuals and videos.
- Thetalking avatar creator achieves up to 8k resolution for pictures and 4k.
Cons
- One problem is that talking avatars can’t sound entirely natural yet.
Pricing Plans
- Professional Plan: $30 per month (600 credits)
- Studio Plan: $500 per month (12000 credits)
Steps To Create Talking Avatars With Akool
As discussed before, Akool lets its users customize their talking avatars. Let’s discuss the steps tocreate a talking avatar online for free using this tool:
Step 1. Get the online tool through your preferred web browser and open its homepage. Now, hover over the “Platform” dropdown menu and select the “Talking Photo” feature.
![]()
Step 2. Within the upcoming window, click the “Choose File” button from the center to upload the image. Also, you can choose an example offered by the tool. After making a selection, you can also revert changes.
![]()
Step 3. After uploading the picture, head to the “Text” section on the right side and type in the script. Then, under the “Voice” section, make adjustments in gender, language, and speed. Later, preview your generated talking avatar and tap the “Results” at the top right. Finally, the tool will process it and provide you with the final results.
![]()
2.Yepic AI
If you also want to createan AI talking avatar , Yepic AI is your go-to preference. You can create a lifelike digital version of yourself with just a headshot. Users can uniquely present their videos by choosing from over 40 preset avatars. It boasts many actors, languages, and voices, with over 450 options available to personalize your avatar.
![]()
Pros
- The tool personalizes every aspect of your videos, from backgrounds and transitions to actors and voices.
- You can scale and localize your content across different countries, languages, and accents.
Cons
- It offers only 20 video credits per month, and one credit equals a 60s video, limiting extensive use.
Pricing Plans
- Consumer Plan: £5.75 /month
- Standard Plan: £24.16/month
- Plus Plan: £65.83/month
- Premium Plan: £415.83/month
- Infinite Plan: £665.83/month
Steps To Create Talking Avatars with Yepic AI
Users can utilize the capabilities of this tool to create talking avatars seamlessly. Here are the steps to carry out the process of makingAI-speaking avatars to engage viewers.
Step 1. To start the process, tap the “Get Started” button on the main website page and access the editing window. The tool lets you choose avatars or talking photos within this editing interface.
Step 2. Afterward, in the text box, type your script and hit the “Listen” button. Alternatively, you can upload your voiceover to the tool to make it personalized.
Step 3. Upon uploading the voiceover, select the voice and the desired language for your written words. Then, select the desired background and add shapes to modify the outlook of your talking avatar. Finally, preview the video and download it to share with others.
3.Speechify
Speechify Studio serves as the premier AI Video and AI Voice Platform. This site empowers anyone to create professional videos in just one minute, with no skills required. You can quickly produce captivating content using AI-generated talking faces. It lets youcreate a talking avatar online for free to save your valuable resources and time.
![]()
Pros
- Speechify Studio offers a user-friendly interface that makes video production quick and effortless.
- Users can combine high-quality text-to-speech synthesis with lifelike avatars for an interactive audiovisual experience.
Cons
- The narration of this tool lacks human-like empathy and emotions.
Pricing Plans
Talk to the sales team.
Steps To Create Talking Avatars with Speechify
With Speechify’s intuitive interface, you can easily perform various tasks. In the following section, you’re given the simple steps to create anAI talking avatar using this online tool.
Step 1. First, access the “AI-Generated Talking Face” page from the main interface of Speechify. Proceed by hitting the “Try for Free” button and log in using a Google account. After entering the editing interface, press “Create AI Avatar,” which leads you to a new window.
![]()
Step 2. Now, opt for the desired avatar from a vast library. Upon selecting this avatar, it will appear on the right side of the editing window. Afterward, you can adjust “Avatar Style” and the “Layout” settings.
![]()
Import your script from a media file or paste a URL from YouTube. Afterward, choose the voiceover among the available options and preview the video. Once satisfied, tap the “Export” button at the top right to download this from this tool.
![]()
4.HitPaw Online AI Face Animator
This online AI face animator is an easy-to-use AI-based tool that brings your still images to life with animated faces. You can choose from various funny templates to animate your photos with a simple upload and a click. It allows you to add humor and personality to your images. The tool supports JPG, PNG, JPEG, and WEBP formats for pictures and animates them with customization.
![]()
Pros
- Users can animate various photos, from individual portraits to group shots, with many templates available.
- It emphasizes safety and security and ensures your photos are protected.
Cons
- Weekly Plan: $0.57/Day
- Monthly Plan: $0.27/Day
- Yearly Plan: $0.13/Day
Steps To Create Talking Avatars With HitPaw Online AI Face Animator
HitPaw Online is another onlinetalking avatar maker with a straightforward approach. The following are the steps to animate a photo using this online tool:
Step 1. Visit the tool’s official website and access the main user interface. You can place your cursor over the “Photo AI” dropdown menu and click “AI Face Animator.”
![]()
Step 2. Next, hit the “Upload Image” button from the left side. This action will move you to the main editing window to create talking avatars.
![]()
Step 3. Select the “Drag and drop or click to upload image” option from the left panel in the new window. Under the “Choose a Template” section, select the category of style and expression for your uploaded photo. Then, press the “Animate” button at the bottom. Now, you can see your animated image in the middle of the screen after processing.
![]()
Step 4. Once satisfied with the results, download it on your system. You can save it with the HitPaw logo or as a GIF for fun.
Image name: best-tools-for-creating-talking-avatars-20.jpg
Image alt: download final product from hitpaw
![]()
Conclusion
We conclude that there are variousspeaking avatar creator platforms with different features. These tools make it easy to create avatars that talk to use for different functions. However, the one that stands out among these options is Wondershare Virbo. You can customize your avatars in just a few clicks on different devices.
Get Started Online Free Download
Also read:
- Updated How To Use CapCut Translate to Transform Video Content
- Updated In 2024, Best 4 Ways of Instagram Video Promotion
- New In 2024, New Essential Details of Making Perfect Talking Face
- Updated 2024 Approved Create AI Avatar Video
- New 2024 Approved AI Video Translator | Online
- Create Videos with an AI Script Generator
- New Best AI YouTube Script Writers and The Ultimate Guide for 2024
- New Top List Best Livestream Shopping Apps Of for 2024
- New In 2024, Launching Your Live Room
- Top 7 Video Language Converter Online Free for 2024
- In 2024, A Comprehensive Guide for Free Video Translator Downloading
- Updated How To Make Talking Emoji on iPhone in Easy Steps for 2024
- What Is AI Advertising? | Wondershare Virbo Glossary
- Create AI Avatar Video with Template | Wondershare Virbo
- Updated How To Auto Translate YouTube Videos Into Different Languages for 2024
- New Latest Top Darth Vader Voice Generators for All Platforms for 2024
- New In 2024, How To Get More NFL Viewers For Your Sports Live Streaming Channel
- New Create AI Avatar Videos | Wondershare Virbo for 2024
- New In 2024, Best AI Rap Voice Generators You Should Try
- 2024 Approved The Best AI Video Makers From Photos to Create Captivating Videos with Pictures
- New In 2024, How to Make a Talking AI Avatar From Photos Easy Guide
- New Best 10 Free AI Video Generators with Innovative/Advanced Algorithms for 2024
- Updated Make Your Pictures Speak Online With the Best Tools Recommended for 2024
- Top 6 Mickey Mouse Voice Generators Providing Efficient Results for 2024
- Updated The Guide to Learning All the Details About Voice Cloning
- New In 2024, AI Script Feature
- What Is an AI Headshot Generator for 2024
- New 5 Tips About YouTube Shorts to Grow Your Business for 2024
- In 2024, Template | Wondershare Virbo
- In 2024, Must-Have Apps for Real-Time Video Translation
- In 2024, How to Track a Lost Xiaomi Redmi 13C 5G for Free? | Dr.fone
- Top 12 Prominent Realme Narzo N53 Fingerprint Not Working Solutions
- In 2024, 9 Mind-Blowing Tricks to Hatch Eggs in Pokemon Go Without Walking On Vivo Y78 5G | Dr.fone
- In 2024, The Top 5 Android Apps That Use Fingerprint Sensor to Lock Your Apps On Samsung Galaxy F34 5G
- How to Digitally Sign .dot file online free - (Tutorial)
- Best Ways on How to Unlock/Bypass/Swipe/Remove Lava Blaze 2 5G Fingerprint Lock
- Overview of the Best Asus ROG Phone 8 Screen Mirroring App | Dr.fone
- Top 12 Prominent Xiaomi Civi 3 Fingerprint Not Working Solutions
- How to Recover Apple iPhone 6s Plus Data From iOS iCloud? | Dr.fone
- How to Transfer Photos from Nokia 105 Classic to Laptop Without USB | Dr.fone
- In 2024, Is GSM Flasher ADB Legit? Full Review To Bypass Your Oppo A1x 5GFRP Lock
- Is GSM Flasher ADB Legit? Full Review To Bypass Your Infinix Hot 30i Phone FRP Lock
- How to Unlock Samsung Galaxy A54 5G Pattern Lock if Forgotten? 6 Ways
- In 2024, 5 Ways to Transfer Music from Poco C50 to Other Android Devices Easily | Dr.fone
- In 2024, Turning Off Two Factor Authentication On iPhone 7? 5 Tips You Must Know
- Remove Google FRP Lock on Zero 30 5G
- Still Using Pattern Locks with Poco F5 5G? Tips, Tricks and Helpful Advice
- Bypass/Reset P60 Phone Screen Passcode/Pattern/Pin
- In 2024, The Magnificent Art of Pokemon Go Streaming On Vivo Y78+ (T1) Edition? | Dr.fone
- Title: Updated In 2024, A Guide on Starting Private Live Streams on YouTube
- Author: Sam
- Created at : 2024-05-19 03:35:11
- Updated at : 2024-05-20 03:35:11
- Link: https://ai-voice-clone.techidaily.com/updated-in-2024-a-guide-on-starting-private-live-streams-on-youtube/
- License: This work is licensed under CC BY-NC-SA 4.0.
