
:max_bytes(150000):strip_icc():format(webp)/GettyImages-944229088-5bd1f61e46e0fb0026fdf2f0.jpg)
Updated 2024 Approved How to Make Lip Sync Video Without Installing Any App
How to Make Lip Sync Video Without Installing Any App
TikTok has transformed the social media landscape through its short-form video content. They encourage users to make creative content using popular audio clips. Which enables them to entertain, gain recognition, and contribute to the platform.
Lip-syncing is a big part of what makes TikTok popular. Many users post lip-syncing videos that imitate voices from songs, movies, or trending audio clips. This art of lip-syncing has become an essential element of TikTok’s culture. Now, you might wonder**how to lip-sync on TikTok videos. This article will teach us how to make it effortlessly.
Part 1. Why Do People Lip Sync on TikTok?
Lip-syncing involves mimicking the words or vocals of an existing audio track. TikTok users take this concept to new heights by lip-syncing popular songs or clips. Lip-sync is appealing because it lets people get creative and reach a large audience.
Here are a few reasons why people engage in**lip sync TikTok :
- Self-expression: Lip-sync allows users to embody their favorite artists or characters by showcasing their personality and creativity.
- Entertainment: Many users lip-sync to entertain followers. They offer comedic performances, heartfelt renditions, or engaging storytelling.
- Virality: TikTok’s algorithm favors engaging content and well-executed lip-sync videos. They have the potential to go viral, rapidly gaining likes, shares, and followers.
Part 2. How to Make Lip Sync Video on TikTok
Here’s the step-by-step guide on how to lip sync on TikTok and captive your followers:
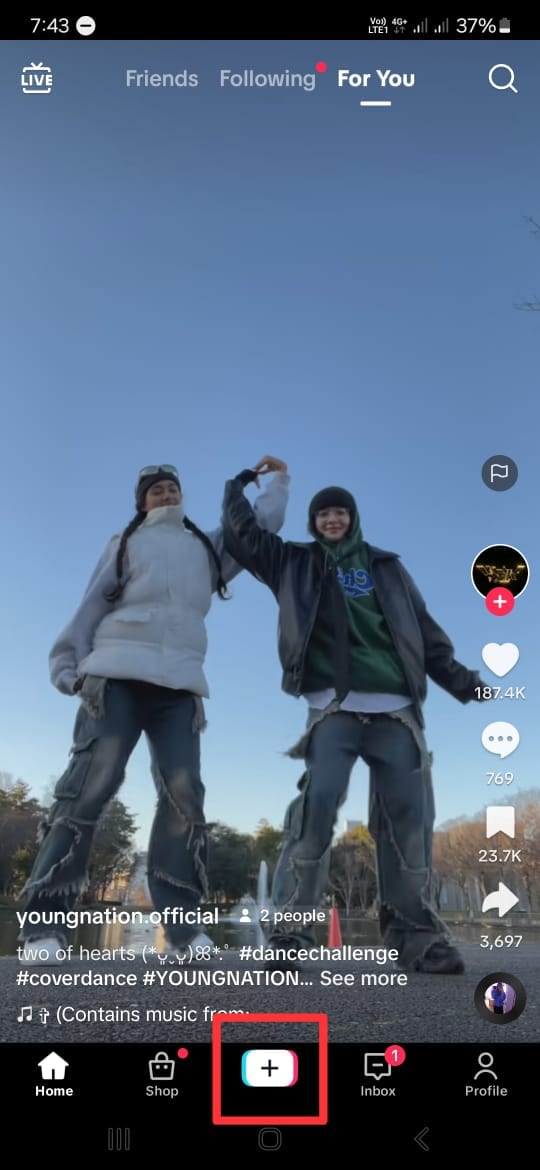
- Step 1. Open the TikTok app and tap the “+” button.
Start with opening the TikTok app on your phone. Then, tap the “+” button at the bottom of your screen to make a new video.
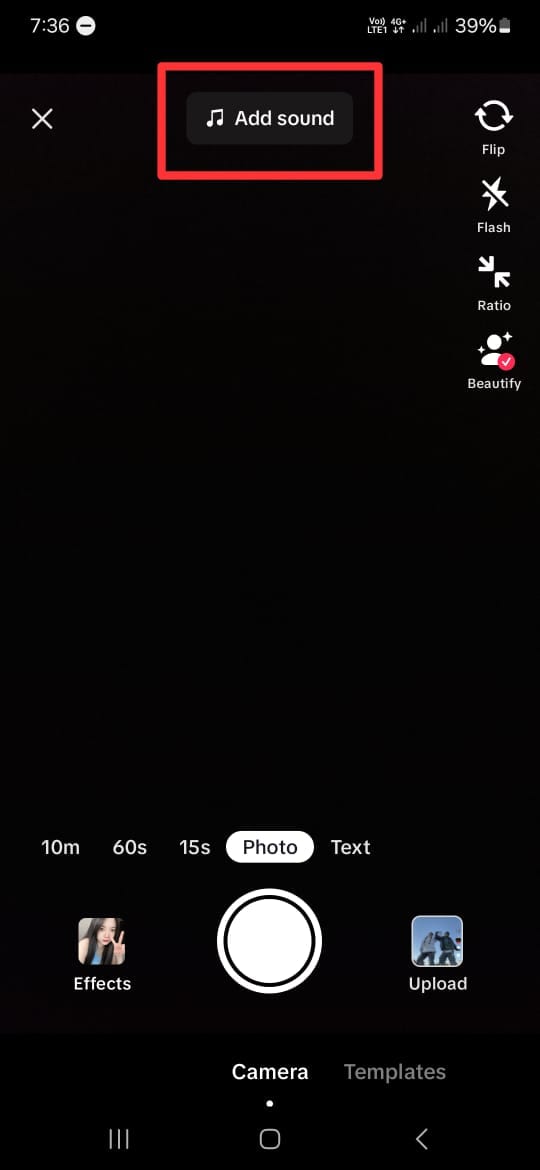
- Step 2. Add a song that you want to lip-sync to.
Next, click “Add Sound” with the musical note icon at the top of the screen. If you have a specific song in mind, you can find it by searching it on the search tab. Then, tap the song and click the check icon beside it.
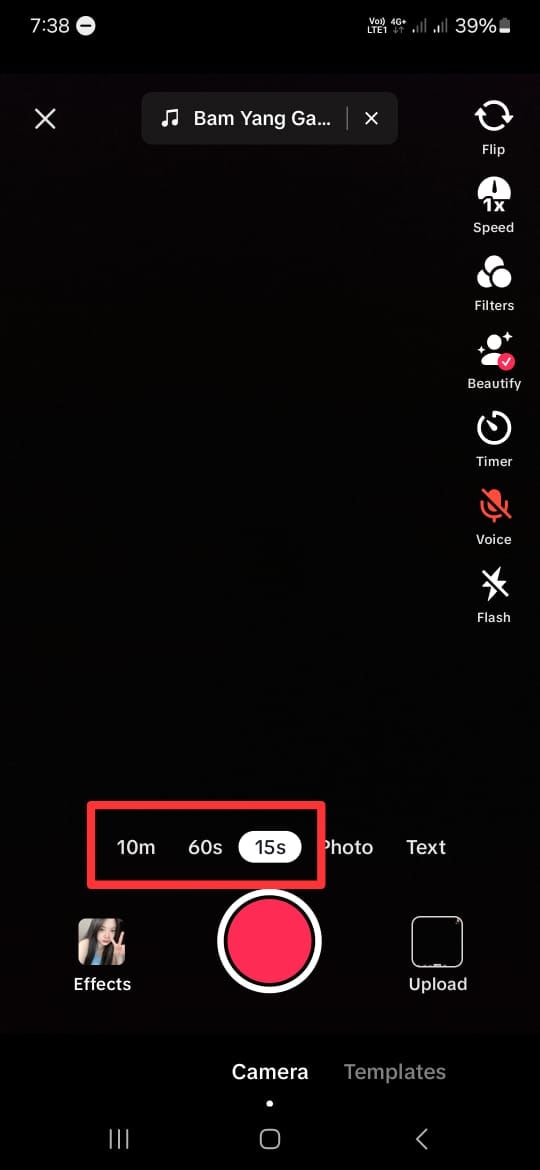
- Step 3. Choose the duration and the part of the song.
After choosing the song you want, you will return to the recording screen. Here, select your video duration at the bottom of the screen. You can choose between 10 minutes, 60 seconds, and 15 seconds. Remember that the duration of the songs on TikTok is usually only 30 to 60 seconds.
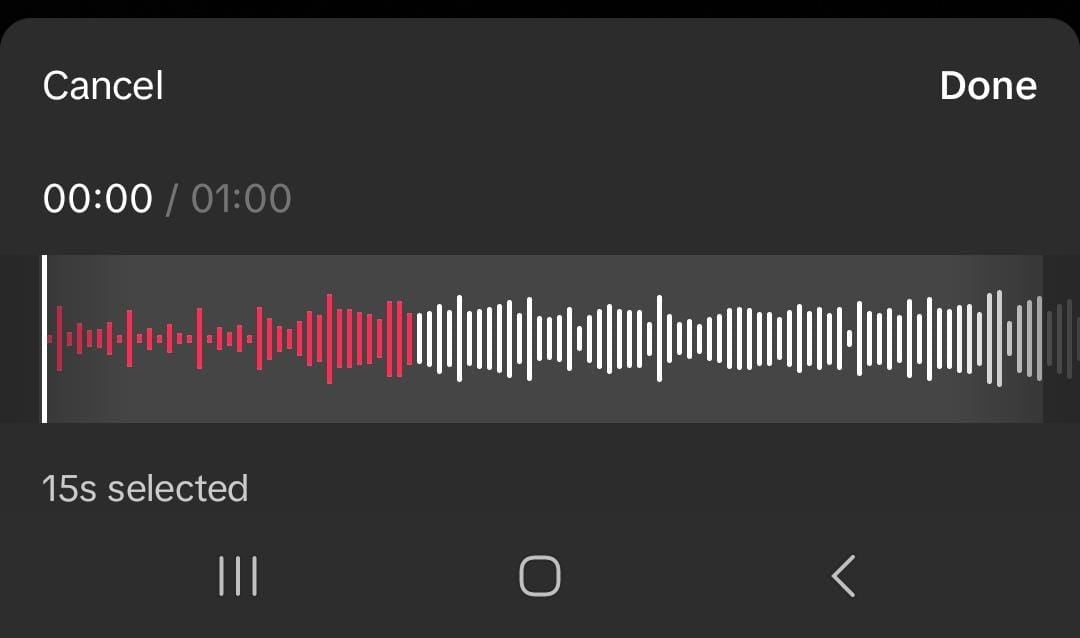
- Step 4. Choose the part of the song.
TikTok allows you to change the part of the song when lip-sync. However, the duration of the video should be less than the duration of the chosen song.
To do this, click on the song’s name at the top of your screen. Then, the bottom of your screen will display your chosen song. Tap the scissor icon and slide the playback to change the part of the song. Click “Done” once you have finished editing.
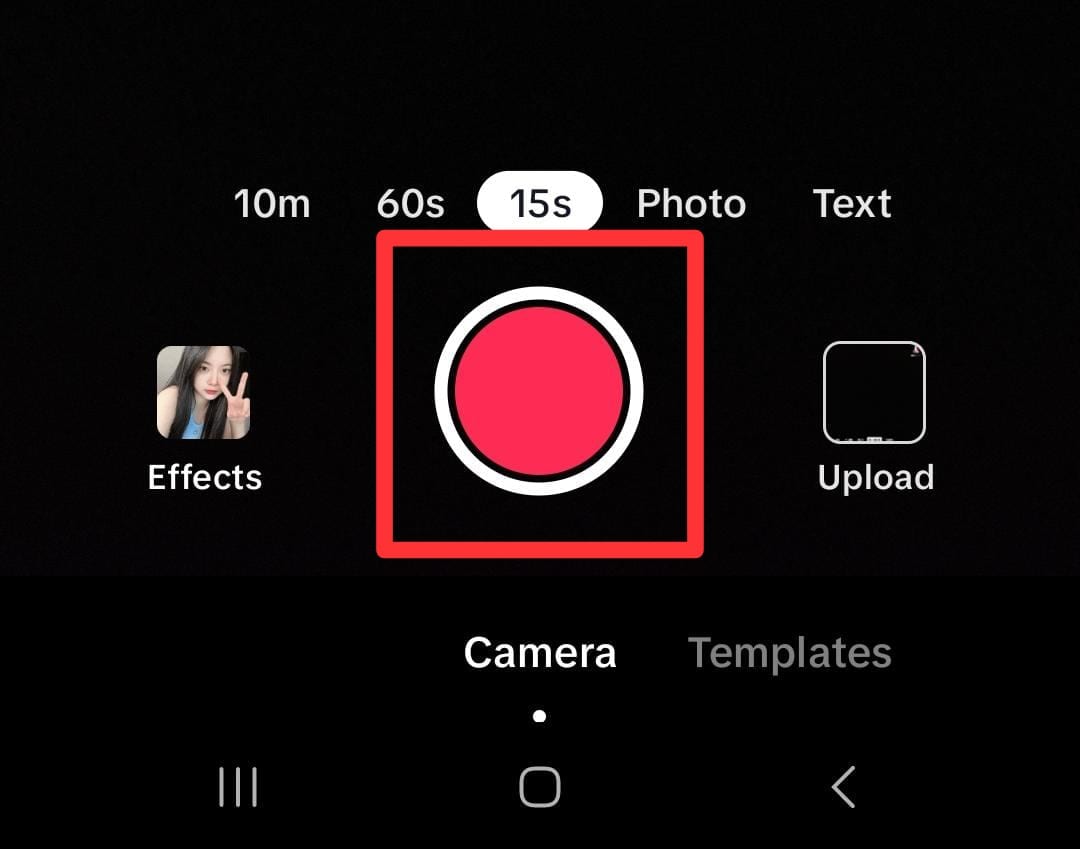
- Step 5. Tap on the red button.
If you are ready to record, tap the red button at the bottom of your screen. Then TikTok will play the chosen part of the song and record your lip-sync simultaneously. You can pause and continue the recording by clicking the same red button.
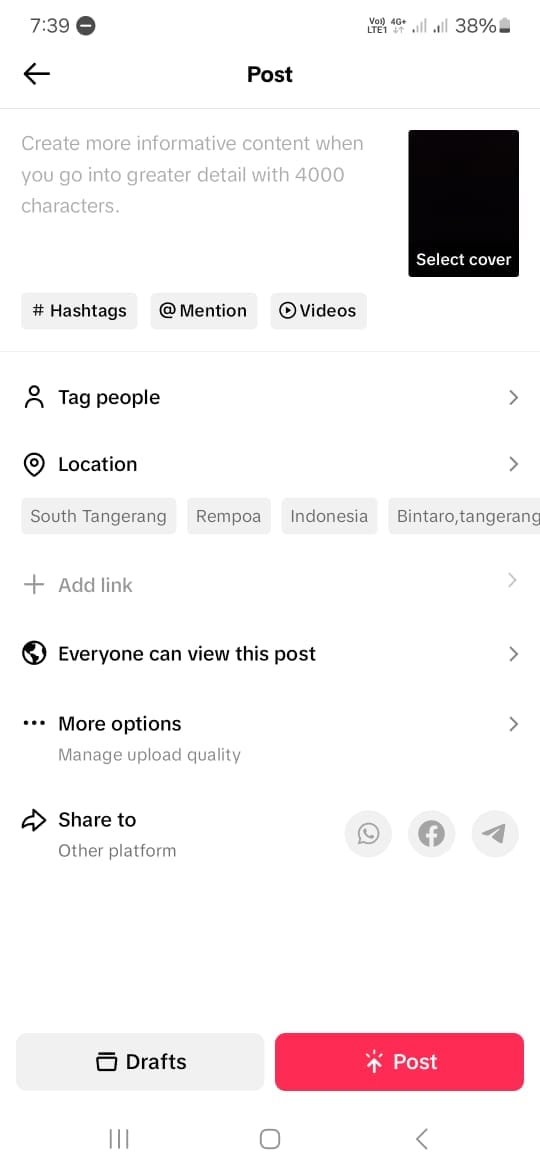
- Step 6. Post the video.
If you are satisfied with the results of your edits, click Next to proceed to the posting stage. Here, you can write a description and any other information you want. Click Post to share your lip-sync video to TikTok.
Creating a video on TikTok by lip-syncing is a fun and creative way to express yourself and connect with others. By following the steps above, you can create a lip-sync video on the TikTok app with ease. Keep in mind that by using these steps, you need to memorize the sentences and understand the beat of the chosen songs.
Part 3. How to Make Lip Sync Video Without Memorizing the Words
Making a**TikTok lip-sync video can be challenging because you must remember and match the words with the music. But there are three simple methods to make it easier.
Method 1: Record at slower speed
You can slow the speed down while recording instead of trying to keep up with the song. This technique lets you hear, understand, and follow the words more easily.
Here’s how to slow down the recording:
- Step 1. Follow steps 1 to 4 from the step-by-step guide in Part 2.
Start by following the first to fourth steps from the guide in Part 2 above.
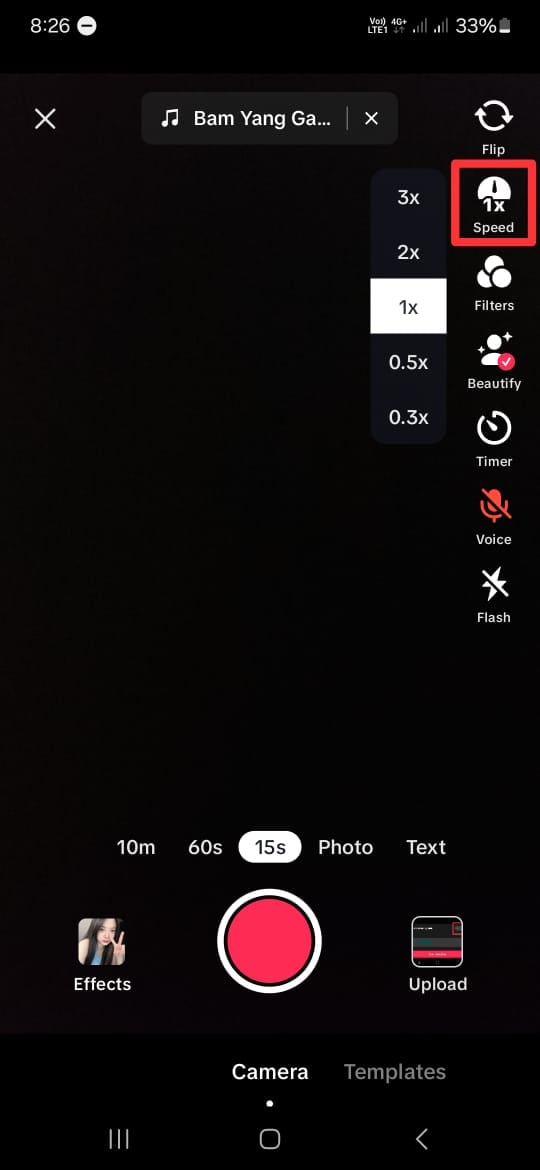
- Step 2. Set the speed record slower.
On the recording screen, click on the Speed icon on the right side of the screen. To make it slower, choose 2x or 3x. This step will make your recording time 2 or 3 times longer than it should be.
- Step 3. Tap on the red button.
Once you tap the red button, TikTok will play the song slower and record your lip-sync simultaneously. Repeat this step to help you memorize the lyrics and the beat of the songs.
Once you’re comfortable, switch back to normal speed for the final recording. This method will save time and improve accuracy.
Method 2: Purposely delay mouthing the words
While lip-syncing videos may vary in style and pacing, this technique can prove particularly useful for slower rhythms. Moreover, mastering the art of mouth sync on TikTok can elevate the overall production value of lip-syncing videos.
Using the timer feature will give you a slight lag between lip movements and audio playback. Then, it lets creators ensure more precise synchronization during editing. Here’s how to lip-sync on TikTok more easily:
- Step 1. Follow steps 1 to step 4 from the step-by-step guide in Part 2.
Like Method 1, you can start by following the first to fourth steps from the guide in Part 2 above.
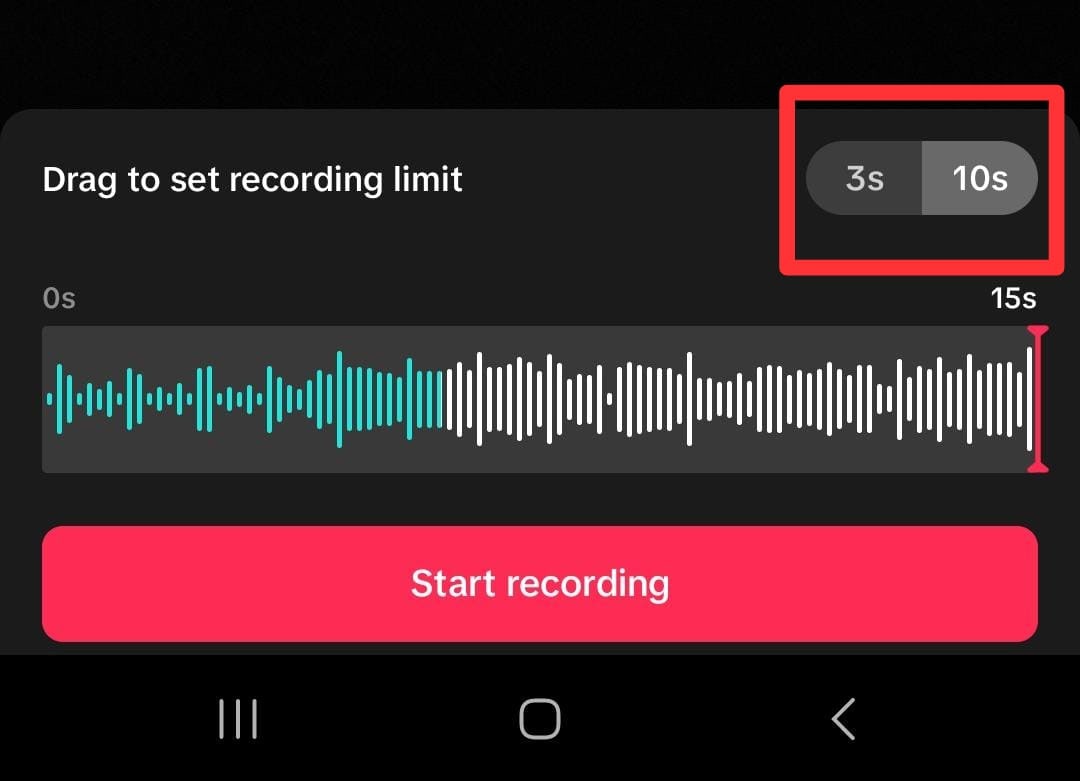
- Step 2. Delay the recording
On the recording screen, click on the Timer icon on the right side of the screen. Here, you can set the timer to 3 to 10 seconds to delay the recording’s start. You can also drag and set the recording limit if you want.
- Step 3. Start the recording
Then click “Start recording” to record the video with the timer on.
Method 3: Use a Photo Talking Tool
Next, consider using a Talking Photo feature by Wondershare Virbo. This method is for you who want to create engaging TikTok lip-sync videos without memorizing the words.
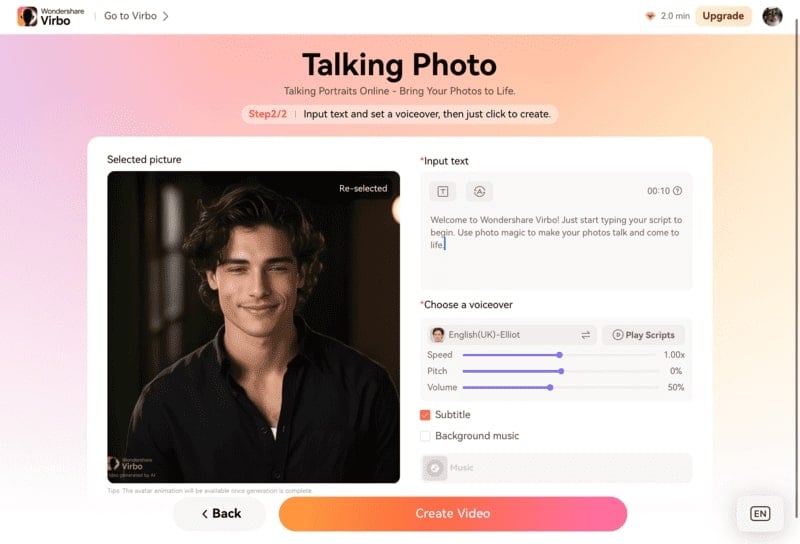
Virbo’s Talking Photo feature tool lets you upload a portrait of your photo and then make it appear as though it is speaking along with the audio. You do not have to install the app because you can use this feature online on their official website.
Here’s how to use Wondershare Virbo - Photo Talking feature to create a TikTok lip-sync video:
- Step 1. Start a new project.
Open the Wondershare Virbo website and tap the talking photo function to start a new project.
Get Started Online Free Download
- Step 2. Upload a portrait.
Tap “Upload Photo”, then upload a picture you want to use by following the instructions.
- Step 3. Edit and export.
Insert the text and adjust the voice settings. If you want to insert your own audio, you can use Wondershare Virbo for mobile or Desktop to upload or record your audio. Then, tap “Generate Video” to export.
Now, you have successfully made your own TikTok lip-sync video. You can upload it to TikTok and share it with your followers. For more detailed instructions, you can see how to useVirbo’s Photo Talking tool .
Part 4: How To Lipsync Your Video to Any Language Using AI Video Translator
In today’s globalized world, reaching audiences in different languages is important for effective communication. Thanks to technological advancements, there is a tool that can help you translate video content.
Wondershare Virbo – Video Translator offers seamless solutions to translate video content into various languages with AI. Virbo ensures high-quality translations that maintain the integrity and impact of your original message.
How to lipsync TikTok videos to any language with Wondershare Virbo - Video Translator:
- Step 1. Go to Virbo’sofficial website , then click Generate AI Video Online.

Get Started Online Free Download
- Step 2. Log in or create an account.

- Step 3. Then, navigate to the Video Translator tool on the Virbo’s homepage.
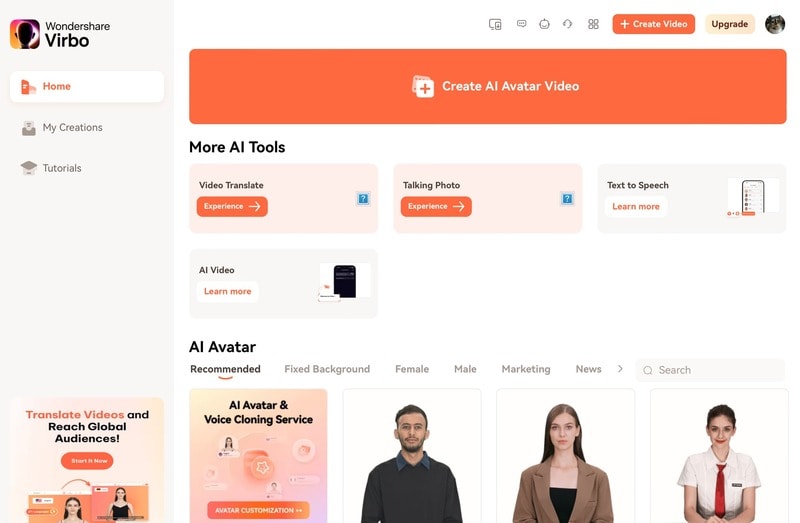
- Step 4. Upload the video.
Once inside the Video Translator interface, upload the video file you wish to translate. Select the original video language and the preferred target language from the available options. Additionally, enable the Lip Sync feature to ensure that the translated audio aligns perfectly with the lip movements in the video.
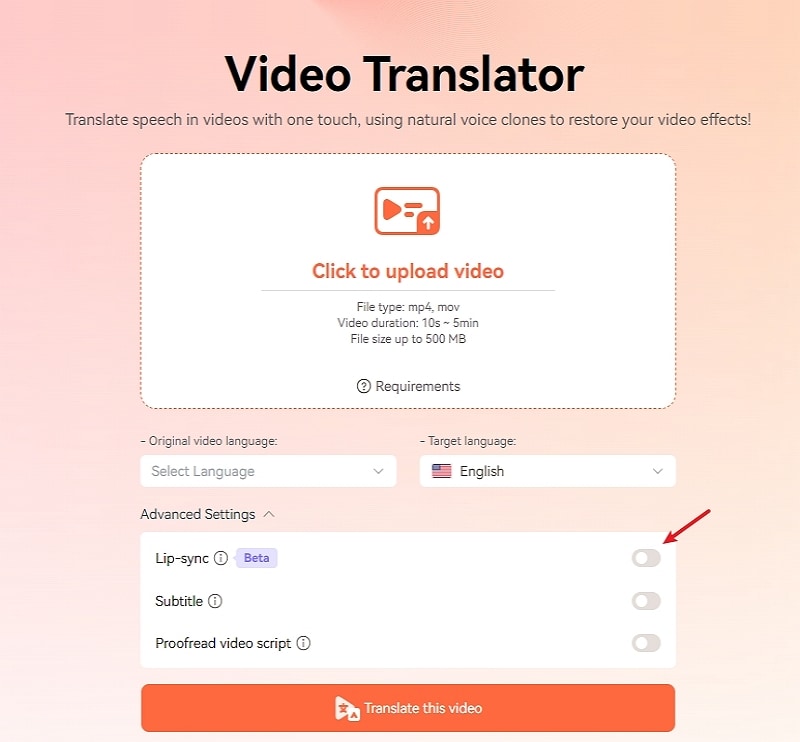
- Step 5. Click “Translate this video” to start translating the video.
Virbo’s Video Translator will use its advanced algorithms to translate the audio and synchronize it with the video seamlessly. Depending on the length and complexity of the video, the translation process may take some time.
Conclusion
Lip-syncing on TikTok has become a significant aspect of TikTok culture. It helps users show their creativity, entertain people, and maybe even become famous. Making**mouth sync TikTok videos usually means remembering lines and matching them to music, but there’s an easier way with Wondershare Virbo’s Talking Photo tool. This tool allows you to upload a portrait and sync it with audio without remembering the lines.
Also, Wondershare Virbo has a Video Translator tool that allows you to translate videos seamlessly into any language. This translator tool helps you communicate with people worldwide and maintain the original message.
Create Video With PPT
Create Video With PPT
Wondershare Virbo is a comprehensive video-making facility offering a wide set of possibilities to its users. It has recently extended its productivity by offering the option of creating videos out of PPT. With such diverse options to convert PowerPoint to video, you can develop the best visuals for your audience from the available content. Following is a comprehensive step-by-step guide to converting PPT to video with Virbo.
02Add Avatars and Voiceover To the PPT Video
03Perform Other Edits to Video
04Preview And Export Final PPT Video From Virbo
Step 1. Start By Importing Your PPT File
After launching Wondershare Virbo on your desktop, continue to select the “Create Video“ button. As this opens a pop-up, select the “Import PPT“ option on the bottom-left to add your PowerPoint file.
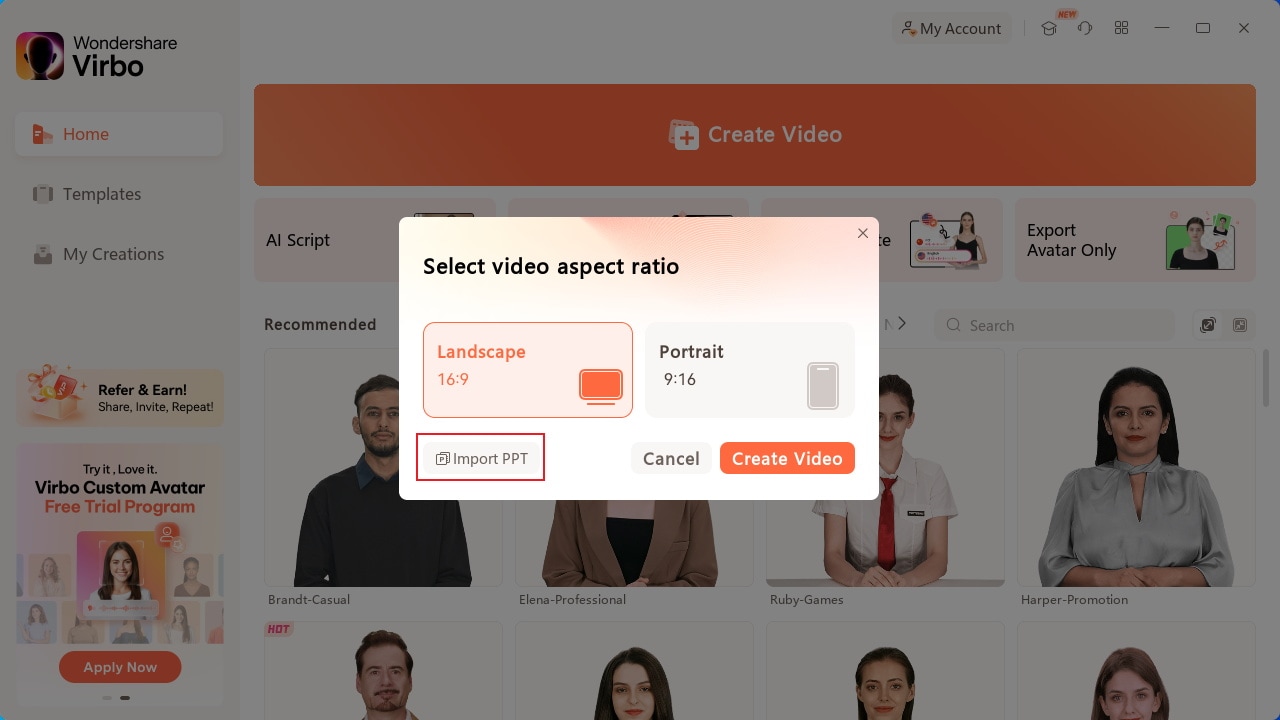
Choose Import PPT
Step 2. Add Avatars and Voiceover To the PPT Video
As you’ve imported your PPT file successfully, define whether you want to extract your script from the file or not. Click “Create Video” to redirect to the next window, which outlines the PowerPoint file as a video.
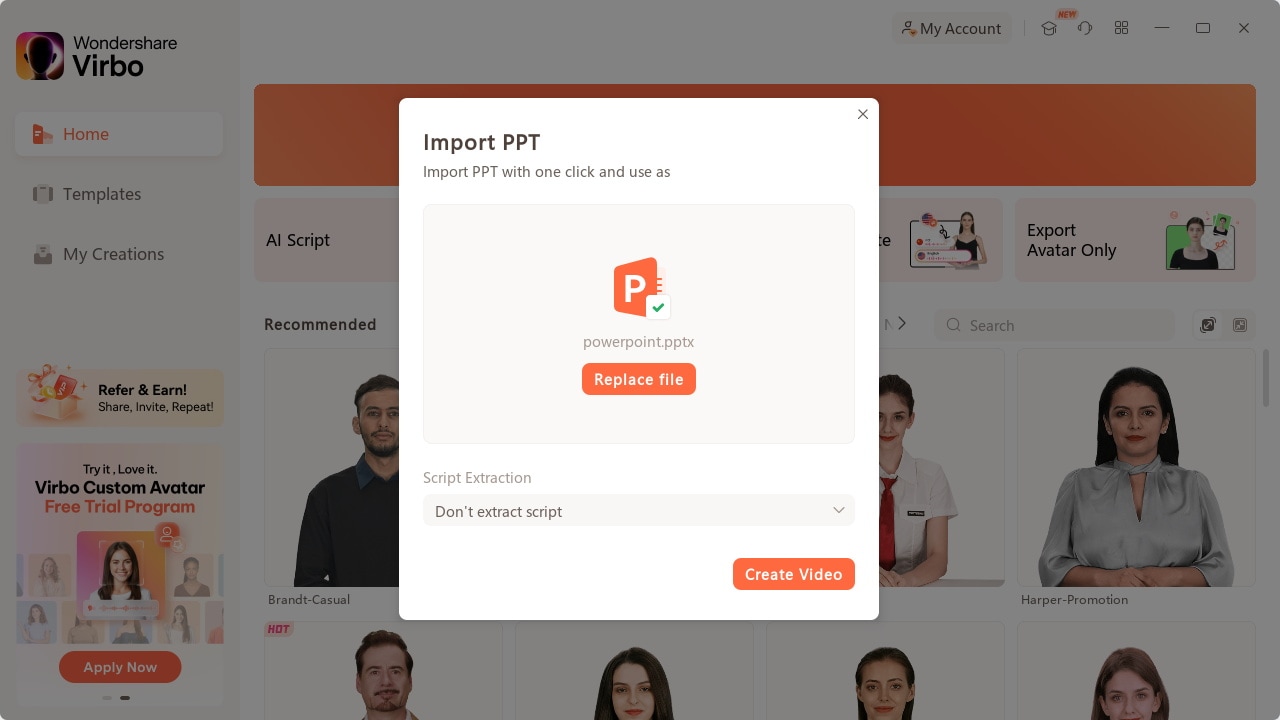
Import PPT
Here, you need to define a proper avatar according to your video, which can be done using the “Avatars“ button on the top toolbar.
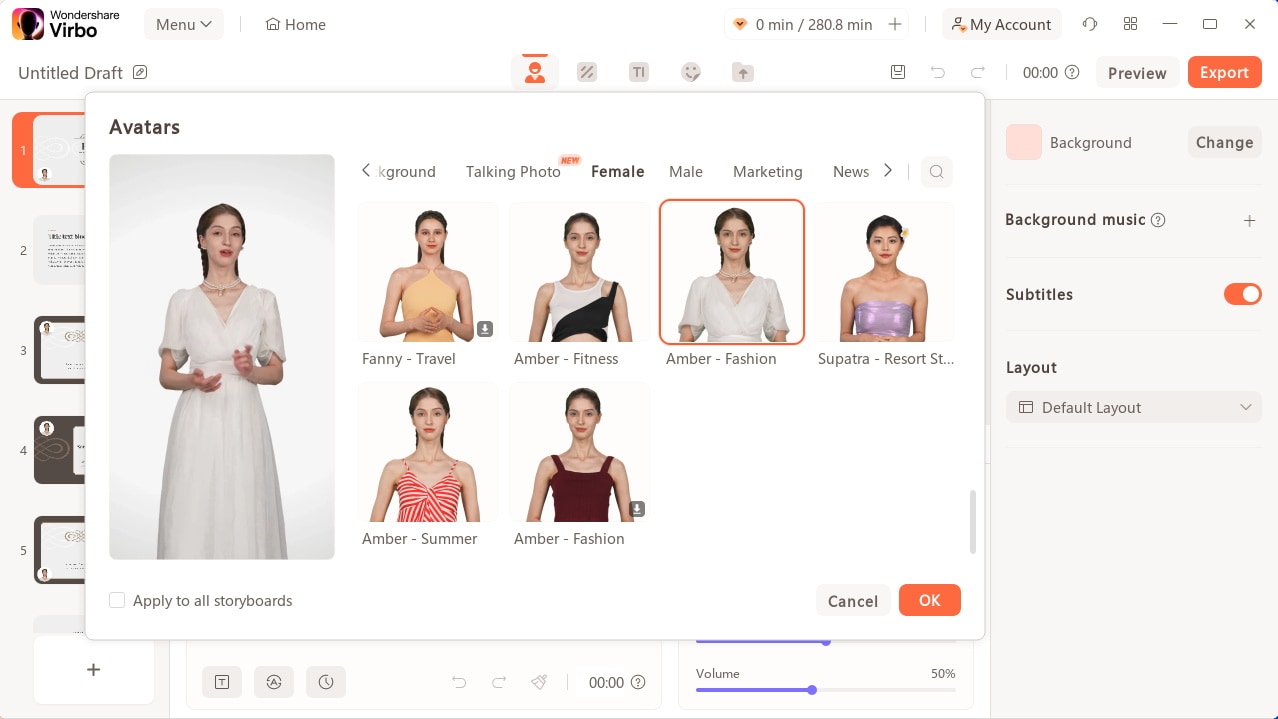
Select Avatars
Consequently, you need to add a proper voiceover that will assist you in explaining the PowerPoint file within the video. For that, lead to the “Text Script” or “Audio Upload” section to add the appropriate voiceover. Define your voice from the available list and set its parameters, or upload your pre-recorded voice to add along with the avatar.
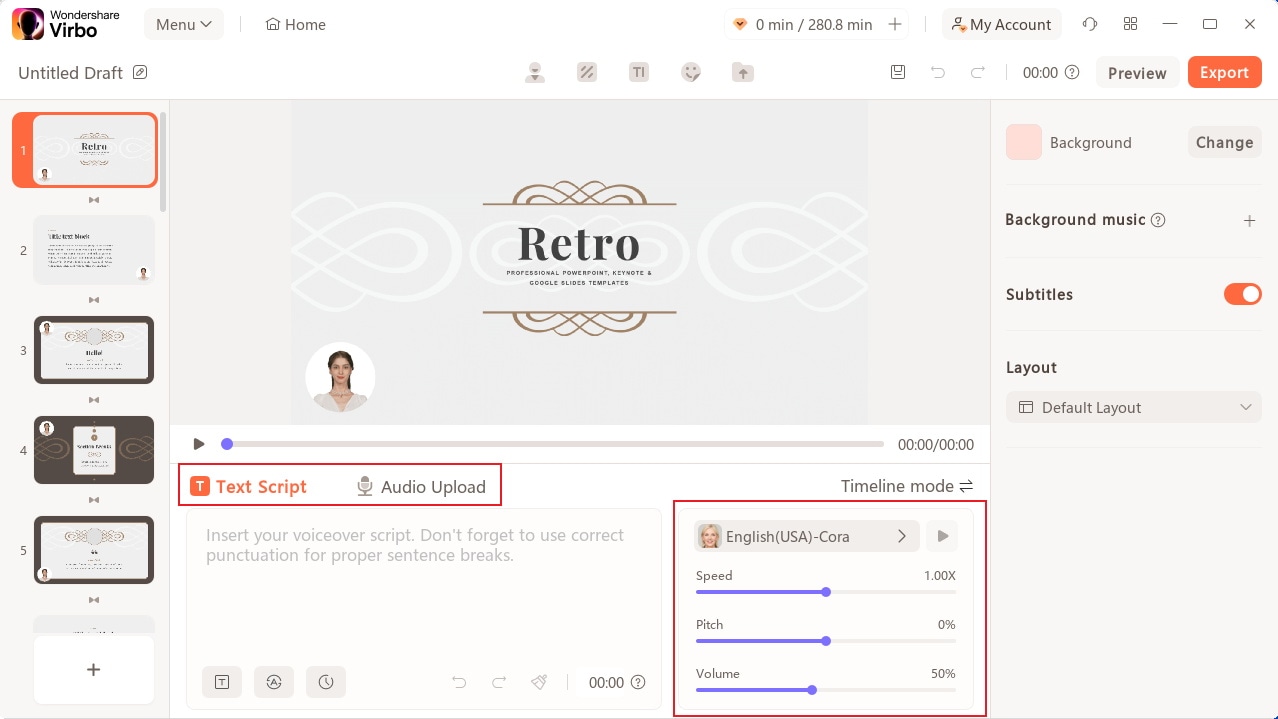
Add Voiceover
Step 3. Perform Other Edits to Video
After selecting the avatar and voiceover for the video, you can perform other edits as well. Change the background of the video or add music in the background according to your choice. If you want to display the subtitles across the video, enable the “Subtitle“ option. Furthermore, for more advanced settings in your video, you can define a proper “Layout“ or add stickers and edit text style on the top toolbar.
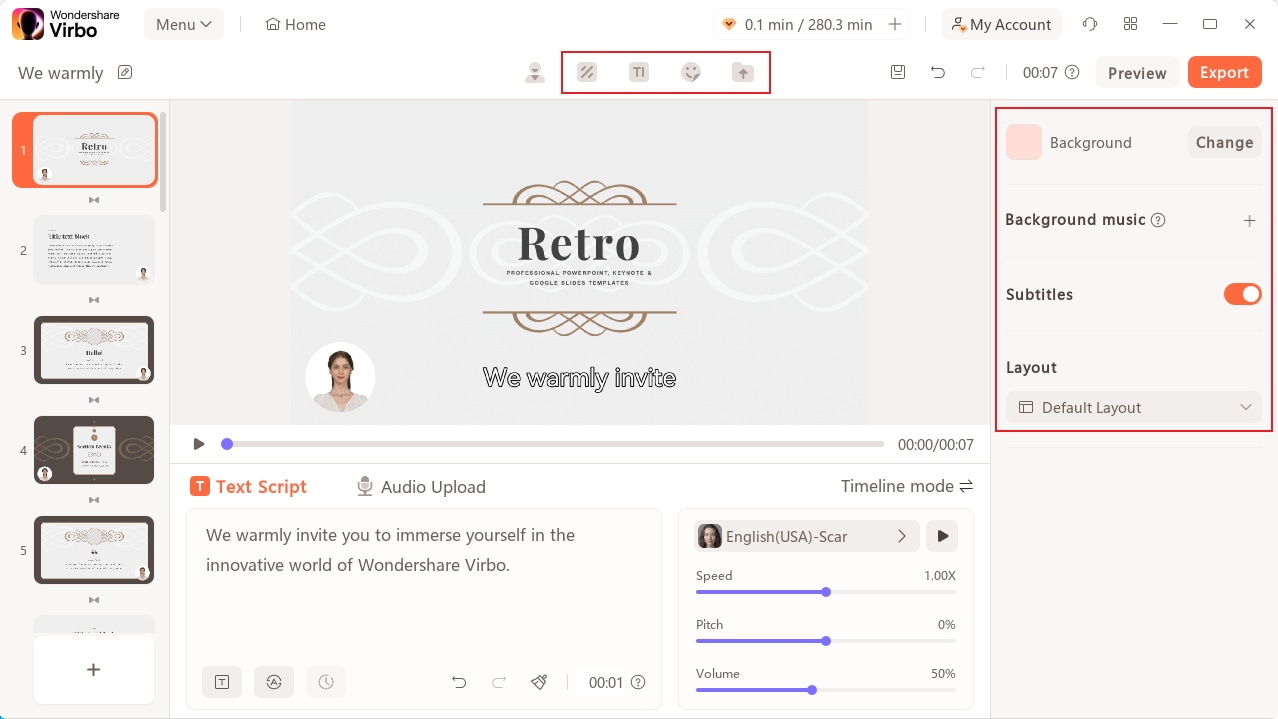
Edit Video
Step 4. Preview And Export Final PPT Video From Virbo
Once you finish all the edits, click the “Preview“ button on the top right corner to preview the video.
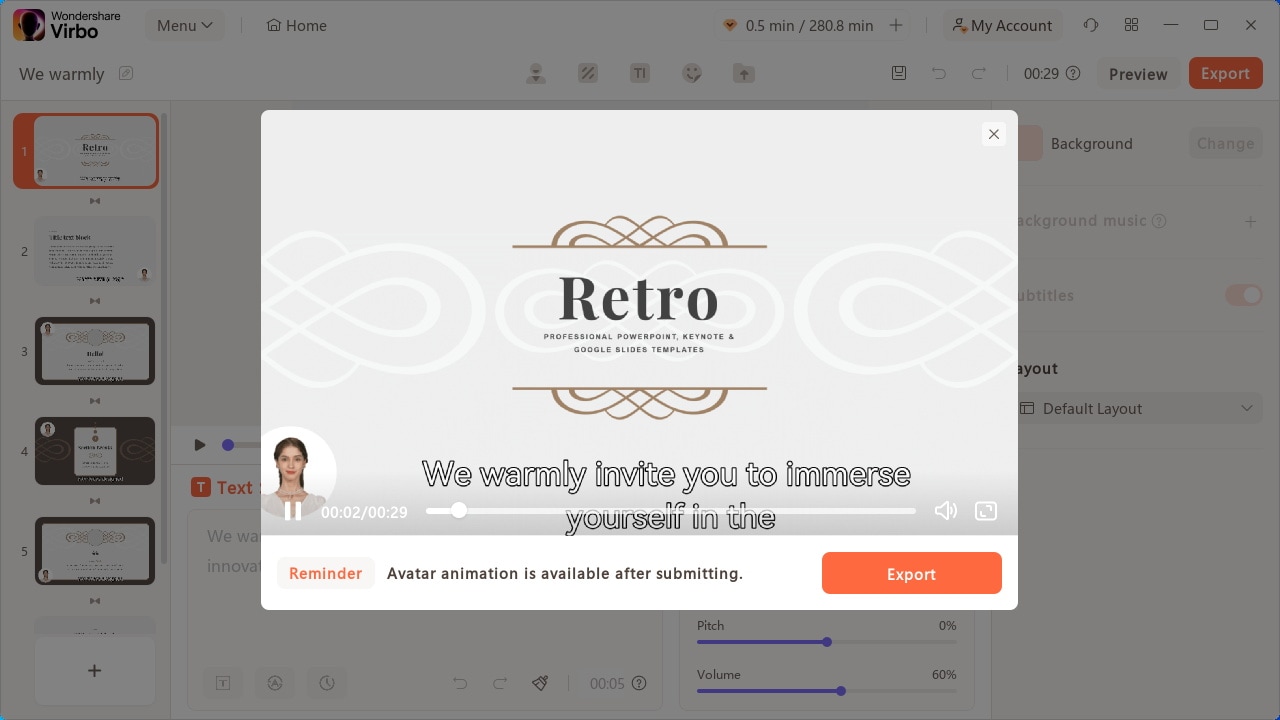
Preview Video
If you are satisfied with the video after previewing, click the “Export“ button to save this video.
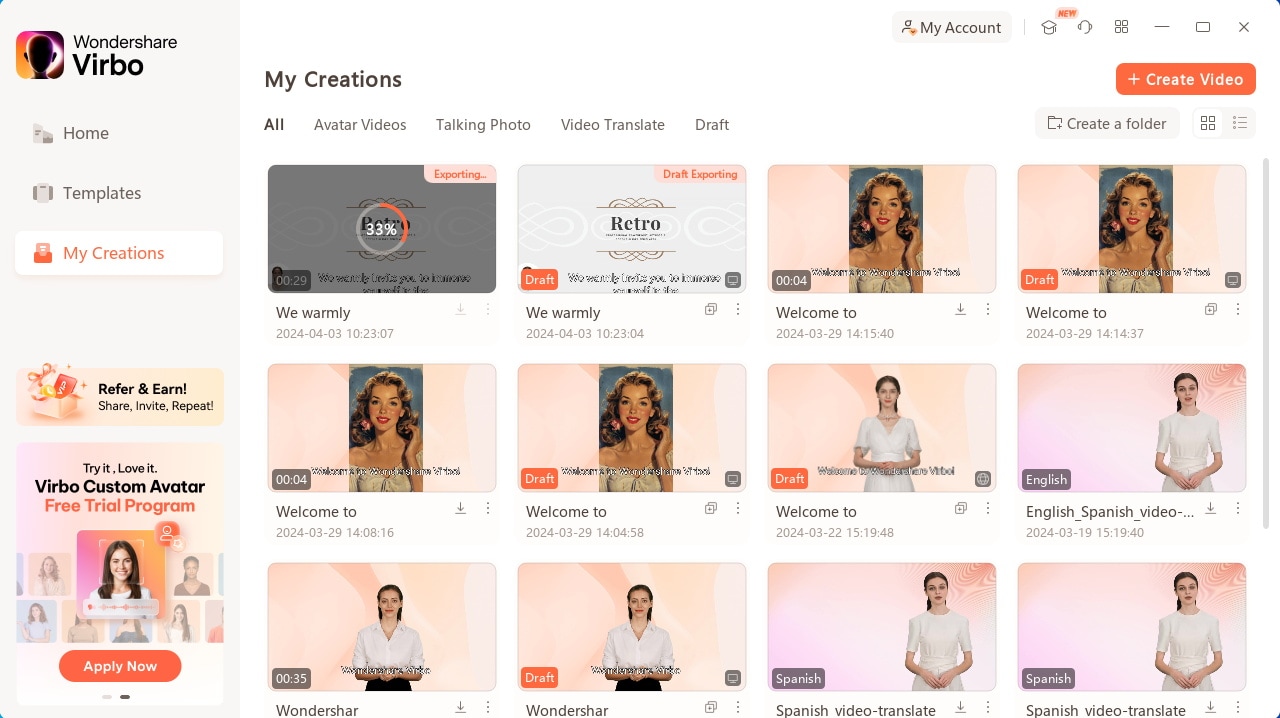
Export Video
02Add Avatars and Voiceover To the PPT Video
03Perform Other Edits to Video
04Preview And Export Final PPT Video From Virbo
Step 1. Start By Importing Your PPT File
After launching Wondershare Virbo on your desktop, continue to select the “Create Video“ button. As this opens a pop-up, select the “Import PPT“ option on the bottom-left to add your PowerPoint file.
Choose Import PPT
Step 2. Add Avatars and Voiceover To the PPT Video
As you’ve imported your PPT file successfully, define whether you want to extract your script from the file or not. Click “Create Video” to redirect to the next window, which outlines the PowerPoint file as a video.
Import PPT
Here, you need to define a proper avatar according to your video, which can be done using the “Avatars“ button on the top toolbar.
Select Avatars
Consequently, you need to add a proper voiceover that will assist you in explaining the PowerPoint file within the video. For that, lead to the “Text Script” or “Audio Upload” section to add the appropriate voiceover. Define your voice from the available list and set its parameters, or upload your pre-recorded voice to add along with the avatar.
Add Voiceover
Step 3. Perform Other Edits to Video
After selecting the avatar and voiceover for the video, you can perform other edits as well. Change the background of the video or add music in the background according to your choice. If you want to display the subtitles across the video, enable the “Subtitle“ option. Furthermore, for more advanced settings in your video, you can define a proper “Layout“ or add stickers and edit text style on the top toolbar.
Edit Video
Step 4. Preview And Export Final PPT Video From Virbo
Once you finish all the edits, click the “Preview“ button on the top right corner to preview the video.
Preview Video
If you are satisfied with the video after previewing, click the “Export“ button to save this video.
Export Video
[Ultimate Guide] How to Live Stream on Facebook?
A lot of people consume Facebook Live content as it provides a fun experience for the audience. Today, Facebook Live is being displayed across all genres. From gaming, vlogging, and sports, to basically anything under the Sun, going live on Facebook has become a new trend.
However, even to this date, a lot of users are confused about how to livestream on Facebook. That is why we have created this guide so you canlivestream on Facebook without any hassle.
Part 1: Easy-to-follow Step Guidance to Start Facebook Live
Facebook Live video is one of the most sought-after features of all time. Not only does it help creators connect with their audience but it lets them generate more revenue, ultimately bringing more money to their account.
Moreover, it is an awesome way to reach a broader audience and let people discover your content in real-time. A lot of people are confused abouthow to use Facebook Live because the methods to use it on the mobile app, the web, and Creator Studio are all different.
So, let’s talk about how togo live on Facebook. Before you start, you should understand that you can live stream to your page, group, profile, and event using the Facebook app or using a camera and streaming software.
01 How to go live on Facebook using a phone
As we have already discovered, you can go live on your Facebook page, group, profile, and event from anywhere in the world. The best way to go about life in the modern world is to use the Facebook app which is available on both Android and iOS.
Here is a complete guide on how to useFacebook Live streaming services on your mobile.
Step 1 Choosing where to go live (Personal Profile, Group, or Page)
The first step is choosing where you want to live. Ask yourself where are you trying to go live. Is it on your personal profile, a Facebook page that you own, or in some group? Navigate to wherever you want to go live.
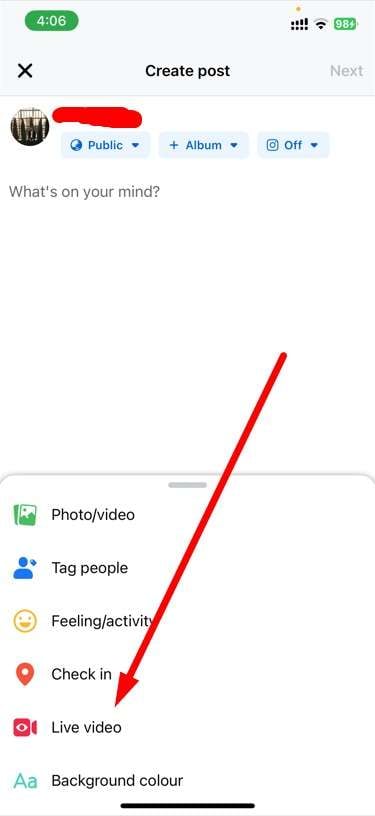
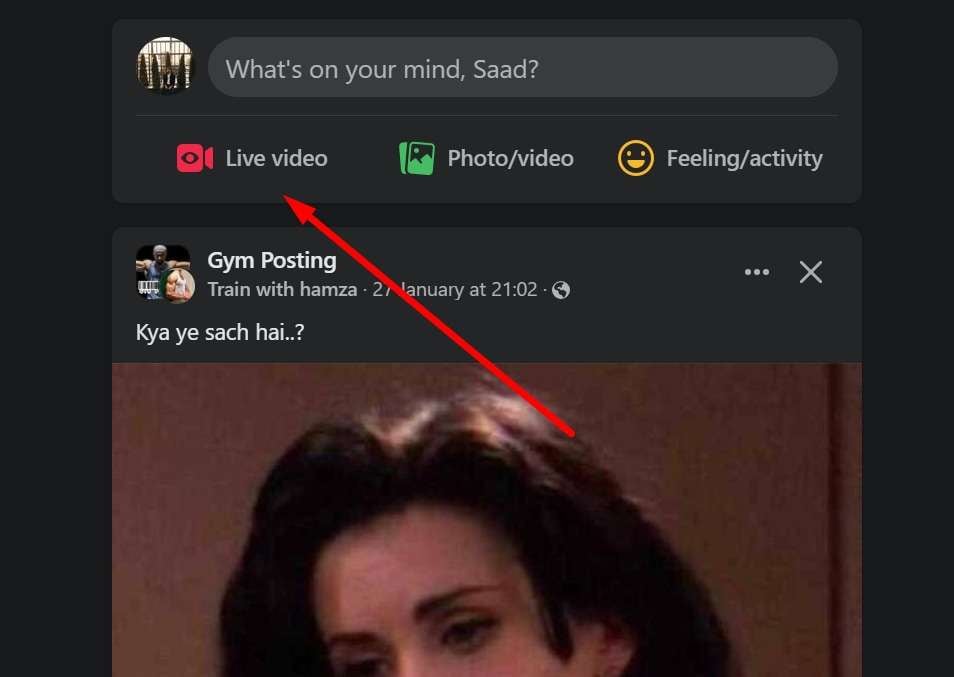
Step 2 Going live
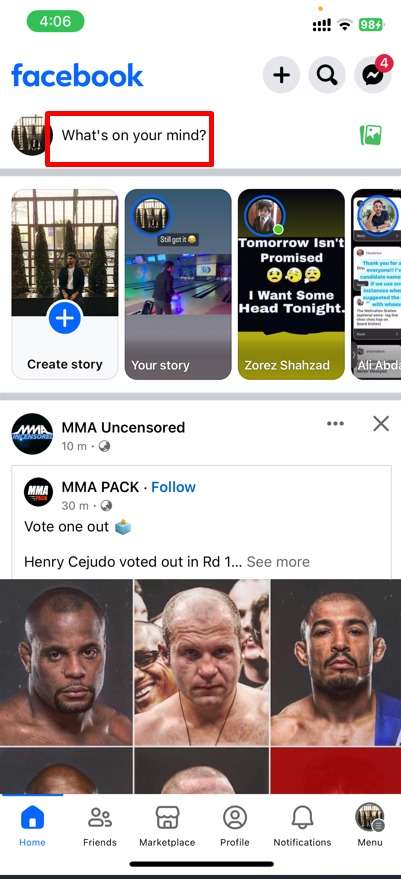
Let’s say that you want to go live on your personal Facebook profile. Then, you need to click on the Facebook app, and click onWhat’s on your mind? SelectLive Video which will be an option available. Now, you will start to see that new features will appear and you will need to set details about your livestreams in the next step.
Step 3 Setting live stream details and going live
Now you will need to give Facebook access to your camera and microphone, add a description to your video, set effects of your liking, and adjust everything accordingly. You can also invite your friends to join and watch the live video. So set those options and click onGo Live.
Step 4 Finishing the live stream
Once you have completed the live stream, simply click theFinish button to end your broadcast. In just a couple of minutes, your livestream will be ready in the form of a video.
02 How to go live on Facebook using the web
When you use the web version of Facebook, you will be redirected toLive Producer , which is a tool that allows you to use higher-end production equipment and streaming software. This happens on both laptops and PCs.
If you are aFacebook live streamer and want to go live using the web, then follow these steps.
Step 1 Find the Live video option on Facebook
Firstly, you will need to be logged in to your Facebook account. Once you are logged in, at the top of the News Feed, click on theWhat’s on your mind section and click on the three dots action button. There, you will findLive Video which will ultimately redirect you to Live Producer. So click on it.
Step 2 Setting up livestream
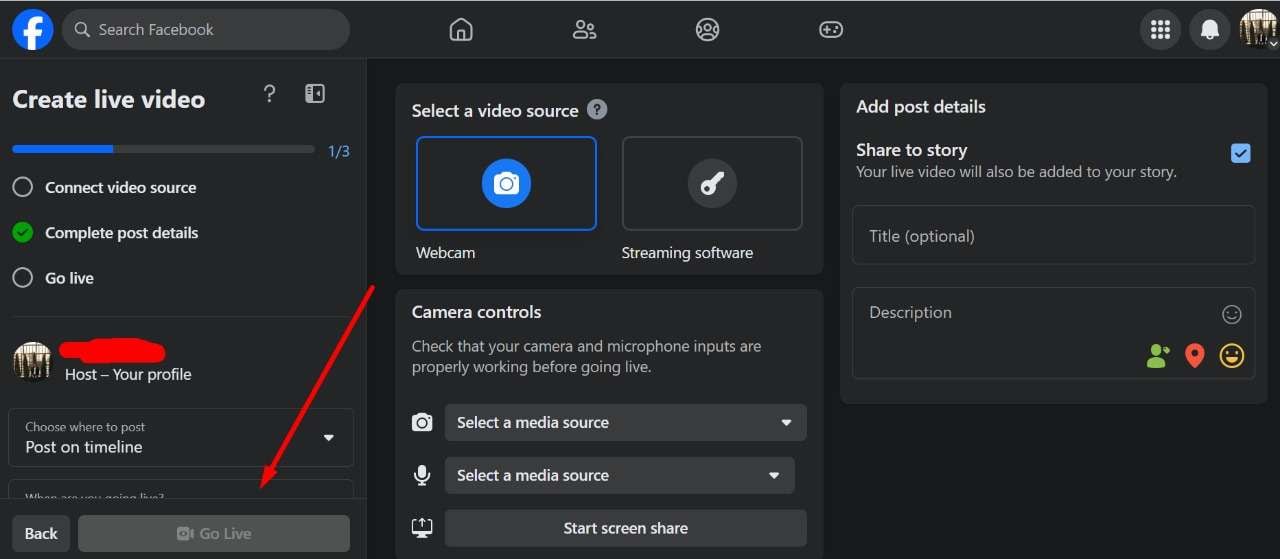
Once you are on Facebook Live Producer, you can add your title, and description, choose the equipment, and set a lot of things right on your Facebook account. You can do this before the live stream starts which is great because you can start live in a professional manner.
Step 3 Start your live stream on Web
Once everything is good to go, simply click onGo Live and you will be able to share your story with the rest of the world. You can also end the live stream whenever you like.
Part 2: Selected Tool to Elevate Your Facebook Live Experience
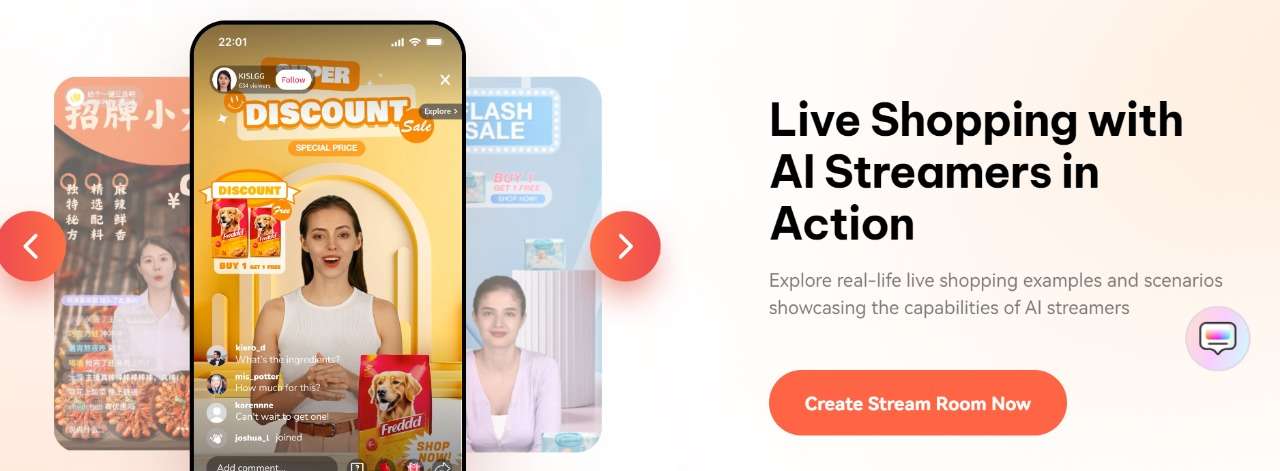
If you want to take yourFacebook streaming to the next level, then you should tryVirbo Live . Virbo is an all-in-one AI platform that allows users to create high-quality content with 300+ voices and a plethora of powerful features.
Virbo Live aims to transform the live experience by adding AI into play and improving traditional Facebook live streaming. Using Virbo Live is simple. You need to create a live shopping room where you can create a room or simply select a template. Then, you can choose the AI models and background. You can also choose the text and the voice that you want to be played during the live stream. And lastly, you can interact with your audience in the most user-friendly way possible.
For Facebook live streaming,Virbo Live is one of the most amazing tools that is transforming traditional boring live shopping into an AI-driven shopping experience. Let’s discover some of the features related to Facebook Live.
Features ofVirbo Live
- Cost-effective: When it comes to going live on Facebook using the traditional method, you will need a lot of equipment like a camera, mic, and more. With Virbo Live, you don’t need anything because everything is handled by AI.
- 24/7 broadcasting: The regular Facebook live stream can be interrupted but with Virbo Live, you get continuous 24/7 broadcasting without interruptions.
- Live shopping made it easier: Virbo Live makes it easier for brands to showcase their products in the most user-friendly way possible. You can have the AI describe everything as your product gets bought by the audience.
Part 3: FAQs about Facebook Live
1. How do you get to Facebook Live?
You geta live stream on Facebook by using the live streaming feature. To do that, you either need to have a PC, Android, or iOS device. If you are on PC, you can simply log in to Facebook Web. But on mobile devices, you need to have the Facebook app or the Creators app downloaded to go live.
2. Can you watch Facebook Live without an account?
Facebook live videos are public, meaning you can watch them on any device as long as you have the internet. Moreover, Facebook live videos don’t require an active Facebook account to be played as they are usually public.
3. Is Facebook Live stream free?
Yes,Facebook live streaming is 100% free, meaning you don’t have to pay a penny to use any of the features. However, if you use a third-party tool, then you might need to pay to get some features unlocked.
4. Is YouTube Live better than Facebook Live?
Both YouTube Live and Facebook Live are perfect for streaming. However, if your goal is monetization and making money, then using YouTube Live would be better. However, if you want to interact with your audience and make your community grow, then Facebook Live is the best choice.
Conclusion
Facebook streams are a fun and engaging way to interact with the audience. In this guide, we have covered a complete guide that you can follow to get live on your Facebook and reach a broader audience.
And if you want to take your Facebook live streaming to the next level, then a tool like Virbo AI will be perfect for businesses that want to bring in more revenue and reach a bigger audience.
How to Enable the Text to Speech Function on iPhone
In the world of gadgets and gizmos, our devices have become a regular part of our lives, making things easier and more interesting. Among all these cool things, there’s one feature that’s kind of sneaky but really useful – it’s called Text-to-Speech (TTS) on iPhones. These days we’re always busy and there’s so much stuff going on, iPhone text to speech is like a helper that makes things smoother. It helps us do lots of things at once and understand stuff better.
So, in this guide, we’re going to learn how to make your iPhone talk to you i.e.iPhone read text ,iPhone read text out loud ,speak text iPhone ontext to speech app iPhone and make life cooler. We’ll find out how to turn on this cool trick and see all the good stuff it brings. Let’s get started and make your iPhone a chatty buddy!
Part 1: What is Text-to-Speech?
Text-to-Speech, as the name suggests, is a technology that converts written text into spoken words. This powerful function has gained immense popularity due to its diverse range of applications. Imagine scenarios where you’re driving and need to access an important email, or you’re cooking while following a recipe from a website. Without thetext to speech app iPhone function, these situations could be both inconvenient and potentially unsafe.
Thisvoice text message iPhone function transcends mere convenience; it’s an accessibility boon for those with visual impairments or learning disabilities. Moreover, it caters to various learning styles by offering an auditory alternative to traditional text-based content. From educational content to news articles, eBooks to social media updates, TTS ensures that you’re never tied down by the limitations of visual reading alone.
Part 2: How to Enable the TTS Function on iPhone?
EnablingiPhone t ext to s peech function is a straightforward process. Follow these steps to harness the power of auditory content consumption:
Step 1
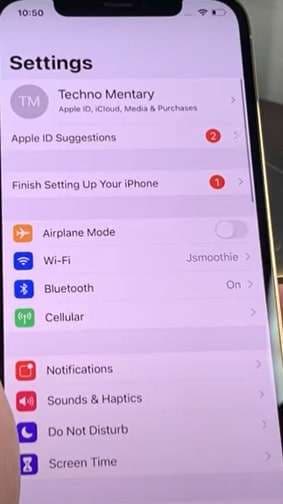
Begin by locating and tapping the “Settings” app icon on your iPhone’s home screen. The “Settings” app can be identified by its gear icon. This action will lead you to a menu where you have the ability to adjust and configure various settings for your device.
Step 2
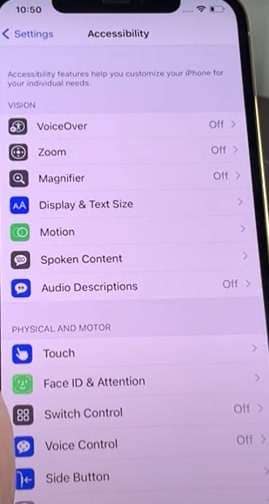
Within the “Settings” menu, scroll through the options until you spot the “Accessibility” section. The “Accessibility” icon typically features a simple representation of a person enclosed within a circle. Tapping on this icon will reveal another menu tailored to settings that cater to different user needs, making your device more user-friendly.
Step 3
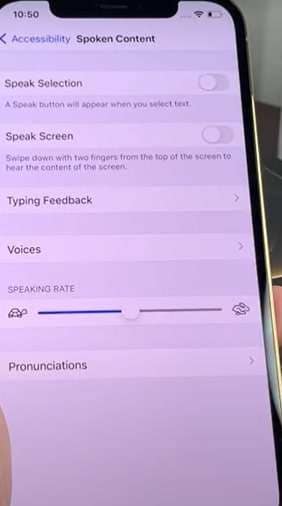
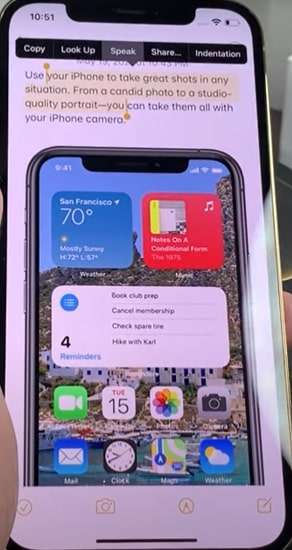
Inside the “Accessibility” menu, look for and tap on the “Spoken Content” option. The icon associated with “Spoken Content” is usually characterized by a speaker or text bubble icon accompanied by some text. When you select this option, a new menu will emerge, offering features that allow you to enable and customize the text-to-speech function orspeak screen iPhone .
Step 4
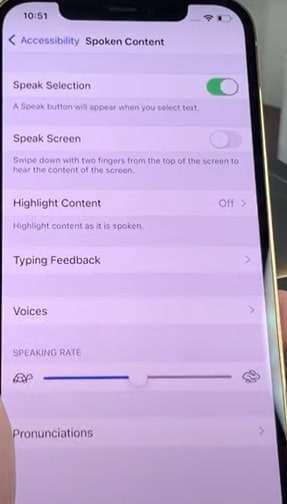
Within the “Spoken Content” menu, among the various options available, locate “Speak Selection.” This should be the first choice in the menu. Toggle the switch adjacent to “Speak Selection” into the ON position. By activating this option which isread text out loud iPhone , you grant your device the ability to audibly communicate the selected text.
Step 5
To make the most of the text-to-speech feature, proceed to any app or area where text is present. Tap and hold your finger on the specific text you wish to hear aloud oriPhone read text out loud . This action will summon a tool known as the “selector tool,” which is represented by a blue, yellow and any other color bar. The selector tool empowers you to highlight text by dragging its handles located at both ends.
For a Single Word
Above the selector tool, you’ll notice an option labeled “Speak.” Tap on “Speak” and your device will instantly pronounce the selected word audibly.
For Multiple Words or Entire Content
Should you intend to have all the text on the screen read aloud, tap “Select All,” another option visible above the selector tool. This action will encompass all the available text. Subsequently, tap on “Speak,” which is now positioned beside options such as “Copy” and “Share.” Tapping “Speak” will prompt your device to audibly relay all the selected text.
By meticulously following these steps, you’ll be able to effortlessly enable and harness the potential of the text to speech iPhone, enriching your interaction with the device and augmenting its accessibility.
Part 3: Bonus Tip: A Best Text to Speech Online AI Tool You May Like
You have just learned how to use thetext to speech iPhone function, which can readtext out loud on iPhone with a voice. This is a handy feature that can help you with many tasks, such as reading, learning, entertainment, accessibility, and more. However, you might wonder if there is a better way to convert text to speech, one that can offer you more options and flexibility. Well, there is, and it is called Virbo, one of thebest text to speech apps for iPhone .
Virbo is an online AI voice generator that can create realistic and diverse voices for any text. Unlike the text to speech function on your iPhone, which has a limited and fixed voice, Virbo allows you to choose from over 100 voices in different languages, accents, genders, and ages. You can also customize the voice parameters, such as speed, pitch, volume, and pause. Moreover, you can add emotions and tones to the voice, such as happy, sad, angry, calm, etc. You can preview and download the voice as an MP3 file and use it for personal or commercial purposes.

Get Started Online Free Download
Virbo isn’t just another run-of-the-milltext to speech iPhone tool; it’s a versatile platform that puts the control in your hands. It offers a rich array of functions that allow you to craft exceptional voices for your text content, granting a new dimension of expression and accessibility.
Functions of Virbo
- You’re not limited to typing or pasting text – you’re empowered to unleash your creativity. Enter your text on the website, and Virbo springs to action, generating a voice that brings your words to life. But that’s not all. Virbo understands your multimedia needs – whether it’s a text file or a URL, the platform steps up to read it aloud, bridging the gap between written content and audible experiences.
- Virbo stands out with an impressive array of over 100 voices. This is where your text’s persona takes shape. The drop-down menu reveals a tapestry of languages, accents, genders, and ages, each voice carrying its unique nuance. You’re not just choosing a voice; you’re selecting the very essence that suits your content’s essence.
- Once you’ve picked your voice, it’s time to tailor it to your desires. The platform puts the reins in your hands – adjust the parameters, tweak the speed, finesse the pitch, fine-tune the volume, and choreograph the pauses. Drag sliders to infuse your voice with personality, or type in special symbols and commands to curate the perfect vocal choreography.
- Preview, Download, and Create Virbo’s symphony doesn’t end with creation; it crescendos to an audio output that’s as versatile as your needs. Hit the play button and listen to your creation right on the website – a preview that bridges the gap between conception and realization. Want more? Click the download button, and your voice transforms into an MP3 file, ready to grace your projects. Whether it’s for personal or commercial use, Virbo grants you unrestricted access to your auditory masterpiece.
Key Features of Virbo
- Virbo is fueled by cutting-edge AI technology that defies robotic intonations. It’s a virtual vocal artist that digs into the text, understanding context, meaning, and even emotions. It harnesses these insights to compose voices that sound strikingly human. And it doesn’t stop there – Virbo learns from interactions, fine-tuning its craft over time, so your voice keeps evolving.
- The app isn’t bound by language barriers. It’s a polyglot powerhouse, supporting various languages and accents – English, Spanish, French, Chinese, Japanese, and beyond. The language you choose isn’t just a checkbox; it’s a portal to your text’s soul. Effortlessly toggle between languages by typing the language code, transcending borders with the written word turned spoken art.
- In the world of voices, Virbo isn’t a monologue – it’s a chorus of options. Tailor-made for various scenarios, each voice category resonates with a purpose – narration, education, podcasting, gaming, and more. Immerse yourself in these categories, listen to voice samples, and let your imagination take flight. Virbo caters not just to content, but to its essence.
- Virbo knows that words are more than just syllables; they carry emotions and tones. This platform empowers you to sculpt your voice’s sentiment. Happy, sad, angry, calm – you name it, Virbo offers it. Mix and match these emotions, make your voice an orchestra of feeling. By typing emotions in brackets, you’re not just creating words – you’re choreographing an emotional symphony.
With Virbo, your text becomes a canvas, and your voice is the brushstroke that paints its vivid story. Explore, experiment, and embark on an auditory journey that transcends the limits of written communication.
Conclusion
In a world where devices do more than we can imagine, your iPhone can become your personal narrator too. Remember, you can makeiPhone read text andspeak text iPhone . It reads to you by diving into the settings, finding Accessibility, and choosing Spoken Content. Just turn on Speak Selection, and your iPhone will talk to you whenever you want.
But if you’re curious to explore beyond your iPhone, consider Virbo, one of thebest t ext t o speech apps for iPhone . It’s an online friend that can turn text into speech in different languages and voices. With features like adjusting speed and saving audio files, it’s a handy sidekick for your auditory adventures.
So, as you embrace this technology, let your iPhone’s voice bring words to life, making your world a bit more engaging. And don’t forget, with tools like Virbo, you’re not just reading – you’re listening, learning, and experiencing a new way of connecting with words.
Get Started Online Free Download
Best 5 Viral Video Marketing Techniques For Big Sellers
Videos are the most powerful medium for sharing everything with the world. There are several types ofviral video marketing present on the web. This may include product marketing, viral video marketing, UGC video marketing, and more. These videos can give you massive reachability and build reliable emotional connections.
By the end of this article, you will know all the valuable information aboutviral ads . Besides this, we will also discuss some strategies. Through them, you will be able to make best-in-class videos.
Part 1: What is Viral Video Marketing?
Viral video marketing involves the creation of videos that can spread rapidly. These videos can become visible to social media and other online communities rapidly. The main goal of these videos is to get better brand exposure and boost brand awareness. Moreover, you have to ensure some of the key factors in viral videos. This may include short length, creativity, retention, etc.
Importance of Viral Video Marketing
You must be thinking, why can’t you just use simple videos instead ofviral advertising ? Viral videos can provide endless benefits instead of simple videos. Some of the key benefits of viral videos are discussed here for you:
1. Higher Brand Recognition Ratio
A viral video can reach millions of people in the smallest amount of time. This gives massive exposure to the brands. If you are a small business or a new setup, viralvideo marketing can be beneficial. With this, you can get a better amount of audience and customers without hassle.
2. Better Engagement and Web Traffic
Viral advertisement can be a medium for getting better organic traffic on your website. Imagine you are watching a video about a parrot that can change color. Now this is clearly not true, but you will search for that video out of curiosity. Thus, viral videos do the same for your business and boost your engagement in an automated manner.
3. Cost-Effective Social Presence
Getting famous on social media without spending dollars is a dream of every person. You can also get a reliable social presence on many social media platforms for a cost-effective amount. If you are not going for some traditional commercials and ads, so yes, it helps in saving money.
4. Instant Reach and Awareness
If you are launching a new product, you have to share it with as many users as you can. In this scenario, viral video marketing can help you without any issues. It also helps in getting instant brand recognition along with attentive attraction.
5. User Generated Content and Shareability
Viral videos can potentially encourage the use of and improve their online visibility. You can also experience the creation of user-generated content with it. Moreover, you can also get a chance to engage potential customers. Sharing videos to get reliable global impact is also possible with it.
Part 2: Best 5 Viral Video Marketing Techniques
Limitlessviral video marketing techniques are present on the web. Yet, you have to trust the techniques and strategies that can provide you with many benefits. Some of the effective and easily implementable techniques which can upgrade yourviral ads are also given in the below context:
1. Add Storytelling in Videos
Before anything else, you must ensure your videos are not boring. Go the extra mile and add a sense of storytelling to the videos. This can help you establish an emotional connection with the world. Moreover, you can also build a strong and dependable bond with your viewers. Improving retention and enhancing brand identity are also part ofviral advertisements .
You can also communicate complex ideas to get the solution better. It can also help you build trust, credibility, and universal appeal. Memorable stories of your videos can also cast a long-term impact on your followers, which is highly beneficial.
2. Emotionally Driven Content
Don’t ever add robotic themes and content in the marketing videos. You have to make videos more emotional to persuade an emotional connection. For this, share your hassles and hardships with the viewers. Also, try to tell them how long your journey to this day was. Moreover, inspire them with your emotions.
At the end of the videos, always thank them for watching videos and for their support. It will assure the viewers that you care a lot about them. This also initiates the universal appeal of content irrespective of cultural barriers.
3. User-Generated Content
You have to motivate the users to create content related to your products and services. This can help you in creating viral marketing videos. You can also do paid partnerships with the users and send them gifts or coupons. It will work as a reliable investment for you. Moreover, it will help you improve your brand community with viral potential in them.
This will also help you to experience the continual content flow that can keep your videos more up-to-date. It can also work as social proof that your brand is a dependable and authentic one. You can generate a known and trustworthy reputation for your brand with this.
4. Influencer Collaborations
For creating optimized quality videos, you can also contactviral marketing agencies . Not only this, but you can also collaborate with influencers that comprehend a considerable number of followers. With this, you can expand your reach and become more visible on social media. Attracting a targeted audience is also possible with this premium-grade strategy.
Moreover, you can also boost the authenticity of yourviral ad s. It can also lead to desirable results in a limited time. You can also experience flexibility in campaigns with this. Above all, spending tons of dollars to collaborate with influencers is unnecessary. So, it is also a cost-effective strategy.
5. Humor and Entertainment
You also need to add a touch of entertainment to your videos. It is essential because no one likes to watch boring and dry videos. There are versatile funny effects and sounds that you can add to your videos to make them more engaging. Along with this part, it also helps boost your video retention.
For making optimized quality videos, you can get assistance from the AI-powered tool. One of the tools that holds the most recommendations for creating best-in-class videos isVirbo . By using Virbo, You can generate videos without making manual adjustments. Virbo also helps you manage the videos’ visual metrics in a customized manner.
Get Started Online Free Download
Virbo is a tool that has the potential to generate videos from text. So, you just have to add text, and this will manage the rest of the work for you. One of the best things is you can access premium-grade tools like Virbo on several platforms. This may include Android, iOS, and Windows.
Key Features
- Virbo supports a diversified operating system; you can use its premium account on several devices.
- It has over 150 AI Avatars, and you can also select the avatars based on their age or ethnicity.
- If you are late meeting your deadlines, use the 180+ templates in Virbo. With this, you can customize them and add royalty-free music to videos.
- There are versatile AI Voices in Virbo, and you can also use them for creating best-in-class text-to-speech videos.
- You can even use Virbo for optimizing the pre-written scripts on a Windows computer. It can also write new scripts for you.
Conclusion
Conclusively, you can useviral video marketing to attract potential clients. This helps in displaying your products and services all across the world in a limited time. Above all, you can also get effective social presence and brand awareness with this.
There are countless benefits and crucial factors of usingviral ads , but few have been discussed previously. For creating unmatchable viral videos, you can implement the strategies mentioned above. To make videos with the assistance of a virtual YouTuber, consider using Virbo.
You May Also Ask
1. What are some ways to measure the success of my viral video marketing campaign?
The success of viral videos is possible to measure with several metrics. This includes comments, likes, shares, views, and click-through rates. You can also track the conversion rate and website traffic for this. With the help of the previously mentioned metrics, you can easily understand the effects of your campaigns.
2. What is the best and most effective way to promote viral videos?
There are several ways to promote viral videos, and one of them is to collaborate with influencers. Those influencers can share your videos with their followers and help you to create authentic connections.
3. Which platforms can help you in promoting viral videos?
All the social media platforms help promote viral videos. These may include TikTok, Facebook, Instagram, YouTube, and more. You can also search for the most liked platform by your targeted audience and share videos on that platform.
Must-Read: Learn From Deepfake Scandals & Protect Your Stream
Advancements in artificial intelligence (AI) tools have significantly influenced various industries, including streaming services. In the recent wave of development,deepfake streamers have emerged as a way of replicating people in videos. Creators are also usingdeepfake live streams to engage viewers with avatars that look just like their favorite celebs. However, deepfake streams often encounter attacks and issues that may question their authenticity. In this article, we look at some of the hacks creators can use to beat deepfake attacks.
Part 1: What is Deepfake Scandals?
Deepfake scandals involve incidents when media is manipulated using artificial intelligence (AI) in unethical or harmful ways.

Some of the issues included in the Deepfake scandals include:
- Misinformation and Disinformation: Creation of misleading and false videos or audio recordings of public figures, which helps to sway public opinion and influence elections.
- Financial Fraud: Impersonating someone to gain access to their financial accounts and other personal information.
- Nonconsensual Deepfake Pornography: Superimposing an individual’s face or body onto another’s in sexually explicit content without their consent.
- Cyberbullying and harassment: Creating humiliating or embarrassing videos of an individual to harass or cyberbully them.
Part 2: Must-read Tips for Deepfake Streamers
The rise of deepfake content has caught the eyes of many regulatory agencies, including the Federal Bureau of Investigation (FBI). The major concern is the use of deepfakes for crimes like blackmail, extortion, and harassment. With several scandals also pegged to deepfake, streamers need to be conscious of how they use this technology. Here are 5 must-read pieces of advice concerning deepfakes.
1. Choose Your Content Wisely
Although the power of deepfakes is undeniable, creatives can overcome it by choosing content wisely. To be on the safe side, avoid content that treads on sensitive ground. Stay away from topics that spread misinformation, and avoid engaging in malicious humor or issues that involve impersonating real people without their consent. You may be considering using fictional narratives, original characters, or transformative works that push the boundaries of storytelling. Try to be more creative and imaginative in your work while staying within the ethical frameworks.
2. Be Transparent in Your Work
Streamers are often carried away by the buzz or the need to stay in the spotlight. However, being honest and transparent will help you stay authentic with your audience. Right from the onset, try to be as upfront with your views as possible about the use of deepfakes. By being open about your creative journey, you will be enhancing rather than spoiling the magic.
The way you represent deepfakes to your audience means everything. Announce your personas clearly and explain the technology behind the creation. Use the opportunity to build trust with your audience and engage them in intriguing conversations about the nature of identity and digital representations. Doing so can also help spark more interest among the audience as they realize that they are interacting with a meticulously crafted avatar and not a celebrity clone.
3. Label and Contextualize
When you are using deepfakes for streaming, treat your viewer like an intelligent companion. Avoid the mistake of seeing them as gullible marks. Make sure your content is clearly labeled as deepfake through titles, overlays, or disclaimers in your stream. Show that you care about your audience and you do not want to leave them guessing. Explain the purpose behind your chosen person and the creative choices that you have made.
4. Prioritize Respect Over Reach
Deepfakes allow you to instantly explore fame and what people think of your avatar. However, avoid being carried away by the fame and being swayed to the unethical side. Steer clear of impersonation that can lead to reputational damage or harm vulnerable groups. Even if your avatar is just a fictional character, it still deserves ethical treatment. If it engaged in potential offensive behavior, make sure it is within the confines of your established narrative.
5. Embrace the Collaborative Spirit
Deepfake streamlining has great potential for community building. You can easily collaborate with other creators by engaging in open discussions and encouraging responsible use of the technology. Working together with other creators also helps you to share knowledge and troubleshoot challenges together. You also get to elevate your content while contributing to a healthier and more responsible deepfake ecosystem.
Bonus - A Safe Choice for Live Streaming:Virbo Live
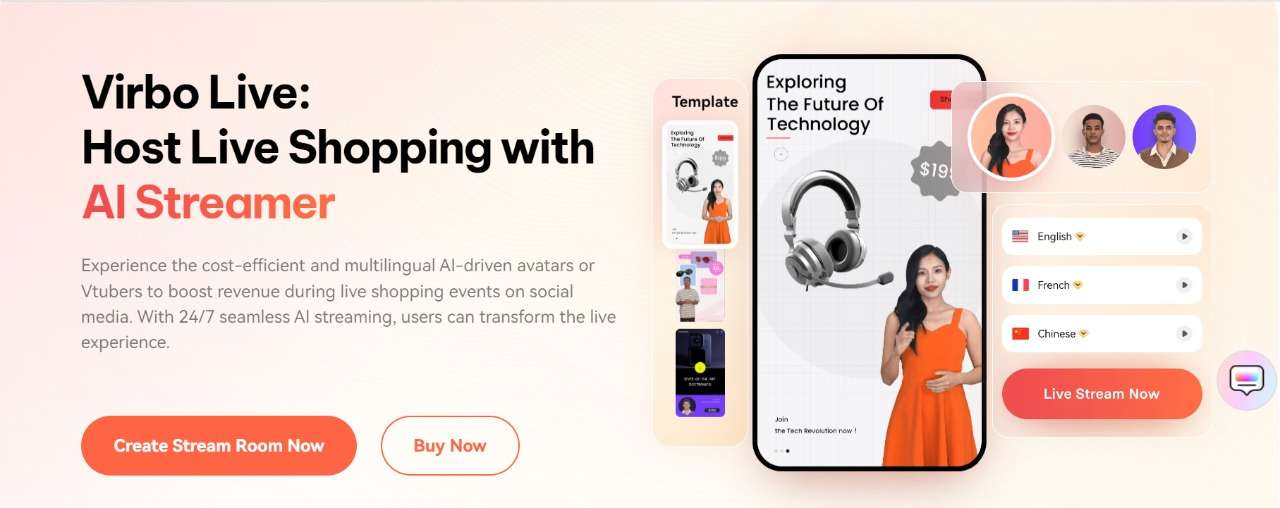
Whether you are a content creator or a brand, you can benefit from the power of AI in your content. With Deepfake scandals having such ethical issues, finding a safe option is essential. In particular, you can use AI-powered avatars to provide vital information to your users and keep them engaged. Wondershare Virbo Live allows you to keep your viewers engaged without necessarily having to create fresh content from scratch.
1. Unlock AI Live streaming with Virbo Live
Virbo Live offers you a cost-effective way to host love shopping with an AI streamer. The multi-lingual avatars or Vtubers keep your viewers engaged for a seamless experience. By supporting all streaming platforms, including TikTok and Shopee, you can start broadcasting using the official live tools for each platform. In the case of platforms like Facebook Live and YouTube, you can stream directly using OBS.

Get Started Online Free Download
Compatibility:
Online Tool
Powerful Features
- Realistic AI-driven Avatars : Engage your audience with AI streamers or Vtubers that can perfectly mimic natural movements
- Multiple Languages and Accents : Seamless language and accent integration for a global audience reach
- AI Translation : Automatically translate your text into multiple languages and generate a voice-driven AI streamer to match your viewers’ needs
- AI Live Shopping Script Generation : Effortlessly generate engaging shopping scripts for your products
2. Easy-to-follow Step Guidance for AI streaming
Wondershare Virbo is one of the easiest AI streaming services to use. It comes with a simplified platform that will work on almost any device. You only need to define your AI-powered avatar, generate some content, and see your stream come to life.
01 Equipment requirement:
Wondeshare Virbo has no special equipment requirements to get started. You can start creating your AI stream right from your PC or phone. Make sure you meet at least these requirements:
- Computer Requirements : A properly configured and smoothly running computer with Stereo Mix or other virtual sound cards.
- Network Requirements: The average network speed in the computer’s environment should be more than 5Mbps for smooth live streaming.
- Browser Requirements : Recommended to use the Chrome browser and update it to the latest version for optimal and stable performance.
02 Step Guidance
Using Virbo Live is quite easy and does not require technical expertise to get started. The whole process is automated to have your AI Avatar live and interact with your audience.
Step 1 Create a Live Shopping Rooms
Once you have logged in toVirbo Live tool , click “Create Project” or select a template of choice from the available ones to create a new live room.

Get Started Online Free Download
Step 2 Choose AI Streamers and Background
Pick a virtual streamer from the virtual host library to add to your live room. You also have the option to customize the avatar and background or add stickers and adjust the avatar’s position and size.

Step 3 Enter Text or Voice
Upload your audio or enter a script that the AI Avatar will use to interact with your views. You use the AI smart scriptwriter and AI translator to generate the script effortlessly.

Step 4 Start Live Streaming
With everything ready for your AI Avatar, it is time to Start Live Streaming. You can add the live windows to OBS for live streaming in the OBS software, for platforms like Facebook and YouTube.

Step 5 Interact With the Audience
Once live, the AI streamer will interact seamlessly with the audience and respond to their questions without your involvement.

Conclusion
Deepfake Live offers an exceptional opportunity for content creators. You can produce content that is more relevant to your audience but with less effort. However, this technology poses a formidable challenge as seen with the recent scandals. Therefore,Deepfake streamers need to adopt an approach that is transparent and protects other people. A safe alternative is usingVirbo Live , which allows you to create a great streaming experience for your audience using AI streamers.
Diverse Template
Template
Virbo’s template feature collects a wide range of ready-made and exquisite video templates for users to choose from, eliminating the hassle of creating videos from scratch. With just a few simple clicks, you can easily create a sophisticated video that guarantees your satisfaction.
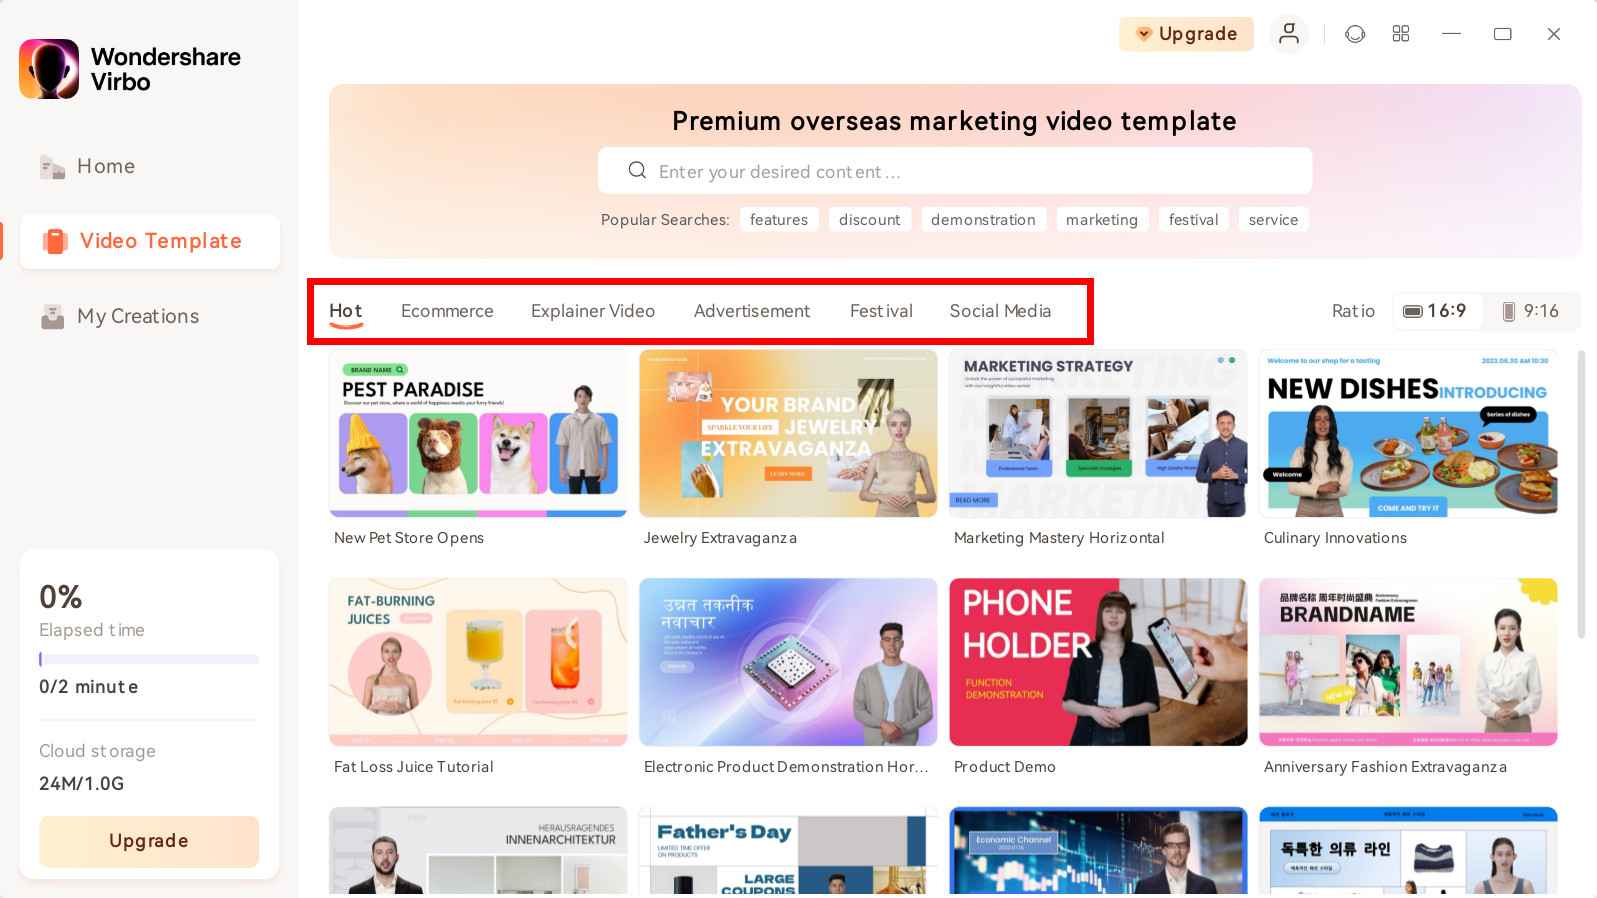
Step 1. Choose Template
On the main interface of Virbo, you can click on the “Video Template” tab to switch to the template display area. Above the templates, there are six categorized sections: Hot, Ecommerce, Explainer Video, Advertisement, Festival, and Social Media.
Choose Template
There is also a ratio selection switch beside it, where you can choose your preferred video aspect ratio.

Choose Aspect Ratio
Step 2. Create Video
After selecting your preferred template, click and preview it. Then, in the bottom right corner, click the “Create Video” button to proceed to the editing interface.
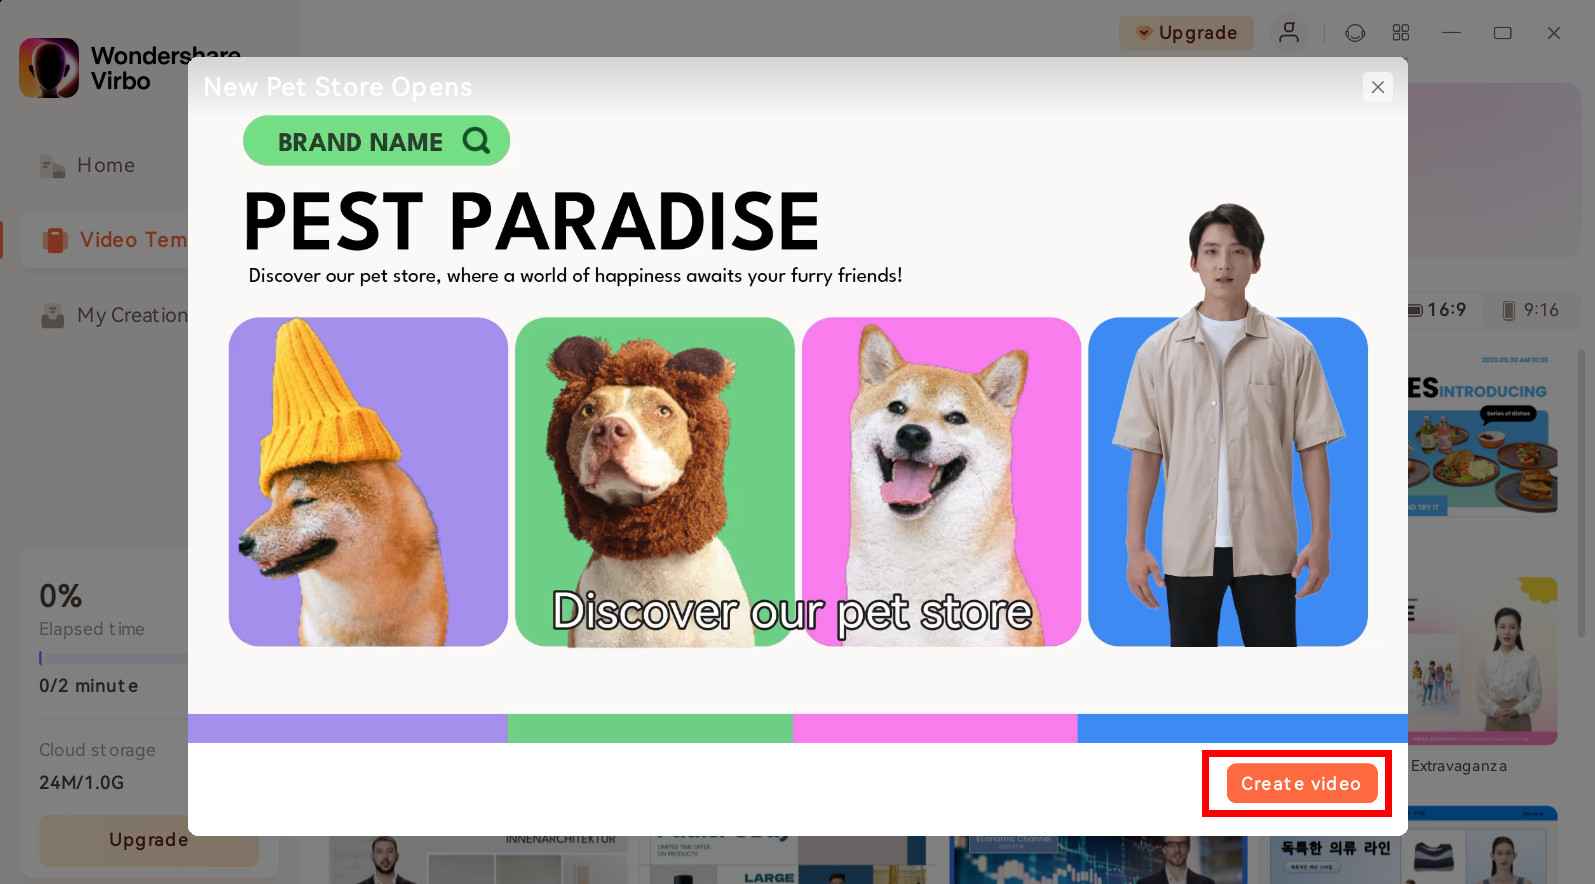
Create Video
Step 3. Edit Video
In the editing interface, you can enter the script text and adjust elements like voiceover and avatar. You can also change the background and add stickers, among other options.
Edit Video
FAQs about Diverse Templates
1Are These Avatars Based On Real Humans?
Yes, these avatars are all based on video footage using real actors.
2Can the Generated Videos with Digital Presenter Be Used for Commercial Purposes?
For free users, videos are not allowed to be used for commercial purpose. For subscribed users, all materials provided in the software are commercially available, and the produced videos containing digital humans are also available for commercial use. Subscribe now>
3Can I Control Avatars’ Gestures or Expressions?
For personalized avatars on Virbo, you can enjoy the liberty to craft gestures and expressions to your liking. Click now to explore Virbo’s Customization Service!
Step 1. Choose Template
On the main interface of Virbo, you can click on the “Video Template” tab to switch to the template display area. Above the templates, there are six categorized sections: Hot, Ecommerce, Explainer Video, Advertisement, Festival, and Social Media.
Choose Template
There is also a ratio selection switch beside it, where you can choose your preferred video aspect ratio.
Choose Aspect Ratio
Step 2. Create Video
After selecting your preferred template, click and preview it. Then, in the bottom right corner, click the “Create Video” button to proceed to the editing interface.
Create Video
Step 3. Edit Video
In the editing interface, you can enter the script text and adjust elements like voiceover and avatar. You can also change the background and add stickers, among other options.
Edit Video
FAQs about Diverse Templates
1Are These Avatars Based On Real Humans?
Yes, these avatars are all based on video footage using real actors.
2Can the Generated Videos with Digital Presenter Be Used for Commercial Purposes?
For free users, videos are not allowed to be used for commercial purpose. For subscribed users, all materials provided in the software are commercially available, and the produced videos containing digital humans are also available for commercial use. Subscribe now>
3Can I Control Avatars’ Gestures or Expressions?
For personalized avatars on Virbo, you can enjoy the liberty to craft gestures and expressions to your liking. Click now to explore Virbo’s Customization Service!
Also read:
- 2024 Approved Must-Have Apps for Real-Time Video Translation
- New The Top 10 AI Avatar Generators for 2024
- 2024 Approved Clone Your Voice Harness the Potential of AI
- Updated How To Create Video From Text Easily Step-by-Step for 2024
- Diverse Template for 2024
- Maximizing Yandex Translate in Video Translation and Beyond
- Updated In 2024, Essential Tools for Creating Dynamic Talking Avatars
- In 2024, Best 12 AI Voice Cloning Tools Online & Offline
- New Top 10 Free and Best Text-to-Speech Generators for 2024
- Updated In 2024, What Is AI Marketing?
- New Top 11 Deepfake Voice Apps and Software You Need to Know About
- New Exploring AI Face Generators | Wondershare Virbo Glossary
- Updated 2024 Approved Top 10 AI Script Writers to Choose
- New 5 Tips About YouTube Shorts to Grow Your Business
- New Top 5 AI YouTube Shorts Generators to Create Diverse and Engaging Videos
- Updated Create AI Avatar Video with Avatar | Online for 2024
- New 2024 Approved Best Celebrity Voice Generator Tools You Cannot Miss
- Updated What Is an AI Voice Generator for 2024
- Updated In-Depth Review of Ivona Text to Speech Converter
- In 2024, What Is AI Pixel Art Generator?
- New In 2024, Common Platforms for Live Streaming | Virbo AI Live Stream
- Updated Easy Tutorial How To Make a Talking Cartoon Video Step-by-Step for 2024
- Narakeet Review Text to Speech Convenient Voice Maker for 2024
- Best 5 AI Voice Generators Online (Supports All Browsers) for 2024
- Updated Translate Live Videos With The Best Video Translator for 2024
- The Guide to Learning All the Details About Voice Cloning for 2024
- Updated 2024 Approved The Most Recommended Natural AI Hindi Voice Generator
- Updated Create Video With PPT for 2024
- Easy Guide How To Make Talking Head Videos
- 10 Best Free AI Video Generators with Innovative and Advanced Algorithms
- Updated 2024 Approved What Is an AI Script Generator? | Wondershare Virbo Glossary
- In 2024, Best Options Top Live Streaming Platforms According to Types
- New In 2024, Top 5 Tools to Convert Text to Audio Online for Free
- Updated Top 10 Streaming Services Worth a Try
- New Handling Exceptions for 2024
- Updated Right Moves to Use TTS in Descript
- New In 2024, Handling Exceptions
- Updated How to Translate Audio/Video Content From Spanish to English and Vice Versa?
- In 2024, Build Your AI Twitch Streamer with Animated Avatars
- New 2024 Approved Becoming a Pro in TikTok Live Shopping Your Complete Guide
- How To Unlock Xiaomi Redmi Note 12 4G Phone Without Password?
- In 2024, How does the stardust trade cost In pokemon go On Motorola Moto G23? | Dr.fone
- In 2024, Hacks to do pokemon go trainer battles For Lava Blaze 2 Pro | Dr.fone
- 8 Solutions to Fix Find My Friends Location Not Available On Realme V30 | Dr.fone
- How to Factory Reset Samsung Galaxy S23 without Losing Data | Dr.fone
- Preparation to Beat Giovani in Pokemon Go For Honor Magic 5 Lite | Dr.fone
- Ultimate guide to get the meltan box pokemon go For Poco C55 | Dr.fone
- Easy steps to recover deleted music from Samsung Galaxy A05s
- In 2024, How Do You Get Sun Stone Evolutions in Pokémon For Motorola Defy 2? | Dr.fone
- How to Retrieve deleted photos on Motorola Moto G Stylus (2023)
- In 2024, 5 Ways to Send Ringtones from Apple iPhone 15 Plus to iPhone Including iPhone 15 | Dr.fone
- Is pgsharp legal when you are playing pokemon On Samsung Galaxy S23? | Dr.fone
- In 2024, How to Mirror PC Screen to Lava Yuva 3 Pro Phones? | Dr.fone
- In 2024, How to Mirror Realme 11X 5G to Mac? | Dr.fone
- In 2024, 10 Easy-to-Use FRP Bypass Tools for Unlocking Google Accounts On Poco C55
- How to Unlock Vivo S18e Phone without PIN
- In 2024, How to Watch Hulu Outside US On Realme V30 | Dr.fone
- How to Fix Android App Not Installed Error on Oppo A78 5G Quickly? | Dr.fone
- What is Geo-Blocking and How to Bypass it On Infinix Hot 40 Pro? | Dr.fone
- Recover iPhone 8 Data From iOS iTunes | Dr.fone
- How to Transfer Photos from Samsung Galaxy S23+ to New Android? | Dr.fone
- Top 4 Android System Repair Software for Samsung Galaxy M14 5G Bricked Devices | Dr.fone
- How to Fix Pokemon Go Route Not Working On Vivo Y28 5G? | Dr.fone
- How to Restore Deleted Huawei P60 Pictures An Easy Method Explained.
- 3 Ways of How to Get Someones Apple ID Off Apple iPhone XS without Password
- Is GSM Flasher ADB Legit? Full Review To Bypass Your Nokia C210FRP Lock
- In 2024, Does Airplane Mode Turn off GPS Location On Nokia 105 Classic? | Dr.fone
- Simple and Effective Ways to Change Your Country on YouTube App Of your Realme 11 Pro+ | Dr.fone
- How to Sign .docm file Online with DigiSigner
- How to Bypass iCloud Lock on Apple iPhone SE
- How To Transfer Data From Apple iPhone 13 Pro Max To Other iPhone? | Dr.fone
- Reset pattern lock Tutorial for Motorola Moto G73 5G
- In 2024, How to Unlock Nubia Red Magic 8S Pro+ Pattern Lock if Forgotten? 6 Ways
- What To Do When Samsung Galaxy F14 5G Has Black Screen of Death? | Dr.fone
- A Working Guide For Pachirisu Pokemon Go Map On Apple iPhone 13 | Dr.fone
- In 2024, Complete Tutorial to Use GPS Joystick to Fake GPS Location On Vivo Y28 5G | Dr.fone
- In 2024, Unova Stone Pokémon Go Evolution List and How Catch Them For Nokia C300 | Dr.fone
- Title: Updated 2024 Approved How to Make Lip Sync Video Without Installing Any App
- Author: Sam
- Created at : 2024-05-19 03:35:09
- Updated at : 2024-05-20 03:35:09
- Link: https://ai-voice-clone.techidaily.com/updated-2024-approved-how-to-make-lip-sync-video-without-installing-any-app/
- License: This work is licensed under CC BY-NC-SA 4.0.
