
:max_bytes(150000):strip_icc():format(webp)/free-disk-partition-software-tools-2624950-fad3ccc557d34ed89d53eff7538f5fdb.png)
Updated 2024 Approved Build Your AI Twitch Streamer with Animated Avatars
Build Your AI Twitch Streamer with Animated Avatars
The rise ofAI streamers has transformed how people consume content. With AI slowly becoming a normal part of life, many tasks can now easily be automated. Among the key players in this resolution is Twich AI. Originally launched in 2001, Twitch has been a go-to for streaming live videos. However, the recent development allows users to stream with realistic avatars. In this article, we explore the evolution of AI Twitch streamers and how Virbo can help you become a better streamer.
Part 1: Create Better AI Shows on Twitch With Virbo’s AI Streamer
AI-powered shows on Twitch have great potential, but they require effort to stand out. You must understand the needs of your audience and create a streamer they can resonate with. It is also important to consider how viewers will be interacting with the AI streamer.
01 What is a Twitch AI streamer?
Twitch AI streamer is a live stream on the Twitch platform where the person on the screen is an AI-powered avatar rather than a human. The AI streamer Twitch platform is known to be engaging and allows viewers to interact with an avatar of their choosing.
![]()
The AI avatar in Twitch can be manifested in several ways:
- Virtual AI Streamers : An animated 2D or 3D avatar is controlled by an AI program to play games or respond to chat messages in real-time. The avatar can engage in basic conversations either in text messages or synthesized voice. Common examples include AtheneLive and Neuro-sama.
- AI-Powered Stream Assistants: The A avatar acts as a co-host or helper alongside a human streamer. They can analyze chat messages and offer insights, play music, generate live graphs, respond to cues, and add overlays to enhance the stream.
- Deepfake Streamers: This option uses Deepfake technology to create virtual avatars that mimic the voice and appearance of specific human streamers. Although still considered a controversial approach with some ethical concerns, Deepfake streamers offer an exceptional experience to twitch streamer AI viewers.
The AI streamers on Twitch have become quite popular within a short time because of several reasons. The novelty of watching an AI interact and entertain is one of the reasons people are so curious about the platform. They get a glimpse into the future content creation and just how much AI will offer. AI streamers are also more engaging and can interact heavily with the chat without tiring. They can respond to questions and adapt their content based on viewer feedback. Some viewers find this to be a unique way of consuming content and creating a dynamic experience.
02 How can Virbo become your AI Twitch streamer?
The use of AI in streaming videos has become popular and widely accepted. Creators who leverage the power of AI can produce content that is more relevant and valuable to their audience. Virbo Live has put in place vital features needed to become a successful AI Twitch streamer. You can create your AI streamer with less effort and offer your audience quality content.
![]()
Get Started Online Free Download
Powerful Features of Virbo asAI Twitch streamer
- Realistic AI-driven Avatars : Keep your audience engaged with AI streamers or Vtubers that mimic natural movements perfectly.
- Multiple Languages and Accents : Integrate the right language and accent for your specific audience
- AI Translation : Effortlessly translate your text into multiple languages and appropriate voices to match various audiences
- AI Live Shopping Script Generation : Generate a script for your AI streamer automatically to make sure it does not miss a thing
- Customizable Q&A Repository : Create a personalized Q&A database to allow AI streamer to connect with your audience in a smarter way
- Microphone Integration for Voice-Driven AI : Get your AI-powered avatar to speak in real-time by connecting and speaking into the microphone
- Interaction Through Text : Trigger and get your AI streamer to speak what is in your text
Part 2: Creating AI Streamers on Twitch: Step-by-Step Guide
Creating AI streamers on Twitch can be an exciting experience. You can create content on the go and keep your viewers engaged at all times. However, Virbo Live offers you an easy way to create AI streamers that will keep your Twitch audience engaged. With Virbo, the process is faster and requires less effort because most steps are automated.
Equipment requirement
Before creating your AI show Twitch, you need to make sure your equipment can stream effectively and that your internet speed is fast enough. Some of theequipment requirements for building your AI streamer include:
- Computer Requirements : Make sure your computer is configured well with Stereo Mix or other virtual sound cards and is running smoothly
- Network Requirements: Make sure your average network speed is at least 5Mbps for smooth live streaming.
- Browser Requirements : It is recommended that you use the latest Chrome browser for optimal and stable performance.
Once you have confirmed that your computer is in a good state, you can head over to Virbo Live and create an AI streamer for your Twitch show. The process is easy and takes only a few steps.
Step 1 Create a Live Shopping Rooms
Visit the Virbo Live and log in. Click “Create a Black Livestream Room” to get started. Alternatively, you can select a template of choice from the available ones to create a new live room.
![]()
Get Started Online Free Download
Step 2 Choose AI Streamers and Background
From the virtual host library, choose an AI avatar that you would like to use as your virtual streamer. Add the avatar to your live room and customize it as desired. You can change the avatar’s position, appearance, and even the background to match your Twitch show.
![]()
Step 3 Enter Text or Voice
With the AI streamer ready, it is time to add in the content. You can upload your audio or enter a script that the AI Avatar for the avatar. Virbo Live also allows you to automatically generate a script using the AI smart scriptwriter. On the other hand, the AI translator allows you to effortlessly translate your script to match your audience.
![]()
Step 4 Start Live Streaming
After preparing your AI Avatar with the content, you can go ahead and live stream it on Twitch. Click Start Live Streaming in the top right corner and choose the OBS software to live stream on Twitch.
![]()
Step 5 Interact With the Audience
Virbo Live allows your AI streamer to actively interact with your audience. Make sure you turn on this feature once your avatar has gone live.
![]()
Part 3: Future Integrations of Virbo Live and Twitch to Elevate Streaming Experience
The integration of Virbo Live and Twitch creates an opportunity to elevate the streaming experience. The fusion of AI streamers and Twitch will likely revolutionize the streaming landscape. By creating immersive and interactive experiences. Both viewers and creators will benefit from the exciting possibilities brought about by this integration:
For Viewers:
- Personalized Content Curation: AI will analyze viewing habits and recommend streams tailored to the viewer’s interests by predicting what you’ll enjoy before you know it.
- Interactive AI Companions: The AI co-host will analyze chats and offer witty commentary alongside the streamer.
- Dynamic Stream Overlays: AI will generate real-time overlays that react to viewer interactions and emotions, adding a layer of dynamism and personalization to the viewing experience.
- Immersive Virtual Worlds: AI will power dynamic virtual environments that react to the stream’s content.
For Streamers:
- AI-powered Production Assistant: An AI assistant will handle scene transitions and managing overlays freeing up streamers to focus on creating engaging content.
- AI-driven Content Generation: AI will generate creative in-game challenges, adding an element of improvisation and keeping the stream fresh.
- Enhanced Audience Engagement: AI will analyze chat sentiment to suggest conversation starters or engaging activities based on viewer interests.
- Stream Performance Insights: AI will analyze viewer engagement metrics and provide actionable insights to streamers.
Conclusion
The rise of AI streamers has significantly affected the way creators produce content and viewers receive it. AsAI Twitch streamers become more popular, Virbo Live is helping content creators develop more engaging content for their audience. It is important to ensure that the AI streamer can engage effectively with the audience and offer them valuable experience. WithVirbo Live , you can create a highly responsive AI streamer that will leave your audience entertained and engaged.
Get Started Online Free Download
A Comprehensive Guide to Video and Subtitle Translation with Veed.io
If you are a multilingual content creator, having a tool like Veed in your arsenal can be pretty useful. It can quickly and accurately translate your videos online. Such translated content can allow you to reach a much wider audience and engage with them in a better way. It’s a powerful tool that can simplify the process of adding subtitles, transcriptions, and translations to your video content. In this article, we will explain how you can utilize Veed io translate feature to stay on top of your game.
Part 1. Veed Translate: Unlocking Language Diversity
Translating videos and adding captions to your YouTube videos makes your content more accessible. You can make content suitable for more social platforms and engage even more audiences. Below are some useful tips for unlocking language diversity with the Veed video translate feature.
Seamless integration with YouTube and other social media platforms
Veed supports seamless integration with all popular social media platforms. With this tool, you can import your videos from YouTube for quick translation, share your translated video directly to Facebook, optimize your video content for TikTok, and do so much more. This ensures you can optimize your content for maximum social media engagement and reach a wider audience.
Contextually relevant and accurate translations
Veed has a fantastic 98.5% accuracy rate when it comes to translations. This means Veed is actually a great alternative to tools like Google Translate that don’t always provide contextually relevant output. It automatically transcribes the audio in your videos into simple text. Afterwards, it synchronizes the generated text with your videos, ensuring accurate and well-timed translations.
Fantastic Editing Tools
Veed gives you complete creative control over the type of content you want to produce and how. It offers a range of editing tools to enhance your video creation process. For instance, it lets you change and customize the font style. You can use fun fonts, spacing, size, colors, etc. You can also add animations and visuals, incorporate templates and do so much more.
Multi-language support and translation service
Veed supports multiple languages. To be more specific, Veed translations are available in 125+ different languages of the world. This makes it easy for you to reach a global audience by creating content that resonates with a diverse audience.
Professional quality output with easy sharing options
Once you are done with your video, you can export it in multiple different formats. For instance, it supports SRT and VTT subtitle files. You can export the text as an SRT file for easy sharing and upload on other platforms, including social media, websites and podcasts etc. There’s also a screen recording option which lets you create pro-grade videos with the help of voiceovers and CC feature.
Generate Engaging
AI Video in Minutes!
Easily convert text into professional spokesperson videos in over 120+ voices & languages in minutes.
Generate AI Video Free Generate AI Video Now


Part 2. Veed.io Translate Video: Step-by-Step Tutorial
Let’s take a look now at the step-by-step tutorial to translate a video with Veed. Note: For this Veed io translate guide, we will be translating a video using Veed on mobile.
Step 1 Launch Veed and Import Your Video
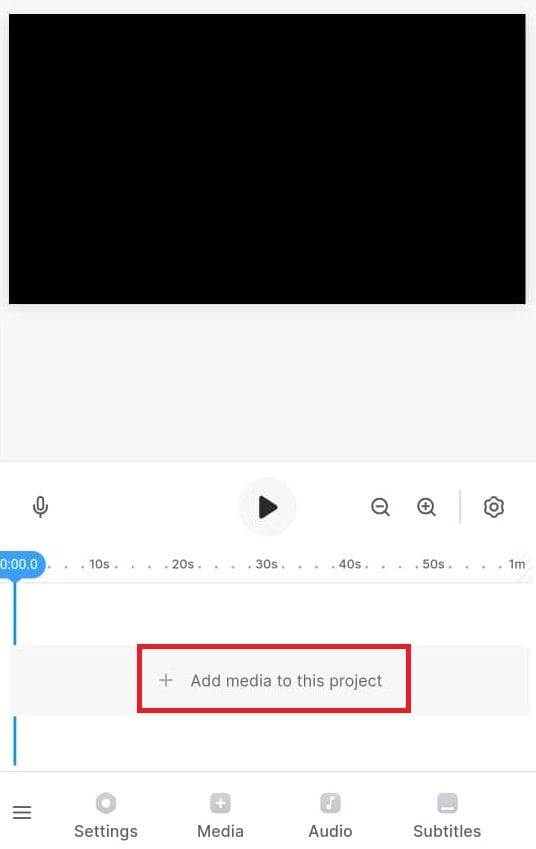
Start Veed and click on the big Add media to this project button you see in the middle. You can add audio, video, or subtitle files to the Veed platform and edit them if you want.
Step 2 Go To Project Settings
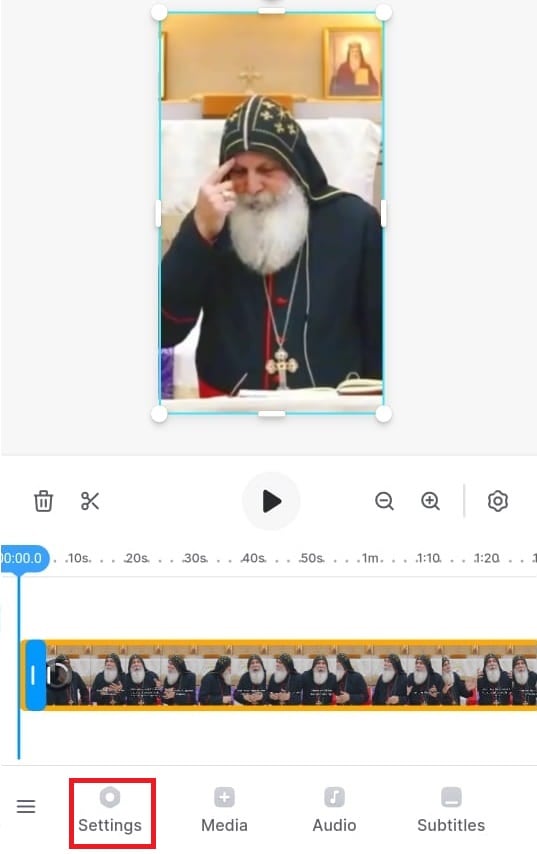
Next, go to your project’s settings by clicking the Settings button on the bottom left corner of the screen.
Step 3 Translate your Voice
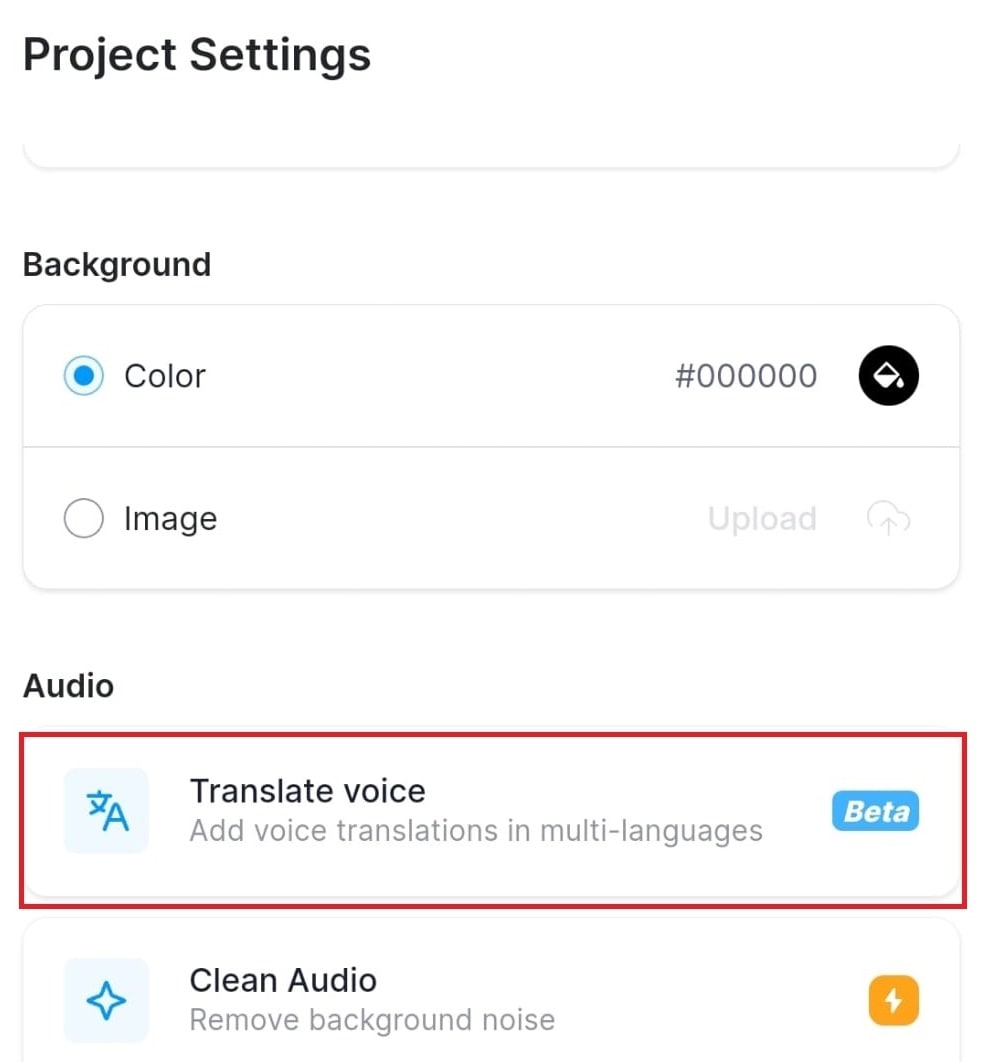
Next, click on the Translate Voice button. Note: Veed supports multiple languages. It lets you translate and then add these translations in multiple languages.
Step 4 Check Your Translation Settings
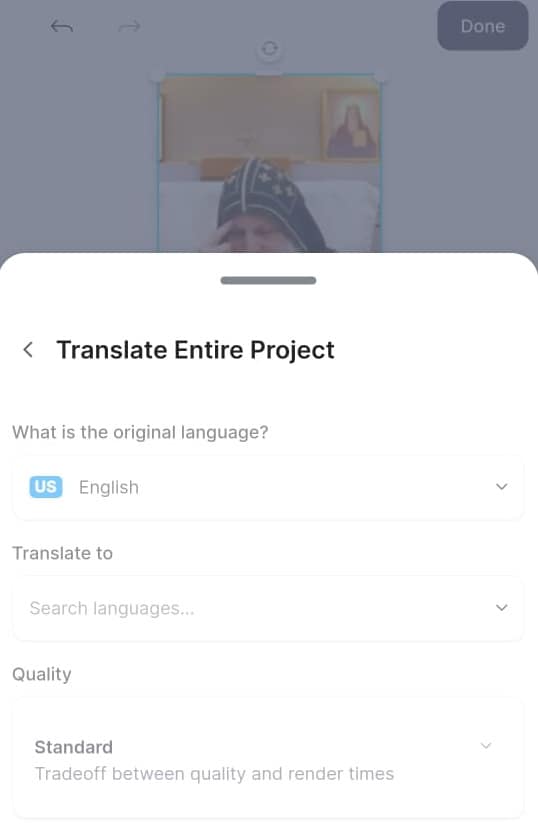
Veed automatically detects the language in the video. So, take a look at all the other settings, like the language you want to translate into and content quality and click Translate. Veed will start generating the translation in your preferred language.
Part 3: The Best Alternative to Veed.io
If you are not satisfied with the features of Veed.io, we have a better solution for you. Wondershare Virbo will prove to be the best alternative to theVeed.io translation tool. Using this advanced tool, you can select from multiple languages to get the desired translations. To carry out the translation process, you can import videos in two different formats, MP4 and MOV.
Other than video translation, users will also be able to carry out subtitle translations using this tool. Plus, this tool offers much more than translation capabilities. You can also utilize this Veed.io translate video alternative to create customized AI videos for different purposes.
Key Features of Wondershare Virbo
- Users will be able to use the lip-sync feature to create translated narrations that match the video.
- Using its talking photo functionality, you can add AI voiceovers in any language to your photos.
- Virbo provides you with an AI script feature to generate writings in multiple languages.
Advantages
- Veed.io provides very restricted minutes of translation under its subscription plans compared to Wondershare Virbo.
- Using the online version of Wondershare Virbo, you can proofread and edit the translated script.
- Veed.io is not available for offline use in Windows operating systems. However, Virbo delivers an efficient offline platform for video translation.
Translate Video Online Download APP Now Free Download
How to Translate Videos With This Veed.io Alternative
You have understood how Virbo is better than the Veed.io translation tool. Let’s analyze the method you can use to translate videos using this tool.
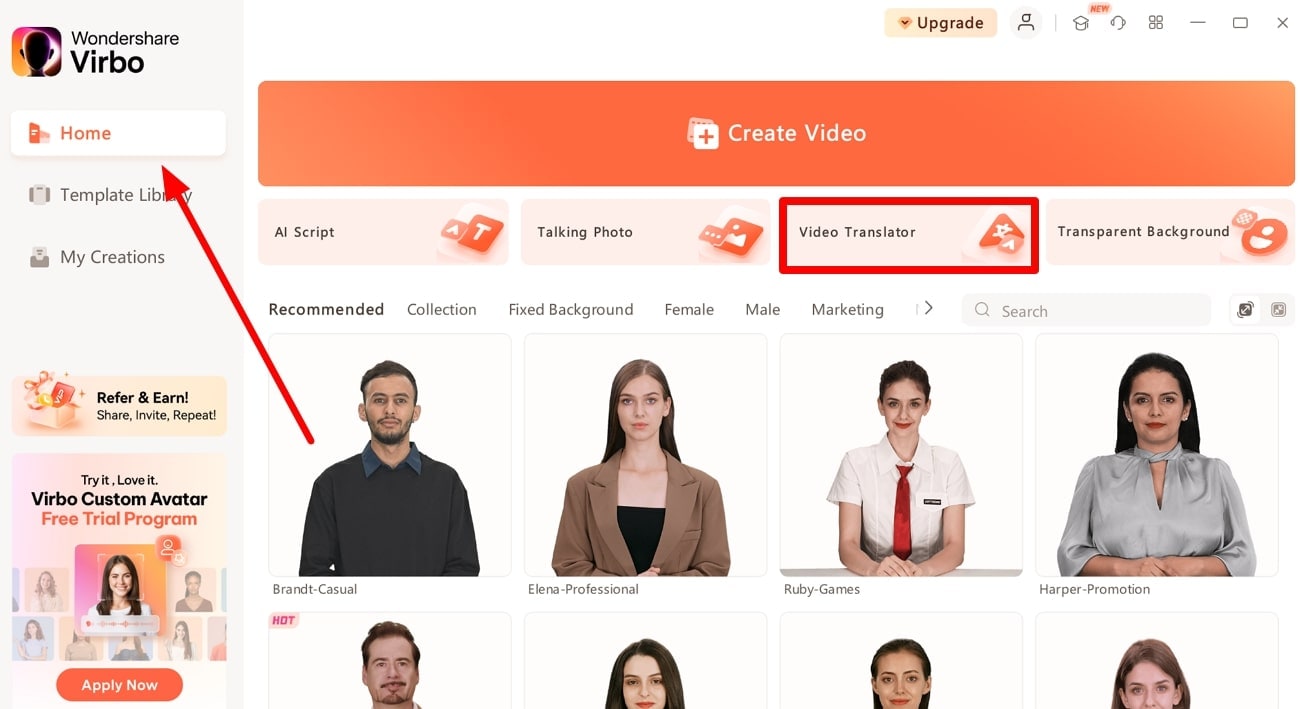
Step 1 Enter the Video Translator Feature from the Home Tab
Once you download Virbo from its official website, launch this Veed.io alternative on your computer. Next, hit the “Video Translator” button from its main interface after accessing the “Home” tab.
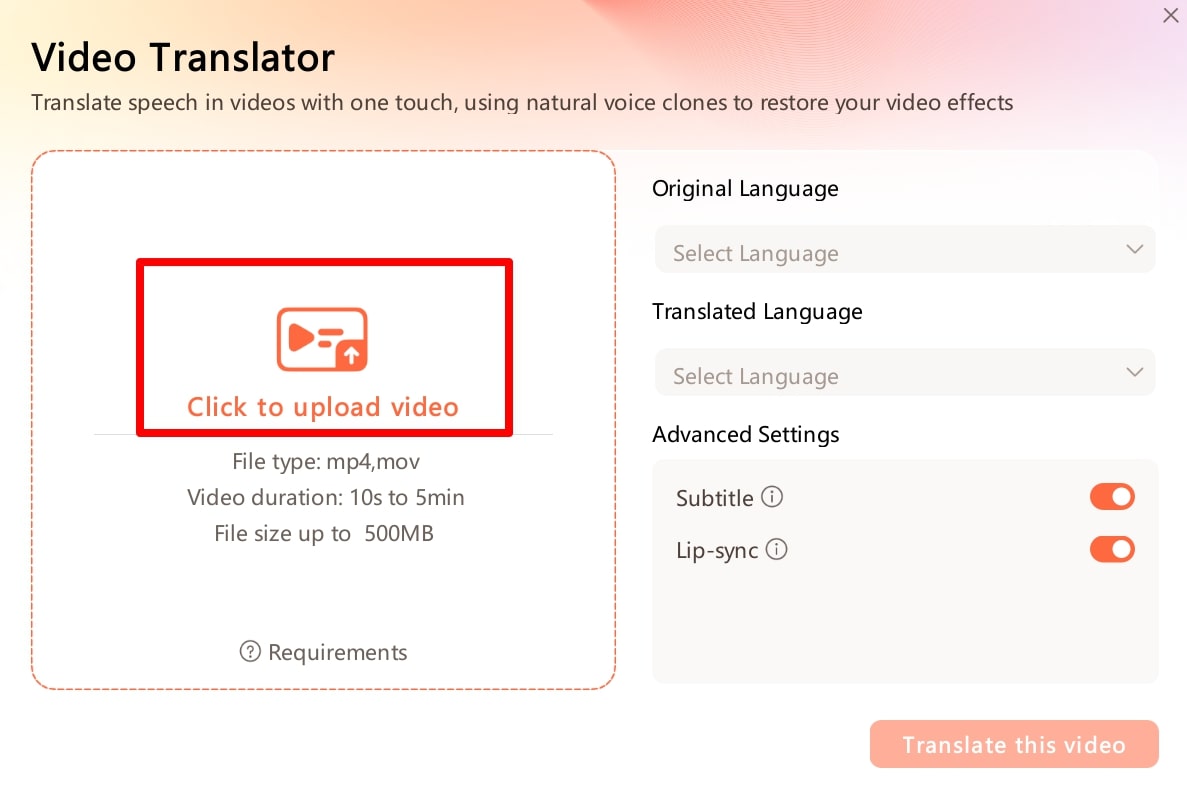
Step 2 Import Your Video to Start the Video Translation Process
Upon entering this feature, click on the “Click to Upload Video” option to add your desired video to the tool. However, there is only an option to import MP4 or MOV videos that are under 5 minutes in length.
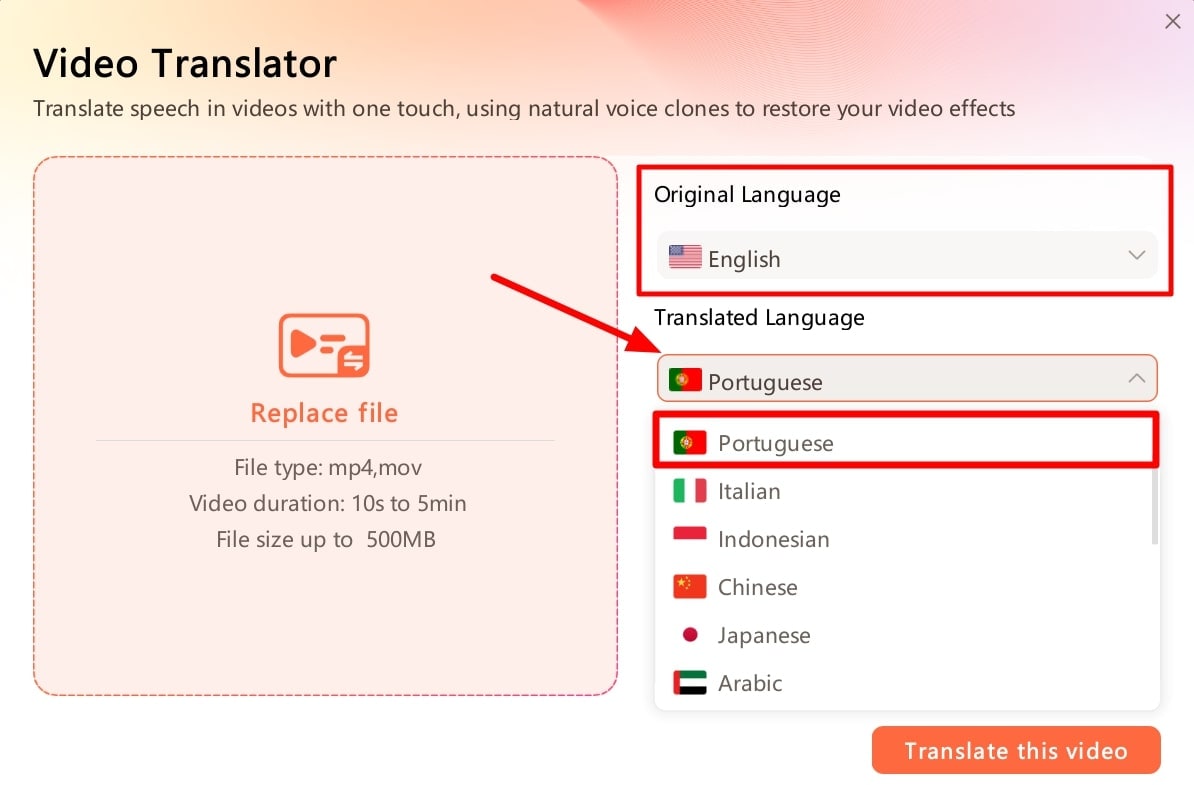
Step 3 Choose the Original and Translated Languages
After importing the video, select the original language of your video from the “Original Language” dropdown menu. Afterward, access the “Translated Language” dropdown menu to choose your desired translation language.
Step 4 Optimize the Advanced Video Translation Settings
Now, you can adjust the advanced settings for your video translation process. For this purpose, turn on the Subtitle option to get the video subtitles translated along with the audio. Also, enable the Lip-Sync option to generate translated audios that align with the video. Finally, hit the Translate This Video button to get your desired translated video.

Translate Video Online Download APP Now Free Download
Part 4. FAQs about Veed.io Subtitle Translation
1. How can I easily translate a video into English or any other language?
You can easily translate a video to 125+ languages of the world, including English, with an online video translator like Veed or Wondershare Virbo.
2. Are Veed translations accurate?
Veed has an accuracy percentage of 98.5, which is fantastic for an online tool. In fact, it is higher than many translation software out there.
3. Can I translate an audio file with Veed?
Yes, of course! You can easily upload any audio file in mp3 format to Veed. It will automatically translate and let you download the text file.
4. How can I download my content after it has been translated?
Simply click on the Download button when you finish the translation process. It takes just one click!
5. What makes Veed different from others?
Veed has many one-click features. For instance, auto subtitles, translations, social media formatting, templates, video compression, etc are all available in one simple click.
6. Can Veed translate subtitles?
Yes, Veed also supports translating subtitles. Simply upload your subtitle file in SRT format and leave the rest to Veed. Veed io subtitle translationis just as accurate as its video translation feature.
7. Is Veed good for editing?
Veed has many exceptional features that make content creation easy. But, it cannot replace a full-fledged video editor or help you create a new video from scratch. This is its biggest disadvantage. If you want to create a video, you can try to use Wondershare Virbo.
Conclusion
All said, Veed is a fantastic tool that makes translation into multiple languages as easy as possible. You can use the Veed translate feature to translate your video content into 125+ languages of the world, making it accessible to a larger audience. Videos in local languages get more engagement than those without because people can closely relate with the content. By adding captions in other languages, you can engage audiences from those countries, Veed supports an extensive range of content creators with their creative projects. What should you do if you want to create a video from scratch or want to try another alternative to translate video? Just try Wondershare Virbo!
Translate Video Online Download APP Now Free Download
Common Platforms
Common Platforms for Live Streaming
Maximize your reach with Virbo AI Live Stream on popular live streaming platforms. Uncover the common platforms compatible with our technology!
03TikTok
05Kwai
Alibaba International
Operational Steps
- Prepare Equipment, Network, and Browser
- Install Virtual Sound Card
- Due to audio restrictions on Alibaba International, a virtual sound card is required. If your computer’s sound device has a “stereo mix,” it can be used as an alternative. Check the path: My Computer - Properties - Sound - Sound Control Panel - Recording.
- Set Up “Stereo Mix”
- Skip this step if using a virtual sound card.
- Click My Computer - Properties - Sound - Sound Control Panel - Recording, activate stereo sound effects, and set it as default.
- Click Properties - Listen, select your speaker device, and click OK.
- Confirm the settings by playing a video on your computer. If both speakers and the microphone show sound detection, the setup is successful.
- Download and Install OBS
- As Alibaba International has restrictions on webcams, OBS is needed as a virtual camera (future Virbo Live product features will support this).
- After installation, go to Settings - Video and change the resolution to “1080x1920.” Select the “+” sign - Window Capture, and add the window of the Live Explosion (Live Version).
- Crop the URL bar by holding Ctrl + left-click. Click “Start Virtual Camera.”
- Prepare Materials
- Initiate the Live Stream
- Start Live Streaming on Alibaba Seller’s Live Companion
- Log in to Alibaba Seller, open the live stream, and the Alibaba Live Companion window will pop up.
- Choose “Free Mode,” add the camera, select Logitech c930e, and display it to cover the entire screen.
- Set the microphone to stereo mix or virtual sound card, click OK, and confirm the microphone has fluctuations.
- After adding products, click “Start Live” or “Start Reception.”
1688 Live Platform
Operational Steps
- Prepare Equipment, Network, and Browser
- Prepare Materials
- Initiate the Live Stream
- Start Live Streaming on 1688 Live Companion
- Log in to the 1688 Live Companion client, click the material management “+” sign - Window, select the digital person live window, and click OK.
- Zoom in the window to remove the URL bar. Click “Start Streaming,” and the live stream has started.
TikTok
Operational Steps
- Keep your equipment, network, and browser ready
- Please check the Device/Network/Browser Requirements for a detailed guide.
- Initiate the Live Stream
*Download and open the TikTok Live Studio and tap the “add source” icon (+) at the left of the screen.

Login
* Select Virbo LIVE browser (chrome.exe) from the menu. Once you select Virbo LIVE successfully, you’ll be able to see a preview of your video feed.
Adjust source
* In this part, drag and manipulate the controls to adjust the screen, ensuring a perfect showcase.
Adjust screen
- When you’re ready, tap “Go LIVE” to begin streaming.
Note
If your screen shows “ Tiktok Live studio access, it will soon be available.” Stay tuned for updates. This condition means that you still need to meet the requirements for Tiktok Live.
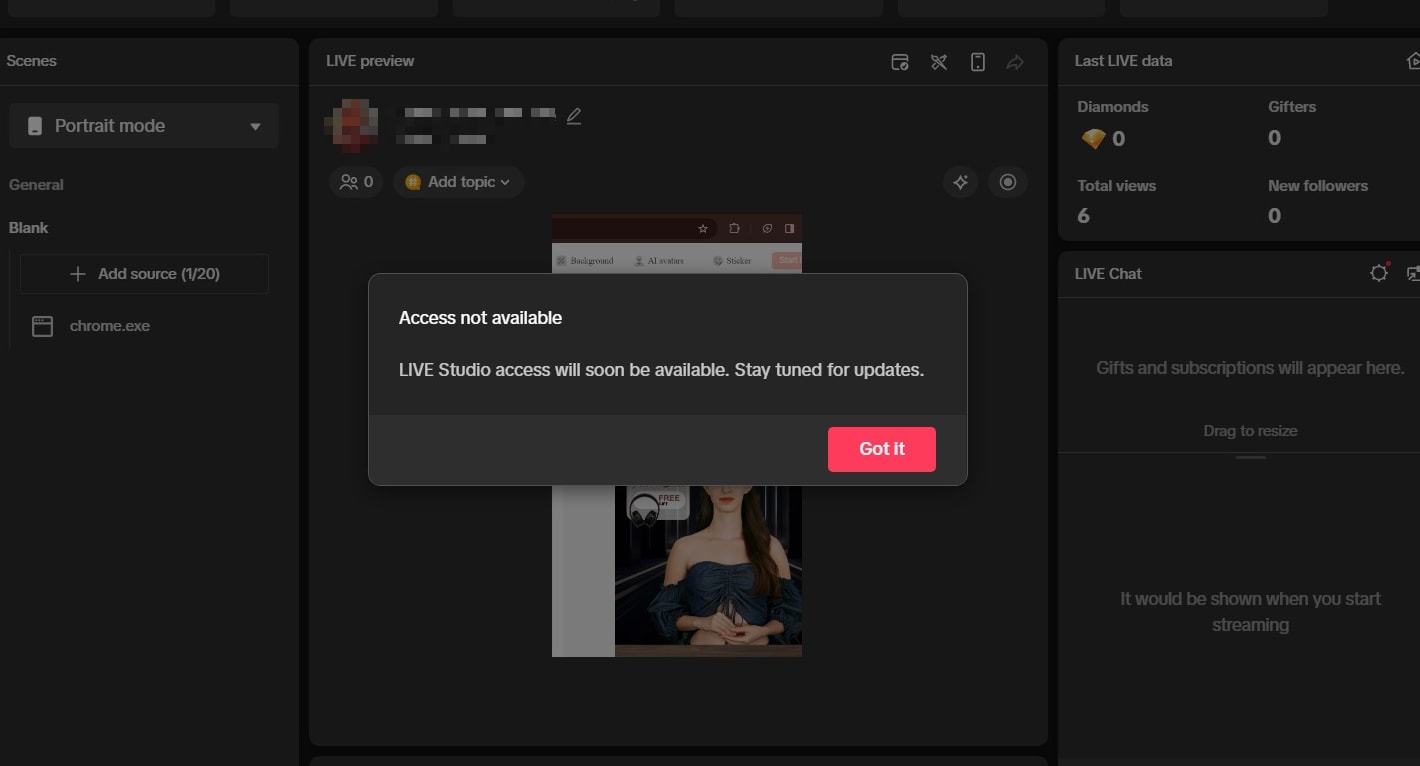
No access
TikTok Live Requirements: 1k followers, 25 min streamed in the last 180 days, and no bans. For details, please click here to get the TikTok Live studio guidelines
WeChat Video
Operational Steps
- Prepare Equipment, Network, and Browser
- Prepare Materials
- Initiate the Live Stream
- Start Live Streaming on WeChat Video Live Companion
- Log in to the WeChat Video Live Companion client, click the material management “+” sign - Window, select the digital person live window, and click OK.
- Alt + mouse or zoom the window to remove the URL bar. Click “Start Live,” and the live stream has started.
Kwai
Operational Steps
- Prepare Equipment, Network, and Browser
- Prepare Materials
- Initiate the Live Stream
- Start Live Streaming on Kuaishou Live Companion
- Log in to the Kuaishou Live Companion client, click the material management “+” sign - Window, select the digital person live window, and click OK.
- Alt + mouse or zoom the window to remove the URL bar. Click “Start Live,” and the live stream has started.
03TikTok
05Kwai
Alibaba International
Operational Steps
- Prepare Equipment, Network, and Browser
- Install Virtual Sound Card
- Due to audio restrictions on Alibaba International, a virtual sound card is required. If your computer’s sound device has a “stereo mix,” it can be used as an alternative. Check the path: My Computer - Properties - Sound - Sound Control Panel - Recording.
- Set Up “Stereo Mix”
- Skip this step if using a virtual sound card.
- Click My Computer - Properties - Sound - Sound Control Panel - Recording, activate stereo sound effects, and set it as default.
- Click Properties - Listen, select your speaker device, and click OK.
- Confirm the settings by playing a video on your computer. If both speakers and the microphone show sound detection, the setup is successful.
- Download and Install OBS
- As Alibaba International has restrictions on webcams, OBS is needed as a virtual camera (future Virbo Live product features will support this).
- After installation, go to Settings - Video and change the resolution to “1080x1920.” Select the “+” sign - Window Capture, and add the window of the Live Explosion (Live Version).
- Crop the URL bar by holding Ctrl + left-click. Click “Start Virtual Camera.”
- Prepare Materials
- Initiate the Live Stream
- Start Live Streaming on Alibaba Seller’s Live Companion
- Log in to Alibaba Seller, open the live stream, and the Alibaba Live Companion window will pop up.
- Choose “Free Mode,” add the camera, select Logitech c930e, and display it to cover the entire screen.
- Set the microphone to stereo mix or virtual sound card, click OK, and confirm the microphone has fluctuations.
- After adding products, click “Start Live” or “Start Reception.”
1688 Live Platform
Operational Steps
- Prepare Equipment, Network, and Browser
- Prepare Materials
- Initiate the Live Stream
- Start Live Streaming on 1688 Live Companion
- Log in to the 1688 Live Companion client, click the material management “+” sign - Window, select the digital person live window, and click OK.
- Zoom in the window to remove the URL bar. Click “Start Streaming,” and the live stream has started.
TikTok
Operational Steps
- Keep your equipment, network, and browser ready
- Please check the Device/Network/Browser Requirements for a detailed guide.
- Initiate the Live Stream
*Download and open the TikTok Live Studio and tap the “add source” icon (+) at the left of the screen.
Login
* Select Virbo LIVE browser (chrome.exe) from the menu. Once you select Virbo LIVE successfully, you’ll be able to see a preview of your video feed.
Adjust source
* In this part, drag and manipulate the controls to adjust the screen, ensuring a perfect showcase.
Adjust screen
- When you’re ready, tap “Go LIVE” to begin streaming.
Note
If your screen shows “ Tiktok Live studio access, it will soon be available.” Stay tuned for updates. This condition means that you still need to meet the requirements for Tiktok Live.
No access
TikTok Live Requirements: 1k followers, 25 min streamed in the last 180 days, and no bans. For details, please click here to get the TikTok Live studio guidelines
WeChat Video
Operational Steps
- Prepare Equipment, Network, and Browser
- Prepare Materials
- Initiate the Live Stream
- Start Live Streaming on WeChat Video Live Companion
- Log in to the WeChat Video Live Companion client, click the material management “+” sign - Window, select the digital person live window, and click OK.
- Alt + mouse or zoom the window to remove the URL bar. Click “Start Live,” and the live stream has started.
Kwai
Operational Steps
- Prepare Equipment, Network, and Browser
- Prepare Materials
- Initiate the Live Stream
- Start Live Streaming on Kuaishou Live Companion
- Log in to the Kuaishou Live Companion client, click the material management “+” sign - Window, select the digital person live window, and click OK.
- Alt + mouse or zoom the window to remove the URL bar. Click “Start Live,” and the live stream has started.
The Ultimate Guide on How to Promoting Music Videos on YouTube
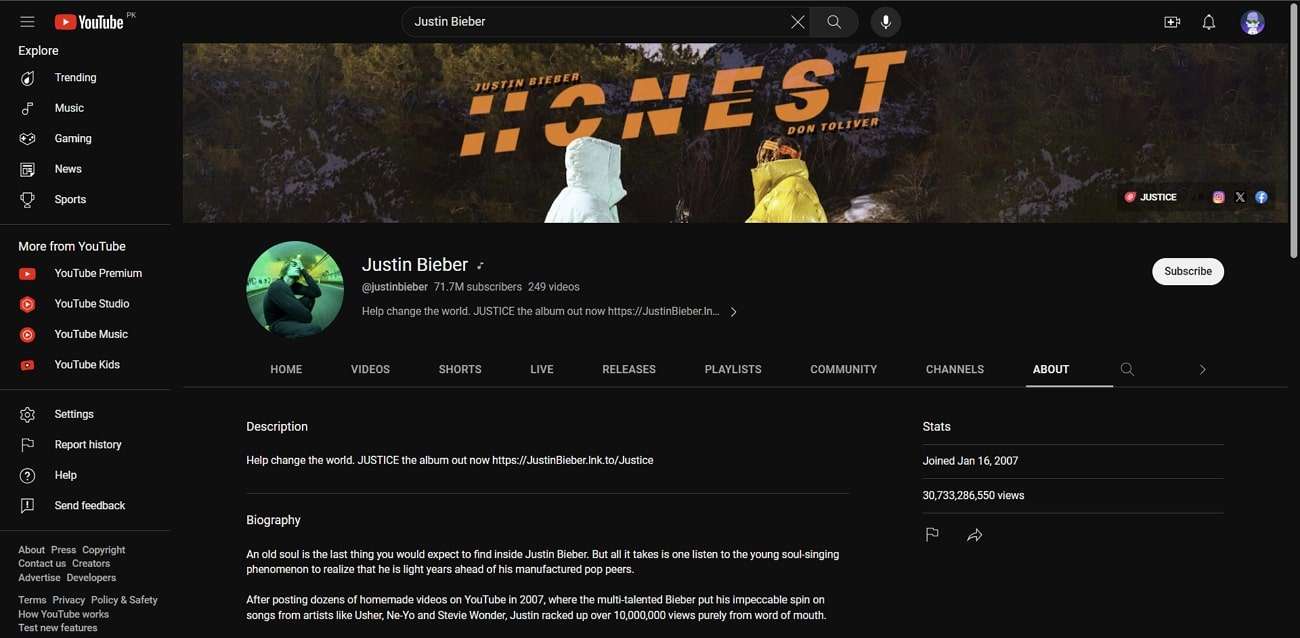
YouTube is one of the well-known platforms that has a promising audience globally. Many musicians and artists use YouTube for self-promotion. The influencing power of YouTube helps musicians to reach their targeted audience from all over the world. Therefore, it’s important topromote music videos on YouTube. By doing so, viewers can interact and enjoy your music videos through comments, likes, and shares.
If you are willing topromote music on YouTube , you are at the right place. This article will discuss a comprehensive guide to promoting music videos on YouTube to gain maximum viewership. Thus, keep reading this article to fetch authentic guidelines and tools for promoting music videos on YouTube.
Part 1: Why Promoting Music Video is Important?
Music video promotion on YouTube is essential for musicians and artists. This platform can provide musicians an excellent opportunity to showcase their talent through music videos. To learn the benefits of promoting music videos on YouTube, read the following points:
1. Attracts Vast Audience Through Visuals
Without a second thought, it can be stated that YouTube is a massive platform worldwide. It has a vast audience, as this platform is recognized in many countries. Therefore, you can connect with diverse people through your music videos on YouTube. This will help you in connecting with many people without going anywhere.
Moreover, the chances of gaining viewership on your music videos increase on YouTube to a great extent. The reason is that you can present your music videos through attractive visual storytelling. A well-produced music video can hook your audience thoroughly.
2. Financial Opportunities
YouTube also helps artists to get financial benefits. You can not only pursue your passion through YouTube but also gain monetary benefits. Once you have gained sufficient subscribers and viewership on the YouTube channel, you can earn money through it. WithYouTube ads music , you can generate a handsome income by sitting at home. Thus, YouTube helps people to become financially independent and strong.
3. Easy to Discover
YouTube algorithms function to promote music videos to people regularly. Once you have posted a music video on YouTube, it can be visible to various viewers. This platform lets you insert relevant keywords in your YouTube titles and descriptions for effective promotion. Thus, you can gain viewership on your music videos regularly.
4. Analytics and Feedback
Do you know that YouTube offers data and analytics on every music video performance? With data and analytics, you can analyze audience demographics on your YouTube channel. This will help you understand the current preferences of your viewers. Moreover, YouTube provides relevant information about watch times on your YouTube channel to help you modify your content.
Furthermore, you can generate feedback from your audience through comments. It will assist you in enhancing your music videos. Resultantly, you can engage more viewers through your music videos by bringing constant improvements.
5. Create Trends and Ensures Cross Promotion
You can become a trendsetter if you successfully showcase your unique talent throughmusic video promotion . YouTube displays trending videos separately to get a spotlight from a maximum number of people. Moreover, YouTube videos can be shared on multiple platforms like Facebook, Instagram, WhatsApp, etc. Thus, you can create a strong fan base by posting music videos on YouTube.
Part 2: Ultimate Guide to Promoting Music Videos on YouTube
Do you want topromote music videos on YouTube successfully? Read this section carefully to learn the valuable tactics for effective music video promotion on YouTube.
1. Reach Your Audience
Targeting your audience is essential to ensure high viewership on your music video. To do so, you have to research your audience demographics, such as age, gender, and location. It would help to understand your audience’s preferences, current demands, and interests. You can use the YouTube Analytics tool to analyze your audience’s behavior.
After knowing the needs of your viewers, ensure to produce relevant content. Furthermore, you should construct a schedule to upload your YouTube videos. You can pick a time when most people are free and want entertainment. This will help in reaching your targeted audience at the right time.
2. Create a Compelling Profile
Apart frompromoting music videos , creating an attractive profile on YouTube is also significant. To make your identity highlighted and accepted, it would be ideal to generate a complete YouTube profile. First, select a unique yet relevant YouTube channel name. The name should compellingly display your true identity. Afterward, you should pay attention to your channel art by uploading attractive banners.
Your YouTube profile picture also plays a key role in attracting viewers. Thus, select a high-quality profile picture that matches the personality of your YouTube channel. Afterward, you can produce a channel trailer to intrigue your viewers. You should also create engaging custom thumbnails for YouTube videos to get click baits. Moreover, provide complete information in your channel’s “About” section.
3. Apply Proficient Video Editing Skills
Once you have produced a music video, it’s time to edit the raw footage. To cast a professional impression, you should know how to experiment with video editing. Thus, you should learn the basics of video editing through online classes or professional help. This will help you adjust your video’s settings to remove flaws from your music videos.
Most importantly, you should try reliable video editing software. To achieve quality results, you can try Wondershare Filmora . This tool has multiple AI features that can boost editing efficiency by automating manual tasks. Moreover, it has a friendly interface that can help beginners and inexperienced individuals. Thus, you can practice on Filmora to edit your YouTube music videos.

4. Add Engaging Elements
For effectiveYouTube music promotion , you should add engaging elements to your video. Your video should engage the viewers so that they can share it on other platforms. If you are hesitant to present your music video, you can use virtual YouTube presenters. For this, the best available tool isVirbo . This tool contains tons of AI Avatars with different attires that can present your music videos with natural human voices.
Virbo can produce engaging AI videos within a few minutes. This video avatar creator is compatible with Windows, Android, iOS, and Web Browsers. It uses advanced AI technology to complete your given tasks automatically. With cost-effective resources on this tool, you can make your music videos engaging through this tool. Therefore, you must try Virbo to get instant results without putting in a manual effort.

Get Started Online Free Download
Key Features
- Multi-National AI Avatars: Virbo comprises more than 150 AI Avatars of multiple nationalities. The avatars are available in both genders with different age ranges and attires.
- Various Supported AI Voices: You can select AI voices for your avatar from more than 120 options. The AI voices are available in all common languages and diverse accents. You can also choose the tone of the AI voice.
- Generate YouTube Titles and Descriptions: With the integration of ChatGPT in Virbo, you can create YouTube titles and descriptions automatically. By inserting relevant keywords and product details, the tool can produce attractive YouTube descriptions.
- Free Assets and Templates: This AI-powered tool consists of built-in templates and free assets that you can utilize for your videos. Moreover, they are free and can easily be used for video enhancement.
5. Make Connection with Your Viewers
Bridging the gap with your viewers helps in building a strong YouTube community. You should respond to the comments under your video to communicate with your viewers. You can also create a Q&A video to answer the common queries of your audience. Live chats and sessions also play a key role in effective communication.
Furthermore, you can collaborate with other YouTubers to connect with more people. You can plan exciting activities with other YouTubers so that viewers can enjoy them to their fullest. Also, you should post your other social media links, such as Instagram, Facebook, and Twitter, under the YouTube description. This will help you gain followers on all your social media platforms.
6. Enhance YouTube SEO
You should enhance your YouTube SEO game to gain maximum visibility for your music videos. By executing YouTube SEO strategies, you canpromote music videos effortlessly. First, research common keywords people use to find YouTube videos of their interest. You can get help from tools like TubeBuddy and Google Keyword Planner . Afterward, insert the famous keywords in YouTube titles and descriptions smartly.
Moreover, you should also use tags wisely so that YouTube can comprehend the context of your video. This will help YouTube algorithms to increase the visibility of your music video. You should also add closed captions to your music video, which can lead to improved YouTube SEO. Also, you should create playlists on your YouTube channel to organize your music videos. It will allow viewers to navigate to your content.
Conclusion
YouTube music promotion can help in reaching a maximum number of people globally. To become a famous musician, you should know the techniques to promote music videos on YouTube. This article taught you the importance of attractive storytelling, YouTube SEO, and other essential factors for music video promotion.
You can also add AI virtual presenters to your YouTube music videos through Virbo. Hence, consider this article to get complete guidelines for YouTube music video promotion.
You May Also Ask
1.Can you do free promotion of music videos on YouTube?
Yes, you can do free YouTube music video promotion by using organic methods. These methods include sharing music videos on social media, optimizing the SEO of titles and descriptions, and interacting with the audience in the comment section.
2. Should you buy likes and views to market YouTube music videos?
There are various ways of buying views and likes for YouTube music videos, but it is not recommended. This is because YouTube has powerful advanced algorithms to detect fake or purchased likes or views.
Launching Your Live Room
Launching Your Live Room
Explore step-by-step instructions on decorating your space, uploading local images and videos, adding engaging AI interactions, etc. Elevate your streaming experience and captivate your audience with a seamlessly executed live room. Dive into our comprehensive guide now!
02Uploading Local Images and Videos
07AI Intelligent Script Generation
11Starting/Ending the Live Broadcast
Decorating Your Live Room
Decoration Guidance
- Click on the product homepage and create a blank live room to initiate a new live session.

Create a blank live room
- Upon creating a blank live room, the live room editing page will open. The left side serves as the operation area, the right side as the canvas area, and the materials area is located above.

Livestream room navigation
- Click on the templates to use pre-designed combinations of background, virtual hosts, and stickers.

Select a template
- Customize the background from the background library. During the live broadcast, only one background can be used.

Livestream room customization
- Choose a virtual host from the virtual host library. Only one virtual host can be used during the live session.
![]()
Choose a virtual host
- Add stickers from the sticker library. Multiple stickers can be used during the live broadcast.
- After selecting materials, adjust their position and size in the canvas area. Right-click to modify layers, copy, or delete materials.
Uploading Local Images and Videos
Upload background images or videos
- Upload: Click Background -> Upload Background -> Select file to upload. Materials will be displayed in “My Background” after uploading.

Upload Background
- Apply: Click Background -> My Background, then click on the material to use it on the canvas.
- Delete: Hover over the material and click the delete icon to remove it.

Delete Background
Note
Background upload requirements:
- Image and video dimensions should be 9:16
- Image formats: JPG/JPEG/PNG
- Video formats: MP4/MOV
- Resolution should not exceed 1080P
- Video duration should not exceed 30 minutes
- File size should not exceed 1GB
Upload sticker images or videos
- Upload: Click Sticker -> Upload Sticker -> Select file to upload. Materials will be displayed in “My Sticker” after uploading.

Upload Sticker
- Apply: Click Sticker -> My Sticker, then click on the material to use it on the canvas.
- Delete: Click Sticker -> My Sticker, hover over the material, click the delete icon to remove it.

Delete Sticker
Note
Sticker upload requirements:
- Image and video dimensions are flexible.
- Image formats: JPG/JPEG/PNG
- Video formats: MP4/MOV
- Resolution should not exceed 1080P
- Video duration should not exceed 30 minutes
- File size should not exceed 1GB
Text-Driven Live Room
Script Guidance
- Input script text: Copy and paste your script into the script dialogue box.

Text Scripts Inset
- Choose a matching tone: Click the voice-over entrance above, select a suitable tone, and preview it.
- Preview: Click the “Preview” button below the text to listen.
Audio-Driven Live Room
Audio Guidance
- Upload audio: Click Script -> Audio -> Upload local voice and upload the local file.

Upload Audio
- Preview audio: After uploading, click to preview the audio.

Preview Audio
- Audio sorting: Hold and drag to sort the audio files.

Audio sorting
- Audio sorting: Hold and drag to sort the audio files.

Modifying Live Room Name
Method Guidance
- Method 1: Click the edit button in the upper-left corner of the edit page to rename the live room.

Rename Livestream Room
- Method 2: Product homepage -> My Live Rooms -> Click on the more options for an individual live room -> Choose Rename.
Adding AI Identification
Step Guidance
- On the live room editing page, click on the checkbox before the AI identification to enable or disable it.
AI Intelligent Script Generation
Generation Guidance
- Click the “AI Intelligent Script” button below the script, a popup will appear.
- Enter your product name (mandatory), selling points (optional), promotional information (optional), select language and style, then click generate.

AI Script
- The generated result can be further modified, click “Use” to add it to the script dialogue box.
AI Translation
Translation Guidance
- Click the “AI Translation” button below the script, a popup will appear.
- Place the text to be translated on the left, click the middle arrow to select the language for translation (e.g., English), and click translate.

AI Translation
- The generated result can be further modified, click “Use” to add it to the script dialogue box.

AI Translation Result
Manual Interaction
Microphone Interaction
- Operational Flow:
- Click Manual Interaction -> Microphone, and select the microphone device.
- Speak into the microphone and observe the sound wave status.
- Open “Start Live,” wait for the appearance of the virtual host image, and click “Open Mic Takeover.” The virtual host’s mouth will be closed, and your voice will drive the virtual host to speak.
- After speaking, click “End Takeover,” and the virtual host will resume reading the scripted dialogue.
- Click Manual Interaction -> Microphone, and select the microphone device.
- Grant Browser Microphone Access:
- Google Chrome:
*Open Chrome, click the settings icon in the top right.
* Click “Settings,” open the settings page. Select “Privacy and Security” and then click “Site Settings.”
*Enter the site settings page, click “Microphone.”
* On the microphone authorization page, select that the site can request the use of your microphone.
* After these settings, when the browser needs to use the camera or microphone, a device request box will pop up on the page. Select “Allow.” - Mozilla Firefox:
*Open Firefox, click the settings icon in the top right, and click “Settings.”
* Open the settings page, click “Privacy & Security,” and find “Microphone Permissions.” Click “Settings” next to “Microphone.”
*Enter the settings page, add the site that requests the use of your microphone to the list, and click “Save Changes.”
* After these settings, when the browser needs to use the camera or microphone, a device request box will pop up on the page. Select “Allow.” - Sogou Browser:
*Open Sogou Browser, click the settings icon in the top right, and click “Options.”
* Open the options page, click “Advanced,” find “Privacy - Browsers on the Mac System:
*Locate “System Preferences” on your Mac dock and click the icon. Once opened, find “Security & Privacy” and click to open.
* On the “Security & Privacy” page, select “Privacy,” then click on “Microphone” and set the applications that need to use the microphone to “Allow.”
- Google Chrome:
Text Interaction
- Click on “Artificial Interaction” and enter interaction scripts in the input box below.
- Click “Add Text” to add it to the interaction list. After starting the live broadcast, each interaction script will have a send button.

Text Interactionn
- Click “Send” to trigger the AI to speak according to the interaction script.
Intelligent Interaction
Note
The current intelligent interaction feature only supports Alibaba International. If you are streaming on other platforms, you can skip this step.
Setting Entrance
- On the live broadcast page, click on “Intelligent Interaction,” select the live platform, and the supported intelligent interaction features will be randomly displayed.
Q&A Library Settings
- Creating a New Q&A:
- On the product homepage, click on Q&A Library - Add Q&A, and a popup window will appear.
- Fill in the rule name, keywords, reply text, and upload a reply video. Click Save.
Note
Rule Name: Name the rule for easy identification.
Keywords: If a viewer’s question in the live room contains any of these keywords, it will trigger the AI to answer.
Reply Content: You can add up to 5 replies. Include variables like [Viewer’s Nickname] and [Viewer’s Country] for personalized responses.
Sequential Reply: Replies in sequence when triggered.
Random Reply: Randomly selects a reply when triggered.
Reply Video: If configured, the video will be displayed at the specified position until the AI’s reply ends.
- Adjusting Q&A Activation Status:
- Click Q&A Library - Switch to close or open the Q&A rule. When closed, the Q&A rule will not take effect after the live broadcast starts.
- Turning on Q&A Library Switch in the Live Room:
- On the live broadcast editing page, click Intelligent Interaction - Platform, select “Alibaba International,” and turn on the Q&A Library switch. This must be done after starting the live broadcast and capturing the barrage for the function to work.
Greeting Rules Settings
- Greeting Content: You can add up to 5 replies, including variables like [Viewer’s Nickname] and [Viewer’s Country].
- Sequential Reply: Replies in sequence when triggered.
- Random Reply: Randomly selects a reply when triggered.
- On the live broadcast editing page, click Intelligent Interaction - Platform, select “Alibaba International,” turn on the Greeting switch, and click the edit icon to open the editing window. Fill in the reply text and click Save.
Sending Business Cards and Product Catalogs
- On the live broadcast editing page, click Intelligent Interaction - Platform, select “Alibaba International,” turn on the “Send Business Cards” switch, and turn on the “Send Product Catalogs” switch.
Note
These functions will only take effect after starting the live broadcast and capturing the barrage.
How to Start Live Barrage Capture
- Start Broadcasting in Virbo Live
- Follow the steps for “Start/End Broadcast” on the live broadcast editing page.
- Install the Plugin in Chrome
- Ensure Chrome is up to date, then download the plugin from the provided link . After downloading, unzip locally.
- Configure the Plugin in Chrome
- Open Chrome, go to Settings - Extensions - Manage Extensions, enable Developer mode, click “Load Unpacked,” and select the unzipped folder. Enable “Allow in incognito mode” in the plugin details.
- Copy the Live Control Page Link
- Copy the link of your live control page (web version) from the live platform. Paste the link into the live broadcast editing page under Intelligent Interaction - Live Room Link Input, then click “Start Capturing.”
Note
Alibaba International currently supports automatic Q&A, automatic greetings, automatic business card sending, and automatic product catalog sending. You can turn on the corresponding switches and then configure the detailed settings for each item.
Starting/Ending the Live Broadcast
Starting the Live Broadcast
- On the live broadcast editing page, click “Start Broadcasting.”
- The AI live broadcast window will appear shortly after, displaying the AI live broadcast.
Using Your Broadcasting Partner or OBS
Note
Keep the AI live broadcast window open on the desktop during the broadcast, or it will not broadcast properly.
- Open your broadcasting partner or OBS, add a window, select the Wondershare VVB (Live Version) live window.
- Click “Start Broadcasting.” Use Alt + mouse to crop out the web bar or use the zoom function to remove it.
- During the live broadcast, you can only modify the “Artificial Interaction” function; other broadcast settings cannot be changed.
Ending the Broadcast
- When concluding the live broadcast, initiate the termination of the live stream on the platform’s broadcasting partner first, followed by clicking the “End Live” button on Virbo Live to finalize the shutdown process.
02Uploading Local Images and Videos
07AI Intelligent Script Generation
11Starting/Ending the Live Broadcast
Decorating Your Live Room
Decoration Guidance
- Click on the product homepage and create a blank live room to initiate a new live session.
Create a blank live room
- Upon creating a blank live room, the live room editing page will open. The left side serves as the operation area, the right side as the canvas area, and the materials area is located above.
Livestream room navigation
- Click on the templates to use pre-designed combinations of background, virtual hosts, and stickers.
Select a template
- Customize the background from the background library. During the live broadcast, only one background can be used.
Livestream room customization
- Choose a virtual host from the virtual host library. Only one virtual host can be used during the live session.
![]()
Choose a virtual host
- Add stickers from the sticker library. Multiple stickers can be used during the live broadcast.
- After selecting materials, adjust their position and size in the canvas area. Right-click to modify layers, copy, or delete materials.
Uploading Local Images and Videos
Upload background images or videos
- Upload: Click Background -> Upload Background -> Select file to upload. Materials will be displayed in “My Background” after uploading.
Upload Background
- Apply: Click Background -> My Background, then click on the material to use it on the canvas.
- Delete: Hover over the material and click the delete icon to remove it.
Delete Background
Note
Background upload requirements:
- Image and video dimensions should be 9:16
- Image formats: JPG/JPEG/PNG
- Video formats: MP4/MOV
- Resolution should not exceed 1080P
- Video duration should not exceed 30 minutes
- File size should not exceed 1GB
Upload sticker images or videos
- Upload: Click Sticker -> Upload Sticker -> Select file to upload. Materials will be displayed in “My Sticker” after uploading.
Upload Sticker
- Apply: Click Sticker -> My Sticker, then click on the material to use it on the canvas.
- Delete: Click Sticker -> My Sticker, hover over the material, click the delete icon to remove it.
Delete Sticker
Note
Sticker upload requirements:
- Image and video dimensions are flexible.
- Image formats: JPG/JPEG/PNG
- Video formats: MP4/MOV
- Resolution should not exceed 1080P
- Video duration should not exceed 30 minutes
- File size should not exceed 1GB
Text-Driven Live Room
Script Guidance
- Input script text: Copy and paste your script into the script dialogue box.
Text Scripts Inset
- Choose a matching tone: Click the voice-over entrance above, select a suitable tone, and preview it.
- Preview: Click the “Preview” button below the text to listen.
Audio-Driven Live Room
Audio Guidance
- Upload audio: Click Script -> Audio -> Upload local voice and upload the local file.
Upload Audio
- Preview audio: After uploading, click to preview the audio.
Preview Audio
- Audio sorting: Hold and drag to sort the audio files.
Audio sorting
- Audio sorting: Hold and drag to sort the audio files.
Modifying Live Room Name
Method Guidance
- Method 1: Click the edit button in the upper-left corner of the edit page to rename the live room.
Rename Livestream Room
- Method 2: Product homepage -> My Live Rooms -> Click on the more options for an individual live room -> Choose Rename.
Adding AI Identification
Step Guidance
- On the live room editing page, click on the checkbox before the AI identification to enable or disable it.
AI Intelligent Script Generation
Generation Guidance
- Click the “AI Intelligent Script” button below the script, a popup will appear.
- Enter your product name (mandatory), selling points (optional), promotional information (optional), select language and style, then click generate.
AI Script
- The generated result can be further modified, click “Use” to add it to the script dialogue box.
AI Translation
Translation Guidance
- Click the “AI Translation” button below the script, a popup will appear.
- Place the text to be translated on the left, click the middle arrow to select the language for translation (e.g., English), and click translate.
AI Translation
- The generated result can be further modified, click “Use” to add it to the script dialogue box.
AI Translation Result
Manual Interaction
Microphone Interaction
- Operational Flow:
- Click Manual Interaction -> Microphone, and select the microphone device.
- Speak into the microphone and observe the sound wave status.
- Open “Start Live,” wait for the appearance of the virtual host image, and click “Open Mic Takeover.” The virtual host’s mouth will be closed, and your voice will drive the virtual host to speak.
- After speaking, click “End Takeover,” and the virtual host will resume reading the scripted dialogue.
- Click Manual Interaction -> Microphone, and select the microphone device.
- Grant Browser Microphone Access:
- Google Chrome:
*Open Chrome, click the settings icon in the top right.
* Click “Settings,” open the settings page. Select “Privacy and Security” and then click “Site Settings.”
*Enter the site settings page, click “Microphone.”
* On the microphone authorization page, select that the site can request the use of your microphone.
* After these settings, when the browser needs to use the camera or microphone, a device request box will pop up on the page. Select “Allow.” - Mozilla Firefox:
*Open Firefox, click the settings icon in the top right, and click “Settings.”
* Open the settings page, click “Privacy & Security,” and find “Microphone Permissions.” Click “Settings” next to “Microphone.”
*Enter the settings page, add the site that requests the use of your microphone to the list, and click “Save Changes.”
* After these settings, when the browser needs to use the camera or microphone, a device request box will pop up on the page. Select “Allow.” - Sogou Browser:
*Open Sogou Browser, click the settings icon in the top right, and click “Options.”
* Open the options page, click “Advanced,” find “Privacy - Browsers on the Mac System:
*Locate “System Preferences” on your Mac dock and click the icon. Once opened, find “Security & Privacy” and click to open.
* On the “Security & Privacy” page, select “Privacy,” then click on “Microphone” and set the applications that need to use the microphone to “Allow.”
- Google Chrome:
Text Interaction
- Click on “Artificial Interaction” and enter interaction scripts in the input box below.
- Click “Add Text” to add it to the interaction list. After starting the live broadcast, each interaction script will have a send button.
Text Interactionn
- Click “Send” to trigger the AI to speak according to the interaction script.
Intelligent Interaction
Note
The current intelligent interaction feature only supports Alibaba International. If you are streaming on other platforms, you can skip this step.
Setting Entrance
- On the live broadcast page, click on “Intelligent Interaction,” select the live platform, and the supported intelligent interaction features will be randomly displayed.
Q&A Library Settings
- Creating a New Q&A:
- On the product homepage, click on Q&A Library - Add Q&A, and a popup window will appear.
- Fill in the rule name, keywords, reply text, and upload a reply video. Click Save.
Note
Rule Name: Name the rule for easy identification.
Keywords: If a viewer’s question in the live room contains any of these keywords, it will trigger the AI to answer.
Reply Content: You can add up to 5 replies. Include variables like [Viewer’s Nickname] and [Viewer’s Country] for personalized responses.
Sequential Reply: Replies in sequence when triggered.
Random Reply: Randomly selects a reply when triggered.
Reply Video: If configured, the video will be displayed at the specified position until the AI’s reply ends.
- Adjusting Q&A Activation Status:
- Click Q&A Library - Switch to close or open the Q&A rule. When closed, the Q&A rule will not take effect after the live broadcast starts.
- Turning on Q&A Library Switch in the Live Room:
- On the live broadcast editing page, click Intelligent Interaction - Platform, select “Alibaba International,” and turn on the Q&A Library switch. This must be done after starting the live broadcast and capturing the barrage for the function to work.
Greeting Rules Settings
- Greeting Content: You can add up to 5 replies, including variables like [Viewer’s Nickname] and [Viewer’s Country].
- Sequential Reply: Replies in sequence when triggered.
- Random Reply: Randomly selects a reply when triggered.
- On the live broadcast editing page, click Intelligent Interaction - Platform, select “Alibaba International,” turn on the Greeting switch, and click the edit icon to open the editing window. Fill in the reply text and click Save.
Sending Business Cards and Product Catalogs
- On the live broadcast editing page, click Intelligent Interaction - Platform, select “Alibaba International,” turn on the “Send Business Cards” switch, and turn on the “Send Product Catalogs” switch.
Note
These functions will only take effect after starting the live broadcast and capturing the barrage.
How to Start Live Barrage Capture
- Start Broadcasting in Virbo Live
- Follow the steps for “Start/End Broadcast” on the live broadcast editing page.
- Install the Plugin in Chrome
- Ensure Chrome is up to date, then download the plugin from the provided link . After downloading, unzip locally.
- Configure the Plugin in Chrome
- Open Chrome, go to Settings - Extensions - Manage Extensions, enable Developer mode, click “Load Unpacked,” and select the unzipped folder. Enable “Allow in incognito mode” in the plugin details.
- Copy the Live Control Page Link
- Copy the link of your live control page (web version) from the live platform. Paste the link into the live broadcast editing page under Intelligent Interaction - Live Room Link Input, then click “Start Capturing.”
Note
Alibaba International currently supports automatic Q&A, automatic greetings, automatic business card sending, and automatic product catalog sending. You can turn on the corresponding switches and then configure the detailed settings for each item.
Starting/Ending the Live Broadcast
Starting the Live Broadcast
- On the live broadcast editing page, click “Start Broadcasting.”
- The AI live broadcast window will appear shortly after, displaying the AI live broadcast.
Using Your Broadcasting Partner or OBS
Note
Keep the AI live broadcast window open on the desktop during the broadcast, or it will not broadcast properly.
- Open your broadcasting partner or OBS, add a window, select the Wondershare VVB (Live Version) live window.
- Click “Start Broadcasting.” Use Alt + mouse to crop out the web bar or use the zoom function to remove it.
- During the live broadcast, you can only modify the “Artificial Interaction” function; other broadcast settings cannot be changed.
Ending the Broadcast
- When concluding the live broadcast, initiate the termination of the live stream on the platform’s broadcasting partner first, followed by clicking the “End Live” button on Virbo Live to finalize the shutdown process.
What Is an AI Video Maker? | Wondershare Virbo Glossary
Part 1.What is an AI video maker?
AI video maker refers to a video creation tool that utilizes artificial intelligence (AI) technology to automate or enhance various aspects of the video production process. These tools often integrate machine learning algorithms and computer vision techniques to perform tasks such as video editing, scene recognition, automated video generation, voiceover synthesis, and more.
With AI video makers, users can create professional-looking videos more efficiently and with less manual effort. These tools can analyze raw video footage, apply filters, add visual effects, generate subtitles, and even suggest relevant music or soundtracks based on the video’s content. Some AI video makers can also create videos from scratch using provided assets, such as images and text, transforming them into dynamic and engaging visual presentations.
The use of AI in video creation has significantly simplified the process and made it accessible to individuals and businesses without specialized video editing skills. As AI technology advances, AI video makers will likely become even more sophisticated, allowing for more creative and innovative video productions.
Part 2. Any differences between an AI video maker and a generator?
Yes, there is a difference between an AI video maker and an AI video generator, although they are related concepts.
1. AI Video Maker
An AI video maker is a software tool or platform that leverages artificial intelligence (AI) technologies to assist in video creation and editing. It provides users various automated features and tools to streamline video production. AI video makers typically offer functionalities such as automatic video editing, scene recognition, visual effects, subtitle generation, voiceover synthesis, and music suggestions. These tools are designed to make video creation more accessible and efficient for users, regardless of their level of expertise in video editing.
2. AI Video Generator
On the other hand, an AI video generator is an AI system that can autonomously produce videos from scratch without human intervention. These generators use AI algorithms, often powered by deep learning techniques, to create videos based on specific input parameters or data. For example, an AI video generator could take images, text, or audio inputs and use them to generate a complete video sequence. The generated videos may be entirely fictional or based on real-world data, depending on the system’s design and purpose.
In summary, the main difference lies in their primary functions: an AI video maker assists users in the video creation process. In contrast, an AI video generator autonomously produces videos without human intervention. Both concepts leverage AI technology to enhance video-related tasks, but they serve different purposes and cater to other use cases. challenges they may present.
Revolutionize Creative Tasks With Proficiency: AI Voice Cloning
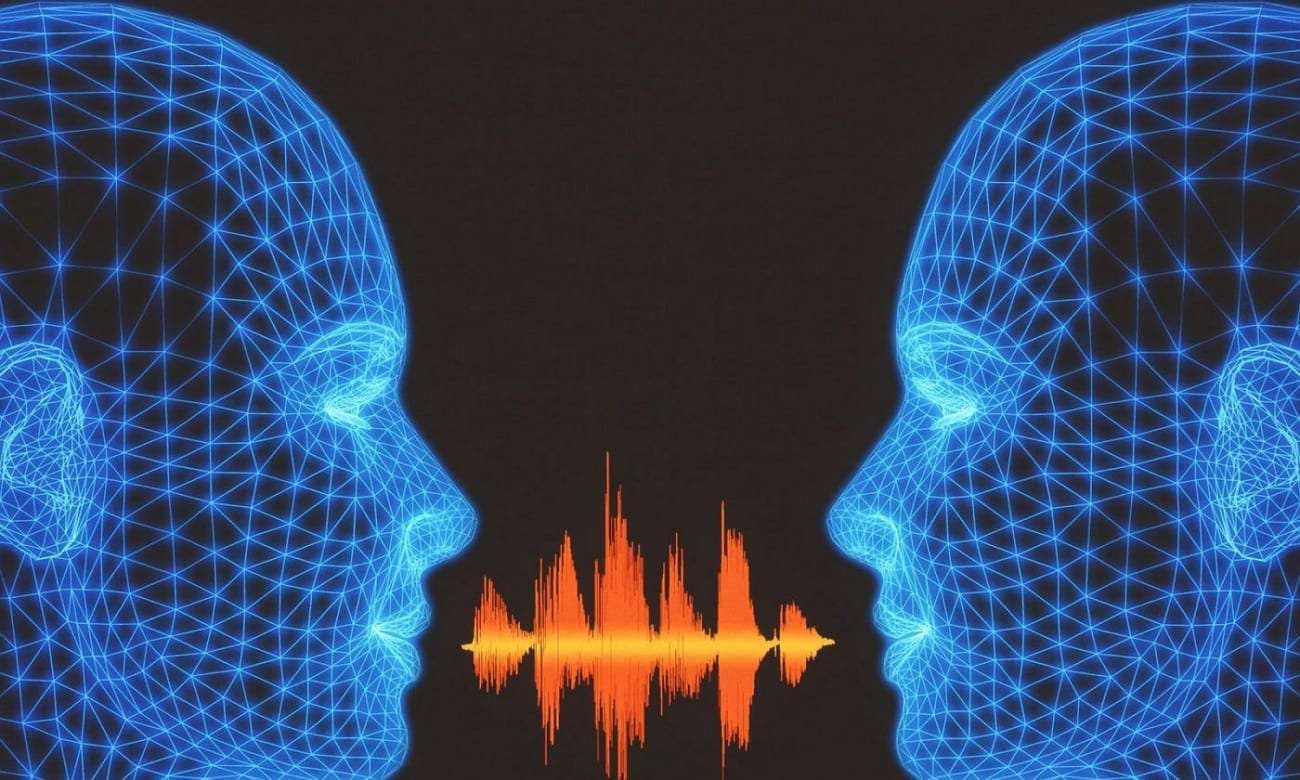
One of the prominent applications of artificial intelligence is in the field of AI voice cloning. It eliminates bad-quality audio in a snap and replaces it with natural-sounding AI voices. Where production houses used to pay millions to voice actors, they can now use voice clones. This article will discuss the rise of voice cloning, its applications, and a relevant tool.
Part 1: A Basic Definition of AI Voice Cloning
AI voice cloning refers to the techniques that enable users to generate deepfake voices from a sample. If you provide a sample that fulfills data requirements, AI will generate a voice you can customize. At the core, vast training datasets make the backbone of these tools. This data enables AI to analyze samples, recognize frequencies, and generate an exact AI voice.
For the perfect voice cloning, neural networks like Convolutional Neural Networks (CNNs) or Recurrent Neural Networks (RNNs) collaborate. They ensure the level of similarity and focus on elements like tone, emotion, and accents.
The next step involves the integration of Text-to-Speech (TTS) technology in these AI voice cloning-free tools. This means you can clone the voice of Taylor Swift and use TTS technology to make it say whatever you want.
Part 2: Understanding Things That AI Voice Cloning Can Execute
Now that you are familiar with voice cloning AI technology and how it works, let’s discover its practical scope. This section discusses how AI voices are of use in the current market:
- Entertainment Industry: Voice cloning tools reduce the financial burdens of hiring professional voice actors. With advanced algorithms, they can do emotional voice expressions. AI technology is devoid of human errors and enhances voiceover productivity.
- Interactive Customer Support: These tools benefit all customer care sites covering various industries. Advanced voice recognition can bring realistic expressions in AI voices. This means AI voices will interact with customers just as any other human providing interactive solutions.
- Gaming and Education Industry: eBooks can become 10 times more interactive with these tools. Online learning and gaming experiences have become more interactive. Tutors and gamers can create voice clones for once and use them via TTS tech later.
- Multilingual Voice Dubbing: The majority of voice cloning tools have multilingual integration. This means that documentaries, eBooks, films, and everything can be dubbed. The multilingual compatibility broadens the scope of voice-focused industries and services.
- Content Generation: These AI voice cloning tools have become integral in the creative industry. Creating vlogs, tutorials, and explainer videos with voiceovers became a trend. You can use this technique to clone your voice and create voiceovers from texts.
Generate Engaging
AI Video in Minutes!
Easily convert text into professional spokesperson videos in over 120+ voices & languages in minutes.
Generate AI Video Free Generate AI Video Now
Part 3: [Review] The Best AI Voice Cloning Tool: Wondershare Virbo
Wondershare Virbo is an AI-driven software designed to fulfill the creative requirements of content creators. The tool features a sophisticated display with a self-explanatory interface and smooth navigation. It clones your voice and exhibits video creation capabilities. Virbo’s advanced AI functionality enables users to generate engaging scripts and compelling dialogues for videos.
Furthermore, it has a video translator feature that can dub your videos in other languages along with subtitles. Its “Talking Photo” feature can help you craft creative portfolios or profiles. Furthermore, the tool has 300+ AI avatars proficient in 300+ languages and voices. These gender-based avatars have custom fashion attire options, accents, and ethnicities.
01 AI Voice Feature – Wondershare Virbo
Besides many of its features, you can employ Virbo’s AI voice feature with language selection options. Whether you are seeking narrative, fluent, or universal tones, it has got you covered. Its realistic collection of AI voices is designed to fit versatile situations. In addition to conversational tones, the tool has gender-based voice selection options.
Upon adding an AI voice, speed, pitch, and volume adjustment options exist. The AI voice feature uses Text-to-Speech advancements to help you craft voiceovers. The clarity and quality of these AI voices, alongside realistic AI avatars, engage the audience.
Get Started Online Download APP Now Free Download
02 Step-by-Step Guide To Using AI Voice Feature in Wondershare Virbo
As you are aware of this exceptional AI clone software and its AI voice feature, let’s explore it in its interface:
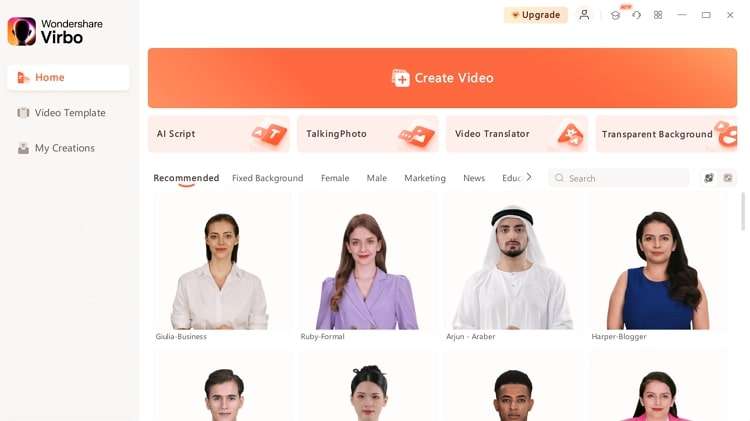
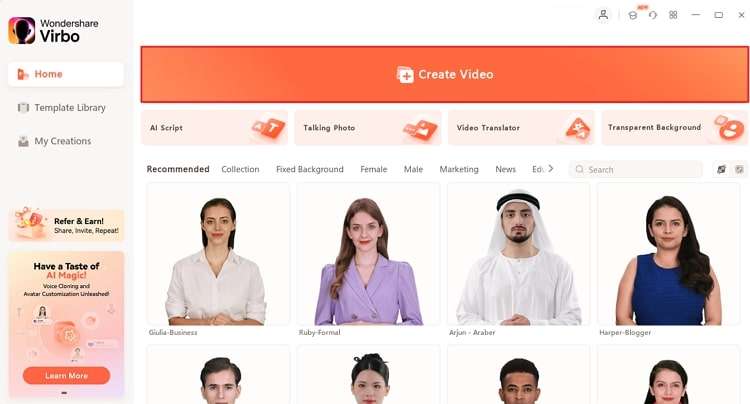
Step 1 Launch Wondershare Virbo and Create a Video
After completing the installation process, launch the software on your device. You can also try to use its online service for effective video creation. Once you reach its main interface, click the “Create Video” button.
Get Started Online Download APP Now Free Download
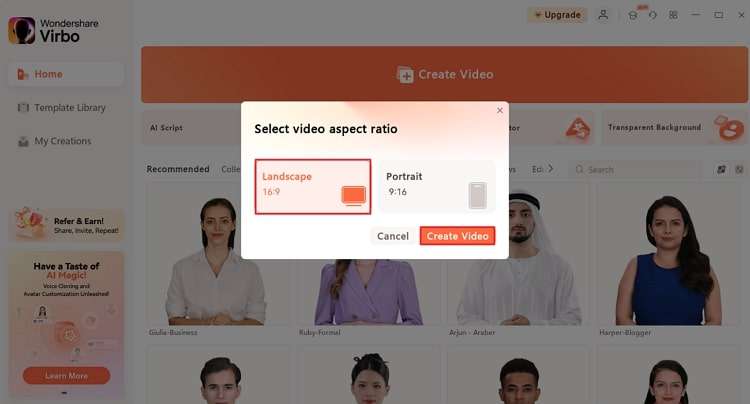
Step 2 Select Video Aspect Ratio to Start
In the new pop-up window, choose a ratio for your video, either “Portrait” or “Landscape.” After selection, click the “Create Video” button.
Get Started Online Download APP Now Free Download
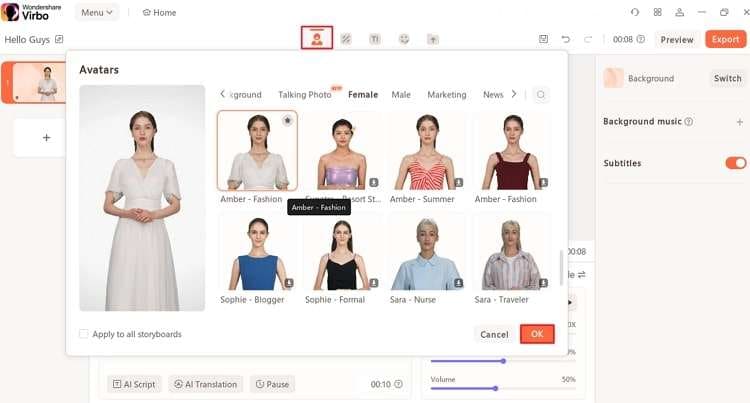
Step 3 Select an AI Avatar for Video
Once you enter the video creator, navigate towards the top toolbar. Click the “Avatars” option, choose an avatar from the dropdown window, and press “OK.”
Get Started Online Download APP Now Free Download
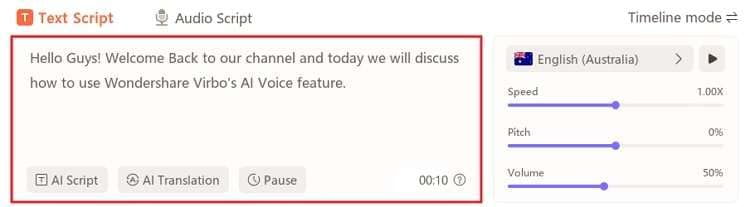
Step 4 Write or Add a Script for Voiceover
If you already have the video script, copy and paste it into the “Text Script” section. You can also employ the “AI Script” function for automated scripts or the “Audio Script” feature. Once you have added a script, you’ll be able to observe subtitles in the preview window.
Get Started Online Download APP Now Free Download
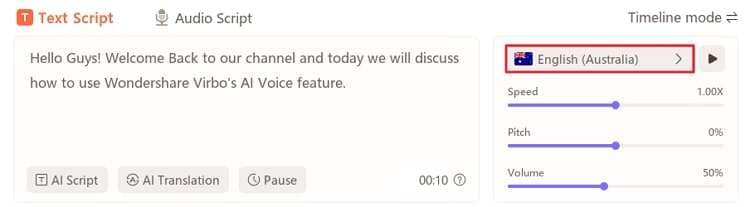
Step 5 Access AI Voice Feature
Navigate towards the voice section below the preview window and click the navigation displaying the AI voice being used in the video.
Get Started Online Download APP Now Free Download
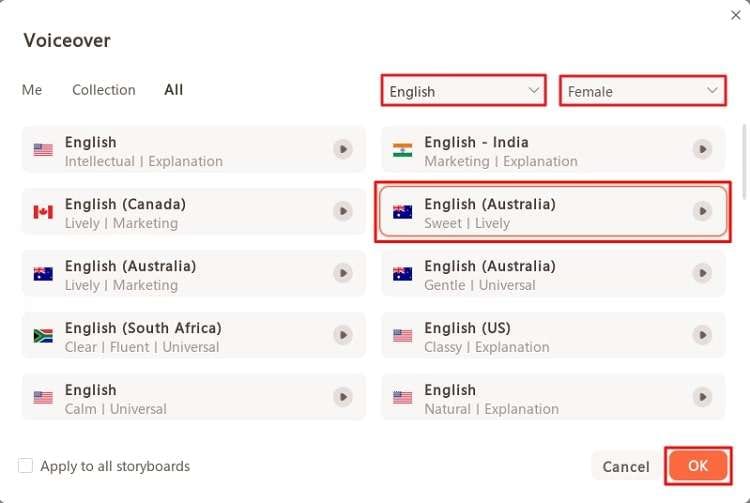
Step 6 Adjust Voiceover Settings
Once you have access to the Voiceover window, choose a gender and language that suits the notion of your video. Choose the voiceover style and click “OK.” Afterward, play your video, and you’ll be able to hear the AI voice you selected.
Get Started Online Download APP Now Free Download
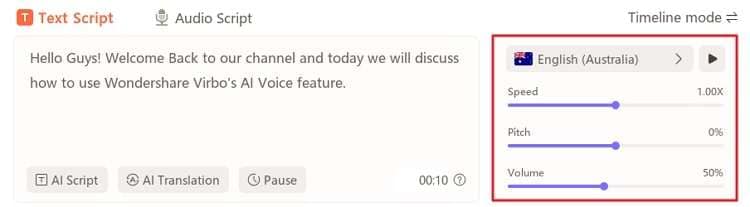
Step 7 Adjust General Voice Settings
From the voice settings section, use “Speed,” “Pitch,” and “Volume” tabs to manage audio quality. Hit the “Player” button to observe the results and export the final video.
Get Started Online Download APP Now Free Download
Conclusion
This article provided brief research on the underlying concept of AI voice cloning and how it works. As per our findings, voice cloning tools are ruling several industries. If you wish to use an effective tool that offers voice cloning, we recommend Wondershare Virbo . Besides voice cloning, it is loaded with natural-sounding AI voices ready to turn passive viewers into active leads.
Also read:
- Live Selling A Comprehensive Starters Guide for 2024
- Updated 2024 Approved Right Moves to Use TTS in Descript
- New 2024 Approved Latest Top Darth Vader Voice Generators for All Platforms
- The Top 10 AI Avatar Generators for 2024
- New Descript Overdub Controlling the Audio in Video for 2024
- 2024S Top 10 Streaming Video Services Free Ones Available
- New 2024 Easy Steps to Translate Video on Twitter
- Updated A Comprehensive List of The Top SpongeBob Voice Generators for 2024
- New In 2024, Google Translate Video A Complete Guide To Translate Video With Google
- In-Depth Review of Ivona Text to Speech Converter for 2024
- Updated 2024 Approved Text To Speech | Online
- New In 2024, Introduction of Wondershare Virbo
- Updated AI Script Feature for 2024
- Want to Clone Voices in Real-Time? Explore These GitHub Repositories for 2024
- Updated 2024 Approved Best 5 AI Movie Script Generators
- Updated Top 5 AI-Integrated AI Cartoon Video Generators to Use for 2024
- New How To Create AI-Powered Videos Using Synthesia Avatar and Voices
- Updated Register | Online for 2024
- New Top 10 Solutions for Movie Subtitle Translation Making Things Perfect
- In 2024, How to Make an Animated Explainer Video
- New Best 7 Ways to Promote Twitch Stream for 2024
- New Diverse Template for 2024
- In 2024, Chrome Video Translator Select the Perfect Platform
- Updated What Is AI Voice for 2024
- New Voicemod AI Review Transforming Your Voice in Real Time
- Updated 2024 Approved Best 7 Whiteboard Explainer Videos to Inspire You
- Updated In 2024, Best 10 Hindi Video Translators with Step-by-Step Guidance
- Updated In 2024, 9 Best French Video Translators Online and Download Options
- Updated Diverse Template | Online
- Guide on How to Enable the Text to Speech Function on iPhone
- In 2024, What Is AI Voice Over? | Wondershare Virbo Glossary
- New In 2024, Top 4 Morgan Freeman Voice Generator Tools for Voice Cloning
- New 2024 Approved How To Use Korean to English Video Translators for Creators
- In 2024, For People Wanting to Mock GPS on Motorola Moto E13 Devices | Dr.fone
- In 2024, Easiest Guide How to Clone Samsung Galaxy F15 5G Phone? | Dr.fone
- In 2024, What Pokémon Evolve with A Dawn Stone For Oppo A18? | Dr.fone
- How PGSharp Save You from Ban While Spoofing Pokemon Go On Vivo Y77t? | Dr.fone
- Three Ways to Sim Unlock Nokia 130 Music
- Fix Unfortunately Settings Has Stopped on Realme C67 5G Quickly | Dr.fone
- How Lava Agni 2 5G Mirror Screen to PC? | Dr.fone
- Best Anti Tracker Software For Honor 90 Lite | Dr.fone
- How To Fake GPS On Poco X5 For Mobile Legends? | Dr.fone
- Why Your Oppo A59 5G Screen Might be Unresponsive and How to Fix It | Dr.fone
- How to Restore Deleted Honor 90 Lite Photos An Easy Method Explained.
- Remove Device Supervision From your iPhone XS Max
- In 2024, How to Come up With the Best Pokemon Team On Xiaomi Redmi Note 12 4G? | Dr.fone
- How to Downgrade iPhone SE to an Older iOS Version? | Dr.fone
- Title: Updated 2024 Approved Build Your AI Twitch Streamer with Animated Avatars
- Author: Sam
- Created at : 2024-05-19 03:35:06
- Updated at : 2024-05-20 03:35:06
- Link: https://ai-voice-clone.techidaily.com/updated-2024-approved-build-your-ai-twitch-streamer-with-animated-avatars/
- License: This work is licensed under CC BY-NC-SA 4.0.
