
Updated 2024 Approved AI Video Translator | Online
AI Video Translator | Online
AI Video Translator
It can be challenging and expensive for content creators to create a single video in multiple languages. To overcome this problem, Virbo has an innovative AI Video Translator feature that you can also use online.
02 Perform the Video Translation
04 Download the Translated Video
Step 1. Choose the Video Translate Feature
From the dashboard of Wondershare Virbo Online , choose the “Video Translator” feature under the “More AI Tools” section.
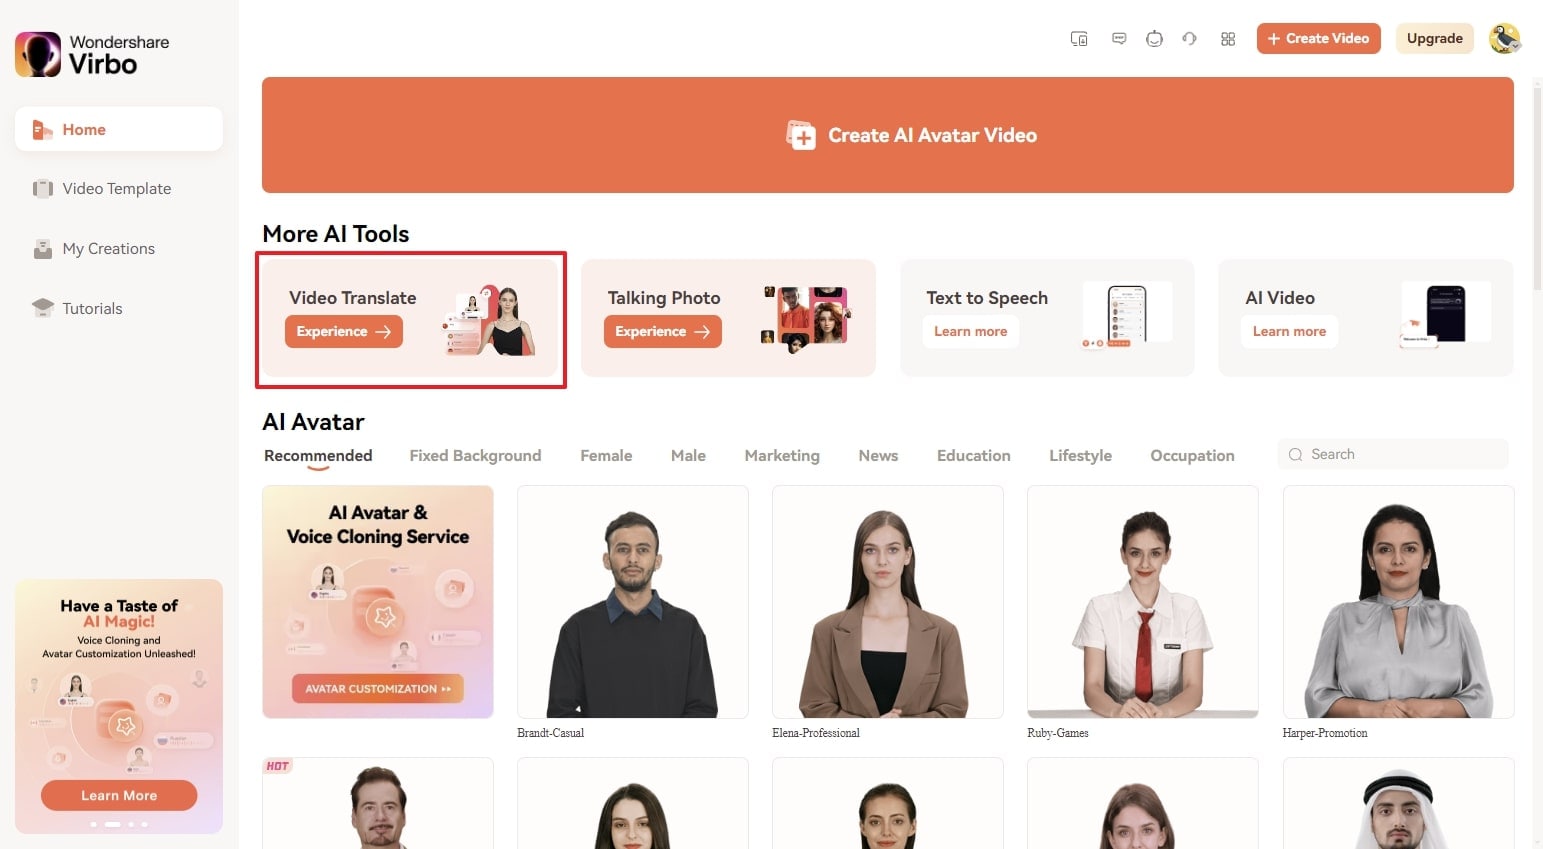
Choose Video Translator
Step 2. Perform the Video Translation
- To upload the video file for translation, press the “Click to upload video“ button, or you can use the drag-and-drop feature.
- Specify the “Original Video Language” and the “Target Language” and enable the required “Advanced Settings,” which are Lip-Sync, Subtitles, and Proofread Video Script.
- Finally, click the “Translate this video” button to change your video voice in the target language.
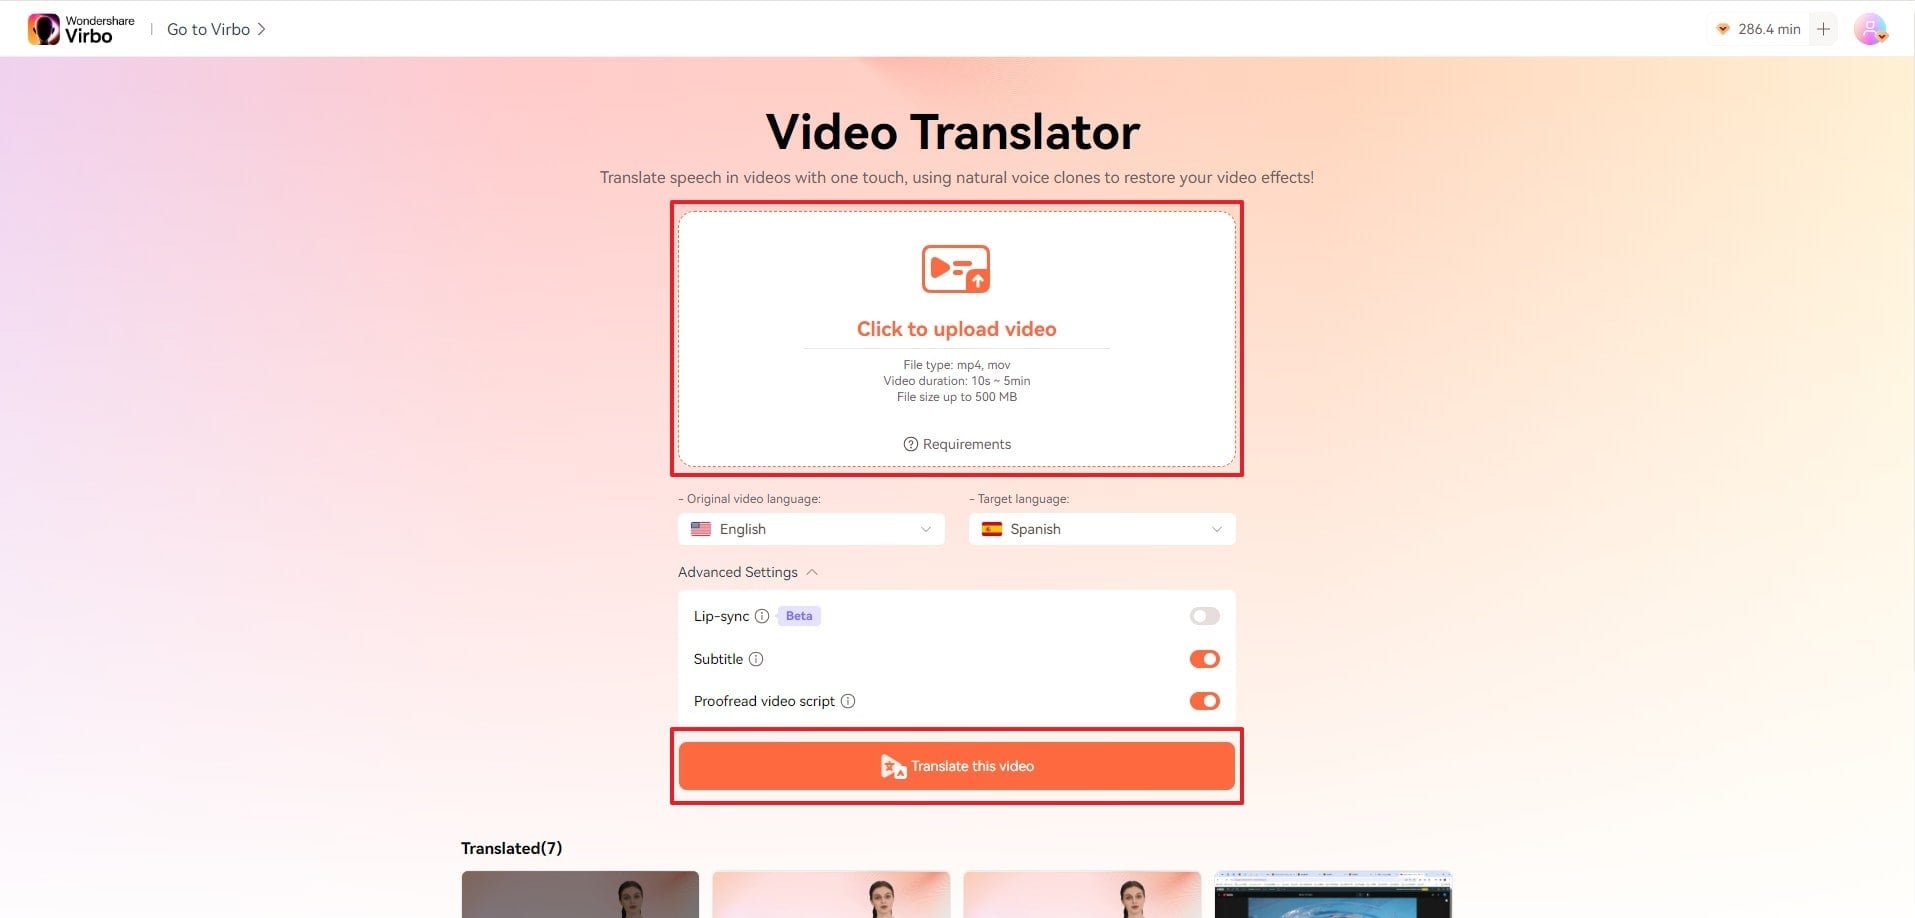
Perform Video Translation
Step 3. Proofread the Video Script
Proofread the translated video script to avoid any mistakes in the video. You can also export the subtitles file by tapping the “Download SRT” button. And then, click “Translate Video“
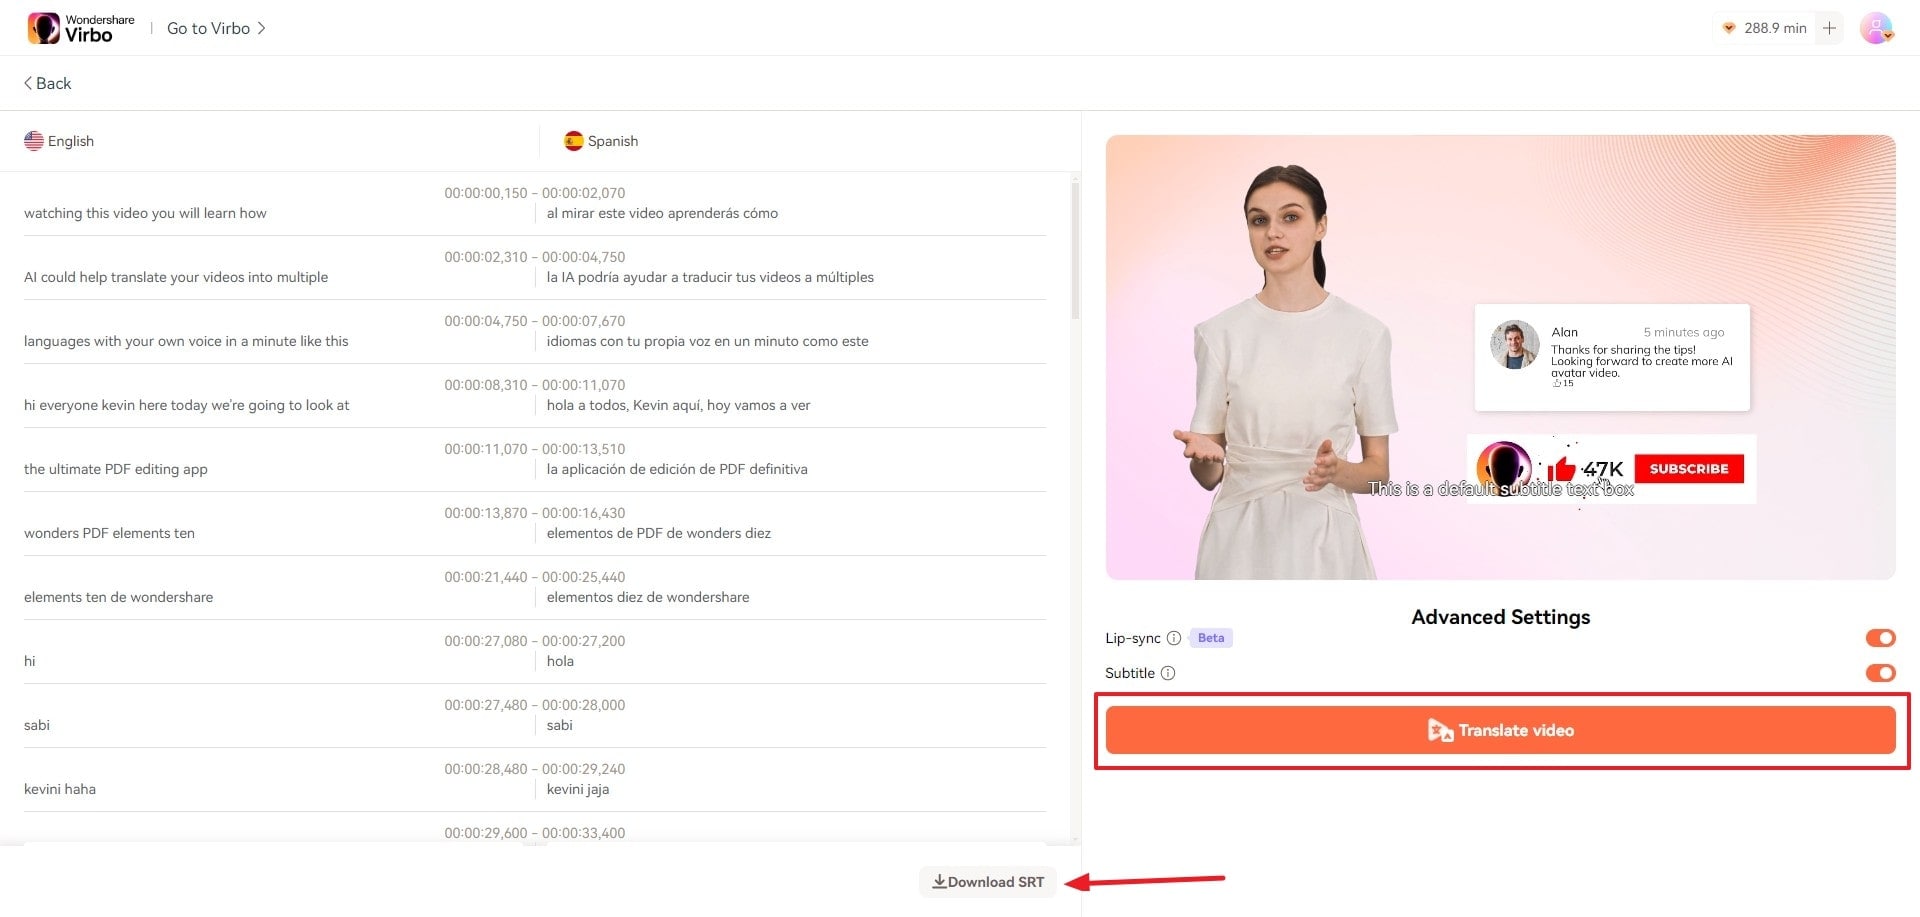
Proofread Script
Step 4. Proofread the Video Script
Preview the final version of the translated video and press the “Download Video” button to get it exported to your device.
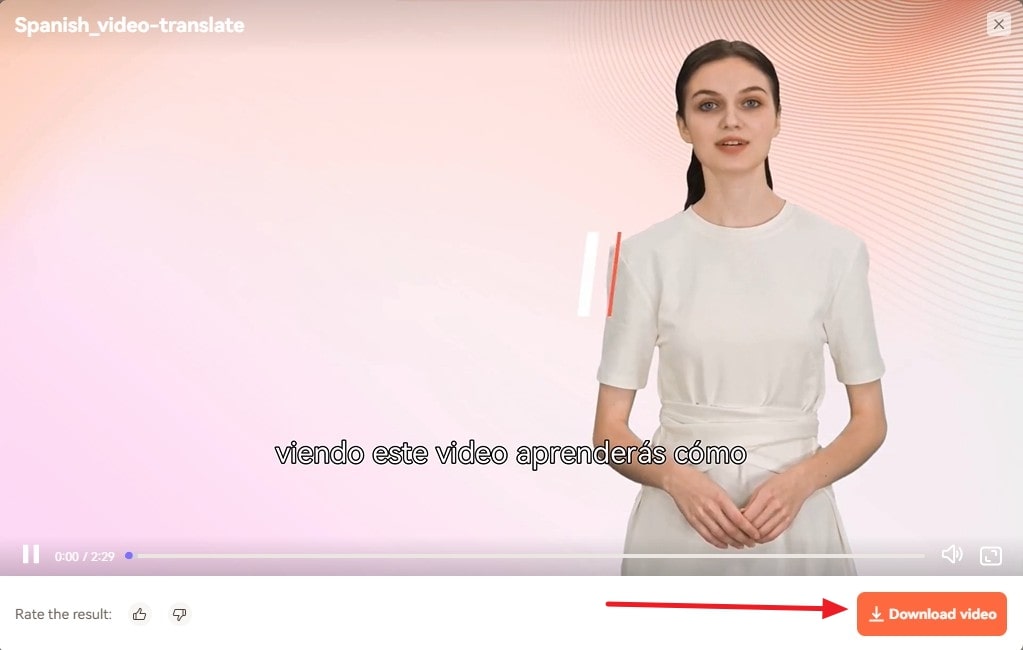
Download Video
FAQs about Video Translator
1Can I edit and export auto-generated subtitles?
Of course! You have the flexibility to modify and customize the generated subtitles to suit your preferences, and once done, you can seamlessly export the edited subtitle file.
2Is there a fee for using the Video Translator feature?
The Video Translator feature follows the Virbo subscription plan. This means that unsubscribed users can export a multilingual video of up to 2 minutes for free within 512MB storage space. For more information, please refer to the Virbo Subscription Plan>
3How accurate is the translation output?
The translation accuracy delivered by the Video Translator feature is remarkably high, thanks to the empowering capabilities of AI technology. The system utilizes advanced algorithms and machine learning to ensure precise and contextually relevant translations, enhancing the overall quality of the translated content.
02 Perform the Video Translation
04 Download the Translated Video
Step 1. Choose the Video Translate Feature
From the dashboard of Wondershare Virbo Online , choose the “Video Translator” feature under the “More AI Tools” section.
Choose Video Translator
Step 2. Perform the Video Translation
- To upload the video file for translation, press the “Click to upload video“ button, or you can use the drag-and-drop feature.
- Specify the “Original Video Language” and the “Target Language” and enable the required “Advanced Settings,” which are Lip-Sync, Subtitles, and Proofread Video Script.
- Finally, click the “Translate this video” button to change your video voice in the target language.
Perform Video Translation
Step 3. Proofread the Video Script
Proofread the translated video script to avoid any mistakes in the video. You can also export the subtitles file by tapping the “Download SRT” button. And then, click “Translate Video“
Proofread Script
Step 4. Proofread the Video Script
Preview the final version of the translated video and press the “Download Video” button to get it exported to your device.
Download Video
FAQs about Video Translator
1Can I edit and export auto-generated subtitles?
Of course! You have the flexibility to modify and customize the generated subtitles to suit your preferences, and once done, you can seamlessly export the edited subtitle file.
2Is there a fee for using the Video Translator feature?
The Video Translator feature follows the Virbo subscription plan. This means that unsubscribed users can export a multilingual video of up to 2 minutes for free within 512MB storage space. For more information, please refer to the Virbo Subscription Plan>
3How accurate is the translation output?
The translation accuracy delivered by the Video Translator feature is remarkably high, thanks to the empowering capabilities of AI technology. The system utilizes advanced algorithms and machine learning to ensure precise and contextually relevant translations, enhancing the overall quality of the translated content.
In-Depth Review of Ivona Text to Speech Converter
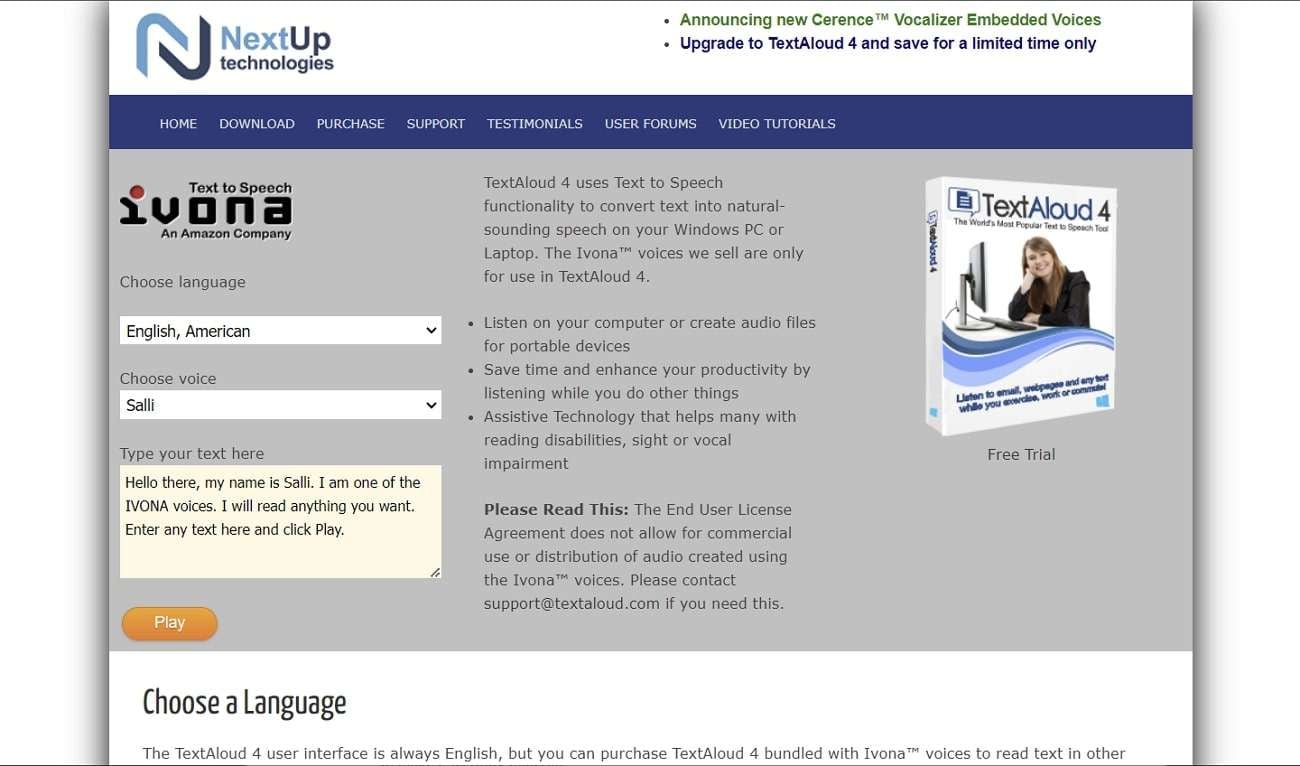
NextUp Technologies has introduced the best-in-class text-to-speech converter known as TextAloud 4 Ivona . This software has gained considerable immense popularity all across the globe. This is because of its outstanding potential to drive desirable outcomes.
By the end of this discussion, you will be familiar with theIvona text-to-speech software. Moreover, we will also discuss the basics of this tool, such as pricing, compatibility, procedure, etc. You will also learn about the most innovative and powerful alternative to this software.
Part 1: Overview Of The Key Features of Ivona Text to Speech Converter
Listening to the written text can boost your productivity in no time. You can get through the lengthened written text thoroughly and also understand the information in a better way. No matter if you wanttext-to-speech Ivona to read emails, documents, or webpages for you, this tool can help you with all. This premium-grade tool also supports 20 plus languages, which makes your work easier than ever.
Ivona also integrates a reliable user interface which helps in making your work easier than ever. You will also not face any interruption issues with theIvona app . In addition, it has powerful algorithms that help Ivona replicate human speech with precise accuracy.
Main Features of Ivona Text-to-Speech Converter
Key features of digital tools help in understanding it in a better way. It also highlights the professionalism and the assistive side of the tool. If you also wish to know the key features ofIvona text-to-speech online , read the information here:
- Ivona TTS supports a wide array of languages for the ease of the users. The languages that it supports include English, Welsh, Danish, French, German, Italian, and more.
- You can also select a customized voice that fits your taste. Ivona lets you select a voice from the options of Salli, Joey, Kendra, Ivy, etc.
- This tool never targets one gender, as you can select both male and female voices. You can also use it to make e-learning material.
- It also allows you to customize the speed, pitch, volume, and other audio metrics. You can also change voices anytime and place a bookmark anywhere.
Part 2: Supported Platforms for Ivona
Ivona text-to-speech is a lightweight software that you can use on Windows computers.
If you want to work on docs, webpages, or other written material, TextAloud 4 Ivona can help you. It also has assistive technology that allows visually impaired people to upgrade their capabilities. You can read anything on Windows computers aloud using its pre-installed voicing system.
Part 3: Pricing Plans of Ivona
This is quite a cost-effective tool through which you can accomplish your task while staying within budget. If you are still curious about the subscription plans ofIvona TTS, have a look below:
| Amount | Charge |
|---|---|
| 5 Ivona Voices | $159 |
| 3 Ivona Voices | $119 |
| 1 Ivona Voices | $59 |
| No Optional Voices | $34.95 |
Part 4: Simplified Step-by-Step Guide for Using Ivona
Ivona app is a dependable tool that integrates the straightforward procedure of converting text to speech. There is no need to have a special skill to work with this tool. You can follow the instructions listed here to accomplish this task in no time:
Step 1 Download TextAloud 4 Ivona to your device and open it
Step 2 Go to the “Text Box” and write or paste the text of your choice
Step 3 Hit the “Speak” button present from the toolbar, and by this, you can listen to your text in human voices
Bonus Part: The Perfect AI Alternative to Ivona Text-to-Speech Converter
You must be wondering if there is any specialized tool through which you can convert written text into speech without any issues. Yes, there is another tool that you can say is a perfect alternative to theIvona app . The name of this tool is Virbo , and it has the potential to convert any written text into reliable speech with accuracy.
It also supports 120 plus languages and voices, which makes your work easier than ever. All the voices in Virbo are humane, which gives you more assistance in listening to text. It also shows cross-platform compatibility. You can even login with the same account on multiple devices.
Get Started Online Free Download
Device Compatibility
- Windows
- iOS
- Android
- Online Tool
Prominent Features
- It supports 150+ realistic-looking avatars through which you can make videos on multiple topics. It also lets you select the attire and gender of an avatar.
- Using the AI script generator of Virbo, you can get intuitive and descriptive scripts on versatile topics. It also lets you optimize scripts on Windows computers.
- This tool has endless royalty-free assets that you can use without issues. It also lets you access its templates to work in various ways.
Streamlined Step-by-Step Procedure to Convert Text to Speech with Virbo
Do you want to know how to convert text to speech using Virbo? No worries because the below-given streamlined instructions can help you with this:
Step 1 Access Virbo and Choose Feature
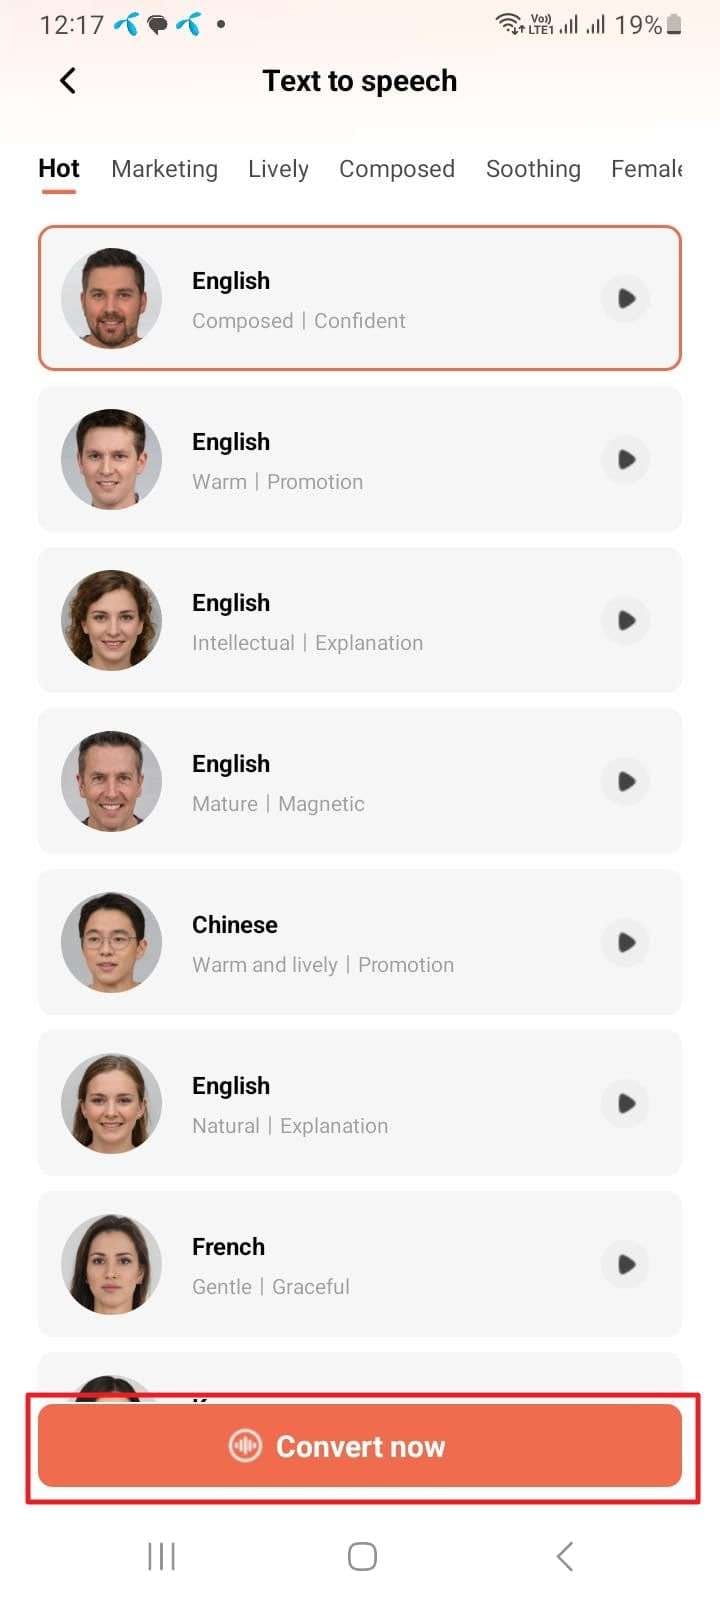
To convert text to speech with Virbo, launch it on your device and tap on “Text to Speech.” Following this, select a “Category” from the top toolbar and choose the ‘Language” of your choice. Next, hit the “Convert Now” button.
Get Started Online Free Download
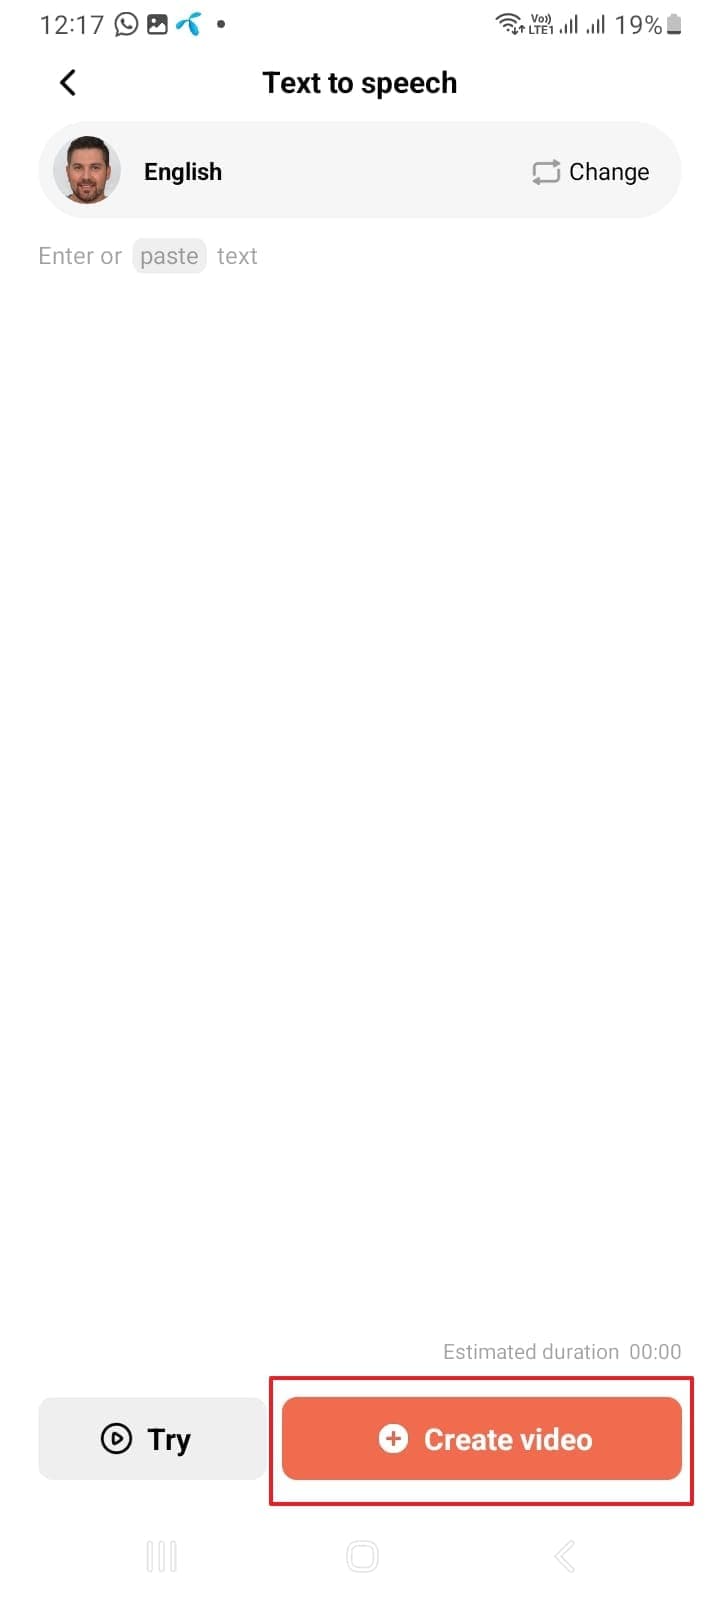
Step 2 Add Text and Make Speech
After this, add the text you want to convert into speech and tap the “Create Video” button. Choose the dimension of the video by selecting either one from the “Portrait video” or “Landscape” video options.
Conclusion
In a nutshell, it can be said thatIvona text to speech is a good tool for converting written text into understandable speech. It also offers you flexibility in selecting the language and voices of your choice. You can use theIvona app on a Windows computer to convert text to speech.
The pricing plan of Ivona, along with the procedure, is also described in this article. However, if you are looking for an alternative to Ivona, the answer is Virbo .
Power of AI Thumbnail Generators
Part 1. What is an AI Thumbnail Generator?
An AI thumbnail generator is a sophisticated tool that employs artificial intelligence algorithms, often based on machine learning and deep neural networks, to create captivating and eye-catching thumbnails for various digital media content. These generators analyze content features, layout principles, and user preferences to craft thumbnails that entice and engage audiences.
Part 2. Top Benefits of AI Thumbnail Generators
Enhanced Visual Appeal
AI thumbnail generators harness data-driven insights to craft visually striking thumbnails. They ensure that images are attention-grabbing, which can lead to higher click-through rates and audience engagement.
Time Efficiency
Creating thumbnails manually can be time-consuming. AI generators automate this process, enabling content creators to save valuable time that can be allocated to other creative tasks.
A/B Testing Optimization
Many AI tools offer A/B testing capabilities, allowing creators to experiment with different thumbnail variations and identify which ones resonate best with their audience.
Part 3. Common Applications of AI Thumbnail Makers
Video Content
AI thumbnail generators excel in creating thumbnails for videos, helping creators encapsulate the essence of their content and encourage viewership.
Social Media Posts
Eye-catching thumbnails on social media platforms can significantly boost content visibility and user engagement.
Blog Posts and Articles
Thumbnails play a crucial role in enticing readers to explore articles and blog posts, making them an essential component of content marketing.
Part 4. Top AI Tools That Deserve a Try
Canva
Canva’s AI-powered platform offers intuitive thumbnail design capabilities, making it a go-to choice for both beginners and professionals.
Adobe Sensei
Adobe’s AI technology seamlessly integrates with Creative Cloud applications, enhancing the thumbnail creation process.
Visme
Visme’s AI-driven features empower users to effortlessly design captivating thumbnails for a variety of digital content.
In an era where visual appeal can make or break digital content’s success, AI thumbnail generators emerge as indispensable assets for content creators and marketers.
Conclusion
AI thumbnail generators are revolutionizing the way we present digital content. Their ability to craft visually compelling thumbnails with precision and efficiency is transforming the digital landscape. As the demand for engaging visuals continues to rise, these AI-powered tools stand as invaluable allies for creators seeking to make a lasting impact in the digital realm.
Template | Wondershare Virbo
Template
Virbo’s template feature collects a wide range of ready-made and exquisite video templates for users to choose from, eliminating the hassle of creating videos from scratch. With just a few simple clicks, you can easily create a sophisticated video that guarantees your satisfaction.
02 Create Video
03 Edit Video
Step 1. Choose Template
On the main interface of Virbo, you can click on the “Video Template” tab to switch to the template display area. Above the templates, there are six categorized sections: Hot, Ecommerce, Explainer Video, Advertisement, Festival, and Social Media.
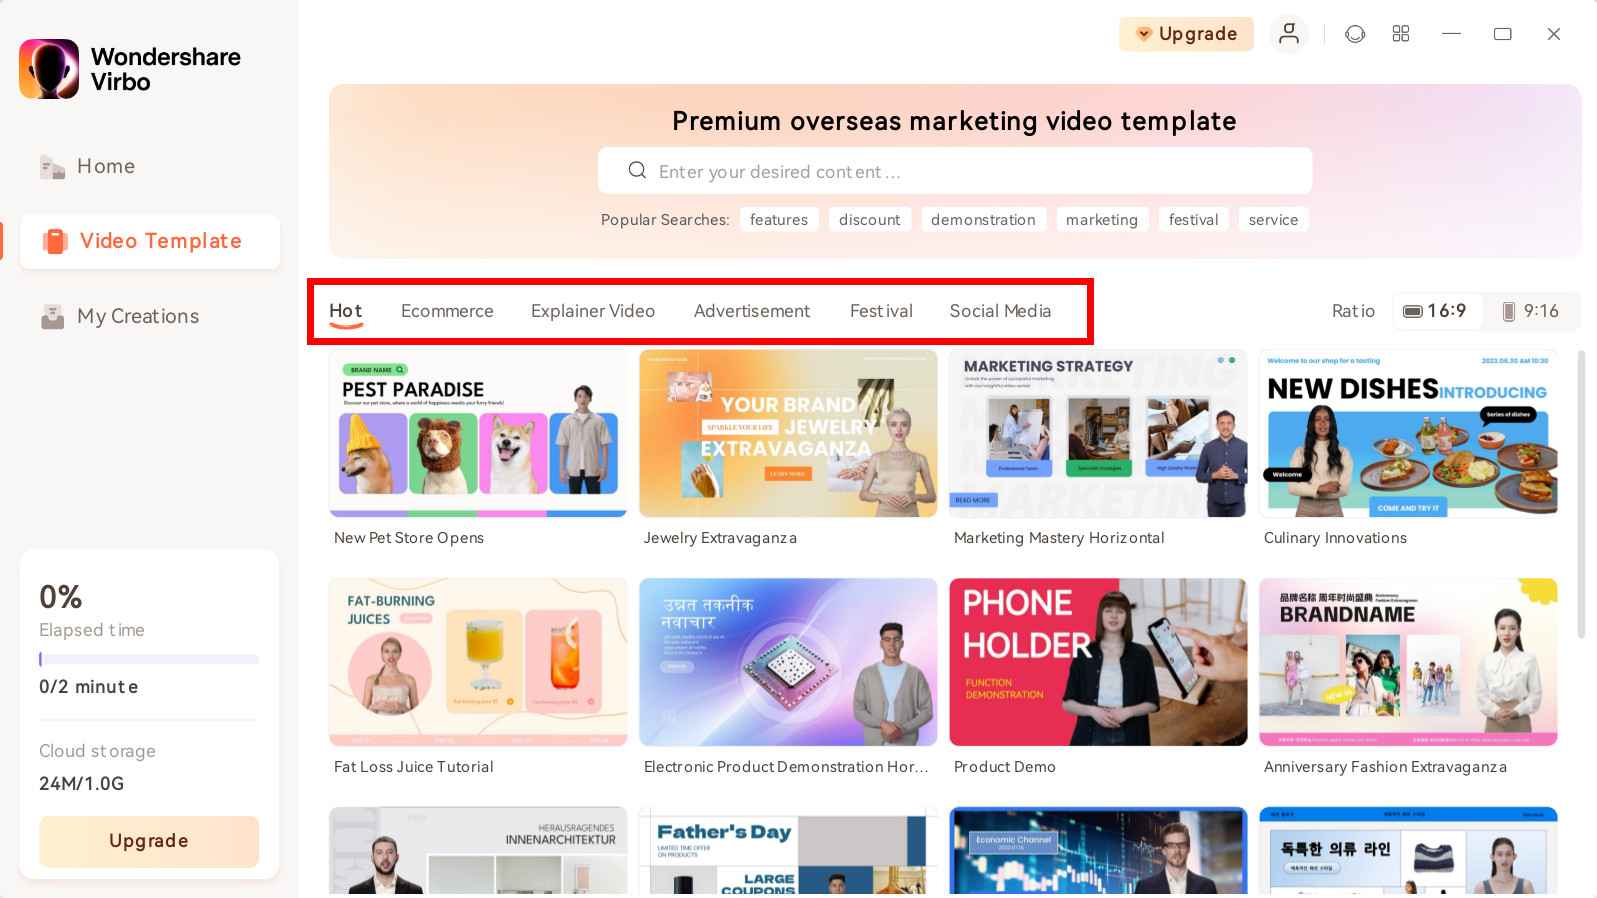
Choose Template
There is also a ratio selection switch beside it, where you can choose your preferred video aspect ratio.

Choose Aspect Ratio
Step 2. Create Video
After selecting your preferred template, click and preview it. Then, in the bottom right corner, click the “Create Video” button to proceed to the editing interface.
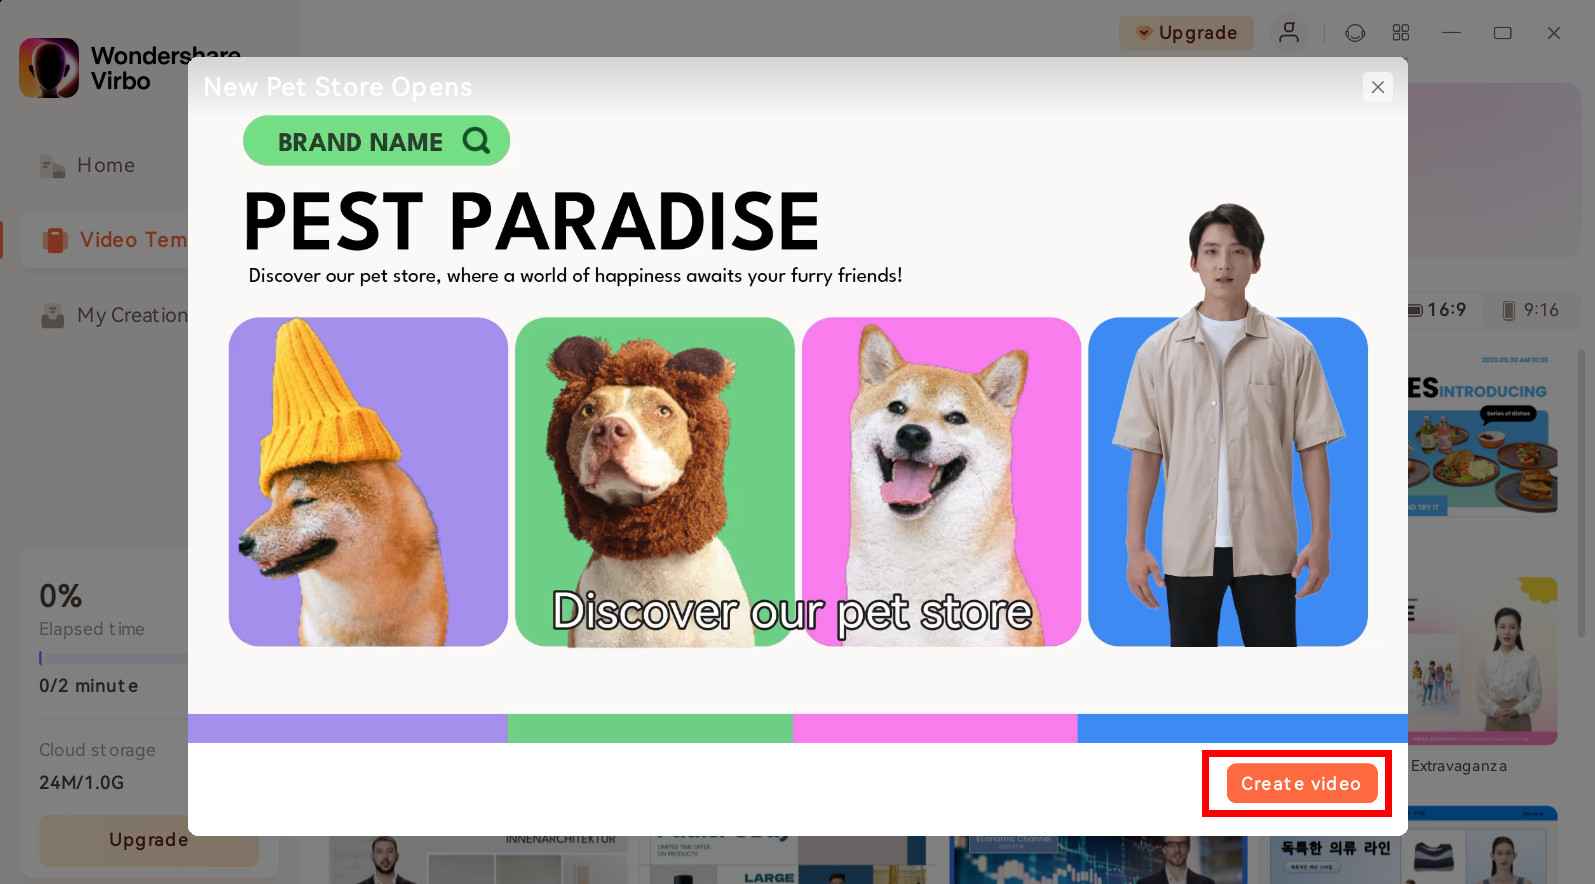
Create Video
Step 3. Edit Video
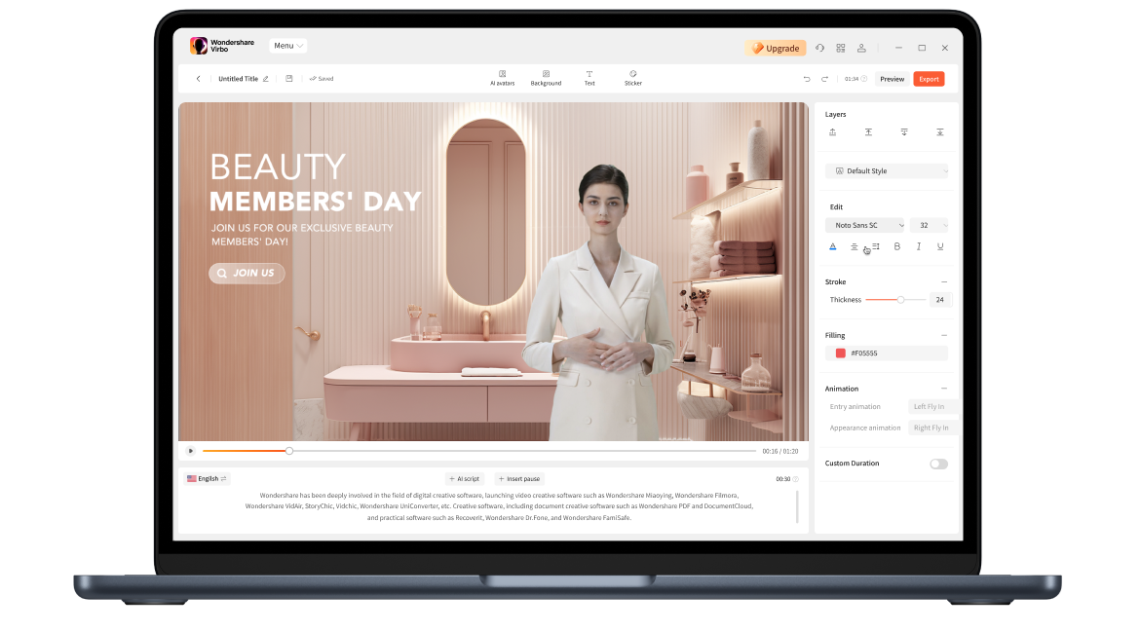
In the editing interface, you can enter the script text and adjust elements like voiceover and avatar. You can also change the background and add stickers, among other options.
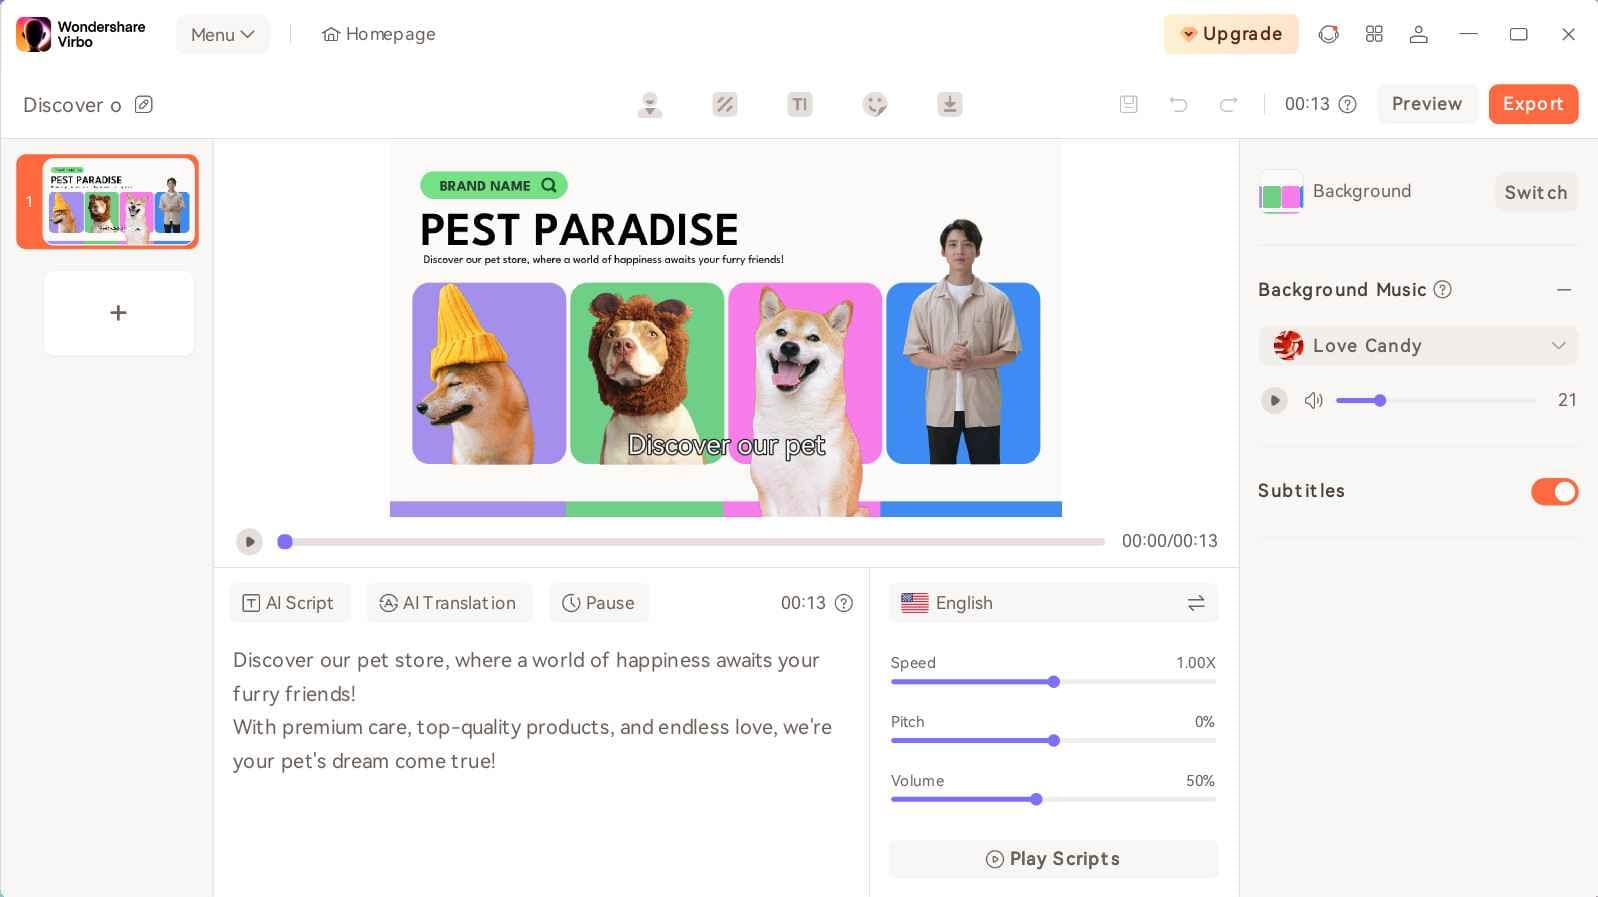
Edit Video
FAQs about Diverse Templates
1Are These Avatars Based On Real Humans?
Yes, these avatars are all based on video footage using real actors.
2Can the Generated Videos with Digital Presenter Be Used for Commercial Purposes?
For free users, videos are not allowed to be used for commercial purpose. For subscribed users, all materials provided in the software are commercially available, and the produced videos containing digital humans are also available for commercial use. Subscribe now>
3Can I Control Avatars’ Gestures or Expressions?
For personalized avatars on Virbo, you can enjoy the liberty to craft gestures and expressions to your liking. Click now to explore Virbo’s Customization Service!
02 Create Video
03 Edit Video
Step 1. Choose Template
On the main interface of Virbo, you can click on the “Video Template” tab to switch to the template display area. Above the templates, there are six categorized sections: Hot, Ecommerce, Explainer Video, Advertisement, Festival, and Social Media.
Choose Template
There is also a ratio selection switch beside it, where you can choose your preferred video aspect ratio.
Choose Aspect Ratio
Step 2. Create Video
After selecting your preferred template, click and preview it. Then, in the bottom right corner, click the “Create Video” button to proceed to the editing interface.
Create Video
Step 3. Edit Video
In the editing interface, you can enter the script text and adjust elements like voiceover and avatar. You can also change the background and add stickers, among other options.
Edit Video
FAQs about Diverse Templates
1Are These Avatars Based On Real Humans?
Yes, these avatars are all based on video footage using real actors.
2Can the Generated Videos with Digital Presenter Be Used for Commercial Purposes?
For free users, videos are not allowed to be used for commercial purpose. For subscribed users, all materials provided in the software are commercially available, and the produced videos containing digital humans are also available for commercial use. Subscribe now>
3Can I Control Avatars’ Gestures or Expressions?
For personalized avatars on Virbo, you can enjoy the liberty to craft gestures and expressions to your liking. Click now to explore Virbo’s Customization Service!
A Comprehensive Guide for Free Video Translator Downloading
Welcome to our comprehensive guide on video translator download , your gateway to a diverse world of multimedia content. In an era where connecting with a global audience is paramount, the ability to break language barriers through video translation is a game-changer. Whether you’re a content creator, language enthusiast, this guide will walk you through the essential factors to consider, step-by-step instructions for a seamless video translator download, and address common questions related totranslating English to Hindi videos .
Part 1: Step-by-step Instructions for Video Translator Downloading

Now that we’ve explored the crucial factors to consider when venturing into video translation let’s embark on a practical journey — downloading a video translator. Follow these step-by-step instructions to integrate this powerful tool into your content creation toolkit seamlessly. Additionally, we’ll recommend two reputable video translator apps to guide you through the installation process.
A Versatile Video Translator Tool: Virbo
As a multilingual tool, Virbo takes real-time translation to the next level. Accessible online and through dedicated applications, Virbo boasts advanced features that enhance communication dynamics. Its capabilities extend to video language translation, making it a valuable addition to the subtitle translation toolkit.
Step 1: Visit the official Virbo website or use the dedicated software/app.
Generate Voice Online Download APP Now Free Download
Step 2: Upload your desired file for instant translation.

Step 3: Choose the target language for translation. Virbo’s extensive language support allows you to cater to a broad audience.

Step 4: Click the “Translate” button, triggering the initiation of the translation process.
Translating English to Hindi Made Easy: Descript
Descript is a revolutionary platform that redefines the landscape of audio and video editing. Pioneering the concept of text-based editing, it allows users to edit multimedia content as easily as editing a document. With its intuitive interface, users can manipulate audio and video files by simply editing the transcribed text, seamlessly making changes to the corresponding media.
Step 1: Navigate to the official Descript Translator website, the digital haven where linguistic precision meets innovation.

Step 2: Upload your video file directly onto the platform, initiating the process of transforming spoken words into the language of your choice.

Step 3: Customize your translation experience by choosing your desired language.

Step 4: Once the translation is complete, download the translated text or share it directly from the platform.
Part 2: Important Factors to Consider While Translating Videos
In the vibrant landscape of digital content, the ability to transcend linguistic boundaries is a crucial aspect of reaching a diverse audience. When venturing into the realm of video translation, it’s essential to consider various factors to ensure an accurate and meaningful representation of your content. Let’s delve into the key considerations that can significantly impact the quality of your video translations.
1.Content Accuracy
In the intricate dance of video translation, accuracy takes center stage. When selecting a video translation tool, it’s imperative to prioritize those that not only promise but guarantee precise content translation. The soul of your message lies in its accuracy, and choosing a tool that preserves the essence and nuances of the original message establishes a deep and meaningful connection with your viewers through every frame of the translated content.
2.Language Support
The beauty of global content creation lies in its linguistic diversity. Opt for a video translator that transcends language boundaries—a true polyglot. Choosing a tool with broad language support empowers you to cater to the diverse linguistic preferences of your audience, creating an inclusive and accessible viewing experience. Your selected tool should be a gateway to a world where language is not a barrier but a bridge.
3.Subtitle Customization
Visual elements, especially subtitles, contribute significantly to the overall viewer experience. Seek a video translator that goes beyond the basics, offering options for customizing subtitles. The ability to adjust not only the appearance but also the timing of subtitles ensures that your translated content aligns seamlessly with the rhythm and tone of your original video. This customization transforms your subtitles from a mere translation tool to an integral part of your storytelling.
4.User-Friendly Interface
In the fast-paced and dynamic landscape of content creation, efficiency is the key to success. Choose a video translation tool adorned with a user-friendly interface—a design that is intuitive and serves as a compass guiding both beginners and experienced users effortlessly through the translation process. A tool that feels familiar and accessible contributes not only to a smoother workflow but also to a more enjoyable and productive content creation experience.
5.Offline Functionality
In a world where the ubiquity of the internet is not guaranteed, the ability to navigate offline is a valuable asset. Consider a video translator that offers offline capabilities, allowing you to enjoy translated content even when a stable internet connection is elusive. This feature provides convenience and flexibility, ensuring your content creation journey is not hindered by connectivity constraints.
Break Language Barriers Now with Wondershare Virbo - Video Translator!
Part 3: FAQs Related to Translating English to Hindi Video and Downloading it
As you delve into the realm of video translation, it’s natural to have questions about the process, especially when aiming to translate content from English to Hindi. Let’s address some frequently asked questions to provide clarity and guidance on translating English to Hindi videos and the downloading process.
Q1. Can I Download a Video Translator for Free?
Yes, many video translators like Virbo offer free versions with basic features. It’s advisable to visit the official website of your chosen video translator to obtain accurate information on free and premium offerings.
Q2. Is Offline Translation Possible?
Many video translators offer offline functionality. During the download process, check for features related to offline translation to ensure that the tool supports this capability. Offline functionality allows you to work on translations even without a stable internet connection.
Q3. Can I Customize Subtitles for Translated Videos?
Yes, Virbo video translators allow the customization of subtitles. Explore the settings or preferences within the downloaded tool to adjust the appearance, timing, and other aspects of subtitles.
Q4. Are There Specific Video Formats Supported by the Translator?
So far, Virbo only allows uploading MP4 files. Stay tuned for future updates!
Conclusion
In a nutshell, the dynamic landscape ofvideo translation is a journey marked by precision, creativity, and accessibility. As creators, language enthusiasts, or viewers, our exploration has unveiled a spectrum of considerations crucial for a seamless and enriching experience.
Armed with these insights, venture into the world of video translation with confidence, knowing that every frame carries the power to resonate across borders, fostering a global connection through powerful translation tools likeWondershare Virbo .
Generate Voice Online Download APP Now Free Download
Master Deepface Live: Download and Train Your Live Model
DeepFace Live offers you an opportunity to swap your face for someone else’s when streaming or making video calls. By swapping your face in real-time, you can present yourself in videos in any way you like. With the recent development made by DeepFaceLab, you get accurate and quality face-swapping, create realistic live models, and live up to the hype withDeepFace Live . In this article, we provide an overview ofDeeepFace Live and provide simple guides for downloading the application to your PC and creating your first live model.
Part 1: What is DeepFace Live
Deepface Live refers to a real-time face-swapping application, which allows you to swap faces during video calls and streaming.
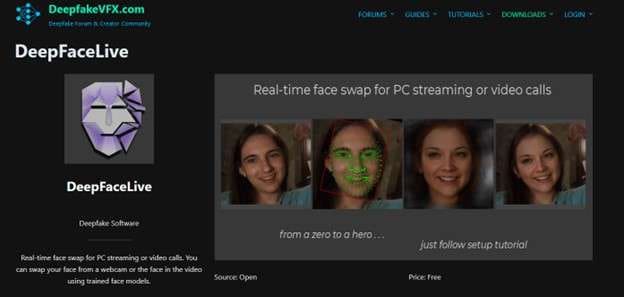
Using Deepface Live allows you to superimpose your face onto someone else’s in real-time. With Deepface Live, you can:
- Swap your face with that of a celeb: Quickly and easily have a conversation with your friends and family while looking like your favorite actor or actress.
- Create Prank or Funny Videos: WIth Deepface Live, you can create all sorts of prank or funning videos, such as giving a speech or singing a song.
- Make it Look Like You Are in a Different Place: Deepface Live allows you to superimpose your face onto the body of someone else so you can appear like you are in a different location.
Part 2: Download DeepFace Live the Easy Way: A Step-by-Step Guide
Downloading and installing DeepFace Live is quite straightforward. Make sure you have Python installed on your system, and follow the steps in any of the two methods to download DeepFace Live.
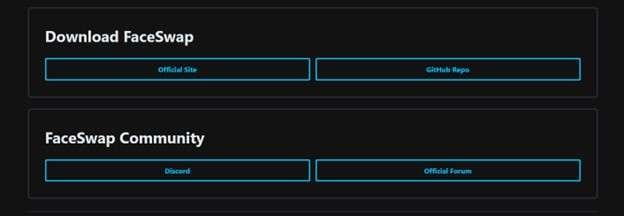
Method 1: Access from the official website
Step 1 Visit the official Deepfakevfs website

Step 2 Scroll down to the Download section
Then locate the section with the Face Swap download links. From the available download options select the version that suits your operating system the best. You can the option to download a Windows or Linux version.
Step 3 Click the Download button to initiate the process
Install the software by running the downloaded file by locating the installation file on your PC and running it to start the installation process. Then follow the on-screen instructions until you complete the installation process.
Method 2: Access from Github
An alternative process to installing Deepface Live is accessing it from GitHub. The process is pretty much simple and involves only a few steps.
Step 1 Visit the GitHub repository
Using a browser on your PC, visit the GitHub repository and navigate to DeepFace Live.
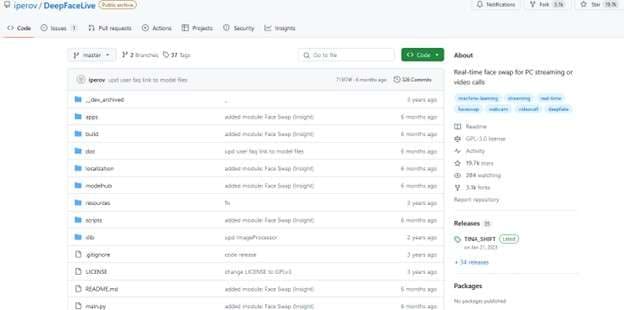
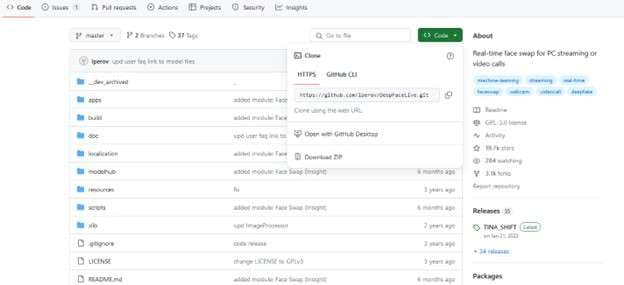
Step 2 Click the Code Button
Found on the top right corner of the repository page, the greed Code button allows you to select what you want to do with the code. On the pop-up menu that appears, select the “Download Zip” option. This will allow you to download the compressed file that contains the Deepface Live code.
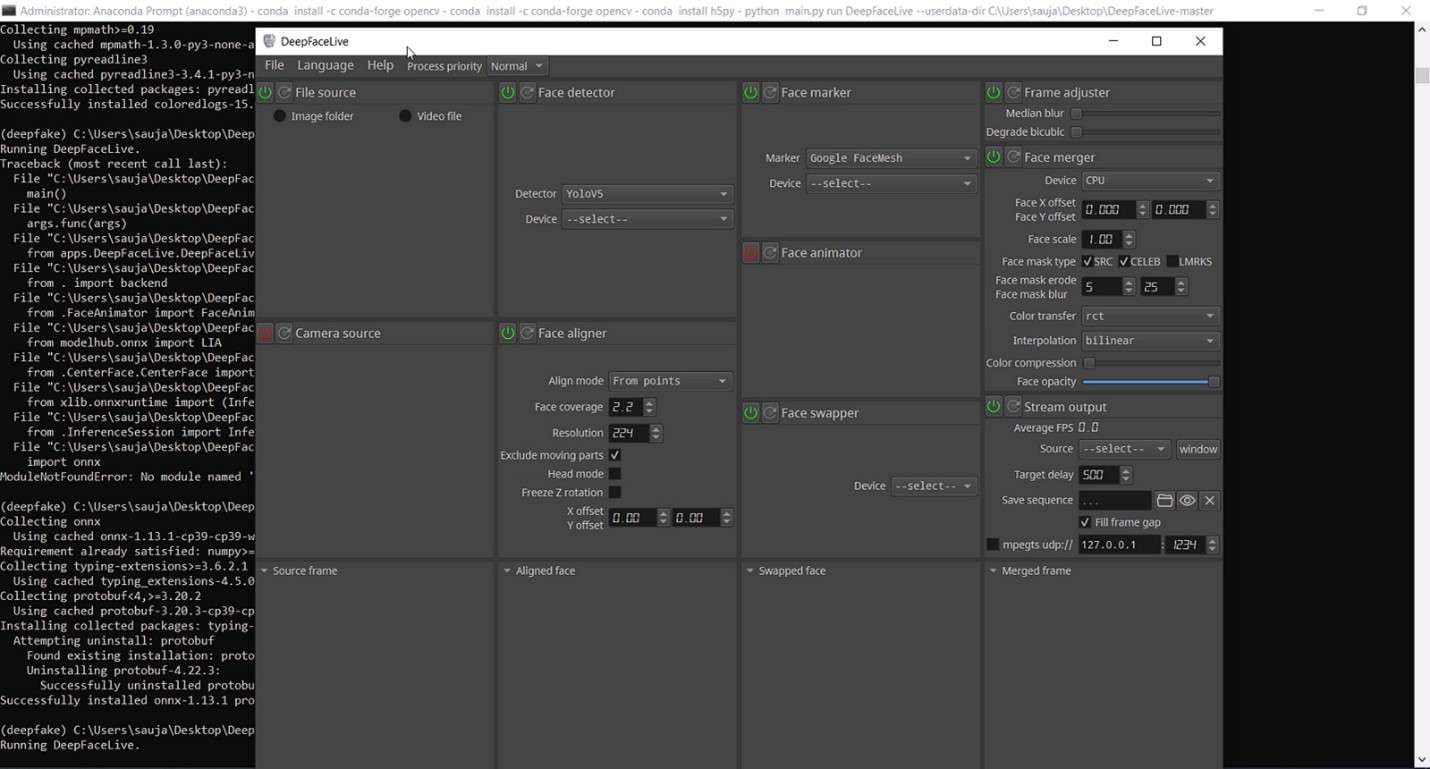
Step 3 Install and Rin the Application
After downloading the Zip file to your PC, extract its content to a desired location. Open the command prompt or a terminal and navigate to the extruded Deepface Live direction. Then, use the command “pip install -r requirements.txt” to install the required dependencies on your PC. After installing all the dependencies, run DeepFace Live on your PC using the command “python main.py. ”
Part 3: Build Your Live Model: Easy Tutorial
Creating customizedDeepFace Live models can be an exciting experience. It allows you to bring your imagination with real-time interaction. However, with the Deepfake issues and concerns among viewers, you may need a safe alternative to engage your audience with. You will want to engage your audience while assuring them that the information they are getting is authentic.
![]()
Get Started Online Free Download
Virbo Live is designed to give users the ultimate AI streamer experience. You can host live shopping with an AI streamer, saving the time and cost of generating such content or hiring a human streamer. With Virbo, you get access to multi-lingual AI-driven avatars or Vtubers that will interact with your viewers in real time. Transform their live experience while boosting your revenue.
Virbo Live allows you to broadcast your stream on platforms like Facebook Live and YouTube using OBS on each platform. In some platforms like TikTok and Shopee, you can use the official live tools like TikTok Live Studio to stream your Avatar.
01 Equipment Requirement:
You can use Virbo Live with any device that supports live streaming. This can be your PC or mobile device with decent storage and access to high-speed internet. The major equipment requirements include:
- Computer Requirements : Make sure your computer is properly configured with Stereo Mix or other virtual sound cards.
- Network Requirements: Your internet speed should be at least 5Mbps for smooth live streaming.
- Browser Requirements : While most browsers are supported, it is recommended to use the latest Chrome browser for optimal and stable performance.
Once you have checked on all the equipment requirements , you can go ahead to create your first AI-powered stream. Here are the steps to follow to create an AI streamer and set it up for interactions with your viewers:
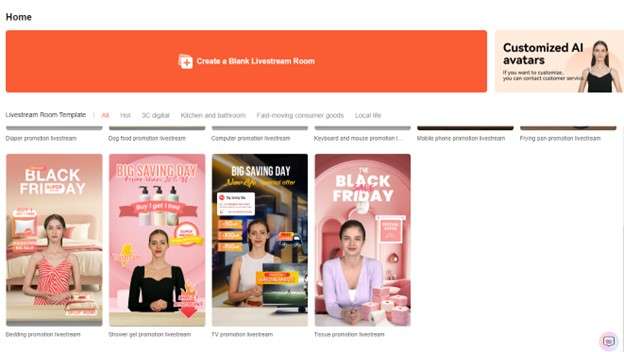
Step 1 Create a Live Shopping Rooms
On the Virbo Live page , select “Create a Blank Livestream Room” or choose a template of choice from the available options to create a new livestream room.
Get Started Online Free Download
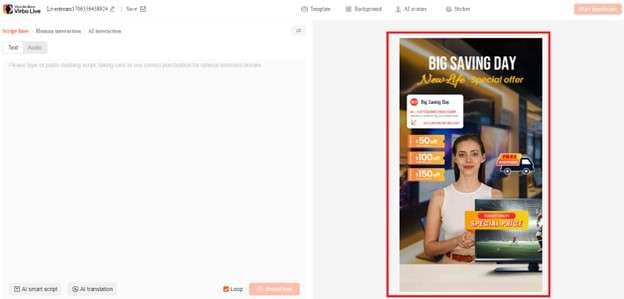
Step 2 Choose AI Streamers and Background
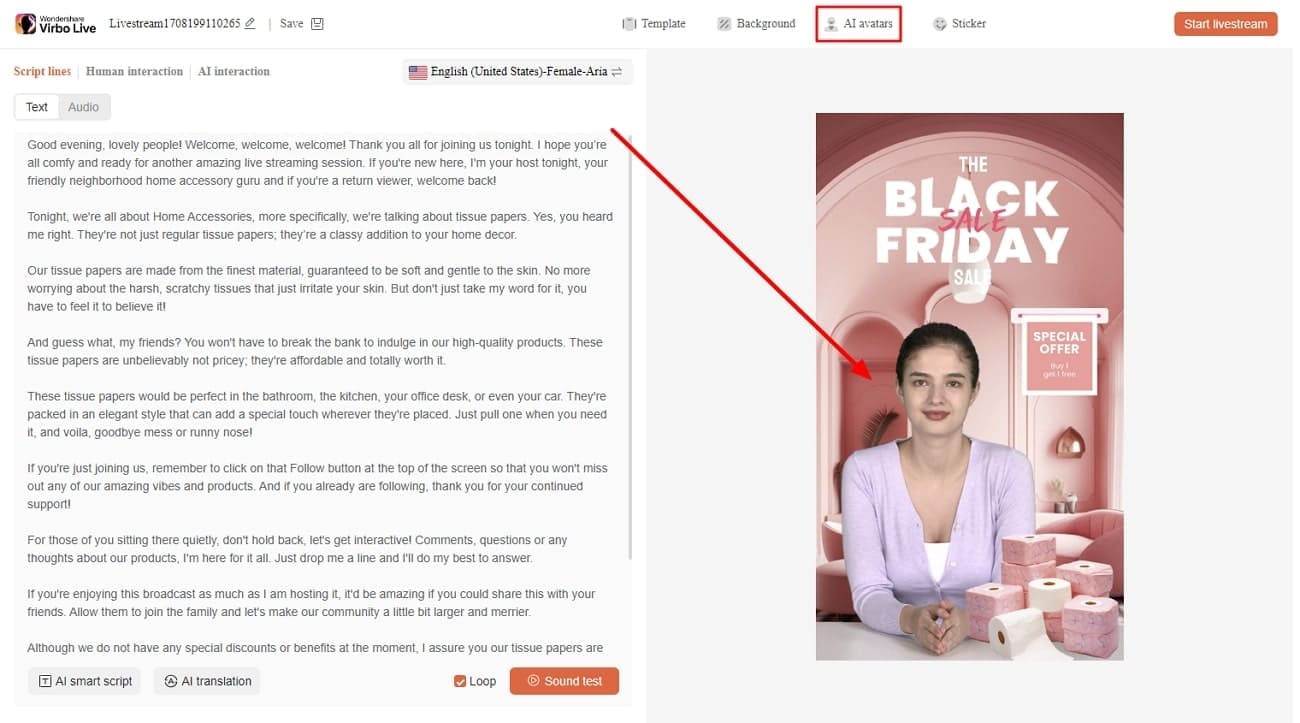
Add a virtual streamer of choice to your live stream room from the virtual host library.Virbo Live provides a wide range of AI avatars and backgrounds to suit your needs. You can also customize the avatar and background the way you like, and add stickers to enhance your viewers’ experience.
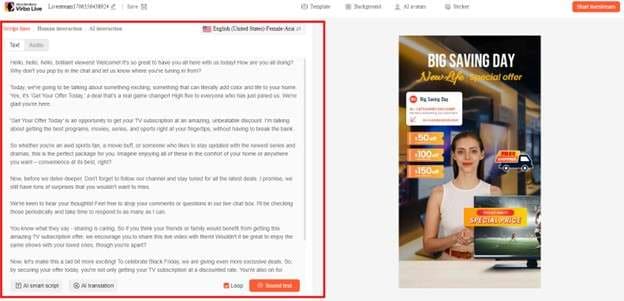
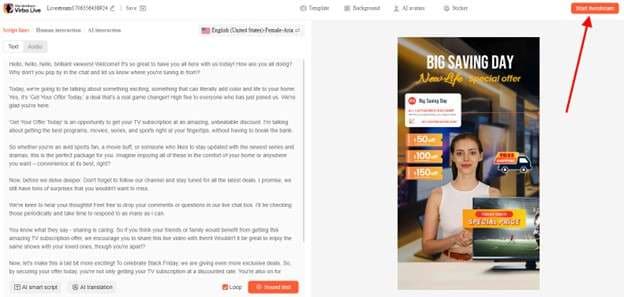
Step 3 Enter Text or Voice
With the avatar set, you need to upload your audio or enter a script with all the necessary details. Virbo Live allows you to automate this step with the AI smart scriptwriter and AI translator. Simply enter basic details about your product, and the Smart AI Scriptwriter will generate a fully detailed script for the avatar. Be sure to specify the language that you want to use and the desired tone for a more accurate script.
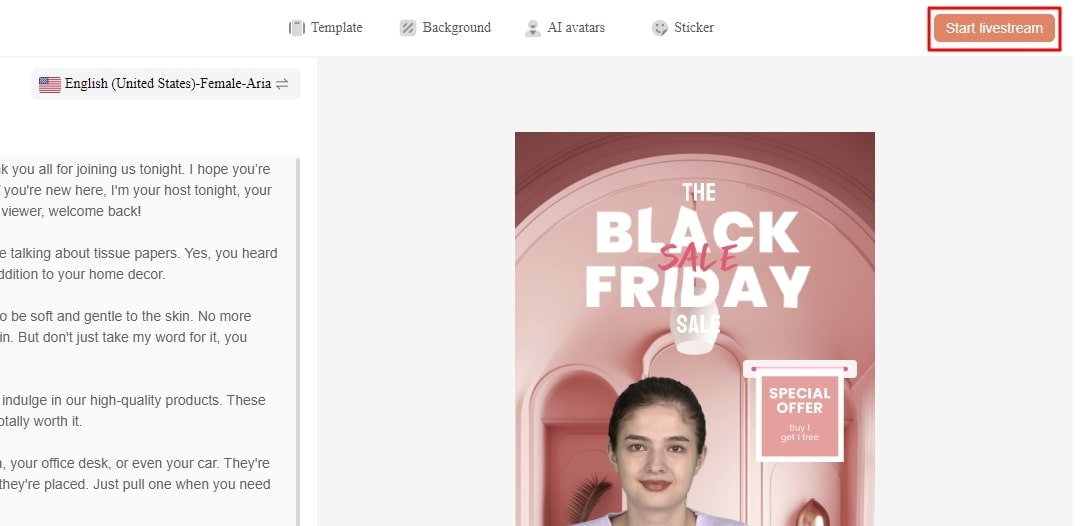
Step 4 Start Live Streaming
After choosing your AI Avatar and generating or adding a script, click “Start Live Streaming”. This allows you to AI stream your Avatar through OBS software, and allow the Avatar to interact with your audience on platforms like Facebook Live and YouTube.
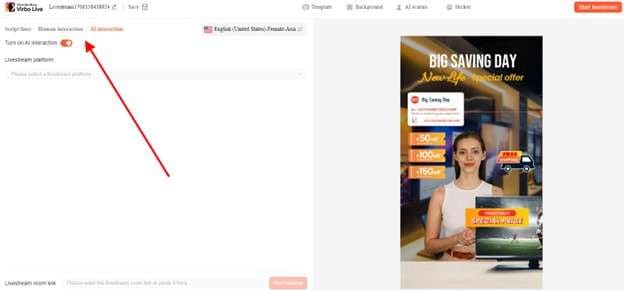
Step 5 Interact With the Audience
AI streamer from Virbo Live will do more than present your information to the audience. It will also interact with them seamlessly by responding to questions and providing additional information.
Conclusion
Deepface Live allows you to experiment with different faces when streaming live videos. You can present your videos as a celeb or even appear as if you are in a different location. While theDeepFace Live application can give you an incredible experience, you may have to deal with some ethical issues associated with Deepfake scandals. For this reason, we highly recommend using Virbo Live as a safe alternative. It allows you to create AI-powered avatars that can seamlessly interact with your audience without negative repercussions.
RTMP Streaming on Instagram: A Comprehensive Tutorial
Professionals and content creators now use different social media platforms for live streaming. There are many big names on these platforms, such as Instagram . Instagram is one of the most-used networks, with over 2 billion monthly active users. Using this live-stream platform is always a plus for companies and individuals.
However, the discussion is abouthow to stream to Instagram with an RTMP . This detailed guide helps you in usingRTMP Instagram for live streaming. Furthermore, you will also learn about a recommended tool that offers AI-powered features for broadcasting.
Part 1. Some Rules and Requirements To Understand Before Live Streaming on Instagram
Like every platform, Instagram has some protocols for broadcasting content to global audiences. Therefore, learning the rules and requirements before going live on Instagram is necessary. First, your account should be at least 30 days old; otherwise, they can restrict your stream.
There is a rule that you can go live for 4 hours per stream without retakes. This length was increased from 60 minutes in the recent update. Also, you can repost a live video on your profile if it is more than 15 minutes long. Instagram allows you to schedule a stream from 1 hour to 90 days in advance.
The initial requirement ofInstagram Live RTMP is that your content be respectful and updated. Additionally, you need to set your stream to 1920x1080 resolution on a vertical camera. Meanwhile, Instagram gives leverage on the number of followers so that you can start with minimum viewers. Also, there is no need to have a business account for live streaming.
Part 2. How To Live Stream to Instagram With an RTMP?
Setting high-quality live streams encourages people to tune into your broadcast. For this purpose, you need a seamless encoder like OBS . Unfortunately, Instagram doesn’t officially support third-party encoders. To solve this query, you need an effective solution.
Therefore, the following steps guide streaming on Instagram with an RTMP (Real-Time Messaging Protocol). You will also learn how to set the required parameters in this comprehensive guide:
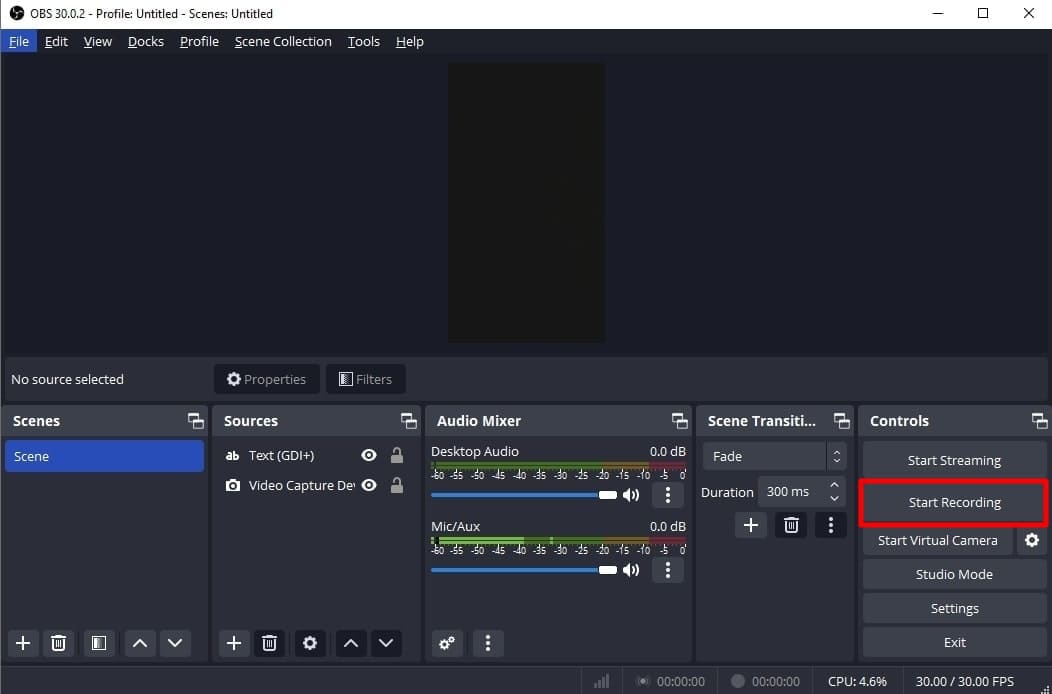
- Step 1. Start with downloading and launching OBS Studio on your PC. The first thing to do is set up vertical camera dimensions forRTMP Instagram live streaming. To access the settings window, hit the “Settings” option in the “Controls” panel.
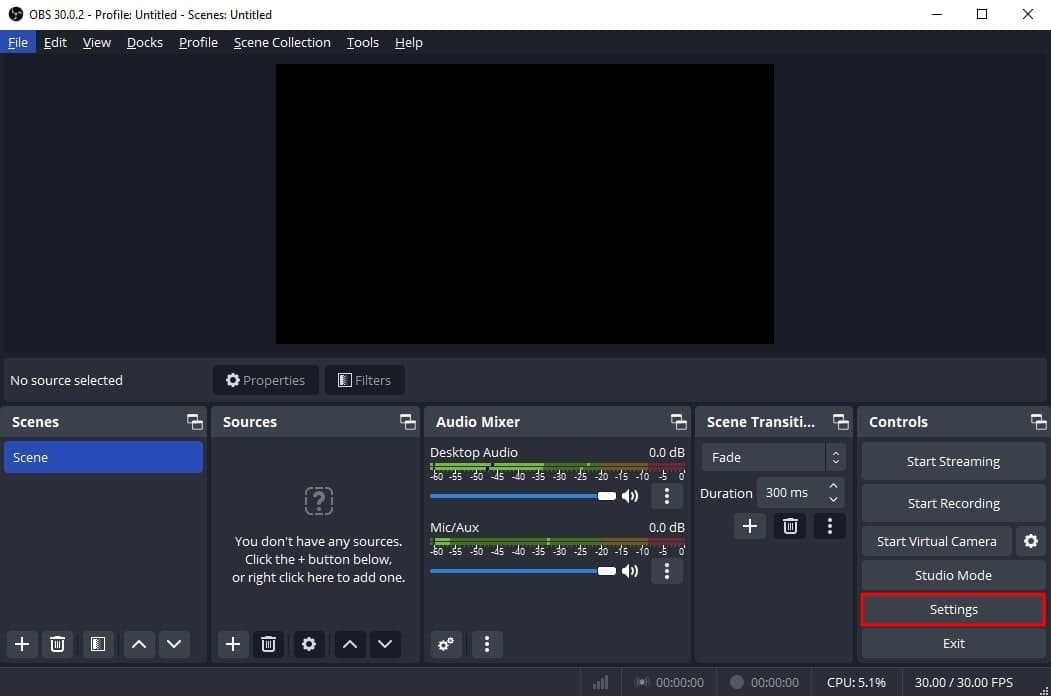
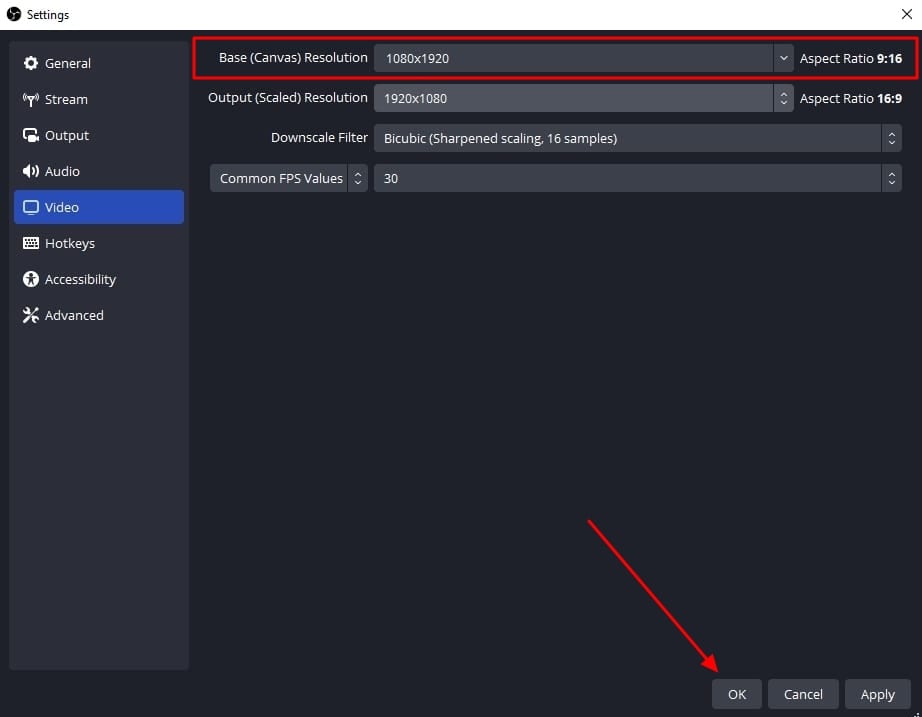
- Step 2. Look for the “Video” tab in the “Settings” window that opens. After that, enter “1080x1920” in the “Base (Canvas) Resolution” bar. Similarly, add a “1080x1920” value in the “Output (Scaled) Resolution” bar to set a 9:16 aspect ratio for vertical display. Then, hit the “OK” button to apply these changes to your Instagram streams.
- Step 3. After that, you need to add external sources to the scene. Click on the “+” icon in the “Scenes” panel or rename the scene. Once the scene is created, hit the “+” icon of the “Sources” panel. Then, select the “Video Capture Device” option from the menu and rename the device to your liking. After that, choose the video capture device from the “Device” dropdown and hit the “OK” option. Similarly, you can select the “Audio Input Capture” option to introduce an audio device.

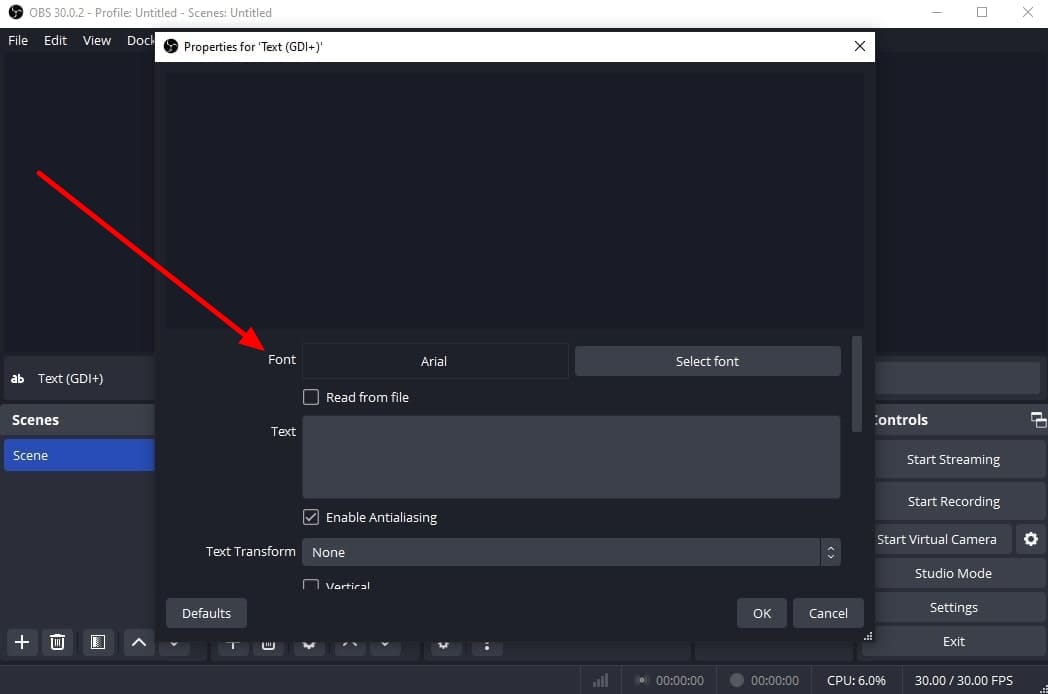
- Step 4. To add text overlays on your stream, hit the “+” icon again in the “Sources” panel. Choose the “Text (GDI+)” option and rename your overlay. On the next window, insert your text in the “Text” box. Then, click the “Select Font” button and choose your required font style and size. Additionally, you can change font color, opacity, alignment, background, and more. After customizing the text, hit the “OK” button to save the overlay in the sources section.
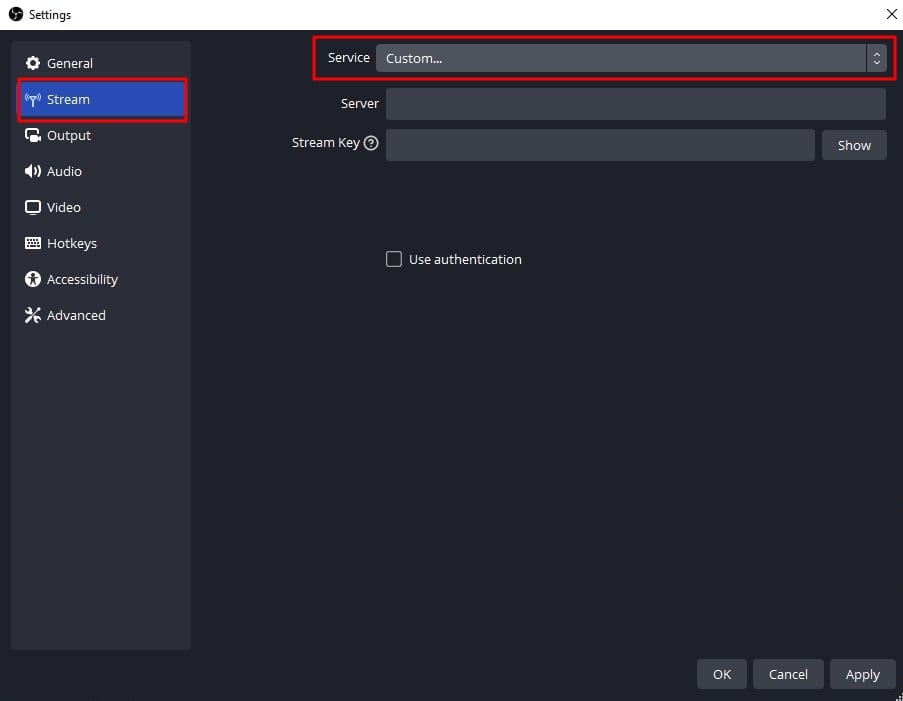
- Step 5. Afterward, select the “Stream” option in the settings window of OBS Studio. Set the “Service” to “Custom” from the dropdown. Then, you need to enter the server and stream key to proceed.
- Step 6. To get the server and stream key, visit rtmp.in on your browser. On the main interface of thisInstagram RTMP , hit the “GO LIVE ON INSTAGRAM” widget. Then, it asks you to log in to your Instagram account.
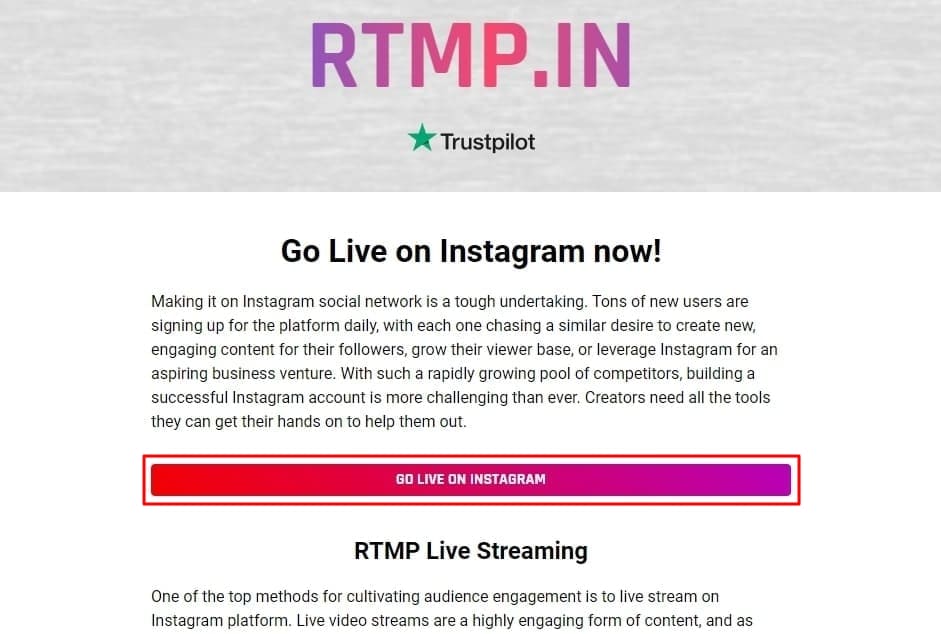
- Step 7. Once you’re logged in, it gives you a stream server URL and Stream key. First, copy the Server link and return to the OBS Studio software. Then, paste the link in the “Server” bar. After that, open the RTMP site again and hit the “Create New Broadcast” option.
You can also give a name to your broadcast in the “Broadcast Title” bar. After creating the broadcast, it shows the “Stream Key,” which you can copy. Then, move again to the OBS Stream setting panel and paste the key in the “Stream Key” bar. Lastly, hit the “Apply” option to save all these settings for your stream.

- Step 8. After getting ready, choose the “Start Streaming” option from the “Controls” panel. It starts your stream with selected parameters. To stop the stream, you can select the “Stop Streaming” option.
Part 3. How To Attract a Better Audience During Live Streaming on Instagram?
OBS Studio is an efficient software but offers limited functionality when it comes to engaging streams. Thus, you need an advanced solution that can help you reach global audiences through live streaming. For this purpose,Wondershare Virbo Live becomes an unsung hero for you. It provides AI-powered functions that help to start creative streams and generate more leads.
Moreover, the handy controls of Wondershare Virbo Live allow you to customize live streams to your requirements. Therefore, you can start streaming for different purposes, such as marketing, brand awareness, and more. Additionally, it allows you to set automatic responses and create a Q&A database to keep your audience engaged. Plus, it allows you to select creative AI avatars with different poses and outfits.
Key Features of Virbo Live
- You can choose different templates and backgrounds for a stunning streaming appearance.
- Users can write or generate scripts manually using the AI Smart Script feature. For this, they need to add prompts according to the script’s purpose.
- This tool helps to translate scripts into multiple languages and accents. Also, you can get dubbed audio in different AI voices.
Simple Guide To Start Live Streaming Using Wondershare Virbo Live
Many live streaming tools exist, but Wondershare Virbo Live provides more controls. Now, the thing is how to create a live stream room with this tool. For this, follow the given steps one by one to start live streaming with Virbo Live:
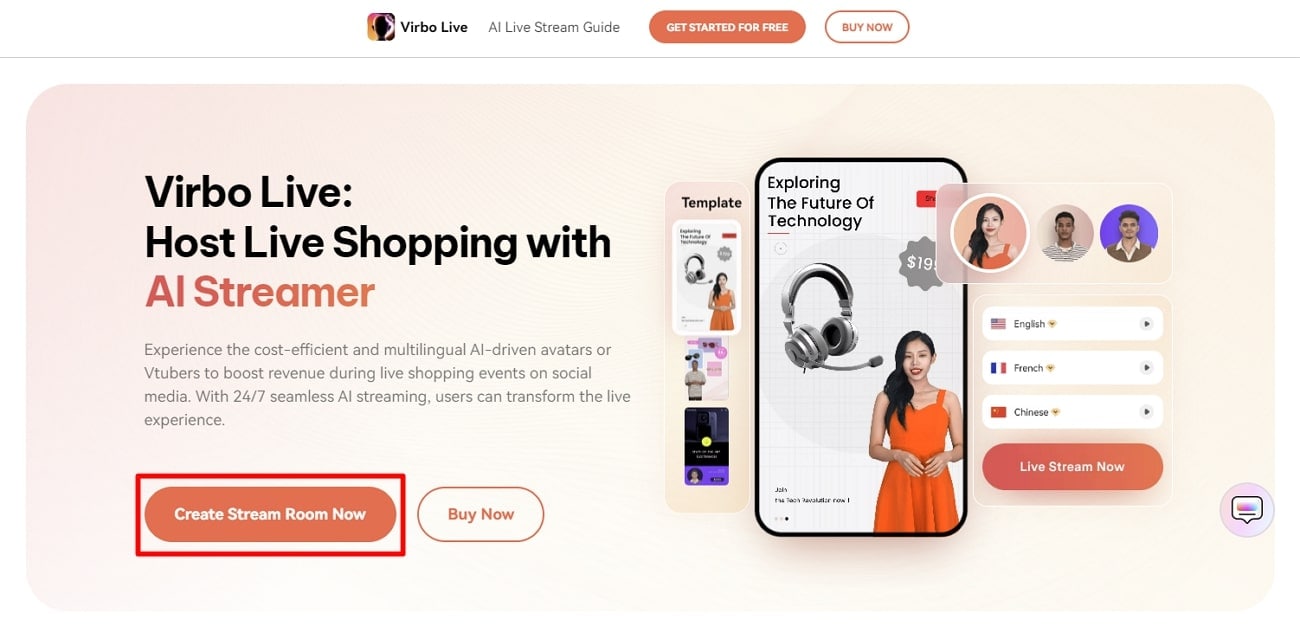
- Step 1. Visit the Official Site To Create a Stream Room
First,open theofficial website of Wondershare Virbo Live tool on your device. Navigate to the window and hit the “Create Stream Room Now” button. Upon doing that, it takes you inside the main interface of the tool.
Get Started Online Free Download
- Step 2. Advance To Create a Blank Livestream Room
Once you get to the tool’s home screen, select the “Create a Blank Livestream Room” option. Then, you can try different customization features to make your livestream room look stunning.

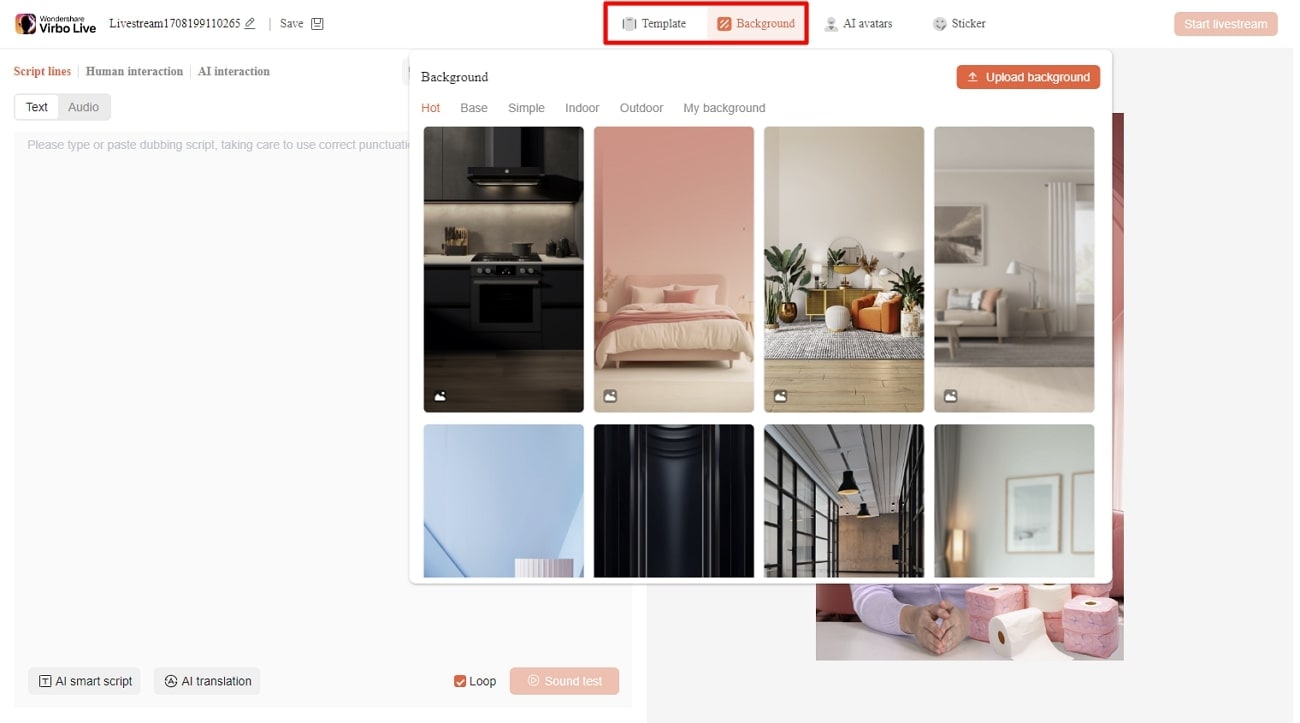
- Step 3. Customize Your Livestream Template and Background
After that, click on the “Template” tab to explore different templates. Choose a template that suits live streaming needs. Furthermore, open the “Background” tab from the same window to check exciting background options. You can select different backgrounds from variating categories in the same window.
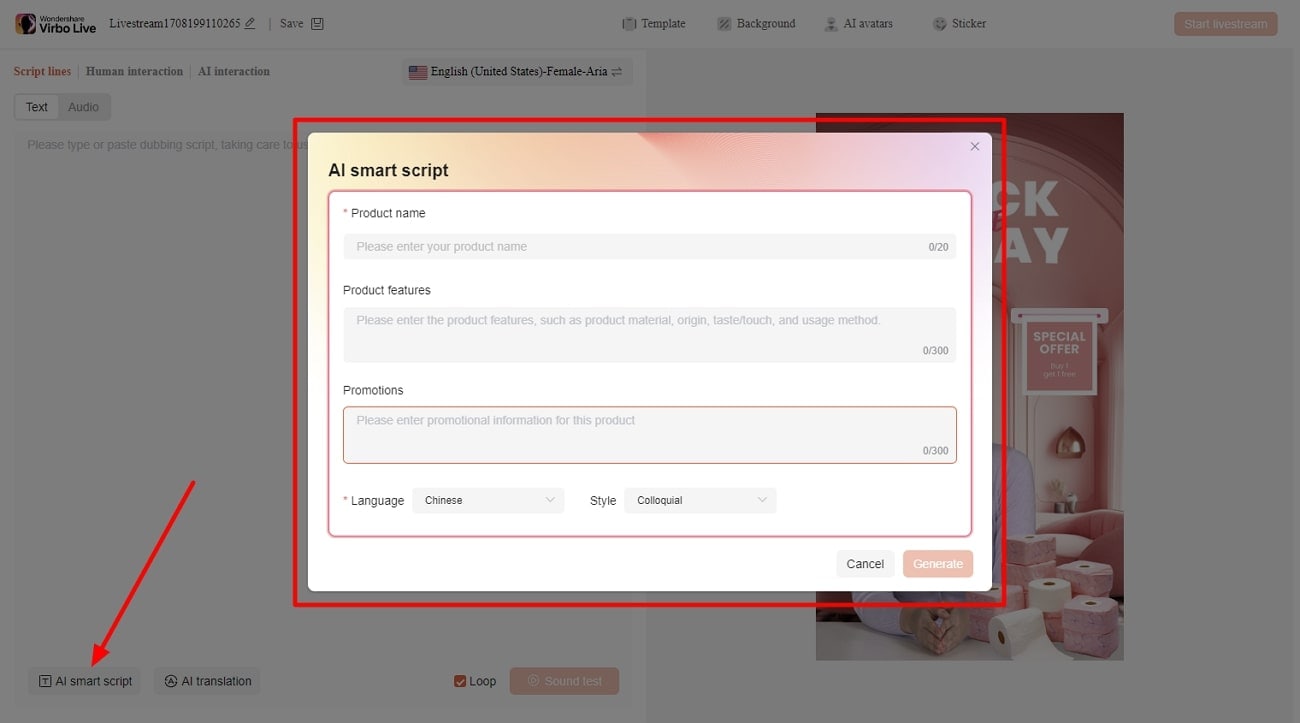
- Step 4. Add Script or Use AI Script Generator
Then, you need to provide the script for translation or dubbing. Select the “Text” given in the left side section for this. It provides a text box to type or paste your script text. Choose the “AI Smart Script” option from the bottom left corner if you don’t have a script. Add prompts there, and it will generate your scripts instantly.
- Step 5. Select Creative AI Avatars According to Requirement
Select the “AI avatars” tab to unveil creative avatars. There is also a whole range of AI avatars to choose from. After selecting the one that suits your motive, you can preview your selected AI avatar before launching the stream.
- Step 6. Start Your Livestream With All Selections
After finalizing all the options, you canproceed to start your stream. Select the “Start livestream” option from the top right corner in the same window.
Conclusion
Conclusively, this article intends to provide information about rules and requirements for live streaming on Instagram. You also learnedhow to live stream to Instagram with an RTMP like OBS Studio. Tools like Wondershare Virbo Live simplify your live streams with AI integration. Also, you can make your broadcast exciting for viewers by using different interactive elements.
Also read:
- [New] 2024 Approved Essential Top 5 Ultra-Light Video Capturers Guide
- [Updated] Serenade Selections Romantic Anthems for The Big Decision
- [Updated] Unraveling the Best Video Formats for YouTube Success
- 2024 Approved Tips for Effective PPT Sharing via Google Meet
- In 2024, Does iTools virtual location not work On Apple iPhone 14 Pro Max/iPad? | Dr.fone
- In-Depth Review of Genius WideCam F100's Image Resolution & Audio Performance
- Large-Scale Success with the Apple iPhone 12 Pro Max Review: Embracing a Bigger Approach
- New AI Script | Wondershare Virbo Online for 2024
- New In 2024, How to Define AI Video?
- New In 2024, How To Use Korean to English Video Translators for Creators
- Understanding the Cause of Error 0X80([KEY])70: Troubleshooting Steps
- Updated 2024 Approved How to Promote Your TikTok Videos Best 8 Strategies
- Updated 2024 Approved Live Chat With WooCommerce Leading Into the Live Selling World
- Updated Coqui Voice Cloning The Ultimate Solution to Streamline Audio Content
- Updated Essential Tips for Shooting Talking Head Videos
- Updated Guide to Generating Speech in Different Languages With the Best Tools for 2024
- YouTube's Economic Model Month-to-Month Income, In 2024
- Title: Updated 2024 Approved AI Video Translator | Online
- Author: Sam
- Created at : 2025-02-11 16:18:53
- Updated at : 2025-02-14 19:06:49
- Link: https://ai-voice-clone.techidaily.com/updated-2024-approved-ai-video-translator-online/
- License: This work is licensed under CC BY-NC-SA 4.0.