
New Top 5 AI Movie Script Generators for 2024
Top 5 AI Movie Script Generators
The software program that is powered by artificial intelligence and has the capability to create scripts for movies is known as an AI movie script generator. You can input customized descriptions about the movie, and this tool will handle the rest for you. Moreover, the AI screenplay generator has the capability to generate movies in versatile genres.
You can also use them to create a script about different types of movies. In this article, we will guide you through the top screenwriting AI tools. Moreover, we will also tell you how to make movies by using the most recommendable AI tool.
Part 1: Top 5 AI Movie Script Generators
The AI movie script generator can help you enhance your productivity and appears to be more time-saving. You can also facilitate collaboration with these tools. In this section, you will discover the top-rated AI film script generator.
Other than this, you will also discover the key features along with the pros and cons of these tools. So, why wait when you can get into the AI tools given here without delay:
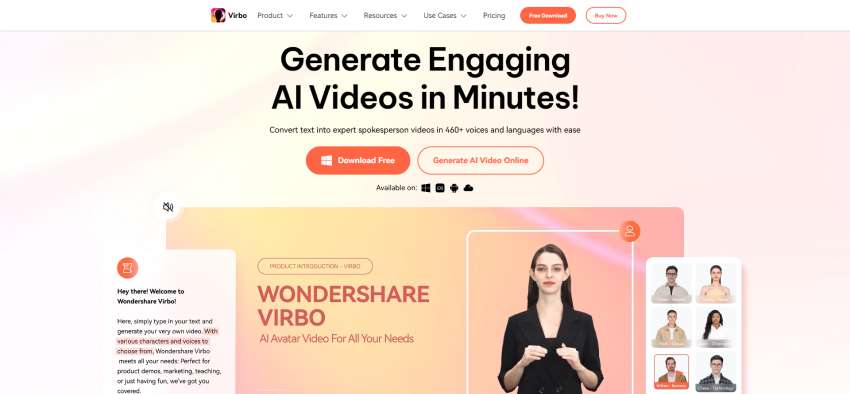
1. Virbo
Virbo is the most known and reliable video script AI tool. The interface of Virbo is uniquely designed, so users can use it without any complexity. Besides this, it integrates ultra-fast processing speed, which is quite convenient for users. With this revolutionary tool, you can create engaging scripts for movies.
Not only movies, but they can also write scripts on everything you wish for. Other than this, Virbo also has built-in AI Avatars, which can make your work easier than ever. You also get cloud storage to save your projects with Virbo.
Compatibility: Windows, iOS, Android, Online
Key Features of Virbo
- This is a cross-platform tool, so that you can use it on multiple operating systems. Moreover, you can also operate one premium account on multiple devices.
- It supports 150-plus multi-nation AI Avatars so that users can customize the age, style, or ethnicity of avatars according to their movie requirements.
- There are abundant commercial stocks and templates in Virbo. You can access 180+ video templates along with royalty-free music.
- The integration of natural AI voices in Virbo can make your work easier than ever. It lets you access more than 120 languages and accents to help you make engaging voice videos.
- Virbo AI movie scrip generator can write potentially captivating scripts for you. Moreover, you can also optimize the scripts on Windows computers.
Pros of Virbo
- Virbo supports several AI features which give users the opportunity to users for creating engaging content.
- This tool also supports 1080p export resolution, so you can export high-quality videos.
- You can even create a 2-minute-long video without making manual adjustments with Virbo.
Cons of Virbo
- You cannot make unlimited AI scripts with Virbo until you are a premium user.
- Virbo only provides 100GB of cloud storage in its Yearly Plans.
Generate Engaging
AI Video in Minutes!
Easily convert text into professional spokesperson videos in over 120+ voices & languages in minutes.
Generate AI Video Free Generate AI Video Now


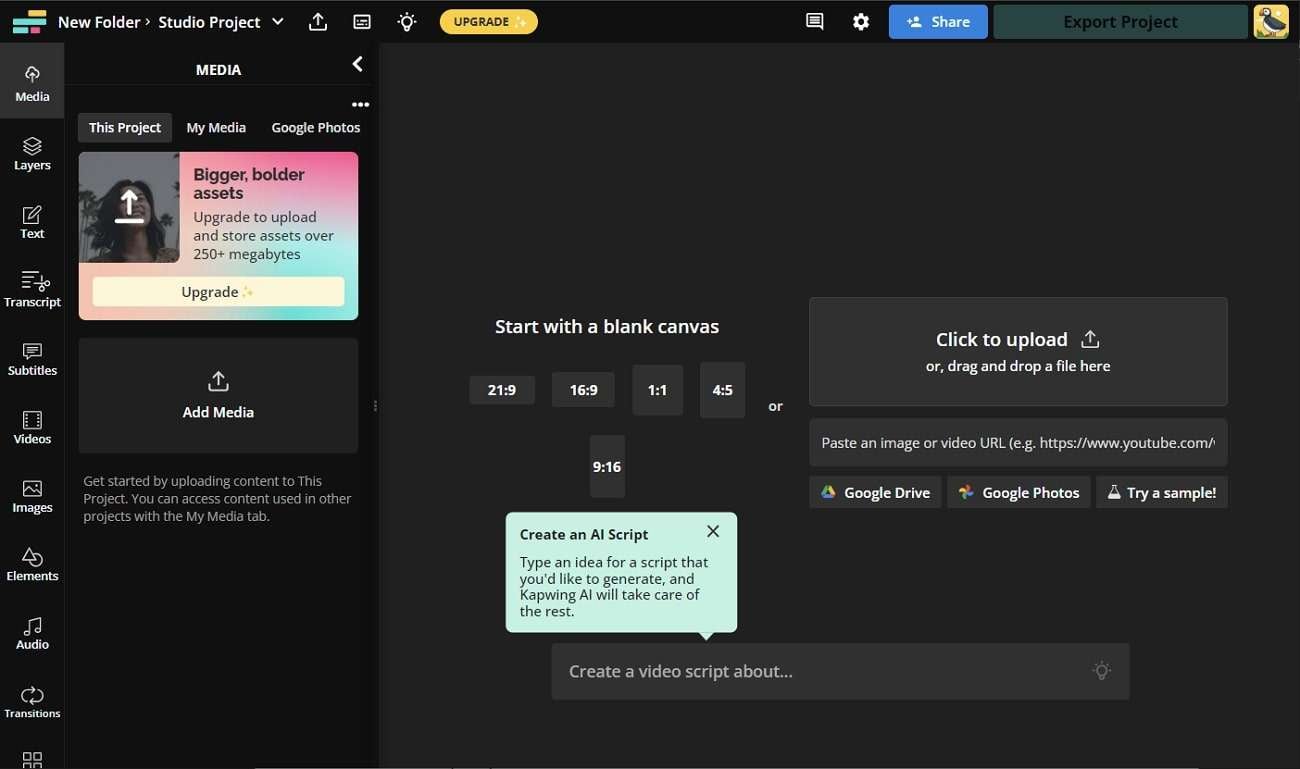
2. Kapwing
Kapwing is a perfect tool for writing AI movie scripts on multiple domains. No matter if you wish to write scripts for movies or YouTube videos, this tool can help you with all. You can save the hassle of writing long scripts and brainstorming daily to generate new ideas. Moreover, it can give you creative script content through which you can attract your targeted audience.
Compatibility: Online
Key Features of Kapwing
- The procedure of creating scripts with Kapwing is quite straightforward. Thus, you can generate scripts on multiple topics with ease.
- You can also customize your scripts and control their metrics, such as script length or genre.
- It also integrates the option of copying whole-length script so you can save it with your other projects.
- While making movies, you can use its Smart Cut feature to eliminate unwanted and awkward silence moments from videos.
- Kapwing also lets you clean the audio without any problem. You can eliminate all times of background noises with this.
Pros of Kapwing
- You just need to add a short description of the script you want, and this tool will handle the rest for you.
- It is an easy-to-use tool, so you can use it even by following the on-screen instructions.
- Kapwing offers a spam and ad-free interface, which lets users explore the tool without any complexity.
Cons of Kapwing
- If you are in a hurry, it’s not a great choice because you can face a few glitches and interruptions while using it.
- Exporting long projects can take longer than you have expected. Thus, it’s a problematic thing for users.
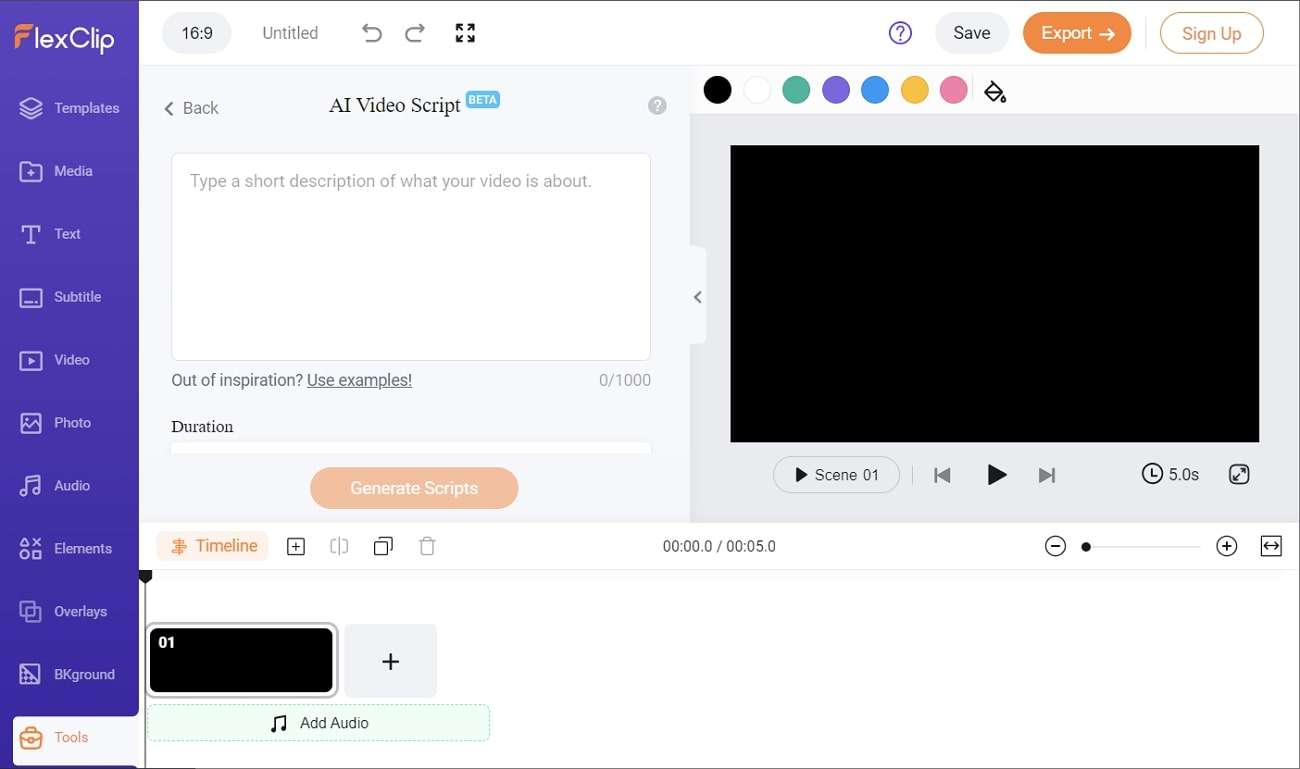
3. FlexClip AI Video Script Generator
This AI video script generator shows integrations with ChatGPT, through which you can ensure that you will get high-quality scripts. It can also make the script-generating procedure a breeze because of its blazing-fast speed. You can also select the customized language for your script by using this exclusive tool. Moreover, it lets you create scripts on multiple topics without any limitations.
Compatibility: Online
Key Features of FlexClip AI Video Script Generator
- With FlexClip AI Video Script Generator, you can also turn the scripts into animated videos.
- It also supports AI editing tools, including the AI Auto Subtitle feature. You can also create AI images with this tool.
- You can customize the duration and prompt for your video to get personalized scripts.
- With its built-in AI Text to Speech feature, this tool can also turn your text into speech.
- FlexClip AI Video Script Generator also has the potential to turn simple text into amazing-looking pictures.
Pros of FlexClip
- It integrates many basic editing tools such as Motion Graphics, Change Video Speed, Slideshow Maker, Compress Video, and more.
- You can utilize the text-to-video tool for creating videos directly from scripts with customization.
- FlexClip AI Video Script Generator can also add subtitles and music to the videos to make them more interesting.
Cons of FlexClip
- The procedure of generating scripts for movies can be pretty tricky for new scriptwriters.
- You cannot access a few premium features of FlexClip AI Video Script Generator until you buy its subscription plans.
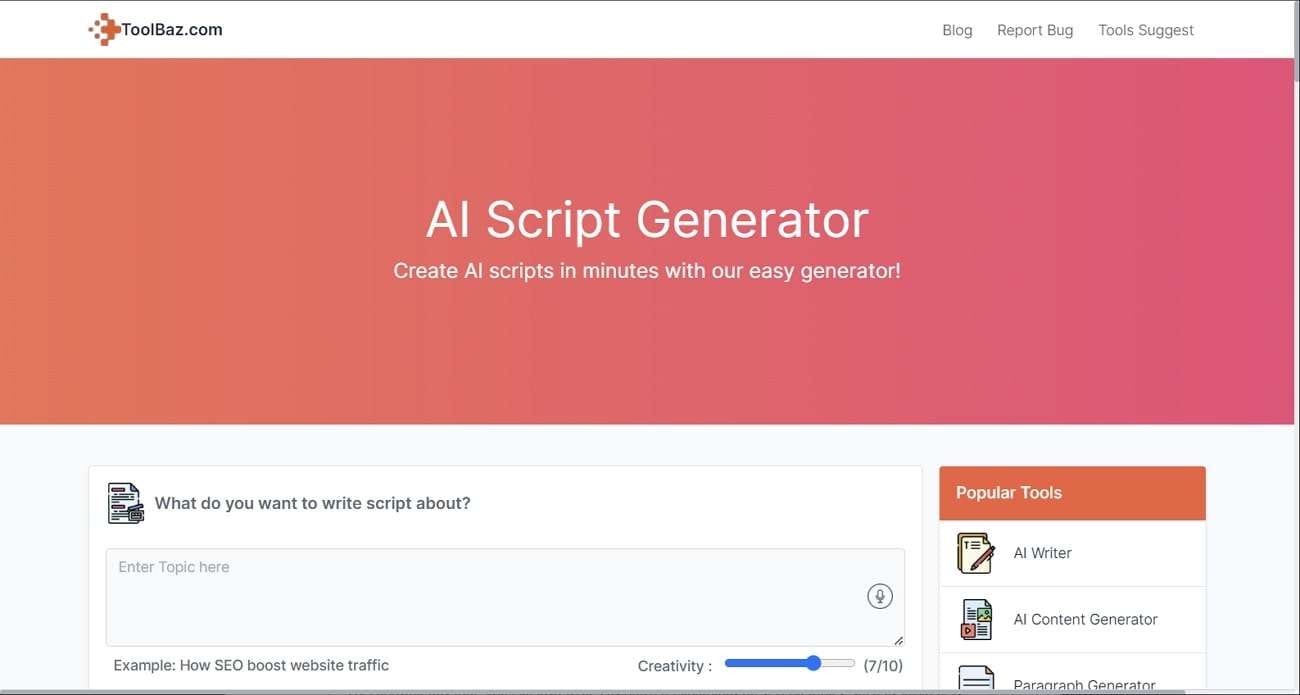
4. Toolbaz AI Script Generator
Toolbaz AI Script Generator is a free-to-use AI screenplay generator. Moreover, it also has powerful encryption policies for the users’ data privacy. It is quite easy to use the tool, so you can generate scripts with this without any technical skill. This tool also offers you to manage the creativity level of script generation as per your need.
Compatibility: Online
Key Features of Toolbaz AI Script Generator
- You have the option of creating different variations of the script for the same topic.
- The procedure of script generation of Toolbaz AI Script Generator is automated, so you don’t have to do anything manually.
- With the AI Story Generator of Toolbaz AI Script Generator, you can make best-in-class stories and share them on social media.
- Its AI text generator tool lets you create intuitive text for sales emails, media content, and media posts.
- By choosing this tool, you can also write customized paragraphs on several topics, such as awareness and tech.
Pros of Toolbaz
- This tool has the potential to generate plagiarism-free scripts for users.
- It also adds emotions to several parts of the script to give it a more realistic look.
- Toolbaz AI Script Generator can also create better movie plots that help make the best storyline.
Cons of Toolbaz
- It can sometimes integrate bugs and glitches, impacting your workflow efficiency.
- This tool has several irritating ads that can be a distraction factor and compromise the tool’s exploration.
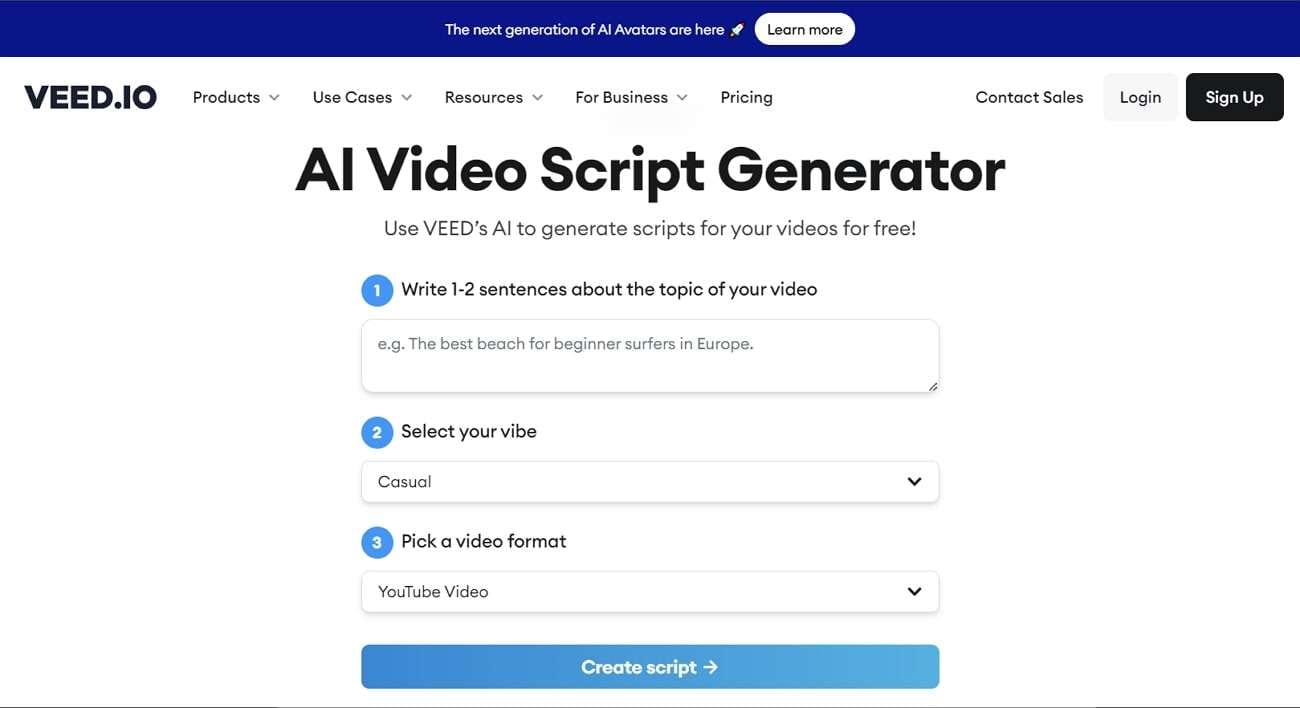
5. Veed AI Video Script Generator
No matter if you wish to generate scripts for Instagram reels or cinematic movies, this AI film script generator can help you with everything. You can create compelling movies by following the scripts created with this. Moreover, you have to write a prompt for what you want in the script. After this, Veed AI Video Script Generator will write scripts with emotions and plots for you.
Compatibility: Online
Key Features of Veed AI Video Script Generator
- You can write every type of script with it, such as informative, creative, funny, professional, and more.
- From the project setting, you can change the background color, audio, duration, and size of the scripted video.
- It can also create reliable subtitles and sync them to the video in an automated manner.
- To make script videos more attractive, you can add several elements.
- Veed AI Video Script Generator also lets you import media from a device and use templates for video creation.
Pros of Veed
- This AI screenplay generator supports straightforward timeline-based editing, which is very convenient for users.
- You can also use its built-in stock videos, music, and sound effects to give a professional look to scripted videos.
- Veed.io supports a wide array of templates, and you can also search for your desired templates with keywords.
Cons of Veed
- Veed AI Video Script Generator cannot create move scripts in languages other than English.
- The editing options of the Veed AI Video Script Generator can be quite restricted if you wish to work on lengthier projects.
Part 2: How to Generate a Script for a Movie by Using Virbo
The best-in-class AI film script generator through which you can create unique scripts for movies is Virbo. Do you want to know how to create scripts with this video script AI tool? The below-given instructions will help you in this matter:
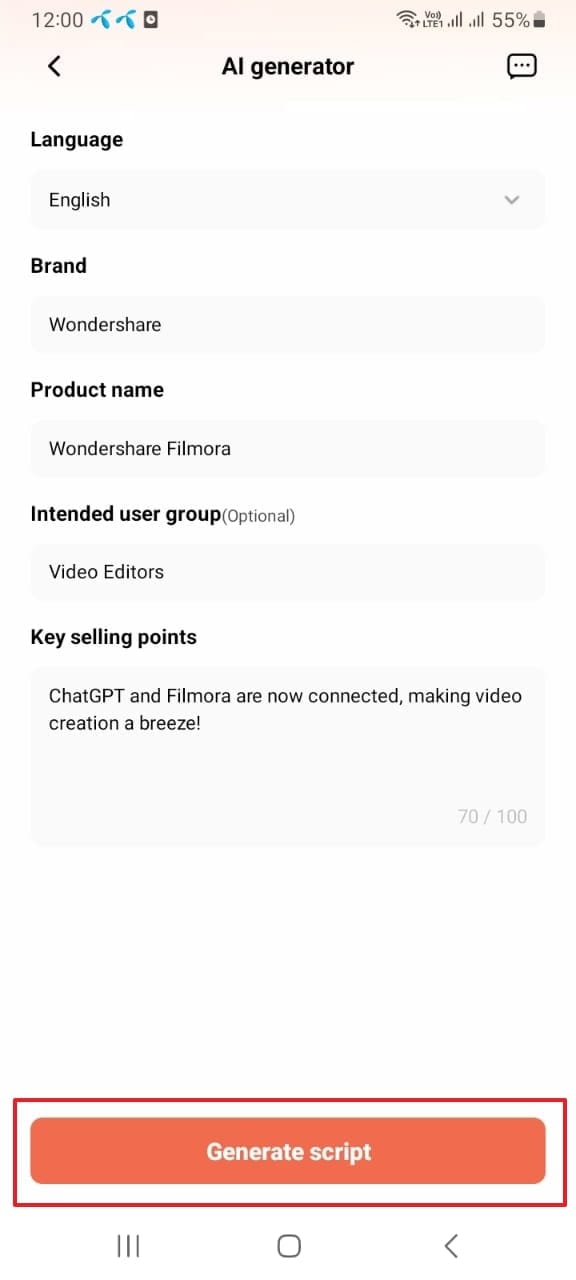
Step 1: Launch Virbo and Go To AI Script
Initially, launch Virbo on your device and select “AI Script” from the main interface. Next, customize the “Language,” “Brand,” “Product Name,” and “Key Selling Points. To create the movie script, hit the “Generate Script” button.
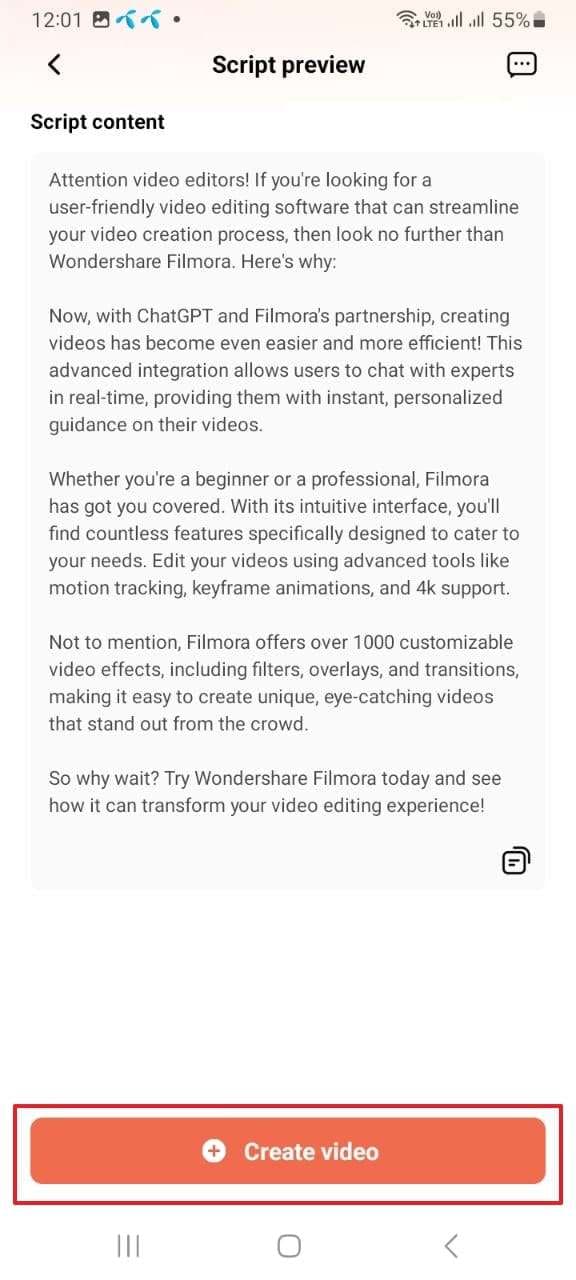
Step 2: Edit the Script and Make a Video
Following this, you will get the script on your screen. Read the script carefully and make edits if needed. Once satisfied, hit the “Create Video” button, and select the aspect ratio from the options of “Portrait Video” and “Landscape Video”. Finally, click the “Create Now” button and wait a few moments.
Conclusion
As stated in the above article, you can use the AI movie script generator to create innovative scripts. Several tools can help you with this; however, the top 5 are discussed above. You can use these tools to generate the best scripts for movies. If you wish to know the best AI movie script creator, the answer is Virbo. You can follow the above-given instructions to make scripts with Virbo.
Maximize Yandex Translate in Video Translation and Beyond
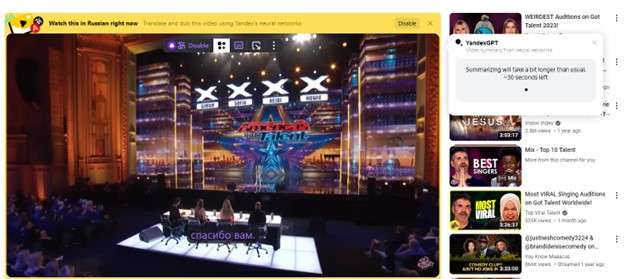
Technological advancements in the world of video translation have transformed how content is being consumed. Away from automated translation and video dubbing,Yandex translate video allows users to watch videos with instant voice-over translation. By just clicking on the play button of a video, the Yandex video translate feature brings you to a world of new possibilities. In this article, we explore how the Yandex browser translate video works and how it compares to Google. We’ll also share some pro tips for efficient video translation with Yandex translate video.
Part 1. Yandex Browser Video Translation Overview
Yandex browser video translation is a useful tool for watching videos in your native language. The feature is designed to allow users across the globe to watch videos in their native language, regardless of the original language used. This unique feature automatically translates the audio track of a video, displaying the subtitles in a language of your choice.
Capabilities of Yandex Translate in Video Translation
The Yandex browser video translation comes with an in-built translator that shows words and phrases in the language being used in the browser interface. It also comes with additional features, including translating Yandex emoji and Yandex photo translate which improves user experience. These features recognize text in images, providing translation over the source text. This means that you only need to view a video and it will automatically generate subtitles in the language you are using with the browser.
Yandex browser translate video feature automatically detects the language of the loaded pages. It will then ask you if you want to translate it, and allow you to open the translation dialog window once you click the SmartBox. In only a few simple steps, you can translate the languages in any video, text, or image.
- Click “Translate” in the window of the Yandex Browser to translate the page text. From the page text that appears, click Show Original in the window.
- When you play videos, click on the “SmartBox” indicating Translate Video that hovers on top of the video. Choose the language that you want, and select “Show Subtitles”. Yandex will automatically translate the video, allowing you to view it in your native language.
Pros
- Supports Multiple Languages: With Yandex video translate, you can watch any video in over 90 languages
- Accurate Subtitles: The Yandex browser translate video feature automatically generates highly accurate subtitles using speech recognition technology
- Live Translation: Translate any live stream videos in real-time, including conferences and news broadcasts in foreign language
- Offline Translation: Yandex Translate works seamlessly offline by allowing users to download subtitles to their devices for viewing later
- User-friendly Interface : Yandex browser translate video has an easy-to-use and highly intuitive interface that requires users to only click on the Translate button to access the subtitles
Cons
- Users have complained that Yandex translate videos often contain some errors in pronunciation
- Live translation and online video translation usually require an internet connection, and may not always be useful
- The video translation feature is only limited to the desktop version of the Yandex browser
- Users have limited control of the Yandex video translation process, including customizing the subtitles or changing the translation process
- Certain features may be technical for some users and only support certain video formats like MP4 and WEBM
Part 2. Google vs. Yandex: A Comprehensive Comparison
Making a choice between Google and Yandex for video translation can be challenging. The two search engines offer unique experiences and allow users to achieve various tasks. However, each has its strengths and weaknesses. As you explore the options for Google Translate Yandex, let’s have a look at what stands out the most for each.
Here is a quick comparison:
| Metrics | Google Translate | Yandex |
|---|---|---|
| Supported Languages | 135 | 102 |
| Maximum Documents File Size | 10MB | 5MB |
| Supported Image Formats | JPG, JPEG, PNG | JPG, PNG, GIF |
| Website Translation | Yes | Yes |
| Mobile App | Android & iOS | No |
| Offline Use | Yes | No |
| Translate History | Yes | Yes |
| Voice Input | Yes | Yes |
| Translate Handwriting or Virtual Keyboard | Yes | No |
| Translate Widget | For Android Users Only | Yes |
For a comprehensive comparison, keep reading!
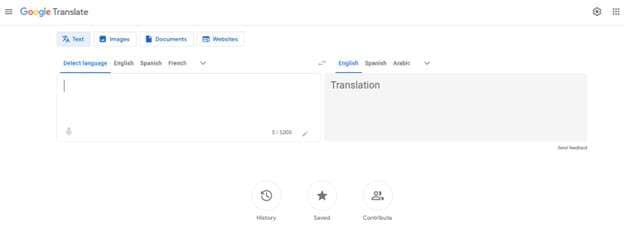
1. Google Translate
Google Translate is widely used both on PC and mobile devices. The easy-to-use feature instantly translates languages in text, images, documents, and websites. With an impressive range of 130+ languages, Google Translate appeals to a whole range of audiences.
Strengths:
- Larger language support: Supports over 100 languages, making it more versatile.
- Wider platform availability: Available across the web, mobile apps, and various integrations.
- High accuracy: Generally considered the industry standard for translation accuracy.
- Advanced features: Offers offline translation, dictionary lookup, and image translation.
- Extensive data: Trained on a massive dataset, leading to more natural translations.
Weaknesses:
- Limited context sensitivity: May struggle with complex sentences or cultural nuances.
- Limited customization: Users have limited control over the translation style or tone.
- Privacy concerns: Google collects user data for its translation engine.
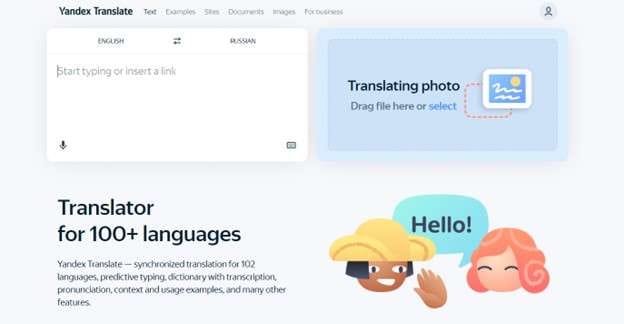
2. Yandex Translate
The Yandex Translate feature boasts synchronized translation for 102 languages. The feature can translate documents, videos, images, documents, and other forms of media. It also comes with additional capabilities such as predictive typing, pronunciation, dictionary with transcription, context, and usage examples.
Strengths:
- Stronger in Eastern European languages: Offers superior accuracy for languages like Russian and Ukrainian.
- Live translation: Provides real-time video translation for live streams and conferences.
- User-friendly interface: Simpler and more intuitive interface compared to Google Translate.
- Offline translation: Allows downloading subtitles for offline video viewing.
- Strong in technical terms: Handles technical jargon and terminology more effectively.
Weaknesses:
- Limited language support: Supports fewer languages than Google Translate.
- Limited platform availability: Primarily available on Yandex Browser.
- Less accurate for some languages: May struggle with languages outside its focus area.
- Fewer advanced features: Lacks some of the features offered by Google Translate.
- Less data: Trained on a smaller dataset, which can affect translation accuracy.
3. Choosing the Right Tool for Your Translation Needs
The choice betweenGoogle Yandex translate options will depend on your specific needs. Each search engine has its own unique features that make it useful for various kinds of users.
When you need translation for a wider range of languages and platforms, you will find Google Translate a better option. However, Yandex Translate is a better choice when looking to translate Eastern European languages. It is also more useful when you are interested in translating live streams and news broadcasts in a foreign language. In the end, both search engines are helpful and will achieve the desired goal.
Part 3. Pro Tips for Efficient Video Translation
Achieving efficient video translation starts with choosing the right translation. As explained in the previous section, Google and Yandex Translate features are easy to use and produce great results. However, you need to consider your language needs and the level of accuracy you are aiming for before making a choice. To achieve better results, software designed to specially translate videos will do a better job.
Best Free Online Video Translator – Wondershare Virbo
Wondershare Virbo stands out as an effective tool that accurately translates videos in minutes. The AI-powered tool is designed to translate videos, or even generate engaging videos almost instantly. You can further convert text into professional spokesperson videos or translate the voice in your videos to the desired subtitles language. This easy-to-use and provision of great results within a short time makes Virbo a good choice for various kinds of projects. You only need to upload your video to the software, and Virbo will do all the heavy lifting.
Translate Video Online Download APP Now Free Download
Compatibility of Wondershare Virbo:
- Online, Windows, Android, iOS devices
Key Features of Wondershare Virbo :
- AI Video Translator : This feature allows you to achieve global communication with Virbo. Easily translate video content in over 20 languages for viewership and audience needs.
- Auto-Generate Script: Virbo eliminates the need to manually write your script by automatically generating it and ensuring consistency in language and tone.
- AI Cloning Voices: Virbo infuses emotion and vitality in your videos to appeal to different kinds of audiences.
- Lip-Sync Precision : With high precision in lip-sync, every part of the video is harmoniously synchronized to a great viewing experience.
- Soundtrack Reserved : Virbo enhances audience engagement by making video content more memorable.
**

Pros
- Virbo is widely compatible with different kinds of mobile and PC devices, offering a more versatile experience
- An affordable video translator tool that offers budget-friendly prices for all kinds of users
- An easy-to-use and intuitive interface for accurate video subtitle translations
- Multiple language support for various video needs
- Translate videos in the same platform without having to edit subtitles manually
Cons
- Limited language support compared to some advanced and paid options
- Lacks advanced features offered by paid services
How to Use Wondershare Virbo to Translate Video
How to translate video with Virbo? You can do this by following the instructions provided below:
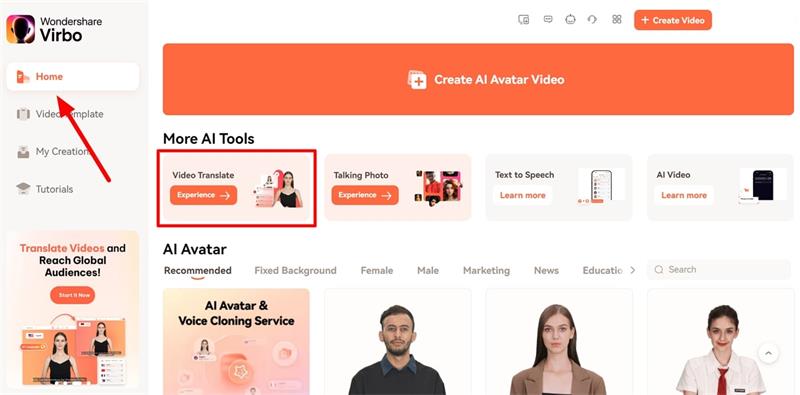
Step 1. Open the Wondershare Virbo Online Tool
Click “Translate Video Online” to open the Wondershare Virbo online tool on a browser. You can also download it on your computer or mobile device.
Translate Video Online Download APP Now Free Download
Step 2. Access Video Translate and Upload Video
Following this, proceed with the “Video Translate” feature from the “More AI Tools” section. Upload your video file by tapping on the “Click to upload video” option, and the video length can be a maximum of 5 minutes. Moreover, the maximum supported file size is 500MB, and file types are MP4 and MOV.
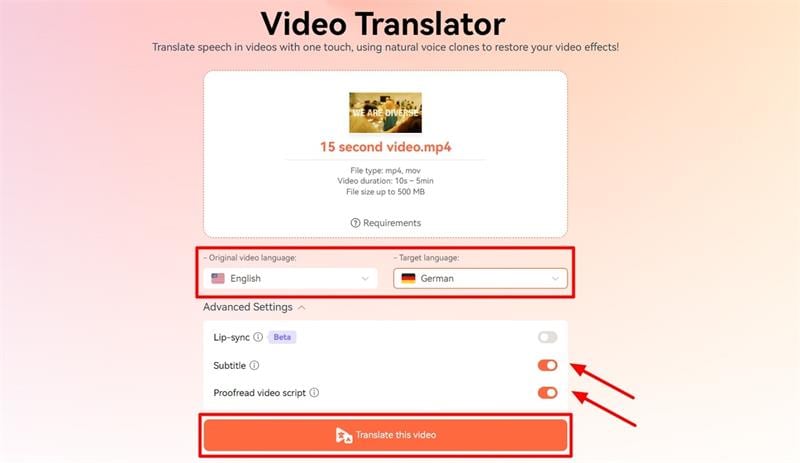
Step 3. Choose Target Language and Advanced Settings
Before starting the video translation process, you need to choose the “Target Language” and enable other advanced settings such as Lip-sync, Subtitle, or Proofread video script. After that, press the “Translate this video” button to initiate the AI video translation process.
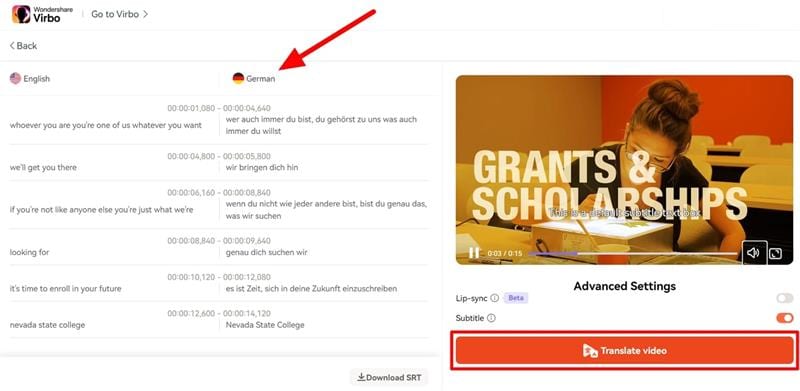
Step 4. Check the Video Script and Finalize the Translation
In case you have enabled the “Proofread video script” feature, you will be able to check the translated video script and edit it according to your requirements. Afterward, press the “Translate video” button and download your translated video once the process is completed.
Translate Video Online Download APP Now Free Download
Conclusion
The Yandex browser video translation is a popular feature for instant and quick video translations. The features work well with different kinds of videos, especially live streams and news broadcasts in Eastern European languages. Although the in-built features offer unique experiences to customers, it is limited in some ways.
Since choosing the right tool is the first step to successful video translation, going with installable software will produce better results. We recommend installingWondershare Virbo to handle your video translation needs. This is the best free online video translator that is AI-powered to meet the specific needs of various kinds of audiences.
The Ultimate Guide to Learning All the Details About Voice Cloning
Advancements in AI technology have done wonders for every field and industry. Many AI-powered tools use advanced technology to create artificial stimulation of any individual’s voice. This process is called voice cloning which uses deep learning techniques to mimic any person’s voice. Moreover, there are many voice cloning software that can assist you in cloning a voice with high accuracy.
Do you know the key benefits of voice cloning? This procedure can help with accessibility and eases the manual work in the media industry. To learn more about voice cloning in detail, you should read the following article.
Get Started Online Free Download
Part 1: What is Voice Cloning?
Voice cloning is a procedure in which a program generates an identical voice of a real person through speech synthesis. This technology uses deep learning strategies and AI to replicate a human voice through audio recordings. To clone a voice, there are several voice cloning apps comprising distinctive properties.
The voice cloning software analyzes the speech patterns, pitch, tone, and other vocal properties of the targeted human. Voice cloning has various uses in businesses and media industries. Due to its abundant usage, voice cloning apps bring constant powerful features. By using advanced voice cloning software, you can clone the voice of any individual with perfection.
Part 2: How a Voice Cloning Works to Clone a Voice Efficiently
Voice cloning technology uses a structured procedure to bring accurate results. The first step is to collect the data from the targeted audio recordings. The audio recordings include the speech of a particular person with different phrases and contexts. Afterward, the program extracts the distinctive features of the person’s voice. The features include voice tone, pitch, rhythm, intonation, and other properties.
After collecting the data, the AI technology creates a training dataset. This dataset includes the input text and audio recordings of the individual. Then AI technology learns to match the input text to audio recordings. Now, the program uses a neural network as a deep learning technique to clone a voice. This network helps the model train through the input text and given vocal properties of the person’s voice.
Once the model gets trained, it generates a cloned voice by managing its internal parameters. Afterward, final adjustments and refinements are made to bring you the perfect output in the form of audio samples.
Part 3: What are the Benefits of Using Voice Cloning Software?
There are many reasons that make voice cloning beneficial for people. To learn its key benefits, you should proceed to the following section:
1. Media Industry and Brand Endorsement
In the media industry, you can create voiceovers by cloning the voices of famous celebrities. It can also help in producing documentaries, as you can add narration through cloned voices. Moreover, you can adjust the properties of a cloned voice to match the genre of your movie and documentary.
Brand endorsements can also be done through voice cloning. You can create a customized brand voice through voice cloning without hiring voice actors. Furthermore, you can use the brand’s voice in advertisement and marketing.
2. Offers Accessibility to Disabled
Voice cloning can help people who find it difficult to speak properly. It can help them regain a voice that sounds natural and familiar. Using a cloned voice, they can communicate on digital platforms without seeking external help. Moreover, visually impaired individuals can also listen to cloned voices to access information. Therefore, voice cloning helps disabled individuals in our society to a great extent.
3. Personal Assistants and Customized User Experience
Voice assistants like Alexa, Siri, and Google Assistant may sound generic. With voice cloning, you can give unique voice characteristics to your vocal assistants. The interactions with the customized voice assistants can become more engaging through it.
Furthermore, it can enhance your user experience while playing games on digital platforms. You can select a cloned voice that matches your personality. Thus, voice cloning makes user interaction appealing and relatable.
Generate Engaging
AI Video in Minutes!
Easily convert text into professional spokesperson videos in over 120+ voices & languages in minutes.
Generate AI Video Free Generate AI Video Now
4. Public Announcements and Voice Alerts
In case of emergencies and public announcements, voice cloning can greatly benefit. Moreover, with voice cloning technology, you can deliver clear announcements and notifications. Through a definitive voice, the instructions can be understood. In addition, you can create personalized voice alerts and reminders on your devices through voice cloning.
5. Helps in Language Learning and Pronunciation
Language learners and enthusiasts always struggle with correct pronunciation. With voice cloning, beginners can practice accurate pronunciations at their homes. Moreover, it can help them to learn native accents and tones of multiple languages. Therefore, you can practice and learn new languages with voice cloning.
Part 4: How to Select the Best Cloning Software in 2024
In the market, there are several voice cloning software offering different features. It may be confusing to select a trustworthy and effective voice cloning program. In the following part, we have listed the properties that should be present in the best voice cloning software.
1. Natural Voice Quality
The most important factor in any voice cloning app is its ability to create a natural cloned voice. You should run tests to analyze the quality of voices in the software. The voice quality should not be robotic and artificial. It should mimic human-like properties with perfect rhythm, tone, and accent. Moreover, it should include necessary human emotions to add a natural element.
2. Personalized Options and Contextual Understanding
Personalized options help to create a customized cloned voice easily. There should be options to specify the tone, volume, pitch, and sample rate of the voice. Moreover, the tool should be able to understand the context. Through this advanced understanding, the tool can adjust the tone of the voice according to the given situation.
3. Strong Encryption
Sensitive audio recordings that need to be uploaded on voice cloning apps should be protected. The voice cloning app should be integrated with encrypted security to protect the user’s data at all costs. Hence, you should select a tool that prioritizes the user’s privacy and security.
4. Multiple Language Support
An ideal voice clone app supports multiple languages to target a diverse audience. You should prefer a tool that shows compatibility with different languages and accents. To make content for an international audience, a multilingual voice cloning app can help you.
5. Accuracy and Cost-Effectiveness
There are some distinctive voices comprising unique speaking patterns. The tool should be able to clone such unique voices with high accuracy. Moreover, the software should have affordable pricing plans to match your financial budget. Thus, cost-effectiveness and high accuracy are two important factors that you must look for in a voice cloning app.
Get Started Online Free Download
Part 5: The Most Recommended Voice Cloning Software of All Time
Do you want to use the best voice cloning software? This section will discuss some of the premium voice cloning software that can help generate perfect output results.
1. LOVO AI
LOVO AI is a professional AI voice cloning app that can execute voice cloning within a few minutes. On its interface, you can find different cloned voices inspired by famous celebrities. Examples are Ariana Venti, Barack Yo Mama, Mark Zuckerpunch, etc. Unlike other tools, it does not take hours to clone a voice. You can record your audio on this tool and generate the results within minutes.
Furthermore, you can also upload audio files of 1 minute to clone the desired voice. Also, you can create your personalized library on this tool of your created cloned voices. By doing so, you can access your favorite cloned voices anytime.
Pricing Plans
| Plan | Price |
|---|---|
| Basic | $19/month |
| Pro | $24/month |
| Pro+ | $75/month |
2. PlayHT
PlayHT is a well-reputed voice cloning software that can produce dynamic cloned voices. It has a robust model to provide you with the utmost advanced security. Moreover, it ensures verified access through two-factor authentication to the cloned voices in its ecosystem. Without expensive equipment, it can clone voices within a few hours. Additionally, it has an excellent interface that can help you in voice cloning.
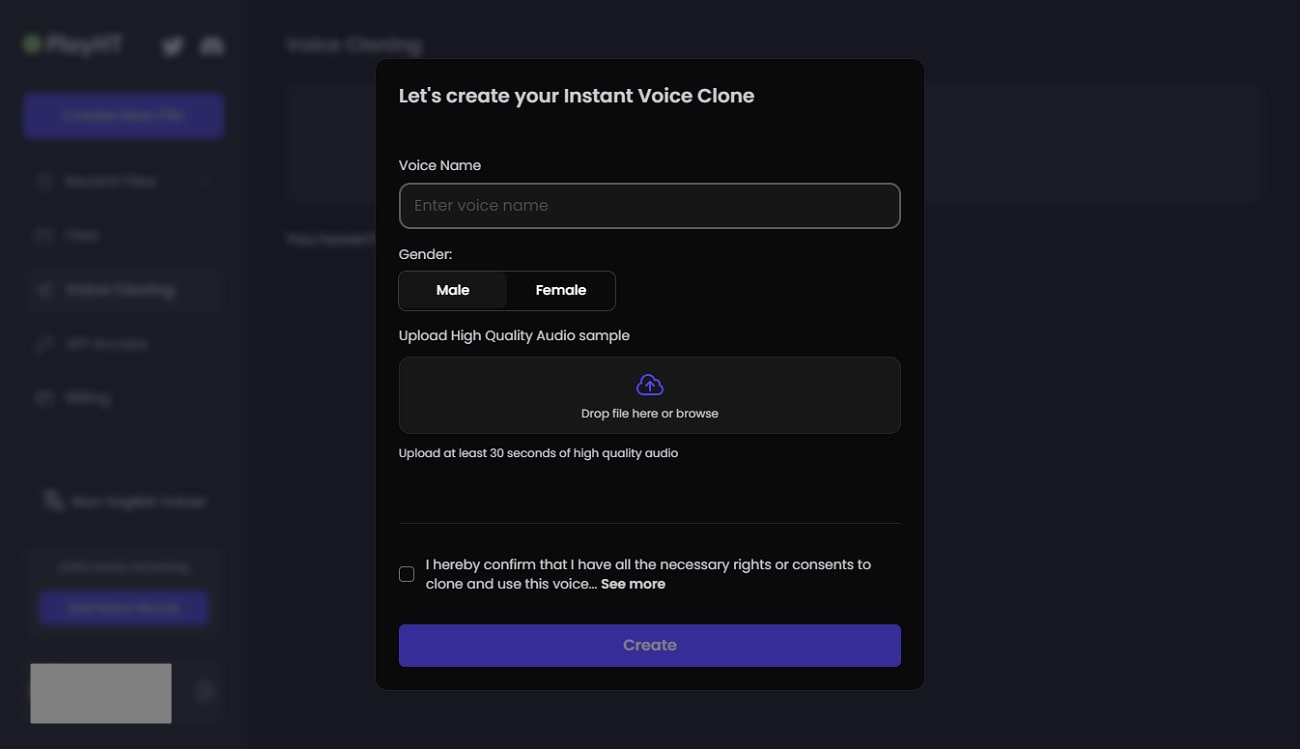
PlayHT also has an advanced script editor that facilitates the editing workflow. You can also try its text-to-speech feature that can generate AI voices with the best audio quality. Hence, you should try PlayHT to produce effective cloned voices in a comfortable environment.
Pricing Plans
| Plan | Price |
|---|---|
| Personal | $9/month |
| Creator | $39/month |
| Pro | $99/month |
3. Speechify
Speechify is an online voice clone app that offers multiple features to produce cloned and AI voices. For voice cloning, this tool only requires 30 seconds of audio recording. You can generate various takes and refine the results unlimited times. For customization, you can also adjust the volume and speed of the cloned voice. Moreover, you can also add human emotion to the voice by adding excitement, emphasis, and pauses.
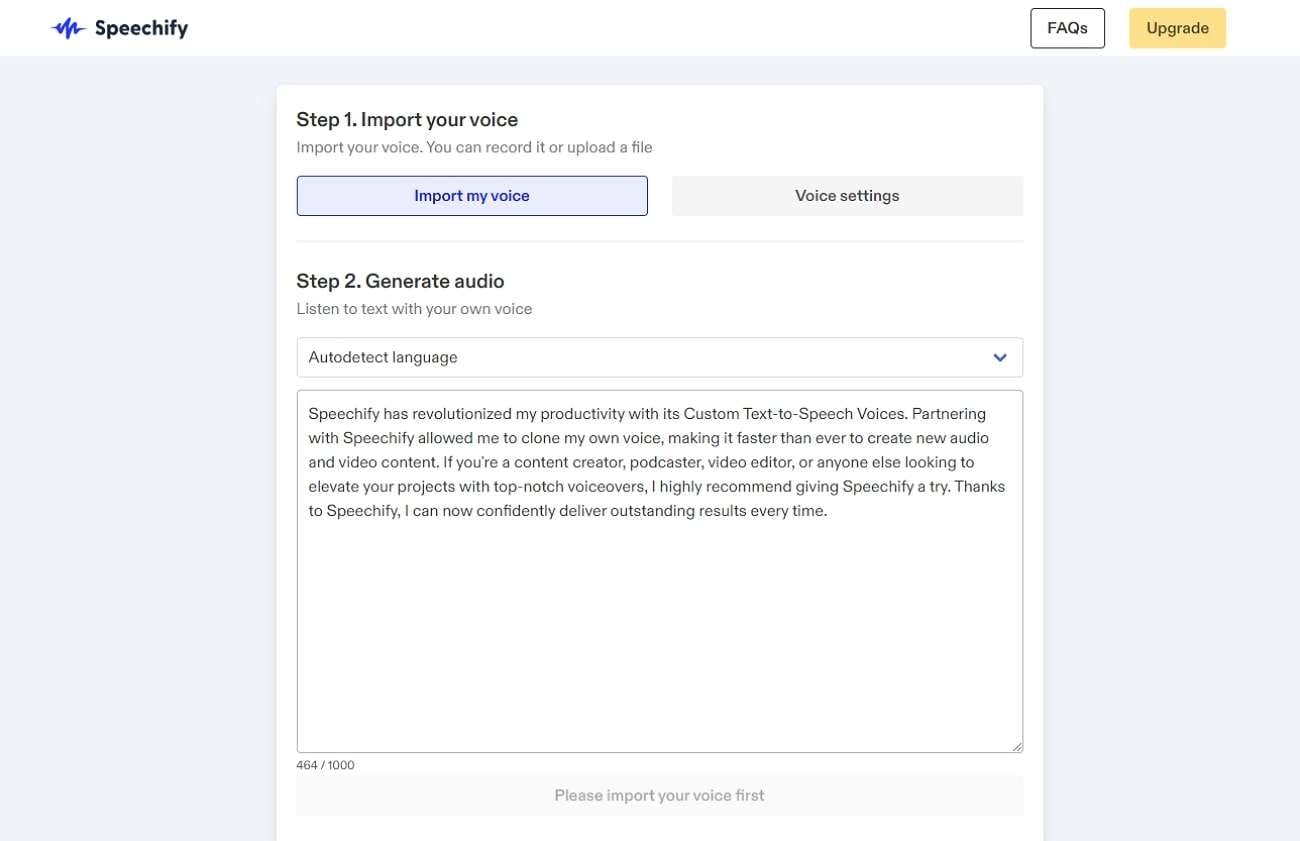
This tool also supports multiple languages such as German, English, Hindi, Spanish, Italian, etc. You can also find other helpful features on this tool, such as AI dubbing, AI voiceover, and AI video generator. Hence, Speechify is an all-rounder tool to generate cloned and AI voices.
Pricing Plans
| Plan | Price |
|---|---|
| Professional | $20.75/month |
4. Voice.AI
This tool uses deep learning technology to clone the voices without compromising the audio quality. You can explore its extensive library to find cloned voices in distinct tones and accents. Moreover, it lets you change your voice in real-time to enhance your user experience. It supports various games like Among Us, Minecraft, League of Legends, etc. The supported apps are Discord, Skype, Zoom, WhatsApp, and many more.
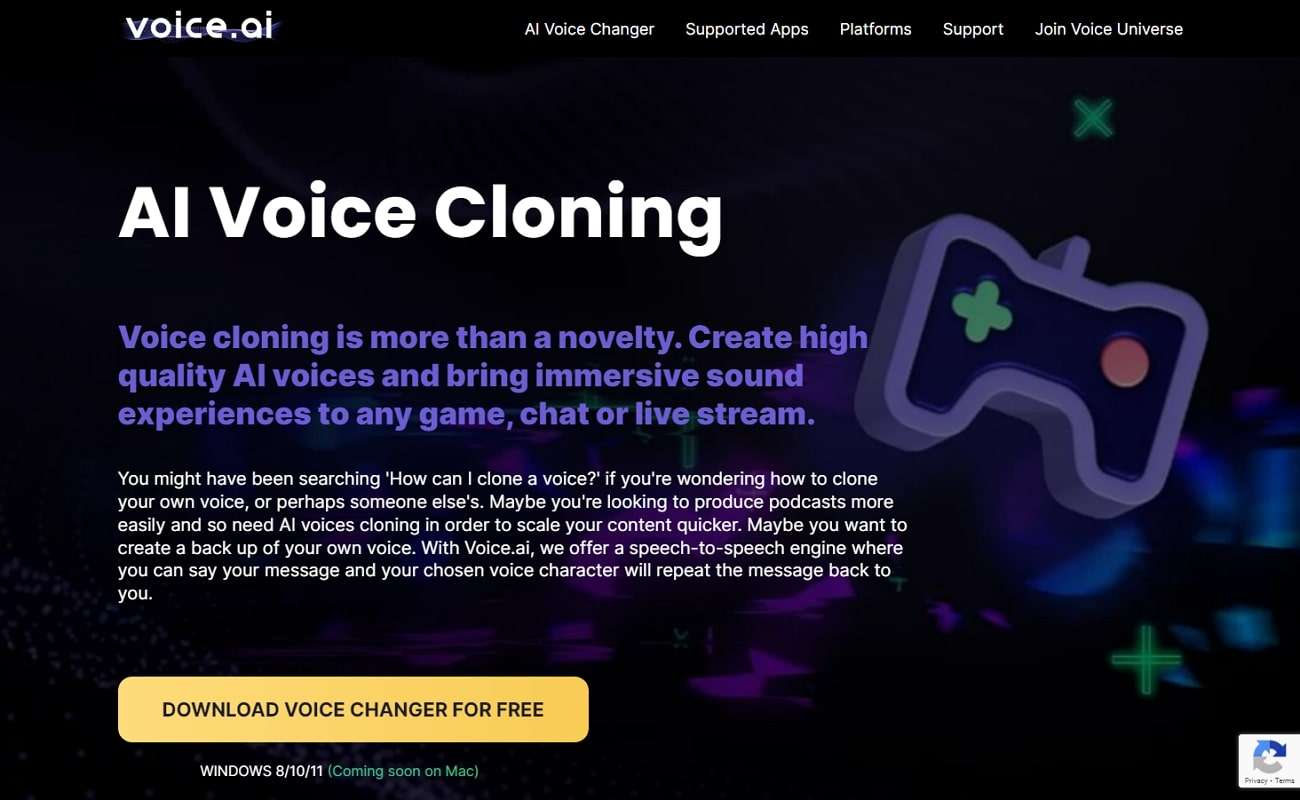
Furthermore, you can generate soundboard recordings through this tool perfectly. You can create customized audio clips from its offered AI voices to use on soundboards. Also, you can launch this tool on your Windows, Mac, iOS, and Android devices without complications.
Pricing Plans
- Unavailable on Website
5. Resemble.AI
Resemble.ai is an online voice cloning software that can generate high-quality results quickly. It requires only 3 minutes of audio recording to extract the vocal properties of the targeted individual. Within 12 minutes, you can get cloned voice of your audio recording. Moreover, the supported languages are Spanish, French, Chinese, Italian, German, etc.
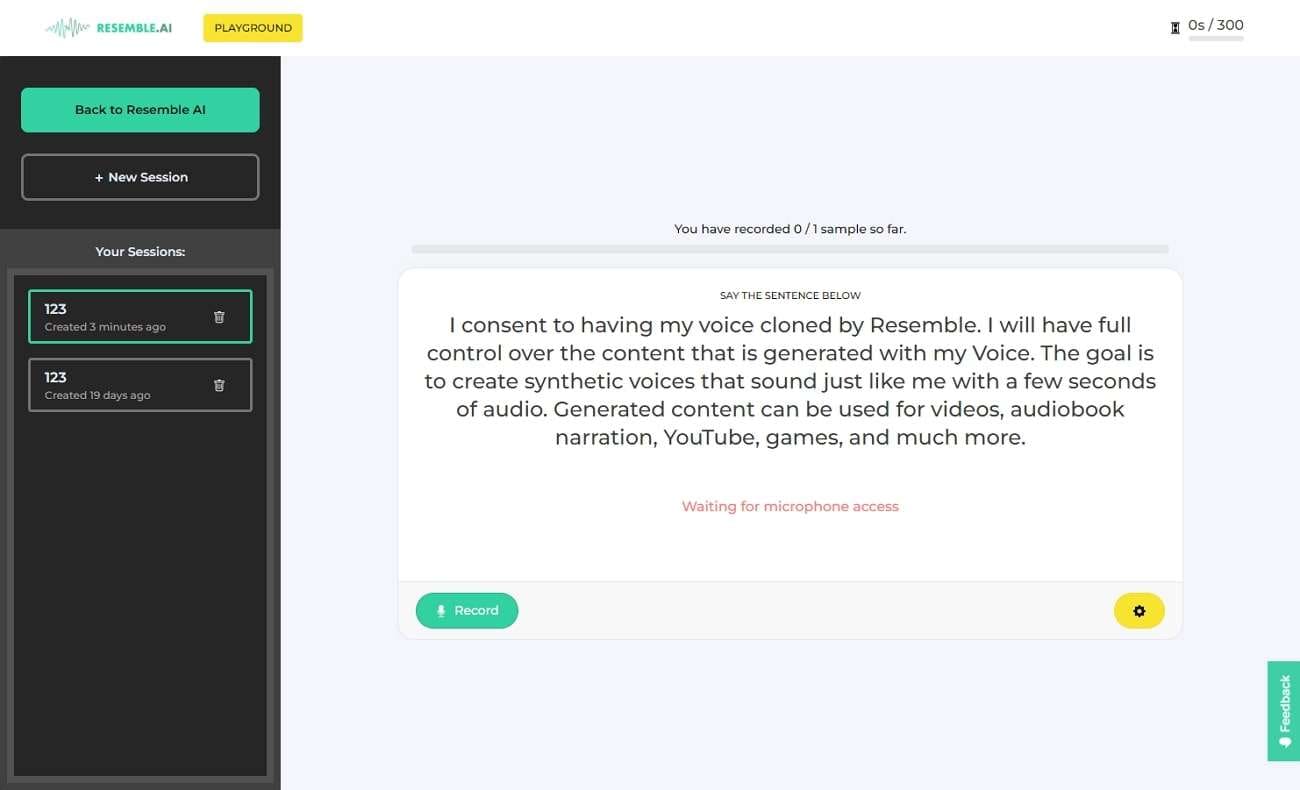
On this tool, you can also find helpful features to dub your native voice in more than 60 languages. It also provides a neural audio editing function. Using this feature, you can alter the speech with synthetic voice cloning. Thus, this clone voice AI tool can benefit you in many use cases.
Pricing Plans
| Plan | Price |
|---|---|
| Basic | $0.006 per second |
Conclusion
Voice cloning apps are necessary for voiceover, narration, and audiobook production. Such apps also help make conversations with voice assistants like Siri and Alexa engaging. In this article, we have highlighted the significance and impact of voice cloning in different fields. Moreover, you can also explore some of the best tools to clone the voices with accuracy and perfection.
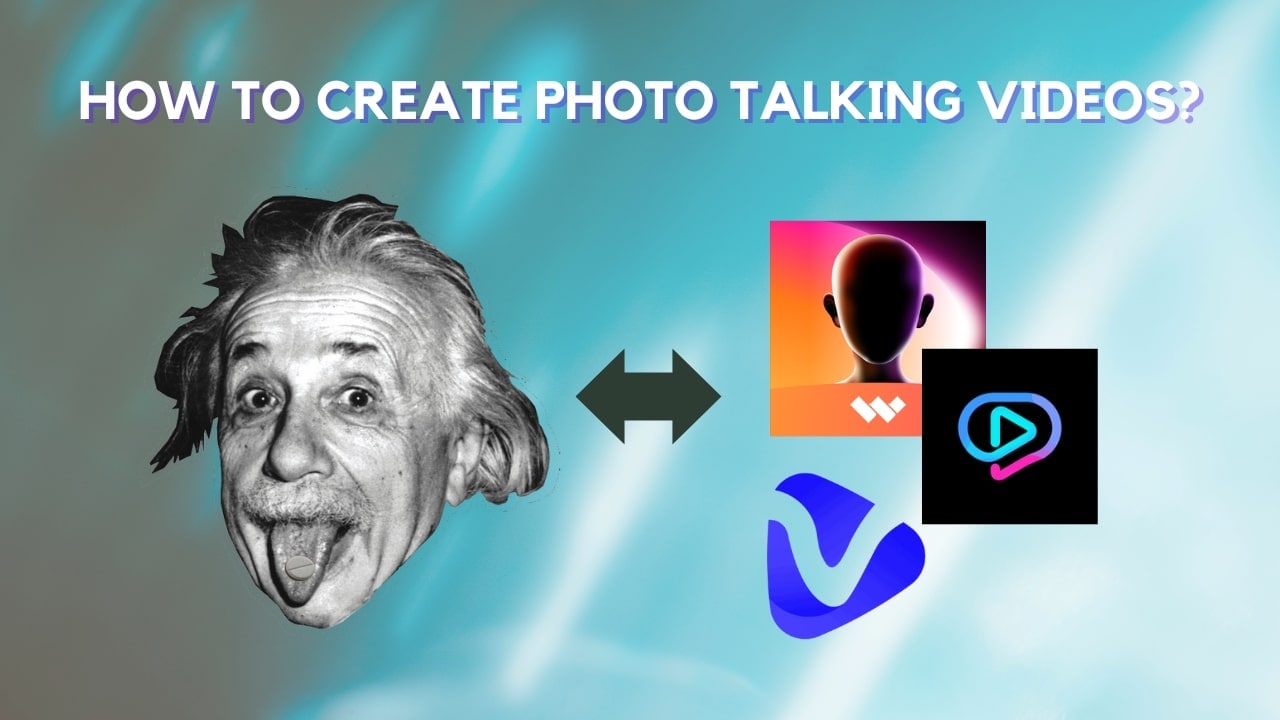
[User’s Guide] How To Create Photo Talking Videos With the Best Tools?
Pictures and videos are crucial for preserving memories; companies also use them for promotional purposes. However, technology has now created an innovative and engaging way to use pictures. For example, you can now put life into your photos and make them a talking video.
If you are wonderinghow to make a photo-talking video , this article presents a complete guide. We will share some of the best tools for creating photo-talking videos. Simply follow it to the end to learn about it in detail.
Part 1. What Is a Photo Talking Video?
Atalking-photo video is like a magic trick for making pictures engaging. You can take still pictures and make them move or talk like they are alive. It represents a captivating merge of photography and animation for an interactive experience. Moreover, new and creative ideas are always invented to make photo-talking videos even better.
No doubt this creativity takes your entertainment to the next level, but there’s more to it. These photos also change how companies talk to us about their products. It is like giving a voice to photos and using them to tell stories in a way that grabs customers’ attention. That’s why photo-talking videos are becoming a big deal in today’s market dynamics.
Innovations in Picture-to-Talking Video
People use various tools and techniques to convert images to talking videos. These techniques may include mobile applications or computer software, which keep getting innovations:
- Integration of artificial intelligence for more realistic movements.
- Use of facial recognition technology for accurate lip-syncing.
- Implementation of voice synthesis to generate lifelike speech.
- Introduction of interactive features allowing user engagement.
Part 2. How To Create Talking Video With Reliable Desktop Tool—Wondershare Virbo
In the above sections, we have introduced the concept and importance oftalking photo videos . Let’s head to the part where you will know how you can create them with tools. One of the most straightforward methods to generate such talking photos isWondershare Virbo . Whether you want to market a product or deliver a presentation, using this tool is a good idea.
With its AI-powered Talking Photo feature, you can bring life to your pictures. Not only can you make them move, but you can also add voice clips for a better and more engaging experience. You can count on this diversified tool with variating compatibility for integrating your pics with social media platforms. It even allows users to create such content online and offline.
Top-Rated Features of Wondershare Virbo
- Wondershare Virbo can convert the text you provided to speech for use in your talking photos.
- You can customize your uploaded voice in talking pictures to make it more interesting.
- Using the versatile AI avatars of this tool, you can attract and engage a broader audience.
- This tool allows users to add background music to their content for personalization.
Step-by-Step Guideline To Create Talking Photo Videos Using Virbo
Wondershare Virbo provides a smooth and simple process for creating such art. This section will explain how to make a photo-talking video with the help of this tool:
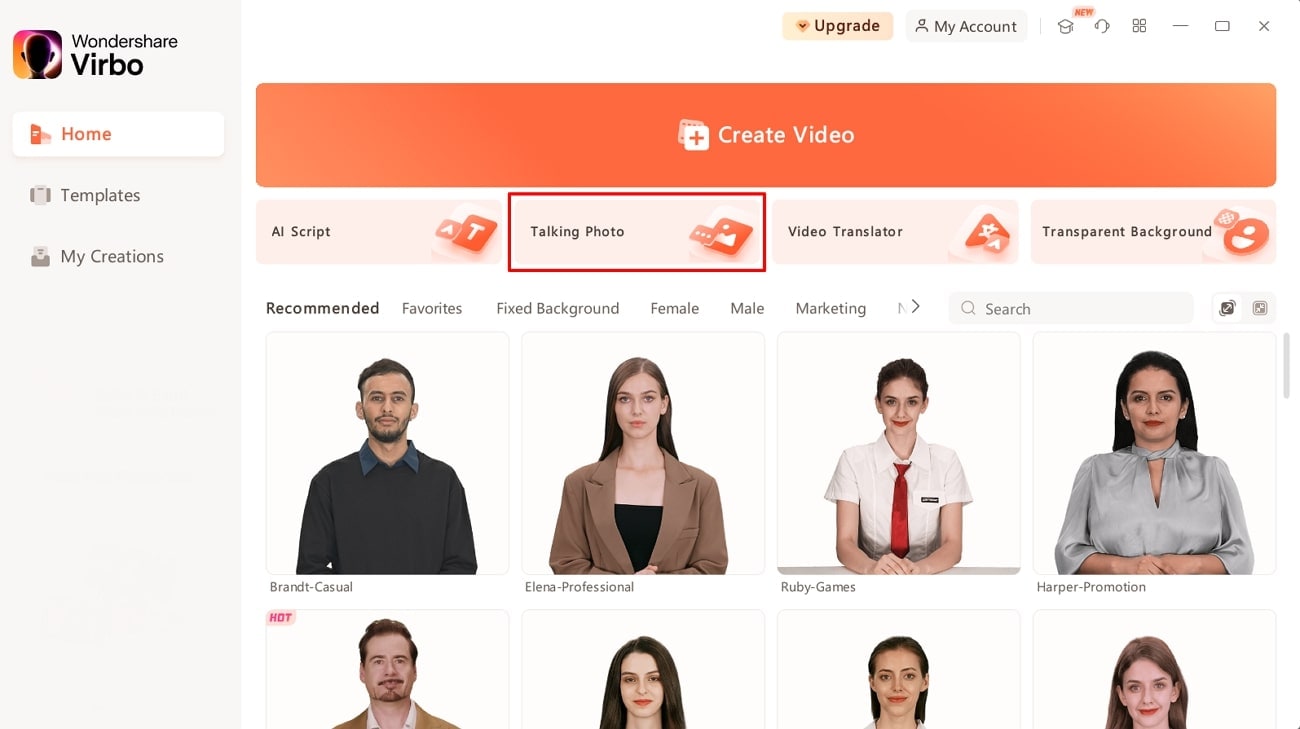
Step 1. Initiate the Creation Process With Virbo
First, download and launch the Wondershare Virbo application on your system. From its main interface, tap the “Talking Photo” feature from its home screen.
Get Started Online Free Download
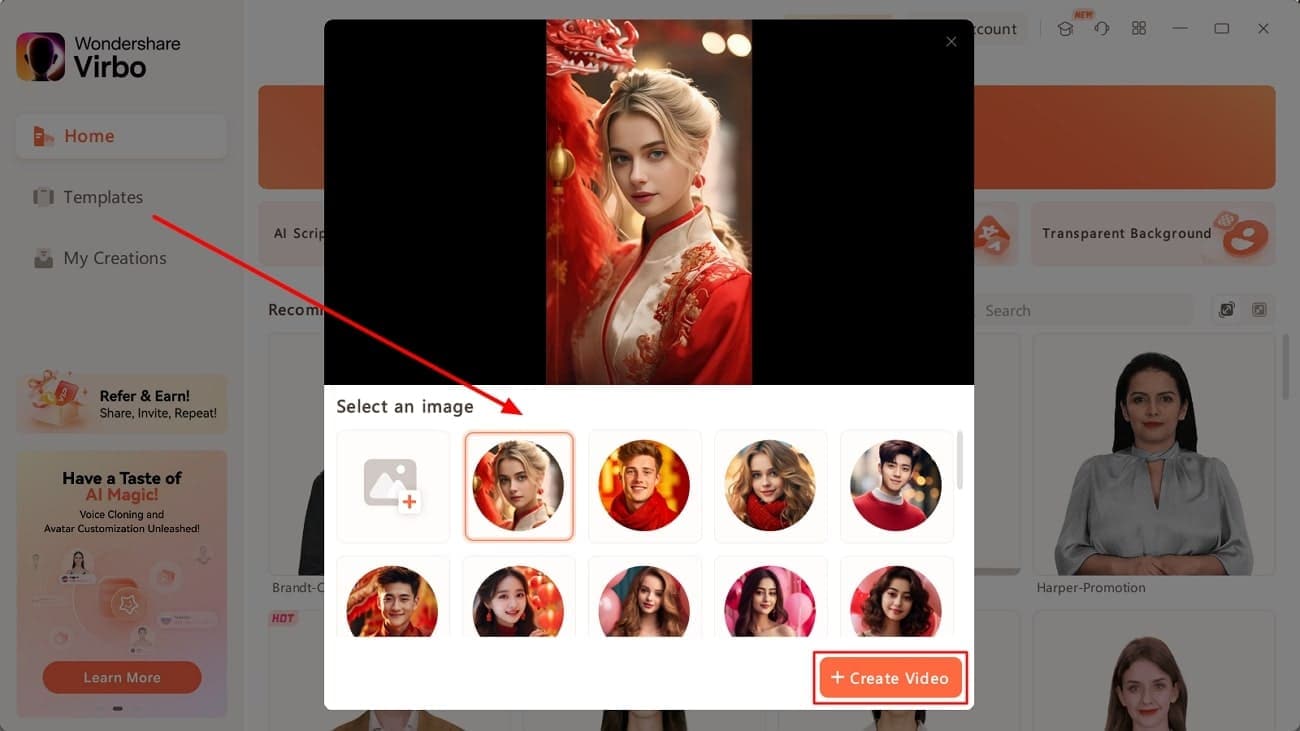
Step 2. Choose an Image To Create Talking-Photo Video
You will access a new pop-up window with different preset image avatars by clicking on this feature. Select your desired avatar and click the “Create Video” button to initiate the process.
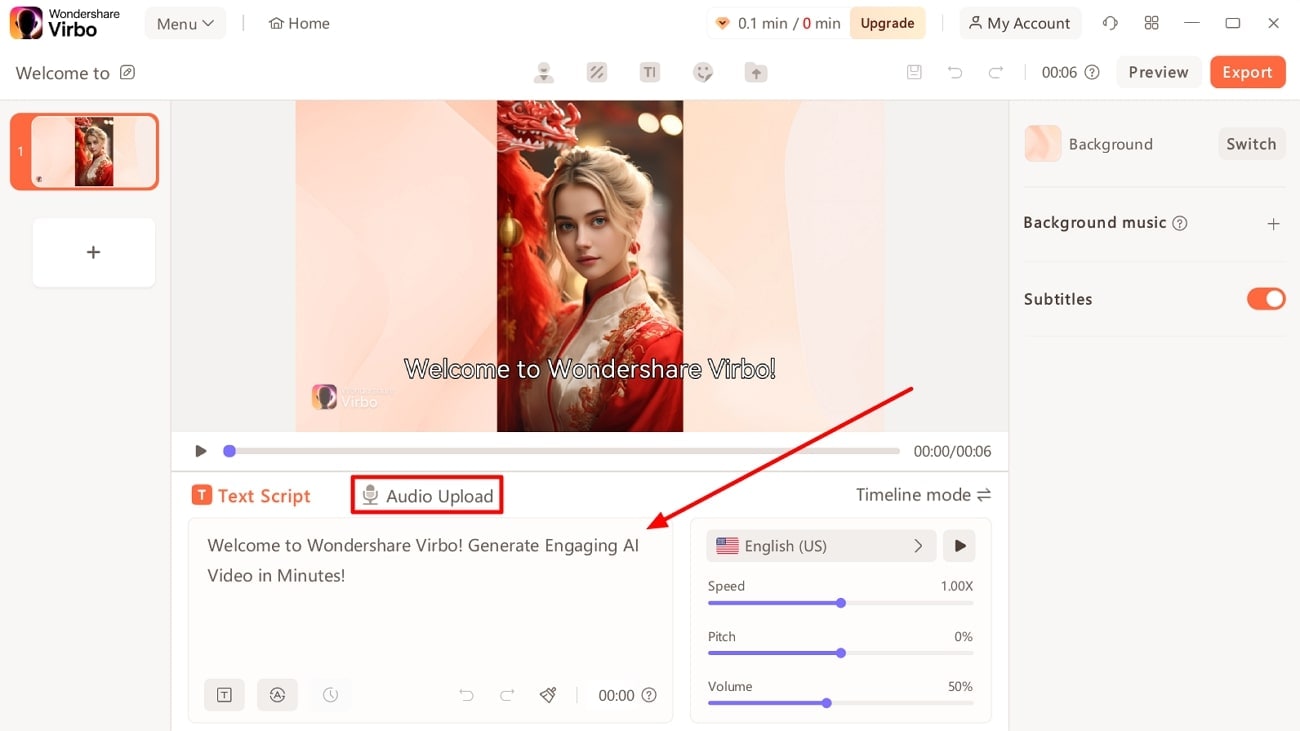
Step 3. Input the Text or Recorded Audio for AI Speech
Enter the text you want to use in your talking photo. You also have the option to shift to the “Audio Script” tab to upload your audio to convert your picture to a talking video.
Step 4. Select the Language and Accent for Your Video
After that, scroll to the “Language” portion and click on it. A new pop-up window will appear where you can choose any language and accent. Hit the “Gender” dropdown menu to select your desired gender, and finally, tap the “OK” button.
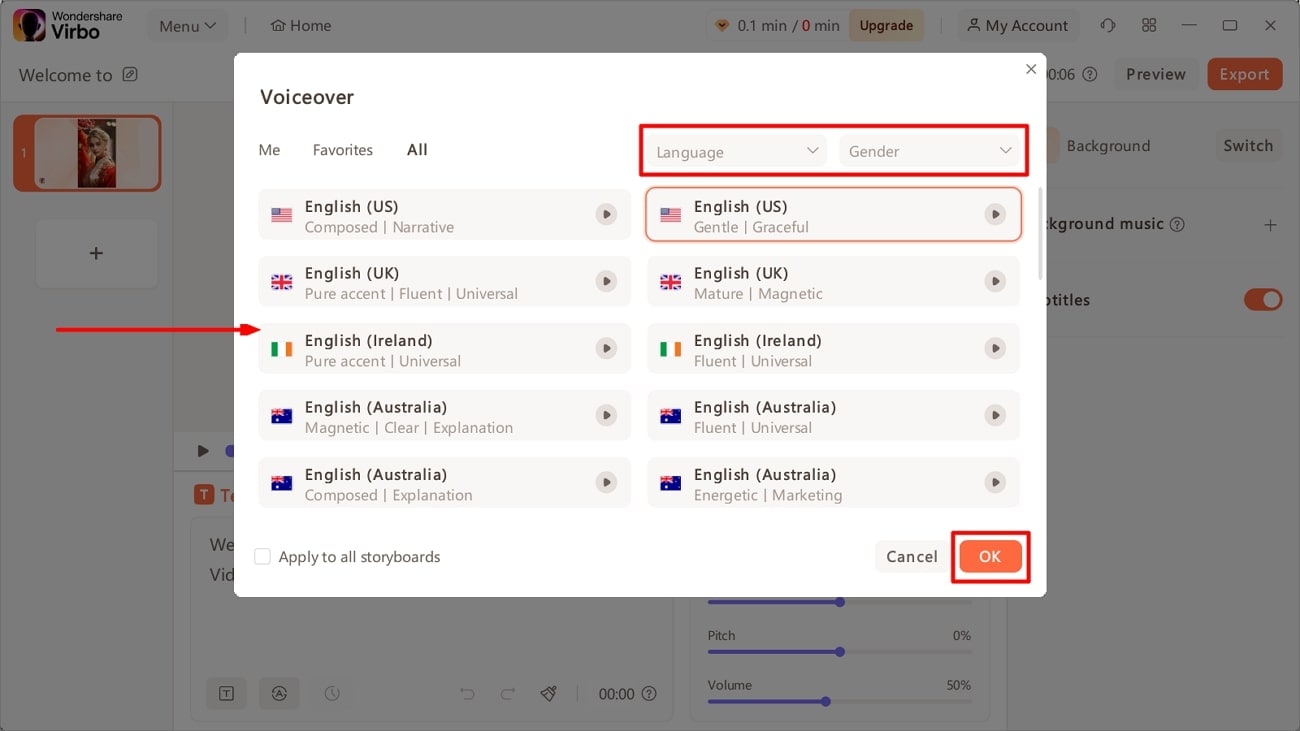
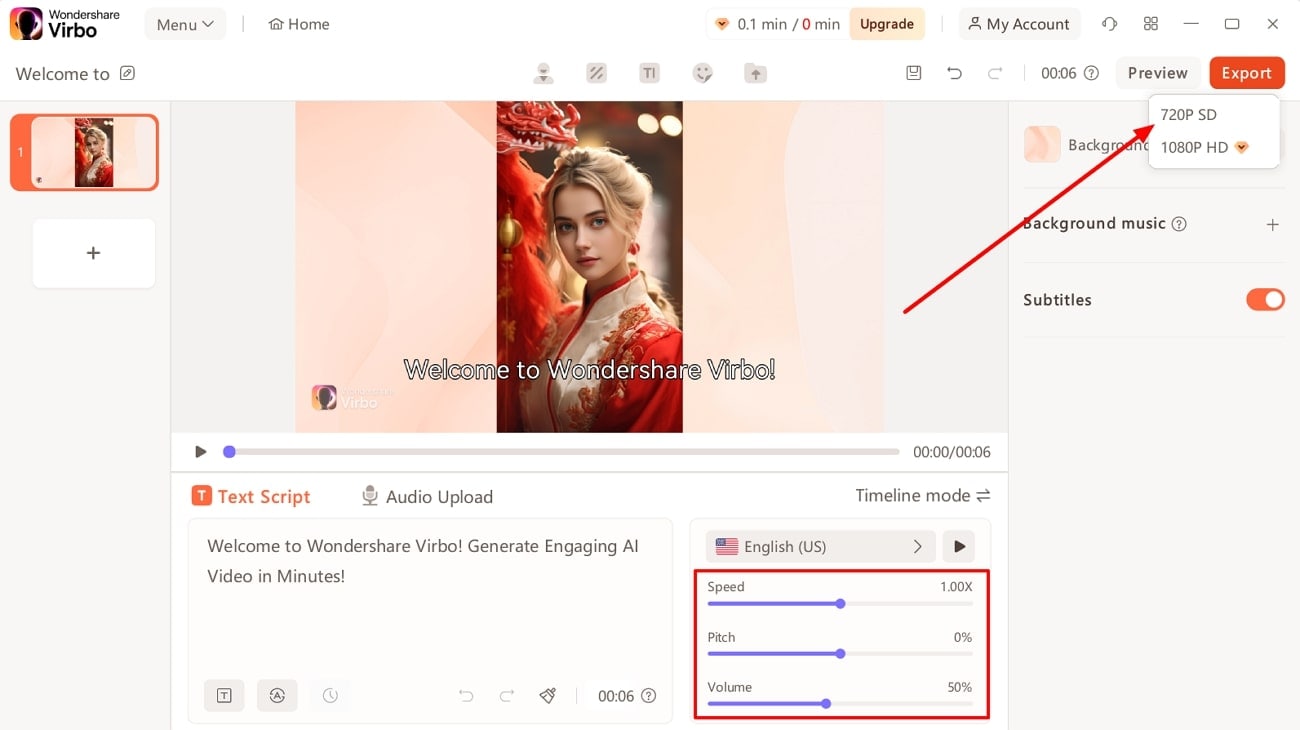
Step 5. Customize Voice Features and Export Talking Photo
Now, set the speed of delivery voice as per your requirement. You can also customize the volume and pitch of it. Finally, click the “Export” button in the upper right corner. After selecting the resolution for the output file, you will be redirected to the “My Creations” section with saved files.
Part 3. How To Create Photo Talking Videos With Some Top Online Tools
Wondershare Virbo is the ultimate choice for making your photo into a talking video. However, we will mention alternative online tools if you are still looking for them. Go through this section to learnhow to make a talking picture video using the top online tools besides Virbo:
1. Vidnoz
Vidnoz is an online AI-powered tool that can create talking photos within minutes. It can convert your still picture into a realistic talking avatar that you can use for various purposes. You can also choose between built-in avatars for this creativity. Additionally, Vidnoz allows users to perform a face swap operation, where you can swap the face in a picture with any other face. If you intend to use this tool to convert images to talking videos, walk through these steps.
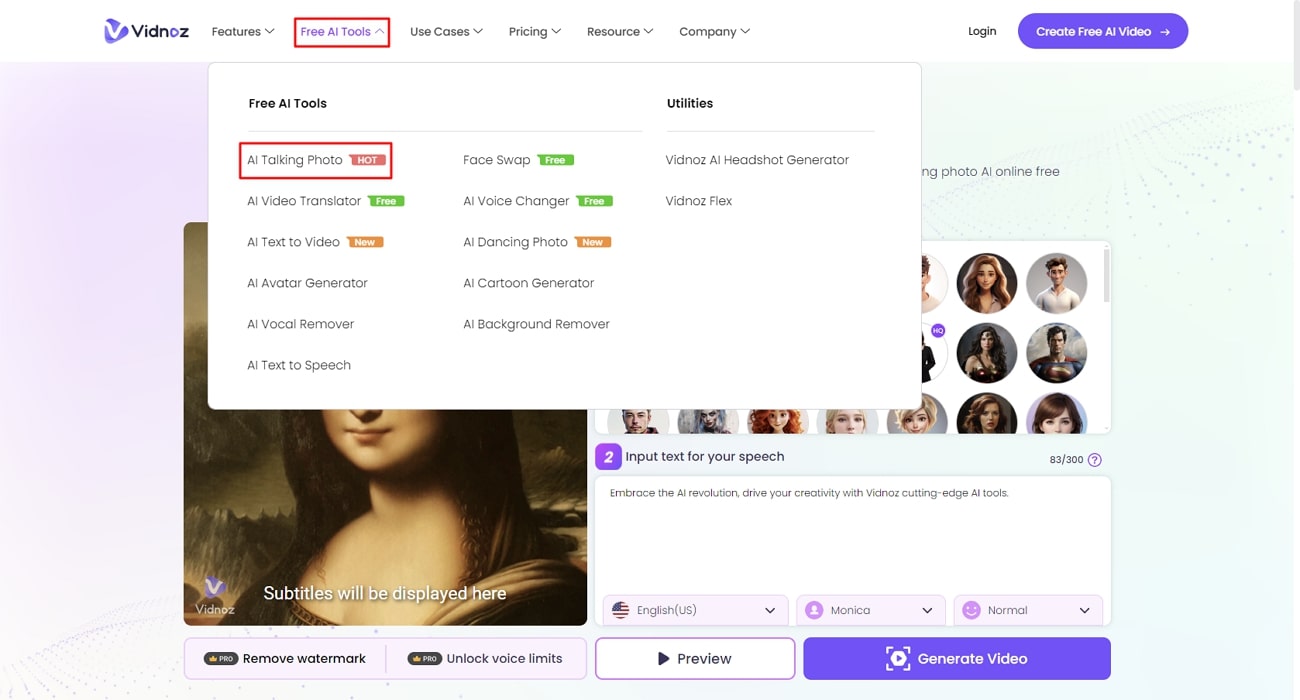
Step 1. First, access the official site of the Vidnoz tool and scroll to the “Free AI Tools” section. In the list of features, look for the “AI Talking Photo” feature from there to get started.
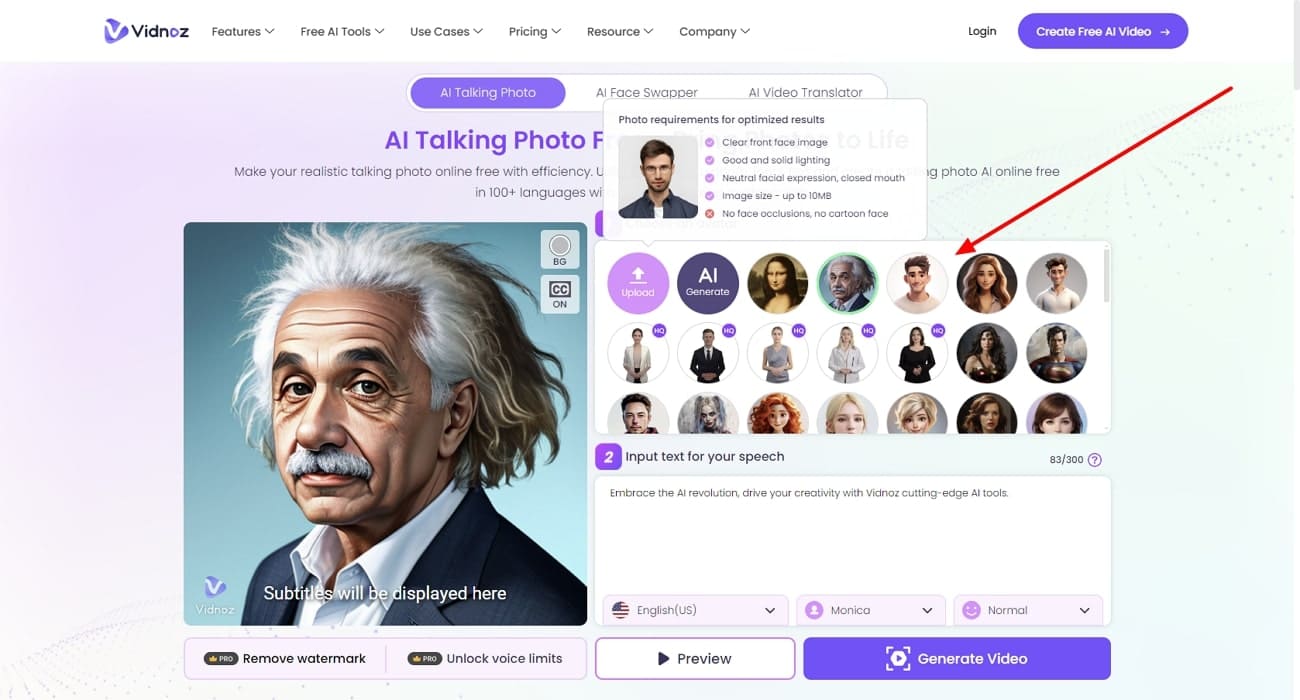
Step 2. After that, select the avatar from pre-available options. You can also upload your own desired picture for this purpose.
Step 3. Then, go to the text box section and input any text you want to convert to speech. Also, select any preferred language, voice, or mood from the below dropdown menus.
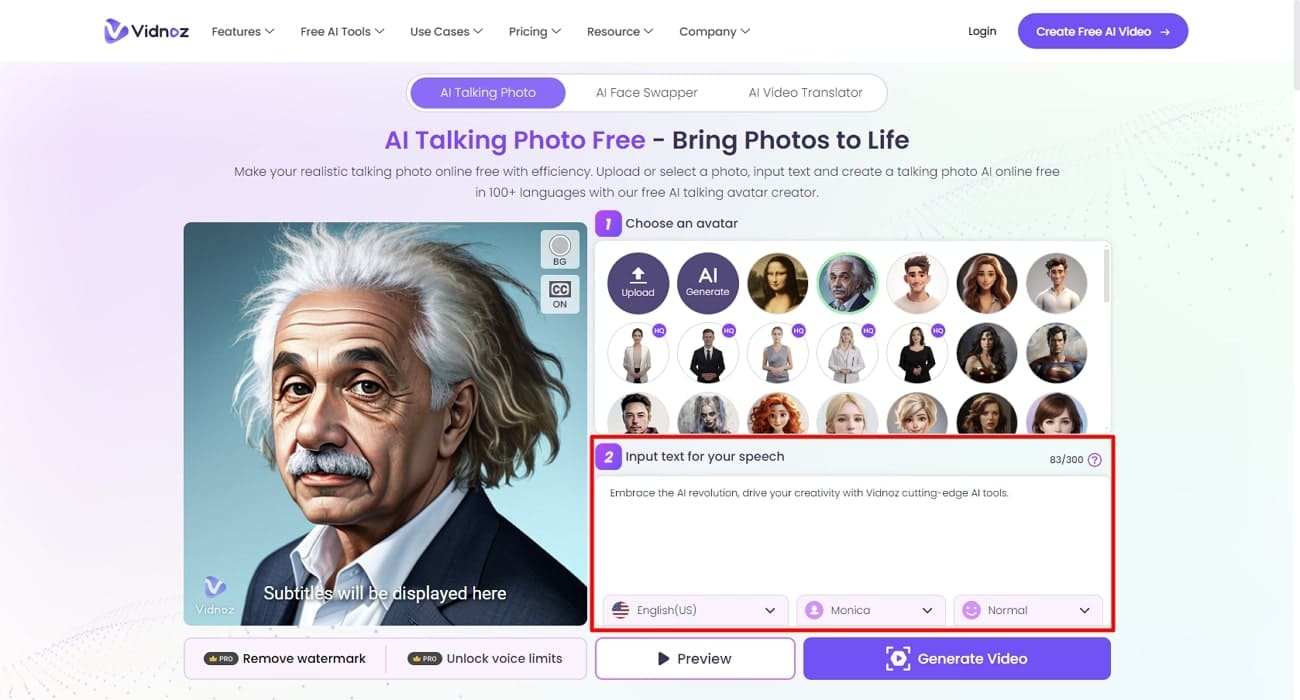
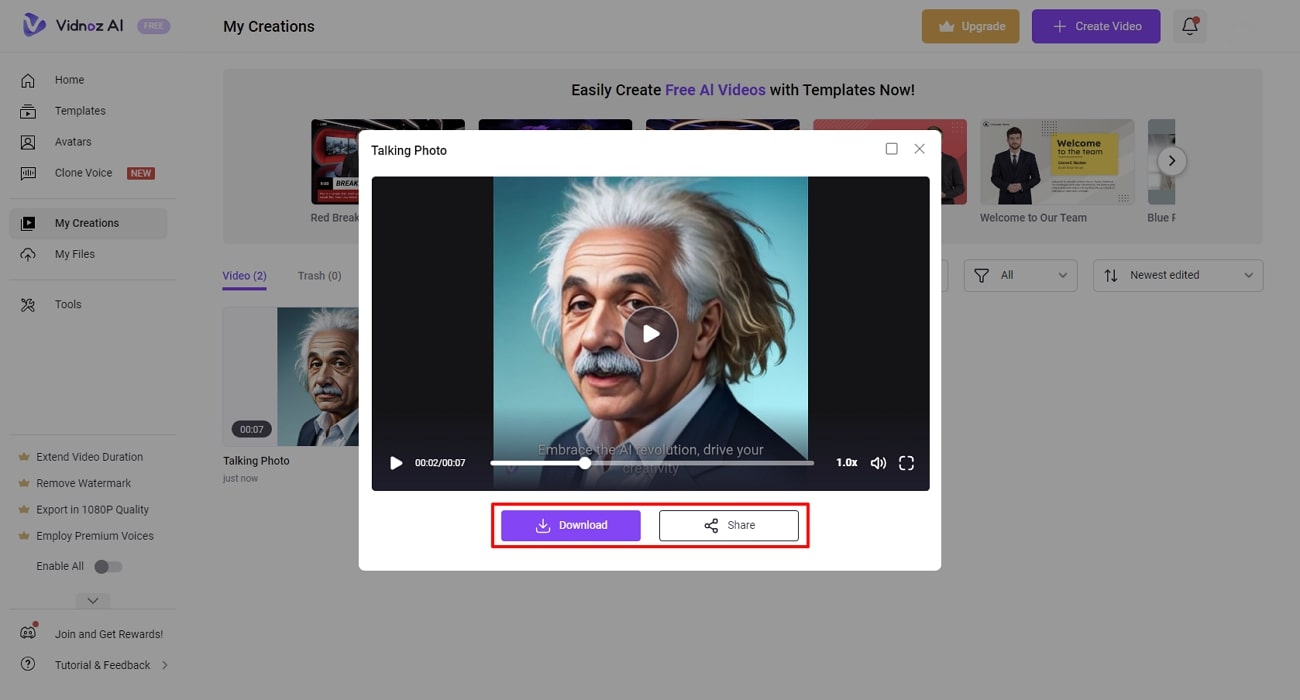
Step 4. Once everything is set, click on the “Generate Video” button to finalize the creation of a talking-photo video. A pop-up window then appears on the “My Creations” page. You can download it to your device or share it directly on social media platforms from that window.
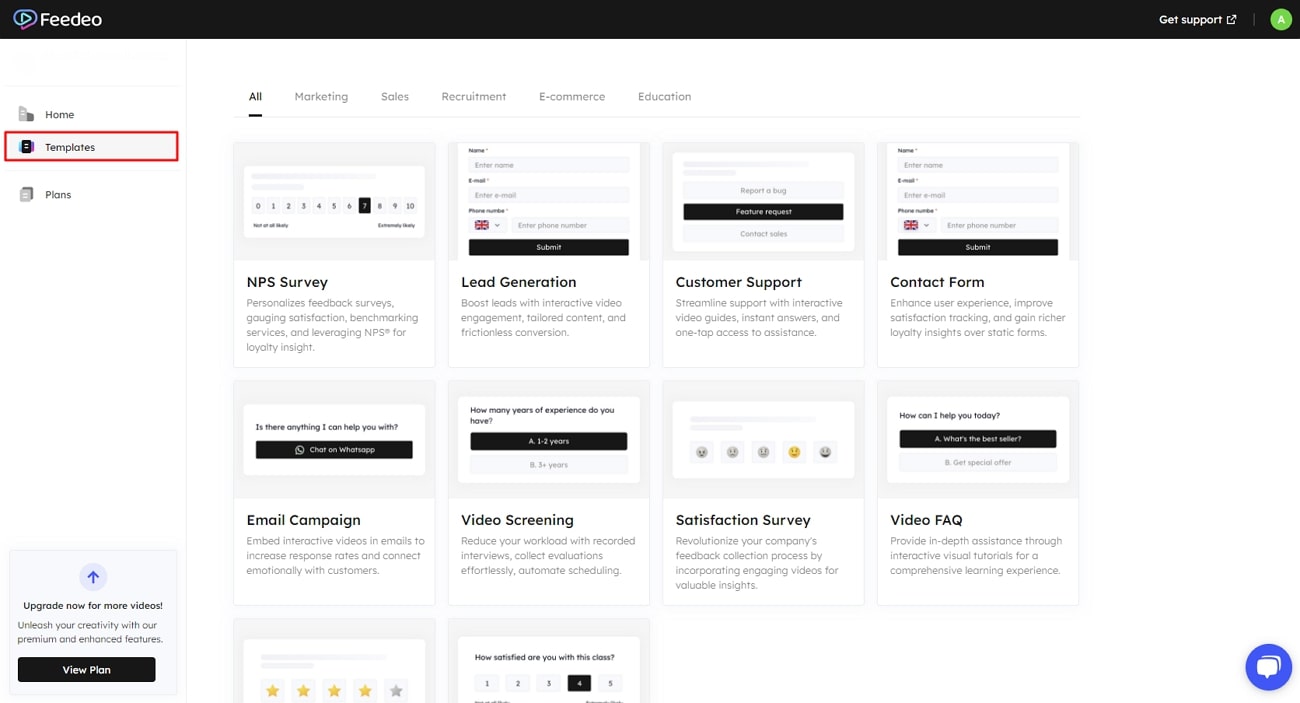
2. Feedeo
Feedeo is also an online talking photo creator that enables users to make interactive content. With its wide range of AI avatars and voices, you can have a customizable and versatile experience. In addition, you can also use your pic to showcase yourself in the talking photo. To convert your photo to a talking video with Feedeo, apply this guide below:
Step 1. Go to the Feedeo website and log in through your account. Once done, you will be shifted to the dashboard page. Then, select the “Templates” section from the left sidebar and choose any template you want.
Step 2. After that, you will reach the editing interface of this tool. Select a virtual avatar you want to use for your talking photo or upload your photo.
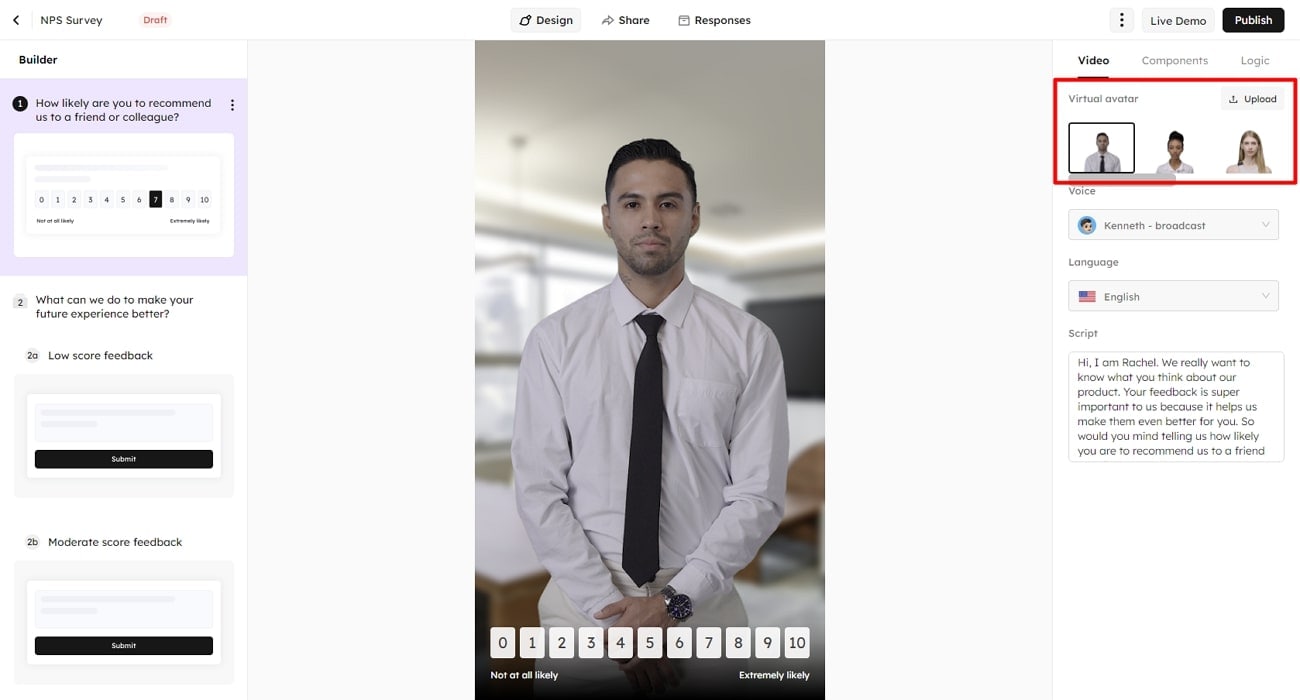
Step 3. Go to the “Voice” dropdown menu and choose any voice and its tone. Afterward, select your desired language from the “Language” dropdown menu. In the section below, you can type any text as the script of your talking photo.
Step 4. Now, hit the “Publish” button, and it will start processing in a new pop-up window. A message will then appear for successful publishing, from where you can share the output file to multi-platforms.
Conclusion
It is incredible how AI-powered tools can transformimages into talking video s. We have shared information on some of the best tools to create such art. However, if you are confused about choosing the best one, Wondershare Virbo is the clear choice. With multiple AI avatars and different language dialects, Wondershare Virbo can surely make your talking photos more fun.
Get Started Online Free Download
7 Top Explainer Video Makers You May Like
An explainer video is a short video of a few minutes in which a company can represent its product. The main purpose of making explanatory videos is to boost the company’s sales. Because in explainer video production it must be kept in mind that the company’s product is completely explained and some awareness will also be created among the people about your brand. Other purposes may include providing education, improving SEO, etc. In this article, I am going to tell you the importance of making an explainer video along with the names of some explainer video creators. So, let’s dive into it.
Part 1: The Importance of Making Explainer Videos
The importance of making explainer videos in today’s digital world can be described in the following points:
1. Engage and connect with the audience
Explainer video contains images, animations, and stories which help in grabbing the attention of the users so that one can engagingly convey his information. This can bring a positive impact on your brand. It also helps in the educational process, educator uses explanatory videos to grab the attention of the students so that they can able to understand and learn more and more.
2. Increase brand awareness and reach
With the help of these explanatory videos, one can create awareness about his brand among the public and also increase its reach by sharing these videos on different video-sharing platforms as well as on a website. With multi-platform accessibility and search engine visibility, these videos position your logo as an industry authority, whilst regular branding and compelling calls to motion foster a deeper connection, ultimately changing visitors into unswerving clients and advocates.
3. Boost conversion rates and sales
By showcasing your products through these explanatory videos, one can easily increase conversion rates as well as sales also because these types of videos are usually created in a way that they can answer the particular question which is in the mind of the public and embedded on the landing pages. Explanatory videos increase logo attention and reach by simplifying complex messages, enticing viewers with visuals and emotions, and inspiring social sharing.
4. Enhance website SEO and visibility
An explanatory video is always beneficial for your website because by embedding explainer videos on a website one can enhance his website’s SEO and later bring organic traffic also it can help in reducing bounce rate, making the website look more appealing, enhancing user experience and also grabbing their attention.
5. Stand out in a competitive market
It is very much important to represent your product in a unique attention-grabbing way to generate sales in today’s fast-paced digital world because you have many competitors and you have to win the race. So, after not any compromise on quality and quantity as well you should have to advertise your brand in such a way that it becomes unique in front of everyone.
Part 2: 7 Best Explainer Video Makers
There are many explainer video creators in marketing we are going to discuss 7 best explainer video makers among them.
1. Wideo
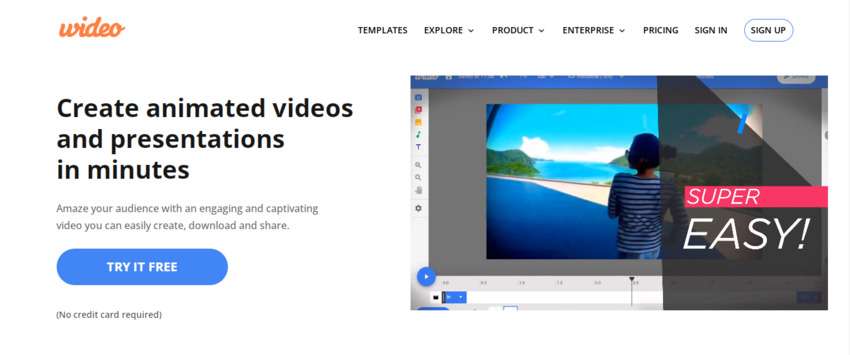
Wideo is an amazing web-based platform for creating animated videos. It helps users in creating 2d or 3d explainer videos without any technical skills or prior experience. Just like other products it also has its good and Cons which are as follows:
Pros
- It is user-friendly. Anyone can use it.
- It offers a wide range of graphics, templates ad animations. By using all these you can grab the attention of the users easily.
- Wideo is cloud-based which allows different users to work on the same project at a time. This is very helpful for team working as well as remote working.
- As it is a web-based platform so you do not have to download any heavy software and apps as well.
Cons
- Wideo is only suitable for basic projects not for complex projects.
- Although Wideo is also available in the free version some of its advanced features have subscription fees.
- As it is a web-based platform that’s why it requires a stable internet connection.
- Wideo allows you to add audio to your content but there are some restrictions like you do not adjust the volume according to your choice etc.
2. Powtoon

Powtoon is also a web-based platform for creating videos. It is too much user friendly so that anybody can use it effectively. It also helps in creating lectures and explainer videos.
Pros
- Powtoon has different pre-designed templates specifically for explainer videos which helps in creating eye-catching videos. You can also customize templates easily.
- You can easily share the designed video to your social media accounts or website etc.
- It allows you to add transition effects your videos.
- Moreover, you can add your voiceovers or other sound effects to your video.
Cons
- As it is also a web-based platform so it is also dependent on the Internet. Failure in internet connection may cause problems for you.
- It also has sharing limitation as per your subscription plans.
- Powtoon is not designed to create professional animations.
3. Moovly
Moovly is an online video creation platform through which one can easily create explainer videos because it provides a variety of templates, images as well as audio clips. It is good to use in small businesses as well as for educational purposes. Some of its pros and cons are as under:
Pros
- Moovly offers an easy-to-use interface for beginners.
- It has over one million libraries of stock images, templates as well as audio files.
- You can also add audio and do voiceovers.
- It also allows users to export videos in HD quality.
- Moreover, it is affordable to begin with creating explainer videos.
Cons
- Advanced features are only available in premium plans.
- You may also experience bad customer response.
- You may find bugs.
- It focuses on 2d animation and has limitations in 3d animation.
4. Vyond
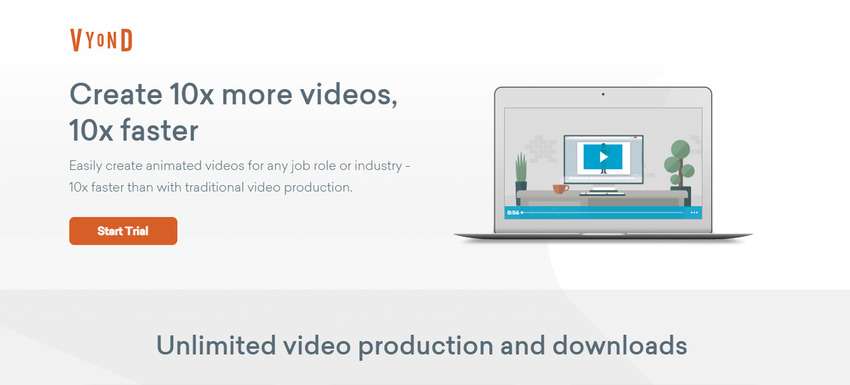
Vyond is another cloud-based software for video creation. It not just only helps in creating 2d and 3d animated videos but also creates whiteboard explainer videos. It is a good choice for freelancers and also for educators because it helps too much in creating engaging content.
Pros
- Vyond has huge assets of templates, images, etc.
- It has integrated with different software like google drive etc.
- The platform has made sharing explainer videos easy.
- It also has good customer support.
Cons
- Vyond is undoubtedly an expensive tool to try.
- It has some restrictions on freemium version for 3D animations.
- It also has some restrictions when we customize templates by our choice.
- You may face some bugs and errors while dealing with longer videos.
5. Virbo
Virbo is developed by Wondershare. It is an Ai video creation platform where you can easily create high-quality videos with less or sometimes with no editing. So, say goodbye to old editing software that takes lots of time name of editing because it’s time to say hello to Virbo as it creates engaging videos for you with the help of AI. Virbo mainly needs a stable internet connection, a 4 GB RAM, a 20 GB of storage.
Get Started Online Free Download
Compatibility
Virbo is compatible a with wide range of devices which includes:
- Desktop computes
- Web Browsers
Key Features
Here are some key features of Virbo by Wondershare
- Virbo supports diversified operating systems, due to which you can use its single premium account on multiple platforms without issues.
- It integrates 150+ AI Avatars with multinational features. You can also select the AI Avatars as per their styles, ages, or ethnicity.
- There are versatile amounts of commercial stock in Virbo. You can also use the 180+ Virbo templates along with royalty-free music.
- This tool also integrates natural AI Voices. With these AI Voices, you can make top-class text-to-speech videos.
6. Animaker
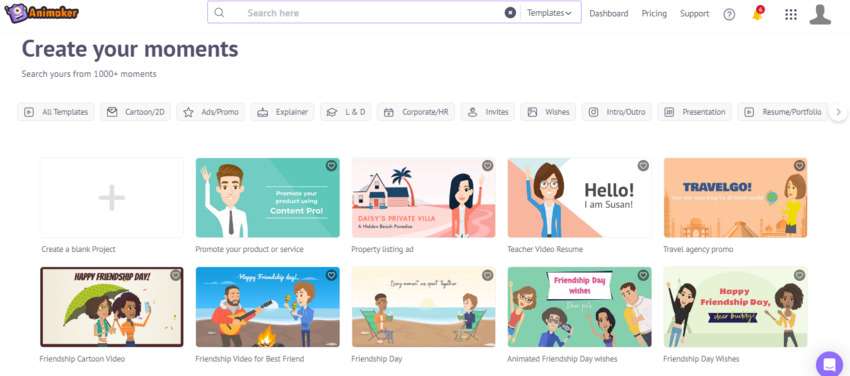
Animaker is yet another online video creation platform for explainer videos. It allows users to create animated videos, presentations as well as other visual content. It is very helpful in explainer video production. Here are some Pros and Cons of the product.
Pros
- Animaker is good to start with due to low-budget and intuitive UI.
- It has large asset of images and templates which you can easily customize according to your choice.
- It also has an ability to do voiceovers as well as add audio effects.
Cons
- Although it has user friendly interface but the beginners may feel difficulties in understanding the effective use of tools and features.
- It primarily focuses on 2d animation.
7. Biteable
Biteable is a web video creation platform that permits users to create animated explainer movies, product demos, and social media videos quickly and effortlessly. It has ability to export videos in HD first-rate with a number of customizable templates to begin with.
Pros
- Biteable has ability to add textual content, voiceovers, and song.
- It has affordable pricing plans.
- Sometimes it has free plan to be had.
Cons
- Biteable can be sluggish to render larger videos.
- It’s some features are available only in top-class plans.
- Its customer guide can be sluggish to respond.
- There are some bugs in this software.
Conclusion
In the dynamic realm of animation and video tools, numerous alternatives, along with Wideo, Powtoon, Moovly, Vyond, Animaker, and Biteable, present themselves as reachable solutions for content material advent, catering to people with restricted layout expertise. Striking a balance between comfort and disadvantages inclusive of getting to know curves and net reliance is pivotal in making a knowledgeable preference. Virbo, an AI-driven platform, distinguishes itself by using hastily generating brilliant videos, though with ability downsides.
Notably, Virbo excels through its consumer-intuitive interface, collaborative talents, and reservoir of inventory sources. While mainly desirable for crafting advertising and marketing and academic movies, customers with aspirations of complicated customization might discover exchange avenues well worth exploring. In evaluating these options, customers have to weigh the advantages of ease-of-use in opposition to concerns like net get admission to and hardware prerequisites to select the device that aligns greatly with their content material advent objectives.
Launching Your Live Room | Virbo AI Live Stream
Launching Your Live Room
Explore step-by-step instructions on decorating your space, uploading local images and videos, adding engaging AI interactions, etc. Elevate your streaming experience and captivate your audience with a seamlessly executed live room. Dive into our comprehensive guide now!
02Uploading Local Images and Videos
07AI Intelligent Script Generation
11Starting/Ending the Live Broadcast
Decorating Your Live Room
Decoration Guidance
- Click on the product homepage and create a blank live room to initiate a new live session.

Create a blank live room
- Upon creating a blank live room, the live room editing page will open. The left side serves as the operation area, the right side as the canvas area, and the materials area is located above.

Livestream room navigation
- Click on the templates to use pre-designed combinations of background, virtual hosts, and stickers.

Select a template
- Customize the background from the background library. During the live broadcast, only one background can be used.

Livestream room customization
- Choose a virtual host from the virtual host library. Only one virtual host can be used during the live session.
![]()
Choose a virtual host
- Add stickers from the sticker library. Multiple stickers can be used during the live broadcast.
- After selecting materials, adjust their position and size in the canvas area. Right-click to modify layers, copy, or delete materials.
Uploading Local Images and Videos
Upload background images or videos
- Upload: Click Background -> Upload Background -> Select file to upload. Materials will be displayed in “My Background” after uploading.

Upload Background
- Apply: Click Background -> My Background, then click on the material to use it on the canvas.
- Delete: Hover over the material and click the delete icon to remove it.

Delete Background
Note
Background upload requirements:
- Image and video dimensions should be 9:16
- Image formats: JPG/JPEG/PNG
- Video formats: MP4/MOV
- Resolution should not exceed 1080P
- Video duration should not exceed 30 minutes
- File size should not exceed 1GB
Upload sticker images or videos
- Upload: Click Sticker -> Upload Sticker -> Select file to upload. Materials will be displayed in “My Sticker” after uploading.

Upload Sticker
- Apply: Click Sticker -> My Sticker, then click on the material to use it on the canvas.
- Delete: Click Sticker -> My Sticker, hover over the material, click the delete icon to remove it.

Delete Sticker
Note
Sticker upload requirements:
- Image and video dimensions are flexible.
- Image formats: JPG/JPEG/PNG
- Video formats: MP4/MOV
- Resolution should not exceed 1080P
- Video duration should not exceed 30 minutes
- File size should not exceed 1GB
Text-Driven Live Room
Script Guidance
- Input script text: Copy and paste your script into the script dialogue box.

Text Scripts Inset
- Choose a matching tone: Click the voice-over entrance above, select a suitable tone, and preview it.
- Preview: Click the “Preview” button below the text to listen.
Audio-Driven Live Room
Audio Guidance
- Upload audio: Click Script -> Audio -> Upload local voice and upload the local file.

Upload Audio
- Preview audio: After uploading, click to preview the audio.

Preview Audio
- Audio sorting: Hold and drag to sort the audio files.

Audio sorting
- Audio sorting: Hold and drag to sort the audio files.

Modifying Live Room Name
Method Guidance
- Method 1: Click the edit button in the upper-left corner of the edit page to rename the live room.

Rename Livestream Room
- Method 2: Product homepage -> My Live Rooms -> Click on the more options for an individual live room -> Choose Rename.
Adding AI Identification
Step Guidance
- On the live room editing page, click on the checkbox before the AI identification to enable or disable it.
AI Intelligent Script Generation
Generation Guidance
- Click the “AI Intelligent Script” button below the script, a popup will appear.
- Enter your product name (mandatory), selling points (optional), promotional information (optional), select language and style, then click generate.

AI Script
- The generated result can be further modified, click “Use” to add it to the script dialogue box.
AI Translation
Translation Guidance
- Click the “AI Translation” button below the script, a popup will appear.
- Place the text to be translated on the left, click the middle arrow to select the language for translation (e.g., English), and click translate.

AI Translation
- The generated result can be further modified, click “Use” to add it to the script dialogue box.

AI Translation Result
Manual Interaction
Microphone Interaction
- Operational Flow:
- Click Manual Interaction -> Microphone, and select the microphone device.
- Speak into the microphone and observe the sound wave status.
- Open “Start Live,” wait for the appearance of the virtual host image, and click “Open Mic Takeover.” The virtual host’s mouth will be closed, and your voice will drive the virtual host to speak.
- After speaking, click “End Takeover,” and the virtual host will resume reading the scripted dialogue.
- Click Manual Interaction -> Microphone, and select the microphone device.
- Grant Browser Microphone Access:
- Google Chrome:
*Open Chrome, click the settings icon in the top right.
* Click “Settings,” open the settings page. Select “Privacy and Security” and then click “Site Settings.”
*Enter the site settings page, click “Microphone.”
* On the microphone authorization page, select that the site can request the use of your microphone.
* After these settings, when the browser needs to use the camera or microphone, a device request box will pop up on the page. Select “Allow.” - Mozilla Firefox:
*Open Firefox, click the settings icon in the top right, and click “Settings.”
* Open the settings page, click “Privacy & Security,” and find “Microphone Permissions.” Click “Settings” next to “Microphone.”
*Enter the settings page, add the site that requests the use of your microphone to the list, and click “Save Changes.”
* After these settings, when the browser needs to use the camera or microphone, a device request box will pop up on the page. Select “Allow.” - Sogou Browser:
*Open Sogou Browser, click the settings icon in the top right, and click “Options.”
* Open the options page, click “Advanced,” find “Privacy - Browsers on the Mac System:
*Locate “System Preferences” on your Mac dock and click the icon. Once opened, find “Security & Privacy” and click to open.
* On the “Security & Privacy” page, select “Privacy,” then click on “Microphone” and set the applications that need to use the microphone to “Allow.”
- Google Chrome:
Text Interaction
- Click on “Artificial Interaction” and enter interaction scripts in the input box below.
- Click “Add Text” to add it to the interaction list. After starting the live broadcast, each interaction script will have a send button.

Text Interactionn
- Click “Send” to trigger the AI to speak according to the interaction script.
Intelligent Interaction
Note
The current intelligent interaction feature only supports Alibaba International. If you are streaming on other platforms, you can skip this step.
Setting Entrance
- On the live broadcast page, click on “Intelligent Interaction,” select the live platform, and the supported intelligent interaction features will be randomly displayed.
Q&A Library Settings
- Creating a New Q&A:
- On the product homepage, click on Q&A Library - Add Q&A, and a popup window will appear.
- Fill in the rule name, keywords, reply text, and upload a reply video. Click Save.
Note
Rule Name: Name the rule for easy identification.
Keywords: If a viewer’s question in the live room contains any of these keywords, it will trigger the AI to answer.
Reply Content: You can add up to 5 replies. Include variables like [Viewer’s Nickname] and [Viewer’s Country] for personalized responses.
Sequential Reply: Replies in sequence when triggered.
Random Reply: Randomly selects a reply when triggered.
Reply Video: If configured, the video will be displayed at the specified position until the AI’s reply ends.
- Adjusting Q&A Activation Status:
- Click Q&A Library - Switch to close or open the Q&A rule. When closed, the Q&A rule will not take effect after the live broadcast starts.
- Turning on Q&A Library Switch in the Live Room:
- On the live broadcast editing page, click Intelligent Interaction - Platform, select “Alibaba International,” and turn on the Q&A Library switch. This must be done after starting the live broadcast and capturing the barrage for the function to work.
Greeting Rules Settings
- Greeting Content: You can add up to 5 replies, including variables like [Viewer’s Nickname] and [Viewer’s Country].
- Sequential Reply: Replies in sequence when triggered.
- Random Reply: Randomly selects a reply when triggered.
- On the live broadcast editing page, click Intelligent Interaction - Platform, select “Alibaba International,” turn on the Greeting switch, and click the edit icon to open the editing window. Fill in the reply text and click Save.
Sending Business Cards and Product Catalogs
- On the live broadcast editing page, click Intelligent Interaction - Platform, select “Alibaba International,” turn on the “Send Business Cards” switch, and turn on the “Send Product Catalogs” switch.
Note
These functions will only take effect after starting the live broadcast and capturing the barrage.
How to Start Live Barrage Capture
- Start Broadcasting in Virbo Live
- Follow the steps for “Start/End Broadcast” on the live broadcast editing page.
- Install the Plugin in Chrome
- Ensure Chrome is up to date, then download the plugin from the provided link . After downloading, unzip locally.
- Configure the Plugin in Chrome
- Open Chrome, go to Settings - Extensions - Manage Extensions, enable Developer mode, click “Load Unpacked,” and select the unzipped folder. Enable “Allow in incognito mode” in the plugin details.
- Copy the Live Control Page Link
- Copy the link of your live control page (web version) from the live platform. Paste the link into the live broadcast editing page under Intelligent Interaction - Live Room Link Input, then click “Start Capturing.”
Note
Alibaba International currently supports automatic Q&A, automatic greetings, automatic business card sending, and automatic product catalog sending. You can turn on the corresponding switches and then configure the detailed settings for each item.
Starting/Ending the Live Broadcast
Starting the Live Broadcast
- On the live broadcast editing page, click “Start Broadcasting.”
- The AI live broadcast window will appear shortly after, displaying the AI live broadcast.
Using Your Broadcasting Partner or OBS
Note
Keep the AI live broadcast window open on the desktop during the broadcast, or it will not broadcast properly.
- Open your broadcasting partner or OBS, add a window, select the Wondershare VVB (Live Version) live window.
- Click “Start Broadcasting.” Use Alt + mouse to crop out the web bar or use the zoom function to remove it.
- During the live broadcast, you can only modify the “Artificial Interaction” function; other broadcast settings cannot be changed.
Ending the Broadcast
- When concluding the live broadcast, initiate the termination of the live stream on the platform’s broadcasting partner first, followed by clicking the “End Live” button on Virbo Live to finalize the shutdown process.
02Uploading Local Images and Videos
07AI Intelligent Script Generation
11Starting/Ending the Live Broadcast
Decorating Your Live Room
Decoration Guidance
- Click on the product homepage and create a blank live room to initiate a new live session.
Create a blank live room
- Upon creating a blank live room, the live room editing page will open. The left side serves as the operation area, the right side as the canvas area, and the materials area is located above.
Livestream room navigation
- Click on the templates to use pre-designed combinations of background, virtual hosts, and stickers.
Select a template
- Customize the background from the background library. During the live broadcast, only one background can be used.
Livestream room customization
- Choose a virtual host from the virtual host library. Only one virtual host can be used during the live session.
![]()
Choose a virtual host
- Add stickers from the sticker library. Multiple stickers can be used during the live broadcast.
- After selecting materials, adjust their position and size in the canvas area. Right-click to modify layers, copy, or delete materials.
Uploading Local Images and Videos
Upload background images or videos
- Upload: Click Background -> Upload Background -> Select file to upload. Materials will be displayed in “My Background” after uploading.
Upload Background
- Apply: Click Background -> My Background, then click on the material to use it on the canvas.
- Delete: Hover over the material and click the delete icon to remove it.
Delete Background
Note
Background upload requirements:
- Image and video dimensions should be 9:16
- Image formats: JPG/JPEG/PNG
- Video formats: MP4/MOV
- Resolution should not exceed 1080P
- Video duration should not exceed 30 minutes
- File size should not exceed 1GB
Upload sticker images or videos
- Upload: Click Sticker -> Upload Sticker -> Select file to upload. Materials will be displayed in “My Sticker” after uploading.
Upload Sticker
- Apply: Click Sticker -> My Sticker, then click on the material to use it on the canvas.
- Delete: Click Sticker -> My Sticker, hover over the material, click the delete icon to remove it.
Delete Sticker
Note
Sticker upload requirements:
- Image and video dimensions are flexible.
- Image formats: JPG/JPEG/PNG
- Video formats: MP4/MOV
- Resolution should not exceed 1080P
- Video duration should not exceed 30 minutes
- File size should not exceed 1GB
Text-Driven Live Room
Script Guidance
- Input script text: Copy and paste your script into the script dialogue box.
Text Scripts Inset
- Choose a matching tone: Click the voice-over entrance above, select a suitable tone, and preview it.
- Preview: Click the “Preview” button below the text to listen.
Audio-Driven Live Room
Audio Guidance
- Upload audio: Click Script -> Audio -> Upload local voice and upload the local file.
Upload Audio
- Preview audio: After uploading, click to preview the audio.
Preview Audio
- Audio sorting: Hold and drag to sort the audio files.
Audio sorting
- Audio sorting: Hold and drag to sort the audio files.
Modifying Live Room Name
Method Guidance
- Method 1: Click the edit button in the upper-left corner of the edit page to rename the live room.
Rename Livestream Room
- Method 2: Product homepage -> My Live Rooms -> Click on the more options for an individual live room -> Choose Rename.
Adding AI Identification
Step Guidance
- On the live room editing page, click on the checkbox before the AI identification to enable or disable it.
AI Intelligent Script Generation
Generation Guidance
- Click the “AI Intelligent Script” button below the script, a popup will appear.
- Enter your product name (mandatory), selling points (optional), promotional information (optional), select language and style, then click generate.
AI Script
- The generated result can be further modified, click “Use” to add it to the script dialogue box.
AI Translation
Translation Guidance
- Click the “AI Translation” button below the script, a popup will appear.
- Place the text to be translated on the left, click the middle arrow to select the language for translation (e.g., English), and click translate.
AI Translation
- The generated result can be further modified, click “Use” to add it to the script dialogue box.
AI Translation Result
Manual Interaction
Microphone Interaction
- Operational Flow:
- Click Manual Interaction -> Microphone, and select the microphone device.
- Speak into the microphone and observe the sound wave status.
- Open “Start Live,” wait for the appearance of the virtual host image, and click “Open Mic Takeover.” The virtual host’s mouth will be closed, and your voice will drive the virtual host to speak.
- After speaking, click “End Takeover,” and the virtual host will resume reading the scripted dialogue.
- Click Manual Interaction -> Microphone, and select the microphone device.
- Grant Browser Microphone Access:
- Google Chrome:
*Open Chrome, click the settings icon in the top right.
* Click “Settings,” open the settings page. Select “Privacy and Security” and then click “Site Settings.”
*Enter the site settings page, click “Microphone.”
* On the microphone authorization page, select that the site can request the use of your microphone.
* After these settings, when the browser needs to use the camera or microphone, a device request box will pop up on the page. Select “Allow.” - Mozilla Firefox:
*Open Firefox, click the settings icon in the top right, and click “Settings.”
* Open the settings page, click “Privacy & Security,” and find “Microphone Permissions.” Click “Settings” next to “Microphone.”
*Enter the settings page, add the site that requests the use of your microphone to the list, and click “Save Changes.”
* After these settings, when the browser needs to use the camera or microphone, a device request box will pop up on the page. Select “Allow.” - Sogou Browser:
*Open Sogou Browser, click the settings icon in the top right, and click “Options.”
* Open the options page, click “Advanced,” find “Privacy - Browsers on the Mac System:
*Locate “System Preferences” on your Mac dock and click the icon. Once opened, find “Security & Privacy” and click to open.
* On the “Security & Privacy” page, select “Privacy,” then click on “Microphone” and set the applications that need to use the microphone to “Allow.”
- Google Chrome:
Text Interaction
- Click on “Artificial Interaction” and enter interaction scripts in the input box below.
- Click “Add Text” to add it to the interaction list. After starting the live broadcast, each interaction script will have a send button.
Text Interactionn
- Click “Send” to trigger the AI to speak according to the interaction script.
Intelligent Interaction
Note
The current intelligent interaction feature only supports Alibaba International. If you are streaming on other platforms, you can skip this step.
Setting Entrance
- On the live broadcast page, click on “Intelligent Interaction,” select the live platform, and the supported intelligent interaction features will be randomly displayed.
Q&A Library Settings
- Creating a New Q&A:
- On the product homepage, click on Q&A Library - Add Q&A, and a popup window will appear.
- Fill in the rule name, keywords, reply text, and upload a reply video. Click Save.
Note
Rule Name: Name the rule for easy identification.
Keywords: If a viewer’s question in the live room contains any of these keywords, it will trigger the AI to answer.
Reply Content: You can add up to 5 replies. Include variables like [Viewer’s Nickname] and [Viewer’s Country] for personalized responses.
Sequential Reply: Replies in sequence when triggered.
Random Reply: Randomly selects a reply when triggered.
Reply Video: If configured, the video will be displayed at the specified position until the AI’s reply ends.
- Adjusting Q&A Activation Status:
- Click Q&A Library - Switch to close or open the Q&A rule. When closed, the Q&A rule will not take effect after the live broadcast starts.
- Turning on Q&A Library Switch in the Live Room:
- On the live broadcast editing page, click Intelligent Interaction - Platform, select “Alibaba International,” and turn on the Q&A Library switch. This must be done after starting the live broadcast and capturing the barrage for the function to work.
Greeting Rules Settings
- Greeting Content: You can add up to 5 replies, including variables like [Viewer’s Nickname] and [Viewer’s Country].
- Sequential Reply: Replies in sequence when triggered.
- Random Reply: Randomly selects a reply when triggered.
- On the live broadcast editing page, click Intelligent Interaction - Platform, select “Alibaba International,” turn on the Greeting switch, and click the edit icon to open the editing window. Fill in the reply text and click Save.
Sending Business Cards and Product Catalogs
- On the live broadcast editing page, click Intelligent Interaction - Platform, select “Alibaba International,” turn on the “Send Business Cards” switch, and turn on the “Send Product Catalogs” switch.
Note
These functions will only take effect after starting the live broadcast and capturing the barrage.
How to Start Live Barrage Capture
- Start Broadcasting in Virbo Live
- Follow the steps for “Start/End Broadcast” on the live broadcast editing page.
- Install the Plugin in Chrome
- Ensure Chrome is up to date, then download the plugin from the provided link . After downloading, unzip locally.
- Configure the Plugin in Chrome
- Open Chrome, go to Settings - Extensions - Manage Extensions, enable Developer mode, click “Load Unpacked,” and select the unzipped folder. Enable “Allow in incognito mode” in the plugin details.
- Copy the Live Control Page Link
- Copy the link of your live control page (web version) from the live platform. Paste the link into the live broadcast editing page under Intelligent Interaction - Live Room Link Input, then click “Start Capturing.”
Note
Alibaba International currently supports automatic Q&A, automatic greetings, automatic business card sending, and automatic product catalog sending. You can turn on the corresponding switches and then configure the detailed settings for each item.
Starting/Ending the Live Broadcast
Starting the Live Broadcast
- On the live broadcast editing page, click “Start Broadcasting.”
- The AI live broadcast window will appear shortly after, displaying the AI live broadcast.
Using Your Broadcasting Partner or OBS
Note
Keep the AI live broadcast window open on the desktop during the broadcast, or it will not broadcast properly.
- Open your broadcasting partner or OBS, add a window, select the Wondershare VVB (Live Version) live window.
- Click “Start Broadcasting.” Use Alt + mouse to crop out the web bar or use the zoom function to remove it.
- During the live broadcast, you can only modify the “Artificial Interaction” function; other broadcast settings cannot be changed.
Ending the Broadcast
- When concluding the live broadcast, initiate the termination of the live stream on the platform’s broadcasting partner first, followed by clicking the “End Live” button on Virbo Live to finalize the shutdown process.
How To Generate Speech From Text | The Best Text-to-Speech Converters
In today’s digital age, using the latest technology to enhance productivity is imperative. Text-to-speech converters have revolutionized the way we interact with written content. Knowinghow to generate speech from text serves a great number of benefits. This cutting-edge technology has allowed humankind to bridge the gap between language and technology.
Here, you can delve deep into the world of text-to-speech converters. Discover the top features, benefits, and how-to guides toconvert text to voice easily.
Part 1: What are the Benefits of Converting Text to Audio in Real Life?
It would be a good idea toconvert text into audio for several reasons. Here are some key benefits that the process can provide:
1. Accessibility and Assistance
Text-to-audio conversion plays a crucial role in creating a more inclusive digital environment. People with various forms of disabilities and impairments can make use of this technology. Converting text into audio empowers such individuals and helps them stay informed and connected to the real world.
Reading content, particularly long-form content, can be challenging for people with visual impairments, dyslexia, or other reading and developmental difficulties. If youconvert text to audio , you can make your written content easily accessible to them.
2. Enhanced Learning and Language Improvement
Converting text to speech can significantly benefit language learners. Studies have proved that listening to text aloud helps greatly improve pronunciation, comprehension, and fluency. To enhance their language, a simple solution is toturn text into audio and listen to it. Many converters have various speech options these days that can help with this.
3. Ease of Content Consumption
An added benefit ofgenerating speech from text is making your content easy to access and consume. Users have different preferences for content consumption. Written content is often a cause of eye strain and fatigue. Engaging audio content provides a great alternative to written content. By simple conversion, your content can cater to different user learning styles.
4. Improved Engagement
Audio content can be much more engaging as compared to written content. Bycreating voice from text , you can capture the audience’s attention and create a more immersive experience. Text-to-speech conversions can also facilitate better communication. It enables natural and engaging interactions between users and their devices.
5. Boosting Productivity
Moreover,converting text to voice is a good idea when you wish to boost efficiency. Especially in professional settings, you can listen to important documents, emails, or reports on the go. You can perform other tasks simultaneously, enabling you to save time. This can add a significant productivity boost to your everyday tasks.
Part 2: The Best Tools Available in the Market to Generate Audio from Text
After knowing the benefits of text-to-speech conversion, you might wonder how to perform the task. Here are the top 5 tools that can help youcreate audio from text quickly and easily.
1. Virbo
Topping our list of the best tools toconvert text to voice is Virbo. Powered by Wondershare, Virbo is based on state-of-the-art AI technology. The tool provides an interactive interface and easy-to-use functions. You can easily convert any text into a range of voices using this.
Virbo offers a wide range of voices for users to choose from. It is the perfect cross-platform tool to easily generate high-quality content on both Windows and Apple devices. With many voices, tones, and languages to choose from, it is just what you need for quick text-to-voice conversions.
Key Features
- Virbo offers many realistic avatars, languages, and accents to make your content unique and cater to every need.
- You can customize various aspects of your AI avatar, including gender, attire, and tone, with ease.
- Besides a wide range of voices, Virbo also offers an AI script generator. You can thus create efficient scripts for multiple purposes.
Steps to Use Wondershare Virbo For Generating Speech From Text
Virbo makes it fairly easy toconvert text into audio . Here are the detailed steps on how to generate speech from text using Virbo:
Step 1: Launch Virbo and Select your Feature
To start, install and launch Wondershare Virbo on your device. Select the “Text to Speech” option from the program’s main interface. Now, select a template of your choice. Among the listed options, you can choose a language and tone. Virbo offers more than 150 options to choose from, and click on the “Convert Now” button.
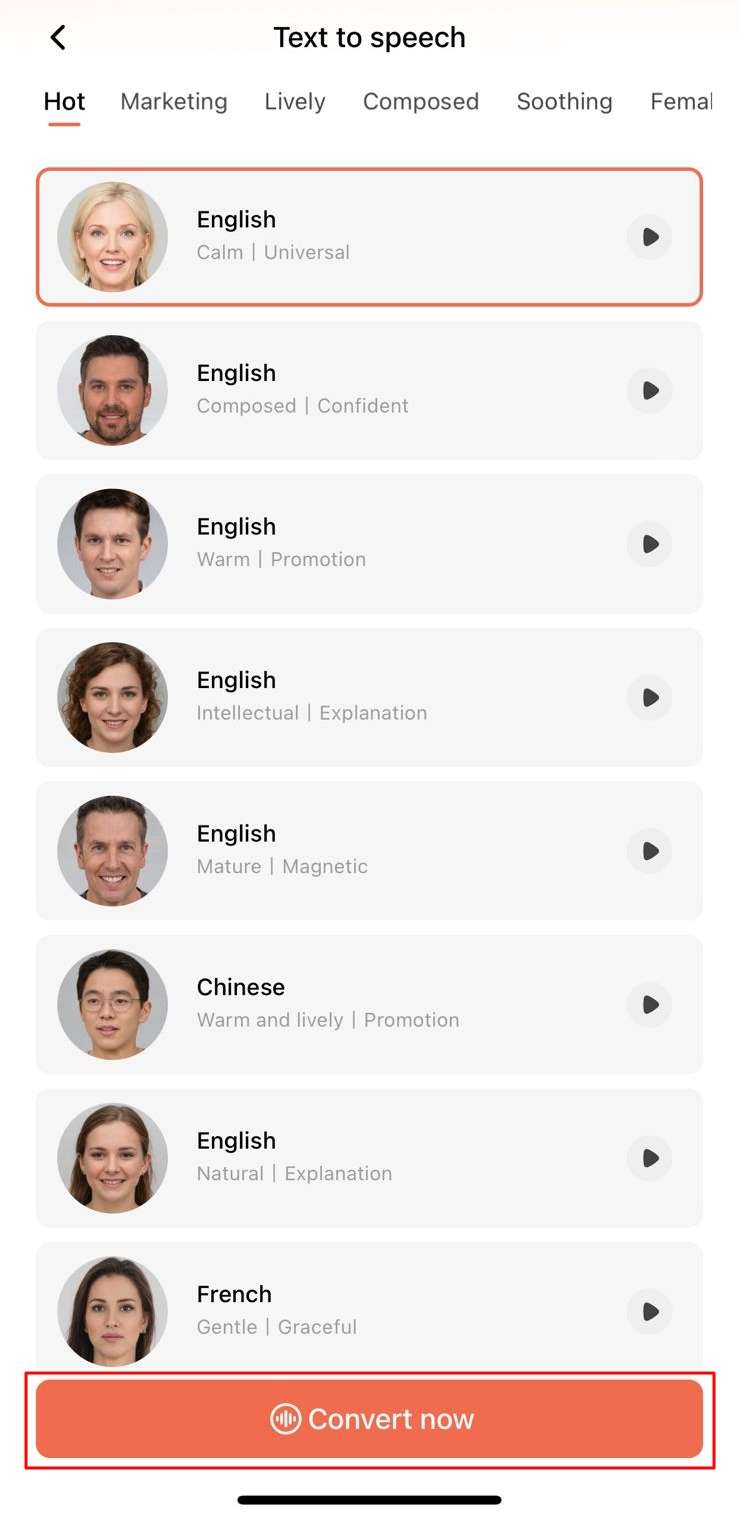
Get Started Online Free Download
Step 2: Input the Desired Text
In the next interface, you can add your desired text to convert into speech. Click the “Create Video” button, choose the video orientation, and Virbo will automatically convert your text into speech. You can edit your generated video further and tweak the features as you like.
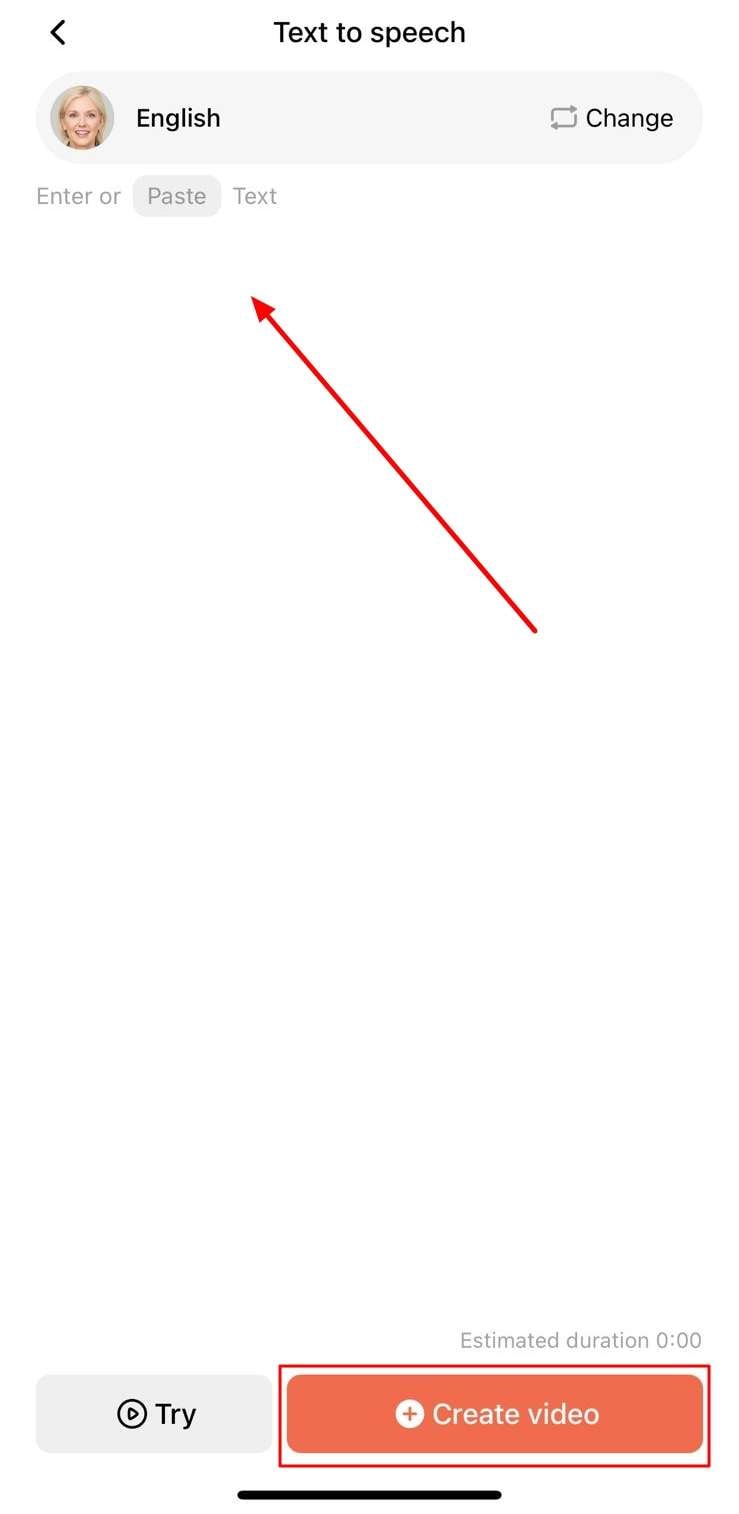
Step 3: Preview and Export the AI Video
Once you have worked through the entire editing, preview the video. Then, select the “Export” button to save the video on your smartphone.
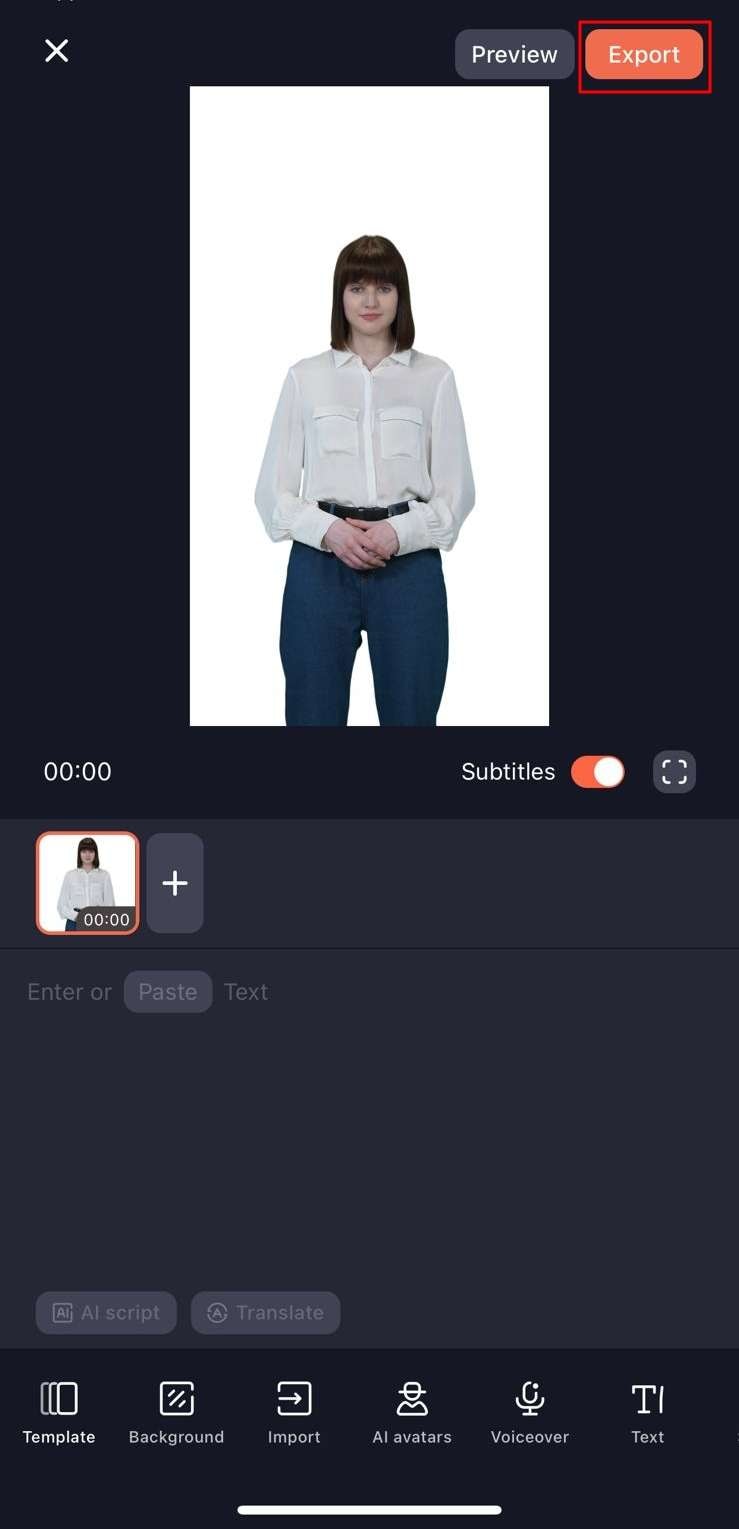
2. Murf.ai
If you are looking for an online tool toconvert text to audio , Murf.ai is a good choice. This versatile web-based tool enables users to generate high-quality speech. The AI algorithm of Murf.ai can easily generate life-like, natural voices.
Besides text-to-speech conversions, Murf.ai also offers several other useful elements. The feature-packed tool offers several unique voices to suit varying moods. You can use the generated audio for podcasts, videos, and other instances.
Key Features
- ai lets users save the output in multiple file formats and quality types.
- Besides text-to-voice, you can also add other media elements like images and videos to your final output.
- ai also enables users to collaborate with their teams and add a shared workspace to boost productivity.
Steps To Use Murf.ai For Generating Speech From Text
Step 1: Go to Murf.ai and click the “Open Studio” button. You will be redirected to the studio workspace, where you can click “Create Project.” From the next tab, choose the option most suited to your project from the available list and tap the “Create Project” button.
Step 2: You can now type the text you want to convert into speech. From the panel at the top, you can select the language and voice of the audio. You can also modify other aspects, such as the pitch and speed.
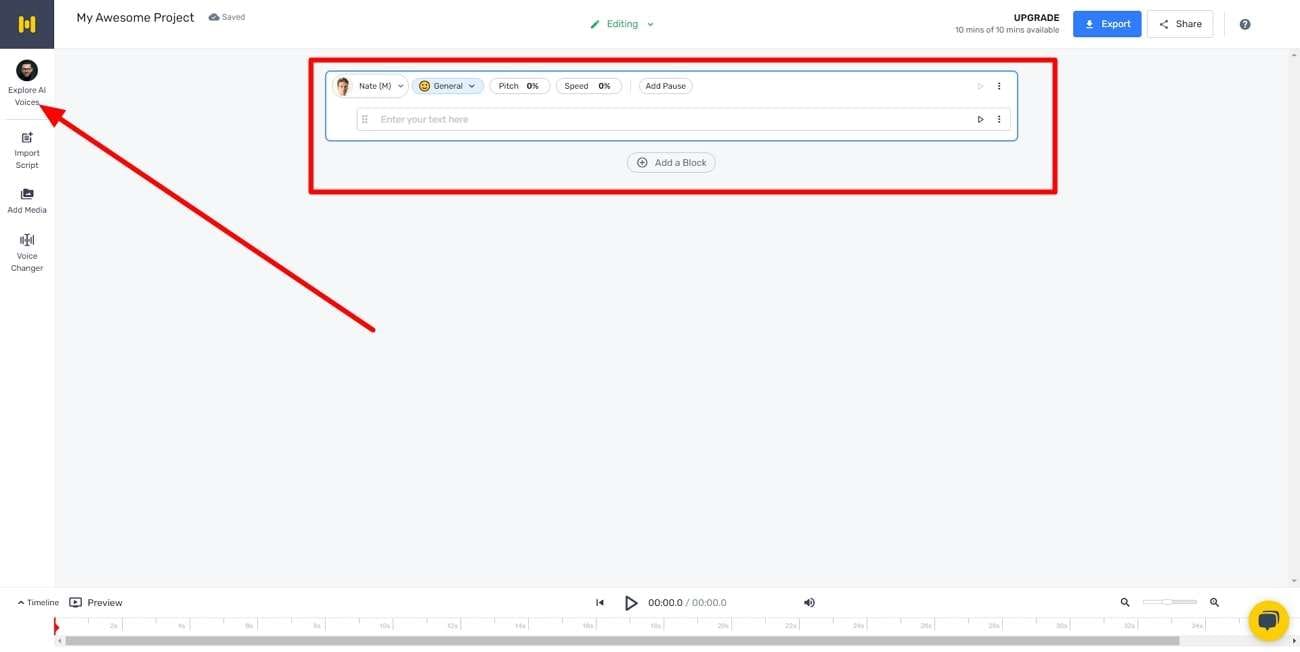
Step 3: Once satisfied with your project, click the “Export” button at the top right to save your audio.
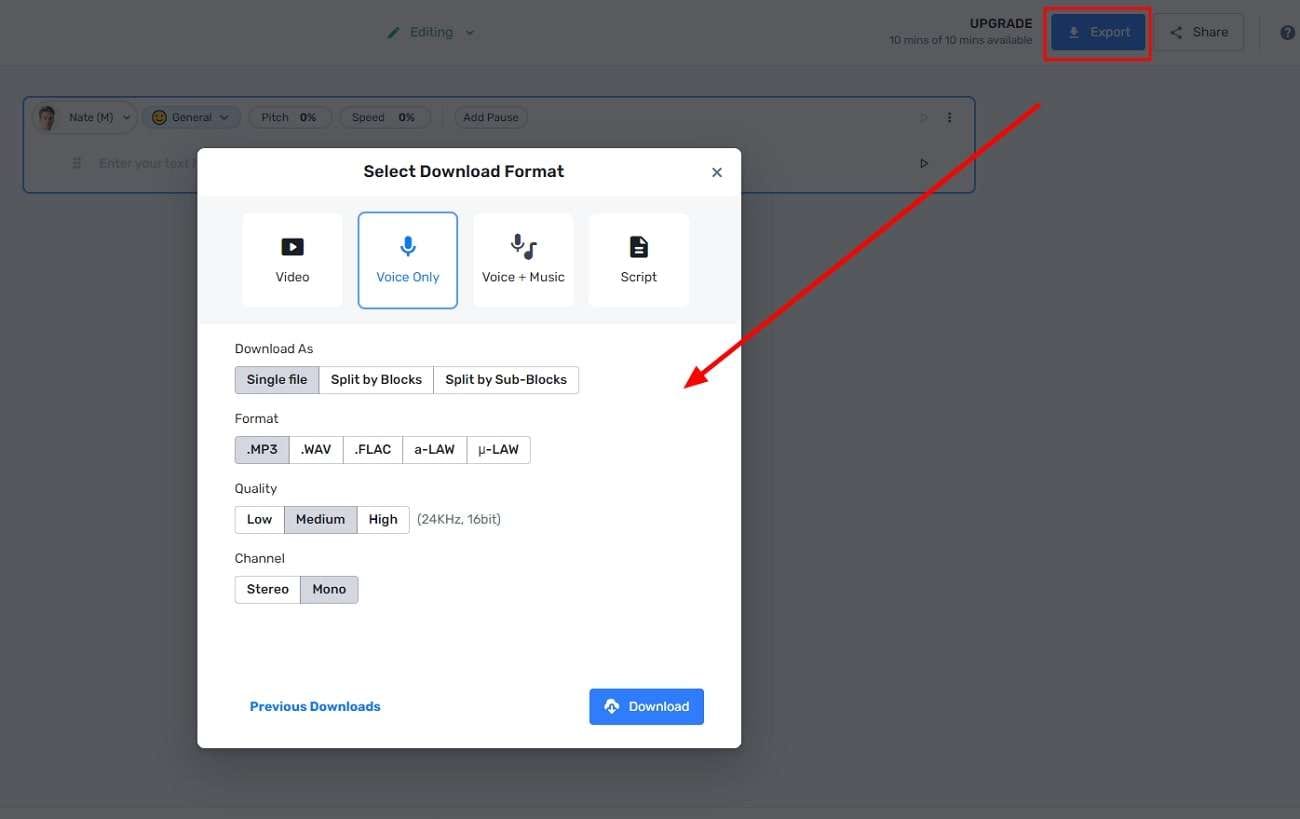
3. MicMonster
MicMonster is another top-rated tool that canconvert text to speech for free . With a straightforward interface, the website offers several voice options. Be it for e-learning or generating audiobooks, you can use MicMonster for all purposes.
The tool comes with an advanced editor that is relatively simple to use. You can also preview your full audio on MicMonster before downloading it. Select a voice from its growing library and convert it into natural-sounding speech using MicMonster.
Key Features
- On MicMonster, you can select a specific portion of your script and assign it to a voiceover of your choice. This way, you can generate multiple voices in the same audio file.
- You can fine-tune the audio’s rate, pitch, emphasis, and pauses. As a result, you can make your audio sound more natural.
- MicMonster allows users to customize pronunciations of certain words. This feature ensures that names, acronyms, and other important information get delivered without any trouble.
Steps To Generate Speech From Text Using MicMonster
Step 1: You can begin the conversion process by going to MicMonster. You can type in your text from the main interface in the text input field.
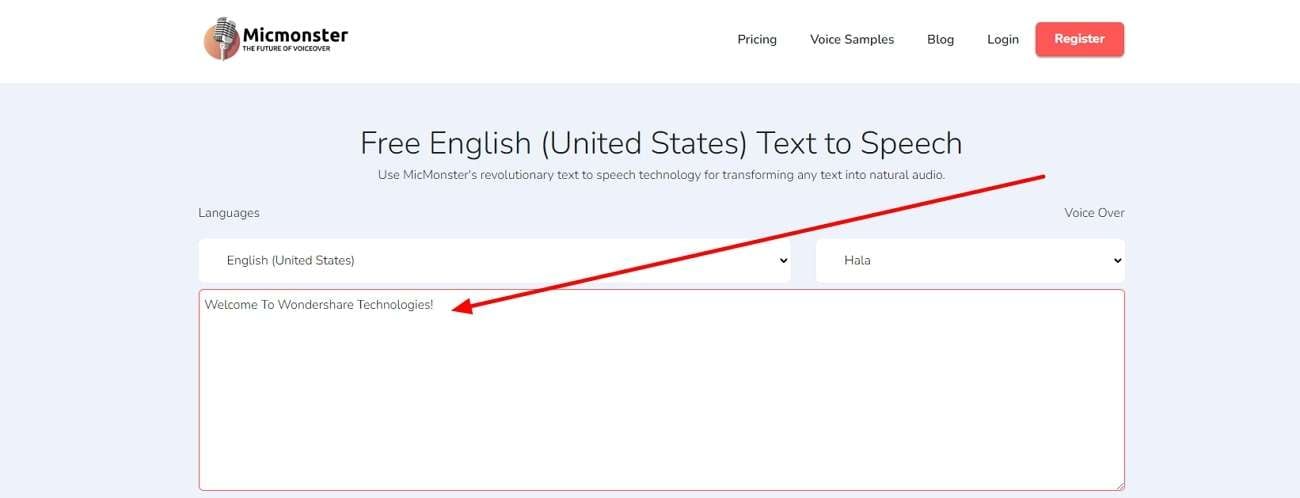
Step 2: From the top toolbar, you can select a language of your choice. In each language, MicMonster offers multiple voiceovers that you can choose.
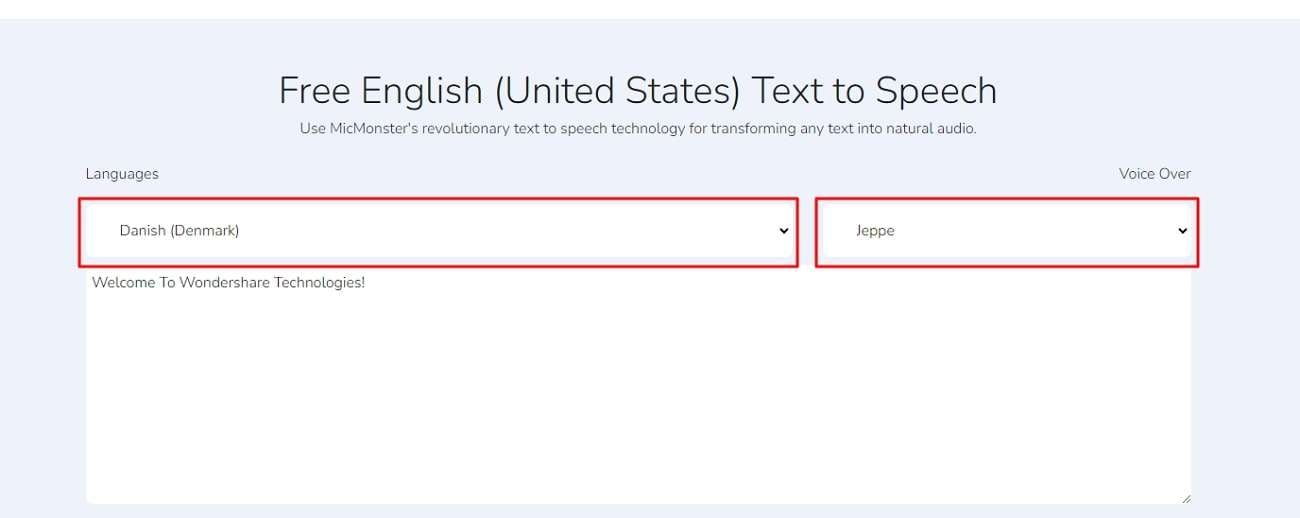
Step 3: Once everything is done, click “Generate” toturn your text into speech .
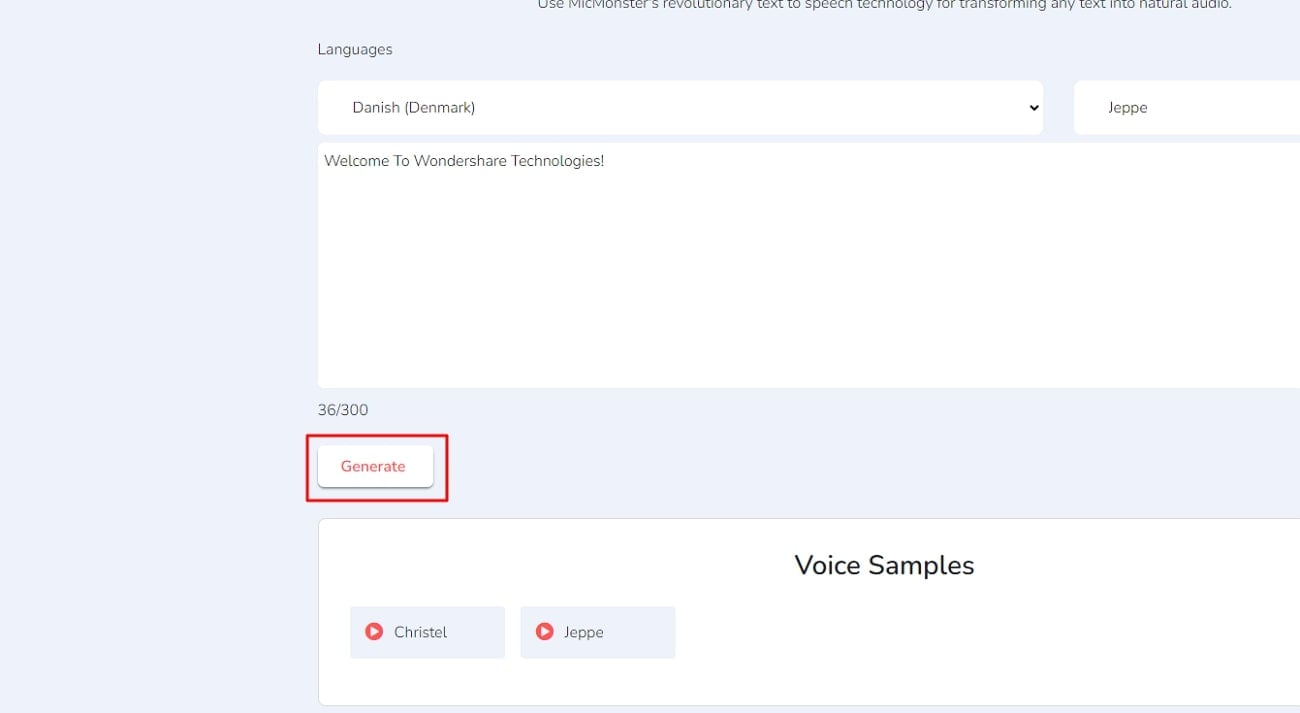
4. SpeechGen.io
If you want a cheap tool that caneasily generate audio from text , SpeechGen.io offers the perfect solution. Being a web-based tool, it is easily accessible to everyone. Its AI technology offers powerful text-to-speech conversions in no time.
SpeechGen.io offers a wide range of languages and voices. Its realistic voice generator abilities can help you produce content for all purposes. You can use SpeechGen.io for quick and easy text-to-audio conversions.
Key Features
- You can save the output audio file in multiple formats. Some examples include MP3, WAV, and OGG.
- io is compatible with many popular software, including Adobe Premier and After Effects. This feature is helpful if you want to refine your content further using professional editing programs.
- You can add your tracks to your cloud history on SpeechGen.io. You can also add audio files to your favorite list in one click.
Steps To Generate Speech Through Text Using SpeechGen.io
Step 1: Go to SpeechGen.io and type your text in the required field.
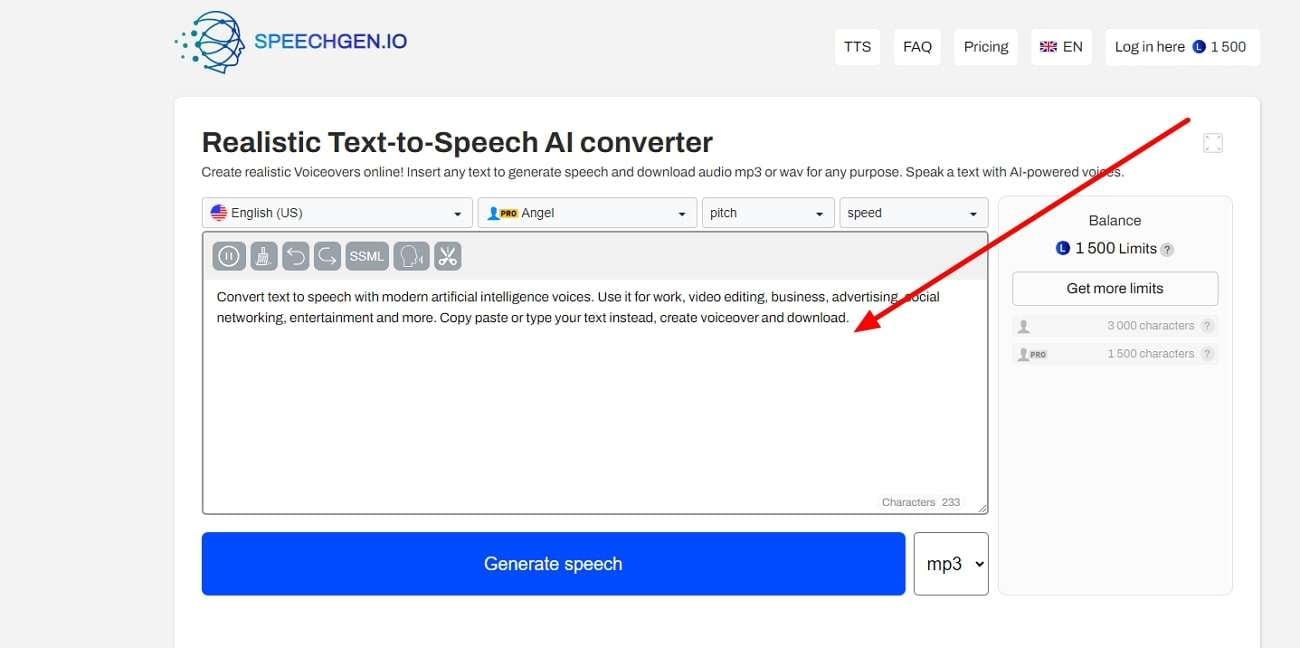
Step 2: Next, choose your language and AI voice. You can also select the pitch and speed of the audio. Once done, tap on “Generate speech.”
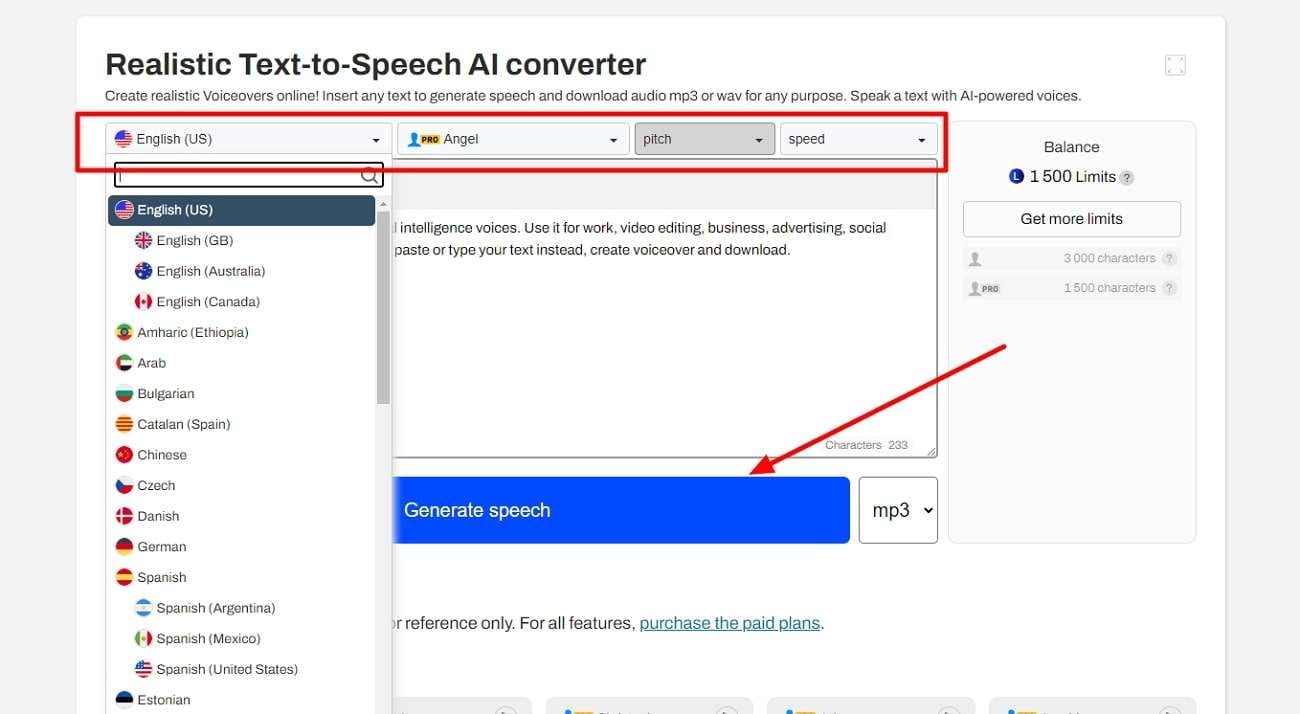
Step 3: You can then save your output file in a format of your choice.
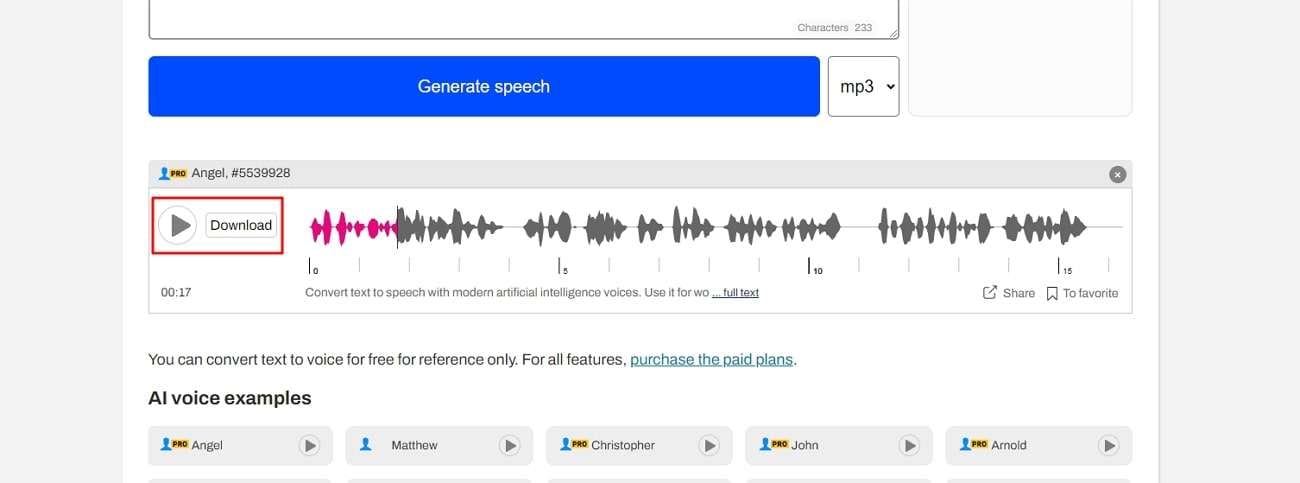
5. Listen2It
Listen2It is a remarkable AI tool that can generate realistic audio outputs from text. With more than 900 AI voices, the tool offers studio-level editing features. You can tweak all the audio aspects according to your liking.
Listen2It offers a friendly interface for all users. The tool can produce top-quality results in no time. You can use it for all purposes, from podcasts to educational and marketing content. Make use of Listen2It to generate vibrant voices and tones with remarkable ease.
Key Features
- Listen2It offers over 900 voices in more than 145 languages from across the globe. You can thus create diverse and inclusive content.
- You can add background audio to your tracks. This way, you can add a natural and realistic touch to the content.
- The tool also allows users to build custom AI characters. You can save specific audio settings for each character you build.
Steps To Use Listen2It Perfectly For Creating Speech From Text
Step 1: Go to Listen2It and tap the “Start” button. Once you reach the studio, click “Create Audio”.

Step 2: In the next window, you can type your text in the field. From the toolbar at the top, you can customize the language, voice, and other aspects of the audio.
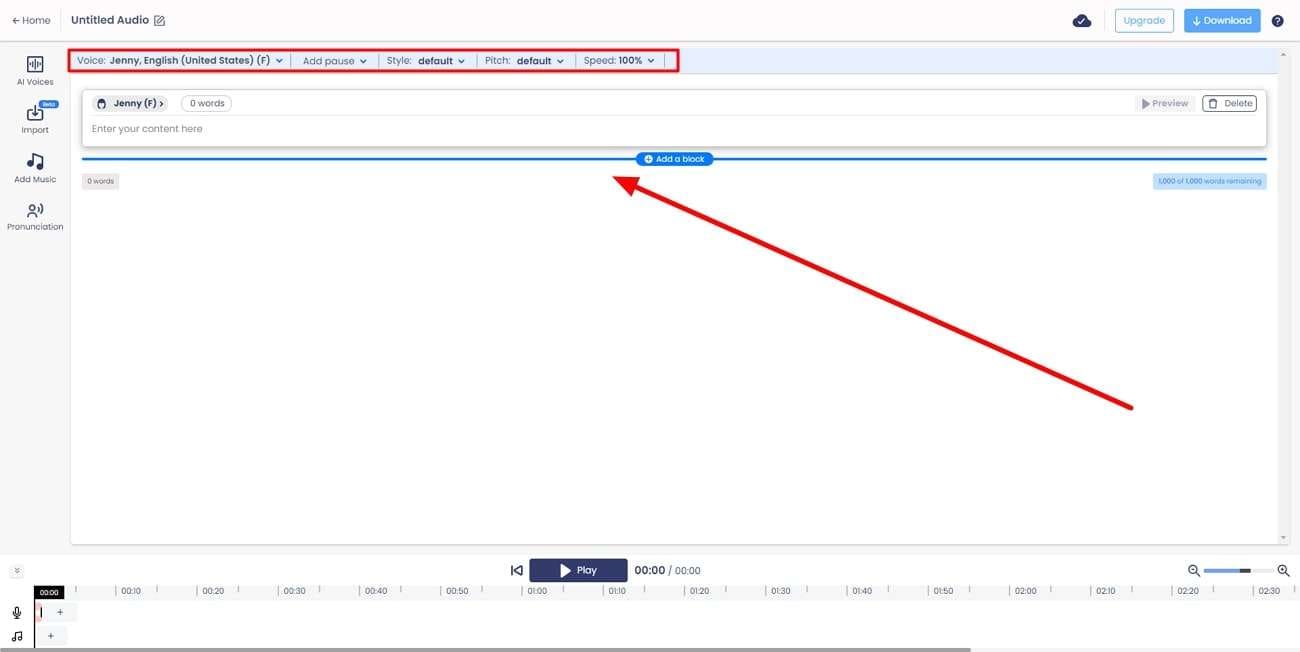
Step 3: Afterward, click the “Download” button at the top-right corner to save your output file.
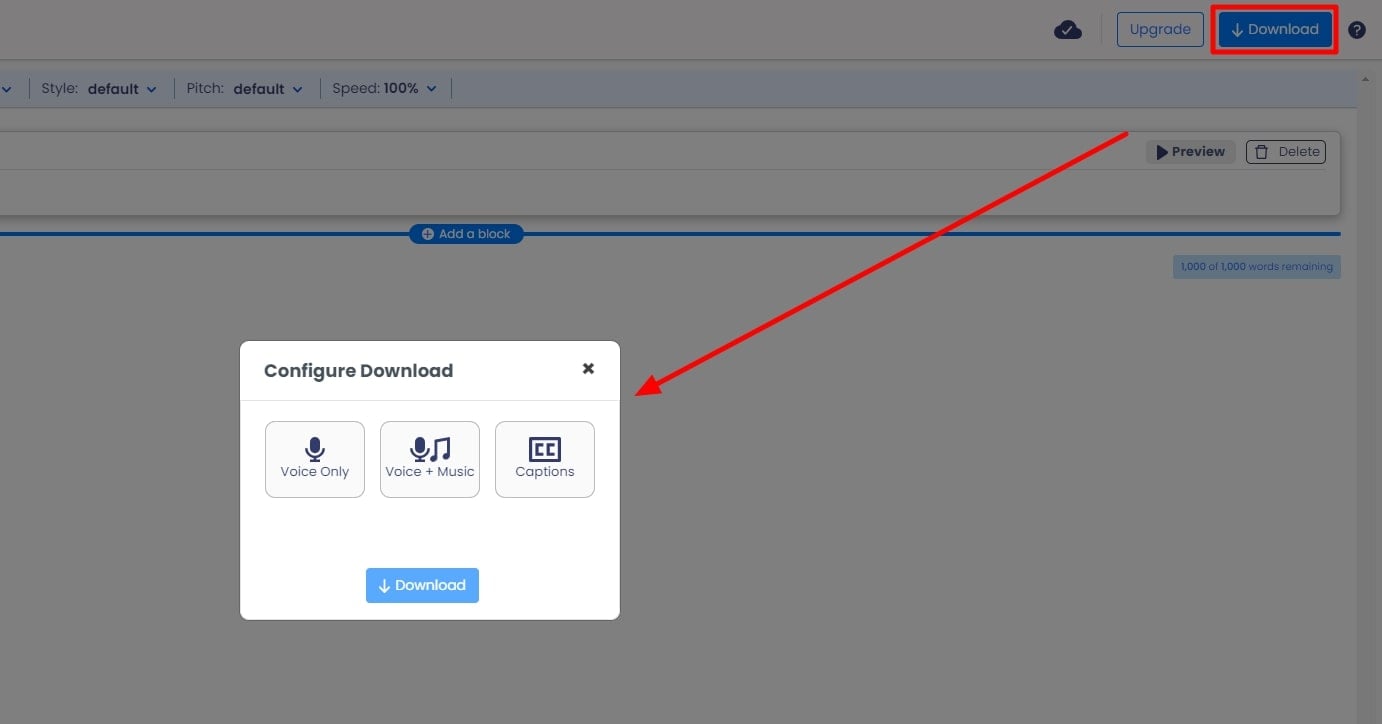
Conclusion
Text-to-speech converters are quickly taking over the world. Byconverting text to voice , you can increase the accessibility of your content. The converter tools mentioned above are a great way for effective communication and engagement with users. With increased demand, harnessing their powers for various aspects of everyday business is vital.
Also read:
- New In 2024, A Brief Review of CapCut Translate With Alternative
- Updated What Is an AI Text Generator, In 2024
- Updated In 2024, Top 5 Viral Video Marketing Techniques For Big Sellers
- Updated 2024 Approved What Is AI API? | Wondershare Virbo Glossary
- New 2024 Approved Becoming a Pro in TikTok Live Shopping Your Complete Guide
- New What Is AI Advertising for 2024
- Create AI Videos Using Synthesia Avatar and Voices
- Updated What Is AI Generated Text, In 2024
- New In 2024, Top 10 AI Avatar Generators
- New In 2024, What Is Talking Avatar?
- Updated Revolutionize Creative Tasks With Proficiency AI Voice Cloning
- Updated In 2024, Text To Speech | Wondershare Virbo Online
- What Is an AI Art Generator?
- New In 2024, Top AI Rap Voice Generators Upgrade Your Rap
- Updated What Is an AI Artist? | Wondershare Virbo Glossary for 2024
- New Top 8 Text-to-Video AI Generators to Produce Video Easily
- New The Power of AI Thumbnail Generators
- The Top English Voice Generator To Convert Text Into Desired Accent
- In 2024, How to Promote Your TikTok Videos Best 8 Strategies
- Updated Create An AI Avatar Video
- 7 Top Explainer Video Makers You May Like
- New Breaking Language Barriers Elevate Your Content with the Best Free Video Translator Apps
- 10 Free Football Streaming Sites To Bookmark
- New In 2024, The Best Text-to-Speech Online Tools To Use
- Updated Create AI Avatar Video with AI Script for 2024
- In 2024, Everything You Want To Know About Kapwing Video Translation
- Updated A Step-by-Step Guide on How to Promote YouTube Channel
- Updated What Is AI Marketing?
- In 2024, Top 4 Hatsune Miku Voice AI Generators for All Times
- New 2024 Approved Is Coqui Voice Cloning Worth the Hype? A Comprehensive Review
- New Guide to Promoting Music Videos on YouTube
- New In 2024, How To Translate Videos in Tamil for a Wider Reach
- Updated 2024 Approved AI Script | Online
- In 2024, A Detailed Guide To Stream to Instagram With an RTMP
- New Maximize Your User Engagement With Instagram Live Shopping Expert Tips for 2024
- New In 2024, The Best Voice Changers to Sound Like a Stormtrooper
- What Is an AI Art Generator for 2024
- 2024 Approved Common Platforms
- In 2024, Top 6 Free Talking Stock Photo Sites
- Updated 2024 Approved Device/Network/Browser Requirements | Virbo AI Live Stream
- In 2024, The Best English Voice Generator To Convert Text Into Desired Accent
- Updated 2024 Approved Best 5 AI Voice Generators Online (Supports All Browsers)
- Updated A Detailed and Trustworthy Review of Murf.ai AI Text-to-Speech Tool
- New 2024 Approved Get Closer to the Artistic Marvels of AI Portrait Generator
- In 2024, Create AI Avatar Video with Template | Wondershare Virbo
- Updated A Comprehensive Guide to Video and Subtitle Translation with Veed.io for 2024
- What Is Talking Avatar, In 2024
- Top 5 Xiaomi Redmi 12 5G Bypass FRP Tools for PC That Actually Work
- Apple ID Locked for Security Reasons From Apple iPhone 13 Pro? Find the Best Solution Here
- Play MOV movies on Galaxy M14 4G, is it possible?
- In 2024, The Best Methods to Unlock the iPhone Locked to Owner for Apple iPhone 6s | Dr.fone
- Bricked Your Vivo Y200? Heres A Full Solution | Dr.fone
- How to Reset Samsung Galaxy S21 FE 5G (2023) Without the Home Button | Dr.fone
- In 2024, Most Asked Questions about Pokemon Go Battle League Rewards On Apple iPhone 15 Plus | Dr.fone
- Undelete lost contacts from Honor Magic 6 Lite.
- Read This Guide to Find a Reliable Alternative to Fake GPS On Samsung Galaxy A24 | Dr.fone
- Complete Guide on Unlocking Apple iPhone 11 Pro with a Broken Screen? | Dr.fone
- How To Restore Missing Photos Files from Samsung Galaxy A05s.
- Title: New Top 5 AI Movie Script Generators for 2024
- Author: Sam
- Created at : 2024-06-23 02:57:13
- Updated at : 2024-06-24 02:57:13
- Link: https://ai-voice-clone.techidaily.com/new-top-5-ai-movie-script-generators-for-2024/
- License: This work is licensed under CC BY-NC-SA 4.0.
