
:max_bytes(150000):strip_icc():format(webp)/GettyImages-545864051-5c29cf6346e0fb0001d25712.jpg)
New The Best Tools to Convert Text to MP3 With the Best Natural Voices for 2024
The Best Tools to Convert Text to MP3 With the Best Natural Voices
Text to MP3 voice makers can convert your text into speech in an MP3 format. The benefits of such tools can enhance your productivity and work efficiency. As a language enthusiast, you can listen to the generated speech in MP3 format. Moreover, MP3 file formats are compatible with all media players and codecs.
Thus, you can listen to the generated MP3 voice on any device comfortably. In this article, we will guide you on how toconvert text into MP3 through professional TTS converters. Therefore, continue reading this article to learn about the best MP3 voice makers and their key features.
Part 1: How a Text to MP3 Voice Maker Can Help You in Your Daily Routine Tasks
Text to MP3 voice makers can make your daily tasks quicker and more efficient. This section will highlight some of the major advantages of usinga text-to-speech generator MP3 .
1. Entertainment and Gaming Industries
In the entertainment industry, creators may need to add voiceovers to their movies. This can help them reach an international audience easily. Moreover, game lovers also love to add their commentary in the form of narration. Such tasks can only be done through reliable MP3 voice makers supporting different languages and voices.
2. Enhances Productivity
Do you want to read your audiobooks or e-magazines while doing house chores? Well, you can use MP3 TTS converters to read the textual content from your e-newspapers and audiobooks in the perfect voice. Thus, it can improve your work productivity and efficiency to a greater extent.
3. Acts as an Assistant
Text-to-speech generator MP3 can also be integrated with assistive technology to help you in various cases. For example, MP3 TTS converters can help in the form of screen readers and voice assistants to execute tasks. They can also be embedded with communication devices to help tourists navigate and travel.
4. Language Training
Are you a language enthusiast? Language learning can be crucial if you want to excel in the correct pronunciation of words in many languages. Using an MP3 TTS converter, you can listen to the native pronunciation of difficult words in a compatible MP3 file format. By repeatedly listening to the generated MP3 file, you can practice the desired language easily.
5. Helps Visually Disabled
There are some unfortunate groups of people who cannot access textual information due to their disabilities. However, with MP3 TTS converters, they can convert text into speech to absorb the information easily. In this way, they can access digital content in the form of a natural human voice without challenges.
Part 2: The Best 5 Tools to Convert Text to MP3 With the Highest Accuracy
Have you ever tried MP3 TTS converters? This section will discuss the top 5 tools that can convert text to MP3 with accuracy and reliability.
1. Virbo
Virbo is a unique TTS converter offering more than 120 languages and AI voices. You can easily launch this tool on the Web, Windows, iOS, and Android devices. To convert text into MP3, Virbo offers many options for customization. You can select the gender and an AI voice of your desired attire. There are many accents of different languages which you can choose preferably.
Moreover, you would find multiple speaking tones like commercial, lively, natural, and many more on Virbo. The quality of the generated AI voices is professional and clear. It has a friendly interface that can help convert text to speech quickly. Thus, Virbo is an all-in-one tool that can meet all your needs to convert text into high-quality voices in MP3 format.

Get Started Online Free Download
Key Features
- To give your AI voice a virtual presenter, Virbo offers over 150 AI Avatars. The AI Avatars are present in appealing attires with perfect voices.
- The AI script generator of Virbo is integrated with ChatGPT to write your script easily. Through this feature, you can create flawless titles for your videos.
- Virbo can create videos in both portrait and landscape modes. Moreover, it can export video in up to 1080p quality.
Rating
- 85/5
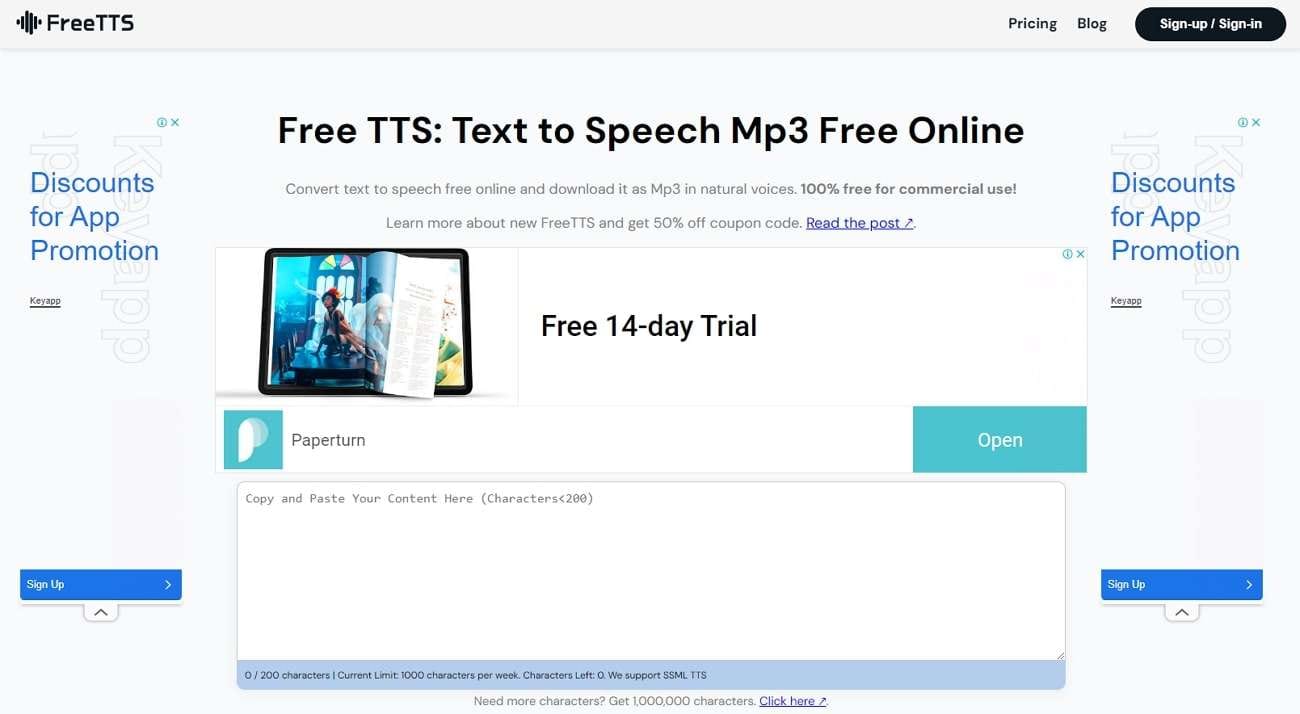
2. FreeTTS
FreeTTS is a basic tool that canconvert text to MP3 efficiently. You can use this tool for commercial purposes with high security. It supports over 50 languages to facilitate a global audience. It is a free-to-use text-to-MP3 converter and does not require registration. By buying its premium plans, you can get 5000 characters for each conversion.
Furthermore, it uses Google machine learning technology to generate speech from text accurately. On this tool, you can also get 24/7 customer support to consult about queries. Moreover, the premium plans support WaveNet, Neural2, and standard Google voices. Thus, you must explore FreeTTS to make MP3 voices for commercial purposes.
Key Features
- This tool has SSML support that can create customized voices. With this support, you can add pauses and emphasis to the generated voice.
- FreeTTS uses high security to protect your data. The servers of this tool automatically delete data after 24 hours.
- With SSML support, you can say the date, characters, time, and unit in a correct manner.
Rating
- 1/5
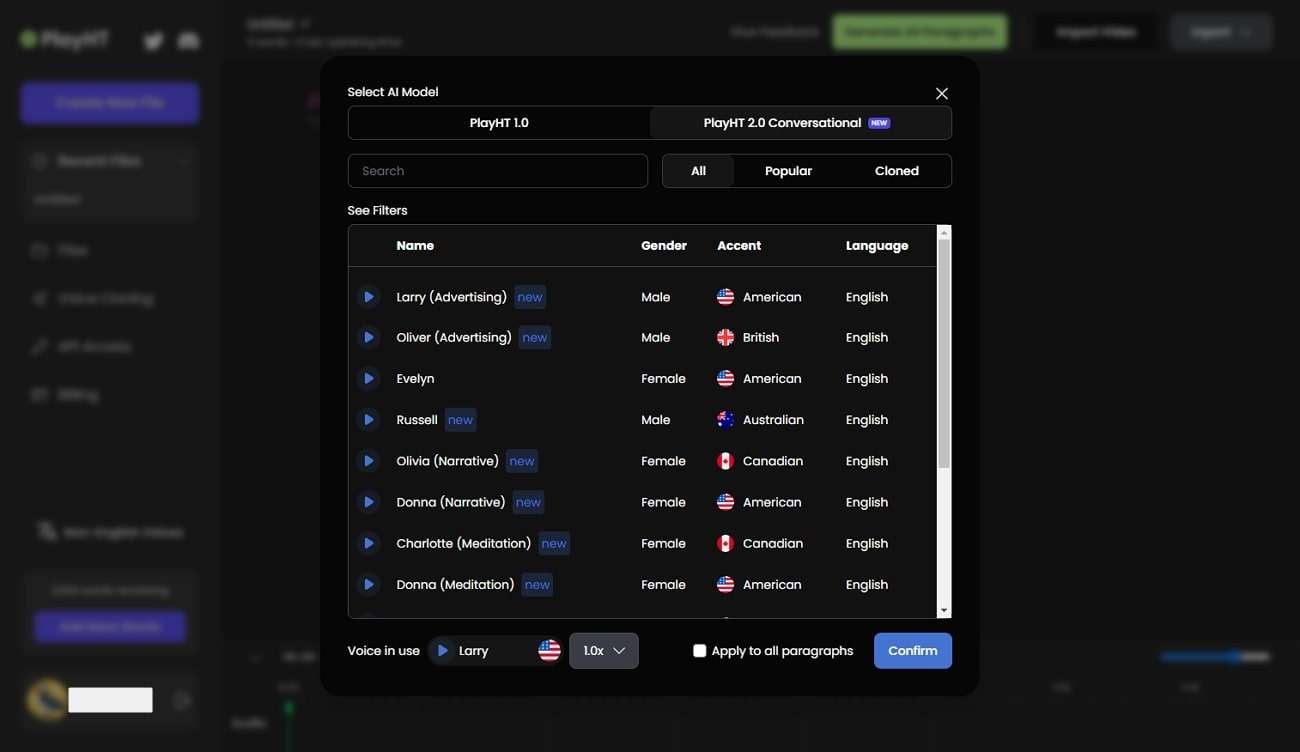
3. PlayHT
PlayHT is an advanced tool supporting more than 800 AI voices. This tool lets you get explainer, conversational, children, and narrative voices. You can also explore character voices that you can add in voiceovers and narrations of the movies. In its extensive library, you can discover more than 100 diverse languages. There are also multiple accents of some common languages according to the nationalities.
Furthermore, you can easily import your script into its text editor. By doing so, you can convert text into speech within a few clicks. Therefore, PlayHT is a renowned tool that can offer excellent results in creating AI voices in MP3.
Key Features
- This tool supports multiple voices in the same MP3 file. Using this feature, you can create conversations between the characters easily.
- It offers custom pronunciations to help you in adding modifications. You can redefine the pronunciations of certain words through this feature.
- You can also alter voice inflections by changing the pitch, rate, and volume of the AI voices.
Rating
- 3/5
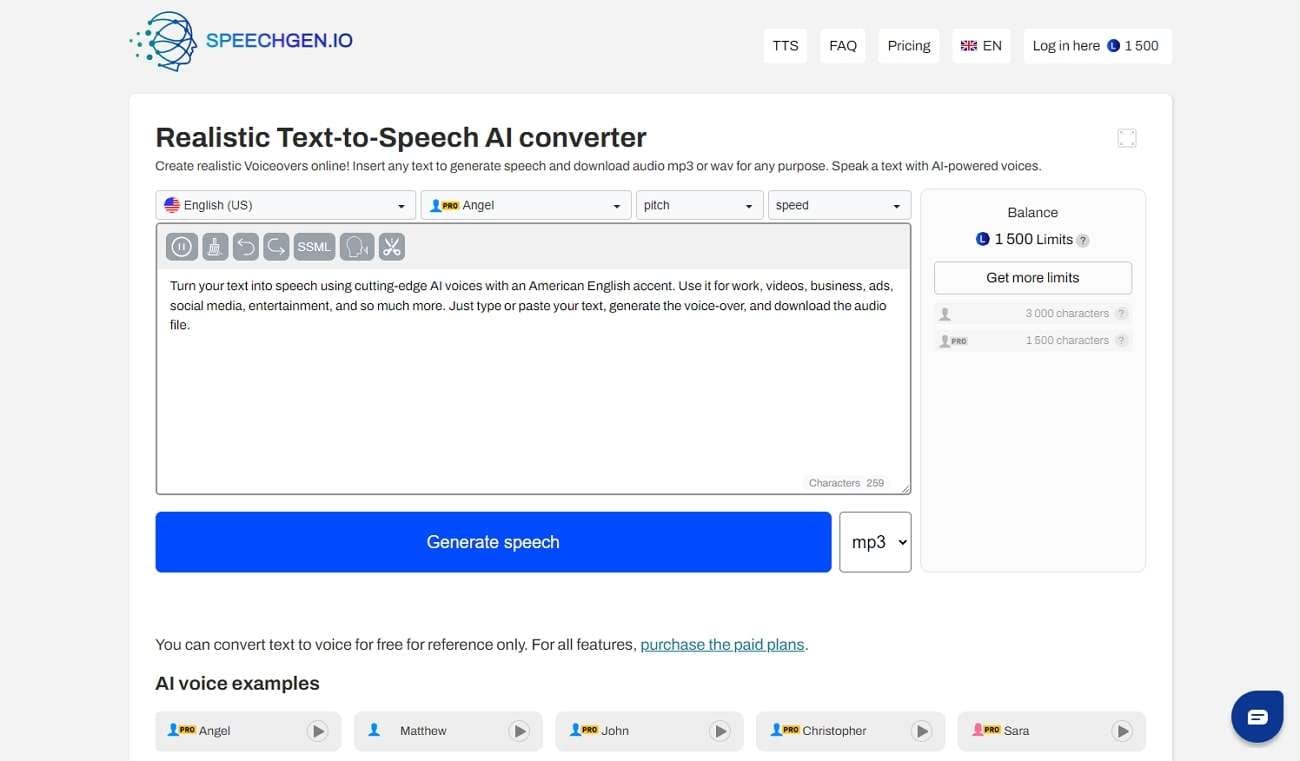
4. SpeechGen.io
SpeechGen.io is a powerful tool that can generate realistic voices from your textual script. You can find over 270 natural AI voices on this tool with accurate accents. The interface of this tool lets you test the AI voices for free. After listening to the voices, you can select your favorite AI voice from the provided options.
Furthermore, you can set the output settings of the AI voice according to your desire. You can modify speed, pitch, volume, stress, and intonation on this tool. Thus, it gives you complete freedom to create a customized voice in MP3 file format. Along with supporting MP3 file format, it also shows compatibility with WAV and OGG.
Key Features
- Thistext-to-speech generator MP3 shows support for all the famous editing software. The supported editing programs are Audacity, Adobe, DaVinci Resolve, Apple Motion, iMovie, etc.
- You can share your MP3 audio file with your colleagues with a link. By tapping on the link, your friends can listen to the AI voice easily.
- The cloud server of this tool saves the history of your AI voices and scripts in a secure manner. You can also create a “Favorite” folder to keep all your AI voices intact.
Rating
- 5/5
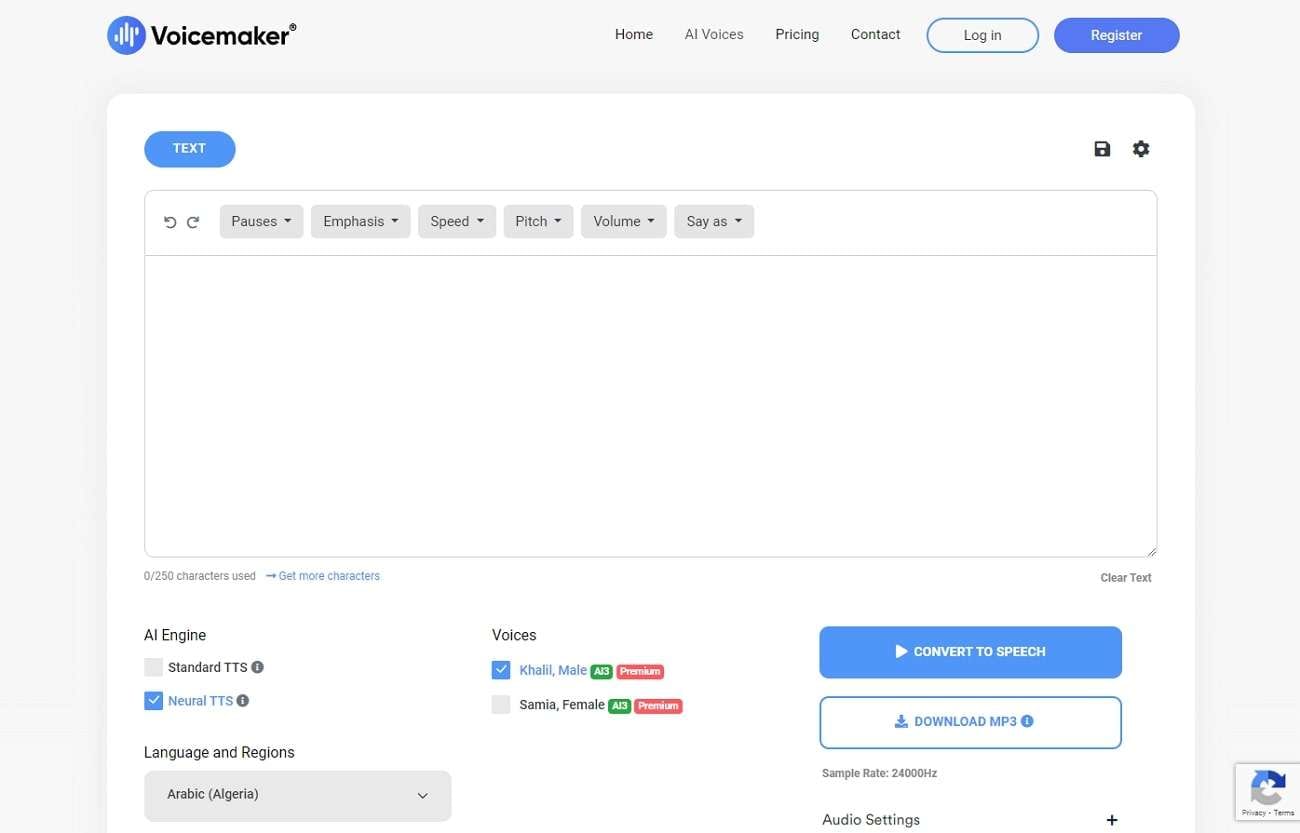
5. Voicemaker
Voicemaker is a famous online platform that canconvert text into MP3 with high audio quality. It contains various effects that let you add human emotions to your AI voice. From the audio settings, you can also determine the volume, pitch, and sample rate of your AI. Furthermore, it supports more than 1000 AI voices that you can explore in its library.
The supported languages are more than 130 to offer you diversity. To find your desired AI voice, you can conduct a search through country, language, and gender. Therefore, Voicemaker is a popular TTS converter as it can produce accurate AI voices from the given text.
Key Features
- This tool has two AI engines: Standard and Neural. Both engines have different AI voices in various accents.
- The voice settings let you adjust the sliders of voice speed and volume accordingly. You can also reset the basic settings quickly.
- You can create voice profiles by buying premium subscriptions. Moreover, it offers cloud storage of up to 10GB in paid plans.
Rating
- 25/5
Conclusion
MP3 voice makers convert the textual content into an audible MP3 file format. These MP3 TTS converters can significantly benefit you in improving productivity, language learning, and making information accessible. Through this article, you came across the famous text-to-speech MP3 tools that can produce excellent results. Thus, you can read this guide to find the besttext-to-speech generator MP3 .
[Selected] Overdub Voice with AI: Virbo At Its Finest
Recently, AI overdub voice cloning technology has significantly impacted the entertainment industry. Voice cloning technology is used for content creation and professional voiceovers. After the integration, overdubbing becomes a tool to streamline the work of professionals. Also, you can use this overdubbing technology to create voiceovers for advertisements or presentations. This article is about the different methods and tools used to overdub voice using AI technology.
Part 1: Featured Overdub Voice with AI Using Wondershare Virbo
Many tools offer a cost-effective solution to overdub AI voice with the latest technology. One is Wondershare Virbo , which provides a unique and simple procedure for providing AI voice services. This tool offers online and offline solutions to overdub voices with the integration of AI. The overdub feature of Virbo allows users to generate AI voice from text.
It provides you the flexibility to choose the gender of created AI voices. Furthermore, you can choose the language and accent while generating AI voices. All this diversity makes this tool valuable for your audio recording purposes. Users can get ultra-realistic voice cloning with the AI technology of the tool.
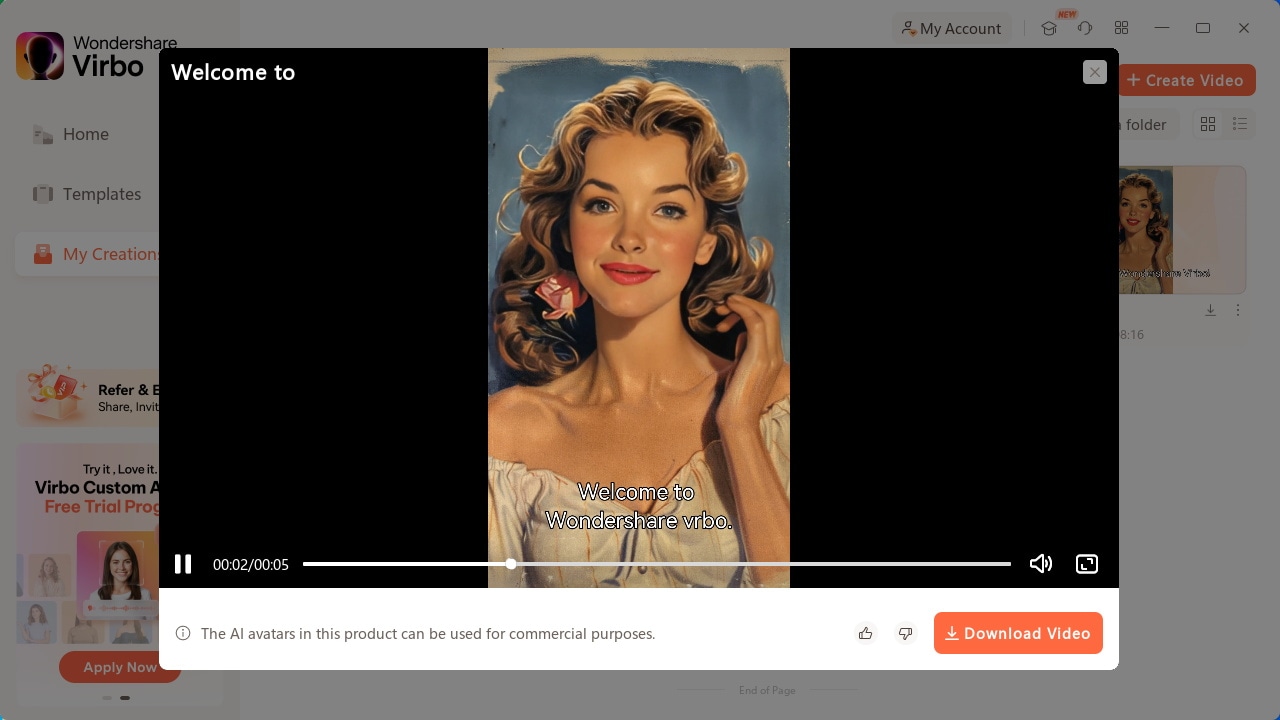
Generate Engaging
AI Video in Minutes!
Easily convert text into professional spokesperson videos in over 120+ voices & languages in minutes.
Generate AI Video Free Generate AI Video Now


01 Key Features Marking Wondershare Virbo’s Greatness
- AI Avatar: Virbo offers the AI Avatar feature to give a human touch to your video. With the help of these AI avatar videos, you can engage with your audience better. It provides diversity through 300+ real human avatars in multiple languages and voices.
- AI Script Generator: The tool is empowered by AI technology to generate the script according to your needs. This AI script generator feature saves time and effort and creates the script effortlessly. A cost-effective solution for video editing to fulfill marketing and educational purposes.
- AI Video Translator: Besides voice and script generator, the tool provides the AI video translator feature. With this feature, you can translate video content into 20+ languages. Users can do global video marketing with the help of this feature by reducing the language barrier.
- AI Talking Photo: Give your photo a living narration with this AI Talking Photo feature of Virbo. You can make your photos interactive by adding voice clips to them. It makes the storytelling process interesting and innovative for people.
02 Steps To Generate Overdub Voice With AI Using Wondershare Virbo
Virbo can help the content creator to create attractive narration and voiceovers. As we discussed, this AI overdub tool helps generate voice with its AI technology. Follow the step-by-step guide to generate an overdubbed AI voice with Wondershare Virbo.
Step 1 Launch Wondershare Virbo to Create a Video
Launch and install Wondershare Virbo to get access to the voice cloning feature. On the main interface, choose your avatar and click the “Create Video” button. After this, choose the video’s aspect ratio and hit the “Create Video” button again to start the process.
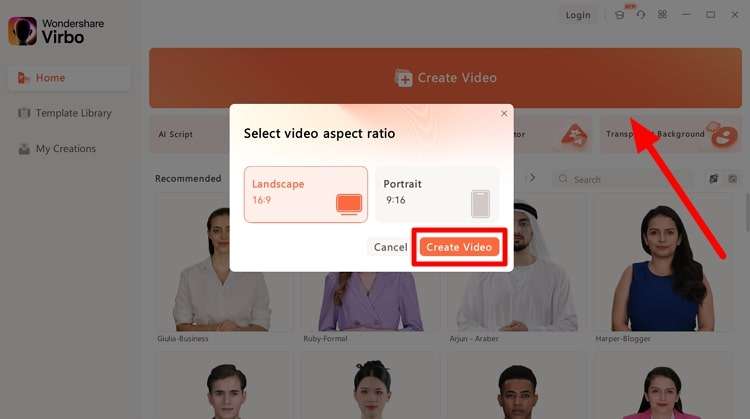
Get Started Online Download APP Now Free Download
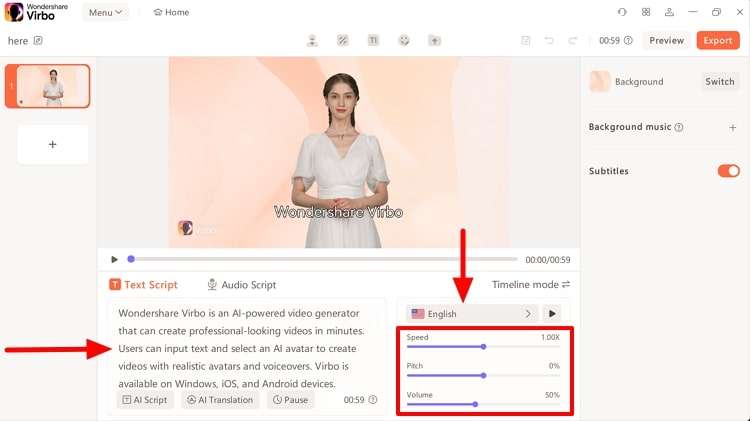
Step 2 Add Script to Utilize Overdub Voice
Now, a new window will open with your selected avatar. Afterward, write your narration or voiceover text in the “Text Script” section. Adjust the pitch, speed, and volume of your avatar voice as needed. This will personalize the overdubbed voice of your AI avatar.
Get Started Online Download APP Now Free Download
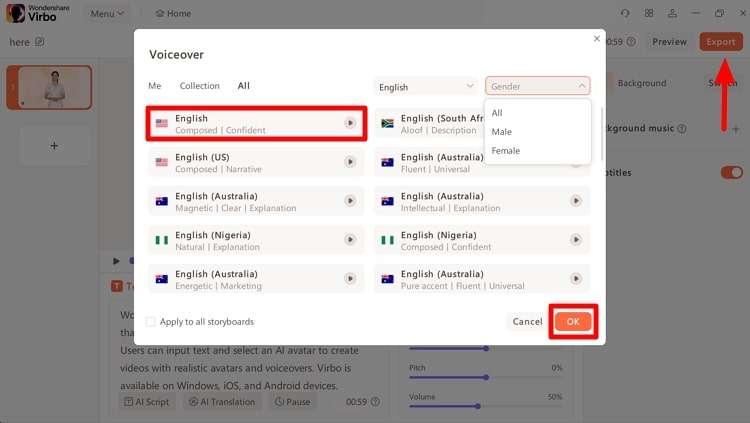
Step 3 Adjust the Voiceover Setting and Export the Video
After this, adjust the voice settings by pressing the “Language” button over the volume setting. Now, you get the pop-up window to choose the language, gender, and narrator of the video. Finally, click the “OK” button to save the video settings. In the end, hit the “Export” button on the top right side to save the overdubbed video on your device.
Get Started Online Download APP Now Free Download
Part 2: Overdub With Descript: Another Platform To Offer Voice Cloning
Another platform that offers the voice cloning service is Descript . This tool provides a specific overdub feature that assists you during voice cloning. Users do not need to re-record if they miss something in the voiceover. The Descript overdub voice cloning feature allows you to replace incorrect audio by altering the script.
Also, it reduces the need to spend hours recording and editing your audio files. You get a seamless result that is more natural and imperfection-free. With its efficient overdub voice feature, it matches the different vocal performances.
01 Key Features of Descript
- With this podcast editing software, you can record and publish the podcast effortlessly. The built-in remote recording studio can create high-quality video and audio.
- Descript has a transcription feature to transcribe automatically with high accuracy. It can transcribe audio in 22 different languages and help you collaborate.
- Users can make high-resolution screen recordings with the feature of this tool. This screen recording feature also gives the link to share the recorded video with others.
- Generate your personal voice clone with the help of the AI voice features of the tool. Plus, this feature has a library of life-like AI voices for its users.
02 Step-by-Step Guide to Use Overdub Feature of Descript
An individual can record the wrong or awkward voice while doing a voiceover. There’s no need to re-record it, as the Overdub feature of Descript has a solution for you. Let’s go through the step-by-step guide to using the overdub feature of this Overdub AI voice tool:
Step 1 Start Creating Project in Descript
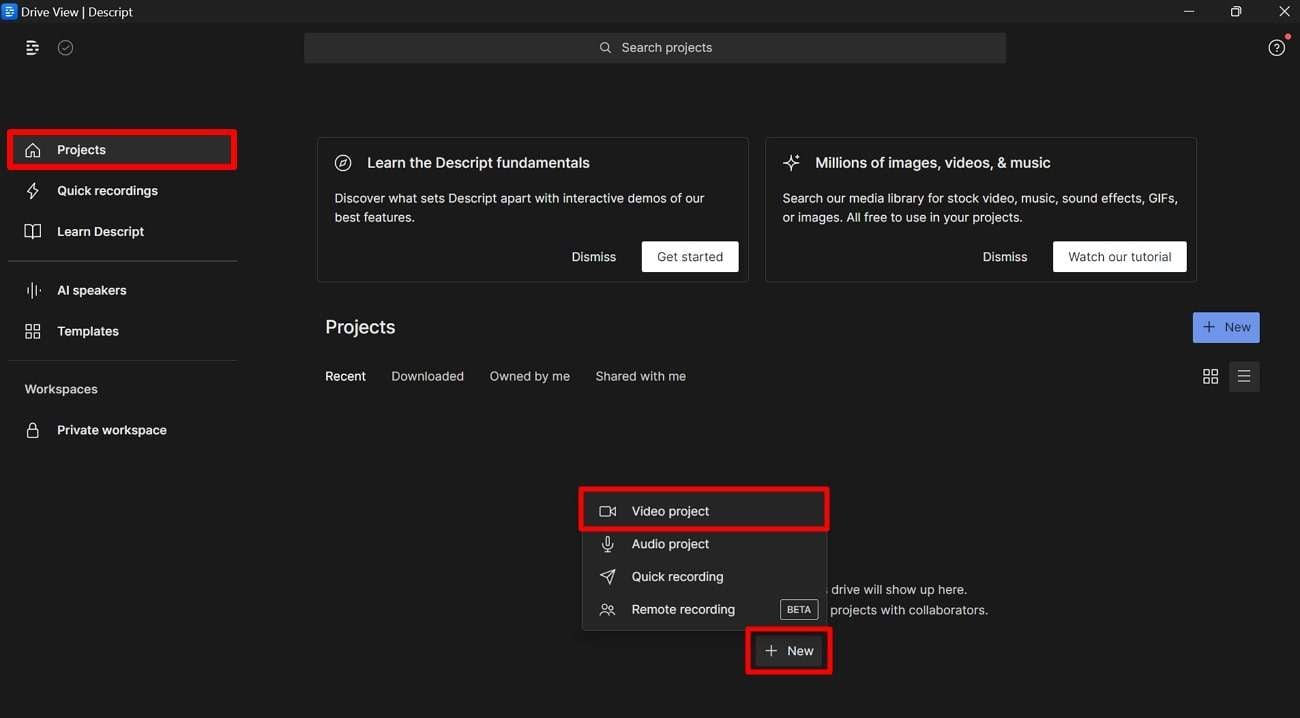
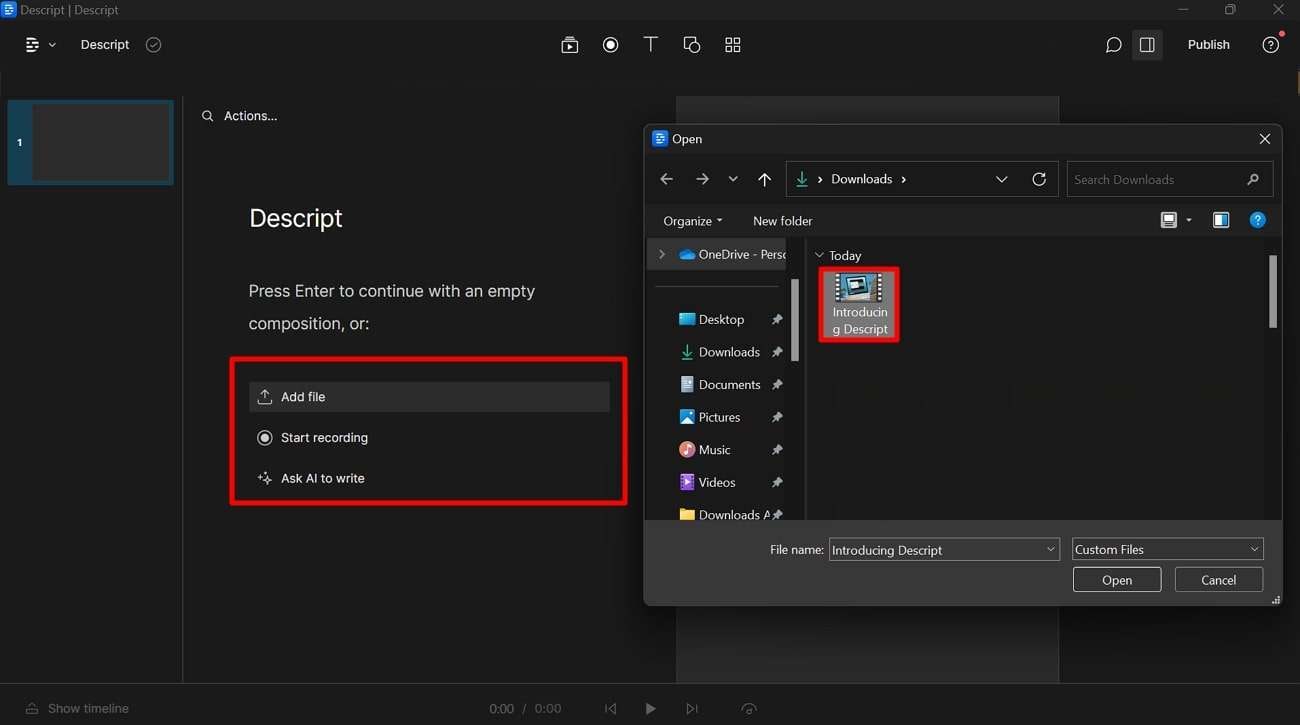
First, download the Descript software and open the interface to click the “Projects” tab on the left-side panel. Press the “+New” button to get the extended window. Now, select the “Video Project” option to open a new window on the tool.
Step 2 Import Video Content into Descript
After that, write the project name above the available different options. Click the “Add File” option to open the dialogue box. After this, select the desired video content to import them.
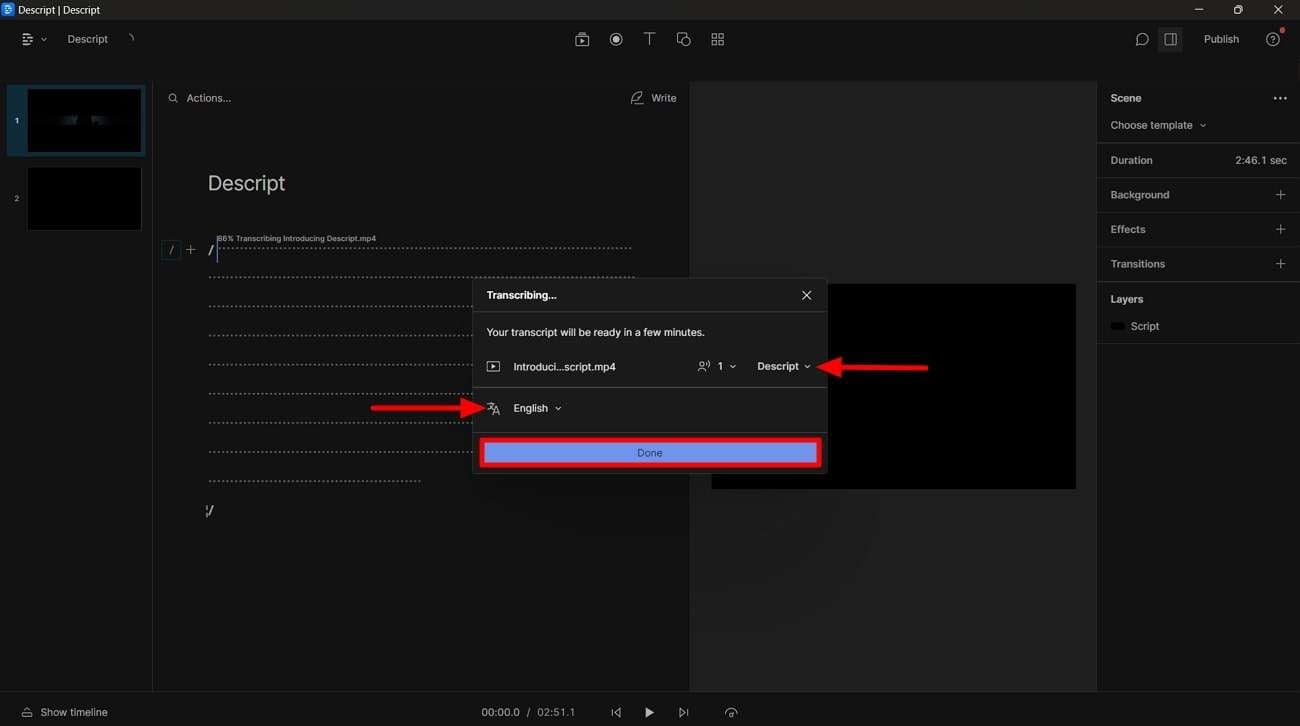
Step 3 Define Language and Speaker
Now, you get the “Transcribing” screen when the desired video content gets uploaded. Here, you can choose the language and speaker of the video. Once you select the desired option for the video, save it by hitting the “Done” button.
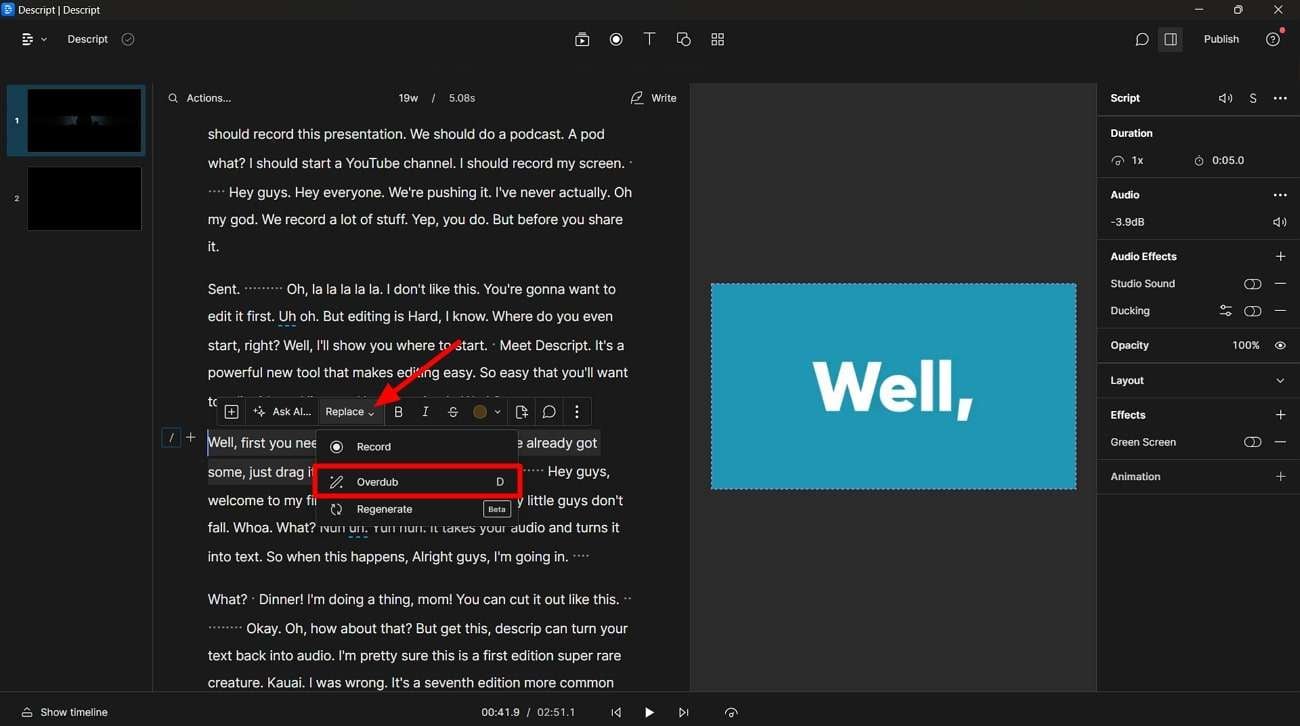
Step 4 Overdub Video Text to Change
Afterward, change the text you want to overdub in your prerecorded video. Select the text you wish to change in the script to open the pop-up window. Click the “Replace” dropdown menu and choose “Overdub” to make changes to the video.
Part 3: Online Solutions to Overdub Voice With Professionalism
You should be familiar with the fact that Wondershare Virbo offers an online service for creating videos with AI. Plus, you can use its AI voice feature to clone your voice with ease. However, other platforms also offer online overdub AI services if you are looking for more options. The following are some of the top AI overdub online platforms.
Best Online Solutions for Voice Overdubbing
1. VEED.io
VEED.io has overdub technology to create an AI voice clone. If you are a social media influencer, use this tool to voiceover your videos personally. This tool allows you to utilize your AI-generated overdub voiceovers to create video content for all types of entertainment. With the help of this, you can streamline your video and audio content creation.
2. Dubdub
Dubdub is included in the list of AI overdub online tools that offer diversity in voice cloning services. It provides overdubbing services to users in 40+ languages. You can get the best experience with the text-aware translation feature of the tool. The tool supports all formats of audio, video, and text files for overdubbing. Users can get a preview of overdubbed videos before downloading through this tool.
3. Speechify
Content creators can use Speechify to dub the video and create content. It is an overdub AI voice tool that offers diversity in 20+ languages. Being a podcaster, you can dub your prerecorded video with the AI technology of the tool. You only need to add the text to convert it into the voice with its text-to-speech feature.
Conclusion
We concluded that AI technology helps in overdubbing and voice cloning functionalities. Users can overdub the video or audio file with overdub AI technology. Many offline and online tools offer overdub voice features for error-free audio content creation. However, Wondershare Virbo is the best tool that assists users in utilizing the AI voice feature to overdub any content.
Launching Your Live Room
Launching Your Live Room
Explore step-by-step instructions on decorating your space, uploading local images and videos, adding engaging AI interactions, etc. Elevate your streaming experience and captivate your audience with a seamlessly executed live room. Dive into our comprehensive guide now!
02Uploading Local Images and Videos
07AI Intelligent Script Generation
11Starting/Ending the Live Broadcast
Decorating Your Live Room
Decoration Guidance
- Click on the product homepage and create a blank live room to initiate a new live session.

Create a blank live room
- Upon creating a blank live room, the live room editing page will open. The left side serves as the operation area, the right side as the canvas area, and the materials area is located above.

Livestream room navigation
- Click on the templates to use pre-designed combinations of background, virtual hosts, and stickers.

Select a template
- Customize the background from the background library. During the live broadcast, only one background can be used.

Livestream room customization
- Choose a virtual host from the virtual host library. Only one virtual host can be used during the live session.
![]()
Choose a virtual host
- Add stickers from the sticker library. Multiple stickers can be used during the live broadcast.
- After selecting materials, adjust their position and size in the canvas area. Right-click to modify layers, copy, or delete materials.
Uploading Local Images and Videos
Upload background images or videos
- Upload: Click Background -> Upload Background -> Select file to upload. Materials will be displayed in “My Background” after uploading.

Upload Background
- Apply: Click Background -> My Background, then click on the material to use it on the canvas.
- Delete: Hover over the material and click the delete icon to remove it.

Delete Background
Note
Background upload requirements:
- Image and video dimensions should be 9:16
- Image formats: JPG/JPEG/PNG
- Video formats: MP4/MOV
- Resolution should not exceed 1080P
- Video duration should not exceed 30 minutes
- File size should not exceed 1GB
Upload sticker images or videos
- Upload: Click Sticker -> Upload Sticker -> Select file to upload. Materials will be displayed in “My Sticker” after uploading.

Upload Sticker
- Apply: Click Sticker -> My Sticker, then click on the material to use it on the canvas.
- Delete: Click Sticker -> My Sticker, hover over the material, click the delete icon to remove it.

Delete Sticker
Note
Sticker upload requirements:
- Image and video dimensions are flexible.
- Image formats: JPG/JPEG/PNG
- Video formats: MP4/MOV
- Resolution should not exceed 1080P
- Video duration should not exceed 30 minutes
- File size should not exceed 1GB
Text-Driven Live Room
Script Guidance
- Input script text: Copy and paste your script into the script dialogue box.

Text Scripts Inset
- Choose a matching tone: Click the voice-over entrance above, select a suitable tone, and preview it.
- Preview: Click the “Preview” button below the text to listen.
Audio-Driven Live Room
Audio Guidance
- Upload audio: Click Script -> Audio -> Upload local voice and upload the local file.

Upload Audio
- Preview audio: After uploading, click to preview the audio.

Preview Audio
- Audio sorting: Hold and drag to sort the audio files.

Audio sorting
- Audio sorting: Hold and drag to sort the audio files.

Modifying Live Room Name
Method Guidance
- Method 1: Click the edit button in the upper-left corner of the edit page to rename the live room.

Rename Livestream Room
- Method 2: Product homepage -> My Live Rooms -> Click on the more options for an individual live room -> Choose Rename.
Adding AI Identification
Step Guidance
- On the live room editing page, click on the checkbox before the AI identification to enable or disable it.
AI Intelligent Script Generation
Generation Guidance
- Click the “AI Intelligent Script” button below the script, a popup will appear.
- Enter your product name (mandatory), selling points (optional), promotional information (optional), select language and style, then click generate.

AI Script
- The generated result can be further modified, click “Use” to add it to the script dialogue box.
AI Translation
Translation Guidance
- Click the “AI Translation” button below the script, a popup will appear.
- Place the text to be translated on the left, click the middle arrow to select the language for translation (e.g., English), and click translate.

AI Translation
- The generated result can be further modified, click “Use” to add it to the script dialogue box.

AI Translation Result
Manual Interaction
Microphone Interaction
- Operational Flow:
- Click Manual Interaction -> Microphone, and select the microphone device.
- Speak into the microphone and observe the sound wave status.
- Open “Start Live,” wait for the appearance of the virtual host image, and click “Open Mic Takeover.” The virtual host’s mouth will be closed, and your voice will drive the virtual host to speak.
- After speaking, click “End Takeover,” and the virtual host will resume reading the scripted dialogue.
- Click Manual Interaction -> Microphone, and select the microphone device.
- Grant Browser Microphone Access:
- Google Chrome:
*Open Chrome, click the settings icon in the top right.
* Click “Settings,” open the settings page. Select “Privacy and Security” and then click “Site Settings.”
*Enter the site settings page, click “Microphone.”
* On the microphone authorization page, select that the site can request the use of your microphone.
* After these settings, when the browser needs to use the camera or microphone, a device request box will pop up on the page. Select “Allow.” - Mozilla Firefox:
*Open Firefox, click the settings icon in the top right, and click “Settings.”
* Open the settings page, click “Privacy & Security,” and find “Microphone Permissions.” Click “Settings” next to “Microphone.”
*Enter the settings page, add the site that requests the use of your microphone to the list, and click “Save Changes.”
* After these settings, when the browser needs to use the camera or microphone, a device request box will pop up on the page. Select “Allow.” - Sogou Browser:
*Open Sogou Browser, click the settings icon in the top right, and click “Options.”
* Open the options page, click “Advanced,” find “Privacy - Browsers on the Mac System:
*Locate “System Preferences” on your Mac dock and click the icon. Once opened, find “Security & Privacy” and click to open.
* On the “Security & Privacy” page, select “Privacy,” then click on “Microphone” and set the applications that need to use the microphone to “Allow.”
- Google Chrome:
Text Interaction
- Click on “Artificial Interaction” and enter interaction scripts in the input box below.
- Click “Add Text” to add it to the interaction list. After starting the live broadcast, each interaction script will have a send button.

Text Interactionn
- Click “Send” to trigger the AI to speak according to the interaction script.
Intelligent Interaction
Note
The current intelligent interaction feature only supports Alibaba International. If you are streaming on other platforms, you can skip this step.
Setting Entrance
- On the live broadcast page, click on “Intelligent Interaction,” select the live platform, and the supported intelligent interaction features will be randomly displayed.
Q&A Library Settings
- Creating a New Q&A:
- On the product homepage, click on Q&A Library - Add Q&A, and a popup window will appear.
- Fill in the rule name, keywords, reply text, and upload a reply video. Click Save.
Note
Rule Name: Name the rule for easy identification.
Keywords: If a viewer’s question in the live room contains any of these keywords, it will trigger the AI to answer.
Reply Content: You can add up to 5 replies. Include variables like [Viewer’s Nickname] and [Viewer’s Country] for personalized responses.
Sequential Reply: Replies in sequence when triggered.
Random Reply: Randomly selects a reply when triggered.
Reply Video: If configured, the video will be displayed at the specified position until the AI’s reply ends.
- Adjusting Q&A Activation Status:
- Click Q&A Library - Switch to close or open the Q&A rule. When closed, the Q&A rule will not take effect after the live broadcast starts.
- Turning on Q&A Library Switch in the Live Room:
- On the live broadcast editing page, click Intelligent Interaction - Platform, select “Alibaba International,” and turn on the Q&A Library switch. This must be done after starting the live broadcast and capturing the barrage for the function to work.
Greeting Rules Settings
- Greeting Content: You can add up to 5 replies, including variables like [Viewer’s Nickname] and [Viewer’s Country].
- Sequential Reply: Replies in sequence when triggered.
- Random Reply: Randomly selects a reply when triggered.
- On the live broadcast editing page, click Intelligent Interaction - Platform, select “Alibaba International,” turn on the Greeting switch, and click the edit icon to open the editing window. Fill in the reply text and click Save.
Sending Business Cards and Product Catalogs
- On the live broadcast editing page, click Intelligent Interaction - Platform, select “Alibaba International,” turn on the “Send Business Cards” switch, and turn on the “Send Product Catalogs” switch.
Note
These functions will only take effect after starting the live broadcast and capturing the barrage.
How to Start Live Barrage Capture
- Start Broadcasting in Virbo Live
- Follow the steps for “Start/End Broadcast” on the live broadcast editing page.
- Install the Plugin in Chrome
- Ensure Chrome is up to date, then download the plugin from the provided link . After downloading, unzip locally.
- Configure the Plugin in Chrome
- Open Chrome, go to Settings - Extensions - Manage Extensions, enable Developer mode, click “Load Unpacked,” and select the unzipped folder. Enable “Allow in incognito mode” in the plugin details.
- Copy the Live Control Page Link
- Copy the link of your live control page (web version) from the live platform. Paste the link into the live broadcast editing page under Intelligent Interaction - Live Room Link Input, then click “Start Capturing.”
Note
Alibaba International currently supports automatic Q&A, automatic greetings, automatic business card sending, and automatic product catalog sending. You can turn on the corresponding switches and then configure the detailed settings for each item.
Starting/Ending the Live Broadcast
Starting the Live Broadcast
- On the live broadcast editing page, click “Start Broadcasting.”
- The AI live broadcast window will appear shortly after, displaying the AI live broadcast.
Using Your Broadcasting Partner or OBS
Note
Keep the AI live broadcast window open on the desktop during the broadcast, or it will not broadcast properly.
- Open your broadcasting partner or OBS, add a window, select the Wondershare VVB (Live Version) live window.
- Click “Start Broadcasting.” Use Alt + mouse to crop out the web bar or use the zoom function to remove it.
- During the live broadcast, you can only modify the “Artificial Interaction” function; other broadcast settings cannot be changed.
Ending the Broadcast
- When concluding the live broadcast, initiate the termination of the live stream on the platform’s broadcasting partner first, followed by clicking the “End Live” button on Virbo Live to finalize the shutdown process.
02Uploading Local Images and Videos
07AI Intelligent Script Generation
11Starting/Ending the Live Broadcast
Decorating Your Live Room
Decoration Guidance
- Click on the product homepage and create a blank live room to initiate a new live session.
Create a blank live room
- Upon creating a blank live room, the live room editing page will open. The left side serves as the operation area, the right side as the canvas area, and the materials area is located above.
Livestream room navigation
- Click on the templates to use pre-designed combinations of background, virtual hosts, and stickers.
Select a template
- Customize the background from the background library. During the live broadcast, only one background can be used.
Livestream room customization
- Choose a virtual host from the virtual host library. Only one virtual host can be used during the live session.
![]()
Choose a virtual host
- Add stickers from the sticker library. Multiple stickers can be used during the live broadcast.
- After selecting materials, adjust their position and size in the canvas area. Right-click to modify layers, copy, or delete materials.
Uploading Local Images and Videos
Upload background images or videos
- Upload: Click Background -> Upload Background -> Select file to upload. Materials will be displayed in “My Background” after uploading.
Upload Background
- Apply: Click Background -> My Background, then click on the material to use it on the canvas.
- Delete: Hover over the material and click the delete icon to remove it.
Delete Background
Note
Background upload requirements:
- Image and video dimensions should be 9:16
- Image formats: JPG/JPEG/PNG
- Video formats: MP4/MOV
- Resolution should not exceed 1080P
- Video duration should not exceed 30 minutes
- File size should not exceed 1GB
Upload sticker images or videos
- Upload: Click Sticker -> Upload Sticker -> Select file to upload. Materials will be displayed in “My Sticker” after uploading.
Upload Sticker
- Apply: Click Sticker -> My Sticker, then click on the material to use it on the canvas.
- Delete: Click Sticker -> My Sticker, hover over the material, click the delete icon to remove it.
Delete Sticker
Note
Sticker upload requirements:
- Image and video dimensions are flexible.
- Image formats: JPG/JPEG/PNG
- Video formats: MP4/MOV
- Resolution should not exceed 1080P
- Video duration should not exceed 30 minutes
- File size should not exceed 1GB
Text-Driven Live Room
Script Guidance
- Input script text: Copy and paste your script into the script dialogue box.
Text Scripts Inset
- Choose a matching tone: Click the voice-over entrance above, select a suitable tone, and preview it.
- Preview: Click the “Preview” button below the text to listen.
Audio-Driven Live Room
Audio Guidance
- Upload audio: Click Script -> Audio -> Upload local voice and upload the local file.
Upload Audio
- Preview audio: After uploading, click to preview the audio.
Preview Audio
- Audio sorting: Hold and drag to sort the audio files.
Audio sorting
- Audio sorting: Hold and drag to sort the audio files.
Modifying Live Room Name
Method Guidance
- Method 1: Click the edit button in the upper-left corner of the edit page to rename the live room.
Rename Livestream Room
- Method 2: Product homepage -> My Live Rooms -> Click on the more options for an individual live room -> Choose Rename.
Adding AI Identification
Step Guidance
- On the live room editing page, click on the checkbox before the AI identification to enable or disable it.
AI Intelligent Script Generation
Generation Guidance
- Click the “AI Intelligent Script” button below the script, a popup will appear.
- Enter your product name (mandatory), selling points (optional), promotional information (optional), select language and style, then click generate.
AI Script
- The generated result can be further modified, click “Use” to add it to the script dialogue box.
AI Translation
Translation Guidance
- Click the “AI Translation” button below the script, a popup will appear.
- Place the text to be translated on the left, click the middle arrow to select the language for translation (e.g., English), and click translate.
AI Translation
- The generated result can be further modified, click “Use” to add it to the script dialogue box.
AI Translation Result
Manual Interaction
Microphone Interaction
- Operational Flow:
- Click Manual Interaction -> Microphone, and select the microphone device.
- Speak into the microphone and observe the sound wave status.
- Open “Start Live,” wait for the appearance of the virtual host image, and click “Open Mic Takeover.” The virtual host’s mouth will be closed, and your voice will drive the virtual host to speak.
- After speaking, click “End Takeover,” and the virtual host will resume reading the scripted dialogue.
- Click Manual Interaction -> Microphone, and select the microphone device.
- Grant Browser Microphone Access:
- Google Chrome:
*Open Chrome, click the settings icon in the top right.
* Click “Settings,” open the settings page. Select “Privacy and Security” and then click “Site Settings.”
*Enter the site settings page, click “Microphone.”
* On the microphone authorization page, select that the site can request the use of your microphone.
* After these settings, when the browser needs to use the camera or microphone, a device request box will pop up on the page. Select “Allow.” - Mozilla Firefox:
*Open Firefox, click the settings icon in the top right, and click “Settings.”
* Open the settings page, click “Privacy & Security,” and find “Microphone Permissions.” Click “Settings” next to “Microphone.”
*Enter the settings page, add the site that requests the use of your microphone to the list, and click “Save Changes.”
* After these settings, when the browser needs to use the camera or microphone, a device request box will pop up on the page. Select “Allow.” - Sogou Browser:
*Open Sogou Browser, click the settings icon in the top right, and click “Options.”
* Open the options page, click “Advanced,” find “Privacy - Browsers on the Mac System:
*Locate “System Preferences” on your Mac dock and click the icon. Once opened, find “Security & Privacy” and click to open.
* On the “Security & Privacy” page, select “Privacy,” then click on “Microphone” and set the applications that need to use the microphone to “Allow.”
- Google Chrome:
Text Interaction
- Click on “Artificial Interaction” and enter interaction scripts in the input box below.
- Click “Add Text” to add it to the interaction list. After starting the live broadcast, each interaction script will have a send button.
Text Interactionn
- Click “Send” to trigger the AI to speak according to the interaction script.
Intelligent Interaction
Note
The current intelligent interaction feature only supports Alibaba International. If you are streaming on other platforms, you can skip this step.
Setting Entrance
- On the live broadcast page, click on “Intelligent Interaction,” select the live platform, and the supported intelligent interaction features will be randomly displayed.
Q&A Library Settings
- Creating a New Q&A:
- On the product homepage, click on Q&A Library - Add Q&A, and a popup window will appear.
- Fill in the rule name, keywords, reply text, and upload a reply video. Click Save.
Note
Rule Name: Name the rule for easy identification.
Keywords: If a viewer’s question in the live room contains any of these keywords, it will trigger the AI to answer.
Reply Content: You can add up to 5 replies. Include variables like [Viewer’s Nickname] and [Viewer’s Country] for personalized responses.
Sequential Reply: Replies in sequence when triggered.
Random Reply: Randomly selects a reply when triggered.
Reply Video: If configured, the video will be displayed at the specified position until the AI’s reply ends.
- Adjusting Q&A Activation Status:
- Click Q&A Library - Switch to close or open the Q&A rule. When closed, the Q&A rule will not take effect after the live broadcast starts.
- Turning on Q&A Library Switch in the Live Room:
- On the live broadcast editing page, click Intelligent Interaction - Platform, select “Alibaba International,” and turn on the Q&A Library switch. This must be done after starting the live broadcast and capturing the barrage for the function to work.
Greeting Rules Settings
- Greeting Content: You can add up to 5 replies, including variables like [Viewer’s Nickname] and [Viewer’s Country].
- Sequential Reply: Replies in sequence when triggered.
- Random Reply: Randomly selects a reply when triggered.
- On the live broadcast editing page, click Intelligent Interaction - Platform, select “Alibaba International,” turn on the Greeting switch, and click the edit icon to open the editing window. Fill in the reply text and click Save.
Sending Business Cards and Product Catalogs
- On the live broadcast editing page, click Intelligent Interaction - Platform, select “Alibaba International,” turn on the “Send Business Cards” switch, and turn on the “Send Product Catalogs” switch.
Note
These functions will only take effect after starting the live broadcast and capturing the barrage.
How to Start Live Barrage Capture
- Start Broadcasting in Virbo Live
- Follow the steps for “Start/End Broadcast” on the live broadcast editing page.
- Install the Plugin in Chrome
- Ensure Chrome is up to date, then download the plugin from the provided link . After downloading, unzip locally.
- Configure the Plugin in Chrome
- Open Chrome, go to Settings - Extensions - Manage Extensions, enable Developer mode, click “Load Unpacked,” and select the unzipped folder. Enable “Allow in incognito mode” in the plugin details.
- Copy the Live Control Page Link
- Copy the link of your live control page (web version) from the live platform. Paste the link into the live broadcast editing page under Intelligent Interaction - Live Room Link Input, then click “Start Capturing.”
Note
Alibaba International currently supports automatic Q&A, automatic greetings, automatic business card sending, and automatic product catalog sending. You can turn on the corresponding switches and then configure the detailed settings for each item.
Starting/Ending the Live Broadcast
Starting the Live Broadcast
- On the live broadcast editing page, click “Start Broadcasting.”
- The AI live broadcast window will appear shortly after, displaying the AI live broadcast.
Using Your Broadcasting Partner or OBS
Note
Keep the AI live broadcast window open on the desktop during the broadcast, or it will not broadcast properly.
- Open your broadcasting partner or OBS, add a window, select the Wondershare VVB (Live Version) live window.
- Click “Start Broadcasting.” Use Alt + mouse to crop out the web bar or use the zoom function to remove it.
- During the live broadcast, you can only modify the “Artificial Interaction” function; other broadcast settings cannot be changed.
Ending the Broadcast
- When concluding the live broadcast, initiate the termination of the live stream on the platform’s broadcasting partner first, followed by clicking the “End Live” button on Virbo Live to finalize the shutdown process.
Talking Photo
Talking Photo
Have you ever wanted to create a video using your favorite photos to express your ideas? Virbo’s Talking Photo can fulfill your wish! This feature allows you to make photos speaking or even generate videos using preset images or photos uploaded from your device. By following our instructions, you will quickly learn how to operate.
02Use Your Still Photos to Create Videos
Way 1: Simply Bring Your Photos to Life with 2 Steps
Simply input your script (or use Virbo’s AI feature to generate one), choose the voice-over, and export the video to achieve the desired effect! You can also record audio online or upload your own recordings to make your photos speak.
Step 1. Choose Talking Photo
Download and install Wondershare Virbo on your computer and click “Talking Photo” to bring photos to life.
Make Photos Speak Make Photos Speak
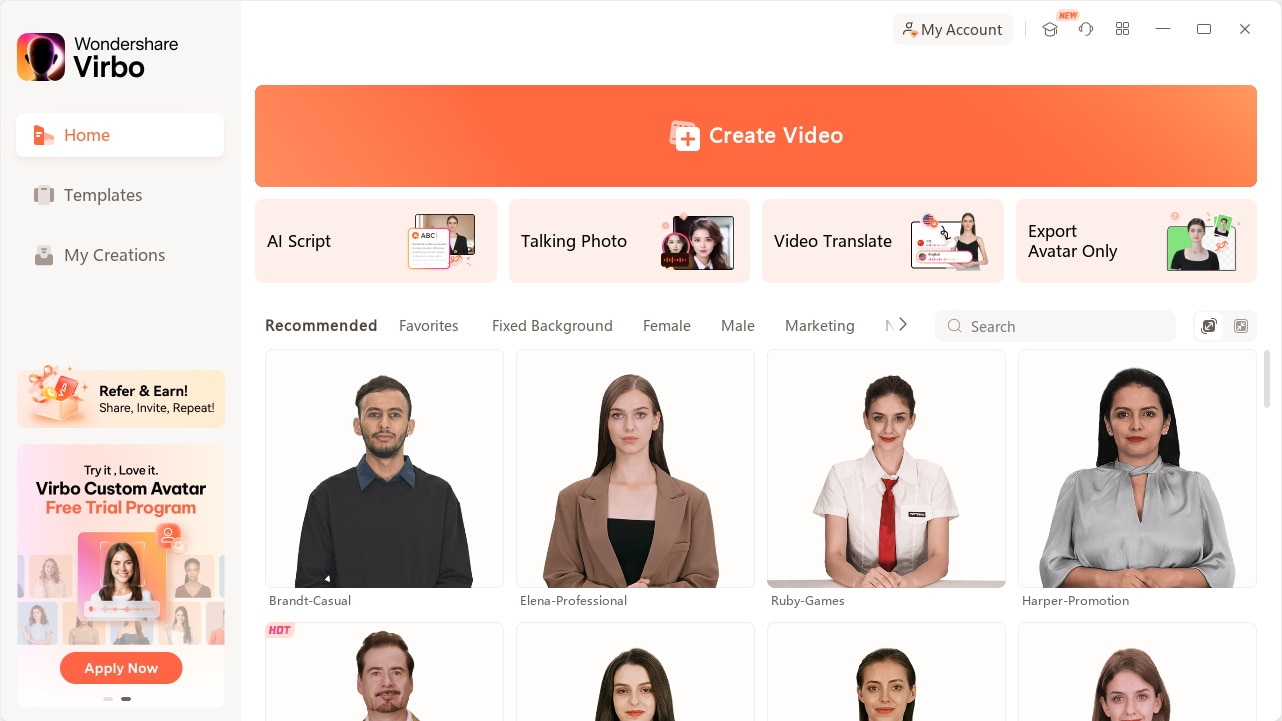
Click Talking Photo
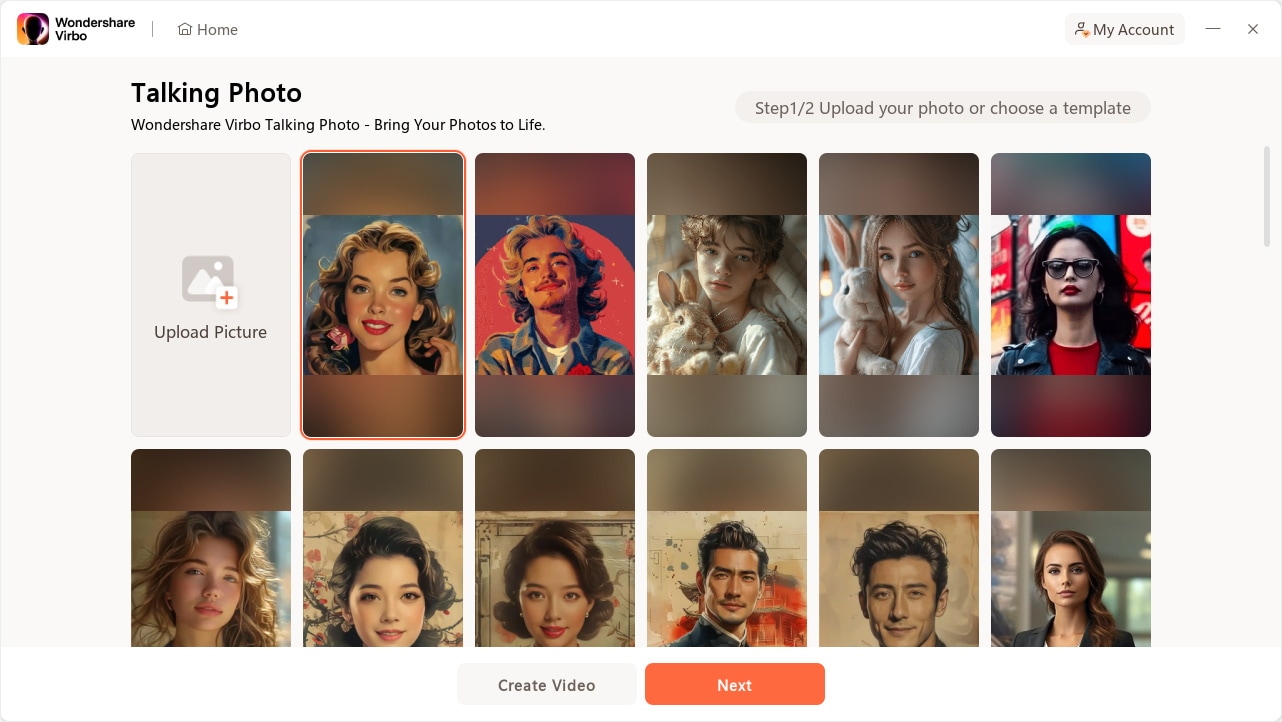
Pick a template or click “Upload Picture” to upload your own picture and tap “Next”.
Create Next Button
Step 2. Input Text and Set A Voiceover
Enter your voiceover script or click the ‘Audio Upload’ to import an audio file as the voiceover.
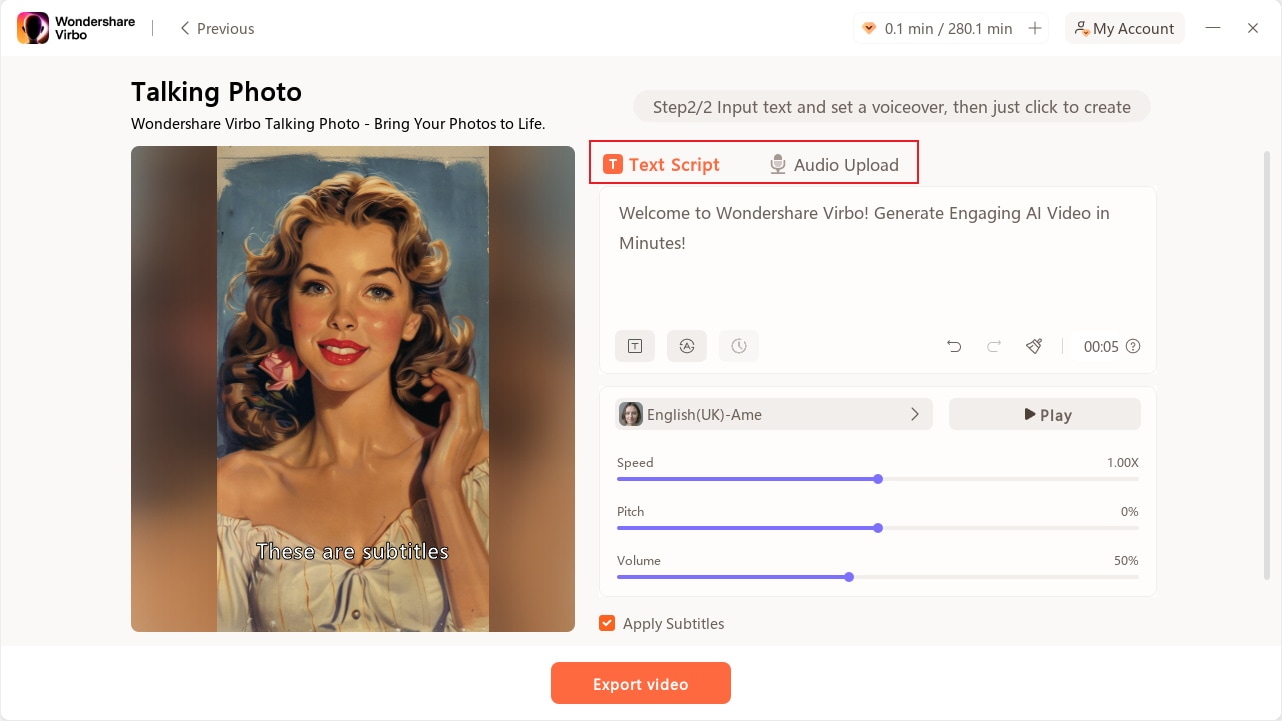
Input Script
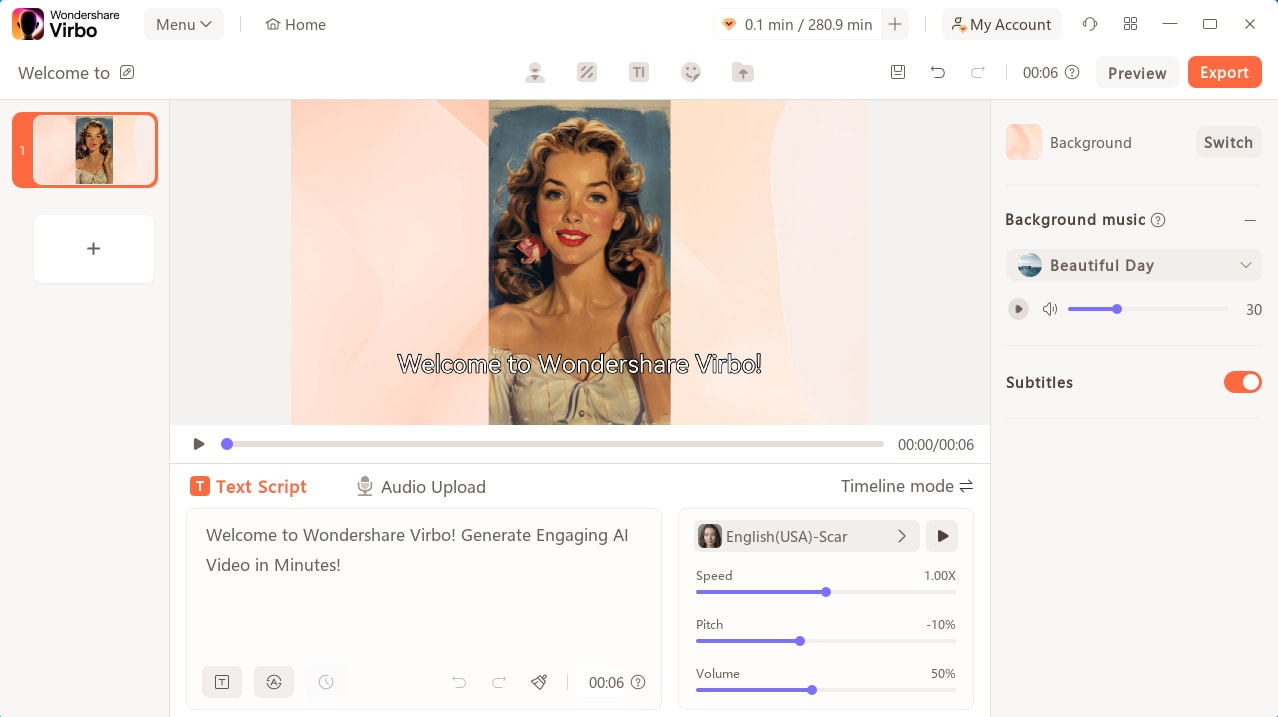
After entering your voiceover script, you can customize the language, and adjust playback speed, pitch, and volume.
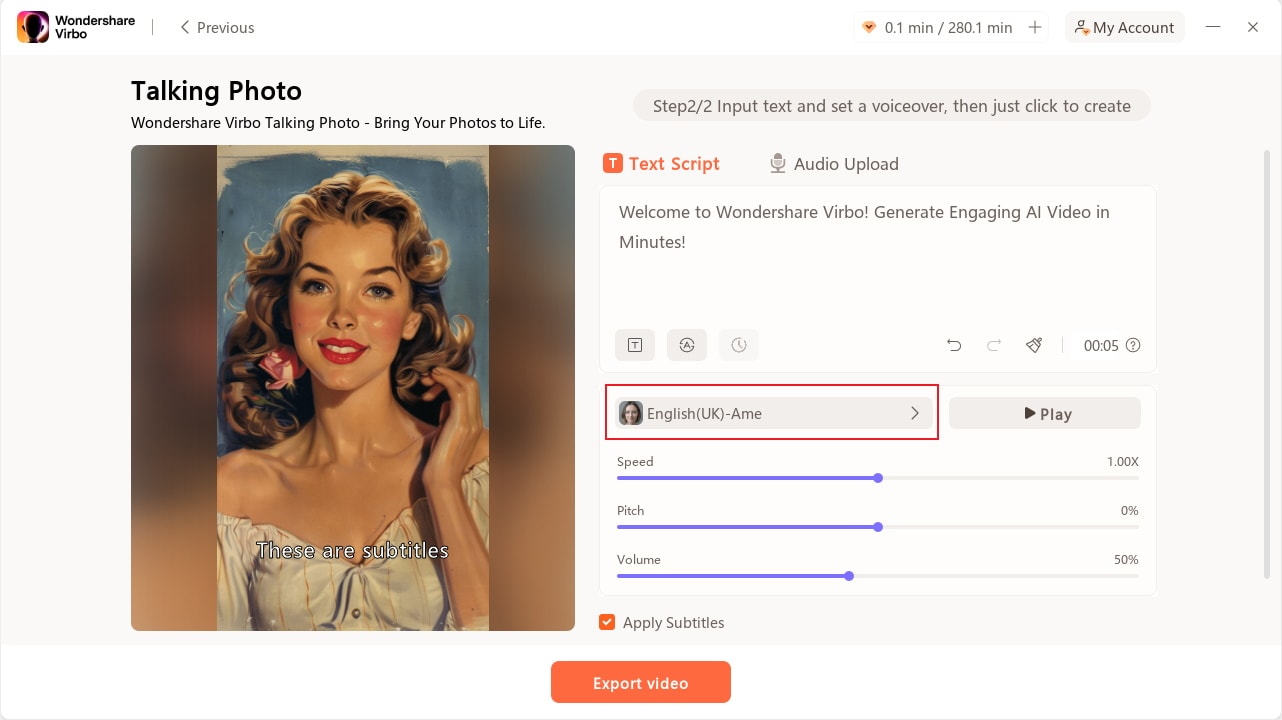
Edit Voiceover
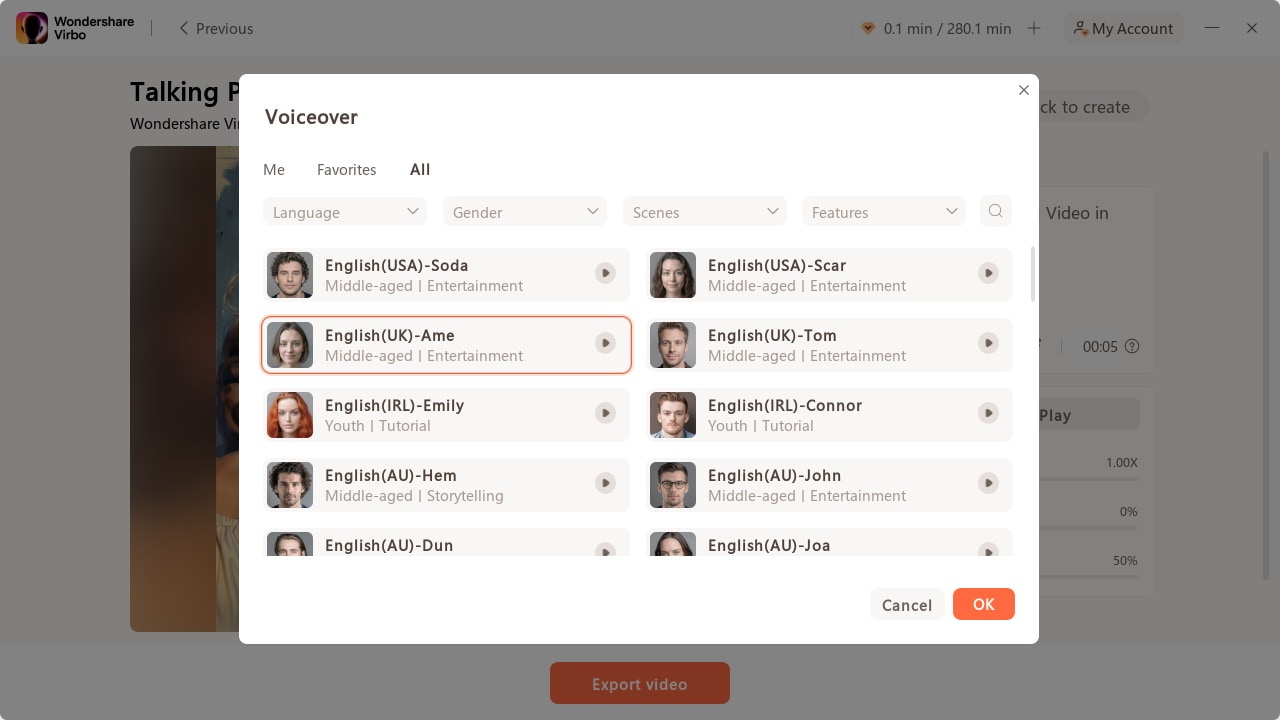
Choose Voiceover
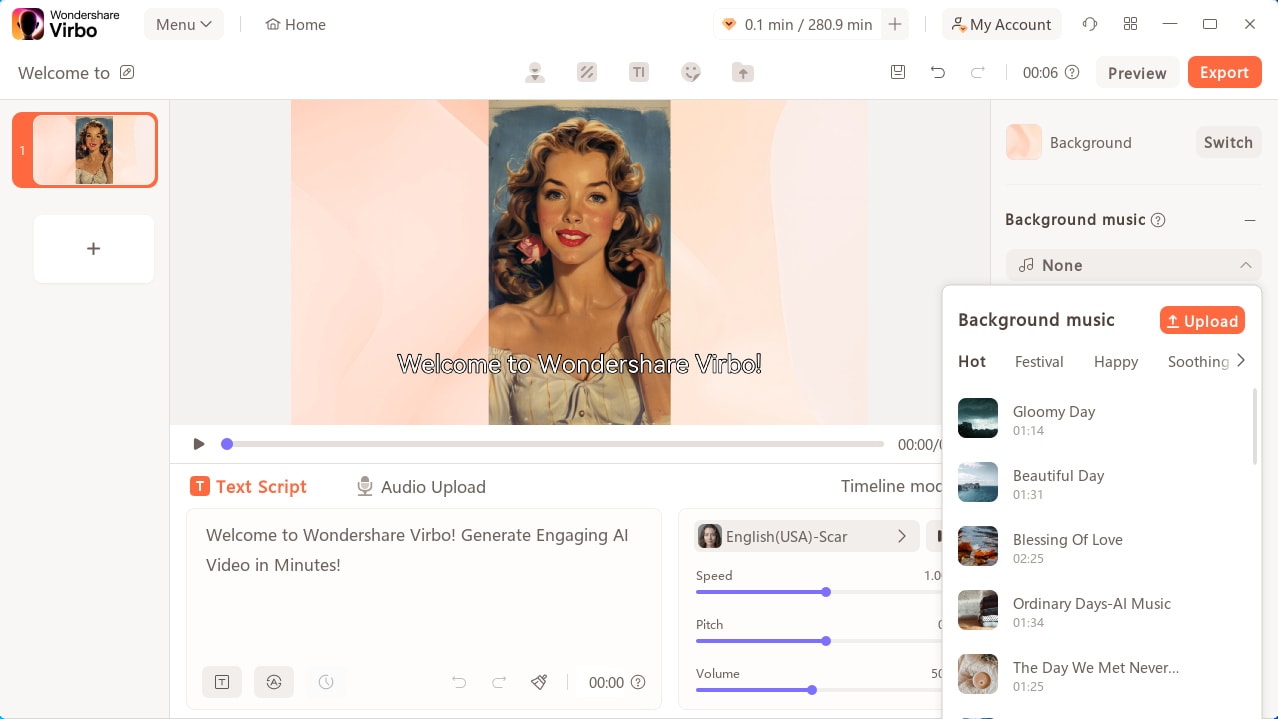
Check “Background Music” to add or upload background music, or add subtitles by checking “Apply Subtitles”.
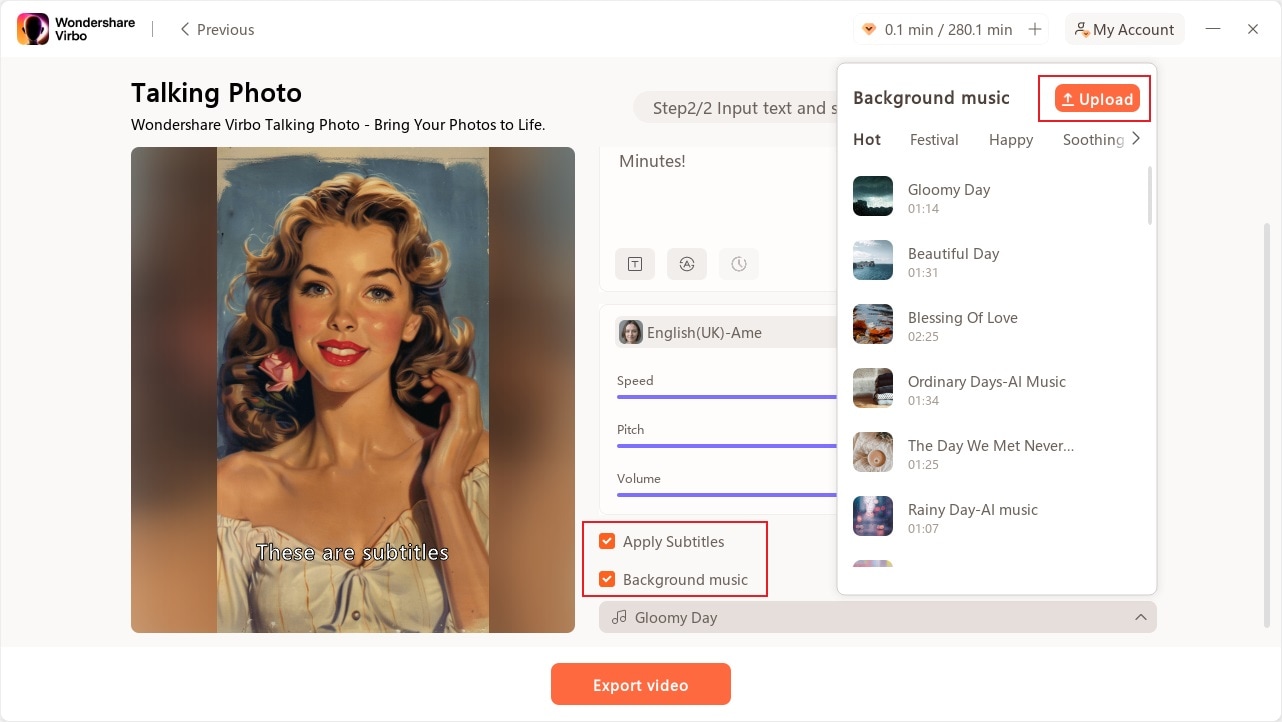
Apply Subtitles And Add Background Music
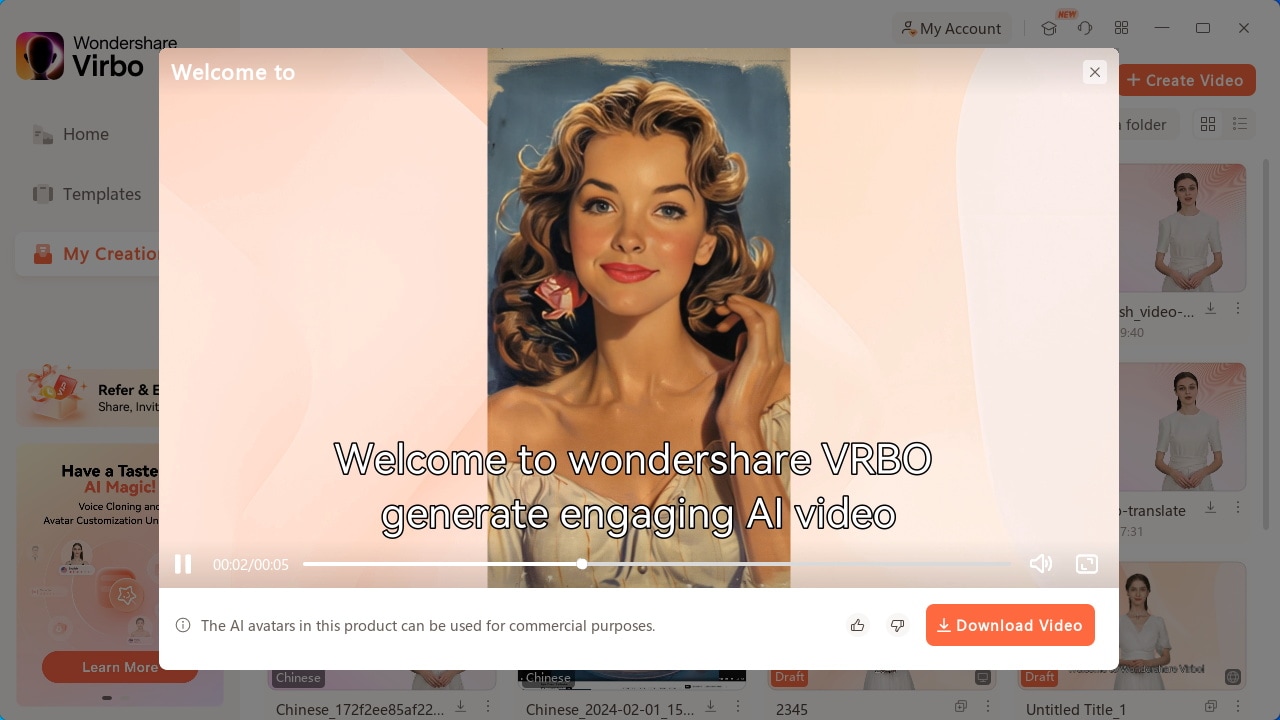
Step 3. Export Talking Photo
Now, you can click “Export Video” to export the talking photo. Wait for export successfully and then you will see it under “My Creations”.
Download Talking Photo
Make Photos Speak Make Photos Speak
Way 2: Use Your Still Photos to Create Videos
Want to create videos with your photo? You can view the following steps:
Step 1. Create a project
After clicking “Talking Photo” on the homepage, pick an image you desire or click “+” to upload an image and tap “Create Video” to start creating a new video.
Generate AI Video Free Generate AI Video Free
Create Video
Step 2. Edit video
Type/paste your voiceover script or click “Audio Upload” to upload/extract/record the audio as video script. You can choose different languages and adjust speed, pitch, and volume at the operation bar. You can also switch the background, add background music, or add subtitles.
Edit Video
Step 3. Export video
Click preview to check the effect of your video. Once you are satisfied with the whole video, click “Export” to generate the video.
Export Video
The generated video will be shown on “My Creations”. You can view it and click “Download Video” to save it to your computer.
Download Video
Generate AI Video Free Generate AI Video Free
02Use Your Still Photos to Create Videos
Way 1: Simply Bring Your Photos to Life with 2 Steps
Simply input your script (or use Virbo’s AI feature to generate one), choose the voice-over, and export the video to achieve the desired effect! You can also record audio online or upload your own recordings to make your photos speak.
Step 1. Choose Talking Photo
Download and install Wondershare Virbo on your computer and click “Talking Photo” to bring photos to life.
Make Photos Speak Make Photos Speak
Click Talking Photo
Pick a template or click “Upload Picture” to upload your own picture and tap “Next”.
Create Next Button
Step 2. Input Text and Set A Voiceover
Enter your voiceover script or click the ‘Audio Upload’ to import an audio file as the voiceover.
Input Script
After entering your voiceover script, you can customize the language, and adjust playback speed, pitch, and volume.
Edit Voiceover
Choose Voiceover
Check “Background Music” to add or upload background music, or add subtitles by checking “Apply Subtitles”.
Apply Subtitles And Add Background Music
Step 3. Export Talking Photo
Now, you can click “Export Video” to export the talking photo. Wait for export successfully and then you will see it under “My Creations”.
Download Talking Photo
Make Photos Speak Make Photos Speak
Way 2: Use Your Still Photos to Create Videos
Want to create videos with your photo? You can view the following steps:
Step 1. Create a project
After clicking “Talking Photo” on the homepage, pick an image you desire or click “+” to upload an image and tap “Create Video” to start creating a new video.
Generate AI Video Free Generate AI Video Free
Create Video
Step 2. Edit video
Type/paste your voiceover script or click “Audio Upload” to upload/extract/record the audio as video script. You can choose different languages and adjust speed, pitch, and volume at the operation bar. You can also switch the background, add background music, or add subtitles.
Edit Video
Step 3. Export video
Click preview to check the effect of your video. Once you are satisfied with the whole video, click “Export” to generate the video.
Export Video
The generated video will be shown on “My Creations”. You can view it and click “Download Video” to save it to your computer.
Download Video
Generate AI Video Free Generate AI Video Free
Top 10 AI Subtitle Translators for Content Creators
According to the Linguistic Society of America, there are over 7,000 languages in the world. In such a diverse world, there’s one way for any content creator to reach as many as possible: Subtitles. Yes, with subtitles, you can reach even those people who do not understand your language. There’s one problem, though. Manually subtitling is time and effort-consuming. It’s also prone to mistakes. Solution?AI Subtitle Translator tools. These handy tools quickly and efficiently change spoken content into written text in multiple languages. So, if you’re searching for the best subtitle translator to make your content stand out, we’re here to help. Read on to find out the 10 best AI subtitle translators available today!
Part 1. How AI Subtitle Translators Work
AI subtitle translators generally use ASR and Machine Learning technologies to carry out the task. Automatic speech recognition technology converts spoken audio into text. The developers train these systems on vast amounts of audio data for text identification. Once the speech is transcribed, AI translation engines convert the text into the target language. Here is the complete breakdown of how these subtitle translators work:
- Input: You provide the video or subtitle file containing the source language. For this, some translators allow you to paste the URL of videos. However, some require you to import the whole video or SRT file.
- Speech Recognition: The AI system extracts the audio and converts it into text. In the case of only subtitle files, the systems will recognize the language of the uploaded SRT.
- Machine Translation: The transcript is then fed into the machine translation engine. Afterward, the MT engines translate the text into the desired language.
- Output: The translated text is displayed as subtitles synchronized with the video’s audio. You will also be able to translate SRT into your desired language as a separate file.
Part 2: How to Choose a Good Subtitle Translator?
Now, you have understood howAI translates subtitle files for you. Let’s analyze the factors you need to consider while choosing a suitable subtitle translator.
1. Supported Languages
You need to consider a translator that supports various input and output subtitle languages. Preferably, a suitable AI subtitle translator will support all the famous languages in the world.
2. Contextual Understanding
A good subtitle translator should understand the context of the content. So, choose a translator that comprehends cultural nuances for natural-sounding translations.
3. Customization Options
Users should look for a translator that provides different options to customize subtitles. Using such a tool will allow you to personalize the font and color of subtitles.
4. Supported File Formats
If you want to choose the best AI subtitle translator, consider the file formats it supports. An ideal translator will support various video, audio, and subtitle formats.
Part 2. Top 10 AI Subtitle Translators You Can Use
Now, you should know how to choose good subtitle translators, we will introduce 10 AI subtitle translators for you in the following part.
1. Wondershare Virbo
Translate Online Download APP Now Free Download
Wondershare’s Virbo is primarily an AI Avatar video generator. But it has a fantastic feature set, which includes anAI subtitle translator . No need to manually type out translations. You can use Virbo’s advanced AI solution to create subtitles and subtitle translations in 20+ languages, including English, Arabic, Hindi, Thai, Spanish, French, Korean, and Japanese among others.
Free Trial: Available
Unique Features
- Match translated audio and subtitles to video with its advanced lip-sync feature
- Allow you to download the SRT subtitle file along with the video (Online version)
- Proofread translated subtitles before processing video content (Online version)
- Support different video formats, such as MP4 and MOV, for video translation
Step-by-Step Guide to Translate Video Subtitles with Wondershare Virbo
After getting to know about its features, it is time to understand the workings of the Virbo video translator. For this purpose, you can refer to the simplified guide provided below:
Step 1: Access the Video Translator Feature within Virbo
After downloading Wondershare Virbo, launch this AI subtitle translator on your system to start the process. Now, click on the “Video Translator” button to enter its Video Translator window.

Step 2: Import Your Video for Subtitle Translation
Afterward, hit the “Click to Upload Video” button to import the video you want to translate. For this purpose, you can import an MP4 or MOV video file in under 5 minutes.

Step 3: Adjust the Subtitle Translation Settings
Once you import the video file, choose the original and translated language for the task. Within its advanced settings, enable the “Subtitle” and “Lip-Sync” options for an optimized translation process. Finally, hit the “Translate this Video” button to finish the process.

Translate Online Download APP Now Free Download
2. SubtitleBee

SubtitleBee is another great subtitle translator. It has a very friendly interface, allowing quick text edits and subtitle customization. SubtitleBee also lets you choose between different fonts, change styles and colors according to your preferences. It’s auto-subtitling tool is particularly handy for YouTube videos, as you can just enter the video link and leave the rest to SubtitleBee.
Free Trial: Not Available
Unique Features
- Automatically adds captions and subtitles
- Allows subtitle customization
- Supports 120 languages
- Has a drag-and-drop editor
3. Bing Microsoft Translator

Microsoft’sBing Translate is a very interesting choice. You can use it absolutely free of cost to translate texts, subtitles or entire webpage into a different language. It can translate into all the major languages of the world. But the only problem is that you would have to provide text to translate as it cannot generate subtitles from a video.
Free Trial: Totally Free
Unique Features
- Supports almost all languages of the world
- Can translate entire web pages or text into different languages
- Absolutely free of costAI translate subtitles
- Integrates with MS Office and Edge
4. Flixier

Flixier is a powerful video editing platform. It offers a range of options to streamline your content creation workflow, including team collaboration, auto subtitle creation,AI subtitle translation , and customization among others. With Flixier, you can automatically create, edit and translate subtitles in over 30 languages as per your needs. Oh, and it supports all major subtitle formats like SRT, VTT SCC, etc.
Free Trial: Available
Unique Features
- Very fast and accurate online subtitle translator
- Supports 30+ languages of the world
- Can translate SRT, VTT, SUB, DFXP and SCC file types
- Allows manual edits to subtitle
5. VEED

VEED is a very popularAI subtitle translator . With an accuracy rate of 95%, VEED empowers you to tailor content for global audiences with ease. It’s fast, it’s accurate, and it supports on-the-go functionality. What’s more, you can directly add the translated text to your video or download them as subtitles for offline editing. Like other AI translators on this list, VEED is incredibly simple and easy to use – even for non-techies.
Free Trial: Available
Unique Features
- Lets you edit multiple languages
- Supports 100 languages
- 95% translation accuracy rate
- Supports Customization
6. Simplified

A relatively new tool,Simplified expands your global reach by easily creating and translating subtitles. It’s incredibly easy to use, offering individual as well as collaborative features to get the job done. Beyond subtitles, Simplified offers a range of other useful tools for content creators. These include, AI Writer, Video Animator, Text-to-Speech, Voiceovers, and Video Editor, etc.
Free Trial: Available
Unique Features
- Auto subtitle generator and translator
- Can work with SRT files or Videos
- Collaborative team features
- Plenty of other tools for simplified content creation
7. Nova

Nova AI subtitle translator is another great option for audio and video content. Once the text has been generated, it’s easily accessible in the subtitle panel, giving you options to edit and meet your needs. Moreover, you can also personalize how you interact with Nova.ai by creating distinct phrases and creating your own unique style.
Free Trial: Available
Unique Features
- 97% subtitle accuracy rate
- Supports 75 languages of the world
- Allows subtitle downloads in SRT and TXT files
- Subtitle sync feature
8. Media.io

Media.io is one of the oldest AI subtitle translators and still remains one of the best. The best thing about Media.io is that you don’t need to download software on your PC/device. Simply upload your video on Media.io’s online platform, translate your subtitles and you’re done. You can also preview different alterations before finalizing or downloading your content.
Free Trial: Available
Unique Features
- Supports 90 languages
- Generates highly accurate subtitles
- Offers cross-platform compatibility
- Supports almost all video formats
9. Subly

This is the first timeSubly has made it to our top 10 list, and not without a reason. Subly has added some fantastic new features along with support for translating subtitles into 73 different languages. ThisAI subtitle translator now also allows quick adjustments like font, color, appearance and size, etc. Subly also has a subtitles app with which you can easily turn audio into videos by adding photos and logos.
Free Trial: Not Available
Unique Features
- Supports 73 languages
- Team Collaboration feature
- Allows subtitle export in TXT, SRT and VRT formats
- Auto video translation
10. Smartling

Smartling is a cloud-based translation solution for businesses. It provides content localization and translation services in over 150 languages. What’s unique about Smartling is that it uses a combination of AI and human translators to give you the most accurate translation possible. Smartling is known for its Translation Management System that can integrate with various CMSs and other tools for a hassle-free translation solution.
Free Trial: Available
Unique Features
- Supports over 150 languages
- Easy integration with different CMS and tools
- Translation memory and terminology management services
- Automates workflows
Part 3. AI Subtitle Translation: Challenges & Limitations
Even though AI has made strides in improving translations, there are still some limitations. Below are 4 major challenges:
- AI subtitle translator tools often struggle with contextual nuances, resulting in glaring misinterpretations.
- Capturing and translating idiomatic expressions accurately still poses a significant challenge for AI systems.
- AI lacks cultural understanding, leading to translations that sometimes don’t align with cultural differences.
- Diverse speech patterns or accents often affect the accuracy of AI-generated subtitles.
- AI tools still face difficulties with complex sentence structures
Some AI translators like Wondershare Virbo offer high translation accuracy and support proofreading, it’s essential to acknowledge the broader context. AI can help us save time and improve translation efficiency, but human oversight and intervention remain crucial for ensuring the quality and appropriateness of translated subtitles, particularly in contexts where accuracy and cultural sensitivity are paramount.
Bonus Tip: How to Make Your Social Media Content Stand Out
How do you use Wondershare Virbo to create new videos? You can get your hands on over 150 AI avatars to make content for social media via Wondershare Virbo. You can also create AI scripts for your videos using this tool.
After creating scripts, creators get to add voiceovers to their videos. Now, let’s see how to utilize all these features to create AI video to stand out from your competitors:
Step 1: Start Creating a Video on Wondershare Virbo
Upon installing Wondershare Virbo on your computer, launch this tool to start generating content. On its main interface, press the “Create Video” button and choose the aspect ratio to enter the AI video generator.

Step 2: Choose AI Avatar and Background for Your Video
Now, click on the “AI Avatar” icon on the top toolbar to access the Avatars drop-down menu. From this menu, choose your desired AI avatar for the video. Similarly, you can choose the background and add stickers to personalize the visuals.

Step 3: Write a Script for Your Social Media Content
Afterward, write the script for your social content in the “Text Script” text box. Moreover, you can get help from an “AI Script” writer to make writing more engaging.

Step 4: Select Voiceover Language and Adjust Narration Settings
Once you finalize the script, choose your desired voiceover language and gender for AI narration. Then, adjust the “Speed,” “Pitch,” and “Volume” settings for your voiceovers. Finally, hit the “Export” button to post this video on your social platforms.

Try It Online Download APP Now Free Download
Conclusion
So, these are the top subtitle translators available today. These tools simplify the translation and transcription of video content and help boost its global reach. Each tool brings its unique features and advantages to the table. However, Wondershare Virbo stands out as the bestAI subtitle translator when we consider its overall usefulness. It uses advanced AI to give you accurate translations, boasts a friendly interface, and saves an incredible amount of time. Give it a try, and let us know what you think!
Try It Online Download APP Now Free Download
Essential Tools for Creating Dynamic Talking Avatars
Avatars have become crucial in many different industries in the last few years. Whether it is customer support or entertaining people, avatars connect businesses with their audience in a better way. As technology gets better, we’re witnessing a remarkable evolution in avatars.
Read this article to learn some freetalking avatar makers you can use. Also, we’ll explore the finest tool to use this innovative technology while joining in the fun for diverse purposes.
![]()
Part 1. Recommended: Finest Talking Avatar Creation With Wondershare Virbo
Wondershare Virbo stands out as an exceptional tool for creating talking avatars. It offers a comprehensive solution for crafting high-quality avatars on a single platform. The tool is versatile, showing compatibility with various devices and operating systems. This groundbreaking tool lets you bring your static photo into a dynamic storyteller.
Plus, it lets you add voice clips to your photos to make them interactive. Its talking feature adds emotion, explanation, or personalized messages to your visual content. Users can transform old pictures into captivating stories with personalized voice clips. With the support of a wide range of accents, you can create talking avatars that resonate with the global audience.
Highlighted Features of Wondershare Virbo
- The text-to-speech feature converts text into spoken language for smooth
- Users can elevate the mood and atmosphere with personalized background music within the Talking Photo feature.
- Its versatile AI avatars and clear audio quality ensure that your voiceovers are crisp and clear.
Pricing Plans
- Monthly Plan: $9.9
- Essential Yearly Plan: $19.9
- Pro Yearly Plan: $199
Step-by-Step Guide to Using the Talking Photo Feature in Wondershare Virbo
Wondershare Virbo ensures a seamless experience for its users in talking avatar creation. The process is as simple as it can customize your talking photos. Follow the below-mentioned detailed steps to use thisAI-speaking avatar creator :
Step 1. Download Virbo and Access Its Talking Photo Feature
Begin by downloading and installing this AItalking avatar maker on your devices. Afterward, launch the tool on your system and access its dashboard. Click the “Talking Photo” button among the available options here.
![]()
Get Started Online Free Download
Step 2. Select AI Avatar or Import Your Photo
A mini window will pop up on the screen, allowing you to select from preset images. You can also import the picture by browsing your system. Once you’ve selected, you’ll be directed toward a new window.
![]()
Step 3. Generate Script Using AI
Head to the bottom left in the upcoming window and hit the “AI Script” icon. Type the script in the text box and optimize it with AI features. Afterward, press the “Apply” button from the right bottom to use it for talking avatar.
![]()
Step 4. Make Adjustments in Language and Gender
After creating a script, it is time to customize its language. Tap on the “Language” button, which opens a pop-up window. Clicking on the “Language” dropdown menu allows you to choose your preferred language. You can opt for either male or female by choosing the “Gender” dropdown menu. Later, click on the “OK” button to proceed with the process.
![]()
Step 5. Modify the Voiceover Characteristics and Export the Video
Next, personalize the qualities of voiceover under the language section. Here, you can modify the “Speed,” “Pitch,” and “Volume” as needed. You can preview the video you’ve customized by tapping on the “Play” icon. Finally, navigate toward the top left corner of the window and press the “Export” button to save it.
![]()
Pricing Plans
- Monthly Plan: $9.9
- Essential Yearly Plan: $19.9
- Pro Yearly Plan: $199
Part 2. Alternatives: Other Talking Avatar Creator Tools for Enhanced Content
Previously, we have discussed the best tool to generate talking AI avatars. However, if you want to try out some alternatives to Wondershare Virbo, we have a solution. For this purpose, we’ve enlisted some othertalking avatar creators to help you in getting results to your satisfaction:
1.Akool
Akool is a comprehensive generative AI platform available for creators and innovators. Its intuitive features allow users to materialize ideas quickly for diverse marketing and advertising needs. You can upload JPEG and PNG images of less than 30MB for each picture on the tool. Plus, the picture should be clear as it does not detect blurry, overexposure, and side faces.
![]()
Pros
- With film-level quality outputs, it ensures high-quality visuals and videos.
- Thetalking avatar creator achieves up to 8k resolution for pictures and 4k.
Cons
- One problem is that talking avatars can’t sound entirely natural yet.
Pricing Plans
- Professional Plan: $30 per month (600 credits)
- Studio Plan: $500 per month (12000 credits)
Steps To Create Talking Avatars With Akool
As discussed before, Akool lets its users customize their talking avatars. Let’s discuss the steps tocreate a talking avatar online for free using this tool:
Step 1. Get the online tool through your preferred web browser and open its homepage. Now, hover over the “Platform” dropdown menu and select the “Talking Photo” feature.
![]()
Step 2. Within the upcoming window, click the “Choose File” button from the center to upload the image. Also, you can choose an example offered by the tool. After making a selection, you can also revert changes.
![]()
Step 3. After uploading the picture, head to the “Text” section on the right side and type in the script. Then, under the “Voice” section, make adjustments in gender, language, and speed. Later, preview your generated talking avatar and tap the “Results” at the top right. Finally, the tool will process it and provide you with the final results.
![]()
2.Yepic AI
If you also want to createan AI talking avatar , Yepic AI is your go-to preference. You can create a lifelike digital version of yourself with just a headshot. Users can uniquely present their videos by choosing from over 40 preset avatars. It boasts many actors, languages, and voices, with over 450 options available to personalize your avatar.
![]()
Pros
- The tool personalizes every aspect of your videos, from backgrounds and transitions to actors and voices.
- You can scale and localize your content across different countries, languages, and accents.
Cons
- It offers only 20 video credits per month, and one credit equals a 60s video, limiting extensive use.
Pricing Plans
- Consumer Plan: £5.75 /month
- Standard Plan: £24.16/month
- Plus Plan: £65.83/month
- Premium Plan: £415.83/month
- Infinite Plan: £665.83/month
Steps To Create Talking Avatars with Yepic AI
Users can utilize the capabilities of this tool to create talking avatars seamlessly. Here are the steps to carry out the process of makingAI-speaking avatars to engage viewers.
Step 1. To start the process, tap the “Get Started” button on the main website page and access the editing window. The tool lets you choose avatars or talking photos within this editing interface.
Step 2. Afterward, in the text box, type your script and hit the “Listen” button. Alternatively, you can upload your voiceover to the tool to make it personalized.
Step 3. Upon uploading the voiceover, select the voice and the desired language for your written words. Then, select the desired background and add shapes to modify the outlook of your talking avatar. Finally, preview the video and download it to share with others.
3.Speechify
Speechify Studio serves as the premier AI Video and AI Voice Platform. This site empowers anyone to create professional videos in just one minute, with no skills required. You can quickly produce captivating content using AI-generated talking faces. It lets youcreate a talking avatar online for free to save your valuable resources and time.
![]()
Pros
- Speechify Studio offers a user-friendly interface that makes video production quick and effortless.
- Users can combine high-quality text-to-speech synthesis with lifelike avatars for an interactive audiovisual experience.
Cons
- The narration of this tool lacks human-like empathy and emotions.
Pricing Plans
Talk to the sales team.
Steps To Create Talking Avatars with Speechify
With Speechify’s intuitive interface, you can easily perform various tasks. In the following section, you’re given the simple steps to create anAI talking avatar using this online tool.
Step 1. First, access the “AI-Generated Talking Face” page from the main interface of Speechify. Proceed by hitting the “Try for Free” button and log in using a Google account. After entering the editing interface, press “Create AI Avatar,” which leads you to a new window.
![]()
Step 2. Now, opt for the desired avatar from a vast library. Upon selecting this avatar, it will appear on the right side of the editing window. Afterward, you can adjust “Avatar Style” and the “Layout” settings.
![]()
Import your script from a media file or paste a URL from YouTube. Afterward, choose the voiceover among the available options and preview the video. Once satisfied, tap the “Export” button at the top right to download this from this tool.
![]()
4.HitPaw Online AI Face Animator
This online AI face animator is an easy-to-use AI-based tool that brings your still images to life with animated faces. You can choose from various funny templates to animate your photos with a simple upload and a click. It allows you to add humor and personality to your images. The tool supports JPG, PNG, JPEG, and WEBP formats for pictures and animates them with customization.
![]()
Pros
- Users can animate various photos, from individual portraits to group shots, with many templates available.
- It emphasizes safety and security and ensures your photos are protected.
Cons
- Weekly Plan: $0.57/Day
- Monthly Plan: $0.27/Day
- Yearly Plan: $0.13/Day
Steps To Create Talking Avatars With HitPaw Online AI Face Animator
HitPaw Online is another onlinetalking avatar maker with a straightforward approach. The following are the steps to animate a photo using this online tool:
Step 1. Visit the tool’s official website and access the main user interface. You can place your cursor over the “Photo AI” dropdown menu and click “AI Face Animator.”
![]()
Step 2. Next, hit the “Upload Image” button from the left side. This action will move you to the main editing window to create talking avatars.
![]()
Step 3. Select the “Drag and drop or click to upload image” option from the left panel in the new window. Under the “Choose a Template” section, select the category of style and expression for your uploaded photo. Then, press the “Animate” button at the bottom. Now, you can see your animated image in the middle of the screen after processing.
![]()
Step 4. Once satisfied with the results, download it on your system. You can save it with the HitPaw logo or as a GIF for fun.
Image name: best-tools-for-creating-talking-avatars-20.jpg
Image alt: download final product from hitpaw
![]()
Conclusion
We conclude that there are variousspeaking avatar creator platforms with different features. These tools make it easy to create avatars that talk to use for different functions. However, the one that stands out among these options is Wondershare Virbo. You can customize your avatars in just a few clicks on different devices.
Get Started Online Free Download
The Most Direct Guide to Learning How to Clone Your Voice
The procedure of voice replication generated with AI powers is termed voice cloning. Through this, you can capture a person’s voice and create speeches and other audio in their voices. The clone of your voice tools can also act as your personal assistant. Moreover, you can also experience accessibility and less time required for recording the voice.
By the end of this discussion, you will know meaningful information about clone my voice. We will also present and explain some of the use cases of voice cloning and the factors for selecting the best cloning software. You don’t have to surf the internet further because this article will also provide reputable tools to clone your voice.
Get Started Online Free Download
Part 1: What Are the Real-Life Use Cases of Voice Cloning?
Many of the users are not aware of the usability of voice cloning. That doesn’t mean there are no real-life use cases of cloning your voice AI. The below-given points will help you to understand the real-life applications of voice cloning:
1. Voice Dubbing and Narrations
You can easily dub a foreign-language movie and shows through reliable voice cloning tools. It also helps you make consistent and high-quality voice clones without compromising word pronunciation. The developers can also create unique voices for the gaming characters through this. It can add life to the virtual characters.
Above all, if you are a publisher, you can create narrations and audiobooks in your voice through this. Readers can match their expectations with expressive voices and have the best user experience.
2. Accessibility and Voice Support
This technology can be beneficial for people with speech impairments. Through this, people with speech impairments can hear themselves in natural-sounding voices. This also allows them to communicate properly. Visually impaired people can also access the content in an optimized manner through this.
If you are a call center owner, you can also get virtual call center agents through this. Saving the cost of hiring a substantial number of people is a reliable benefit of using voice cloning. Making content and other information more accessible for people of all nationalities is possible with this.
3. Marketing and Chatbots
You can choose a voice you like to clone and expressively convey information. While working with the digital assistant, you can customize its voice to boost the experience. Chatbots can also commute in human-like voices with users through this. It makes the fostering of emotional connections easier than ever.
You can also ensure informational retrieval through this. Moreover, brands can use this technology to make a consistent brand voice. They can also use their customized brand voice in various campaigns and broadcasting.
Generate Engaging
AI Video in Minutes!
Easily convert text into professional spokesperson videos in over 120+ voices & languages in minutes.
Generate AI Video Free Generate AI Video Now
4. Language Learning and Biometrics
If you are a native English speaker and want to learn French, voice cloning can help you. Through this, you can clone your voice and listen to text in multiple languages. There is no need to worry about the complexity of learning as it has the potential to pronounce words clearly and accurately.
Furthermore, you can not only learn but can also practice new languages without wasting time. By accessing the virtual partner, you can also master conversational skills. It lets you speak in your targeted language in a seamless flow. You can also ensure biometric security through this.
5. Figures and AI Models
To create historical documentaries, voice cloning can be extremely beneficial. You can create a clone of your voice or the voice of your favorite historical figure without facing any complexity. Whether you want to make educational videos or do a museum exhibition, this can help you bring history to life.
Not only this but researchers can also use voice cloning technologies to create AI voices. It eventually helps train the AI models to get a grip on speech recognition technologies. You can also use this to create natural language models with this.
6. Character Voices and Services
Are you a big fan of Katana from Mortal Kombat and obsessed with her voice? No worries because you can use the voice of Katana in several ways through this innovative technology. It helps you in creating customized character voices along with expressive emotions.
Alongside this, voice cloning can also provide urgent alters and notification services. You can also deliver critical information to the public in case of mishaps and emergencies.
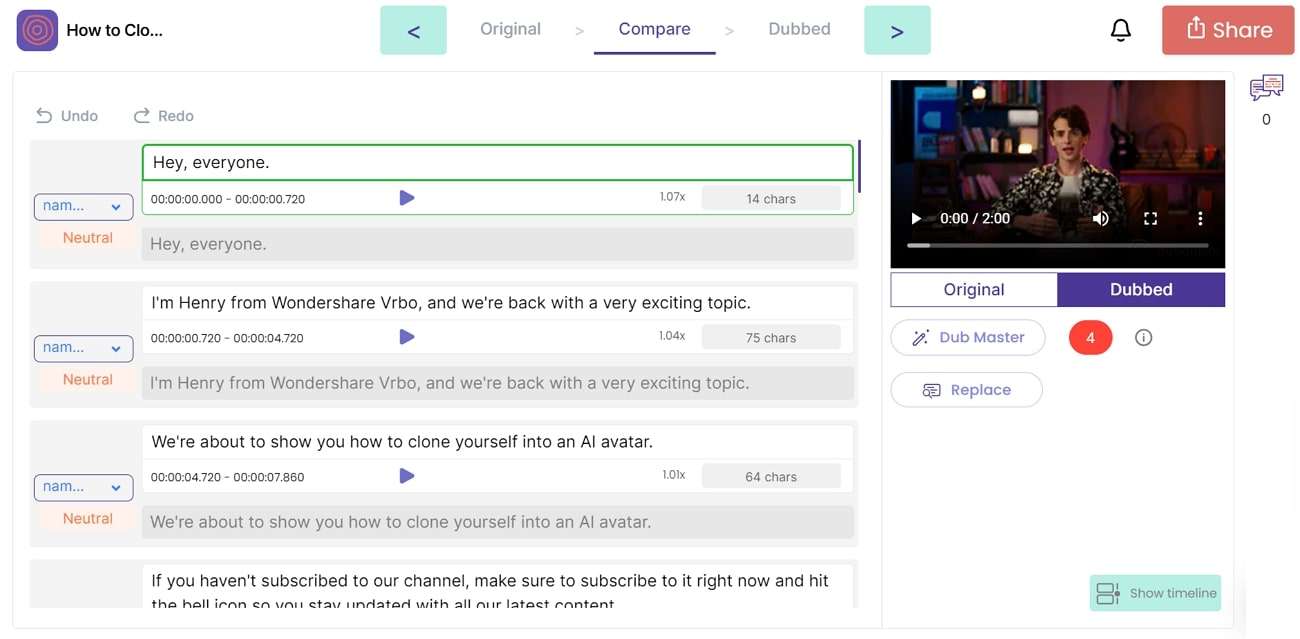
7. Performances and Authentication
You can clone your voice and use it for authentication purposes. It can also help create voice-based security based on voice traits such as pitch. You can make the authentication of your accounts and facilities stronger through this. To give iconic performances, you can often use voice cloning in live performances.
It can also open paths of communication for the users without ethical complications. You can give the best live performance experience to the users.
Part 2: The Best AI-Powered Tools to Clone Your Voice
Day by day, the advancement of AI-powered tools is increasing drastically. Multiple options are now available, and users feel difficulty selecting the best voice cloning software. If you want to know what software can help me to clone my voice, this section is for you.
Here, we will discuss the top 6 software through which you will be too able to clone your voice AI. You can find the software, along with its introduction and key features, here:
1. Speechify
Speechify is the best AI-powered tool that helps you make voice clones without compromising quality. You can use this effective tool to clone your voice in a customized manner. Whether you are a content creator, podcast maker, or video editor, this tool can help you.
You can make quality-oriented voice clones by adding a sample of your voice in real time. With Speechify, you can also modify the speed and volume of spoken audio. Moreover, it also lets you add versatile emotions to the voice clone audio. It includes excitement, emphasis, happiness, and more.
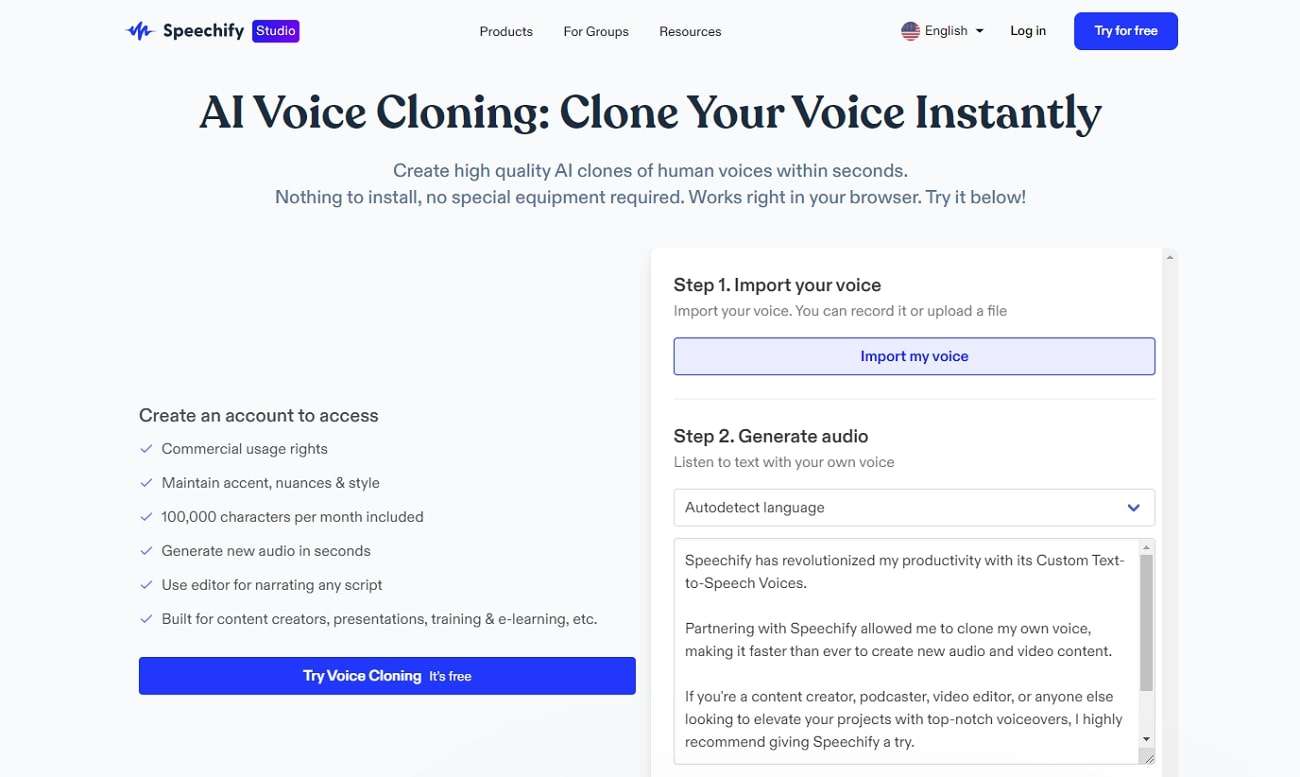
Key Features
- Speechify supports multiple languages for the ease of the users. This includes English, German, Italian, French, Hindi, etc.
- It also integrates a text-to-speech feature to turn the pre-written text into understandable audio.
- The AI Dubbing feature of Speechify lets you dub the audio in 20+ languages. Moreover, it will help you grow your audience in no time.
- Using the AI voiceover Generator, you can add expressive voiceovers in any video and customize voice and speed.
2. Voice.ai
Do you want to create the best-in-class voice clones without any problem? No worries because this tool lets you clone your voice in optimized quality. Whether you want to change your voice in live streaming, game, or chats, it can help you. You need to add the reference audio in its AI system, and eventually, it will create a perfect voice clone for you.
It also comprehends an evergreen library of voice that continues to grow daily. Moreover, you can also sound younger, older, funnier, or scarier with this.
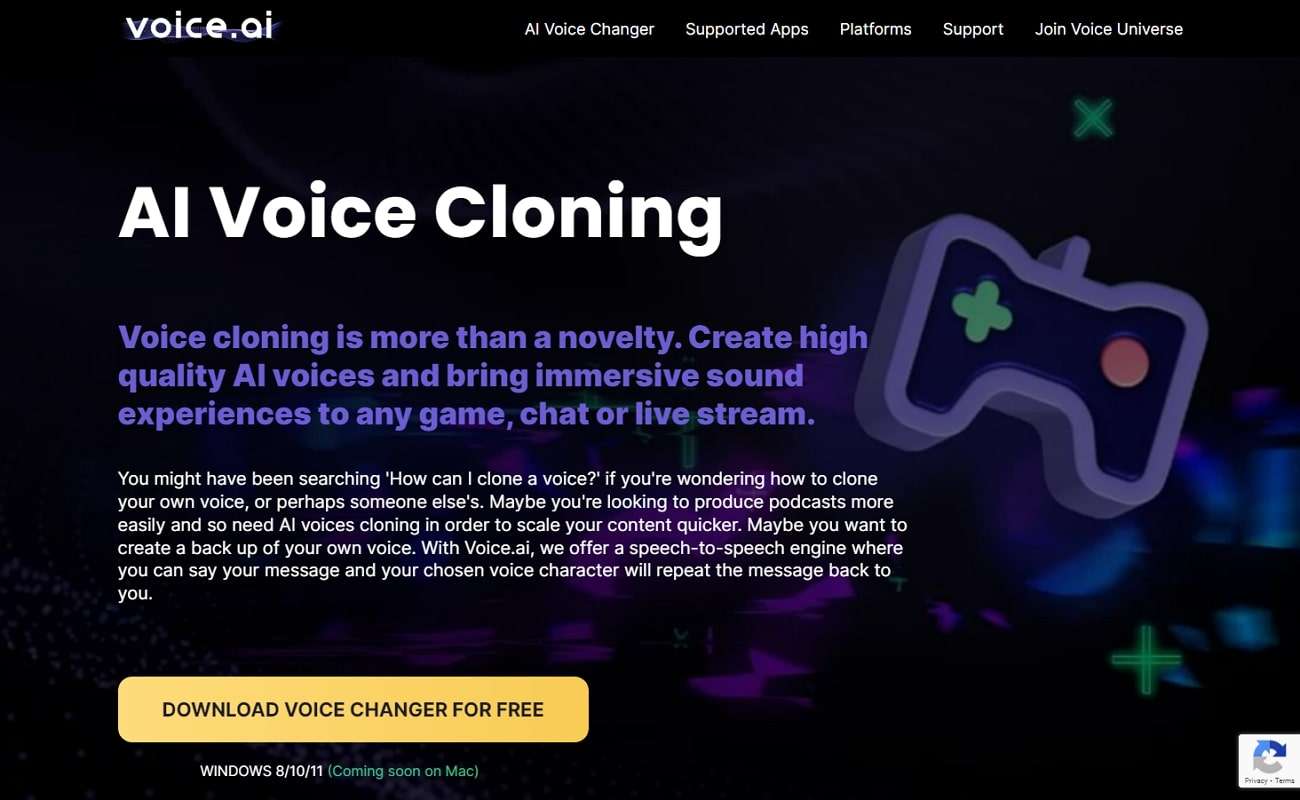
Key Features
- This software has several games and app integrations. It includes Discord, Skype, Zoom, WhatsApp, and Minecraft.
- It has the capability to create a replica of the sample audio, along with adding emotions, accents, and pacings.
- Its specialized AI Voice Changer lets you change your voice in real time. You can also record voices and use them on soundboards.
- ai supports a wide array of platforms. This includes iOS, Android, Windows, and Mac.
3. PlayHT
If you want to make voice clones with unparalleled quality, then this tool is a perfect fit for you. By using it, you can clone your voice with 99% accuracy. Hiring a professional voice artist is unnecessary as this voice cloning tool can add a human touch to audio projects. There are several voice samples in it, and you can also preview them before choosing the voices.
You initially need to upload 2 to 3 hours of speech without background music, select a voice for cloning, and then this tool will handle the rest for you. Moreover, you can also use the generated clones as in the editor or API.

Key Features
- It incorporates a powerful text-to-audio online editor. You can create and edit the audio and export it in MP3 and WAV formats.
- You can create custom pronunciations and niche terminologies with its Pronunciations and IPA Phonetics Library.
- The AI text-to-speech feature helps users to turn written text into descriptive speeches with full customization.
- PlayHT has 800+ AI Voices along with 130+ languages. This is a very convenient thing for the users.
4. LOVO AI
If you want to make voice clones in Cocoon O’Brien or Ariana Venti, this voice cloning software can do it for you. It can also help you to clone your voice with human-like qualities. You can also drag and drop the sample audio or record the sample audio in real-time to make the clone.
It lets you create as many voices as you wish. Above all, you can build the customized library of your created clones and access them anytime. You can also use this fantastic tool for building special brand voices.
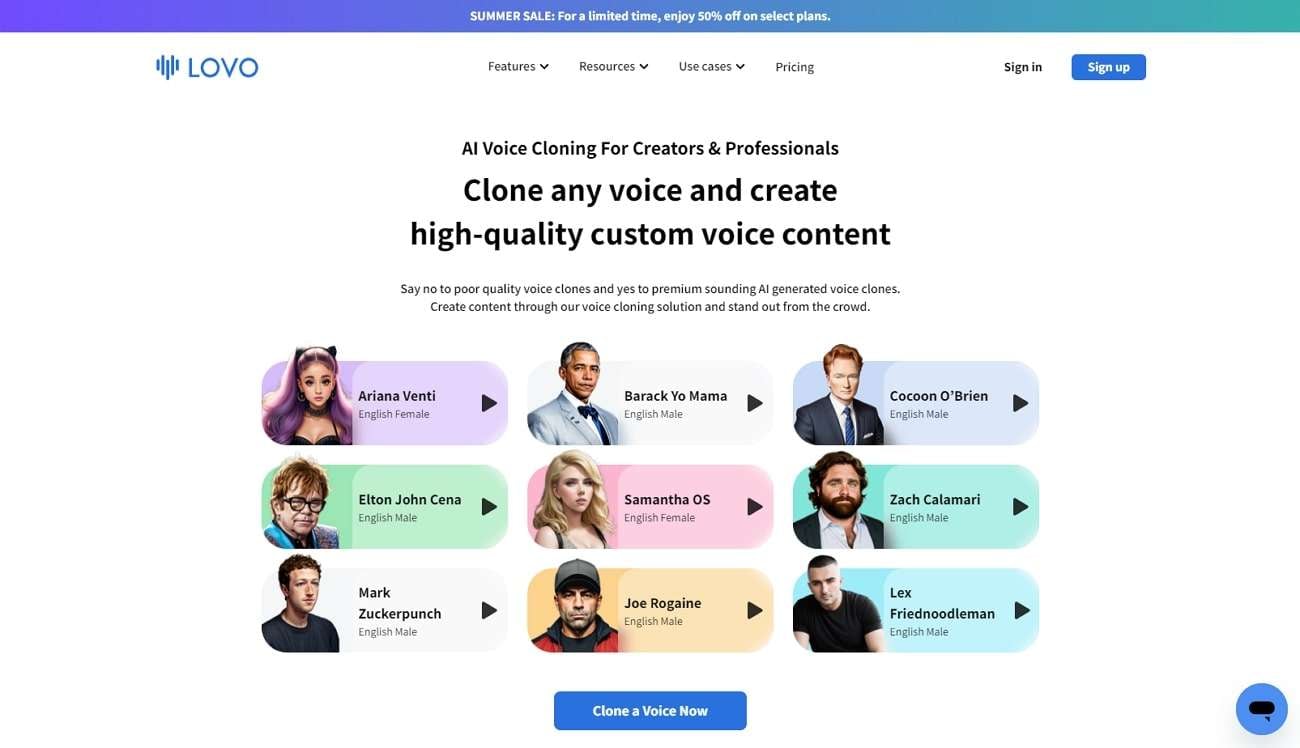
Key Features
- This tool has a considerable number of AI voices for every use case. It also supports 150 plus AI voices along with 25+ emotions.
- LOVO AI has a specialized text-to-speech feature through which you can convert written text into audio and make voiceovers through them.
- The online video editor of LOVO AI lets you create premium-grade videos and sync the voiceovers with a few taps.
- Using its AI Writer, you can generate scripts for your social media content without hiring professional scriptwriters.
5. Resemble.ai
This tool suits you if you are willing to create dynamic and unique voice clones. The voices cloned with this tool will help you stand out in the crowd. For uploading the sample audio, you can use its web recorder or upload data from the device.
One of the best things is it has the potential to create a voice clone in approximately 12 minutes. The AI Engine can narrate your voice, add a dramatic effect to it, and can also speak in other languages. There is also an in-built voice assistant that you can use as per your need.

Key Features
- It offers preset game dialogue for gaming users, and you can use them without worrying about compromise in performance.
- Creating audio ads with full personalization is also a specialty of this tool. You can also manage address, name, and location.
- If you are making documentaries, narrations, or voiceovers, this fantastic voice cloning tool can assist you with its Film Dialogue feature.
- ai supports a wide array of APIs for the ease of the users. This includes Podcastle, Vidon AL, Open AI’s ChatGPT, Synthesia, and more.
6. HeyGen
This amazing tool encompasses the potential to generate clear audio without any problems with background noises. It helps you to streamline your workflow efficiency. You can also clone your voice AI in multiple voices, such as German, Polish, Italian, French, and more.
In addition to this, it can also help you transform text into professional videos. The interface of this tool is quite delightful, so you will not face any problems while using it. Moreover, it also has blazing-fast processing speed, making it a good tool.
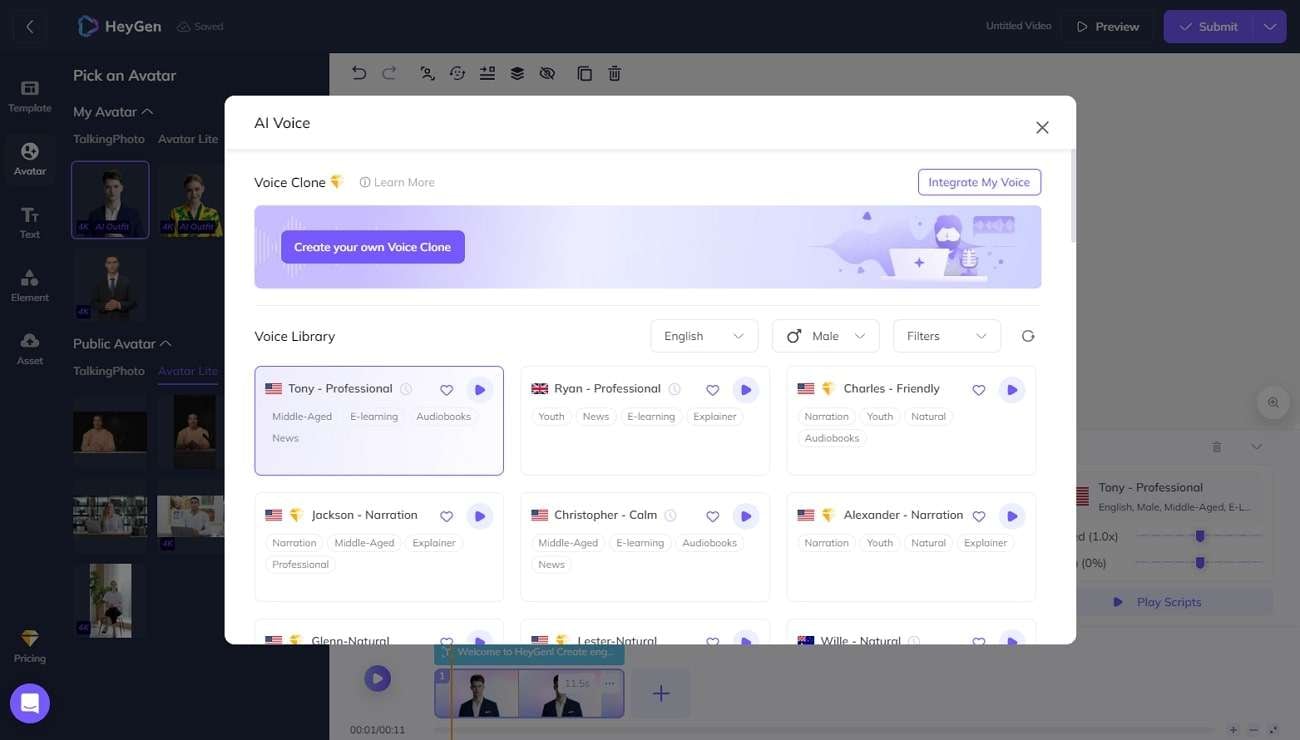
Key Features
- You can use this quality-oriented tool for creating marketing, educational, training, or social media projects.
- There is a versatile pre-built template in it, which you can align with your vision and use as you like.
- This tool also has the potential for creating customized AI Avatars that can represent your brand and help you to interact with the audience.
- HeyGen also supports integration with Zapier, which can help you to enhance its usability in no time.
Part 3: How To Select The Best AI-Powered Cloning Software
Selecting the best software to clone your voice can be hectic. To save you from this hassle, we present some of the effective factors that help select the best out of a thousand. So, let’s get into these quality-reciprocating factors without any further delays:
1. Quality and Customization Options
Before selecting the tools, ensure they can provide reliable results without compromising the quality. The quality of the voice clones generated with the AI software should encompass naturalness. This will help you to attract more listeners without any doubt.
A tool hold lets you create clones that can sound natural, along with having emotions and rhythms. You should also be able to adjust the audio metrics, inclusive of speed, tone, and pitch.
2. Language Support and Understanding
Make sure the tool you select can support the language you want in your cloned voices. Not only language, but should also support versatile accents to ensure flexibility. This is a crucial factor for having accuracy and reliability in the voice clones. Making global content can also get easier with this.
In addition to this part, you have to evaluate the ability of the software to understand the commands you are giving. You can also check for the voice patterns that the respective tool supports.
3. Adaptability and Integration
Some software allows you to train them on some specific voice samples. It helps in optimizing the accuracy when you clone your voice AI. So, it is essential to check if the tool has the potential to adopt new patterns.
Moreover, it is essential to know about the integration of a tool in your system. If you want to experience a smoother workflow, then integration is extremely important.
4. Real-time Processing and Security
Real-time voice cloning is very important for several user cases. You can use it while talking on the phone and in other types of communication. You can also clone your voice in real time with the help of effective software. The AI-powered software has the potential to generate voices quickly without compromising words and quality.
Voice data is a very sensitive type of data, so you have to be careful while selecting the software. Make sure to choose software that can employ strong encryption and security.
Conclusion
To wrap things up, you can clone your voice to communicate worldwide in an engaging manner. There are several scenarios where you can use voice cloning technologies. Some include biometrics, language learning, accessibility, dubbing, and other cases discussed above.
The top 6 software through which you can create best-in-class voice clones are also discussed above. You can follow the factors discussed in the above parts to select the best AI-powered clone software to clone your voice AI.
Also read:
- New 2024 Approved Best Voice Generators & Changers with The Most Anime Voices Supported
- New Translate Live Videos With The Best Video Translator
- New In 2024, Best 10 Animated Explainer Video Examples
- In 2024, What Is an AI Video Generator?
- Updated How To Translate Videos in Tamil for a Wider Reach
- New Right Moves to Use TTS in Descript for 2024
- New Best Video Translator App for PC Cannot Miss for 2024
- 2024 Approved A Complete Guide of Top 7 Video Language Translators
- Updated What Is an AI Voice Generator? | Wondershare Virbo Glossary for 2024
- New How to Translate Instagram Videos for Global Engagement for 2024
- 2024 Approved 10 Best Text-to-Video AI Generators to Create Engaging Videos
- New In 2024, The Best Text-to-Audio Converters of All Times
- Updated 2024 Approved What Is AI Voice Over? | Wondershare Virbo Glossary
- 2024 Approved 10 Free Football Streaming Sites To Bookmark
- Common Platforms for Live Streaming | Virbo AI Live Stream for 2024
- Translate Videos Like a Pro with Subtitle Cat Your Essential Guide
- Updated AI Voice | Wondershare Virbo Online
- Updated 2024 Approved Amazon Live for Beginners Features, Pro Tips & Future Trends
- Updated In 2024, 7 Top Explainer Video Makers You May Like
- New SRT Subtitle Translation Tools and Techniques
- New In 2024, Translate Live Videos With The Best Video Translator
- New 2024 Approved Ever-Changing Era of AI Video Translation A Reality to Be Fulfilled
- Updated Live Commerce Success Stories Lessons Learned & Predictions for the Future
- New What Is ChatGPT? | Wondershare Virbo Glossary for 2024
- Updated Top 10 AI Avatar Video Generators for 2024
- New Step-by-Step Guide How to Translate Twitter Video Easily
- In 2024, Easy Ways to Manage Your Vivo S17e Location Settings | Dr.fone
- Fixing Foneazy MockGo Not Working On Huawei Nova Y71 | Dr.fone
- How To Bypass iCloud By Checkra1n Even From Apple iPhone XR If Youve Tried Everything
- How to Easily Hard reset my Sony Xperia 5 V | Dr.fone
- How Oppo A78 Mirror Screen to PC? | Dr.fone
- Top 10 Best Spy Watches For your Oppo Find X7 | Dr.fone
- How to Screen Mirroring Lava Agni 2 5G? | Dr.fone
- Everything You Need to Know about Lock Screen Settings on your Vivo T2 5G
- In 2024, How To Remove Passcode From Apple iPhone SE (2022)? Complete Guide
- Bypass Activation Lock On Apple iPhone 15 Pro Max - 4 Easy Ways
- In 2024, How to Fake GPS on Android without Mock Location For your Oppo Reno 11 5G | Dr.fone
- In 2024, Best Pokemons for PVP Matches in Pokemon Go For Samsung Galaxy S23 | Dr.fone
- Proven Ways to Fix There Was A Problem Parsing the Package on Realme C67 5G | Dr.fone
- Title: New The Best Tools to Convert Text to MP3 With the Best Natural Voices for 2024
- Author: Sam
- Created at : 2024-05-19 03:35:06
- Updated at : 2024-05-20 03:35:06
- Link: https://ai-voice-clone.techidaily.com/new-the-best-tools-to-convert-text-to-mp3-with-the-best-natural-voices-for-2024/
- License: This work is licensed under CC BY-NC-SA 4.0.
