
New RTMP Streaming on Instagram A Comprehensive Tutorial
RTMP Streaming on Instagram: A Comprehensive Tutorial
Professionals and content creators now use different social media platforms for live streaming. There are many big names on these platforms, such as Instagram . Instagram is one of the most-used networks, with over 2 billion monthly active users. Using this live-stream platform is always a plus for companies and individuals.
However, the discussion is abouthow to stream to Instagram with an RTMP . This detailed guide helps you in usingRTMP Instagram for live streaming. Furthermore, you will also learn about a recommended tool that offers AI-powered features for broadcasting.
Part 1. Some Rules and Requirements To Understand Before Live Streaming on Instagram
Like every platform, Instagram has some protocols for broadcasting content to global audiences. Therefore, learning the rules and requirements before going live on Instagram is necessary. First, your account should be at least 30 days old; otherwise, they can restrict your stream.
There is a rule that you can go live for 4 hours per stream without retakes. This length was increased from 60 minutes in the recent update. Also, you can repost a live video on your profile if it is more than 15 minutes long. Instagram allows you to schedule a stream from 1 hour to 90 days in advance.
The initial requirement ofInstagram Live RTMP is that your content be respectful and updated. Additionally, you need to set your stream to 1920x1080 resolution on a vertical camera. Meanwhile, Instagram gives leverage on the number of followers so that you can start with minimum viewers. Also, there is no need to have a business account for live streaming.
Part 2. How To Live Stream to Instagram With an RTMP?
Setting high-quality live streams encourages people to tune into your broadcast. For this purpose, you need a seamless encoder like OBS . Unfortunately, Instagram doesn’t officially support third-party encoders. To solve this query, you need an effective solution.
Therefore, the following steps guide streaming on Instagram with an RTMP (Real-Time Messaging Protocol). You will also learn how to set the required parameters in this comprehensive guide:
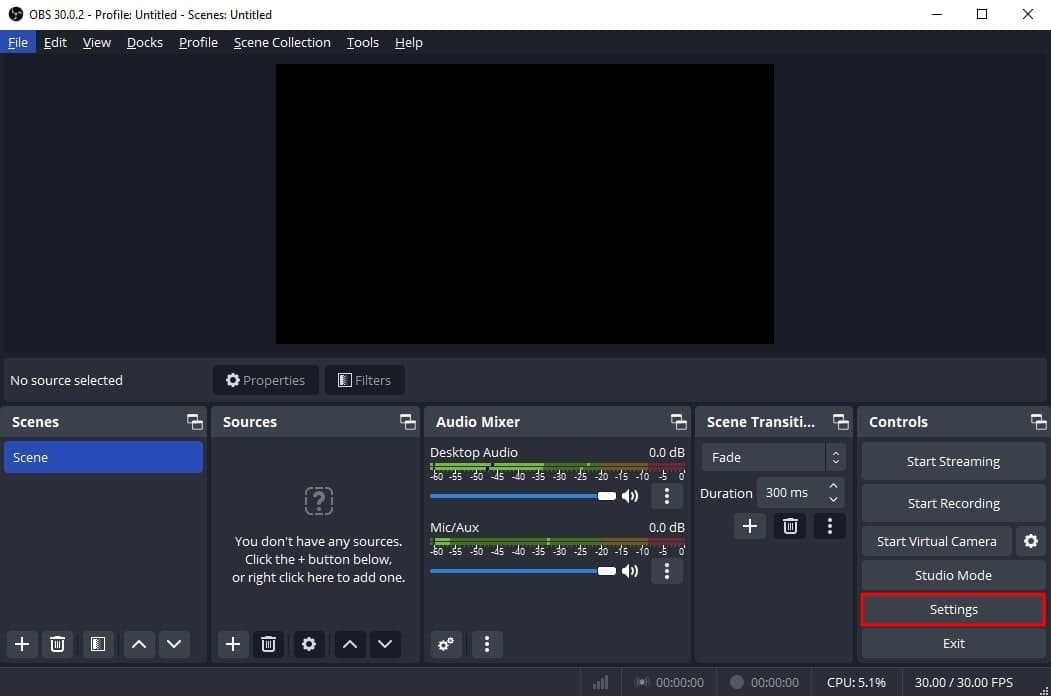
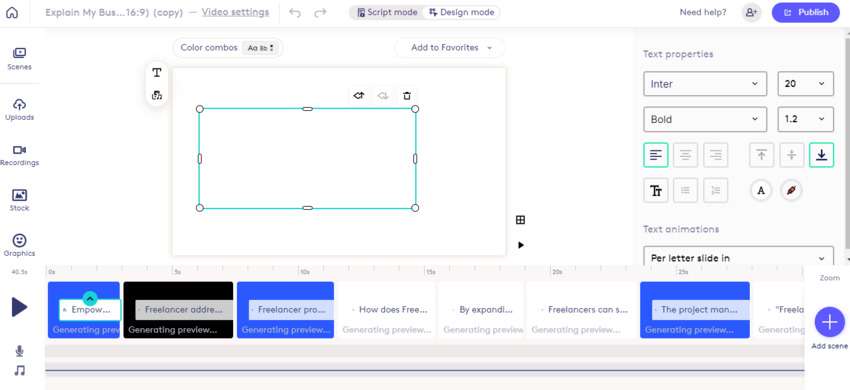
- Step 1. Start with downloading and launching OBS Studio on your PC. The first thing to do is set up vertical camera dimensions forRTMP Instagram live streaming. To access the settings window, hit the “Settings” option in the “Controls” panel.
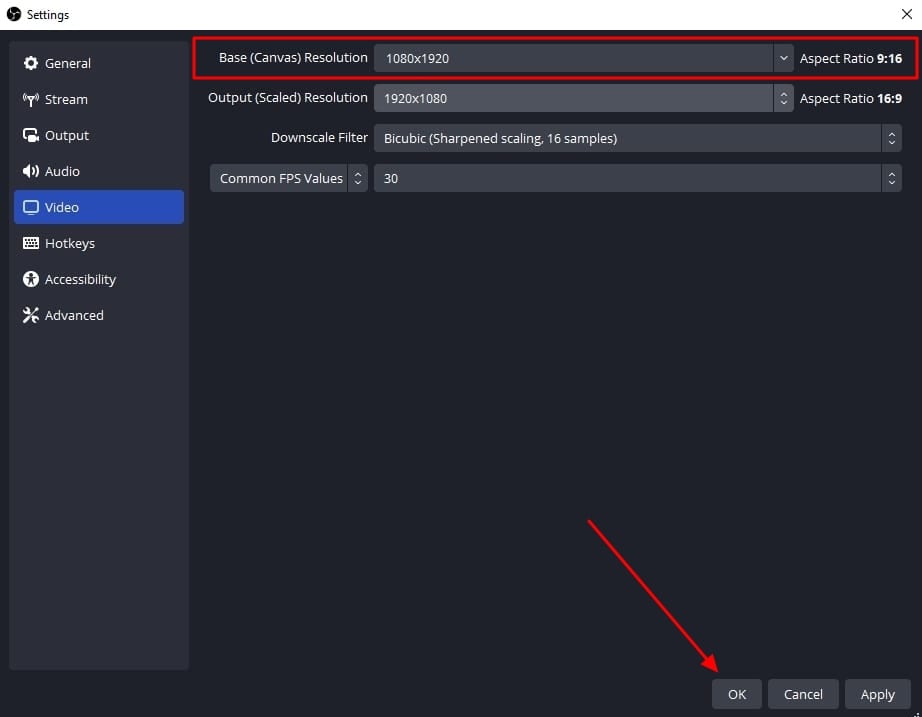
- Step 2. Look for the “Video” tab in the “Settings” window that opens. After that, enter “1080x1920” in the “Base (Canvas) Resolution” bar. Similarly, add a “1080x1920” value in the “Output (Scaled) Resolution” bar to set a 9:16 aspect ratio for vertical display. Then, hit the “OK” button to apply these changes to your Instagram streams.
- Step 3. After that, you need to add external sources to the scene. Click on the “+” icon in the “Scenes” panel or rename the scene. Once the scene is created, hit the “+” icon of the “Sources” panel. Then, select the “Video Capture Device” option from the menu and rename the device to your liking. After that, choose the video capture device from the “Device” dropdown and hit the “OK” option. Similarly, you can select the “Audio Input Capture” option to introduce an audio device.

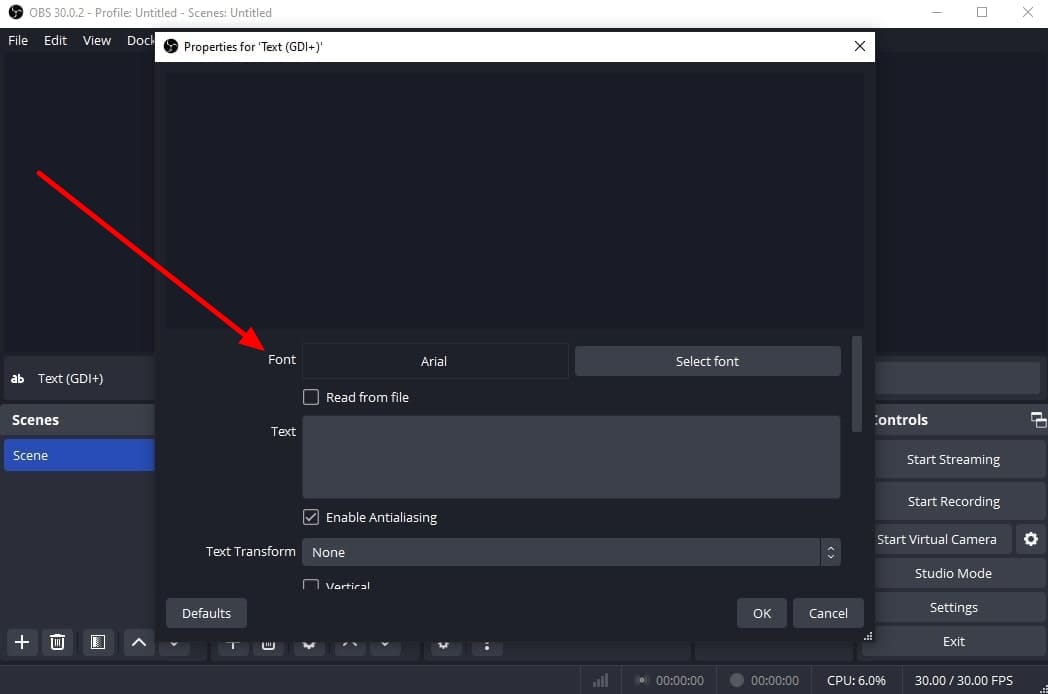
- Step 4. To add text overlays on your stream, hit the “+” icon again in the “Sources” panel. Choose the “Text (GDI+)” option and rename your overlay. On the next window, insert your text in the “Text” box. Then, click the “Select Font” button and choose your required font style and size. Additionally, you can change font color, opacity, alignment, background, and more. After customizing the text, hit the “OK” button to save the overlay in the sources section.
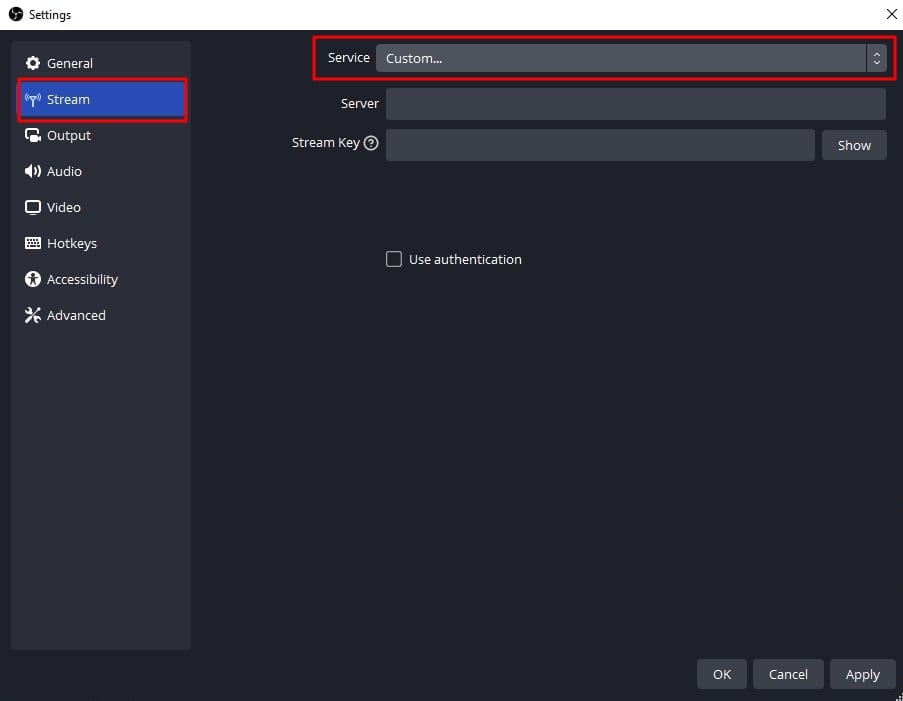
- Step 5. Afterward, select the “Stream” option in the settings window of OBS Studio. Set the “Service” to “Custom” from the dropdown. Then, you need to enter the server and stream key to proceed.
- Step 6. To get the server and stream key, visit rtmp.in on your browser. On the main interface of thisInstagram RTMP , hit the “GO LIVE ON INSTAGRAM” widget. Then, it asks you to log in to your Instagram account.
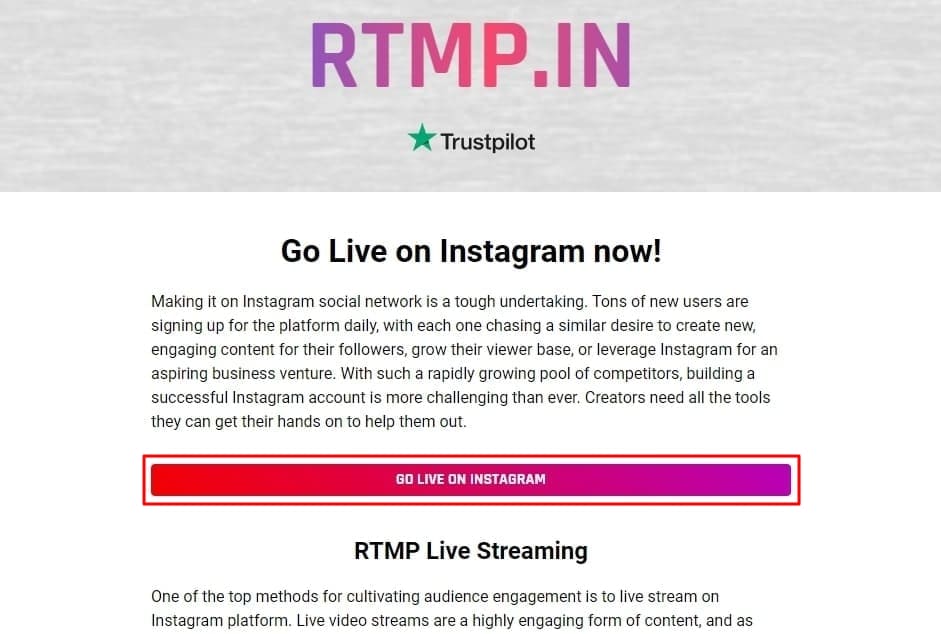
- Step 7. Once you’re logged in, it gives you a stream server URL and Stream key. First, copy the Server link and return to the OBS Studio software. Then, paste the link in the “Server” bar. After that, open the RTMP site again and hit the “Create New Broadcast” option.
You can also give a name to your broadcast in the “Broadcast Title” bar. After creating the broadcast, it shows the “Stream Key,” which you can copy. Then, move again to the OBS Stream setting panel and paste the key in the “Stream Key” bar. Lastly, hit the “Apply” option to save all these settings for your stream.

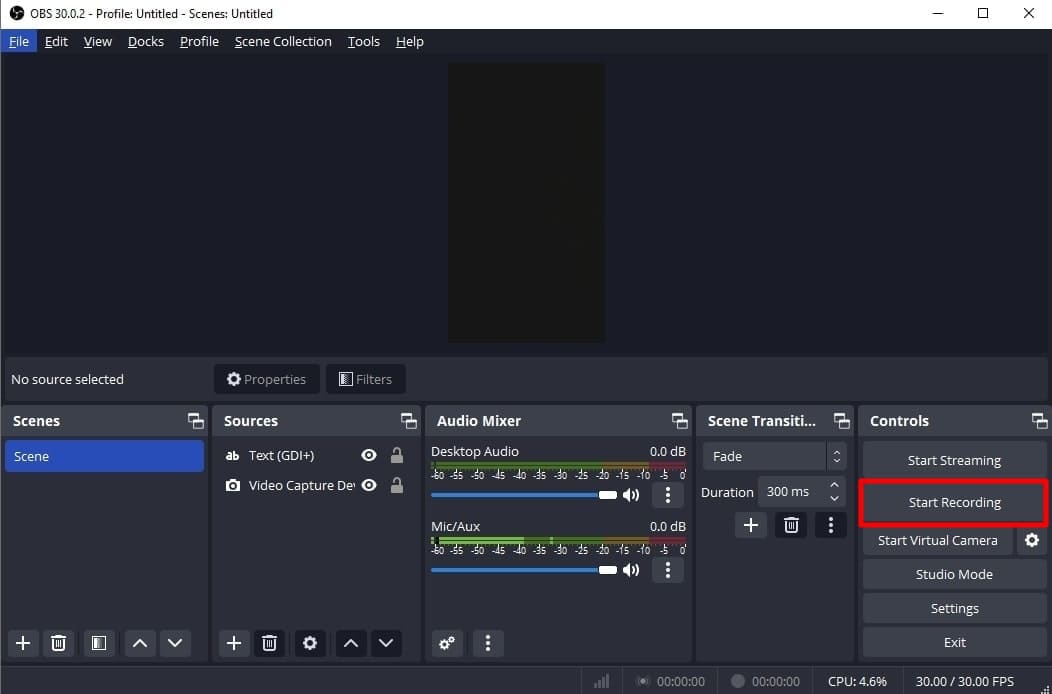
- Step 8. After getting ready, choose the “Start Streaming” option from the “Controls” panel. It starts your stream with selected parameters. To stop the stream, you can select the “Stop Streaming” option.
Part 3. How To Attract a Better Audience During Live Streaming on Instagram?
OBS Studio is an efficient software but offers limited functionality when it comes to engaging streams. Thus, you need an advanced solution that can help you reach global audiences through live streaming. For this purpose,Wondershare Virbo Live becomes an unsung hero for you. It provides AI-powered functions that help to start creative streams and generate more leads.
Moreover, the handy controls of Wondershare Virbo Live allow you to customize live streams to your requirements. Therefore, you can start streaming for different purposes, such as marketing, brand awareness, and more. Additionally, it allows you to set automatic responses and create a Q&A database to keep your audience engaged. Plus, it allows you to select creative AI avatars with different poses and outfits.
Key Features of Virbo Live
- You can choose different templates and backgrounds for a stunning streaming appearance.
- Users can write or generate scripts manually using the AI Smart Script feature. For this, they need to add prompts according to the script’s purpose.
- This tool helps to translate scripts into multiple languages and accents. Also, you can get dubbed audio in different AI voices.
Simple Guide To Start Live Streaming Using Wondershare Virbo Live
Many live streaming tools exist, but Wondershare Virbo Live provides more controls. Now, the thing is how to create a live stream room with this tool. For this, follow the given steps one by one to start live streaming with Virbo Live:
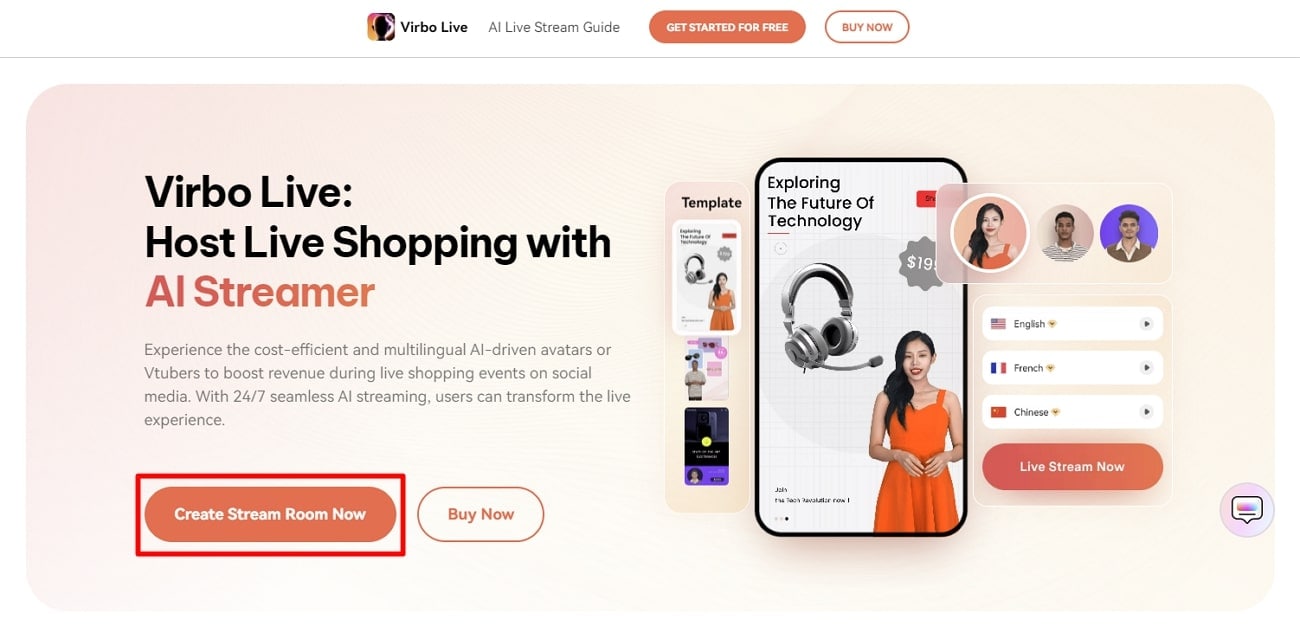
- Step 1. Visit the Official Site To Create a Stream Room
First,open theofficial website of Wondershare Virbo Live tool on your device. Navigate to the window and hit the “Create Stream Room Now” button. Upon doing that, it takes you inside the main interface of the tool.
Get Started Online Free Download
- Step 2. Advance To Create a Blank Livestream Room
Once you get to the tool’s home screen, select the “Create a Blank Livestream Room” option. Then, you can try different customization features to make your livestream room look stunning.

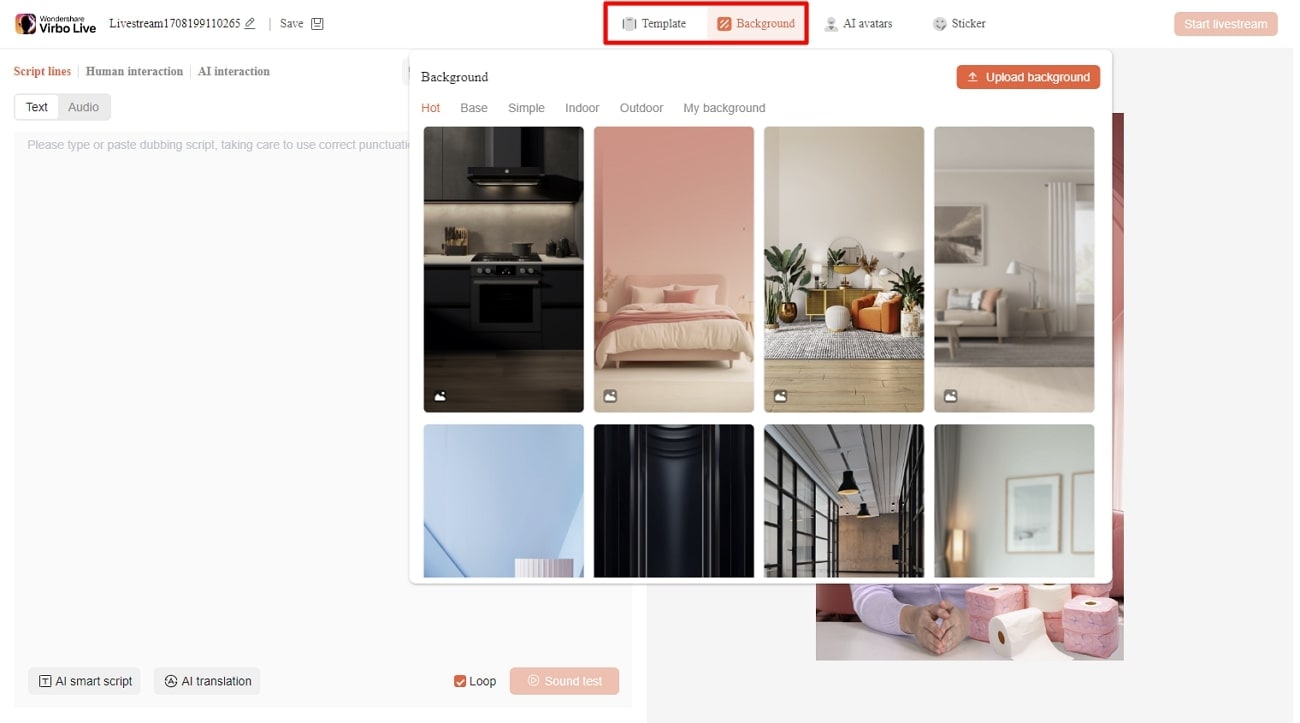
- Step 3. Customize Your Livestream Template and Background
After that, click on the “Template” tab to explore different templates. Choose a template that suits live streaming needs. Furthermore, open the “Background” tab from the same window to check exciting background options. You can select different backgrounds from variating categories in the same window.
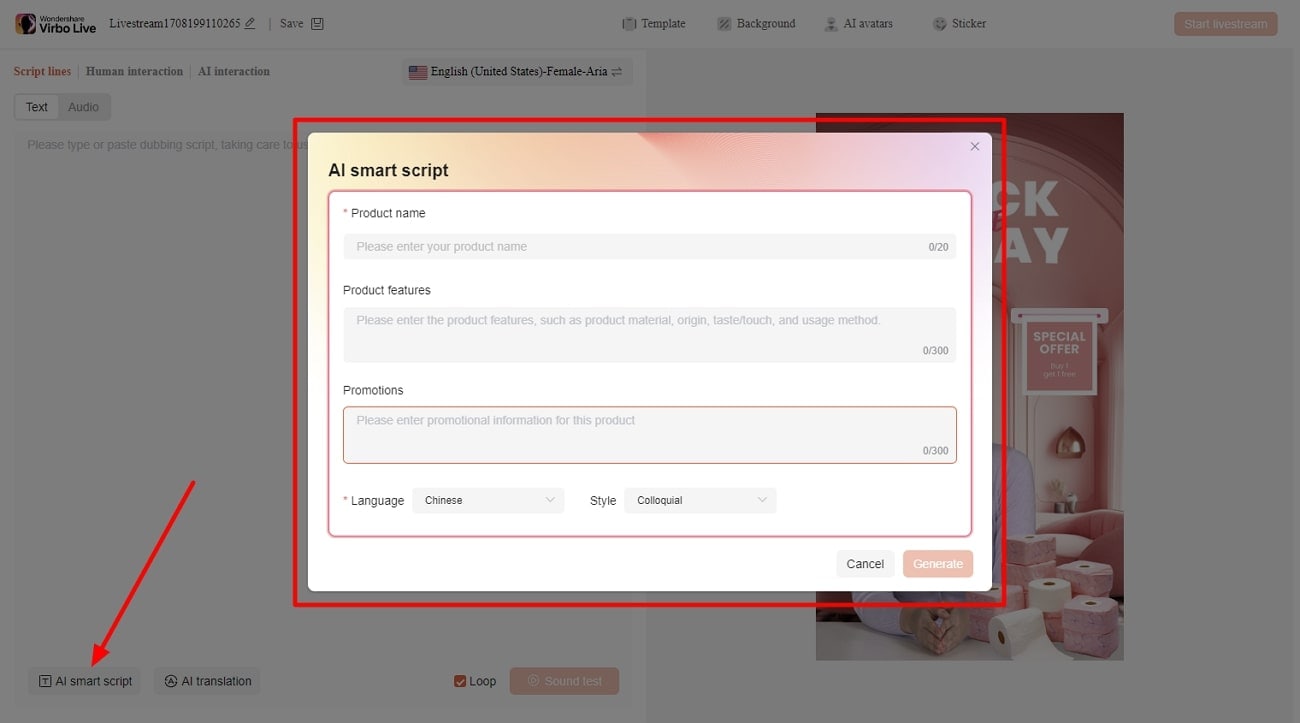
- Step 4. Add Script or Use AI Script Generator
Then, you need to provide the script for translation or dubbing. Select the “Text” given in the left side section for this. It provides a text box to type or paste your script text. Choose the “AI Smart Script” option from the bottom left corner if you don’t have a script. Add prompts there, and it will generate your scripts instantly.
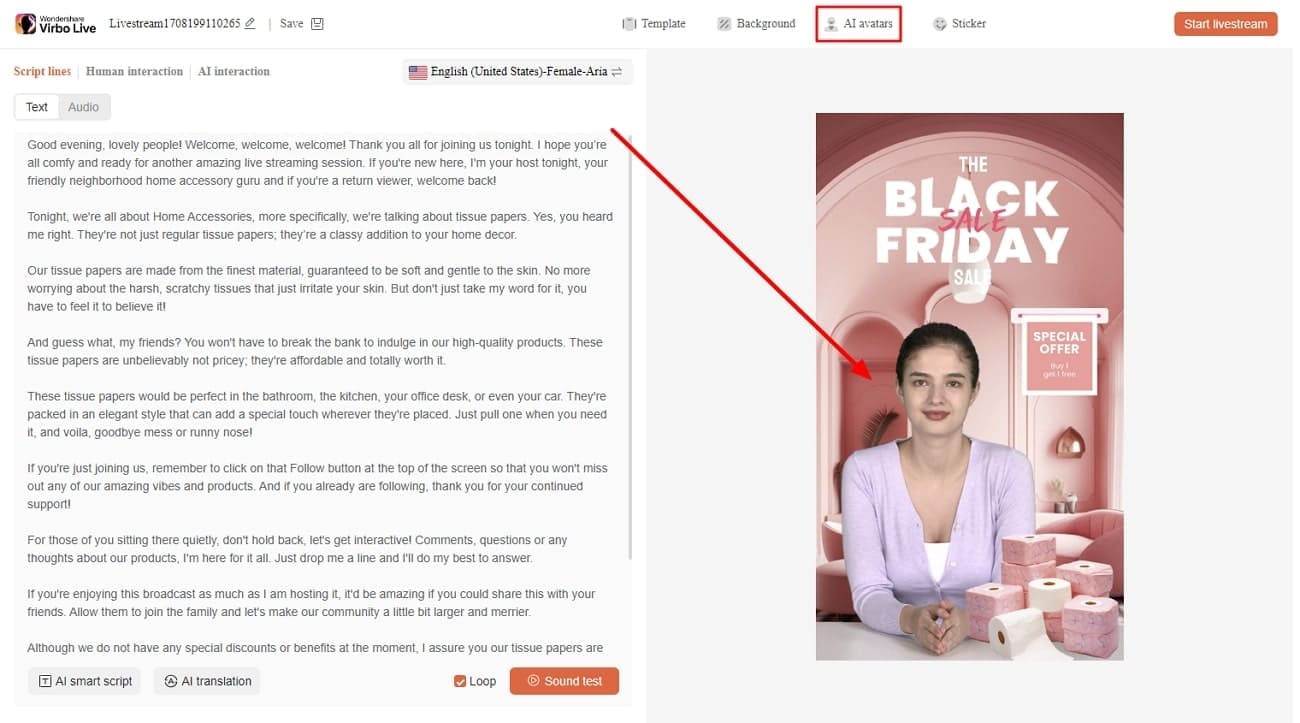
- Step 5. Select Creative AI Avatars According to Requirement
Select the “AI avatars” tab to unveil creative avatars. There is also a whole range of AI avatars to choose from. After selecting the one that suits your motive, you can preview your selected AI avatar before launching the stream.
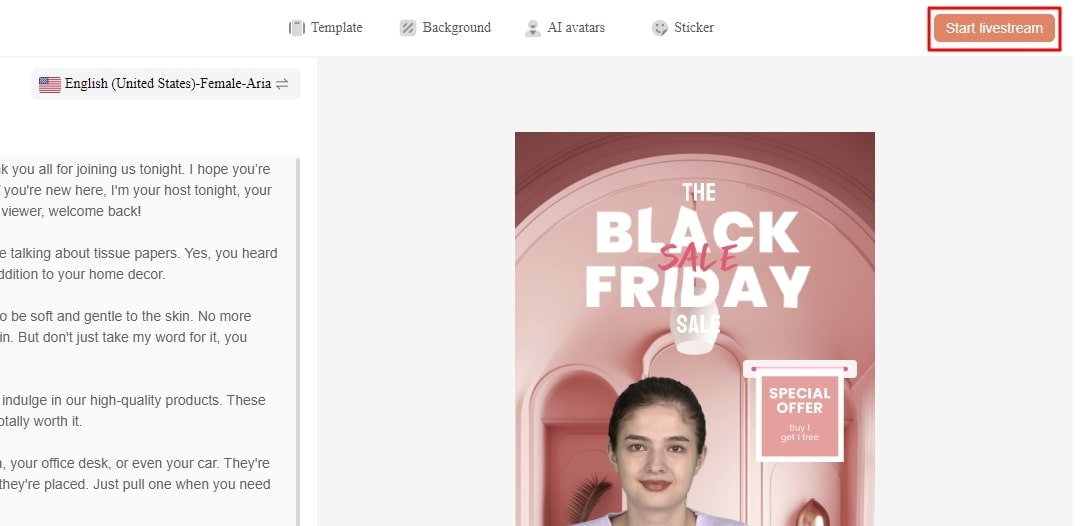
- Step 6. Start Your Livestream With All Selections
After finalizing all the options, you canproceed to start your stream. Select the “Start livestream” option from the top right corner in the same window.
Conclusion
Conclusively, this article intends to provide information about rules and requirements for live streaming on Instagram. You also learnedhow to live stream to Instagram with an RTMP like OBS Studio. Tools like Wondershare Virbo Live simplify your live streams with AI integration. Also, you can make your broadcast exciting for viewers by using different interactive elements.
Descript Overdub: Controlling the Audio in Video
With the ever-increasing technological advancements, AI plays a big role in audio recording. AI has changed how we handle work, such as in businesses, content creation, etc. One of the best features of AI is overdubbing, which accurately mimics your voice. If you want a cost-effective solution, use an AI overdubbing solution instead of re-recording audio.
Descript offers multiple AI audio-oriented features, which makes it an exceptional creative platform. With its transformative abilities to create videos from text scripts, utilize the Descript Overdub AI to enhance audio within the content. In this article, we’ll explore Descript Overdub, an AI-induced platform offering diverse tools like AI overdub.
Get Started Online Free Download
Part 1: An Introduction to Descript Overdub: A Unique Video Script Influencing Toolkit
There are several instances where you make a mistake while recording, and returning to re-recoding is not ideal. Here, we introduce you to Descript Overdub, an excellent solution for dealing with script mistakes within videos. Traditionally, outdated technology does not offer such technical tools to automatically rectify mistakes in media content.
Overdubbing is useful as it adds richness to the original recording and removes errors. You can transform your videos with the Descript Overdub AI feature. Descript Overdub uses AI voice cloning that replaces incorrect audio without re-recording it. That overdubbed audio can blend in with any audio conditions.
You’ll get the same result whether you record with a different mic or at a different place. It can fix audio mistakes in seconds that otherwise would take hours of editing. This feature saves money and verifies ownership before creating your AI voice. Users can edit, record, collaborate, and publish their work all in one place.

Key Features
Are you wondering what other tools or features Descript has to offer that can assist your needs? The following section will provide you with features other than Descript Overdub AI:
1. Text-To-Speech
Use the Descript text-to-speech feature to create voice clones with AI. Descript captures the emotions and narration style of human speech. It almost feels like a real person is talking back instead of a computer-generated voice.
2. Transcription
The Descript transcription feature provides you with industry-level accuracy and speed. You can add speaker labels in seconds with the AI speaker detection feature. It also supports over 22 languages and keeps your data secure and confidential. Also, you can access your history in DOC, RTF, or other formats with the cloud sync tool.
3. Podcast Editor
As a professional podcaster, you can also face various video editing difficulties. For this purpose, Descript presents its podcast editing software that saves you the trouble. It is an all-in-one podcast editor that can help you record, collaborate, share, publish, promote, and more. Using a built-in recording studio, you can get professional-grade audio and 4K video from this tool.
4. AI Voices
Descript AI voices can generate clone voices for you. There is a vast collection of voice actors you can choose from with different emotions, tones, and accents. It will also detect commas and vary its tone of voice according to the given text. Also, this tool smoothens over any blunders or slips you make.
Availability: Windows, Mac, and Online
Generate Engaging
AI Video in Minutes!
Easily convert text into professional spokesperson videos in over 120+ voices & languages in minutes.
Generate AI Video Free Generate AI Video Now


Limitations
Despite how many features Descript offers, there are still some limitations to using this tool. In the following section, we have highlighted some of these:
- Descript doesn’t have a mobile app for editing videos. Many users find it convenient to record and edit content on a smartphone rather than on a desktop.
- This tool can sometimes be a bit slow, especially on a MacBook. While this is common for video editing tools, it can be irritating while making videos.
- While you can find various templates within the Descript library, the options are not flexible. Users are unable to find different options to choose template themes.
- Although the transcription quality is generally great, it always needs some post-editing. Descript does not automatically update all changes of a word after fixing it in the transcript.
Pricing Plans
The pricing plan of Descript is very reasonable for content creators and provides valuable features with each plan. No matter if you are a beginner or a professional, the Descript overdub feature will help you with content creation tasks:
| Pricing Plan | Price |
|---|---|
| Basic | $12 per month |
| Pro | $24 per month |
Part 2: Descript Overdub Feature: A Step-by-Step Guide
If you cannot upload any recorded podcasts due to scripting errors, we have a solution for you. Previously, we have understood what Descript Overdub AI is capable of and how much we can take advantage of it. Below, let’s learn about Descript and how to use the Overdub feature to enhance your videos:
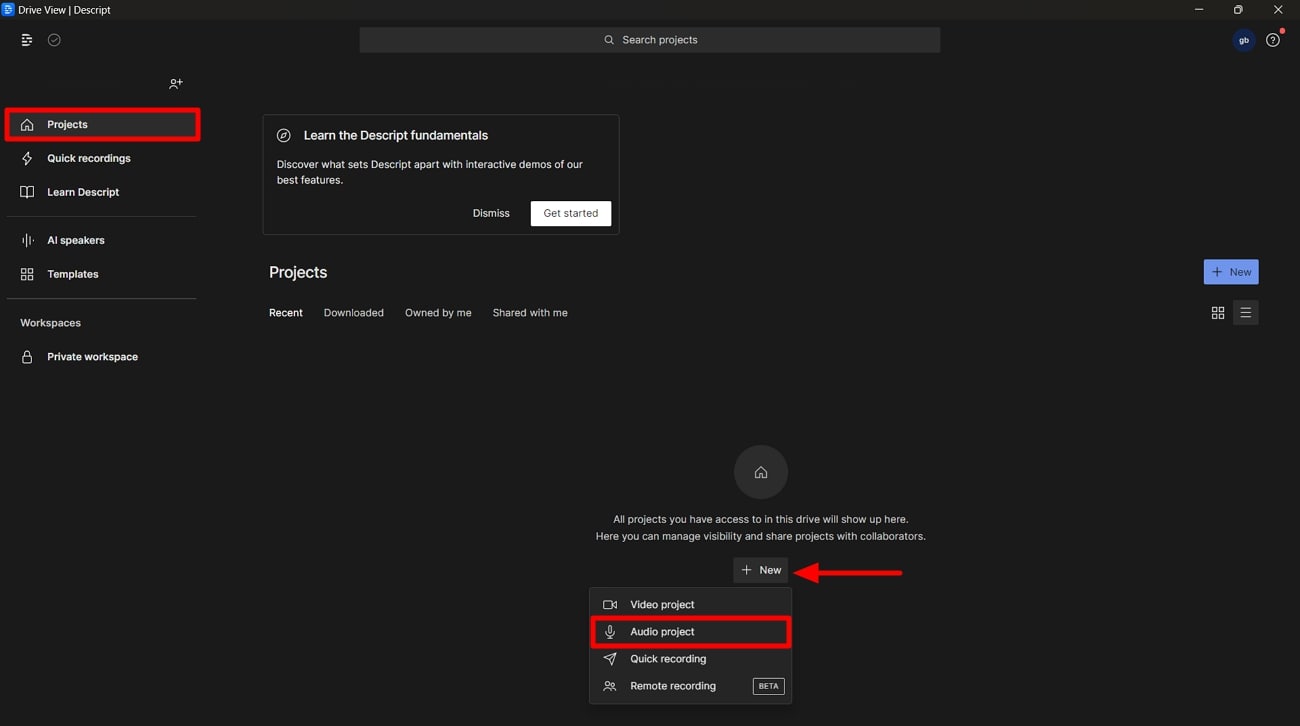
Step 1. Begin by downloading Descript and launch it on your desktop. When the interface appears, click the “Projects” tab from your left-side panel. Now, press the “+ New” button, and from the extended menu, choose the “Video Project” option.

Step 2. When a new window opens, you can write your project name above the options available. Following this hit the “Add file” option to proceed. Once the dialogue box opens, choose your desired video and import the video content.

Step 3. After the video is uploaded, a small “Transcribing” screen will appear. On this mini screen, you can choose your speaker and language for the uploaded video. When selecting the desired options, hit the “Done” button.

Step 4. Following the process, you can make your desired changes to the text without any interruption. Once the changes are done, select the changed text in the script, and a small pop-up screen will appear. Here, you have to click the “Replace” dropdown menu and choose “Overdub” to change the audio.

Conclusion
In the end, we learned how to use the Descript Overdub feature. Besides, there are many other important AI features of Descript that can benefit creators. Also, consider the limitations discussed above before using this tool as your go-to solution. Overall, the Descript Overdub feature can be used to make your audio content creation error-free.
Create AI Avatar Video
Create AI Avatar Videos
You can start creating your AI avatar video by clicking the “Create Video” button on the homepage.
03 Edit Video
04 Export Video
Step 1. Create a Project
Click “Create Video” to start creating a new video.
Create a Project
Select the video aspect ratio that you desire. You can choose either to make a landscape video or a portrait video based on your needs. Click “Create Video”.
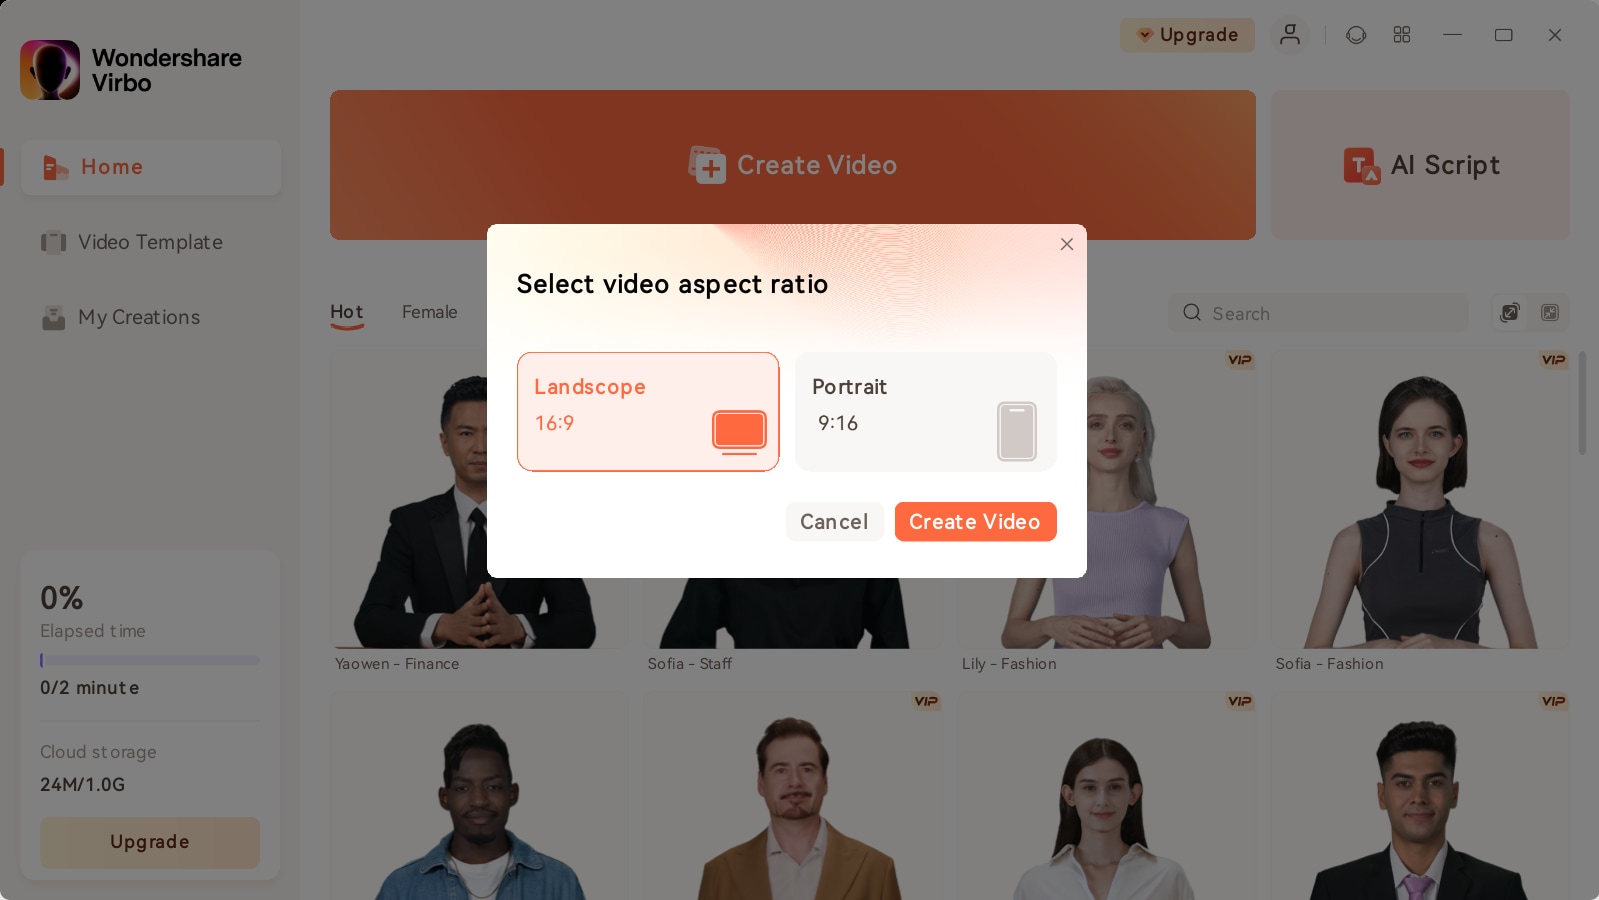
Choose Aspect Ratio
Step 2. Choose Avatar & Voiceover
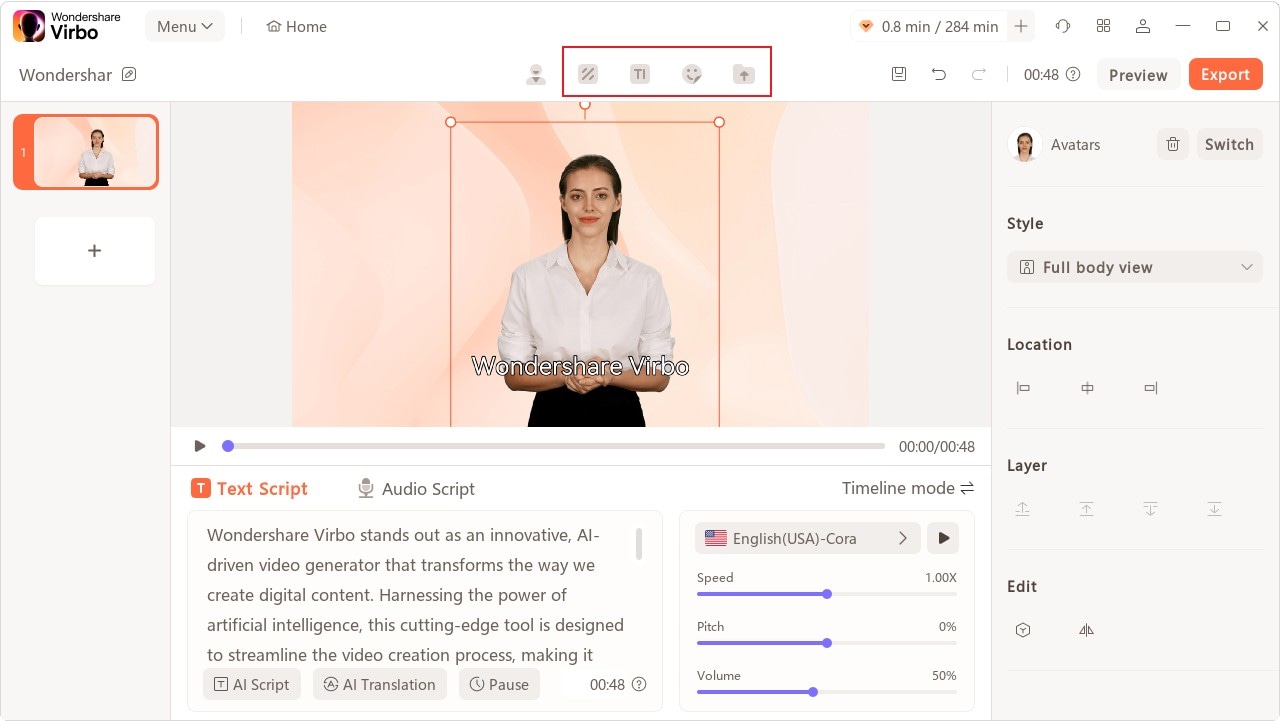
Once inside the user interface, click “Avatars” to pick an AI avatar for your video. Click the shown avatar in the screen, and an action bar will appear on the right side of the screen, where you can choose to adjust the style and location of the displayed video persona.
![]()
Choose Avatar
Enter the text you intend to put in the video. You can adjust the speed, pitch and volume of your avatar at the bar shown on the right. Click “Play Script” or “Preview” once you finished operation to preview the video.
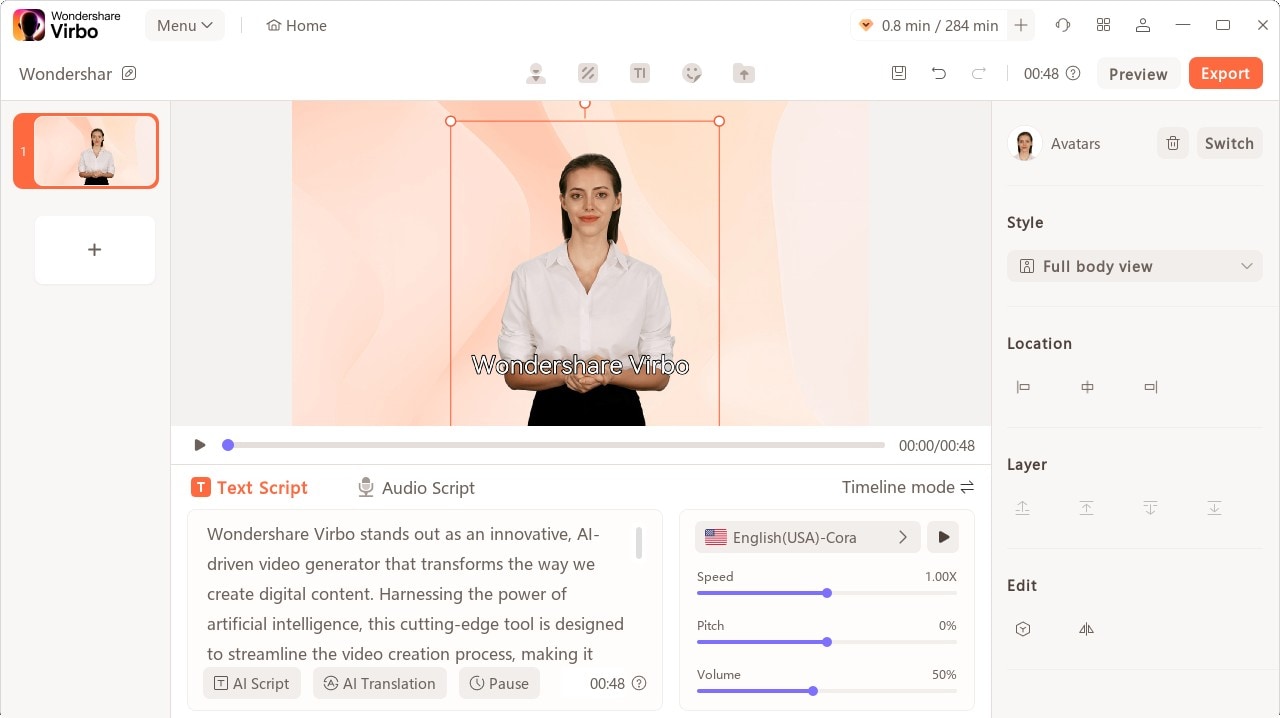
Play Scripts
Step 3. Edit Video
You can also adjust the background, choose the text style, or add the sticker to the video.
Edit Video
Click Background Music > None to choose the music for the video, or you can upload your own music that you intend to use.
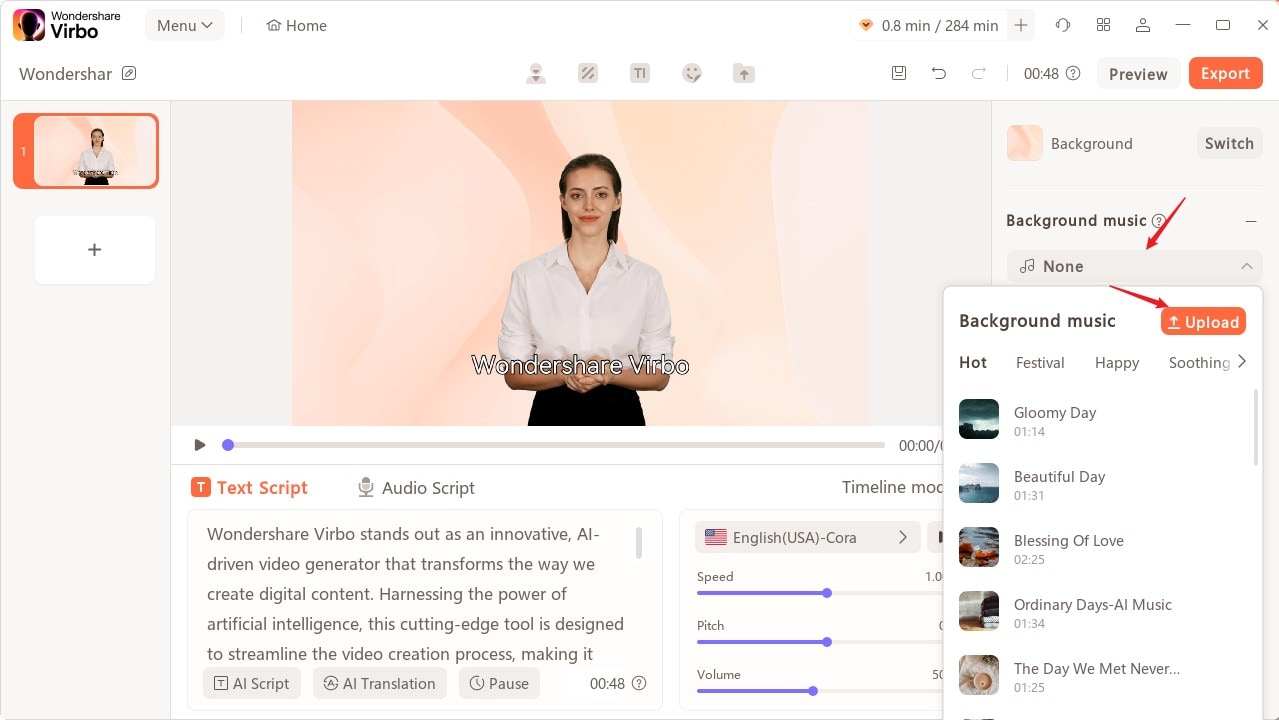
Choose Background Music
Step 4. Export Video
Once you are satisfied with the effect of the whole video, click “Export” to generate the video. In this way, a brand new video using Virbo AI avatar is created.
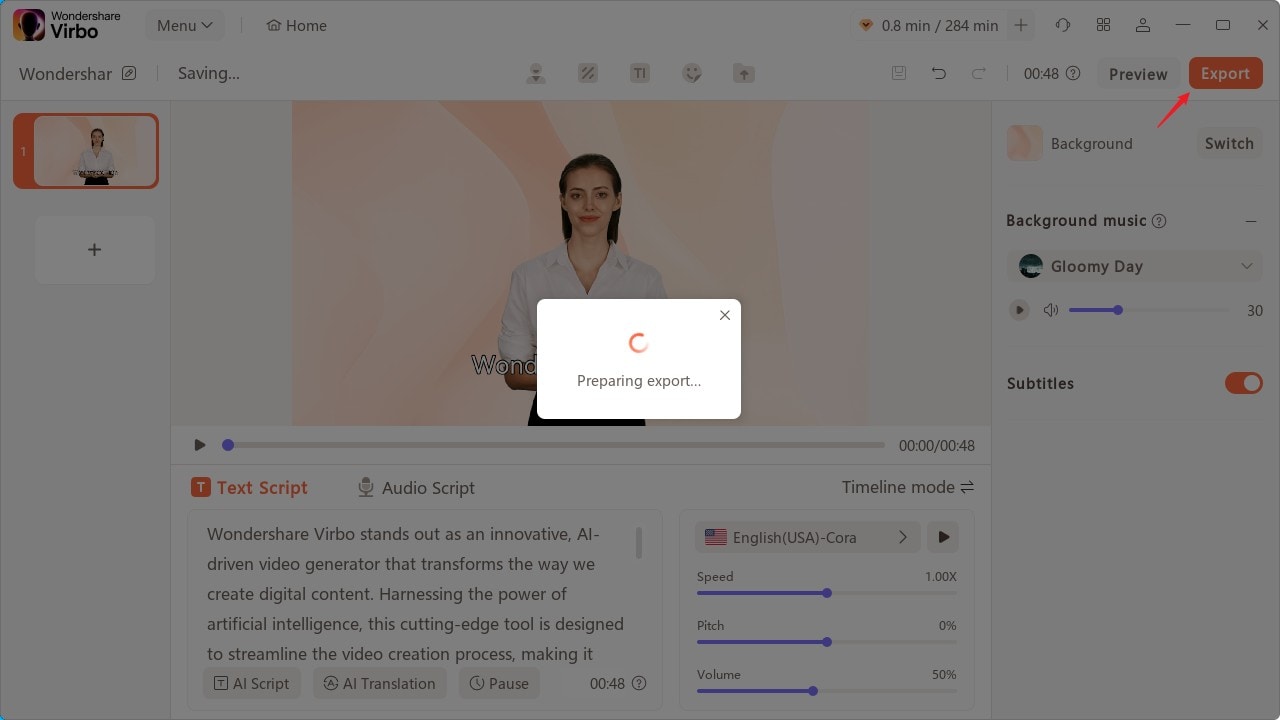
Export Video
03 Edit Video
04 Export Video
Step 1. Create a Project
Click “Create Video” to start creating a new video.
Create a Project
Select the video aspect ratio that you desire. You can choose either to make a landscape video or a portrait video based on your needs. Click “Create Video”.
Choose Aspect Ratio
Step 2. Choose Avatar & Voiceover
Once inside the user interface, click “Avatars” to pick an AI avatar for your video. Click the shown avatar in the screen, and an action bar will appear on the right side of the screen, where you can choose to adjust the style and location of the displayed video persona.
![]()
Choose Avatar
Enter the text you intend to put in the video. You can adjust the speed, pitch and volume of your avatar at the bar shown on the right. Click “Play Script” or “Preview” once you finished operation to preview the video.
Play Scripts
Step 3. Edit Video
You can also adjust the background, choose the text style, or add the sticker to the video.
Edit Video
Click Background Music > None to choose the music for the video, or you can upload your own music that you intend to use.
Choose Background Music
Step 4. Export Video
Once you are satisfied with the effect of the whole video, click “Export” to generate the video. In this way, a brand new video using Virbo AI avatar is created.
Export Video
Handling Exceptions | Virbo AI Live Stream
Handling Exceptions
Effectively managing unforeseen scenarios or exceptions, ensuring a smooth and uninterrupted live streaming experience!
02 Insufficient Cloud Storage Space
03 No Sound in the Live Mini-Window
04 Video Lag or Audio-Video Desynchronization
08 Unusual Duration of Live Streaming
No Live Streaming Permissions
1For our free users, kindly note that streaming privileges are not available. Upgrade to a VIP membership by visiting our purchase page.
2If you are already a VIP user, please ensure your authorization is current. You can refresh it by navigating to the product homepage and clicking on your personal profile.
Insufficient Cloud Storage Space
1Check your cloud storage status by clicking on your personal avatar on the product homepage.
2If your cloud storage is running low, head to the purchase page to acquire additional space.
No Sound in the Live Mini-Window
1We highly recommend using the Chrome browser and updating it to the latest version for optimal and stable performance.
Video Lag or Audio-Video Desynchronization
1We highly recommend using the Chrome browser and updating it to the latest version for optimal and stable performance.
Text Cannot Be Previewed
1We highly recommend using the Chrome browser and updating it to the latest version for optimal and stable performance.
Streaming Failed
1We highly recommend using the Chrome browser and updating it to the latest version for optimal and stable performance.
Live Streaming in Progress
1We highly recommend using the Chrome browser and updating it to the latest version for optimal and stable performance.
Unusual Duration of Live Streaming
1We highly recommend using the Chrome browser and updating it to the latest version for optimal and stable performance.
Order Inquiries
1We highly recommend using the Chrome browser and updating it to the latest version for optimal and stable performance.
A Guide to Unlock Descript Text-to-Speech Features in Detail
Content creators often struggle with time-consuming tasks like crafting scripts and narrations. Here, Descript text-to-speech emerges as a game changer in the video editing scene. Its features have become crucial in automating voiceovers, generating scripts, and ensuring accessibility.
Users must understand the effective use of TTS to ensure a smooth editing process. As we explore the range of TTS tools, this article focuses onDescript TTS, the top performer in the market.
Part 1: Text-to-Speech in Descript: A Review
Availability: Windows, Mac, and Online
While exploring TTS technology, it becomes clear that these tools come in many forms. They offer unique automation options to convert written content into spoken words.Descript AI text-to-speech , in particular, differentiates itself with its strong features. Its entire project creation process includes user-generated scripts or content generated through AI.
Whether you choose to write out your ideas or rely on AI, Descript changes the input into speech. It brings the content to life through the application of advanced AI algorithms. This direct transition from written script to spoken words showcases the tool’s efficiency.
Moreover, it offers realistic AI-powered text-to-speech to simplify podcast and video production. You can create voice clones or use stock AI voices for quick audio generation. The creation of these dubbed voices is without recording or editing. With the natural speech patterns training, it delivers lifelike intonations and pauses. Also, it allows you to customize vocal styles for various settings and emotions.
Other Top-Notch Features of Descript
1. Overdub
If you want to correct your mistakes or enhance a specific part of an audio track, you don’t need to re-record it. The Overdub feature enables you to record an extra soundtrack with AI voice cloning. It allows users to type what they meant to say without a time-consuming editing process. Plus, the tool ensures users fully own their AI voice for easy sharing with others.
2. Regenerate
The irritating background noise or unmatched tone can make your videos imperfect. Descript’s Regenerate feature restores your audio by fixing errors. The tool uses AI technology to match your tone and regenerate a lifelike sound in a few clicks. It eliminates dull dialogues and background noises available in your videos and podcasts.
3. Remove Filler Words
Filler words and verbal hesitations can impact the presentation by distracting listeners. Descript’s feature to cut filler words addresses this need with a quick solution. You can remove words like “ums,” “uhs,” and “you knows” with it. Removing fillers empowers you to present a compelling audio presence.
4. Studio Sound
The “Studio Sound” feature removes background noise, enhances speech, and mimics studio-quality recording. It tackles echo and imperfections in the audio and video editing. You can isolate voices and regenerate audio quality by removing unwanted noise. Users can use it in different recording environments to create professional-sounding content.
Pricing Plans
After exploringDescript text to speech with other features, let’s discuss how much it costs. It has different options to fit what you need to make it accessible for everyone:
| Plans | Price |
|---|---|
| Descript Creator | $12 per user/month |
| Descript Pro | $24 per user/month |
Part 2: TTS Function in Descript: Getting Aware of the Operations
Imagine you’ve put much effort into writing the script, ensuring every word is right. But the idea of recording audio seems a bit overwhelming. That’s where theDescript text-to-speech feature finds its application. It can turn your written script into captivating audio with simple steps. Let’s explore the easy steps to see magic and give life to your video scripts:
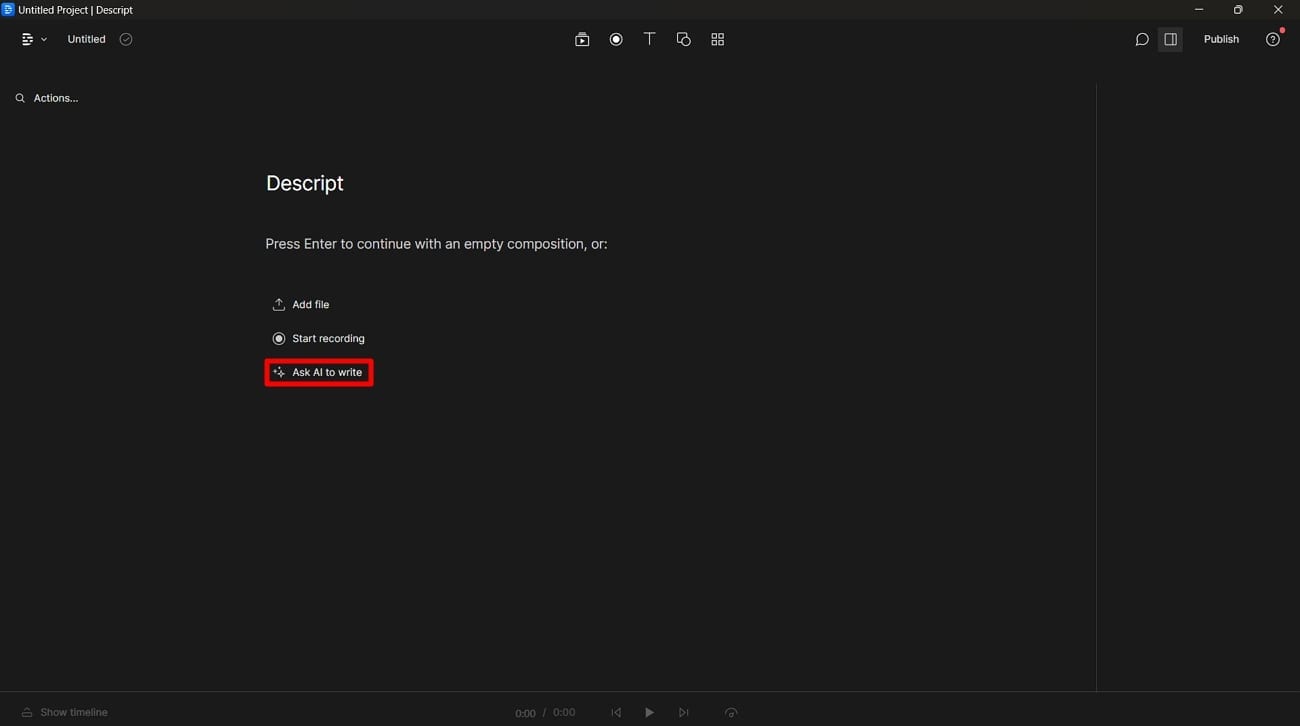
Step 1 Create an Audio Project
First, visit the official website of Descript, download the tool, and open it on your devices. On the tool’s dashboard, head to the left toolbar and click the “Projects” tab. On the upcoming window, tap on the “New” button. Now, you’ll find a dropdown menu; choose “Audio Project” among the available features. Then, you’ll find a new screen to do your audio projects.
Step 2 Generate the Script
Start writing your script to generate lifelike voices. However, if you want to write a script yourself, press “Enter.” In contrast, if you want to get an AI-generated script, choose the “Ask AI to Write” option.
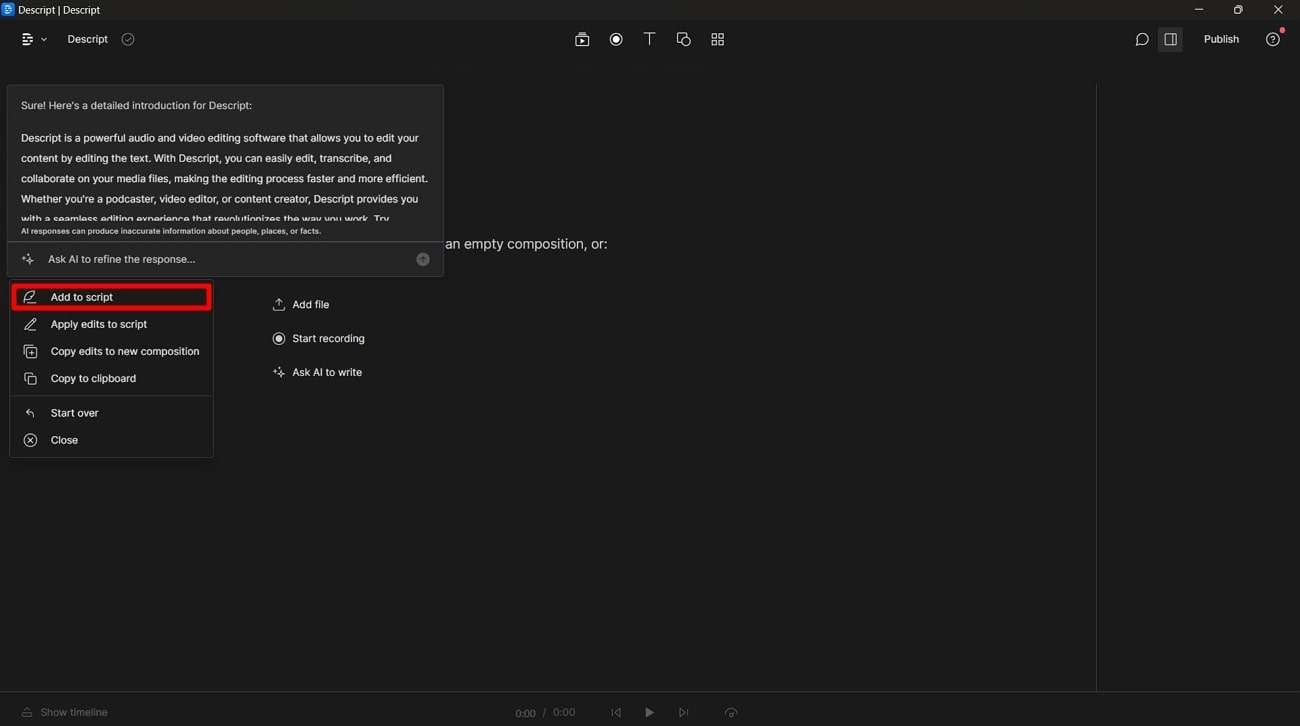
Step 3 Employ AI to Polish Your Script
After clicking this button, a dialog box will appear on the screen. Now, write what you want AI to do in the prompt box and select the “Enter” key. You can specify your output of a whole script, an outline, or brainstorming ideas for your content. Moreover, you can ask AI to refine the result to get the required answer. Finally, choose the “Add to Script” option to use it for your videos.
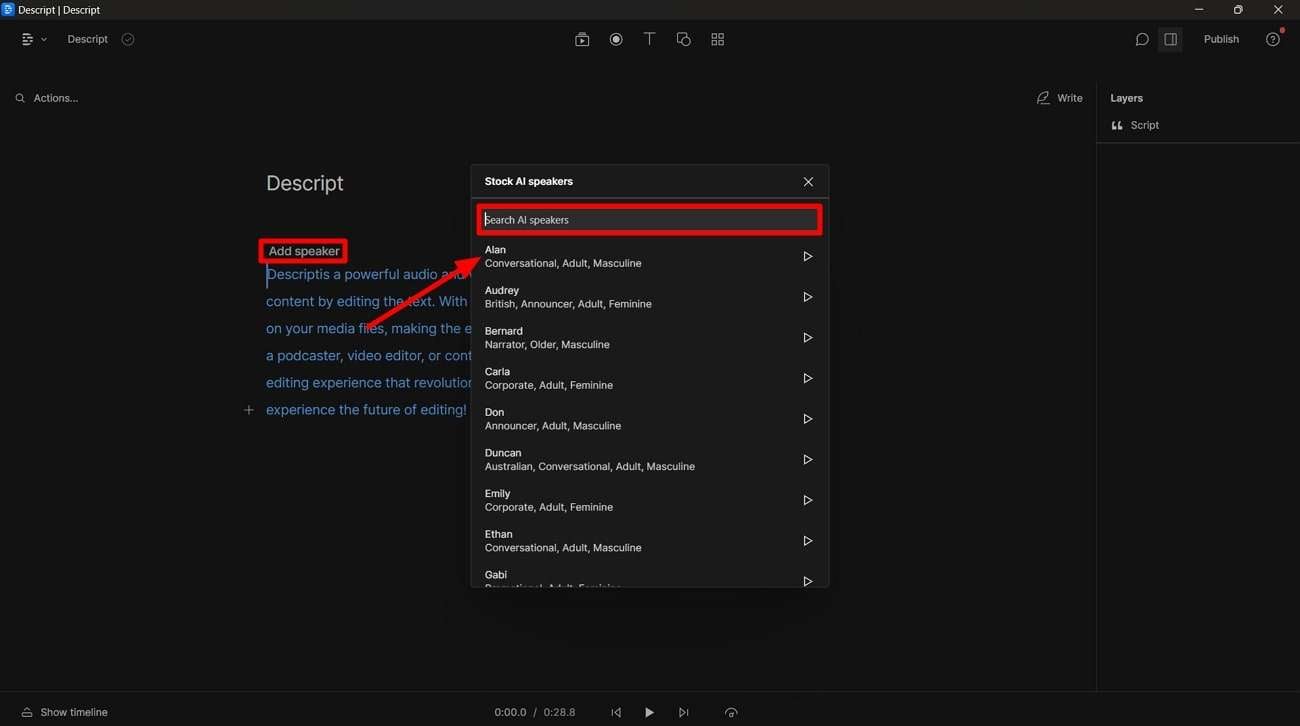
Step 4 Add Speaker to Your Project
In the next step, the chosen script will appear on the screen. Now, hit the “Add Speaker” button to select the speaker you want to produce voices for your videos. You can opt for the “Browse Stock AI Speakers” to choose among the speakers offered by the tool. Later, navigate to the bottom of the screen and tap on the “Play” icon to preview the recording.
Conclusion
In conclusion, users are now familiar withDescript TTS, where efficiency and creativity come together. Descript offers an understanding of the possibilities of TTS and stands out as a leader. This article discusses the features it offers at an affordable pricing plan. Plus, the easy-to-follow steps help you convert written text into customized voices. Due to its cross-platform adaptability, you can use it on Windows, Mac, and even online.
7 Best Explainer Video Makers You May Like
An explainer video is a short video of a few minutes in which a company can represent its product. The main purpose of making explanatory videos is to boost the company’s sales. Because in explainer video production it must be kept in mind that the company’s product is completely explained and some awareness will also be created among the people about your brand. Other purposes may include providing education, improving SEO, etc. In this article, I am going to tell you the importance of making an explainer video along with the names of some explainer video creators. So, let’s dive into it.
Part 1: The Importance of Making Explainer Videos
The importance of making explainer videos in today’s digital world can be described in the following points:
1. Engage and connect with the audience
Explainer video contains images, animations, and stories which help in grabbing the attention of the users so that one can engagingly convey his information. This can bring a positive impact on your brand. It also helps in the educational process, educator uses explanatory videos to grab the attention of the students so that they can able to understand and learn more and more.
2. Increase brand awareness and reach
With the help of these explanatory videos, one can create awareness about his brand among the public and also increase its reach by sharing these videos on different video-sharing platforms as well as on a website. With multi-platform accessibility and search engine visibility, these videos position your logo as an industry authority, whilst regular branding and compelling calls to motion foster a deeper connection, ultimately changing visitors into unswerving clients and advocates.
3. Boost conversion rates and sales
By showcasing your products through these explanatory videos, one can easily increase conversion rates as well as sales also because these types of videos are usually created in a way that they can answer the particular question which is in the mind of the public and embedded on the landing pages. Explanatory videos increase logo attention and reach by simplifying complex messages, enticing viewers with visuals and emotions, and inspiring social sharing.
4. Enhance website SEO and visibility
An explanatory video is always beneficial for your website because by embedding explainer videos on a website one can enhance his website’s SEO and later bring organic traffic also it can help in reducing bounce rate, making the website look more appealing, enhancing user experience and also grabbing their attention.
5. Stand out in a competitive market
It is very much important to represent your product in a unique attention-grabbing way to generate sales in today’s fast-paced digital world because you have many competitors and you have to win the race. So, after not any compromise on quality and quantity as well you should have to advertise your brand in such a way that it becomes unique in front of everyone.
Part 2: 7 Best Explainer Video Makers
There are many explainer video creators in marketing we are going to discuss 7 best explainer video makers among them.
1. Wideo
Wideo is an amazing web-based platform for creating animated videos. It helps users in creating 2d or 3d explainer videos without any technical skills or prior experience. Just like other products it also has its good and Cons which are as follows:
Pros
- It is user-friendly. Anyone can use it.
- It offers a wide range of graphics, templates ad animations. By using all these you can grab the attention of the users easily.
- Wideo is cloud-based which allows different users to work on the same project at a time. This is very helpful for team working as well as remote working.
- As it is a web-based platform so you do not have to download any heavy software and apps as well.
Cons
- Wideo is only suitable for basic projects not for complex projects.
- Although Wideo is also available in the free version some of its advanced features have subscription fees.
- As it is a web-based platform that’s why it requires a stable internet connection.
- Wideo allows you to add audio to your content but there are some restrictions like you do not adjust the volume according to your choice etc.
2. Powtoon

Powtoon is also a web-based platform for creating videos. It is too much user friendly so that anybody can use it effectively. It also helps in creating lectures and explainer videos.
Pros
- Powtoon has different pre-designed templates specifically for explainer videos which helps in creating eye-catching videos. You can also customize templates easily.
- You can easily share the designed video to your social media accounts or website etc.
- It allows you to add transition effects your videos.
- Moreover, you can add your voiceovers or other sound effects to your video.
Cons
- As it is also a web-based platform so it is also dependent on the Internet. Failure in internet connection may cause problems for you.
- It also has sharing limitation as per your subscription plans.
- Powtoon is not designed to create professional animations.
3. Moovly
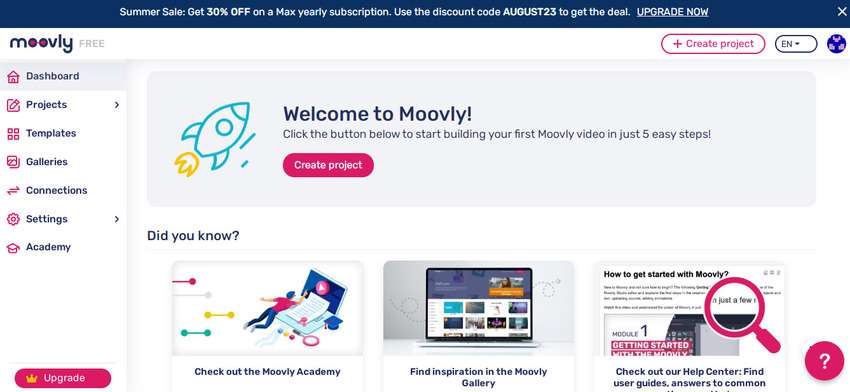
Moovly is an online video creation platform through which one can easily create explainer videos because it provides a variety of templates, images as well as audio clips. It is good to use in small businesses as well as for educational purposes. Some of its pros and cons are as under:
Pros
- Moovly offers an easy-to-use interface for beginners.
- It has over one million libraries of stock images, templates as well as audio files.
- You can also add audio and do voiceovers.
- It also allows users to export videos in HD quality.
- Moreover, it is affordable to begin with creating explainer videos.
Cons
- Advanced features are only available in premium plans.
- You may also experience bad customer response.
- You may find bugs.
- It focuses on 2d animation and has limitations in 3d animation.
4. Vyond
Vyond is another cloud-based software for video creation. It not just only helps in creating 2d and 3d animated videos but also creates whiteboard explainer videos. It is a good choice for freelancers and also for educators because it helps too much in creating engaging content.
Pros
- Vyond has huge assets of templates, images, etc.
- It has integrated with different software like google drive etc.
- The platform has made sharing explainer videos easy.
- It also has good customer support.
Cons
- Vyond is undoubtedly an expensive tool to try.
- It has some restrictions on freemium version for 3D animations.
- It also has some restrictions when we customize templates by our choice.
- You may face some bugs and errors while dealing with longer videos.
5. Virbo
Virbo is developed by Wondershare. It is an Ai video creation platform where you can easily create high-quality videos with less or sometimes with no editing. So, say goodbye to old editing software that takes lots of time name of editing because it’s time to say hello to Virbo as it creates engaging videos for you with the help of AI. Virbo mainly needs a stable internet connection, a 4 GB RAM, a 20 GB of storage.
Get Started Online Free Download
Compatibility
Virbo is compatible a with wide range of devices which includes:
- Desktop computes
- Web Browsers
Key Features
Here are some key features of Virbo by Wondershare
- Virbo supports diversified operating systems, due to which you can use its single premium account on multiple platforms without issues.
- It integrates 150+ AI Avatars with multinational features. You can also select the AI Avatars as per their styles, ages, or ethnicity.
- There are versatile amounts of commercial stock in Virbo. You can also use the 180+ Virbo templates along with royalty-free music.
- This tool also integrates natural AI Voices. With these AI Voices, you can make top-class text-to-speech videos.
6. Animaker
Animaker is yet another online video creation platform for explainer videos. It allows users to create animated videos, presentations as well as other visual content. It is very helpful in explainer video production. Here are some Pros and Cons of the product.
Pros
- Animaker is good to start with due to low-budget and intuitive UI.
- It has large asset of images and templates which you can easily customize according to your choice.
- It also has an ability to do voiceovers as well as add audio effects.
Cons
- Although it has user friendly interface but the beginners may feel difficulties in understanding the effective use of tools and features.
- It primarily focuses on 2d animation.
7. Biteable
Biteable is a web video creation platform that permits users to create animated explainer movies, product demos, and social media videos quickly and effortlessly. It has ability to export videos in HD first-rate with a number of customizable templates to begin with.
Pros
- Biteable has ability to add textual content, voiceovers, and song.
- It has affordable pricing plans.
- Sometimes it has free plan to be had.
Cons
- Biteable can be sluggish to render larger videos.
- It’s some features are available only in top-class plans.
- Its customer guide can be sluggish to respond.
- There are some bugs in this software.
Conclusion
In the dynamic realm of animation and video tools, numerous alternatives, along with Wideo, Powtoon, Moovly, Vyond, Animaker, and Biteable, present themselves as reachable solutions for content material advent, catering to people with restricted layout expertise. Striking a balance between comfort and disadvantages inclusive of getting to know curves and net reliance is pivotal in making a knowledgeable preference. Virbo, an AI-driven platform, distinguishes itself by using hastily generating brilliant videos, though with ability downsides.
Notably, Virbo excels through its consumer-intuitive interface, collaborative talents, and reservoir of inventory sources. While mainly desirable for crafting advertising and marketing and academic movies, customers with aspirations of complicated customization might discover exchange avenues well worth exploring. In evaluating these options, customers have to weigh the advantages of ease-of-use in opposition to concerns like net get admission to and hardware prerequisites to select the device that aligns greatly with their content material advent objectives.
How To Generate Speech From Text | The Top Text-to-Speech Converters
In today’s digital age, using the latest technology to enhance productivity is imperative. Text-to-speech converters have revolutionized the way we interact with written content. Knowinghow to generate speech from text serves a great number of benefits. This cutting-edge technology has allowed humankind to bridge the gap between language and technology.
Here, you can delve deep into the world of text-to-speech converters. Discover the top features, benefits, and how-to guides toconvert text to voice easily.
Part 1: What are the Benefits of Converting Text to Audio in Real Life?
It would be a good idea toconvert text into audio for several reasons. Here are some key benefits that the process can provide:
1. Accessibility and Assistance
Text-to-audio conversion plays a crucial role in creating a more inclusive digital environment. People with various forms of disabilities and impairments can make use of this technology. Converting text into audio empowers such individuals and helps them stay informed and connected to the real world.
Reading content, particularly long-form content, can be challenging for people with visual impairments, dyslexia, or other reading and developmental difficulties. If youconvert text to audio , you can make your written content easily accessible to them.
2. Enhanced Learning and Language Improvement
Converting text to speech can significantly benefit language learners. Studies have proved that listening to text aloud helps greatly improve pronunciation, comprehension, and fluency. To enhance their language, a simple solution is toturn text into audio and listen to it. Many converters have various speech options these days that can help with this.
3. Ease of Content Consumption
An added benefit ofgenerating speech from text is making your content easy to access and consume. Users have different preferences for content consumption. Written content is often a cause of eye strain and fatigue. Engaging audio content provides a great alternative to written content. By simple conversion, your content can cater to different user learning styles.
4. Improved Engagement
Audio content can be much more engaging as compared to written content. Bycreating voice from text , you can capture the audience’s attention and create a more immersive experience. Text-to-speech conversions can also facilitate better communication. It enables natural and engaging interactions between users and their devices.
5. Boosting Productivity
Moreover,converting text to voice is a good idea when you wish to boost efficiency. Especially in professional settings, you can listen to important documents, emails, or reports on the go. You can perform other tasks simultaneously, enabling you to save time. This can add a significant productivity boost to your everyday tasks.
Part 2: The Best Tools Available in the Market to Generate Audio from Text
After knowing the benefits of text-to-speech conversion, you might wonder how to perform the task. Here are the top 5 tools that can help youcreate audio from text quickly and easily.
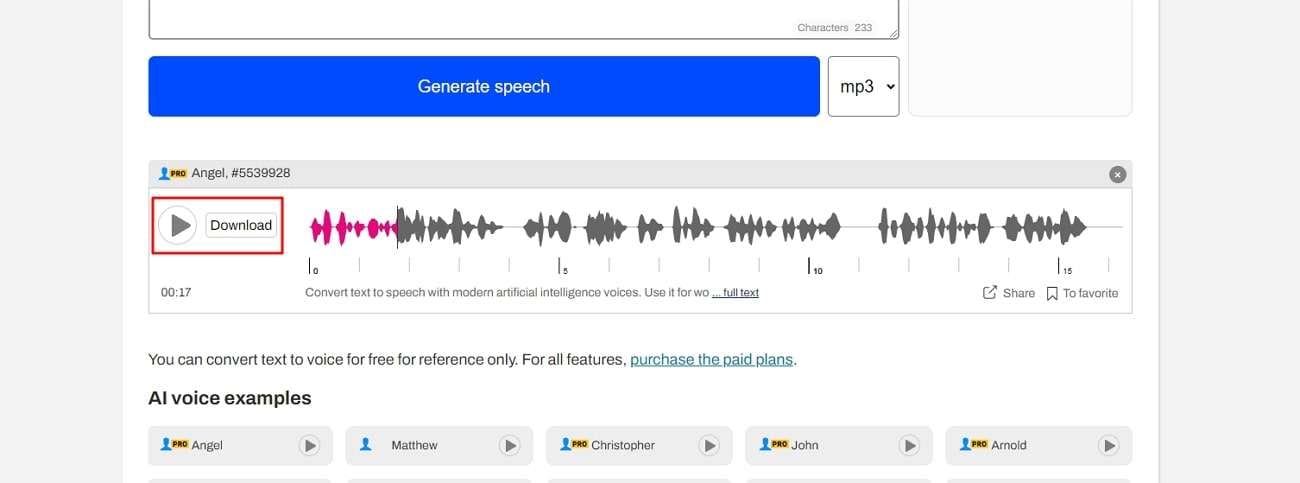
1. Virbo
Topping our list of the best tools toconvert text to voice is Virbo. Powered by Wondershare, Virbo is based on state-of-the-art AI technology. The tool provides an interactive interface and easy-to-use functions. You can easily convert any text into a range of voices using this.
Virbo offers a wide range of voices for users to choose from. It is the perfect cross-platform tool to easily generate high-quality content on both Windows and Apple devices. With many voices, tones, and languages to choose from, it is just what you need for quick text-to-voice conversions.
Key Features
- Virbo offers many realistic avatars, languages, and accents to make your content unique and cater to every need.
- You can customize various aspects of your AI avatar, including gender, attire, and tone, with ease.
- Besides a wide range of voices, Virbo also offers an AI script generator. You can thus create efficient scripts for multiple purposes.
Steps to Use Wondershare Virbo For Generating Speech From Text
Virbo makes it fairly easy toconvert text into audio . Here are the detailed steps on how to generate speech from text using Virbo:
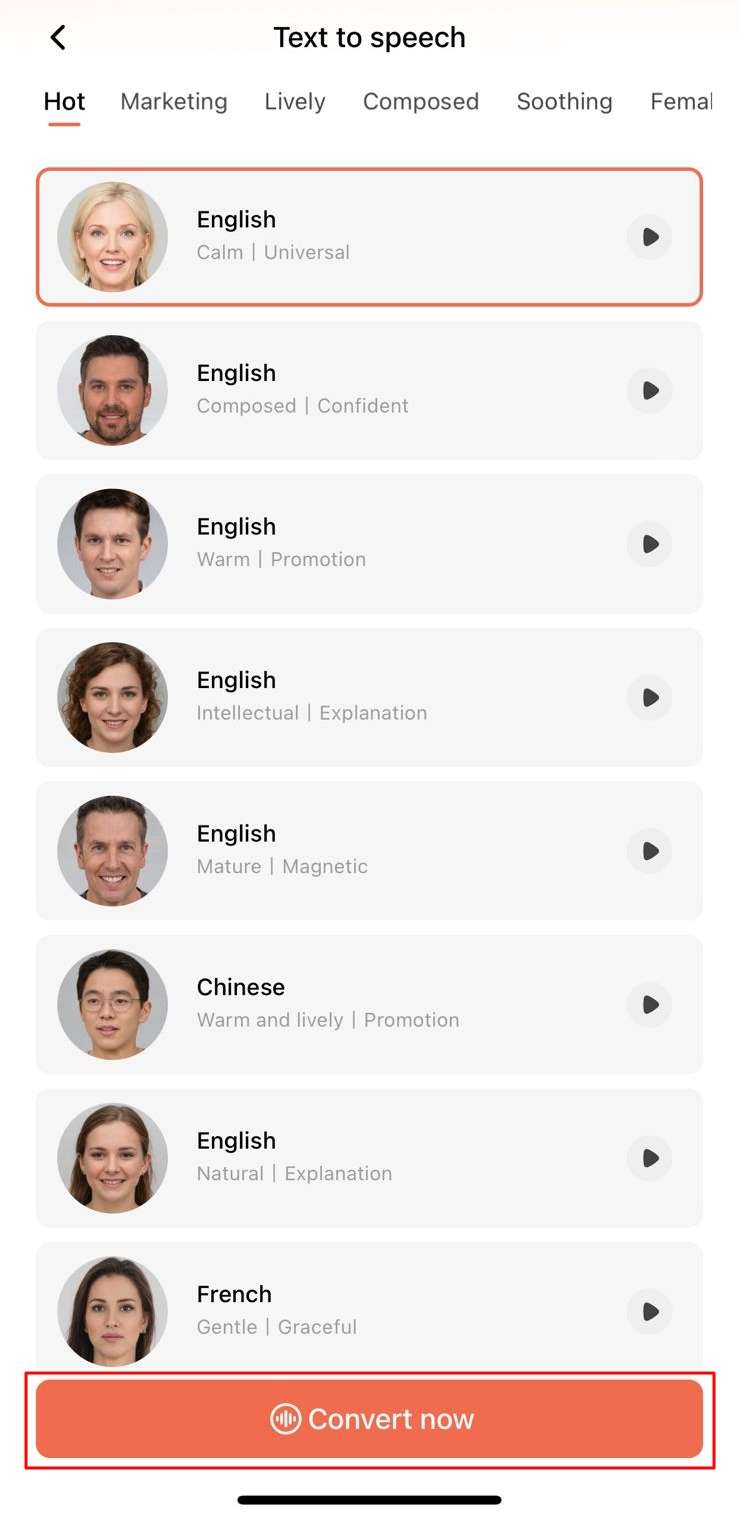
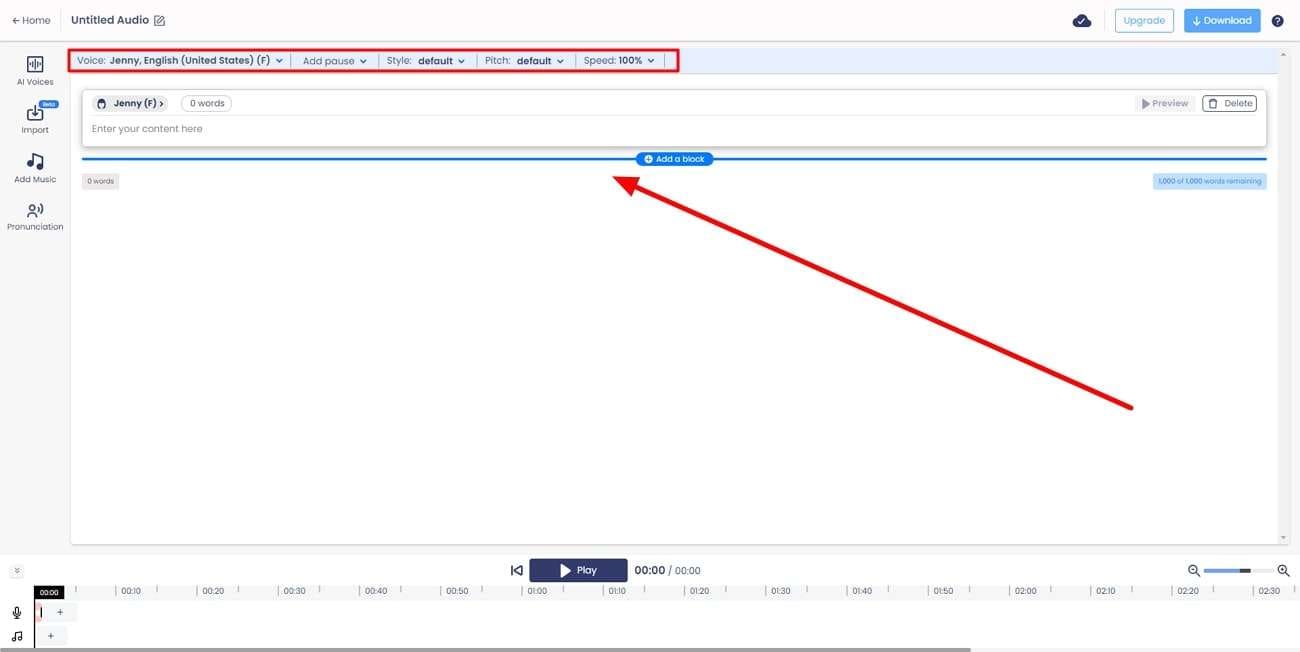
Step 1: Launch Virbo and Select your Feature
To start, install and launch Wondershare Virbo on your device. Select the “Text to Speech” option from the program’s main interface. Now, select a template of your choice. Among the listed options, you can choose a language and tone. Virbo offers more than 150 options to choose from, and click on the “Convert Now” button.
Get Started Online Free Download
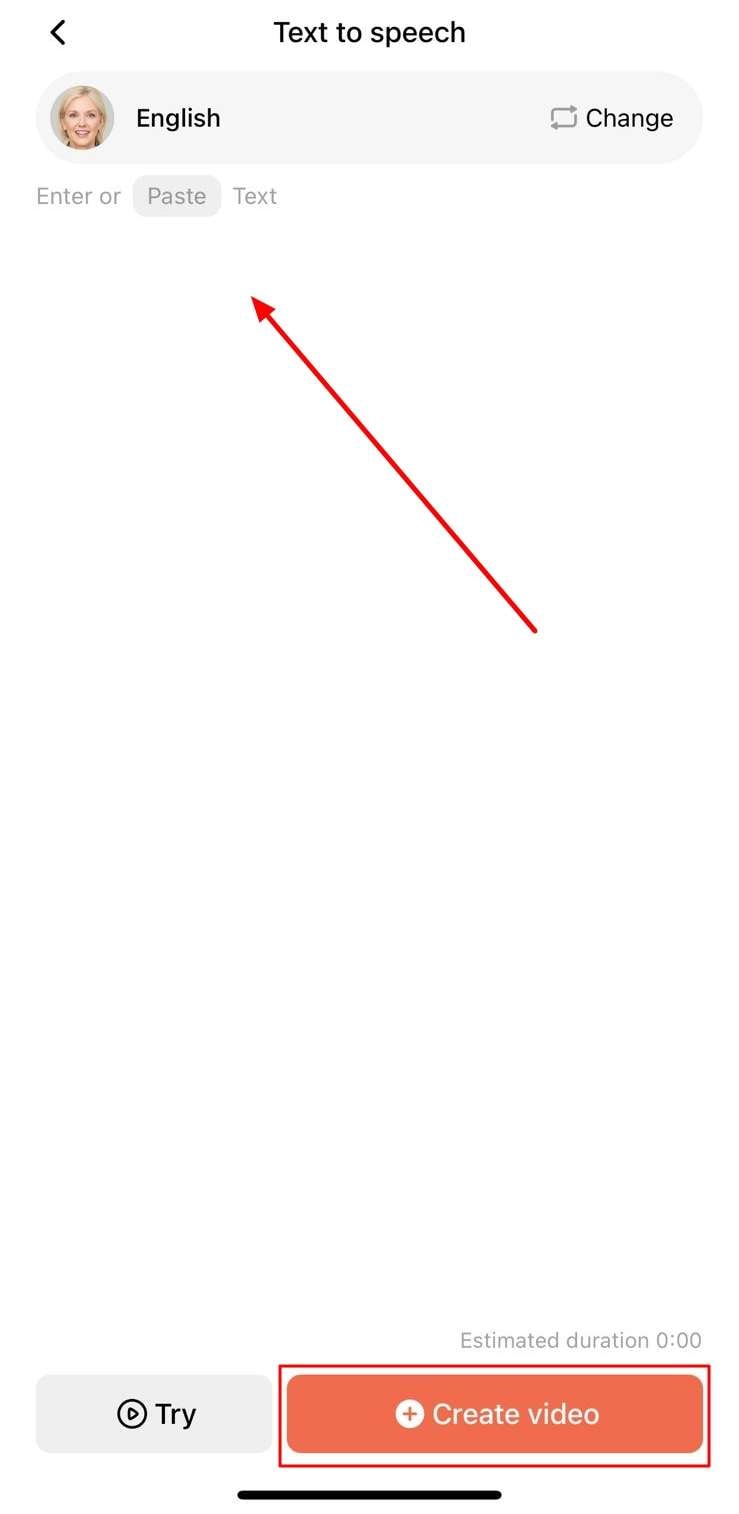
Step 2: Input the Desired Text
In the next interface, you can add your desired text to convert into speech. Click the “Create Video” button, choose the video orientation, and Virbo will automatically convert your text into speech. You can edit your generated video further and tweak the features as you like.
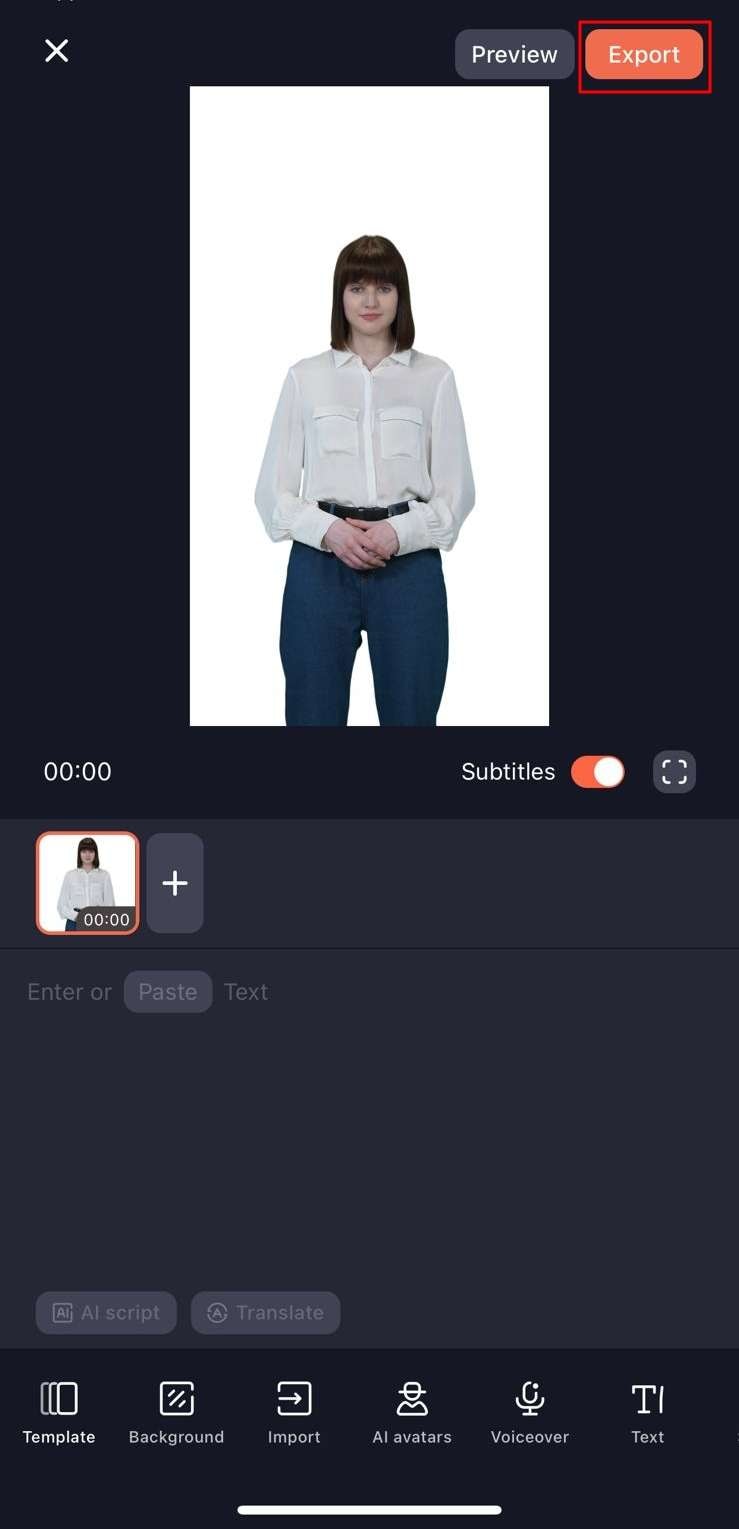
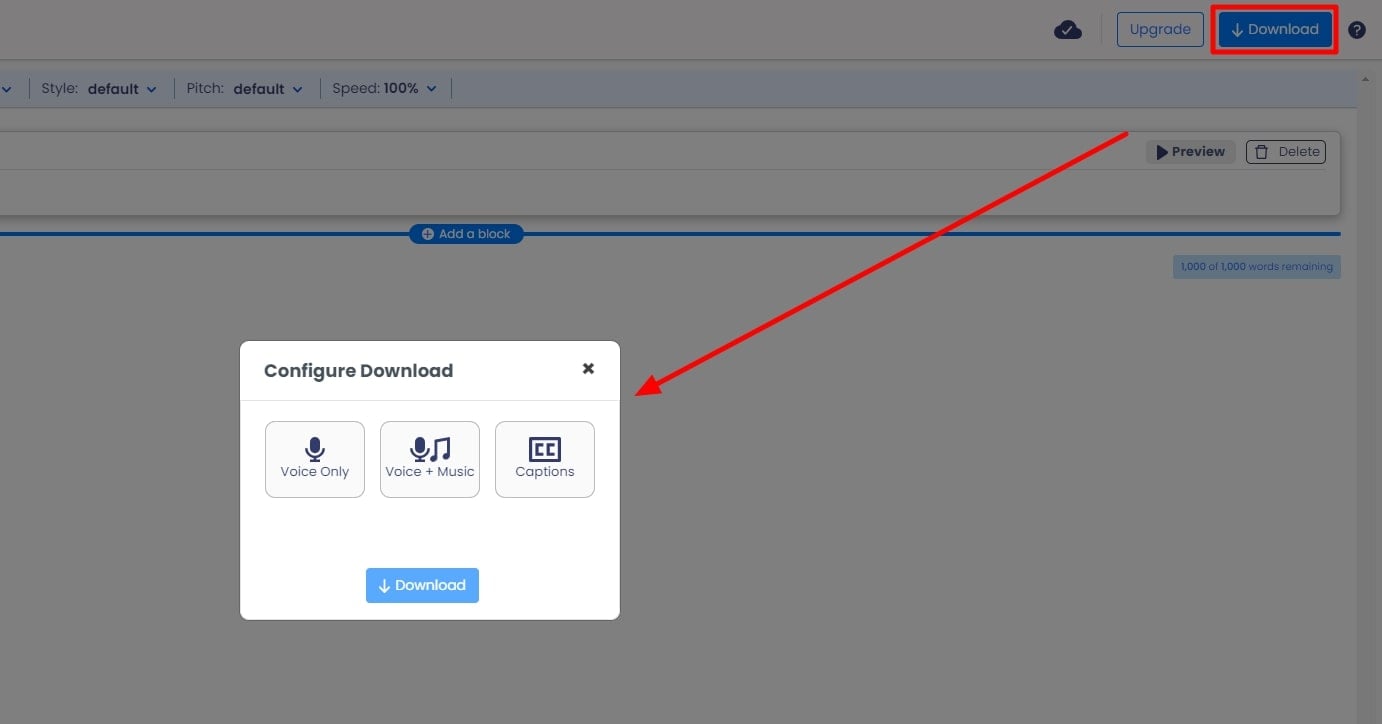
Step 3: Preview and Export the AI Video
Once you have worked through the entire editing, preview the video. Then, select the “Export” button to save the video on your smartphone.
2. Murf.ai
If you are looking for an online tool toconvert text to audio , Murf.ai is a good choice. This versatile web-based tool enables users to generate high-quality speech. The AI algorithm of Murf.ai can easily generate life-like, natural voices.
Besides text-to-speech conversions, Murf.ai also offers several other useful elements. The feature-packed tool offers several unique voices to suit varying moods. You can use the generated audio for podcasts, videos, and other instances.
Key Features
- ai lets users save the output in multiple file formats and quality types.
- Besides text-to-voice, you can also add other media elements like images and videos to your final output.
- ai also enables users to collaborate with their teams and add a shared workspace to boost productivity.
Steps To Use Murf.ai For Generating Speech From Text
Step 1: Go to Murf.ai and click the “Open Studio” button. You will be redirected to the studio workspace, where you can click “Create Project.” From the next tab, choose the option most suited to your project from the available list and tap the “Create Project” button.
Step 2: You can now type the text you want to convert into speech. From the panel at the top, you can select the language and voice of the audio. You can also modify other aspects, such as the pitch and speed.
Step 3: Once satisfied with your project, click the “Export” button at the top right to save your audio.
3. MicMonster
MicMonster is another top-rated tool that canconvert text to speech for free . With a straightforward interface, the website offers several voice options. Be it for e-learning or generating audiobooks, you can use MicMonster for all purposes.
The tool comes with an advanced editor that is relatively simple to use. You can also preview your full audio on MicMonster before downloading it. Select a voice from its growing library and convert it into natural-sounding speech using MicMonster.
Key Features
- On MicMonster, you can select a specific portion of your script and assign it to a voiceover of your choice. This way, you can generate multiple voices in the same audio file.
- You can fine-tune the audio’s rate, pitch, emphasis, and pauses. As a result, you can make your audio sound more natural.
- MicMonster allows users to customize pronunciations of certain words. This feature ensures that names, acronyms, and other important information get delivered without any trouble.
Steps To Generate Speech From Text Using MicMonster
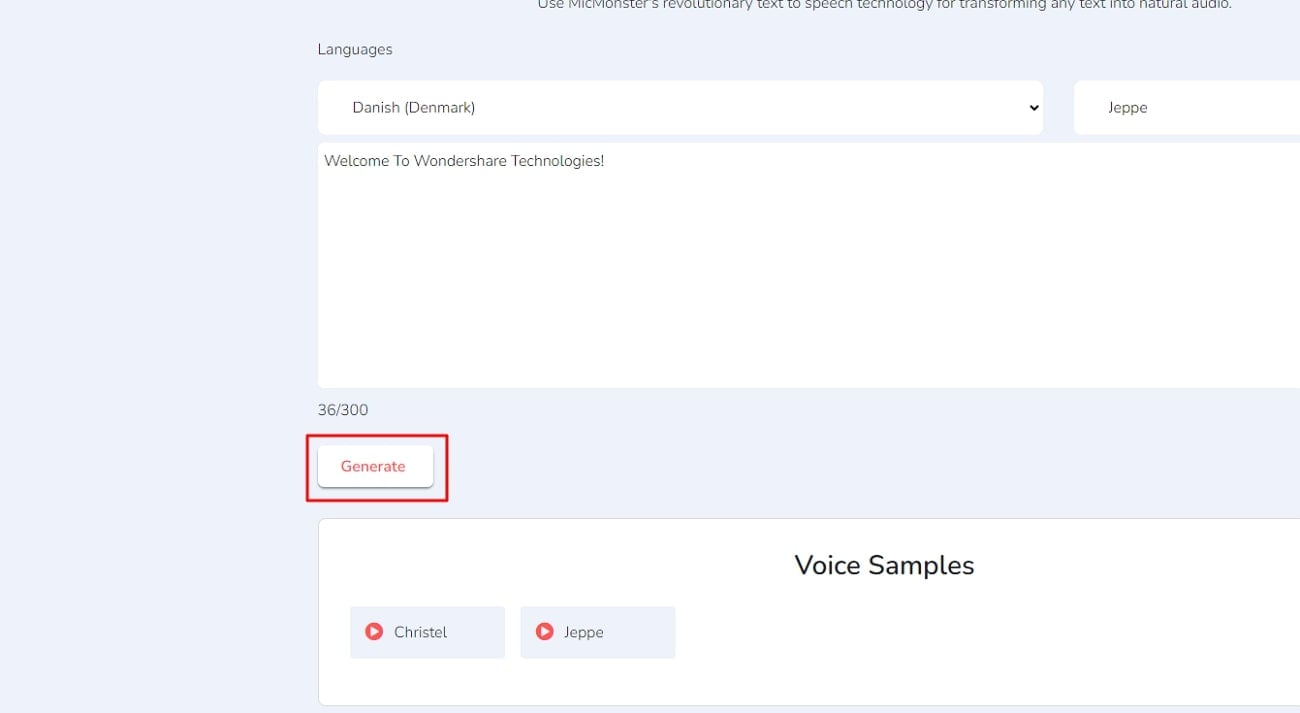
Step 1: You can begin the conversion process by going to MicMonster. You can type in your text from the main interface in the text input field.
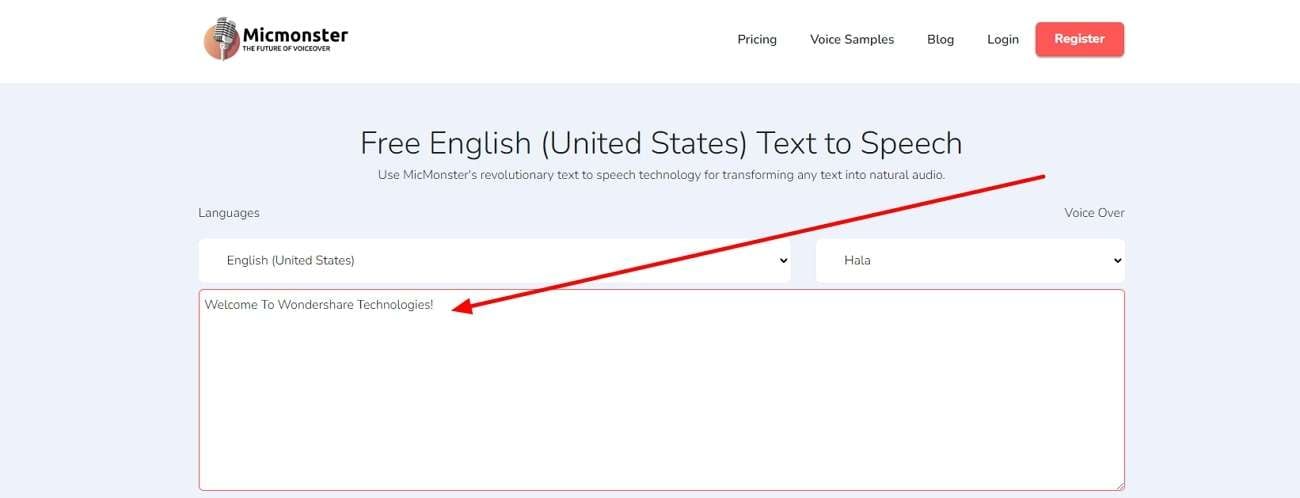
Step 2: From the top toolbar, you can select a language of your choice. In each language, MicMonster offers multiple voiceovers that you can choose.
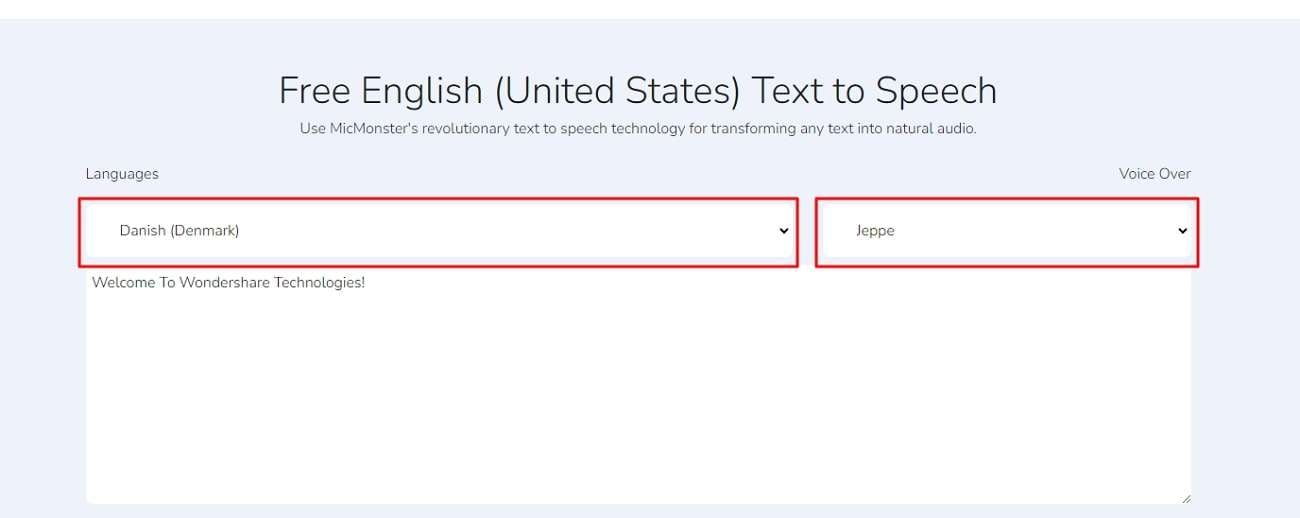
Step 3: Once everything is done, click “Generate” toturn your text into speech .
4. SpeechGen.io
If you want a cheap tool that caneasily generate audio from text , SpeechGen.io offers the perfect solution. Being a web-based tool, it is easily accessible to everyone. Its AI technology offers powerful text-to-speech conversions in no time.
SpeechGen.io offers a wide range of languages and voices. Its realistic voice generator abilities can help you produce content for all purposes. You can use SpeechGen.io for quick and easy text-to-audio conversions.
Key Features
- You can save the output audio file in multiple formats. Some examples include MP3, WAV, and OGG.
- io is compatible with many popular software, including Adobe Premier and After Effects. This feature is helpful if you want to refine your content further using professional editing programs.
- You can add your tracks to your cloud history on SpeechGen.io. You can also add audio files to your favorite list in one click.
Steps To Generate Speech Through Text Using SpeechGen.io
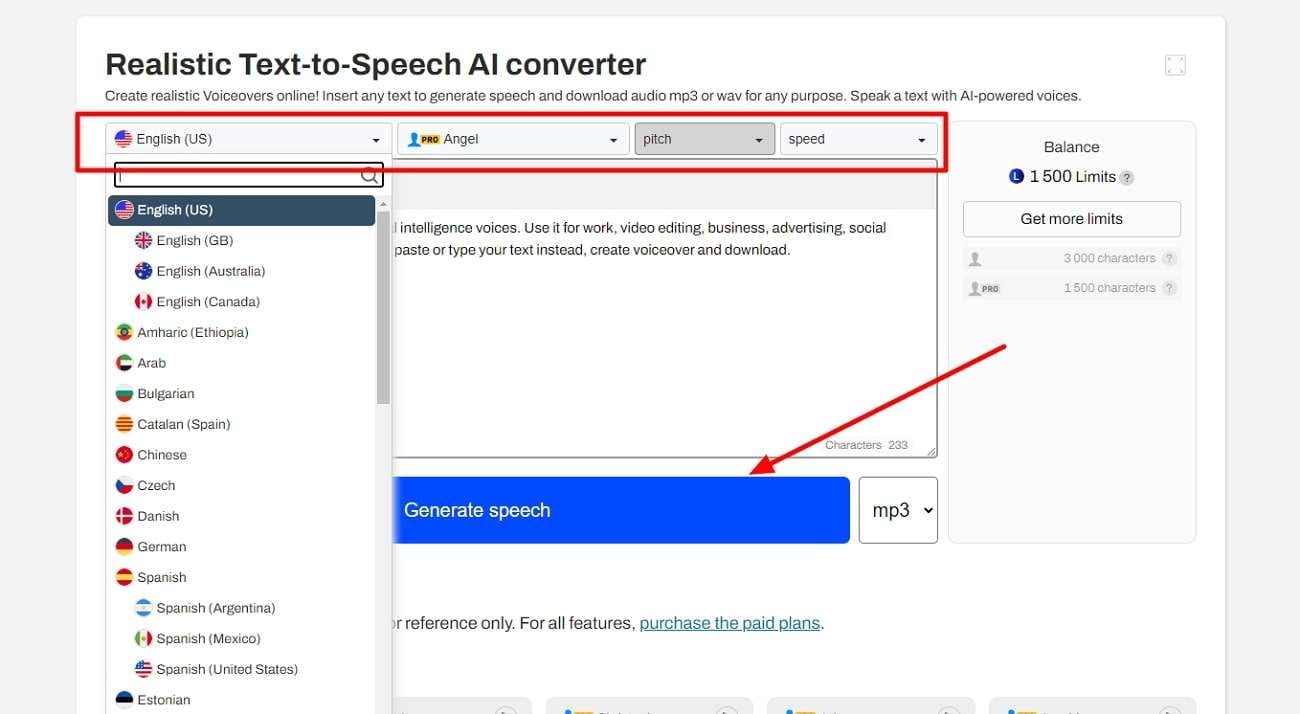
Step 1: Go to SpeechGen.io and type your text in the required field.
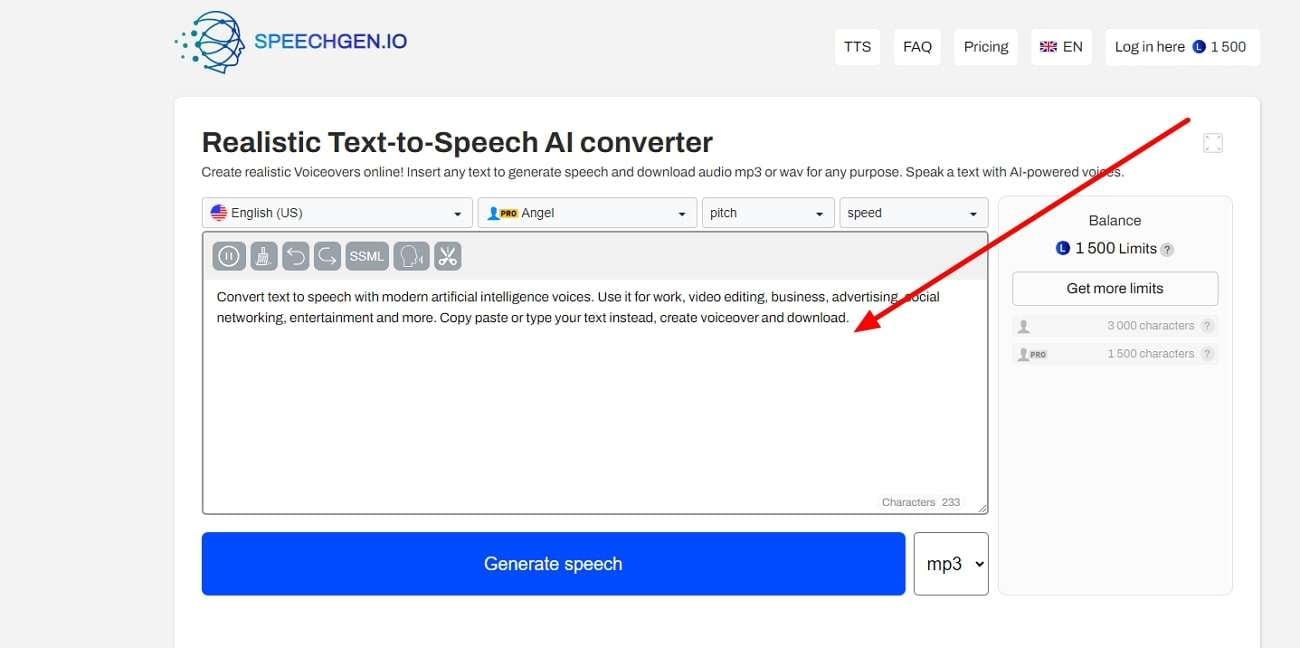
Step 2: Next, choose your language and AI voice. You can also select the pitch and speed of the audio. Once done, tap on “Generate speech.”
Step 3: You can then save your output file in a format of your choice.
5. Listen2It
Listen2It is a remarkable AI tool that can generate realistic audio outputs from text. With more than 900 AI voices, the tool offers studio-level editing features. You can tweak all the audio aspects according to your liking.
Listen2It offers a friendly interface for all users. The tool can produce top-quality results in no time. You can use it for all purposes, from podcasts to educational and marketing content. Make use of Listen2It to generate vibrant voices and tones with remarkable ease.
Key Features
- Listen2It offers over 900 voices in more than 145 languages from across the globe. You can thus create diverse and inclusive content.
- You can add background audio to your tracks. This way, you can add a natural and realistic touch to the content.
- The tool also allows users to build custom AI characters. You can save specific audio settings for each character you build.
Steps To Use Listen2It Perfectly For Creating Speech From Text
Step 1: Go to Listen2It and tap the “Start” button. Once you reach the studio, click “Create Audio”.

Step 2: In the next window, you can type your text in the field. From the toolbar at the top, you can customize the language, voice, and other aspects of the audio.
Step 3: Afterward, click the “Download” button at the top-right corner to save your output file.
Conclusion
Text-to-speech converters are quickly taking over the world. Byconverting text to voice , you can increase the accessibility of your content. The converter tools mentioned above are a great way for effective communication and engagement with users. With increased demand, harnessing their powers for various aspects of everyday business is vital.
Also read:
- [New] Essential iPhone Selfie Tools Ranked #8
- [Updated] 2024 Approved In Search of Perfection - GoPro's #1-10 Case Review
- [Updated] Creating Captivating TikTok Outro Sequences
- 2024 Approved Rise to the Top - Livestreaming on YouTube, No Matter How Low Followers Are
- 高画質映像の品質向上手順:完全ガイド
- Fix: Persistent Crashes in Age of Empires IV on Windows – Solutions Inside
- How To Effortlessly Transfer Your Digital Memories From Google to iCloud
- In 2024, Best Anti Tracker Software For Motorola Razr 40 Ultra | Dr.fone
- Introducing the AM01 by Ayaneo: The Perfect Blend of Classic Appeal and Modern Power – Available Now in Stores
- Obscure Crossover Port Uncovered: DisplayPort & HDMI Fusion Inside the Abandoned Steam Machine, Piston Xi3
- Slash Prices! Get $250 Discount on High-End RTX 4090 Gamer's Dream PC
- Ultimate Review of Mophie PowerStation AC: Expensive Yet Incredibly Handy
- Ultimate Selection of Compatible Mice for Your Apple Tablet
- Updated 2024 Approved Unlock the Potential of Your Videos with Our Comprehensive List of Best Free Converters (Online/Offline)
- Title: New RTMP Streaming on Instagram A Comprehensive Tutorial
- Author: Sam
- Created at : 2025-01-26 17:35:26
- Updated at : 2025-01-31 23:43:56
- Link: https://ai-voice-clone.techidaily.com/new-rtmp-streaming-on-instagram-a-comprehensive-tutorial/
- License: This work is licensed under CC BY-NC-SA 4.0.