
:max_bytes(150000):strip_icc():format(webp)/should-you-buy-a-kindle-5270180-b1c49aad9c1142dc8722cfdb5d02072c.jpg)
New Narakeet Review Convenient Text to Speech Voice Maker
Narakeet Review: Convenient Text to Speech Voice Maker
In a world where content consumption is constantly evolving, having innovative tools at your disposal to enhance the accessibility and engagement of your content is essential. One such tool that has gained significant popularity in recent times is Narakeet text to speech – a versatile Text to Speech (TTS) voice maker.
In this article, we will delve into the intricacies of Narakeet, exploring its features, functionality, and how it can revolutionize the way you deliver content. Whether you’re a content creator, educator, or simply someone seeking efficient ways to communicate ideas, this article will provide valuable insights into Narakeet’s offerings.
Part 1: What is Text to Speech Narakeet?
Narakeet is a powerful TTS platform designed to transform written content into engaging audiovisual presentations. Whether it’s turning blog posts into engaging videos or creating captivating educational materials,Narakeet text to speech simplifies the process by seamlessly converting text into speech.
Compatibility of Narakeet
- Narakeet is compatible with PowerPoint, Google Slides and Keynote formats.
- You can upload your presentation file to the web app or use a link to your online presentation.
- Narakeet will automatically detect the language of your text and choose a suitable voice for it. You can also change the voice manually if you prefer.
Key Features of Narakeet
- Narakeet has a large collection of natural-sounding voices in different accents and genders. You can preview the voices before choosing one for your video.
- It can generate subtitles for your video based on your notes. You can edit the subtitles, change their font, size and color, and choose whether to show them on the video or as a separate file.
- The app add background music to your video from its library of royalty-free tracks. You can select a music genre, mood and intensity, and adjust the volume of the music.
- Narakeet text to speech allows you to trim, crop, rotate and resize your video, as well as add transitions, effects and filters. You can also adjust the brightness, contrast and saturation of your video.
- It can capture your presentation slides as video segments and combine them into a single video file. You can also upload your own images, videos or audio files to enhance your video.
- The versatile app can add subtitles to your video based on your speaker notes. You can customize the font, size, color and position of the subtitles.
- Narakeet can produce videos in high-definition quality, up to 1080p. You can also choose from different aspect ratios, such as 16:9, 4:3 or 1:1.
- It has a built-in media library that offers hundreds of royalty-free images, videos and music tracks that you can use in your video. You can also search for media by keywords or categories.
- The app comes with a powerful text to speech engine that can generate realistic and natural voices for your video. You can choose from over 600 voices in 90Narakeet languages such as Narakeet text to speech Bengali, Narakeet text to speech Urdu along with several others; and accents. You can also adjust the pitch, speed, volume and tone of the voice.
Pricing of Narakeet
- Narakeet has a free plan that lets you create up to 5 videos per month with a watermark and a maximum length of 5 minutes.
- The paid plans start from $9 per month and offer more features, such as longer videos, no watermark, custom branding, higher resolution and more voices.
Narakeet text to speech free is a convenient tool for creating narrated videos with TTS. It can be useful for making educational videos, tutorials, presentations, explainer videos, marketing videos and more.
Part 2: How Does Narakeet Work?
Creating captivating videos withNarakeet text to speech is a seamless process that allows you to transform your written script and presentation slides into an engaging audiovisual experience. Here’s a detailed breakdown of each step.
Step 1
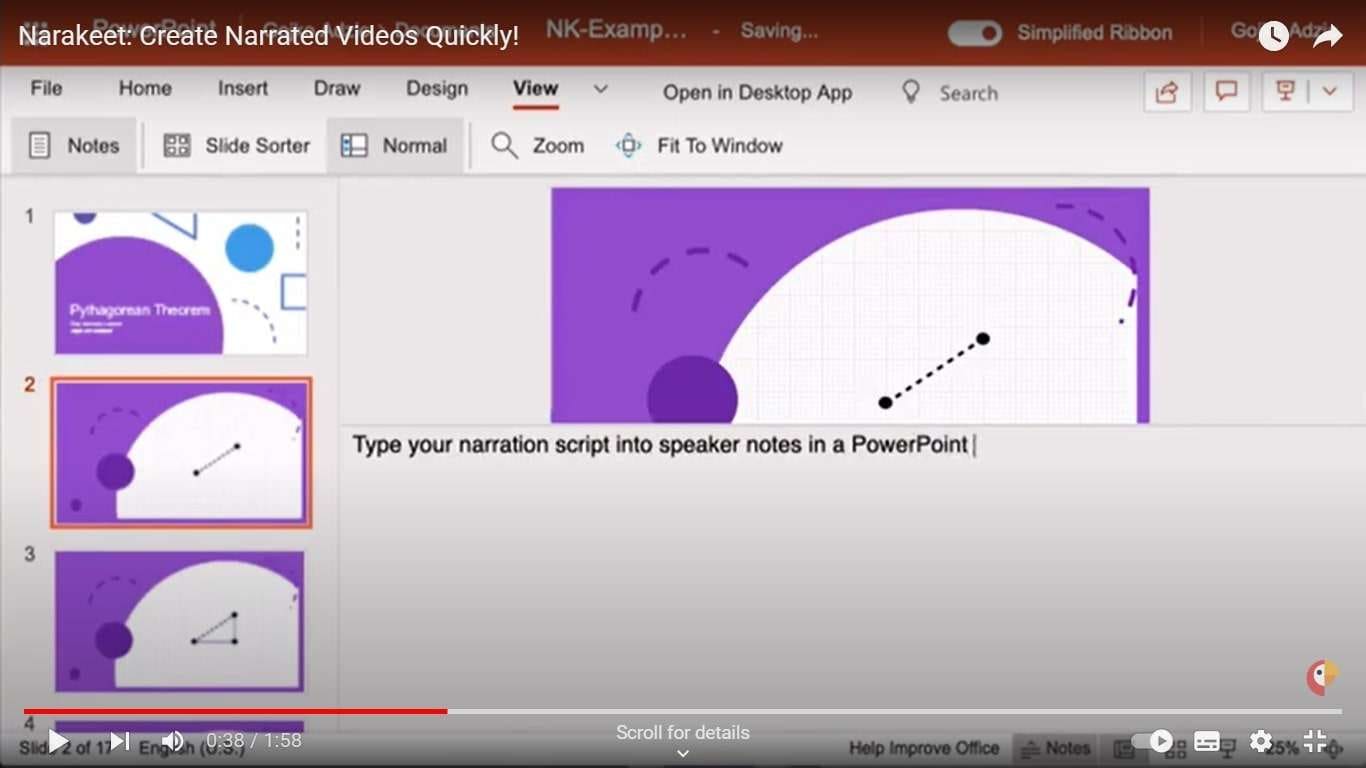
To start the process, you’ll need a script that outlines the content of your video. You can create this script using Markdown, a versatile formatting language that supports various elements like headings, lists, links, and images. Markdown provides a structured way to organize your content. Alternatively, if you have a presentation in PowerPoint, Google Slides, or Keynote, you can use the speaker notes section to write your script. This way, you’re aligning your visual content with the spoken narration.
Step 2
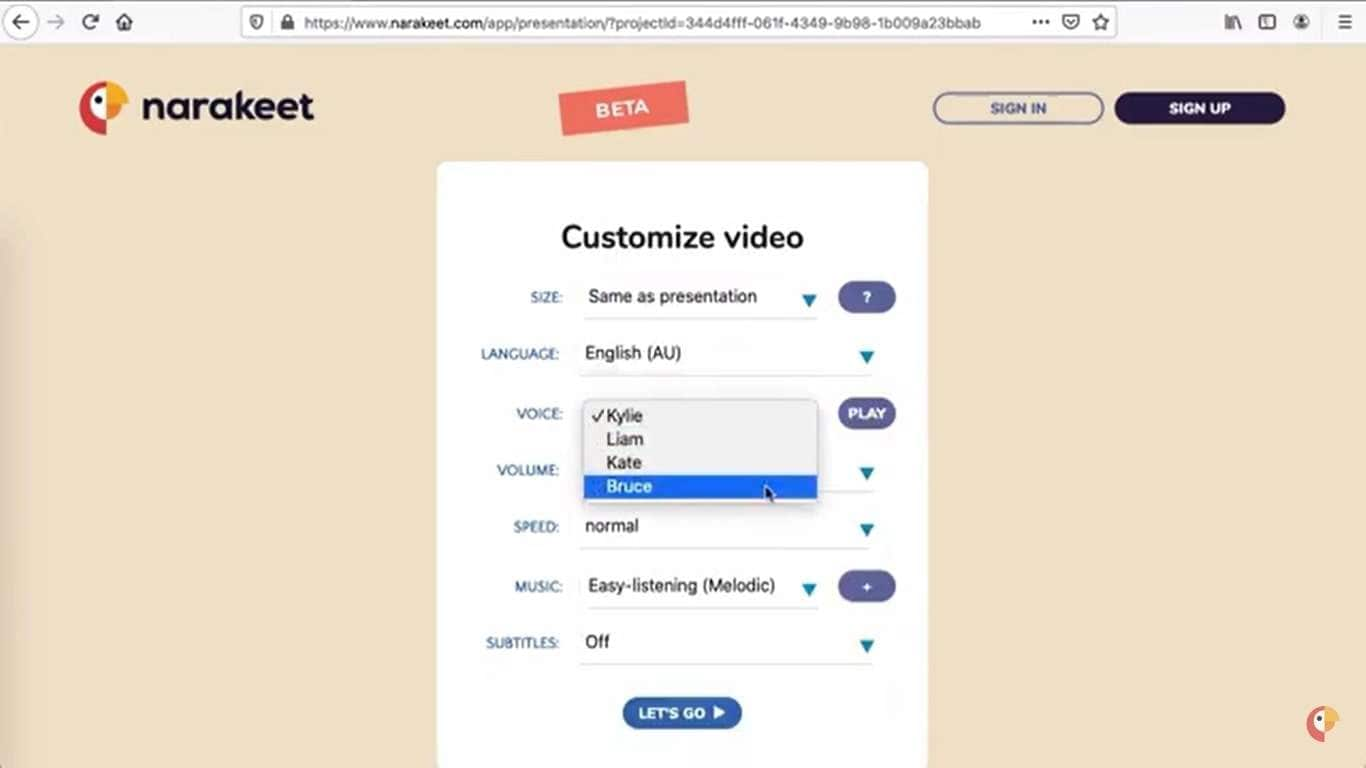
Narakeet offers an impressive array of over 600 voices in 90Narakeet languages and accents. After preparing your script, you can select a voice that best matches the tone and theme of your content. The platform allows you to preview the chosen voice, giving you a glimpse of how your narration will sound. Furthermore, you can fine-tune the voice’s pitch, speed, volume, and tone to create a customized auditory experience that resonates with your audience.
Step 3
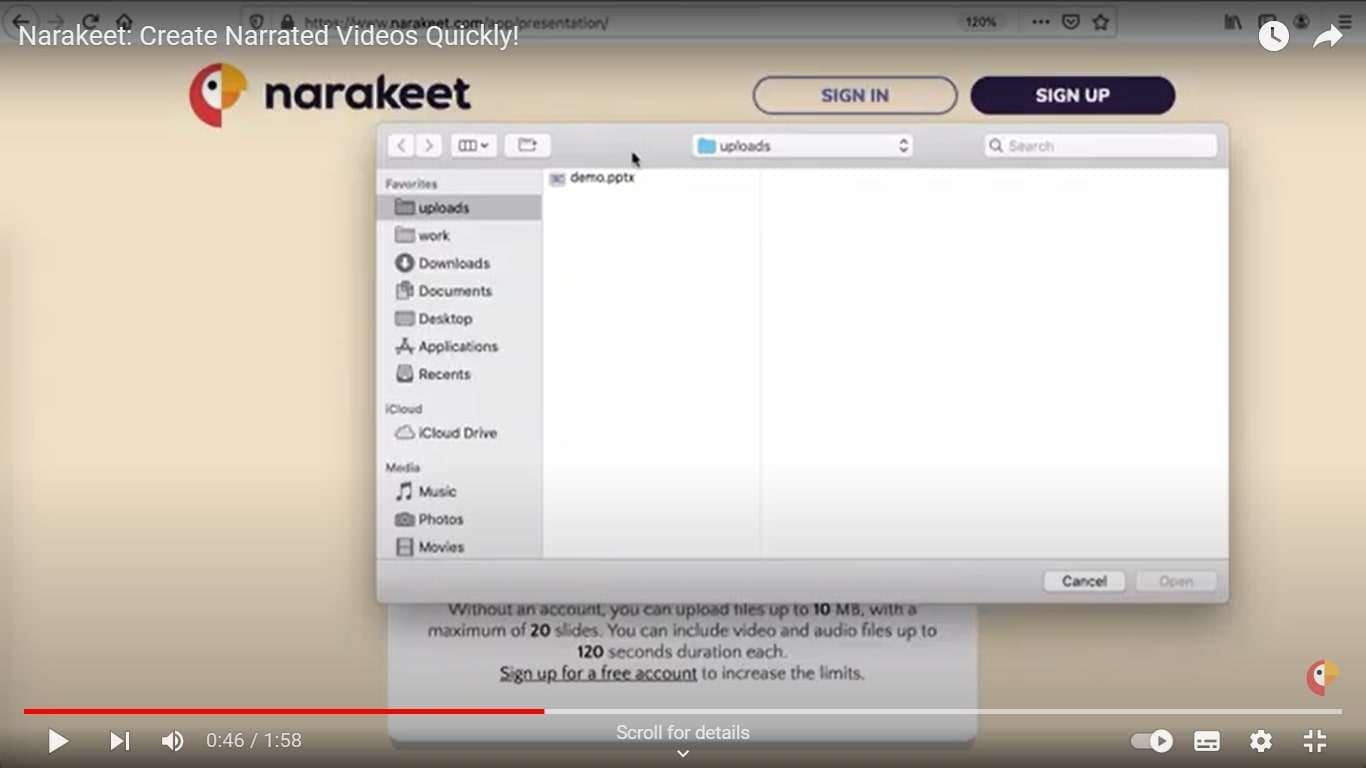
If you have a presentation with slides, you can upload it to Narakeet as PDF files. Narakeet’s smart technology automatically segments each slide and synchronizes them with the voiceover. This integration ensures that the visual elements align seamlessly with the spoken content. Besides presentation slides, you can also enhance your video by uploading your images, videos, or audio files. This versatility allows you to create a visually rich video that keeps your audience engaged.
Step 4
Narakeet’s online editor provides a range of tools to refine your video’s visual and auditory aspects. You can trim video segments to eliminate unnecessary content, crop and rotate visuals for optimal framing, and even apply zoom effects to emphasize specific elements. Adding transitions and effects can enhance the overall flow and visual appeal of your video. Moreover, you can incorporate subtitles and background music to reinforce your message and create a more immersive experience. Adjusting the order, duration, and timing of each slide ensures that your video maintains a coherent and engaging narrative.

Step 5
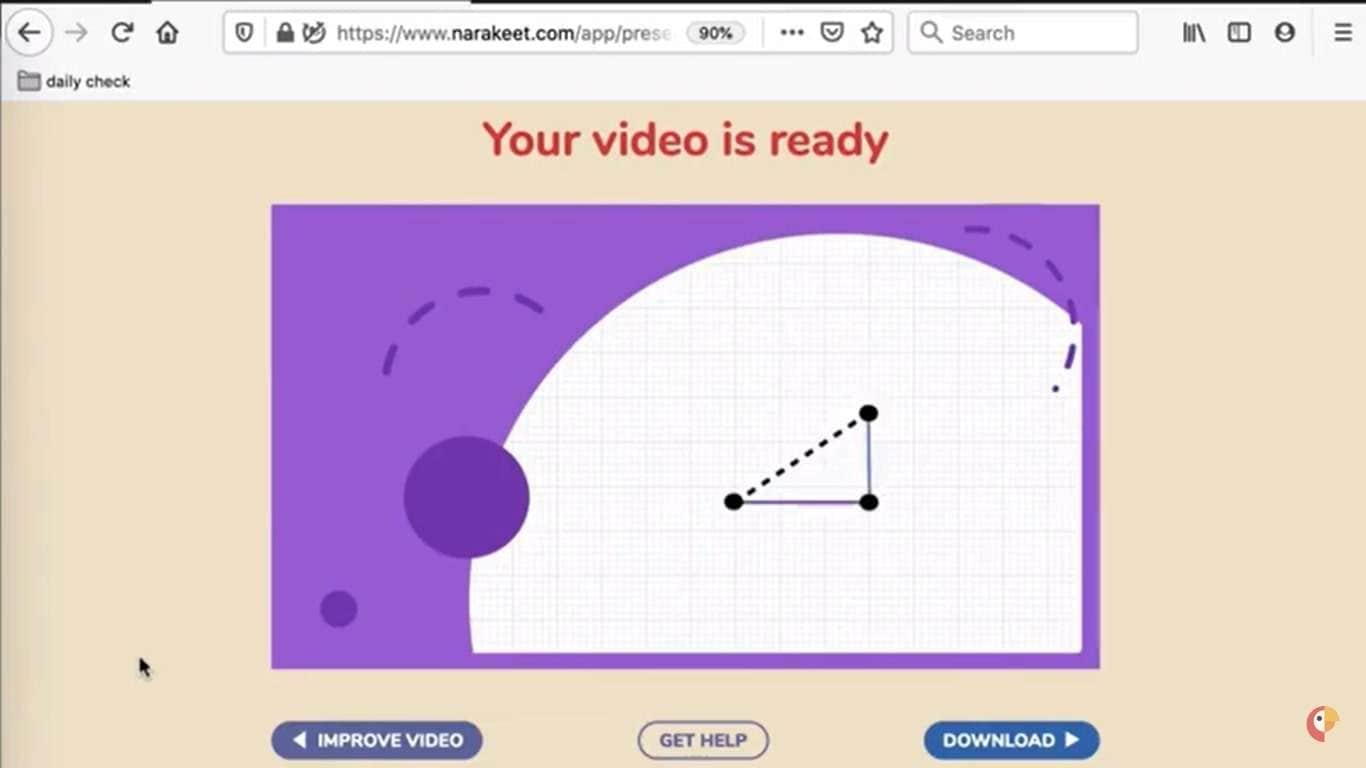
Once you’re satisfied with your video, Narakeet offers various options for distribution. You can download your video as an MP4 file, suitable for sharing on social media platforms, websites, or other mediums. Alternatively, Narakeet provides direct integration with platforms like YouTube and Vimeo, allowing you to share your content seamlessly. Furthermore, you can export your video as an audio file or a subtitle file, broadening the ways you can engage your audience.
All in all,Narakeet text to speech streamlines the process of creating compelling videos by transforming scripts and presentations into dynamic audiovisual content. By following these detailed steps, you can harness the power of Narakeet’s features to produce videos that effectively communicate your message and captivate your audience. Whether you’re an educator, marketer, or content creator, this amazing app provides a versatile and user-friendly platform to elevate your content creation efforts.
Part 3: Bonus Tip: A Best Text to Speech Online AI Tool You May Need
You have just learned how to use theNarakeet text to speech app, which can turn your text into videos. This is a handy feature that can help you with many tasks. However, you might wonder if there is a better way to convert text to speech, one that can offer you more options and flexibility. Well, there is, and it is called Virbo, one of the best text to speech apps for all your tasks.
One of the best alternative ways to convert your text into engaging and professional videos isVirbo . It is an AI avatar video generator that can create spokesperson videos in minutes. It is is a product of Wondershare, a leading software company that offers various tools for video editing, data recovery, PDF editing and more. The app is available on Windows, iOS and Android devices, and you can use it for various purposes, such as education, marketing, entertainment and more.
Get Started Online Free Download
Virbo isn’t like ordinary text-to-speech tools. It’s a versatile platform that gives you a lot of control. It has many features that help you create unique voices for your written content, making it sound more interesting and accessible.
Functions of Virbo
- With Virbo, you can enter your text on the website, and it will turn your words into a voice. Virbo can also read text from files or web links, making it easy to listen to written content.
- Virbo has over 100 different voices to choose from. Each voice has its own language, accent, gender, and age. You can pick the voice that matches your content’s style and essence.
- Once you choose a voice, you can customize it. You can change its speed, pitch, volume, and pauses. You can adjust sliders to make the voice sound unique, or use special symbols and commands to control how it sounds.
- You can listen to a preview of your voice creation on the website before you do anything else. If you like it, you can download it as an MP3 file to use in your projects. Whether you’re using it for personal or business purposes, Virbo gives you full access to your voice creation.
Key Features of Virbo
- Virbo uses advanced AI technology to make voices that don’t sound robotic. It understands the context, meaning, and even emotions in the text. This helps it create voices that sound like real humans. Plus, Virbo learns from its interactions, so it keeps getting better over time.
- It supports many languages and accents, like English, Spanish, French, Chinese, and Japanese. You can easily switch between languages by typing the language code.
- The app offers different types of voices for different purposes, like storytelling, teaching, podcasts, and games. Each voice category is made to fit a specific role.
- It lets you add emotions to the voice. You can make it sound happy, sad, angry, calm, and more. By typing emotions in brackets, you can make the voice express different feelings.
With Virbo, your text becomes a canvas, and the voice you create is like a brushstroke that adds life to your words. You can explore and experiment with different voices, taking your written content on an exciting journey beyond just reading.
Conclusion
Narakeet text to speech stands out as an exceptional Text to Speech voice maker that simplifies the process of creating engaging audiovisual content. Whether you’re a content creator looking to repurpose your articles or an educator striving to make learning more accessible, Narakeet’s intuitive interface, customization options, and compatibility with various content formats make it a valuable addition to your toolkit. By exploring Narakeet’s features and learning how to use it effectively, you can unlock a new realm of content creation possibilities, enhancing the way you connect with your audience.
And for those seeking alternative tools, Virbo provides an excellent option to further expand your TTS capabilities. Embrace these tools, and empower your content with the magic of AI-driven narration and presentation.
The Most Direct Guide to Learning How to Clone Your Voice
The procedure of voice replication generated with AI powers is termed voice cloning. Through this, you can capture a person’s voice and create speeches and other audio in their voices. The clone of your voice tools can also act as your personal assistant. Moreover, you can also experience accessibility and less time required for recording the voice.
By the end of this discussion, you will know meaningful information about clone my voice. We will also present and explain some of the use cases of voice cloning and the factors for selecting the best cloning software. You don’t have to surf the internet further because this article will also provide reputable tools to clone your voice.
Get Started Online Free Download
Part 1: What Are the Real-Life Use Cases of Voice Cloning?
Many of the users are not aware of the usability of voice cloning. That doesn’t mean there are no real-life use cases of cloning your voice AI. The below-given points will help you to understand the real-life applications of voice cloning:
1. Voice Dubbing and Narrations
You can easily dub a foreign-language movie and shows through reliable voice cloning tools. It also helps you make consistent and high-quality voice clones without compromising word pronunciation. The developers can also create unique voices for the gaming characters through this. It can add life to the virtual characters.
Above all, if you are a publisher, you can create narrations and audiobooks in your voice through this. Readers can match their expectations with expressive voices and have the best user experience.
2. Accessibility and Voice Support
This technology can be beneficial for people with speech impairments. Through this, people with speech impairments can hear themselves in natural-sounding voices. This also allows them to communicate properly. Visually impaired people can also access the content in an optimized manner through this.
If you are a call center owner, you can also get virtual call center agents through this. Saving the cost of hiring a substantial number of people is a reliable benefit of using voice cloning. Making content and other information more accessible for people of all nationalities is possible with this.
3. Marketing and Chatbots
You can choose a voice you like to clone and expressively convey information. While working with the digital assistant, you can customize its voice to boost the experience. Chatbots can also commute in human-like voices with users through this. It makes the fostering of emotional connections easier than ever.
You can also ensure informational retrieval through this. Moreover, brands can use this technology to make a consistent brand voice. They can also use their customized brand voice in various campaigns and broadcasting.
Generate Engaging
AI Video in Minutes!
Easily convert text into professional spokesperson videos in over 120+ voices & languages in minutes.
Generate AI Video Free Generate AI Video Now


4. Language Learning and Biometrics
If you are a native English speaker and want to learn French, voice cloning can help you. Through this, you can clone your voice and listen to text in multiple languages. There is no need to worry about the complexity of learning as it has the potential to pronounce words clearly and accurately.
Furthermore, you can not only learn but can also practice new languages without wasting time. By accessing the virtual partner, you can also master conversational skills. It lets you speak in your targeted language in a seamless flow. You can also ensure biometric security through this.
5. Figures and AI Models
To create historical documentaries, voice cloning can be extremely beneficial. You can create a clone of your voice or the voice of your favorite historical figure without facing any complexity. Whether you want to make educational videos or do a museum exhibition, this can help you bring history to life.
Not only this but researchers can also use voice cloning technologies to create AI voices. It eventually helps train the AI models to get a grip on speech recognition technologies. You can also use this to create natural language models with this.
6. Character Voices and Services
Are you a big fan of Katana from Mortal Kombat and obsessed with her voice? No worries because you can use the voice of Katana in several ways through this innovative technology. It helps you in creating customized character voices along with expressive emotions.
Alongside this, voice cloning can also provide urgent alters and notification services. You can also deliver critical information to the public in case of mishaps and emergencies.
7. Performances and Authentication
You can clone your voice and use it for authentication purposes. It can also help create voice-based security based on voice traits such as pitch. You can make the authentication of your accounts and facilities stronger through this. To give iconic performances, you can often use voice cloning in live performances.
It can also open paths of communication for the users without ethical complications. You can give the best live performance experience to the users.
Part 2: The Best AI-Powered Tools to Clone Your Voice
Day by day, the advancement of AI-powered tools is increasing drastically. Multiple options are now available, and users feel difficulty selecting the best voice cloning software. If you want to know what software can help me to clone my voice, this section is for you.
Here, we will discuss the top 6 software through which you will be too able to clone your voice AI. You can find the software, along with its introduction and key features, here:
1. Speechify
Speechify is the best AI-powered tool that helps you make voice clones without compromising quality. You can use this effective tool to clone your voice in a customized manner. Whether you are a content creator, podcast maker, or video editor, this tool can help you.
You can make quality-oriented voice clones by adding a sample of your voice in real time. With Speechify, you can also modify the speed and volume of spoken audio. Moreover, it also lets you add versatile emotions to the voice clone audio. It includes excitement, emphasis, happiness, and more.
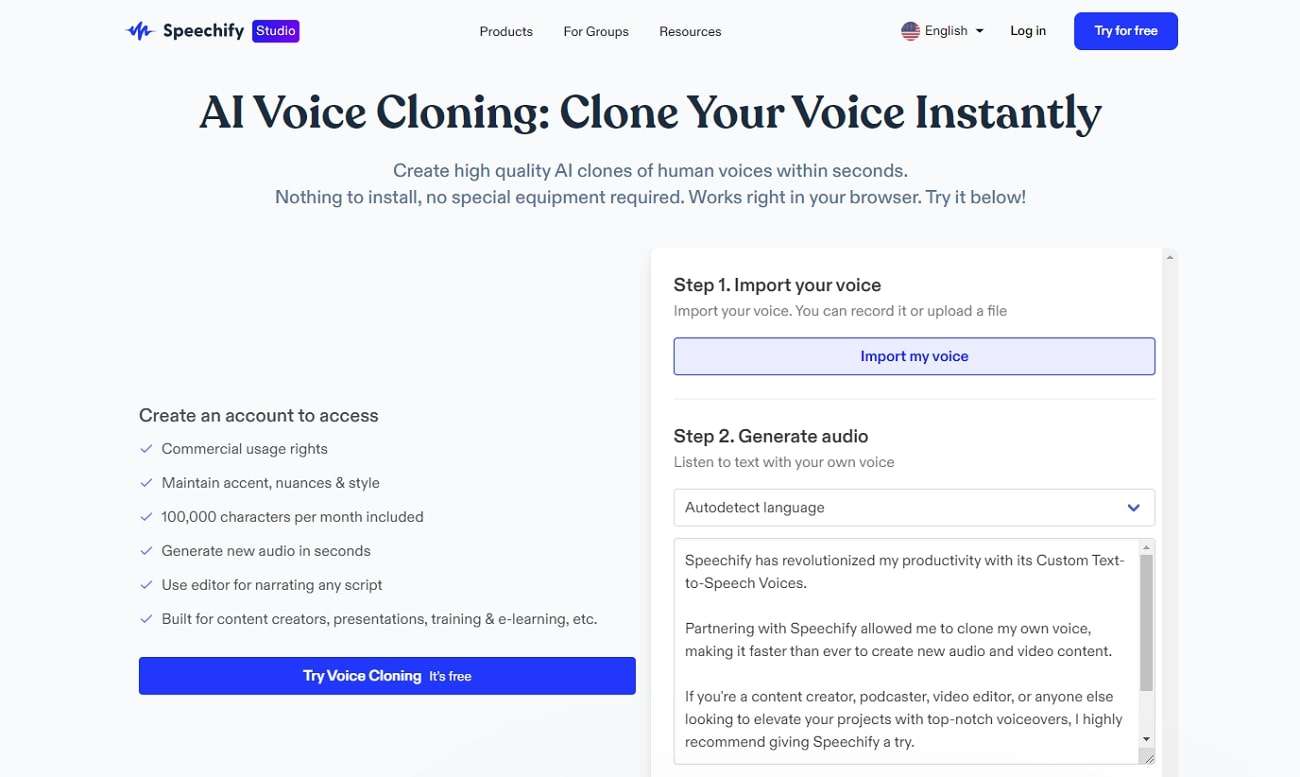
Key Features
- Speechify supports multiple languages for the ease of the users. This includes English, German, Italian, French, Hindi, etc.
- It also integrates a text-to-speech feature to turn the pre-written text into understandable audio.
- The AI Dubbing feature of Speechify lets you dub the audio in 20+ languages. Moreover, it will help you grow your audience in no time.
- Using the AI voiceover Generator, you can add expressive voiceovers in any video and customize voice and speed.
2. Voice.ai
Do you want to create the best-in-class voice clones without any problem? No worries because this tool lets you clone your voice in optimized quality. Whether you want to change your voice in live streaming, game, or chats, it can help you. You need to add the reference audio in its AI system, and eventually, it will create a perfect voice clone for you.
It also comprehends an evergreen library of voice that continues to grow daily. Moreover, you can also sound younger, older, funnier, or scarier with this.
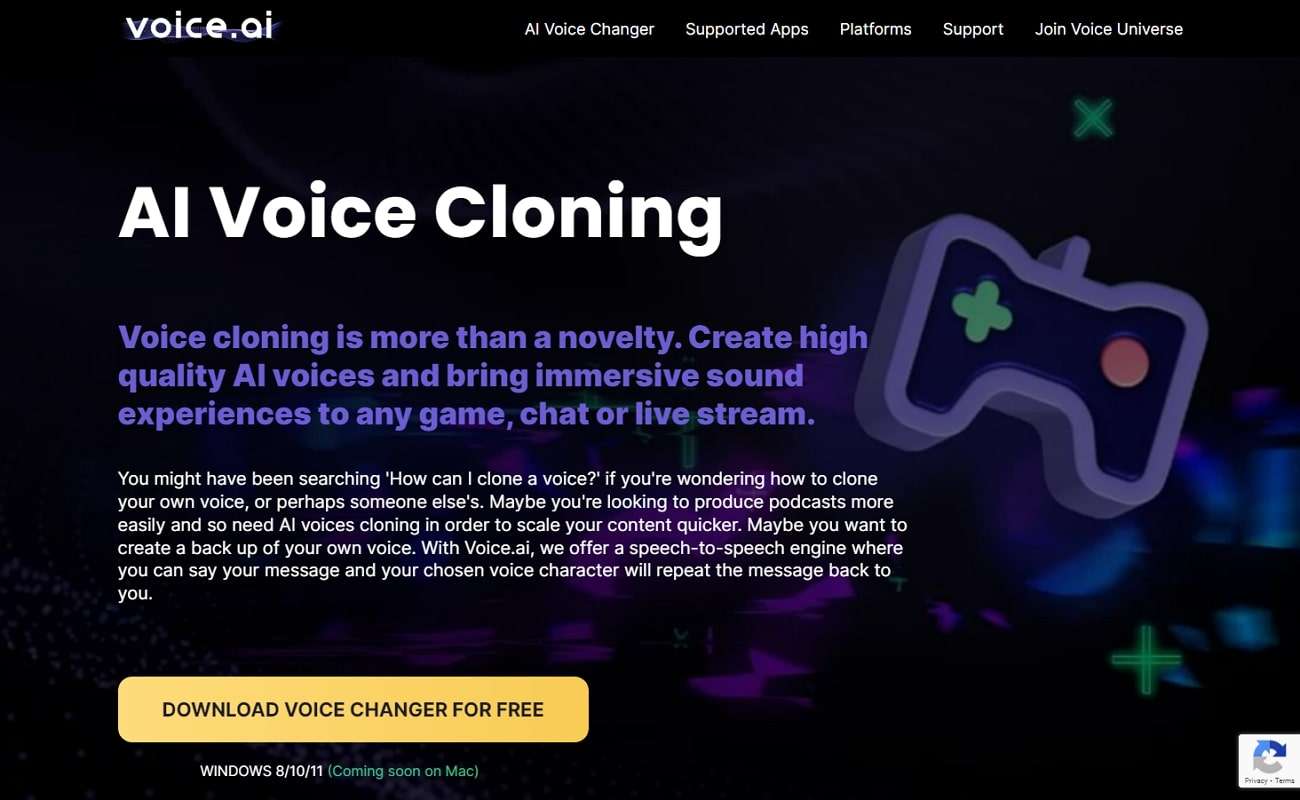
Key Features
- This software has several games and app integrations. It includes Discord, Skype, Zoom, WhatsApp, and Minecraft.
- It has the capability to create a replica of the sample audio, along with adding emotions, accents, and pacings.
- Its specialized AI Voice Changer lets you change your voice in real time. You can also record voices and use them on soundboards.
- ai supports a wide array of platforms. This includes iOS, Android, Windows, and Mac.
3. PlayHT
If you want to make voice clones with unparalleled quality, then this tool is a perfect fit for you. By using it, you can clone your voice with 99% accuracy. Hiring a professional voice artist is unnecessary as this voice cloning tool can add a human touch to audio projects. There are several voice samples in it, and you can also preview them before choosing the voices.
You initially need to upload 2 to 3 hours of speech without background music, select a voice for cloning, and then this tool will handle the rest for you. Moreover, you can also use the generated clones as in the editor or API.

Key Features
- It incorporates a powerful text-to-audio online editor. You can create and edit the audio and export it in MP3 and WAV formats.
- You can create custom pronunciations and niche terminologies with its Pronunciations and IPA Phonetics Library.
- The AI text-to-speech feature helps users to turn written text into descriptive speeches with full customization.
- PlayHT has 800+ AI Voices along with 130+ languages. This is a very convenient thing for the users.
4. LOVO AI
If you want to make voice clones in Cocoon O’Brien or Ariana Venti, this voice cloning software can do it for you. It can also help you to clone your voice with human-like qualities. You can also drag and drop the sample audio or record the sample audio in real-time to make the clone.
It lets you create as many voices as you wish. Above all, you can build the customized library of your created clones and access them anytime. You can also use this fantastic tool for building special brand voices.
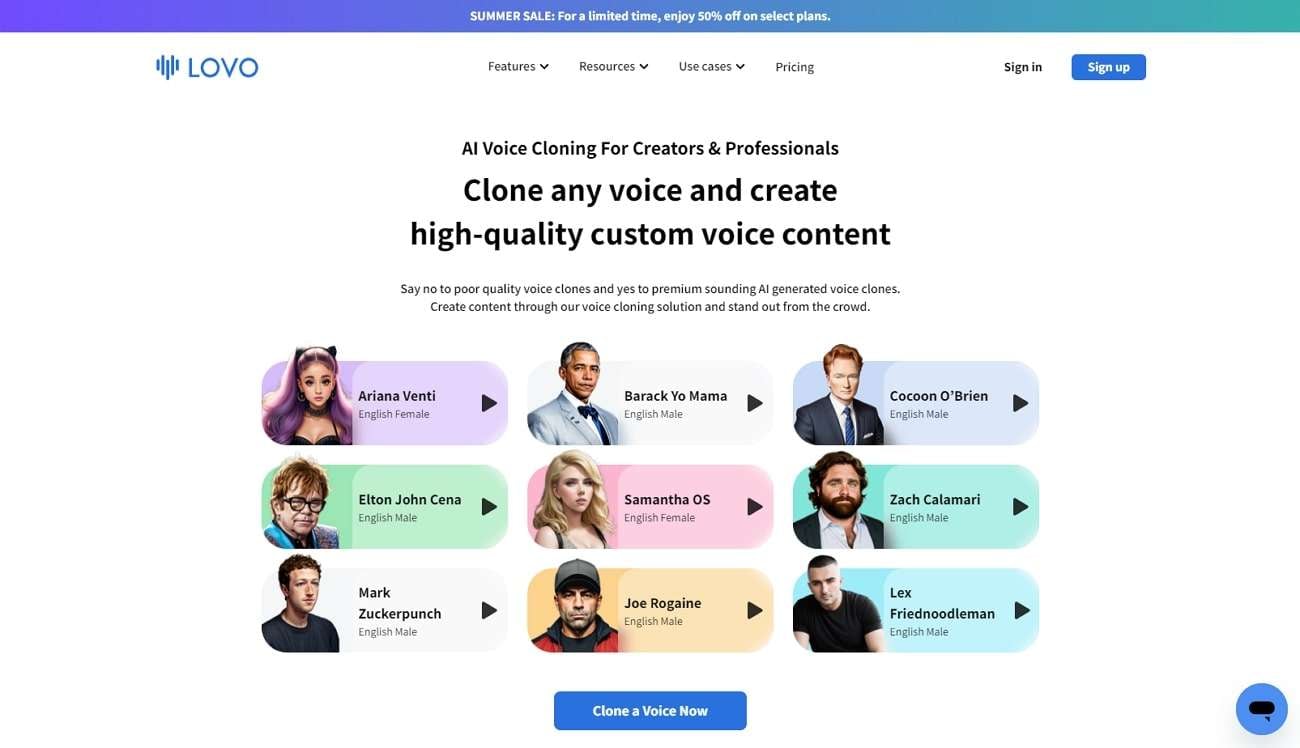
Key Features
- This tool has a considerable number of AI voices for every use case. It also supports 150 plus AI voices along with 25+ emotions.
- LOVO AI has a specialized text-to-speech feature through which you can convert written text into audio and make voiceovers through them.
- The online video editor of LOVO AI lets you create premium-grade videos and sync the voiceovers with a few taps.
- Using its AI Writer, you can generate scripts for your social media content without hiring professional scriptwriters.
5. Resemble.ai
This tool suits you if you are willing to create dynamic and unique voice clones. The voices cloned with this tool will help you stand out in the crowd. For uploading the sample audio, you can use its web recorder or upload data from the device.
One of the best things is it has the potential to create a voice clone in approximately 12 minutes. The AI Engine can narrate your voice, add a dramatic effect to it, and can also speak in other languages. There is also an in-built voice assistant that you can use as per your need.

Key Features
- It offers preset game dialogue for gaming users, and you can use them without worrying about compromise in performance.
- Creating audio ads with full personalization is also a specialty of this tool. You can also manage address, name, and location.
- If you are making documentaries, narrations, or voiceovers, this fantastic voice cloning tool can assist you with its Film Dialogue feature.
- ai supports a wide array of APIs for the ease of the users. This includes Podcastle, Vidon AL, Open AI’s ChatGPT, Synthesia, and more.
6. HeyGen
This amazing tool encompasses the potential to generate clear audio without any problems with background noises. It helps you to streamline your workflow efficiency. You can also clone your voice AI in multiple voices, such as German, Polish, Italian, French, and more.
In addition to this, it can also help you transform text into professional videos. The interface of this tool is quite delightful, so you will not face any problems while using it. Moreover, it also has blazing-fast processing speed, making it a good tool.
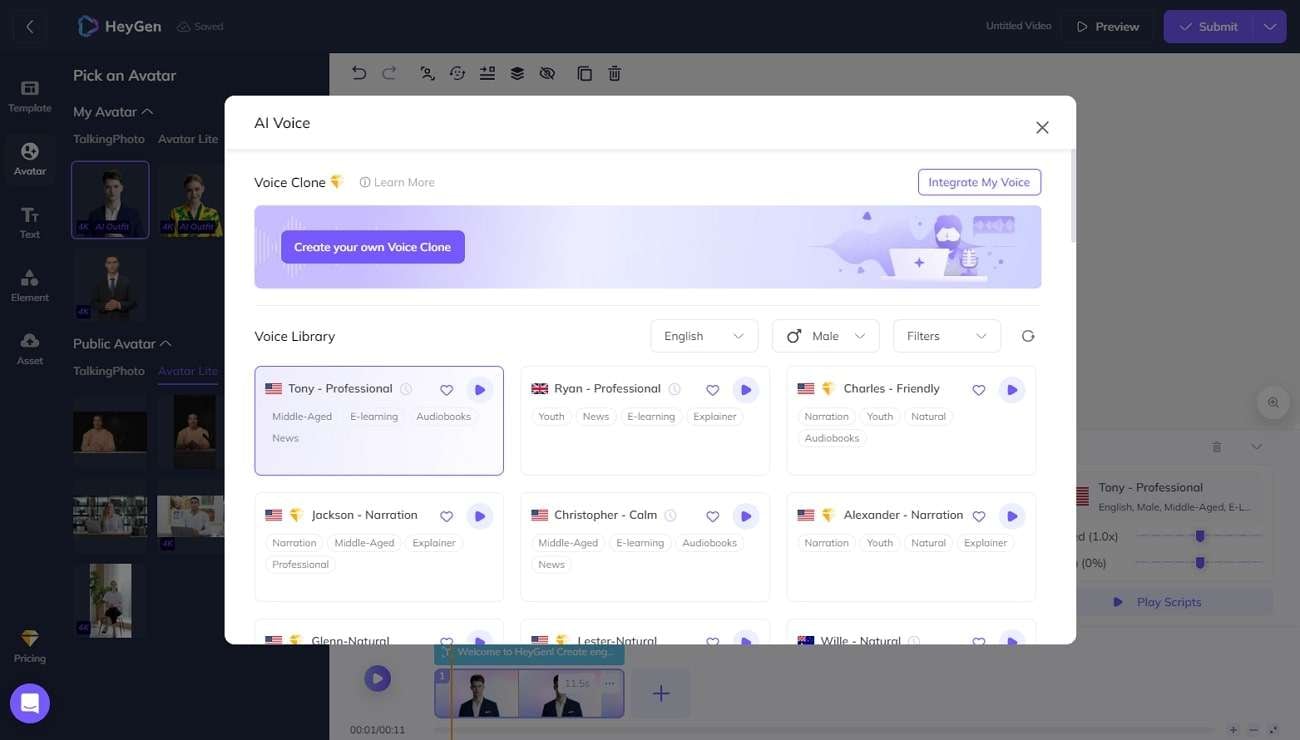
Key Features
- You can use this quality-oriented tool for creating marketing, educational, training, or social media projects.
- There is a versatile pre-built template in it, which you can align with your vision and use as you like.
- This tool also has the potential for creating customized AI Avatars that can represent your brand and help you to interact with the audience.
- HeyGen also supports integration with Zapier, which can help you to enhance its usability in no time.
Part 3: How To Select The Best AI-Powered Cloning Software
Selecting the best software to clone your voice can be hectic. To save you from this hassle, we present some of the effective factors that help select the best out of a thousand. So, let’s get into these quality-reciprocating factors without any further delays:
1. Quality and Customization Options
Before selecting the tools, ensure they can provide reliable results without compromising the quality. The quality of the voice clones generated with the AI software should encompass naturalness. This will help you to attract more listeners without any doubt.
A tool hold lets you create clones that can sound natural, along with having emotions and rhythms. You should also be able to adjust the audio metrics, inclusive of speed, tone, and pitch.
2. Language Support and Understanding
Make sure the tool you select can support the language you want in your cloned voices. Not only language, but should also support versatile accents to ensure flexibility. This is a crucial factor for having accuracy and reliability in the voice clones. Making global content can also get easier with this.
In addition to this part, you have to evaluate the ability of the software to understand the commands you are giving. You can also check for the voice patterns that the respective tool supports.
3. Adaptability and Integration
Some software allows you to train them on some specific voice samples. It helps in optimizing the accuracy when you clone your voice AI. So, it is essential to check if the tool has the potential to adopt new patterns.
Moreover, it is essential to know about the integration of a tool in your system. If you want to experience a smoother workflow, then integration is extremely important.
4. Real-time Processing and Security
Real-time voice cloning is very important for several user cases. You can use it while talking on the phone and in other types of communication. You can also clone your voice in real time with the help of effective software. The AI-powered software has the potential to generate voices quickly without compromising words and quality.
Voice data is a very sensitive type of data, so you have to be careful while selecting the software. Make sure to choose software that can employ strong encryption and security.
Conclusion
To wrap things up, you can clone your voice to communicate worldwide in an engaging manner. There are several scenarios where you can use voice cloning technologies. Some include biometrics, language learning, accessibility, dubbing, and other cases discussed above.
The top 6 software through which you can create best-in-class voice clones are also discussed above. You can follow the factors discussed in the above parts to select the best AI-powered clone software to clone your voice AI.
Live Deepfakes Made Easy: How to Download and Make Your Own Live Model
DeepFace Live offers you an opportunity to swap your face for someone else’s when streaming or making video calls. By swapping your face in real-time, you can present yourself in videos in any way you like. With the recent development made by DeepFaceLab, you get accurate and quality face-swapping, create realistic live models, and live up to the hype withDeepFace Live . In this article, we provide an overview ofDeeepFace Live and provide simple guides for downloading the application to your PC and creating your first live model.
Part 1: What is DeepFace Live
Deepface Live refers to a real-time face-swapping application, which allows you to swap faces during video calls and streaming.
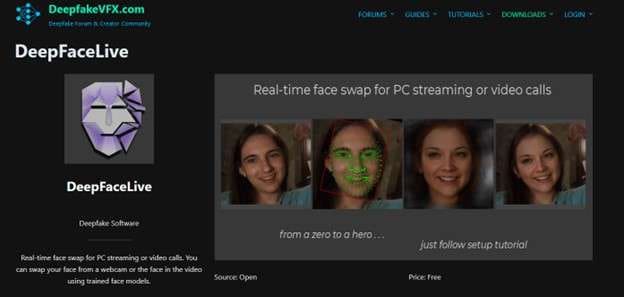
Using Deepface Live allows you to superimpose your face onto someone else’s in real-time. With Deepface Live, you can:
- Swap your face with that of a celeb: Quickly and easily have a conversation with your friends and family while looking like your favorite actor or actress.
- Create Prank or Funny Videos: WIth Deepface Live, you can create all sorts of prank or funning videos, such as giving a speech or singing a song.
- Make it Look Like You Are in a Different Place: Deepface Live allows you to superimpose your face onto the body of someone else so you can appear like you are in a different location.
Part 2: Download DeepFace Live the Easy Way: A Step-by-Step Guide
Downloading and installing DeepFace Live is quite straightforward. Make sure you have Python installed on your system, and follow the steps in any of the two methods to download DeepFace Live.
Method 1: Access from the official website
Step 1 Visit theofficial Deepfakevfs website with your browser

Step 2 Scroll down to the Download section
Then locate the section with the Face Swap download links. From the available download options select the version that suits your operating system the best. You can the option to download a Windows or Linux version.
Step 3 Click the Download button to initiate the process
Install the software by running the downloaded file by locating the installation file on your PC and running it to start the installation process. Then follow the on-screen instructions until you complete the installation process.
Method 2: Access from Github
An alternative process to installing Deepface Live is accessing it from GitHub. The process is pretty much simple and involves only a few steps.
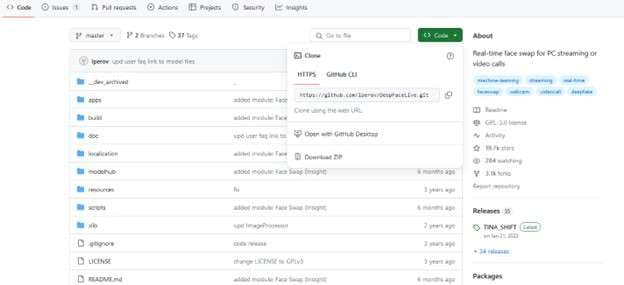
Step 1 Visit the GitHub repository
Using a browser on your PC, visit the GitHub repository and navigate toDeepFace Live.
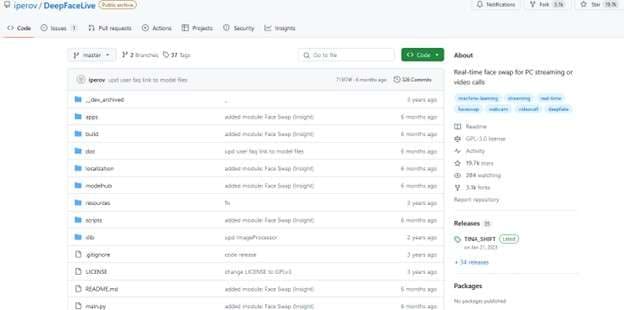
Step 2 Click the Code Button
Found on the top right corner of the repository page, the greed Code button allows you to select what you want to do with the code. On the pop-up menu that appears, select the “Download Zip” option. This will allow you to download the compressed file that contains the Deepface Live code.
Step 3 Install and Rin the Application
After downloading the Zip file to your PC, extract its content to a desired location. Open the command prompt or a terminal and navigate to the extruded Deepface Live direction. Then, use the command “pip install -r requirements.txt” to install the required dependencies on your PC. After installing all the dependencies, run DeepFace Live on your PC using the command “python main.py. ”
Part 3: Build Your Live Model: Easy Tutorial
Creating customizedDeepFace Live models can be an exciting experience. It allows you to bring your imagination with real-time interaction. However, with the Deepfake issues and concerns among viewers, you may need a safe alternative to engage your audience with. You will want to engage your audience while assuring them that the information they are getting is authentic.
![]()
Get Started Online Free Download
Virbo Live is designed to give users the ultimate AI streamer experience. You can host live shopping with an AI streamer, saving the time and cost of generating such content or hiring a human streamer. With Virbo, you get access to multi-lingual AI-driven avatars or Vtubers that will interact with your viewers in real time. Transform their live experience while boosting your revenue.
Virbo Live allows you to broadcast your stream on platforms like Facebook Live and YouTube using OBS on each platform. In some platforms like TikTok and Shopee, you can use the official live tools like TikTok Live Studio to stream your Avatar.
01 Equipment Requirement:
You can use Virbo Live with any device that supports live streaming. This can be your PC or mobile device with decent storage and access to high-speed internet. The major equipment requirements include:
- Computer Requirements : Make sure your computer is properly configured with Stereo Mix or other virtual sound cards.
- Network Requirements: Your internet speed should be at least 5Mbps for smooth live streaming.
- Browser Requirements : While most browsers are supported, it is recommended to use the latest Chrome browser for optimal and stable performance.
Once you have checked on all theequipment requirements , you can go ahead to create your first AI-powered stream. Here are the steps to follow to create an AI streamer and set it up for interactions with your viewers:
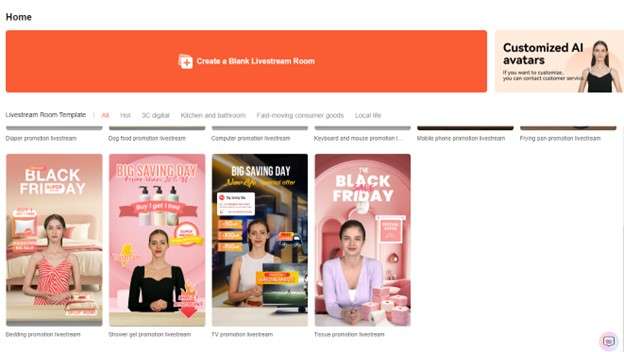
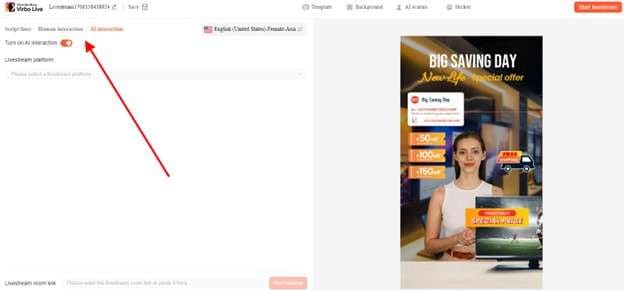
Step 1 Create a Live Shopping Rooms
On theVirbo Live page , select “Create a Blank Livestream Room” or choose a template of choice from the available options to create a new livestream room.
Get Started Online Free Download
Step 2 Choose AI Streamers and Background
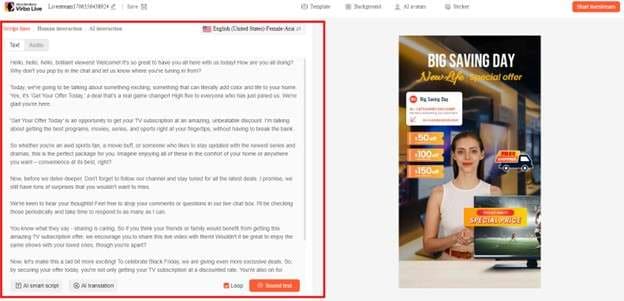
Add a virtual streamer of choice to your live stream room from the virtual host library.Virbo Live provides a wide range of AI avatars and backgrounds to suit your needs. You can also customize the avatar and background the way you like, and add stickers to enhance your viewers’ experience.
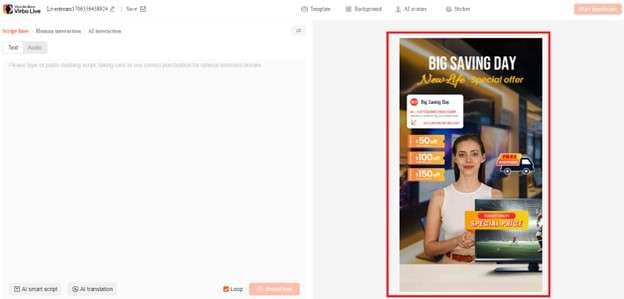
Step 3 Enter Text or Voice
With the avatar set, you need to upload your audio or enter a script with all the necessary details. Virbo Live allows you to automate this step with the AI smart scriptwriter and AI translator. Simply enter basic details about your product, and the Smart AI Scriptwriter will generate a fully detailed script for the avatar. Be sure to specify the language that you want to use and the desired tone for a more accurate script.
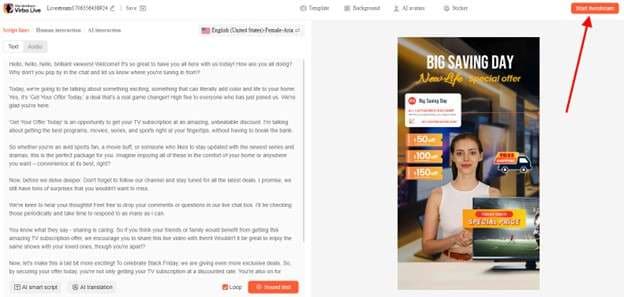
Step 4 Start Live Streaming
After choosing your AI Avatar and generating or adding a script, click “Start Live Streaming”. This allows you to AI stream your Avatar through OBS software, and allow the Avatar to interact with your audience on platforms like Facebook Live and YouTube.
Step 5 Interact With the Audience
AI streamer from Virbo Live will do more than present your information to the audience. It will also interact with them seamlessly by responding to questions and providing additional information.
Conclusion
Deepface Live allows you to experiment with different faces when streaming live videos. You can present your videos as a celeb or even appear as if you are in a different location. While theDeepFace Live application can give you an incredible experience, you may have to deal with some ethical issues associated with Deepfake scandals. For this reason, we highly recommend usingVirbo Live as a safe alternative. It allows you to create AI-powered avatars that can seamlessly interact with your audience without negative repercussions.
Secrets for TikTok Live Studio Success
TikTok has changed the streaming world. With millions of users on the platform, TikTok Live Studio is a tool that allows you to stream and go live with ease and better engagement. TikTok has realized the power of streaming and is now competing with some of the biggest platforms like Facebook Live, Twitch, and YouTube.
But if you want to grow your TikTok using the Live Studio, then we have a complete guideline of how to go from a beginner streamer to an advanced one.
Part 1: Basic Knowledge of Pro Tips for TikTok Live Studio Success

We live in an attention economy where live streaming has become the pinnacle of entertainment. You see many creators like Adin Ross, N3on, and Sneako making the move and becoming one of the biggest streamers out there, earning millions of dollars per year.
The studio behind TikTok saw the potential and decided to allow live streaming, which is one of the best ways creators can interact with their audience. However, as the platform got bigger, TikTok introduced its official Live Studio tool that aims to set streamers up for success.
So what exactly is Live Studio? LIVE Studio is TikTok-dedicated streaming software that lets you stream games on TikTok, connect with the community, receive gifts, and subscriptions, and easily create high-quality content for your viewers to enjoy.
So how does it work?
01 How does TikTok Live Studio work?
Being a comprehensive live streaming software, creators who want to use Live Studio will need to at least have 1000 followers to unlock and access this wonderful software. TikTok LIVE Studio has helped gaming creators up their TikTok Live experience, experience true monetization, and connect deeply with their viewers.
However, if you want to be a gaming-related creator, you must have posted game-related short videos or gone live while playing a game of your choice. But with non-gamers, the policy is different. You need at least 10,000 followers to have access to the LIVE Studio.
02 Benefits and Features of TikTok Live Studio
Tik Tok LIVE Studio provides many features that make streaming a breeze. Especially when you are a gamer, you get so many intuitive controls that it turns your TikTok into an analytical dashboard where you can understand your audience a bit better.
Firstly,Live Studio TikTok makes it easier for beginners to go live and get their streaming career started. It is simple to use and easy to get started when there is a dedicated tool for streaming.
Secondly, you can engage with viewers like a pro using streaming-oriented features like LIVE, LIVE Goal, Highlight, and more. It sets up a whole system for you to follow and improve, allowing you to take your streaming career to the next level.
Moreover, with TikTok LIVE Studio, you can also chat with your viewers through an in-game chatbox. From reacting to their comments and receiving gifts, Live Studio provides all the options for streamers to leverage.
Part 2: Pro Tips for TikTok Live Studio Success
1. Select AI-powered streaming tools to ease the workload

We live in an AI-focused world where even gamers tend to move towards AI avatars instead of displaying themselves playing the game. If you have been a fan of vTubers and want a similar streaming style for your gaming TikTok Live, then you should tryVirbo Live .
Moreover, in the modern world, TikTok commerce has been blowing up with shops showcasing their products and getting the most return of the content that they are making. But withvirtual live avatars in Virbo, you can take it up a notch and get your TikTok store to sell better with greater engagement.
First of all, you are going to save a lot of money when it comes to using an AI avatar since you won’t need to hire a person to do everything for you. Secondly, using these VTubers will give you a boost in revenue especially when there is a live shopping event.
Lastly, with 24/7 seamless AI streaming, you can plan the stream ahead of time and get much more out of your livestreams. Here are some of Virbo’s live-streaming features.
Features of Virbo Live
- AI Live Shopping: Virbo offers 24/7 live avatars that you can use to set up AI live shopping right on your TikTok page. You don’t need any human model present and you can showcase your product on the TikTok page as you like.
- Realistic AI-Driven Avatars: All avatars are realistic and the vTubers can perfectly mimic natural movements. From different ethnicities, poses, and attire, you have the freedom to choose anything.
- Multiple Languages and Accents: Virbo offers multiple languages and accents that various avatars can have. Hence, you can break the language barrier and create live streams in various languages to target the native people.
2. Set your objectives for TikTok Live
When it comes to going live on TikTok, you also need to set your objectives. TikTok Live Studio provides many features that you can leverage. Hence, by planning your actions, you can make the best out of going live on TikTok
For example, before your stream starts, ask yourself, what are your objectives? Do you want more views, more people engaged, more conversations, monetization? Once you have the goal in mind, then you can leverage TikTok Live Studio and make the most return out of your effective live session.
3. Promote your live beforehand
Before you go live using TikTok Live Studio, you need to promote your life. It is important to build up anticipation before actually going live on the platform. Hence, when you announce that you are going live and also tease what is going to be in the video, you improve your chances of getting more viewers to join, especially if you have an audience already.
One of the best ways to promote is simply to make an engaging TikTok that only teases the content of your upcoming live session, sparking the curiosity factor amongst the potential viewers.
4. Timing matters the most
The right time when you push out your content is what matters the most. The same is true with YouTube, Facebook, Instagram, and most other platforms. With TikTok, you must understand where your audience is mostly active in
How do you find that? Well, you need to understand your audience deeply and when they are mostly active. For example, your audience could be active on TikTok on a certain time and that’s where pushing your livestream will get the most results.
5. Take care of technical aspects
Most people ignore the technical aspects of TikTok livestream. This is especially true if you want to come in front of the camera for live streaming purposes. For example, you need to make sure that your lighting, sound, and connectivity are perfect so nothing hinders the experience of your audience.
With TikTok Live Studio, you can handle the hardware, which devices you want to connect, and the overall quality of your live streams. So, when you address the technical aspects the right way, you increase your chances of engaging the audience.
Part 3: Step Guidance to Start TikTok Live Studio
Step 1 Download TikTok Live Studio

Visit the official website ofTikTok Live Studio and download it for your Windows. But you can also log in to your TikTok account and download Live Studio from there. But if you don’t see the TikTok Live Studio download button in your TikTok app, then that means the software might not be available in your region.
Step 2 Install and Login TikTok Live Studio

After completing the download, you need to install the software on your Windows PC or laptop. Give it all the permission that it needs and after you are done installing it on your machine, you need to log in just like you log in to your TikTok. The application will allow you to choose various options like Facebook, Google, and Twitter login.
Step 3 Setting up LIVE Studio and going live

Once you are logged in, you can either skip the process or Set Up so that everything will go under your supervision. You will need to select things like Microphone, Camera settings, Streaming Settings, and more. Once everything is set up, you just need to clickGo Live, and your live stream will be started.
Conclusion
TikTok Live Studio is one of the best live streaming tools you will find. The regular TikTok app is quite limited, especially if you are a streamer trying to make it on the TikTok world.
There is so much competition on theTikTok streaming service, but with Live Studio, you get a lot of freedom and tools to measure your progress in the competitive TikTok world.
[Top List] Best 5 Tools for Creating Talking Avatars
Avatars have become crucial in many different industries in the last few years. Whether it is customer support or entertaining people, avatars connect businesses with their audience in a better way. As technology gets better, we’re witnessing a remarkable evolution in avatars.
Read this article to learn some freetalking avatar makers you can use. Also, we’ll explore the finest tool to use this innovative technology while joining in the fun for diverse purposes.
![]()
Part 1. Recommended: Finest Talking Avatar Creation With Wondershare Virbo
Wondershare Virbo stands out as an exceptional tool for creating talking avatars. It offers a comprehensive solution for crafting high-quality avatars on a single platform. The tool is versatile, showing compatibility with various devices and operating systems. This groundbreaking tool lets you bring your static photo into a dynamic storyteller.
Plus, it lets you add voice clips to your photos to make them interactive. Its talking feature adds emotion, explanation, or personalized messages to your visual content. Users can transform old pictures into captivating stories with personalized voice clips. With the support of a wide range of accents, you can create talking avatars that resonate with the global audience.
Highlighted Features of Wondershare Virbo
- The text-to-speech feature converts text into spoken language for smooth
- Users can elevate the mood and atmosphere with personalized background music within the Talking Photo feature.
- Its versatile AI avatars and clear audio quality ensure that your voiceovers are crisp and clear.
Pricing Plans
- Monthly Plan: $9.9
- Essential Yearly Plan: $19.9
- Pro Yearly Plan: $199
Step-by-Step Guide to Using the Talking Photo Feature in Wondershare Virbo
Wondershare Virbo ensures a seamless experience for its users in talking avatar creation. The process is as simple as it can customize your talking photos. Follow the below-mentioned detailed steps to use thisAI-speaking avatar creator :
Step 1. Download Virbo and Access Its Talking Photo Feature
Begin by downloading and installing this AItalking avatar maker on your devices. Afterward, launch the tool on your system and access its dashboard. Click the “Talking Photo” button among the available options here.
![]()
Get Started Online Free Download
Step 2. Select AI Avatar or Import Your Photo
A mini window will pop up on the screen, allowing you to select from preset images. You can also import the picture by browsing your system. Once you’ve selected, you’ll be directed toward a new window.
![]()
Step 3. Generate Script Using AI
Head to the bottom left in the upcoming window and hit the “AI Script” icon. Type the script in the text box and optimize it with AI features. Afterward, press the “Apply” button from the right bottom to use it for talking avatar.
![]()
Step 4. Make Adjustments in Language and Gender
After creating a script, it is time to customize its language. Tap on the “Language” button, which opens a pop-up window. Clicking on the “Language” dropdown menu allows you to choose your preferred language. You can opt for either male or female by choosing the “Gender” dropdown menu. Later, click on the “OK” button to proceed with the process.
![]()
Step 5. Modify the Voiceover Characteristics and Export the Video
Next, personalize the qualities of voiceover under the language section. Here, you can modify the “Speed,” “Pitch,” and “Volume” as needed. You can preview the video you’ve customized by tapping on the “Play” icon. Finally, navigate toward the top left corner of the window and press the “Export” button to save it.
![]()
Pricing Plans
- Monthly Plan: $9.9
- Essential Yearly Plan: $19.9
- Pro Yearly Plan: $199
Part 2. Alternatives: Other Talking Avatar Creator Tools for Enhanced Content
Previously, we have discussed the best tool to generate talking AI avatars. However, if you want to try out some alternatives to Wondershare Virbo, we have a solution. For this purpose, we’ve enlisted some othertalking avatar creators to help you in getting results to your satisfaction:
1.Akool
Akool is a comprehensive generative AI platform available for creators and innovators. Its intuitive features allow users to materialize ideas quickly for diverse marketing and advertising needs. You can upload JPEG and PNG images of less than 30MB for each picture on the tool. Plus, the picture should be clear as it does not detect blurry, overexposure, and side faces.
![]()
Pros
- With film-level quality outputs, it ensures high-quality visuals and videos.
- Thetalking avatar creator achieves up to 8k resolution for pictures and 4k.
Cons
- One problem is that talking avatars can’t sound entirely natural yet.
Pricing Plans
- Professional Plan: $30 per month (600 credits)
- Studio Plan: $500 per month (12000 credits)
Steps To Create Talking Avatars With Akool
As discussed before, Akool lets its users customize their talking avatars. Let’s discuss the steps tocreate a talking avatar online for free using this tool:
Step 1. Get the online tool through your preferred web browser and open its homepage. Now, hover over the “Platform” dropdown menu and select the “Talking Photo” feature.
![]()
Step 2. Within the upcoming window, click the “Choose File” button from the center to upload the image. Also, you can choose an example offered by the tool. After making a selection, you can also revert changes.
![]()
Step 3. After uploading the picture, head to the “Text” section on the right side and type in the script. Then, under the “Voice” section, make adjustments in gender, language, and speed. Later, preview your generated talking avatar and tap the “Results” at the top right. Finally, the tool will process it and provide you with the final results.
![]()
2.Yepic AI
If you also want to createan AI talking avatar , Yepic AI is your go-to preference. You can create a lifelike digital version of yourself with just a headshot. Users can uniquely present their videos by choosing from over 40 preset avatars. It boasts many actors, languages, and voices, with over 450 options available to personalize your avatar.
![]()
Pros
- The tool personalizes every aspect of your videos, from backgrounds and transitions to actors and voices.
- You can scale and localize your content across different countries, languages, and accents.
Cons
- It offers only 20 video credits per month, and one credit equals a 60s video, limiting extensive use.
Pricing Plans
- Consumer Plan: £5.75 /month
- Standard Plan: £24.16/month
- Plus Plan: £65.83/month
- Premium Plan: £415.83/month
- Infinite Plan: £665.83/month
Steps To Create Talking Avatars with Yepic AI
Users can utilize the capabilities of this tool to create talking avatars seamlessly. Here are the steps to carry out the process of makingAI-speaking avatars to engage viewers.
Step 1. To start the process, tap the “Get Started” button on the main website page and access the editing window. The tool lets you choose avatars or talking photos within this editing interface.
Step 2. Afterward, in the text box, type your script and hit the “Listen” button. Alternatively, you can upload your voiceover to the tool to make it personalized.
Step 3. Upon uploading the voiceover, select the voice and the desired language for your written words. Then, select the desired background and add shapes to modify the outlook of your talking avatar. Finally, preview the video and download it to share with others.
3.Speechify
Speechify Studio serves as the premier AI Video and AI Voice Platform. This site empowers anyone to create professional videos in just one minute, with no skills required. You can quickly produce captivating content using AI-generated talking faces. It lets youcreate a talking avatar online for free to save your valuable resources and time.
![]()
Pros
- Speechify Studio offers a user-friendly interface that makes video production quick and effortless.
- Users can combine high-quality text-to-speech synthesis with lifelike avatars for an interactive audiovisual experience.
Cons
- The narration of this tool lacks human-like empathy and emotions.
Pricing Plans
Talk to the sales team.
Steps To Create Talking Avatars with Speechify
With Speechify’s intuitive interface, you can easily perform various tasks. In the following section, you’re given the simple steps to create anAI talking avatar using this online tool.
Step 1. First, access the “AI-Generated Talking Face” page from the main interface of Speechify. Proceed by hitting the “Try for Free” button and log in using a Google account. After entering the editing interface, press “Create AI Avatar,” which leads you to a new window.
![]()
Step 2. Now, opt for the desired avatar from a vast library. Upon selecting this avatar, it will appear on the right side of the editing window. Afterward, you can adjust “Avatar Style” and the “Layout” settings.
![]()
Import your script from a media file or paste a URL from YouTube. Afterward, choose the voiceover among the available options and preview the video. Once satisfied, tap the “Export” button at the top right to download this from this tool.
![]()
4.HitPaw Online AI Face Animator
This online AI face animator is an easy-to-use AI-based tool that brings your still images to life with animated faces. You can choose from various funny templates to animate your photos with a simple upload and a click. It allows you to add humor and personality to your images. The tool supports JPG, PNG, JPEG, and WEBP formats for pictures and animates them with customization.
![]()
Pros
- Users can animate various photos, from individual portraits to group shots, with many templates available.
- It emphasizes safety and security and ensures your photos are protected.
Cons
- Weekly Plan: $0.57/Day
- Monthly Plan: $0.27/Day
- Yearly Plan: $0.13/Day
Steps To Create Talking Avatars With HitPaw Online AI Face Animator
HitPaw Online is another onlinetalking avatar maker with a straightforward approach. The following are the steps to animate a photo using this online tool:
Step 1. Visit the tool’s official website and access the main user interface. You can place your cursor over the “Photo AI” dropdown menu and click “AI Face Animator.”
![]()
Step 2. Next, hit the “Upload Image” button from the left side. This action will move you to the main editing window to create talking avatars.
![]()
Step 3. Select the “Drag and drop or click to upload image” option from the left panel in the new window. Under the “Choose a Template” section, select the category of style and expression for your uploaded photo. Then, press the “Animate” button at the bottom. Now, you can see your animated image in the middle of the screen after processing.
![]()
Step 4. Once satisfied with the results, download it on your system. You can save it with the HitPaw logo or as a GIF for fun.
Image name: best-tools-for-creating-talking-avatars-20.jpg
Image alt: download final product from hitpaw
![]()
Conclusion
We conclude that there are variousspeaking avatar creator platforms with different features. These tools make it easy to create avatars that talk to use for different functions. However, the one that stands out among these options is Wondershare Virbo. You can customize your avatars in just a few clicks on different devices.
Get Started Online Free Download
Voicemod AI Review Transforming Your Voice in Real Time
Voice modulation tools like Voicemod AI have become trendy nowadays. With voice-changing software, you can transform your voice into a celebrity, monster, or any other character and prank your friends online. This technology can also be helpful with video narrations and gaming, where you don’t need to reveal your voice. But to achieve that, you must research the best voice modulation program. So, in this post, we want to introduce you to how to useVoicemod AI voices to sound differently on video games, VoIP apps, video narrations, and more. You’ll also know the best alternative to this AI-powered program.
Part I. A Quick Overview of Voicemod AI
Voicemod AI is a Windows/Mac program designed to change your voice in real-time. This software packs a range of AI voices to change your persona in your online interactions. With this program, you can sound almost like anything, including monsters, chipmunks, males, females, children, celebrities, and more. Even better, Voicemod has frequent updates with new AI voices.
So, where can you use the AI voices on this program? Voicemod is a pretty flexible program that allows you to achieve quite a lot. That’s because this program will modulate your voice in real-time, allowing you to shake things up on Discord group chats, Skype video calls, Steam gaming sessions, and other applications. You can even use it to create unique YouTube content and carve out your brand.
Part II. Features and Capabilities
You must be asking yourself why we singled out Voicemod AI of all the AI voice modulation programs out there. The thing is that Voicemod comes with special features that can make your voice stand out in the group. Also, this tool is designed to give you a seamless voice-changing session. Let’s look at some of its shining points!
1. Real-time voice modulator
Voicemod allows you to process voices in real-time, making it the ideal software for streaming on Twitch or making fun calls on Zoom. The AI voice generator has been extensively trained by voices from professional actors to give you human-like narrations. You only need to connect your mic to stream content withVoicemod AI voice . We’ll show you how to do that in this guidepost.
2. Extensive variety of voice effects
Voicemod comes with more than 100 voice effects, with this voice-changing software adding more voices with new updates. The massive library of voice effects and sound modification features means you’ll get unlimited experience with Voicemod. It’s one of the few programs that allows you to modify your voices with reverb, pitch, chorus, vocoder, and other customization features.
3. Create custom voices on VoiceLab
You can exploit the VoiceLab tool on your Voicemod Pro account to generate custom voices. With it, you can create voices from scratch by combining different audio effects and processors like reverb, pitch shifter, filter, and more. Once you have made a custom voice, proceed to name it, add an avatar, and add it to the voice control panel. This is an excellent way to create unique voices you cannot find anywhere else.
Below is how to change your voice with Voicemod AI:
Step 1. Install Voicemod on your Windows 7/10/11 PC or Mac computer and run it.

Step 2. Once you have installed the program successfully, open the sound settings to choose your input and output sound devices.

Step 3. Ensure that theVoice Changer toggle at the bottom of the Voicemod home window is enabled. Then, click theVoicebox tab and choose one of the sound effects. Speak to your microphone to listen, preview, and possibly change the new voice.

Step 4. If the voice is working, head to the application or browser tab where you want to apply the voice effect to start streaming. That’s it!
Note: Remember to select the “Voicemod Virtual Audio Device (WDMI)” on the application on which you’ll stream the sound effect. For example, if you’re using Twitch, click Settings, choose Audio, then select this sound input device.
Part III. Real User Experience
So, what was our user experience withAI Voicemod ? To be honest, Voicemod is one of the best if not the best, voice modulator programs. We were impressed by how easily it picks up sounds on our microphone. The range of voice effects and customization options is also impressive, to say the least. And yes, the platform itself looks stylish and modern.
But this program’s main drawback comes from its major strength. Although Voicemod is a feature-rich program, beginners might feel intimidated at first. You may need to follow the developer’s guide to connect your microphone appropriately and customize the sound settings. Overall, Voicemod isn’t for green hands, although it’s fun to use once you get the hang of it.
Part IV. Pricing and Plans
Although Voicemod is free, you must upgrade to the Pro version to unlock all the voice effects and capabilities. Thankfully, the Voicemod subscription plan is one of the most competitive. You can opt for the One-Time Payment at**$59.00** , although the program often has50% off for new installations. You can also choose the Annual plan of**$23.88** or the 3-month plan of**$11.97** .
Below are some of the advantages you’ll get with Voicemod Pro:
- Design your unique voices from scratch with VoiceLab.
- Unlimited MP3 and WAV audio uploads.
- Complete Voicebox with 80+ pre-made voice effects.
- Receive new voices and themed soundboards every month.
- Unlock all AI voice filters.

Bonus Tips: Try the Best Alternative to Voicemod AI - Virbo
Voicemod might stand out as one of the best voice-changing software around. But, this program has a few drawbacks, primarily complex usability. Also, Voicemod only works with audio files and live microphone recordings. This begs the question: what if you want to add a voice effect to a video and share it online?
In that case, Wondershare Virbo is the best alternative to Voicemod AI. With this AI-backed desktop program, you can create video templates with 150+ free avatars and 120+ voiceovers. It’s the best tool for creating videos with unique voice effects for digital marketing, online classes, tutorials, and other uses. This tool also supports tens of languages and can convert texts to audio overlays.
Follow these steps to create a video with AI voiceover on Wondershare Virbo:
Step 1. Download and install Wondershare Virbo on your PC, then click theAvatar button. The installation process should take just a few seconds.

Get Started Online Free Download
Step 2. After choosing a video template, proceed to select the narration language. This program supports English, Arabic, French, Portuguese, and more.

Step 3. Next, tap theAudio Scripts button, then chooseOnline Recording to begin recording live voiceover on your video template. You can also upload a pre-recorded MP3/WAV file or extract audio from MP4.

Step 4. Preview the video and change the sound effects by choosing a new avatar if needed. If satisfied, tapExport to save your video template with AI voice. That was easy, right?

Note: Virbo transforms texts into voice overlays by simply entering your Text Scripts. This makes it an excellent tool to create unique videos if you have voice problems.
Final Words
Now it’s time to try everything you have learned in this guidepost. WithVoicemod , you can transform your live voices on multiple gaming and voice apps. However, we advise you to upgrade to the Pro plan to unlock this tool’s full capabilities. And don’t forget to check outWondershare Virbo to create videos with unique AI voices. Give it a try!
Everything You Want To Know About Kapwing Video Translation
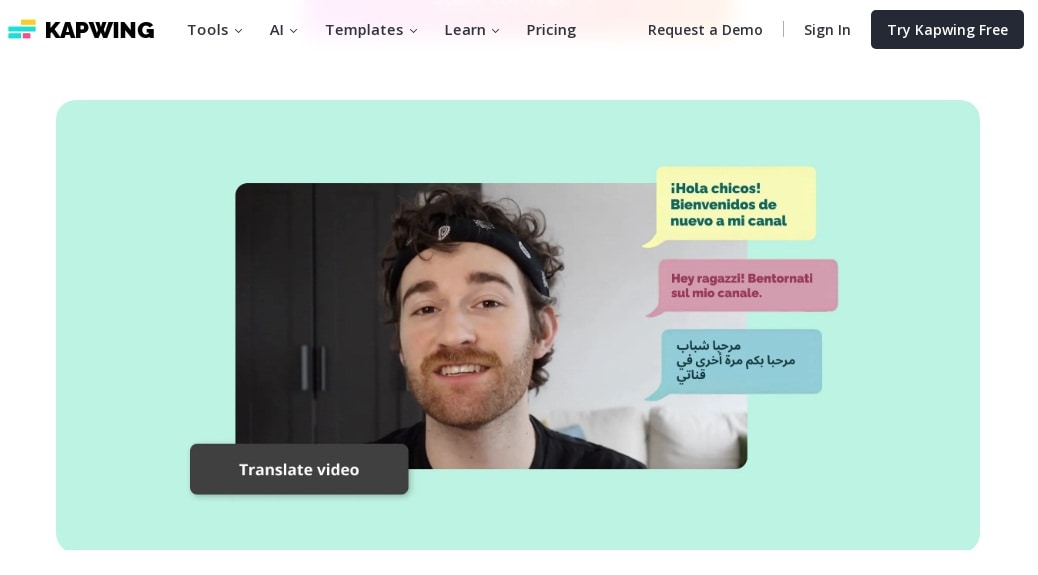
Effective communication extends beyond language barriers. As content creators strive for global reach, video translation takes center stage. Kapwing is one such Video Translation tool. It’s a versatile tool designed to bring down linguistic boundaries and elevate the impact of visual storytelling. In this article, we will delve into the key aspects of Kapwing, providing an insightful guide on its video translator, usage, and explore an alternative platform that complements or rivals its capabilities. So, join us as we unravel everything you need to know about theKapwing translate video tool.
Part 1: What is Kapwing
Kapwing is an online video editing platform. It lets you create, combine, and edit multimedia content. You can use it for creating videos, managing images, and making GIFs. It offers a wide range of tools and features for customizing visual content, such as video editing, image enhancements, subtitle/transcription generator, Kapwing video translator, meme maker, and much more.
Kapwing has a very user-friendly interface with beginners in mind. That’s why even people with no prior experience in graphics design or video editing can use it seamlessly to create unique content, making it a popular option for social media managers, content creators, and digital marketers alike.
Unique Features of Kapwing
- Drag and drop functionality : Working with Kapwing is incredibly simple. Just drag and drop your media into the Kapwing editor and start editing from the browser. No need to download anything.
- Excellent customization features : Whether you’re working with text, audio, or video, Kapwing offers a host of customization features such as adding text, text color, size, images and audio, etc.
- Add Subtitles and captions : With Kapwing translate you can easily generate captions and subtitles. After that, add them to your videos, making them more engaging.
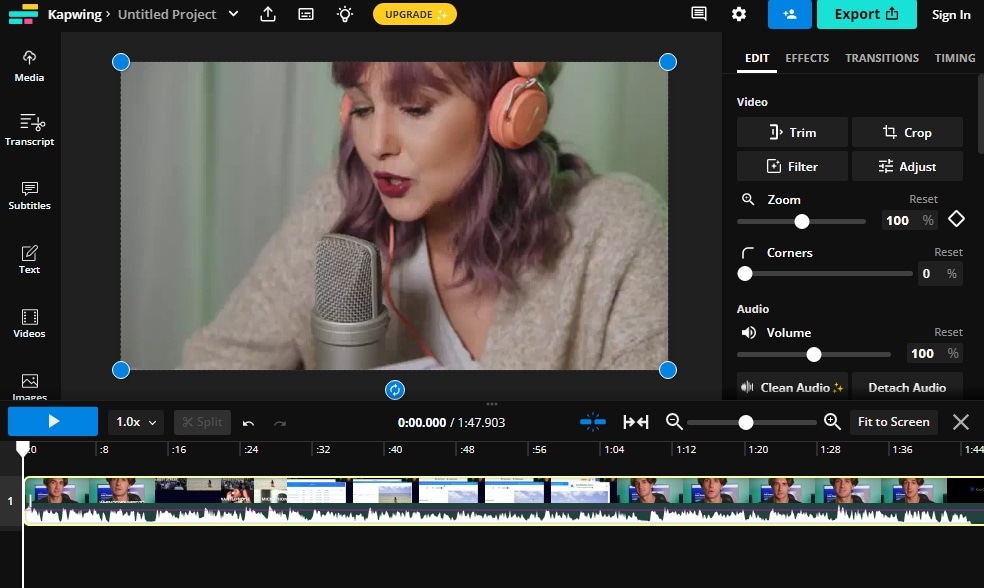
- Excellent video editing tools : Trimming, cropping, filtering, Cutting – Kapwing offers a range of video editing tools that make post-production a real breeze.
- Extensive Video format support : Kapwing can work with an extensive range of video file formats, including but not limited to, AVI, MOV, FLV, MP4, WEBM, GIF, and 3GP.
What is the Kapwing Video Translate Tool
Kapwing has a fantastic instant video translation tool. It uses the latest AI technology to auto-transcribe your content, saving both time and effort. You can also use Kapwing Translate to translate subtitles into 70 languages of the world, helping you reach a global audience. Transcribing is easy with just a few clicks. You can translate video, as well as audio and text. Moreover, you can customize subtitles using fonts, transitions, filters, and animations, and if you want to get the subtitle file to use with a video editor, you can do so as well. Kapwing supports subtitle downloads in SRT, TXT, or VTT file types.
Part 2: How to Use Kapwing Video Translator To Translate A Video
Below is a step-by-step process for the Kapwing translate video tool.
Step 1
– Go to the officialKapwing video translator tool by following the link below:
https://www.kapwing.com/studio/editor/subtitles
It takes you directly to the online editor. No need to download any app/software or sign up with your account.
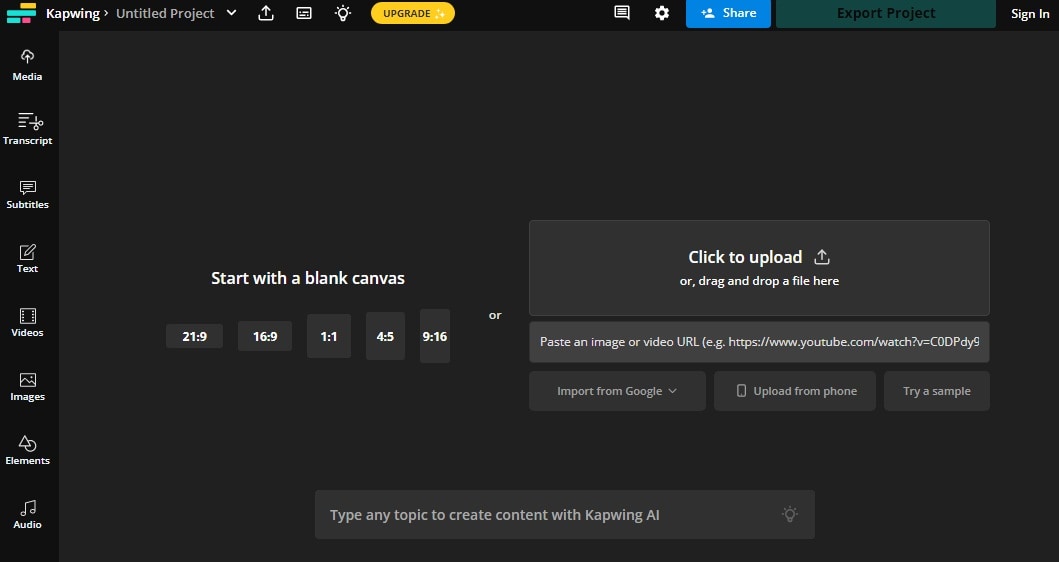
Step 2
- Upload your video by clicking on the box or dragging and dropping your content file. Below is what the Kapwing interface looks like when you upload a video.
Step 3
– Click on theSubtitle option in the top left corner. Kapwing will show a list of transcription options.
Step 4
– Next, select your target language.
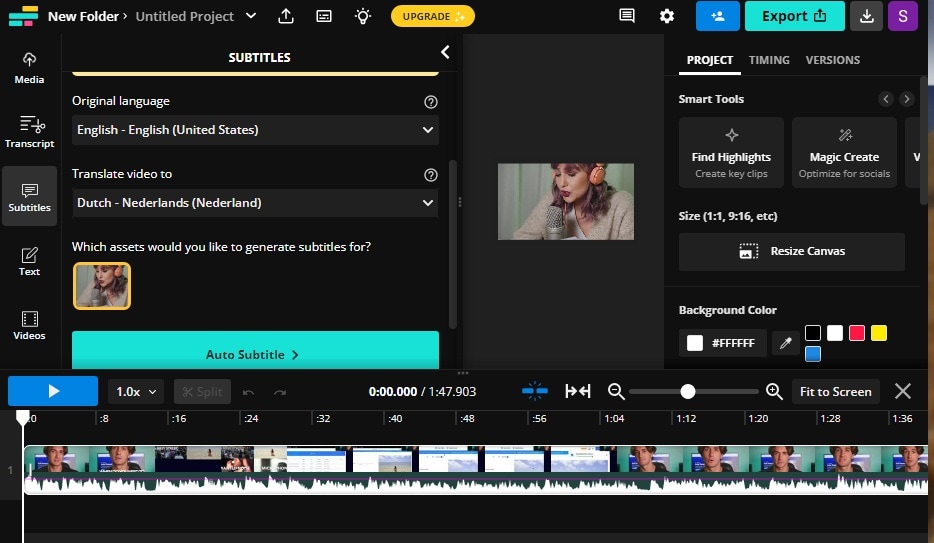
For this tutorial, we are translating an English video to Dutch as you can see above.
Step 5
– Click onAuto Subtitle
Kapwing will start automatically translating your video. It may take some time. Longer videos take more time to translate than shorter ones.
Step 6
– Lastly, check final settings
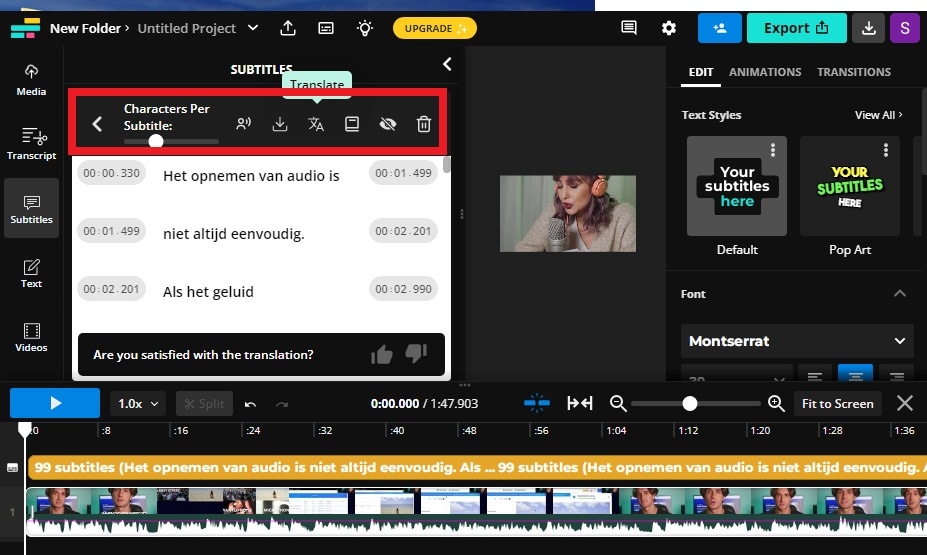
Once you get the translated subtitles, you can add voice dubbing, download the SRT file, further translate these subtitles into other languages, add custom spelling, and do much more using the options in the red box seen above.
That’s all. Pretty easy, right? This is how you use theKapwing video translator .
Part 3: Best Alternative to Kapwing: Wodnershare Virbo
While Kapwing is a great platform for video editing online, some other platforms provide similar features with better AI tools. One such notable tool isWondershare Virbo .
Generate Voice Online Download APP Now Free Download
Use Virbo to Generate AI Videos or Translate Your Audio/Video Content
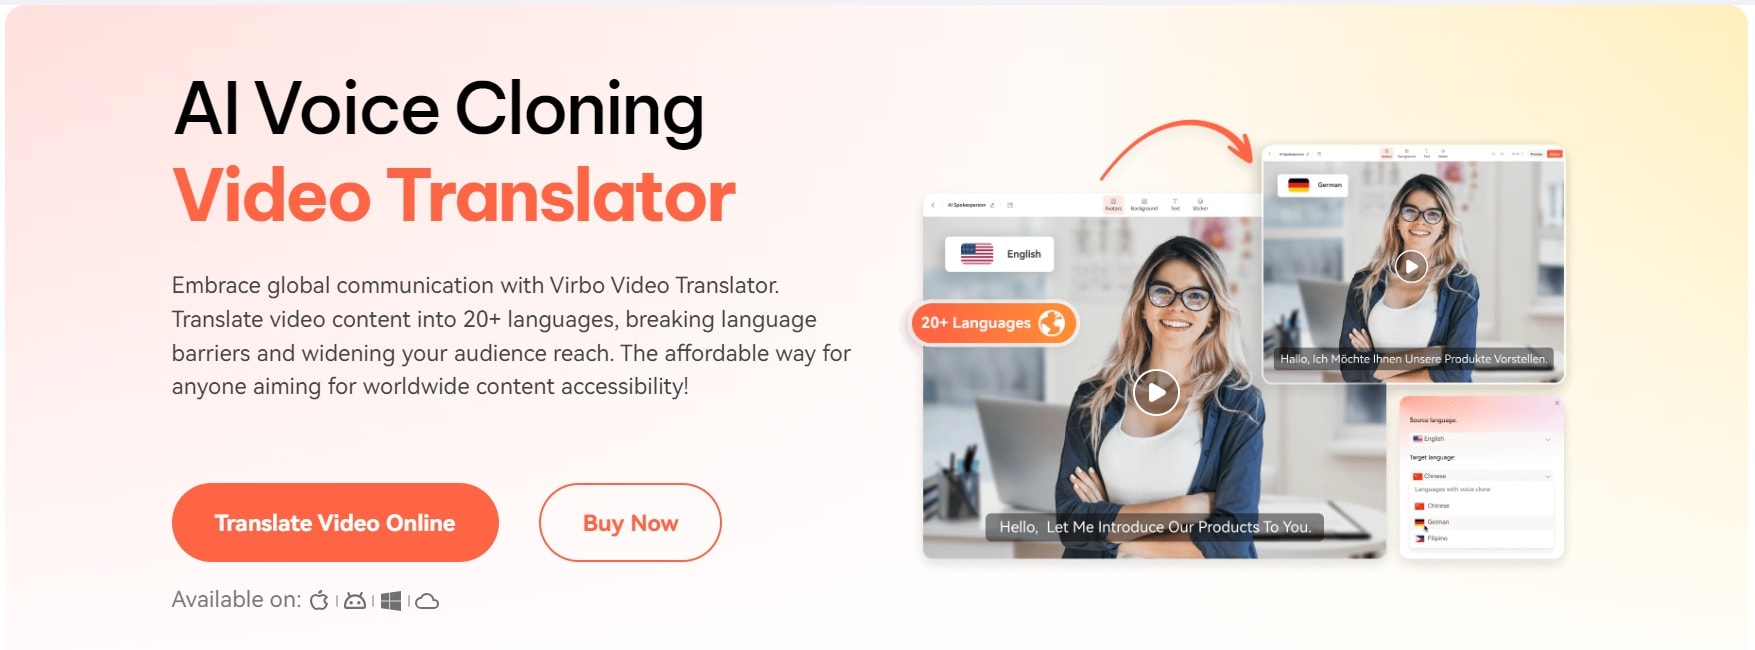
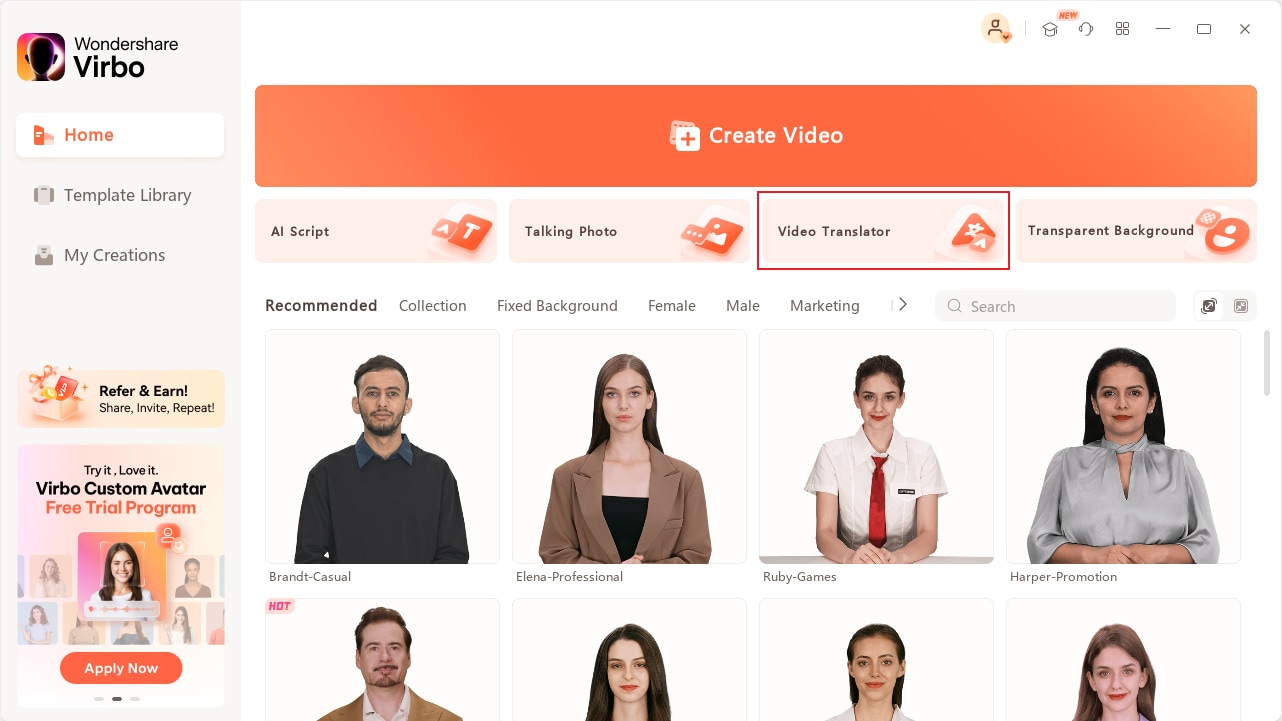
Virbo is a fantastic Kapwing alternative that steps it up a notch. With Kapwing you can convert text into professional-grade talking videos in over 300 languages, voices, and dialects. As far as its video translator is concerned, Virbo can easily translate any video into 20+ top languages of the world, including English, Chinese, French, German, Japanese, Korean, Russian, and Hindi among others.
Virbo: Unique Features
Below are some other unique features of Virbo that you don’t easily find in any other AI translation tool.
- Auto generate script – Eliminates the need to write script manually and ensures consistency.
- Lip-sync Precision – Provides harmonious and synchronized expressions. [New feature coming soon]
- AI Cloning Voices – Provides realistic AI voices to inject some emotion into your videos
- Soundtrack Reserved – To enhance user engagement and make your content more appealing
Use Wondershare Virbo to Translate Videos into Any Language
Let’s learn how to translate video into any language using Wondershare Virbo. You can use Wondershare Virbo in three ways: the online app, the desktop app, and a mobile app with the same set of features.
Using Wondershare Virbo Online
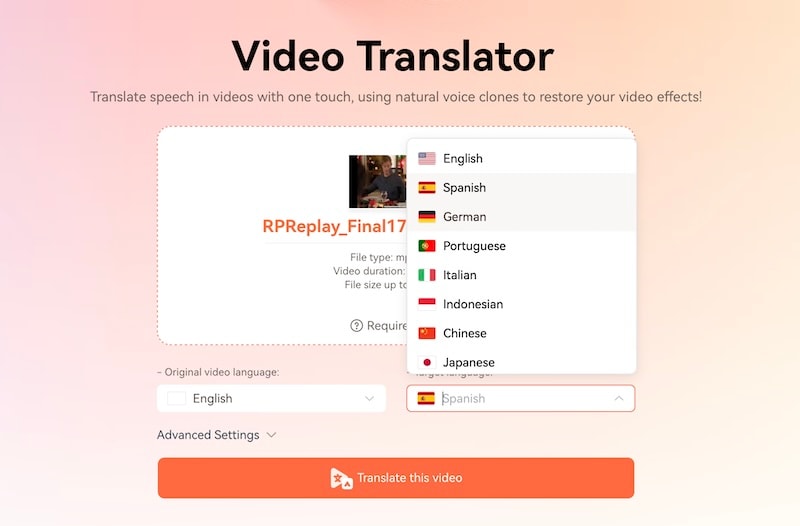
Step 1: On theWondershare Virbo Online website, start by signing in with a Google/ Facebook/ Twitter account/ Apple ID or your Wondershare Account. If you do not have a Wondershare Account, start by creating a new one.
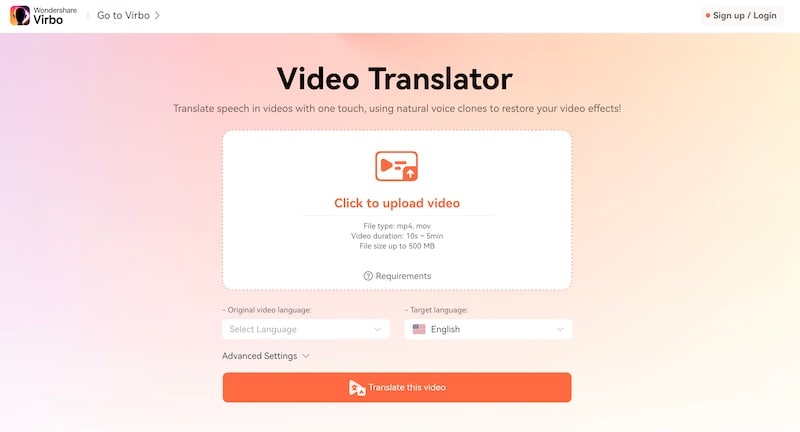
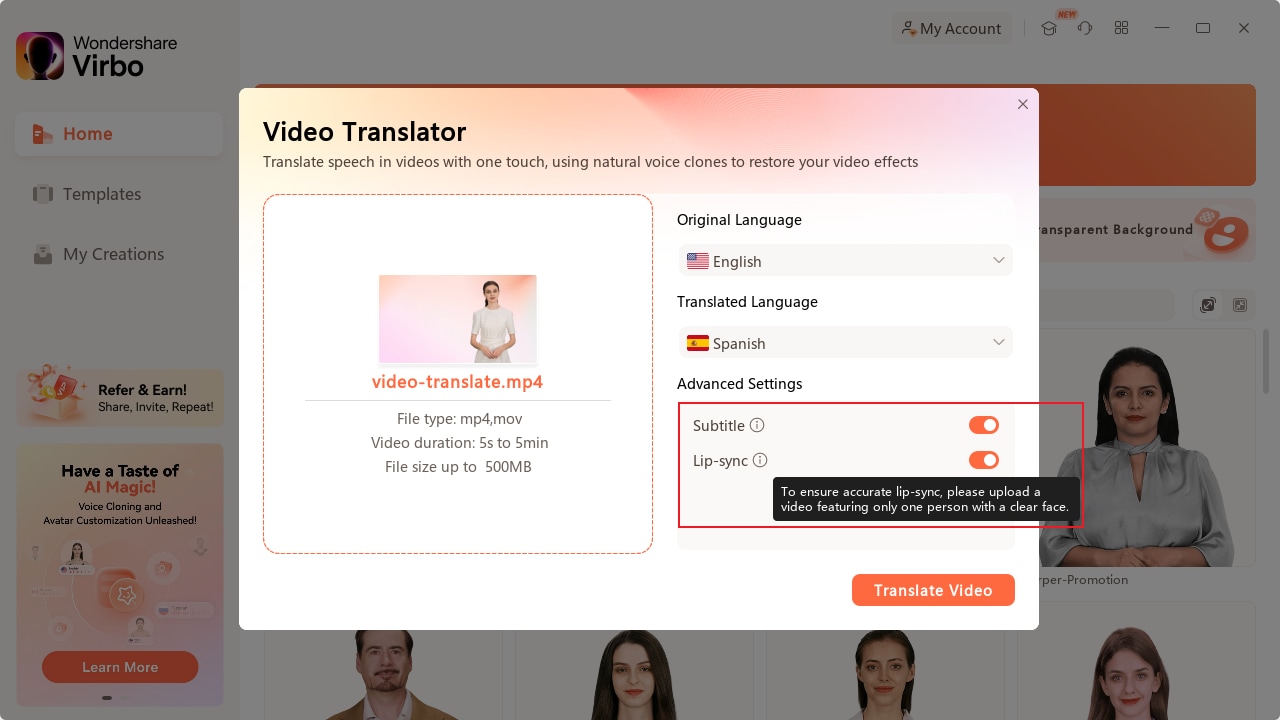
Step 2: Upload the video you want to translate. Note that your videos are safe. Wondershare does not sell your data. Next, select the original video language and the language you want to translate into (target language). At this point, you can click “Translate this video” to translate the video and save it. However, the next step talks about the advanced features of Virbo.
Step 3: Click Translate this video if you want to translate the video with no further processing. However, Wondershare Virbo comes with some advanced features you might find useful.
ADVANCED FEATURES
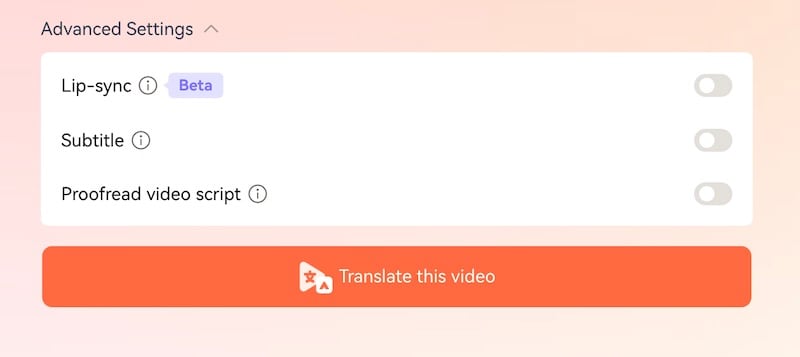
- If you want to add lip-sync to the translated video, toggle the Lip-sync option. This option uses the power of AI to lip-sync the videos into the translated language! Wow!
- The subtitle option can be used to bake the translated subtitles into the video. It works if there are no subtitles in the input video.
- Proofread Video Script proofreads the video script to translate the video more accurately.
Translate Video Online Download APP Now Free Download
Using Wondershare Virbo Desktop App
Step 1: Launch Wondershare Virbo and select Video Translator.
Step 2: Upload a video to Virbo. Note that there are some limitations to the input video, as mentioned below.
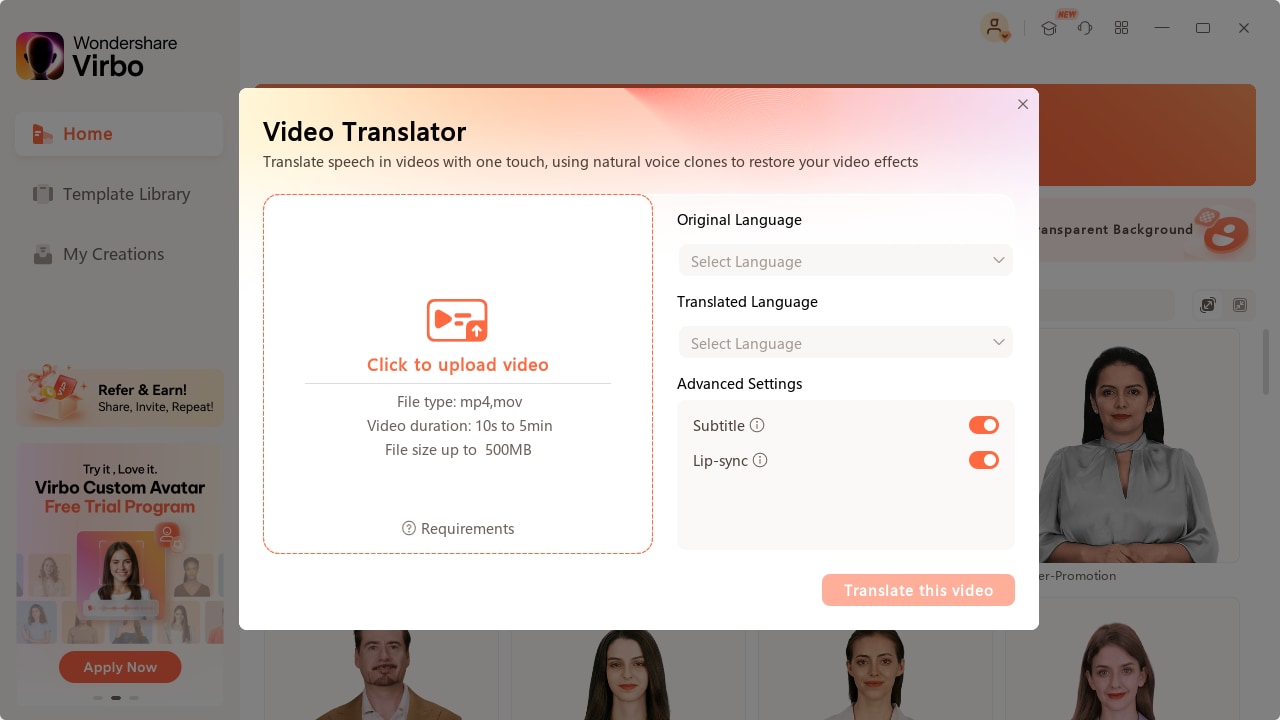
INPUT REQUIREMENTS
Be mindful that your video adheres to the following conditions for best results.
- Videos should be minimum 10 seconds and maximum 5 minutes long.
- Virbo will translate only authentic human voices.
Check the original language and select the target translation language.
ADVANCED FEATURES
Wondershare Virbo comes with advanced features that elevate and enhance your video translation experience. Using the power of AI, Wondershare Virbo can be used to translate and add subtitles, too! The voice in the translated languages can also match the lip movements of the video speaker in the original language.
Step 3: Click Translate and upon completion, save the video to the computer. That’s all it takes to quickly translate video with Wondershare Virbo!
Translate Video Online Download APP Now Free Download
Part 4: Kapwing and Wondershare Virbo: Differences At A Glance
Here are the differences between Wondershare Virbo and Kapwing.
| FEATURES | Kapwing | Wondershare Virbo |
|---|---|---|
| Easy to Understand | Yes | Yes |
| Easy to Use | Yes | Yes |
| Add Subtitles | Yes | Yes |
| Translate Video | Yes | Yes |
| Translate Subtitles | Yes | Yes |
| Automatic Script Generation | Not Supported | Yes |
| Precise Lip Sync in Translation | Not Supported | Yes |
| AI Voice Cloning | Not Supported | Yes |
| Reserve Soundtrack | Not Supported | Yes |
As you can see, Kapwing is an excellent tool that anyone would find easy to use and sufficient, but for more demanding and advanced users who need more options and better quality of video translation thanks to advanced features such as lip sync in translated video and keeping background score intact, the winner is undoubtedly Wondershare Virbo.
Translate Video Online Download APP Now Free Download
Conclusion
As you must have noticed, Kapwing is a very versatile and user-friendly online editor. It provides a range of features and makes content creation a real breeze.Kapwing subtitle translator , in particular, helps make your content suitable for global audiences. But, we have one better alternative - Virbo. Whether you’re creating AI talking videos, translating your video online into different languages, or adding subtitles, Virbo offers a proficient workflow. Thanks to its extensive AI editing features, flexibility of settings, and social media integration, Virbo emerges as a powerful Kapwing alternative for content creators who want to add some extra oomph to their content and reach a wider audience.
Translate Video Online Download APP Now Free Download
Also read:
- Updated 2024 Approved What Is AI Text to Video? | Wondershare Virbo Glossary
- New In 2024, What Is an AI Video Editor?
- Create AI Videos Using Synthesia Avatar and Voices
- Text to Speech
- New In 2024, A List of The Top SpongeBob Voice Generators
- Updated In 2024, AI Translation | Online
- New 8 Types of Explainer Videos with Examples for 2024
- In 2024, Create Lip Sync TikTok Videos Without Installing Any App
- 2024 Approved Best 10 Free AI Video Generators with Innovative/Advanced Algorithms
- New AI Video Translator | Online for 2024
- New Top 4 Elon Musk Voice Generator Programs to Make You Sound Like the Billionaire
- New In 2024, A Basic Guidebook To Live Selling in Todays Digital World
- Updated Best 10 AI Script Writers to Choose
- Updated A Comprehensive Guide for Free Video Translator Downloading
- 10 Best Free AI Script Generators | Movie Script Generators for 2024
- Updated In 2024, How to Make Explainer Videos—Step by Step Guide
- Live Shopping in China Major Changes in the Industry for 2024
- Updated In 2024, Top List Best 5 Tools for Creating Talking Avatars
- Voice Translation English to Bangla Online and Offline Apps
- Updated The Best Text-to-Speech Online Tools To Use for 2024
- Updated Material Preparation
- Updated Unveiling the Secrets of Shopee Livestream Selling System
- Updated Selected Best 5 YouTube Script Writing AI Customized for You for 2024
- In 2024, Get Closer to the Artistic Marvels of AI Portrait Generator
- New 2024 Approved How to Generate Videos From Text with AI
- New In 2024, AI Avatars | Online
- Updated In 2024, Create AI Avatar Video | Online
- Updated In 2024, Text to Speech
- Updated In 2024, How to Define AI Video?
- New 2024 Approved The Power of YouTube Live Selling Unlock Your Sales Potential
- New In 2024, Top AI Video Makers to Create Captivating Videos with Pictures
- 2024 Approved Exploring AI Face Generators | Wondershare Virbo Glossary
- New 2024 Approved What Is an AI Avatar?
- Updated In 2024, Revolutionize Creative Tasks With Proficiency AI Voice Cloning
- Top 8 Text-to-Video AI Generators to Produce Video Easily
- The Most Useful Tips for Pokemon Go Ultra League On Honor X50i+ | Dr.fone
- Best Ways on How to Unlock/Bypass/Swipe/Remove Samsung Galaxy F04 Fingerprint Lock
- In 2024, Latest Guide How To Bypass Nokia C32 FRP Without Computer
- How to Unlock Infinix Note 30 Pro Phone Pattern Lock without Factory Reset
- How To Deal With the Nokia C12 Screen Black But Still Works? | Dr.fone
- How To Restore Missing Photos Files from Pixel 7a.
- In 2024, How can I get more stardust in pokemon go On Lenovo ThinkPhone? | Dr.fone
- How to Factory Reset Realme 12 Pro 5G If I Forgot Security Code or Password? | Dr.fone
- In 2024, How to Unlock Your iPhone SE Passcode 4 Easy Methods (With or Without iTunes) | Dr.fone
- How to Successfully Bypass iCloud Activation Lock on Apple iPhone 6s
- How to Remove a Previously Synced Google Account from Your Infinix Hot 40i
- In 2024, Is Mega Mewtwo The Strongest Pokémon On Apple iPhone 11 Pro Max? | Dr.fone
- How to Fix Apple iPhone 11 Pro Passcode not Working? | Dr.fone
- How to Reset Vivo Y78t Without the Home Button | Dr.fone
- 3 Ways to Change Location on Facebook Marketplace for Tecno Pova 5 Pro | Dr.fone
- 10 Best Fake GPS Location Spoofers for Oppo A79 5G | Dr.fone
- Complete guide for recovering contacts files on ZTE .
- In 2024, How to Bypass FRP from Tecno Spark 10 Pro?
- 8 Ultimate Fixes for Google Play Your HTC U23 Isnt Compatible | Dr.fone
- Fixes for Apps Keep Crashing on Xiaomi Redmi 12 5G | Dr.fone
- Why Your Oppo Find N3 Screen Might be Unresponsive and How to Fix It | Dr.fone
- In 2024, Reasons why Pokémon GPS does not Work On Honor X50i? | Dr.fone
- How To Activate and Use Life360 Ghost Mode On Vivo S18 | Dr.fone
- In 2024, Easy Steps on How To Create a New Apple ID Account On Apple iPhone 6s Plus | Dr.fone
- How To Reset Your Apple iPhone SE? | Dr.fone
- 8 Quick Fixes Unfortunately, Snapchat has Stopped on Vivo S18e | Dr.fone
- Simple ways to get lost music back from Lava Blaze 2 5G
- In 2024, Planning to Use a Pokemon Go Joystick on Realme C51? | Dr.fone
- How to Unlock Oppo A18 Phone Password Without Factory Reset?
- Can I Bypass a Forgotten Phone Password Of OnePlus 12?
- In 2024, Best 3 Motorola Razr 40 Emulator for Mac to Run Your Wanted Android Apps | Dr.fone
- Fixes for Apps Keep Crashing on Nokia C22 | Dr.fone
- Can I recover permanently deleted photos from Honor Magic Vs 2
- In 2024, How To Fix Apple iPhone 6s Unavailable Issue With Ease | Dr.fone
- How to use Pokemon Go Joystick on Honor X9a? | Dr.fone
- Title: New Narakeet Review Convenient Text to Speech Voice Maker
- Author: Sam
- Created at : 2024-05-19 03:34:57
- Updated at : 2024-05-20 03:34:57
- Link: https://ai-voice-clone.techidaily.com/new-narakeet-review-convenient-text-to-speech-voice-maker/
- License: This work is licensed under CC BY-NC-SA 4.0.
