
:max_bytes(150000):strip_icc():format(webp)/GettyImages-1065028028-8e770c58918e4cf8b0852e81cff60ed6.jpg)
New In 2024, How To Auto Translate YouTube Videos Into Different Languages
How To Auto Translate YouTube Videos Into Different Languages
Are you looking for how toauto translate YouTube videos ? Or are you frustrated with auto translate for YouTube feature? We know, that sometimes it works, sometimes it does not. There are limitations, and depending on your use case, you might be frustrated. Learn how to auto translate YouTube video into your language at the click of a button including the ability to auto translate YouTube video captions and subtitles. Using a third-party auto translate captions YouTube software, you can easily translate videos into a language of your choice and add matching auto translated subtitles.
Part 1: How To Translate YouTube Videos Automatically
If you don’t know YouTube recently launched the auto-translate feature for all videos, you can follow the steps below totranslate YouTube video into any language:
Step 1
Go to any YouTube video that you would like to translate.
Step 2
Turn on Closed Captions by clicking on the CC button at the bottom.
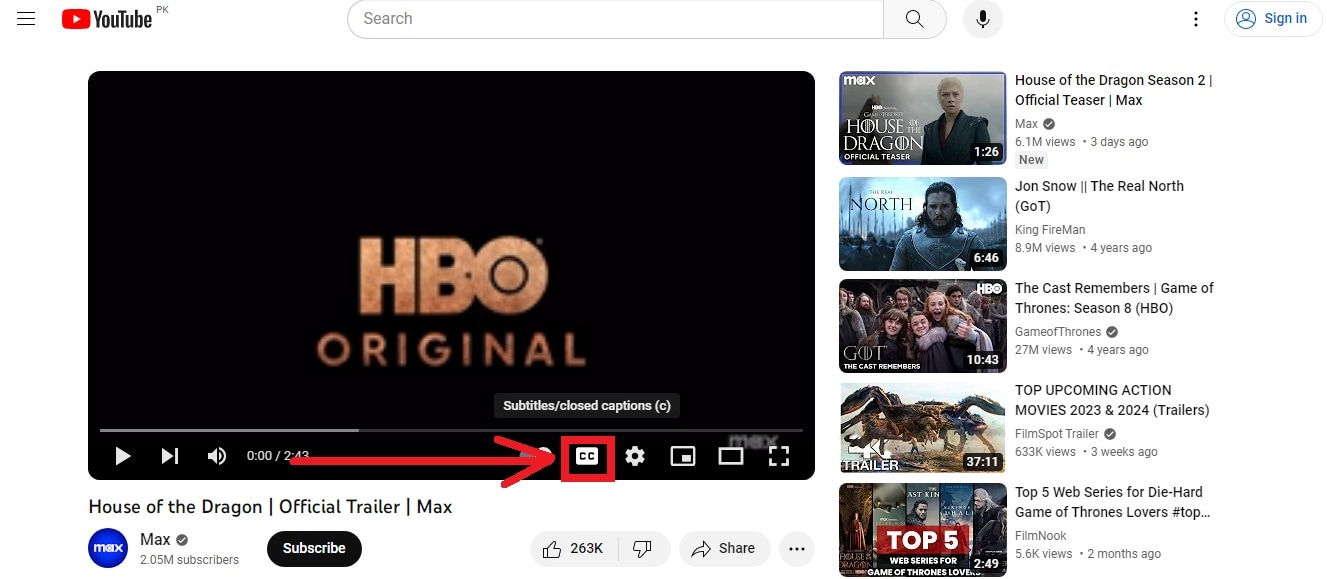
Step 3
Can you see the auto-generated closed captions in English? Good!

Go toSettings by clicking on the gear icon (as seen above) and click Subtitles/CC.
This will show you all the languages a video is already available in.
Step 4
Go to Auto Translate and select a language.
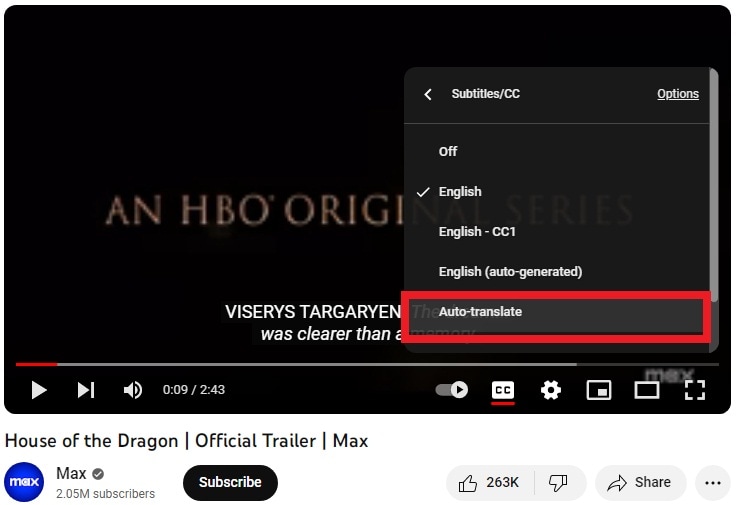
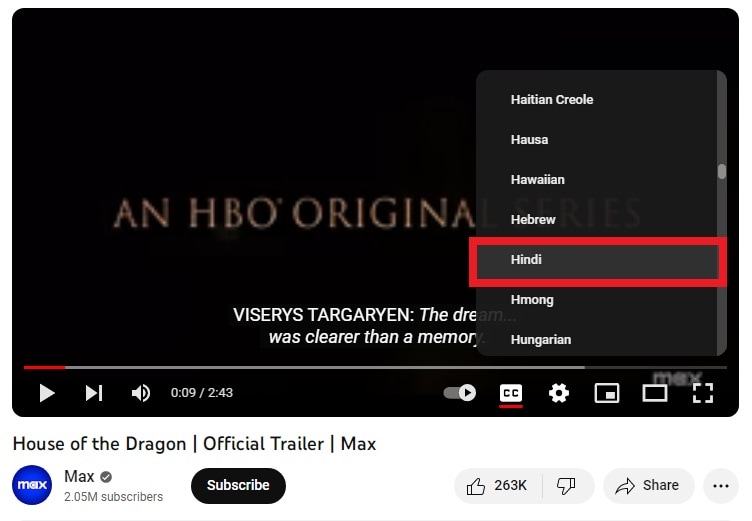
Step 5
For this example, we are selecting Hindi.
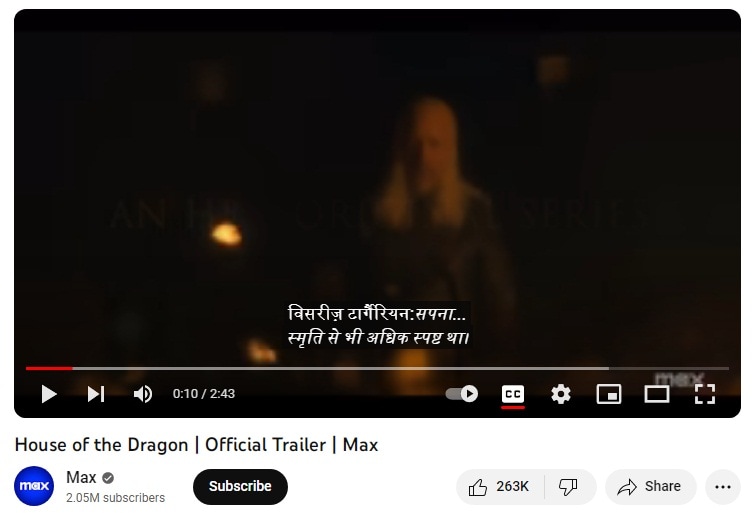
Step 6
As you can see in the screenshot below, subtitles are now auto-translated into Hindi.
That’s all. We hope now you know howauto translate for YouTube works. With this feature, you cantranslate YouTube video to English, or any other language according to your needs. It’s easy and super helpful for watching content in any language.
Part 2: Limitations of YouTube Auto Translate Feature
Like all good things,auto translate for YouTube captions feature is not without its faults. Below are some of it’s limitations:
- While YouTube is slowly rolling out the feature for all languages, automatic captions still don’t support many regional languages
- If the video is over an hour in length, YouTube’s automatic caption software fails to capture the dialogue in an efficient way.
- If the video has a lower audio quality or the dialogue uses a specific word multiple times, it is hard to decipher for the auto-translate AI.
- Long periods of silence at the beginning or end of the video can also throw off the software.
- If a video has multiple speakers with overlapping dialogue, it can confuse the software and make errors in translation.
Part 3: Virbo: A Powerful Tool That Translates Accurately
Wondershare Virbo has been around for a while. You probably already know it because of its revolutionary feature of creating AI avatar videos. But they recently unveiled another fantastic new feature - AI video translation. You can use it as alanguage translator for YouTube video content**.**
Translate Online Download APP Now Free Download
Why Choose Virbo?
Most AI video translators refer only to subtitles for translation. They translate verbatim and leave out the audio lip-synching from the final product. Virbo is different because it utilizes the latest AI advancements to understand the context of a dialogue, giving you highly accurate and precise results. It also matches the lip-synching to give you synchronized talking videos in a different language. What’s more, you can also set Virbo to proofread the generated text before translation. This removes any unnecessary or repeated words, making your subtitles crisp and concise. You can also download translated subtitles as SRT or TXT files and use them the way you want.
Language Support
Virbo currently supports translation in the following languages:
English, Chinese, Spanish, Arabic, Portuguese, Indonesian, French, Russian, German, Japanese, Italian, Korean, Thai, Filipino, Bengali, Turkish, Dutch, Swedish, Croatian, Romanian, Czech, Hindi, Ukrainian, Vietnamese, Malay, Slovak, Danish, Tamil, Polish, Greek, Finnish, Burmese, Urdu
How To Use Virbo With YouTube Videos For Auto Translation
If you want totranslate YouTube video online with Virbo, there are two ways to proceed, depending on your goal. We will be discussing both of these methods below
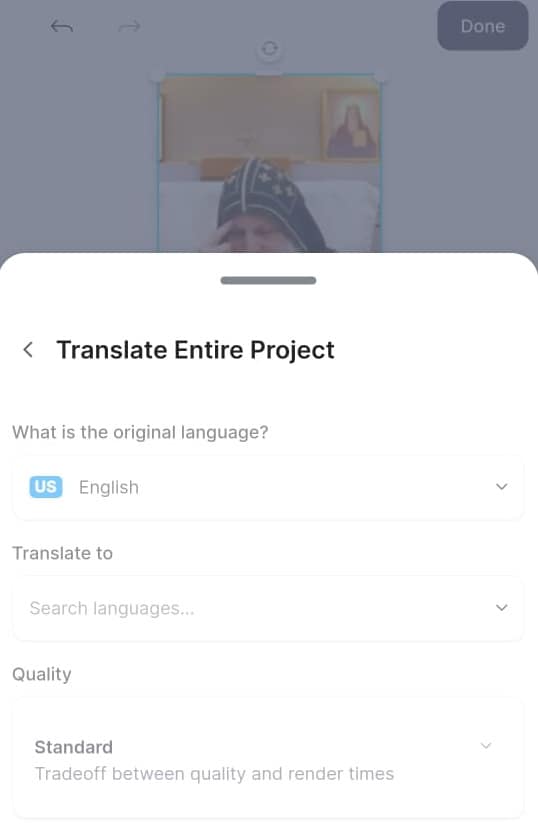
Goal 1 - You Want a Translated Synchronized Video

Translate Online Download APP Now Free Download
For a translated synchronized video, you can follow these steps:
- Download and install Virbo on your mobile/PC and then run the software/app(Note: You can also use the Virbo online tool)
- On the main page of Virbo, go to the Video Translator tab
- A new window will pop up, asking you to Upload your video. Drag and drop your video content.
- When the video finishes uploading, select Original and Translated languages
- Pick advanced features like Show Translated Subtitles, Keep original BG Music, etc
- Click on the orange Translate button to begin the translation
It will take some time, but the AI Translator Tool will automatically translate and synchronize the translation with the original video. You don’t need to do anything else!
Goal 2: You Want Translated Subtitles for Your Video

Translate Online Download APP Now Free Download
if you want translated subtitles of a published video, here’s how to proceed with Virbo:
- Upload the video to Virbo and get the subtitles translated as discussed above
- Next download the SRT or TXT file.
- Now, sign in to your YouTube Studio.
- Next selectSubtitles , from the left-hand side menu
- Click on the video that you would like to add subtitles for.
- TapADD LANGUAGE and choose your language.
- Now, under subtitles, click onADD to add your translated subtitles to a published YouTube video.
Easy, right? This is how toauto translate YouTube video into your language.
Frequently Asked Questions
Here are answers to frequently asked questions that you might find helpful.
FAQ 1: What to do about videos without subtitles?
For such videos, you can always use Wondershare Virbo to easily add subtitles and translate them into the target language of your choice!
FAQ 2: What to do if I need more accuracy in translated subtitles?
For such cases, Virbo online is the tool that supports proofreading the translated words. It gives you the most accurate subtitles in the language of your choice.
FAQ 3: Any way to permanently enable auto translate for YouTube on every video?
Sign in to YouTube and then, in any YouTube video, click the gear icon at the bottom right corner of the video, click Subtitles/CC, and click Settings. You will be taken to your Playback and Performance settings, where you should tick “Include auto-generated subtitles”.

Now, for every video where subtitles are available, YouTube will automatically use subtitles.
Conclusion
In case you didn’t know, YouTube provides an auto translate for YouTube feature for you to use. However, in classic Google fashion, it comes with several limitations. To remove and bypass those limitations, you can use a third-party auto translation YouTube software such as Wondershare Virbo that allows you toauto translate YouTube video into your language including auto translate captions easily on mobile, Windows PC, and even online! Try the best auto translate for YouTube software today and auto translate YouTube video into your language anytime, anywhere on PC, web, and mobile!
Translate Online Download APP Now Free Download
AI Script | Wondershare Virbo Online
AI Script
Virbo’s cutting-edge AI capabilities offer a transformative solution to your copywriting needs. With the prowess of our advanced artificial intelligence, rewriting, translating, and refining your content becomes a seamless and efficient endeavor, alleviating you from the burdensome challenges often accompanying these tasks.
Elevate Your Video Production Game with Virbo
Easy to use, suitable for beginners
AI-generated voices for videos
All-in-one AI Video Generator
Get To Know Our AI Script Feature

Click here to learn more about AI Script >>
AI-generated voices for videos
All-in-one AI Video Generator
Get To Know Our AI Script Feature
Click here to learn more about AI Script >>
AI-generated voices for videos
All-in-one AI Video Generator
Get To Know Our AI Script Feature
Click here to learn more about AI Script >>
AI-generated voices for videos
All-in-one AI Video Generator
Get To Know Our AI Script Feature
Click here to learn more about AI Script >>
Best Live Streaming Platforms To Engage Audiences and Increase Viewership
Today, there are lots oflive-streaming sites for different needs and likes. Each of them has unique features that make them different in the market. Plus, each offers different functionalities as they can be used for gaming, fun, and learning.
Read this article to explore the best live-streaming websites based on their functionalities. This insight will help you choose the best one that fits your preferences and requirements.

Part 1. Recognizing the Different Types of Live Streaming Platforms
As live streaming is getting popular, people now watch videos online for entertainment. In addition to fun, thetop live-streaming platforms are used in many different areas like entertainment and education. Let us recognize these types and what makes them separate to understand them better:
1. Live Shopping Streaming Platforms
The online places to shop while watching live videos are called live shopping streaming platforms. Through such shopping streams, sellers can directly interact with the buyers to generate revenue.
2. Music and Podcast Streaming Platforms
These are websites or apps where you can listen to music and podcasts. You can make playlists and explore different types of audio content on these streaming sites.
3. Live Gaming Streaming Platforms
For people who love video games, these live-streaming sites are perfect. Game lovers can watch their favorite streamers play games live and have a chat with them.
4. Live TV Series Streaming Platforms
With these platforms, you can watch your favorite TV shows live or catch up on episodes you missed. Plus, they can work like regular TV, but you can watch online without cable.
5. Live Sports Streaming Platforms
If you’re a sports fan, these top live-streaming sites are fit for you. They show live sports events worldwide, so you can watch games in real-time.
Part 2. The Best Live Shopping Live Streaming Platform in 2024
Let’s understand what live shopping is before discussing thebest live-streaming websites . Live shopping combines fun and entertainment with online shopping. You can see products showcased in real time and chat with the hosts. This section will discuss the top live shopping sites and see what makes them stand out.
1.TikTok Shop
If you are a TikTok enthusiast, you can shop here without leaving the app. It is built right into the platform to let brands connect with people in a fun way. Sellers can sell things and talk to their customers in one place.

2.Facebook Live
Facebook Live lets businesses talk to their followers right away. Plus, going live on your Facebook Page helps more people see your brand. Other than that, the features of live polls and featured links make the conversation enjoyable.

Make Impressive Live Streaming Content With Wondershare Virbo Live
Using the power of live streaming is essential to maximize revenue in this competitive e-commerce market. With the emergence of many live shopping platforms, it is vital to make your content stand out. To do so,Wondershare Virbo Live can help you create professional live-stream videos to sell products on any platform. It simplifies the setup of your live stream selling system with special tools.
Unlike other platforms, you can stream your live videos on multiple platforms at once to reach more people. Also, its AI script generation feature saves time and keeps your audience engaged with targeted speech. The platform operates directly from the cloud, eliminating the need for downloads. Users can also utilize the platform’s AI-driven avatars to host live shopping events.
Key Features of Wondershare Virbo Live
- AI Avatars: Wondershare Virbo Live offers AI avatars that speak multiple languages to appeal to a diverse global audience.
- Support For Variety of Languages: It supports languages like English, Chinese, French, German, and Japanese. This versatility makes it easier for viewers worldwide to understand your content.
- Q&A Library: The customized Q&A dataset allows you to tackle customer queries instantly.
Steps of Creating a Stream Room for Live Shopping on Wondershare Virbo Live
Creating a specific stream room is simple and easy to follow. Here is the step-by-step guide to carry out the process using Wondershare Virbo Live:
- Step 1. Open the Tool and Make a Blank Livestream Room
First, visit the tool’s official website through your desired web browser. To make a compelling video for live shopping, click the “Create Stream Room Now” button. The tool will proceed with the process on a new window. Select “Create a Blank Livestream Room” at the top to access a range of features.

Get Started Online Free Download
- Step 2. Give Prompt to Virbo To Generate AI Script
With a new window opened, browse the page and press the “AI Smart Script” button. This action opens a dialogue box and allows you to input the details of the product you’re going to sell. Add the product name, key features, and promotional information. Then, select the language and style to engage with the target audience. Later, hit the “Generate” button and use this AI-generated script for marketing.

- Step 3. Customize AI Streamers and Background Before Live Shopping
Afterward, choose one of the available avatars by clicking on the “AI Avatars” tab. Plus, you can adjust the appearance in the “Background” tab. After finalizing the setup, click the “Start livestream” button at the top right corner and start live selling.

Part 3. The Best Game Streaming Platform To Use in 2024
Gamers can now stream while playing video games to earn a hefty amount. As gaming improves, picking the right streaming platform becomes super important. The following are thebest live-streaming websites for gamers who want to give audiences an engaging experience.
1.BIGO Live
If you want to show off your gaming skills, BIGO Live should be your preferred choice. It allows you to chat with viewers and grow a fanbase with plenty of opportunities to improve. Gamers can livestream their gameplay and join virtual events with its packed features.

2.Twitch
Twitch is a well-known gaming platform loved by gamers worldwide. The forum has everything from live gameplay to eSports tournaments and gaming discussions. It boasts a vast selection of gaming content and a vibrant community. Users can enjoy its customizable streaming options to discover new content.

Part 4. The Best Music and Podcast Streaming Platforms in 2024
The emerging online stream sites have changed how we listen to music and podcasts. Now, we can listen to songs and shows whenever and wherever we are. Therefore, let’s pick the one that’s best for us to keep up with the latest audio content.
1.Spotify
People all over the world love Spotify because it is friendly and gives suggestions that suit their tastes. It has lots of songs, albums, playlists, and podcasts to choose from. You can find new music, make your playlists, and listen offline.

2.YouTube
You can get entertained with YouTube Music by listening to different audio creators. It has a massive library of content, including stuff made by users and official releases. You can find music and podcasts in categories including new releases, trending, long listening, and more.

Part 5. The Best TV Streaming Platform for Entertainment Purposes
Users can watch lots of shows and movies online with services like Netflix. Various streaming platforms are available, so it’s essential to find the one with what you like. Let’s find out which ones are the best for watching TV in today’s digital world:
1.Tubi TV
Tubi is the largest freelive-streaming video website for TV shows and movies in the US. It has a wide range of content, from classic movies to popular TV series. You can browse your desired show by either genre or through specific titles.

2.Popcorn Flix
Popcorn Flix offers free live TV streams and over 1500 full-length movies for viewing on all your devices. It features a variety of genres like spotlight films, comedies, and horror movies. The video quality is decent at 720p HD, which is suitable for watching TV shows.

Part 6. The Best Live Sports Streaming Platform in 2024
For the best sports streaming platform, we should consider the video quality and what games they offer. In the following section, you’ll find the best options for watching sports live:
1.ESPN+
ESPN provides extensive coverage of various sports worldwide. You can benefit from its live streaming capabilities across devices and exclusive content like ESPN Originals. It updates you with comprehensive sports news and analysis to provide the best viewing experiences.

2.Watchsports
Watchsports is the premier sports streaming platform with popular and niche sports. You can watch live games and on-demand highlights for mainstream leagues or international competitions. The variety of games available across Watchsports makes it a good yet simple option for streaming content.

Conclusion
We conclude that eachlive-streaming site has its unique features for different interests. As mentioned in the article, streaming sites are available for game, music, and sports lovers. Moreover, with the increasing trend of online shopping, live shopping platforms are also introduced in the market. But if you want to optimize live streams on many platforms, Wondershare Virbo Live is the best choice.
Essential Tools for Creating Dynamic Talking Avatars
Avatars have become crucial in many different industries in the last few years. Whether it is customer support or entertaining people, avatars connect businesses with their audience in a better way. As technology gets better, we’re witnessing a remarkable evolution in avatars.
Read this article to learn some freetalking avatar makers you can use. Also, we’ll explore the finest tool to use this innovative technology while joining in the fun for diverse purposes.
![]()
Part 1. Recommended: Finest Talking Avatar Creation With Wondershare Virbo
Wondershare Virbo stands out as an exceptional tool for creating talking avatars. It offers a comprehensive solution for crafting high-quality avatars on a single platform. The tool is versatile, showing compatibility with various devices and operating systems. This groundbreaking tool lets you bring your static photo into a dynamic storyteller.
Plus, it lets you add voice clips to your photos to make them interactive. Its talking feature adds emotion, explanation, or personalized messages to your visual content. Users can transform old pictures into captivating stories with personalized voice clips. With the support of a wide range of accents, you can create talking avatars that resonate with the global audience.
Highlighted Features of Wondershare Virbo
- The text-to-speech feature converts text into spoken language for smooth
- Users can elevate the mood and atmosphere with personalized background music within the Talking Photo feature.
- Its versatile AI avatars and clear audio quality ensure that your voiceovers are crisp and clear.
Pricing Plans
- Monthly Plan: $9.9
- Essential Yearly Plan: $19.9
- Pro Yearly Plan: $199
Step-by-Step Guide to Using the Talking Photo Feature in Wondershare Virbo
Wondershare Virbo ensures a seamless experience for its users in talking avatar creation. The process is as simple as it can customize your talking photos. Follow the below-mentioned detailed steps to use thisAI-speaking avatar creator :
Step 1. Download Virbo and Access Its Talking Photo Feature
Begin by downloading and installing this AItalking avatar maker on your devices. Afterward, launch the tool on your system and access its dashboard. Click the “Talking Photo” button among the available options here.
![]()
Get Started Online Free Download
Step 2. Select AI Avatar or Import Your Photo
A mini window will pop up on the screen, allowing you to select from preset images. You can also import the picture by browsing your system. Once you’ve selected, you’ll be directed toward a new window.
![]()
Step 3. Generate Script Using AI
Head to the bottom left in the upcoming window and hit the “AI Script” icon. Type the script in the text box and optimize it with AI features. Afterward, press the “Apply” button from the right bottom to use it for talking avatar.
![]()
Step 4. Make Adjustments in Language and Gender
After creating a script, it is time to customize its language. Tap on the “Language” button, which opens a pop-up window. Clicking on the “Language” dropdown menu allows you to choose your preferred language. You can opt for either male or female by choosing the “Gender” dropdown menu. Later, click on the “OK” button to proceed with the process.
![]()
Step 5. Modify the Voiceover Characteristics and Export the Video
Next, personalize the qualities of voiceover under the language section. Here, you can modify the “Speed,” “Pitch,” and “Volume” as needed. You can preview the video you’ve customized by tapping on the “Play” icon. Finally, navigate toward the top left corner of the window and press the “Export” button to save it.
![]()
Pricing Plans
- Monthly Plan: $9.9
- Essential Yearly Plan: $19.9
- Pro Yearly Plan: $199
Part 2. Alternatives: Other Talking Avatar Creator Tools for Enhanced Content
Previously, we have discussed the best tool to generate talking AI avatars. However, if you want to try out some alternatives to Wondershare Virbo, we have a solution. For this purpose, we’ve enlisted some othertalking avatar creators to help you in getting results to your satisfaction:
1.Akool
Akool is a comprehensive generative AI platform available for creators and innovators. Its intuitive features allow users to materialize ideas quickly for diverse marketing and advertising needs. You can upload JPEG and PNG images of less than 30MB for each picture on the tool. Plus, the picture should be clear as it does not detect blurry, overexposure, and side faces.
![]()
Pros
- With film-level quality outputs, it ensures high-quality visuals and videos.
- Thetalking avatar creator achieves up to 8k resolution for pictures and 4k.
Cons
- One problem is that talking avatars can’t sound entirely natural yet.
Pricing Plans
- Professional Plan: $30 per month (600 credits)
- Studio Plan: $500 per month (12000 credits)
Steps To Create Talking Avatars With Akool
As discussed before, Akool lets its users customize their talking avatars. Let’s discuss the steps tocreate a talking avatar online for free using this tool:
Step 1. Get the online tool through your preferred web browser and open its homepage. Now, hover over the “Platform” dropdown menu and select the “Talking Photo” feature.
![]()
Step 2. Within the upcoming window, click the “Choose File” button from the center to upload the image. Also, you can choose an example offered by the tool. After making a selection, you can also revert changes.
![]()
Step 3. After uploading the picture, head to the “Text” section on the right side and type in the script. Then, under the “Voice” section, make adjustments in gender, language, and speed. Later, preview your generated talking avatar and tap the “Results” at the top right. Finally, the tool will process it and provide you with the final results.
![]()
2.Yepic AI
If you also want to createan AI talking avatar , Yepic AI is your go-to preference. You can create a lifelike digital version of yourself with just a headshot. Users can uniquely present their videos by choosing from over 40 preset avatars. It boasts many actors, languages, and voices, with over 450 options available to personalize your avatar.
![]()
Pros
- The tool personalizes every aspect of your videos, from backgrounds and transitions to actors and voices.
- You can scale and localize your content across different countries, languages, and accents.
Cons
- It offers only 20 video credits per month, and one credit equals a 60s video, limiting extensive use.
Pricing Plans
- Consumer Plan: £5.75 /month
- Standard Plan: £24.16/month
- Plus Plan: £65.83/month
- Premium Plan: £415.83/month
- Infinite Plan: £665.83/month
Steps To Create Talking Avatars with Yepic AI
Users can utilize the capabilities of this tool to create talking avatars seamlessly. Here are the steps to carry out the process of makingAI-speaking avatars to engage viewers.
Step 1. To start the process, tap the “Get Started” button on the main website page and access the editing window. The tool lets you choose avatars or talking photos within this editing interface.
Step 2. Afterward, in the text box, type your script and hit the “Listen” button. Alternatively, you can upload your voiceover to the tool to make it personalized.
Step 3. Upon uploading the voiceover, select the voice and the desired language for your written words. Then, select the desired background and add shapes to modify the outlook of your talking avatar. Finally, preview the video and download it to share with others.
3.Speechify
Speechify Studio serves as the premier AI Video and AI Voice Platform. This site empowers anyone to create professional videos in just one minute, with no skills required. You can quickly produce captivating content using AI-generated talking faces. It lets youcreate a talking avatar online for free to save your valuable resources and time.
![]()
Pros
- Speechify Studio offers a user-friendly interface that makes video production quick and effortless.
- Users can combine high-quality text-to-speech synthesis with lifelike avatars for an interactive audiovisual experience.
Cons
- The narration of this tool lacks human-like empathy and emotions.
Pricing Plans
Talk to the sales team.
Steps To Create Talking Avatars with Speechify
With Speechify’s intuitive interface, you can easily perform various tasks. In the following section, you’re given the simple steps to create anAI talking avatar using this online tool.
Step 1. First, access the “AI-Generated Talking Face” page from the main interface of Speechify. Proceed by hitting the “Try for Free” button and log in using a Google account. After entering the editing interface, press “Create AI Avatar,” which leads you to a new window.
![]()
Step 2. Now, opt for the desired avatar from a vast library. Upon selecting this avatar, it will appear on the right side of the editing window. Afterward, you can adjust “Avatar Style” and the “Layout” settings.
![]()
Import your script from a media file or paste a URL from YouTube. Afterward, choose the voiceover among the available options and preview the video. Once satisfied, tap the “Export” button at the top right to download this from this tool.
![]()
4.HitPaw Online AI Face Animator
This online AI face animator is an easy-to-use AI-based tool that brings your still images to life with animated faces. You can choose from various funny templates to animate your photos with a simple upload and a click. It allows you to add humor and personality to your images. The tool supports JPG, PNG, JPEG, and WEBP formats for pictures and animates them with customization.
![]()
Pros
- Users can animate various photos, from individual portraits to group shots, with many templates available.
- It emphasizes safety and security and ensures your photos are protected.
Cons
- Weekly Plan: $0.57/Day
- Monthly Plan: $0.27/Day
- Yearly Plan: $0.13/Day
Steps To Create Talking Avatars With HitPaw Online AI Face Animator
HitPaw Online is another onlinetalking avatar maker with a straightforward approach. The following are the steps to animate a photo using this online tool:
Step 1. Visit the tool’s official website and access the main user interface. You can place your cursor over the “Photo AI” dropdown menu and click “AI Face Animator.”
![]()
Step 2. Next, hit the “Upload Image” button from the left side. This action will move you to the main editing window to create talking avatars.
![]()
Step 3. Select the “Drag and drop or click to upload image” option from the left panel in the new window. Under the “Choose a Template” section, select the category of style and expression for your uploaded photo. Then, press the “Animate” button at the bottom. Now, you can see your animated image in the middle of the screen after processing.
![]()
Step 4. Once satisfied with the results, download it on your system. You can save it with the HitPaw logo or as a GIF for fun.
Image name: best-tools-for-creating-talking-avatars-20.jpg
Image alt: download final product from hitpaw
![]()
Conclusion
We conclude that there are variousspeaking avatar creator platforms with different features. These tools make it easy to create avatars that talk to use for different functions. However, the one that stands out among these options is Wondershare Virbo. You can customize your avatars in just a few clicks on different devices.
Get Started Online Free Download
Translate Videos and Subtitles with Veed.io
If you are a multilingual content creator, having a tool like Veed in your arsenal can be pretty useful. It can quickly and accurately translate your videos online. Such translated content can allow you to reach a much wider audience and engage with them in a better way. It’s a powerful tool that can simplify the process of adding subtitles, transcriptions, and translations to your video content. In this article, we will explain how you can utilize Veed io translate feature to stay on top of your game.
Part 1. Veed Translate: Unlocking Language Diversity
Translating videos and adding captions to your YouTube videos makes your content more accessible. You can make content suitable for more social platforms and engage even more audiences. Below are some useful tips for unlocking language diversity with the Veed video translate feature.
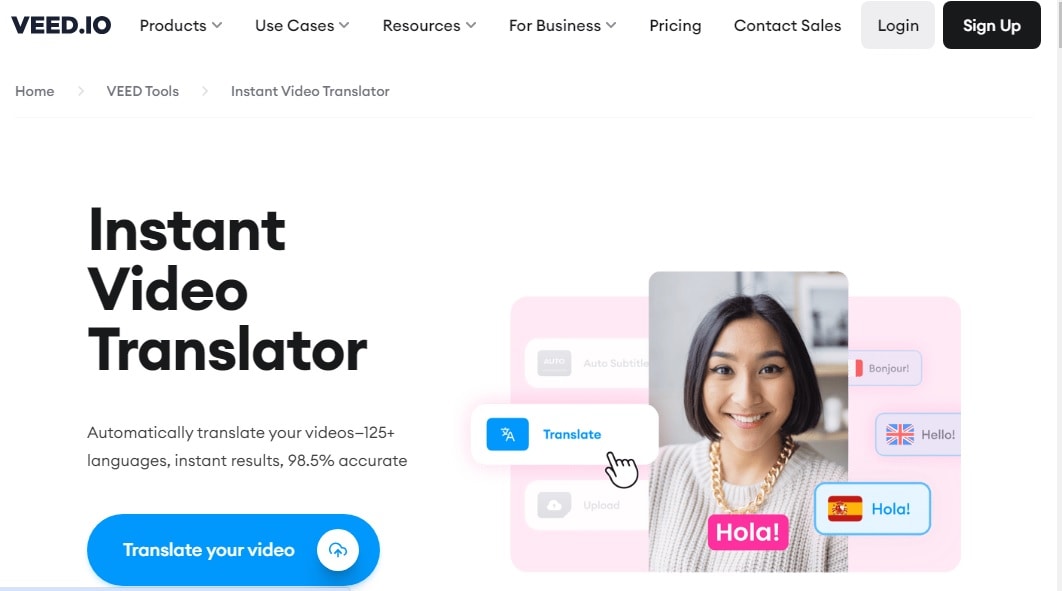
Seamless integration with YouTube and other social media platforms
Veed supports seamless integration with all popular social media platforms. With this tool, you can import your videos from YouTube for quick translation, share your translated video directly to Facebook, optimize your video content for TikTok, and do so much more. This ensures you can optimize your content for maximum social media engagement and reach a wider audience.
Contextually relevant and accurate translations
Veed has a fantastic 98.5% accuracy rate when it comes to translations. This means Veed is actually a great alternative to tools like Google Translate that don’t always provide contextually relevant output. It automatically transcribes the audio in your videos into simple text. Afterwards, it synchronizes the generated text with your videos, ensuring accurate and well-timed translations.
Fantastic Editing Tools
Veed gives you complete creative control over the type of content you want to produce and how. It offers a range of editing tools to enhance your video creation process. For instance, it lets you change and customize the font style. You can use fun fonts, spacing, size, colors, etc. You can also add animations and visuals, incorporate templates and do so much more.
Multi-language support and translation service
Veed supports multiple languages. To be more specific, Veed translations are available in 125+ different languages of the world. This makes it easy for you to reach a global audience by creating content that resonates with a diverse audience.
Professional quality output with easy sharing options
Once you are done with your video, you can export it in multiple different formats. For instance, it supports SRT and VTT subtitle files. You can export the text as an SRT file for easy sharing and upload on other platforms, including social media, websites and podcasts etc. There’s also a screen recording option which lets you create pro-grade videos with the help of voiceovers and CC feature.
Generate Engaging
AI Video in Minutes!
Easily convert text into professional spokesperson videos in over 120+ voices & languages in minutes.
Generate AI Video Free Generate AI Video Now


Part 2. Veed.io Translate Video: Step-by-Step Tutorial
Let’s take a look now at the step-by-step tutorial to translate a video with Veed. Note: For this Veed io translate guide, we will be translating a video using Veed on mobile.
Step 1 Launch Veed and Import Your Video
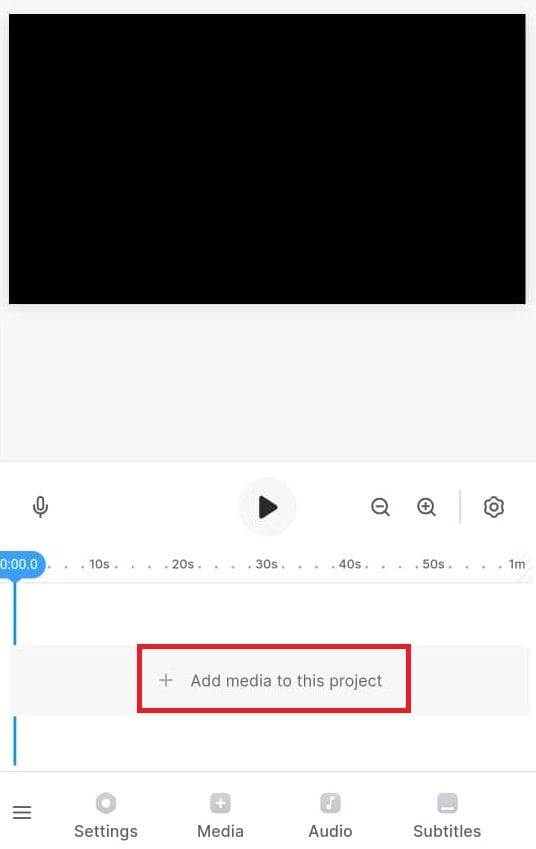
Start Veed and click on the big Add media to this project button you see in the middle. You can add audio, video, or subtitle files to the Veed platform and edit them if you want.
Step 2 Go To Project Settings
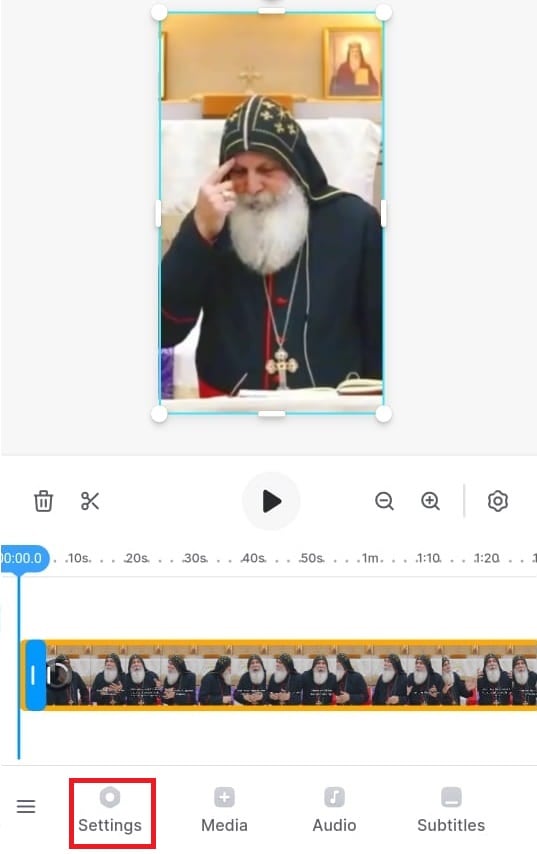
Next, go to your project’s settings by clicking the Settings button on the bottom left corner of the screen.
Step 3 Translate your Voice
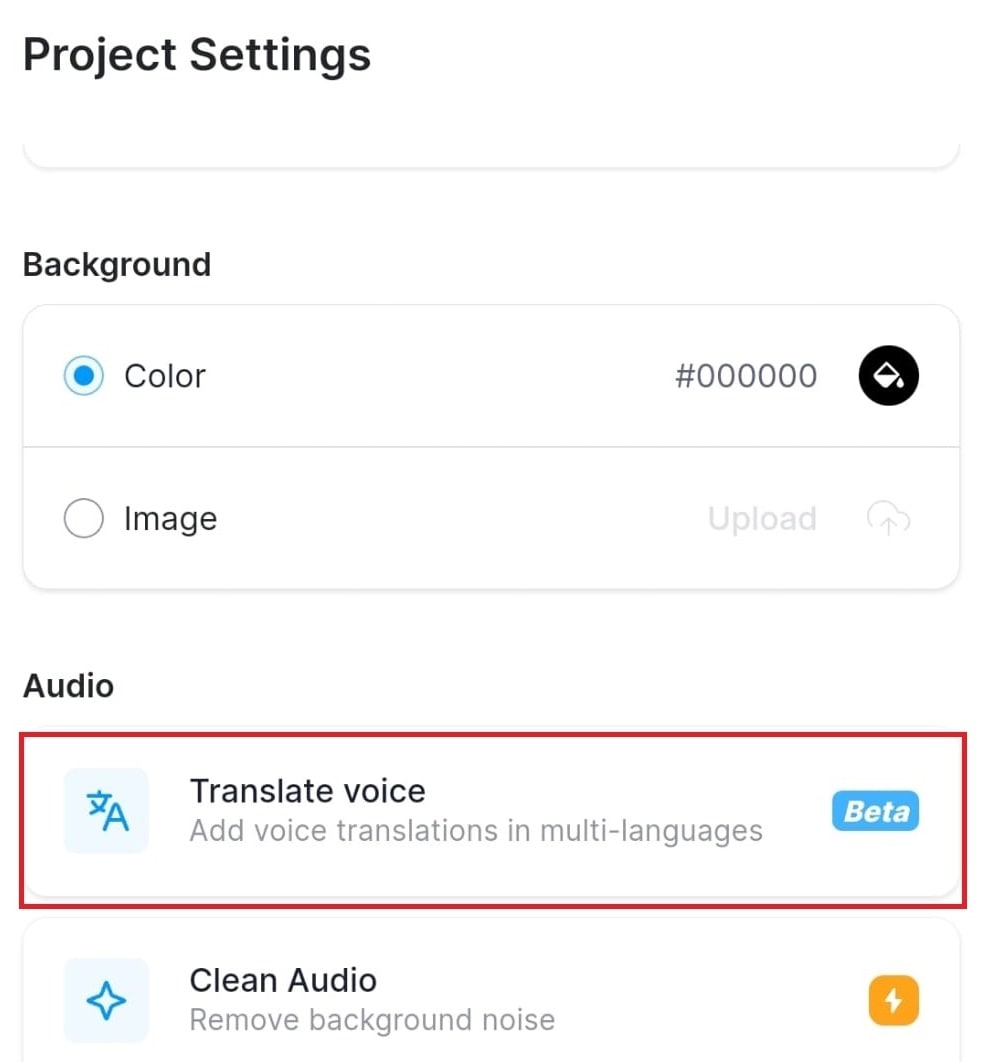
Next, click on the Translate Voice button. Note: Veed supports multiple languages. It lets you translate and then add these translations in multiple languages.
Step 4 Check Your Translation Settings
Veed automatically detects the language in the video. So, take a look at all the other settings, like the language you want to translate into and content quality and click Translate. Veed will start generating the translation in your preferred language.
Part 3: The Best Alternative to Veed.io
If you are not satisfied with the features of Veed.io, we have a better solution for you. Wondershare Virbo will prove to be the best alternative to theVeed.io translation tool. Using this advanced tool, you can select from multiple languages to get the desired translations. To carry out the translation process, you can import videos in two different formats, MP4 and MOV.
Other than video translation, users will also be able to carry out subtitle translations using this tool. Plus, this tool offers much more than translation capabilities. You can also utilize this Veed.io translate video alternative to create customized AI videos for different purposes.
Key Features of Wondershare Virbo
- Users will be able to use the lip-sync feature to create translated narrations that match the video.
- Using its talking photo functionality, you can add AI voiceovers in any language to your photos.
- Virbo provides you with an AI script feature to generate writings in multiple languages.
Advantages
- Veed.io provides very restricted minutes of translation under its subscription plans compared to Wondershare Virbo.
- Using the online version of Wondershare Virbo, you can proofread and edit the translated script.
- Veed.io is not available for offline use in Windows operating systems. However, Virbo delivers an efficient offline platform for video translation.
Translate Video Online Download APP Now Free Download
How to Translate Videos With This Veed.io Alternative
You have understood how Virbo is better than the Veed.io translation tool. Let’s analyze the method you can use to translate videos using this tool.
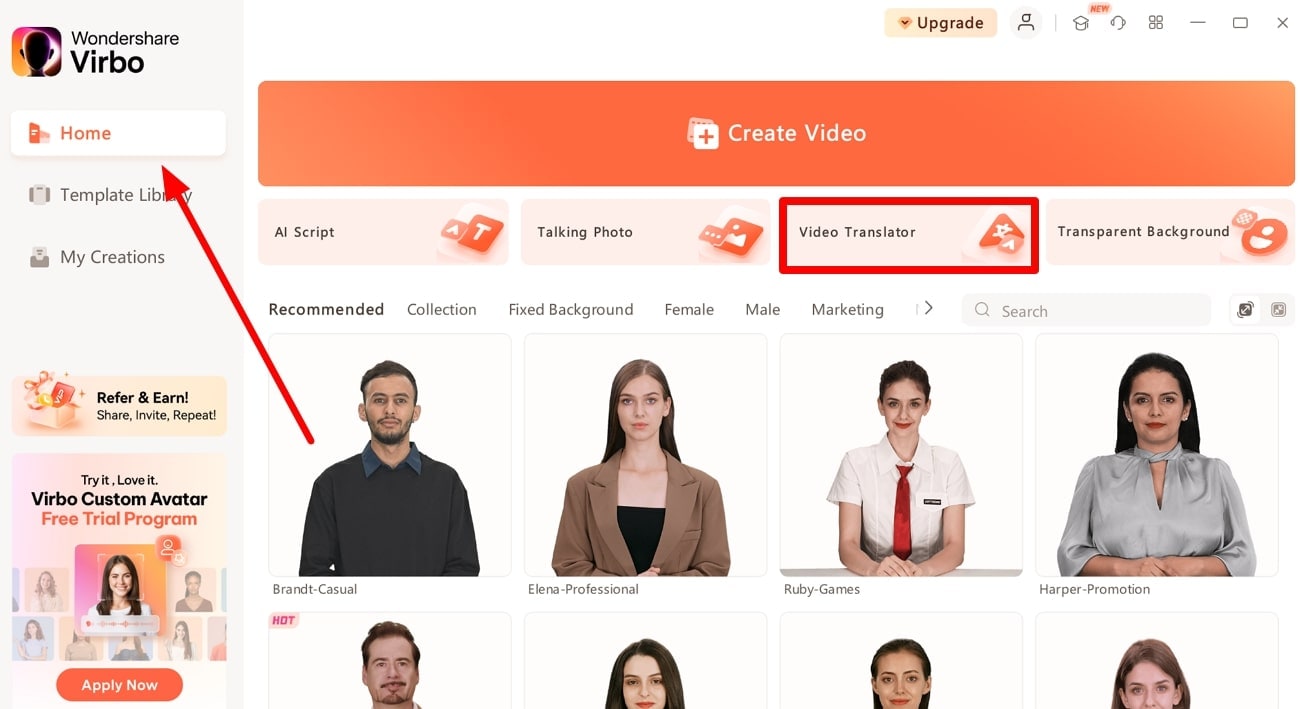
Step 1 Enter the Video Translator Feature from the Home Tab
Once you download Virbo from its official website, launch this Veed.io alternative on your computer. Next, hit the “Video Translator” button from its main interface after accessing the “Home” tab.
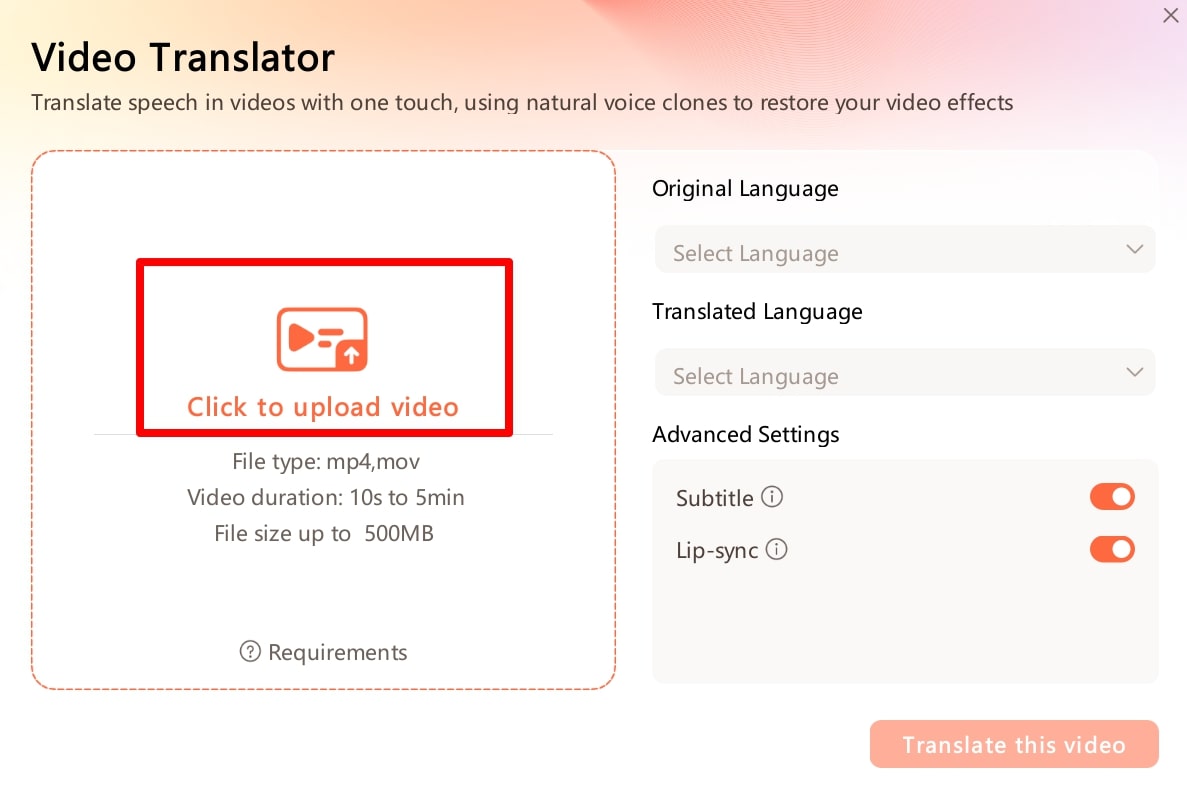
Step 2 Import Your Video to Start the Video Translation Process
Upon entering this feature, click on the “Click to Upload Video” option to add your desired video to the tool. However, there is only an option to import MP4 or MOV videos that are under 5 minutes in length.
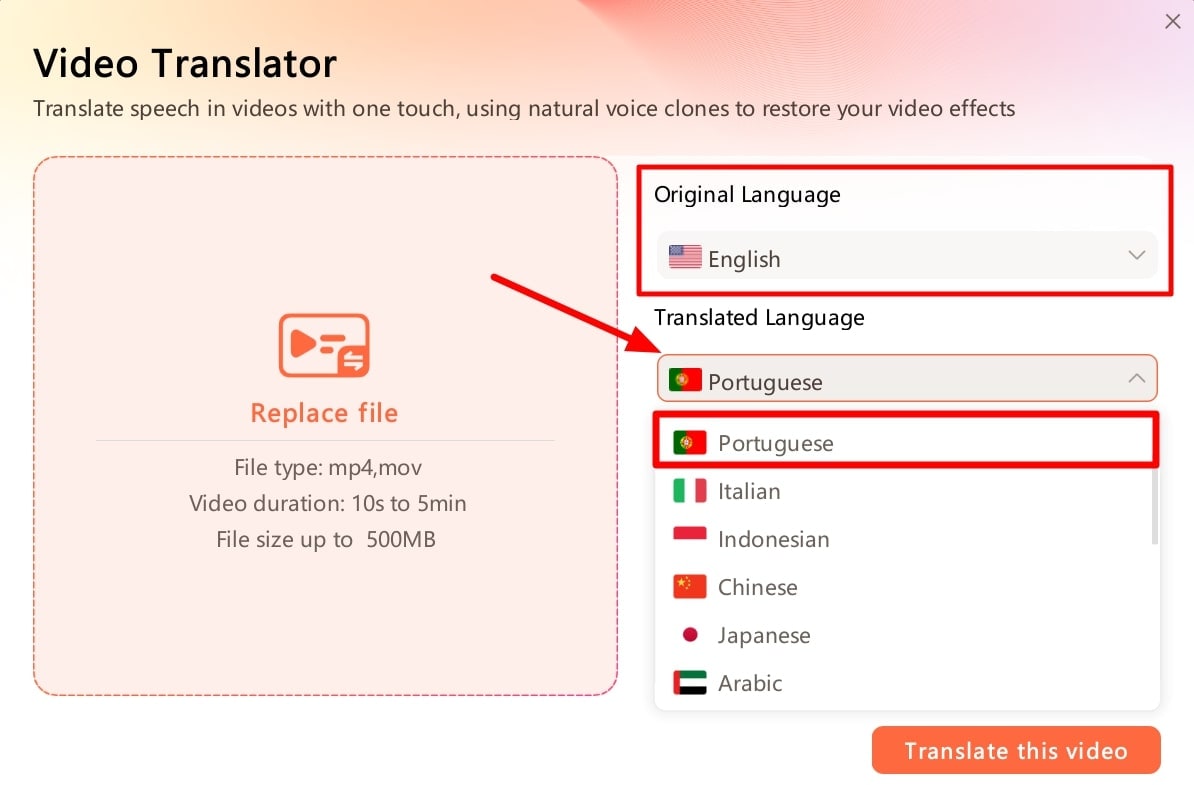
Step 3 Choose the Original and Translated Languages
After importing the video, select the original language of your video from the “Original Language” dropdown menu. Afterward, access the “Translated Language” dropdown menu to choose your desired translation language.
Step 4 Optimize the Advanced Video Translation Settings
Now, you can adjust the advanced settings for your video translation process. For this purpose, turn on the Subtitle option to get the video subtitles translated along with the audio. Also, enable the Lip-Sync option to generate translated audios that align with the video. Finally, hit the Translate This Video button to get your desired translated video.

Translate Video Online Download APP Now Free Download
Part 4. FAQs about Veed.io Subtitle Translation
1. How can I easily translate a video into English or any other language?
You can easily translate a video to 125+ languages of the world, including English, with an online video translator like Veed or Wondershare Virbo.
2. Are Veed translations accurate?
Veed has an accuracy percentage of 98.5, which is fantastic for an online tool. In fact, it is higher than many translation software out there.
3. Can I translate an audio file with Veed?
Yes, of course! You can easily upload any audio file in mp3 format to Veed. It will automatically translate and let you download the text file.
4. How can I download my content after it has been translated?
Simply click on the Download button when you finish the translation process. It takes just one click!
5. What makes Veed different from others?
Veed has many one-click features. For instance, auto subtitles, translations, social media formatting, templates, video compression, etc are all available in one simple click.
6. Can Veed translate subtitles?
Yes, Veed also supports translating subtitles. Simply upload your subtitle file in SRT format and leave the rest to Veed. Veed io subtitle translationis just as accurate as its video translation feature.
7. Is Veed good for editing?
Veed has many exceptional features that make content creation easy. But, it cannot replace a full-fledged video editor or help you create a new video from scratch. This is its biggest disadvantage. If you want to create a video, you can try to use Wondershare Virbo.
Conclusion
All said, Veed is a fantastic tool that makes translation into multiple languages as easy as possible. You can use the Veed translate feature to translate your video content into 125+ languages of the world, making it accessible to a larger audience. Videos in local languages get more engagement than those without because people can closely relate with the content. By adding captions in other languages, you can engage audiences from those countries, Veed supports an extensive range of content creators with their creative projects. What should you do if you want to create a video from scratch or want to try another alternative to translate video? Just try Wondershare Virbo!
Translate Video Online Download APP Now Free Download
How to Stream on Twitch: The Ultimate Guide
Live streaming has become a regular source of enjoyment for many people in recent years, especially on a platform like Twitch. In the first quarter of 2023 alone, Twitch users watchedover 5.3 billion hours of video.
If you’re a content creator, you should definitely consider leveraging this power of Twitch video streaming, as it tends to have higher levels of engagement compared to pre-recorded content. But with so many Twitch streamers out there, standing out from the crowd can be challenging.
If you’re new to the scene, we can help you start your Twitch streaming journey off right with the right gear and some useful tips.

Part 1: Essential Preparations Before Beginning Your Twitch Streaming Journey
Whether you’re playing games, hosting events, or just chatting, streaming on Twitch is an exciting and rewarding way to engage with your audience in real-time. But to do well on Twitch, you need to prepare properly so your viewers can enjoy watching your content.
To start streaming on Twitch, here’s what you’ll need:
Twitch Streaming Software
First, you need to download streaming software for your Twitch video streaming. OBS Studio is the popular one, but Twitch has released its Twitch Studio, which is more beginner-friendly.
- OBS Studio
OBS Studio is a free streaming software that works on any device. You can use it to make your Twitch streams live more attractive by adding alerts, creating starting screens, and using different audio and video sources.
- Twitch Studio
Twitch Studio is the official free streaming application developed to simplify the streaming process for new streamers on Twitch. It offers an intuitive interface and pre-made scenes designed to streamline the user experience.
Streaming equipment
- A device to stream from
To kickstart your Twitch streaming journey, the first step you need to take is selecting the device from which you’ll broadcast. You can use your desktop, mobile phone, or gaming console. Your choice will depend on your existing equipment and the nature of your intended content.
If you plan to make gaming content for your Twitch Live, we recommend using a PC with these specifications:
- CPU
When streaming and gaming, it’s crucial to have a powerful CPU to minimize lagging. The number of cores in a CPU determines its processing power, ranging from dual to eight cores. Some good options to consider are the AMD Ryzen 9 5900X, Intel i9 – 12900K, or the more budget-friendly Intel Core i5-12400.
- GPU or graphic cards
Nvidia RTX graphics cards come equipped with built-in hardware encoders, which can lighten the CPU’s workload when used with OBS Studio. Alternatively, you can consider the Radeon RX 570 and the GeForce GTX 1660 Ti for quality GPU options.
- Microphone
Although you might get by using a gaming headset’s built-in microphone for a bit, it’s better to invest in a standalone mic from the start. Some top microphone options for Twitch streaming include the Elgato Wave:3, HyperX QuadCast S, Audio-Technica AT2020, Razer Seiren Mini, and Blue Yeti X.
- Webcam
If your Twitch stream content involves showcasing your reactions or facial expressions, investing in a camera is a wise choice. Webcams are convenient as they can easily connect to your computer or laptop.
You can consider some popular webcam choices like the Logitech HD Pro C920, Logitech StreamCam, Logitech BRIO, Microsoft LifeCam HD-3000, and Razer Kiyo.

Understanding Twitch Streaming Rules
Aside from preparing your streaming gear, you must also understand Twitch streaming rules to avoid any potential violations that could result in penalties or even suspension of your account. Twitch’s community guidelines cover a wide range of topics, including harassment, hate speech, copyright infringement, and mature content. You can read the full Twitch streaming ruleshere .
Part 2: Comprehensive Guide To Stream Live on PC, Mac, or Smartphone on Twitch
Once you’ve gathered all the necessary equipment, you can proceed with the following steps to start your Twitch stream.
How to stream Twitch live on PC or Mac
Step 1: Download and installTwitch Studio on your PC or Mac. Then, launch Twitch Studio and log in to your Twitch account. You’ll receive a prompt to connect your microphone and webcam.
Step 2: Use Twitch Studio to customize your Twitch stream with different scenes and settings. Experiment with these features to find what works best for your livestream.

Step 3: When you’re ready to start broadcasting, click “Start Stream” at the bottom of the Twitch Studio. Then, select your stream category and enter your live stream title. Hit “Go Live” to begin streaming.

How to stream Twitch live on a smartphone
Starting Twitch streaming from your smartphone is a bit different, as the app primarily allows broadcasting from your device’s camera. Here’s how to live stream on Twitch from your smartphone:
Step 1: Download and install theTwitch App .
Step 2: Log in to the Twitch app. Then, go to your profile and tap “Go Live.” If you are using newer version of the Twitch app, you can tap “Create.”

You’ll then have two options: “Stream Games” or “Stream IRL.” The “Stream IRL” will allow you to live stream on Twitch using your phone’s camera, while the first option lets you stream mobile games.

Step 3: Grant access to your camera and/or microphone before starting your stream.
Step 4: Set up the stream and Go Live. Give your stream a name, choose a content category, and select the camera you want to use.
Once you’ve completed these steps, press the “Start Stream” button, and you’ll be live on Twitch.
Key elements of success for streaming on Twitch
While the process for starting Twitch streaming may be similar for all streamers, what makes a streamer successful? Based on reports, there are a few key elements of success for streaming on Twitch.
- Engaging content
Successful Twitch streamers captivate their audience with compelling content that resonates with viewers. This could include entertaining gameplay, informative discussions, or engaging activities. If people like your stream, they might subscribe or donate their money.
- Make use of the interactive features
Twitch stream labs offer unique features like chat rooms and special emojis, fostering interaction between streamers and viewers. Streamers actively engaging with their audience tend to cultivate a loyal and enthusiastic community.
- Consistency and persistence
This is often the toughest part. On Twitch, consistency is crucial. Successful streamers usually maintain regular schedules to make sure their audience knows when to expect new content. If you are new, continuous live streaming can be an effective strategy to engage with your audience consistently and increase your channel’s visibility.
Part 3: Best AI-Powered Tool for You To Set Up a 24/7 Live Stream on Twitch
If you want to make your Twitch channel stand out and automate the live streaming process, you can use Wondershare Virbo Live. With this tool, you can set up a 24/7 live stream on Twitch without needing to be present all the time.
Additionally, the Virbo live stream feature seamlessly integrates with major live-streaming platforms supported by OBS. You can also use it on numerous other platforms, such as TikTok Live, 1688 Live Platform, Alibaba International, Kwai, and more.
How to live stream 24/7 on Twitch with Wondershare Virbo Live
To live stream 24/7 on Twitch with Virbo, you will first need to prepare your AI avatar on Virbo Live to broadcast continuously on Twitch. Once you have customized your avatar, you can obtain the streaming key from Twitch. This key will enable OBS to connect with Twitch’s streaming platform.
Follow the detailed steps on how to live stream 24/7 on Twitch:
Step 1: Access Wondershare Virbo Live and create a live streaming room.
Go toWondershare Virbo Live and select “Create Stream Room Now” > “Create a Blank Live Stream Room” to initiate the setup process.

Step 2: Write your content script or upload audio recordings.
Within the Virbo Live interface, you can either compose the script for your live stream or upload pre-recorded audio content by selecting “Upload local file.”

Pro Tip: You can use Virbo’s AI Script Writer for inspiration. Click on “AI Smart Script” and provide topic details, language preferences, and stylistic choices. Click “Generate” to create a script. Then, you can refine it as needed.
Step 3: Customize your AI avatar and background.
Navigate to “AI Avatars” to select an avatar for your live stream. Additionally, you can customize the background, incorporate stickers, or use available templates.

Step 4: Start the live stream.
Once your AI avatar and background are set, click “Start Livestream” to commence broadcasting. The next step should be acquiring the Twitch streaming key to put into the OBS.

Once everything is ready, click “Start Streaming” in OBS Studio, and your stream will broadcast on Twitch.
Conclusion
With billions of hours of video watched and many content creators vying for attention, streaming on Twitch can be exciting and challenging. However, by following the essential preparations outlined in this guide, you’ll be able to kickstart your Twitch live stream ahead of others.
You can use Wondershare Virbo Live to make an automated streaming experience 24/7. This helps you maintain a consistent presence on the platform even when you’re not around.
Installation and Registration | Wondershare Virbo
For iOS
1. System Requirements
To consume Virbo for iOS, you need to fulfill the following requirements. The overall speed and performance of the tool are entirely based on the device, its memory, and storage space. The following are the minimum system requirements:
- System: Requires iOS 13.0 or later.
- Equipment: Can work with iPhone 7+ or later models.
- Available Space: 9MB of free space (200MB preferable)
2. Download and Installation
- Launch the App Store on your iOS device and look for “Wondershare Virbo” in the Search toolbar.
- Tap the “Get” button against the tool from the results.
- Continue to select the “Install” button that appears on the pop-up window to proceed with the installation.
- As it is installed, choose “Open” to launch the program.
- Once it launches, you need to accept the “Privacy Policy” and “End User License Agreement” by tapping the “Agree” button.
For Android
1. System Requirements
To use Wondershare Virbo on your Android device, you must fulfill the following requirements. As stated before, the speed and performance of the program are entirely based on the device, its memory, and available space:
- System: Android 7.0 (Nougat) and later.
- Required Chipset: ARMEABI-V7A, ARM64-V8A
- Available Space: 200MB of Storage Space is needed.
2. Download and Installation
- You need to select the download link that appears on your Android smartphone.
- The installation package will download on your device, which can be tapped for further installation.
- To start using Virbo, select the “Agree” option against the “Privacy Policy” and “End User License Agreement” for the tool.
Also read:
- What Is an AI Video Maker? | Wondershare Virbo Glossary
- Create AI Video with AI Avatar | Wondershare Virbo
- New Comprehensive Guide for Free Video Translator Downloading for 2024
- Updated 5 Tips About YouTube Shorts to Grow Your Business for 2024
- Updated Top 6 Darth Vader AI Generators for All Platforms for 2024
- Updated Top 10 Robotic Voice Generators for 2024
- What Is AI Voice Text to Speech? | Wondershare Virbo Glossary for 2024
- In 2024, Top 8 Multi-Subtitles Translators You Can Use
- In 2024, The Recommended Natural AI Hindi Voice Generator
- New In 2024, What Is an AI Text Generator?
- New Demystifying AI Game Generators | Wondershare Virbo Glossary
- Create AI Avatar Video with AI Script
- New In 2024, Access All Matches Free World Cup Live Streaming Options
- New How to Make Animated Explainer Videos
- New In 2024, 8 Best Multi-Subtitles Translators You Shouldnt Miss
- New 10 Best Text-to-Video AI Generators to Create Engaging Videos for 2024
- New AI Script | Wondershare Virbo Online for 2024
- 2024 Approved Top 11 Deepfake Voice Apps and Software You Need to Know About
- Best 10 Free AI Video Generators with Innovative/Advanced Algorithms
- Exploring AI Face Generators | Wondershare Virbo Glossary for 2024
- Updated In 2024, Translate Video Speech to Text with Speech-to-Text Converters
- 2024 Approved What Is AI Background Generator?
- 2024 Approved Secrets for TikTok Live Studio Success
- New In 2024, What Is AI Influencer?
- Top 8 Text-to-Video AI Generators to Produce Video Easily for 2024
- Updated In 2024, Selected Overdub Voice with AI Virbo At Its Finest
- Top 7 Video Language Converter Online Free
- Top 10 Free AI Voice Generators to Use in Daily Life
- New Best 6 Celebrity Text to Speech AI Voice Generators You May Like
- Updated Top 10 Free and Best Text-to-Speech Generators
- Updated Top List Best Livestream Shopping Apps Of
- How to Translate Audio/Video Content From Spanish to English and Vice Versa, In 2024
- Updated In 2024, Maximize Yandex Translate in Video Translation and Beyond
- New The Power of YouTube Live Selling Unlock Your Sales Potential
- Updated Create AI Videos Using Synthesia Avatar and Voices
- New Top 11 Deepfake Voice Apps and Software You Need to Know About for 2024
- Updated In 2024, A Detailed Review of Murf.ai AI Text-to-Speech Tool
- In 2024, Video Translator | Wondershare Virbo Online
- Updated Must-Read Top 10 AI Realistic Avatar Generators
- Updated What Are AI Tools, In 2024
- Updated Create AI Avatar Videos | Wondershare Virbo Online
- The Best English Voice Generator To Convert Text Into Desired Accent for 2024
- How to Change Google Play Location On Nokia XR21 | Dr.fone
- How PGSharp Save You from Ban While Spoofing Pokemon Go On Samsung Galaxy A24? | Dr.fone
- How to Honor Get Deleted Pictures Back with Ease and Safety?
- Reinstall your hardware drivers with Device Manager in Windows 11 & 10
- Reasons for Realme 12+ 5G Stuck on Startup Screen and Ways To Fix Them | Dr.fone
- Which Pokémon can Evolve with a Moon Stone For Motorola Edge+ (2023)? | Dr.fone
- In 2024, 9 Best Free Android Monitoring Apps to Monitor Phone Remotely For your Honor 100 Pro | Dr.fone
- How to Mirror Samsung Galaxy S24 Ultra to Mac? | Dr.fone
- Samsung Galaxy M34 5G Stuck on Screen – Finding Solutions For Stuck on Boot | Dr.fone
- About Tecno Pova 6 Pro 5G FRP Bypass
- Defy 2 Unlock Tool - Remove android phone password, PIN, Pattern and fingerprint
- Top 15 Augmented Reality Games Like Pokémon GO To Play On OnePlus Open | Dr.fone
- In 2024, How Many Attempts To Unlock Apple iPhone 12 Pro
- Top 10 Best Spy Watches For your Apple iPhone 8 | Dr.fone
- In 2024, The Most Useful Tips for Pokemon Go Ultra League On Nubia Red Magic 8S Pro+ | Dr.fone
- Xiaomi 14 Pro Not Connecting to Wi-Fi? 12 Quick Ways to Fix | Dr.fone
- In 2024, How to Unlock Apple iPhone 7, Apples New iPhone | Dr.fone
- In 2024, Forgot Locked iPhone 12 mini Password? Learn the Best Methods To Unlock
- Will the iPogo Get You Banned and How to Solve It On Apple iPhone 15 | Dr.fone
- Forgot Apple iPhone SE (2020) Backup Password? Heres What to Do | Dr.fone
- The Updated Method to Bypass Vivo Y78 5G FRP
- A Quick Guide to Motorola Moto G84 5G FRP Bypass Instantly
- In 2024, List of Pokémon Go Joysticks On Apple iPhone 13 mini | Dr.fone
- How to Transfer Data from Huawei P60 to Other Android Devices? | Dr.fone
- Bypassing Google Account With vnROM Bypass For Itel P40
- The way to get back lost call history from Tecno Pova 5 Pro
- Cellular Network Not Available for Voice Calls On Lava Yuva 3 | Dr.fone
- Unlock Your Vivo Y02T Phone with Ease The 3 Best Lock Screen Removal Tools
- In 2024, Proven Ways in How To Hide Location on Life360 For Samsung Galaxy A24 | Dr.fone
- In 2024, Top 10 Best Spy Watches For your OnePlus Ace 2V | Dr.fone
- In 2024, How To Bypass Honor X50i FRP In 3 Different Ways
- Fix the Error of Unfortunately the Process.com.android.phone Has Stopped on Infinix Note 30 | Dr.fone
- How to Unlock Apple iPhone XR Online? Here are 6 Easy Ways
- How To Change Samsung Galaxy S23 Ultra Lock Screen Password?
- How To Recover Data from Apple iPhone 12? | Dr.fone
- How to Change GPS Location on Lava Storm 5G Easily & Safely | Dr.fone
- Which is the Best Fake GPS Joystick App On Realme C33 2023? | Dr.fone
- In 2024, Edit and Send Fake Location on Telegram For your Poco X6 Pro in 3 Ways | Dr.fone
- Title: New In 2024, How To Auto Translate YouTube Videos Into Different Languages
- Author: Sam
- Created at : 2024-04-17 22:10:54
- Updated at : 2024-04-18 22:10:54
- Link: https://ai-voice-clone.techidaily.com/new-in-2024-how-to-auto-translate-youtube-videos-into-different-languages/
- License: This work is licensed under CC BY-NC-SA 4.0.
