
:max_bytes(150000):strip_icc():format(webp)/GettyImages-1134410016-75c4b547097941299e55dceeef4b764c.jpg)
New Create Video With PPT
Create Video With PPT
Create Video With PPT
Wondershare Virbo is a comprehensive video-making facility offering a wide set of possibilities to its users. It has recently extended its productivity by offering the option of creating videos out of PPT. With such diverse options to convert PowerPoint to video, you can develop the best visuals for your audience from the available content. Following is a comprehensive step-by-step guide to converting PPT to video with Virbo.
02Add Avatars and Voiceover To the PPT Video
03Perform Other Edits to Video
04Preview And Export Final PPT Video From Virbo
Step 1. Start By Importing Your PPT File
After launching Wondershare Virbo on your desktop, continue to select the “Create Video“ button. As this opens a pop-up, select the “Import PPT“ option on the bottom-left to add your PowerPoint file.
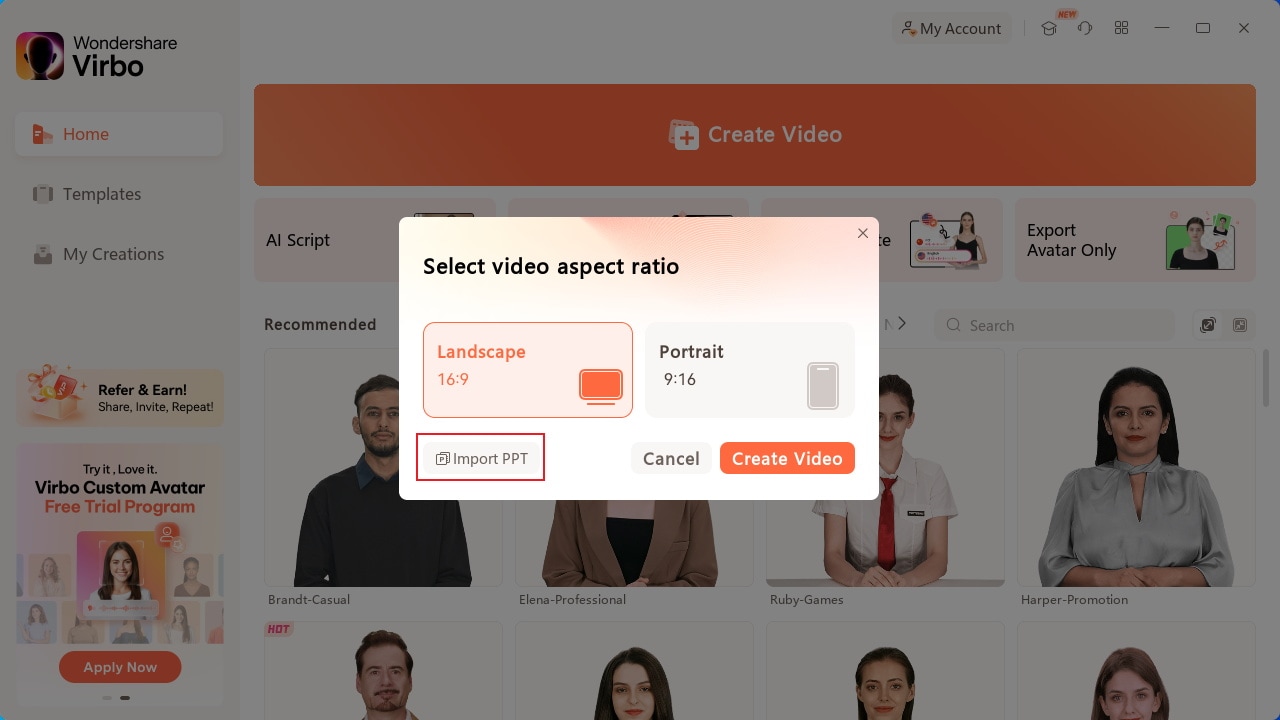
Choose Import PPT
Step 2. Add Avatars and Voiceover To the PPT Video
As you’ve imported your PPT file successfully, define whether you want to extract your script from the file or not. Click “Create Video” to redirect to the next window, which outlines the PowerPoint file as a video.
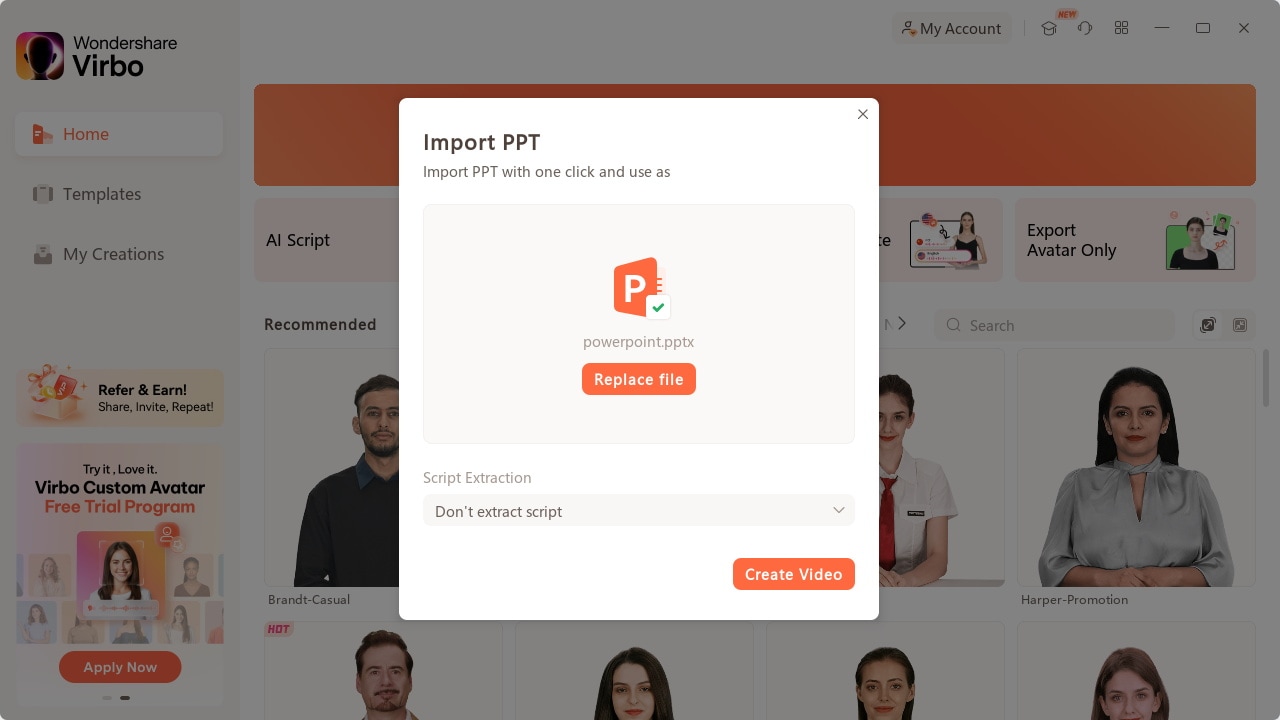
Import PPT
Here, you need to define a proper avatar according to your video, which can be done using the “Avatars“ button on the top toolbar.
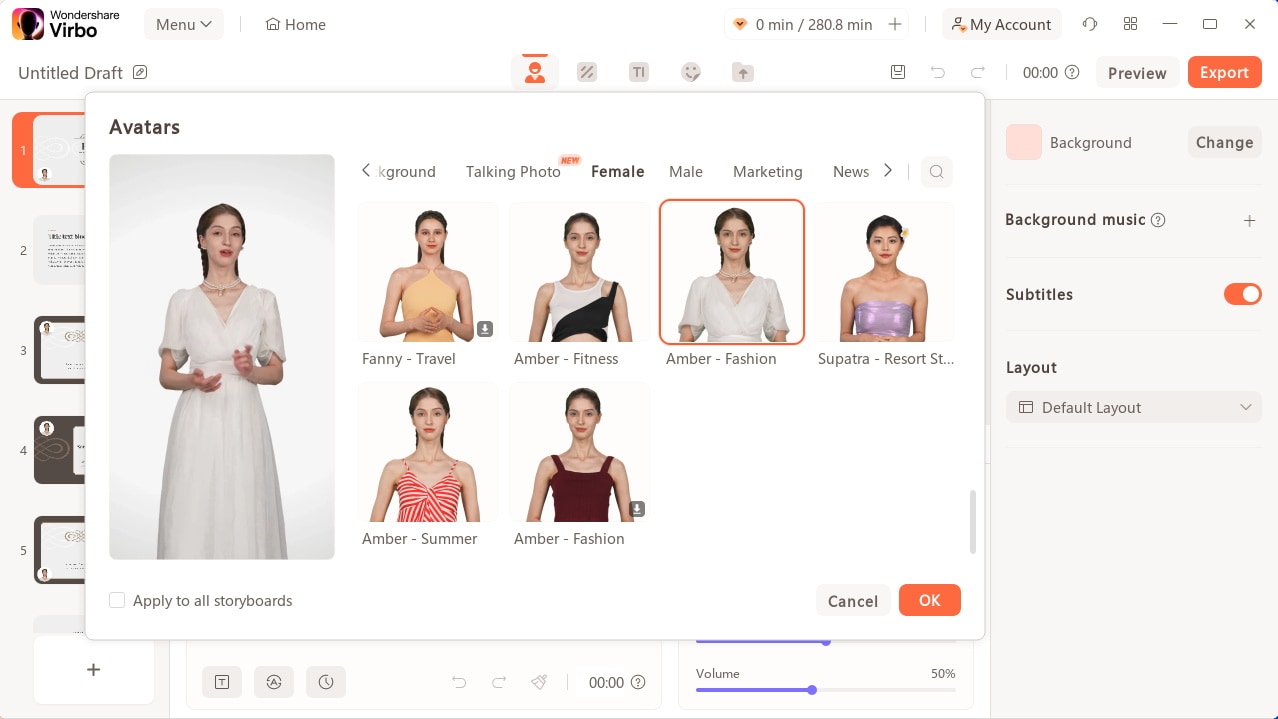
Select Avatars
Consequently, you need to add a proper voiceover that will assist you in explaining the PowerPoint file within the video. For that, lead to the “Text Script” or “Audio Upload” section to add the appropriate voiceover. Define your voice from the available list and set its parameters, or upload your pre-recorded voice to add along with the avatar.
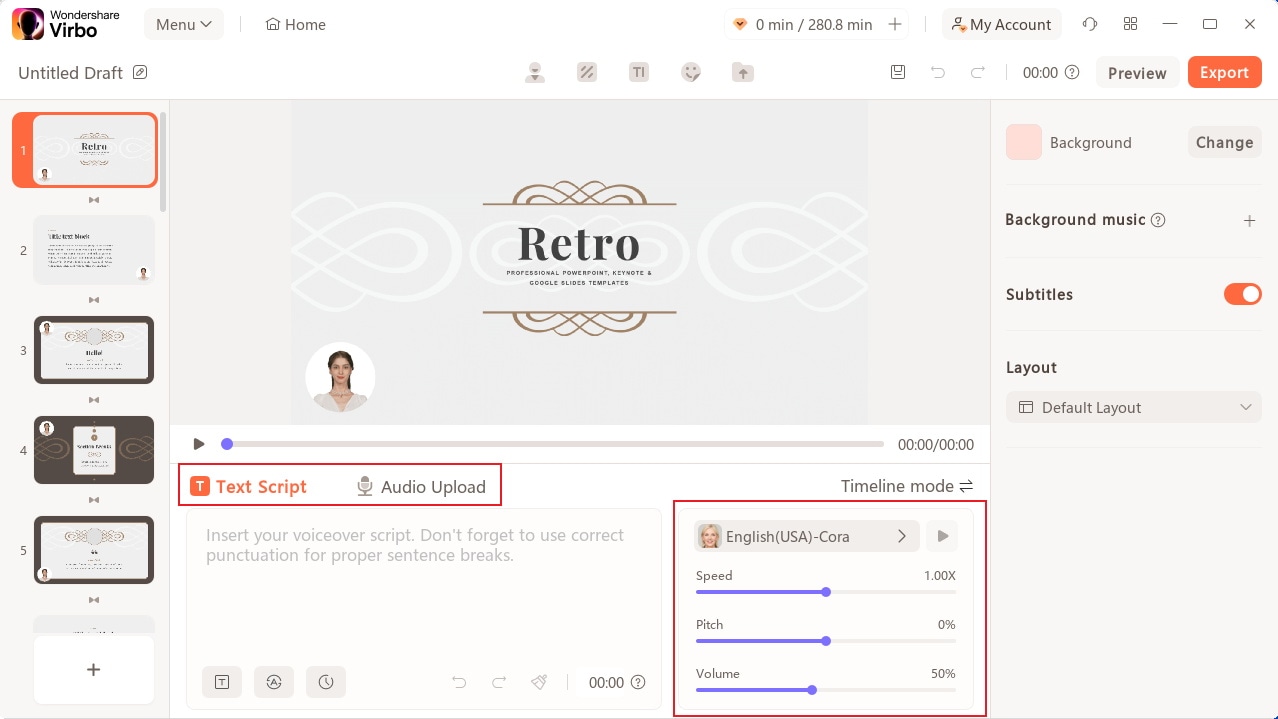
Add Voiceover
Step 3. Perform Other Edits to Video
After selecting the avatar and voiceover for the video, you can perform other edits as well. Change the background of the video or add music in the background according to your choice. If you want to display the subtitles across the video, enable the “Subtitle“ option. Furthermore, for more advanced settings in your video, you can define a proper “Layout“ or add stickers and edit text style on the top toolbar.
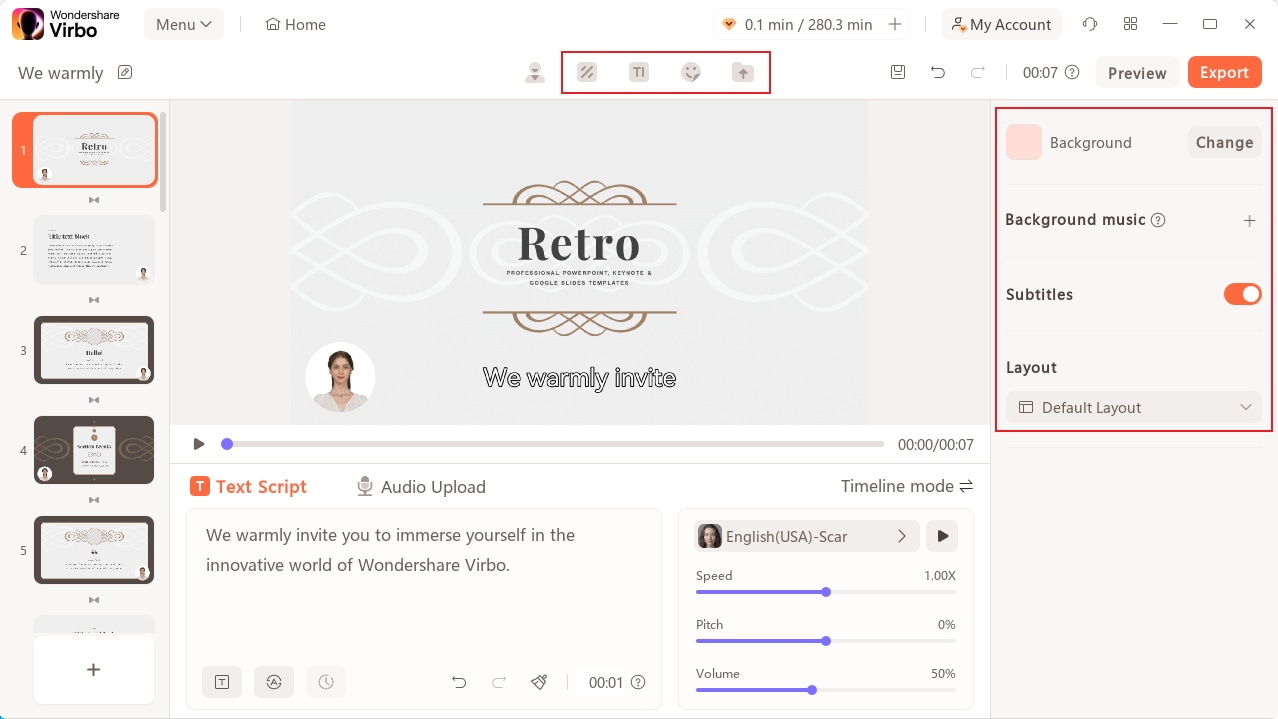
Edit Video
Step 4. Preview And Export Final PPT Video From Virbo
Once you finish all the edits, click the “Preview“ button on the top right corner to preview the video.
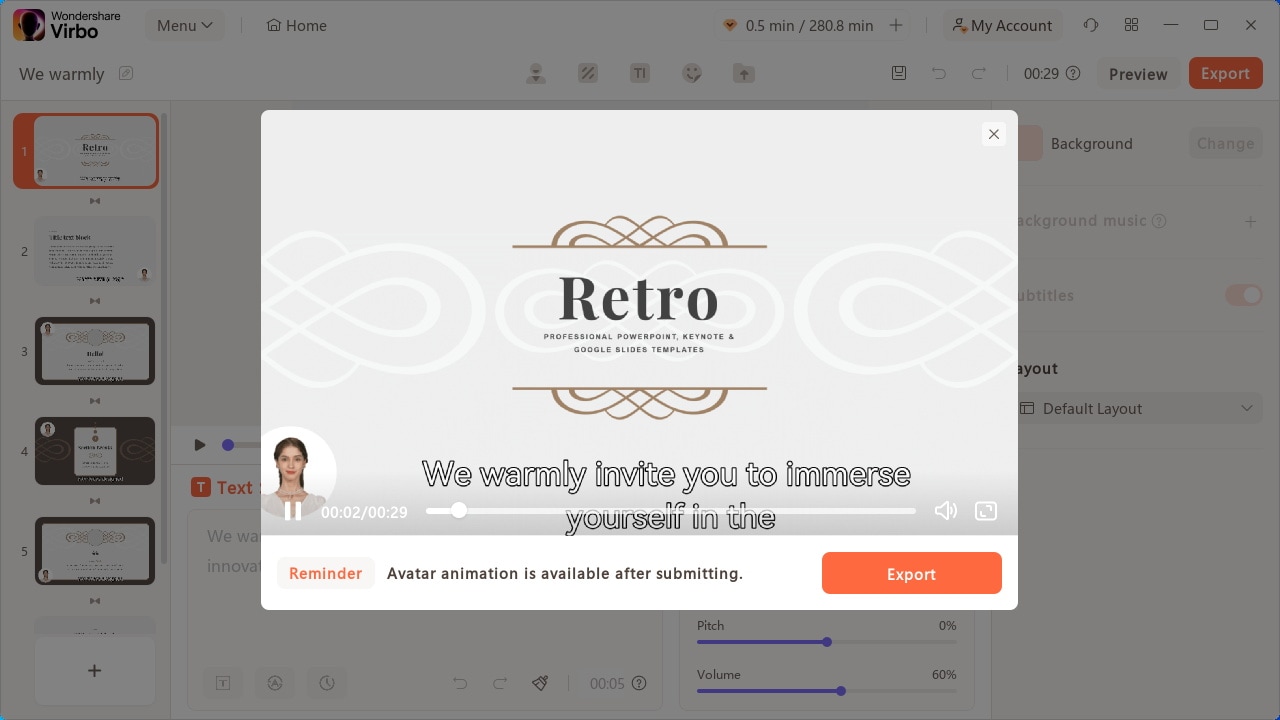
Preview Video
If you are satisfied with the video after previewing, click the “Export“ button to save this video.
Export Video
02Add Avatars and Voiceover To the PPT Video
03Perform Other Edits to Video
04Preview And Export Final PPT Video From Virbo
Step 1. Start By Importing Your PPT File
After launching Wondershare Virbo on your desktop, continue to select the “Create Video“ button. As this opens a pop-up, select the “Import PPT“ option on the bottom-left to add your PowerPoint file.
Choose Import PPT
Step 2. Add Avatars and Voiceover To the PPT Video
As you’ve imported your PPT file successfully, define whether you want to extract your script from the file or not. Click “Create Video” to redirect to the next window, which outlines the PowerPoint file as a video.
Import PPT
Here, you need to define a proper avatar according to your video, which can be done using the “Avatars“ button on the top toolbar.
Select Avatars
Consequently, you need to add a proper voiceover that will assist you in explaining the PowerPoint file within the video. For that, lead to the “Text Script” or “Audio Upload” section to add the appropriate voiceover. Define your voice from the available list and set its parameters, or upload your pre-recorded voice to add along with the avatar.
Add Voiceover
Step 3. Perform Other Edits to Video
After selecting the avatar and voiceover for the video, you can perform other edits as well. Change the background of the video or add music in the background according to your choice. If you want to display the subtitles across the video, enable the “Subtitle“ option. Furthermore, for more advanced settings in your video, you can define a proper “Layout“ or add stickers and edit text style on the top toolbar.
Edit Video
Step 4. Preview And Export Final PPT Video From Virbo
Once you finish all the edits, click the “Preview“ button on the top right corner to preview the video.
Preview Video
If you are satisfied with the video after previewing, click the “Export“ button to save this video.
Export Video
A Detailed Guide to Making Your Pictures Speak
In today’s digital era, visual communication flourishes as a highly effective way to convey messages across diverse contexts. With smartphones and social media on the rise, the demand for engaging visual content has surged.
Visual communication effectively shares information with diverse audiences. When combined with audio, it enhances the experience even more. Audio adds depth and emotion, guiding attention to details. Whether it’s music or someone speaking, the audio complements the visuals seamlessly.
Adding audio strengthens visual communication and fosters a stronger connection with audiences through their senses. In this article, we’ll explore how to use visual communication effectively. We aim to provide you with a guide on how tomake your pictures talk .
Part 1. AI Talking Photo Technology Benefits
AI-talking photos are revolutionizing how we communicate visually, merging images with audio narration to create immersive storytelling experiences. These photos offer personalized interactions that meet the preferences of users and enhance accessibility for all.
Thus, talking photos has become a cornerstone in modern communication across various industries, from advertising to education. With technology continually advancing, the potential for AI talking photos to deliver impactful messages is ever-expanding.
For a more comprehensive understanding, here’s a breakdown of the benefits of AI talking photo technology. Below are the following:
● Enriched Narratives
With AI-talking photos, storytelling reaches new heights that enable photographs to articulate themselves. Bymaking your pictures talk , the stories they tell become more engaging and immersive.
● Customization and Personalization
Users can now personalize their storytelling experience by narrating the stories behind their AI-generated photos using their voices.
● Accessibility and Inclusivity
AI talking photos also address the needs of individuals with visual impairments by providing audio descriptions of the images. This feature significantly enhances the accessibility of visual content, ensuring that everyone, regardless of their visual abilities, can engage with and enjoy the stories being told through the photos.
● Creating Lasting Memories
Throughmaking your image talk , they possess the ability to transform fleeting moments into enduring memories. The addition of audio narration enhances the emotional resonance of the images, making them more vivid and memorable.
● Facilitating Artistic Expression
AI talking photos provide a versatile platform for artistic expression, allowing users to experiment with various narratives, voices, and styles. The possibilities are endless, from personal storytelling to creative projects.

Part 2. Difficulties in Talking Photo Technology

Despite its potential,making your photos talk encounters numerous challenges that hinder its seamless integration and effectiveness. Here, we outline some difficulties you might encounter:
● Unnatural Mouth Shape
Despite advancements in facial recognition and animation, creating natural-looking mouth movements in talking photos remains a significant challenge. The technology often struggles to accurately replicate the intricate movements and subtleties of human speech.
● Unnatural AI Voice
Another obstacle lies in the synthesis of natural-sounding AI voices. While text-to-speech (TTS) technology has advanced significantly, AI-generated voices can still sound robotic or unnatural. They often lack the nuances and inflections of human speech. Crafting a voice that is clear and emotionally resonant poses a significant challenge, as it involves capturing human expression and intonation nuances.
● Lack of Lip Non-Actuation in Multi-Person Conversation Photos
In multi-person conversation photos, accurately synchronizing lip movements poses a complex challenge. Coordinating lip movements and distinguishing speakers is challenging, especially in dynamic group settings with diverse expressions and speech patterns.
● Technical Limitations
Real-time lip-syncing and audio processing require a lot of computer power. Handling large amounts of data while keeping quality needs efficient algorithms. Additionally, it’s hard to balance performance and resources in talking photo technology.
● Ethical and Privacy Concerns
Besides technical hurdles, ethical and privacy issues arise with talking photo technology. Manipulating visual and auditory content raises concerns about misinformation, privacy breaches, and potential misuse of digital media.
Part 3. How to Create a Talking Picture with A Powerful Tool - Wondershare Virbo on Mobile/Online
In the current dynamic digital landscape, the merging of visuals and audio has reshaped our methods of communication and connection. Talking photos, with their capability to infuse images with voices and feelings, lead this transformative shift.
Wondershare Virbo stands as a testament to innovation in visual storytelling that offers a powerful platform that redefines how we engage with images and sound. With its cutting-edge technology, it effortlessly merges audio with visuals and surpasses the constraints of traditional static imagery. This breakthrough allows creators to transform ordinary photos into captivating narratives that resonate with depth and emotion.
Enter the realm of visionary storytellers and explore Virbo—a tool worth discovering to enhance your storytelling to new heights! Users can utilize it for mobile or online which ensures accessibility and convenience for their needs. Moreover, exploring Virbo online offers the same excitement and fluidity as using it on a desktop that guarantees an engaging experience on either platform. To create a talking photo on mobile/online, follow the steps outlined below:
Get Started Online Free Download
For Mobile
To create a talking photo on mobile, follow the steps outlined below:
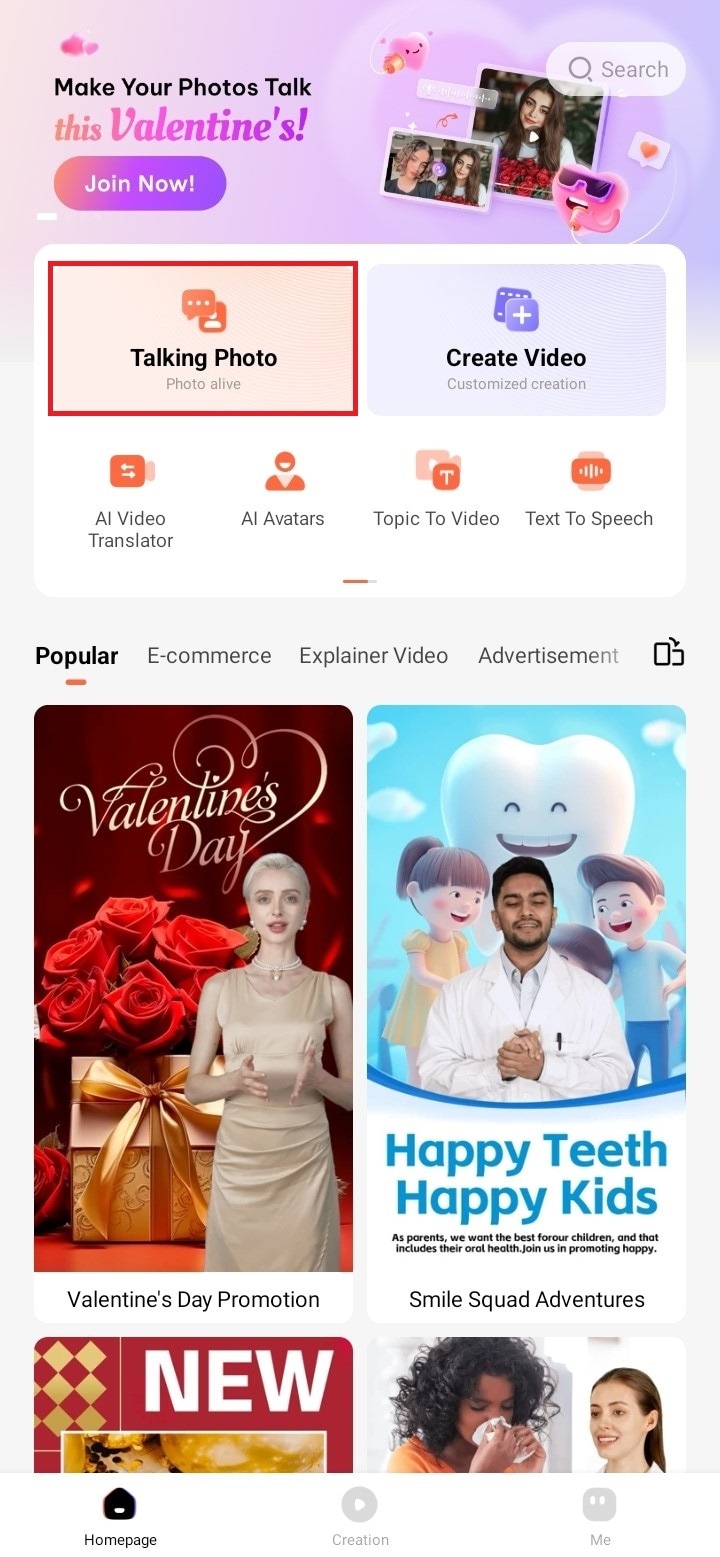
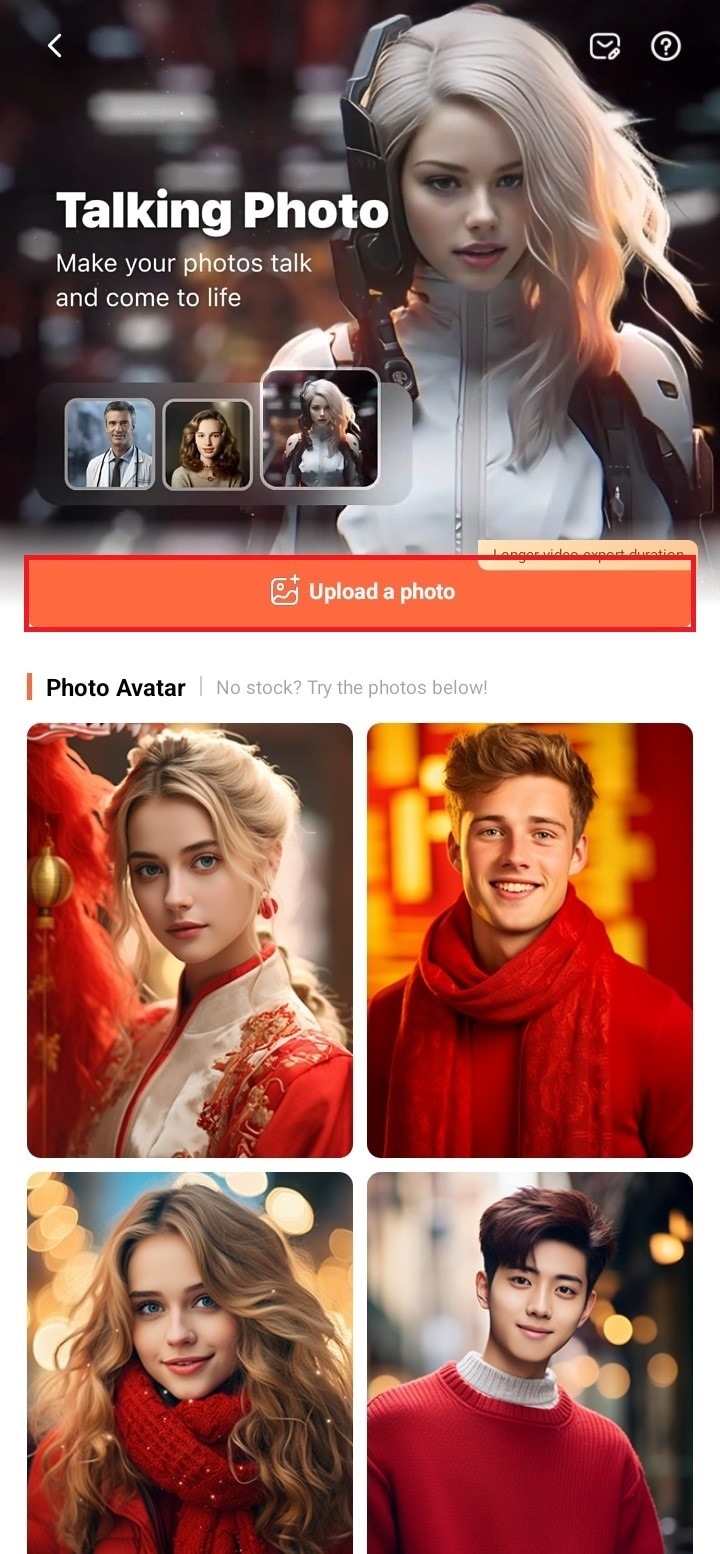
- Download and open the Wondershare Virbo app and select the talking photo feature to access the operational interface.
- Choose the AI-generated talking photo that best suits your preference, or you can select to upload your image.
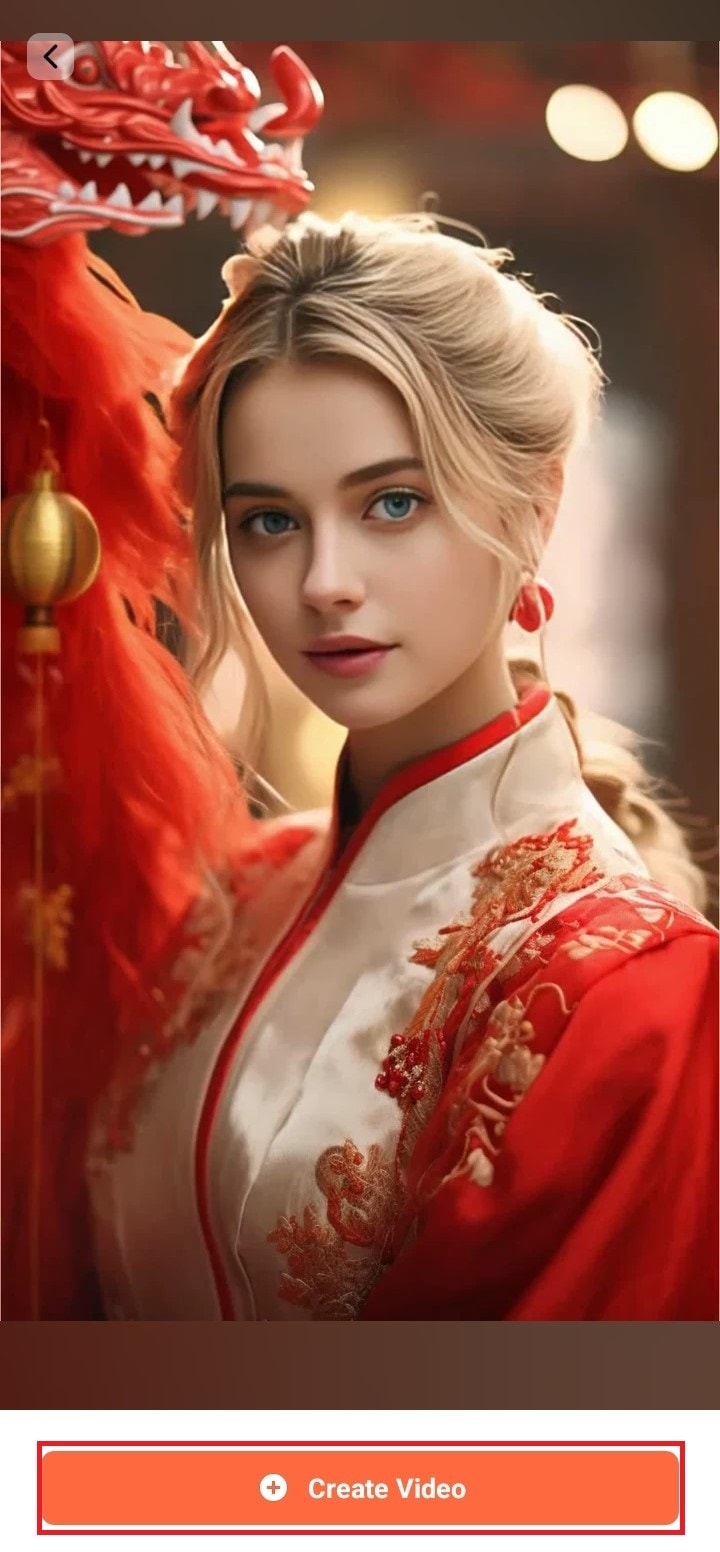
- Once you’ve chosen the AI talking photo you prefer, simply click on theCreate Video button located below.
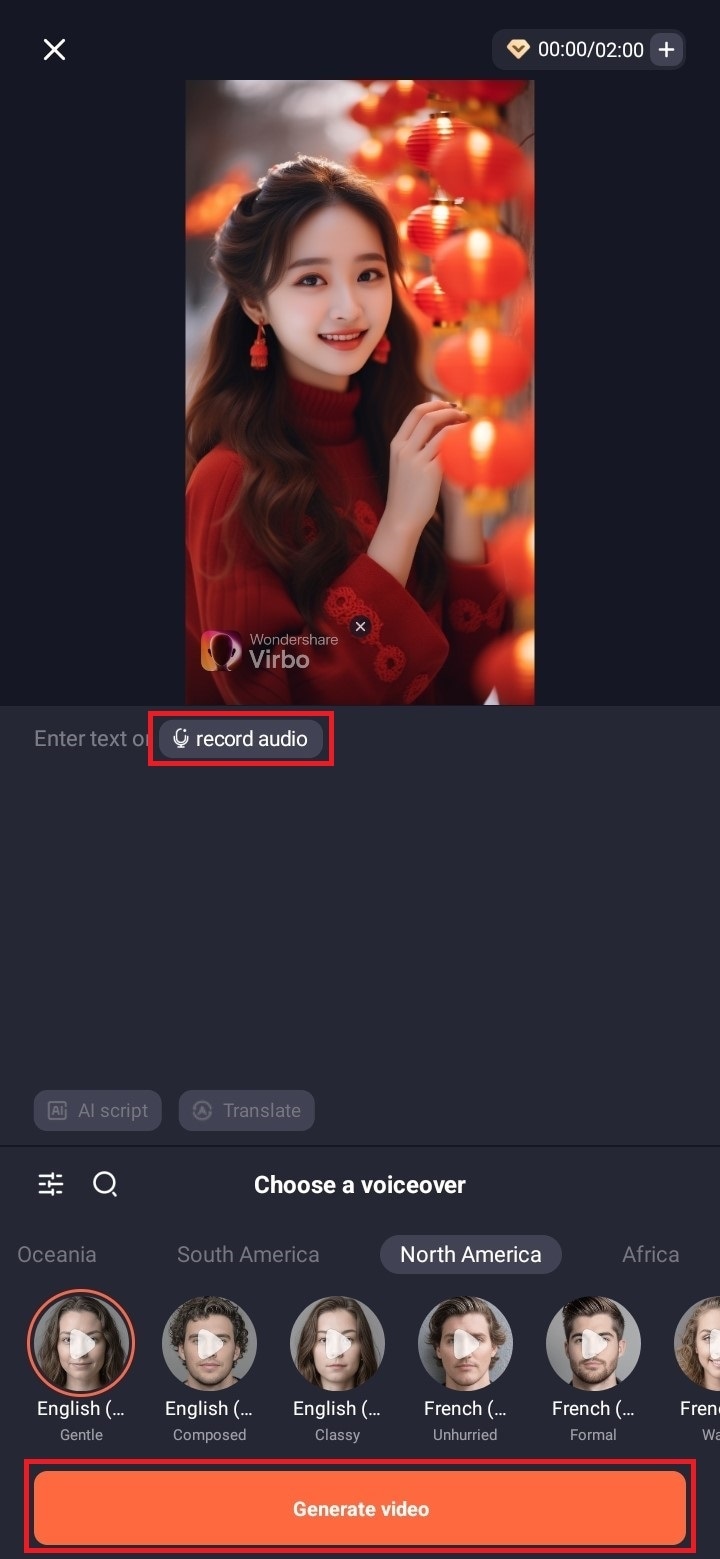
- Input your text and select a voiceover from the options below to create the audio for your video. Alternatively, you can record your voice by selectingrecord audio . When finished editing, tapGenerate Video to export it.
For PC
Tomake pictures talk online or on your PC, here are the following steps:
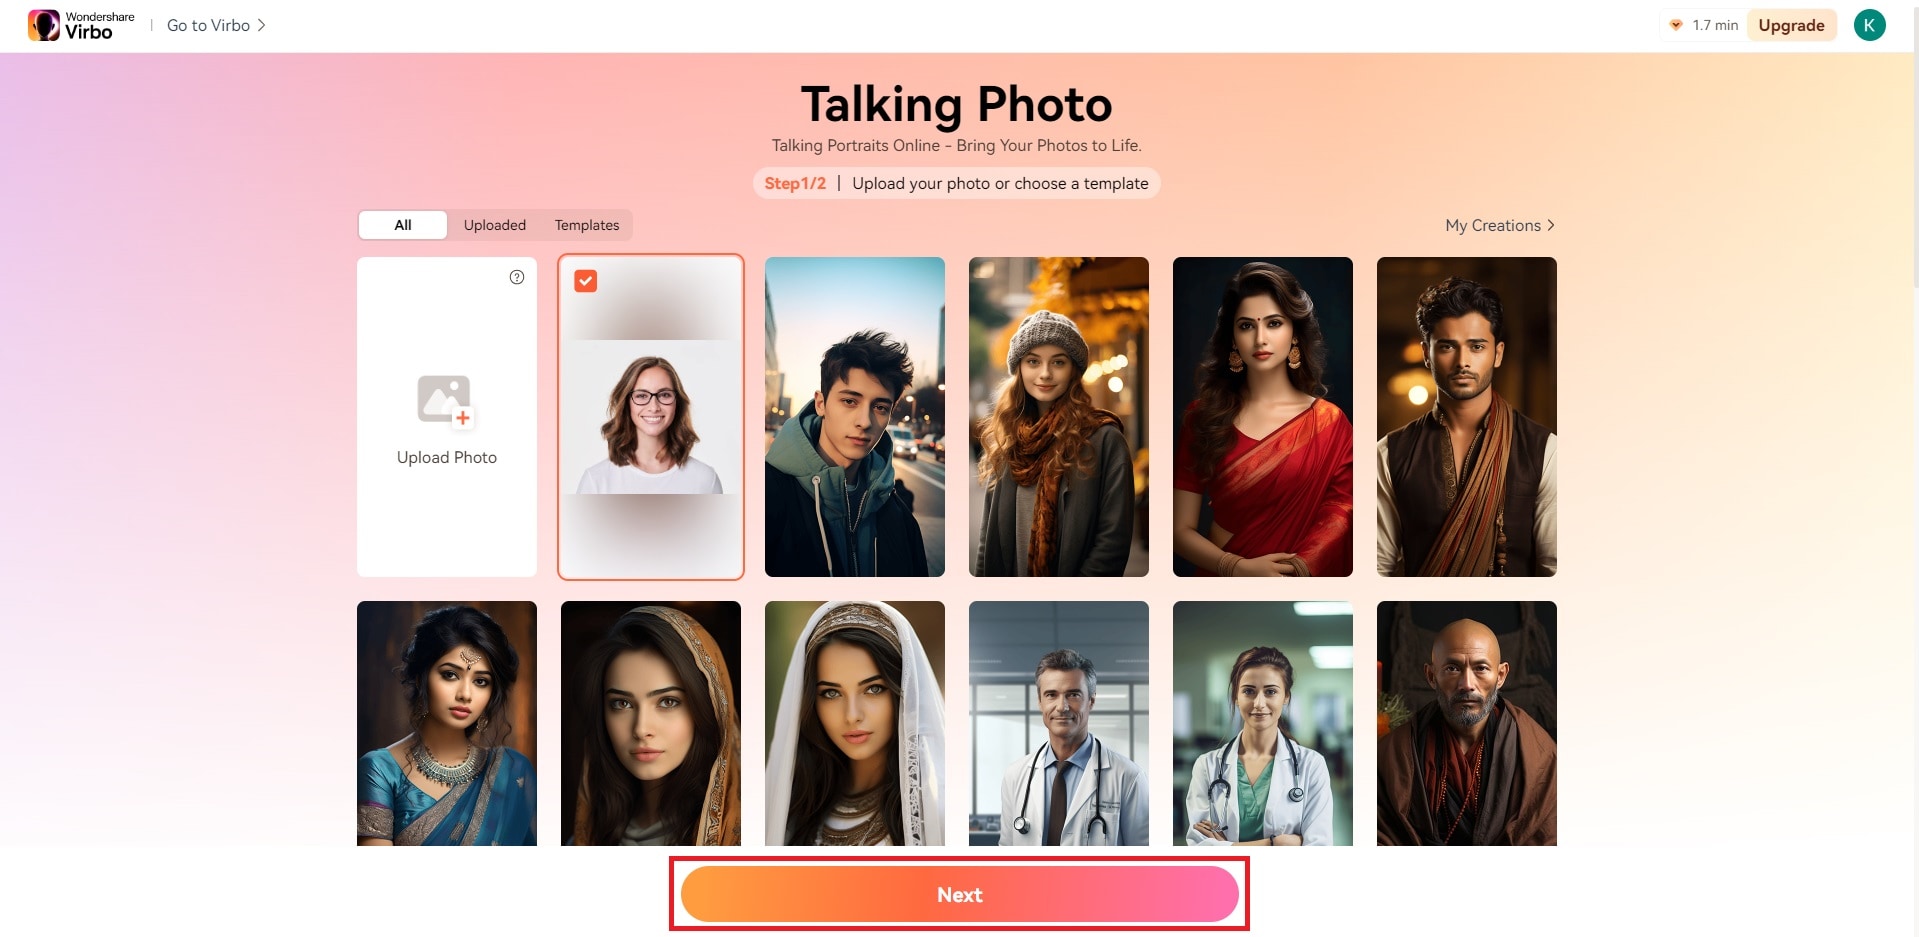
- Launch the Virbo on itswebsite and click the Talking Photo option.
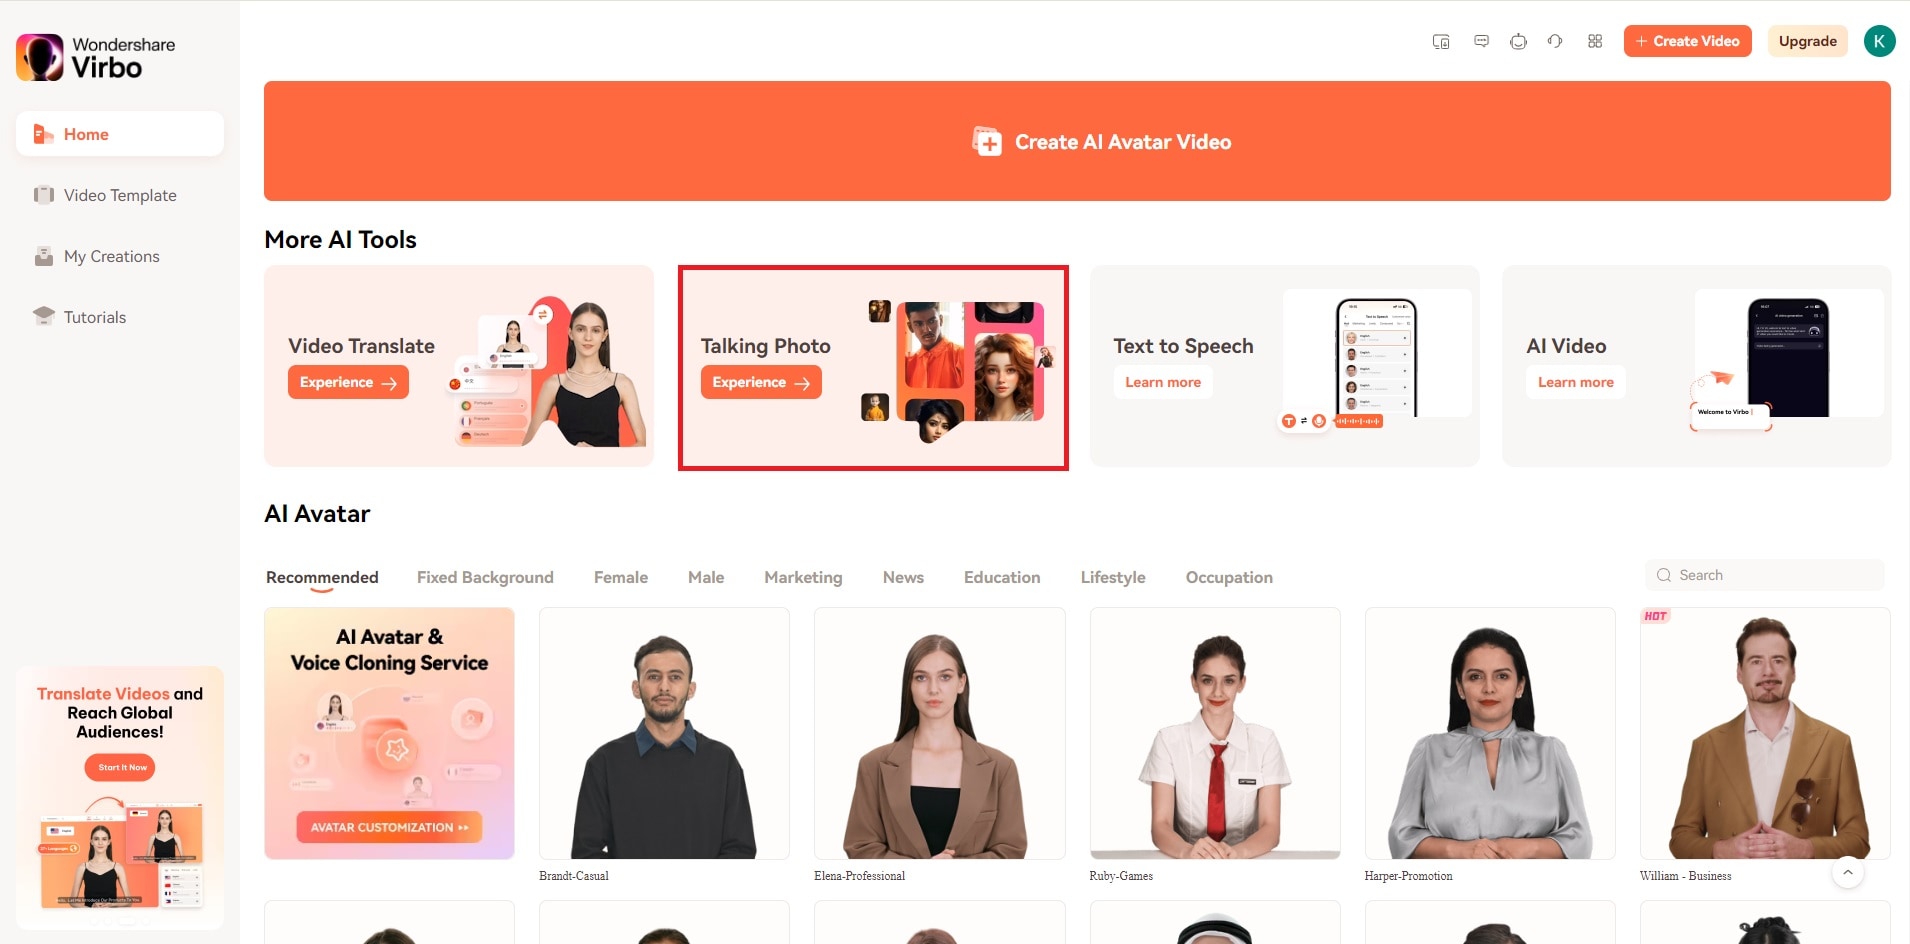
- You’ll encounter two options: either select from the images provided by this talking photo app or upload an image from your computer.
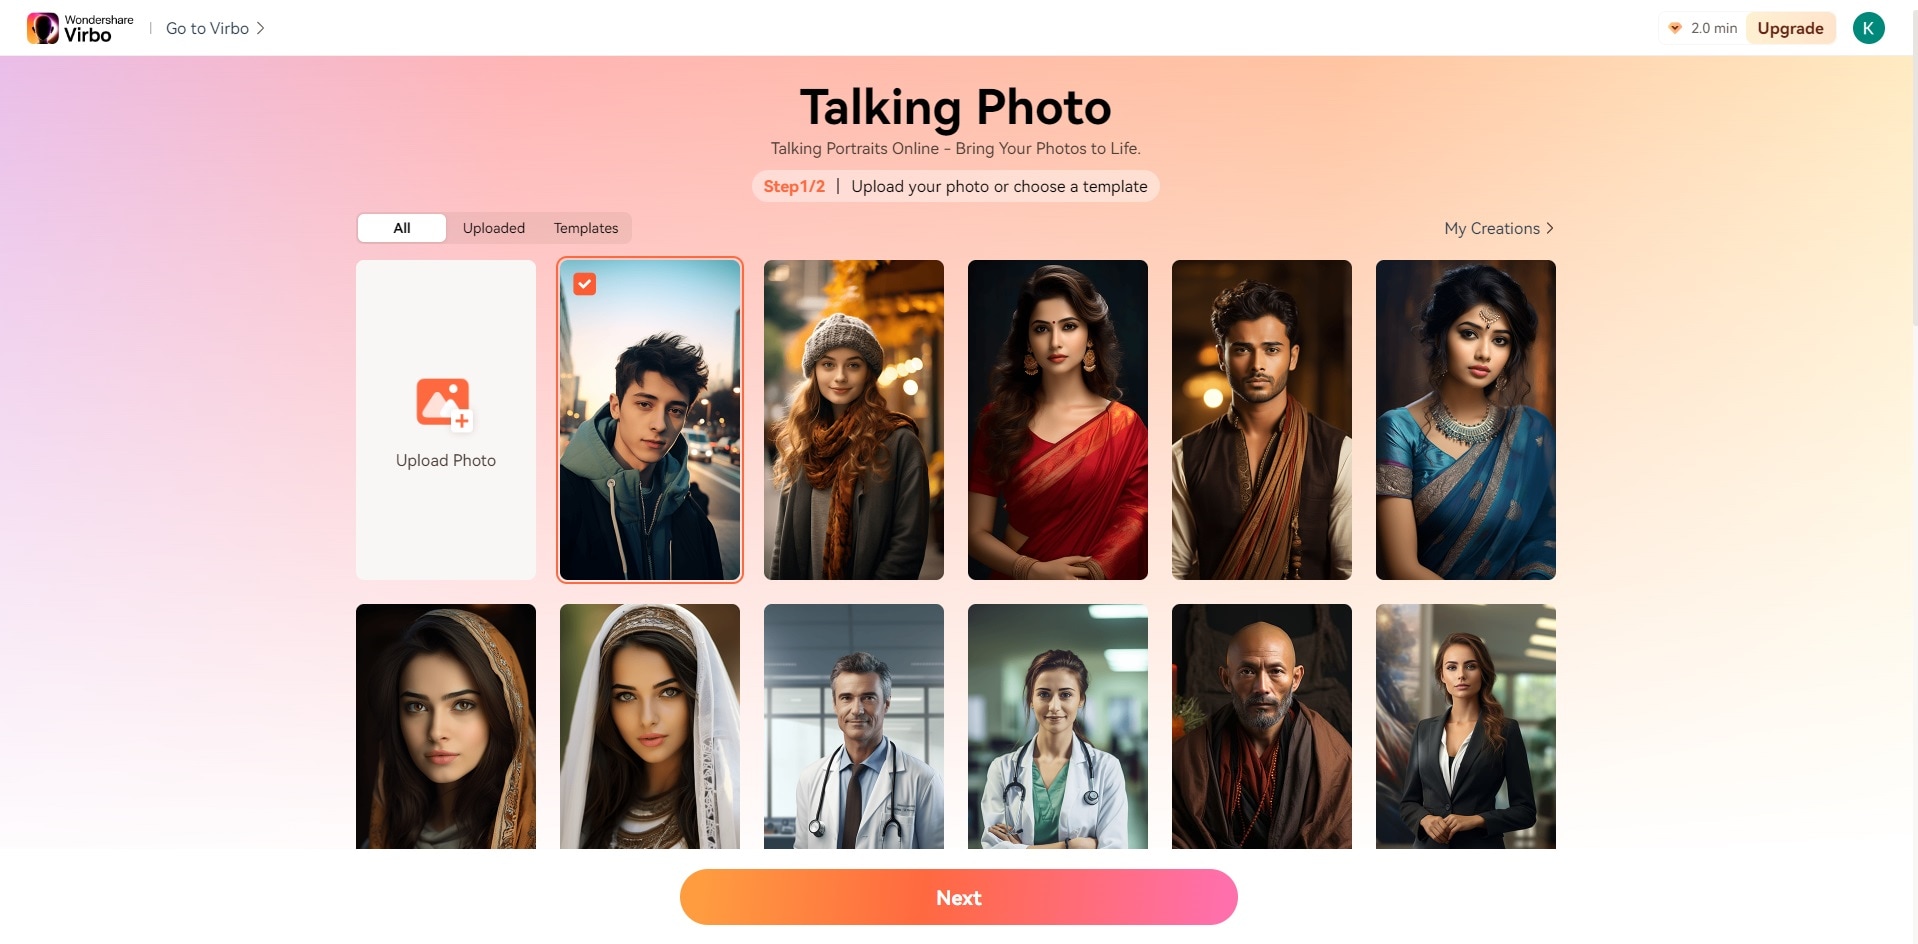
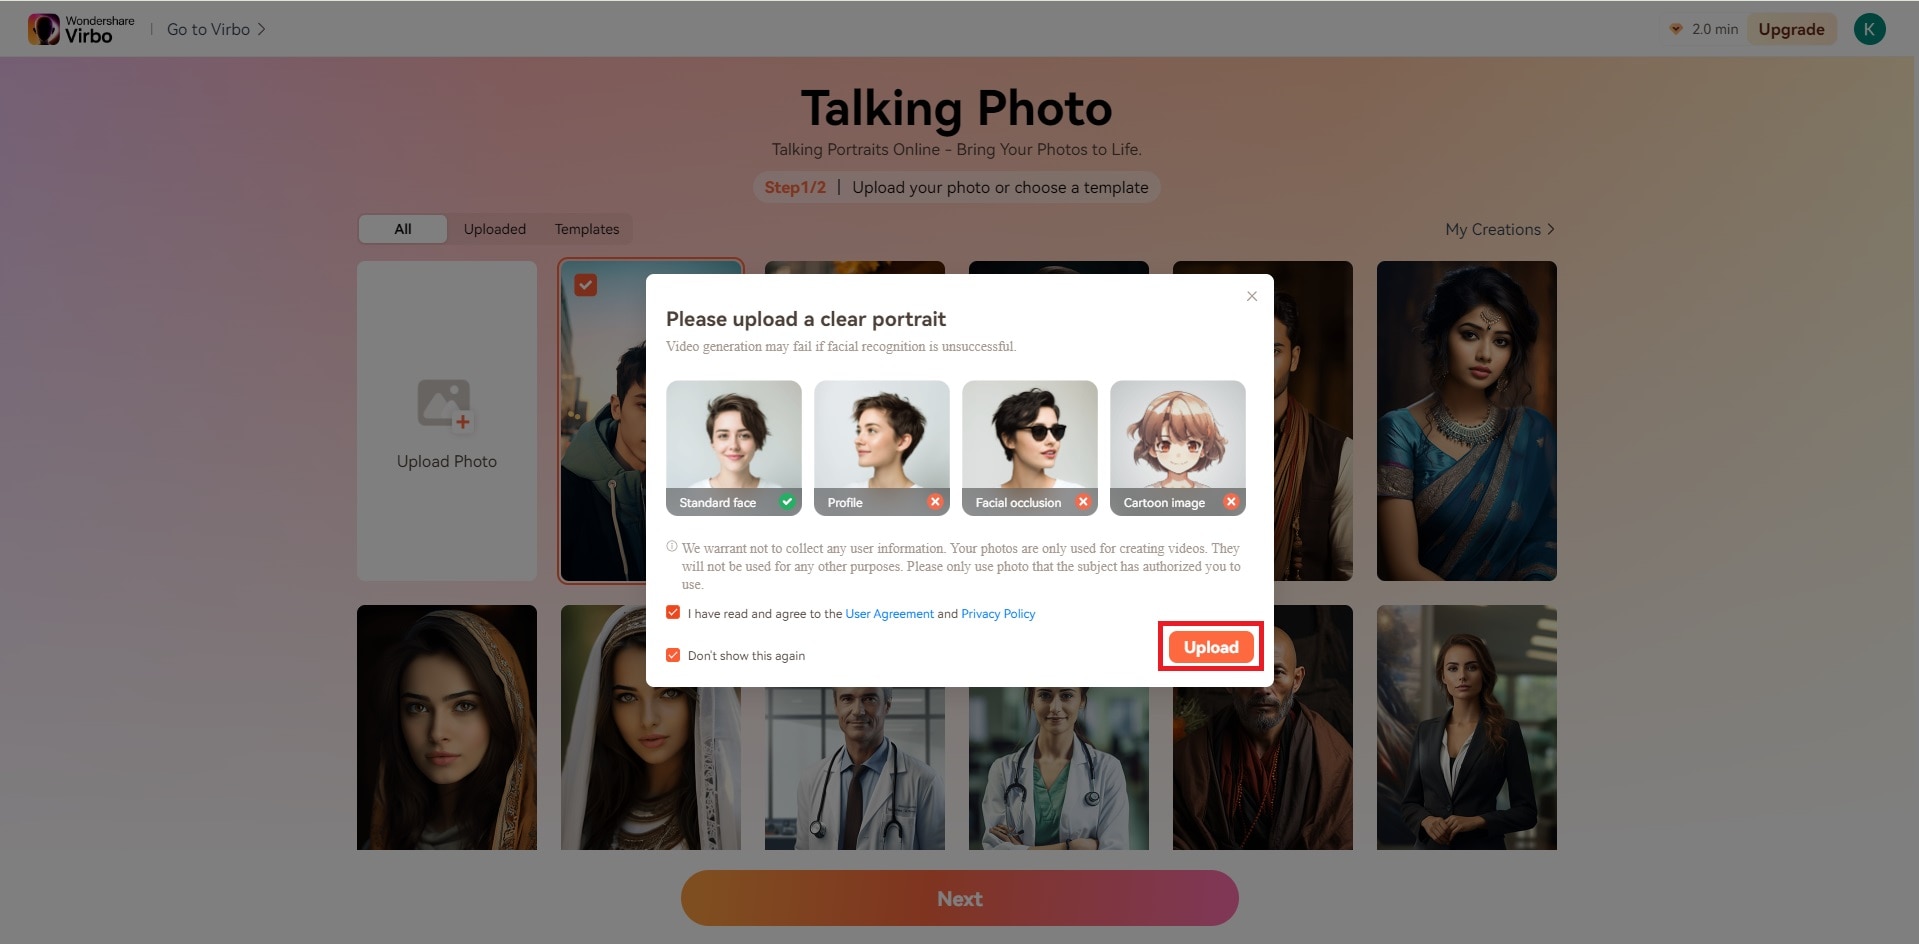
- To upload an image, click on theupload photo icon and review the User Agreement and Privacy Policy of Wondershare Virbo. Check the box to agree with the terms.
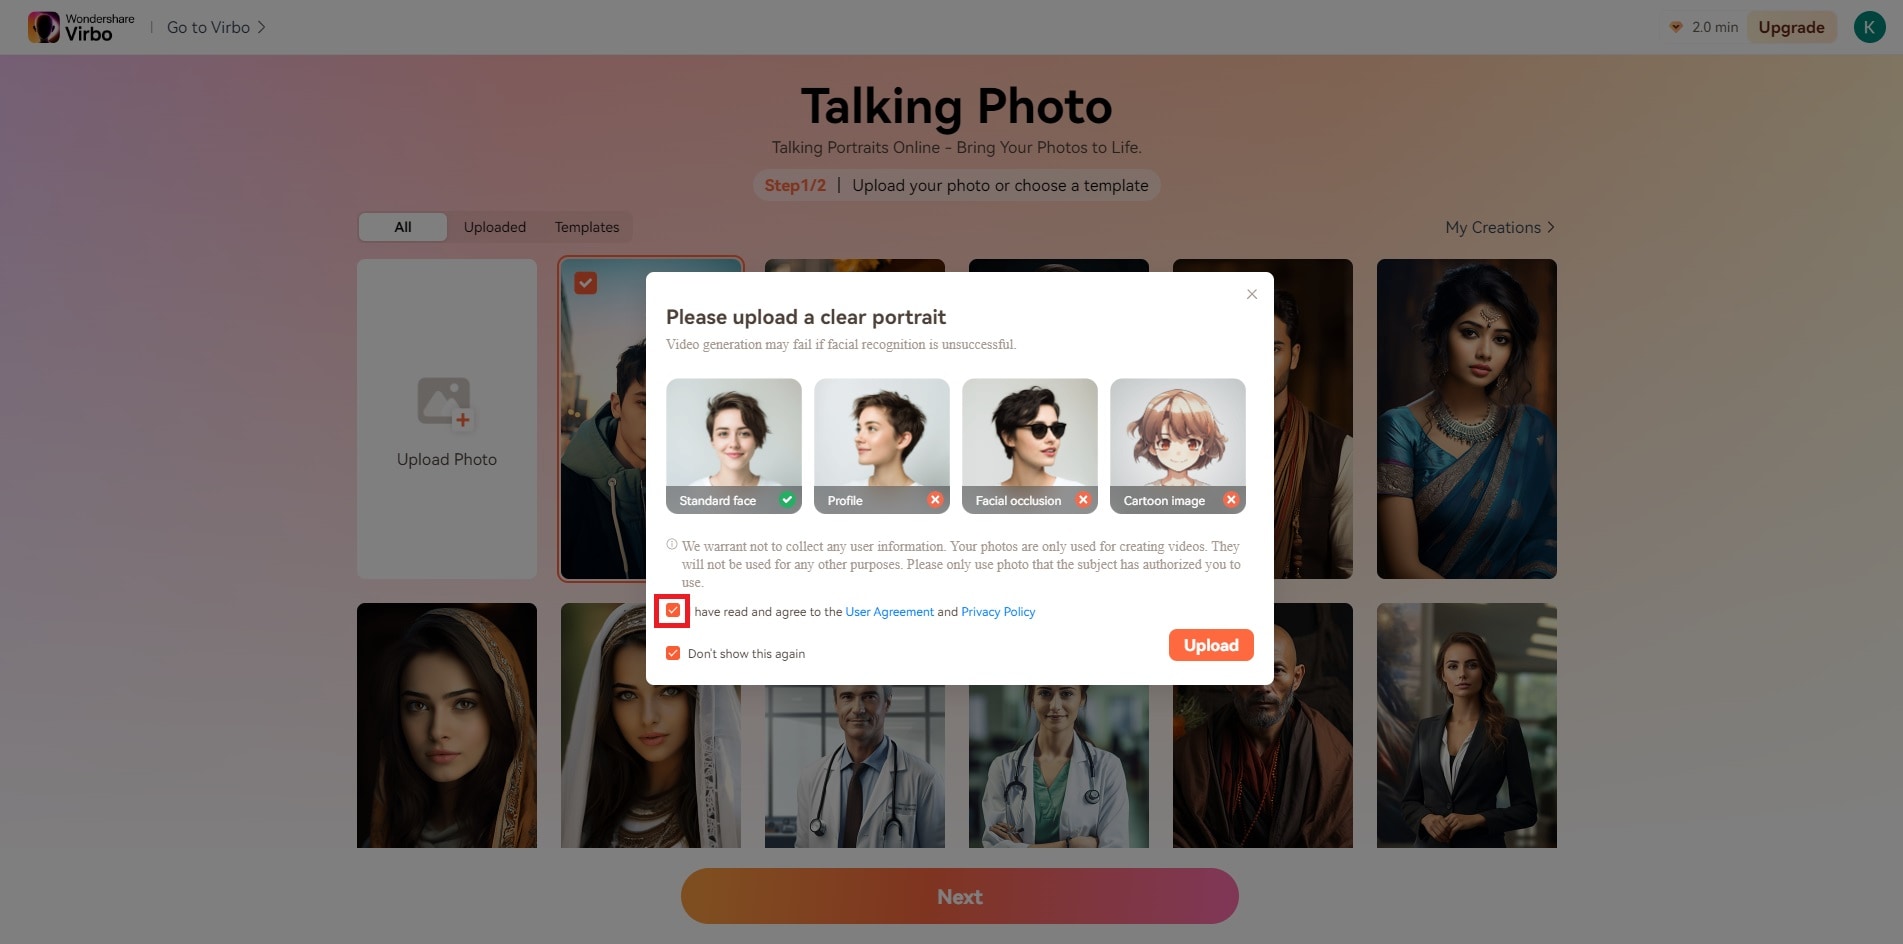
- Click the Upload button to select your image from the computer and open it. Tip: Choose a photo with just one person’s face in it.
- Once uploaded, move your cursor to the Next button. Allow the app to set up your studio.
- When ready, enter the text you wish your photo to speak within the Text Script section. After inputting your script, adjust your voiceover settings from the section located at the bottom right of the page.
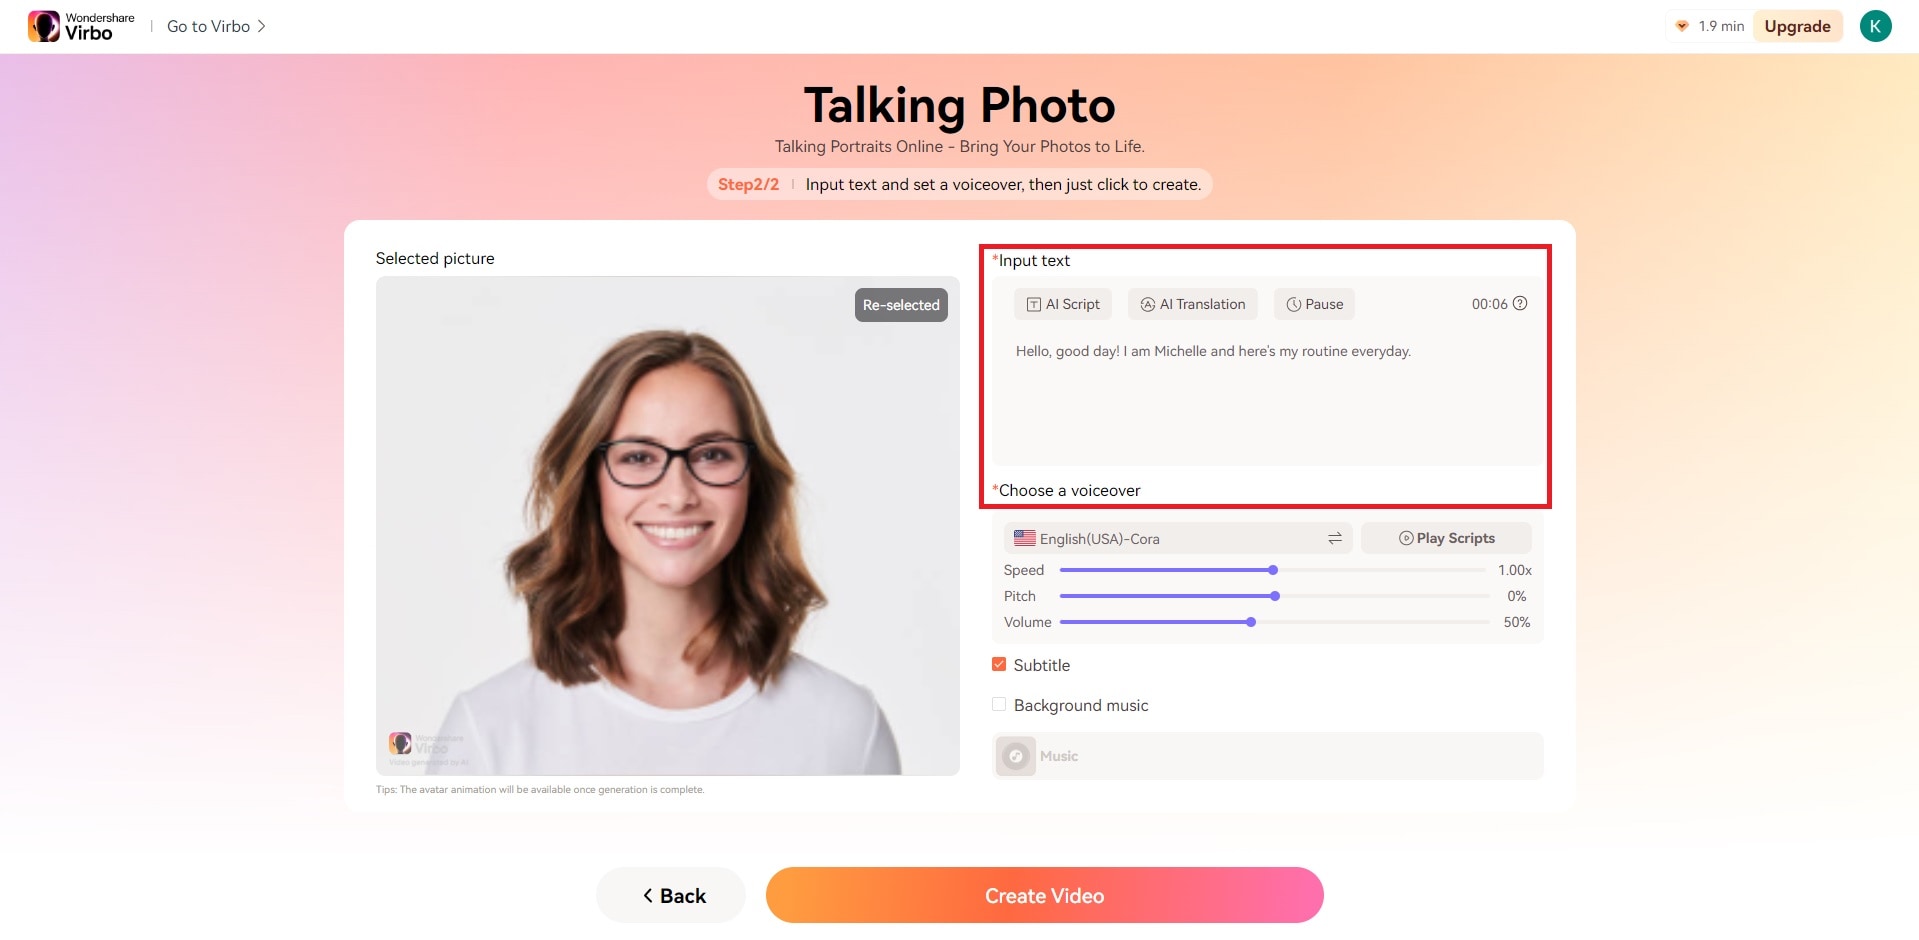
- Here, you can modify the speed, pitch, and volume of the audio. Select the language and gender of your voice and then click OK.
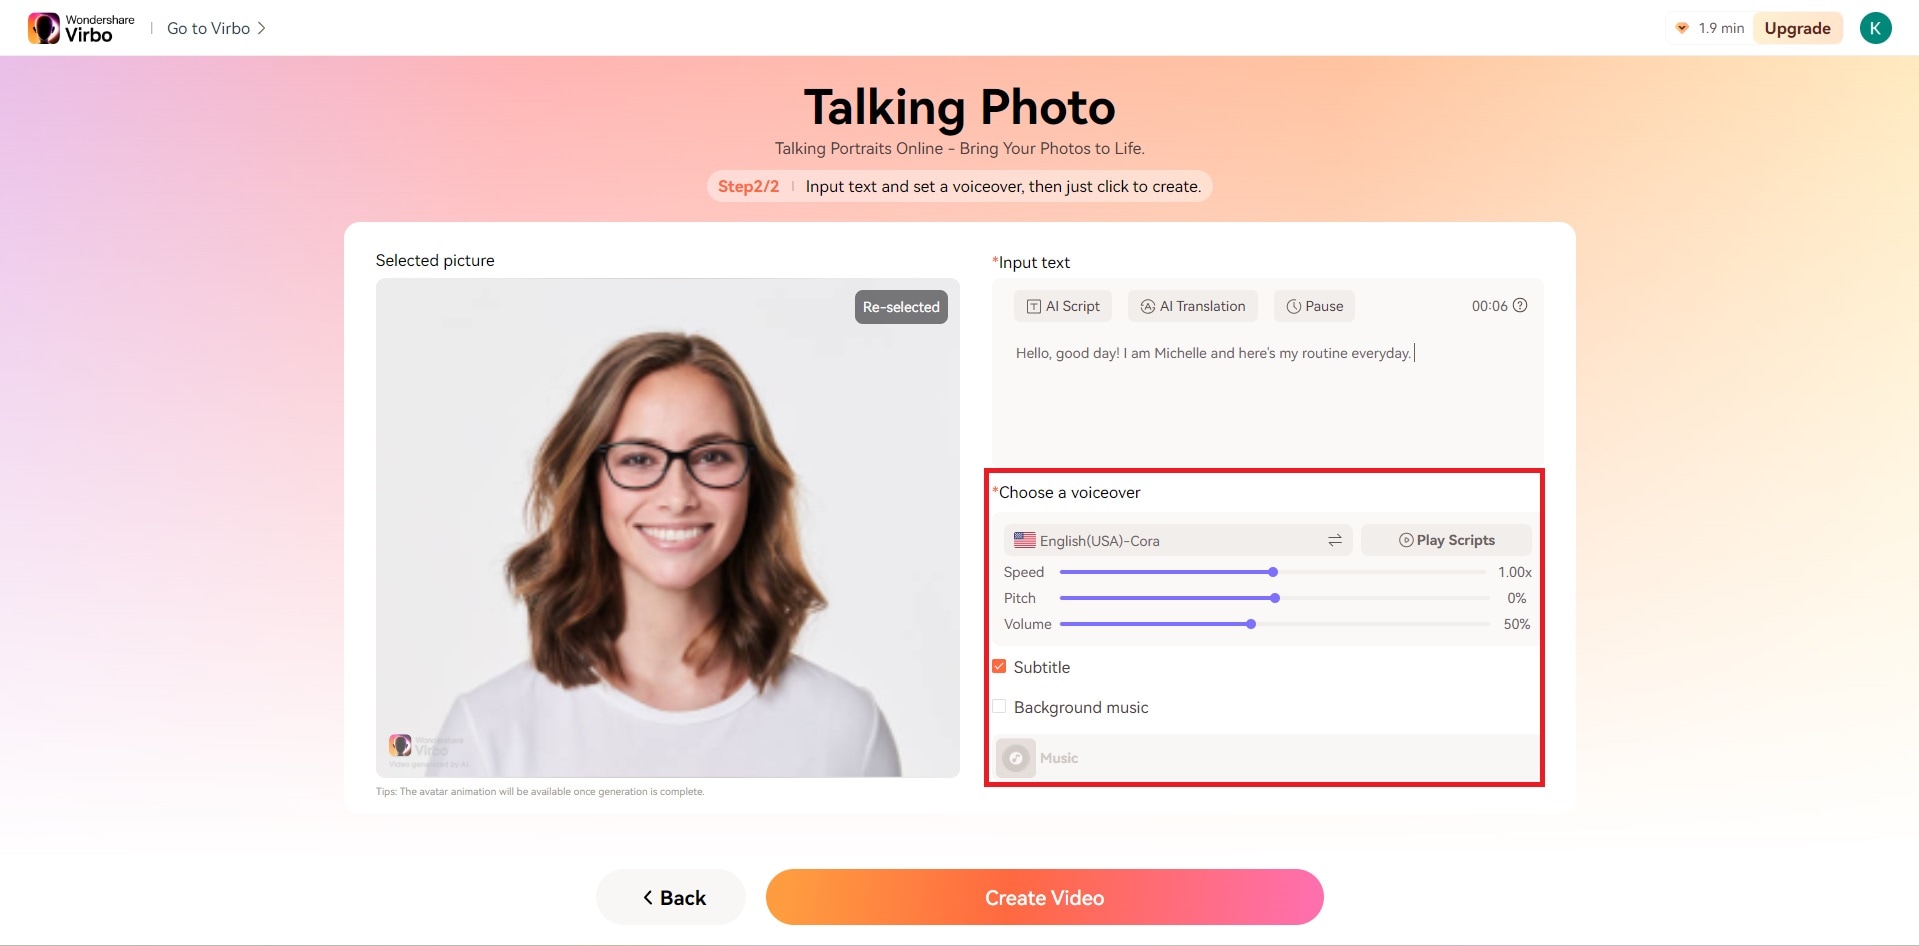
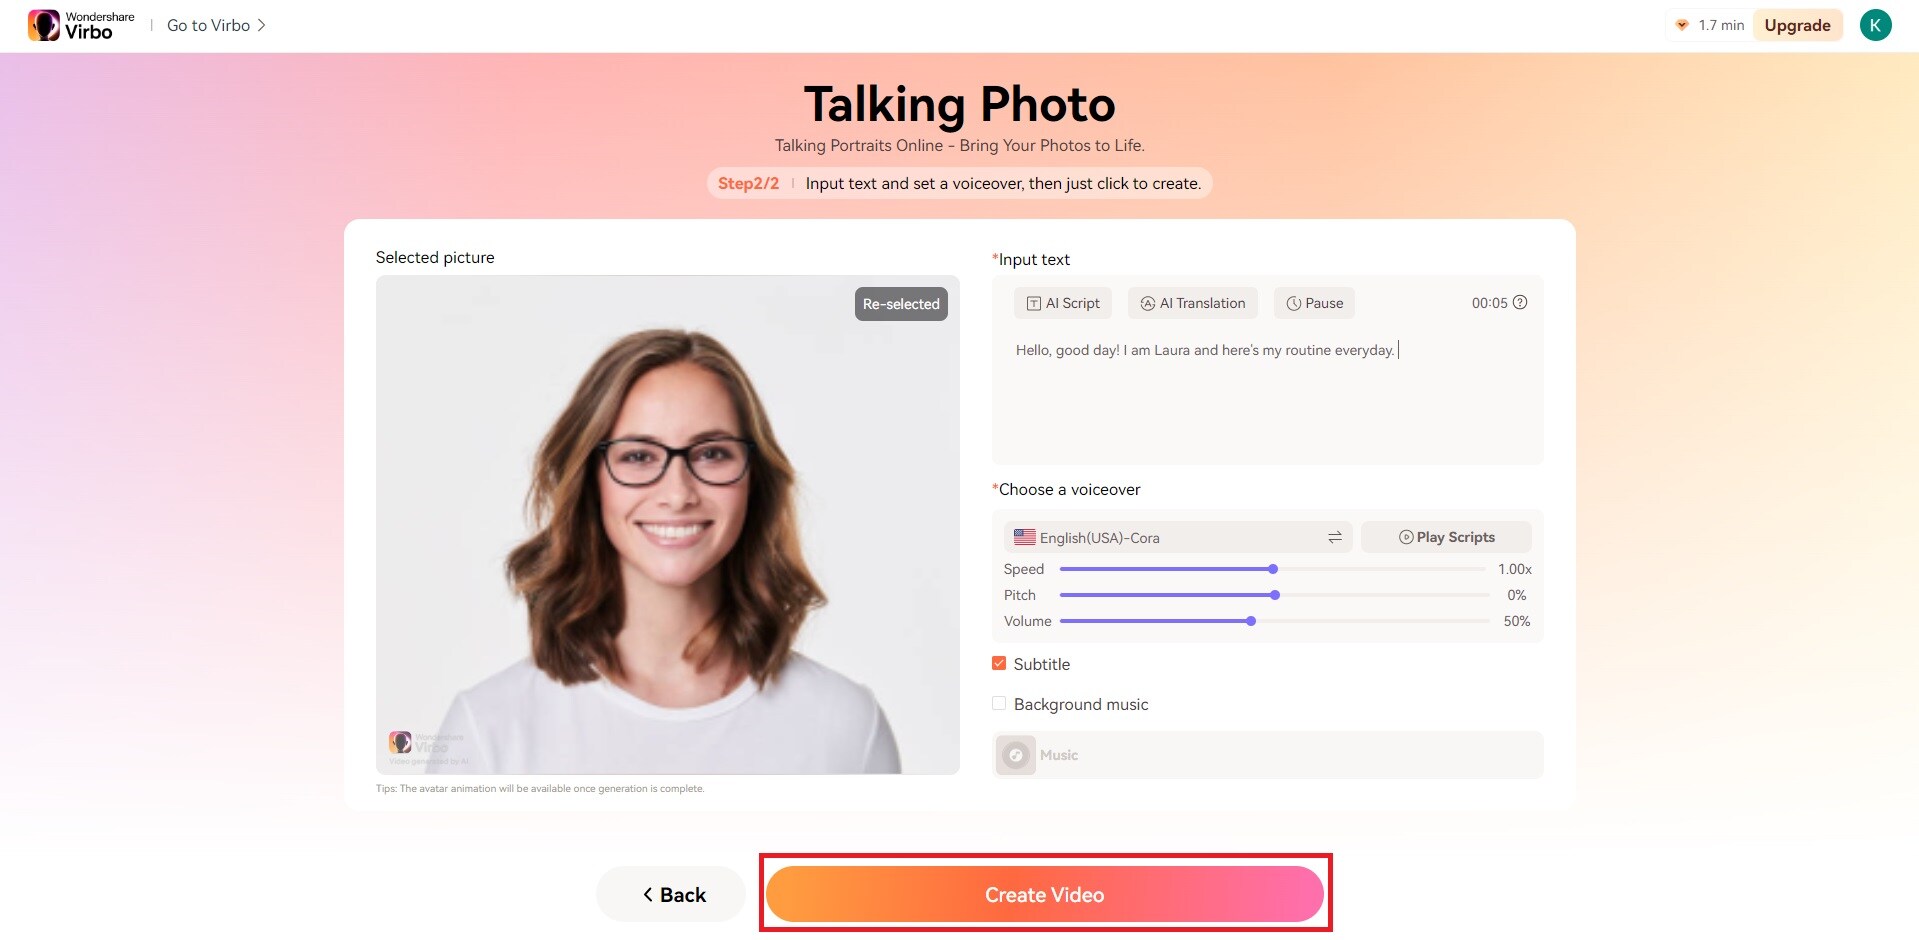
- Experiment with various voices and scripts to discover the perfect match for your photo. When finished editing, click the Create Video button.
Conclusion
Recognizing the importance of embracing new technology is vital in today’s fast-paced environment. We must acknowledge and integrate these advancements into our lives seamlessly.
One standout feature worth highlighting is Virbo’s Talking Photo functionality. This feature not only adds an extra layer of depth to capturing memories but also enhances communication by incorporating audio into images. By incorporating Virbo’s Talking Photo feature into our daily routines, we can enhance our interactions and experiences, underscoring the significance of embracing cutting-edge technologies.
A Detailed Guide To Stream to Instagram With an RTMP
Professionals and content creators now use different social media platforms for live streaming. There are many big names on these platforms, such asInstagram . Instagram is one of the most-used networks, with over 2 billion monthly active users. Using this live-stream platform is always a plus for companies and individuals.
However, the discussion is abouthow to stream to Instagram with an RTMP . This detailed guide helps you in usingRTMP Instagram for live streaming. Furthermore, you will also learn about a recommended tool that offers AI-powered features for broadcasting.
Part 1. Some Rules and Requirements To Understand Before Live Streaming on Instagram
Like every platform, Instagram has some protocols for broadcasting content to global audiences. Therefore, learning the rules and requirements before going live on Instagram is necessary. First, your account should be at least 30 days old; otherwise, they can restrict your stream.
There is a rule that you can go live for 4 hours per stream without retakes. This length was increased from 60 minutes in the recent update. Also, you can repost a live video on your profile if it is more than 15 minutes long. Instagram allows you to schedule a stream from 1 hour to 90 days in advance.
The initial requirement ofInstagram Live RTMP is that your content be respectful and updated. Additionally, you need to set your stream to 1920x1080 resolution on a vertical camera. Meanwhile, Instagram gives leverage on the number of followers so that you can start with minimum viewers. Also, there is no need to have a business account for live streaming.
Part 2. How To Live Stream to Instagram With an RTMP?
Setting high-quality live streams encourages people to tune into your broadcast. For this purpose, you need a seamless encoder likeOBS . Unfortunately, Instagram doesn’t officially support third-party encoders. To solve this query, you need an effective solution.
Therefore, the following steps guide streaming on Instagram with an RTMP (Real-Time Messaging Protocol). You will also learn how to set the required parameters in this comprehensive guide:
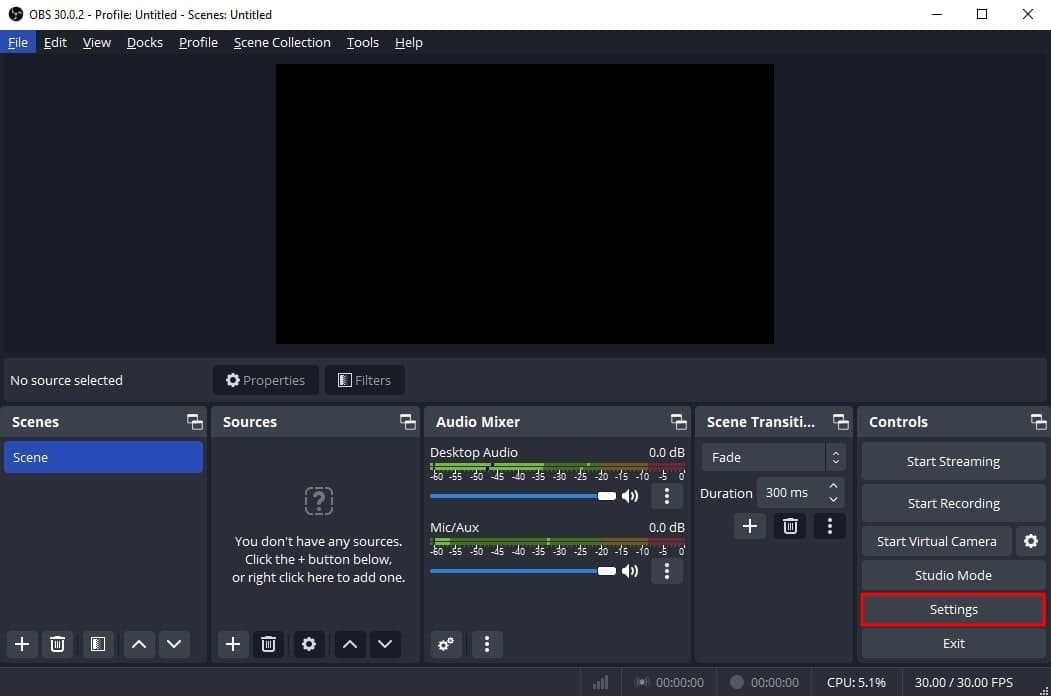
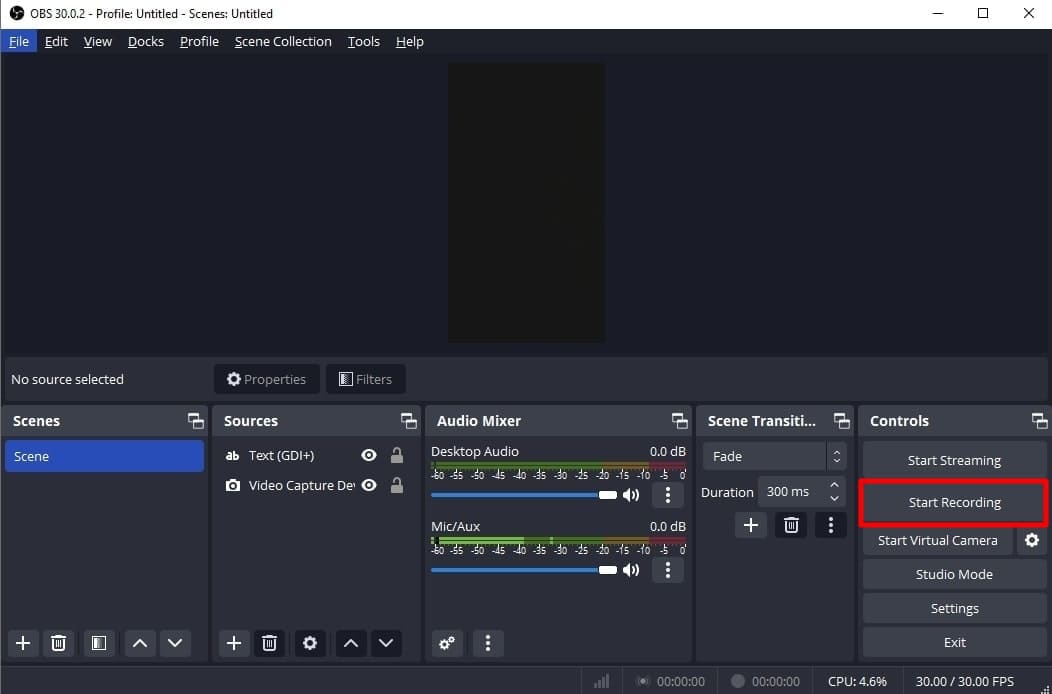
- Step 1. Start with downloading and launching OBS Studio on your PC. The first thing to do is set up vertical camera dimensions forRTMP Instagram live streaming. To access the settings window, hit the “Settings” option in the “Controls” panel.
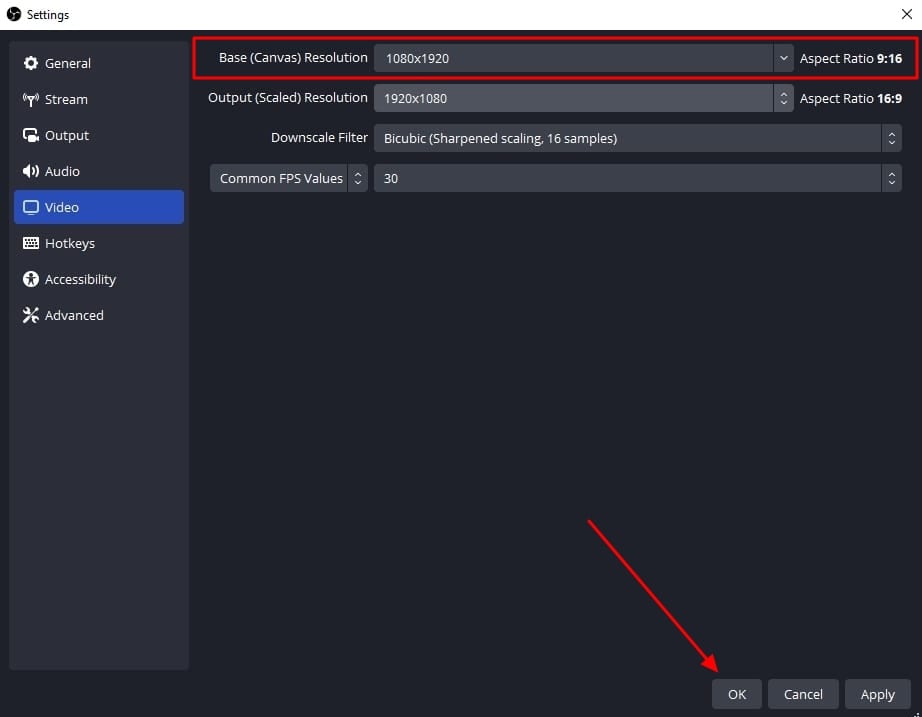
- Step 2. Look for the “Video” tab in the “Settings” window that opens. After that, enter “1080x1920” in the “Base (Canvas) Resolution” bar. Similarly, add a “1080x1920” value in the “Output (Scaled) Resolution” bar to set a 9:16 aspect ratio for vertical display. Then, hit the “OK” button to apply these changes to your Instagram streams.
- Step 3. After that, you need to add external sources to the scene. Click on the “+” icon in the “Scenes” panel or rename the scene. Once the scene is created, hit the “+” icon of the “Sources” panel. Then, select the “Video Capture Device” option from the menu and rename the device to your liking. After that, choose the video capture device from the “Device” dropdown and hit the “OK” option. Similarly, you can select the “Audio Input Capture” option to introduce an audio device.

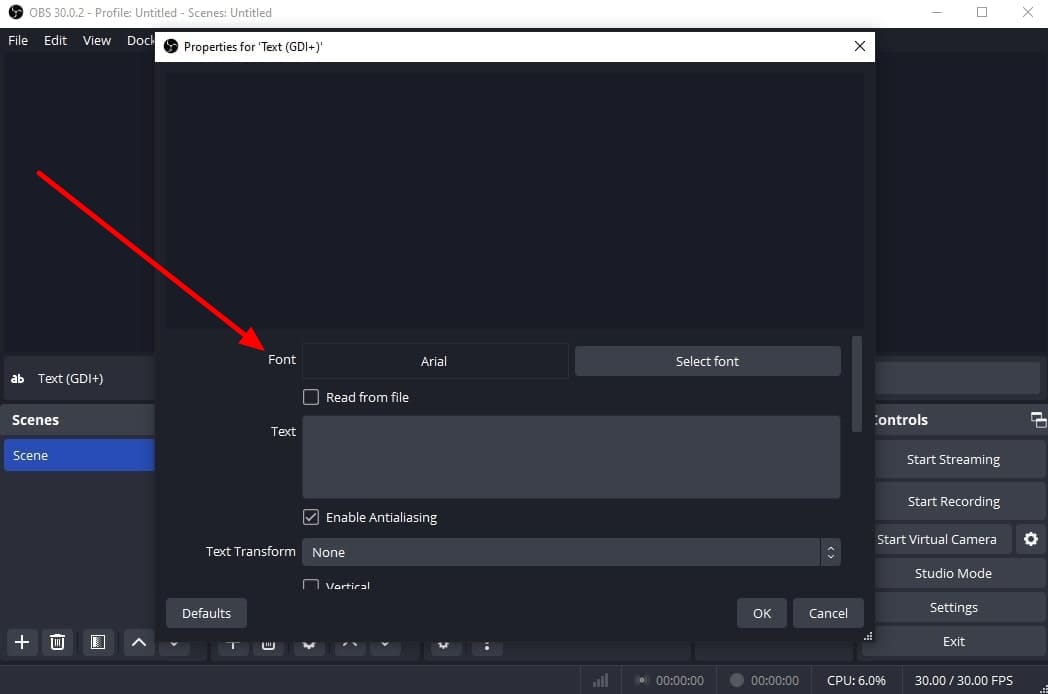
- Step 4. To add text overlays on your stream, hit the “+” icon again in the “Sources” panel. Choose the “Text (GDI+)” option and rename your overlay. On the next window, insert your text in the “Text” box. Then, click the “Select Font” button and choose your required font style and size. Additionally, you can change font color, opacity, alignment, background, and more. After customizing the text, hit the “OK” button to save the overlay in the sources section.
- Step 5. Afterward, select the “Stream” option in the settings window of OBS Studio. Set the “Service” to “Custom” from the dropdown. Then, you need to enter the server and stream key to proceed.
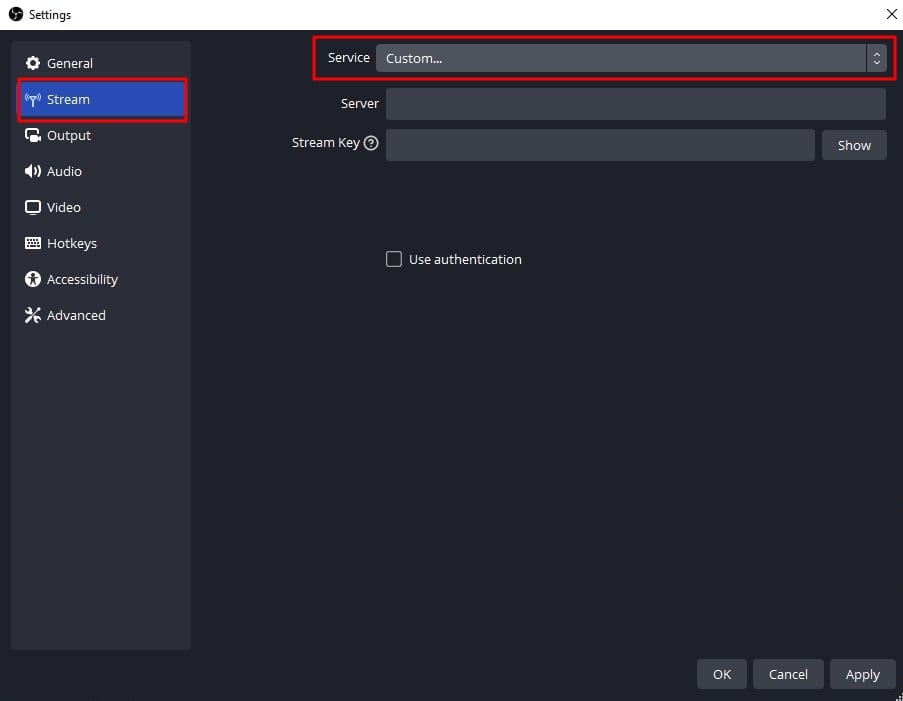
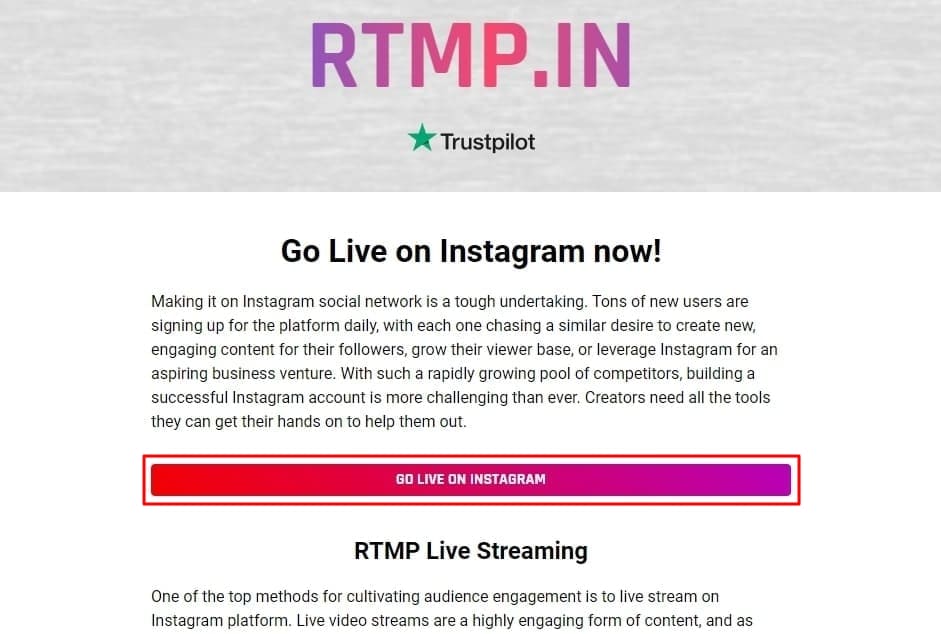
- Step 6. To get the server and stream key, visitrtmp.in on your browser. On the main interface of thisInstagram RTMP , hit the “GO LIVE ON INSTAGRAM” widget. Then, it asks you to log in to your Instagram account.
- Step 7. Once you’re logged in, it gives you a stream server URL and Stream key. First, copy the Server link and return to the OBS Studio software. Then, paste the link in the “Server” bar. After that, open the RTMP site again and hit the “Create New Broadcast” option.
You can also give a name to your broadcast in the “Broadcast Title” bar. After creating the broadcast, it shows the “Stream Key,” which you can copy. Then, move again to the OBS Stream setting panel and paste the key in the “Stream Key” bar. Lastly, hit the “Apply” option to save all these settings for your stream.

- Step 8. After getting ready, choose the “Start Streaming” option from the “Controls” panel. It starts your stream with selected parameters. To stop the stream, you can select the “Stop Streaming” option.
Part 3. How To Attract a Better Audience During Live Streaming on Instagram?
OBS Studio is an efficient software but offers limited functionality when it comes to engaging streams. Thus, you need an advanced solution that can help you reach global audiences through live streaming. For this purpose,Wondershare Virbo Live becomes an unsung hero for you. It provides AI-powered functions that help to start creative streams and generate more leads.
Moreover, the handy controls of Wondershare Virbo Live allow you to customize live streams to your requirements. Therefore, you can start streaming for different purposes, such as marketing, brand awareness, and more. Additionally, it allows you to set automatic responses and create a Q&A database to keep your audience engaged. Plus, it allows you to select creative AI avatars with different poses and outfits.
Key Features of Virbo Live
- You can choose different templates and backgrounds for a stunning streaming appearance.
- Users can write or generate scripts manually using the AI Smart Script feature. For this, they need to add prompts according to the script’s purpose.
- This tool helps to translate scripts into multiple languages and accents. Also, you can get dubbed audio in different AI voices.
Simple Guide To Start Live Streaming Using Wondershare Virbo Live
Many live streaming tools exist, but Wondershare Virbo Live provides more controls. Now, the thing is how to create a live stream room with this tool. For this, follow the given steps one by one to start live streaming with Virbo Live:
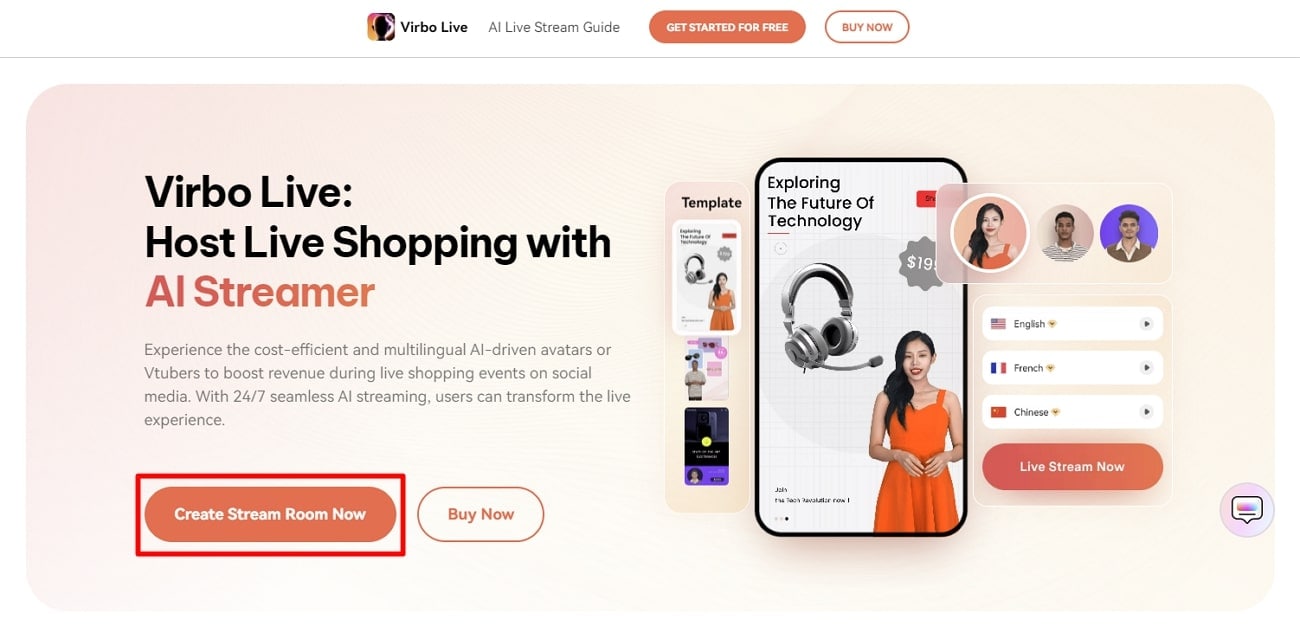
- Step 1. Visit the Official Site To Create a Stream Room
First,open theofficial website of Wondershare Virbo Live tool on your device. Navigate to the window and hit the “Create Stream Room Now” button. Upon doing that, it takes you inside the main interface of the tool.
Get Started Online Free Download
- Step 2. Advance To Create a Blank Livestream Room
Once you get to the tool’s home screen, select the “Create a Blank Livestream Room” option. Then, you can try different customization features to make your livestream room look stunning.

- Step 3. Customize Your Livestream Template and Background
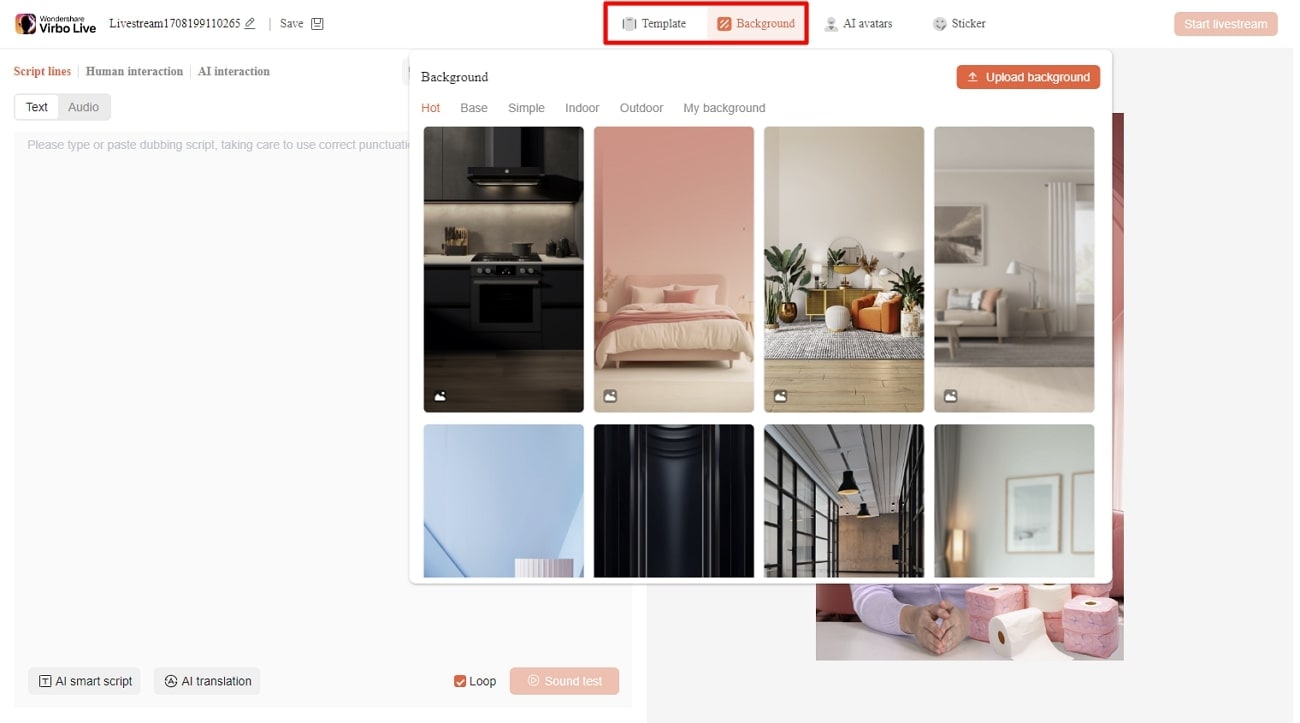
After that, click on the “Template” tab to explore different templates. Choose a template that suits live streaming needs. Furthermore, open the “Background” tab from the same window to check exciting background options. You can select different backgrounds from variating categories in the same window.
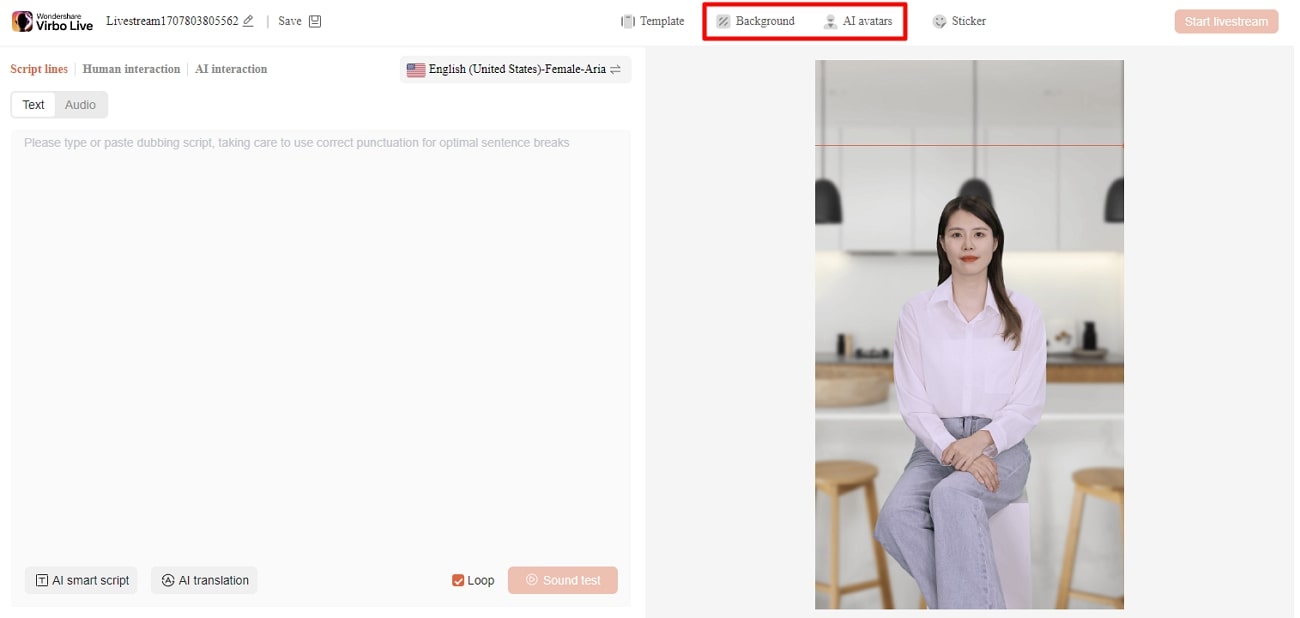
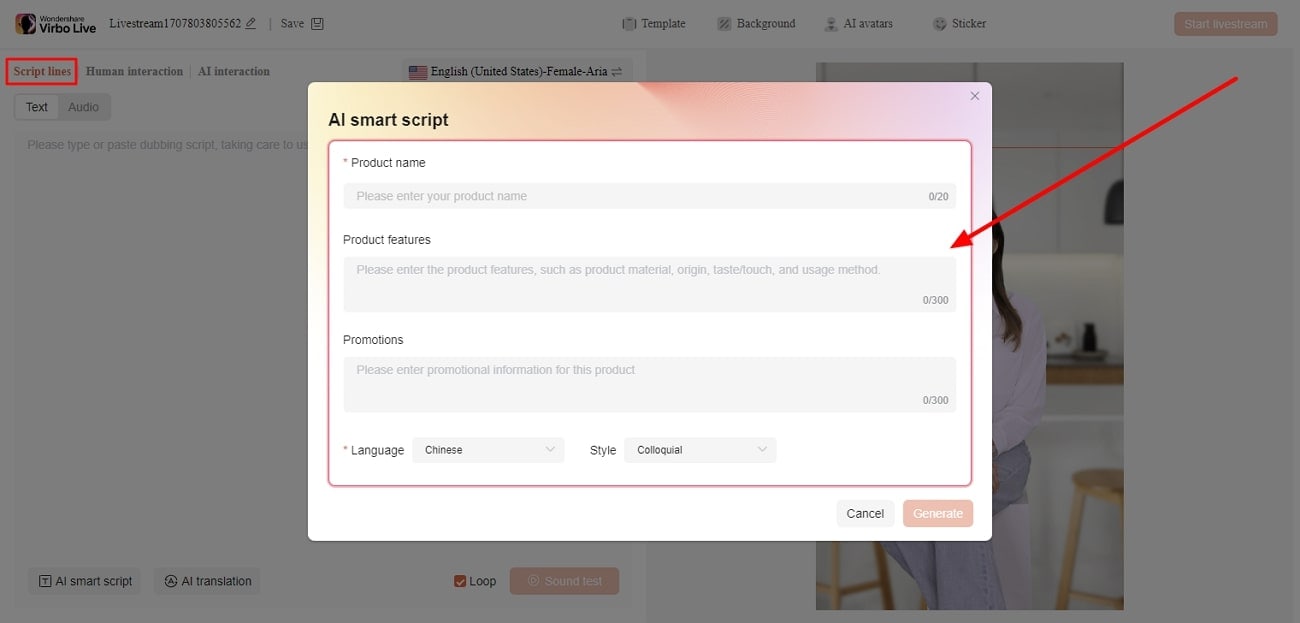
- Step 4. Add Script or Use AI Script Generator
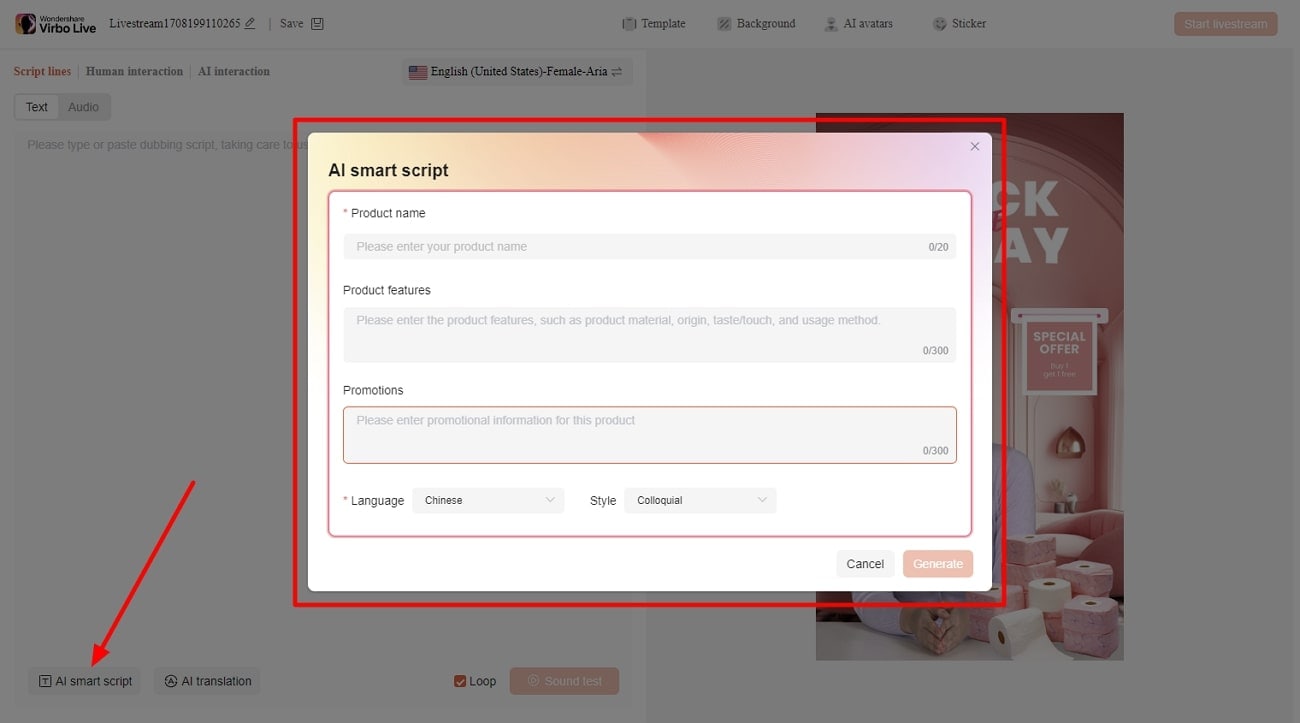
Then, you need to provide the script for translation or dubbing. Select the “Text” given in the left side section for this. It provides a text box to type or paste your script text. Choose the “AI Smart Script” option from the bottom left corner if you don’t have a script. Add prompts there, and it will generate your scripts instantly.
- Step 5. Select Creative AI Avatars According to Requirement
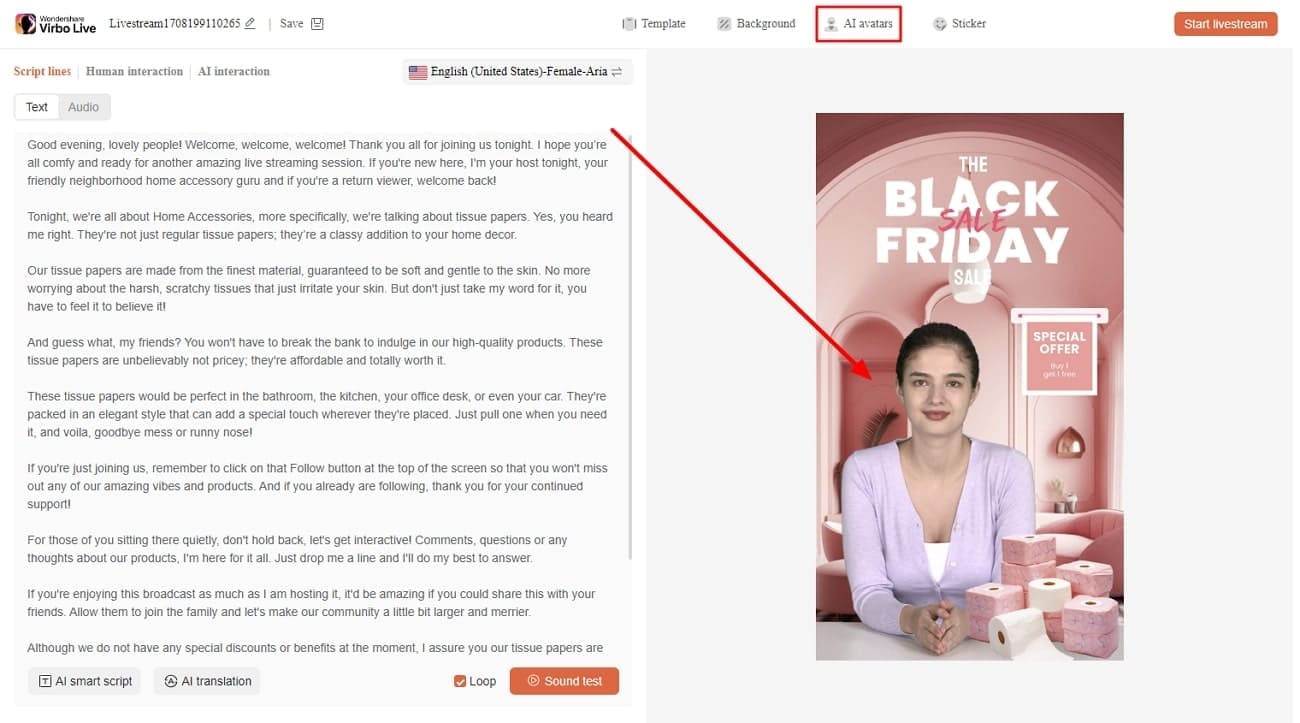
Select the “AI avatars” tab to unveil creative avatars. There is also a whole range of AI avatars to choose from. After selecting the one that suits your motive, you can preview your selected AI avatar before launching the stream.
- Step 6. Start Your Livestream With All Selections
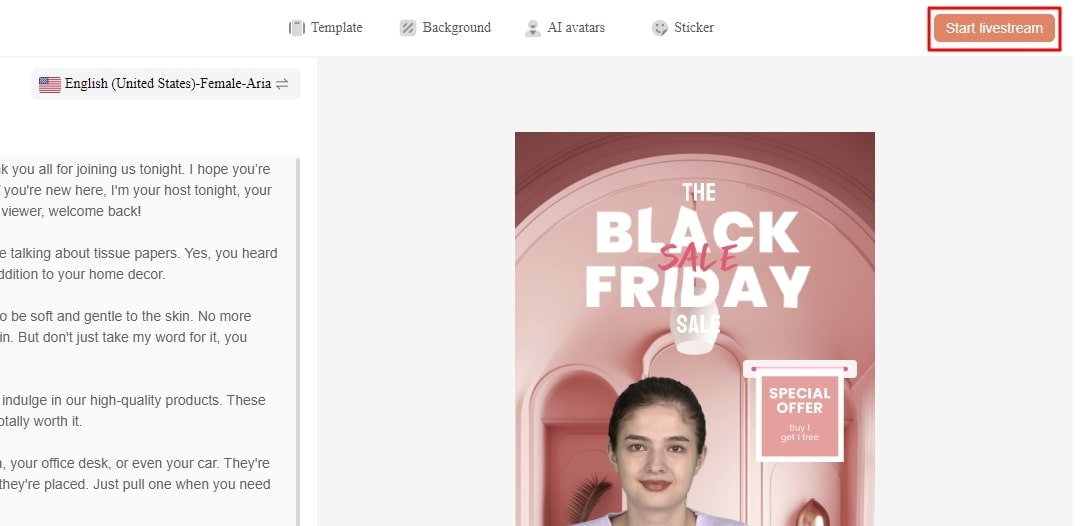
After finalizing all the options, you canproceed to start your stream. Select the “Start livestream” option from the top right corner in the same window.
Conclusion
Conclusively, this article intends to provide information about rules and requirements for live streaming on Instagram. You also learnedhow to live stream to Instagram with an RTMP like OBS Studio. Tools like Wondershare Virbo Live simplify your live streams with AI integration. Also, you can make your broadcast exciting for viewers by using different interactive elements.
The Best Text-to-Video AI Generator Tools Alternative to Sora
Following the recent launch of Sora by OpenAI, interest intext-to-video generators has skyrocketed. This AI technology has sparked curiosity among content creators and enthusiasts alike.
This surge in interest is closely tied to the changing preferences of online users, who are increasingly gravitating towards video content for both information and entertainment purposes. With a text-to-video generator, video content production becomes easier and faster.
Here, we will recommend the top text-to-video AI solutions, both free and paid, that can help you harness the power of this cutting-edge technology.
1. Sora by OpenAI

Sora , developed by OpenAI, is a text-to-video generator AI model from the same creators behind ChatGPT. It allows users to input a text prompt, generating a video up to one minute long based on the description provided.
Currently, Sora is only available to a specific group of researchers referred to as the “red team.” These experts are responsible for scrutinizing the model for any possible concerns or problems.
Price: N/A
Pros
- Generating ultra-realistic video up to one minute
Cons
- Not open to the public yet
- Still lack of understanding of how physics work
2. Steve AI

Steve AI is an innovative video-to-text AI generator that is powered by a custom Image generation technology to transform ideas into engaging educational videos. With over three years of data training, Steve AI offers diverse script categories and various video styles to explore.
Steve AI features:
- Turning text into an animation video
- Built-in video editing tools
- Assets that are free to use
- Provide more than 8 video styles
Price: Start from $15/month for the basic plan.
Pros
- Incorporating collaboration tools to produce videos with teams
- Capability to transform blog posts into video content
- Flexibility to select from a range of animation styles and character options
Cons
- Limited choices for advanced users to customize
- The editing screen might seem confusing for beginners
3. Elai.io

If you are looking for atext-to-video AI for free ,Elai could be just what you need. Its text-to-video generator transforms written scripts into dynamic visual content. Moreover, Elai facilitates seamless content repurposing, offering the ability to transform PowerPoint presentations, PDF files, or blog posts into videos within minutes. The platform also provides a built-in editor for personalized video customization.
Elai features:
- Diverse video styles, spanning from infographic-style presentations to animated explainers
- An extensive library of stock media assets to enhance your video
- An auto-voiceover function
- Pre-designed video templates tailored for different social media platforms
Price: Free version available. The subscription plan starts from $12/month.
Pros
- User-friendly interface
- Ability to generate dialogues using AI avatars
Cons
- Not suitable for audio-only voiceovers
- You can’t arrange different video elements precisely using timeline editing
4. Veed.io

Veed.io now also has atext-to-video AI generator tool that enables you to generate videos from text within minutes. Moreover, the platform offers built-in animations, filters, subtitles, and sound effects. It provides the tools to express your creativity in videos across various languages.
Veed.io features
- Basic video editing capabilities such as adding text, music, and images.
- VEED’s selection of filters and effects to enhance the visual quality and appeal of your videos.
- Ability to manually or automatically add subtitles to your videos.
Price: Free version available. The subscription plan starts from $20/month.
Pros
- Veed.io’s interface is simple to navigate and good for beginners
- Ability to add subtitles to your videos
Cons
- Video templates are available for premium users only
- No phone support
5. Kapwing

Kapwing’s text-to-video generator enables users to transform text of any length into videos. You can also incorporate elements such as stock footage, background music, subtitles, transitions, and additional features. Furthermore, you can edit your AI-generated videos directly within their web browser using Kapwing’s video editor.
Kapwing features
- Built-in video editor
- The “Create Script” tool allows users to generate video scripts from text prompts
- Option to choose output size and text styling
Price: Free version available. The subscription plan starts from $16/month.
Pros
- Ability to export to different video formats
- Various animations and text formatting options
Cons
- Slow video processing
- Occasional glitches and bugs
6. Kaiber AI

Kaiber offers a user-friendly platform enabling creators to craft videos using text prompts, images, and music files. Thistext-to-video maker appeals to a range of users including artists, musicians, marketers, and others. Notably, Kaiber highlights features such as artistic style transfer, audio-reactive visuals, and video storyboarding, enhancing its overall appeal.
Kaiber AI features
- Text and image-to-video generation
- Audio visualization and synchronization
- Control over customizable animations
- Enhanced video quality with 4K upscaling
- Access anywhere via cloud-based platform
Price: Free trial available. The subscription plan starts from $5/month for 300 credits
Pros
- Ability to create music visualizers and art videos
- Easy to use
Cons
- Longer video duration requires higher subscription plans
- Limited fine-grain control
- Potential concerns about style imitation or privacy
7. InVideo.io

Invideo.io stands out as an effective text-to-video generator tool for transforming text into videos effortlessly. With its user-friendly interface and intuitive navigation, crafting short yet striking videos is easy. The platform offers a plethora of pre-designed templates and a vast library of stock photos, catering especially to novices.
InVideo.io features
- Available in mobile apps
- Live chat support
- Collaboration tools
- Extensive library containing videos, stock photos, and music
Price: Free version available. The subscription plan starts from $20/month.
Pros
- Regular updates introduce new templates and features
- Customize and access a range of design features
Cons
- The editor interface may pose difficulties for beginners
- The free plan includes a watermark
8. Stable-diffusion-videos

Stable-diffusion-videos is one of thetext-to-video AI free online tools. This tool is based on Stable Diffusion technology, where users can generate alternative versions of a single prompt or seamlessly transition between different text prompts.
Stable-diffusion-videos features
- Built on Stable Diffusion technology
- Seamless transitions between different text prompts
- Flexibility to generate various iterations of a single prompt
Price: Free
Pros
- Free to use
- Realistic video result
Cons
- Not suitable for beginners
- Interface can be confusing at first glance
- Sign in required
Author’s Verdict
Sora by OpenAI is arguably the most advanced text-to-video generator AI to date. While it can generate ultra-realistic videos, it remains inaccessible to the public for the time being. For those seeking immediate solutions in the absence of access to Sora, several other text-to-video AI platforms offer compelling features and functionalities.
Among these, you might want to check out Steve AI for its innovative approach to transforming text into engaging videos. It provides collaboration tools and offers diverse animation styles for you to choose from. But if you want a text-to-video AI that is free to use, you can try Stable-diffusion-videos and experiment with your prompts.
Bonus: The Best Video-to-Text Tool – Wondershare Virbo
Whiletext-to-video generators allow you to create videos from text, sometimes you might want to do the reverse: extract text from videos. This is where Wondershare Virbo comes into play.
Virbo is widely regarded as one of the best video-to-text tools available. With its advanced algorithms and intuitive interface, it makes the process of transcribing videos easy through itsVideo Translator tool.

Get Started Online Free Download
Some key features of Virbo’s Video Translator tool are:
- Facilitates translation into more than 20 languages.
- Automated transcription and lip-sync capabilities across multiple languages
- Available across different platforms (Android/iOS/Windows/web)
- High accuracy in translating spoken content to written text
This text-to-video AI tool proves invaluable in overcoming language obstacles. It serves as a resource for content creators, businesses, and people who want to engage with diverse global audiences by delivering compelling and localized video content.
Conclusion
The rapid advancement oftext-to-video AI generator technology is revolutionizing content creation and consumption. With innovative tools like Sora by OpenAI leading the way, the potential for generating high-quality video content from simple text prompts is limitless.
While Sora is not accessible to the public yet, a plethora of alternative platforms such as Steve AI, Elai.io, and others offer compelling features to meet diverse needs. Meanwhile, video-to-text AI tools like Wondershare Virbo’s Video Translator further expand the accessibility and versatility of multimedia content creation.
[Guide] Learning the Right Ways To Start Facebook Live Shopping
After the COVID-19 pandemic, people started trusting online shopping. Therefore, a live shopping trend emerged, which felt like a one-on-one conversation between shopkeepers and buyers. In this regard, different platforms developed and facilitated live shopping. Yet, many features and options need to be introduced for an evener shopping experience.
Considering this scenario, major tech giants like Meta entered the market. They released aFacebook live shopping feature and pushed the boundaries of e-commerce. If you are new to this tech-based shopping or selling, this guide is for you. However, read it by the end to get comprehensive insights on Facebook live selling and shopping.
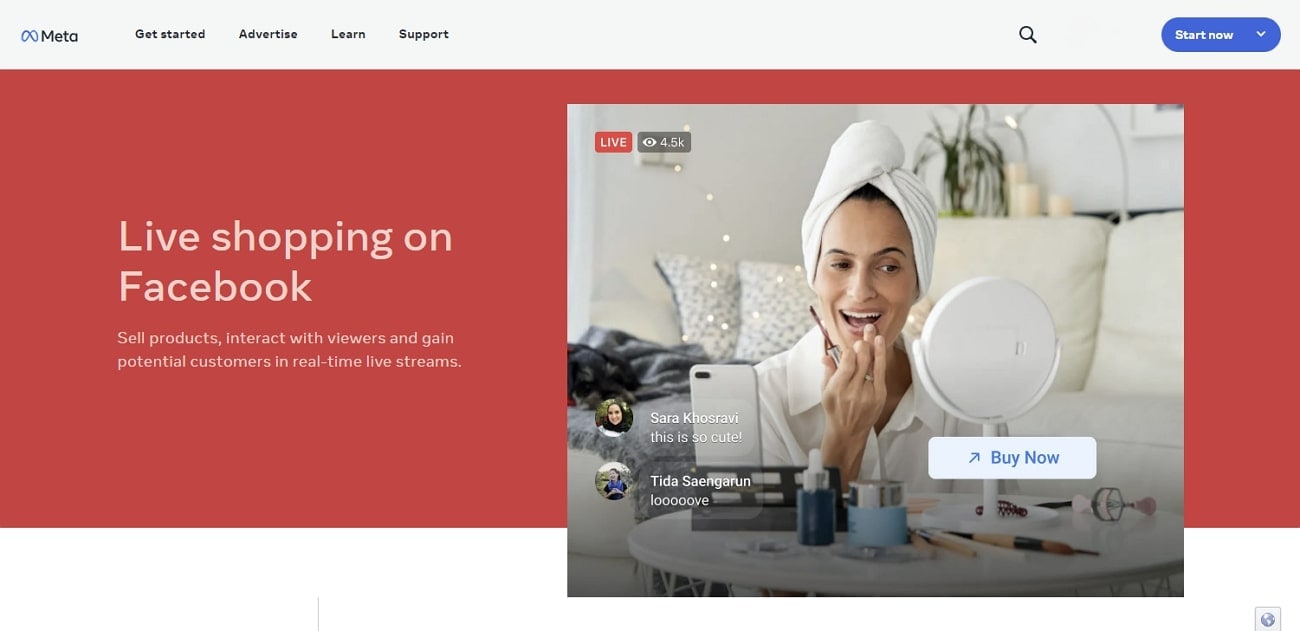
Part 1. A Brief Introduction to Facebook Live Shopping
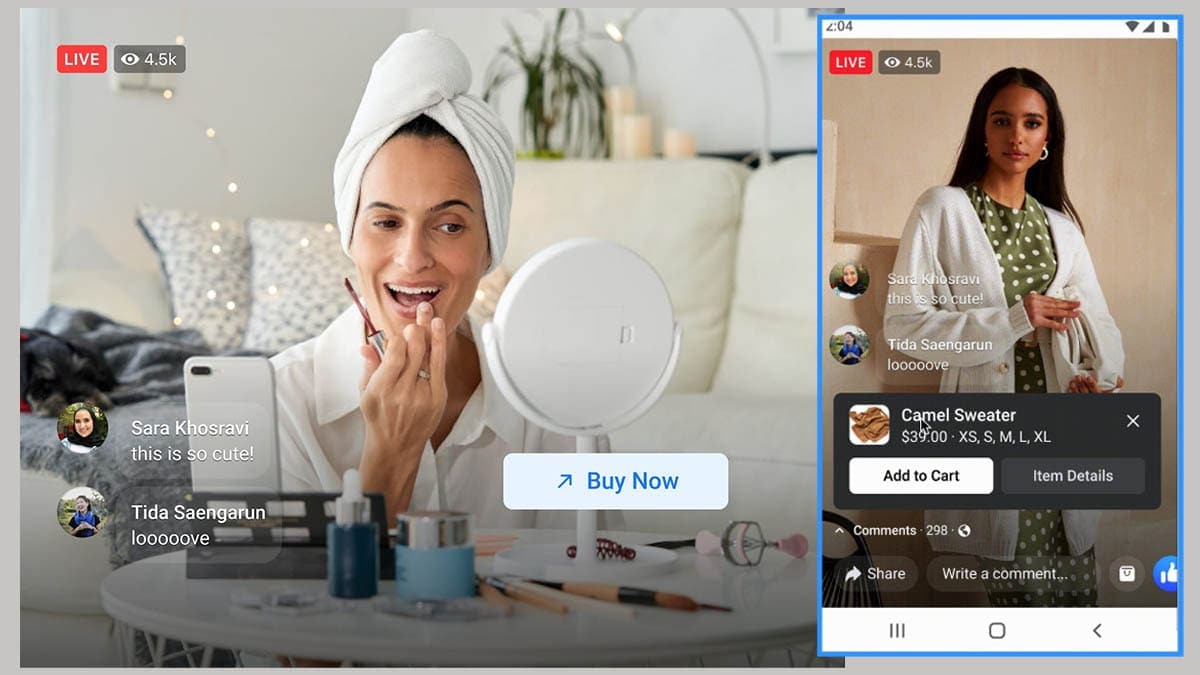
Facebook live shopping is a free tool to interact directly with sellers during a live video. It is among the top livestream shopping platforms in the US, and it was launched in 2021. Retailers connect with buyers while showing their items in real-world scenarios through this service. Facebook lets them tag their product in live streaming, containing website links to place orders.
According tostatistics , 82% of consumers prefer livestream content from brands. Besides, 80% of the brands prefer Facebook to market their product through live videos. Still, the e-commerce market continues to develop and address loopholes in live selling with care. Anyhow, look into the perks ofFacebook live selling features discussed ahead:
1. Facebook Live Shopping Notification
To bring viewer traffic, Facebook sends notifications to customers. People get notified via Messenger or Facebook notifications about their favorite brand’s live selling. This way, merchants can attract the maximum number of customers.
2. Product Demonstration
Live shopping has completely changed traditional online shopping. Unlike static photos of a product,selling live on Facebook live shopping allows you to see how the product works. In the live session, potential customers can see how it looks, in which size it is available, and its exact color.
3. Easy Product Management
Before going live, the host can set up a shopping playlist with categories. Also, they can tag product details and website links before going live. As a result, people can easily navigate to the product, add it to their cart, and purchase directly. During the session, anyone can ask questions through the live chat feature.
Part 2. A Beginner’s Guide to Setting Up a Facebook Live Shopping for Your Product
After understanding these features, sellers can set up their shop. For this purpose, review this section and learn to set up your Facebook shop. Below are some details on how to create a shopping profile on Facebook:
Requirements : Firstly, check your business location, which must be based in the USA. Plus, your business can be located in 21 exempt countries in America, Europe, and Asia. Afterward, create a Facebook business page where you carry an admin role. Then, ensure that Facebook supports your country’s currency. Later, verify your product is complying with Facebook’s commerce policies.
- Step 1. Sign in or create a Facebook page containing all information about your brand. Then, go directly to the Meta Business page and hit the “Live” button in the “Create” section.
- Step 2. From the top bar of your Meta Business page, tap the “Live Shopping” option. There, toggle the “Enable Live Shopping” option and go to stream your first shopping session.

Upon creating an account and choosing a suitable product niche, it’s time to feature them. To learn how sellers feature products, review these steps and make your items visible to viewers:
- Step 1. As you enable the live shopping option earlier, click the “Commerce Manager” to discover the Live Shopping feature in the “Promotions” tab. Continue to select the “Create Playlist” button for setting up a product playlist for live shopping.
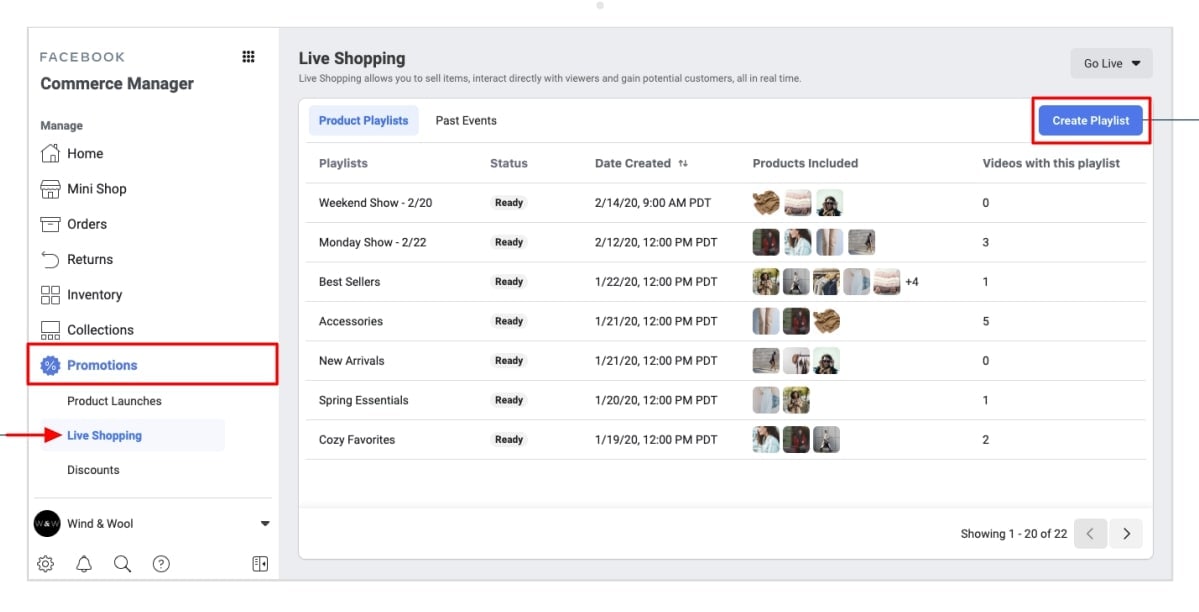
- Step 2. This opens up a new window where you have to provide all the details involving the product. Add the product and their respective details, and review the result in the playlist. After you’ve created the playlist, select where you wish to go live on Facebook, i.e., desktop or mobile app. On selecting the right option, click the “Go Live” button to conclude the process.

What Products Are Suitable for Facebook Live?
Determining the top-selling product would help retailers to increase sales. Notably, clothing and accessories are the most selling products of 2022 on Facebook. Meanwhile, self-grooming products stand second, followed by furniture and electronic appliances. Provided is a list of the products that seem suitable forFacebook live shopping :
- Electronics
- Home and Garden
- Vehicles
- Clothing and Accessories
- Furniture
- Mobile Accessories
Part 3. Some Progressive Tips To Excel in Facebook Live Shopping
After learning about setting up a Facebook shop, you should look into some tips for settling down in the market. Thus, the following are some strategies that you need to focus on beforeselling live on Facebook :
1. Promote Your Shopping Event
Build anticipation of your event a couple of days before. Following that, announce or promote your event and encourage people to subscribe to your page. You can invite them via other channels like Instagram posts, blogs, and social media groups.
2. Keep It Short and Engaging
Consider the first few minutes of the live event important. Show an energetic attitude and grab the audience’s attention initially. According to research, social media users prefer to watch videos in under 1 minute.
3. Plan Things and Be Organized
It is better to plan your points of discussion before the event. You should write the outline and transition lines to shift from one product to another. Besides, keep your surroundings organized to give viewers a good impression.
4. Energetically Communicate
Make your audience as much involved in the event as you can. For this, it is suggested that they respond to their questions and ask them to comment. You can show your product trials and ask a friend or family to create more engaging discussions.
5. Don’t Let Your Work Wasted
You should not let yourFacebook live online selling sessions be wasted. Save it in your timeline for people to watch anytime and get information about items. It will also attract new audiences who couldn’t join the live session.
Part 4. Sell Better With Simplicity: Wondershare Virbo Live
Live selling on Facebook seems easy, but you need effective tools to attract the most customers. In this regard, people still don’t have enough knowledge to plan and execute live streaming. Therefore, usingWondershare Virbo Live is the ultimate solution to perform the entire process in one place. It is an AI tool that offers multilingual AI-driven avatars for seamless shopping broadcasting.
You can set up a customized Q/A database for automatic queries using this tool. Plus, it is compatible with almost all social media platforms, such as YouTube, Facebook, and Instagram. Not only that, but you can also dive into its prominent features, which are explained below for more insights:
- AI Live Script Generation: Are you unable to brainstorm engaging pinpoints for your product selling? Use the AI Script feature of Wondershare Virbo Live and get a compelling script by describing your needs. You can even select a script tone from marketing to specialization options.
- AI Translation: To attract a diverse audience, you need videos in different languages. Therefore, Virbo Live offers a feature to translate your script into another language. Apart from that, a dubbing option holds AI voices of different languages and accents.
- AI Avatars: If you are a camera-shy person but live selling is a need of your business, use AI Avatars as a dynamic shift to progress. They can mimic real-life nuances while showing various ethnicities and attires. You pick one via scrolling, standing, or sitting pose avatars.
Get Started Online Free Download
Steps To Sell Better With Wondershare Virbo Live
Another notable option is that Wondershare Virbo Live lets you import an image or video background for effective enhancement. To explore that option, follow these steps and use Wondershare Virbo Live to the maximum:
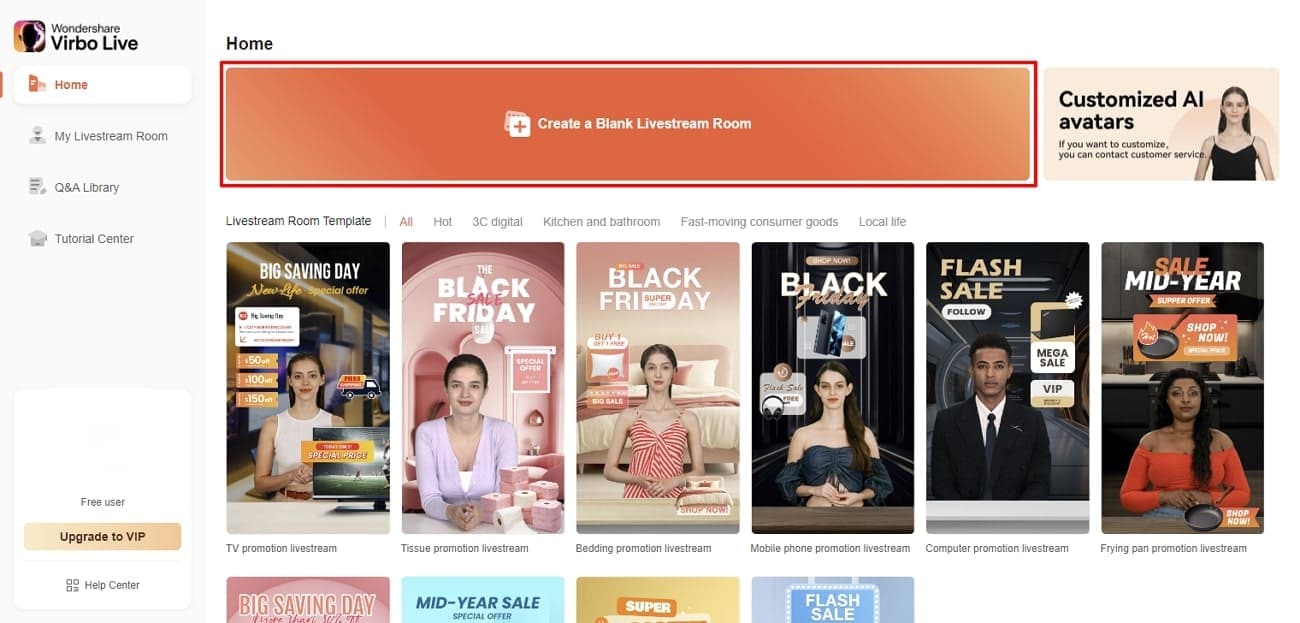
- Step 1. Access Virbo Live and Create a Blank Live Stream Room
Enter the official Virbo Live website and proceed to select the “Create Stream Room Now” button. Select the “Create a Blank Livestream Room” button to initiate the live stream system as you lead into the main interface.
Get Started Online Free Download
- Step 2. Customize Your AI Avatar for Streaming
From the editing screen of Virbo Live, press the “AI avatars” option from the top bar. Scroll and pick one avatar that suits you best. Then, hit the “Background” option next to AI Avatar and choose one background.
- Step 3. Add Script for Livestream Video
Move to the left and enter the words you want the AI Avatar to speak under the “Script lines” section. Alternatively, you can choose the “AI Smart Script” button from the bottom left corner. You can describe your product, set a Style, and adjust other parameters to get an AI script there.
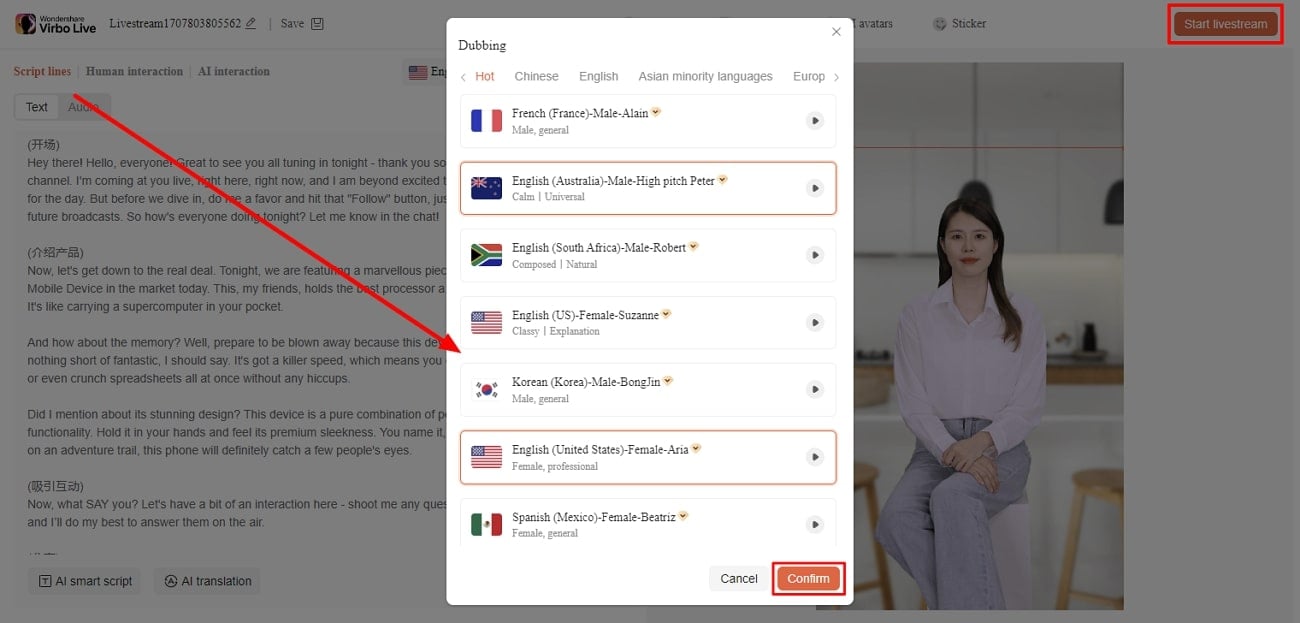
- Step 4. Pick a Dubbing Voice for Avatar To Live Stream
After customizing the avatar, head to the “Dubbing” option from the top. Using it, pick one language and accent of the AI voice to proceed with the “Confirm” button. Finally, your live-selling video is ready to post via the “Start livestream” button at the top right corner.
Conclusion
To summarize, livestream selling is becoming a competition between platforms. Meta isn’t behind in this situation and offerslive shopping on Facebook , which is highlighted in this guide. Undoubtedly, Facebook is setting trends, but it is difficult for many users to comprehend. Therefore, Wondershare Virbo Live is a perfect solution to plan and execute live selling seamlessly in one place.
What Is an AI Avatar?
Part 1. What exactly is an AI avatar?
AI avatar refers to a digital representation or embodiment of an individual that is created and controlled using artificial intelligence techniques. It is an interactive virtual character that can simulate human-like behaviors, emotions, and interactions.
AI avatars are often designed to resemble human appearance and can be used in various applications, such as virtual assistants, customer service representatives, virtual companions, or virtual reality environments.
AI algorithms and technologies, including natural language processing, computer vision, and machine learning power these avatars. They can understand and respond to user inputs, engage in conversations, express emotions through facial expressions and gestures, and provide personalized interactions.
AI avatars aim to enhance human-computer interactions by creating a more engaging and immersive experience. They can be utilized in diverse fields, including entertainment, education, healthcare, and more, to provide interactive and personalized experiences to users.
Part 2. What’s the characteristics and advantages of AI avatars?
Compared to traditional avatar representations, AI avatars are more “human-like.” Their most notable characteristic is their possession of human-like appearance. AI avatars are designed to resemble human beings in their appearance, including facial features, expressions, and body movements. This helps create a sense of familiarity and relatability for users. Hence, they are interactive and responsive, as well as capable of understanding and responding to user inputs, whether through text, speech, or gestures. They can engage in conversations, answer questions, and provide relevant information or assistance.
Meanwhile, AI avatars also have the ability to learn adaptively and can learn from user interactions and adapt their responses over time. They can improve their understanding, language capabilities, and behavior based on user feedback, making their interactions more effective and tailored to individual preferences.
Moreover, AI avatars have great advantages, such as 24/7 availability and consistency. They can be available round the clock, providing assistance and information anytime. This ensures continuous support and access to services without limitations imposed by human availability. In the meantime, they can maintain a consistent tone, language, and behavior across interactions, eliminating variations that may occur with human operators.
Part 3. What’s the application area of AI avatars?
AI avatars have a wide range of applications across various fields. Some common areas where AI avatars are used include:
1. Virtual Assistants
AI avatars can serve as virtual assistants, providing information, answering questions, and assisting with tasks in a conversational manner. Examples include Apple’s Siri, Amazon’s Alexa, and Google Assistant.
2. Customer Service
AI avatars are utilized in customer service applications, where they can engage with customers, handle inquiries, and provide support in a more interactive and personalized way. They can assist with product recommendations, troubleshooting, and order processing.
3. Education
AI avatars are used in educational applications to create interactive learning experiences. They can act as virtual tutors, guiding students through lessons, providing explanations, and adapting to individual learning needs.
4. Entertainment
AI avatars play a role in entertainment applications such as virtual reality (VR) and video games. They can be characters within a game or interactive companions that respond to user actions and emotions, creating immersive and engaging experiences.
5. Healthcare
AI avatars find applications in healthcare for patient education, therapy, and mental health support. They can provide information about medical conditions, assist with medication reminders, and offer emotional support.
6. Training and Simulation
AI avatars are used in training simulations for various industries, including military, aviation, and healthcare. They can replicate realistic scenarios, allowing trainees to practice skills and decision-making in a safe and controlled environment.
7. Social Media and Chat Applications
AI avatars are integrated into social media platforms and chat applications, providing users with personalized interactions, recommendations, and entertainment.
The applications of AI avatars are continually expanding as technology advances, offering new possibilities for interactive and immersive experiences in various domains.
Unlocking Global Audiences: Top Video Language Converters
In the ever-expanding digital landscape, content creators are presented with a unique challenge — the diverse linguistic preferences of a global audience.
Enter the transformative world of video language converters, essential tools that play a pivotal role in breaking down language barriers and fostering inclusivity in content creation. This article delves into the reasons behind the increasing need for video language converters and presents a curated list of the top 6 online tools, all of which offer free services.
Part 1: Why the Need Arises to Use the Video Language Converter in the Real-World
In the dynamic landscape of content creation, the demand for video language converter has surged, and with good reason. As content creators strive to engage a global audience, linguistic diversity becomes a critical consideration. Here, the video language converter emerges as an indispensable tool, addressing the challenge of language barriers and enhancing the accessibility of content across borders.
1. Cross-Cultural Communication
In a world characterized by cultural richness, effective communication necessitates breaking down language barriers. Video language converters facilitate cross-cultural communication by enabling creators to convey their messages in multiple languages. This, in turn, promotes a deeper understanding and appreciation of diverse perspectives.
2. Accessibility and Inclusivity
Accessibility is at the core of the video language converter’s role. By providing translations or subtitles, content becomes more inclusive, ensuring that individuals with varying language proficiencies can engage with and comprehend the material. This democratization of content aligns with the principles of diversity and inclusion.
3. Enhancing Educational Content
In the realm of educational content, video language converters play a crucial role in making learning materials accessible to a global audience. Whether its tutorials, lectures, or informative videos, translations break down language barriers, allowing students from different linguistic backgrounds to benefit from the content.
4. SEO and Discoverability
From a practical standpoint, leveraging video language converters enhances the discoverability of content. By providing translations or subtitles, creators improve the search engine optimization (SEO) of their videos, making them more likely to surface in searches conducted in different languages.
Part 2: Top 7 Video Language Converter Online Free
In the ever-evolving landscape of content creation, the availability of online tools simplifies complex processes. Video language converter online free, in particular, has become essential for creators seeking to make their content accessible to diverse audiences. Here, we explore six noteworthy online platforms that offer video language conversion services without any cost, empowering creators to bridge linguistic gaps seamlessly.
1. Wondershare Virbo
In the fast-paced world of digital content creation, the ability to communicate with a global audience is a game-changer. Virbo, a cutting-edge video language translator app, steps into this arena, offering content creators a dynamic platform to transcend linguistic barriers and connect with viewers worldwide. As we delve into Virbo, let’s explore its unique features, advantages, and considerations.

Features
- Whether you’re a seasoned creator or just starting, it’s user-friendly layout ensures a smooth and efficient experience.
- Its advanced speech recognition ensures accurate and nuanced translations, enhancing the audiovisual appeal of your content.
- It ensures that you can translate content dynamically as you create, providing instant feedback on how your video will resonate with a global audience.
Pros
- Its intuitive design ensures that creators of all levels can navigate the app seamlessly.
- Its extensive range of supported languages makes it a versatile tool for connecting with diverse audiences.
- Its commitment to user privacy ensures a secure environment for content creation and translation.
Cons
- It offers an offline mode; some features may be limited without an internet connection.
- For new users, the array of features may require some learning, but the intuitive design helps mitigate this.
Get Started Online Free Download
2. Veed.io
In the realm of online video editing, Veed stands out as a comprehensive platform that goes beyond the ordinary. With its integrated automatic subtitle generator and translator, it brings a new level of efficiency and creativity to content creation.

Features
- It excels in simplifying the subtitle creation process through its automatic generator, significantly reducing the time and effort required for manual transcription.
- The platform stands out with its translation feature, enabling creators to connect with a global audience by converting subtitles into various languages, promoting inclusivity.
- It offers a seamless integration of video editing tools, allowing users to enhance their content within the same platform, eliminating the need for multiple applications.
Pros
- It enables a smooth and efficient content creation process, saving time and effort.
- Its interface is user-friendly, fostering accessibility and ensuring a positive experience for creators at various skill levels.
- It allows users to access their projects from anywhere with an internet connection, promoting flexibility in content creation.
Cons
- It relies on a stable internet connection, which may pose challenges in areas with limited connectivity.
- It offers a range of features; it may not provide the depth of advanced editing tools available in standalone video editing software.
3. Kapwing
Kapwing emerges as a comprehensive video audio language converter, offering a suite of tools that includes a powerful subtitling feature. With a user-friendly interface, it caters to a diverse range of creators seeking versatility in their multimedia projects.

Features
- It offers a dynamic platform for creating subtitles with versatility, allowing users to customize and enhance their multimedia content effortlessly.
- It excels in facilitating seamless translation of subtitles, enabling content creators to reach a global audience by providing multilingual support.
- It provides a range of multimedia editing tools, allowing users to edit and enhance their videos with features like trimming, cropping, and adding additional elements.
Pros
- Its user-friendly approach ensures that both novice and experienced creators can utilize its features.
- Users enjoy creative freedom with its versatile editing tools, allowing them to express their ideas and enhance their content according to their vision.
- Its collaborative editing feature fosters teamwork, making it easy for multiple contributors to work together seamlessly on a project.
Cons
- Its free version may include a watermark on exported content.
- Its functionality relies on a stable internet connection.
4. Subtitle Horse
Subtitle Horse stands out as a dedicated online subtitle and captions editor designed to simplify the process of editing and translating subtitles. With a user-friendly interface and versatile subtitle customization options, it emerges as a valuable tool for content creators seeking efficiency and precision.

Features
- It provides a seamless platform for both editing and translating subtitles, offering a comprehensive solution for content creators looking to enhance their videos..
- It supports a variety of subtitle formats, ensuring compatibility with different video editing software and platforms, enhancing its usability.
- With a user-friendly interface, Subtitle Horse caters to both beginners and experienced users, making the subtitle editing process accessible and efficient.
Pros
- It provides a range of customization options, empowering creators to tailor subtitles to match the style and tone of their videos.
- It allows users to edit and adjust subtitles on the fly, providing immediate feedback and enhancing the efficiency of the subtitling process.
- It supports a range of video formats, enhancing its versatility and making it compatible with different types of video content.
Cons
- It may be less suitable for projects that involve extensive teamwork or contributions from multiple users simultaneously.
- An active internet connection is necessary for utilizing Subtitle Horse effectively.
5. Rev.com
Rev.com stands as a leading platform offering professional transcription and translation services tailored for video content creators. With a commitment to human-generated translations and a reputation for high-quality and accurate results, it emerges as a reliable solution for those seeking precision and professionalism in their video translations.

Features
- It facilitates effortless subtitle editing, allowing users to make precise adjustments to timing, text, and formatting.
- It supports a wide range of subtitle formats, ensuring compatibility with diverse video content.
- It provides users with customization options, allowing them to tailor subtitles to match the visual style of their content.
Pros
- It excels in offering a user-friendly experience, making it accessible to creators with varying levels of expertise in subtitle editing and translation.
- It streamlines the translation process, providing creators with a time-efficient solution to adapt their content for global audiences.
- It supports various formats ensures compatibility with a broad spectrum of video content.
Cons
- It often comes with a higher cost compared to automated alternatives.
- The reliance on human translators may introduce potential delays.
6. Trint
Trint takes center stage as an AI-powered transcription tool, redefining the landscape of subtitle creation with its automated transcription and translation capabilities. This platform not only simplifies the transcription process but also provides powerful tools for refining subtitles, making it a go-to choice for creators seeking efficiency and precision.

Features
- It goes a step further by offering translation services, allowing users to create multilingual subtitles effortlessly.
- From adjusting timing to refining text, these tools ensure that the subtitles align seamlessly with the content.
- Its AI-driven transcription ensures a high level of accuracy, minimizing errors in the transcribing process.
Pros
- It offers precise control over subtitle adjustments, allowing creators to achieve a polished and professional result.
- Its interface is designed to be user-friendly, catering to creators with varying levels of technical proficiency.
- It enables creators to focus more on content creation than on manual tasks.
Cons
- It operates on a subscription model, which may pose budget constraints for some users.
- It relies on a stable internet connection, which might be a limitation in areas with inconsistent connectivity.
7. Happy Scribe
Happy Scribe stands out as a comprehensive solution for creators seeking fast and accurate transcription and translation services for their audio and video content. With its automated capabilities and support for multiple languages, It streamlines the content creation process, making it an invaluable tool for various industries.

Features
- It employs advanced automation technology to transcribe audio and video content swiftly.
- It provides customizable options for transcriptions, allowing users to adapt the output to their specific requirements, whether for subtitles, captions, or written transcripts.
- It facilitates the creation of subtitles and captions for videos, enhancing accessibility and engagement for diverse audiences.
Pros
- It is designed with a user-friendly interface, ensuring that creators can navigate and utilize its features without extensive technical expertise.
- Its Collaborative tools enhance teamwork, allowing multiple users to contribute to transcription.
- It support for multiple languages caters to the diverse linguistic needs of content creators, expanding their reach and impact.
Cons
- It operates on a subscription model, which may present budget considerations for some users.
- Its functionality relies on a stable internet connection.
Part 3: FAQ about the Best Video Language Converter Online
Q1. How do online video language converters work?
These converters use advanced algorithms, machine learning, or a combination of both to analyze the audio or text content of a video. They then generate accurate translations or subtitles based on the identified language, providing a multilingual experience for viewers.
Q2. Can online video language converters translate multiple languages?
Yes, several online video language converters support translation into multiple languages. They are designed to cater to a diverse global audience and provide subtitles or translations in various linguistic landscapes.
Q3. Is there a limit to the video length that online converters can handle?
The capacity to handle video length varies among converters. Some platforms may have limitations on video duration for free versions, while premium versions or professional tools often offer more extensive capabilities.
Q4. Are the translations provided by online converters accurate?
The accuracy of translations can vary depending on the platform. While many online video language converters strive for precision, factors such as language complexity, context, and accents may influence the accuracy of the final output.
Q5. How can I choose the best online video language converter for my needs?
Consider factors such as the languages supported, accuracy of translations, ease of use, collaboration features, and any additional functionality offered. It’s beneficial to explore user reviews and platform specifications to find the converter that aligns with your specific requirements.
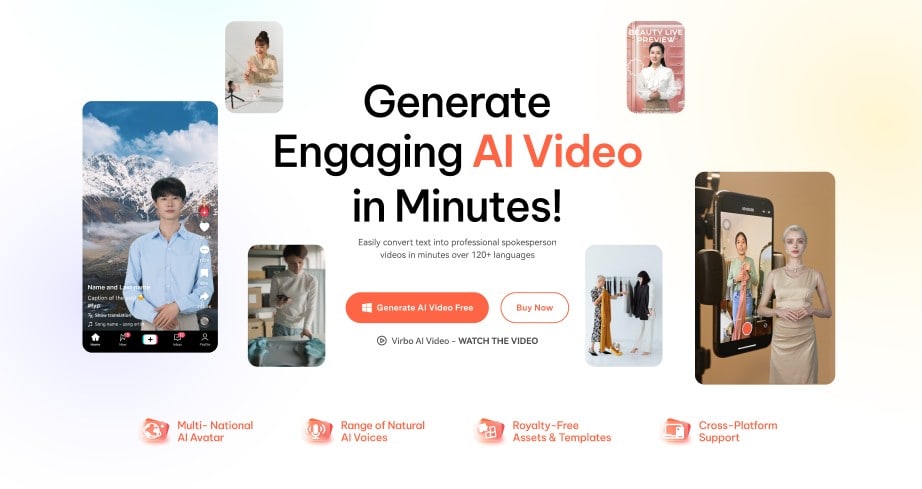
Generate Engaging
AI Video in Minutes!
Easily convert text into professional spokesperson videos in over 120+ voices & languages in minutes.
Generate AI Video Free Generate AI Video Now


Conclusion
In conclusion, the era of online video language converters signifies a significant leap in global communication. Whether you’re a content creator or a business expanding its reach, these tools offer a bridge to cross-cultural understanding. Embrace their power, and embark on a journey where every word resonates globally, connecting diverse communities in the vast landscape of digital content.
Also read:
- New 2024 Approved 5 Top Realistic Text to Speech AI Voice Generators You May Like
- What Is an AI Text Generator for 2024
- Updated In 2024, Top 10 Solutions for Movie Subtitle Translation Making Things Perfect
- New Create Lip Sync TikTok Videos Without Installing Any App for 2024
- Your Selling Strategy With LazLive Live Selling for 2024
- The Best AI Translator to Translate Videos Online for 2024
- Updated Diverse Template | Online
- Updated In 2024, What Is an AI Video Editor? | Wondershare Virbo Glossary
- Updated How To Perform a Successful Streaming on Twitch
- New In 2024, Maximize Your User Engagement With Instagram Live Shopping Expert Tips
- Updated In 2024, Best YouTube Video Into Text Converters
- Video Translator for 2024
- New Talking Photo | Wondershare Virbo
- In 2024, What Is AI Generated Text?
- The Ultimate Guide on How to Promoting Music Videos on YouTube
- In 2024, Top 10 Streaming Services Worth a Try
- Updated What Is an AI Artist? | Wondershare Virbo Glossary
- 2024 Approved How to Make Explainer Videos—Step by Step Guide
- Updated 2024 Approved 10 Best Free AI Video Generators with Innovative and Advanced Algorithms
- New In 2024, Best 5 AI Movie Script Generators
- Updated In 2024, Best AI YouTube Script Writers and The Ultimate Guide
- Updated Best 10 Chinese Video to English Translator
- New 10 Best Free AI Script Generators | Movie Script Generators for 2024
- Updated Easy Tutorial How To Make a Talking Cartoon Video Step-by-Step
- Updated In 2024, Chrome Video Translator Select the Perfect Platform
- Updated A Detailed and Trustworthy Review of Murf.ai AI Text-to-Speech Tool
- In 2024, AddROM Bypass An Android Tool to Unlock FRP Lock Screen For your Honor Magic 5
- Locked Out of Apple iPhone 12 Pro Max? 5 Ways to get into a Locked Apple iPhone 12 Pro Max | Dr.fone
- In 2024, How to Track Vivo Y27 5G by Phone Number | Dr.fone
- How to Fake GPS on Android without Mock Location For your Samsung Galaxy Z Flip 5 | Dr.fone
- In 2024, 7 Fixes to No GPS - Showing Approximate Location on Apple iPhone 6s Waze | Dr.fone
- Pokemon Go Error 12 Failed to Detect Location On Apple iPhone SE (2022)? | Dr.fone
- The Updated Method to Bypass Samsung Galaxy M14 4G FRP
- How to Unlock Samsung Galaxy M34 Phone Pattern Lock without Factory Reset
- In 2024, How to Change Google Play Location On Vivo X Flip | Dr.fone
- In 2024, How to Bypass Android Lock Screen Using Emergency Call On Realme GT 3?
- Top 15 Apps To Hack WiFi Password On Realme Narzo 60 5G
- In 2024, Unlock Your Vivo T2 5G Phone with Ease The 3 Best Lock Screen Removal Tools
- My Videos Arent Playing on Nokia C02 – What Can I Do? | Dr.fone
- How To Remove Flashlight From iPhone 11 Pro Lock Screen | Dr.fone
- Title: New Create Video With PPT
- Author: Sam
- Created at : 2024-05-19 03:34:54
- Updated at : 2024-05-20 03:34:54
- Link: https://ai-voice-clone.techidaily.com/new-create-video-with-ppt/
- License: This work is licensed under CC BY-NC-SA 4.0.
