
New Amazon Live for Beginners Features, Pro Tips & Future Trends
Amazon Live for Beginners: Features, Pro Tips & Future Trends
Going live on Amazon is a great way to drive sales and traffic to your product. The platforms work in a similar way to other livestreaming services including Facebook and Taobao. Sellers can useAmazon Live streaming to drive trading and brand awareness of their products. In this article, we explore theAmazon Live streaming shopping experience including the key features and pro tips.
Part 1: Live on Amazon: A Game-Changer for Sellers
Amazon has been hosting many live streams where sellers promote a wide range of products. With Amazon Live Events, thousands of creators and influencers sell products and demonstrate how they work. This type of livestream shopping is an effective marketing strategy. It allows a personable host to demonstrate products while shoppers talk about their experience and ask any burning questions.
01 What is Amazon Live Streaming?
Amazon Live Streaming is an interactive fee that allows brands to show live videos for their products. You can introduce your brands to the audience and demonstrate how products work. With Amazon Live, sellers highlight their product listings and create banners for customers using product promotions on a carousel below each live video. On the other hand, customers interact with the live video by asking questions in the comment sections or chatting with hosts.

02 Who Can Benefit from Amazon Live?
Amazon Live streaming sales focus on the desires of the shoppers to know more about a product. It is also based on the tendency of online shoppers to impulse buy. By providing instant answers to shoppers, sellers can minimize the guesswork and boost sales.
- Shoppers: Discover new products and see them in demonstrated action before making a purchase. They can also ask questions in real time and get additional information.
- Seller and Brands: Increased product awareness and sales with the potential for building brand image.
- Influencers: A new income stream and access to a wider audience while building relationships with brands.
- Fans of Influencers : Get to know their favorite personalities better and get exclusive deals or discounts from their recommendations.
- Anyone Seeking Entertainment : Amazon Livestream can be a source of entertainment with DIY projects and demonstrations.
03 Is Amazon Live Streaming Right for You?
Amazon Live is an effective tool for starting a major sale or increasing the overall awareness of your product. The program streams live videos on the Amazon Live homepage to your brand’s product details pages giving you more exposure. You can speak about your products or simply demonstrate how they work. This makes Amazon Live a highly engaging promotional tool that sellers and influencers can use to drive more informed shoppers to buy their products, Here are some pros and cons of using Amazon Sale live streaming:
Pros
- A free live-streaming platform for sellers
- Offers creative tools and resources to effectively promote your products
- Amazon Live selling is a small part of the growing market and offers the opportunity for brands to scale
Cons
- Low consumer engagement rates with low-quality videos
- You will still need a creative team with resources to represent your brand well
- Amazon Live is still a fledging service and does not offer influencer marketing nor have its own place on Amazon’s website navigation yet
Part 2: Step Guidance: Getting Started with Amazon Live
To create a livestream on Amazon, you need to be a U.S. Professional Seller either registered as a U.S. Vendor or in the Amazon Brand Registry. Sellers who meet the requirements can create their livestreams through theAmazon Live Creator mobile app.

With Amazon streaming live service, you can record Livestream in advance and schedule them to go up at a later date or go Live in real-time. This will usually depend on your goals and the kind of interaction you want with your audience. In any case, Amazon recommends the use of an external camera and a video encounter instead of your mobile phone to ensure quality video. Although you can use either, an external camera gives you an edge in terms of quality. Let’s have a look at a detailed step-by-step guide to getting started with Amazon Live:
Step 1 Create an Amazon Live Account
Download theAmazon Live Creator app from the Apps Store. The app is currently only available for iOS and will work on iPhone or iPad. Sign into your Seller, Influencer, or Vendor account and create a Live Account.

Step 2 Enter Details of your Product or Brand
Choose your brand and enter the desired profile name. Edit your profile the way you like to be a true representation of your brand.

Step 3 Add Products to Your Livestream
Choose the products you want to add to your livestream. These are the products that you want to promote and use to engage with your viewers.

Step 4 Set Up Your Amazon Livestream
With the product added, you are ready to set up your live stream. Take some time in the practice mode to familiarize yourself with the platform, and prepare your talking points. Also, come up with responses to possible customer questions and any other important information. Although Amazon Live is free, you can also consider using Amazon advertising to reach a wider audience.

Step 5 Go Live
Once everything is ready, enter your stream time and start time. You can view your analytics from the homepage and see how well the live stream is performing.

Once published, Amazon Live events can be found on theAmazon.com/Live page . They are also discoverable in Amazon stores, product detail pages, and the Amazon mobile app under “Amazon Live.” A well-presented Amazon Live stream will:
- Build a community by communicating and engaging with consumers
- Entice viewers to take action
- Reduce pre-purchase support requests, such as live chat
- Generate sales
- Lower returns by providing essential details and answers
Bonus Tip: Enhanced Live Streaming with AI (Future Trends)
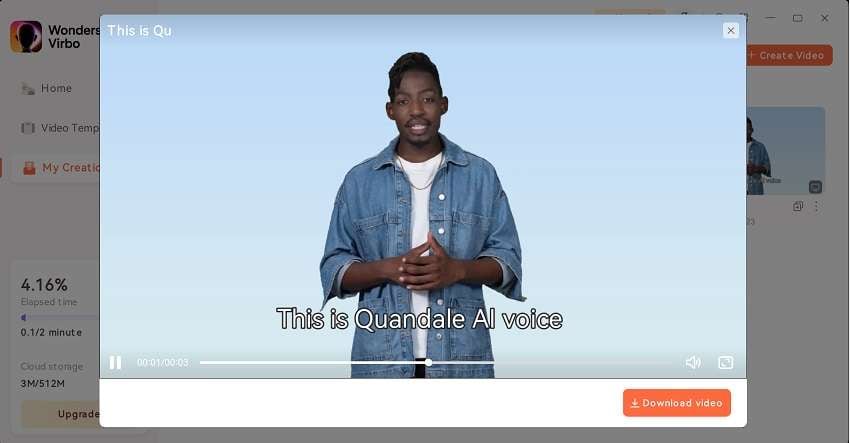
As artificial intelligence continues to touch every aspect of life, brands can leverage this technology to offer more personalized content to their audience.Virbo Live offers you an ultimate AI streamer experience where you can host live shopping with an AI streamer. Instead of creating content from scratch, choose an AI streamer to interact with your audience, saving the time and cost of hiring a human streamer. Embark on this transformative streaming journey, and keep your audience engaged even without your direct involvement.

01 Leveraging Virbo AI streaming for sales and shopping
Virbo Live offers you access to multi-lingual AI-driven avatars or Vtubers that will sell your products and interact with your viewers in real time. The AI-powered avatars can provide more information about your products and answer questions from your viewers. By automating the streaming process, you can transform your viewers’ experience while boosting your revenue.
As Amazon Live becomes more popular among sellers and buyers, any solution that would make the work of sellers easier is worth exploring. Virbo Live offers you an excellent solution to live stream your products without the heavy budget of hiring a creative team. You only need to select an Avatar of your choice, generate a script, and allow the avatar to do the rest.
02 Simplified workflow and better viewer experience with Virbo Live
Virbo Live offers you a simplified workflow for a better viewer experience by creating a realistic and seamless interaction with the audience. Although the avatars are AI-powered, they can interact freely with the audience, ensuring they have perfect information before making a purchase. Some of the features that make Virbo Live such a powerful tool include:
- Realistic AI-driven Avatars : Interact with and keep your viewers engaged by mimicking natural movements perfectly.
- AI Live Shopping Script Generation : Automatically generate a script for your AI streamer by adding details about your product
- Multiple Languages and Accents : Automatically translate your script to desired a language and integrate the right accent for your viewers
- Customizable Q&A Repository : Create a personalized Q&A database so that your AI streamer can connect with your viewers better and offer realistic solutions
- Interaction Through Text : Trigger your AI streamer to automatically speak your text and engage with the viewers
Conclusion
Amazon Live lets sellers and influencers promote products through live streaming. Get started easily, interact with your audience, and showcase your products. TryVirbo Live ‘s AI streamers for a cost-effective and efficient alternative.
Create AI Avatar Video with AI Avatar | Wondershare Virbo Online
Create AI Avatar Videos
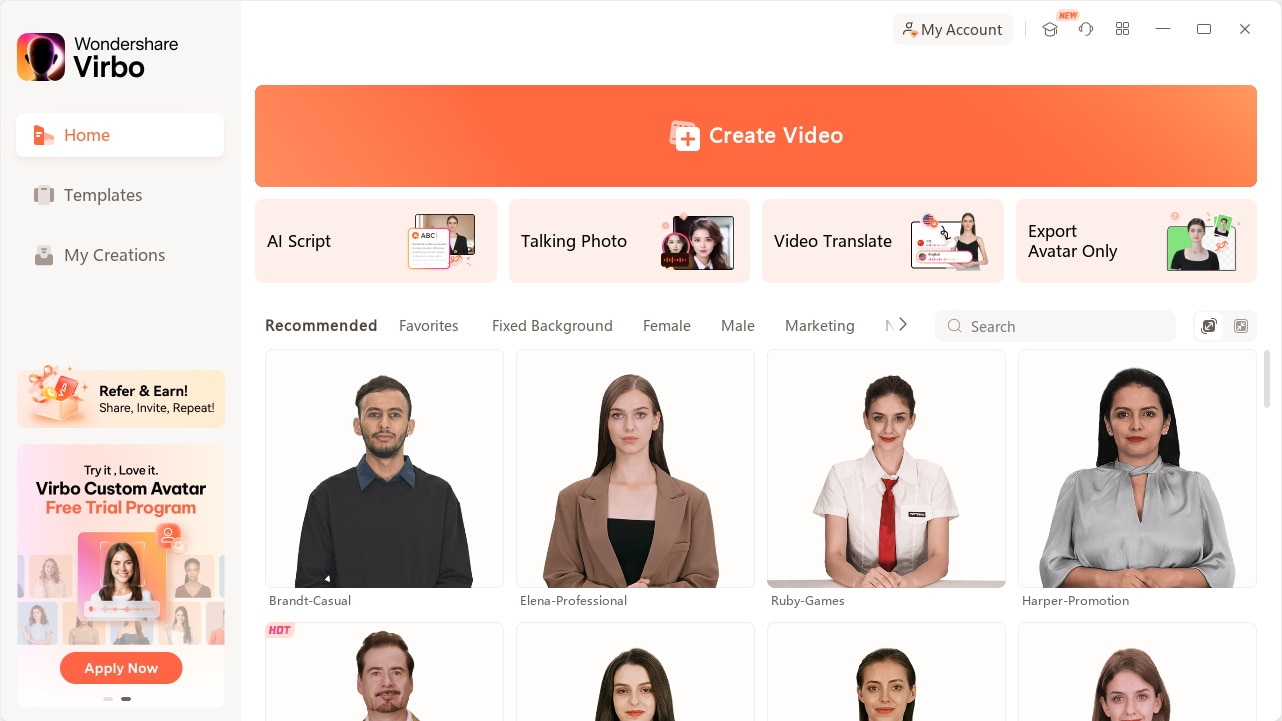
Simply clicking the AI Avatars showcased on the homepage, and initiate your video production process.
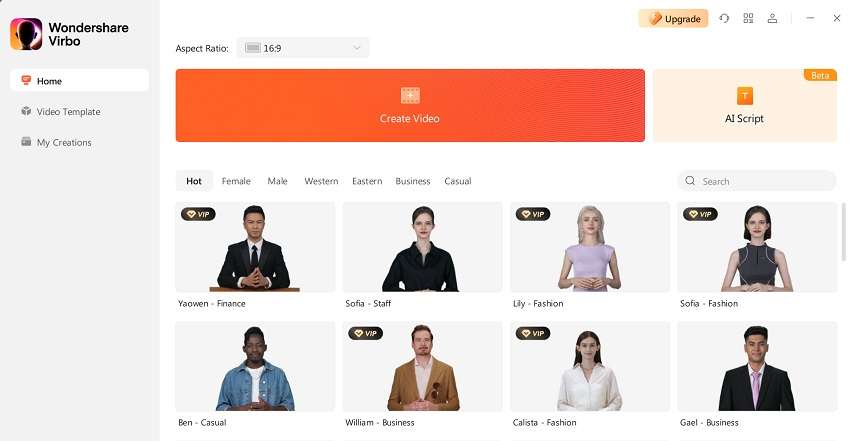
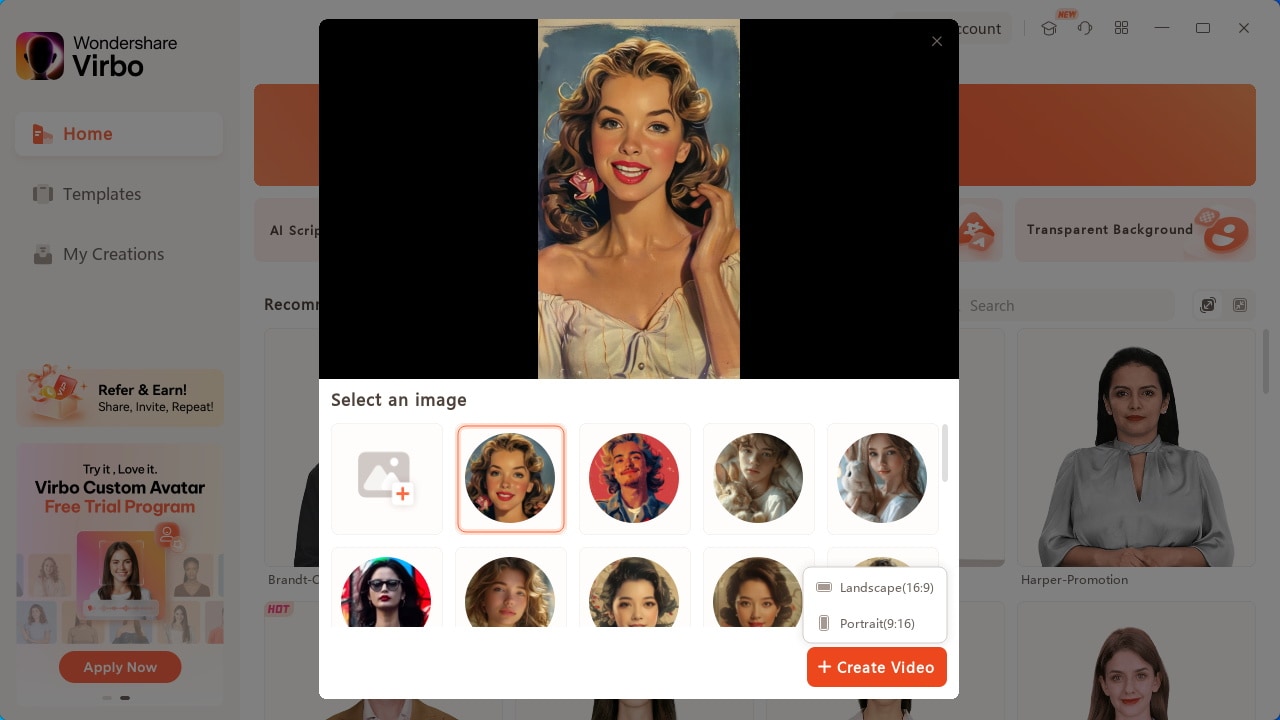
Step 1. Choose AI Avatar
Select the AI avatar you like from those presented on the homepage.
Hover your mouse over the chosen avatar and pick your preferred video mode.
![]()
Choose AI Avatar
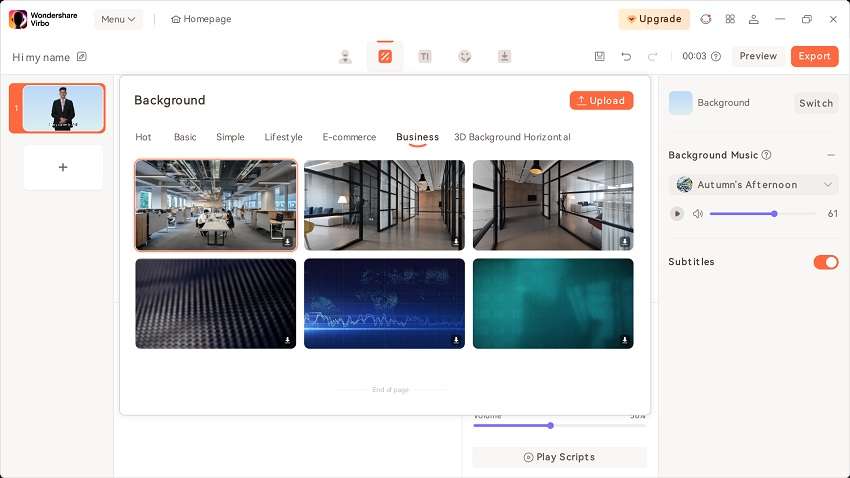
Step 2. Edit Video
Enter the user interface and start editing the video. You can also customize the voiceover, background, text style, and add stickers to the video.
![]()
Edit Video
Select “Music” to choose the video’s soundtrack. Browse through our extensive music library and adjust the volume to suit your individual preferences.
![]()
Choose Background Music
Step 3. Export Video
Once you finished producing the video, click “export” to generate the video.
![]()
Export Video
FAQs about AI Avatars
1Are These Avatars Based On Real Humans?
Yes, these avatars are all based on video footage using real actors.
2Can the Generated Videos with Digital Presenter Be Used for Commercial Purposes?
For free users, videos are not allowed to be used for commercial purpose. For subscribed users, all materials provided in the software are commercially available, and the produced videos containing digital humans are also available for commercial use. Subscribe now>
3Can I Control Avatars’ Gestures or Expressions?
For personalized avatars on Virbo, you can enjoy the liberty to craft gestures and expressions to your liking. Click now to explore Virbo’s Customization Service!
Step 1. Choose AI Avatar
Select the AI avatar you like from those presented on the homepage.
Hover your mouse over the chosen avatar and pick your preferred video mode.
![]()
Choose AI Avatar
Step 2. Edit Video
Enter the user interface and start editing the video. You can also customize the voiceover, background, text style, and add stickers to the video.
![]()
Edit Video
Select “Music” to choose the video’s soundtrack. Browse through our extensive music library and adjust the volume to suit your individual preferences.
![]()
Choose Background Music
Step 3. Export Video
Once you finished producing the video, click “export” to generate the video.
![]()
Export Video
FAQs about AI Avatars
1Are These Avatars Based On Real Humans?
Yes, these avatars are all based on video footage using real actors.
2Can the Generated Videos with Digital Presenter Be Used for Commercial Purposes?
For free users, videos are not allowed to be used for commercial purpose. For subscribed users, all materials provided in the software are commercially available, and the produced videos containing digital humans are also available for commercial use. Subscribe now>
3Can I Control Avatars’ Gestures or Expressions?
For personalized avatars on Virbo, you can enjoy the liberty to craft gestures and expressions to your liking. Click now to explore Virbo’s Customization Service!
How to Make an Animated Explainer Video
Explainer films are among the easiest and most inventive methods to present a project, a product, a service, or pretty much anything else you can imagine. In reality, the demand for an explanation film increases with product complexity. Fortunately, with the help of some of the fantastic explainer video software tools available online, you may be able to accomplish it yourself.
You’ll find a few tools in this article that will let you sit down and make whatever kind of explainer film you want. An overview of the key components required for a successful explainer video is provided at the bottom.
Part 1: The Preparation Stage of Animated Explainers
An explainer video’s primary goal is to improve the company’s marketing plan. They are so distinctive and ultimately successful because of this. However, for the creation process to be successful, it must also include all participants and be open and transparent. The process may sometimes be full of intriguing and surprising answers at any point, or it might reach a dead end. Actually, the whole creative process is quite orderly and transparent. Here is a list of the actions you need to do to complete it successfully.
Define Your Target Audience and Purpose:
The process often begins with project research, which includes gathering data from the customer, doing a market study, and completing product research.
The key is clarity since it will enable you to precisely explain your requirements for team members and resources. Your explainer video’s success depends on careful preparation. You must work together without hurrying or falling behind since there will be several connected jobs.
Craft a Compelling Script:
The screenplay describes all the video’s spoken words, whether you’re using voiceovers, dialogue, or a mix of the two. During the pre-production phase, we devote a significant amount of time and effort to scriptwriting.
Consequently, the next and most crucial phase in the creation of animated videos is scriptwriting. It determines if a marketing message will be conveyed to the target audience clearly and, more broadly, whether the video will convert.
Select the Right Animation Style and Tools:
After the script has been polished and completed, style and formatting are needed. This phase also aids in giving you a general idea of the character that will appear in the video, the color schemes that will be used, the tone, etc. Start by gathering supporting materials for the final film, such as images, videos, and other elements. Referencing your storyboard and keeping a list of the materials your video needs is a smart idea. Animated characters, icons, and images are examples of assets.
Make the spectator feel as if they are a part of the universe you have created. This is a challenging step since you must coordinate all the animations to get the ideal outcome! Along with speech and other significant notes, they often contain instructions for camera angles, tips and changes for lighting, and transitions between scenes.
Choose an Appropriate Voice-Over or Narration:
Like the majority of experienced writers, brilliant marketers start their videos with voice-over narrations. It’s crucial to remember that before the animation process can begin, the voice-over must be recorded.
The majority of video editing programs provide you access to stock music that you may use in your productions. As an alternative, you may search through a variety of websites with royalty-free music to locate the ideal song for your film.
Part 2: The Operation Procedure to Create Animated Explainer Videos
Some people may believe that making animated explanation films is simple. The misunderstanding is mostly caused by how brief and uncomplicated many animated videos on social media are. From consulting with customers, selecting ideas, and developing a storyboard to accomplishing business objectives, video production is complicated.
Design Captivating Characters or Visual Elements :
For many years, the customer journey has been heavily influenced by brand identification and brand trust. Finding a simple technique to easily convey your brand to a target demographic is the difficult part. Animated explainer videos excel in this situation. A useful tool for promoting goods, services, concepts, and companies is an animated explainer film. Explainer videos are an innovative marketing strategy that many forward-thinking companies actively include into their operations.
There are several techniques to animate your films since there is no one approach that works perfectly. Be original and imaginative. You could be unsure about what style to utilize as a result. You should create many instances of the same character because of this. It aids in better appreciating the mood of the video. In this manner, you can choose which fashions suit your brand and the tone of the film the most!
Animate the Scenes Using Motion Graphics or Traditional Animation Techniques:
The second piece of advice is to make sure your animated film appears just as stunning without sound as it does with it. An animated figure often follows a script in an explainer film, utilizing objects and other visual elements to guide viewers through a process or explain a topic. When developing mascots for a family-oriented product offering, live-action videos may have a significant influence.
The most enjoyable part is undoubtedly the illustrations! You get to choose and create your characters’ environments. Users will be interested and more inclined to watch the video due to the animation. Because of this, it’s preferable to employ titers in the film or make your animation seem catchy from the very beginning.
Incorporate Suitable Background Music and Sound Effects:
The audience won’t be interested in the product if the voice-over isn’t up to par. If they can’t even hear what you have to say due to voice quality issues, how can they be interested? It’s time to concentrate on the sound now. It is where you put together the narration, music, and sound effects to provide the audience the best experience possible.
If you’re just starting off, this step could seem a little intimidating. Consider employing a professional with built-in tools to achieve it effectively if you’re searching for someone with expertise and experience using editing software. Furthermore, background music may provide pacing, intrigue, and a sense of setting to the film.
Part 3: Utilize Professional Video Editing Software for Post-Production
When making an explainer video, choosing the correct editing program may make all the difference. Different explainer video creators will provide you access to effects and asset libraries, which will make creating your video easier. To make the process of producing animated images easier,Virbo provides hundreds of pre-made designs. The user-friendly design and selection of free tools make it simple for novices to produce animated films of high quality.
Get Started Online Free Download
Virbo animated explainer video maker can create captivating explainer videos with customizations. Businesses can create interesting, interactive content that can be shared on many different web channels because to its extensive feature set and simple interface. Because the graph editor makes it simple to create seamless transitions and add fascinating effects, it is a fantastic option for animated explainer movies.
Key Features:
Enriched Effects:
Compositing for motion pictures, animated explainer videos, and visual effects are all done using Virbo. Utilizing a wide variety of hundreds of one-of-a-kind effects, this program is utilized in the post-production stage to allow users to alter the final result.
User-friendly Interface:
You may quickly clip and construct a timeline using the drag-and-drop tool. That is why Virbo is considered the top-notch choice of beginners and expert animated video production companies. It has an organized set of tools on ready-to-utilize basis.
AI-Based Scripting:

The program automatically creates a storyboard based on the screenplay and explainer video template that you’ve selected. As opposed to starting from scratch, you now simply need to tweak your flow, substantially simplifying the process.
Automated Avatars:
![]()
With its simple interface, you may choose your preferred animated figure, infographic, or effect before editing the animated text. You can mix characters, effects, and video with this animation creator to create engaging animated videos.
Creative Templates:

With the help of built-in presets and other templates, Virbo may combine your individual shots or composite footage into a single, seamless piece that will help your explainer video stand out from the competition. The platform has around 180+ templates that can be utilized on a single drag-and-drop basis.
Animation Customization:
You have greater control over animated features because to the seamless blending of 2D and 3D parts, and character creation is made simple by the abundance of rigging and animation tools. Also, Virbo has around 150+ avatars that are AI-backed so all you need to do is bring your favorite to the scene and create your animated explainers.
Export and Share Your Animated Explainer Video Across Various Platforms:
In a culture where people have short attention spans and a need for eye-catching graphics and material, animated explainers are also very helpful for spreading ideas. A captivating animated film posted with your fans on social media will aid in promoting your business across the whole network. There is no one size fits all when it comes to explanation videos. You must be aware at this point of the complexity of explainer videos.
Having said that, it’s simply a lot to absorb; both the procedure and the kinds! You must present your explainer videos effectively if you want to be heard and seen. For this reason, we advise immediately posting your video clip to a social media website. Talking of which, Virbo comes in as a great option as it provides seamless integration of various platforms where you can share your animated explainer videos single-handedly.
To do that, simply go to the export button and explore the plethora of sharing and saving options available to you with regard to your explainer videos.
Conclusion:
Explainer videos that are animated are a fantastic method to sell your goods or services. They may aid in fostering greater consumer knowledge and are entertaining and educational. They assist in raising awareness while also assisting organizations in achieving productivity objectives. By simplifying complex ideas into enticing motion graphics, brief and effective animated movies may clearly communicate ideas, goods, and services.
It might be overwhelming for a newbie to navigate the many stages involved in making an animated film. Every stage of the creation process—from gathering materials to recording voiceovers—requires the creator to pay close attention to the little things and keep the end result in mind. In that spectrum, consider using Virbo as your all-in-one partner to create animated explainer films if you’re unsure that you have the time, energy, or expertise to do it yourself. Try it now and experience the creative world on your own.
s just as stunning without sound as it does with it. An animated figure often follows a script in an explainer film, utilizing objects and other visual elements to guide viewers through a process or explain a topic. When developing mascots for a family-oriented product offering, live-action videos may have a significant influence.
The most enjoyable part is undoubtedly the illustrations! You get to choose and create your characters’ environments. Users will be interested and more inclined to watch the video due to the animation. Because of this, it’s preferable to employ titers in the film or make your animation seem catchy from the very beginning.
Best 7 Photo Talking AI
Today’s digital age allows you to do much with static photos taken with your smartphone or digital camera. For instance, you can breathe some life into your smartphone snaps by creating a talking photo free and sharing it on your social media apps. While this might sound impossible, numerous AI-powered apps can help you generate a talking photo online. So, in this post, we want to introduce you to our carefully curated list of programs to create animated talking images. Read on to discover!
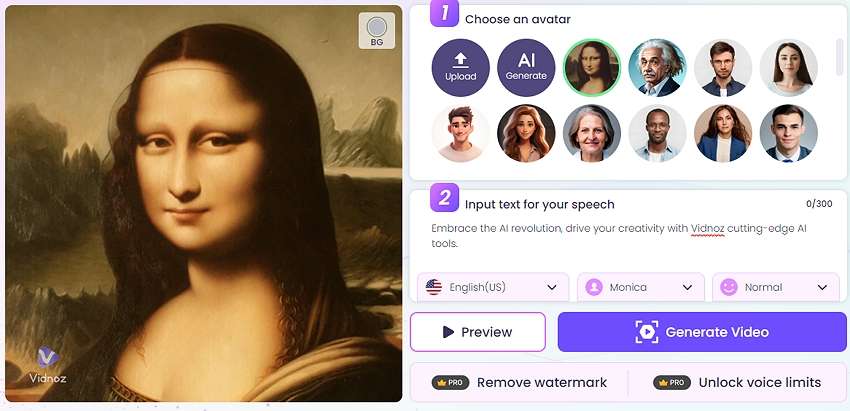
Tool 1: Wondershare Virbo
Wondershare Virbo talking photo AI boasts an immersive user interface to create a talking picture from your local images. Alternatively, you can choose a royalty-free image template and customize it with your favorite sound animates. Virbo lets you customize the audio speed, pitch, and volume to make your talking image stand out. You can also change the photo’s background, apply stickers, change the language, etc. Then, export your talking image picture in up to 1080p resolution.
Generate Talking Photo Online Download APP Now Free Download
Steps to create a talking picture with Wondershare Virbo
Step 1 Install and run Wondershare Virbo TalkingPhoto
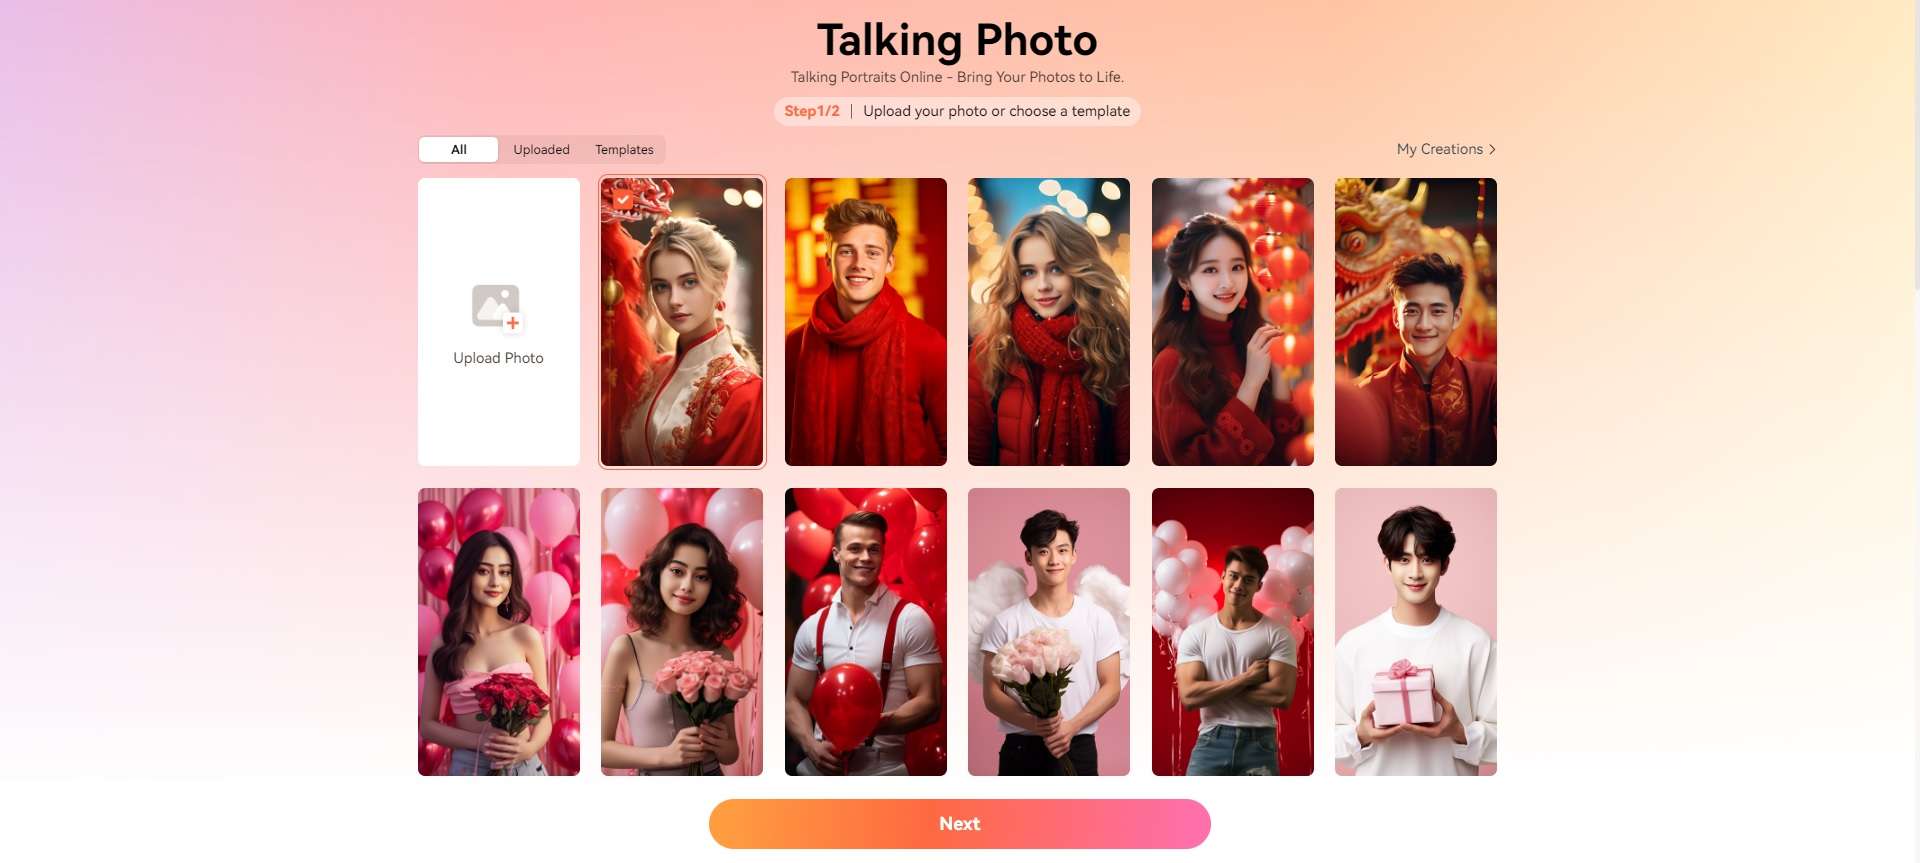
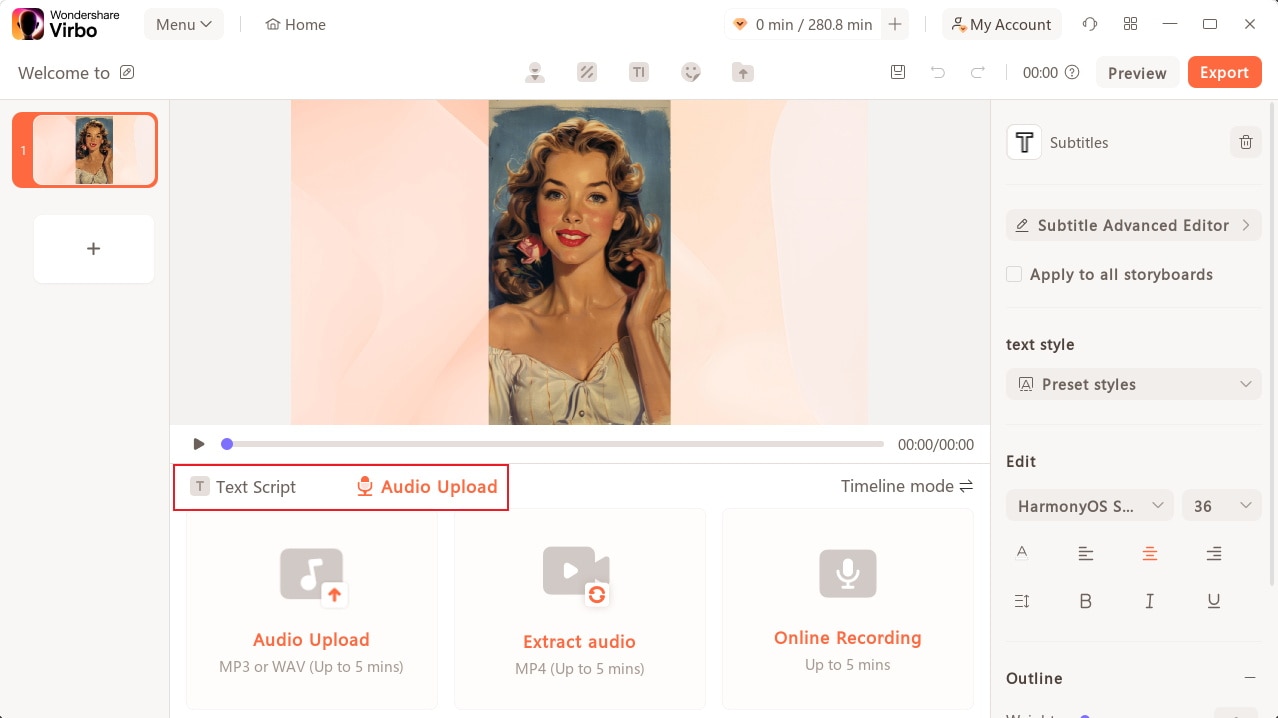
Head to the program’s official site and install Wondershare Virbo on your PC. Alternatively, you can access its online platform for seamless creation. Run the program and click the Talking Photo button.
Step 2 Upload a photo you want to animate
Next, click the Upload button to browse and import a photo you wish to animate. You can also choose an image template from the available options.
Step 3 Add an audio animation to the photo
Enter the Text Script you want to convert into audio. Alternatively, click the Audio Script button to upload a WAV or MP3 file or extract audio from the video. You can even live to record your own voice. The maximum audio duration is 2 minutes.
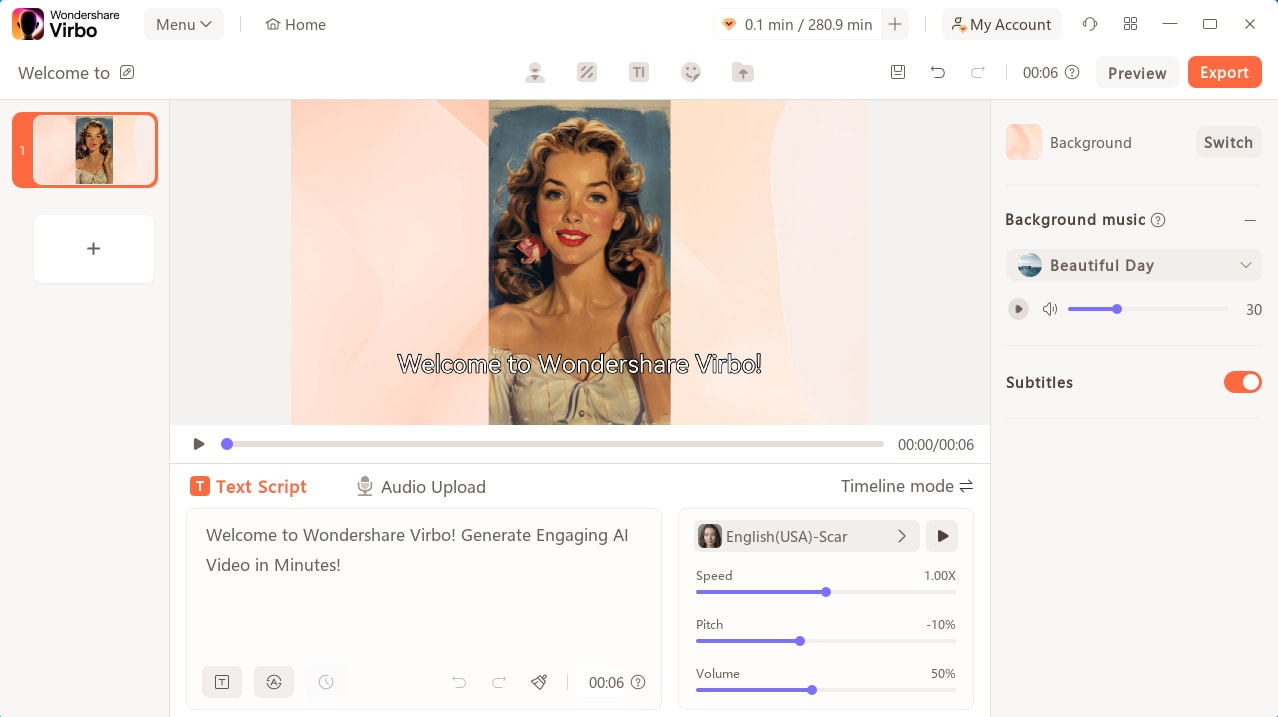
Step 4 Customize the audio settings (Optional)
If you’re using the Text Script option, you may need to customize audio settings like language, volume, speed, and pitch. Skip this step if you’ve already recorded an audio file.

Step 5 Preview your talking photo and export it
Before saving the video, tap the Preview button and proceed to record another voiceover if the outcome isn’t impressive. But if you’re happy with everything, tap the Export button to save the talking image video in 720p or 1080p MP4 resolution. It’s that easy!
Generate Talking Photo Online Download APP Now Free Download
Tool 2: HeyGen
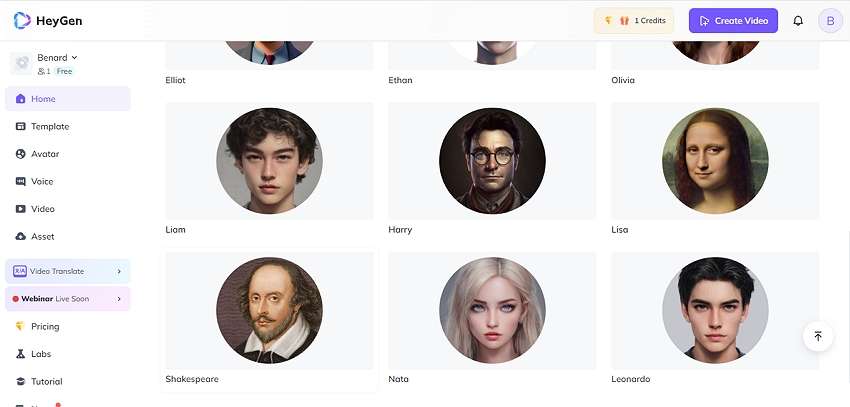
HeyGen is another image talking tool to create HD videos from images taken using any camera. Like Virbo, it combines animations with typed texts or recorded audio to give you an engaging talking photo AI. Using this program is also easy. Upload an image you want to bring to life, create a video avatar, then input your text characters or upload a video. You can also choose from 300+ voices in 40+ languages.
Pros:
- Hundreds of talking photo voices.
- Create talking pictures in 40+ languages.
- It can do lip-syncing with a script.
Cons:
- Advanced tools are available to subscription users.
Tool 3: Tokking Heads
Tokking Heads is another fun online photo talking AI. This program can add human expressions to your image thanks to its extensive list of facial animations backed by powerful facial recognition technology. Excitingly, this program lets you customize people’s talking photos with filters, music, animated texts, and sound effects. It’s an excellent talking photo tool to have!
Pros:
- Completely free to use.
- Numerous avatar templates to explore.
- Compatible with Android and iOS.
Cons:
- Limited talking picture customization options.
Tool 4: Vindoz
Vindoz is a powerful online tool to make a talking picture and make it come to life. With it, you can transform any still image with a clear front face into an animated picture. To get started with this program, upload a local photo or choose from the numerous templates. It also has an AI feature to create a talking image in English, Armenian, Japanese, French, etc. However, you must unlock the Pro plan to use most features.
Pros:
- Free to generate talking head MP4 videos.
- 20+ free avatar characters.
- 100+ speaking head languages.
Cons:
- Most features are from Pro users only.
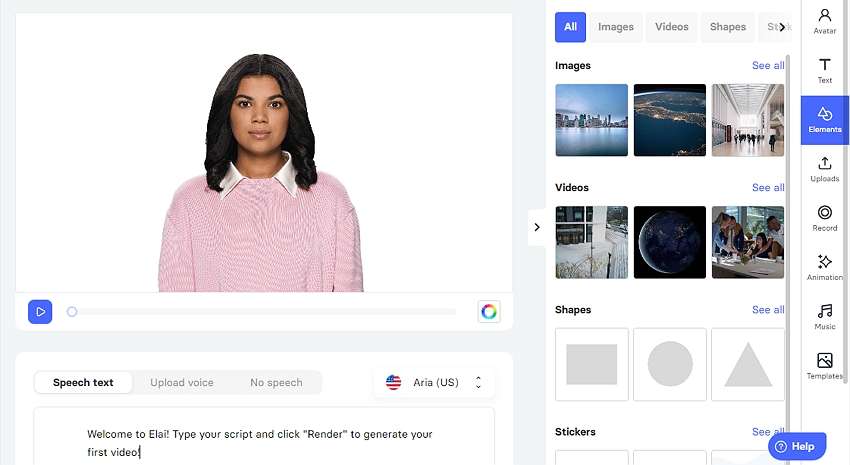
Tool 5: Elai.io
Elai.io is an online app that uses advanced AI technology to bring your photos to life by adding a talking photo animation. This incredible tool can make a static portrait photo talk, giving them a life-life persona. After uploading your portrait photo, Elai.io lets you give it a personal touch with a live microphone recording or pre-recorded audio. You can also input text with at least ten characters and watch your photo come to life.
Pros:
- Record microphone voiceover on talking heads.
- 100+ talking head templates to explore.
- 80+ diverse avatars.
Cons:
- Beginners may need a learning curve.
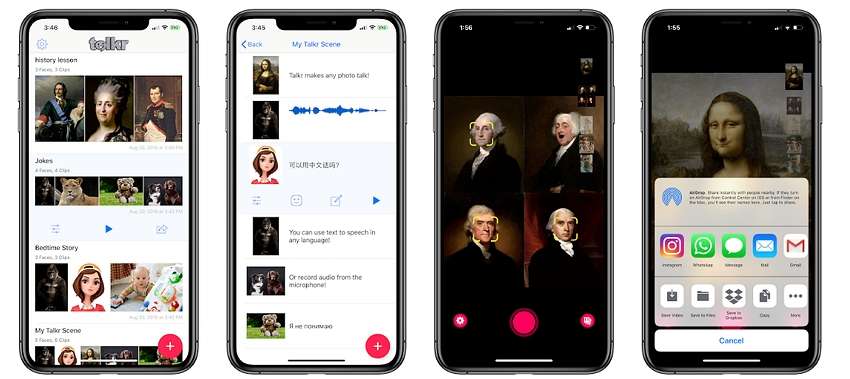
Tool 6: Talkr
Talkr is an iOS app to generate a talking photo album on your iPhone or iPad. This app comes in two modes – Talkr Live and Talkr Classic. With the Live mode, you can record your camera on iPhone X or newer while talking like your favorite celebrity or any other character. It allows you to enter texts or audio to create a talking snapshot. On the other hand, Talkr Classic enables you to upload a local photo and customize it with your favorite voices. The only drawback is that you’ll have to download these apps separately.
Pros:
- It’s an incredible free program.
- Create AI talking photos in numerous languages.
- Numerous faces to edit for free.
Cons:
- Some faces don’t work as advertised.
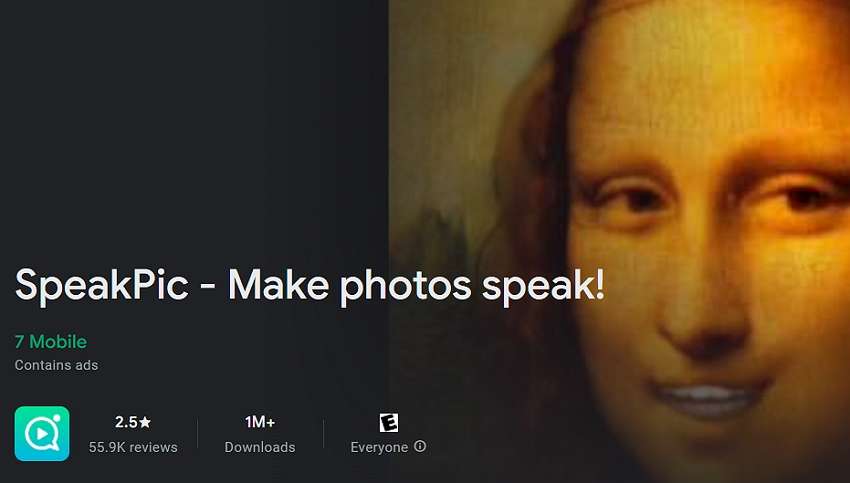
Tool 7: SpeakPic
As the name of this tool hints, it’s an Android app that will make your static photos speak using AI magic. With it, you can record a voiceover or type a text to give life to your pictures while saying everything in your mind. Simply select a photo from your local storage, and then the program will scan the face before allowing simple editing. You can edit your voice with different effects to make it funnier or change the language to multiple options.
Pros:
- It allows batch uploads of up to five images.
- Customizable facial expressions.
- Fun-to-use animated text function.
Cons:
- It crashes and stops working sometimes.
Generate Engaging
AI Video in Minutes!
Easily convert text into professional spokesperson videos in over 120+ voices & languages in minutes.
Generate AI Video Free Generate AI Video Now


Final Words
These seven free talking photo AI tools should help you breathe life into your static photos without any special skills. Remember that there are many reasons to create an AI talking picture, including privacy concerns, talking challenges, pranking friends, and more. And don’t forget to explore Wondershare Virbo’s extensive list of AI-powered features. Make your image talk and have fun with it Download APP Now Free Download
How to Create Funny Talking Avatars Using Oddcast Text to Speech Tech
In the ever-evolving landscape of digital communication, avatars have emerged as captivating tools that add a dash of fun and personalization to our online interactions. Among the pioneers in this domain,Oddcast TTS has emerged as a standout player, offering a remarkable Text to Speech (TTS) technology that brings avatars to life with hilarious and engaging voices.Oddcast text to speech offers a free online demo that lets you choose from hundreds of characters, languages, and voices, and customize your avatar’s appearance, expressions, and movements.
In this article, we will show youOddcast TTS demo to create your own funny talking avatars in a few easy steps. You will be able to make your avatars say anything you want, and share them with your friends or audience in no time after reading this post.
Part 1: What is Oddcast Text to Speech?
Oddcast is a company that specializes in text to speech (TTS) technology and solutions for web developers and content creators.Oddcast online TTS is a technology that converts text into natural sounding speech. It offers two types of TTS products: a cloud based API for developers that enables real-time audio in any online app or website, and a downloadable mp3 audio for games, apps, tutorials or videos.
Compatibility of Oddcast
- Compatible with various platforms and languages, such as HTML5, Flash, JavaScript, PHP, ASP.NET, and more
- Supports over 25 languages and 200 voices to choose from
Functions of Oddcast
- Can be used to create talking avatars, interactive learning materials, e-books, quizzes, games, cartoons, podcasts, ads, presentations, demos, voice assistance, and more
Key Features of Oddcast
- Oddcast comes with high quality and natural sounding speech, unlike some other TTS products that sound robotic or unnatural,Oddcast voice sounds like a real human voice that can convey emotions and expressions.
- The app has customizable pitch, speed, volume, and effects that you can apply to your speech. You can adjust these settings to make your speech sound more realistic, humorous, dramatic, or any other way you want.
- Oddcast supports for SSML (Speech Synthesis Markup Language) that allows you to have advanced control over your speech. You can use SSML tags to add pauses, emphasis, breaks, or other effects to your speech.
- It offers easy integration with online tools and websites. You can use Oddcast with any online app or website that supports audio playback. You can also use it with the free online demo that lets you create talking avatars in a few easy steps.
- It comes with affordable pricing plans and free trial options. You can choose from different plans depending on your usage and budget. You can also tryOddcast DJ voice tag for free before you buy it.
Limitations of Oddcast
- Requires an internet connection for the cloud based API
- Has a limit of 1000 characters per request for the downloadable mp3 audio
- Has a limit of 60 seconds per audio for the free online demo
Part 2: How to Create Funny Talking Avatars Using Oddcast Text to Speech Tool?
Creating amusing talking avatars withOddcast online is an exciting endeavor that requires a blend of creativity and technical know-how. Here’s a step-by-step guide to get you started:
Step 1
To start creating your funny talking avatar, you need to visit the Oddcast TTS demo page ofOddcast Text to Speech Tool. This is a free online tool that lets you create and download talking avatars in a few easy steps. You can access this page from any web browser on your computer or mobile device.

Step 2
Once you are on the online demo page, you will see a list of characters on the left side of the page. These are the avatars that you can choose from to create your funny talking avatar. You can browse the characters by category, such as animals, celebrities, cartoons, etc. You can also search for a specific character by typing their name in the search box at the top of the list. For example, if you want to create a funny talking avatar of Donald Trump, you can type “Trump” in the search box and select his character from the list.

Step 3
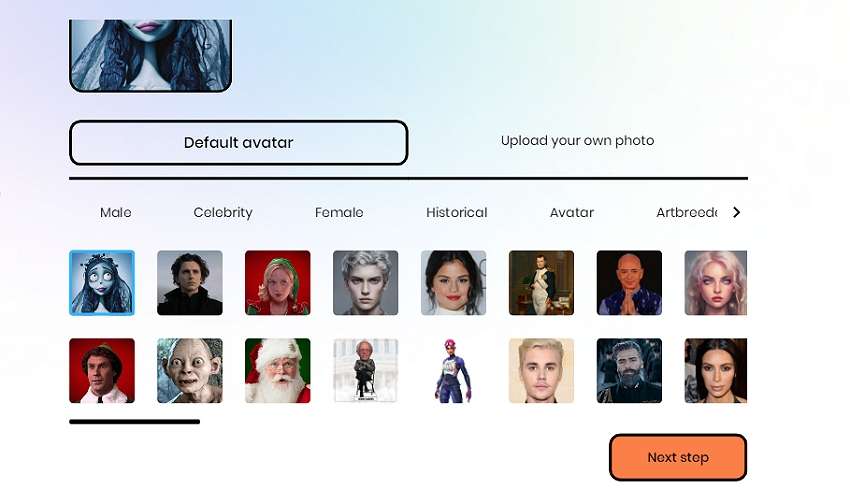
After you select a character, you will see their image on the right side of the page. This is where you can customize their appearance and voice settings. Below the character image, you will see an “Edit” button that allows you to change their hair, eyes, mouth, clothes, accessories, and background. You can click on this button and use the sliders and buttons to adjust these features as you like. For example, if you want to make your character look more funny, you can change their hair color, eye shape, mouth expression, etc.

Step 4
Next to the “Edit” button, you will see two drop-down menus that allow you to choose a language and a voice for your character. You can select from over 25 languages and 200 voices thatOddcast Text to Speech Tool supports. You can also listen to a sample of each voice by clicking on the speaker icon next to the menu. For example, if you want to create a funny talking avatar of Donald Trump in Spanish, you can select “Spanish” from the language menu and “Jorge” from the voice menu.

Step 5
Below the language and voice menus, you will see four sliders that allow you to adjust the pitch, speed, volume, and effects of your character’s voice. You can use these sliders to make your character sound more funny or realistic. For example, if you want to make your character sound more high-pitched or low-pitched, you can move the pitch slider to the left or right. If you want to make your character sound more fast or slow, you can move the speed slider to the left or right. If you want to make your character sound more loud or soft, you can move the volume slider to the left or right. If you want to add some effects to your character’s voice, such as echo or reverb, you can move the effects slider to the left or right.

Step 6
Below the sliders, you will see a box where you can type or paste your text that you want your character to say aloud. You can use up to 1000 characters per request for this box. You can also use SSML (Speech Synthesis Markup Language) tags to add some pauses, emphasis, or other effects to your speech. SSML is a standard way of controlling how text is spoken by a speech synthesizer. You can use SSML tags by enclosing them in angle brackets (< >). For example, if you want to add a pause of half a second between two words, you can use the tag

Step 7
After you type or paste your text in the box, you can click on the “Say It” button below it to hear your character speak your text aloud. You will also see your character’s expressions and movements change according to your text. For example, if your text contains some punctuation marks or emoticons, such as ! ? :) :( etc., your character will show some corresponding emotions and gestures on their face and body.

Step 8
To save or share your funny talking avatar, you can click on the “Download” or “Share” buttons below your character image. The Oddcast voice “Download ” button allows you to download your avatar as anOddcast text to speech mp3 audio file or a video file that contains both audio and visual elements of your avatar. The “Share” button allows you to share your avatar via email, Facebook, Twitter, or embed code that you can copy and paste on any website that supports HTML code.
That’s it! You have created your own funny talking avatar usingOddcast Text to Speech Tool. You can now use it for any purpose that suits your needs and preferences.
Part 3: Bonus Tip: An Awesome Alternative to Oddcast You May Like
WhileOddcast Text to Speech Tool is a great tool for creating funny talking avatars, some of you might be wondering if there are any other online tools that can do the same or even better. Well, the answer is yes! There is an awesome alternative to Oddcast that you should definitely check out - and it’s Virbo.
Wondershare Virbo is an AI video and voice generator that enables you to create stunning and engaging videos with realistic avatars and natural voices in over 120 languages and accents. You can use Wondershare Virbo for various purposes, such as marketing, education, entertainment, social media, voice assistance, and more.
Key Features of Virbo
- Choose from over 150 realistic avatars that can mimic your facial expressions and gestures
- Use ready-made templates that suit your video theme and style
- Adjust the pitch, speed, volume, and effects of the voice
- Use the built-in script editor with smart suggestions and tips
- Access a rich library of royalty-free assets
- Use the app on both desktop and mobile devices
Functions of Virbo
- Create AI video with realistic avatars and natural voices
- Convert text into speech in over 120 languages and accents
- Customize avatar appearance, clothing, accessories, and background
- Use ready-made templates or edit them as you like
- Access royalty-free images, videos, music, sound effects, and fonts
- Export video in various formats and resolutions

Get Started Online Free Download
Conclusion
Creating funny talking avatars is a fun and creative way to express yourself, entertain others, or promote your brand. With Oddcast TTS Tool, you can easily create and download talking avatars for free in a few simple steps. You can also customize their language, voice, and emotions to suit your needs and preferences.
But if you want to take your video creation to the next level, you should definitely try out Virbo. This is an amazing AI video and voice generator that lets you create stunning and engaging videos with realistic avatars and natural voices in over 120 languages and accents. You can also access a range of royalty-free assets and customizable templates to make your video stand out from the crowd.
Whether you want to create videos for marketing, education, entertainment, social media, voice assistance, or any other purpose, Wondershare Virbo is the perfect tool for you. You can use it on both desktop and mobile devices, and export your video in various formats and resolutions.
Don’t miss this opportunity to unleash the power of AI to create awesome videos with Wondershare Virbo. Sign up for a free account today and start creating your first AI video in minutes. You will be blown away by the results!
Create Lip Sync TikTok Videos Without Installing Any App
TikTok has transformed the social media landscape through its short-form video content. They encourage users to make creative content using popular audio clips. Which enables them to entertain, gain recognition, and contribute to the platform.
Lip-syncing is a big part of what makes TikTok popular. Many users post lip-syncing videos that imitate voices from songs, movies, or trending audio clips. This art of lip-syncing has become an essential element of TikTok’s culture. Now, you might wonder**how to lip-sync on TikTok videos. This article will teach us how to make it effortlessly.
Part 1. Why Do People Lip Sync on TikTok?
Lip-syncing involves mimicking the words or vocals of an existing audio track. TikTok users take this concept to new heights by lip-syncing popular songs or clips. Lip-sync is appealing because it lets people get creative and reach a large audience.
Here are a few reasons why people engage in**lip sync TikTok :
- Self-expression: Lip-sync allows users to embody their favorite artists or characters by showcasing their personality and creativity.
- Entertainment: Many users lip-sync to entertain followers. They offer comedic performances, heartfelt renditions, or engaging storytelling.
- Virality: TikTok’s algorithm favors engaging content and well-executed lip-sync videos. They have the potential to go viral, rapidly gaining likes, shares, and followers.
Part 2. How to Make Lip Sync Video on TikTok
Here’s the step-by-step guide on how to lip sync on TikTok and captive your followers:
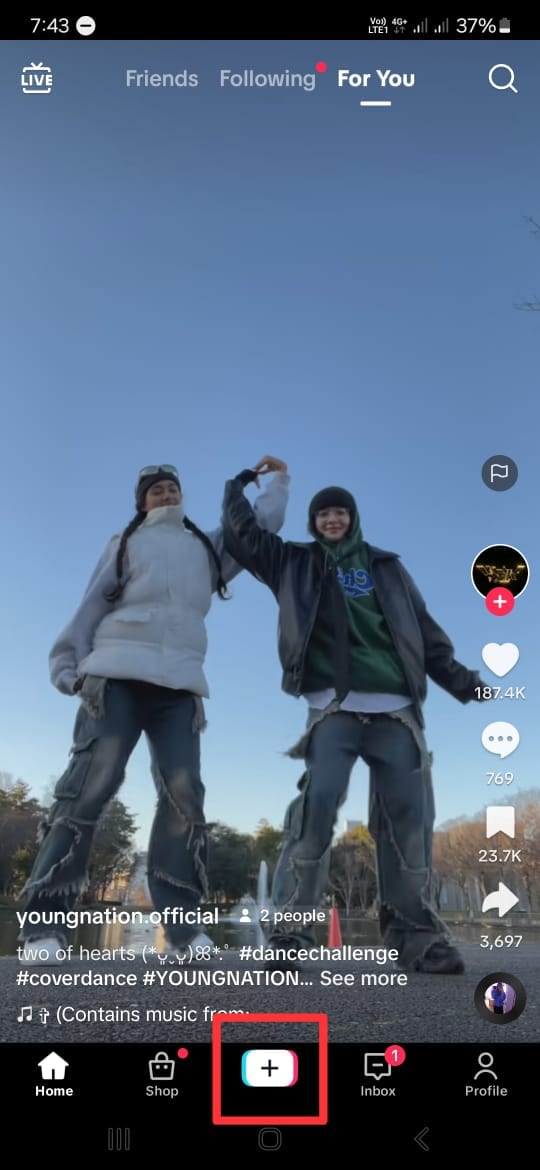
- Step 1. Open the TikTok app and tap the “+” button.
Start with opening the TikTok app on your phone. Then, tap the “+” button at the bottom of your screen to make a new video.
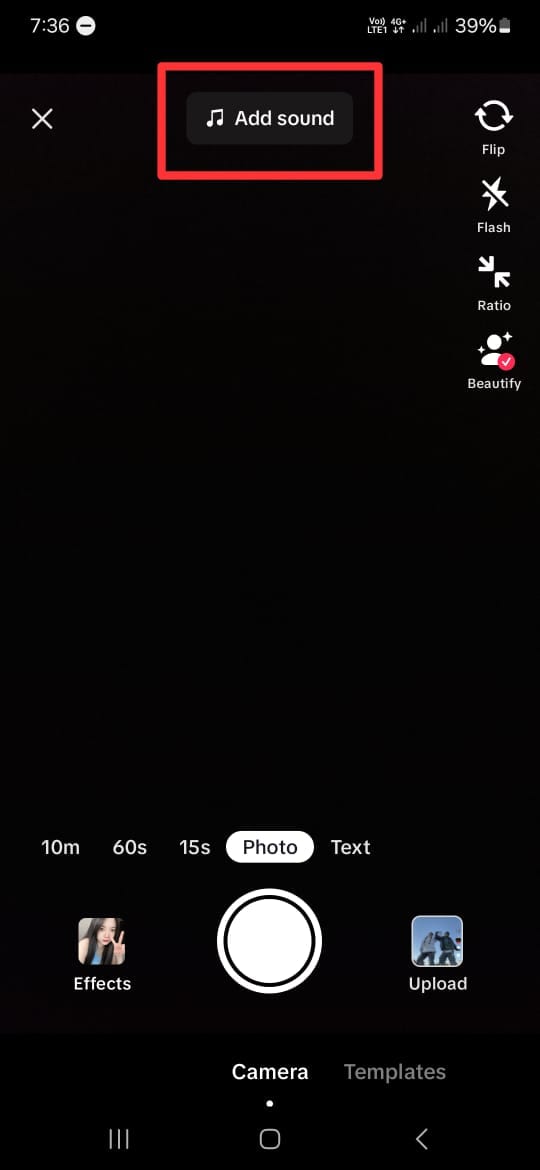
- Step 2. Add a song that you want to lip-sync to.
Next, click “Add Sound” with the musical note icon at the top of the screen. If you have a specific song in mind, you can find it by searching it on the search tab. Then, tap the song and click the check icon beside it.
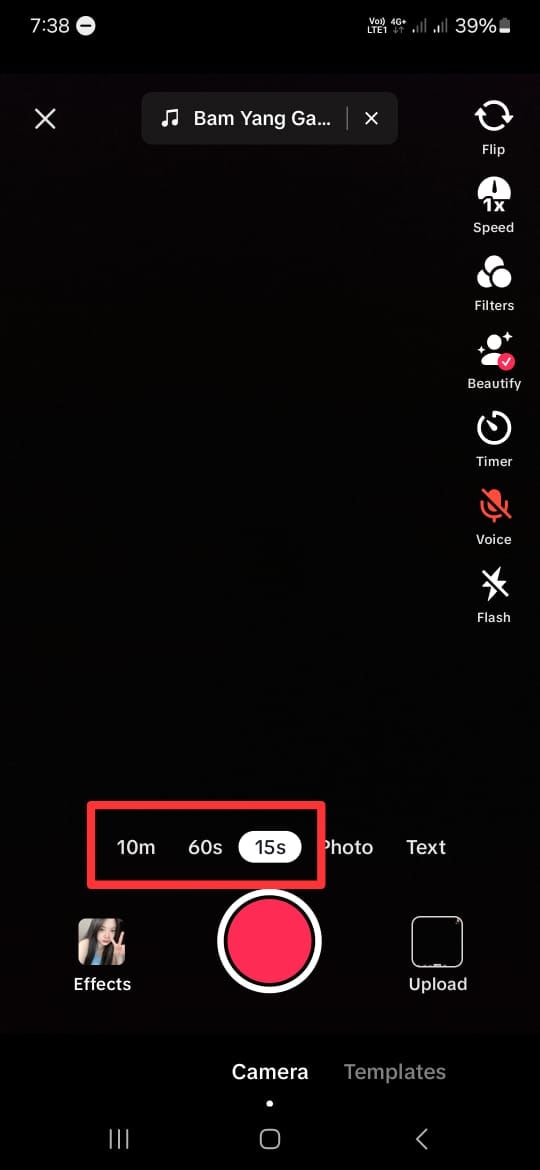
- Step 3. Choose the duration and the part of the song.
After choosing the song you want, you will return to the recording screen. Here, select your video duration at the bottom of the screen. You can choose between 10 minutes, 60 seconds, and 15 seconds. Remember that the duration of the songs on TikTok is usually only 30 to 60 seconds.
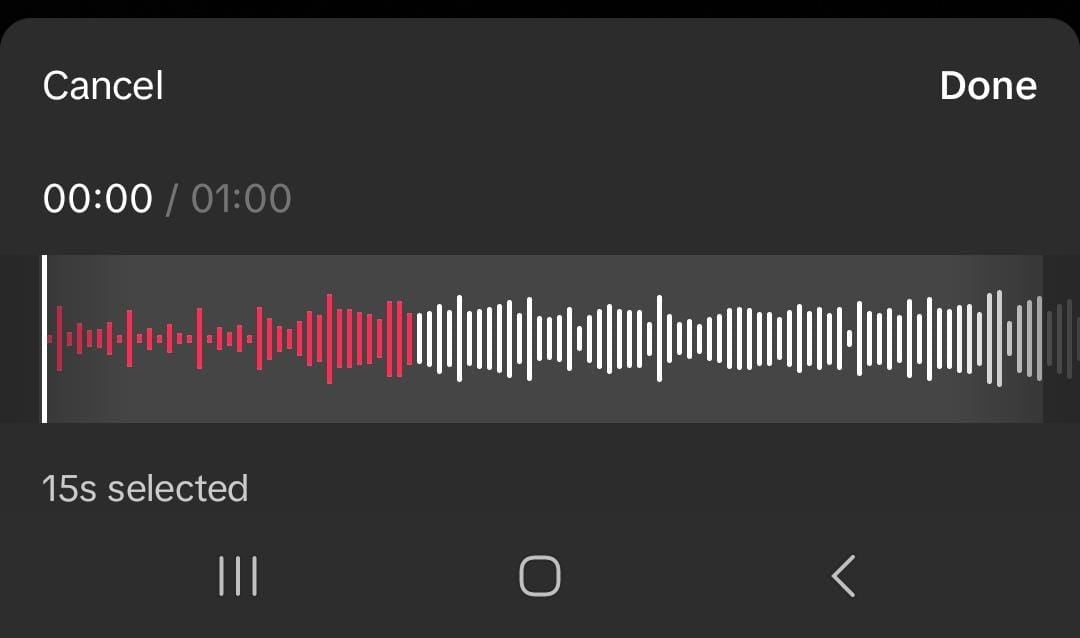
- Step 4. Choose the part of the song.
TikTok allows you to change the part of the song when lip-sync. However, the duration of the video should be less than the duration of the chosen song.
To do this, click on the song’s name at the top of your screen. Then, the bottom of your screen will display your chosen song. Tap the scissor icon and slide the playback to change the part of the song. Click “Done” once you have finished editing.
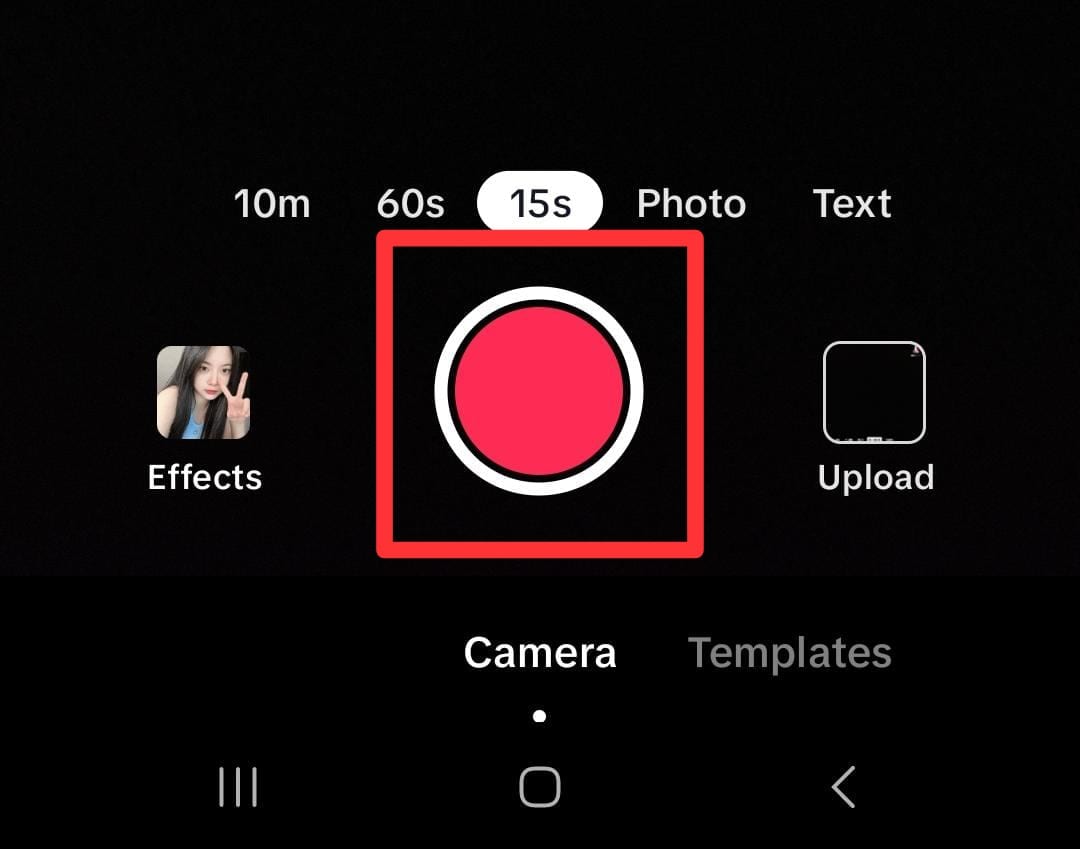
- Step 5. Tap on the red button.
If you are ready to record, tap the red button at the bottom of your screen. Then TikTok will play the chosen part of the song and record your lip-sync simultaneously. You can pause and continue the recording by clicking the same red button.
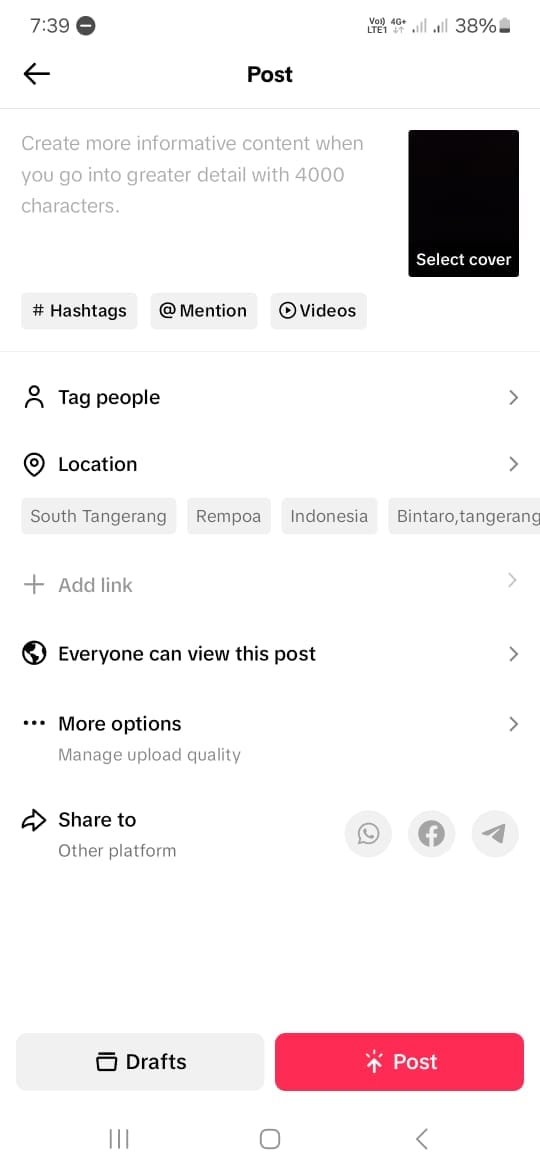
- Step 6. Post the video.
If you are satisfied with the results of your edits, click Next to proceed to the posting stage. Here, you can write a description and any other information you want. Click Post to share your lip-sync video to TikTok.
Creating a video on TikTok by lip-syncing is a fun and creative way to express yourself and connect with others. By following the steps above, you can create a lip-sync video on the TikTok app with ease. Keep in mind that by using these steps, you need to memorize the sentences and understand the beat of the chosen songs.
Part 3. How to Make Lip Sync Video Without Memorizing the Words
Making a**TikTok lip-sync video can be challenging because you must remember and match the words with the music. But there are three simple methods to make it easier.
Method 1: Record at slower speed
You can slow the speed down while recording instead of trying to keep up with the song. This technique lets you hear, understand, and follow the words more easily.
Here’s how to slow down the recording:
- Step 1. Follow steps 1 to 4 from the step-by-step guide in Part 2.
Start by following the first to fourth steps from the guide in Part 2 above.
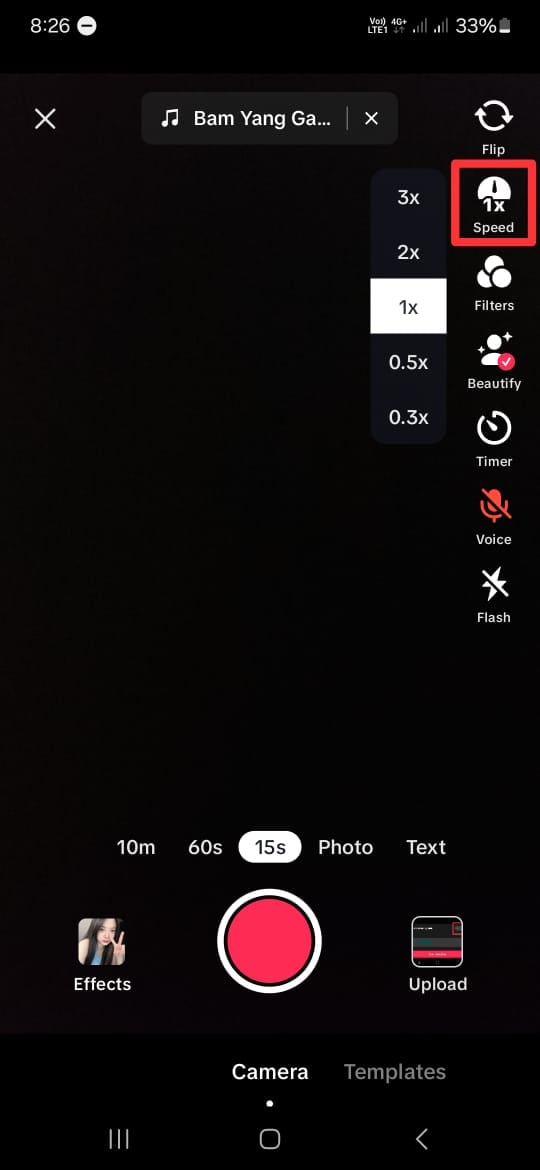
- Step 2. Set the speed record slower.
On the recording screen, click on the Speed icon on the right side of the screen. To make it slower, choose 2x or 3x. This step will make your recording time 2 or 3 times longer than it should be.
- Step 3. Tap on the red button.
Once you tap the red button, TikTok will play the song slower and record your lip-sync simultaneously. Repeat this step to help you memorize the lyrics and the beat of the songs.
Once you’re comfortable, switch back to normal speed for the final recording. This method will save time and improve accuracy.
Method 2: Purposely delay mouthing the words
While lip-syncing videos may vary in style and pacing, this technique can prove particularly useful for slower rhythms. Moreover, mastering the art of mouth sync on TikTok can elevate the overall production value of lip-syncing videos.
Using the timer feature will give you a slight lag between lip movements and audio playback. Then, it lets creators ensure more precise synchronization during editing. Here’s how to lip-sync on TikTok more easily:
- Step 1. Follow steps 1 to step 4 from the step-by-step guide in Part 2.
Like Method 1, you can start by following the first to fourth steps from the guide in Part 2 above.
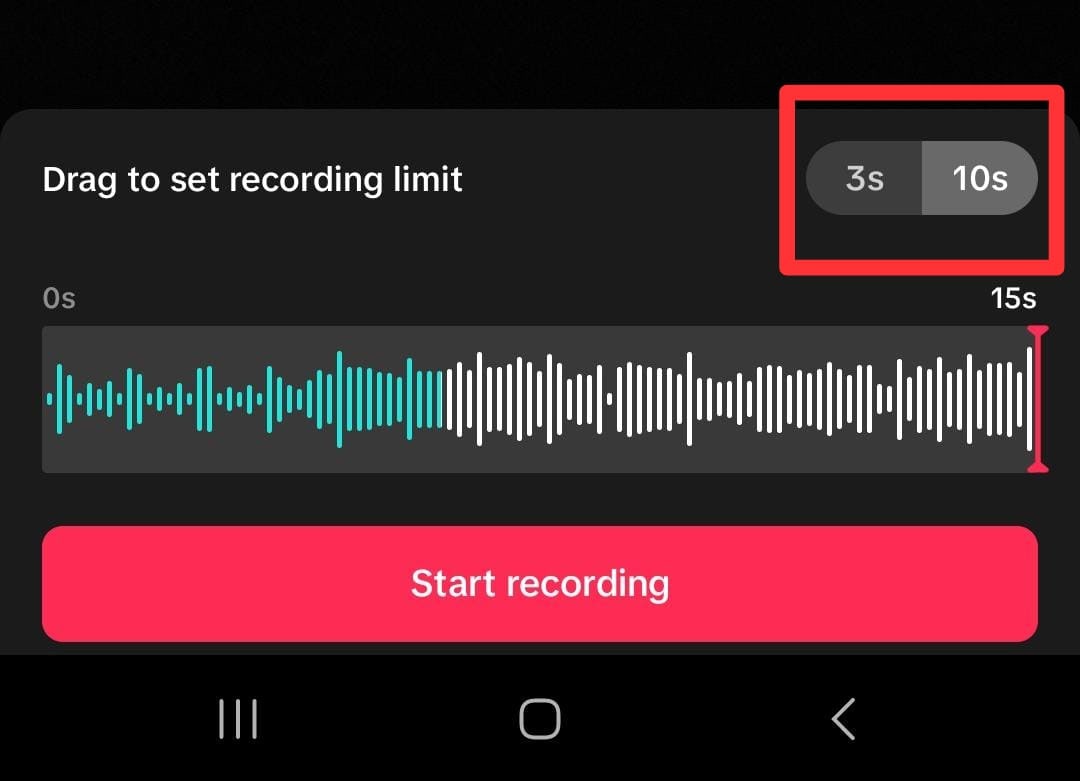
- Step 2. Delay the recording
On the recording screen, click on the Timer icon on the right side of the screen. Here, you can set the timer to 3 to 10 seconds to delay the recording’s start. You can also drag and set the recording limit if you want.
- Step 3. Start the recording
Then click “Start recording” to record the video with the timer on.
Method 3: Use a Photo Talking Tool
Next, consider using a Talking Photo feature by Wondershare Virbo. This method is for you who want to create engaging TikTok lip-sync videos without memorizing the words.
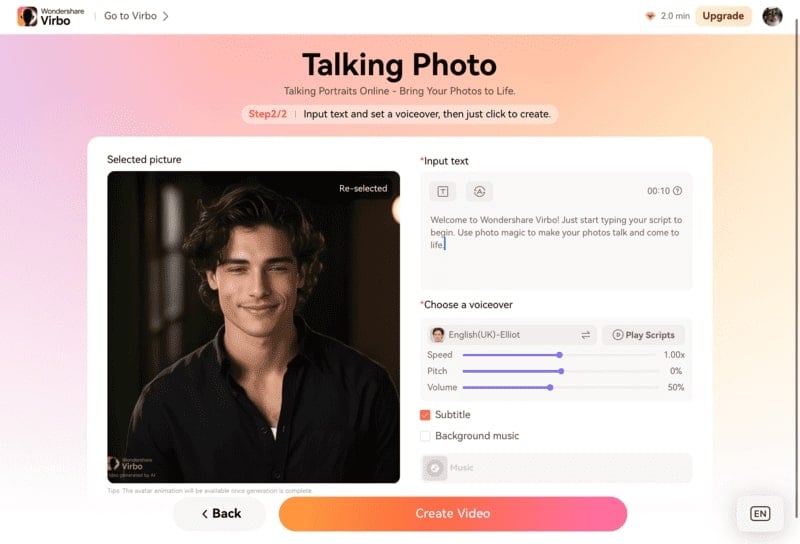
Virbo’s Talking Photo feature tool lets you upload a portrait of your photo and then make it appear as though it is speaking along with the audio. You do not have to install the app because you can use this feature online on their official website.
Here’s how to use Wondershare Virbo - Photo Talking feature to create a TikTok lip-sync video:
- Step 1. Start a new project.
Open the Wondershare Virbo website and tap the talking photo function to start a new project.
Get Started Online Free Download
- Step 2. Upload a portrait.
Tap “Upload Photo”, then upload a picture you want to use by following the instructions.
- Step 3. Edit and export.
Insert the text and adjust the voice settings. If you want to insert your own audio, you can use Wondershare Virbo for mobile or Desktop to upload or record your audio. Then, tap “Generate Video” to export.
Now, you have successfully made your own TikTok lip-sync video. You can upload it to TikTok and share it with your followers. For more detailed instructions, you can see how to useVirbo’s Photo Talking tool .
Part 4: How To Lipsync Your Video to Any Language Using AI Video Translator
In today’s globalized world, reaching audiences in different languages is important for effective communication. Thanks to technological advancements, there is a tool that can help you translate video content.
Wondershare Virbo – Video Translator offers seamless solutions to translate video content into various languages with AI. Virbo ensures high-quality translations that maintain the integrity and impact of your original message.
How to lipsync TikTok videos to any language with Wondershare Virbo - Video Translator:
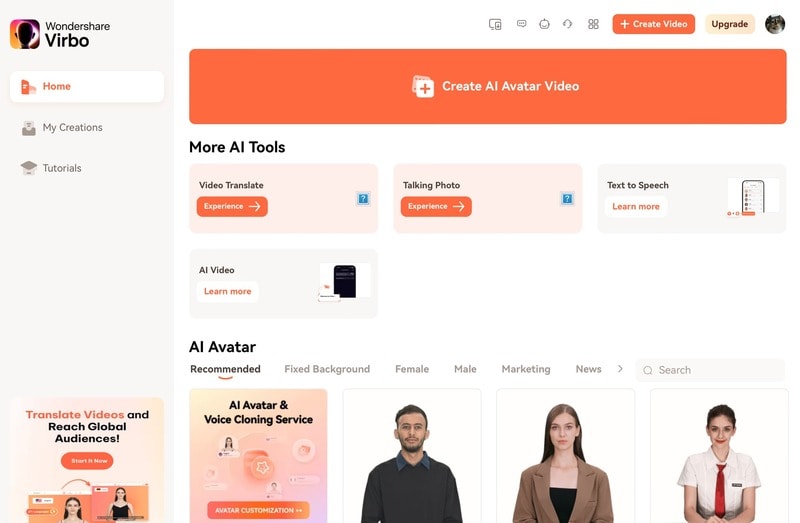
- Step 1. Go to Virbo’sofficial website , then click Generate AI Video Online.

Get Started Online Free Download
- Step 2. Log in or create an account.

- Step 3. Then, navigate to the Video Translator tool on the Virbo’s homepage.
- Step 4. Upload the video.
Once inside the Video Translator interface, upload the video file you wish to translate. Select the original video language and the preferred target language from the available options. Additionally, enable the Lip Sync feature to ensure that the translated audio aligns perfectly with the lip movements in the video.
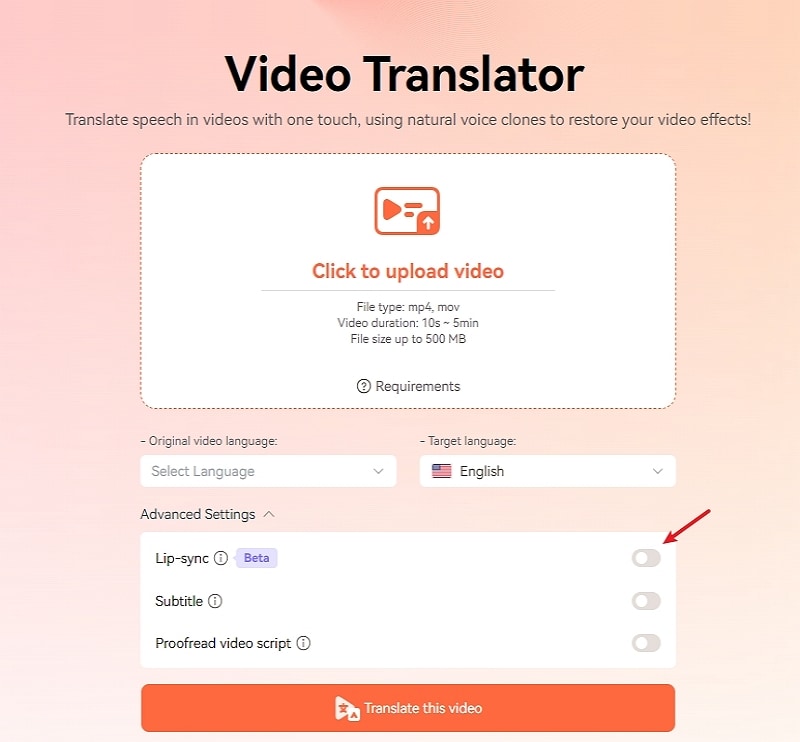
- Step 5. Click “Translate this video” to start translating the video.
Virbo’s Video Translator will use its advanced algorithms to translate the audio and synchronize it with the video seamlessly. Depending on the length and complexity of the video, the translation process may take some time.
Conclusion
Lip-syncing on TikTok has become a significant aspect of TikTok culture. It helps users show their creativity, entertain people, and maybe even become famous. Making**mouth sync TikTok videos usually means remembering lines and matching them to music, but there’s an easier way with Wondershare Virbo’s Talking Photo tool. This tool allows you to upload a portrait and sync it with audio without remembering the lines.
Also, Wondershare Virbo has a Video Translator tool that allows you to translate videos seamlessly into any language. This translator tool helps you communicate with people worldwide and maintain the original message.
The Ultimate Guide to Generating Speech in Different Languages With the Best Tools
To make your work reach worldwide, you would need effective communication. To ensure it, you would require mastering different languages. By doing so, you can make your work accessible and multilingual. In this case, text-to-speech converters are widely used.
Using such tools, you can convert the textual content into an AI voice in your desired language. Therefore, you must know about the famous TTS converters that can help you in mastering different languages. Hence, read this article to learn aboutSpanish voice generators and other language generators.
Part 1: What are the Reasons to Generate Speech in Different Languages
Generating speech in different languages can come with various benefits. It can help language learners, businessmen, and educationists ensure effective global communication. In this section, you can find many reasons for generating speech in many languages.
1. Learning Different Cultures
The cultural history of any nation or country lies in its language. If you want to know about the different cultural backgrounds of countries, you should understand their language. It will help you celebrate the prominent linguistic diversity of many cultures. Thus, generating speech in different languages can help you absorb the traditional knowledge of any certain culture.
2. Reaching Global Audience
To reach a global audience, you have to execute effective communication. In professional fields, people belong to different linguistic backgrounds. By generating speech in other languages, you can communicate with a diverse audience. It will benefit your business on international platforms. Moreover, it can make your information accessible to people worldwide.
3. Language Learning and Research
Do you want to learn different languages? By listening to a speech in different languages, you can know the correct pronunciation of certain words. You can also get familiar with different accents of languages easily. Moreover, you can conduct language analysis by comparing different languages.
4. Assist in Tourism
The tourism industry also benefits by generating speech in different languages. It helps foreigners to communicate with natives without any barriers. Moreover, it helps tourists to listen to the travel guide to ensure a smooth traveling experience. Thus, generating speech in multiple languages is necessary to make tourists understand the navigation system.
Part 2: The Best AI Text-to-Voice Generators with Custom and Optimized AI Voices
Do you want to learn about AI voice generators? This section will highlight the prominent text-to-speech generators that can convert your speech into different languages.
1. Synthesia
Synthesia is a renowned AI tool that can convert text to speech within a few seconds. It supports more than 400 languages of unique accents and tones. To generate speech in different languages, it supports more than 120 languages. ThisRussian accent voice generator has a constantly growing library of AI voices. Moreover, you can also customize an AI voice to meet your requirements.
This tool is not only a TTS converter but also produces videos of high quality. Through your textual content, you can generate an appealing video quickly. Hence, you should try this tool to convert your written content into an appealing AI voice.

Key Features
- With SSML tags, you can add pauses and emphasize certain phrases. Moreover, you can also modify the pronunciation of words in the AI voice.
- Once done with generating an AI voice, you can also insert desired soundtracks as a background from the given options.
- To present your generated AI voice, you can use an AI Avatar from this tool. This can help in virtual presentations and videos.
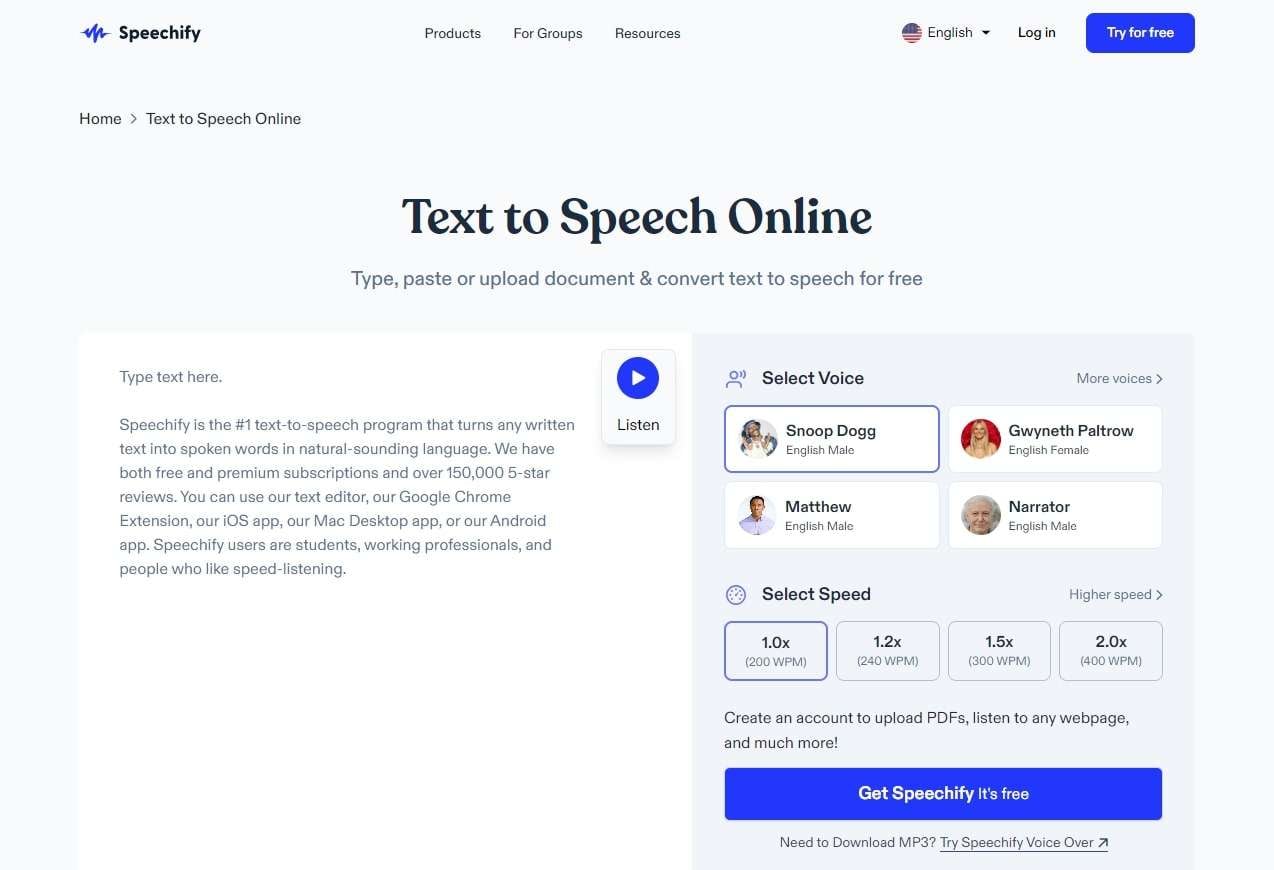
2. Speechify
Have you ever used Speechify before? This tool lets you upload, type, and paste the text on its interface for conversion. Moreover, it supports more than 50 human-like voices in natural tones. The supported languages are more than 30 that you can select according to your choice. The interface is well-organized without ads and bugs. Therefore, it’s an advanced tool comprising many powerful features.
Speechify can also convert PDFs and webpages into an AI voice in your chosen language. Thus, you won’t face any restrictions while using this tool. Furthermore, thisSpanish accent voice generator also offers options for AI voice cloning and AI dubbing. By utilizing such options, you can add innovation to your creative content.
Key Features
- Speechify offers a speed reader to help modify the listening speed. It can convert your text into AI voice with 9X faster speed.
- With this tool, you can explore the exclusive voices of famous celebrities. For example, you can select Gwyneth Paltrow and Snoop Dogg as your AI voice.
- You can save your created AI voices in the library of this tool. Moreover, the changes will be automatically synced across all your devices.
3. Speakatoo
Speakatoo is a trusted platform for generating speech in different languages. This tool supports more than 120 languages with a wide range of accents and tones. It covers all the accents of native speakers of other countries. The extensive AI voices on this tool can help you understand the tone and rhythm of different languages.
Moreover, it includes more than 850 AI voices that will sound realistic. ThisKorean voice generator uses deep learning algorithms to deliver the best audio results. Moreover, it lets you manage the rate, pitch, and volume of the AI voice efficiently.
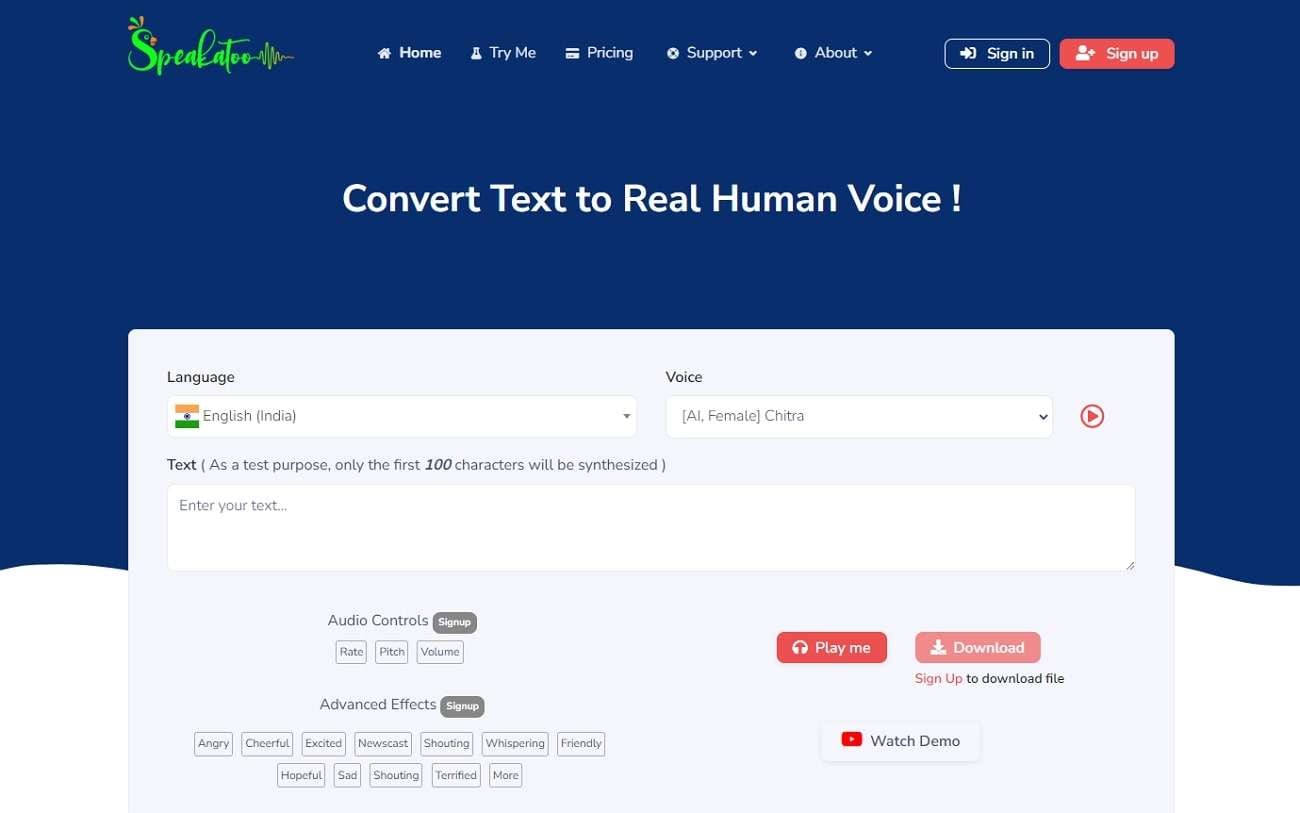
Key Features
- This tool comes with multiple audio formats. You can download the AI voice in WAV, OGG, FLAC, MP3, and MP4.
- You can insert natural breathing pauses in your AI voice using this tool. This will make the generated voice natural and realistic.
- Through this voice generator, you can add auto inflections to the AI voice to produce professional results.
4. SpeechGen.io
Do you want a basicChinese accent generator ? This tool has a simple interface that can help beginners. You can use this tool for commercial purposes to create voiceovers in different languages. The compatible audio file formats are MP3, WAV, and OGG. By buying its premium plans, you can convert 500,000 characters with great ease. Moreover, you can have unlimited downloads of your generated AI voices.
This TTS generator supports more than 270 AI voices with perfect pronunciations. You can also explore more than 30 languages on this platform. Thus, it’s a cost-effective tool that can generate promising AI voices in many languages.

Key Features
- It’s a multi-voice editor, as you can use multiple AI voices in a single audio file. This can help you in generating dialogues for movies and TV shows.
- With SSML support, you can manage custom voice settings. For instance, you can easily adjust intonation, pause, emphasis, stress, and volume.
- This tool shows compatibility with famous video editing software. For example, After Effects, Adobe, DaVinci, Audacity, etc.
5. Voicemaker
Voicemaker is an advanced tool that can also help generate speech in multiple languages. In its AI Engine, you can choose either Standard TTS or Neural TTS. Both these options display different AI voices and accents. From its given voice settings, you can preferably adjust the sliders of voice speed and volume. Moreover, you can share your audio file on many platforms like Facebook, TikTok, Instagram, etc.
ThisUrdu voice generator supports more than 1000 human voices in clear audio quality. Furthermore, you can discover more than 130 languages on this tool. Therefore, this tool is a well-trusted platform by many users worldwide.
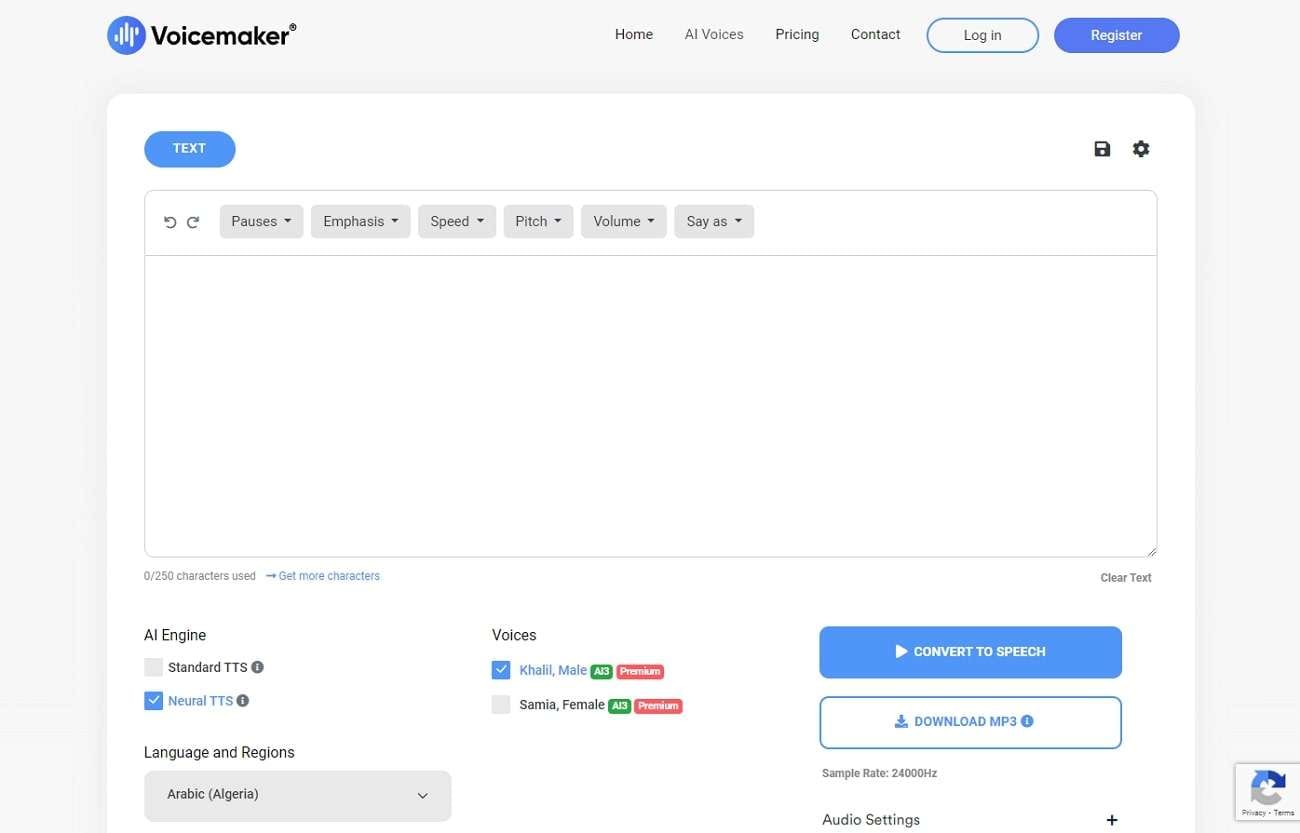
Key Features
- From the “Say As” option on this tool, the AI voice can correctly speak date, time, unit, address, etc.
- The audio settings allow you to select the desired sample rate and audio file format.
- This tool consists of many voice effects such as happy, sad, natural, breathing, soft, whispered, etc.
Bonus Tip: The Best AI Text to Speech App With Realistic and Natural Voices
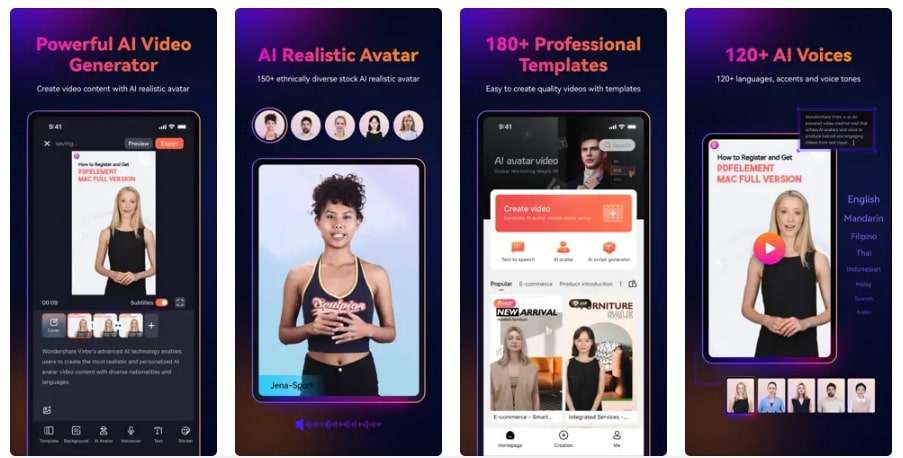
Do you want a more efficient for generating speech in different languages?Virbo is a famous tool offering an advanced text-to-speech converter. It can function on iOS, Android, Windows, and Web Browsers. It supports more than 120 AI voices and languages with the best audio quality. This tool has separate categories of AI voices, such as hot, marketing, lively, composed, soothing, etc.
You can either type or paste the text on its interface. After inserting the text, the tool will also display the estimated duration of the AI voice. It also has a wide range of tones and speaking styles of each language. Moreover, it provides AI avatars and an AI script generator which can further help display your content. Thus, Virbo is a professional TTS converter supporting many languages and accents.
Get Started Online Free Download
Wrapping Up
Generating speech in many languages can help you learn rich linguistic diversity. By reading this article, you can find out the top 5 tools that support multiple languages and AI voices. These tools produce clear audio quality and can be easily operated.
However, if you want a more advancedRussian voice generator that supports many languages, we suggest Virbo. It’s an efficient TTS converter that can produce AI voices in many tones and accents.
Also read:
- 2024 Approved Create Videos with an AI Script Generator
- Updated 2024 Approved Text To Speech | Wondershare Virbo Online
- Updated In 2024, How to Translate YouTube Videos to English Subtitles
- Overdub Voice With AI Virbo At Its Finest
- Updated Must-Have Apps for Real-Time Video Translation
- Updated In 2024, How to Enable the Text to Speech Function on iPhone
- Detailed Review & Alternatives of VOCALOID6 Voice Generator for 2024
- In 2024, The Most Straightforward Guide to Learning How to Clone Your Voice
- New Creating AI Videos With Templates
- Updated In 2024, 10 Best Free AI Video Generators with Innovative and Advanced Algorithms
- 2024 Approved How To Convert Video Voice to Text Online for Free?
- Boost Sales with Live Shopping Learn Winning Strategies From Top Brands
- Easy Steps to Make a Talking Avatar with AI From Any Photos
- 2024 Approved The Ever-Changing Era of AI Video Translation A Reality to Be Fulfilled
- New Create AI Avatar Video with AI Avatar | Wondershare Virbo Online for 2024
- New 2024 Approved Best 5 TikTok Voice Generators You Should Try
- Updated How To Generate Speech From Text | The Top Text-to-Speech Converters for 2024
- 2024 Approved Create AI Avatar Videos | Wondershare Virbo
- Updated Top 8 Text-to-Video AI Generators to Produce Video Easily
- Updated The Power of YouTube Live Selling Unlock Your Sales Potential
- 2024 Approved 10 Free Football Streaming Sites To Bookmark
- In 2024, How to Translate TikTok Videos Top 5 Auto Translate Tools
- In 2024, How to Make an Explainer Video Step by Step Guide
- Updated In 2024, Introduction of Virbo Online | Wondershare Virbo
- Updated 2024 Approved Must-Have Apps for Real-Time Video Translation
- New 2024 Approved Perfect Guide To Excel in TikTok Live Shopping
- In 2024, About Meizu 21 Pro FRP Bypass
- 6 Fixes to Unfortunately WhatsApp has stopped Error Popups On Infinix Smart 8 Pro | Dr.fone
- In 2024, Here are Some of the Best Pokemon Discord Servers to Join On Oppo A58 4G | Dr.fone
- How To Erase an iPhone 11 Pro Without Apple ID Password?
- How to Bypass FRP on Itel A60?
- In 2024, Unlock Your Oppo Find N3 Flips Potential The Top 20 Lock Screen Apps You Need to Try
- In 2024, Will Pokémon Go Ban the Account if You Use PGSharp On OnePlus 11 5G | Dr.fone
- In 2024, 5 Techniques to Transfer Data from Meizu 21 Pro to iPhone 15/14/13/12 | Dr.fone
- How To Activate and Use Life360 Ghost Mode On Motorola Moto G13 | Dr.fone
- In 2024, Unlock Apple iPhone 11 Pro Without Passcode Easily | Dr.fone
- How Do You Remove Restricted Mode on iPhone 12 mini | Dr.fone
- Full Solutions to Fix Error Code 920 In Google Play on Xiaomi Mix Fold 3 | Dr.fone
- Simple ways to get lost messages back from Samsung Galaxy F54 5G
- 11 Proven Solutions to Fix Google Play Store Not Working Issue on Vivo Y78+ | Dr.fone
- Undeleted lost videos from Lava
- Possible solutions to restore deleted contacts from Realme Narzo 60 Pro 5G.
- How to Mirror PC Screen to Oppo Reno 8T 5G Phones? | Dr.fone
- How to identify missing or malfunctioning hardware drivers with Windows Device Manager in Windows 10 & 7
- Proven Ways in How To Hide Location on Life360 For Apple iPhone 14 Pro | Dr.fone
- Title: New Amazon Live for Beginners Features, Pro Tips & Future Trends
- Author: Sam
- Created at : 2024-06-23 02:57:20
- Updated at : 2024-06-24 02:57:20
- Link: https://ai-voice-clone.techidaily.com/new-amazon-live-for-beginners-features-pro-tips-and-future-trends/
- License: This work is licensed under CC BY-NC-SA 4.0.
