
:max_bytes(150000):strip_icc():format(webp)/espnplus-6d79c347f2df42d7a38cdb0ba9a2472b.jpg)
New 2024 Approved Top 10 Talking Photo Online Tools You Have To Try
Top 10 Talking Photo Online Tools You Have To Try
People are constantly looking for creative ways to make their photos stand out and communicate messages effectively. One popular trend is tomake pictures talk online . By animating your photos and adding audio, they can be more captivating and leave a lasting impression.
While it can be overwhelming to find the best one, we’ve narrowed down the top 10talking photo online tools that let your photos talk. Plus, we’ve included easy-to-follow guides on how to use them.
Part 1. Best 10 Talking Photo Online Tools in 2024
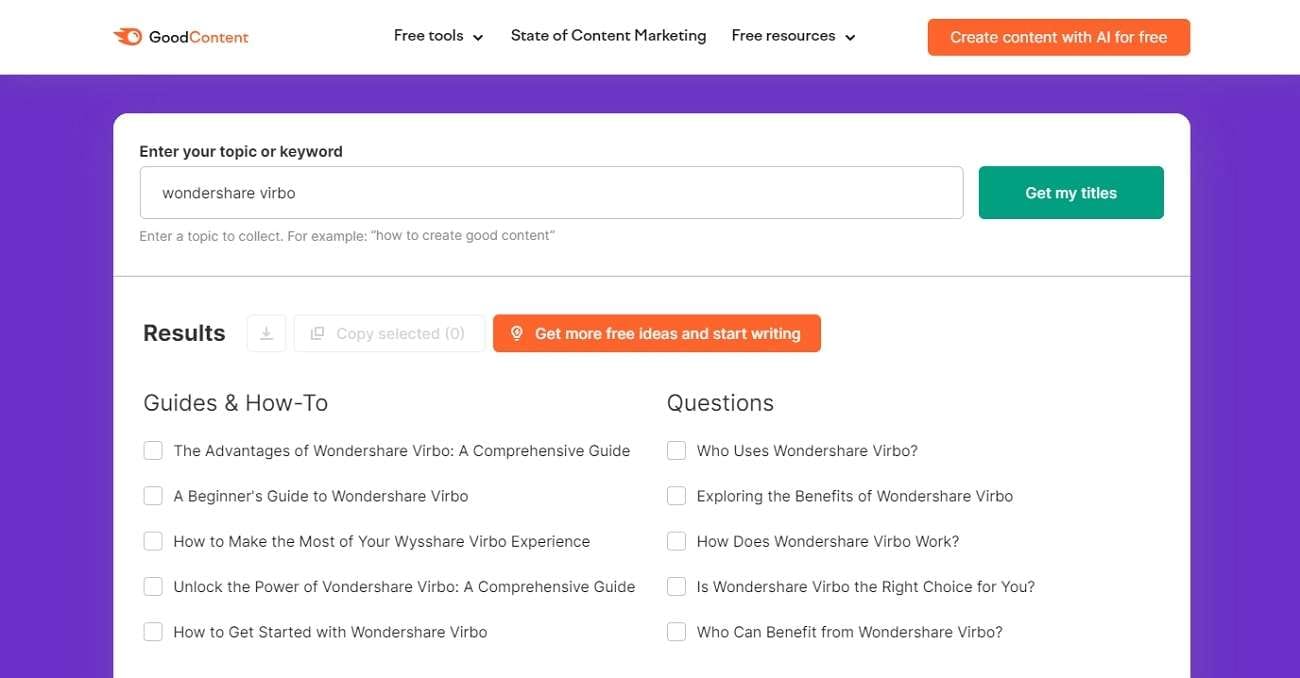
1. Wondershare Virbo
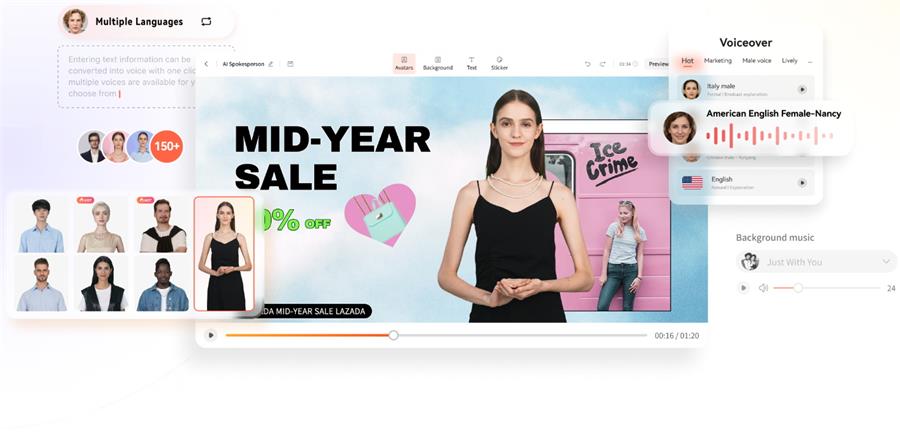
Wondershare Virbo is one of the best versatile video production tools specifically designed for crafting AI human avatar videos. Using artificial intelligence-generated content (AIGC) technology, Virbo excels at creatingtalking photos online for free .
WithTalking Photos feature , you have the flexibility to choose from existing AI avatar templates or upload your own pictures. These avatars can then speak based on your script or synchronize their lip movements with recorded audio.
Virbo’s Talking Photos features:
- A library of more than 300 free AI avatars.
- Over 300 AI voices to choose from
- Easy tutorials with a step-by-step guide
- Compatible across platforms
- Natural animation and lip sync
Pricing: Free trial available. The monthly plan starts from US$9.9 /mo.
Pros
- Language accessibility with a selection of over 300 AI voices
- Virbo AI gives natural animation and accurate lip synchronization
- Equipped with easy-to-follow tutorials, so users can quickly learn and make the most of its features
- The AI video generation process is very fast
Cons
- Although you can use it for free, users may need to pay for a subscription fee for unlimited usage

Get Started Online Free Download
2. Veed.io
VEED.io is an all-purpose online video editing platform that enables creators to easily improve their videos. Packed with various features, this web-based editor simplifies the video editing journey, includingmaking picture talk online with Veed.io Talking Avatar.
Veed.io features:
- Customizable AI avatars
- Allows for audio input or uploading a prerecorded voiceover
- Create talking characters and edit videos in one app
Pricing: Free plan available. The monthly plan starts at $24/month.
Pros
- User-friendly interface
- Extensive format support
- Users can add watermarks to their videos to protect their content
Cons
- Relying on internet connectivity
- Some users have experienced difficulties uploading their personal videos and audio files to the platform

3. Elai.io
Elai.io’s AI Talking Photo works as aphoto speak online tool that uses advanced AI to animate your photos. Once you upload your portrait photo to Elai.io, you have the option to add a live microphone recording or use pre-recorded audio. You can also input text and see your photo talks in a video.
Elai.io features:
- Create videos from a URL link
- Add voiceovers using a microphone
- Explore over 100 talking head templates
- Choose from a selection of more than 80 avatars
Pricing: One minute free for first timers. Monthly subscription starts from $23/month.
Pros
- Maintain user privacy
- Works with Chat GPT to help generate videos
Cons
- Beginners may face challenges when trying for the first time

4. Dupdub
DupDub is a multifaceted platform that provides a range of AI-powered tools that help you with voiceover, writing, painting, avatar creation, and video editing. By using AI technology, Dupdub canmake your photo speak online and simplify your creative workflows.
Dupdub features:
- Sync your avatar’s lips to match the script
- Personalize voiceover for your avatar
- Enjoy an easy-to-use interface.
Pricing: 3 days free trial with 10 credits after registration. The monthly subscription starts at $11/month.
Pros
- You can pay based on credits which can last for a lifetime
- No complicated setups
Cons
- The lip-syncing quality doesn’t look very natural
- There are still pixelation issues around the avatar’s mouth area

5. Tokking Heads
Tokking Heads is a funtalking photo online tool that can also add human expressions to your photo. It uses advanced technology to recognize faces and offers a variety of facial animations. You can customize your talking photos with filters, music, animated texts, and sound effects to make them even more exciting.
Tokking Heads features:
- Add expressions to your photos
- Use facial recognition technology to integrate expressions into images
- Personalize your talking photos with filters, music, animated texts, and sound effects.
- Available on iOS, Android, and online
Pricing: Free trial is available. The monthly subscription starts from $9.99/month.
Pros
- A wide range selection of avatar templates
- Versatile for creating different content types such as talking avatars and animated videos
Cons
- The performance is a bit sluggish

6. Vidnoz
Vindoz offers a robust solution to make photo speak online. Using this platform, users can animate their static images and add voiceovers. The process begins by either uploading a local photo or selecting from a wide array of available templates. Additionally, Vindoz incorporates AI capabilities to generate animated images with speech capabilities in various languages.
Vidnoz photo talking features:
- Support personalized talking photos
- Accommodate various languages
- Offer both female and male voice options
- Generate videos from photos quickly
Pricing: Free to generate 1-minute video per day. Monthly plan starts at $22.49/mo.
Pros
- Generate talking head MP4 videos for free
- Access over 20 avatar characters at no cost
- Choose from over 100 speaking head languages
Cons
- Include a watermark for the free version
- Standard quality

7. Blabberize
Blabberize is another photo editing tool that enables you tomake pictures talk online . While it’s mainly used in education, you can use Blabberize’s talking photo to announce, teach, and tell stories for student projects.
Blabberize features:
- Students can play back their recordings and see their photos talking
- Manually select a specific portion of the picture as the “mouth”
- Simple and easy to use
Pricing: One-week free trial. Yearly plans start from $26/year.
Pros
- Great for educational use
Cons
- Outdated interface
- No clear security and privacy measures
- Limited features and options

8. Good Trust
Good Trust’s Singing Portraits is atalking photo online free to use. This tool offers an enjoyable and interactive method to enrich your photo memories. Simply take a selfie or upload a photo, select a song, and witness the individual lip-syncing to your chosen tune! It’s a delightful way to add a personal touch to your pictures.
Good Trust features:
- Makes your photos sing
- Allows users to take photos directly using their webcam
- Drag-and-drop feature
- Offers a selection of available music tracks to choose from
Pricing: Free.
Pros
- Transforms both human and non-human photos into talking images
- Free to use
Cons
- Limited features and customization
- Not suitable for advanced video editing
- Mainly designed for music-related tasks

9. Yepic AI
Yepic AI’s Talking Photos is a professional talking head AI tool designed to transform your scripts into videos. It provides a variety of AI capabilities to assist in creating creative and captivating videos for social media, presentations, marketing materials, and more.
Yepic AI features:
- Various AI avatars
- Support for multiple languages
- Customizable talking heads
Pricing: 14-day free trial. Monthly subscriptions start from £6.98/user/month.
Pros
- Realistic avatar
- Good quality lipsync
Cons
- Potential for occasional glitches in lipsync quality
- Video quality may not be the best from other options

10. DeepBrain AI
DeepBrain AI is an innovative artificial intelligence dedicated to creating high-quality visual content. Their AI talking head video generator produces lifelike AI portraits,makes picture talk online , and allows you to transform text into video in only 5 minutes.
DeepBrain AI features:
- Simplify the video process with a variety of templates
- Support for over 80 languages
- A ChatGPT-like interface capable of generating and refining your video script
Pricing: Monthly subscriptions start at $29/month.
Pros
- Hyper-realistic AI technology
- Access to a free demo for AI video creation without a credit card
Cons
- Users with the Starter Plan may be insufficient by the 10-minute video limit

Author’s Verdict
After reviewing the various AI-powered tools for creatingtalking photo online , Wondershare Virbo stands out as a versatile and user-friendly option. With its impressive library of over 300 free AI avatars and features such as natural animation and accurate lip synchronization, Virbo excels in making realistic and high-quality AI photo-talking videos.
While some features may require a subscription, the pricing plan is reasonable considering the robust set of functionalities it offers.
Part 2. How To Make Picture Talk Online With the Best Free Tool
Now, let’s put the claim to the test and dive into the process ofmaking picture talk online using Wondershare Virbo. Virbo’s Photo Talking feature can be a great tool for marketing advertisements, online lesson presentations, and content creation for social media posts.
How tomake my photo talk free online with Wondershare Virbo:
Step 1: Go to the Wondershare Virbo website
Visit theWondershare Virbo website and click “Generate AI Video Online” > “Talking Photo.”

Get Started Online Free Download
Step 2: Upload a portrait photo or opt for an AI avatar template
If you prefer to use your own photo, click on “Upload Photo” and pick the portrait you want to use as your talking avatar. Proceed by clicking next.

Step 3: Customize your video
After selecting the talking avatar, input text and choose a voiceover option from the available choices to generate the voiceover for your video. Adjust the accent, speed, pitch, and volume to your liking. You also have the option to include subtitles and background music.
If you’d rather use your own voice, utilize the Wondershare Virbo mobile app and tap “record audio.”

Step 4: Download the talking avatar
Finally, after completing the editing process, export your talking avatar video by clicking on “Create Video.” Allow a few minutes for the export process to finalize, and your talking avatar videos will then be available for download.
Conclusion
Photo talking online refers to the innovative capability of generating animated videos featuring speaking avatars or characters based on static photos. This feature, often powered by artificial intelligence (AI), enables users to make their photos “talking” by animating the subject’s mouth movements and syncing them with recorded or generated audio.
One popular platform that offers photo talking online capabilities is Wondershare Virbo. Through its online interface or mobile app, users can upload a portrait photo or select from a variety of ultra-realistic AI avatars.
Get Started Online Free Download
Launching Your Live Room
Launching Your Live Room
Explore step-by-step instructions on decorating your space, uploading local images and videos, adding engaging AI interactions, etc. Elevate your streaming experience and captivate your audience with a seamlessly executed live room. Dive into our comprehensive guide now!
02Uploading Local Images and Videos
07AI Intelligent Script Generation
11Starting/Ending the Live Broadcast
Decorating Your Live Room
Decoration Guidance
- Click on the product homepage and create a blank live room to initiate a new live session.

Create a blank live room
- Upon creating a blank live room, the live room editing page will open. The left side serves as the operation area, the right side as the canvas area, and the materials area is located above.

Livestream room navigation
- Click on the templates to use pre-designed combinations of background, virtual hosts, and stickers.

Select a template
- Customize the background from the background library. During the live broadcast, only one background can be used.

Livestream room customization
- Choose a virtual host from the virtual host library. Only one virtual host can be used during the live session.
![]()
Choose a virtual host
- Add stickers from the sticker library. Multiple stickers can be used during the live broadcast.
- After selecting materials, adjust their position and size in the canvas area. Right-click to modify layers, copy, or delete materials.
Uploading Local Images and Videos
Upload background images or videos
- Upload: Click Background -> Upload Background -> Select file to upload. Materials will be displayed in “My Background” after uploading.

Upload Background
- Apply: Click Background -> My Background, then click on the material to use it on the canvas.
- Delete: Hover over the material and click the delete icon to remove it.

Delete Background
Note
Background upload requirements:
- Image and video dimensions should be 9:16
- Image formats: JPG/JPEG/PNG
- Video formats: MP4/MOV
- Resolution should not exceed 1080P
- Video duration should not exceed 30 minutes
- File size should not exceed 1GB
Upload sticker images or videos
- Upload: Click Sticker -> Upload Sticker -> Select file to upload. Materials will be displayed in “My Sticker” after uploading.

Upload Sticker
- Apply: Click Sticker -> My Sticker, then click on the material to use it on the canvas.
- Delete: Click Sticker -> My Sticker, hover over the material, click the delete icon to remove it.

Delete Sticker
Note
Sticker upload requirements:
- Image and video dimensions are flexible.
- Image formats: JPG/JPEG/PNG
- Video formats: MP4/MOV
- Resolution should not exceed 1080P
- Video duration should not exceed 30 minutes
- File size should not exceed 1GB
Text-Driven Live Room
Script Guidance
- Input script text: Copy and paste your script into the script dialogue box.

Text Scripts Inset
- Choose a matching tone: Click the voice-over entrance above, select a suitable tone, and preview it.
- Preview: Click the “Preview” button below the text to listen.
Audio-Driven Live Room
Audio Guidance
- Upload audio: Click Script -> Audio -> Upload local voice and upload the local file.

Upload Audio
- Preview audio: After uploading, click to preview the audio.

Preview Audio
- Audio sorting: Hold and drag to sort the audio files.

Audio sorting
- Audio sorting: Hold and drag to sort the audio files.

Modifying Live Room Name
Method Guidance
- Method 1: Click the edit button in the upper-left corner of the edit page to rename the live room.

Rename Livestream Room
- Method 2: Product homepage -> My Live Rooms -> Click on the more options for an individual live room -> Choose Rename.
Adding AI Identification
Step Guidance
- On the live room editing page, click on the checkbox before the AI identification to enable or disable it.
AI Intelligent Script Generation
Generation Guidance
- Click the “AI Intelligent Script” button below the script, a popup will appear.
- Enter your product name (mandatory), selling points (optional), promotional information (optional), select language and style, then click generate.

AI Script
- The generated result can be further modified, click “Use” to add it to the script dialogue box.
AI Translation
Translation Guidance
- Click the “AI Translation” button below the script, a popup will appear.
- Place the text to be translated on the left, click the middle arrow to select the language for translation (e.g., English), and click translate.

AI Translation
- The generated result can be further modified, click “Use” to add it to the script dialogue box.

AI Translation Result
Manual Interaction
Microphone Interaction
- Operational Flow:
- Click Manual Interaction -> Microphone, and select the microphone device.
- Speak into the microphone and observe the sound wave status.
- Open “Start Live,” wait for the appearance of the virtual host image, and click “Open Mic Takeover.” The virtual host’s mouth will be closed, and your voice will drive the virtual host to speak.
- After speaking, click “End Takeover,” and the virtual host will resume reading the scripted dialogue.
- Click Manual Interaction -> Microphone, and select the microphone device.
- Grant Browser Microphone Access:
- Google Chrome:
*Open Chrome, click the settings icon in the top right.
* Click “Settings,” open the settings page. Select “Privacy and Security” and then click “Site Settings.”
*Enter the site settings page, click “Microphone.”
* On the microphone authorization page, select that the site can request the use of your microphone.
* After these settings, when the browser needs to use the camera or microphone, a device request box will pop up on the page. Select “Allow.” - Mozilla Firefox:
*Open Firefox, click the settings icon in the top right, and click “Settings.”
* Open the settings page, click “Privacy & Security,” and find “Microphone Permissions.” Click “Settings” next to “Microphone.”
*Enter the settings page, add the site that requests the use of your microphone to the list, and click “Save Changes.”
* After these settings, when the browser needs to use the camera or microphone, a device request box will pop up on the page. Select “Allow.” - Sogou Browser:
*Open Sogou Browser, click the settings icon in the top right, and click “Options.”
* Open the options page, click “Advanced,” find “Privacy - Browsers on the Mac System:
*Locate “System Preferences” on your Mac dock and click the icon. Once opened, find “Security & Privacy” and click to open.
* On the “Security & Privacy” page, select “Privacy,” then click on “Microphone” and set the applications that need to use the microphone to “Allow.”
- Google Chrome:
Text Interaction
- Click on “Artificial Interaction” and enter interaction scripts in the input box below.
- Click “Add Text” to add it to the interaction list. After starting the live broadcast, each interaction script will have a send button.

Text Interactionn
- Click “Send” to trigger the AI to speak according to the interaction script.
Intelligent Interaction
Note
The current intelligent interaction feature only supports Alibaba International. If you are streaming on other platforms, you can skip this step.
Setting Entrance
- On the live broadcast page, click on “Intelligent Interaction,” select the live platform, and the supported intelligent interaction features will be randomly displayed.
Q&A Library Settings
- Creating a New Q&A:
- On the product homepage, click on Q&A Library - Add Q&A, and a popup window will appear.
- Fill in the rule name, keywords, reply text, and upload a reply video. Click Save.
Note
Rule Name: Name the rule for easy identification.
Keywords: If a viewer’s question in the live room contains any of these keywords, it will trigger the AI to answer.
Reply Content: You can add up to 5 replies. Include variables like [Viewer’s Nickname] and [Viewer’s Country] for personalized responses.
Sequential Reply: Replies in sequence when triggered.
Random Reply: Randomly selects a reply when triggered.
Reply Video: If configured, the video will be displayed at the specified position until the AI’s reply ends.
- Adjusting Q&A Activation Status:
- Click Q&A Library - Switch to close or open the Q&A rule. When closed, the Q&A rule will not take effect after the live broadcast starts.
- Turning on Q&A Library Switch in the Live Room:
- On the live broadcast editing page, click Intelligent Interaction - Platform, select “Alibaba International,” and turn on the Q&A Library switch. This must be done after starting the live broadcast and capturing the barrage for the function to work.
Greeting Rules Settings
- Greeting Content: You can add up to 5 replies, including variables like [Viewer’s Nickname] and [Viewer’s Country].
- Sequential Reply: Replies in sequence when triggered.
- Random Reply: Randomly selects a reply when triggered.
- On the live broadcast editing page, click Intelligent Interaction - Platform, select “Alibaba International,” turn on the Greeting switch, and click the edit icon to open the editing window. Fill in the reply text and click Save.
Sending Business Cards and Product Catalogs
- On the live broadcast editing page, click Intelligent Interaction - Platform, select “Alibaba International,” turn on the “Send Business Cards” switch, and turn on the “Send Product Catalogs” switch.
Note
These functions will only take effect after starting the live broadcast and capturing the barrage.
How to Start Live Barrage Capture
- Start Broadcasting in Virbo Live
- Follow the steps for “Start/End Broadcast” on the live broadcast editing page.
- Install the Plugin in Chrome
- Ensure Chrome is up to date, then download the plugin from the provided link . After downloading, unzip locally.
- Configure the Plugin in Chrome
- Open Chrome, go to Settings - Extensions - Manage Extensions, enable Developer mode, click “Load Unpacked,” and select the unzipped folder. Enable “Allow in incognito mode” in the plugin details.
- Copy the Live Control Page Link
- Copy the link of your live control page (web version) from the live platform. Paste the link into the live broadcast editing page under Intelligent Interaction - Live Room Link Input, then click “Start Capturing.”
Note
Alibaba International currently supports automatic Q&A, automatic greetings, automatic business card sending, and automatic product catalog sending. You can turn on the corresponding switches and then configure the detailed settings for each item.
Starting/Ending the Live Broadcast
Starting the Live Broadcast
- On the live broadcast editing page, click “Start Broadcasting.”
- The AI live broadcast window will appear shortly after, displaying the AI live broadcast.
Using Your Broadcasting Partner or OBS
Note
Keep the AI live broadcast window open on the desktop during the broadcast, or it will not broadcast properly.
- Open your broadcasting partner or OBS, add a window, select the Wondershare VVB (Live Version) live window.
- Click “Start Broadcasting.” Use Alt + mouse to crop out the web bar or use the zoom function to remove it.
- During the live broadcast, you can only modify the “Artificial Interaction” function; other broadcast settings cannot be changed.
Ending the Broadcast
- When concluding the live broadcast, initiate the termination of the live stream on the platform’s broadcasting partner first, followed by clicking the “End Live” button on Virbo Live to finalize the shutdown process.
02Uploading Local Images and Videos
07AI Intelligent Script Generation
11Starting/Ending the Live Broadcast
Decorating Your Live Room
Decoration Guidance
- Click on the product homepage and create a blank live room to initiate a new live session.
Create a blank live room
- Upon creating a blank live room, the live room editing page will open. The left side serves as the operation area, the right side as the canvas area, and the materials area is located above.
Livestream room navigation
- Click on the templates to use pre-designed combinations of background, virtual hosts, and stickers.
Select a template
- Customize the background from the background library. During the live broadcast, only one background can be used.
Livestream room customization
- Choose a virtual host from the virtual host library. Only one virtual host can be used during the live session.
![]()
Choose a virtual host
- Add stickers from the sticker library. Multiple stickers can be used during the live broadcast.
- After selecting materials, adjust their position and size in the canvas area. Right-click to modify layers, copy, or delete materials.
Uploading Local Images and Videos
Upload background images or videos
- Upload: Click Background -> Upload Background -> Select file to upload. Materials will be displayed in “My Background” after uploading.
Upload Background
- Apply: Click Background -> My Background, then click on the material to use it on the canvas.
- Delete: Hover over the material and click the delete icon to remove it.
Delete Background
Note
Background upload requirements:
- Image and video dimensions should be 9:16
- Image formats: JPG/JPEG/PNG
- Video formats: MP4/MOV
- Resolution should not exceed 1080P
- Video duration should not exceed 30 minutes
- File size should not exceed 1GB
Upload sticker images or videos
- Upload: Click Sticker -> Upload Sticker -> Select file to upload. Materials will be displayed in “My Sticker” after uploading.
Upload Sticker
- Apply: Click Sticker -> My Sticker, then click on the material to use it on the canvas.
- Delete: Click Sticker -> My Sticker, hover over the material, click the delete icon to remove it.
Delete Sticker
Note
Sticker upload requirements:
- Image and video dimensions are flexible.
- Image formats: JPG/JPEG/PNG
- Video formats: MP4/MOV
- Resolution should not exceed 1080P
- Video duration should not exceed 30 minutes
- File size should not exceed 1GB
Text-Driven Live Room
Script Guidance
- Input script text: Copy and paste your script into the script dialogue box.
Text Scripts Inset
- Choose a matching tone: Click the voice-over entrance above, select a suitable tone, and preview it.
- Preview: Click the “Preview” button below the text to listen.
Audio-Driven Live Room
Audio Guidance
- Upload audio: Click Script -> Audio -> Upload local voice and upload the local file.
Upload Audio
- Preview audio: After uploading, click to preview the audio.
Preview Audio
- Audio sorting: Hold and drag to sort the audio files.
Audio sorting
- Audio sorting: Hold and drag to sort the audio files.
Modifying Live Room Name
Method Guidance
- Method 1: Click the edit button in the upper-left corner of the edit page to rename the live room.
Rename Livestream Room
- Method 2: Product homepage -> My Live Rooms -> Click on the more options for an individual live room -> Choose Rename.
Adding AI Identification
Step Guidance
- On the live room editing page, click on the checkbox before the AI identification to enable or disable it.
AI Intelligent Script Generation
Generation Guidance
- Click the “AI Intelligent Script” button below the script, a popup will appear.
- Enter your product name (mandatory), selling points (optional), promotional information (optional), select language and style, then click generate.
AI Script
- The generated result can be further modified, click “Use” to add it to the script dialogue box.
AI Translation
Translation Guidance
- Click the “AI Translation” button below the script, a popup will appear.
- Place the text to be translated on the left, click the middle arrow to select the language for translation (e.g., English), and click translate.
AI Translation
- The generated result can be further modified, click “Use” to add it to the script dialogue box.
AI Translation Result
Manual Interaction
Microphone Interaction
- Operational Flow:
- Click Manual Interaction -> Microphone, and select the microphone device.
- Speak into the microphone and observe the sound wave status.
- Open “Start Live,” wait for the appearance of the virtual host image, and click “Open Mic Takeover.” The virtual host’s mouth will be closed, and your voice will drive the virtual host to speak.
- After speaking, click “End Takeover,” and the virtual host will resume reading the scripted dialogue.
- Click Manual Interaction -> Microphone, and select the microphone device.
- Grant Browser Microphone Access:
- Google Chrome:
*Open Chrome, click the settings icon in the top right.
* Click “Settings,” open the settings page. Select “Privacy and Security” and then click “Site Settings.”
*Enter the site settings page, click “Microphone.”
* On the microphone authorization page, select that the site can request the use of your microphone.
* After these settings, when the browser needs to use the camera or microphone, a device request box will pop up on the page. Select “Allow.” - Mozilla Firefox:
*Open Firefox, click the settings icon in the top right, and click “Settings.”
* Open the settings page, click “Privacy & Security,” and find “Microphone Permissions.” Click “Settings” next to “Microphone.”
*Enter the settings page, add the site that requests the use of your microphone to the list, and click “Save Changes.”
* After these settings, when the browser needs to use the camera or microphone, a device request box will pop up on the page. Select “Allow.” - Sogou Browser:
*Open Sogou Browser, click the settings icon in the top right, and click “Options.”
* Open the options page, click “Advanced,” find “Privacy - Browsers on the Mac System:
*Locate “System Preferences” on your Mac dock and click the icon. Once opened, find “Security & Privacy” and click to open.
* On the “Security & Privacy” page, select “Privacy,” then click on “Microphone” and set the applications that need to use the microphone to “Allow.”
- Google Chrome:
Text Interaction
- Click on “Artificial Interaction” and enter interaction scripts in the input box below.
- Click “Add Text” to add it to the interaction list. After starting the live broadcast, each interaction script will have a send button.
Text Interactionn
- Click “Send” to trigger the AI to speak according to the interaction script.
Intelligent Interaction
Note
The current intelligent interaction feature only supports Alibaba International. If you are streaming on other platforms, you can skip this step.
Setting Entrance
- On the live broadcast page, click on “Intelligent Interaction,” select the live platform, and the supported intelligent interaction features will be randomly displayed.
Q&A Library Settings
- Creating a New Q&A:
- On the product homepage, click on Q&A Library - Add Q&A, and a popup window will appear.
- Fill in the rule name, keywords, reply text, and upload a reply video. Click Save.
Note
Rule Name: Name the rule for easy identification.
Keywords: If a viewer’s question in the live room contains any of these keywords, it will trigger the AI to answer.
Reply Content: You can add up to 5 replies. Include variables like [Viewer’s Nickname] and [Viewer’s Country] for personalized responses.
Sequential Reply: Replies in sequence when triggered.
Random Reply: Randomly selects a reply when triggered.
Reply Video: If configured, the video will be displayed at the specified position until the AI’s reply ends.
- Adjusting Q&A Activation Status:
- Click Q&A Library - Switch to close or open the Q&A rule. When closed, the Q&A rule will not take effect after the live broadcast starts.
- Turning on Q&A Library Switch in the Live Room:
- On the live broadcast editing page, click Intelligent Interaction - Platform, select “Alibaba International,” and turn on the Q&A Library switch. This must be done after starting the live broadcast and capturing the barrage for the function to work.
Greeting Rules Settings
- Greeting Content: You can add up to 5 replies, including variables like [Viewer’s Nickname] and [Viewer’s Country].
- Sequential Reply: Replies in sequence when triggered.
- Random Reply: Randomly selects a reply when triggered.
- On the live broadcast editing page, click Intelligent Interaction - Platform, select “Alibaba International,” turn on the Greeting switch, and click the edit icon to open the editing window. Fill in the reply text and click Save.
Sending Business Cards and Product Catalogs
- On the live broadcast editing page, click Intelligent Interaction - Platform, select “Alibaba International,” turn on the “Send Business Cards” switch, and turn on the “Send Product Catalogs” switch.
Note
These functions will only take effect after starting the live broadcast and capturing the barrage.
How to Start Live Barrage Capture
- Start Broadcasting in Virbo Live
- Follow the steps for “Start/End Broadcast” on the live broadcast editing page.
- Install the Plugin in Chrome
- Ensure Chrome is up to date, then download the plugin from the provided link . After downloading, unzip locally.
- Configure the Plugin in Chrome
- Open Chrome, go to Settings - Extensions - Manage Extensions, enable Developer mode, click “Load Unpacked,” and select the unzipped folder. Enable “Allow in incognito mode” in the plugin details.
- Copy the Live Control Page Link
- Copy the link of your live control page (web version) from the live platform. Paste the link into the live broadcast editing page under Intelligent Interaction - Live Room Link Input, then click “Start Capturing.”
Note
Alibaba International currently supports automatic Q&A, automatic greetings, automatic business card sending, and automatic product catalog sending. You can turn on the corresponding switches and then configure the detailed settings for each item.
Starting/Ending the Live Broadcast
Starting the Live Broadcast
- On the live broadcast editing page, click “Start Broadcasting.”
- The AI live broadcast window will appear shortly after, displaying the AI live broadcast.
Using Your Broadcasting Partner or OBS
Note
Keep the AI live broadcast window open on the desktop during the broadcast, or it will not broadcast properly.
- Open your broadcasting partner or OBS, add a window, select the Wondershare VVB (Live Version) live window.
- Click “Start Broadcasting.” Use Alt + mouse to crop out the web bar or use the zoom function to remove it.
- During the live broadcast, you can only modify the “Artificial Interaction” function; other broadcast settings cannot be changed.
Ending the Broadcast
- When concluding the live broadcast, initiate the termination of the live stream on the platform’s broadcasting partner first, followed by clicking the “End Live” button on Virbo Live to finalize the shutdown process.
Top 8 AI Titles Generators for Creating Catchy Titles For All Platforms
A good craft title can provide clarity about the purpose and topic of the media file. It also enhances the SEO and discoverability metrics of a media file to attract more users. With a well-designed title, you can boost your social media engagement. It can also reflect the style of your brand.
Many social media influencers and managers don’t have time to create titles for every post. For this reason, they rely on the AI subtitle generator . If you are new to these AI title tools, this discussion will provide compelling information about them**.**
Part 1: Why Creating a Catchy Title is Important For A Social Media Post
In today’s world, users’ attention spans are pretty short, and they wish to get the idea about the post as soon as possible. In scenarios like this, well-descriptive titles can help you create scroll-stopping posts. There are several reasons which explain the importance of creating catchy titles for social media posts. Some of them are explained below:
1. Captivating Attention and Boosting Engagement
If you want to be a successful person in social media, it is essential for you to create titles that can grab the user’s attention. When you get the user’s attention, they will eventually stop their scrolling and invest more time on your page. For this, use vivid language, a curious tone, and humor to arouse the users’ interest.
With the help of captivating titles, users can also be enticed to like, share, and comment on the posts. Having a high engagement ratio on social media will give a signal to the platform’s algorithm that you have valuable content.
2. Communication and Brand Identity
Titles speak in your place and communicate the value of your brand. With a descriptive title, users can gain reliable information from your content. It can promise information such as entertainment, inspiration, problem-solving, and more.
After a good understanding, they can interact with your posts in a better way. If you consistently utilize catchy titles in your social media posts, it will create a consistent brand identity. Viewers will also recognize your brand’s tone by just reading the start of the post title.
3. Curiosity Triggers and Click Through
As human beings, we all know that humans are extremely curious creatures. With the help of a title written in a curious tone, you will trigger curiosity in the viewers. This makes users eager to learn more about your posts. You can also boost the click-through rates on social media platforms with this.
When your click-through rates are higher, you can attract more organic traffic to your pages. This helps you to appear as a known social media influencer or manager with valuable information.
4. Encourage Sharing and Drive Conversions
If you are a social media user, you know that people share content that they find interesting. Thus, you have to ensure everyone finds your content valuable and entertaining. Through this, they can get more interested in your content.
Above all, a well-chosen title will also evoke an emotional connection, encouraging your post’s sharing. The chances of driving conversion with the help of a catchy title are also possible. Viewers can also download your resource and purchase, which helps drive more conversions.
Part 2: What Are the Benefits of Using an AI-Powered Title Generator
Yes, you can make the quality-perfect titles manually, but why do you want to compromise your time if thesubtitle generator AI can help you? With the usability of an AI-powered tool, you can achieve endless benefits in no time. Some of the benefits that you can gain by using anAI video title generator are:
1. Creativity and Efficiency
AI-powered tools have the potential to generate titles with optimized efficiency and creativity. These tools can produce titles rapidly and sometimes allow you to give customized commands to create titles of your choice.
Through this time-saving feature, you can focus more on the content rather than investing time in creating titles. With the leverage of machine learning algorithms, you can also find creative words. This creative content can help capture the viewers’ attention to attract more users.
2. Options and Expertise
Thesubtitle AI tools can help create a broad array of titles to give you flexibility over selection. You can further ensure to create the content with the pool of titles. It is beneficial when you need to brainstorm ideas for articles, blogs, and social media content.
In addition to this, AI tools are proficient in multiple skills and languages. These tools integrate expertise in filtering out grammatical errors and give optimized titles. One of the best things is you can also create titles in the languages you don’t speak.
3. Keyword Optimization and Types of Content
Keywords help to increase your reach and discoverability. With the power of AI tools, you can generate titles with keyword optimizations. They can also generate titles that can boost your reach within social media engines.
The chance of reaching a broader audience also increases with this. As it can help create diversified types of content, you can also create titles for the same post for different social media platforms.
4. Trends and Personalization
One reliable thing about AI is that it can perfectly adapt to emerging trends. With this capability, it can generate titles showing relevancy with up-to-date content. Moreover, your content will be showcased as more upgraded and engaging. Furthermore, there is no restriction to using the titles created with the AI tools.
You can also personalize the titles as per your needs. Not only this, but you can also give instructions to the AI tool for creating titles as per your preferences. Thus, the trendy content and personalizing options are also part of thesubtitle generator AI .
Part 3: 8 Best Tools to Create Unique and Engaging Social Media Post Titles
There are considerable numbers of social media title generators, such asYouTube title generator AI tools, on the web. However, you can get confused while searching for the best-in-class tools. For this reason, this section will provide information about reliablesubtitle generator AI tools:
1. SEMrush
SEMrush is a premium-grade title generator that can help you generate catchy headlines for various types of content. You only have to enter your topic or keyword and hit the generate button to create catchy titles. With a few taps, you can get the relevant tiles to brainstorm ideas.
The titles created with this tool hold the capability to elevate the productivity of the content. Using thissubtitle generator AI tool, you can generate up-to-date ideas for the content calendars. One of the assuring things is it can also generate titles based on the ideal title length and character.
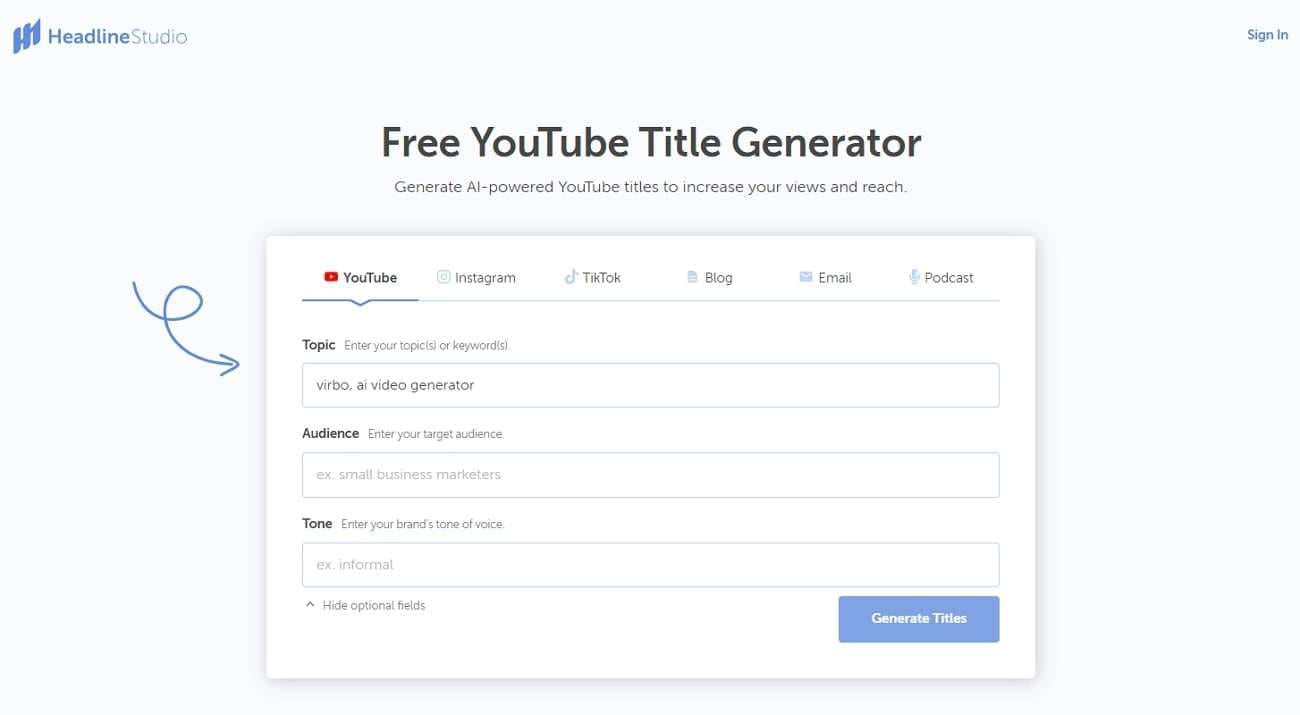
2. CoSchedule (HeadlineStudio)
This fascinating tool can aid you if you need to write the titles with the right word balance and multiple types of headlines. If you don’t like complex writing, you can add clarity in titles with this. With thisAI video title generator , you can add the emotions you want to show to your content.
You have the opportunity to optimize the target audience and tone to drive engagement. Moreover, this AI title generator can create captions for Instagram and TikTok, titles for blogs, subject lines for email, and episode titles for podcasts.
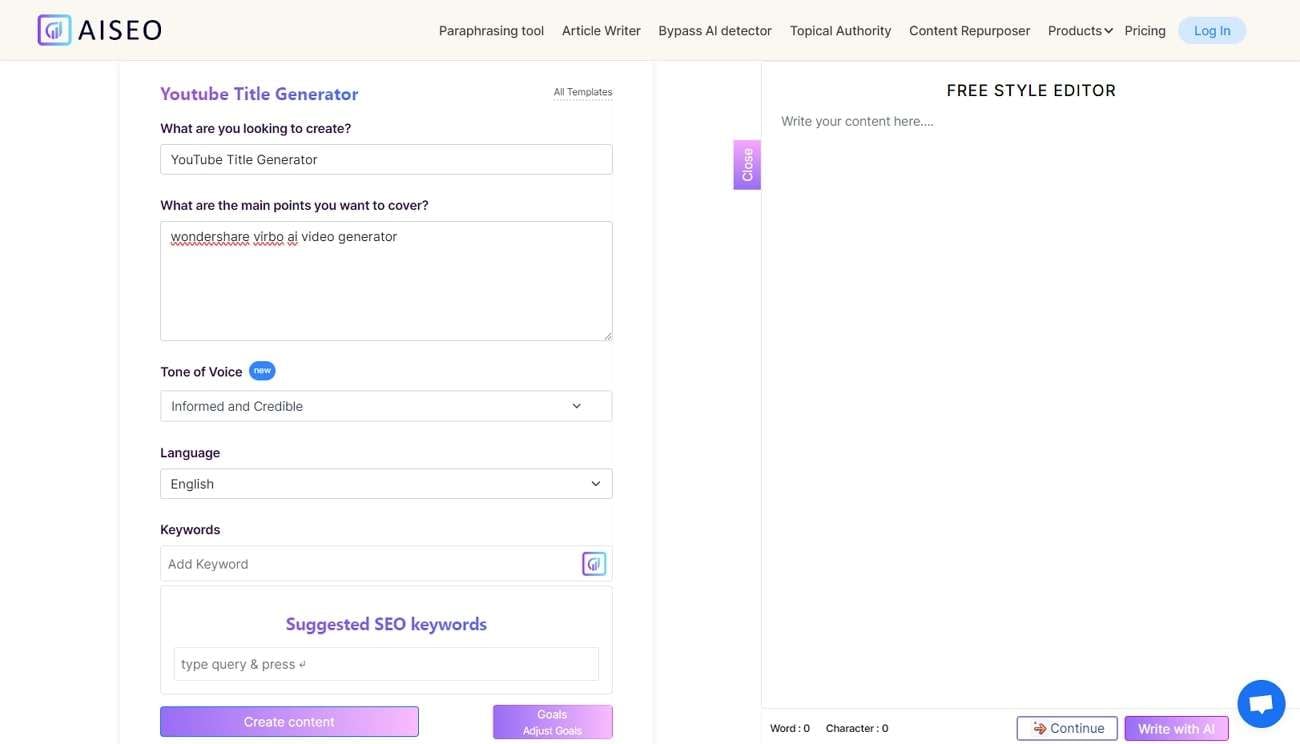
3. AISEO
It is an online tool that incorporates higher productivity metrics and reputable features. This exclusive tool lets you generate titles for blogs, YouTube videos, books, and other social media platforms. You can also insert the customized main points you want to add to your title.
ThisAI subtitle generator for free lets you select the tone of voice from its built-in options. It also supports various languages, such as German, Greek, Spanish, etc. You can select any of the languages to create titles. If you are concerned about keyword integrations, it can also naturally add the keyword in the titles.
4. vidIQ
ThisAI YouTube title generator is a perfect choice for YouTube influencers and content creators. It can generate titles that can drive attention to the content that you aim for. It has prediction algorithms through which you can experience the best content marketing.
For creating titles with this, you can also insert the text description of your YouTube videos. The titles created with this also incorporate the capability to trigger emotional curiosity. So you can showcase the theme of your videos interactively.

5. Hypotenuse AI
Hypotenuse AI is a revolutionaryYouTube title generator AI on the web. Through this, generate YouTube titles that can make your content stand out in the crowd. To generate intuitive titles, you can add the theme of your content or paste your whole content. To further guide the AI tool, you can also add the keyword of your choice.
It can create three variations of the titles and gives you the opportunity to select the one that matches your niche. There is no need to use the titles as it is because you can also edit them to a further extent. Moreover, it can also generate SEO-friendly blog titles or bios for your social media platforms.

6. TubeRanker
Each famous and most viewed YouTube video starts with captivating titles. Don’t worry if you don’t know how to create the perfect YouTube videos because thisYouTube clickbait title generator can help you with this. The titles created with this can enhance your click-ability and findability.
You only need to insert the keywords, and it will create multiple titles for you. Moreover, you can also select titles based on person, place, and content topic. It also allows you to select multiple titles at once and copy them together.

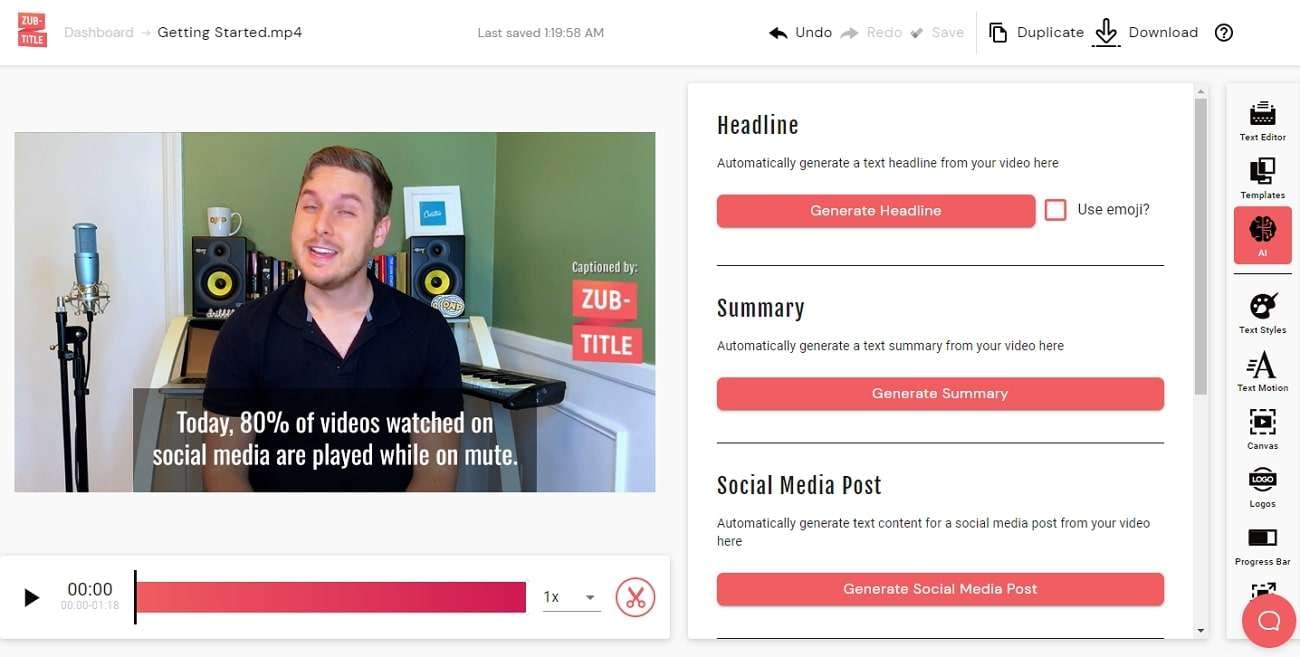
7. Zubtitles
A perfect platform through which you can generate video titles that can help you attract tons of users is Zubtitles. With this state-of-the-artAI video title generator , you can create quality optimized titles while saving your time and effort. Moreover, there is no need to spend lots of dollars to hire a virtual assistant to create engaging titles.
This tool not only saves time but also saves some dollars in your pockets. Above all, you can also edit the titles with your custom fonts and colors. It also lets you manage the parameters like padding, full width, and opacity. You can also position the titles and fine-tune them effectively.
8. Quicktools by Picsart
This innovative tool integrates AI powers to create unlimited titles for your media files. You can create every type of title, from simple content to marketing campaigns, with this. This AI tool also allows you to choose the tone of your title from the options of luxury, bold, professional, empathetic, and much more.
The assistive thing about this tool is it lets you add over 1000 characters of description to generate user-friendly titles. The interface of thisAI subtitle generator for free is well-oriented and delightful. Thus, you can use it without getting bored. It can also help you in generating the titles within a few minutes.

Bonus Tip: The Best AI Integrated Video Editor for Creating Breathtaking Social Media Videos
Undoubtedly, you can create intuitive titles with the help ofAI subtitle generators . However, you need to know a best-in-class tool to edit videos perfectly. For editing videos without losing their quality, you can trustVirbo . By using Virbo, you can also add AI avatars in videos that can represent your brand. It supports 150+ real human AI avatars that never fail to amaze users.
It even allows you to select the avatars based on their age and ethnicity. Moreover, you can also narrate videos in multiple languages and voices with Virbo. It supports over 120 voices along with a wide array of languages. Don’t worry if you don’t have time to create videos from scratch, as it can create videos with the help of text prompts.
Get Started Online Free Download
Conclusion
In the final analysis, you can trust the AI video title generator to create titles for your videos. It is essential to create catchy titles as they can attract a vast number of customers. You also learned about the best AI video title generators to create attractive titles. For generating or editing AI videos to make them more aesthetic, Virbo is the tool of choice.
What Is an AI Video Editor? | Wondershare Virbo Glossary
Part 1. What can be called an AI video editor?
An AI video editor refers to a software or system that utilizes artificial intelligence techniques to assist in the editing and enhancement of videos. It can analyze video content, automatically detect and track objects, apply visual effects, adjust colors and lighting, and even generate or suggest edits based on learned patterns and user preferences. An AI video editor is characterized by its ability to intelligently automate various aspects of the editing process, saving time and effort while enhancing the overall quality and creativity of the final video production.
Part 2. What are the features of an AI video editor?
Comparing traditional video editors, an AI video editor can perform various tasks, including but not limited to:
1. Automatic video editing
It can automatically trim, cut, and arrange video clips to create a cohesive and engaging final video.
2. Scene detection
It can analyze the video footage and identify different scenes or segments, making it easier to organize and edit the video.
3. Object recognition and tracking
It can recognize and track specific objects or elements within the video, allowing for advanced editing techniques like adding effects, text, or annotations.
4. Automated transitions and effects
It can suggest or apply transitions, filters, and effects to enhance the visual appeal and storytelling of the video.
5. Intelligent audio editing
It can optimize audio levels, remove background noise, and even generate or recommend suitable background music or sound effects.
6. Content-aware editing
It can intelligently remove or replace elements within the video, such as removing unwanted objects or replacing green screens with other backgrounds.
7. Workflow automation
It can streamline the video editing process by automating repetitive tasks, saving time and effort for content creators.
Overall, an AI video editor harnesses the power of artificial intelligence to simplify and enhance the video editing process, enabling users to create professional-looking videos with greater ease and efficiency.
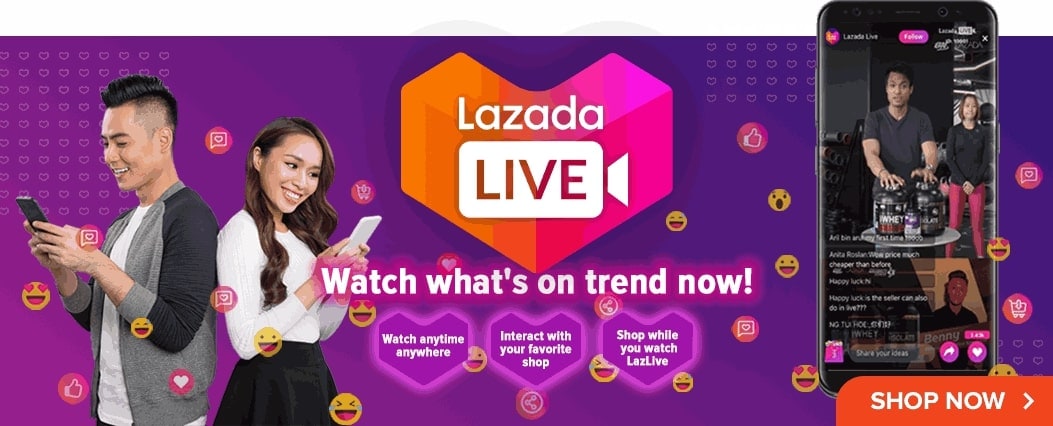
Review of LazLive Live Selling Platform [With Guide]
Live shopping on platforms like**LazLive has become a major trend in Southeast Asian regions such as Malaysia. This shopping method involves hosts showcasing and selling their products to viewers in the live videos. Established companies and startups are entering the market to capitalize on this trend.
However, there is a need for tools to make cohesive and better content for seamless live streaming. This article will give you a comprehensive preview of theLazLive live-selling platform. We will also discuss a tool that will help you optimize your live selling experience by creating optimized content.
Part 1. A Basic Preview of LazLive Shopping Platform
Many content creators usually connect with their audience through live streaming. Audiences all around the world like to engage with sellers to buy products. For this purpose,LazLive provides an interactive experience with its live-streaming feature. Plus, it offers a compelling product line to its users to cater to everyone’s needs. Their products include basic necessities, self-care, entertainment, and fashion products.
Along with the diverse product range, the main interface of this live-streaming app is user-friendly. You will find vouchers and exclusive discounts on the main interface of this platform. Also, there is a search tab for ease, allowing you to search specific product names.
Reviews of Sellers and Buyers on LazLive Shopping
Throughout the internet, you will mostly find negative reviews about this platform. According to users’ responses, the app has insufficient product information. Buyers have to spend extra time watching uninterested products on thisLazada live selling platform. Besides this, sometimes the platform delivers the wrong item that is hard to return.
Sellers of products can’t schedule live streaming on this live shopping platform. Based on seller reviews, the app’s live stream performance does not meet basic standards. With all the responses in line, LazLive still has considerable user inflow and outflow in the Southeast Asian region.
How is LazLive a Good Option for Live Selling?
LazLive can be a good option for startups and small businesses looking for a cheap platform to grow. It can help in brand marketing and selling products by providing the following benefits:
- You can interact with customers directly with this live-streaming platform.
- This live shopping platform features your product in 360°.
- Users can have real-time purchasing options with this live-streaming platform.
- It helps you to promote vouchers and endorse your featured products through live streams.
Part 2. How To Create the Perfect Livestream Selling Environment in LazLive?
You can make your brand attractive and likable with live stream selling. It is a two-way communication that enhances the loyalty of customers. With some tips, you can make the selling environment more attractive in LazLive. Follow the below tips to create a perfect livestream selling environment:
1. Plan Your Content
Sellers should plan attractive content and storylines for live streaming. This content should be informative and engaging for the audience. Developing a script or outline will optimize your livestream presentation. You can present the features and benefits of the product to attract the audience.

2. Increase Your Audience Engagement With Live Giveaways
Audience engagement on live streams can increase through running giveaway campaigns. It will make your audience excited to try your products. Live-selling platforms such asLazLive offer live-stream vouchers to win customers’ attention. With the help of this feature, you can create anticipation among the audience for your future livestream.

3. Promote Live Sale Before and After
It is essential to create hype around your selling events. You can share video ad teasers on social media platforms and email your target leads to promote your stream.Lazada’s live selling platform provides a sharing option to help you promote your live sale. Also, you can encourage your audience to share live videos while streaming.
4. Use the Power of Influencers
Influencers can engage their followers and empower them to buy products. These influencers might help you increase the efficiency of the live-selling Lazada events. You should collaborate with influencers who have loyal followers to boost your brand image.

5. Select a Sophisticated Livestreaming Tool
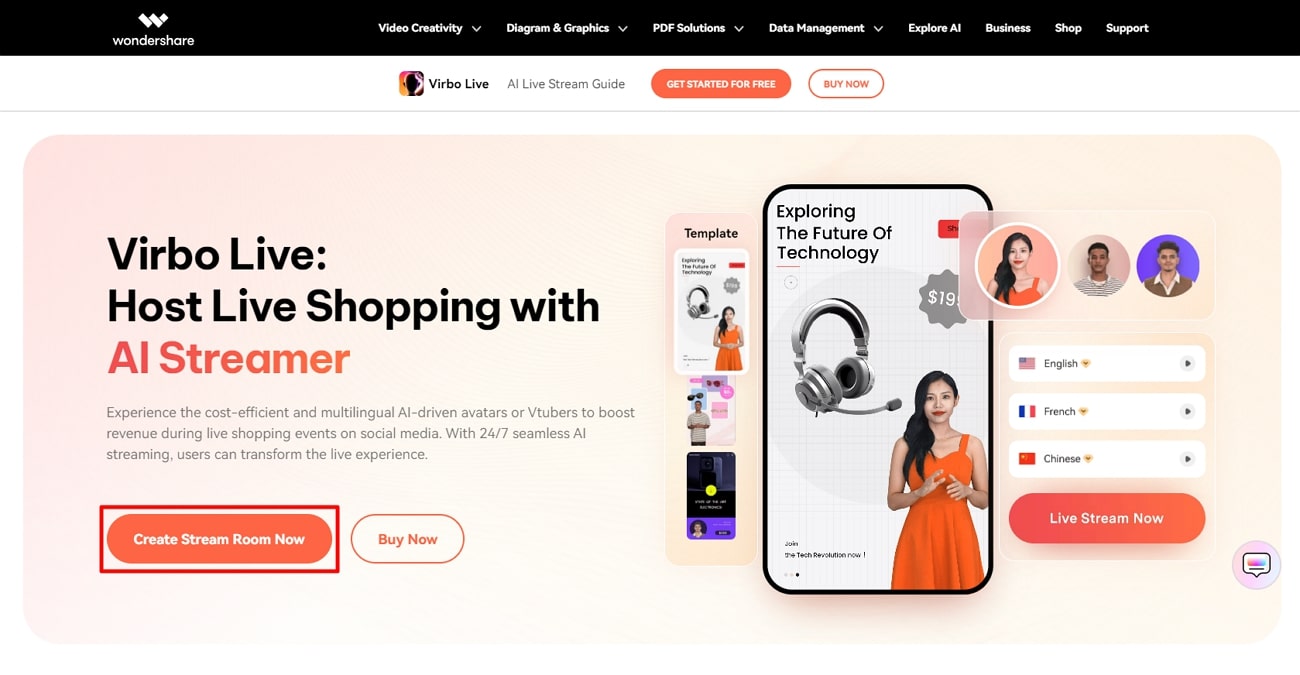
You can use a livestreaming tool to effectively showcase your product. Tools have some features to facilitate you in creating professional-looking live streams. With this, you don’t need to generate live-stream videos from scratch. Wondershare Virbo Live is one of those tools that has advanced features, allowing you to make engaging videos.
Get Started Online Free Download
Part 3. Improve Live Selling Revenue in LazLive With Wondershare Virbo Live
As mentioned earlier, one of the most important elements for successful live selling is selecting the right tool for streaming. When it comes to improving revenue, you can integrate some features in streams to generate sales. Streamers can look to incorporate engaging concepts and visuals to attract the audience.Wondershare Virbo Live offers AI-driven avatars to create a visually engaging atmosphere during live events.
These AI avatars or VTubers can perfectly mimic natural movements to engage the buyers. This will ensure authenticity and connection in every interaction during live shopping. You can also use multiple language features of the tool to break language barriers. With the help of such language options, you can reach a diverse audience through a single platform.
Noting the Best Features of Wondershare Virbo Live
- It offers a customizable Q&A repository to set an automatic response to audience questions. It instantly helps users interact with their audience by answering their most frequently asked questions.
- This tool allows microphone integration to drive AI streamers to speak in real-time. Not only does this promote live audience interaction, but it is also a great way to keep actual identity behind the curtains.
- Wondershare Virbo Live is compatible with many platforms like YouTube and TikTok. It also supports live streaming on LazLive, Shopee, and similar platforms.
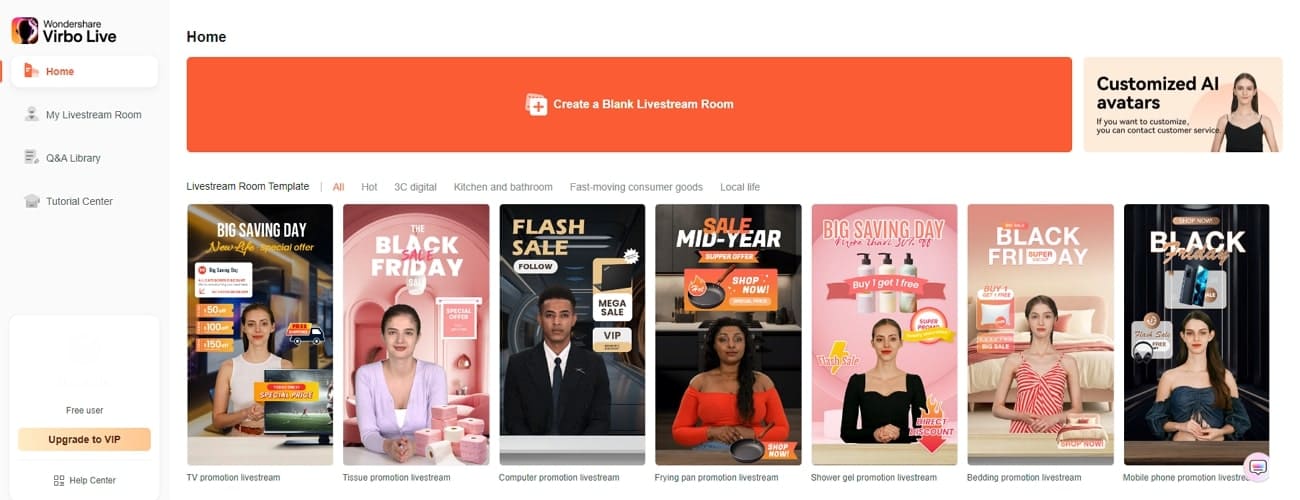
Steps To Create Stream Room Using Wondershare Virbo Live
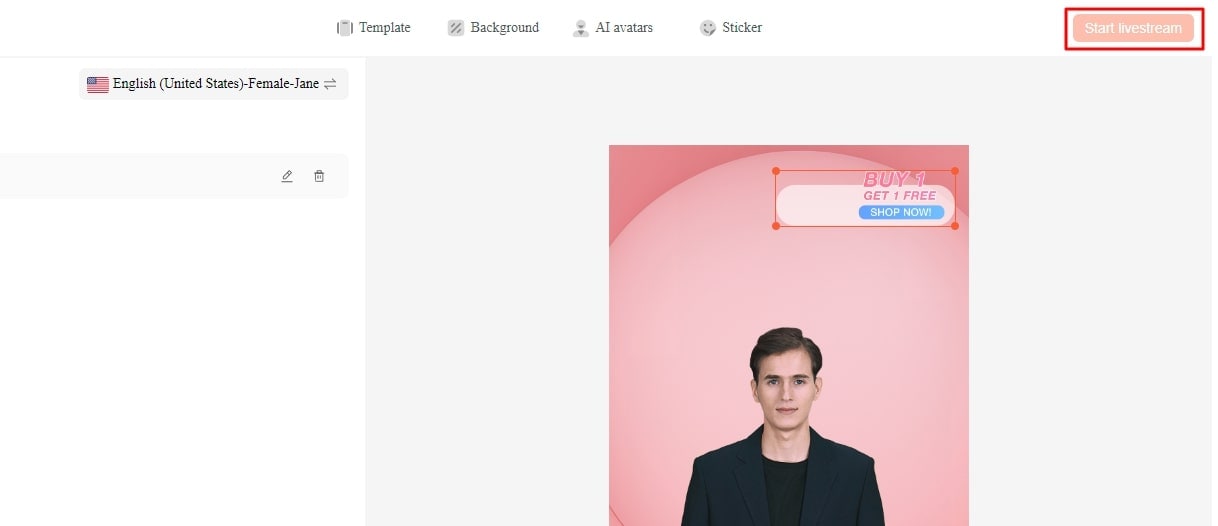
Sellers can use this tool to create optimized live-stream videos for audiences. Below are the steps to create a stream room using Wondershare Virbo Live:
- Step 1. Access Tool To Create Stream Room
Firstly, access this tool online by visiting the official website on your browser. Open its main interface and click the “Create Stream Room Now” button on the left.
Get Started Online Free Download
- Step 2. Create a Blank Live Stream Room
Upon reaching a new window, hit the “Create a Blank Live Stream Room” button at the top of the screen. Next, you will find many options to help you create a personalized video stream.

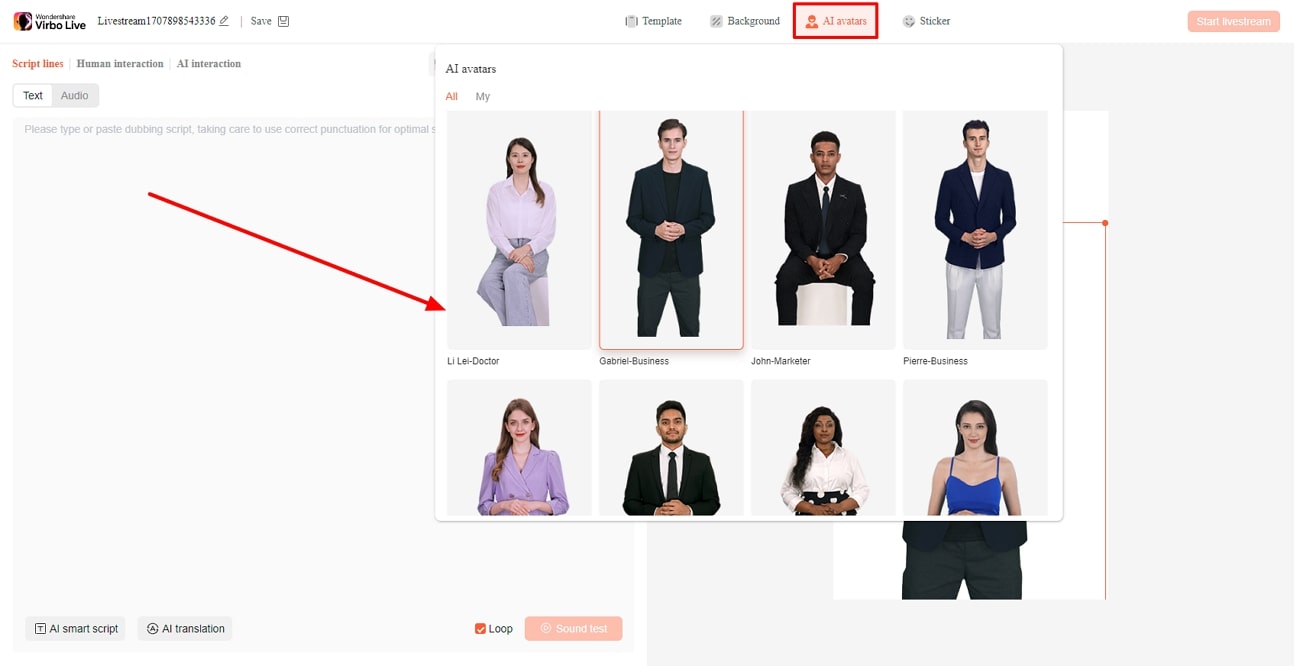
- Step 3. Choose Your Required AI Avatar
Once you reach the editing window, select the “AI avatars” tab on the top. A dialog box will open with different avatars in different dresses and poses. Then, as required, choose any of them, and it will appear on the right side of the screen.
- Step 4. Adjust Changes in Background
Afterward, opt for the “Background” tab to choose a background for product representation. You can choose different options or add your personalized background with the “Upload background” option.

- Step 5. Add Script for Livestream Video
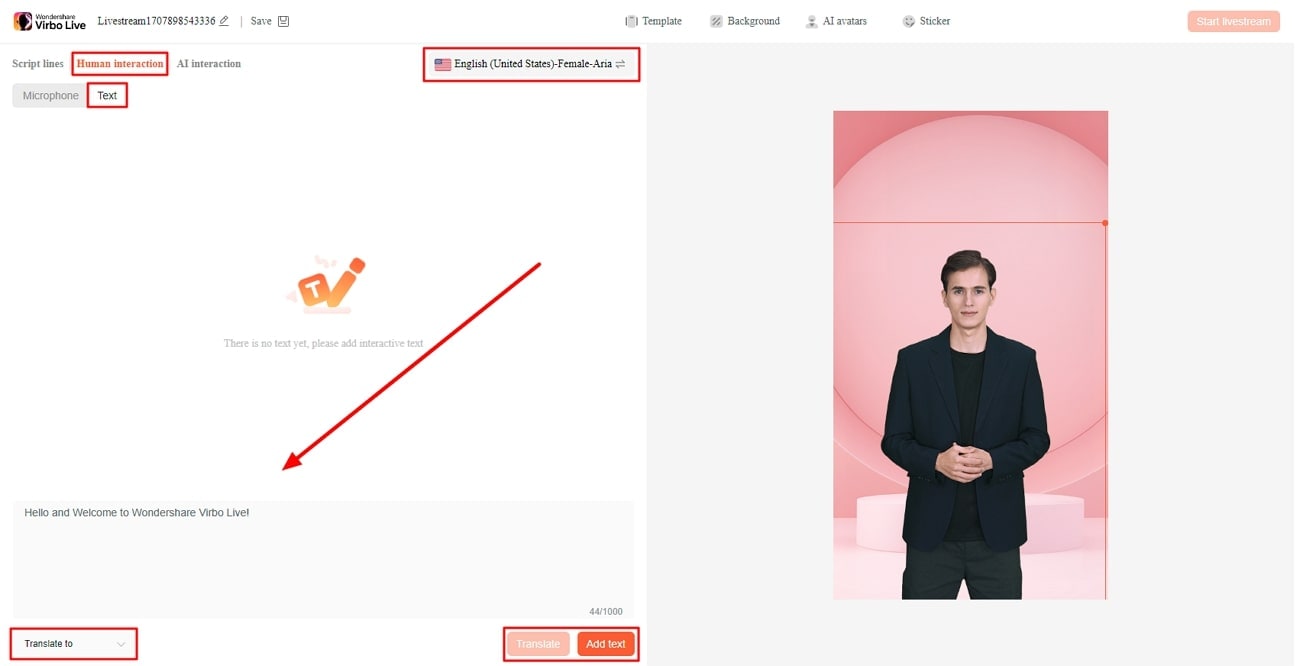
To add the script for the live stream video, you are provided with 3 different scenarios. If you intend to have more human interaction, go to the respective section. Select the appropriate sub-section through which you want to interact with your audience. If you go for “Text,” add the text, which will be limited to 1000 words or less. Set up the dubbing audio using the respective option on the top.
On the other hand, you can define the language through the “Translate to” menu and click “Translate.” If you are not going to translate the text, click “Add text” to conclude by adding the script for the live stream video.
- Step 6. Initiate Livestreaming of Your Products
After defining all settings, press the “Start Livestream” button at the top right to start interacting with your customers.
Conclusion
Platforms likeLazLive will allow you to do live streaming with its easy-to-use interface. This platform allows you to interact with the target audience to increase revenue. We recommend using tools like Wondershare Virbo Live to polish your streams further. It is an AI-powered tool that can help you create live-streaming videos in multiple languages to make your streaming effective.
How To Get More NFL Viewers For Your Sports Live Streaming Channel
If you are running a sports live-streaming channel, tapping into the NFL is the best advice you could get now. Withmillions of viewers regularly tuning in for NFL games, it’s no surprise that the league dominates the list of the most-watched programs.
NFL fans often look for NFL live stream that offers high-quality coverage, reliable streaming, and comprehensive analysis. So this time, we’ll outline strategies to help you attract more NFL viewers to your sports live streaming channel.

Part 1: Choosing a Platform for Your Live NFL Game Stream
When considering getting NFL viewers, you need to know the best platform to stream live NFL games for your channel. Basically, you can always use any live streaming platform as long as you have OBS studio to work as a streaming encoder.
Popular options include Twitch, YouTube Live, and Discord. Each platform has its unique advantages and demographics, so it’s crucial to research and choose the one that aligns best with your target audience.
Twitch

Twitch is a popular choice for gaming content and has a large community of avid gamers and esports enthusiasts. It offers robust features such as chat integration, customizable overlays, and subscription options, which can help foster a sense of community and engagement among viewers.
Pros
- Interactive features to enhance viewer engagement during live streams.
- Various monetization options, such as subscriptions, bits, and donations.
Cons
- Twitch’s audience is primarily younger people interested in gaming content, so reaching NFL fans might be more challenging.
- Twitch has strict content guidelines that could potentially limit the types of NFL content that can be streamed.
YouTube Live

YouTube Live, on the other hand, boasts a massive user base and seamless integration with the rest of the YouTube platform. This means that your live streams can reach a broader audience, including those who may not necessarily be actively searching for NFL content but might stumble upon your stream while browsing related videos.
YouTube also often serve as an NFL streaming service. So you don’t have to worry about setting up a separate streaming platform or dealing with technical issues that may arise.
Pros
- YouTube’s massive user base makes it easier to reach a broader audience, including NFL fans.
- YouTube’s search engine optimization (SEO) can help NFL streams rank well in search results.
Cons
- YouTube Live has a lot of competition, making it harder for new streamers to stand out and attract viewers.
- Streaming NFL content can be a challenge especially if it includes copyrighted material.
Discord

If you own a Discord server with sports fans, you can live stream NFL games free with your Discord server members. Discord provides a more private platform for streaming, so it minimizes concerns about your channel being restricted due to copyright violations or other issues when watching NFL live.
Using the screen share feature on Discord, you can host streaming parties and interact with your audience in real time. Discord’s platform also supports high-quality videos that guarantee a seamless and immersive viewing experience for everyone.
Pros
- Customizable with various channels, roles, and bots to create unique experiences for their audience.
- Direct communication between streamers and viewers through text, voice, and video channels.
- Safer to be used for live streaming NFL games as it’s more private.
Cons
- Lacks the discoverability of platforms like Twitch and YouTube.
- No built-in monetization options like subscriptions or ads.
For live streaming the game, you can watch the NFL live on variousplatforms and services . Some popular options include NFL+, Streaming Services (YouTube TV, Hulu + Live TV, Sling TV, and FuboTV), or Broadcast Networks (CBS, FOX, and ESPN). Alternatively, some of the NFL game live stream online free options are USTVGO, FSL, CricFree, and more.
After knowing which streaming platform to use, it’s essential to proceed with caution. Live-streaming NFL games can present various challenges and considerations, including streaming quality, licensing agreements, potential copyright issues, and more.
Part 2: Strategies to Implement During Live Streaming
Now that you know which platform to use for your sports live-streaming channel, it’s time to strategize your live-streaming approach to maximize audience engagement and make your channel a go-to destination for NFL fans.
During the NFL live stream, you’ll want to captivate your audience from kickoff to the final whistle. Engaging visuals, insightful commentary, and seamless transitions are important in keeping your audience hooked.
Try out these strategies to attract your viewers during NFL live streaming:
- Make a Pre-game Analysis
Before the game begins, provide viewers with insightful analysis and predictions about the upcoming match. Discuss key players, recent team performances, and any strategic adjustments that could impact the game’s outcome. This pre-game analysis helps build anticipation and engagement among viewers.
- Interactive Polls and Q&A Sessions
You can engage with viewers during the NFL livestream by incorporating interactive elements such as polls and Q&A sessions. Ask viewers to vote on game predictions, MVP candidates, or play of the game. Or, you can encourage viewers to ask questions or share their thoughts in the chat and respond to them to foster interaction and community engagement.
- In-game Commentary
You can provide play-by-play analysis, insights into player performances, and strategic observations throughout the NFL streams. Use visuals such as graphics, replays, and statistics to make your commentary more engaging and improve the viewing experience.
- Post-game Analysis and Highlights
After the game concludes, provide viewers with comprehensive post-game analysis and highlights. Recap key moments, analyze standout performances, and discuss the implications of the game on the team’s season to encourage continued engagement and discussion.
- Make Your Channel Discoverable
Make sure your NFL stream titles clearly state the sport or activity. Use tags like “Football” and add descriptors like “Sidecasting” or “Sports Talk” to give viewers an idea of what to expect.
You can also personalize your NFL livestream to boost engagement. Add extensions such as alerts and overlays. Use templates from the platform or third-party tools to make your stream unique.
Part 3: Engaging NFL Fan Viewers with AI Tools
Besides implementing strategies during the NFL live stream, you also need to make your channel discoverable and engage NFL fans to view your channel. The key to this tip is to maintain a constant presence as much as possible.
One effective method to streamline your NFL live streaming is by using AI tools like Wondershare Virbo Live, which can help you set up a continuous 24/7 live stream. With Virbo Live, you don’t have to be constantly present while still attracting a wider audience base by providing constant coverage of NFL-related content.
Additionally, the Virbo live stream feature seamlessly integrates with major live-streaming platforms supported by OBS. That’s why many content creators and fan communities find it convenient to use this tool for their live-streaming needs.
How to live stream 24/7 with Wondershare Virbo Live
To live stream NFL content 24/7 with Wondershare Virbo Live, you need to prepare your AI avatar and set up the templates first. After customizing your avatar, you can acquire the streaming key if available. This key will allow OBS to connect with the streaming platform. Otherwise, you can use OBS as your virtual camera.
Follow these steps on how to live stream 24/7:
Step 1: Access Wondershare Virbo Live and create a live streaming room.
Go toWondershare Virbo Live . Select “Create Stream Room Now” > “Create a Blank Live Stream Room” to start the setup process.

Step 2: Develop your script or upload existing audio recordings.
Within the Virbo Live interface, you have the option to either write the script for your live stream or upload audio content that you’ve prepared beforehand by clicking “Upload local file.”

Tip: Make use of Virbo’s AI Script Writer tool for inspiration. Click on “AI Smart Script” and input relevant topic details, language preferences, and style choices to generate a script. You can then refine it as necessary.

Step 3: Personalize your AI avatar and background.
Head to the “AI Avatars” section to select an avatar suitable for your live stream. Additionally, you can customize the background, add stickers, or choose from available templates to enhance the visual appeal of your stream.

Step 4: Start the live stream.
Once you’ve configured your AI avatar and background, click on “Start Livestream.” The next step should be acquiring the platform’s streaming key to put into the OBS. Then, you can start streaming.
Conclusion
If you’re running a sports live-streaming channel, making use of the NFL live stream is your best bet. With millions of viewers regularly tuning in for NFL games, you have a ready-made audience eager for content.
Moreover, integrating AI tools like Wondershare Virbo Live allows you to have continuous 24/7 live streaming. You can provide consistent coverage of NFL-related content and attract a broader audience base. By following the steps outlined above, you can streamline your broadcasting process and focus on delivering high-quality content to NFL fans.
How To Auto Translate YouTube Videos Into Different Languages
Are you looking for how toauto translate YouTube videos ? Or are you frustrated with auto translate for YouTube feature? We know, that sometimes it works, sometimes it does not. There are limitations, and depending on your use case, you might be frustrated. Learn how to auto translate YouTube video into your language at the click of a button including the ability to auto translate YouTube video captions and subtitles. Using a third-party auto translate captions YouTube software, you can easily translate videos into a language of your choice and add matching auto translated subtitles.
Part 1: How To Translate YouTube Videos Automatically
If you don’t know YouTube recently launched the auto-translate feature for all videos, you can follow the steps below totranslate YouTube video into any language:
Step 1
Go to any YouTube video that you would like to translate.
Step 2
Turn on Closed Captions by clicking on the CC button at the bottom.
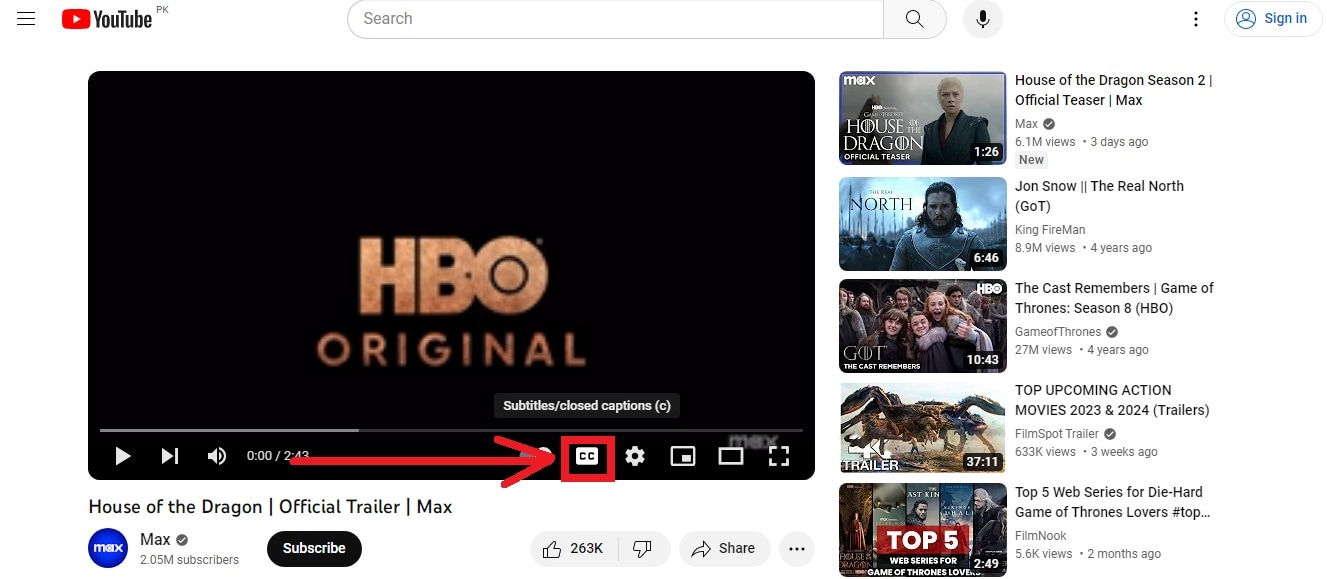
Step 3
Can you see the auto-generated closed captions in English? Good!

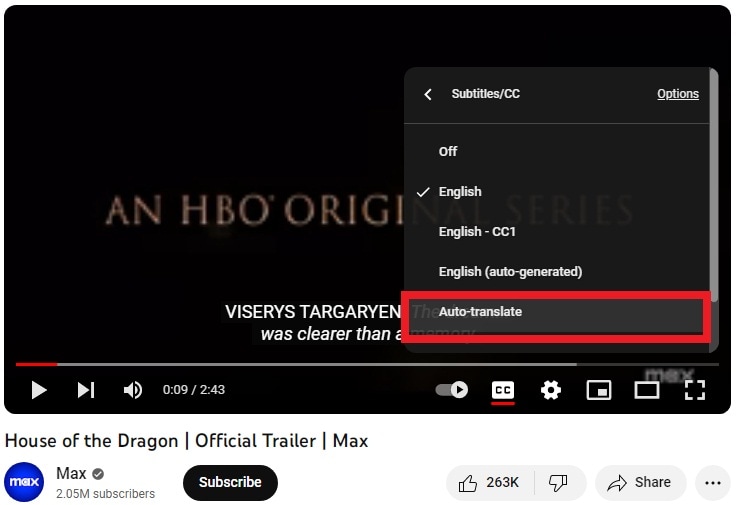
Go toSettings by clicking on the gear icon (as seen above) and click Subtitles/CC.
This will show you all the languages a video is already available in.
Step 4
Go to Auto Translate and select a language.
Step 5
For this example, we are selecting Hindi.
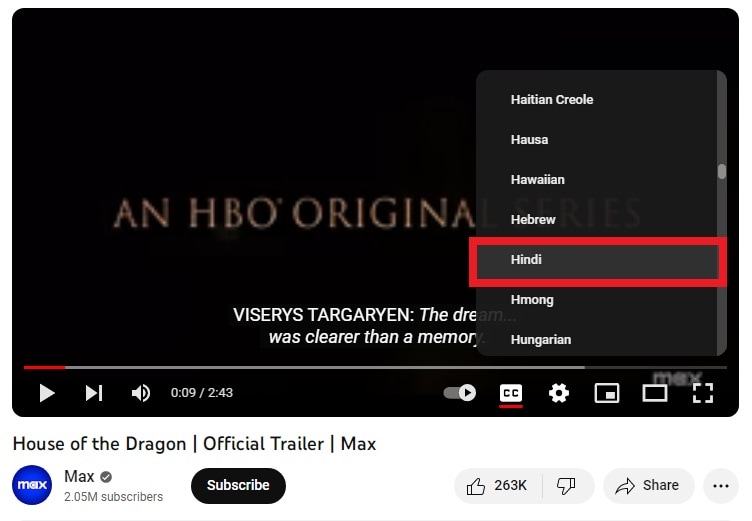
Step 6
As you can see in the screenshot below, subtitles are now auto-translated into Hindi.
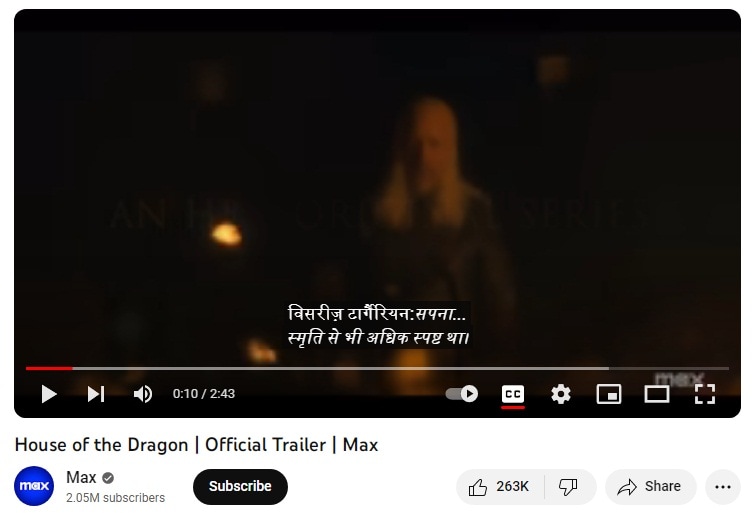
That’s all. We hope now you know howauto translate for YouTube works. With this feature, you cantranslate YouTube video to English, or any other language according to your needs. It’s easy and super helpful for watching content in any language.
Part 2: Limitations of YouTube Auto Translate Feature
Like all good things,auto translate for YouTube captions feature is not without its faults. Below are some of it’s limitations:
- While YouTube is slowly rolling out the feature for all languages, automatic captions still don’t support many regional languages
- If the video is over an hour in length, YouTube’s automatic caption software fails to capture the dialogue in an efficient way.
- If the video has a lower audio quality or the dialogue uses a specific word multiple times, it is hard to decipher for the auto-translate AI.
- Long periods of silence at the beginning or end of the video can also throw off the software.
- If a video has multiple speakers with overlapping dialogue, it can confuse the software and make errors in translation.
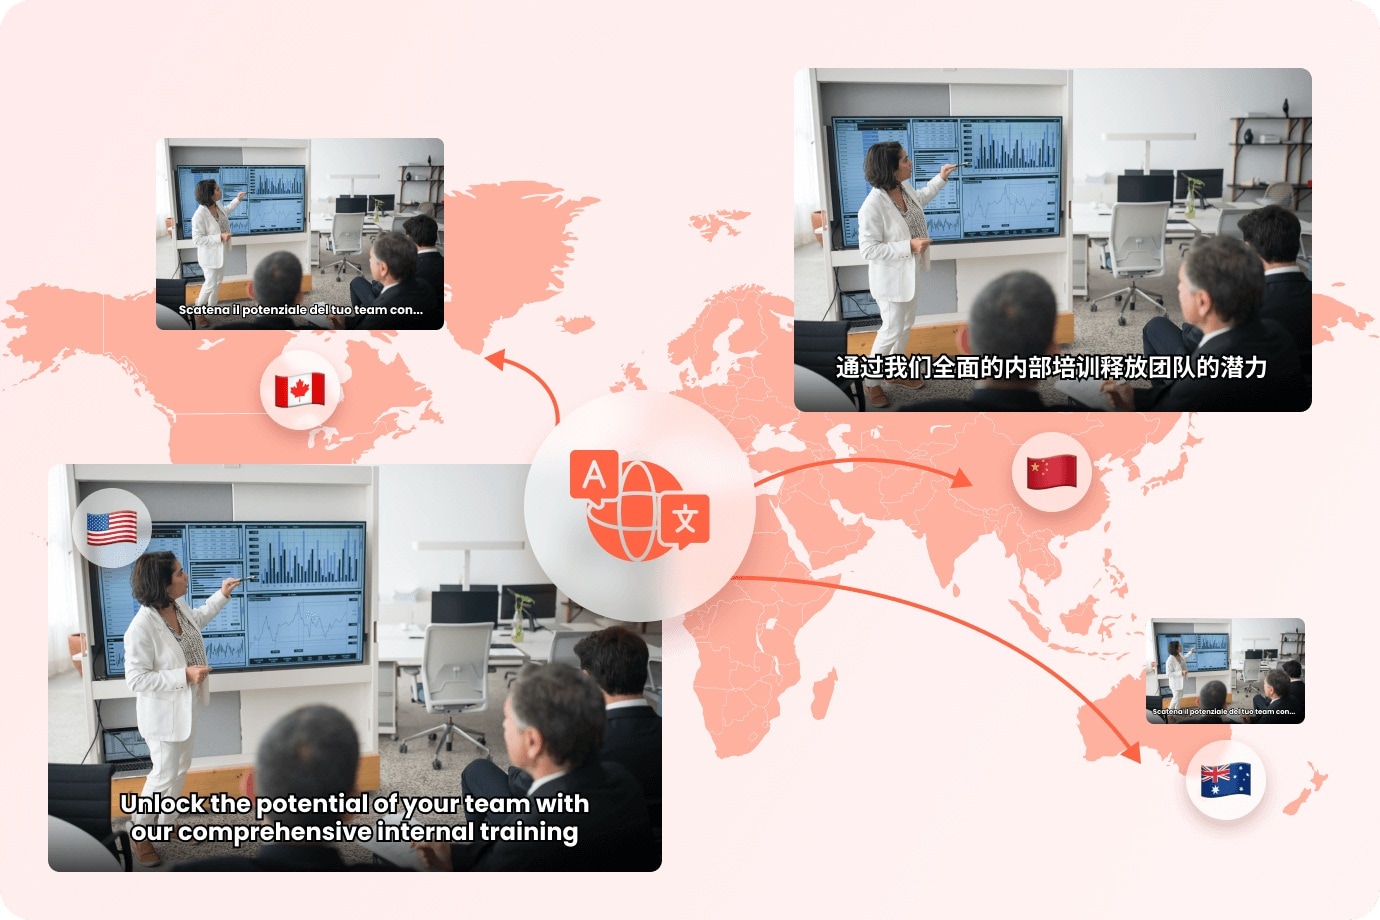
Part 3: Virbo: A Powerful Tool That Translates Accurately
Wondershare Virbo has been around for a while. You probably already know it because of its revolutionary feature of creating AI avatar videos. But they recently unveiled another fantastic new feature - AI video translation. You can use it as alanguage translator for YouTube video content**.**
Translate Online Download APP Now Free Download
Why Choose Virbo?
Most AI video translators refer only to subtitles for translation. They translate verbatim and leave out the audio lip-synching from the final product. Virbo is different because it utilizes the latest AI advancements to understand the context of a dialogue, giving you highly accurate and precise results. It also matches the lip-synching to give you synchronized talking videos in a different language. What’s more, you can also set Virbo to proofread the generated text before translation. This removes any unnecessary or repeated words, making your subtitles crisp and concise. You can also download translated subtitles as SRT or TXT files and use them the way you want.
Language Support
Virbo currently supports translation in the following languages:
English, Chinese, Spanish, Arabic, Portuguese, Indonesian, French, Russian, German, Japanese, Italian, Korean, Thai, Filipino, Bengali, Turkish, Dutch, Swedish, Croatian, Romanian, Czech, Hindi, Ukrainian, Vietnamese, Malay, Slovak, Danish, Tamil, Polish, Greek, Finnish, Burmese, Urdu
How To Use Virbo With YouTube Videos For Auto Translation
If you want totranslate YouTube video online with Virbo, there are two ways to proceed, depending on your goal. We will be discussing both of these methods below
Goal 1 - You Want a Translated Synchronized Video

Translate Online Download APP Now Free Download
For a translated synchronized video, you can follow these steps:
- Download and install Virbo on your mobile/PC and then run the software/app(Note: You can also use the Virbo online tool)
- On the main page of Virbo, go to the Video Translator tab
- A new window will pop up, asking you to Upload your video. Drag and drop your video content.
- When the video finishes uploading, select Original and Translated languages
- Pick advanced features like Show Translated Subtitles, Keep original BG Music, etc
- Click on the orange Translate button to begin the translation
It will take some time, but the AI Translator Tool will automatically translate and synchronize the translation with the original video. You don’t need to do anything else!
Goal 2: You Want Translated Subtitles for Your Video
Translate Online Download APP Now Free Download
if you want translated subtitles of a published video, here’s how to proceed with Virbo:
- Upload the video to Virbo and get the subtitles translated as discussed above
- Next download the SRT or TXT file.
- Now, sign in to your YouTube Studio.
- Next selectSubtitles , from the left-hand side menu
- Click on the video that you would like to add subtitles for.
- TapADD LANGUAGE and choose your language.
- Now, under subtitles, click onADD to add your translated subtitles to a published YouTube video.
Easy, right? This is how toauto translate YouTube video into your language.
Frequently Asked Questions
Here are answers to frequently asked questions that you might find helpful.
FAQ 1: What to do about videos without subtitles?
For such videos, you can always use Wondershare Virbo to easily add subtitles and translate them into the target language of your choice!
FAQ 2: What to do if I need more accuracy in translated subtitles?
For such cases, Virbo online is the tool that supports proofreading the translated words. It gives you the most accurate subtitles in the language of your choice.
FAQ 3: Any way to permanently enable auto translate for YouTube on every video?
Sign in to YouTube and then, in any YouTube video, click the gear icon at the bottom right corner of the video, click Subtitles/CC, and click Settings. You will be taken to your Playback and Performance settings, where you should tick “Include auto-generated subtitles”.

Now, for every video where subtitles are available, YouTube will automatically use subtitles.
Conclusion
In case you didn’t know, YouTube provides an auto translate for YouTube feature for you to use. However, in classic Google fashion, it comes with several limitations. To remove and bypass those limitations, you can use a third-party auto translation YouTube software such as Wondershare Virbo that allows you toauto translate YouTube video into your language including auto translate captions easily on mobile, Windows PC, and even online! Try the best auto translate for YouTube software today and auto translate YouTube video into your language anytime, anywhere on PC, web, and mobile!
Translate Online Download APP Now Free Download
Also read:
- New In 2024, Introduction | Online
- New In 2024, Top 8 Live Selling Platforms & Beginners Tool Suggestion
- In 2024, How To Make Talking Emoji on iPhone in Easy Steps
- Convert Video Voice to Text Online for Free Fast and Easy Ways for 2024
- New 2024 Approved Top 10 Robotic Voice Generators (with Comparison Table)
- New What Is an AI Text Generator, In 2024
- Updated Top 10 AI Subtitle Translators for Content Creators for 2024
- Updated Best Options Top Live Streaming Platforms According to Types for 2024
- Updated 2024 Approved Best 4 Morgan Freeman Voice Generator Tools for Voice Cloning
- New In 2024, What Is AI API? | Wondershare Virbo Glossary
- 2024 Approved 5 Must-Know Hacks to Beat Deepfake Attacks Streamer Survival Guide
- 2024 Approved Revealing Translation Methods Netflix Subtitle Software Comprehensive Guide
- In 2024, Auto Translate YouTube Videos Into Different Languages
- New Chrome Video Translators Top 5 Video Translation Chrome Extensions
- New 10 Free Football Streaming Sites To Bookmark for 2024
- Updated Video Translator | Wondershare Virbo for 2024
- The Ultimate Guide to B2B Video Marketing
- Updated In 2024, Best 4 Eminem Voice Generator Apps for PC, Mac, Mobile, and Online
- New In 2024, Easy Tutorial How To Make a Talking Cartoon Video Step-by-Step
- New In 2024, A Brief Review of CapCut Translate With Alternative
- How to Fix Corrupt video files of Honor using Video Repair Utility?
- Top 15 Apps To Hack WiFi Password On Xiaomi Redmi K70E
- 8 Solutions to Fix Find My Friends Location Not Available On Realme GT Neo 5 SE | Dr.fone
- Guide on How To Erase Apple iPhone SE (2020) Devices Entirely | Dr.fone
- Best Anti Tracker Software For Oppo A1 5G | Dr.fone
- How to Transfer Text Messages from Poco X5 Pro to New Phone | Dr.fone
- How To Do Realme C67 4G Screen Sharing | Dr.fone
- In 2024, Trouble with Apple iPhone 15 Pro Max Swipe-Up? Try These 11 Solutions | Dr.fone
- Top 5 Tracking Apps to Track Realme Narzo N55 without Them Knowing | Dr.fone
- In 2024, Guide to Mirror Your Poco M6 Pro 4G to Other Android devices | Dr.fone
- In 2024, How Can We Unlock Our Itel A60 Phone Screen?
- In 2024, 2 Ways to Monitor Asus ROG Phone 7 Activity | Dr.fone
- Easy Tutorial for Activating iCloud on Apple iPhone 15 Plus Safe and Legal
- Recover iPhone 13 Pro Max Data From iOS iTunes | Dr.fone
- In 2024, Dose Life360 Notify Me When Someone Checks My Location On Honor X7b? | Dr.fone
- Title: New 2024 Approved Top 10 Talking Photo Online Tools You Have To Try
- Author: Sam
- Created at : 2024-04-17 22:13:11
- Updated at : 2024-04-18 22:13:11
- Link: https://ai-voice-clone.techidaily.com/new-2024-approved-top-10-talking-photo-online-tools-you-have-to-try/
- License: This work is licensed under CC BY-NC-SA 4.0.
