
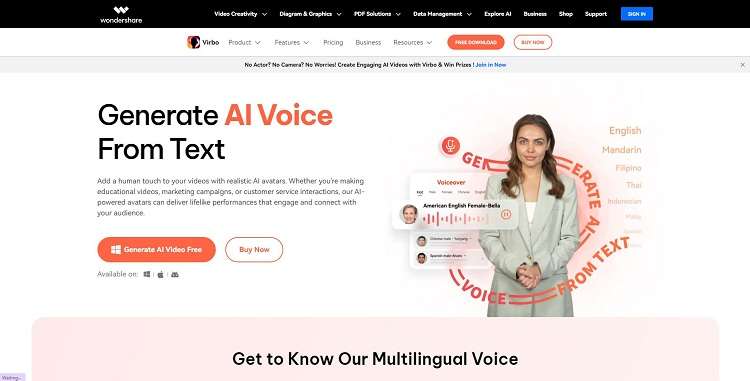
New 2024 Approved How to Stream on Twitch The Ultimate Guide
How to Stream on Twitch: The Ultimate Guide
Live streaming has become a regular source of enjoyment for many people in recent years, especially on a platform like Twitch. In the first quarter of 2023 alone, Twitch users watched over 5.3 billion hours of video.
If you’re a content creator, you should definitely consider leveraging this power of Twitch video streaming, as it tends to have higher levels of engagement compared to pre-recorded content. But with so many Twitch streamers out there, standing out from the crowd can be challenging.
If you’re new to the scene, we can help you start your Twitch streaming journey off right with the right gear and some useful tips.

Part 1: Essential Preparations Before Beginning Your Twitch Streaming Journey
Whether you’re playing games, hosting events, or just chatting, streaming on Twitch is an exciting and rewarding way to engage with your audience in real-time. But to do well on Twitch, you need to prepare properly so your viewers can enjoy watching your content.
To start streaming on Twitch, here’s what you’ll need:
Twitch Streaming Software
First, you need to download streaming software for your Twitch video streaming. OBS Studio is the popular one, but Twitch has released its Twitch Studio, which is more beginner-friendly.
- OBS Studio
OBS Studio is a free streaming software that works on any device. You can use it to make your Twitch streams live more attractive by adding alerts, creating starting screens, and using different audio and video sources.
- Twitch Studio
Twitch Studio is the official free streaming application developed to simplify the streaming process for new streamers on Twitch. It offers an intuitive interface and pre-made scenes designed to streamline the user experience.
Streaming equipment
- A device to stream from
To kickstart your Twitch streaming journey, the first step you need to take is selecting the device from which you’ll broadcast. You can use your desktop, mobile phone, or gaming console. Your choice will depend on your existing equipment and the nature of your intended content.
If you plan to make gaming content for your Twitch Live, we recommend using a PC with these specifications:
- CPU
When streaming and gaming, it’s crucial to have a powerful CPU to minimize lagging. The number of cores in a CPU determines its processing power, ranging from dual to eight cores. Some good options to consider are the AMD Ryzen 9 5900X, Intel i9 – 12900K, or the more budget-friendly Intel Core i5-12400.
- GPU or graphic cards
Nvidia RTX graphics cards come equipped with built-in hardware encoders, which can lighten the CPU’s workload when used with OBS Studio. Alternatively, you can consider the Radeon RX 570 and the GeForce GTX 1660 Ti for quality GPU options.
- Microphone
Although you might get by using a gaming headset’s built-in microphone for a bit, it’s better to invest in a standalone mic from the start. Some top microphone options for Twitch streaming include the Elgato Wave:3, HyperX QuadCast S, Audio-Technica AT2020, Razer Seiren Mini, and Blue Yeti X.
- Webcam
If your Twitch stream content involves showcasing your reactions or facial expressions, investing in a camera is a wise choice. Webcams are convenient as they can easily connect to your computer or laptop.
You can consider some popular webcam choices like the Logitech HD Pro C920, Logitech StreamCam, Logitech BRIO, Microsoft LifeCam HD-3000, and Razer Kiyo.

Understanding Twitch Streaming Rules
Aside from preparing your streaming gear, you must also understand Twitch streaming rules to avoid any potential violations that could result in penalties or even suspension of your account. Twitch’s community guidelines cover a wide range of topics, including harassment, hate speech, copyright infringement, and mature content. You can read the full Twitch streaming rules here .
Part 2: Comprehensive Guide To Stream Live on PC, Mac, or Smartphone on Twitch
Once you’ve gathered all the necessary equipment, you can proceed with the following steps to start your Twitch stream.
How to stream Twitch live on PC or Mac
Step 1: Download and install Twitch Studio on your PC or Mac. Then, launch Twitch Studio and log in to your Twitch account. You’ll receive a prompt to connect your microphone and webcam.
Step 2: Use Twitch Studio to customize your Twitch stream with different scenes and settings. Experiment with these features to find what works best for your livestream.

Step 3: When you’re ready to start broadcasting, click “Start Stream” at the bottom of the Twitch Studio. Then, select your stream category and enter your live stream title. Hit “Go Live” to begin streaming.

How to stream Twitch live on a smartphone
Starting Twitch streaming from your smartphone is a bit different, as the app primarily allows broadcasting from your device’s camera. Here’s how to live stream on Twitch from your smartphone:
Step 1: Download and install the Twitch App .
Step 2: Log in to the Twitch app. Then, go to your profile and tap “Go Live.” If you are using newer version of the Twitch app, you can tap “Create.”

You’ll then have two options: “Stream Games” or “Stream IRL.” The “Stream IRL” will allow you to live stream on Twitch using your phone’s camera, while the first option lets you stream mobile games.

Step 3: Grant access to your camera and/or microphone before starting your stream.
Step 4: Set up the stream and Go Live. Give your stream a name, choose a content category, and select the camera you want to use.
Once you’ve completed these steps, press the “Start Stream” button, and you’ll be live on Twitch.
Key elements of success for streaming on Twitch
While the process for starting Twitch streaming may be similar for all streamers, what makes a streamer successful? Based on reports, there are a few key elements of success for streaming on Twitch.
- Engaging content
Successful Twitch streamers captivate their audience with compelling content that resonates with viewers. This could include entertaining gameplay, informative discussions, or engaging activities. If people like your stream, they might subscribe or donate their money.
- Make use of the interactive features
Twitch stream labs offer unique features like chat rooms and special emojis, fostering interaction between streamers and viewers. Streamers actively engaging with their audience tend to cultivate a loyal and enthusiastic community.
- Consistency and persistence
This is often the toughest part. On Twitch, consistency is crucial. Successful streamers usually maintain regular schedules to make sure their audience knows when to expect new content. If you are new, continuous live streaming can be an effective strategy to engage with your audience consistently and increase your channel’s visibility.
Part 3: Best AI-Powered Tool for You To Set Up a 24/7 Live Stream on Twitch
If you want to make your Twitch channel stand out and automate the live streaming process, you can use Wondershare Virbo Live. With this tool, you can set up a 24/7 live stream on Twitch without needing to be present all the time.
Additionally, the Virbo live stream feature seamlessly integrates with major live-streaming platforms supported by OBS. You can also use it on numerous other platforms, such as TikTok Live, 1688 Live Platform, Alibaba International, Kwai, and more.
How to live stream 24/7 on Twitch with Wondershare Virbo Live
To live stream 24/7 on Twitch with Virbo, you will first need to prepare your AI avatar on Virbo Live to broadcast continuously on Twitch. Once you have customized your avatar, you can obtain the streaming key from Twitch. This key will enable OBS to connect with Twitch’s streaming platform.
Follow the detailed steps on how to live stream 24/7 on Twitch:
Step 1: Access Wondershare Virbo Live and create a live streaming room.
Go to Wondershare Virbo Live and select “Create Stream Room Now” > “Create a Blank Live Stream Room” to initiate the setup process.

Step 2: Write your content script or upload audio recordings.
Within the Virbo Live interface, you can either compose the script for your live stream or upload pre-recorded audio content by selecting “Upload local file.”

Pro Tip: You can use Virbo’s AI Script Writer for inspiration. Click on “AI Smart Script” and provide topic details, language preferences, and stylistic choices. Click “Generate” to create a script. Then, you can refine it as needed.
Step 3: Customize your AI avatar and background.
Navigate to “AI Avatars” to select an avatar for your live stream. Additionally, you can customize the background, incorporate stickers, or use available templates.

Step 4: Start the live stream.
Once your AI avatar and background are set, click “Start Livestream” to commence broadcasting. The next step should be acquiring the Twitch streaming key to put into the OBS.

Once everything is ready, click “Start Streaming” in OBS Studio, and your stream will broadcast on Twitch.
Conclusion
With billions of hours of video watched and many content creators vying for attention, streaming on Twitch can be exciting and challenging. However, by following the essential preparations outlined in this guide, you’ll be able to kickstart your Twitch live stream ahead of others.
You can use Wondershare Virbo Live to make an automated streaming experience 24/7. This helps you maintain a consistent presence on the platform even when you’re not around.
Best Narrator Voice Generators
Having a fascinating and engaging voice is essential in the field of voiceover and narration. But not everybody has a suitable accent for narrating. Anarrator voice generator might be beneficial in this situation. It is a very advanced piece of software that can convert words into a voice-over that sounds realistic, doing away with the need for a human narrator.
The narrator’s voice generator can modify and control the voice qualities. Makers can change the artificial voice’s pitch, speed, and tone to meet the demands of their production. The narrator’s voice generator will probably play a crucial role for everyone involved in audio production.
Part 1: Why do you need a narrator voice generator
Whether you need a deep, authoritative voice for media or a warm, welcoming tone for an e-learning module, anarrator voice generator may provide the ideal voice for the content. It will help you in the following ways:
1. Efficiency and Time-saving
Using a narrator voice generator helps you save time. With a few clicks of a button, you can quickly create the voiceover rather than wait for a human narrator to record and deliver it. It is also beneficial for tasks that have a limited amount of time and demand regular updates. The narrator’s voice generator rapidly converts text into spoken words, saving the content makers a lot of time.
2. Cost-Effectiveness
When compared to voice actors, using a narrator voice generator may significantly decrease costs. Professional voice actors deliver customized narration of the highest caliber, but their services can be expensive, especially for projects requiring a lot of audio. While a narrator voice generator automates the translating of text process into voiceover, it provides a more affordable alternative.
3. Multilingual Support
The voice generator can provide a wide range of voices and accents for each language with multilingual support, making the narration more engaging and authentic to the target viewers. This functionality is particularly beneficial for producing content with a worldwide audience, such as e-learning courses, audiobooks, language study resources, and marketing campaigns.
4. Consistency
A narrator voice generator guarantees professionalism and consistency. The generated voiceover consist of a uniform caliber and tone, avoiding the variations that can arise from using several human narrators. It ensures that your material maintains a high level of professionalism and improves the user experience overall.
Part 2: 5 Consideration for choosing a narrator voice generator
Your narrator’s voice is essential for your audience to have an interesting and professional audio experience. We’ll look into a few crucial considerations to keep in mind while choosing anarrator voice generator . The possibilities of using a narrator voice recorder are diverse, ranging fromstorytelling voice generators toGoogle translate male voice generators .
1. Voice Quality and Naturalness
An engaging and professional audio experience depends on the voice quality and naturalness of the generated voice. To select the voice that perfectly meets the requirements of your project, look for a voice generator that provides a variety of voice choices. It should be clear, with natural pronunciation and the right pitch and tone. Your listeners will be more likely to stay interested in your videos, lectures, or audiobooks if you have a natural voice.
2. Multilingual Support
If you are creating content in several languages or have an international audience, it’s essential to pick anarrator voice generator with multilingual support. Check that the voice generator covers the languages you will be working with and that generated sounds seem natural in each language. A sense of reality is added to your project by keeping the availability of many accents within each language in mind.
3. Pronunciation Accuracy
It’s important to pronounce words correctly, especially when using technical or industry-specific terminology. Look for a voice generator that can pronounce words and phrases correctly and has an extensive pronunciation dictionary. Some voice generators also enable you to modify the pronunciation and allow you to adjust your generated sound according to your particular requirements.
4. Intonation and Emphasis
Spoken language needs to use emphasis and intonation to express the emotions, meaning, and context of a statement. The rise and fall of the pitch during speech is intonation, and it is used to convey a variety of attitudes, feelings, and intentions. Both factors help the narrator’s voice generator effectively deliver the information. The narrator’s voice generator must be able to modify intonation and emphasis to provide natural speech.
5. Commercial use
Voice generators are widely used by both people and businesses to generate sound files for many kinds of commercial uses, including marketing and advertising, e-learning, and training. However, it’s essential to be familiar with the narrator voice generator’s license terms and conditions to ensure agreement to usage rights and intellectual property regulations.
Part 3: Best 3 narrator voice generators you must try
We will look at 3 of the best narrator voice generators that are a must-try for everyone to improve the sound because of their excellent voice quality and flexibility.
**1. Virbo
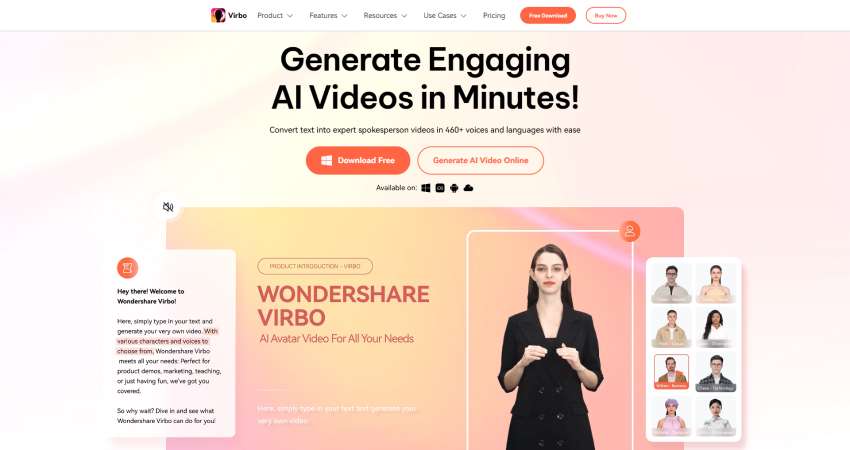
With Virbo, your video dreams may come true with the best narrator voice ever! Whether you’re a professional or a beginner, Virbo has come with seamless cross-platform compatibility. Create incredible videos on Windows, macOS, Android, or Linux with one account and without compatibility issues. You get access to an abundance of more than 180+ video templates. Virbo also offers you an enormous amount of music that is available 100% royalty-free.
Your videos will be more real and entertaining than ever before with Virbo’s seamless text-to-speech translation in over 120+ languages. Virbo’s AI script generator boosts creativity to a new level. Enter your keywords, and ChatGPT will create a comprehensive script for your video. With this innovative function, which is only available on mobile devices, you can let your imagination run wild wherever you are.
Step-by-Step Guide For Using Virbo
Step 1: Install Virbo and launch it
Go to the official website of Virbo and click on free download. Open the .exe file and click on the install button. Wait until the installation is finished. Click on sign in to make an account on it.
Generate Engaging
AI Video in Minutes!
Easily convert text into professional spokesperson videos in over 120+ voices & languages in minutes.
Generate AI Video Free Generate AI Video Now
google-play ](https://app.adjust.com/1187btki%5F11xz9mlt ) app-store ](https://app.adjust.com/1187btki%5F11xz9mlt )

Step 2: Create a video or select any template
Click on the home button to create a video or if you want a video for your business, social media, advertisement, etc. Then click on the video template, and you will get various templates according to your need.

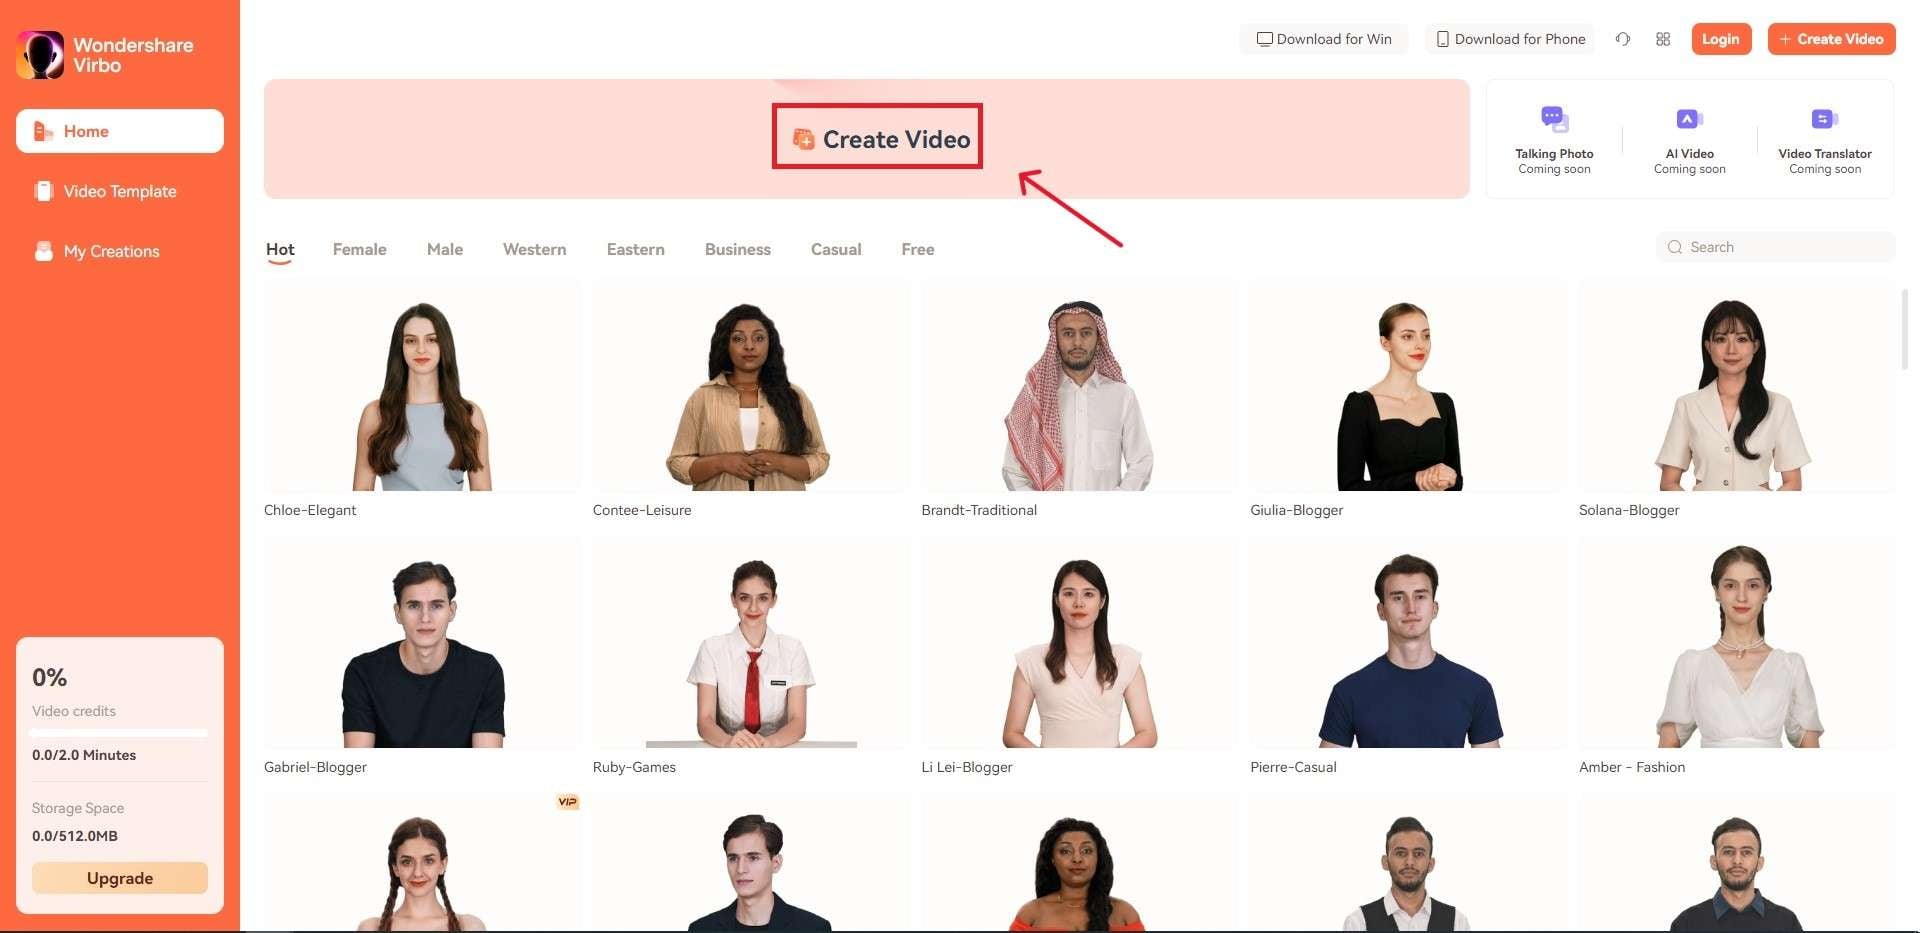
Step 3: Add avatars to your video
After clicking on create videos, add an avatar to your video. You can select male, female, western, casual, etc avatars for your video. You can apply the same avatar to the overall storyboard, or you can also change it.
![]()
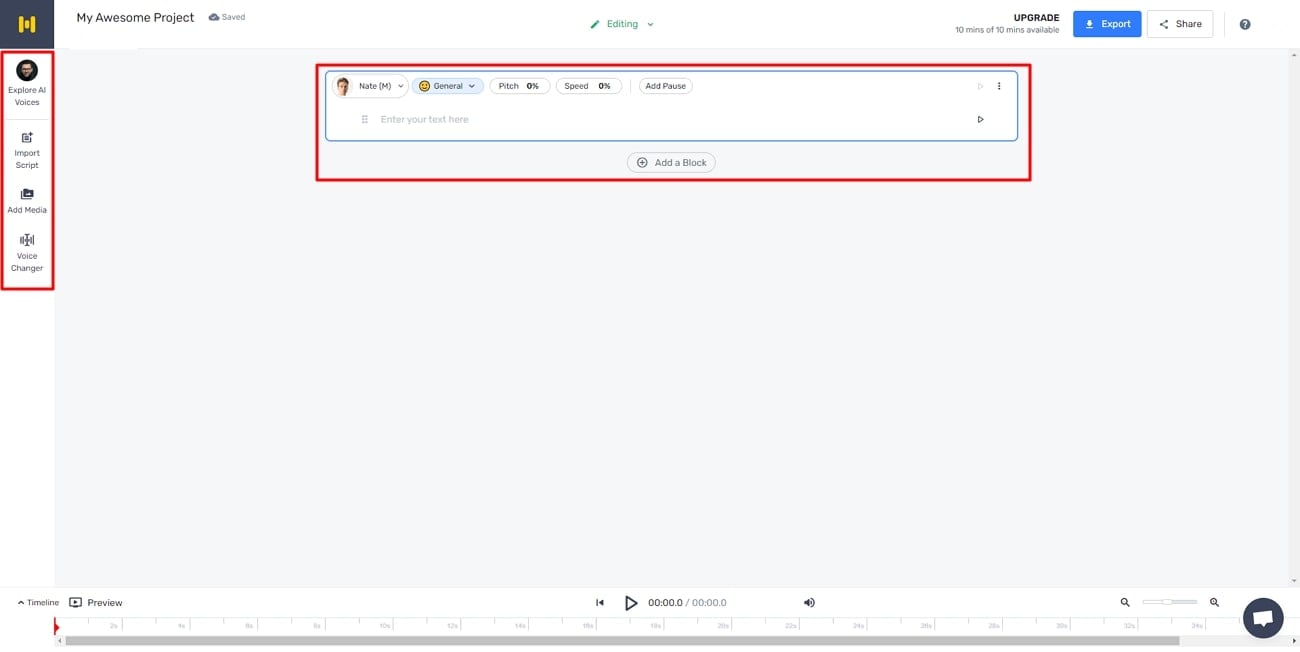
Step 4: Make a script for your video
Click on the AI script a dialogue box will appear. Write your script in the box and optimize the text in any form like professional, engaging, shortened, expand, etc. Click on the apply button to apply it on the video.

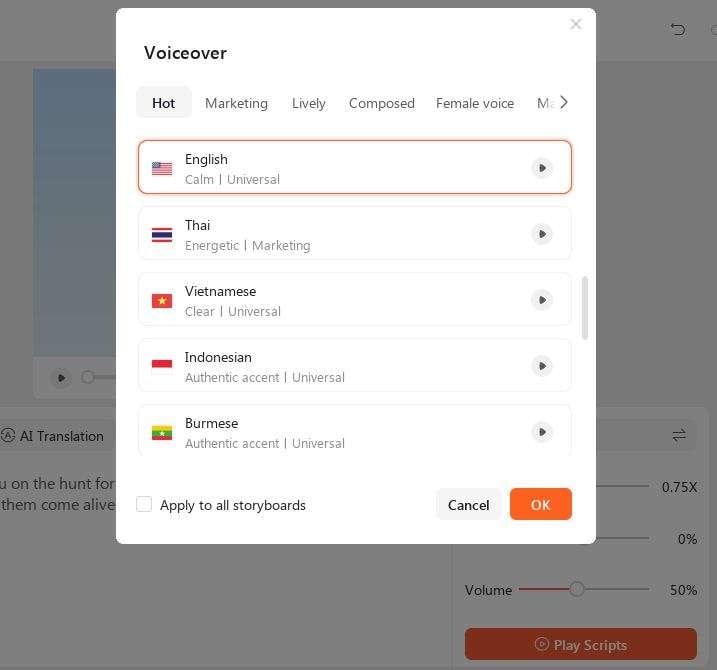
Step 5: Adjust the accent and other settings
You can see further setting options on the right side of the script box. You can adjust the speed, pitch, and volume of the voice. Select the accent of the voice as per your requirement.
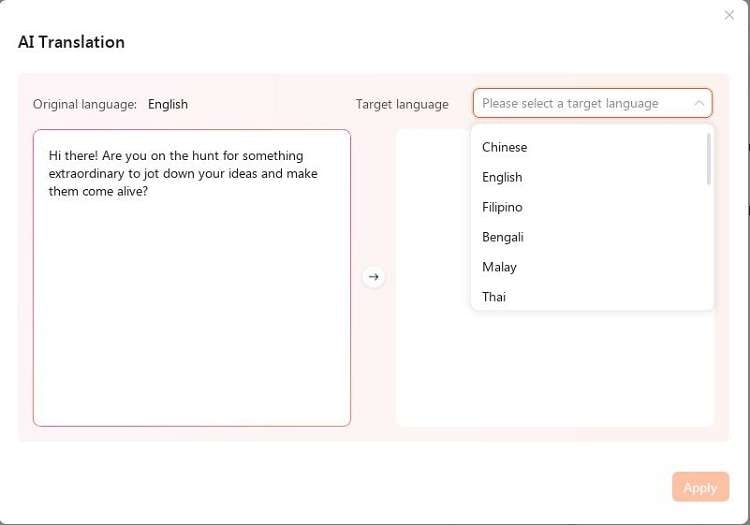
Step 6: Translate your script
If you want to translate the script into other languages, click on AI translation, then select your desired language and translate it.
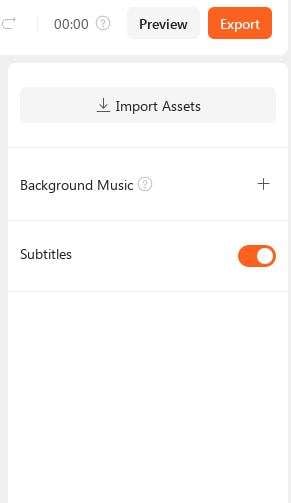
Step 7: Add subtitles and export the video
You can enable the subtitles and add background music to your video. Preview your video and click on the export button. It takes a few minutes to export the video.
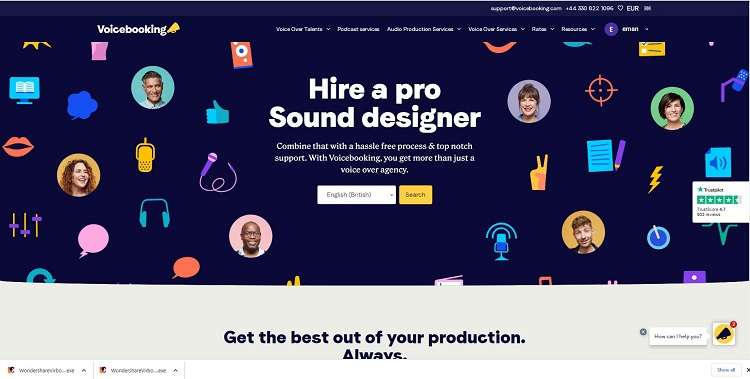
2. Voicebooking
Voicebooking is an essential time-saving tool whether you’re a content producer, creating captivating Instagram reels, or a company planning a series of ads and memes for TikTok. Voice booking is astorytelling voice generator that provides a diverse range of female and male voiceover options, which are available in different languages. You can quickly emphasize specific phrases and include pauses in your text with this tool, improving the overall narration quality.
Step-by-Step Guide For Using Voicebooking
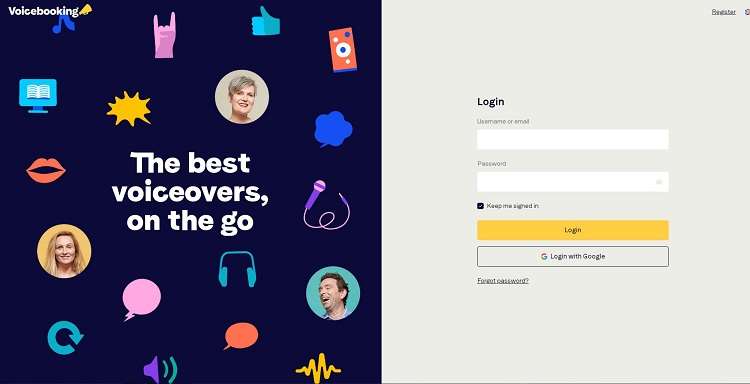
Step 1: Go to the website and make an account
Go to Voicebooking and sign up there to access its features. The software is available for free trial. Since it is a web-based tool, there is no need to download any software.
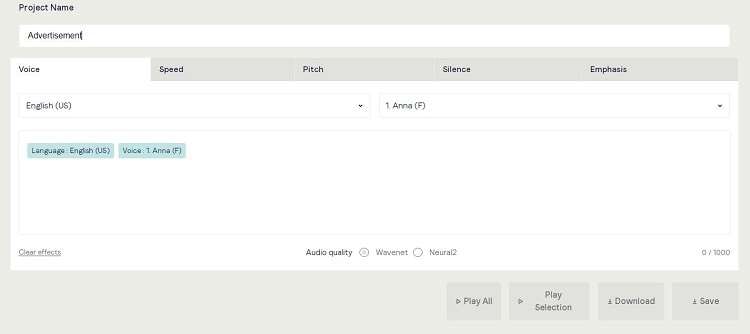
Step 2: Give a name to your project
Give your project a name to get started. Select the language you want to use and the voice that best matches the tone and style of your project. Then time to enter your script into the text area.
Step 3: Adjust the pitch and speed of the voice
Make the voice unique. Test the narration’s pitch and speed, and make any necessary adjustments. Make sure the voice is the ideal fit for your project.

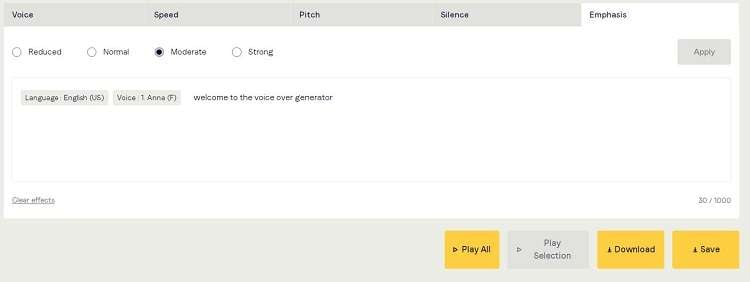
Step 4: Add emphasis to your narration
Emphasize specific words or phrases to add raise to your narration. Different intensity levels, such as normal, moderate, and strong, are available. Choose the emphasizes level, then select the text and click on apply.
Step 5: Verify and download the voice
Give your voiceover a final try to make sure everything is in order once you’ve become satisfied. Download it if it sounds good.

3. Speechify
Text may be easily turned into voiceovers with the help of Speechify’s comprehensive technology. With more than 200 superior voices at your fingertips, you can give your projects a genuine. Discover more than 20 distinct languages to engage with people around the world and deliver your message with local precision. You can modify the pitch, tone, and speed of the narrated voice, providing them with granular control over the audio output.
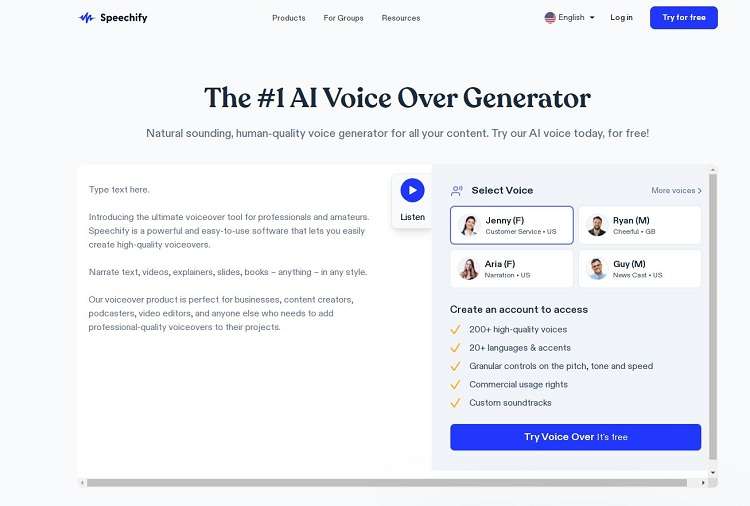
Step-by-Step Guide For Using Speechify
Step 1: Enter and import your script
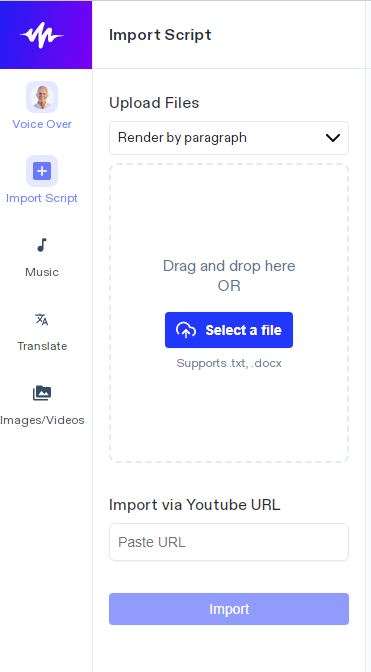
Visit the Speechify website to get started with the voiceover, then select “Try for Free.”. By selecting “Import Script,” you can easily import your script from your device or enter your script manually. You can also import YouTube URLs.
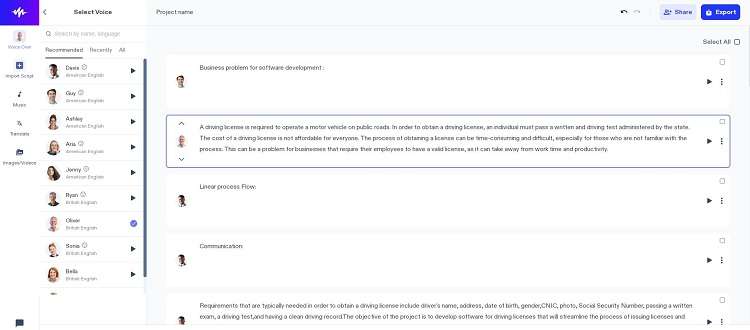
Step 2: Select the voice-over for your projec t
Select the perfect narrative voice by selecting “Voice Over” and then “Voice.” Discover the ideal match for your project among over 200 high-quality voices in more than 20 languages. Customize the speed of voice according to your taste.
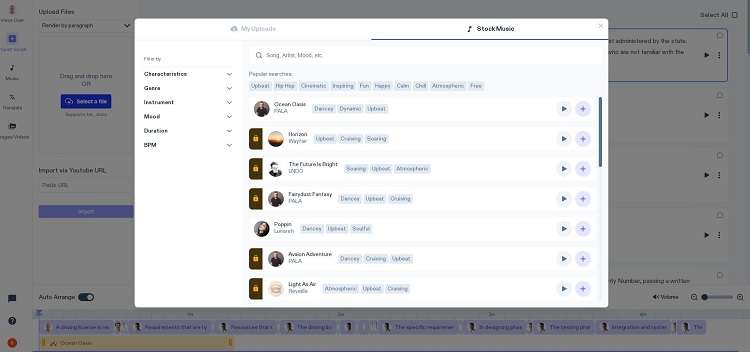
Step 3: Add translations and music to your script
Click on music and choose the music from stock or upload from media. Adjust the background music according to your script. You can also add multiple music to each block of script.
Step 4: Export your project
After completing all the editing, click on the export button to download your project.
Conclusion
In this article, we discussed the importance of a narrator voice generator, emphasizing its efficiency, cost-effectiveness, support for multiple languages, and consistency, it provides to video development. We have also looked at the essential factors to take into account while choosing the best narrator voice generator for your projects.
We provided a list of some of the top voice-over tools for narrators. Wondershare Virbo comes out as the best option among them for generators. With its user-friendly interface, compatibility for several platforms, and availability of more than 180 video templates.
Text To Speech | Online
Text To Speech
Infuse vitality into your narratives with online AI text-to-speech capabilities, offering a variety of languages and voices. Expand your reach by captivating a broader audience with engaging audio content.
Get To Know Our AI Script Feature

Click here to learn more about Text to Speech >>
03 Seamlessly Preview the Speech
Step 1. Create a project
Go to the online Virbo site . Click “Create Video” to start a new project.
Create a project
Step 2. Input your text
Input your script below.
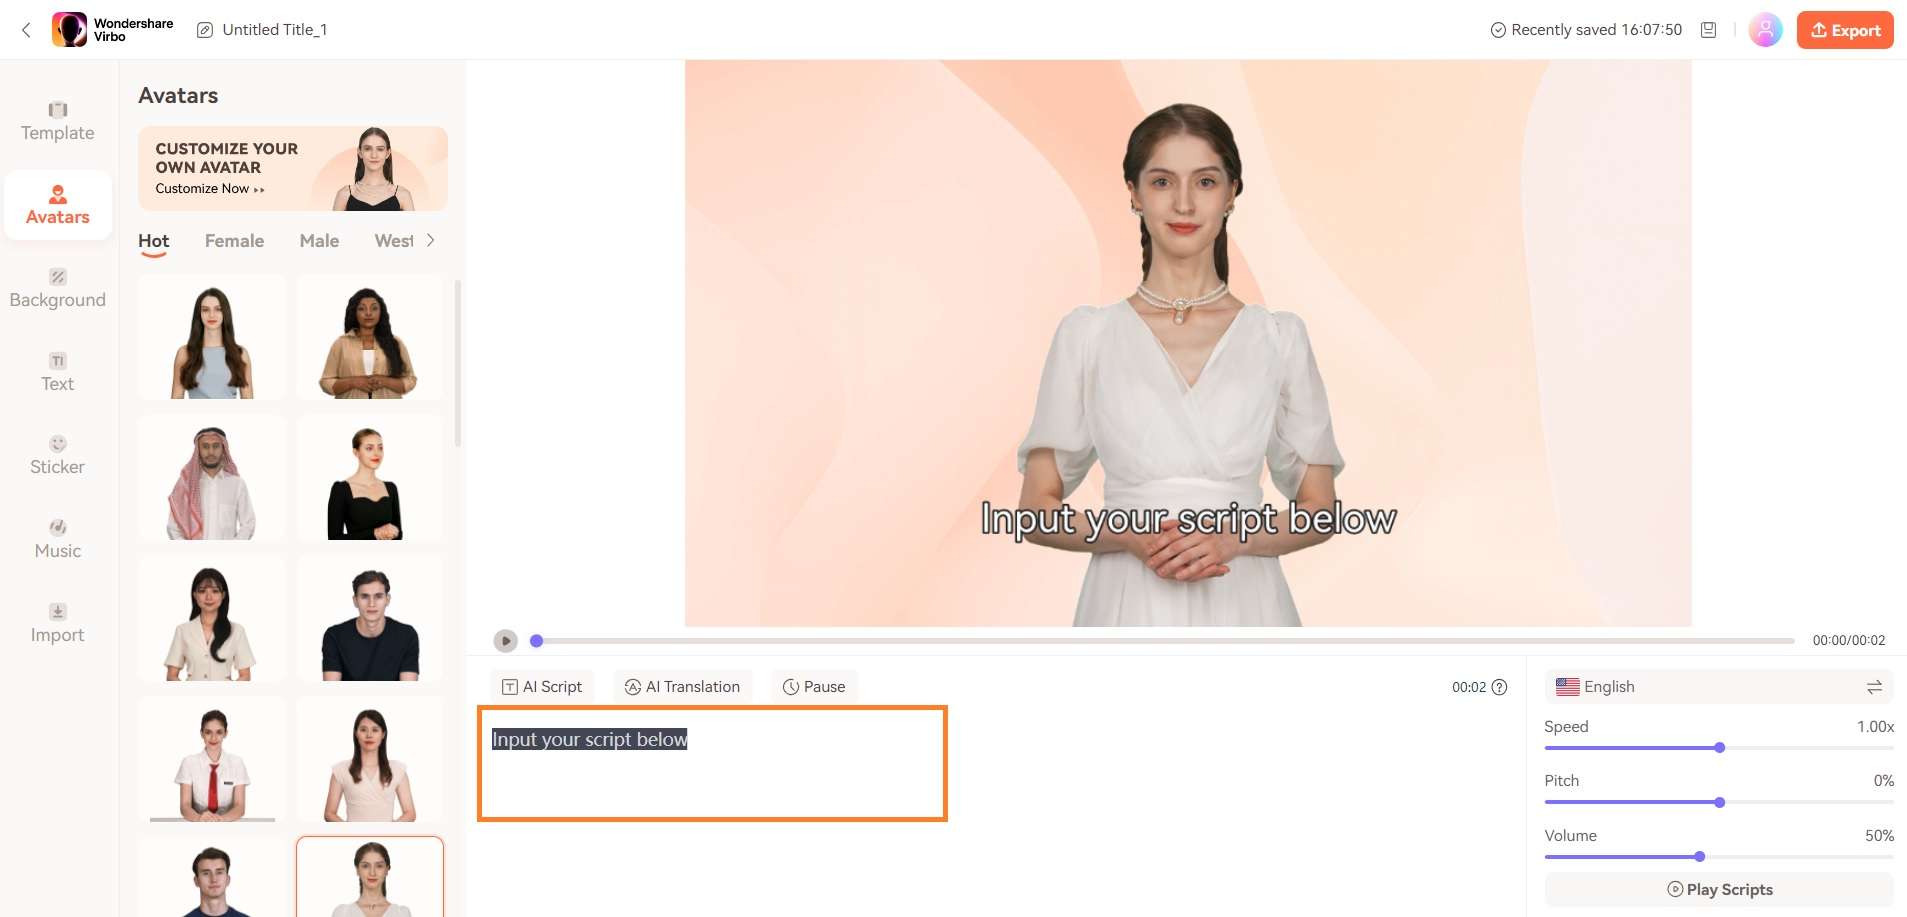
Input your text
Step 3. Seamlessly Preview the Speech
To preview the effect, simply click the play button above or select “Play Scripts“ at the bottom right.
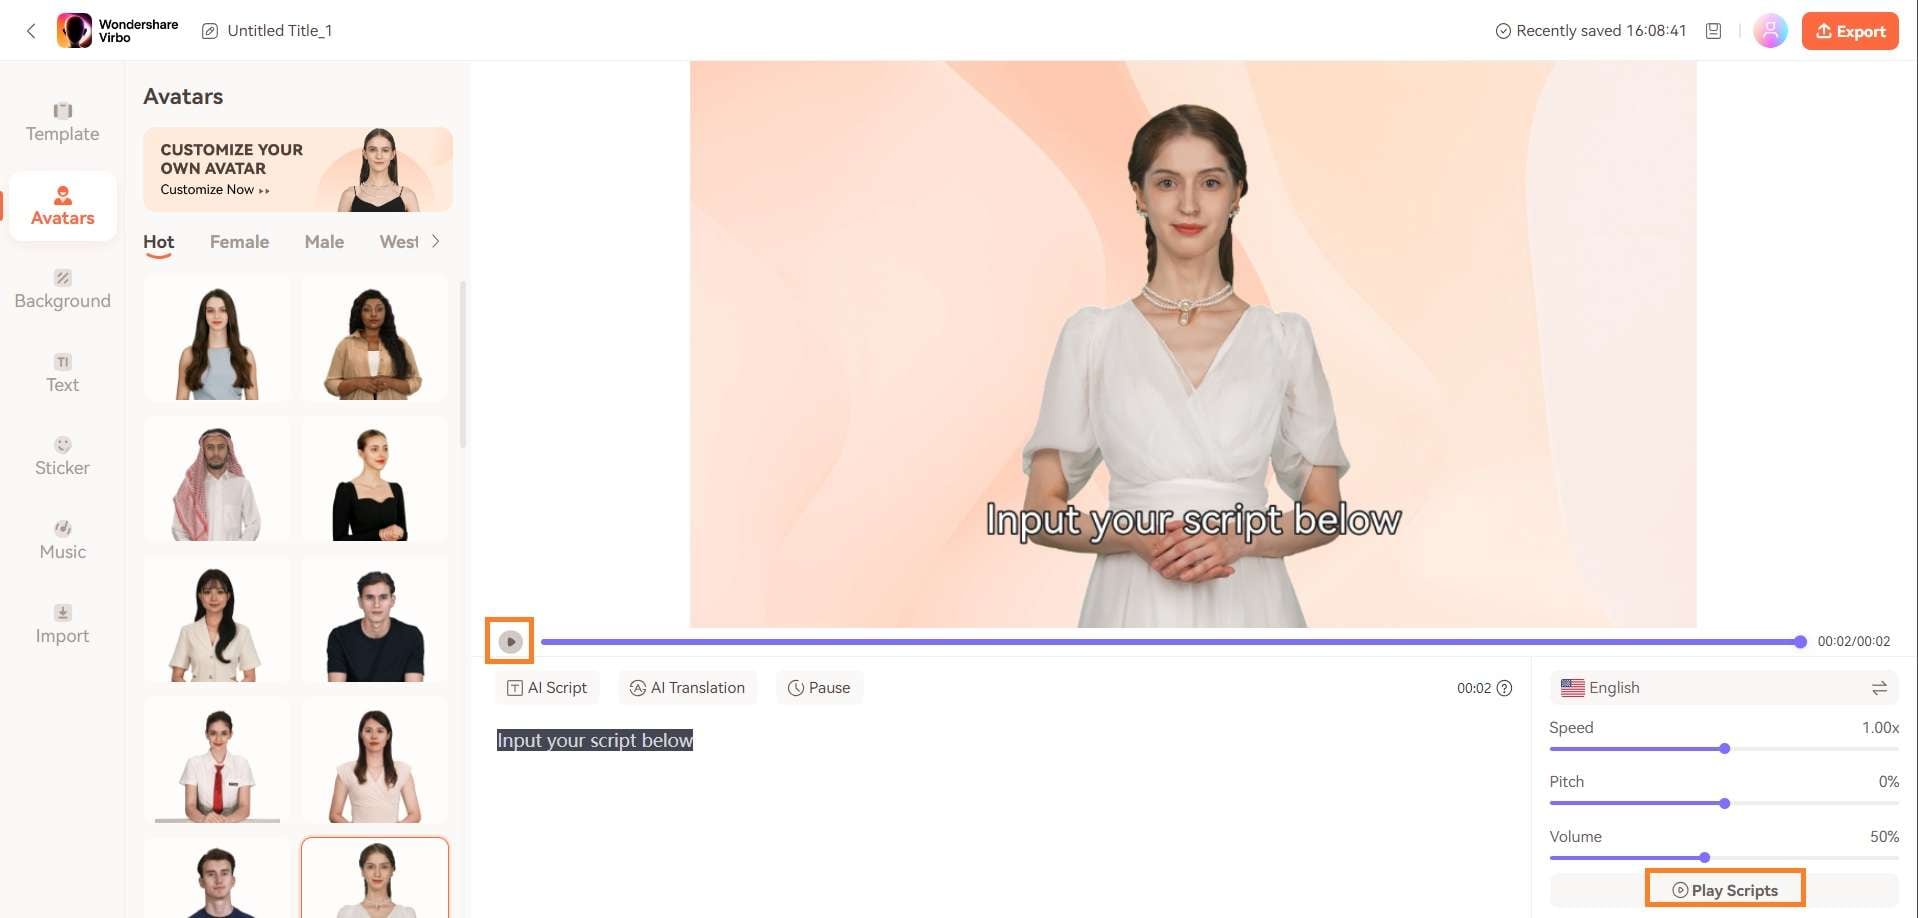
Preview the Speech
03 Seamlessly Preview the Speech
Step 1. Create a project
Go to the online Virbo site . Click “Create Video” to start a new project.
Create a project
Step 2. Input your text
Input your script below.
Input your text
Step 3. Seamlessly Preview the Speech
To preview the effect, simply click the play button above or select “Play Scripts“ at the bottom right.
Preview the Speech
A Guide to Unlock Descript Text-to-Speech Features in Detail
Content creators often struggle with time-consuming tasks like crafting scripts and narrations. Here, Descript text-to-speech emerges as a game changer in the video editing scene. Its features have become crucial in automating voiceovers, generating scripts, and ensuring accessibility.
Users must understand the effective use of TTS to ensure a smooth editing process. As we explore the range of TTS tools, this article focuses onDescript TTS, the top performer in the market.
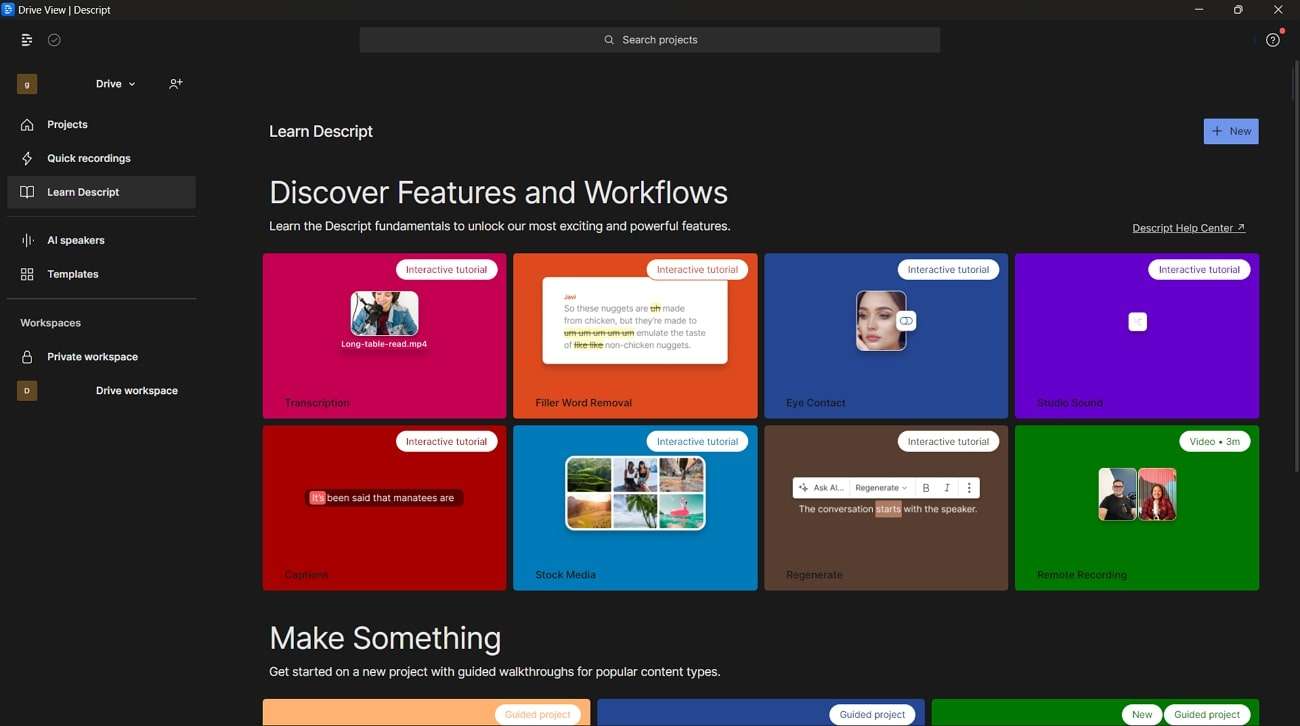
Part 1: Text-to-Speech in Descript: A Review
Availability: Windows, Mac, and Online
While exploring TTS technology, it becomes clear that these tools come in many forms. They offer unique automation options to convert written content into spoken words.Descript AI text-to-speech , in particular, differentiates itself with its strong features. Its entire project creation process includes user-generated scripts or content generated through AI.
Whether you choose to write out your ideas or rely on AI, Descript changes the input into speech. It brings the content to life through the application of advanced AI algorithms. This direct transition from written script to spoken words showcases the tool’s efficiency.
Moreover, it offers realistic AI-powered text-to-speech to simplify podcast and video production. You can create voice clones or use stock AI voices for quick audio generation. The creation of these dubbed voices is without recording or editing. With the natural speech patterns training, it delivers lifelike intonations and pauses. Also, it allows you to customize vocal styles for various settings and emotions.
Other Top-Notch Features of Descript
1. Overdub
If you want to correct your mistakes or enhance a specific part of an audio track, you don’t need to re-record it. The Overdub feature enables you to record an extra soundtrack with AI voice cloning. It allows users to type what they meant to say without a time-consuming editing process. Plus, the tool ensures users fully own their AI voice for easy sharing with others.
2. Regenerate
The irritating background noise or unmatched tone can make your videos imperfect. Descript’s Regenerate feature restores your audio by fixing errors. The tool uses AI technology to match your tone and regenerate a lifelike sound in a few clicks. It eliminates dull dialogues and background noises available in your videos and podcasts.
3. Remove Filler Words
Filler words and verbal hesitations can impact the presentation by distracting listeners. Descript’s feature to cut filler words addresses this need with a quick solution. You can remove words like “ums,” “uhs,” and “you knows” with it. Removing fillers empowers you to present a compelling audio presence.
4. Studio Sound
The “Studio Sound” feature removes background noise, enhances speech, and mimics studio-quality recording. It tackles echo and imperfections in the audio and video editing. You can isolate voices and regenerate audio quality by removing unwanted noise. Users can use it in different recording environments to create professional-sounding content.
Pricing Plans
After exploringDescript text to speech with other features, let’s discuss how much it costs. It has different options to fit what you need to make it accessible for everyone:
| Plans | Price |
|---|---|
| Descript Creator | $12 per user/month |
| Descript Pro | $24 per user/month |
Part 2: TTS Function in Descript: Getting Aware of the Operations
Imagine you’ve put much effort into writing the script, ensuring every word is right. But the idea of recording audio seems a bit overwhelming. That’s where theDescript text-to-speech feature finds its application. It can turn your written script into captivating audio with simple steps. Let’s explore the easy steps to see magic and give life to your video scripts:
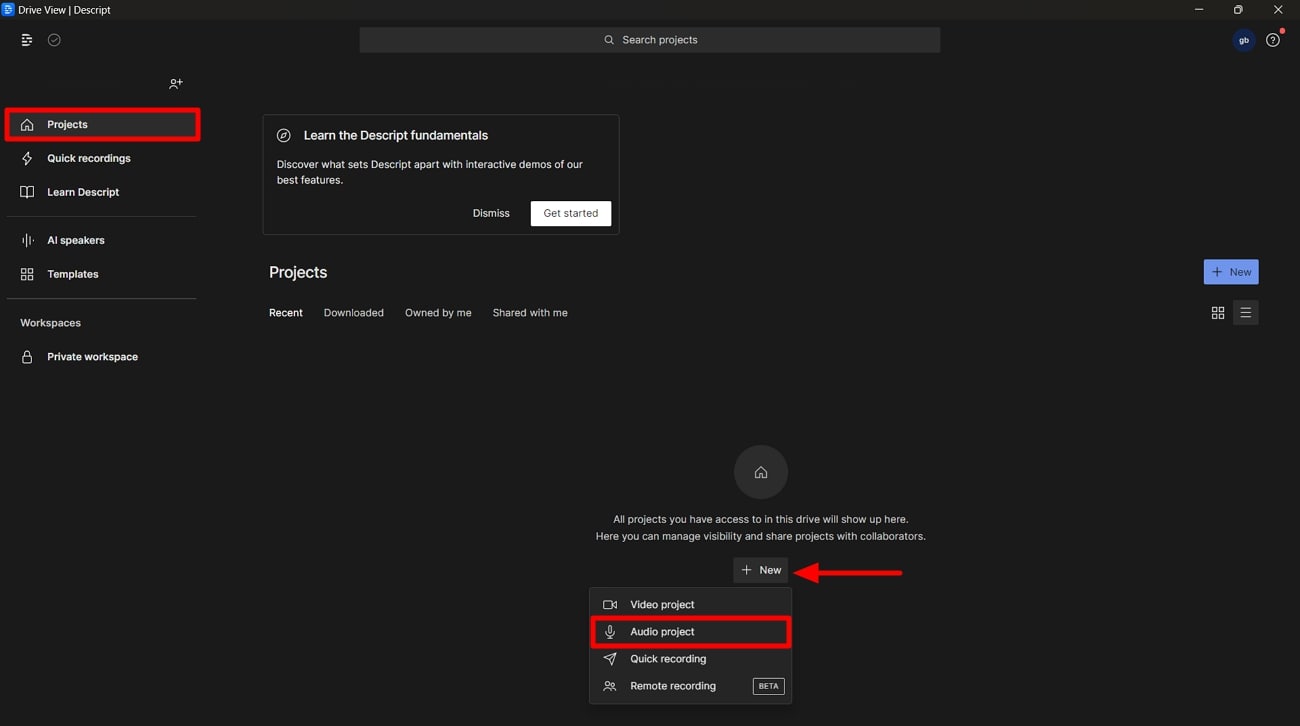
Step 1 Create an Audio Project
First, visit the official website of Descript, download the tool, and open it on your devices. On the tool’s dashboard, head to the left toolbar and click the “Projects” tab. On the upcoming window, tap on the “New” button. Now, you’ll find a dropdown menu; choose “Audio Project” among the available features. Then, you’ll find a new screen to do your audio projects.
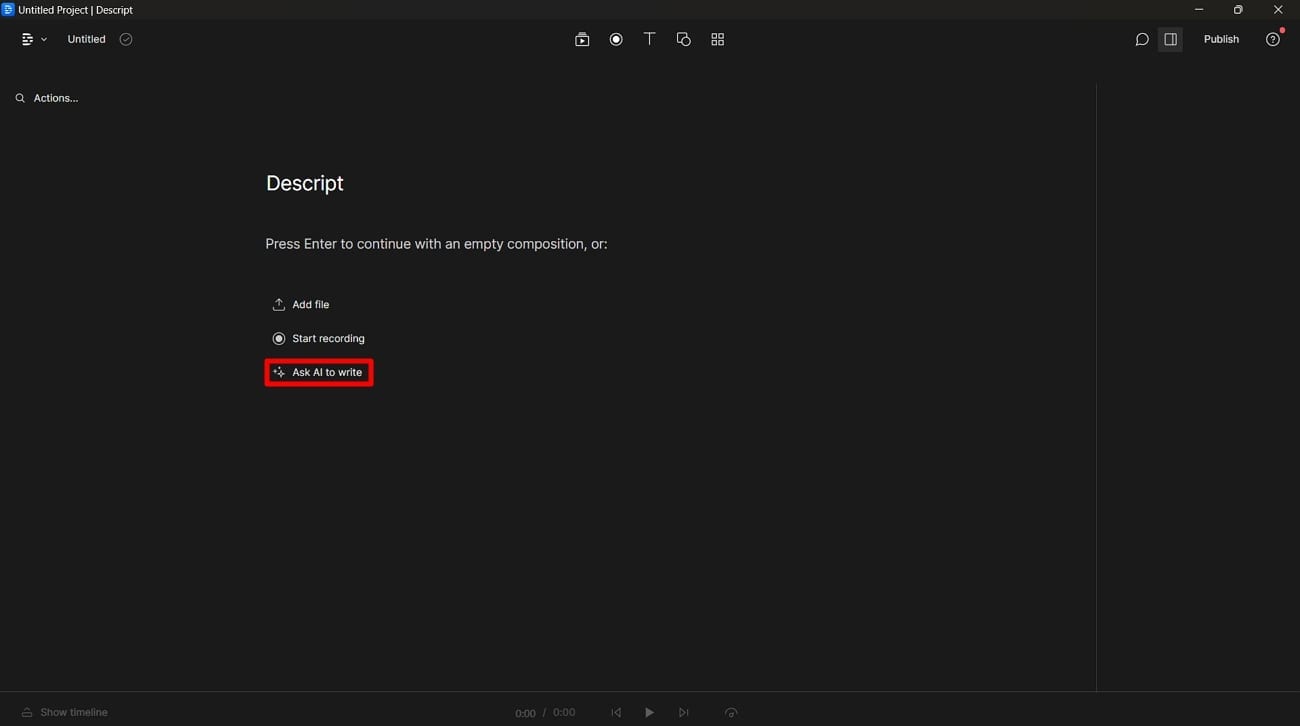
Step 2 Generate the Script
Start writing your script to generate lifelike voices. However, if you want to write a script yourself, press “Enter.” In contrast, if you want to get an AI-generated script, choose the “Ask AI to Write” option.
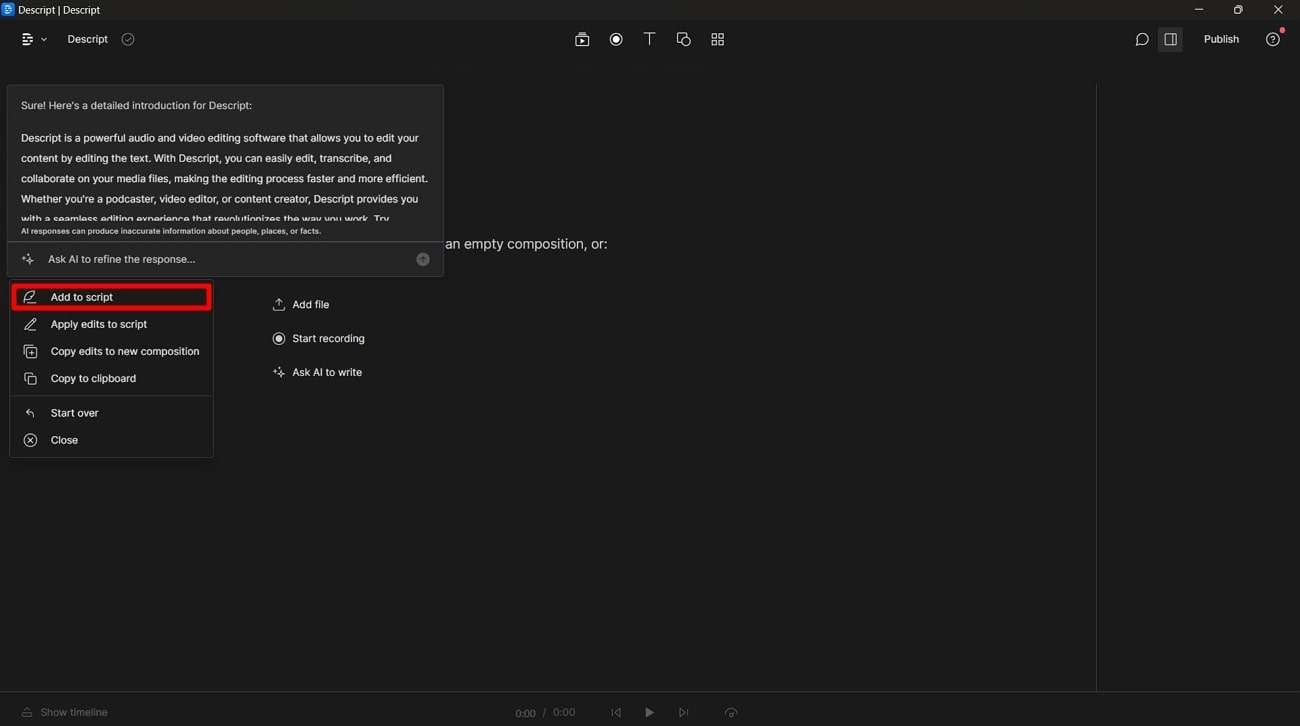
Step 3 Employ AI to Polish Your Script
After clicking this button, a dialog box will appear on the screen. Now, write what you want AI to do in the prompt box and select the “Enter” key. You can specify your output of a whole script, an outline, or brainstorming ideas for your content. Moreover, you can ask AI to refine the result to get the required answer. Finally, choose the “Add to Script” option to use it for your videos.
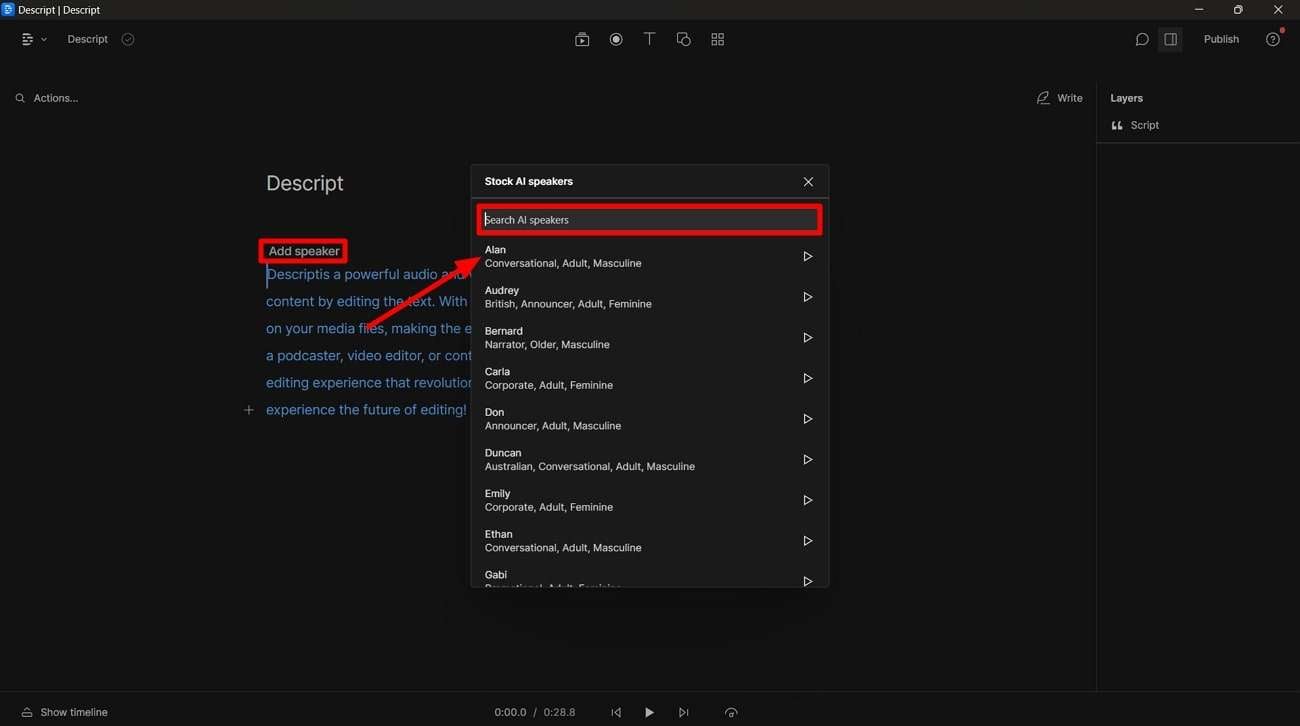
Step 4 Add Speaker to Your Project
In the next step, the chosen script will appear on the screen. Now, hit the “Add Speaker” button to select the speaker you want to produce voices for your videos. You can opt for the “Browse Stock AI Speakers” to choose among the speakers offered by the tool. Later, navigate to the bottom of the screen and tap on the “Play” icon to preview the recording.
Conclusion
In conclusion, users are now familiar withDescript TTS, where efficiency and creativity come together. Descript offers an understanding of the possibilities of TTS and stands out as a leader. This article discusses the features it offers at an affordable pricing plan. Plus, the easy-to-follow steps help you convert written text into customized voices. Due to its cross-platform adaptability, you can use it on Windows, Mac, and even online.
A Detailed Review of Murf.ai AI Text-to-Speech Tool
Text-to-speech generators are widely used by professionals for various cases. Listening to speech can help visually disabled people to understand the content. It makes the information accessible and easy to comprehend. You can also proofread your work by listening to the speech to identify the errors. That’s why there are multiple TTS converters like Murf.ai in the market.
Murf AI text-to-speech is a famous tool that can convert text to speech within a few minutes. To know its powerful features and functions, this article will offer a detailed review. We will also explain a few alternative tools to offer more promising results.
Part 1: What is Murf.ai AI Text-to-Speech Product?
Murf.ai uses artificial technology to convert textual content into an AI voice. It has a clean interface that encourages beginners to convert their text into speech. You can either type or import scripts with supported formats of TXT, DOCX, and SRT. After typing the content, you can select the AI voice from more than 120 options. All AI voices sound natural and realistic with the best audio quality.
Furthermore,Murf.ai’s voice also allows you to set the speaking tone of your AI voice. Once done, you can adjust the pitch and speech of the AI voice according to your needs. You can also insert necessary pauses in between the voices. After generating the voice, you can preview the results on its interface. Hence, Murf.ai is an outstanding TTS converter that can significantly help you in generating text to an AI voice.
Key Features of Murf.ai
- There are different age ranges for the AI voices on this tool, comprising kids, middle-aged, and young.
- From its media library, you can explore a huge variety of stock music, images, and photos. You can use stock content from its media library free of cost.
- It provides a collaborative ecosystem for the users. You can share a project or preview with your friends easily and copy the link to your project to get feedback from your colleagues.
Part 2: How Many Languages are Supported by Murf.ai Text to Speech?
Murf AI text-to-speech supports high-quality AI voices. It supports more than 120 AI voices in multiple tones and accents. There are over 20 supported languages on this tool that you can explore, which are mentioned as follows:
- English
- German
- French
- Italian
- Spanish
- Russian
- Portuguese
- Arabic
- Hindi
- Tamil
- Chinese
- Japanese
- Korean
- Dutch
- Danish
- Finnish
- Norwegian
- Romanian
- Turkish
- Indonesian
- Scottish
Part 3: How to Use the Murf.ai Text-to-Speech with Step-by-Step Instructions
Are you looking forward to tryingMurf TTS? In this article, we have jotted down the accurate steps of using Murf.ai to convert text to speech effectively.
Step 1: Sign Up on Murf.ai
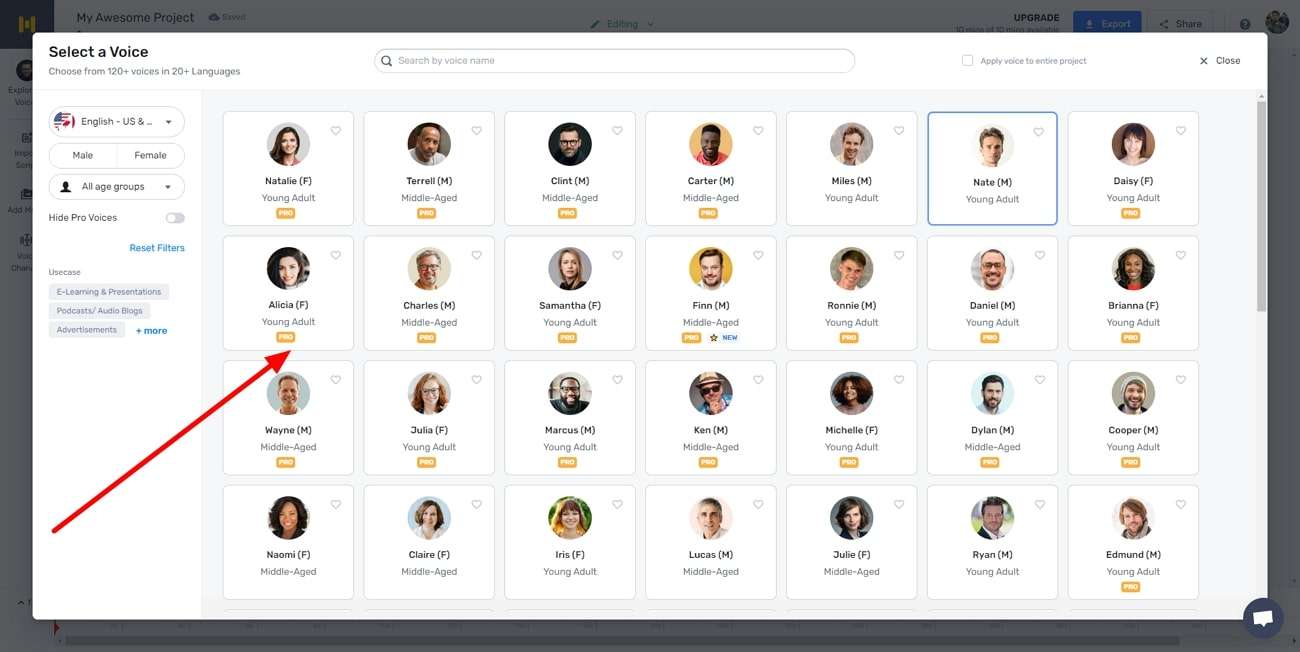
Navigate to the official website of Murf.ai through any web browser. Create your account by entering your credentials. Afterward, you will be able to see the interface of this tool, where you need to click “Create Project” to proceed.
Step 2: Enter the Textual Script
Now, type the textual content in the given space. You can also import the script from your PC. Now, choose the AI voice and language by clicking “Explore AI Voices” from the left menu. From this option, you can explore the variety of AI voices in different age ranges.
Step 3: Adjust the Settings and Export the AI Voice
From the given options, you can adjust pitch, emphasis, volume mixer, and speed. You can also specify the speaking style from the multiple options. Once done, click on the “Play” icon. By doing so, you can check the generated AI voice. Afterward, you can either export or share your AI voice to other platforms.
Part 4: The Top 3 Alternatives to Murf.ai Text-to-Speech Tool
Do you want more options for TTS converters? In this section, we have discussed the top alternatives of Murf.ai in a detailed manner.
1. Virbo
Wondershare Virbo is a well-known TTS converter for various AI features. It offers more than 120 languages and AI voices of professional quality. It contains different speaking styles that you can choose according to the requirements. The speaking styles are commercial, lively, composed, soothing, marketing, etc. You can also check the estimated duration of the generated AI voice from its interface.
Along with producing AI voice, Virbo also provides AI Avatars. These Avatars are available in different nationalities and attires. By using such features, you can create compelling videos within a few minutes. Moreover, you can create AI scripts through this tool to create descriptions and titles for social media platforms.
Get Started Online Free Download
2. Speechify
Speechify is an online TTS converter that creates natural AI voices within a few seconds. With this tool, you can upload PDFs, web pages, and other documents easily. You can also adjust the speed of your AI voice through a slider. This tool offers up to 9X faster reading speed, unlike other tools. You can also use the celebrity AI voices such as Snoop Dogg and Gwyneth Paltrow.
Furthermore, this tool lets you download the audio files in MP3 file format free of charge. It also allows you to save the changes in its library across every device. Thus, Speechify is a complete tool consisting of various beneficial features.

3. Speakatoo
Speakatoo is another text-to-speech converter offering many useful features. It supports over 850 AI voices with clear audio quality. You can also discover over 120 languages and accents you can easily choose from. This tool utilizes advanced algorithms to produce 100% natural human voices. Moreover, it offers cloud storage to save your audio files.
This tool also lets you adjust the rate, pitch, and volume of the AI voice accordingly. You can also add background music to your AI voice to add more engagement. Furthermore, you can add human emotions to your AI voice with advanced voice effects. Hence, you should use Speakatoo to create a customized AI voice within a few clicks.
Conclusion
To produce AI voices, you would require effective TTS converters. One of the commonly used TTS converters is Murf.ai. Through this article, you can read a well-explained review ofMurf’s text-to-speech with its features and guidelines. You can also try the discussed alternatives to generate customized AI voices with the best audio quality.
A Comprehensive Guide for Free Video Translator Downloading
Welcome to our comprehensive guide on video translator download , your gateway to a diverse world of multimedia content. In an era where connecting with a global audience is paramount, the ability to break language barriers through video translation is a game-changer. Whether you’re a content creator, language enthusiast, this guide will walk you through the essential factors to consider, step-by-step instructions for a seamless video translator download, and address common questions related totranslating English to Hindi videos .
Part 1: Step-by-step Instructions for Video Translator Downloading

Now that we’ve explored the crucial factors to consider when venturing into video translation let’s embark on a practical journey — downloading a video translator. Follow these step-by-step instructions to integrate this powerful tool into your content creation toolkit seamlessly. Additionally, we’ll recommend two reputable video translator apps to guide you through the installation process.
A Versatile Video Translator Tool: Virbo
As a multilingual tool, Virbo takes real-time translation to the next level. Accessible online and through dedicated applications, Virbo boasts advanced features that enhance communication dynamics. Its capabilities extend to video language translation, making it a valuable addition to the subtitle translation toolkit.
Step 1: Visit the official Virbo website or use the dedicated software/app.
Generate Voice Online Download APP Now Free Download
Step 2: Upload your desired file for instant translation.

Step 3: Choose the target language for translation. Virbo’s extensive language support allows you to cater to a broad audience.

Step 4: Click the “Translate” button, triggering the initiation of the translation process.
Translating English to Hindi Made Easy: Descript
Descript is a revolutionary platform that redefines the landscape of audio and video editing. Pioneering the concept of text-based editing, it allows users to edit multimedia content as easily as editing a document. With its intuitive interface, users can manipulate audio and video files by simply editing the transcribed text, seamlessly making changes to the corresponding media.
Step 1: Navigate to the official Descript Translator website, the digital haven where linguistic precision meets innovation.

Step 2: Upload your video file directly onto the platform, initiating the process of transforming spoken words into the language of your choice.

Step 3: Customize your translation experience by choosing your desired language.

Step 4: Once the translation is complete, download the translated text or share it directly from the platform.
Part 2: Important Factors to Consider While Translating Videos
In the vibrant landscape of digital content, the ability to transcend linguistic boundaries is a crucial aspect of reaching a diverse audience. When venturing into the realm of video translation, it’s essential to consider various factors to ensure an accurate and meaningful representation of your content. Let’s delve into the key considerations that can significantly impact the quality of your video translations.
1.Content Accuracy
In the intricate dance of video translation, accuracy takes center stage. When selecting a video translation tool, it’s imperative to prioritize those that not only promise but guarantee precise content translation. The soul of your message lies in its accuracy, and choosing a tool that preserves the essence and nuances of the original message establishes a deep and meaningful connection with your viewers through every frame of the translated content.
2.Language Support
The beauty of global content creation lies in its linguistic diversity. Opt for a video translator that transcends language boundaries—a true polyglot. Choosing a tool with broad language support empowers you to cater to the diverse linguistic preferences of your audience, creating an inclusive and accessible viewing experience. Your selected tool should be a gateway to a world where language is not a barrier but a bridge.
3.Subtitle Customization
Visual elements, especially subtitles, contribute significantly to the overall viewer experience. Seek a video translator that goes beyond the basics, offering options for customizing subtitles. The ability to adjust not only the appearance but also the timing of subtitles ensures that your translated content aligns seamlessly with the rhythm and tone of your original video. This customization transforms your subtitles from a mere translation tool to an integral part of your storytelling.
4.User-Friendly Interface
In the fast-paced and dynamic landscape of content creation, efficiency is the key to success. Choose a video translation tool adorned with a user-friendly interface—a design that is intuitive and serves as a compass guiding both beginners and experienced users effortlessly through the translation process. A tool that feels familiar and accessible contributes not only to a smoother workflow but also to a more enjoyable and productive content creation experience.
5.Offline Functionality
In a world where the ubiquity of the internet is not guaranteed, the ability to navigate offline is a valuable asset. Consider a video translator that offers offline capabilities, allowing you to enjoy translated content even when a stable internet connection is elusive. This feature provides convenience and flexibility, ensuring your content creation journey is not hindered by connectivity constraints.
Break Language Barriers Now with Wondershare Virbo - Video Translator!
Part 3: FAQs Related to Translating English to Hindi Video and Downloading it
As you delve into the realm of video translation, it’s natural to have questions about the process, especially when aiming to translate content from English to Hindi. Let’s address some frequently asked questions to provide clarity and guidance on translating English to Hindi videos and the downloading process.
Q1. Can I Download a Video Translator for Free?
Yes, many video translators like Virbo offer free versions with basic features. It’s advisable to visit the official website of your chosen video translator to obtain accurate information on free and premium offerings.
Q2. Is Offline Translation Possible?
Many video translators offer offline functionality. During the download process, check for features related to offline translation to ensure that the tool supports this capability. Offline functionality allows you to work on translations even without a stable internet connection.
Q3. Can I Customize Subtitles for Translated Videos?
Yes, Virbo video translators allow the customization of subtitles. Explore the settings or preferences within the downloaded tool to adjust the appearance, timing, and other aspects of subtitles.
Q4. Are There Specific Video Formats Supported by the Translator?
So far, Virbo only allows uploading MP4 files. Stay tuned for future updates!
Conclusion
In a nutshell, the dynamic landscape ofvideo translation is a journey marked by precision, creativity, and accessibility. As creators, language enthusiasts, or viewers, our exploration has unveiled a spectrum of considerations crucial for a seamless and enriching experience.
Armed with these insights, venture into the world of video translation with confidence, knowing that every frame carries the power to resonate across borders, fostering a global connection through powerful translation tools likeWondershare Virbo .
Generate Voice Online Download APP Now Free Download
Also read:
- [New] In 2024, Perfect Illumination The Ultimate Guide to HDR Photography
- [Updated] Cycle Shaper Set for 2024
- 6 Fixes to Unfortunately WhatsApp has stopped Error Popups On Samsung Galaxy F34 5G | Dr.fone
- Everything You Need To Know About Unlocked Apple iPhone X
- In 2024, Avoid Washout 3 Essential Tips for iPhone HD Video Enhancement in Premiere Pro
- In 2024, What Is an AI Video Generator?
- Mazdayasna مَزدَیَسنا | Free Book
- New 2024 Approved The Recommended Natural AI Hindi Voice Generator
- The Ultimate Guide to Setting up a Group Conversation that Caters to All Systems in Skype for 2024
- Updated 2024 Approved Finest Text-to-Speech Male Voice Tools for Natural Output
- Updated Step-by-Step Guide How to Translate TikTok Videos for 2024
- Title: New 2024 Approved How to Stream on Twitch The Ultimate Guide
- Author: Sam
- Created at : 2025-03-02 18:28:15
- Updated at : 2025-03-03 20:52:25
- Link: https://ai-voice-clone.techidaily.com/new-2024-approved-how-to-stream-on-twitch-the-ultimate-guide/
- License: This work is licensed under CC BY-NC-SA 4.0.