
:max_bytes(150000):strip_icc():format(webp)/laptop-569944733df78cafda90169f.jpg)
Maximizing Yandex Translate in Video Translation and Beyond for 2024
Maximizing Yandex Translate in Video Translation and Beyond
Technological advancements in the world of video translation have transformed how content is being consumed. Away from automated translation and video dubbing,Yandex translate video allows users to watch videos with instant voice-over translation. By just clicking on the play button of a video, the Yandex video translate feature brings you to a world of new possibilities. In this article, we explore how the Yandex browser translate video works and how it compares to Google. We’ll also share some pro tips for efficient video translation with Yandex translate video.
Part 1. Yandex Browser Video Translation Overview
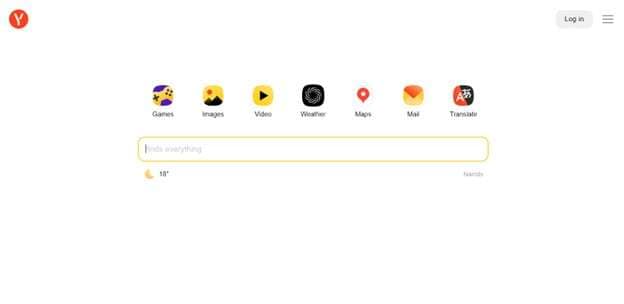
Yandex browser video translation is a useful tool for watching videos in your native language. The feature is designed to allow users across the globe to watch videos in their native language, regardless of the original language used. This unique feature automatically translates the audio track of a video, displaying the subtitles in a language of your choice.
Capabilities of Yandex Translate in Video Translation
The Yandex browser video translation comes with an in-built translator that shows words and phrases in the language being used in the browser interface. It also comes with additional features, including translating Yandex emoji and Yandex photo translate which improves user experience. These features recognize text in images, providing translation over the source text. This means that you only need to view a video and it will automatically generate subtitles in the language you are using with the browser.
Yandex browser translate video feature automatically detects the language of the loaded pages. It will then ask you if you want to translate it, and allow you to open the translation dialog window once you click the SmartBox. In only a few simple steps, you can translate the languages in any video, text, or image.
- Click “Translate” in the window of the Yandex Browser to translate the page text. From the page text that appears, click Show Original in the window.
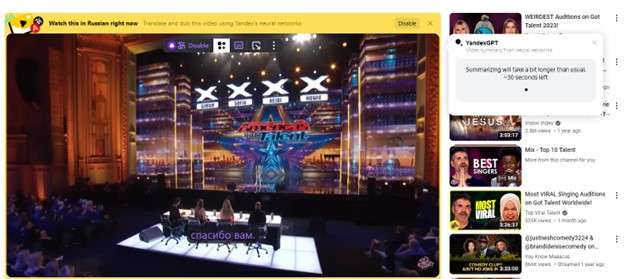
- When you play videos, click on the “SmartBox” indicating Translate Video that hovers on top of the video. Choose the language that you want, and select “Show Subtitles”. Yandex will automatically translate the video, allowing you to view it in your native language.
Pros
- Supports Multiple Languages: With Yandex video translate, you can watch any video in over 90 languages
- Accurate Subtitles: The Yandex browser translate video feature automatically generates highly accurate subtitles using speech recognition technology
- Live Translation: Translate any live stream videos in real-time, including conferences and news broadcasts in foreign language
- Offline Translation: Yandex Translate works seamlessly offline by allowing users to download subtitles to their devices for viewing later
- User-friendly Interface : Yandex browser translate video has an easy-to-use and highly intuitive interface that requires users to only click on the Translate button to access the subtitles
Cons
- Users have complained that Yandex translate videos often contain some errors in pronunciation
- Live translation and online video translation usually require an internet connection, and may not always be useful
- The video translation feature is only limited to the desktop version of the Yandex browser
- Users have limited control of the Yandex video translation process, including customizing the subtitles or changing the translation process
- Certain features may be technical for some users and only support certain video formats like MP4 and WEBM
Part 2. Google vs. Yandex: A Comprehensive Comparison
Making a choice between Google and Yandex for video translation can be challenging. The two search engines offer unique experiences and allow users to achieve various tasks. However, each has its strengths and weaknesses. As you explore the options for Google Translate Yandex, let’s have a look at what stands out the most for each.
Here is a quick comparison:
| Metrics | Google Translate | Yandex |
|---|---|---|
| Supported Languages | 135 | 102 |
| Maximum Documents File Size | 10MB | 5MB |
| Supported Image Formats | JPG, JPEG, PNG | JPG, PNG, GIF |
| Website Translation | Yes | Yes |
| Mobile App | Android & iOS | No |
| Offline Use | Yes | No |
| Translate History | Yes | Yes |
| Voice Input | Yes | Yes |
| Translate Handwriting or Virtual Keyboard | Yes | No |
| Translate Widget | For Android Users Only | Yes |
For a comprehensive comparison, keep reading!
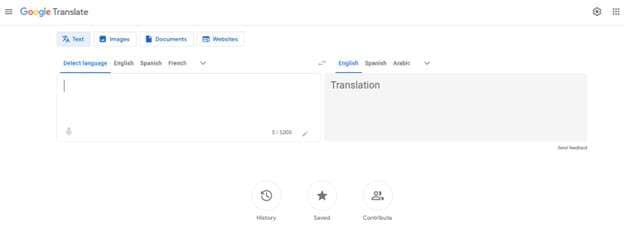
1. Google Translate
Google Translate is widely used both on PC and mobile devices. The easy-to-use feature instantly translates languages in text, images, documents, and websites. With an impressive range of 130+ languages, Google Translate appeals to a whole range of audiences.
Strengths:
- Larger language support: Supports over 100 languages, making it more versatile.
- Wider platform availability: Available across the web, mobile apps, and various integrations.
- High accuracy: Generally considered the industry standard for translation accuracy.
- Advanced features: Offers offline translation, dictionary lookup, and image translation.
- Extensive data: Trained on a massive dataset, leading to more natural translations.
Weaknesses:
- Limited context sensitivity: May struggle with complex sentences or cultural nuances.
- Limited customization: Users have limited control over the translation style or tone.
- Privacy concerns: Google collects user data for its translation engine.
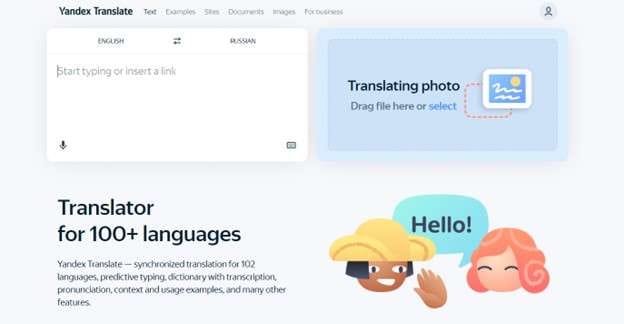
2. Yandex Translate
The Yandex Translate feature boasts synchronized translation for 102 languages. The feature can translate documents, videos, images, documents, and other forms of media. It also comes with additional capabilities such as predictive typing, pronunciation, dictionary with transcription, context, and usage examples.
Strengths:
- Stronger in Eastern European languages: Offers superior accuracy for languages like Russian and Ukrainian.
- Live translation: Provides real-time video translation for live streams and conferences.
- User-friendly interface: Simpler and more intuitive interface compared to Google Translate.
- Offline translation: Allows downloading subtitles for offline video viewing.
- Strong in technical terms: Handles technical jargon and terminology more effectively.
Weaknesses:
- Limited language support: Supports fewer languages than Google Translate.
- Limited platform availability: Primarily available on Yandex Browser.
- Less accurate for some languages: May struggle with languages outside its focus area.
- Fewer advanced features: Lacks some of the features offered by Google Translate.
- Less data: Trained on a smaller dataset, which can affect translation accuracy.
3. Choosing the Right Tool for Your Translation Needs
The choice betweenGoogle Yandex translate options will depend on your specific needs. Each search engine has its own unique features that make it useful for various kinds of users.
When you need translation for a wider range of languages and platforms, you will find Google Translate a better option. However, Yandex Translate is a better choice when looking to translate Eastern European languages. It is also more useful when you are interested in translating live streams and news broadcasts in a foreign language. In the end, both search engines are helpful and will achieve the desired goal.
Part 3. Pro Tips for Efficient Video Translation
Achieving efficient video translation starts with choosing the right translation. As explained in the previous section, Google and Yandex Translate features are easy to use and produce great results. However, you need to consider your language needs and the level of accuracy you are aiming for before making a choice. To achieve better results, software designed to specially translate videos will do a better job.
Best Free Online Video Translator – Wondershare Virbo
Wondershare Virbo stands out as an effective tool that accurately translates videos in minutes. The AI-powered tool is designed to translate videos, or even generate engaging videos almost instantly. You can further convert text into professional spokesperson videos or translate the voice in your videos to the desired subtitles language. This easy-to-use and provision of great results within a short time makes Virbo a good choice for various kinds of projects. You only need to upload your video to the software, and Virbo will do all the heavy lifting.
Translate Video Online Download APP Now Free Download
Compatibility of Wondershare Virbo:
- Online, Windows, Android, iOS devices
Key Features of Wondershare Virbo :
- AI Video Translator : This feature allows you to achieve global communication with Virbo. Easily translate video content in over 20 languages for viewership and audience needs.
- Auto-Generate Script: Virbo eliminates the need to manually write your script by automatically generating it and ensuring consistency in language and tone.
- AI Cloning Voices: Virbo infuses emotion and vitality in your videos to appeal to different kinds of audiences.
- Lip-Sync Precision : With high precision in lip-sync, every part of the video is harmoniously synchronized to a great viewing experience.
- Soundtrack Reserved : Virbo enhances audience engagement by making video content more memorable.

Pros
- Virbo is widely compatible with different kinds of mobile and PC devices, offering a more versatile experience
- An affordable video translator tool that offers budget-friendly prices for all kinds of users
- An easy-to-use and intuitive interface for accurate video subtitle translations
- Multiple language support for various video needs
- Translate videos in the same platform without having to edit subtitles manually
Cons
- Limited language support compared to some advanced and paid options
- Lacks advanced features offered by paid services
How to Use Wondershare Virbo to Translate Video
How to translate video with Virbo? You can do this by following the instructions provided below:
Step 1. Open the Wondershare Virbo Online Tool
Click “Translate Video Online” to open the Wondershare Virbo online tool on a browser. You can also download it on your computer or mobile device.
Translate Video Online Download APP Now Free Download
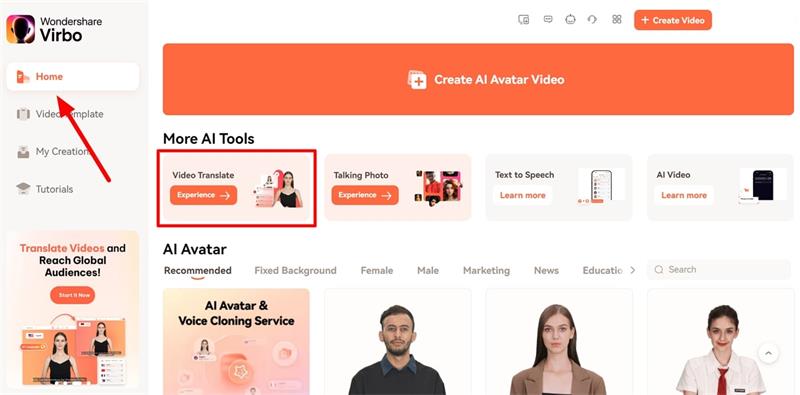
Step 2. Access Video Translate and Upload Video
Following this, proceed with the “Video Translate” feature from the “More AI Tools” section. Upload your video file by tapping on the “Click to upload video” option, and the video length can be a maximum of 5 minutes. Moreover, the maximum supported file size is 500MB, and file types are MP4 and MOV.
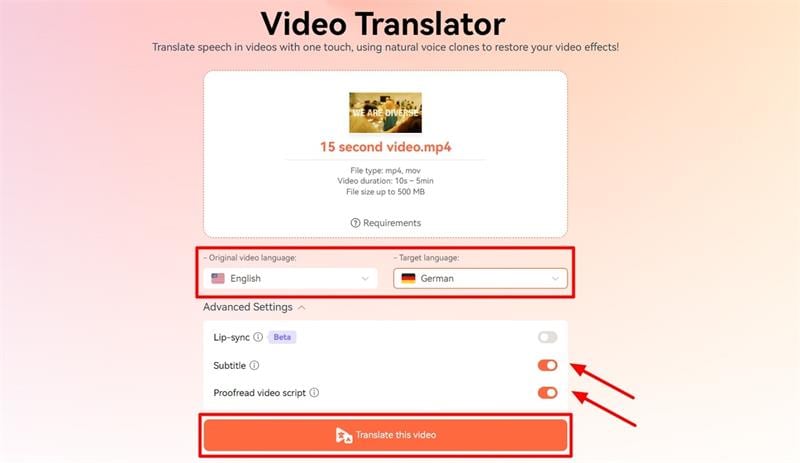
Step 3. Choose Target Language and Advanced Settings
Before starting the video translation process, you need to choose the “Target Language” and enable other advanced settings such as Lip-sync, Subtitle, or Proofread video script. After that, press the “Translate this video” button to initiate the AI video translation process.
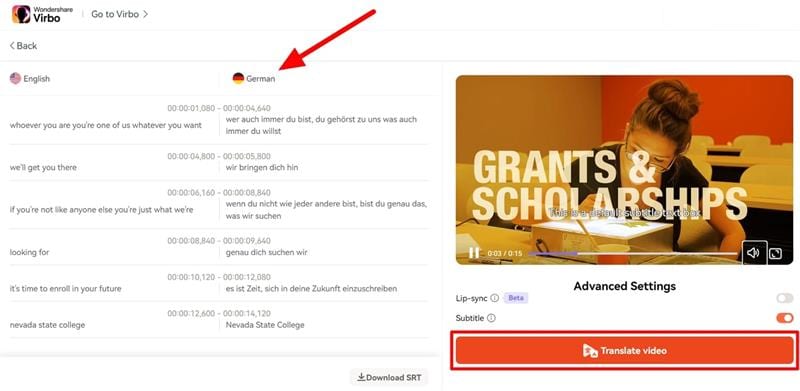
Step 4. Check the Video Script and Finalize the Translation
In case you have enabled the “Proofread video script” feature, you will be able to check the translated video script and edit it according to your requirements. Afterward, press the “Translate video” button and download your translated video once the process is completed.
Translate Video Online Download APP Now Free Download
Conclusion
The Yandex browser video translation is a popular feature for instant and quick video translations. The features work well with different kinds of videos, especially live streams and news broadcasts in Eastern European languages. Although the in-built features offer unique experiences to customers, it is limited in some ways.
Since choosing the right tool is the first step to successful video translation, going with installable software will produce better results. We recommend installingWondershare Virbo to handle your video translation needs. This is the best free online video translator that is AI-powered to meet the specific needs of various kinds of audiences.
Common Platforms
Common Platforms for Live Streaming
Maximize your reach with Virbo AI Live Stream on popular live streaming platforms. Uncover the common platforms compatible with our technology!
03TikTok
05Kwai
Alibaba International
Operational Steps
- Prepare Equipment, Network, and Browser
- Install Virtual Sound Card
- Due to audio restrictions on Alibaba International, a virtual sound card is required. If your computer’s sound device has a “stereo mix,” it can be used as an alternative. Check the path: My Computer - Properties - Sound - Sound Control Panel - Recording.
- Set Up “Stereo Mix”
- Skip this step if using a virtual sound card.
- Click My Computer - Properties - Sound - Sound Control Panel - Recording, activate stereo sound effects, and set it as default.
- Click Properties - Listen, select your speaker device, and click OK.
- Confirm the settings by playing a video on your computer. If both speakers and the microphone show sound detection, the setup is successful.
- Download and Install OBS
- As Alibaba International has restrictions on webcams, OBS is needed as a virtual camera (future Virbo Live product features will support this).
- After installation, go to Settings - Video and change the resolution to “1080x1920.” Select the “+” sign - Window Capture, and add the window of the Live Explosion (Live Version).
- Crop the URL bar by holding Ctrl + left-click. Click “Start Virtual Camera.”
- Prepare Materials
- Initiate the Live Stream
- Start Live Streaming on Alibaba Seller’s Live Companion
- Log in to Alibaba Seller, open the live stream, and the Alibaba Live Companion window will pop up.
- Choose “Free Mode,” add the camera, select Logitech c930e, and display it to cover the entire screen.
- Set the microphone to stereo mix or virtual sound card, click OK, and confirm the microphone has fluctuations.
- After adding products, click “Start Live” or “Start Reception.”
1688 Live Platform
Operational Steps
- Prepare Equipment, Network, and Browser
- Prepare Materials
- Initiate the Live Stream
- Start Live Streaming on 1688 Live Companion
- Log in to the 1688 Live Companion client, click the material management “+” sign - Window, select the digital person live window, and click OK.
- Zoom in the window to remove the URL bar. Click “Start Streaming,” and the live stream has started.
TikTok
Operational Steps
- Keep your equipment, network, and browser ready
- Please check the Device/Network/Browser Requirements for a detailed guide.
- Initiate the Live Stream
*Download and open the TikTok Live Studio and tap the “add source” icon (+) at the left of the screen.

Login
* Select Virbo LIVE browser (chrome.exe) from the menu. Once you select Virbo LIVE successfully, you’ll be able to see a preview of your video feed.
Adjust source
* In this part, drag and manipulate the controls to adjust the screen, ensuring a perfect showcase.
Adjust screen
- When you’re ready, tap “Go LIVE” to begin streaming.
Note
If your screen shows “ Tiktok Live studio access, it will soon be available.” Stay tuned for updates. This condition means that you still need to meet the requirements for Tiktok Live.
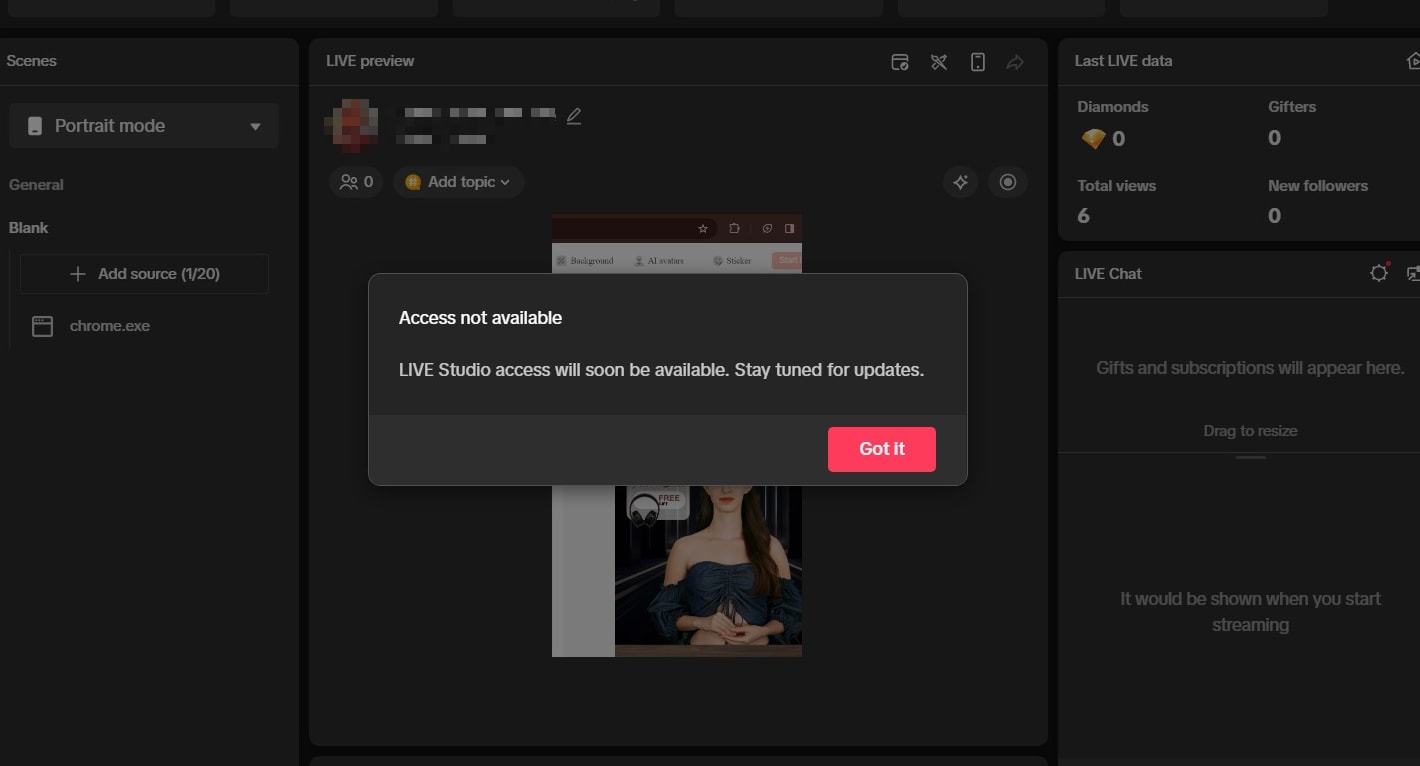
No access
TikTok Live Requirements: 1k followers, 25 min streamed in the last 180 days, and no bans. For details, please click here to get the TikTok Live studio guidelines
WeChat Video
Operational Steps
- Prepare Equipment, Network, and Browser
- Prepare Materials
- Initiate the Live Stream
- Start Live Streaming on WeChat Video Live Companion
- Log in to the WeChat Video Live Companion client, click the material management “+” sign - Window, select the digital person live window, and click OK.
- Alt + mouse or zoom the window to remove the URL bar. Click “Start Live,” and the live stream has started.
Kwai
Operational Steps
- Prepare Equipment, Network, and Browser
- Prepare Materials
- Initiate the Live Stream
- Start Live Streaming on Kuaishou Live Companion
- Log in to the Kuaishou Live Companion client, click the material management “+” sign - Window, select the digital person live window, and click OK.
- Alt + mouse or zoom the window to remove the URL bar. Click “Start Live,” and the live stream has started.
03TikTok
05Kwai
Alibaba International
Operational Steps
- Prepare Equipment, Network, and Browser
- Install Virtual Sound Card
- Due to audio restrictions on Alibaba International, a virtual sound card is required. If your computer’s sound device has a “stereo mix,” it can be used as an alternative. Check the path: My Computer - Properties - Sound - Sound Control Panel - Recording.
- Set Up “Stereo Mix”
- Skip this step if using a virtual sound card.
- Click My Computer - Properties - Sound - Sound Control Panel - Recording, activate stereo sound effects, and set it as default.
- Click Properties - Listen, select your speaker device, and click OK.
- Confirm the settings by playing a video on your computer. If both speakers and the microphone show sound detection, the setup is successful.
- Download and Install OBS
- As Alibaba International has restrictions on webcams, OBS is needed as a virtual camera (future Virbo Live product features will support this).
- After installation, go to Settings - Video and change the resolution to “1080x1920.” Select the “+” sign - Window Capture, and add the window of the Live Explosion (Live Version).
- Crop the URL bar by holding Ctrl + left-click. Click “Start Virtual Camera.”
- Prepare Materials
- Initiate the Live Stream
- Start Live Streaming on Alibaba Seller’s Live Companion
- Log in to Alibaba Seller, open the live stream, and the Alibaba Live Companion window will pop up.
- Choose “Free Mode,” add the camera, select Logitech c930e, and display it to cover the entire screen.
- Set the microphone to stereo mix or virtual sound card, click OK, and confirm the microphone has fluctuations.
- After adding products, click “Start Live” or “Start Reception.”
1688 Live Platform
Operational Steps
- Prepare Equipment, Network, and Browser
- Prepare Materials
- Initiate the Live Stream
- Start Live Streaming on 1688 Live Companion
- Log in to the 1688 Live Companion client, click the material management “+” sign - Window, select the digital person live window, and click OK.
- Zoom in the window to remove the URL bar. Click “Start Streaming,” and the live stream has started.
TikTok
Operational Steps
- Keep your equipment, network, and browser ready
- Please check the Device/Network/Browser Requirements for a detailed guide.
- Initiate the Live Stream
*Download and open the TikTok Live Studio and tap the “add source” icon (+) at the left of the screen.
Login
* Select Virbo LIVE browser (chrome.exe) from the menu. Once you select Virbo LIVE successfully, you’ll be able to see a preview of your video feed.
Adjust source
* In this part, drag and manipulate the controls to adjust the screen, ensuring a perfect showcase.
Adjust screen
- When you’re ready, tap “Go LIVE” to begin streaming.
Note
If your screen shows “ Tiktok Live studio access, it will soon be available.” Stay tuned for updates. This condition means that you still need to meet the requirements for Tiktok Live.
No access
TikTok Live Requirements: 1k followers, 25 min streamed in the last 180 days, and no bans. For details, please click here to get the TikTok Live studio guidelines
WeChat Video
Operational Steps
- Prepare Equipment, Network, and Browser
- Prepare Materials
- Initiate the Live Stream
- Start Live Streaming on WeChat Video Live Companion
- Log in to the WeChat Video Live Companion client, click the material management “+” sign - Window, select the digital person live window, and click OK.
- Alt + mouse or zoom the window to remove the URL bar. Click “Start Live,” and the live stream has started.
Kwai
Operational Steps
- Prepare Equipment, Network, and Browser
- Prepare Materials
- Initiate the Live Stream
- Start Live Streaming on Kuaishou Live Companion
- Log in to the Kuaishou Live Companion client, click the material management “+” sign - Window, select the digital person live window, and click OK.
- Alt + mouse or zoom the window to remove the URL bar. Click “Start Live,” and the live stream has started.
Essential Tips for Shooting Talking Head Videos
Photos and videos always add more power to your marketing campaigns. From presentations to promotional videos, every visual helps to captivate the audience. So, why not make them more creative to generate maximum leads? This article presents an AI-powered tool that allows the creation oftalking head videos for different purposes. Using anAI talking head video can assist in delivering your message with fun.
Moreover, you can also learn tips to make your interactive videos even more professional. Other than that, a dedicated section unveils some major types of talking head videos.

Part 1. Getting To Know the Major Types of Talking Head Videos
Atalking head video features a person talking directly in front of a camera. It can also include the shoulders or even the entire body of the speaker. You can generate these AI talking head videos by animating your pictures for more engagement. This type of video is mainly intended for tutorials, interviews, product reviews, and training. Most importantly, they help to improve your interactions with viewers.
Now, it’s time to explore the major types of talking head videos that serve different purposes. Let’s explore them one by one and learn how they are beneficial for you.
1. Explainer Talking Head Videos
Anexplainer video is the most commontalking head video example . These videos are made to explain concepts or topics related to different subjects. Content creators use this type of video to make connections with their audiences. Moreover, some businesses use explainer videos on their landing pages for marketing purposes.

2. Business Talking Head Videos
Employees and shareholders can communicate throughAI talking head videos in a corporation. They can also interact with customers to provide them with a personalized experience. Also, this type of video increases the engagement rate to grow your business.

3. Interview Talking Head Videos
Using a talking head video strategy is helpful for interviews. In these videos, the speaker usually captures the face and some parts of the body while talking to the camera. Therefore, both sides can remain focused on what they are discussing. Moreover, one-to-one interactions help to understand the personality and skills in a better manner.

4. Product Review Talking Head Videos
Customers or content creators make product review videos to share their opinions about products or services. Thisexample of a talking head video helps demonstrate a product to the audience with different perspectives. Business owners can create engaging videos to assist their viewers in understanding their products and services.

Part 2. Create Perfect Talking Head Videos for Impressive Results Using Wondershare Virbo
If you have a query abouthow to create talking head videos , this section provides the best solution. Here, we will introduce you to the best AI talking video creator,Wondershare Virbo . It provides an AI Talking Photo feature to make dull pictures come alive. Also, this tool facilitates both online and offline users to create content for marketing and other purposes.
There is a whole variety of AI avatars with different outfits and poses. You can choose your favorite avatar or picture to engage with the audience. Moreover, you can add text to convert it into a speech for your talking video. This tool even allows you to upload voice clips and customize them according to your needs.
Prominent Features of Wondershare Virbo
- AI Talking Photo feature allows you to add background music to your talking head videos for a personalized experience.
- Users can make creative talking heads videos in offline mode. Therefore, you can download the tool and use it without the internet.
- It has anAI script feature that can optimize the content of yourAI talking head video .
Comprehensive Guide to Creating Talking Photo Videos Using Wondershare Virbo
You can generate dozens of videos within no time through Wondershare Virbo. Its AI features provide a next-level experience for crafting videos, which is explained as follows:
Step 1. Launch the Tool and Move To Create a Video
Download the Wondershare Virbo tool and launch it to access the functionality. Select the “Talking Photo” feature on the main interface to create a new project. After this, a pop-up screen with a wide range of avatars will appear.

Get Started Online Free Download
Step 2. Import a Photo To Generate a Talking Head Video
Upon accessing the pop-up screen, hit the “Import Photo” icon to add your headshot to this tool. Once you import the picture, click the “Create Video” button to create your video.

Step 3. Add Text To Make Your Photo Talk
After that, select the “Text Script” option to type or paste the text. This text turns into a speech for your talking photo. You can also click on the “AI Script” feature to add text and try the smart optimizations that are given on the right side of the window.

Step 4. Choose the Desired Language and Accent
You can click on the languages menu to access a new pop-up window. In this window, you can choose the required language and accent. Next, click “Gender” from the drop-down you want to use for the voiceover. After selecting these options, hit the “OK” button to proceed.

Step 5. Adjust the Voiceover Features
Once you have selected the language and gender, it is time to adjust the voiceover properties. Drag the “Volume” bar to increase or decrease the volume. You can also change the pitch by adjusting the “Pitch” bar.

Step 6. Export Your Talking Head Video
After making all the selections, you are ready to take your masterpiece out. For that, you can select the “Export” option. Then, you can also adjust the resolution for the final output. Afterward, it takes you to the “My Creations” window to check yourAI talking head video .

Part 3. Where Can a Talking Head Video Be Put To Use?
In the current digital market, animated and whiteboard videos have their worth. However, talking head videos have emerged as the new way to market products. They offer more authenticity and credibility while building connections for your company. Also, these videos help emotionally attach the presenter and the viewer.
As discussed before, you can make explainer videos to deliver your thoughts about a subject or concept. The corporate videos keep employees, customers, and stakeholders attached. Moreover, users can create product review videos to help others understand products or reviews better. Overall,talking head videos are fruitful for marketing, engagement, lead generation, and more.
Tips To Make Professional Talking Head Videos
Learning the right strategy for making talking head videos is essential. A high-quality video helps to deliver a message precisely without distraction. Here are some authentic tips that help you understandhow to make talking head videos more interesting and professional:
1. Plan the Script for Your Video
Going anywhere without preparation is always a disaster; the same goes for creating videos. You should make a rough outline with a concise subject. The video’s intent should be clear so you can deliver it to the right audience. Also, pre-planning can help to craft a professional script and shoot videos accordingly.
2. Adjust Lighting for a Better View
Lighting plays a pivotal role in shooting videos. So, you should focus on lighting adjustments and clarity. Also, you need to avoid overexposure, harsh shadows, and lousy lighting resources. You can also use natural light that doesn’t throw shadows.
3. Improve Audio Quality
Undoubtedly, audio is half of your content and delivers your message to the audience. Therefore, low audio quality is unacceptable when creating professionaltalking head videos. Using a camera microphone might not be a good choice as it doesn’t provide high quality. Therefore, you can use a lapel or boom mic to enhance voice quality.
4. Make Your Setup Decent
You can work on your setup to make your videos more professional and exciting. Your environment reflects a picture of the viewers’ minds. Making your setup look better is a good strategy for engagement. For this purpose, you can use some visually appealing props in your room.
5. Use Two Cameras or More
You can try shooting videos from different angles with more than one camera. This dynamic video looks interesting to viewers, so they can boost engagement. With this advance, you get more flexibility to adjust each frame. Moreover, you can also use this technique to make your video creative and professional.
6. Make Use of AI Tools
With technological advancement, AI can now help you optimize the quality of these videos. You can use AI tools to create engaging talking head videos. Moreover, these tools even allow you to optimize the content ofAI talking head videos.
Conclusion
Throughout this article, we have provided all the essential information abouttalking head videos . There are dedicated sections to understand all major types and tips to improve your videos. Also, we have introduced a recommended tool—Wondershare Virbo to create high-qualityAI talking head videos . Its “Talking Photo” feature allows you to produce magical videos.
Get Started Online Free Download
What Is an AI Voice Generator? | Wondershare Virbo Glossary
Part 1: What is an AI voice generator?
AI voice generators are advanced technologies that utilize artificial intelligence algorithms to generate lifelike and natural-sounding voices. These innovative tools analyze speech patterns, intonations, and other linguistic elements from extensive datasets, enabling them to generate voices that closely resemble human speech. By inputting text or speech, AI voice generators can generate high-quality voice output that ranges from conversational to professional-grade voices.
Part 2: What are AI voice generators used for?
AI voice generators have numerous applications across various fields:
1. Content Creation
AI voice generators revolutionize content creation by automating the process of generating voiceovers for videos, podcasts, audiobooks, and other multimedia content. They provide an efficient and cost-effective solution, saving time and resources compared to traditional voice recording methods.
2. Accessibility
AI speech generator s improve accessibility for individuals with speech impairments or disabilities. These tools enable them to generate clear, natural-sounding voices, enhancing their communication ability.
3. Virtual Assistants
AI voice generators power virtual assistants like Siri and Google AI, enabling them to respond with human-like voices. These AI-powered virtual assistants provide personalized and interactive experiences for users.
4. Language Learning and Pronunciation
AI audio generator s aid language learners in practicing pronunciation and improving their speaking skills. These tools offer accurate and consistent pronunciation models, helping learners develop fluency and confidence.
Part 3: What are examples of AI voice generators?
Popular examples of AI voice generators include:
1. Wondershare Virbo
By inputting key information, Wondershare Virbo automatically generates scripts and provides AI voiceovers for the generated text. Users can choose from a wide selection of voices and languages, with over 120 options available.
Get Started Online Free Download
2. Siri
Apple’s virtual assistant, Siri, utilizes AI voice generation technology to respond with natural and conversational voices, enhancing the user experience.
3. Google AI
Google AI voice generator is another well-known example that powers Google Assistant, delivering realistic and human-like responses to user queries.
4. Microsoft Azure Text to Speech
Microsoft Azure Text to Speech service provides a powerful AI voice generator that converts text into lifelike speech, offering customizable voices and various language options.
5. Amazon Polly
Amazon Polly is an AI-driven service that converts text into lifelike speech, offering multiple language options and customizable voices.
Part 4: Can I create my own AI voice?
Creating your own AI voice requires advanced technical expertise and extensive resources. While there are research projects and initiatives in voice cloning and personalized AI voices, creating a truly personalized AI voice is a complex and ongoing development area.
In conclusion, AI voice generators have transformed the landscape of voice generation. From content creation to accessibility and virtual assistants, these tools offer wide-ranging applications. Explore popular examples like Siri and Google AI, and take advantage of the best AI voice generators available to create lifelike voices effortlessly. While creating your own AI voice is still a developing field, the possibilities for generating realistic and personalized voices continuously evolve.
What Is an AI Presentation Maker?
Part 1: How to define an AI Presentation Maker?
An AI presentation maker is a software application that utilizes artificial intelligence technology to automate and simplify the process of creating presentations. These innovative tools leverage machine learning algorithms and natural language processing to generate visually appealing slides, offer design suggestions and even assist in content creation. With an AI presentation maker, users can save time, streamline their workflow, and create professional-looking presentations with minimal effort.
Part 2: How Does AI PPT Maker Work?
The working principle of an AI PPT maker involves a combination of data analysis, machine learning algorithms, and design automation. These tools typically have a user-friendly interface where users can input their content and select a theme or template. Here’s a breakdown of how an AI PPT maker works:
Content Analysis: The AI algorithms analyze the input content, including text and multimedia elements, to understand its context, key points, and keywords.
Design Suggestions: Based on the content analysis, the AI presentation maker generates design suggestions, such as layout options, font styles, color schemes, and relevant imagery. These suggestions aim to enhance the presentation’s visual impact and overall aesthetics.
Automated Slide Generation: Once the design suggestions are provided, the AI presentation maker automatically generates slides by incorporating the selected design elements and arranging the content visually appealingly. It ensures a cohesive flow throughout the presentation.
Customization and Editing: Users can further customize the generated slides by modifying the design elements, adding or removing content, and adjusting the layout according to their preferences. The AI tool adapts to these modifications and maintains the overall coherence of the presentation.
Collaboration and Sharing: AI PPT makers often offer collaboration features, allowing multiple users to work on a presentation simultaneously. They also facilitate easy sharing and exporting of the final presentation.
Part 3: What are the 10 Best Free AI Presentation Makers?
When it comes to AI presentation makers, there are several excellent tools available that have gained recognition and rank among the top search results on Google. These tools combine the power of artificial intelligence with intuitive interfaces to help users create impressive presentations.
Slidebean
Slidebean is a popular AI presentation maker that offers automated slide generation, design assistance, and a library of templates to create professional presentations effortlessly.
Canva
Known for its versatility, Canva provides an AI-powered presentation maker with a wide range of design options, templates, and user-friendly editing features.
Visme
Visme is an intuitive AI presentation maker that offers a variety of customizable templates, data visualization tools, and animation features to create visually appealing presentations.
Beautiful.ai
Beautiful.ai is an AI-powered presentation maker focusing on automated design, allowing users to create visually stunning slides with minimal effort.
Emaze
Emaze provides an AI-driven presentation maker with 3D templates, multimedia integration, and collaboration features for creating captivating presentations.
Prezi
Prezi is known for its dynamic and interactive presentations. Its AI-powered features allow users to create visually engaging slides with zooming effects and smooth transitions.
Zoho Show
Zoho Show’s AI presentation maker offers collaborative editing, design suggestions, and advanced features like data embedding and analytics.
Google Slides
Google Slides integrates AI capabilities to provide real-time collaboration, smart suggestions, and automated formatting for creating polished presentations.
SlideLizard
SlideLizard offers an AI presentation maker with interactive elements, audience engagement features, and real-time feedback to make presentations more engaging.
Powtoon
Powtoon combines AI with animation features, allowing users to create animated presentations with customized characters, backgrounds, and transitions.
These top-ranking AI presentation makers offer a range of features and functionalities to suit different presentation needs. Whether you’re looking for automated design assistance, collaboration features, or interactive elements, these tools can help you easily create impactful presentations.
RTMP Streaming on Instagram: A Comprehensive Tutorial
Professionals and content creators now use different social media platforms for live streaming. There are many big names on these platforms, such asInstagram . Instagram is one of the most-used networks, with over 2 billion monthly active users. Using this live-stream platform is always a plus for companies and individuals.
However, the discussion is abouthow to stream to Instagram with an RTMP . This detailed guide helps you in usingRTMP Instagram for live streaming. Furthermore, you will also learn about a recommended tool that offers AI-powered features for broadcasting.
Part 1. Some Rules and Requirements To Understand Before Live Streaming on Instagram
Like every platform, Instagram has some protocols for broadcasting content to global audiences. Therefore, learning the rules and requirements before going live on Instagram is necessary. First, your account should be at least 30 days old; otherwise, they can restrict your stream.
There is a rule that you can go live for 4 hours per stream without retakes. This length was increased from 60 minutes in the recent update. Also, you can repost a live video on your profile if it is more than 15 minutes long. Instagram allows you to schedule a stream from 1 hour to 90 days in advance.
The initial requirement ofInstagram Live RTMP is that your content be respectful and updated. Additionally, you need to set your stream to 1920x1080 resolution on a vertical camera. Meanwhile, Instagram gives leverage on the number of followers so that you can start with minimum viewers. Also, there is no need to have a business account for live streaming.
Part 2. How To Live Stream to Instagram With an RTMP?
Setting high-quality live streams encourages people to tune into your broadcast. For this purpose, you need a seamless encoder likeOBS . Unfortunately, Instagram doesn’t officially support third-party encoders. To solve this query, you need an effective solution.
Therefore, the following steps guide streaming on Instagram with an RTMP (Real-Time Messaging Protocol). You will also learn how to set the required parameters in this comprehensive guide:
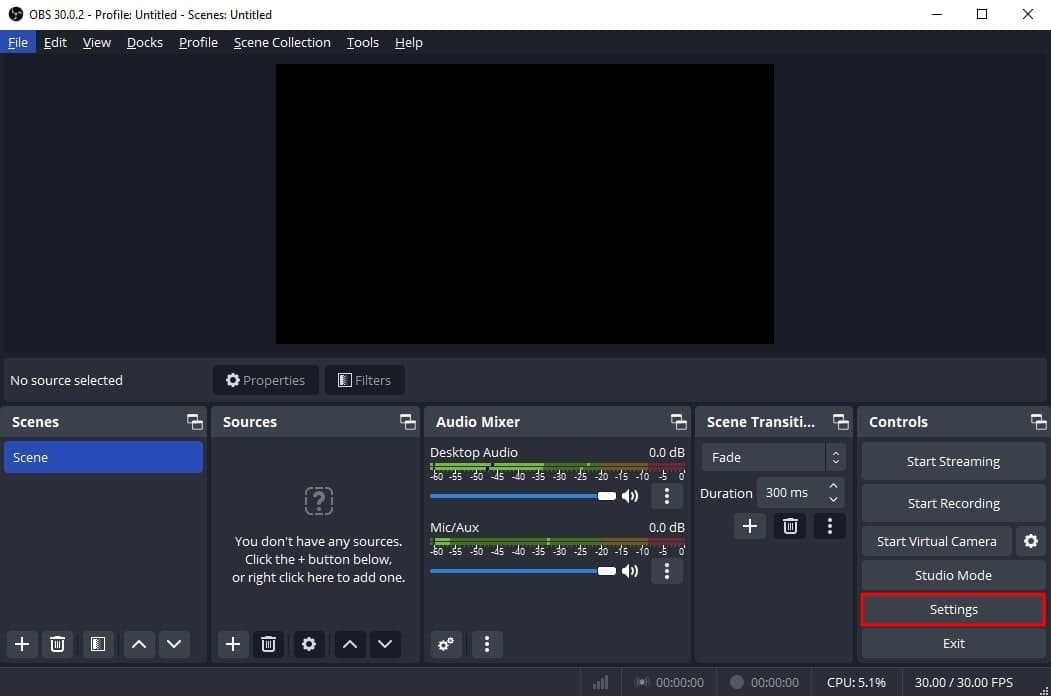
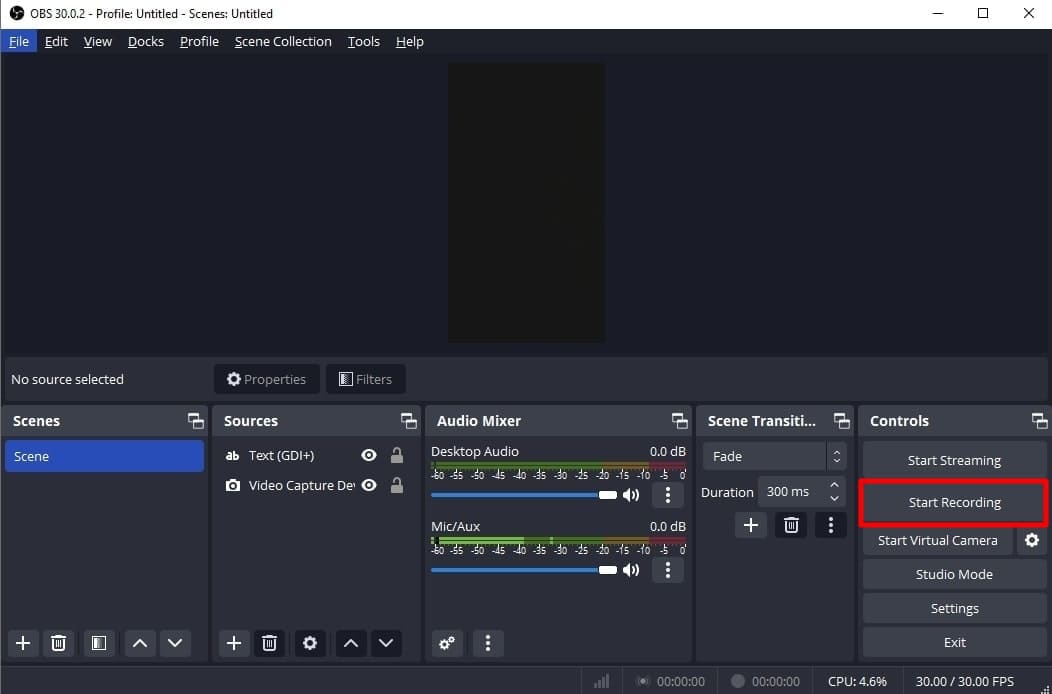
- Step 1. Start with downloading and launching OBS Studio on your PC. The first thing to do is set up vertical camera dimensions forRTMP Instagram live streaming. To access the settings window, hit the “Settings” option in the “Controls” panel.
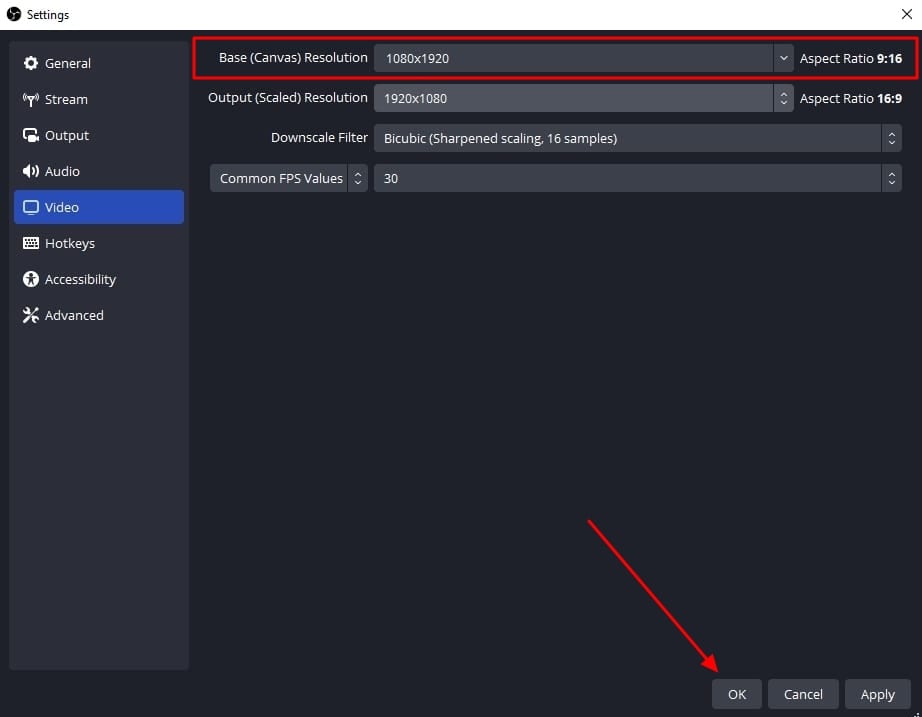
- Step 2. Look for the “Video” tab in the “Settings” window that opens. After that, enter “1080x1920” in the “Base (Canvas) Resolution” bar. Similarly, add a “1080x1920” value in the “Output (Scaled) Resolution” bar to set a 9:16 aspect ratio for vertical display. Then, hit the “OK” button to apply these changes to your Instagram streams.
- Step 3. After that, you need to add external sources to the scene. Click on the “+” icon in the “Scenes” panel or rename the scene. Once the scene is created, hit the “+” icon of the “Sources” panel. Then, select the “Video Capture Device” option from the menu and rename the device to your liking. After that, choose the video capture device from the “Device” dropdown and hit the “OK” option. Similarly, you can select the “Audio Input Capture” option to introduce an audio device.

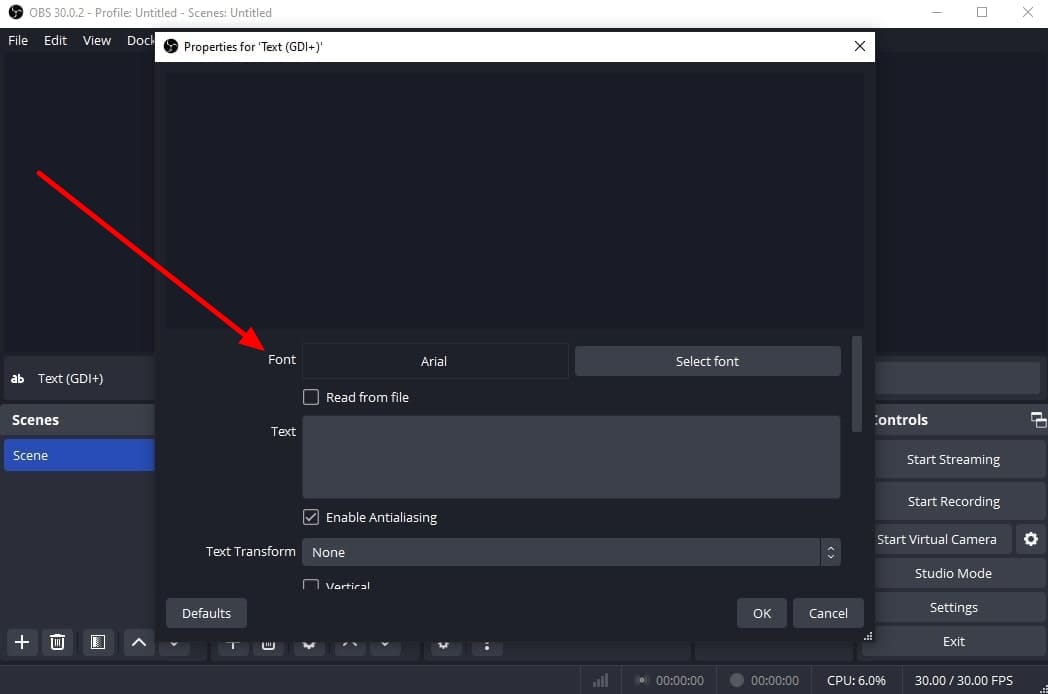
- Step 4. To add text overlays on your stream, hit the “+” icon again in the “Sources” panel. Choose the “Text (GDI+)” option and rename your overlay. On the next window, insert your text in the “Text” box. Then, click the “Select Font” button and choose your required font style and size. Additionally, you can change font color, opacity, alignment, background, and more. After customizing the text, hit the “OK” button to save the overlay in the sources section.
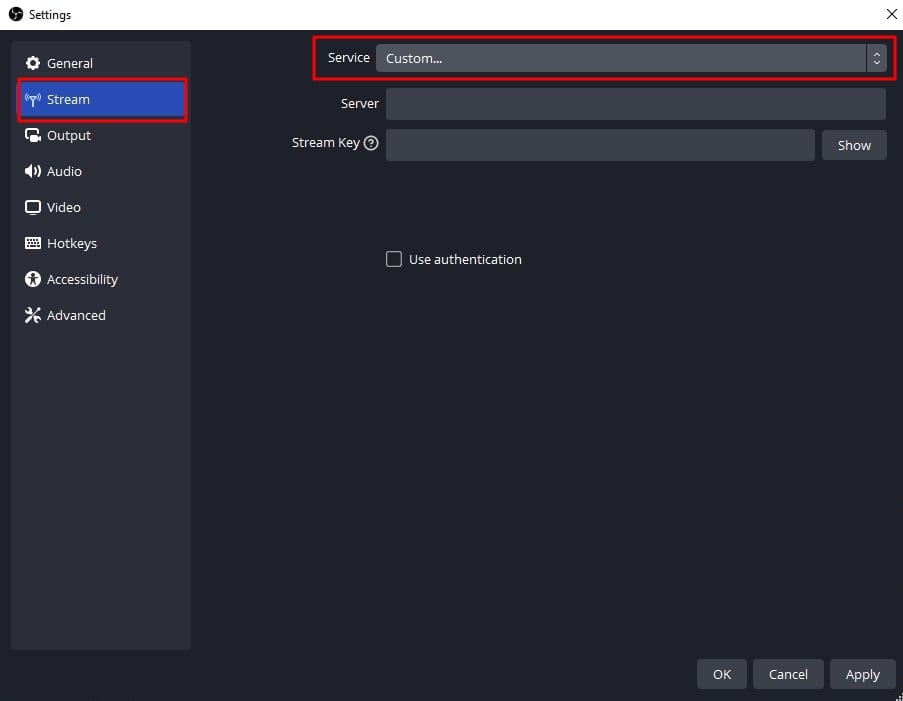
- Step 5. Afterward, select the “Stream” option in the settings window of OBS Studio. Set the “Service” to “Custom” from the dropdown. Then, you need to enter the server and stream key to proceed.
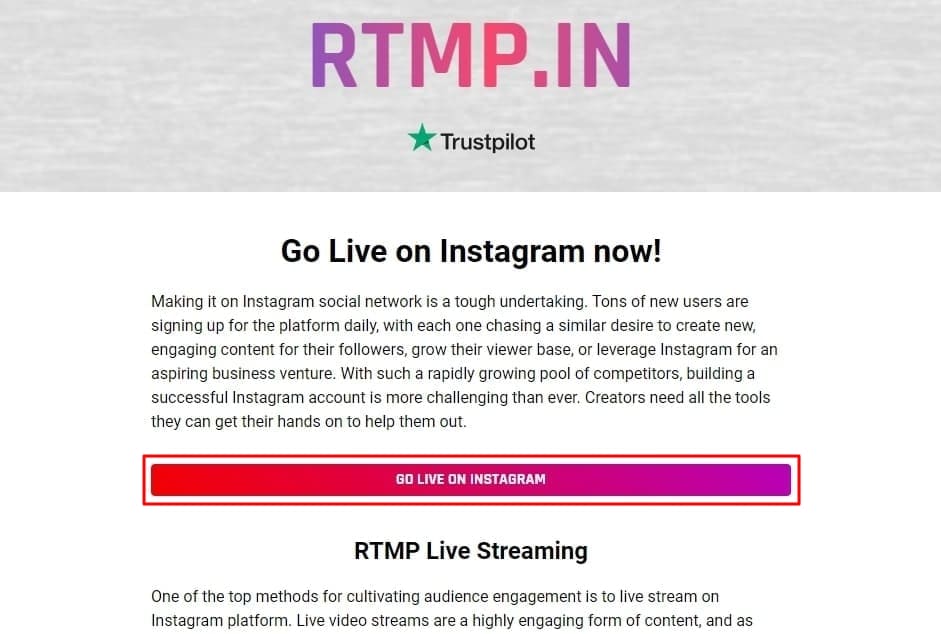
- Step 6. To get the server and stream key, visitrtmp.in on your browser. On the main interface of thisInstagram RTMP , hit the “GO LIVE ON INSTAGRAM” widget. Then, it asks you to log in to your Instagram account.
- Step 7. Once you’re logged in, it gives you a stream server URL and Stream key. First, copy the Server link and return to the OBS Studio software. Then, paste the link in the “Server” bar. After that, open the RTMP site again and hit the “Create New Broadcast” option.
You can also give a name to your broadcast in the “Broadcast Title” bar. After creating the broadcast, it shows the “Stream Key,” which you can copy. Then, move again to the OBS Stream setting panel and paste the key in the “Stream Key” bar. Lastly, hit the “Apply” option to save all these settings for your stream.

- Step 8. After getting ready, choose the “Start Streaming” option from the “Controls” panel. It starts your stream with selected parameters. To stop the stream, you can select the “Stop Streaming” option.
Part 3. How To Attract a Better Audience During Live Streaming on Instagram?
OBS Studio is an efficient software but offers limited functionality when it comes to engaging streams. Thus, you need an advanced solution that can help you reach global audiences through live streaming. For this purpose,Wondershare Virbo Live becomes an unsung hero for you. It provides AI-powered functions that help to start creative streams and generate more leads.
Moreover, the handy controls of Wondershare Virbo Live allow you to customize live streams to your requirements. Therefore, you can start streaming for different purposes, such as marketing, brand awareness, and more. Additionally, it allows you to set automatic responses and create a Q&A database to keep your audience engaged. Plus, it allows you to select creative AI avatars with different poses and outfits.
Key Features of Virbo Live
- You can choose different templates and backgrounds for a stunning streaming appearance.
- Users can write or generate scripts manually using the AI Smart Script feature. For this, they need to add prompts according to the script’s purpose.
- This tool helps to translate scripts into multiple languages and accents. Also, you can get dubbed audio in different AI voices.
Simple Guide To Start Live Streaming Using Wondershare Virbo Live
Many live streaming tools exist, but Wondershare Virbo Live provides more controls. Now, the thing is how to create a live stream room with this tool. For this, follow the given steps one by one to start live streaming with Virbo Live:
- Step 1. Visit the Official Site To Create a Stream Room
First,open theofficial website of Wondershare Virbo Live tool on your device. Navigate to the window and hit the “Create Stream Room Now” button. Upon doing that, it takes you inside the main interface of the tool.
Get Started Online Free Download
- Step 2. Advance To Create a Blank Livestream Room
Once you get to the tool’s home screen, select the “Create a Blank Livestream Room” option. Then, you can try different customization features to make your livestream room look stunning.

- Step 3. Customize Your Livestream Template and Background
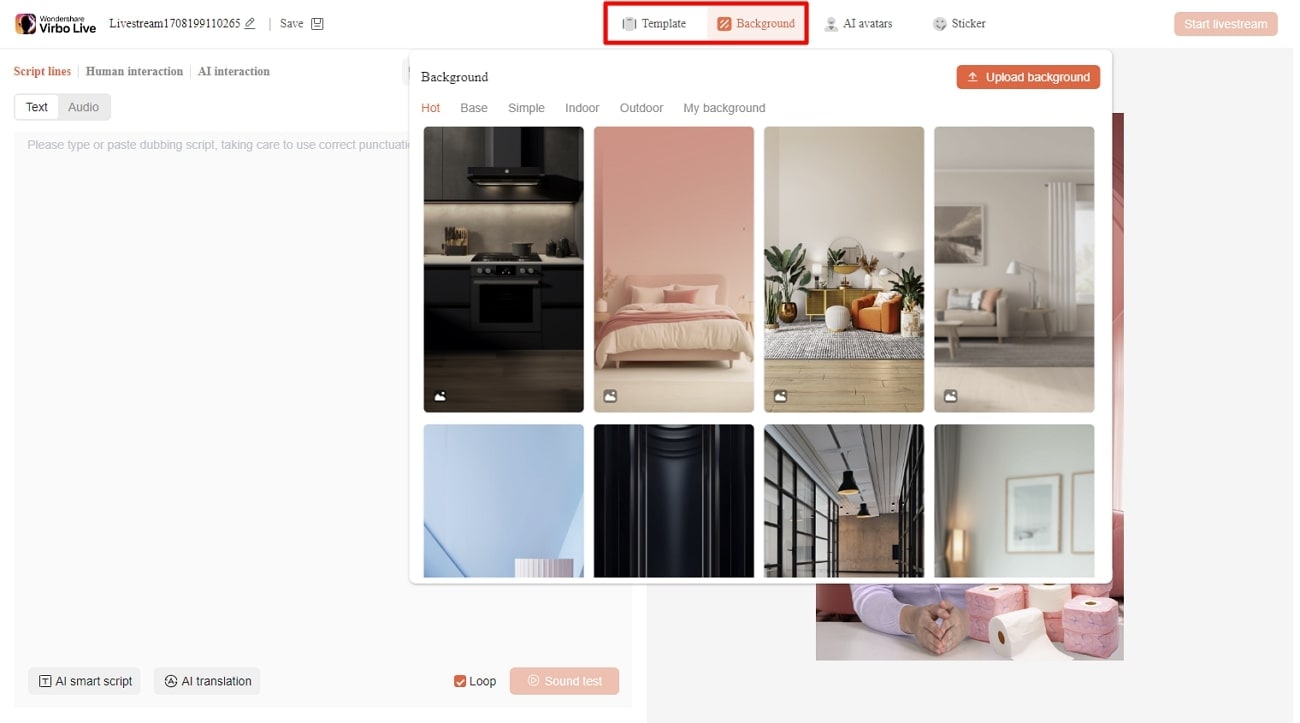
After that, click on the “Template” tab to explore different templates. Choose a template that suits live streaming needs. Furthermore, open the “Background” tab from the same window to check exciting background options. You can select different backgrounds from variating categories in the same window.
- Step 4. Add Script or Use AI Script Generator
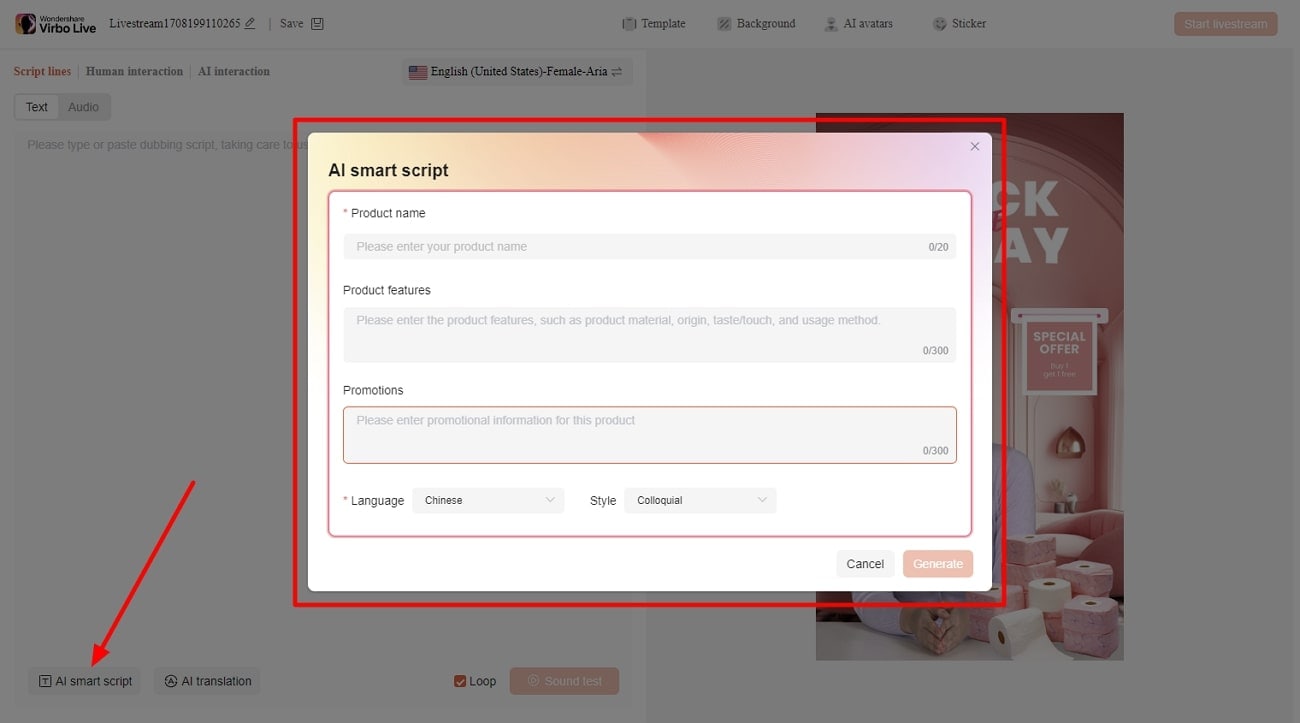
Then, you need to provide the script for translation or dubbing. Select the “Text” given in the left side section for this. It provides a text box to type or paste your script text. Choose the “AI Smart Script” option from the bottom left corner if you don’t have a script. Add prompts there, and it will generate your scripts instantly.
- Step 5. Select Creative AI Avatars According to Requirement
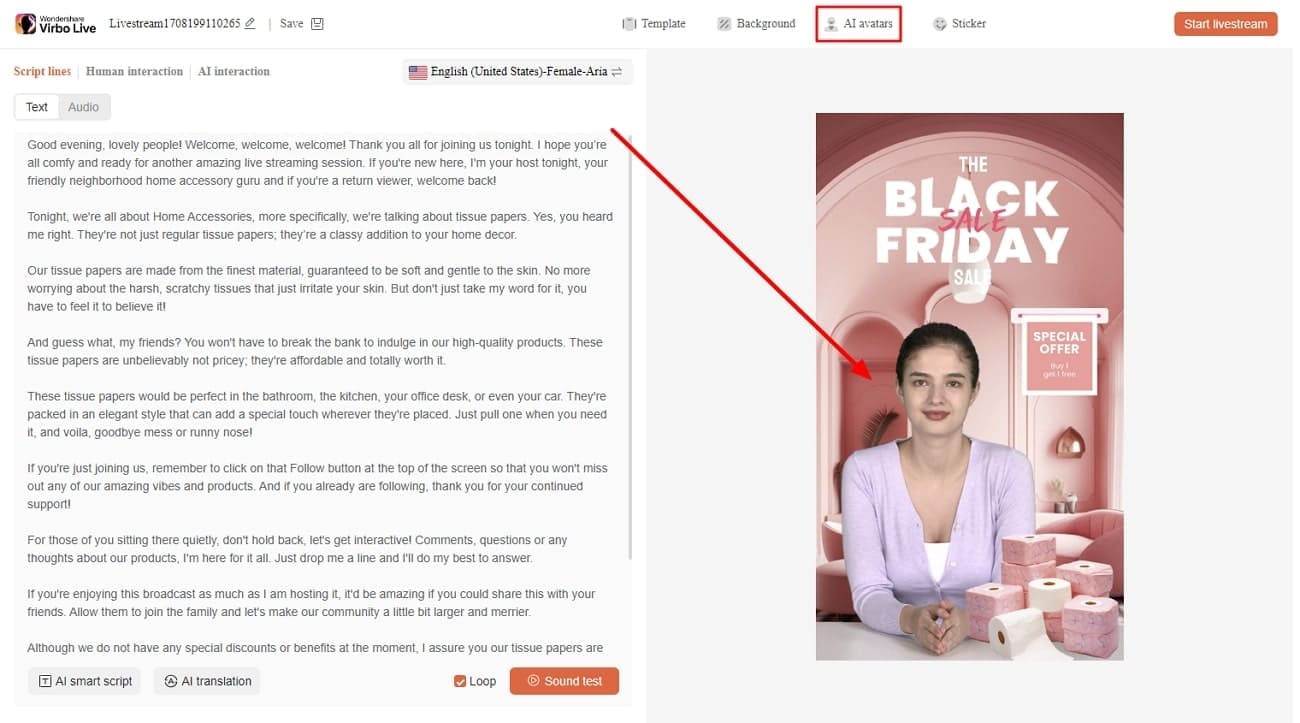
Select the “AI avatars” tab to unveil creative avatars. There is also a whole range of AI avatars to choose from. After selecting the one that suits your motive, you can preview your selected AI avatar before launching the stream.
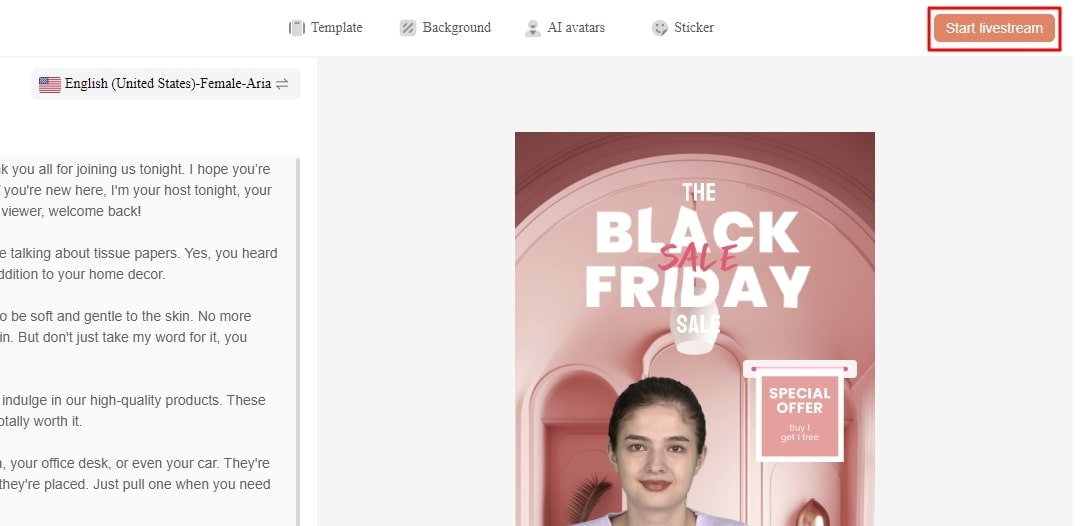
- Step 6. Start Your Livestream With All Selections
After finalizing all the options, you canproceed to start your stream. Select the “Start livestream” option from the top right corner in the same window.
Conclusion
Conclusively, this article intends to provide information about rules and requirements for live streaming on Instagram. You also learnedhow to live stream to Instagram with an RTMP like OBS Studio. Tools like Wondershare Virbo Live simplify your live streams with AI integration. Also, you can make your broadcast exciting for viewers by using different interactive elements.
How To Perform a Successful Streaming on Twitch
Live streaming has become a regular source of enjoyment for many people in recent years, especially on a platform like Twitch. In the first quarter of 2023 alone, Twitch users watchedover 5.3 billion hours of video.
If you’re a content creator, you should definitely consider leveraging this power of Twitch video streaming, as it tends to have higher levels of engagement compared to pre-recorded content. But with so many Twitch streamers out there, standing out from the crowd can be challenging.
If you’re new to the scene, we can help you start your Twitch streaming journey off right with the right gear and some useful tips.

Part 1: Essential Preparations Before Beginning Your Twitch Streaming Journey
Whether you’re playing games, hosting events, or just chatting, streaming on Twitch is an exciting and rewarding way to engage with your audience in real-time. But to do well on Twitch, you need to prepare properly so your viewers can enjoy watching your content.
To start streaming on Twitch, here’s what you’ll need:
Twitch Streaming Software
First, you need to download streaming software for your Twitch video streaming. OBS Studio is the popular one, but Twitch has released its Twitch Studio, which is more beginner-friendly.
- OBS Studio
OBS Studio is a free streaming software that works on any device. You can use it to make your Twitch streams live more attractive by adding alerts, creating starting screens, and using different audio and video sources.
- Twitch Studio
Twitch Studio is the official free streaming application developed to simplify the streaming process for new streamers on Twitch. It offers an intuitive interface and pre-made scenes designed to streamline the user experience.
Streaming equipment
- A device to stream from
To kickstart your Twitch streaming journey, the first step you need to take is selecting the device from which you’ll broadcast. You can use your desktop, mobile phone, or gaming console. Your choice will depend on your existing equipment and the nature of your intended content.
If you plan to make gaming content for your Twitch Live, we recommend using a PC with these specifications:
- CPU
When streaming and gaming, it’s crucial to have a powerful CPU to minimize lagging. The number of cores in a CPU determines its processing power, ranging from dual to eight cores. Some good options to consider are the AMD Ryzen 9 5900X, Intel i9 – 12900K, or the more budget-friendly Intel Core i5-12400.
- GPU or graphic cards
Nvidia RTX graphics cards come equipped with built-in hardware encoders, which can lighten the CPU’s workload when used with OBS Studio. Alternatively, you can consider the Radeon RX 570 and the GeForce GTX 1660 Ti for quality GPU options.
- Microphone
Although you might get by using a gaming headset’s built-in microphone for a bit, it’s better to invest in a standalone mic from the start. Some top microphone options for Twitch streaming include the Elgato Wave:3, HyperX QuadCast S, Audio-Technica AT2020, Razer Seiren Mini, and Blue Yeti X.
- Webcam
If your Twitch stream content involves showcasing your reactions or facial expressions, investing in a camera is a wise choice. Webcams are convenient as they can easily connect to your computer or laptop.
You can consider some popular webcam choices like the Logitech HD Pro C920, Logitech StreamCam, Logitech BRIO, Microsoft LifeCam HD-3000, and Razer Kiyo.

Understanding Twitch Streaming Rules
Aside from preparing your streaming gear, you must also understand Twitch streaming rules to avoid any potential violations that could result in penalties or even suspension of your account. Twitch’s community guidelines cover a wide range of topics, including harassment, hate speech, copyright infringement, and mature content. You can read the full Twitch streaming ruleshere .
Part 2: Comprehensive Guide To Stream Live on PC, Mac, or Smartphone on Twitch
Once you’ve gathered all the necessary equipment, you can proceed with the following steps to start your Twitch stream.
How to stream Twitch live on PC or Mac
Step 1: Download and installTwitch Studio on your PC or Mac. Then, launch Twitch Studio and log in to your Twitch account. You’ll receive a prompt to connect your microphone and webcam.
Step 2: Use Twitch Studio to customize your Twitch stream with different scenes and settings. Experiment with these features to find what works best for your livestream.

Step 3: When you’re ready to start broadcasting, click “Start Stream” at the bottom of the Twitch Studio. Then, select your stream category and enter your live stream title. Hit “Go Live” to begin streaming.

How to stream Twitch live on a smartphone
Starting Twitch streaming from your smartphone is a bit different, as the app primarily allows broadcasting from your device’s camera. Here’s how to live stream on Twitch from your smartphone:
Step 1: Download and install theTwitch App .
Step 2: Log in to the Twitch app. Then, go to your profile and tap “Go Live.” If you are using newer version of the Twitch app, you can tap “Create.”

You’ll then have two options: “Stream Games” or “Stream IRL.” The “Stream IRL” will allow you to live stream on Twitch using your phone’s camera, while the first option lets you stream mobile games.

Step 3: Grant access to your camera and/or microphone before starting your stream.
Step 4: Set up the stream and Go Live. Give your stream a name, choose a content category, and select the camera you want to use.
Once you’ve completed these steps, press the “Start Stream” button, and you’ll be live on Twitch.
Key elements of success for streaming on Twitch
While the process for starting Twitch streaming may be similar for all streamers, what makes a streamer successful? Based on reports, there are a few key elements of success for streaming on Twitch.
- Engaging content
Successful Twitch streamers captivate their audience with compelling content that resonates with viewers. This could include entertaining gameplay, informative discussions, or engaging activities. If people like your stream, they might subscribe or donate their money.
- Make use of the interactive features
Twitch stream labs offer unique features like chat rooms and special emojis, fostering interaction between streamers and viewers. Streamers actively engaging with their audience tend to cultivate a loyal and enthusiastic community.
- Consistency and persistence
This is often the toughest part. On Twitch, consistency is crucial. Successful streamers usually maintain regular schedules to make sure their audience knows when to expect new content. If you are new, continuous live streaming can be an effective strategy to engage with your audience consistently and increase your channel’s visibility.
Part 3: Best AI-Powered Tool for You To Set Up a 24/7 Live Stream on Twitch
If you want to make your Twitch channel stand out and automate the live streaming process, you can use Wondershare Virbo Live. With this tool, you can set up a 24/7 live stream on Twitch without needing to be present all the time.
Additionally, the Virbo live stream feature seamlessly integrates with major live-streaming platforms supported by OBS. You can also use it on numerous other platforms, such as TikTok Live, 1688 Live Platform, Alibaba International, Kwai, and more.
How to live stream 24/7 on Twitch with Wondershare Virbo Live
To live stream 24/7 on Twitch with Virbo, you will first need to prepare your AI avatar on Virbo Live to broadcast continuously on Twitch. Once you have customized your avatar, you can obtain the streaming key from Twitch. This key will enable OBS to connect with Twitch’s streaming platform.
Follow the detailed steps on how to live stream 24/7 on Twitch:
Step 1: Access Wondershare Virbo Live and create a live streaming room.
Go toWondershare Virbo Live and select “Create Stream Room Now” > “Create a Blank Live Stream Room” to initiate the setup process.

Step 2: Write your content script or upload audio recordings.
Within the Virbo Live interface, you can either compose the script for your live stream or upload pre-recorded audio content by selecting “Upload local file.”

Pro Tip: You can use Virbo’s AI Script Writer for inspiration. Click on “AI Smart Script” and provide topic details, language preferences, and stylistic choices. Click “Generate” to create a script. Then, you can refine it as needed.
Step 3: Customize your AI avatar and background.
Navigate to “AI Avatars” to select an avatar for your live stream. Additionally, you can customize the background, incorporate stickers, or use available templates.

Step 4: Start the live stream.
Once your AI avatar and background are set, click “Start Livestream” to commence broadcasting. The next step should be acquiring the Twitch streaming key to put into the OBS.

Once everything is ready, click “Start Streaming” in OBS Studio, and your stream will broadcast on Twitch.
Conclusion
With billions of hours of video watched and many content creators vying for attention, streaming on Twitch can be exciting and challenging. However, by following the essential preparations outlined in this guide, you’ll be able to kickstart your Twitch live stream ahead of others.
You can use Wondershare Virbo Live to make an automated streaming experience 24/7. This helps you maintain a consistent presence on the platform even when you’re not around.
Also read:
- Updated Best Video Translator App for PC You Cannot Miss
- New Recognizing The Top Deepfake Voice App and Software in the Market
- Updated In 2024, 5 Must-Know Hacks to Beat Deepfake Attacks Streamer Survival Guide
- Updated Voice Cloning in Descript Features, Guide & Alternatives for 2024
- Unveiling the Secrets of Shopee Livestream Selling System
- In 2024, AI Script Generator | Virbo Guide
- In 2024, Easy Steps to Create AI Twitch Streamer with Animated Avatars
- In 2024, A Detailed Guide to Making Your Pictures Speak
- New Create AI Avatar Video with Templates for 2024
- Updated What Is an AI Video Generator, In 2024
- Updated In 2024, What Is an AI Art Generator? | Wondershare Virbo Glossary
- Updated 2024 Approved Text To Speech | Wondershare Virbo Online
- New 2024 Approved Top 10 AI Script Writers to Choose
- New In 2024, What Is AI Voice Over? | Wondershare Virbo Glossary
- 2024 Approved Best Text-to-Audio Converters of All Times
- 2024 Approved Top 5 AI Movie Script Generators
- Updated The Recommended Natural AI Hindi Voice Generator for 2024
- Updated Master Amazon Live Features, Pro Tips and Future Trends for 2024
- In 2024, 10 Best Free AI Video Generators with Innovative and Advanced Algorithms
- New In 2024, 6 Best Voice Changers
- New What Is Sora by OpenAI Everything You Need To Know
- Updated Descript AI Voice Enhancing Your Content Through Voice Replication
- In 2024, What Is AI Text to Video?
- New Translate Live Video Making It Possible With The Best Tool
- New Exploring the Magic of AI Selfie Generators
- Updated Live Commerce Success Stories Lessons Learned & Predictions for the Future
- Updated 2024 Approved What Is an AI Video Maker? | Wondershare Virbo Glossary
- New In 2024, Chrome Video Translators Top 5 Video Translation Chrome Extensions
- In 2024, Want to Clone Voices in Real-Time? Explore These GitHub Repositories
- Updated 2024 Approved 10 Best Free AI Video Generators with Innovative and Advanced Algorithms
- Updated Top 10 AI Subtitle Translators for Content Creators for 2024
- New What Is an AI Art Generator?
- New The Best Tools to Convert Text to MP3 With the Best Natural Voices
- New In 2024, Facebook Live Shopping A Comprehensive Guide
- The Most Straightforward Guide to Learning How to Clone Your Voice for 2024
- In 2024, Users Guide How To Create Photo Talking Videos With the Best Tools?
- What Is an AI Artist for 2024
- New Voice Translation English to Bangla Online and Offline Apps for 2024
- Updated Searching for Free Sports Streaming Sites? Look No Further for 2024
- Updated Cloning Voices With Hugging Face Features, Guidance, Alternatives
- What Is an AI Text Generator, In 2024
- In 2024, Top 6 Free Talking Stock Photo Sites
- Video Translator for 2024
- New Complete Guide of Top Video Language Translators
- 9 Best French Video Translators Online and Download Options
- Unlock Your Infinix Smart 8 Pluss Potential The Top 20 Lock Screen Apps You Need to Try
- In 2024, How to Transfer Data from Motorola Moto G23 to BlackBerry | Dr.fone
- Troubleshooting Guide How to Fix an Unresponsive Xiaomi Redmi 13C Screen | Dr.fone
- What are Location Permissions Life360 On Poco X6 Pro? | Dr.fone
- How Can Vivo S18 ProMirror Share to PC? | Dr.fone
- How to Fake Snapchat Location on Nokia 130 Music | Dr.fone
- In 2024, Remove Device Supervision From your Apple iPhone SE (2022) | Dr.fone
- In 2024, How to Track Xiaomi 14 Ultra by Phone Number | Dr.fone
- Complete Guide to Hard Reset Your Nokia G42 5G | Dr.fone
- Top Apps and Online Tools To Track Realme Narzo 60 5G Phone With/Without IMEI Number
- Top 5 Car Locator Apps for Huawei Nova Y91 | Dr.fone
- How To Get the Apple ID Verification Code On Apple iPhone 6 Plus in the Best Ways
- Proven Ways to Fix There Was A Problem Parsing the Package on Honor X50i | Dr.fone
- How to Rescue Lost Videos from Vivo
- How to Screen Mirroring Poco F5 5G? | Dr.fone
- In 2024, 5 Solutions For Samsung Galaxy S24+ Unlock Without Password
- In 2024, How to Detect and Remove Spyware on Lava Blaze 2 5G? | Dr.fone
- In 2024, All You Need To Know About Mega Greninja For Realme 11 Pro+ | Dr.fone
- In 2024, 8 Best Apps for Screen Mirroring Vivo V29 PC | Dr.fone
- Read This Guide to Find a Reliable Alternative to Fake GPS On Google Pixel Fold | Dr.fone
- 3 Ways to Fake GPS Without Root On Vivo Y77t | Dr.fone
- How to Cast Oppo F25 Pro 5G Screen to PC Using WiFi | Dr.fone
- Android Unlock Code Sim Unlock Your Vivo S18 Pro Phone and Remove Locked Screen
- How to Stop Life360 from Tracking You On Tecno Camon 20 Premier 5G? | Dr.fone
- Title: Maximizing Yandex Translate in Video Translation and Beyond for 2024
- Author: Sam
- Created at : 2024-05-19 03:35:02
- Updated at : 2024-05-20 03:35:02
- Link: https://ai-voice-clone.techidaily.com/maximizing-yandex-translate-in-video-translation-and-beyond-for-2024/
- License: This work is licensed under CC BY-NC-SA 4.0.
