
:max_bytes(150000):strip_icc():format(webp)/espnplus-6d79c347f2df42d7a38cdb0ba9a2472b.jpg)
In 2024, Voice Translation English to Bangla Online and Offline Apps
Voice Translation English to Bangla [Online and Offline Apps]
Want to order authentic Bengali food but unsure how to check the menu? Or traveling to Bangladesh and excited to learn more about their culture? Maybe you want to expand your professional network and connect with Bengali speakers.
Whatever reason you have, apps forvoice translation from English to Bangla make it all possible. Since there are plenty of options in the market, we know it’s hard to choose which suits your needs. That’s why we’ve created this guide. Here, you’ll find the best translation apps for various user needs, plus tips for better results. Let’s start.

Part 1: Best Apps for Voice Translation From English to Bangla
Need voice translation from an audio file or text? Whether traveling, creating content, or teaching, there are amazing apps to help. We’ve compiled the best ones, free, offline, AI-powered, or human-assisted. Explore this list below to find the perfect voice translation app for you.
Google Translate: Free English to Bangla Voice Online Translator

Visiting Bengali-speaking areas? Need help with basic directions or ordering food? Google Translate is a free smartphone app perfect for real-time conversations. It won’t turn you into a Bengali pro overnight, but it’ll get you by. And the best part? You can eventranslate English to Bengali using your voice . Just speak, and it does the rest.
Pros
- Free and user-friendly
- Can listen to the translated words
Cons
- Accuracy can be low due to accents, noise, and complexity
- Translations might not capture nuanced meanings or cultural context
- Need to download the language packs for offline use
VideoDubber: Best for Multilingual Voiceovers From English to Bengali

YouTubers and presenters, listen up. Want to reach a wider audience? VideoDubber takes voice translation from English to Bangla (and many other languages!) to the next level. Simply upload your video, and VideoDubber will do the rest with its audio translation feature.
Even better, you can review and edit the generated transcript to ensure everything sounds perfect. Finally, choose your voice or a custom voice to deliver your message in Bangla, keeping your video’s original charm. Let VideoDubber take your content global.
Pros
- Provides free use for the first minute without file limits
- Can translate any number of languages to translate to simultaneously
Cons
- Not ideal for on-the-go translation
- Requires uploading audio files
Gglot: Best English to Bengali Voice Translation Online for Meetings

Need to translate English to Bengali voice recordings but worried about various speakers? Gglot’s multiple speaker recognition feature makes it possible, saving you hours of work. Unlike many tools, it can transcribe up to 10 speakers at once.
No more scrambling to understand who’s saying what. So if you have an English lecture, interview, or discussion you need translating into spoken Bengali, Gglot can handle it all, no problem. This innovative feature makes Gglot perfect for educators seeking a seamless translation experience.
Pros
- Easy to use
- Has a vocabulary filter
- Can download the transcript in several file formats (SRT, SBV, and VTT)
Cons
- Some advanced features might require a paid subscription
- Might not always be 100% accurate
Stepes: Best on the Go Mobile Voice Translation From English to Bangla

Need someone to translate spoken Bengali to English on the go? While AI apps are handy, sometimes you might prefer a human touch. Stepes offers Bengali to English voice translation through professional translators. Simply record your voice, and the professionals will translate it for you. You’ll hear the translated message in English and can even play it back for clarification. Stepes makes real-time communication with Bengali speakers easier.
Pros
- Real-time translation for conversations
- Intuitive interface
- Choose to receive the translated message in voice or text format
Cons
- Limited device compatibility
- Likely more expensive than using free AI translation apps
Flixier: Best Natural Sounding Voice Translator English to Bangla

Impress your audience with professional-grade presentations. Flixier uses AI to translate the voice of Bengali to English and other languages. Just upload the audio file; it will deliver Bengali translations that sound smooth and human-like. That makes Flixier the perfect option for adding voiceovers to educational videos, presentations, or marketing materials. If you want more, Flixier also has a text-to-speech tool you can use to generate audio from Bengali to English.
Pros
- Cloud-based platform
- Drag-and-drop interface
- Pre-built assets
Cons
- Need to upgrade with a subscription for more features
- Some users might find the interface overwhelming
Part 2: How To Choose the Right Voice and Audio Translator App?
Still weighing your options? Choosing the perfect voice translation app from English to Bangla can be tricky. Here are some key factors to consider helping you make the final call:
Accuracy
If clear communication is your priority, choose apps known for their precision. It ensures you’re understood correctly and avoids any awkward blunders. Download a few that caught your eye and experiment. See which one feels most comfortable and translates accurately. Remember, the best app is the one that works best for you.
Features
Consider your travel needs and think about what else you might need. Does the app translate offline in case you lose your internet connection? Does it offer a conversation mode for real-time back-and-forth translation? Pick the Bengali-to-English voice translation app that offers the features you’ll use most.
Ease of Use
A user-friendly interface is crucial, especially in dynamic situations. Look for clear buttons and intuitive navigation. Don’t let a complex app add stress – choose one that’s simple.

Price
Weigh the free versions against premium features. Consider your trip length and usage needs. Will free features suffice, or do you need advanced functionalities? Free apps might suffice for a short trip, while premium features might be valuable for frequent travelers.
Part 3: Tips for Effective Voice Translation
Found the perfect app for voice translating Bengali to English or vice versa, but still facing challenges? Here’s how to get better translation results:
Speak Clearly and Slowly
Enunciate each word clearly and maintain a moderate pace. Avoid mumbling or rushing through sentences. It helps the app accurately understand your speech patterns and translate them effectively.
Use Proper Grammar and Pronunciation
While some apps can handle informal language, proper grammar and pronunciation generally lead to better results. This is especially true for complex sentences or technical terms.
Minimize Background Noise
Background noise can be a real enemy of voice translation. Find a quiet place to speak, away from loud music, traffic, or conversations. You can also try using headphones with a built-in microphone in noisy environments. It ensures the app focuses on your voice and delivers the best possible translation.

Break Down Complex Sentences
Long, winding sentences can be tricky for voice translation apps to decipher. Try breaking down your thoughts into shorter and simpler phrases. It makes it easier for the app to understand the context and translate the file accurately.
Proofread the Translated Text
Even the best apps can make mistakes. Take a moment to review the translated text and make sure it reflects what you intended to say. Look for any awkward phrasing or missing words, just like you would proofread an important email. It helps you to catch any errors and make necessary corrections before using the translated content.
When To Seek Professional Translation Services
When you need to translate English to Bengali using voice for something crucial or formal, these pros have got your back. They bring expertise that guarantees your message is spot on, no matter how complex or sensitive the subject is.
You’re familiar with the bestvoice translation apps from English to Bangla . But you might also need to translate videos when you’re in a foreign place. These could be local news, announcements, or business practices. While regular translation apps are great for spoken words, video translation needs a different approach, especially if you want to do it faster.
That’s where AI video translation comes in. Please keep reading to learn how it can improve your video translation experience.
Bonus: AI-Powered Bangla to English Video Translation With Wondershare Virbo
Ever dreamed of your videos talking in different languages? Well,Wondershare Virbo turns that dream into reality. Using AI, it translates videos into 20+ languages, including Bangla to English. Whether you’re a travel vlogger sharing your adventures or a business expanding your reach, Virbo makes it happen. Now, you can connect with a broader audience effortlessly.

Get Started Online Free Download
Even if you’re staying local, Virbo can be your best AI video translation tool for:
- Global advertising: Target new markets and increase brand awareness with multilingual video ads.
- Social media influencers: Reach a global following and engage with diverse communities.
- Corporations: Facilitate seamless communication across remote and international teams.
Start Your Free Trial Today
Experience the power of Virbo for free online. You can export a multilingual video of up to 2 minutes with 512MB of storage space. You can also edit the generated subtitles and export them. For more extensive projects, flexible upgrade options cater to your needs.
Key Features
Virbo goes beyond basic video translation, offering powerful features to enhance your videos:
- Lip-Sync Precision: Match lip movements to the translated audio with no awkward pauses. It creates a natural and engaging viewing experience.
- AI Cloning Voices: Create realistic voices that capture the speaker’s emotions with AI. Virbo helps you captivate viewers by the natural delivery, regardless of the language.
- Soundtrack Reserved: No need to sacrifice the impact of your original music! Virbo lets you keep your soundtrack intact while adding translated subtitles.
- Auto-Generate Script: Save time and effort with Virbo’s auto-generate script feature. Upload the video and let Virbo generate a script of its content in the translated language. Plus, you can use this script for further editing or marketing purposes.
- Affordable Excellence: Enjoy high-quality video translation at budget-friendly prices.
- Versatile Compatibility: Take your video content globally. Access Virbo as a desktop app for Windows, mobile apps for iOS and Android, or through your web browser. This flexibility allows you to translate videos on the go whenever inspiration strikes, or your workflow demands it.

Get Started Online Free Download
Conclusion
Connecting with Bengali speakers doesn’t have to be tough. With voice translation from English to Bangla apps, you can chat without language hurdles, all in real time.
By now, you can easily understand other languages with one of the apps listed in this guide. Remember to check out Virbo for its impressive AI video translation capabilities. The world of language learning and cultural exchange is just a conversation away.
Best Video Translator App for PC Cannot Miss
In a world where digital content knows no borders, the demand for versatilevideo translator apps for PC is growing exponentially. Whether you’re a cinephile seeking to delve into foreign films or a content creator aiming to reach a global audience, the need for efficient translation tools has become more pressing than ever.
Join us on a journey as we explore this burgeoning demand, unlock the best video translator app for PC - Virbo, and delve into alternatives, including the renowned Google Translate app.
Part 1: Growing Demand of Movie Translator App for PC
In the digital age, where borders dissolve within the pixels of screens, a surge in the demand for movie translator apps for PC is reshaping how we experience global cinema. Movie enthusiasts and content creators alike are recognizing the value of transcending language barriers, and unlocking a world of captivating narratives.
1. Cinematic Exploration Knows No Bounds
- Diverse global cinema access:
The appetite for diverse cinematic experiences has spurred a quest for movies from various corners of the globe.Movie translator apps for PC have emerged as essential companions, breaking down language barriers and unlocking the richness of international cinema.
- Content creators seeking global reach:
Beyond a mere spectatorship perspective, content creators are leveraging movie translation to extend the reach of their creations. From aspiring filmmakers to established production houses, there’s a collective realization of the global potential that these translation tools bring.
2. Evolution of Movie Watching Experience
- Subtitles beyond language barriers:
Movie translator apps go beyond the conventional role of translation; they ensure that subtitles serve as more than mere linguistic conveyors. These tools preserve the nuances, cultural references, and emotions embedded in the original dialogues, enriching the viewer’s experience.
- Empowering multilingual storytelling:
For filmmakers, these tools serve as bridges, allowing them to authentically tell stories in their native languages while ensuring accessibility through translations. This dual function creates a harmonious blend of authenticity and inclusivity in cinematic storytelling.
3. Future Trends and Anticipated Growth
- Innovation in translation technology:
The future holds promising developments in translation technology, with a focus on enhancing accuracy and real-time capabilities. This evolution anticipates a more immersive and seamless experience for viewers engaging with translated content.
- Rise of multilingual streaming platforms:
Anticipate a shift towards the rise of multilingual streaming platforms. The growing demand for movie translation is expected to influence the emergence of platforms catering to a global audience hungry for diverse content.
Part 2: Unlock The Best Video Translator App for PC - Virbo
As the demand for video translation on PC continues to soar, the need for a reliable and feature-rich video translator app becomes paramount. Enter Virbo, an innovative solution tailored to meet the diverse needs of PC users seeking seamless and accurate video translations. Let’s explore the features of Virbo.
1. Wondershare Virbo for Seamless Video Translation Experience
In the world of video translation, where the fusion of diverse cultures and languages propels storytelling, Virbo emerges as a beacon of innovation. Designed for PC users seeking seamless and accurate video translations, it goes beyond the conventional, ensuring that the essence of content is preserved while breaking down language barriers. Let’s delve into the features, pros, and cons of Virbo.
Pros
- It excels in providing accurate translations that maintain the cultural nuances and emotions of the original content.
- It has a user-friendly interface makes it accessible to users of all levels, enhancing the overall experience.
- The offline functionality adds a layer of convenience, allowing users to translate videos even in situations with limited internet connectivity.
Cons
- It may lack some advanced features present in more specialized tools.
Translate Video Online Download APP Now Free Download
2. Why Virbo stands out among others
The brilliance of Virbo’s shine lies in a combination of innovative features, user-centric design, and a commitment to preserving the true essence of content. Let’s unravel the reasons why Virbo stands out among its peers, creating a unique space in the realm of video translation.
01 Fusion of Precision and Intuition
Virbo is not merely a translator; it’s a craftsman of language. Its precision in preserving the subtleties of the original content is paired with an intuitive interface, ensuring that users, regardless of their proficiency, can navigate the tool effortlessly.
02 Subtitle Translations with Artistry
Virbo transcends the realm of literal translation. It’s an artist that delicately paints subtitles, capturing the cultural nuances and emotional palette of the original content. The result is a masterpiece that resonates with viewers on a profound level.
03 Offline Flexibility, Online Impact
In a world dominated by online connectivity, Virbo introduces a refreshing pause. With its offline functionality, it grants users the freedom to translate videos seamlessly, regardless of internet availability, enhancing convenience and flexibility.
04 Diverse Language Symphony
Virbo orchestrates a linguistic symphony, celebrating the diversity of languages. Its broad language support ensures that content creators and viewers alike can engage with videos in their preferred language, fostering a global connection.
05 Harmonious User Experience
Virbo is not just a tool; it’s an experience. Its user-friendly design is a harmonious melody that guides users through the video translation process, making it enjoyable and accessible to all.
06 Future-Forward Innovation
Beyond its current brilliance, Virbo hints at a future illuminated by innovation. As it continues to evolve, users can anticipate new features and capabilities that will further elevate the video translation experience.
3. How to Unlock the Full Potential of Virbo
Step 1 Download and Install
Begin by downloading Virbo from the official website. Follow the installation instructions to set up the app on your PC.
Translate Video Online Download APP Now Free Download
Step 2 Explore the User-Friendly Interface
Upon launching Virbo, take a moment to explore the user-friendly interface. Familiarize yourself with the features that make video translation a seamless process.

Step 3 Upload Your Video
Upload the video file you wish to translate onto the platform. Virbo supports various video formats, ensuring compatibility with your content.

Step 4 Select Target Language
Choose the target language for translation. Virbo’s extensive language support allows you to cater to a broad audience.

Finished! Enjoy Accurate Subtitle Translations
Let Virbo work its magic. Experience accurate subtitle translations that go beyond word-for-word rendering, capturing the cultural nuances and emotions embedded in the original content.
Translate Video Online Download APP Now Free Download
Part 3: Exploring Alternative Options and Solutions
While Virbo shines brightly in the realm of video translation, the landscape offers a multitude of alternatives, each with its own unique strengths. Here are two notable alternatives, including the renowned Google Translate and Amara, inviting users to explore diverse paths to seamless video translation.
1.Media.io
It is an extensive online video translator app for PC catering to your personal, educational, or promotional needs. This platform allows you to edit videos, make AI video presentations, and cartoonist videos. Media.io has an AI video translator that translates videos in over 120 languages to expand your content’s reach. With this AI-powered translator, you can transcribe videos and get subtitle translations.

Features
- Media.io can generate auto-subtitles in your video for visual aid in content comprehension. In this regard, users can also upload an existing subtitle file or add manual subtitles
- Apart from adding subtitles, it lets you translate the generated subtitles into the videos. For this purpose, you must choose a targeted language, and AI will handle the remaining process.
- After translating subtitles, you can change their styles to make the video appealing. Medi.io allows you to add text effects and change effect colors and fonts.
Pros
- It’s not avideo translator app for PCs ; it is web-based software available to all web browsers.
- While exporting the results, you can export subtitle files separately or render them in the videos.
- Despite translating, users can perform other editing tasks, such as adding music and transitions.
Cons
- This tool doesn’t allow you to translate your content for free.
- The translation may not be accurate and may lack your targeted language’s nuances and idioms.
2.Amara
In the process of video translation, where language serves as both a barrier and a bridge, Amara emerges as a collaborative haven, inviting users to shape linguistic narratives collectively. A platform celebrated for its community-driven approach, Amara not only translates videos but also fosters a shared language experience. Let’s delve into the features, pros, and cons that define Amara’s distinctive role in the world of video translation.

Features
- Its collaborative approach allows users to collectively contribute to the translation process, fostering accuracy and inclusivity.
- It supports integration with various video platforms. This compatibility expands its reach, making it applicable to a wide range of content creators and viewers.
- Its language flexibility enables users to contribute to translations and engage with content in their preferred language.
Pros
- Its intuitive interface ensures that contributors, regardless of their expertise, can seamlessly engage in collaborative translation efforts.
- It allows users to engage with content and contribute translations in their preferred language.
- It enables users to collectively refine and enhance translations for a more accurate representation.
Cons
- Users seeking more advanced features found in specialized tools may find it relatively limited.
- Novice users might experience a learning curve in fully utilizing all of Amara’s features.
Conclusion
In a nutshell, as the demand formovie translator apps on PC continues to surge, Virbo emerges as a leading force in reshaping the video translation experience. With its innovative features and user-friendly interface,Virbo unlocks a new realm of possibilities for PC users, bridging language gaps seamlessly.
As users navigate the rich array of video translation options on PC, the transformative impact of these tools becomes increasingly evident, fostering a more connected and multilingual digital experience.
Translate Video Online Download APP Now Free Download
[User’s Guide] How To Create Photo Talking Videos With the Best Tools?
Pictures and videos are crucial for preserving memories; companies also use them for promotional purposes. However, technology has now created an innovative and engaging way to use pictures. For example, you can now put life into your photos and make them a talking video.
If you are wonderinghow to make a photo-talking video , this article presents a complete guide. We will share some of the best tools for creating photo-talking videos. Simply follow it to the end to learn about it in detail.
Part 1. What Is a Photo Talking Video?
Atalking-photo video is like a magic trick for making pictures engaging. You can take still pictures and make them move or talk like they are alive. It represents a captivating merge of photography and animation for an interactive experience. Moreover, new and creative ideas are always invented to make photo-talking videos even better.
No doubt this creativity takes your entertainment to the next level, but there’s more to it. These photos also change how companies talk to us about their products. It is like giving a voice to photos and using them to tell stories in a way that grabs customers’ attention. That’s why photo-talking videos are becoming a big deal in today’s market dynamics.
Innovations in Picture-to-Talking Video
People use various tools and techniques to convert images to talking videos. These techniques may include mobile applications or computer software, which keep getting innovations:
- Integration of artificial intelligence for more realistic movements.
- Use of facial recognition technology for accurate lip-syncing.
- Implementation of voice synthesis to generate lifelike speech.
- Introduction of interactive features allowing user engagement.
Part 2. How To Create Talking Video With Reliable Desktop Tool—Wondershare Virbo
In the above sections, we have introduced the concept and importance oftalking photo videos . Let’s head to the part where you will know how you can create them with tools. One of the most straightforward methods to generate such talking photos isWondershare Virbo . Whether you want to market a product or deliver a presentation, using this tool is a good idea.
With its AI-powered Talking Photo feature, you can bring life to your pictures. Not only can you make them move, but you can also add voice clips for a better and more engaging experience. You can count on this diversified tool with variating compatibility for integrating your pics with social media platforms. It even allows users to create such content online and offline.
Top-Rated Features of Wondershare Virbo
- Wondershare Virbo can convert the text you provided to speech for use in your talking photos.
- You can customize your uploaded voice in talking pictures to make it more interesting.
- Using the versatile AI avatars of this tool, you can attract and engage a broader audience.
- This tool allows users to add background music to their content for personalization.
Step-by-Step Guideline To Create Talking Photo Videos Using Virbo
Wondershare Virbo provides a smooth and simple process for creating such art. This section will explain how to make a photo-talking video with the help of this tool:
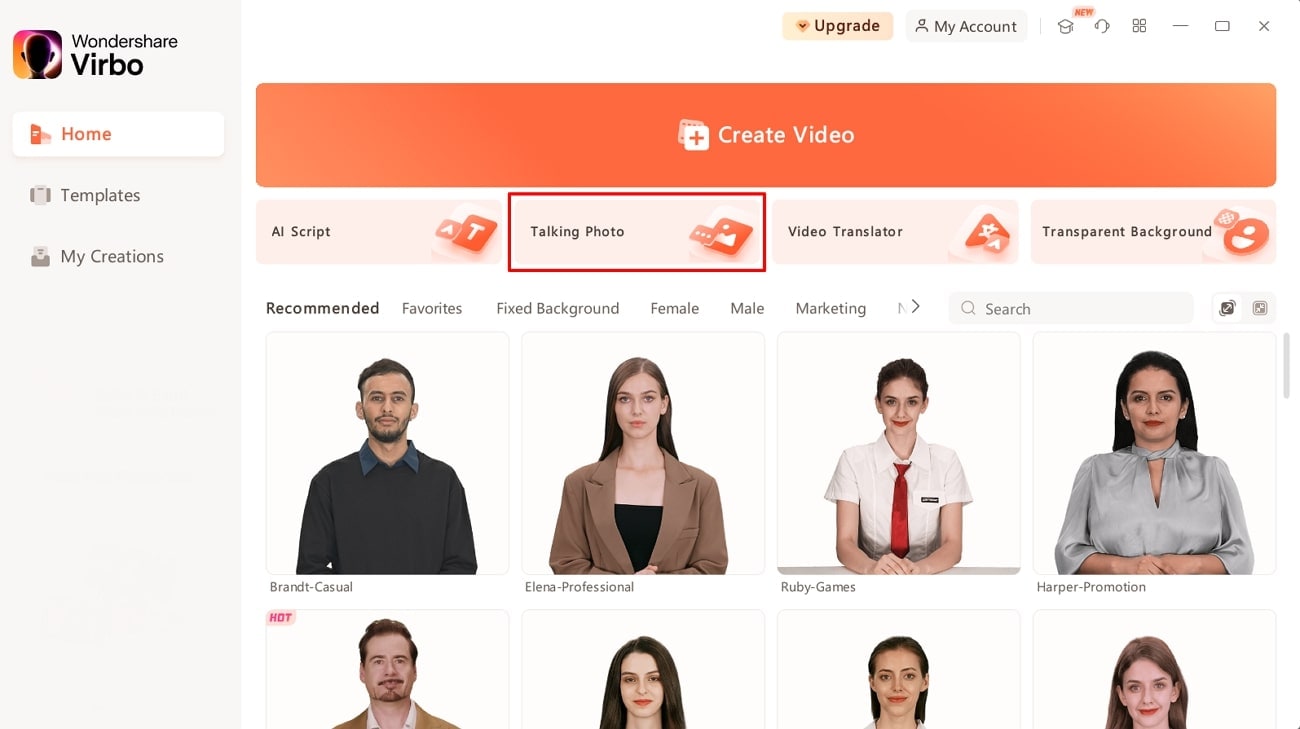
Step 1. Initiate the Creation Process With Virbo
First, download and launch the Wondershare Virbo application on your system. From its main interface, tap the “Talking Photo” feature from its home screen.
Get Started Online Free Download
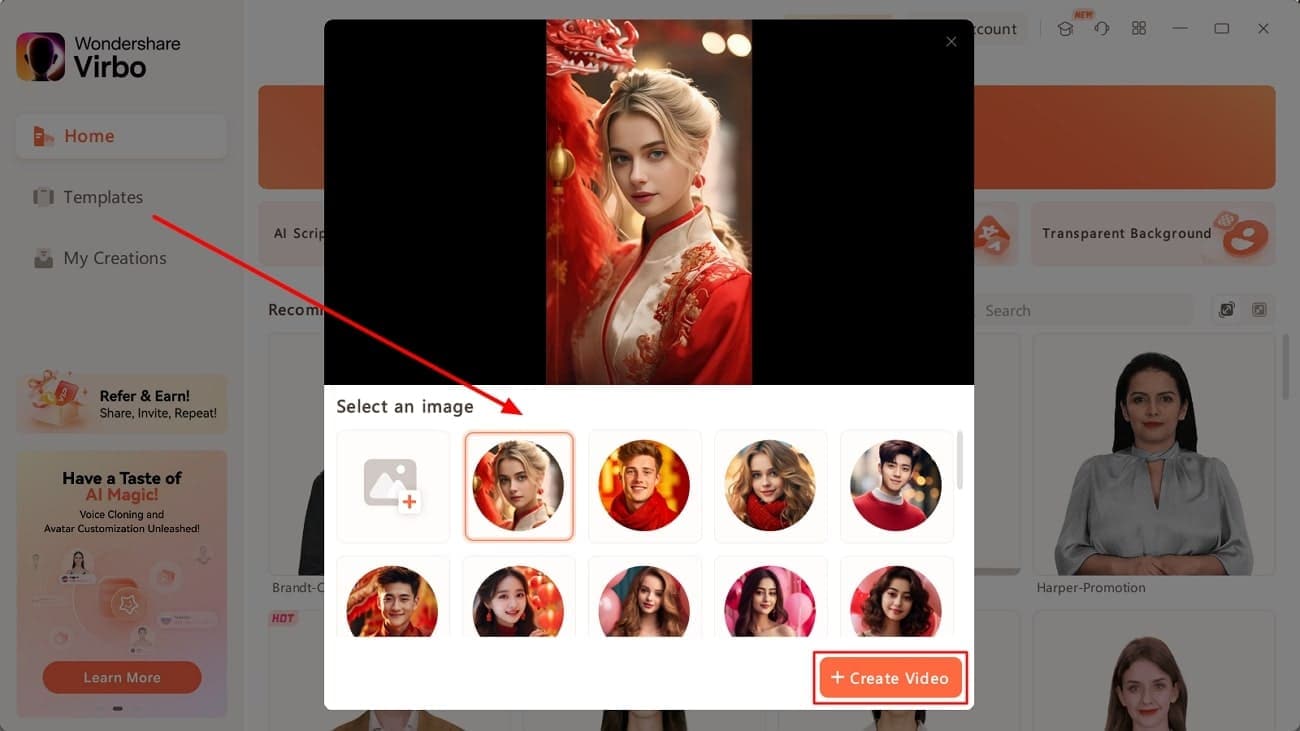
Step 2. Choose an Image To Create Talking-Photo Video
You will access a new pop-up window with different preset image avatars by clicking on this feature. Select your desired avatar and click the “Create Video” button to initiate the process.
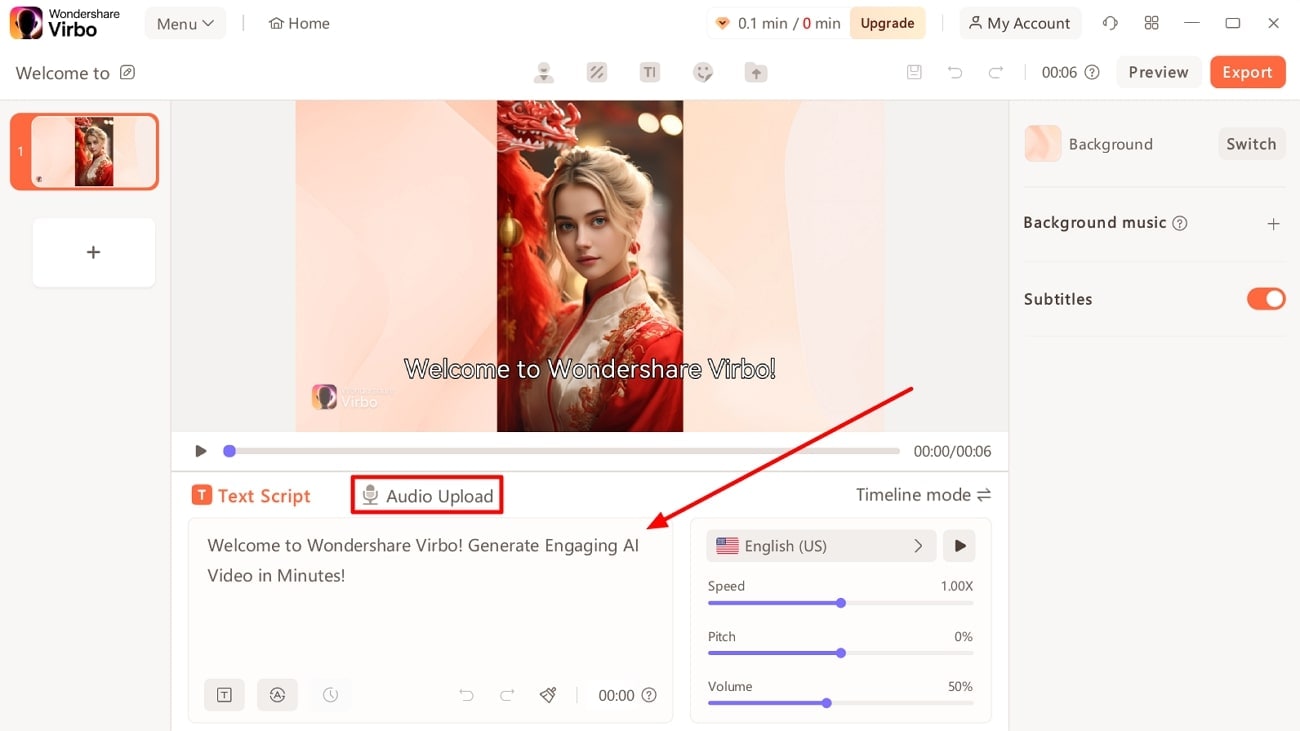
Step 3. Input the Text or Recorded Audio for AI Speech
Enter the text you want to use in your talking photo. You also have the option to shift to the “Audio Script” tab to upload your audio to convert your picture to a talking video.
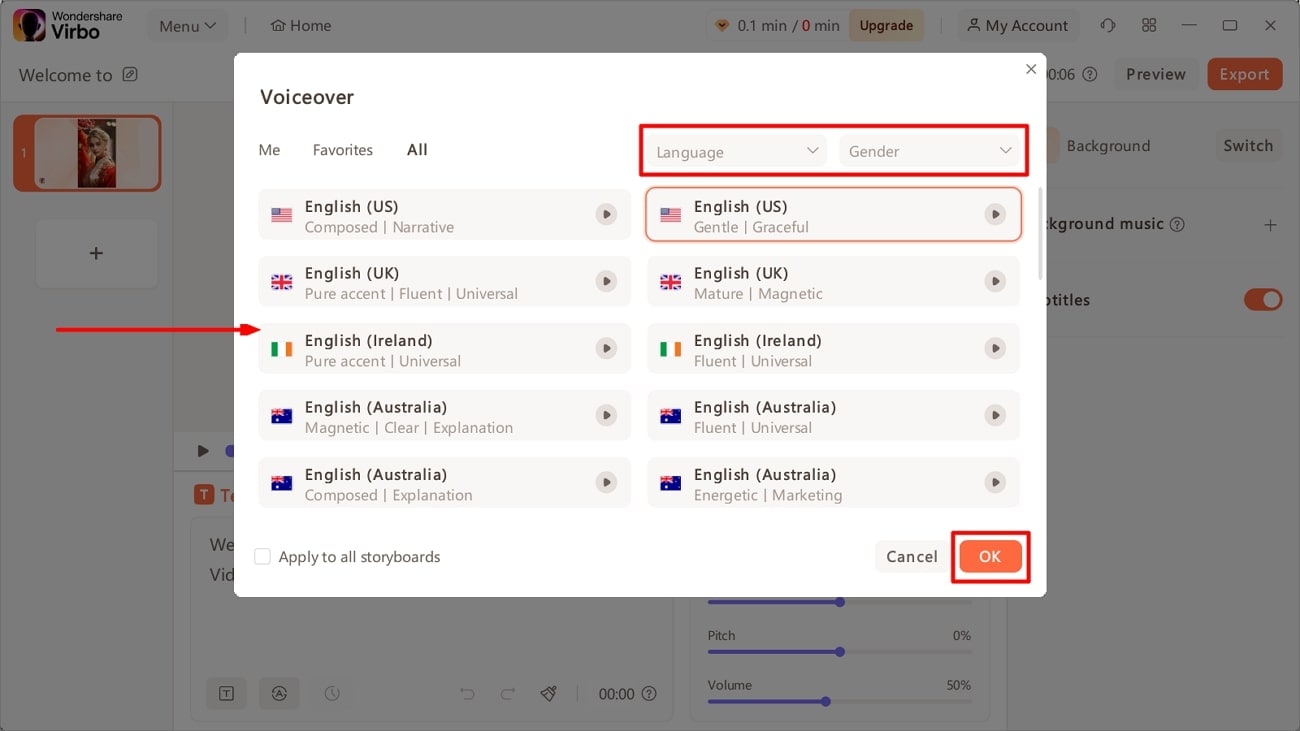
Step 4. Select the Language and Accent for Your Video
After that, scroll to the “Language” portion and click on it. A new pop-up window will appear where you can choose any language and accent. Hit the “Gender” dropdown menu to select your desired gender, and finally, tap the “OK” button.
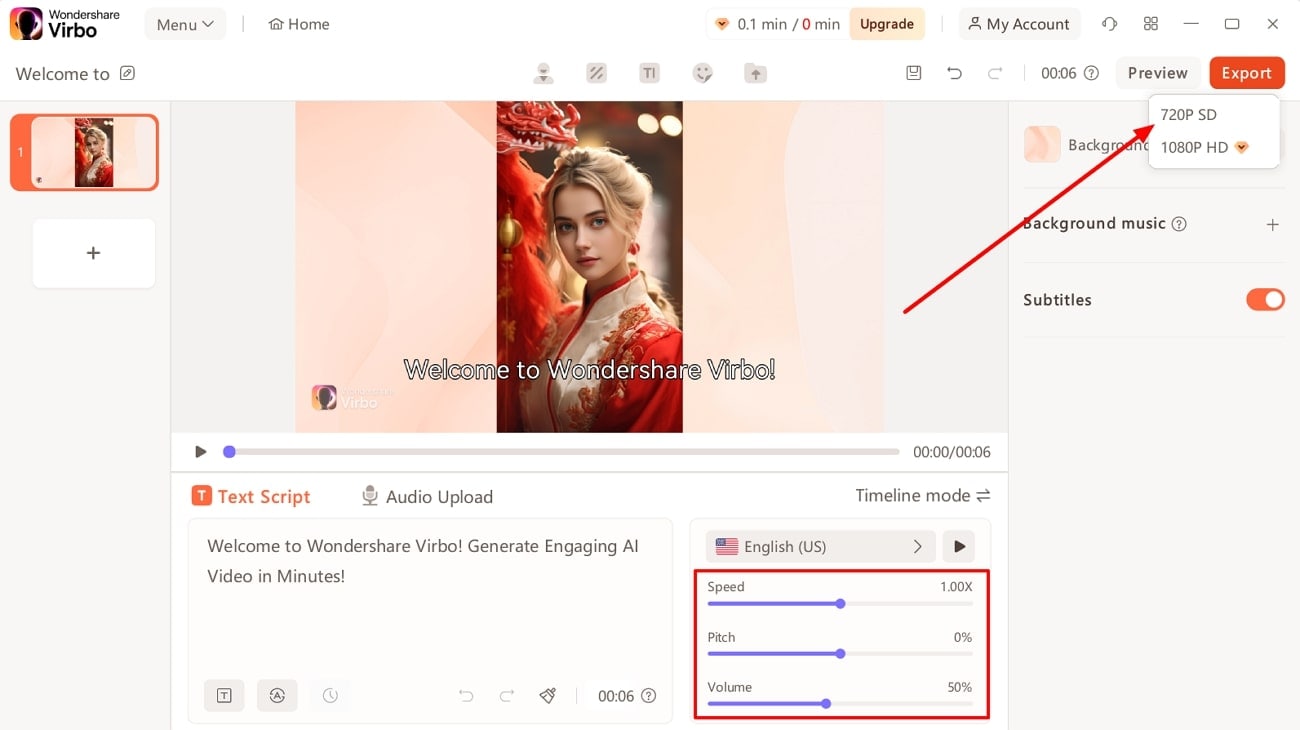
Step 5. Customize Voice Features and Export Talking Photo
Now, set the speed of delivery voice as per your requirement. You can also customize the volume and pitch of it. Finally, click the “Export” button in the upper right corner. After selecting the resolution for the output file, you will be redirected to the “My Creations” section with saved files.
Part 3. How To Create Photo Talking Videos With Some Top Online Tools
Wondershare Virbo is the ultimate choice for making your photo into a talking video. However, we will mention alternative online tools if you are still looking for them. Go through this section to learnhow to make a talking picture video using the top online tools besides Virbo:
1.Vidnoz
Vidnoz is an online AI-powered tool that can create talking photos within minutes. It can convert your still picture into a realistic talking avatar that you can use for various purposes. You can also choose between built-in avatars for this creativity. Additionally, Vidnoz allows users to perform a face swap operation, where you can swap the face in a picture with any other face. If you intend to use this tool to convert images to talking videos, walk through these steps.
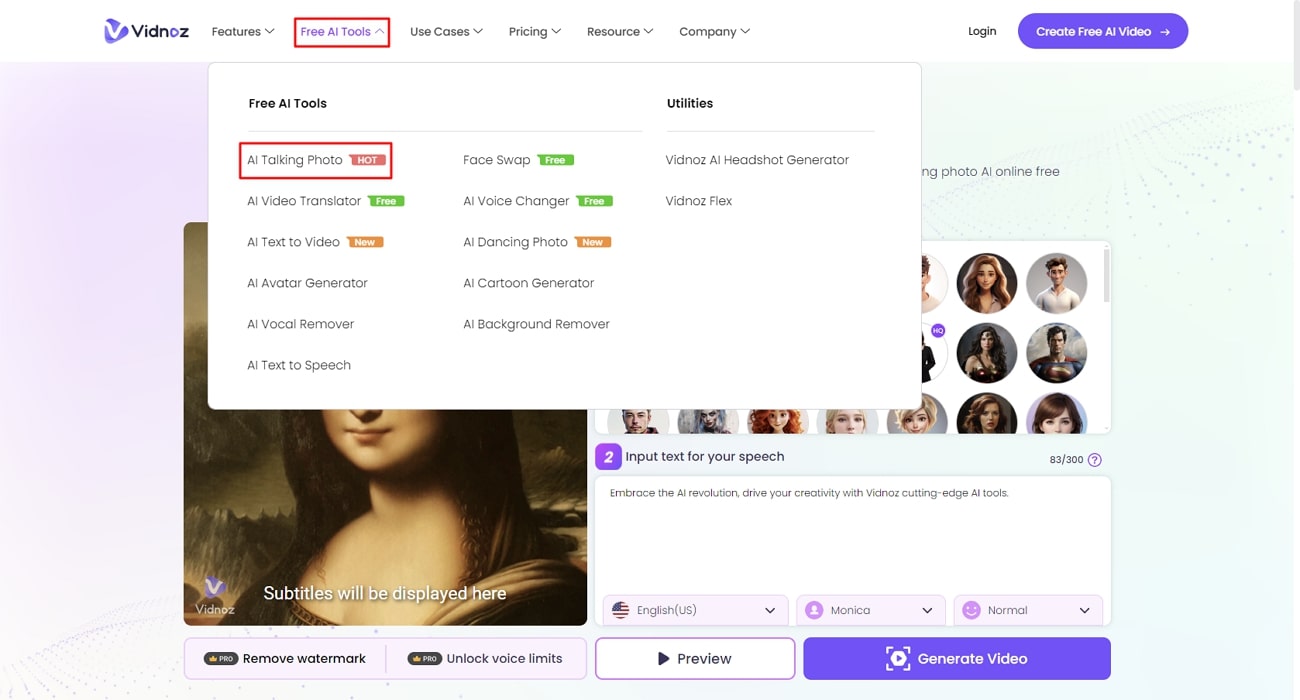
Step 1. First, access the official site of the Vidnoz tool and scroll to the “Free AI Tools” section. In the list of features, look for the “AI Talking Photo” feature from there to get started.
Step 2. After that, select the avatar from pre-available options. You can also upload your own desired picture for this purpose.
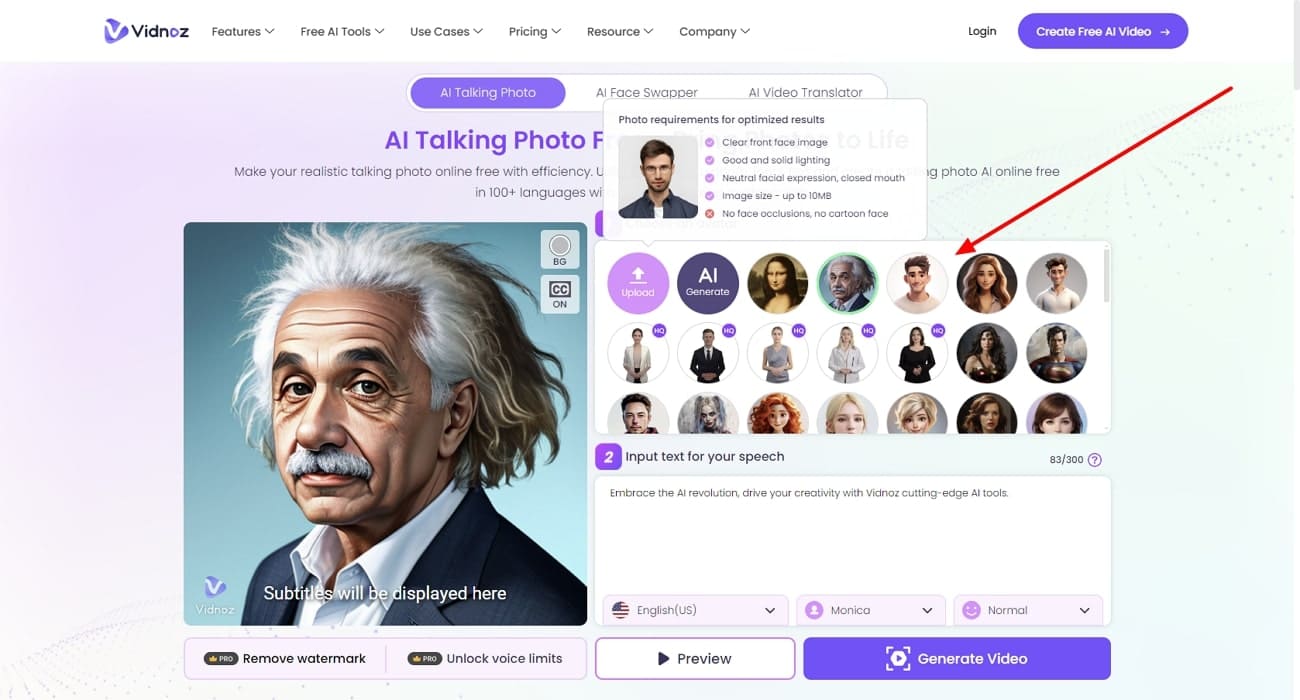
Step 3. Then, go to the text box section and input any text you want to convert to speech. Also, select any preferred language, voice, or mood from the below dropdown menus.
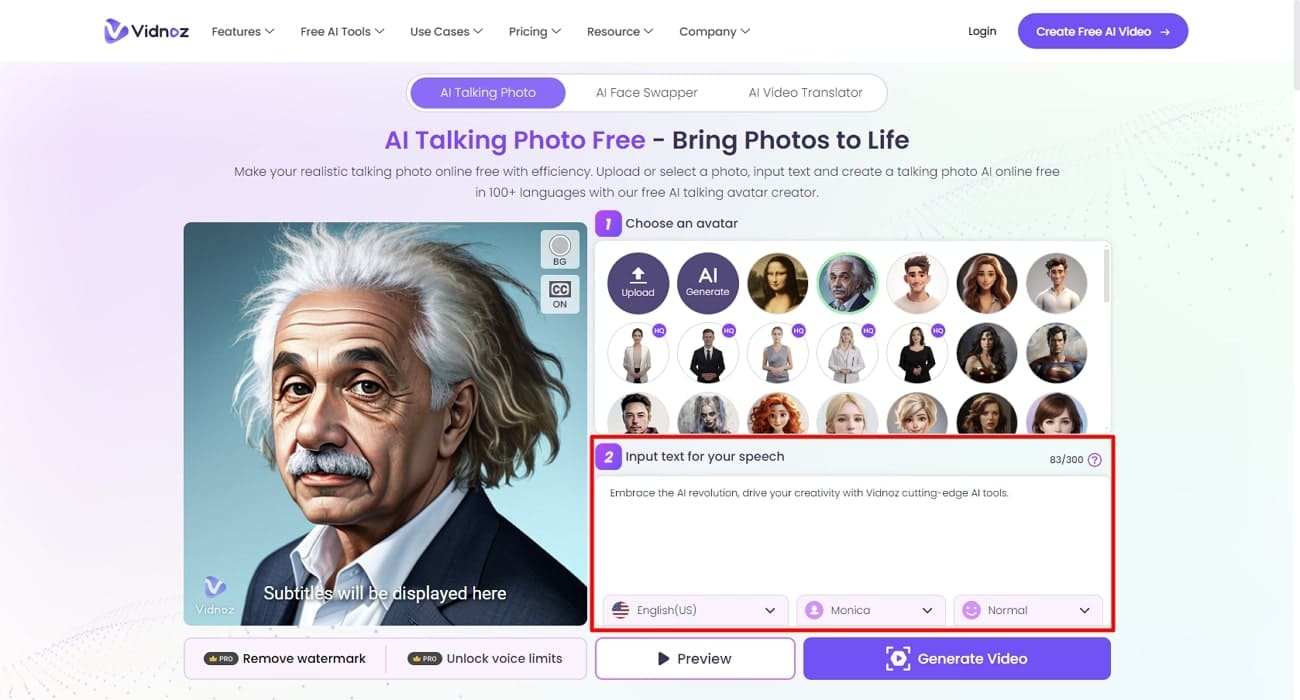
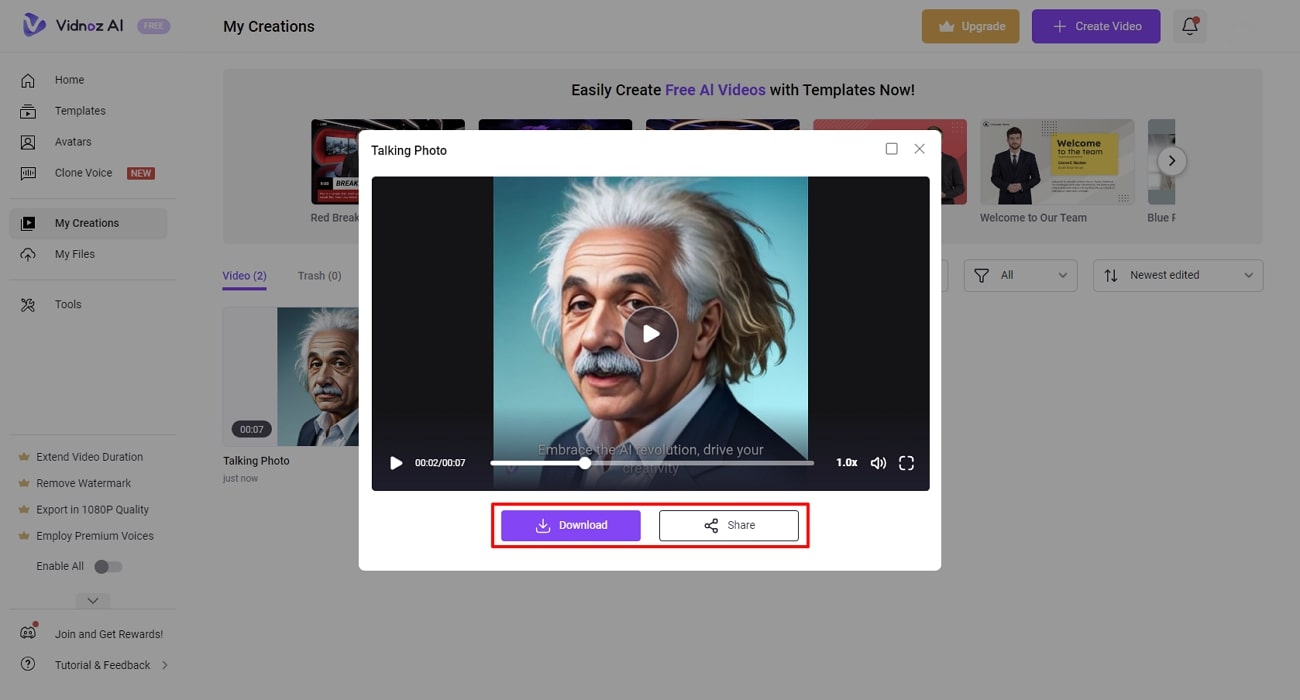
Step 4. Once everything is set, click on the “Generate Video” button to finalize the creation of a talking-photo video. A pop-up window then appears on the “My Creations” page. You can download it to your device or share it directly on social media platforms from that window.
2.Feedeo
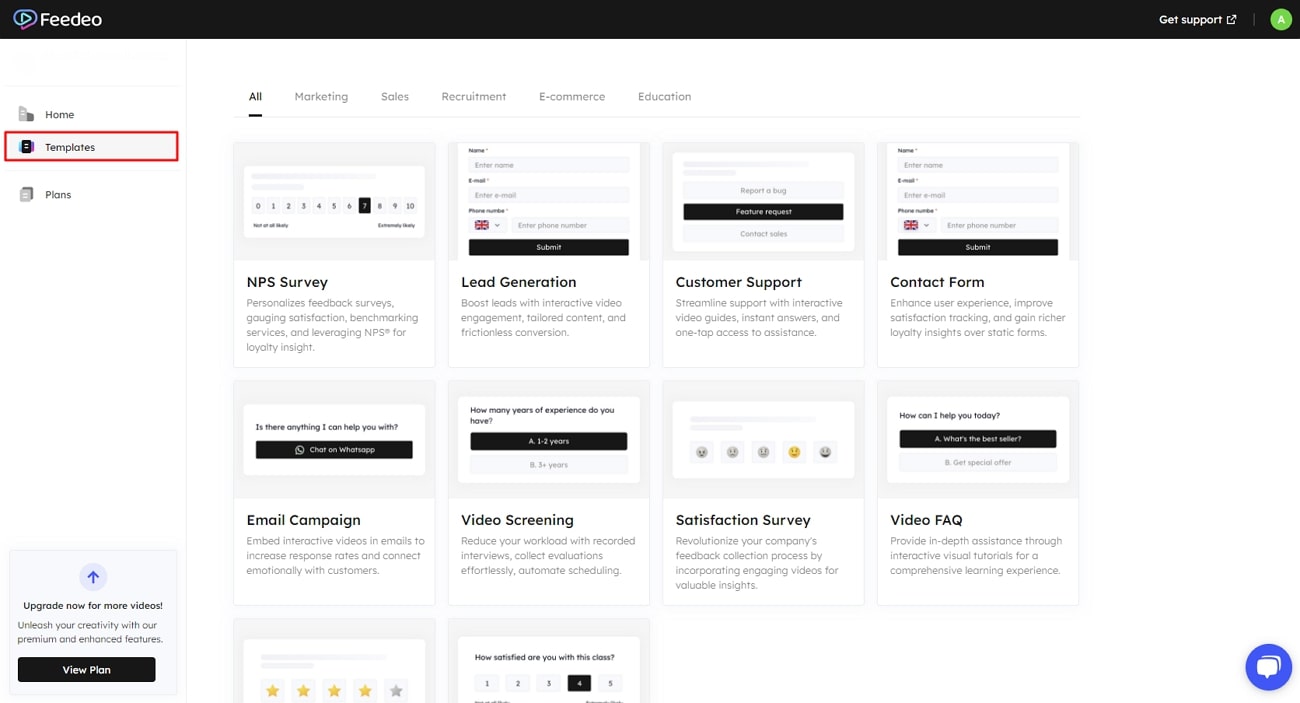
Feedeo is also an online talking photo creator that enables users to make interactive content. With its wide range of AI avatars and voices, you can have a customizable and versatile experience. In addition, you can also use your pic to showcase yourself in the talking photo. To convert your photo to a talking video with Feedeo, apply this guide below:
Step 1. Go to the Feedeo website and log in through your account. Once done, you will be shifted to the dashboard page. Then, select the “Templates” section from the left sidebar and choose any template you want.
Step 2. After that, you will reach the editing interface of this tool. Select a virtual avatar you want to use for your talking photo or upload your photo.
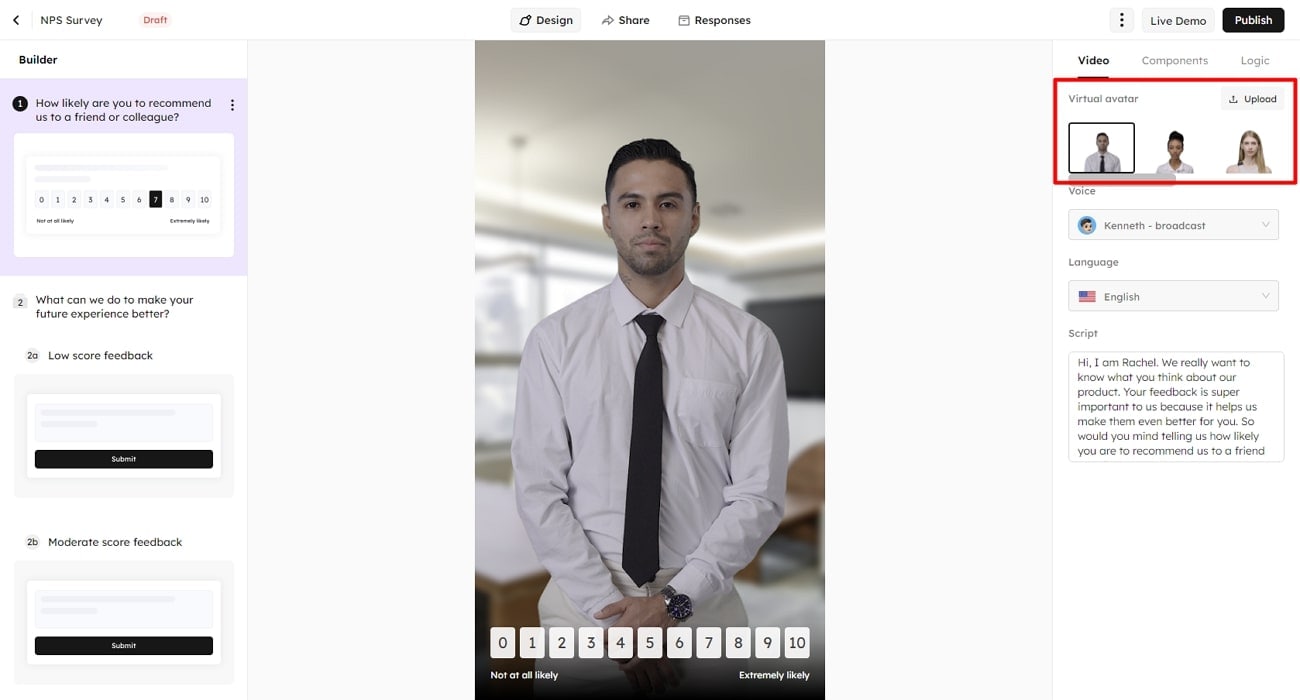
Step 3. Go to the “Voice” dropdown menu and choose any voice and its tone. Afterward, select your desired language from the “Language” dropdown menu. In the section below, you can type any text as the script of your talking photo.
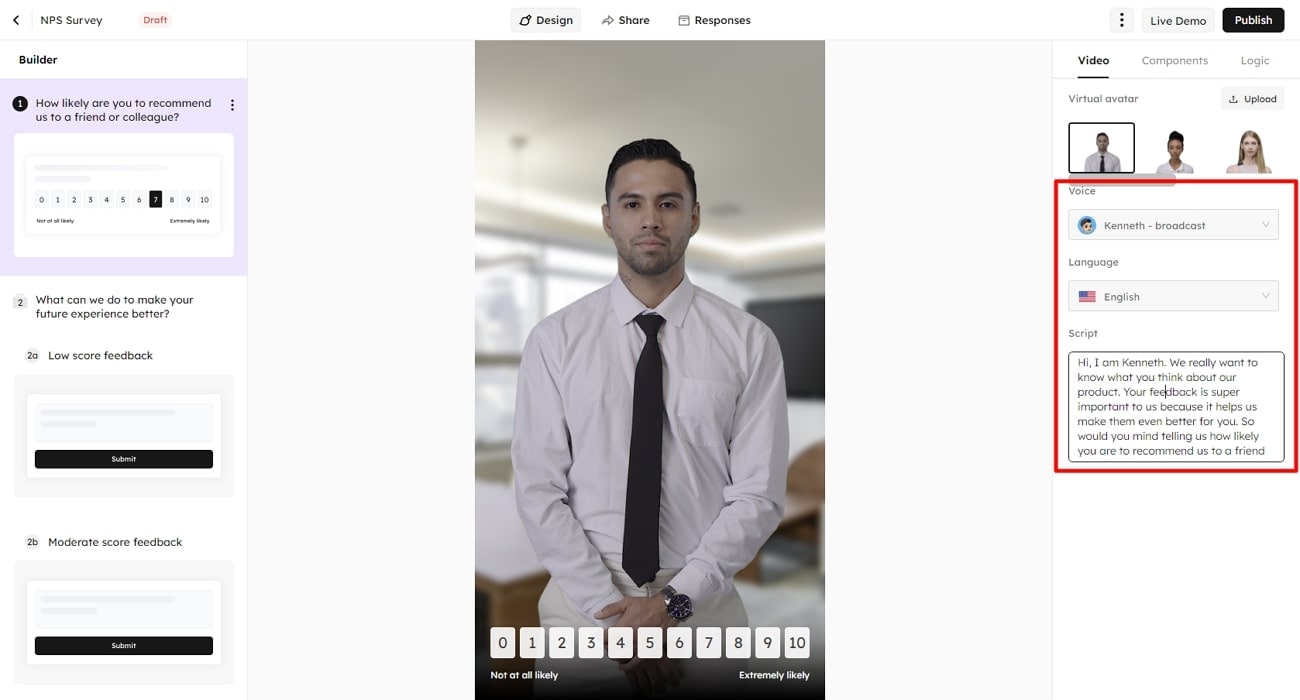
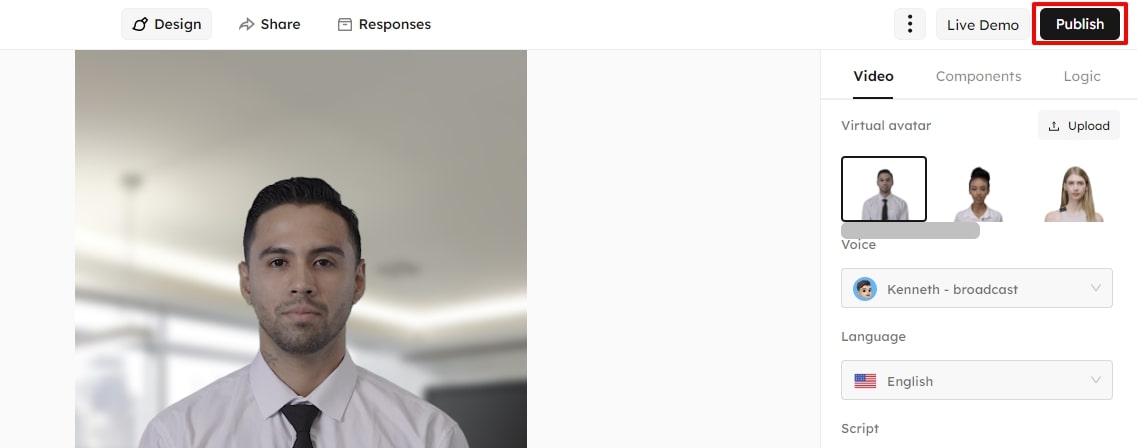
Step 4. Now, hit the “Publish” button, and it will start processing in a new pop-up window. A message will then appear for successful publishing, from where you can share the output file to multi-platforms.
Conclusion
It is incredible how AI-powered tools can transformimages into talking video s. We have shared information on some of the best tools to create such art. However, if you are confused about choosing the best one, Wondershare Virbo is the clear choice. With multiple AI avatars and different language dialects, Wondershare Virbo can surely make your talking photos more fun.
Get Started Online Free Download
Launching Your Live Room
Launching Your Live Room
Explore step-by-step instructions on decorating your space, uploading local images and videos, adding engaging AI interactions, etc. Elevate your streaming experience and captivate your audience with a seamlessly executed live room. Dive into our comprehensive guide now!
02Uploading Local Images and Videos
07AI Intelligent Script Generation
11Starting/Ending the Live Broadcast
Decorating Your Live Room
Decoration Guidance
- Click on the product homepage and create a blank live room to initiate a new live session.

Create a blank live room
- Upon creating a blank live room, the live room editing page will open. The left side serves as the operation area, the right side as the canvas area, and the materials area is located above.

Livestream room navigation
- Click on the templates to use pre-designed combinations of background, virtual hosts, and stickers.

Select a template
- Customize the background from the background library. During the live broadcast, only one background can be used.

Livestream room customization
- Choose a virtual host from the virtual host library. Only one virtual host can be used during the live session.
![]()
Choose a virtual host
- Add stickers from the sticker library. Multiple stickers can be used during the live broadcast.
- After selecting materials, adjust their position and size in the canvas area. Right-click to modify layers, copy, or delete materials.
Uploading Local Images and Videos
Upload background images or videos
- Upload: Click Background -> Upload Background -> Select file to upload. Materials will be displayed in “My Background” after uploading.

Upload Background
- Apply: Click Background -> My Background, then click on the material to use it on the canvas.
- Delete: Hover over the material and click the delete icon to remove it.

Delete Background
Note
Background upload requirements:
- Image and video dimensions should be 9:16
- Image formats: JPG/JPEG/PNG
- Video formats: MP4/MOV
- Resolution should not exceed 1080P
- Video duration should not exceed 30 minutes
- File size should not exceed 1GB
Upload sticker images or videos
- Upload: Click Sticker -> Upload Sticker -> Select file to upload. Materials will be displayed in “My Sticker” after uploading.

Upload Sticker
- Apply: Click Sticker -> My Sticker, then click on the material to use it on the canvas.
- Delete: Click Sticker -> My Sticker, hover over the material, click the delete icon to remove it.

Delete Sticker
Note
Sticker upload requirements:
- Image and video dimensions are flexible.
- Image formats: JPG/JPEG/PNG
- Video formats: MP4/MOV
- Resolution should not exceed 1080P
- Video duration should not exceed 30 minutes
- File size should not exceed 1GB
Text-Driven Live Room
Script Guidance
- Input script text: Copy and paste your script into the script dialogue box.

Text Scripts Inset
- Choose a matching tone: Click the voice-over entrance above, select a suitable tone, and preview it.
- Preview: Click the “Preview” button below the text to listen.
Audio-Driven Live Room
Audio Guidance
- Upload audio: Click Script -> Audio -> Upload local voice and upload the local file.

Upload Audio
- Preview audio: After uploading, click to preview the audio.

Preview Audio
- Audio sorting: Hold and drag to sort the audio files.

Audio sorting
- Audio sorting: Hold and drag to sort the audio files.

Modifying Live Room Name
Method Guidance
- Method 1: Click the edit button in the upper-left corner of the edit page to rename the live room.

Rename Livestream Room
- Method 2: Product homepage -> My Live Rooms -> Click on the more options for an individual live room -> Choose Rename.
Adding AI Identification
Step Guidance
- On the live room editing page, click on the checkbox before the AI identification to enable or disable it.
AI Intelligent Script Generation
Generation Guidance
- Click the “AI Intelligent Script” button below the script, a popup will appear.
- Enter your product name (mandatory), selling points (optional), promotional information (optional), select language and style, then click generate.

AI Script
- The generated result can be further modified, click “Use” to add it to the script dialogue box.
AI Translation
Translation Guidance
- Click the “AI Translation” button below the script, a popup will appear.
- Place the text to be translated on the left, click the middle arrow to select the language for translation (e.g., English), and click translate.

AI Translation
- The generated result can be further modified, click “Use” to add it to the script dialogue box.

AI Translation Result
Manual Interaction
Microphone Interaction
- Operational Flow:
- Click Manual Interaction -> Microphone, and select the microphone device.
- Speak into the microphone and observe the sound wave status.
- Open “Start Live,” wait for the appearance of the virtual host image, and click “Open Mic Takeover.” The virtual host’s mouth will be closed, and your voice will drive the virtual host to speak.
- After speaking, click “End Takeover,” and the virtual host will resume reading the scripted dialogue.
- Click Manual Interaction -> Microphone, and select the microphone device.
- Grant Browser Microphone Access:
- Google Chrome:
*Open Chrome, click the settings icon in the top right.
* Click “Settings,” open the settings page. Select “Privacy and Security” and then click “Site Settings.”
*Enter the site settings page, click “Microphone.”
* On the microphone authorization page, select that the site can request the use of your microphone.
* After these settings, when the browser needs to use the camera or microphone, a device request box will pop up on the page. Select “Allow.” - Mozilla Firefox:
*Open Firefox, click the settings icon in the top right, and click “Settings.”
* Open the settings page, click “Privacy & Security,” and find “Microphone Permissions.” Click “Settings” next to “Microphone.”
*Enter the settings page, add the site that requests the use of your microphone to the list, and click “Save Changes.”
* After these settings, when the browser needs to use the camera or microphone, a device request box will pop up on the page. Select “Allow.” - Sogou Browser:
*Open Sogou Browser, click the settings icon in the top right, and click “Options.”
* Open the options page, click “Advanced,” find “Privacy - Browsers on the Mac System:
*Locate “System Preferences” on your Mac dock and click the icon. Once opened, find “Security & Privacy” and click to open.
* On the “Security & Privacy” page, select “Privacy,” then click on “Microphone” and set the applications that need to use the microphone to “Allow.”
- Google Chrome:
Text Interaction
- Click on “Artificial Interaction” and enter interaction scripts in the input box below.
- Click “Add Text” to add it to the interaction list. After starting the live broadcast, each interaction script will have a send button.

Text Interactionn
- Click “Send” to trigger the AI to speak according to the interaction script.
Intelligent Interaction
Note
The current intelligent interaction feature only supports Alibaba International. If you are streaming on other platforms, you can skip this step.
Setting Entrance
- On the live broadcast page, click on “Intelligent Interaction,” select the live platform, and the supported intelligent interaction features will be randomly displayed.
Q&A Library Settings
- Creating a New Q&A:
- On the product homepage, click on Q&A Library - Add Q&A, and a popup window will appear.
- Fill in the rule name, keywords, reply text, and upload a reply video. Click Save.
Note
Rule Name: Name the rule for easy identification.
Keywords: If a viewer’s question in the live room contains any of these keywords, it will trigger the AI to answer.
Reply Content: You can add up to 5 replies. Include variables like [Viewer’s Nickname] and [Viewer’s Country] for personalized responses.
Sequential Reply: Replies in sequence when triggered.
Random Reply: Randomly selects a reply when triggered.
Reply Video: If configured, the video will be displayed at the specified position until the AI’s reply ends.
- Adjusting Q&A Activation Status:
- Click Q&A Library - Switch to close or open the Q&A rule. When closed, the Q&A rule will not take effect after the live broadcast starts.
- Turning on Q&A Library Switch in the Live Room:
- On the live broadcast editing page, click Intelligent Interaction - Platform, select “Alibaba International,” and turn on the Q&A Library switch. This must be done after starting the live broadcast and capturing the barrage for the function to work.
Greeting Rules Settings
- Greeting Content: You can add up to 5 replies, including variables like [Viewer’s Nickname] and [Viewer’s Country].
- Sequential Reply: Replies in sequence when triggered.
- Random Reply: Randomly selects a reply when triggered.
- On the live broadcast editing page, click Intelligent Interaction - Platform, select “Alibaba International,” turn on the Greeting switch, and click the edit icon to open the editing window. Fill in the reply text and click Save.
Sending Business Cards and Product Catalogs
- On the live broadcast editing page, click Intelligent Interaction - Platform, select “Alibaba International,” turn on the “Send Business Cards” switch, and turn on the “Send Product Catalogs” switch.
Note
These functions will only take effect after starting the live broadcast and capturing the barrage.
How to Start Live Barrage Capture
- Start Broadcasting in Virbo Live
- Follow the steps for “Start/End Broadcast” on the live broadcast editing page.
- Install the Plugin in Chrome
- Ensure Chrome is up to date, then download the plugin from the provided link . After downloading, unzip locally.
- Configure the Plugin in Chrome
- Open Chrome, go to Settings - Extensions - Manage Extensions, enable Developer mode, click “Load Unpacked,” and select the unzipped folder. Enable “Allow in incognito mode” in the plugin details.
- Copy the Live Control Page Link
- Copy the link of your live control page (web version) from the live platform. Paste the link into the live broadcast editing page under Intelligent Interaction - Live Room Link Input, then click “Start Capturing.”
Note
Alibaba International currently supports automatic Q&A, automatic greetings, automatic business card sending, and automatic product catalog sending. You can turn on the corresponding switches and then configure the detailed settings for each item.
Starting/Ending the Live Broadcast
Starting the Live Broadcast
- On the live broadcast editing page, click “Start Broadcasting.”
- The AI live broadcast window will appear shortly after, displaying the AI live broadcast.
Using Your Broadcasting Partner or OBS
Note
Keep the AI live broadcast window open on the desktop during the broadcast, or it will not broadcast properly.
- Open your broadcasting partner or OBS, add a window, select the Wondershare VVB (Live Version) live window.
- Click “Start Broadcasting.” Use Alt + mouse to crop out the web bar or use the zoom function to remove it.
- During the live broadcast, you can only modify the “Artificial Interaction” function; other broadcast settings cannot be changed.
Ending the Broadcast
- When concluding the live broadcast, initiate the termination of the live stream on the platform’s broadcasting partner first, followed by clicking the “End Live” button on Virbo Live to finalize the shutdown process.
02Uploading Local Images and Videos
07AI Intelligent Script Generation
11Starting/Ending the Live Broadcast
Decorating Your Live Room
Decoration Guidance
- Click on the product homepage and create a blank live room to initiate a new live session.
Create a blank live room
- Upon creating a blank live room, the live room editing page will open. The left side serves as the operation area, the right side as the canvas area, and the materials area is located above.
Livestream room navigation
- Click on the templates to use pre-designed combinations of background, virtual hosts, and stickers.
Select a template
- Customize the background from the background library. During the live broadcast, only one background can be used.
Livestream room customization
- Choose a virtual host from the virtual host library. Only one virtual host can be used during the live session.
![]()
Choose a virtual host
- Add stickers from the sticker library. Multiple stickers can be used during the live broadcast.
- After selecting materials, adjust their position and size in the canvas area. Right-click to modify layers, copy, or delete materials.
Uploading Local Images and Videos
Upload background images or videos
- Upload: Click Background -> Upload Background -> Select file to upload. Materials will be displayed in “My Background” after uploading.
Upload Background
- Apply: Click Background -> My Background, then click on the material to use it on the canvas.
- Delete: Hover over the material and click the delete icon to remove it.
Delete Background
Note
Background upload requirements:
- Image and video dimensions should be 9:16
- Image formats: JPG/JPEG/PNG
- Video formats: MP4/MOV
- Resolution should not exceed 1080P
- Video duration should not exceed 30 minutes
- File size should not exceed 1GB
Upload sticker images or videos
- Upload: Click Sticker -> Upload Sticker -> Select file to upload. Materials will be displayed in “My Sticker” after uploading.
Upload Sticker
- Apply: Click Sticker -> My Sticker, then click on the material to use it on the canvas.
- Delete: Click Sticker -> My Sticker, hover over the material, click the delete icon to remove it.
Delete Sticker
Note
Sticker upload requirements:
- Image and video dimensions are flexible.
- Image formats: JPG/JPEG/PNG
- Video formats: MP4/MOV
- Resolution should not exceed 1080P
- Video duration should not exceed 30 minutes
- File size should not exceed 1GB
Text-Driven Live Room
Script Guidance
- Input script text: Copy and paste your script into the script dialogue box.
Text Scripts Inset
- Choose a matching tone: Click the voice-over entrance above, select a suitable tone, and preview it.
- Preview: Click the “Preview” button below the text to listen.
Audio-Driven Live Room
Audio Guidance
- Upload audio: Click Script -> Audio -> Upload local voice and upload the local file.
Upload Audio
- Preview audio: After uploading, click to preview the audio.
Preview Audio
- Audio sorting: Hold and drag to sort the audio files.
Audio sorting
- Audio sorting: Hold and drag to sort the audio files.
Modifying Live Room Name
Method Guidance
- Method 1: Click the edit button in the upper-left corner of the edit page to rename the live room.
Rename Livestream Room
- Method 2: Product homepage -> My Live Rooms -> Click on the more options for an individual live room -> Choose Rename.
Adding AI Identification
Step Guidance
- On the live room editing page, click on the checkbox before the AI identification to enable or disable it.
AI Intelligent Script Generation
Generation Guidance
- Click the “AI Intelligent Script” button below the script, a popup will appear.
- Enter your product name (mandatory), selling points (optional), promotional information (optional), select language and style, then click generate.
AI Script
- The generated result can be further modified, click “Use” to add it to the script dialogue box.
AI Translation
Translation Guidance
- Click the “AI Translation” button below the script, a popup will appear.
- Place the text to be translated on the left, click the middle arrow to select the language for translation (e.g., English), and click translate.
AI Translation
- The generated result can be further modified, click “Use” to add it to the script dialogue box.
AI Translation Result
Manual Interaction
Microphone Interaction
- Operational Flow:
- Click Manual Interaction -> Microphone, and select the microphone device.
- Speak into the microphone and observe the sound wave status.
- Open “Start Live,” wait for the appearance of the virtual host image, and click “Open Mic Takeover.” The virtual host’s mouth will be closed, and your voice will drive the virtual host to speak.
- After speaking, click “End Takeover,” and the virtual host will resume reading the scripted dialogue.
- Click Manual Interaction -> Microphone, and select the microphone device.
- Grant Browser Microphone Access:
- Google Chrome:
*Open Chrome, click the settings icon in the top right.
* Click “Settings,” open the settings page. Select “Privacy and Security” and then click “Site Settings.”
*Enter the site settings page, click “Microphone.”
* On the microphone authorization page, select that the site can request the use of your microphone.
* After these settings, when the browser needs to use the camera or microphone, a device request box will pop up on the page. Select “Allow.” - Mozilla Firefox:
*Open Firefox, click the settings icon in the top right, and click “Settings.”
* Open the settings page, click “Privacy & Security,” and find “Microphone Permissions.” Click “Settings” next to “Microphone.”
*Enter the settings page, add the site that requests the use of your microphone to the list, and click “Save Changes.”
* After these settings, when the browser needs to use the camera or microphone, a device request box will pop up on the page. Select “Allow.” - Sogou Browser:
*Open Sogou Browser, click the settings icon in the top right, and click “Options.”
* Open the options page, click “Advanced,” find “Privacy - Browsers on the Mac System:
*Locate “System Preferences” on your Mac dock and click the icon. Once opened, find “Security & Privacy” and click to open.
* On the “Security & Privacy” page, select “Privacy,” then click on “Microphone” and set the applications that need to use the microphone to “Allow.”
- Google Chrome:
Text Interaction
- Click on “Artificial Interaction” and enter interaction scripts in the input box below.
- Click “Add Text” to add it to the interaction list. After starting the live broadcast, each interaction script will have a send button.
Text Interactionn
- Click “Send” to trigger the AI to speak according to the interaction script.
Intelligent Interaction
Note
The current intelligent interaction feature only supports Alibaba International. If you are streaming on other platforms, you can skip this step.
Setting Entrance
- On the live broadcast page, click on “Intelligent Interaction,” select the live platform, and the supported intelligent interaction features will be randomly displayed.
Q&A Library Settings
- Creating a New Q&A:
- On the product homepage, click on Q&A Library - Add Q&A, and a popup window will appear.
- Fill in the rule name, keywords, reply text, and upload a reply video. Click Save.
Note
Rule Name: Name the rule for easy identification.
Keywords: If a viewer’s question in the live room contains any of these keywords, it will trigger the AI to answer.
Reply Content: You can add up to 5 replies. Include variables like [Viewer’s Nickname] and [Viewer’s Country] for personalized responses.
Sequential Reply: Replies in sequence when triggered.
Random Reply: Randomly selects a reply when triggered.
Reply Video: If configured, the video will be displayed at the specified position until the AI’s reply ends.
- Adjusting Q&A Activation Status:
- Click Q&A Library - Switch to close or open the Q&A rule. When closed, the Q&A rule will not take effect after the live broadcast starts.
- Turning on Q&A Library Switch in the Live Room:
- On the live broadcast editing page, click Intelligent Interaction - Platform, select “Alibaba International,” and turn on the Q&A Library switch. This must be done after starting the live broadcast and capturing the barrage for the function to work.
Greeting Rules Settings
- Greeting Content: You can add up to 5 replies, including variables like [Viewer’s Nickname] and [Viewer’s Country].
- Sequential Reply: Replies in sequence when triggered.
- Random Reply: Randomly selects a reply when triggered.
- On the live broadcast editing page, click Intelligent Interaction - Platform, select “Alibaba International,” turn on the Greeting switch, and click the edit icon to open the editing window. Fill in the reply text and click Save.
Sending Business Cards and Product Catalogs
- On the live broadcast editing page, click Intelligent Interaction - Platform, select “Alibaba International,” turn on the “Send Business Cards” switch, and turn on the “Send Product Catalogs” switch.
Note
These functions will only take effect after starting the live broadcast and capturing the barrage.
How to Start Live Barrage Capture
- Start Broadcasting in Virbo Live
- Follow the steps for “Start/End Broadcast” on the live broadcast editing page.
- Install the Plugin in Chrome
- Ensure Chrome is up to date, then download the plugin from the provided link . After downloading, unzip locally.
- Configure the Plugin in Chrome
- Open Chrome, go to Settings - Extensions - Manage Extensions, enable Developer mode, click “Load Unpacked,” and select the unzipped folder. Enable “Allow in incognito mode” in the plugin details.
- Copy the Live Control Page Link
- Copy the link of your live control page (web version) from the live platform. Paste the link into the live broadcast editing page under Intelligent Interaction - Live Room Link Input, then click “Start Capturing.”
Note
Alibaba International currently supports automatic Q&A, automatic greetings, automatic business card sending, and automatic product catalog sending. You can turn on the corresponding switches and then configure the detailed settings for each item.
Starting/Ending the Live Broadcast
Starting the Live Broadcast
- On the live broadcast editing page, click “Start Broadcasting.”
- The AI live broadcast window will appear shortly after, displaying the AI live broadcast.
Using Your Broadcasting Partner or OBS
Note
Keep the AI live broadcast window open on the desktop during the broadcast, or it will not broadcast properly.
- Open your broadcasting partner or OBS, add a window, select the Wondershare VVB (Live Version) live window.
- Click “Start Broadcasting.” Use Alt + mouse to crop out the web bar or use the zoom function to remove it.
- During the live broadcast, you can only modify the “Artificial Interaction” function; other broadcast settings cannot be changed.
Ending the Broadcast
- When concluding the live broadcast, initiate the termination of the live stream on the platform’s broadcasting partner first, followed by clicking the “End Live” button on Virbo Live to finalize the shutdown process.
2024 Guide: How to Attract More NFL Viewers for Your Sports Live Streaming Channel
If you are running a sports live-streaming channel, tapping into the NFL is the best advice you could get now. Withmillions of viewers regularly tuning in for NFL games, it’s no surprise that the league dominates the list of the most-watched programs.
NFL fans often look for NFL live stream that offers high-quality coverage, reliable streaming, and comprehensive analysis. So this time, we’ll outline strategies to help you attract more NFL viewers to your sports live streaming channel.

Part 1: Choosing a Platform for Your Live NFL Game Stream
When considering getting NFL viewers, you need to know the best platform to stream live NFL games for your channel. Basically, you can always use any live streaming platform as long as you have OBS studio to work as a streaming encoder.
Popular options include Twitch, YouTube Live, and Discord. Each platform has its unique advantages and demographics, so it’s crucial to research and choose the one that aligns best with your target audience.
Twitch

Twitch is a popular choice for gaming content and has a large community of avid gamers and esports enthusiasts. It offers robust features such as chat integration, customizable overlays, and subscription options, which can help foster a sense of community and engagement among viewers.
Pros
- Interactive features to enhance viewer engagement during live streams.
- Various monetization options, such as subscriptions, bits, and donations.
Cons
- Twitch’s audience is primarily younger people interested in gaming content, so reaching NFL fans might be more challenging.
- Twitch has strict content guidelines that could potentially limit the types of NFL content that can be streamed.
YouTube Live

YouTube Live, on the other hand, boasts a massive user base and seamless integration with the rest of the YouTube platform. This means that your live streams can reach a broader audience, including those who may not necessarily be actively searching for NFL content but might stumble upon your stream while browsing related videos.
YouTube also often serve as an NFL streaming service. So you don’t have to worry about setting up a separate streaming platform or dealing with technical issues that may arise.
Pros
- YouTube’s massive user base makes it easier to reach a broader audience, including NFL fans.
- YouTube’s search engine optimization (SEO) can help NFL streams rank well in search results.
Cons
- YouTube Live has a lot of competition, making it harder for new streamers to stand out and attract viewers.
- Streaming NFL content can be a challenge especially if it includes copyrighted material.
Discord

If you own a Discord server with sports fans, you can live stream NFL games free with your Discord server members. Discord provides a more private platform for streaming, so it minimizes concerns about your channel being restricted due to copyright violations or other issues when watching NFL live.
Using the screen share feature on Discord, you can host streaming parties and interact with your audience in real time. Discord’s platform also supports high-quality videos that guarantee a seamless and immersive viewing experience for everyone.
Pros
- Customizable with various channels, roles, and bots to create unique experiences for their audience.
- Direct communication between streamers and viewers through text, voice, and video channels.
- Safer to be used for live streaming NFL games as it’s more private.
Cons
- Lacks the discoverability of platforms like Twitch and YouTube.
- No built-in monetization options like subscriptions or ads.
For live streaming the game, you can watch the NFL live on variousplatforms and services . Some popular options include NFL+, Streaming Services (YouTube TV, Hulu + Live TV, Sling TV, and FuboTV), or Broadcast Networks (CBS, FOX, and ESPN). Alternatively, some of the NFL game live stream online free options are USTVGO, FSL, CricFree, and more.
After knowing which streaming platform to use, it’s essential to proceed with caution. Live-streaming NFL games can present various challenges and considerations, including streaming quality, licensing agreements, potential copyright issues, and more.
Part 2: Strategies to Implement During Live Streaming
Now that you know which platform to use for your sports live-streaming channel, it’s time to strategize your live-streaming approach to maximize audience engagement and make your channel a go-to destination for NFL fans.
During the NFL live stream, you’ll want to captivate your audience from kickoff to the final whistle. Engaging visuals, insightful commentary, and seamless transitions are important in keeping your audience hooked.
Try out these strategies to attract your viewers during NFL live streaming:
- Make a Pre-game Analysis
Before the game begins, provide viewers with insightful analysis and predictions about the upcoming match. Discuss key players, recent team performances, and any strategic adjustments that could impact the game’s outcome. This pre-game analysis helps build anticipation and engagement among viewers.
- Interactive Polls and Q&A Sessions
You can engage with viewers during the NFL livestream by incorporating interactive elements such as polls and Q&A sessions. Ask viewers to vote on game predictions, MVP candidates, or play of the game. Or, you can encourage viewers to ask questions or share their thoughts in the chat and respond to them to foster interaction and community engagement.
- In-game Commentary
You can provide play-by-play analysis, insights into player performances, and strategic observations throughout the NFL streams. Use visuals such as graphics, replays, and statistics to make your commentary more engaging and improve the viewing experience.
- Post-game Analysis and Highlights
After the game concludes, provide viewers with comprehensive post-game analysis and highlights. Recap key moments, analyze standout performances, and discuss the implications of the game on the team’s season to encourage continued engagement and discussion.
- Make Your Channel Discoverable
Make sure your NFL stream titles clearly state the sport or activity. Use tags like “Football” and add descriptors like “Sidecasting” or “Sports Talk” to give viewers an idea of what to expect.
You can also personalize your NFL livestream to boost engagement. Add extensions such as alerts and overlays. Use templates from the platform or third-party tools to make your stream unique.
Part 3: Engaging NFL Fan Viewers with AI Tools
Besides implementing strategies during the NFL live stream, you also need to make your channel discoverable and engage NFL fans to view your channel. The key to this tip is to maintain a constant presence as much as possible.
One effective method to streamline your NFL live streaming is by using AI tools like Wondershare Virbo Live, which can help you set up a continuous 24/7 live stream. With Virbo Live, you don’t have to be constantly present while still attracting a wider audience base by providing constant coverage of NFL-related content.
Additionally, the Virbo live stream feature seamlessly integrates with major live-streaming platforms supported by OBS. That’s why many content creators and fan communities find it convenient to use this tool for their live-streaming needs.
How to live stream 24/7 with Wondershare Virbo Live
To live stream NFL content 24/7 with Wondershare Virbo Live, you need to prepare your AI avatar and set up the templates first. After customizing your avatar, you can acquire the streaming key if available. This key will allow OBS to connect with the streaming platform. Otherwise, you can use OBS as your virtual camera.
Follow these steps on how to live stream 24/7:
Step 1: Access Wondershare Virbo Live and create a live streaming room.
Go toWondershare Virbo Live . Select “Create Stream Room Now” > “Create a Blank Live Stream Room” to start the setup process.

Step 2: Develop your script or upload existing audio recordings.
Within the Virbo Live interface, you have the option to either write the script for your live stream or upload audio content that you’ve prepared beforehand by clicking “Upload local file.”

Tip: Make use of Virbo’s AI Script Writer tool for inspiration. Click on “AI Smart Script” and input relevant topic details, language preferences, and style choices to generate a script. You can then refine it as necessary.

Step 3: Personalize your AI avatar and background.
Head to the “AI Avatars” section to select an avatar suitable for your live stream. Additionally, you can customize the background, add stickers, or choose from available templates to enhance the visual appeal of your stream.

Step 4: Start the live stream.
Once you’ve configured your AI avatar and background, click on “Start Livestream.” The next step should be acquiring the platform’s streaming key to put into the OBS. Then, you can start streaming.
Conclusion
If you’re running a sports live-streaming channel, making use of the NFL live stream is your best bet. With millions of viewers regularly tuning in for NFL games, you have a ready-made audience eager for content.
Moreover, integrating AI tools like Wondershare Virbo Live allows you to have continuous 24/7 live streaming. You can provide consistent coverage of NFL-related content and attract a broader audience base. By following the steps outlined above, you can streamline your broadcasting process and focus on delivering high-quality content to NFL fans.
A Guide on Starting Private Live Streams on YouTube
In today’s digital age, live streaming has become a powerful tool for connecting with audiences in real-time. This method has especially been crucial for businesses looking to get into live selling or gamers wanting to stream their games. But say, for example, that you want to keep your stream private, accessible only to select viewers; how do you do that?
Here’s where private live streaming comes in. This option allows you to share your content with specific individuals, ensuring a more intimate and controlled environment. This guide will teach you how to set upprivate YouTube streams and give you special tips to let AI help you with your streams with Wondershare Virbo.

Part 1: What Do You Need To Get Started With YouTube Private Live Streaming?
Before diving into the exciting world of private live streaming, here is the equipment to ensure a smooth and seamless experience.
- YouTube account. First things first, you’ll need a YouTube account. This is your gateway to the platform and your key to unlock the world of live streaming.
- A capable PC. Next, prepare your PC and the command center for your private stream. While specific requirements vary depending on the complexity of your stream, here are some general recommendations:
- Processor: Intel Core i5 or equivalent (or newer)
- RAM: 8GB or more
- Graphics Card: Dedicated GPU recommended for enhanced performance
- Internet Connection: A stable and fast internet connection with sufficient upload bandwidth (consider at least 3 Mbps for standard definition)
- A streaming tool. Now, you’ll need a streaming tool to capture your video and audio and send it live to YouTube.Wondershare Virbo is recommended, especially for live-selling purposes. Other options include OBS and similar stream apps for other purposes.
With these essential elements in place, you’re on your way to launching your private YouTube adventure.
Part 2: How To Start a Private YouTube Live Stream?
Ready to share your talents or ideas with a select audience? Dive into the steps to create aprivate live stream on YouTube by following the guide below. It’s pretty straightforward.
- Step 1: Access YouTube Studio.Head to your YouTube Studio page (studio.youtube.com) and log in using your Google account linked to your YouTube channel.
- Step 2: Prepare for live streaming**.** ClickCreate in the top left corner of the Studio dashboard, and selectGo Live from the dropdown menu. Alternatively, click the camera icon next to your profile picture and chooseGo Live.

- Step 3: Now, set your visibility. Before starting your broadcast, ensure your stream is private. Under theVisibility setting, click the dropdown menu and choosePrivate . This option restricts viewership to individuals you specifically invite.

- Step 4: There are two methods existing for inviting viewers:
- Email Invitations: Click onShare Privately and enter the email addresses of individuals you wish to grant access. You can also choose to notify them via email.
- Link sharing: Although not recommended for complete privacy, you can copy the stream link and share it directly with trusted individuals. Remember, anyone with the link can access the stream, even uninvited guests.

- Step 5: Once everything is set and your viewers are invited, clickGo Live to launch your private YouTube stream. Remember, only invited individuals using their YouTube accounts can view your content.
Additional Tips for Private YouTube Live Streams
Here are some additional tips that you can follow before starting aprivate YouTube stream :
- Test streaming. Consider using a test stream before inviting viewers to ensure everything runs smoothly.
- Giving guidelines to your viewers. Encourage guests to use their YouTube accounts for optimal viewing experience and security. Further, you can add house rules, especially for more intimate streams or live selling/auctions.
- Exploring advanced privacy settings. Explore advanced privacy settings within YouTube Studio for further control over viewer permissions.
- Using AI . Tools like Wondershare Virbo can help integrate AI into your private YouTube streams. This way, you won’t always have to glue your eyes on your stream. Discover more about this feature in the following section.
By following these steps and keeping privacy in mind, you can effectively host engaging live streams on YouTube, connecting with your chosen audience in a controlled and intimate setting. Remember to personalize your content, interact with your viewers, and enjoy the unique experience of private live streaming.
Part 3: Breaking the Limitations of Live Streams With Wondershare Virbo
Live streaming constantly evolves, offering creators new ways to connect with audiences. While traditional live streams require your physical presence, imagine having an engaging and interactive stream running 24/7, even when you’re not there. This is great, especially forprivate YouTube streams , where the need to engage the select viewers becomes more apparent.
EnterWondershare Virbo , a revolutionary tool that leverages AI to create realistic and captivating live streams around the clock.
Introducing Wondershare Virbo
Gone are the days of relying solely on manual effort to keep your audience engaged. Virbo Live transcends these limitations, offering:
Get Started Online Free Download
- 24/7 content delivery. Whether taking a break or focusing on other tasks, Virbo Live ensures your stream continues with AI-powered content, keeping viewers entertained and informed.
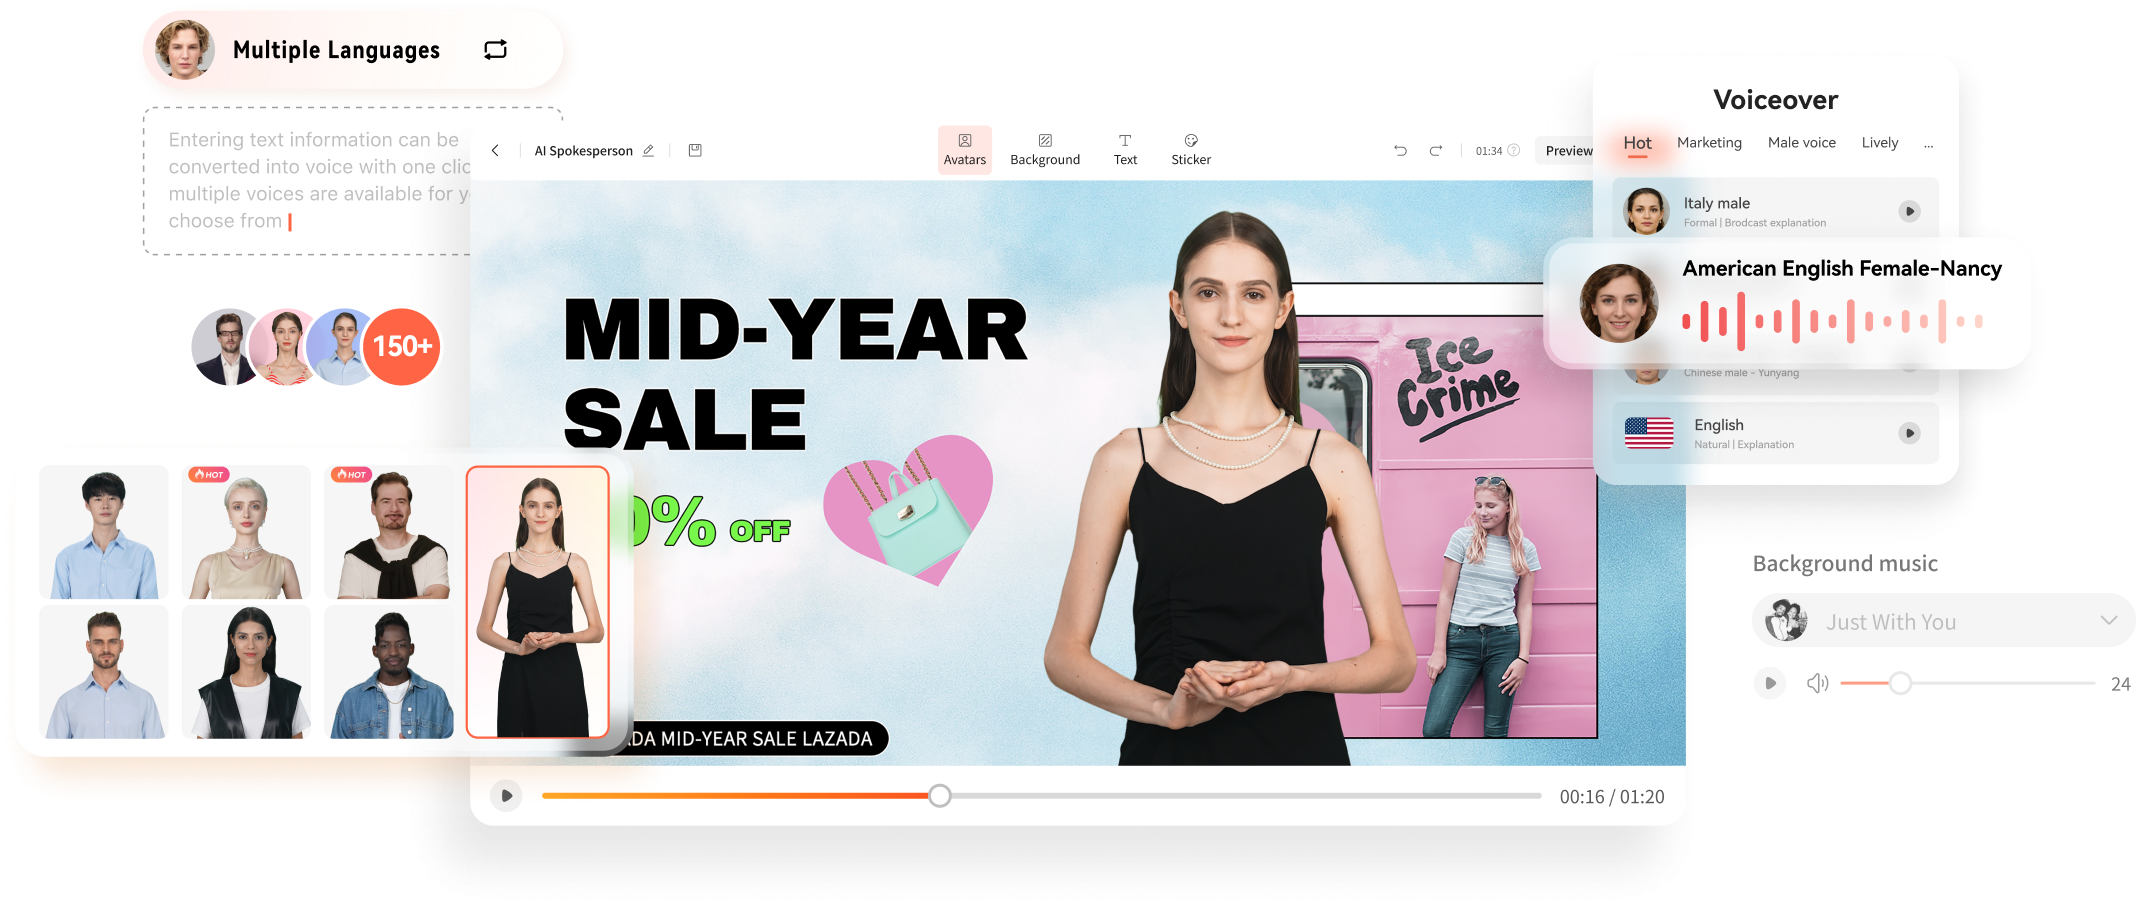
- Virtual host template library. No more scrambling for guest hosts or struggling with solo presentations. Virbo Live’s diverse library of 150+ customizable AI avatars can be your virtual co-host, presenter, or even a captivating character, interacting with viewers, answering questions, and conducting interviews.
- Content creation is made easy with templates. Forget starting from scratch. Virbo Live provides 180+ professionally designed video templates across various themes and styles, saving you time and effort. Plus, enjoy a library of royalty-free music to add the perfect soundtrack.
- Engaging AI voices. Bring your content to life with 120 AI voices, offering a variety of tones and accents, ensuring your message resonates with a global audience.
Integrating AI into Your Live Stream
Adding Virbo Live to your existing setup is simple and intuitive. Add Virbo as a live OBS window and use the YouTube stream key. Here’s a step-by-step guide:
- Step 1: InstallWondershare Virbo or access the web app.
Get Started Online Free Download
- Step 2: ClickCreate a Blank Livestream Room to customize your stream’s interface.

- Step 3: Choose from templates, backgrounds, AI avatars, and stickers to create a visually engaging environment.

- Step 4: UnderScript Lines , write the script your AI host will deliver throughout the stream. UseAI Interaction to set responses for specific questions andHuman interaction for actual responses from your end.

- Step 5: Once everything is set, clickStart Livestream and connect it to your preferred platform through OBS. Paste your streaming key for seamless integration.
Use-Cases for Wondershare Virbo and Private YouTube Live Streaming
Virbo Live empowers you to explore new avenues in content creation. Imagine using it for:
- E-commerce shopping. Showcase products with AI hosts demonstrating their features and answering customer questions in real-time, even outside business hours.
- Educational live tutorials. Host interactive learning experiences with AI tutors delivering engaging lectures and responding to student inquiries.
- Live Q&A sessions. Let your AI host manage large-scale Q&A sessions and field questions and keep the conversation flowing smoothly.
With Wondershare Virbo Live, the possibilities are endless. Unleash your creativity, explore new ways to connect with your audience, and experience the power of 24/7private YouTube streams . Remember, this is just a starting point – personalize your content, experiment with different features, and discover the unique potential Virbo Live brings to your streaming journey.
Conclusion
In today’s digital age, live streaming has become a powerful tool for connecting with audiences in real-time. YouTube live streaming offers a versatile platform to share your passions and connect with a select group of viewers. This article has guided you through setting up aprivate live stream on YouTube , ensuring your content reaches only your guests.
Remember, key considerations include enabling private streaming within YouTube Studio, inviting viewers via email or link sharing, and personalizing your content to create an engaging experience. If you want to take your live streams to the next level, consider Wondershare Virbo, a user-friendly tool designed to simplify private live streaming on YouTube with the help of AI.
Elevate Your Content with the Best Free Video Translator Apps
Welcome to the world of content creation, where language should never be a barrier to connecting with your audience. In a world that thrives on diversity, the key to expanding your reach lies in breaking down linguistic barriers. This journey begins with harnessing the capabilities of the best free video translator apps. In this article, we delve into free video language translator apps catering to various needs, and pave the way for a more inclusive and globally connected audience.
Part 1: How Do Video Translator Apps Work?
Many free video translator apps are available today to help convey your message in different languages. These apps often act like magic tricks to assist people in understanding videos all over the world. For understanding its operation, it starts with speech recognition which is listened by the translation app. The words that are being said in the video are converted into text.
The app then utilizes machine translation powered by AI. This technology translates the text transcript from the source to your target language. As it reaches the end, the translated text appears as subtitles on the screen. You can follow the video and understand the content presented in it, even if it is not present in the native language.
Part 2: Benefits of Translating Video Through Best Video Translator
In the vast landscape of digital content, the ability to transcend language barriers is a powerful asset for content creators. This part of our exploration dives into the manifold benefits of translating videos through the best video translator apps, emphasizing how this strategic move can profoundly impact your reach and engagement.
1. Expanding Your Audience Reach
One of the primary advantages of leveraging the best video translator app free is the unparalleled ability to broaden your audience spectrum. By breaking language barriers, your content becomes accessible to viewers around the globe, fostering a diverse and engaged community.
2. Improving Engagement and Retention
A YouTube video translator app isn’t merely a tool for language conversion; it’s a catalyst for enhanced viewer engagement. Subtitles or voiceovers in a viewer’s native language not only make your content more comprehensible but also contribute to increased viewer retention, as audiences are more likely to invest time in content they can effortlessly understand.
3. Enhancing Accessibility
Beyond linguistic inclusivity, utilizing a free video translator app ensures your content is accessible to a wider audience, including those with hearing impairments. This commitment to accessibility strengthens your content’s appeal and contributes to the creation of a more inclusive online space.
4. Boosting SEO and Discoverability
The advantages of a video subtitle translator app extend beyond immediate viewer experience. Translating your video content can significantly boost its search engine optimization (SEO), making it more discoverable to users searching for content in various languages. This increased visibility can amplify your content’s impact across diverse platforms.
5. Facilitating Cross-Cultural Communication
A video voice translator app isn’t just a technological tool; it’s a bridge for effective cross-cultural communication. Breaking down language barriers fosters a sense of connection and understanding, creating a more engaged and loyal audience base that spans across different cultural backgrounds.
Part 3: Free Video Translator Apps to Translate Every Type of Video
In this section, we set forth on an exploration of the vast landscape of free video voice language translator apps. Our aim is to unveil a myriad of tools, each uniquely designed to cater to a spectrum of video translation needs. Join us as we navigate this diverse terrain, discovering the ideal solutions for every type of video translation requirement.
1. Wondershare Virbo
In the fast-paced world of digital content creation, the ability to communicate with a global audience is a game-changer. Virbo, a cutting-edge video language translator app, steps into this arena, offering content creators a dynamic platform to transcend linguistic barriers and connect with viewers worldwide. As we delve into Virbo, let’s explore its unique features, advantages, and considerations. It is readily available on both the Google Play Store and iOS App Store, ensuring accessibility for content creators across different platforms.
Get Started Online Download APP Now Free Download
Features:
- Whether you’re a seasoned creator or just starting, it’s user-friendly layout ensures a smooth and efficient experience.
- Its advanced speech recognition ensures accurate and nuanced translations, enhancing the audiovisual appeal of your content.
- It ensures that you can translate content dynamically as you create, providing instant feedback on how your video will resonate with a global audience.
Pros
- Its intuitive design ensures that creators of all levels can navigate the app seamlessly.
- Its extensive range of supported languages makes it a versatile tool for connecting with diverse audiences.
- Its commitment to user privacy ensures a secure environment for content creation and translation.
Cons
- It offers an offline mode; some features may be limited without an internet connection.
- For new users, the array of features may require some learning, but the intuitive design helps mitigate this.
How to Use Wondershare Virbo to Translate Videos
Wondershare Virbo makes it easy for users to translate their videos into any language, making the content accessible to a broader audience. Here is a quick guide on how to use this best video translator app to your advantage:
Step 1. Launch AI Video Translator on Virbo
To start translating your video using Virbo, install the app on your iOS or Android device. Once you launch Virbo on your smartphone, you must register using your Google or Apple ID. Choose a suitable option or use “Guest Login” from the top-right corner to continue without an ID. Next, launch the app and choose the “AI Video Translator” button from the homepage.

Step 2. Insert Video for Translation
You can follow the prompts present on the screen to upload your files. Keep in mind that the video resolution must be between 480x480 and 1920x1920. Virbo can only translate human voiceovers and cannot translate music or songs in the video, so files with background audio should be avoided.

Step 3. Specify Parameters and Translate Video
On the next window, select the original language of your video and the target language for translation. Virbo allows users to choose from multiple accents and voices. You can also tweak other options, such as keeping the subtitles after translation or keeping the original background music. Tap the “Translate” button, and once your video is generated, use the “Export” option to save it to your device.

Get Started Online Download APP Now Free Download
2. Google Translate
Standing as a beacon of versatility, Google Translate emerges as a leading video audio translator app. It supports a multitude of languages. It goes beyond traditional translation methods, offering real-time translation through the camera. Whether your content is spoken or written, it provides a user-friendly solution for diverse video translation requirements. Available on both Google Play Store and iOS, it ensures accessibility across different platforms, making it a convenient choice for users on various devices.

Features:
- It boasts an extensive language repertoire, supporting a vast array of languages, making it a versatile tool for global content translation.
- It excels in translating written text. Its text translation capabilities are robust and cover a wide range of linguistic nuances.
- A standout feature is the real-time camera translation, enabling users to translate text in images or videos instantly through their device’s camera.
Pros
- It has a user-friendly interface, making it accessible for users with varying levels of technological expertise.
- It eliminates financial barriers, allowing a broad user base to benefit from its language translation features.
- It regularly updates and improves its translation algorithms.
Cons
- It may still face challenges in accurately translating complex or context-specific phrases.
- Its certain features depend on an internet connection, limiting functionality in offline scenarios.
3. Microsoft Translator
In the world of text and voice translation, Microsoft Translator takes the spotlight. This free and accessible tool caters to content creators seeking seamless translation for spoken content in their videos. Its user-friendly interface and wide language support make it a go-to choice for creators of all levels. Available on both Google Play Store and iOS, Microsoft Translator offers a versatile solution for on-the-go translation needs.

Features:
- It boasts an extensive language portfolio, covering a diverse range of languages to facilitate global communication.
- It excels in text and voice translations, providing users with flexibility in how they choose to communicate across language barriers.
- It is designed with a user-friendly interface, ensuring accessibility for users with varying levels of technical expertise.
Pros
- It is recognized for its accurate speech recognition.
- It allows users to translate content directly within familiar Office tools.
- It supports collaborative translation efforts, enabling multiple users to work together on translating content.
Cons
- It may face challenges in achieving the same level of fluency and nuance in translations for all supported languages.
- Some advanced features may depend on a consistent internet connection.
4. SayHi
Venturing into the realm of voice translation, SayHi captures attention with its real-time translation capabilities. Ideal for creators looking for video voice translator app to add voiceovers or dubbing in different languages, it provides a seamless experience for translating spoken words, enriching the audiovisual dimension of your videos. Find it on iOS and Google Play Store for an accessible and versatile translation experience.

Features:
- It specializes in real-time voice translation, allowing users to engage in live conversations and create dynamic multilingual content effortlessly.
- It supports a wide array of languages, enabling users to translate spoken words seamlessly across diverse linguistic contexts.
- It features a user-friendly interface, making it accessible for users of various language proficiency levels and technical expertise.
Pros
- It offers an offline mode, allowing users to download language packs and perform translations without the need for a continuous internet connection.
- It includes a phrasebook feature, enabling users to store commonly used phrases for quick and easy access during conversations.
- Users have the ability to define and customize dialects, enhancing the precision of translations for specific regional or contextual language nuances.
Cons
- It may face challenges in accurately capturing the nuanced complexities of certain languages and dialects.
- Some advanced features may depend on an internet connection, limiting functionality in offline scenarios.
5. iTranslate Converse
iTranslate Converse takes real-time translation to a new level with its intuitive design resembling a messaging app. This innovative approach allows users to engage in natural conversations that are instantly translated. Supporting a plethora of languages, it is a dynamic tool for spontaneous communication, making it a go-to for those seeking seamless interaction. Available on iOS and the Google App Store, it’s the go-to choice for seamless, spontaneous communication.

Features:
- It resembles a messaging app, offering a familiar and user-friendly environment for communication.
- It facilitates natural and fluid conversations with instant translation, enhancing the user experience.
- This app goes beyond text, allowing users to send voice messages that are instantly translated, adding a dynamic and personal touch to conversations.
Pros
- It excels in real-time conversation mode, allowing users to communicate naturally without interruptions.
- The app’s design enhances usability.
- Ideal for spontaneous communication.
Cons
- Some advanced features may require a subscription.
- Like many translation apps, accuracy may be influenced by speech clarity and ambient noise.
6. Papago
Hailing from South Korea, Papago is an acclaimed translation app known for its accuracy and efficiency. Available on the Google App Store, it provides real-time text and voice translation, breaking down language barriers in everyday and business settings. Papago’s commitment to precision makes it a reliable companion for seamless global communication.

Features:
- It accurately captures spoken language and converts it into text, providing users with a seamless and efficient way to communicate across language barriers.
- It is known for its accuracy and efficiency in translating both text and voice.
- It provides a comprehensive range of supported languages, catering to diverse user needs.
Pros
- It incorporates human expertise, adding a nuanced touch to translations that go beyond literal meaning.
- It brings a unique perspective and precision to its translations.
- It offers offline functionality.
Cons
- It may be less known globally compared to some other translation apps.
- The interface may be perceived as more complex for users seeking a simpler design.
Bonus Part. FAQs About Video Translator Apps
- Can free video translator apps be used offline?
While many video translator apps are available today, only a few free apps can work offline. Some free options claim offline video translation, but their accuracy and functionalities might be restricted. Unlike the more comprehensive online selection, free versions may restrict offline translation to a few popular languages. In addition, real-time translation of live videos often requires an internet connection to process them.
- Can free video translator apps handle all types of videos?
Free video translator apps can usually handle a good variety of videos. However, a few limitations may arise at times. Most free apps will likely work with popular video formats like MP4, and some might support fewer common formats. Similarly, free apps may have restrictions on video lengths. They may also struggle with videos with heavy background noise or multiple speakers.
- Are free video translator apps accurate?
The accuracy of free video translator apps is a mixed bag. Usually, accuracy factors depend on the machine-learning abilities of individual apps. Free apps can translate basic sentences with clear audio reasonably well. You can likely grasp the overall idea of a video in a common language with a free translator app.
- How do you translate a video into English?
You can try one of the many video translator apps available today to translate a video into English. In all honesty, the most reliable tool for video translation is Wondershare Virbo. It has all the tools you may need to convert a language into English. Virbo is a quick and easy way to accurately translate videos to and from any language in a few clicks.
Get Started Online Download APP Now Free Download
Conclusion
In the world of digital content creation, breaking language barriers is the key to global engagement. Video translation apps serve as invaluable tools for content creators, enabling them to connect with diverse audiences. From exploring the benefits of the best video translator app to introducing free options like Wondershare Virbo, Google Translate, Microsoft Translator, Subtitle Edit, SayHi, and Amara, this journey has showcased the vast landscape of possibilities.
Get Started Online Download APP Now Free Download
Also read:
- A Guide to Unlock Descript Text-to-Speech Features in Detail
- 2024 Approved The Most Recommended Natural AI Hindi Voice Generator
- Updated 2024 Approved What Is an AI Text Generator?
- Maximize Yandex Translate in Video Translation and Beyond
- New An Exhaustive List of Lip Sync Apps for Vibrant Video Creation for 2024
- Updated A Detailed Review of Murf.ai AI Text-to-Speech Tool for 2024
- How to Make Animated Explainer Videos
- Updated What Is AI Generated Text?
- Updated 2024 Approved Best 10 AI Script Writers to Choose
- Updated Talking Photo Feature for 2024
- In 2024, Transform YouTube Live with These Must-Know Secrets
- Updated In 2024, Cloning Voices With Hugging Face An In-Depth Review
- New In 2024, Top List Best 10 Android & iOS Voice Cloning Apps Selected
- Updated What Is an AI Presentation Maker? | Wondershare Virbo Glossary
- Updated In 2024, Level Up Your AI Streaming Game A Quick Guide and Tool Recommendation
- 2024 Approved Best 8 AI Title Generators for Creating Catchy Titles For All Platform
- New In 2024, Translate Videos Like a Pro with Subtitle Cat Your Essential Guide
- Top 6 Darth Vader AI Generators for All Platforms for 2024
- New Users Guide How To Create Photo Talking Videos With the Best Tools for 2024
- Updated In 2024, How To Convert Video Voice to Text Online for Free?
- Updated Must-Read Learn From Deepfake Scandals & Protect Your Stream
- In 2024, AI Translation | Online
- Easy Tutorial How To Make a Talking Cartoon Video Step-by-Step for 2024
- Updated In 2024, 10 Best Animated Explainer Video Examples
- New 2024 Approved Chrome Video Translator Select the Perfect Platform
- In 2024, Launching Your Live Room
- Updated 2024 Approved AI Script | Wondershare Virbo
- Updated In 2024, How To Translate Videos in Tamil for a Wider Reach
- Updated 2024 Approved AI Voice | Wondershare Virbo Online
- New In 2024, Selected Best 5 YouTube Script Writing AI Customized for You
- New 2024 Approved Top AI Rap Voice Generators Upgrade Your Rap
- How to Create Funny Talking Avatars Using Oddcast Text to Speech Tech for 2024
- Updated In 2024, AI Translation | Online
- New In 2024, Best 10 Animated Explainer Video Examples
- Updated 10 Best Animated Explainer Video Examples
- Updated In 2024, Diverse Template
- Updated 2024 Approved Live Chat With WooCommerce Leading Into the Live Selling World
- Updated Common Platforms
- In 2024, Best Options Top Live Streaming Platforms According to Types
- 2024 Approved Translate Videos Like a Pro with Subtitle Cat Your Essential Guide
- In 2024, Netflix Subtitle Translation Methods Comprehensive Guide
- Remove Device Supervision From your iPhone 15 Plus
- Sign .svd file Online with DigiSigner
- Complete guide for recovering messages files on Find N3
- Recover your photos after Galaxy S23 Tactical Edition has been deleted.
- How to Transfer Text Messages from Samsung Galaxy F15 5G to New Phone | Dr.fone
- In 2024, How to Unlock iPhone XS Max, Apples New iPhone | Dr.fone
- In 2024, The Easy Way to Remove an Apple ID from Your MacBook For your Apple iPhone SE (2022)
- All About Factory Reset, What Is It and What It Does to Your Meizu 21? | Dr.fone
- How to Digitally Sign JPG online free - (Tutorial)
- In 2024, Complete Tutorial to Use GPS Joystick to Fake GPS Location On Vivo Y27s | Dr.fone
- In 2024, How To Change Poco M6 Pro 4G Lock Screen Clock in Seconds
- Title: In 2024, Voice Translation English to Bangla Online and Offline Apps
- Author: Sam
- Created at : 2024-04-17 22:04:11
- Updated at : 2024-04-18 22:04:11
- Link: https://ai-voice-clone.techidaily.com/in-2024-voice-translation-english-to-bangla-online-and-offline-apps/
- License: This work is licensed under CC BY-NC-SA 4.0.
