
:max_bytes(150000):strip_icc():format(webp)/001_how-to-transfer-data-from-ps4-to-ps5-3392eb400af3482fabad65cabb2a1a91.jpg)
In 2024, Top 8 Text-to-Video AI Generators to Produce Video Easily
Top 8 Text-to-Video AI Generators to Produce Video Easily
Following the recent launch of Sora by OpenAI, interest intext-to-video generators has skyrocketed. This AI technology has sparked curiosity among content creators and enthusiasts alike.
This surge in interest is closely tied to the changing preferences of online users, who are increasingly gravitating towards video content for both information and entertainment purposes. With a text-to-video generator, video content production becomes easier and faster.
Here, we will recommend the top text-to-video AI solutions, both free and paid, that can help you harness the power of this cutting-edge technology.
1. Sora by OpenAI

Sora , developed by OpenAI, is a text-to-video generator AI model from the same creators behind ChatGPT. It allows users to input a text prompt, generating a video up to one minute long based on the description provided.
Currently, Sora is only available to a specific group of researchers referred to as the “red team.” These experts are responsible for scrutinizing the model for any possible concerns or problems.
Price: N/A
Pros
- Generating ultra-realistic video up to one minute
Cons
- Not open to the public yet
- Still lack of understanding of how physics work
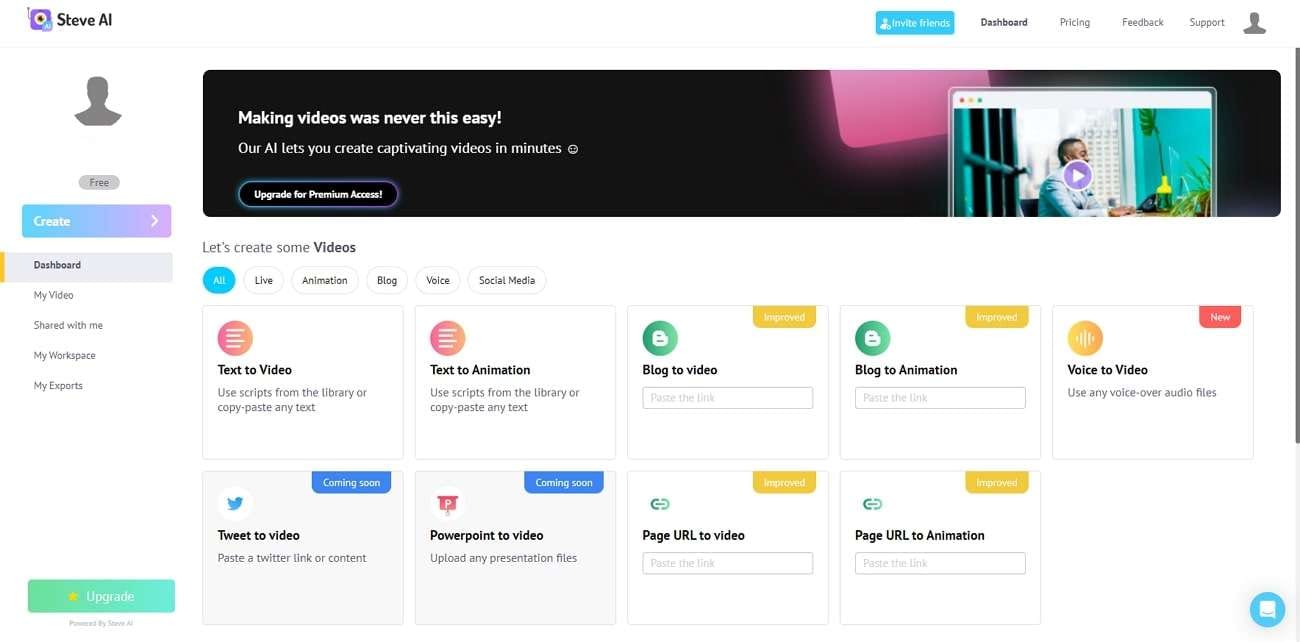
2. Steve AI

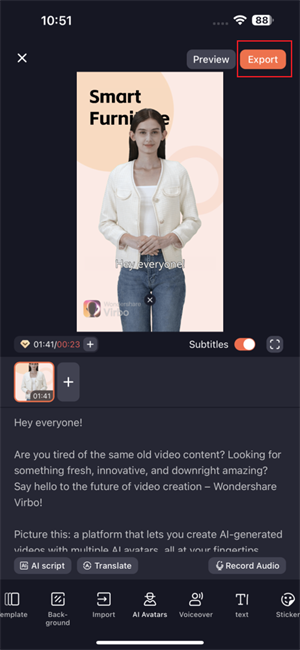
Steve AI is an innovative video-to-text AI generator that is powered by a custom Image generation technology to transform ideas into engaging educational videos. With over three years of data training, Steve AI offers diverse script categories and various video styles to explore.
Steve AI features:
- Turning text into an animation video
- Built-in video editing tools
- Assets that are free to use
- Provide more than 8 video styles
Price: Start from $15/month for the basic plan.
Pros
- Incorporating collaboration tools to produce videos with teams
- Capability to transform blog posts into video content
- Flexibility to select from a range of animation styles and character options
Cons
- Limited choices for advanced users to customize
- The editing screen might seem confusing for beginners
3. Elai.io

If you are looking for atext-to-video AI for free ,Elai could be just what you need. Its text-to-video generator transforms written scripts into dynamic visual content. Moreover, Elai facilitates seamless content repurposing, offering the ability to transform PowerPoint presentations, PDF files, or blog posts into videos within minutes. The platform also provides a built-in editor for personalized video customization.
Elai features:
- Diverse video styles, spanning from infographic-style presentations to animated explainers
- An extensive library of stock media assets to enhance your video
- An auto-voiceover function
- Pre-designed video templates tailored for different social media platforms
Price: Free version available. The subscription plan starts from $12/month.
Pros
- User-friendly interface
- Ability to generate dialogues using AI avatars
Cons
- Not suitable for audio-only voiceovers
- You can’t arrange different video elements precisely using timeline editing
4. Veed.io

Veed.io now also has atext-to-video AI generator tool that enables you to generate videos from text within minutes. Moreover, the platform offers built-in animations, filters, subtitles, and sound effects. It provides the tools to express your creativity in videos across various languages.
Veed.io features
- Basic video editing capabilities such as adding text, music, and images.
- VEED’s selection of filters and effects to enhance the visual quality and appeal of your videos.
- Ability to manually or automatically add subtitles to your videos.
Price: Free version available. The subscription plan starts from $20/month.
Pros
- Veed.io’s interface is simple to navigate and good for beginners
- Ability to add subtitles to your videos
Cons
- Video templates are available for premium users only
- No phone support
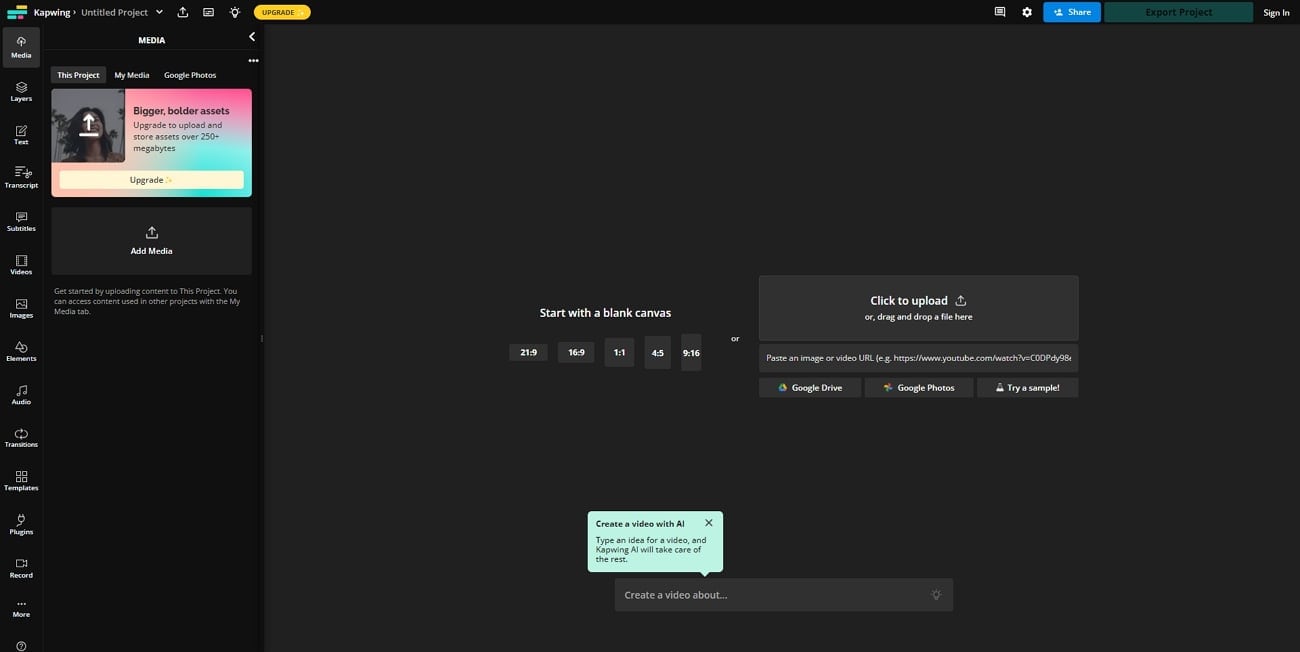
5. Kapwing

Kapwing’s text-to-video generator enables users to transform text of any length into videos. You can also incorporate elements such as stock footage, background music, subtitles, transitions, and additional features. Furthermore, you can edit your AI-generated videos directly within their web browser using Kapwing’s video editor.
Kapwing features
- Built-in video editor
- The “Create Script” tool allows users to generate video scripts from text prompts
- Option to choose output size and text styling
Price: Free version available. The subscription plan starts from $16/month.
Pros
- Ability to export to different video formats
- Various animations and text formatting options
Cons
- Slow video processing
- Occasional glitches and bugs
6. Kaiber AI

Kaiber offers a user-friendly platform enabling creators to craft videos using text prompts, images, and music files. Thistext-to-video maker appeals to a range of users including artists, musicians, marketers, and others. Notably, Kaiber highlights features such as artistic style transfer, audio-reactive visuals, and video storyboarding, enhancing its overall appeal.
Kaiber AI features
- Text and image-to-video generation
- Audio visualization and synchronization
- Control over customizable animations
- Enhanced video quality with 4K upscaling
- Access anywhere via cloud-based platform
Price: Free trial available. The subscription plan starts from $5/month for 300 credits
Pros
- Ability to create music visualizers and art videos
- Easy to use
Cons
- Longer video duration requires higher subscription plans
- Limited fine-grain control
- Potential concerns about style imitation or privacy
7. InVideo.io

Invideo.io stands out as an effective text-to-video generator tool for transforming text into videos effortlessly. With its user-friendly interface and intuitive navigation, crafting short yet striking videos is easy. The platform offers a plethora of pre-designed templates and a vast library of stock photos, catering especially to novices.
InVideo.io features
- Available in mobile apps
- Live chat support
- Collaboration tools
- Extensive library containing videos, stock photos, and music
Price: Free version available. The subscription plan starts from $20/month.
Pros
- Regular updates introduce new templates and features
- Customize and access a range of design features
Cons
- The editor interface may pose difficulties for beginners
- The free plan includes a watermark
8. Stable-diffusion-videos

Stable-diffusion-videos is one of thetext-to-video AI free online tools. This tool is based on Stable Diffusion technology, where users can generate alternative versions of a single prompt or seamlessly transition between different text prompts.
Stable-diffusion-videos features
- Built on Stable Diffusion technology
- Seamless transitions between different text prompts
- Flexibility to generate various iterations of a single prompt
Price: Free
Pros
- Free to use
- Realistic video result
Cons
- Not suitable for beginners
- Interface can be confusing at first glance
- Sign in required
Author’s Verdict
Sora by OpenAI is arguably the most advanced text-to-video generator AI to date. While it can generate ultra-realistic videos, it remains inaccessible to the public for the time being. For those seeking immediate solutions in the absence of access to Sora, several other text-to-video AI platforms offer compelling features and functionalities.
Among these, you might want to check out Steve AI for its innovative approach to transforming text into engaging videos. It provides collaboration tools and offers diverse animation styles for you to choose from. But if you want a text-to-video AI that is free to use, you can try Stable-diffusion-videos and experiment with your prompts.
Bonus: The Best Video-to-Text Tool – Wondershare Virbo
Whiletext-to-video generators allow you to create videos from text, sometimes you might want to do the reverse: extract text from videos. This is where Wondershare Virbo comes into play.
Virbo is widely regarded as one of the best video-to-text tools available. With its advanced algorithms and intuitive interface, it makes the process of transcribing videos easy through itsVideo Translator tool.

Get Started Online Free Download
Some key features of Virbo’s Video Translator tool are:
- Facilitates translation into more than 20 languages.
- Automated transcription and lip-sync capabilities across multiple languages
- Available across different platforms (Android/iOS/Windows/web)
- High accuracy in translating spoken content to written text
This text-to-video AI tool proves invaluable in overcoming language obstacles. It serves as a resource for content creators, businesses, and people who want to engage with diverse global audiences by delivering compelling and localized video content.
Conclusion
The rapid advancement oftext-to-video AI generator technology is revolutionizing content creation and consumption. With innovative tools like Sora by OpenAI leading the way, the potential for generating high-quality video content from simple text prompts is limitless.
While Sora is not accessible to the public yet, a plethora of alternative platforms such as Steve AI, Elai.io, and others offer compelling features to meet diverse needs. Meanwhile, video-to-text AI tools like Wondershare Virbo’s Video Translator further expand the accessibility and versatility of multimedia content creation.
Create AI Avatar Video | Online
Create AI Avatar Videos
To begin crafting your AI avatar video, simply click the “Create Video” button found on the homepage.
Step 1. Create a Project
Click “Create Video” to start creating a new video.
![]()
Create a Project
Choose your preferred video aspect ratio: opt for a landscape or portrait video, depending on your requirements. Then, click on “Create Video.”
![]()
Choose Aspect Ratio
Step 2. Choose Avatar & Voiceover
After entering the user interface, select “Avatars” to choose an AI avatar for your video. Click on the displayed avatar on the screen, and an action bar will appear on the left side, allowing you to customize the style and placement of your video persona.
![]()
Choose Avatar
Input the text you plan to include in the video. You can modify the avatar’s speed, pitch, and volume using the controls displayed on the right-hand side.
![]()
Play Scripts
Step 3. Edit Video
You can also modify the background, select text style, or add adorable sticker to the video.
![]()
Edit Video
Moreover, click on “Music” to select the soundtrack for your video. You can choose from extensive music library and customize the volume to suit your preferences.
![]()
Choose Background Music
Step 4. Export Video
When you’ve achieved the desired video effect, simply click on the “Export” button to generate your video. This straightforward process results in the creation of a brand new video featuring the Virbo AI avatar.
![]()
Export Video
AI Script | Wondershare Virbo Online
AI Script
Virbo’s cutting-edge AI capabilities offer a transformative solution to your copywriting needs. With the prowess of our advanced artificial intelligence, rewriting, translating, and refining your content becomes a seamless and efficient endeavor, alleviating you from the burdensome challenges often accompanying these tasks.
Elevate Your Video Production Game with Virbo
Easy to use, suitable for beginners
AI-generated voices for videos
All-in-one AI Video Generator
Get To Know Our AI Script Feature

Click here to learn more about AI Script >>
AI-generated voices for videos
All-in-one AI Video Generator
Get To Know Our AI Script Feature
Click here to learn more about AI Script >>
AI-generated voices for videos
All-in-one AI Video Generator
Get To Know Our AI Script Feature
Click here to learn more about AI Script >>
AI-generated voices for videos
All-in-one AI Video Generator
Get To Know Our AI Script Feature
Click here to learn more about AI Script >>
AI Script Generator | Virbo Guide
Create videos with an AI script generator
You can complete your video creation using Virbo’s AI Script Generator tool. The specific steps are as follows:
01 Generate your script with AI
Step 1: Add the keywords and basic information for the script you want to prepare. Proceed to the “Key selling points” section for important information in the video.
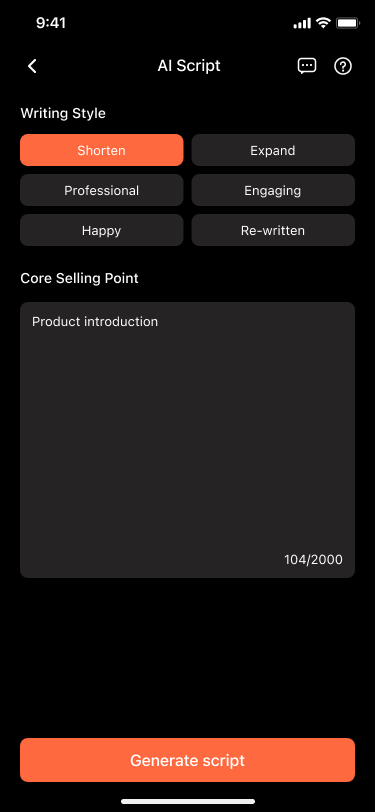
Step 2: After providing all information, select the “Generate script” button on the bottom to start the process.
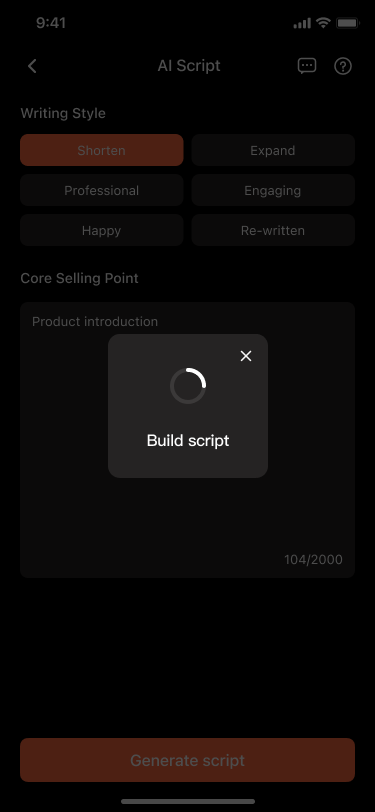
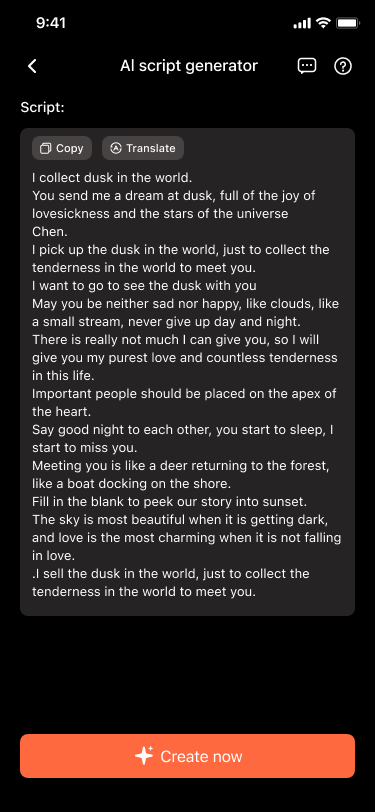
Step 3: It takes time to complete, but once finished, the script will be displayed on the next screen. You can make specific edits to the script as desired. Then, proceed to select the “Create video” button to generate an AI video based on the script.
02 Create AI videos based on the script
Step 1: Upon clicking the “Create video” button, you will be directed to the AI video creation screen, where you can choose your preferred avatar.
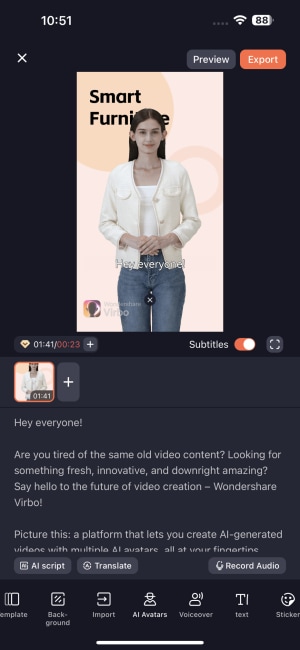
Step 2: At the same time, you can customize the template style, video background, voiceover , and text style. Additionally, you can add stickers and music. If you are satisfied with the result, you can proceed to export the final video.
Note
Please note that free users are limited to exporting videos of up to 30 seconds in duration. Should you exceed this limit, upgrading to the premium version is required to export longer videos.
01 Generate your script with AI
Step 1: Add the keywords and basic information for the script you want to prepare. Proceed to the “Key selling points” section for important information in the video.
Step 2: After providing all information, select the “Generate script” button on the bottom to start the process.
Step 3: It takes time to complete, but once finished, the script will be displayed on the next screen. You can make specific edits to the script as desired. Then, proceed to select the “Create video” button to generate an AI video based on the script.
02 Create AI videos based on the script
Step 1: Upon clicking the “Create video” button, you will be directed to the AI video creation screen, where you can choose your preferred avatar.
Step 2: At the same time, you can customize the template style, video background, voiceover , and text style. Additionally, you can add stickers and music. If you are satisfied with the result, you can proceed to export the final video.
Note
Please note that free users are limited to exporting videos of up to 30 seconds in duration. Should you exceed this limit, upgrading to the premium version is required to export longer videos.
Top AI Video Makers to Create Captivating Videos with Pictures
Do you know that you can create videos by using photos with AI tools? By using AI generators, you can convert your static images into appealing videos. Such tools use advanced methods to add a sense of movement and transitions to produce a video from a photo. This can immensely help you in telling a visual story with a bunch of your photos. Moreover, you would be able to grab viewers’ attention more effectively.
In this article, we will learn about the top-ratedphoto-to-video AI makers. We will also highlight their features that can help you create a professional video easily. Therefore, you can read our well-described guide to produce visually appealing videos using photographs.
Part 1: How AI Photo-to-Video Generators are Revolutionizing the World
Photo-to-video generators are beneficial in many ways. They can easily convert your captured memories to a video within a few seconds. Here are some of the significant advantages ofAI photo-to-video generators.
1. Easy Content Creation
One of the biggest advantages ofAI photo-to-video tools is streamlined content creation. You don’t have to shoot a video from scratch. Instead, you can upload your photos and select a suitable style from the given options. Afterward, the tool will convert your static images into a video in an enhanced way. You can also add captions, stickers, text overlays, and other elements in such AI tools for optimization.
2. Personal and Professional Usage
Photo-to-video AI tools can also benefit you in personal and professional means. For individual usage, you can collect all your precious memories in the form of photographs and convert them into a single video. This can help you in revisiting old memories by simply watching a video.
Furthermore, businessmen and other professionals can advertise their brands with photo-to-video AI makers. They can display their product photos and best-selling features in a video format. Companies can also post such videos on their social media forums to reach their target audience.
3. Education and Learning
There can be certain concepts that need to be explained deeply. To do so, teachers can use diagrams and convert them into a video with an AI tool. This will not only help in grasping viewers’ attention but also make them comprehend the lectures better. Hence, photo-to-video AI makers are vital in educating students by providing them with a visually appealing experience.
4. Entertainment and Media
In the media industry, producers and editors can also experiment with photo-to-video AI makers. This can assist them in enhancing their creativity by using different effects and transitions on such tools. Moreover, they can showcase their innovation in creating animated videos with photo-to-video generators. Hence, photo-to-video AI tools can also make big revolutions in the entertainment field.
Part 2: Top 4 AI Tools to Create High-Quality Videos Using Photographs
Are you eager to know the popularAI photo video makers ? In this section, you can read about the top 4 AI tools that can help you create high-resolution videos with your provided images.
1.Steve AI
Steve AI is a powerful tool for making videos using your uploaded photos. It provides more than 100 templates you can explore for artistic ideas for video creation. Once you have chosen the desired template on this tool, you can upload the photos to its editor. After adding all the desired photographs, this AI tool will instantly create a video clip using your photos.
Moreover, you can customize the color patterns, styles, and themes in the video, preferably. This tool also offers multiple styles to create a video. You can use a blog or text to create a video according to the provided instructions. With AI features, it can make results within 5 seconds.
Main Features
- This tool can create a virtual environment where you can collaborate with your team members. You can also invite your teammates through a link.
- It provides many customizable options for its users. For example, text customization, color themes, and many font styles.
- You can explore its rich media library to get free images from Getty and Pexels. You can also upload your assets to its media library for future use.
2.Nova A.I.
Thisphoto-to-video AI generator can efficiently make stunning videos from still images. This tool allows you to upload files from multiple platforms, such as TikTok, YouTube, etc. While producing a video from the pictures, you can apply filters and effects to make the output more impressive. Furthermore, you can add background music, sound effects, and voiceovers to make the video more captivating.
You can add transitions between the images to make the video more artistic. This tool also has many built-in presets for the transitions that you can easily pick and apply. Hence, Nova A.I. provides all the mandatory elements to make engaging videos.
Main Features
- To describe your video in a better way, you can add subtitles with this tool. It contains an automatic subtitle generator that can save you time and money.
- With AI technology, this tool can also translate the subtitles for you. For translation, you can choose the desired language from the given options.
- It offers a text-to-speech feature that can create voiceovers for you easily. It can produce voiceovers in more than 35 languages with perfect accents.
3. Cutout Photo Animer
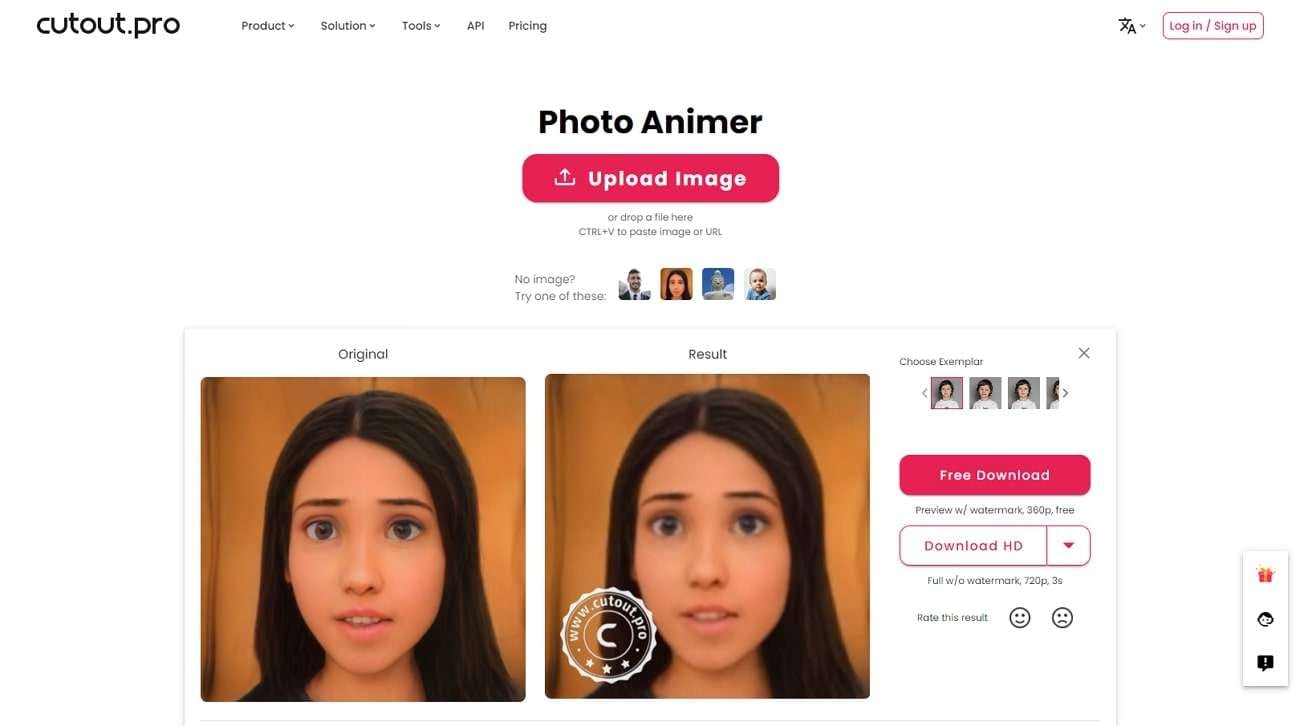
Cutout Photo Animer works professionally in generating videos from pictures. On this tool, you can upload portraits, sketches, paintings, cartoons, and other illustrations to produce a video. You can also enter the URL of the image for uploading effortlessly. With deep learning techniques, it can animate your boring and old photos. By doing so, it can give life to your pictures without decreasing their high quality.
You can also add subtle facial expressions to your static sketches. Furthermore, you can explore and choose a pre-recorded driver for facial movements from the interface of this tool. Hence, thisAI video from photo has the capability of making your photos and illustrations lively.
Main Features
- You can use its auto-enhance feature before animating a picture into a video. This AI feature can be advantageous for old or blurry pictures.
- It can also remove unnecessary objects from your images to clear out all the imperfections. You can also get rid of skin blemishes with this powerful feature.
- With Cutout.pro, you can eradicate unwanted backgrounds from your pictures and videos without using a green screen. Also, this tool does not affect the original quality of your image during the process.
4. Kapwing
Along with images, Kapwing can also convert GIFs into flawless videos. You can also create slideshow-style videos by using multiple images. In its intuitive timeline, you can also specify the duration of each image for the slideshow. This tool supports two common image formats: JPG and PNG. You can also upload the photos directly from Google Drive.
Moreover, you can rearrange their order if you have uploaded multiple images. Kapwing also provides accurate aspect ratios for TikTok (9:16) and YouTube (16:9). Moreover, you can also manually determine your video’s saturation, opacity, and brightness.
Main Features
- If you want to convert your videos into another format, thisAI photo-to-video maker brings an easy solution. With its converter, you can change the file format of your video into MP4, GIF, JPEG, and MP3.
- The smart cut feature on this tool allows you to erase the silent parts from the video automatically. It works 10x faster, unlike other tools.
- From its video resizer, you can change the output size of your video instantly. This feature allows you to resize the video to widescreen and fit square and portrait frames.
Bonus Tip: The Most Efficient and Easy-to-Use AI-Powered Video Editor for All Types of Users
Do you want an all-in-one AI-powered video editor?Virbo is an infamous video creator and editor that can provide impressive results on time. This tool contains over 140 AI avatars that can function as realistic spokespersons in your videos. Each AI avatar has different attire so that it can meet the requirements of your video.
After choosing an AI avatar, you can select an AI voice from more than 120 options. This will help you create a video without hiring actors and voiceover artists. Furthermore, Virbo has a diverse media library of royalty-free assets. From this library, you can use photos, videos, and shapes that can be added to your video.
You can also change the background color of your AI avatar from the provided options. It also has a friendly interface to generate a video effortlessly. Moreover, Virbo is compatible with Windows, iOS, and Android devices. You can also use its online version from any web browser.
Get Started Online Free Download
Main Features
- Pre-Made Templates: Virbo contains many pre-designed templates distinguished by categories. By exploring each category, you can find your desired video template easily.
- AI Voices and Languages: It supports more than 120 AI voices and languages. Through this feature, you can generate voiceovers for your video professionally.
- Editable Voiceovers: You can also edit the voiceover according to your desire. From the sliders, you can change volume, speed, and pitch easily.
- Customizable Options: Virbo offers many options for personalization. Along with changing the background of your video, you can add graphic text designs and stickers to your videos.
The Closing Words
Photo-to-video AI tools are being widely used in many fields. These tools can make your tedious pictures into a lively video within seconds. You can add transitions, filters, and effects to make the video compelling. You can also use Virbo to produce videos in the desired avatars and voiceovers. Thus, this article has provided all the details to help you convert images into flawless videos.
Best YouTube Video Into Text Converters
We all are familiar with YouTube, and it wasn’t long ago when it introduced captions for videos. These captions assisted as subtitles and were great for making content inclusive. However, about accuracy, YouTube’s inbuilt feature wasn’t the best fit. An advanced method of adding captions is to convert YouTube videos into text .
Editors can use many online and desktop tools totranslate YouTube videos into text . They bring accuracy via automatic speech recognition (ASR) and natural language processing (NLP). They provide content access on a broader level, help with SEO ranking and more. This article discusses the leading tools for this purpose and their importance.
Part 1. What is The Breakdown of a Perfect Translated Document?
A factor to consider whentranslating YouTube videos into text is precise translation. The flawless interpretation of speech is important to maintain the essence of video. While translating, it should keep the style, intent, cultural and ethical content norms. This section will elaborate on the factors that form the basis of a good, translated document:
- Precision and Uniformity: There are no grammatical or factual errors in the translation. The tool must maintain the context and essence of the content. The translation should be natural while avoiding any awkward encounters. Moreover, the tone and writing style should be consistent throughout the document.
- Cultural Boundaries: The tone or words must not violate cultural norms and ethics. Some cultures are sensitive to specific content, while to some, it is no big deal. Hence, the translator should have background information on target cultures.
- Relevant Jargon and Expressions: Vast training data helps comprehend the content better. This involves the use of industry-specific jargon and terminologies. In addition, idiomatic expressions also elevate content and attract target audience.
- Proofread and Finalized: It can bring clarity through well-structured and well-managed sentences. Another way of maintaining clarity is by correcting grammatical and spelling errors. The translated content must be proofread and well-formatted to rule out any mistakes. Using headings, sub-headings, bullet points, and formatting elements does the trick.
- Uphold Local Standards: To relate with the audience, adopting the local language is important. The translator must gather some insights into regional or cultural norms. This will help in the translation of content in an effective and preferred way.
- Legal and Ethical Boundaries: Upholding legal and ethical boundaries is important in all documents. If the video contains any medical records, it is essential to keep them confidential. In case of sensitive information, a translator must follow legal and ethical considerations.
- Requirements and Review: To achieve perfection, try finding a native translator for proofreading. The translator should follow any specific instructions provided by the client. This covers word count, file format, or reference materials. Besides, deadlines should be followed in handling translation to clients. Through the process, the translator must uphold communication with the client.
Part 2. What Should a Good Video-to-Text Converter Contain?
There are many features to consider in a goodconvert YouTube video into text tool. A premium video converter must have an automatic speech recognition (ASR) system. It should also analyze and comprehend human language. Here are the essential components of a decentconvert YouTube video into text tool:
1. High Accuracy and Adaption
The translation tool should have advanced technology working at the back end. The technology must ensure high accuracy and adaption to new information. Maintaining accuracy is important to maintain the right meaning of content. The software must be capable of recognizing and adapting new languages and phrases.
2. Multilingual Provision
YouTube content is not bound to specific regions, as anyone can access it. Hence, the translation tool must be compatible with multiple languages. This not only provides global access to content but also increases its reach.
3. Multi-Speech and Timestamps Identification
The tool toconvert YouTube videos into text must have high recognition abilities. This helps with podcasts or videos with multiple speakers. In such cases, a good tool will recognize these voices and transcribe them separately. In addition, the tool should be able to identify specific time lapses of speech. It makes it convenient to align and find the transcript with the video.
4. Text Formatting and Correction
Thesetools to translate YouTube videos into text should maintain the text’s format. There should be room for accuracy and alignment. The tool must automatically add punctuation marks, capitalization, and rearrange text.
5. Live Transcription
The tool you are using must be efficient enough to transcribe speech as it happens. News and Broadcasting channels, seminars, and live webinars benefit from it. It helps people comprehend content better with readable captions and more.
6. Noise Recognition and Advancements
The system should be able to detect background noises and adapt to different acoustics. It should detect and eliminate the background noises instead of transcribing them. In addition, it should keep upgrading to adapt to evolving language patterns.
7. API Integration and Editing Options
The translator tool must offer an application programming interface (API) for broader access. This will enable the tool’s integration into various software and applications. In addition, it should offer editing options afterward, like eliminating or adding text.
8. Multiple Files and Format Support
This tool must support multiple input and output formats for both audio and video. In addition, it should keep upgrading and adding popular and new formats. Moreover, it must be able to handle work at a larger scale via batch processing. Batch processing allows one to cope with work pressure by transcribing many files at a time.
Part 3: Top-Rated YouTube Video to Text Converters
Let’s move forward while remembering an idealtranslate YouTube videos into text tool. In this section of the article, we’ll explore some cutting-edge tools. Theseconvert YouTube videos into text-free tools are influencing the industry. Without further delay, find the advantages and disadvantages of these tools here:
1. VEED.io
Toconvert YouTube videos into text online, VEED.io provides the right platform. Users can transcribe a video in 100 languages with appropriate terminologies. Content creators on YouTube can make their content searchable via transcription. Transcriptions extracted from this tool are accurate and proofread. Its ability to provide multilingual transcripts helps in learning other conversational languages.

Key Features
- With its timeline editing interface, it makes adding and manual subtitles easy.
- Users can upload a pre-existing subtitle file to translate it into other languages.
- Supports multiple input and output text formats like SRT, VTT, and more.
2. Flixier
Being a content writer is tiring, and listening to a complete YouTube video to transcribe adds to it. You canconvert YouTube videos into text-free or upload the subtitles for it. The editing interface is simple and accessible to anyone with or without experience. Its high-end ASR technology and algorithms add accuracy to your content. To employ this tool, there is no need to download or subscribe to any plans.

Key Features
- Avoid the process of downloading a YouTube video and start by copy-pasting a link.
- From the transcribed text, you can generate voiceovers in other languages.
- You can avail the option of the manual script option or edit the video afterward.
3. Happy Scribe
If you want totranslate YouTube videos into text using the latest technology, this is your tool. With its multilingual support and high accuracy, it crafts professional transcripts. Once you enter its editing interface, creating a transcript is an easy process. The process is straightforward: login and choose the option to start transcribing.

Key Features
- You can import a YouTube video from a device, URL, Google Drive, and more.
- With its Glossary feature, you can search for specific words or jargon to ensure their accuracy.
- The tool can create and add typical subtitles or translated subtitles to your videos.
4. Rask AI
Exploring tools toconvert YouTube videos into text free while retaining its integrity? Then, this is the most accessible and vast tool for that purpose. It qualifies to maintain the cultural and grammatical accuracy of content. In addition, the tool masters in transcribing a YouTube video in 60+ languages. Moreover, it has tailored the user interface according to content and user preferences.

Key Features
- You can transform a transcript into various text formats within this tool.
- It enriches your content’s SEO through searchable transcripts and subtitles.
- The tool can turn transcribed text into Google Docs and configure it afterward.
5. Maestra
Do you want to increase your YouTube content reach and broaden your channel? Then thistranslates YouTube video into text tool is at your rescue. The tool not only transcribes video but also generates captions and adds them to your video. Along with being a transcriber, it acts as a translator too. With its multilingual support, it generates multi-language captions for YouTube videos.

Key Features
- Boosts productivity by enabling you to add a YouTube video link for transcription.
- Users can elevate the auto-generated transcript afterward and export it to multiple formats.
- It saves time, boosts SEO ranking, and enhances accessibility in all environments simultaneously.
6. 360converter.com
This is one of the most straightforward tools toconvert YouTube videos into text-free . Users can start by accessing the tool and pasting a YouTube video URL. For enhanced and efficient transcriptions, users can also employ its offline version. The tool not only saves time through rapid conversion but also proofreads the content.

Key Features
- Users can search for specific words pre-transcription for accurate conversion.
- The offline tool saves time and maximizes productivity by supporting batch transcription.
- It also qualifies as a real-time transcription tool for maximum accessibility.
7. Notta
Maximize your YouTube content’s organic reach using this online converter named Notta. It transcribes your text, which you can later use to make your content searchable. In addition, the tool provides 98.86% accurate transcribed results in just 3 steps. With its cutting-edge algorithms, it can transcribe hours-long videos in 5 minutes. The tool can be accessed across platforms to ensure synchronized working.

Key Features
- With its expertise, you can upload multiple formats of audio and video content.
- To use Notta as a learning opportunity, you can transcribe a text in 104 languages.
- It employs high-end security systems to ensure your data’s privacy and safety.
8. Kapwing
Use this tool to transcribe a pre-posted YouTube video or a video you are going to post. This tool can transcribe a video using a URL, Google Drive, and Google Photos. With thistranslate YouTube video-to-text tool, transcribe a video without errors. The tool automatically eliminates grammatical or spelling mistakes.

Key Features
- Along with transcribing YouTube videos, it can attach captions in it.
- Convert YouTube video into text in multiple text format support like SRT, TXT, or VVT.
- Users can also transcribe videos from other social platforms like LinkedIn.
Part 4: How to Translate Youtube Video?
While discussingconverting YouTube videos into text free , let’s see an alternative.Wondershare Virbo is the best alternative powered by AI to serve multiple purposes. With its specialized AI capabilities, it can create avatars, voiceovers, and scripts. What makes it unique is its seamless accessibility across platforms like Windows, Android, and more.
Wondershare Virbo – Video Translator Innovation
One of the notable integrations of this tool is its Video Translator feature. This tool facilitates users toconvert YouTube videos to text or captions. The tool cannot transcribe a video. However, it can generate subtitles in the chosen language. It supports video translation and subtitle generation in 20+ languages.
Moreover, users can translate a video into other languages using the original video voice. For now, this feature supports time durations ranging from 10 seconds to 5 minutes. Users have the flexibility to experiment with the background settings of their videos within this feature.
Steps to UseVirbo ’s Video Translator Feature
Let’s move forward now that you are aware of this tool and its amazing feature that concerns us. In this section, the focal point will be accessing and employing this feature. Following are the steps totranslate YouTube videos into text within this software:
Translate Video Online Download APP Now Free Download
Step 1: Access Tool and Lead into Video Translate Feature
On accessing Virbo Online, hit the “Video Translator” button under the “More AI Tools” section.

Step 2: Adjust Video Translation Settings After Video Upload
Upload your desired video after accessing the “Video Translator” window. Next, you have to choose the original and translated language for translation. Enable the “Proofread Video Script,” “Lip Sync,” and “Subtitle” options. After completing all these settings, click on the Translate the Video button.

Step 3: Finish the Video Translation After Proofreading Subtitles
Afterward, a new window with translated subtitles will appear on your screen. On this window, rectify any mistakes in the translated text. And you can also copy the original/translated video script. Finally, hit the “Translate Video” button to translate the video.

Translate Video Online Download APP Now Free Download
Conclusion
Boosting YouTube content and elevating your career as a content creator is now possible. Users canconvert YouTube videos into text using the above-mentioned tools. These tools are easy to employ and have multiple options other than this. An alternative tool to generate captions in multiple languages is Virbo.
It automatically adds captions and voiceovers to broaden the accessibility of your content. All in all, the tool is a good catch in the realm of these converters. We recommend you try this accurate and productive tool totranslate YouTube videos into text .
Translate Video Online Download APP Now Free Download
Launching Your Live Room
Launching Your Live Room
Explore step-by-step instructions on decorating your space, uploading local images and videos, adding engaging AI interactions, etc. Elevate your streaming experience and captivate your audience with a seamlessly executed live room. Dive into our comprehensive guide now!
02Uploading Local Images and Videos
07AI Intelligent Script Generation
11Starting/Ending the Live Broadcast
Decorating Your Live Room
Decoration Guidance
- Click on the product homepage and create a blank live room to initiate a new live session.

Create a blank live room
- Upon creating a blank live room, the live room editing page will open. The left side serves as the operation area, the right side as the canvas area, and the materials area is located above.

Livestream room navigation
- Click on the templates to use pre-designed combinations of background, virtual hosts, and stickers.

Select a template
- Customize the background from the background library. During the live broadcast, only one background can be used.

Livestream room customization
- Choose a virtual host from the virtual host library. Only one virtual host can be used during the live session.
![]()
Choose a virtual host
- Add stickers from the sticker library. Multiple stickers can be used during the live broadcast.
- After selecting materials, adjust their position and size in the canvas area. Right-click to modify layers, copy, or delete materials.
Uploading Local Images and Videos
Upload background images or videos
- Upload: Click Background -> Upload Background -> Select file to upload. Materials will be displayed in “My Background” after uploading.

Upload Background
- Apply: Click Background -> My Background, then click on the material to use it on the canvas.
- Delete: Hover over the material and click the delete icon to remove it.

Delete Background
Note
Background upload requirements:
- Image and video dimensions should be 9:16
- Image formats: JPG/JPEG/PNG
- Video formats: MP4/MOV
- Resolution should not exceed 1080P
- Video duration should not exceed 30 minutes
- File size should not exceed 1GB
Upload sticker images or videos
- Upload: Click Sticker -> Upload Sticker -> Select file to upload. Materials will be displayed in “My Sticker” after uploading.

Upload Sticker
- Apply: Click Sticker -> My Sticker, then click on the material to use it on the canvas.
- Delete: Click Sticker -> My Sticker, hover over the material, click the delete icon to remove it.

Delete Sticker
Note
Sticker upload requirements:
- Image and video dimensions are flexible.
- Image formats: JPG/JPEG/PNG
- Video formats: MP4/MOV
- Resolution should not exceed 1080P
- Video duration should not exceed 30 minutes
- File size should not exceed 1GB
Text-Driven Live Room
Script Guidance
- Input script text: Copy and paste your script into the script dialogue box.

Text Scripts Inset
- Choose a matching tone: Click the voice-over entrance above, select a suitable tone, and preview it.
- Preview: Click the “Preview” button below the text to listen.
Audio-Driven Live Room
Audio Guidance
- Upload audio: Click Script -> Audio -> Upload local voice and upload the local file.

Upload Audio
- Preview audio: After uploading, click to preview the audio.

Preview Audio
- Audio sorting: Hold and drag to sort the audio files.
Audio sorting
- Audio sorting: Hold and drag to sort the audio files.

Modifying Live Room Name
Method Guidance
- Method 1: Click the edit button in the upper-left corner of the edit page to rename the live room.

Rename Livestream Room
- Method 2: Product homepage -> My Live Rooms -> Click on the more options for an individual live room -> Choose Rename.
Adding AI Identification
Step Guidance
- On the live room editing page, click on the checkbox before the AI identification to enable or disable it.
AI Intelligent Script Generation
Generation Guidance
- Click the “AI Intelligent Script” button below the script, a popup will appear.
- Enter your product name (mandatory), selling points (optional), promotional information (optional), select language and style, then click generate.

AI Script
- The generated result can be further modified, click “Use” to add it to the script dialogue box.
AI Translation
Translation Guidance
- Click the “AI Translation” button below the script, a popup will appear.
- Place the text to be translated on the left, click the middle arrow to select the language for translation (e.g., English), and click translate.

AI Translation
- The generated result can be further modified, click “Use” to add it to the script dialogue box.

AI Translation Result
Manual Interaction
Microphone Interaction
- Operational Flow:
- Click Manual Interaction -> Microphone, and select the microphone device.
- Speak into the microphone and observe the sound wave status.
- Open “Start Live,” wait for the appearance of the virtual host image, and click “Open Mic Takeover.” The virtual host’s mouth will be closed, and your voice will drive the virtual host to speak.
- After speaking, click “End Takeover,” and the virtual host will resume reading the scripted dialogue.
- Click Manual Interaction -> Microphone, and select the microphone device.
- Grant Browser Microphone Access:
- Google Chrome:
*Open Chrome, click the settings icon in the top right.
* Click “Settings,” open the settings page. Select “Privacy and Security” and then click “Site Settings.”
*Enter the site settings page, click “Microphone.”
* On the microphone authorization page, select that the site can request the use of your microphone.
* After these settings, when the browser needs to use the camera or microphone, a device request box will pop up on the page. Select “Allow.” - Mozilla Firefox:
*Open Firefox, click the settings icon in the top right, and click “Settings.”
* Open the settings page, click “Privacy & Security,” and find “Microphone Permissions.” Click “Settings” next to “Microphone.”
*Enter the settings page, add the site that requests the use of your microphone to the list, and click “Save Changes.”
* After these settings, when the browser needs to use the camera or microphone, a device request box will pop up on the page. Select “Allow.” - Sogou Browser:
*Open Sogou Browser, click the settings icon in the top right, and click “Options.”
* Open the options page, click “Advanced,” find “Privacy - Browsers on the Mac System:
*Locate “System Preferences” on your Mac dock and click the icon. Once opened, find “Security & Privacy” and click to open.
* On the “Security & Privacy” page, select “Privacy,” then click on “Microphone” and set the applications that need to use the microphone to “Allow.”
- Google Chrome:
Text Interaction
- Click on “Artificial Interaction” and enter interaction scripts in the input box below.
- Click “Add Text” to add it to the interaction list. After starting the live broadcast, each interaction script will have a send button.

Text Interactionn
- Click “Send” to trigger the AI to speak according to the interaction script.
Intelligent Interaction
Note
The current intelligent interaction feature only supports Alibaba International. If you are streaming on other platforms, you can skip this step.
Setting Entrance
- On the live broadcast page, click on “Intelligent Interaction,” select the live platform, and the supported intelligent interaction features will be randomly displayed.
Q&A Library Settings
- Creating a New Q&A:
- On the product homepage, click on Q&A Library - Add Q&A, and a popup window will appear.
- Fill in the rule name, keywords, reply text, and upload a reply video. Click Save.
Note
Rule Name: Name the rule for easy identification.
Keywords: If a viewer’s question in the live room contains any of these keywords, it will trigger the AI to answer.
Reply Content: You can add up to 5 replies. Include variables like [Viewer’s Nickname] and [Viewer’s Country] for personalized responses.
Sequential Reply: Replies in sequence when triggered.
Random Reply: Randomly selects a reply when triggered.
Reply Video: If configured, the video will be displayed at the specified position until the AI’s reply ends.
- Adjusting Q&A Activation Status:
- Click Q&A Library - Switch to close or open the Q&A rule. When closed, the Q&A rule will not take effect after the live broadcast starts.
- Turning on Q&A Library Switch in the Live Room:
- On the live broadcast editing page, click Intelligent Interaction - Platform, select “Alibaba International,” and turn on the Q&A Library switch. This must be done after starting the live broadcast and capturing the barrage for the function to work.
Greeting Rules Settings
- Greeting Content: You can add up to 5 replies, including variables like [Viewer’s Nickname] and [Viewer’s Country].
- Sequential Reply: Replies in sequence when triggered.
- Random Reply: Randomly selects a reply when triggered.
- On the live broadcast editing page, click Intelligent Interaction - Platform, select “Alibaba International,” turn on the Greeting switch, and click the edit icon to open the editing window. Fill in the reply text and click Save.
Sending Business Cards and Product Catalogs
- On the live broadcast editing page, click Intelligent Interaction - Platform, select “Alibaba International,” turn on the “Send Business Cards” switch, and turn on the “Send Product Catalogs” switch.
Note
These functions will only take effect after starting the live broadcast and capturing the barrage.
How to Start Live Barrage Capture
- Start Broadcasting in Virbo Live
- Follow the steps for “Start/End Broadcast” on the live broadcast editing page.
- Install the Plugin in Chrome
- Ensure Chrome is up to date, then download the plugin from the provided link . After downloading, unzip locally.
- Configure the Plugin in Chrome
- Open Chrome, go to Settings - Extensions - Manage Extensions, enable Developer mode, click “Load Unpacked,” and select the unzipped folder. Enable “Allow in incognito mode” in the plugin details.
- Copy the Live Control Page Link
- Copy the link of your live control page (web version) from the live platform. Paste the link into the live broadcast editing page under Intelligent Interaction - Live Room Link Input, then click “Start Capturing.”
Note
Alibaba International currently supports automatic Q&A, automatic greetings, automatic business card sending, and automatic product catalog sending. You can turn on the corresponding switches and then configure the detailed settings for each item.
Starting/Ending the Live Broadcast
Starting the Live Broadcast
- On the live broadcast editing page, click “Start Broadcasting.”
- The AI live broadcast window will appear shortly after, displaying the AI live broadcast.
Using Your Broadcasting Partner or OBS
Note
Keep the AI live broadcast window open on the desktop during the broadcast, or it will not broadcast properly.
- Open your broadcasting partner or OBS, add a window, select the Wondershare VVB (Live Version) live window.
- Click “Start Broadcasting.” Use Alt + mouse to crop out the web bar or use the zoom function to remove it.
- During the live broadcast, you can only modify the “Artificial Interaction” function; other broadcast settings cannot be changed.
Ending the Broadcast
- When concluding the live broadcast, initiate the termination of the live stream on the platform’s broadcasting partner first, followed by clicking the “End Live” button on Virbo Live to finalize the shutdown process.
02Uploading Local Images and Videos
07AI Intelligent Script Generation
11Starting/Ending the Live Broadcast
Decorating Your Live Room
Decoration Guidance
- Click on the product homepage and create a blank live room to initiate a new live session.
Create a blank live room
- Upon creating a blank live room, the live room editing page will open. The left side serves as the operation area, the right side as the canvas area, and the materials area is located above.
Livestream room navigation
- Click on the templates to use pre-designed combinations of background, virtual hosts, and stickers.
Select a template
- Customize the background from the background library. During the live broadcast, only one background can be used.
Livestream room customization
- Choose a virtual host from the virtual host library. Only one virtual host can be used during the live session.
![]()
Choose a virtual host
- Add stickers from the sticker library. Multiple stickers can be used during the live broadcast.
- After selecting materials, adjust their position and size in the canvas area. Right-click to modify layers, copy, or delete materials.
Uploading Local Images and Videos
Upload background images or videos
- Upload: Click Background -> Upload Background -> Select file to upload. Materials will be displayed in “My Background” after uploading.
Upload Background
- Apply: Click Background -> My Background, then click on the material to use it on the canvas.
- Delete: Hover over the material and click the delete icon to remove it.
Delete Background
Note
Background upload requirements:
- Image and video dimensions should be 9:16
- Image formats: JPG/JPEG/PNG
- Video formats: MP4/MOV
- Resolution should not exceed 1080P
- Video duration should not exceed 30 minutes
- File size should not exceed 1GB
Upload sticker images or videos
- Upload: Click Sticker -> Upload Sticker -> Select file to upload. Materials will be displayed in “My Sticker” after uploading.
Upload Sticker
- Apply: Click Sticker -> My Sticker, then click on the material to use it on the canvas.
- Delete: Click Sticker -> My Sticker, hover over the material, click the delete icon to remove it.
Delete Sticker
Note
Sticker upload requirements:
- Image and video dimensions are flexible.
- Image formats: JPG/JPEG/PNG
- Video formats: MP4/MOV
- Resolution should not exceed 1080P
- Video duration should not exceed 30 minutes
- File size should not exceed 1GB
Text-Driven Live Room
Script Guidance
- Input script text: Copy and paste your script into the script dialogue box.
Text Scripts Inset
- Choose a matching tone: Click the voice-over entrance above, select a suitable tone, and preview it.
- Preview: Click the “Preview” button below the text to listen.
Audio-Driven Live Room
Audio Guidance
- Upload audio: Click Script -> Audio -> Upload local voice and upload the local file.
Upload Audio
- Preview audio: After uploading, click to preview the audio.
Preview Audio
- Audio sorting: Hold and drag to sort the audio files.
Audio sorting
- Audio sorting: Hold and drag to sort the audio files.
Modifying Live Room Name
Method Guidance
- Method 1: Click the edit button in the upper-left corner of the edit page to rename the live room.
Rename Livestream Room
- Method 2: Product homepage -> My Live Rooms -> Click on the more options for an individual live room -> Choose Rename.
Adding AI Identification
Step Guidance
- On the live room editing page, click on the checkbox before the AI identification to enable or disable it.
AI Intelligent Script Generation
Generation Guidance
- Click the “AI Intelligent Script” button below the script, a popup will appear.
- Enter your product name (mandatory), selling points (optional), promotional information (optional), select language and style, then click generate.
AI Script
- The generated result can be further modified, click “Use” to add it to the script dialogue box.
AI Translation
Translation Guidance
- Click the “AI Translation” button below the script, a popup will appear.
- Place the text to be translated on the left, click the middle arrow to select the language for translation (e.g., English), and click translate.
AI Translation
- The generated result can be further modified, click “Use” to add it to the script dialogue box.
AI Translation Result
Manual Interaction
Microphone Interaction
- Operational Flow:
- Click Manual Interaction -> Microphone, and select the microphone device.
- Speak into the microphone and observe the sound wave status.
- Open “Start Live,” wait for the appearance of the virtual host image, and click “Open Mic Takeover.” The virtual host’s mouth will be closed, and your voice will drive the virtual host to speak.
- After speaking, click “End Takeover,” and the virtual host will resume reading the scripted dialogue.
- Click Manual Interaction -> Microphone, and select the microphone device.
- Grant Browser Microphone Access:
- Google Chrome:
*Open Chrome, click the settings icon in the top right.
* Click “Settings,” open the settings page. Select “Privacy and Security” and then click “Site Settings.”
*Enter the site settings page, click “Microphone.”
* On the microphone authorization page, select that the site can request the use of your microphone.
* After these settings, when the browser needs to use the camera or microphone, a device request box will pop up on the page. Select “Allow.” - Mozilla Firefox:
*Open Firefox, click the settings icon in the top right, and click “Settings.”
* Open the settings page, click “Privacy & Security,” and find “Microphone Permissions.” Click “Settings” next to “Microphone.”
*Enter the settings page, add the site that requests the use of your microphone to the list, and click “Save Changes.”
* After these settings, when the browser needs to use the camera or microphone, a device request box will pop up on the page. Select “Allow.” - Sogou Browser:
*Open Sogou Browser, click the settings icon in the top right, and click “Options.”
* Open the options page, click “Advanced,” find “Privacy - Browsers on the Mac System:
*Locate “System Preferences” on your Mac dock and click the icon. Once opened, find “Security & Privacy” and click to open.
* On the “Security & Privacy” page, select “Privacy,” then click on “Microphone” and set the applications that need to use the microphone to “Allow.”
- Google Chrome:
Text Interaction
- Click on “Artificial Interaction” and enter interaction scripts in the input box below.
- Click “Add Text” to add it to the interaction list. After starting the live broadcast, each interaction script will have a send button.
Text Interactionn
- Click “Send” to trigger the AI to speak according to the interaction script.
Intelligent Interaction
Note
The current intelligent interaction feature only supports Alibaba International. If you are streaming on other platforms, you can skip this step.
Setting Entrance
- On the live broadcast page, click on “Intelligent Interaction,” select the live platform, and the supported intelligent interaction features will be randomly displayed.
Q&A Library Settings
- Creating a New Q&A:
- On the product homepage, click on Q&A Library - Add Q&A, and a popup window will appear.
- Fill in the rule name, keywords, reply text, and upload a reply video. Click Save.
Note
Rule Name: Name the rule for easy identification.
Keywords: If a viewer’s question in the live room contains any of these keywords, it will trigger the AI to answer.
Reply Content: You can add up to 5 replies. Include variables like [Viewer’s Nickname] and [Viewer’s Country] for personalized responses.
Sequential Reply: Replies in sequence when triggered.
Random Reply: Randomly selects a reply when triggered.
Reply Video: If configured, the video will be displayed at the specified position until the AI’s reply ends.
- Adjusting Q&A Activation Status:
- Click Q&A Library - Switch to close or open the Q&A rule. When closed, the Q&A rule will not take effect after the live broadcast starts.
- Turning on Q&A Library Switch in the Live Room:
- On the live broadcast editing page, click Intelligent Interaction - Platform, select “Alibaba International,” and turn on the Q&A Library switch. This must be done after starting the live broadcast and capturing the barrage for the function to work.
Greeting Rules Settings
- Greeting Content: You can add up to 5 replies, including variables like [Viewer’s Nickname] and [Viewer’s Country].
- Sequential Reply: Replies in sequence when triggered.
- Random Reply: Randomly selects a reply when triggered.
- On the live broadcast editing page, click Intelligent Interaction - Platform, select “Alibaba International,” turn on the Greeting switch, and click the edit icon to open the editing window. Fill in the reply text and click Save.
Sending Business Cards and Product Catalogs
- On the live broadcast editing page, click Intelligent Interaction - Platform, select “Alibaba International,” turn on the “Send Business Cards” switch, and turn on the “Send Product Catalogs” switch.
Note
These functions will only take effect after starting the live broadcast and capturing the barrage.
How to Start Live Barrage Capture
- Start Broadcasting in Virbo Live
- Follow the steps for “Start/End Broadcast” on the live broadcast editing page.
- Install the Plugin in Chrome
- Ensure Chrome is up to date, then download the plugin from the provided link . After downloading, unzip locally.
- Configure the Plugin in Chrome
- Open Chrome, go to Settings - Extensions - Manage Extensions, enable Developer mode, click “Load Unpacked,” and select the unzipped folder. Enable “Allow in incognito mode” in the plugin details.
- Copy the Live Control Page Link
- Copy the link of your live control page (web version) from the live platform. Paste the link into the live broadcast editing page under Intelligent Interaction - Live Room Link Input, then click “Start Capturing.”
Note
Alibaba International currently supports automatic Q&A, automatic greetings, automatic business card sending, and automatic product catalog sending. You can turn on the corresponding switches and then configure the detailed settings for each item.
Starting/Ending the Live Broadcast
Starting the Live Broadcast
- On the live broadcast editing page, click “Start Broadcasting.”
- The AI live broadcast window will appear shortly after, displaying the AI live broadcast.
Using Your Broadcasting Partner or OBS
Note
Keep the AI live broadcast window open on the desktop during the broadcast, or it will not broadcast properly.
- Open your broadcasting partner or OBS, add a window, select the Wondershare VVB (Live Version) live window.
- Click “Start Broadcasting.” Use Alt + mouse to crop out the web bar or use the zoom function to remove it.
- During the live broadcast, you can only modify the “Artificial Interaction” function; other broadcast settings cannot be changed.
Ending the Broadcast
- When concluding the live broadcast, initiate the termination of the live stream on the platform’s broadcasting partner first, followed by clicking the “End Live” button on Virbo Live to finalize the shutdown process.
Also read:
- Updated Top 10 AI Subtitle Translators for Content Creators That Anyone Can Use
- Updated In 2024, Top 5 AI YouTube Shorts Generators to Create Diverse and Engaging Videos
- New 2024 Approved What Is AI Voice Text to Speech?
- Live Commerce Success Stories Lessons Learned & Predictions for the Future for 2024
- What Is an AI Voice Generator?
- New 2024 Approved Top 7 Video Language Converter Online Free
- New In 2024, 12 Must-Try Best Voice Cloning Tools to Use
- Updated 2024 Approved A Comprehensive Guide for Free Video Translator Downloading
- 2024 Approved How to Create Marketing Videos?
- In 2024, What Are AI Tools?
- What Is AI Influencer? | Wondershare Virbo Glossary for 2024
- Updated Unlocking Global Audiences Top Video Language Converters for 2024
- Top 5 Best Tools to Convert Text to Audio Online for Free for 2024
- Updated In 2024, The Best Text-to-Video AI Generator Tools Alternative to Sora
- 2024 Approved Top 10 AI Script Writers to Choose
- Talkshoplive Reviews & Pro Tips Is This the Live Commerce Tool You Need, In 2024
- In 2024, Exploring the Magic of AI Selfie Generators
- In 2024, The Ultimate Guide to B2B Video Marketing
- A Guide to Unlock Descript Text-to-Speech Features in Detail for 2024
- Updated What Is an AI Video Editor? | Wondershare Virbo Glossary for 2024
- 2024 Approved A Detailed Review & Alternatives of VOCALOID6 Voice Generator
- Updated What Is an AI Video Maker? | Wondershare Virbo Glossary
- AI Voice | Online
- New The Ultimate Guide to Learning All the Details About Voice Cloning
- Maximize Yandex Translate in Video Translation and Beyond
- New 2024 Approved What Is Talking Avatar?
- In 2024, Ultimate Guide to Translating YouTube Videos Without CC
- Updated Best 10 Chinese Video to English Translators
- Updated In 2024, How to Create Funny Talking Avatars Using Oddcast Text to Speech Tech
- New 2024 Approved 5 Best Apps for Voice Translation From English to Bangla
- Updated In 2024, How To Access and Watch Nonstop NBA Live Stream Free Online
- New In 2024, Clone Your Voice Harness the Potential of AI
- New What Is AI Influencer? | Wondershare Virbo Glossary for 2024
- New Best Video Translator App for PC Cannot Miss for 2024
- New Selected Best 5 YouTube Script Writing AI Customized for You for 2024
- Updated Guide to Promoting Music Videos on YouTube for 2024
- Updated In 2024, Chrome Video Translators Top 5 Video Translation Chrome Extensions
- New 2024 Approved Generate Video with Talking Photo Feature
- 5 Best Realistic Text to Speech AI Voice Generators You May Like
- New How to Stream on Twitch The Ultimate Guide for 2024
- Updated In 2024, How to Translate TikTok Videos? All You Want to Know
- 2024 Approved What Are AI Tools?
- New How to Make an Animated Explainer Video
- Updated What Is AI Voice Over, In 2024
- Updated 2024 Approved Top 10 AI Script Generators
- Updated In 2024, Top 6 Mickey Mouse Voice Generators Providing Efficient Results
- Updated 2024 Approved Netflix Subtitle Translation Methods Comprehensive Guide
- Updated In 2024, Demystifying AI Game Generators From Definition to Distinction
- New How to Translate Instagram Videos for Global Engagement
- In 2024, Tips and Tricks for Setting Up your Xiaomi 14 Pro Phone Pattern Lock
- In 2024, 10 Free Location Spoofers to Fake GPS Location on your Tecno Pova 6 Pro 5G | Dr.fone
- 3 Ways to Track Nokia G22 without Them Knowing | Dr.fone
- In 2024, Guide on How To Change Your Apple ID Email Address On Apple iPhone 6s Plus
- 3 Solutions to Hard Reset Vivo Y100i Phone Using PC | Dr.fone
- How to Soft Reset Xiaomi Redmi A2+ phone? | Dr.fone
- In 2024, How to Cast Realme Narzo N53 Screen to PC Using WiFi | Dr.fone
- In 2024, Unlock Your Device iCloud DNS Bypass Explained and Tested, Plus Easy Alternatives On iPhone SE
- In 2024, Top 10 Password Cracking Tools For Infinix Note 30i
- In 2024, The Ultimate Guide to Bypassing iCloud Activation Lock from Apple iPhone 15
- In 2024, How to Change Location on TikTok to See More Content On your Oppo Reno 9A | Dr.fone
- How to Fix Poco F5 5G Find My Friends No Location Found? | Dr.fone
- In 2024, How To Unlock A Found iPhone 6s Plus? | Dr.fone
- In 2024, Full Guide to Bypass Nokia C110 FRP
- How To Use Allshare Cast To Turn On Screen Mirroring On OnePlus Open | Dr.fone
- How To Unlock A Found iPhone 14?
- In 2024, Does Airplane Mode Turn off GPS Location On Realme C51? | Dr.fone
- Best 3 Oppo Reno 10 5G Emulator for Mac to Run Your Wanted Android Apps | Dr.fone
- How To Bypass FRP on OnePlus Nord N30 SE
- 10 Free Location Spoofers to Fake GPS Location on your Samsung Galaxy XCover 7 | Dr.fone
- List of Pokémon Go Joysticks On Nokia G22 | Dr.fone
- Spoofing Life360 How to Do it on Asus ROG Phone 7 Ultimate? | Dr.fone
- Honor 80 Pro Straight Screen Edition Stuck on Screen – Finding Solutions For Stuck on Boot | Dr.fone
- Vivo Y200 Not Receiving Texts? 10 Hassle-Free Solutions Here | Dr.fone
- 4 Effective Methods Fake GPS Location on Apple iPhone 14 Plus/iPad | Dr.fone
- How to Simulate GPS Movement in AR games On Lava Yuva 3? | Dr.fone
- In 2024, How to Change Lock Screen Wallpaper on Motorola Moto G24
- In 2024, Is GSM Flasher ADB Legit? Full Review To Bypass Your Vivo Y55s 5G (2023)FRP Lock
- 4 Easy Ways for Your Vivo X Flip Hard Reset | Dr.fone
- 5 Ways to Track Realme C33 2023 without App | Dr.fone
- 9 Best Phone Monitoring Apps for Apple iPhone 13 mini | Dr.fone
- 3 Ways to Erase Apple iPhone 6 Plus When Its Locked Within Seconds | Dr.fone
- Life360 Circle Everything You Need to Know On Infinix Hot 30i | Dr.fone
- In 2024, Change Location on Yik Yak For your Lava Agni 2 5G to Enjoy More Fun | Dr.fone
- Life360 Learn How Everything Works On Realme Narzo N55 | Dr.fone
- In 2024, How to Mirror Realme Narzo 60 5G to Mac? | Dr.fone
- Title: In 2024, Top 8 Text-to-Video AI Generators to Produce Video Easily
- Author: Sam
- Created at : 2024-05-19 03:34:59
- Updated at : 2024-05-20 03:34:59
- Link: https://ai-voice-clone.techidaily.com/in-2024-top-8-text-to-video-ai-generators-to-produce-video-easily/
- License: This work is licensed under CC BY-NC-SA 4.0.
