
:max_bytes(150000):strip_icc():format(webp)/Cleaningrobotonlaptop_HuberandStarke_GettyImages-1448733073_EVANCROP-8ed67f08b9c4430db8e47c51fde78feb.jpg)
In 2024, How to Make Lip Sync Video Without Installing Any App
How to Make Lip Sync Video Without Installing Any App
TikTok has transformed the social media landscape through its short-form video content. They encourage users to make creative content using popular audio clips. Which enables them to entertain, gain recognition, and contribute to the platform.
Lip-syncing is a big part of what makes TikTok popular. Many users post lip-syncing videos that imitate voices from songs, movies, or trending audio clips. This art of lip-syncing has become an essential element of TikTok’s culture. Now, you might wonder**how to lip-sync on TikTok videos. This article will teach us how to make it effortlessly.
Part 1. Why Do People Lip Sync on TikTok?
Lip-syncing involves mimicking the words or vocals of an existing audio track. TikTok users take this concept to new heights by lip-syncing popular songs or clips. Lip-sync is appealing because it lets people get creative and reach a large audience.
Here are a few reasons why people engage in**lip sync TikTok :
- Self-expression: Lip-sync allows users to embody their favorite artists or characters by showcasing their personality and creativity.
- Entertainment: Many users lip-sync to entertain followers. They offer comedic performances, heartfelt renditions, or engaging storytelling.
- Virality: TikTok’s algorithm favors engaging content and well-executed lip-sync videos. They have the potential to go viral, rapidly gaining likes, shares, and followers.
Part 2. How to Make Lip Sync Video on TikTok
Here’s the step-by-step guide on how to lip sync on TikTok and captive your followers:
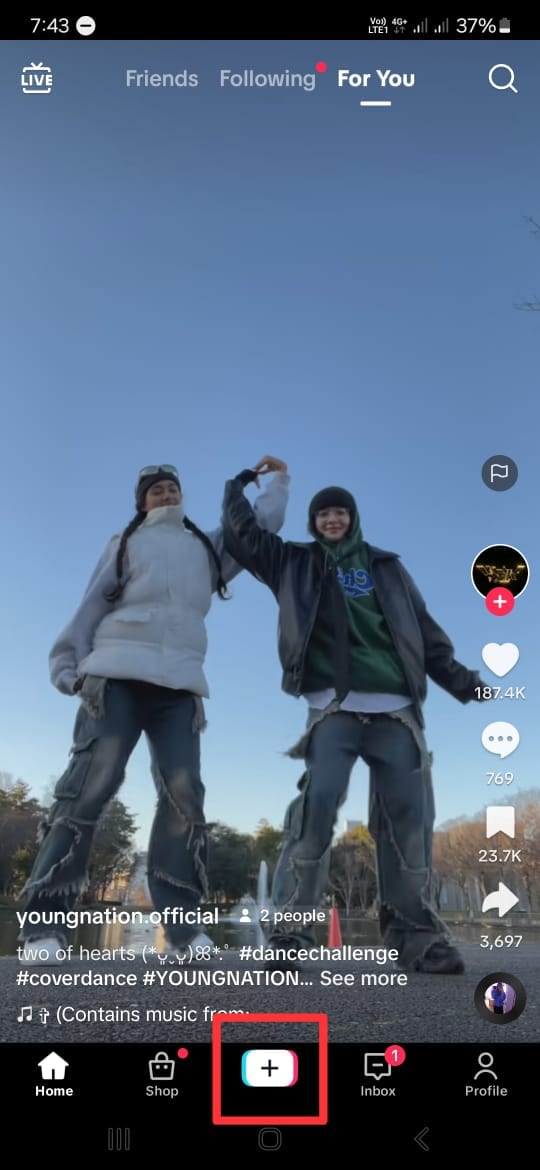
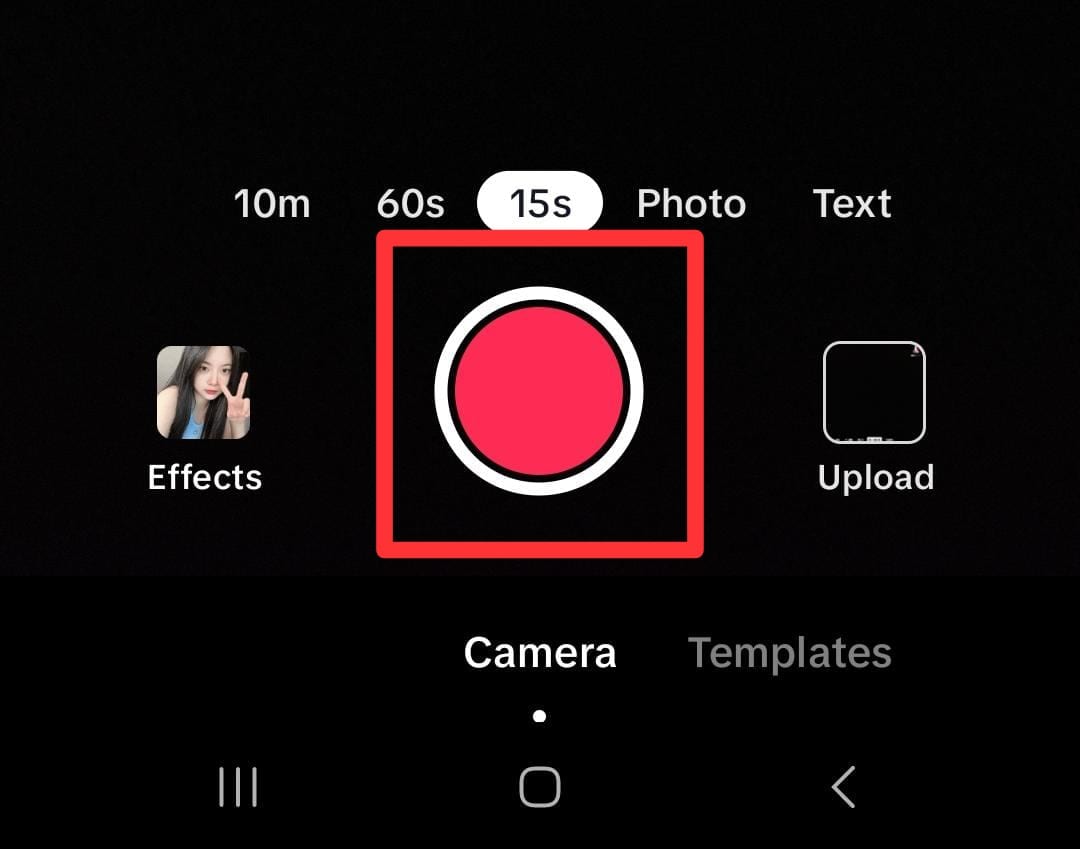
- Step 1. Open the TikTok app and tap the “+” button.
Start with opening the TikTok app on your phone. Then, tap the “+” button at the bottom of your screen to make a new video.
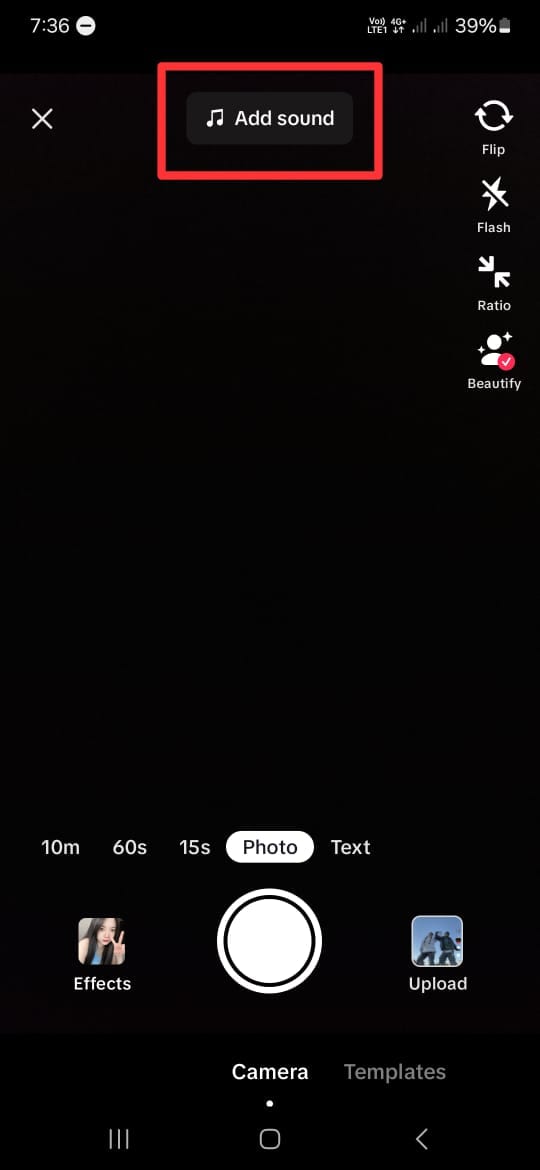
- Step 2. Add a song that you want to lip-sync to.
Next, click “Add Sound” with the musical note icon at the top of the screen. If you have a specific song in mind, you can find it by searching it on the search tab. Then, tap the song and click the check icon beside it.
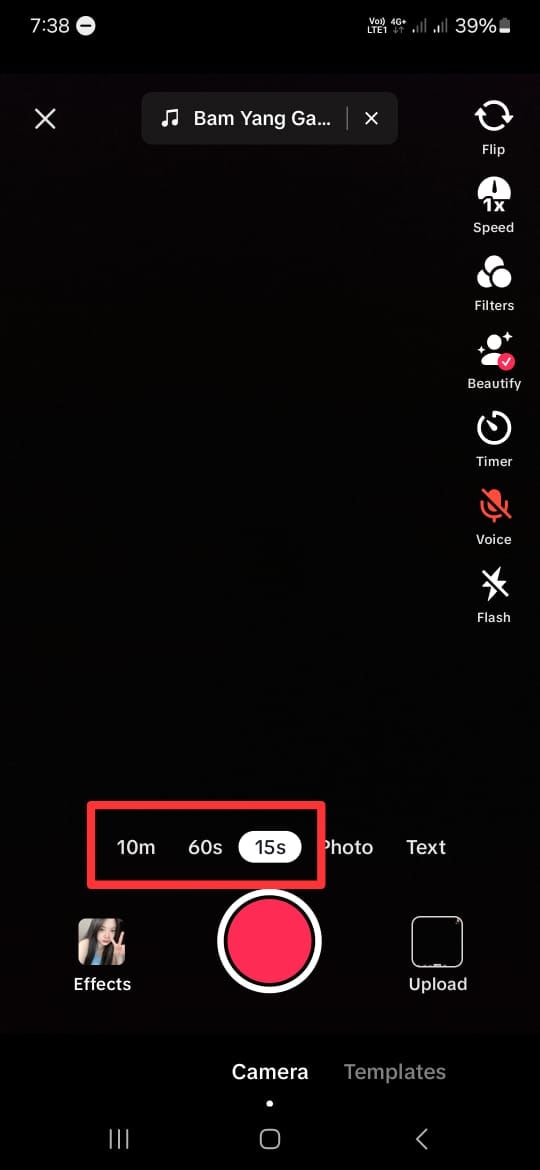
- Step 3. Choose the duration and the part of the song.
After choosing the song you want, you will return to the recording screen. Here, select your video duration at the bottom of the screen. You can choose between 10 minutes, 60 seconds, and 15 seconds. Remember that the duration of the songs on TikTok is usually only 30 to 60 seconds.
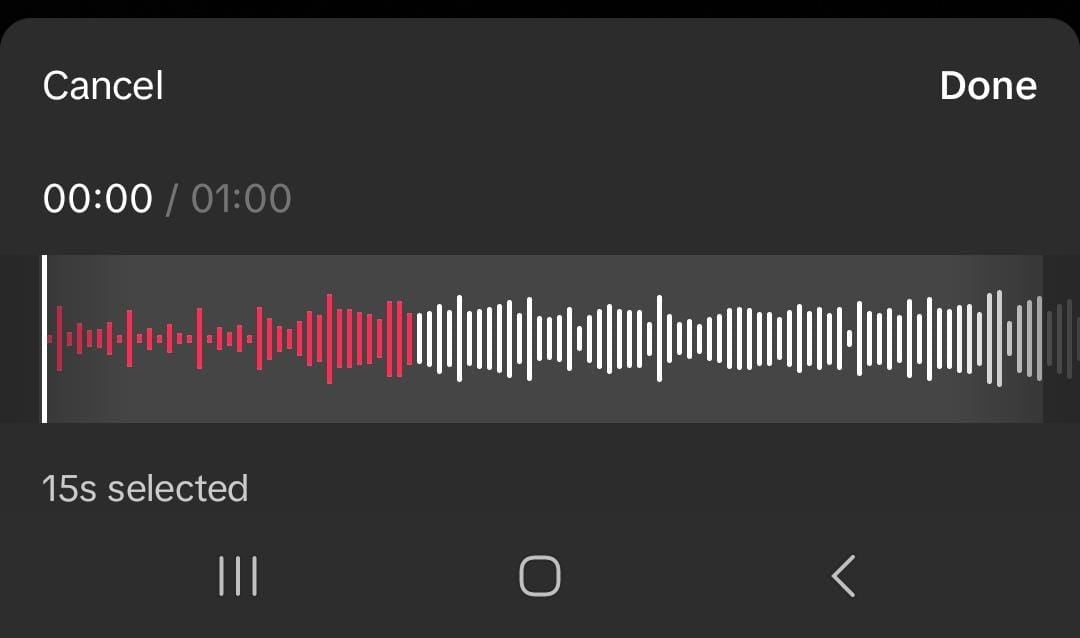
- Step 4. Choose the part of the song.
TikTok allows you to change the part of the song when lip-sync. However, the duration of the video should be less than the duration of the chosen song.
To do this, click on the song’s name at the top of your screen. Then, the bottom of your screen will display your chosen song. Tap the scissor icon and slide the playback to change the part of the song. Click “Done” once you have finished editing.
- Step 5. Tap on the red button.
If you are ready to record, tap the red button at the bottom of your screen. Then TikTok will play the chosen part of the song and record your lip-sync simultaneously. You can pause and continue the recording by clicking the same red button.
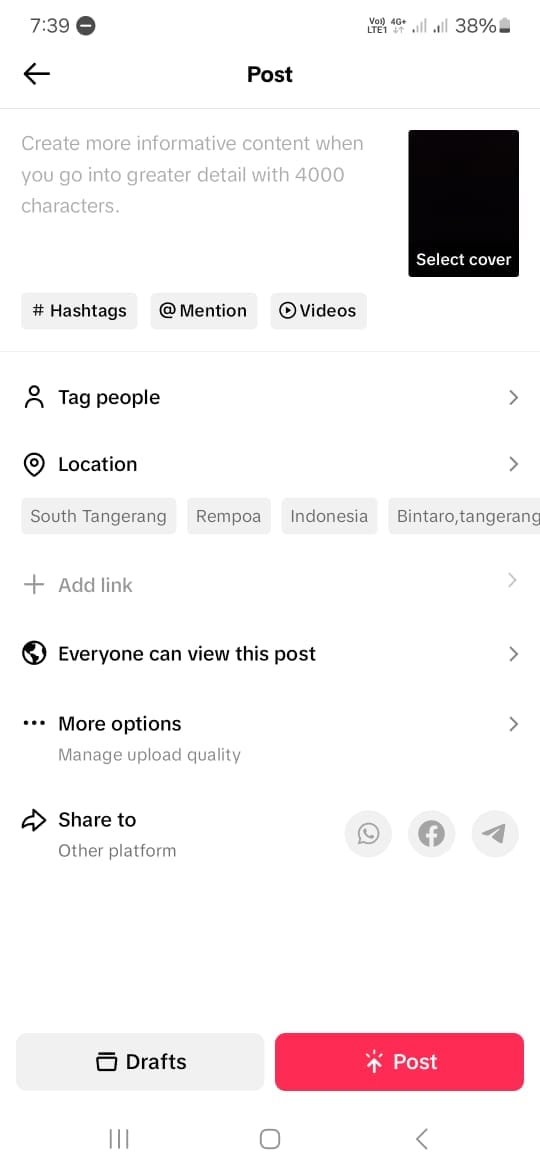
- Step 6. Post the video.
If you are satisfied with the results of your edits, click Next to proceed to the posting stage. Here, you can write a description and any other information you want. Click Post to share your lip-sync video to TikTok.
Creating a video on TikTok by lip-syncing is a fun and creative way to express yourself and connect with others. By following the steps above, you can create a lip-sync video on the TikTok app with ease. Keep in mind that by using these steps, you need to memorize the sentences and understand the beat of the chosen songs.
Part 3. How to Make Lip Sync Video Without Memorizing the Words
Making a**TikTok lip-sync video can be challenging because you must remember and match the words with the music. But there are three simple methods to make it easier.
Method 1: Record at slower speed
You can slow the speed down while recording instead of trying to keep up with the song. This technique lets you hear, understand, and follow the words more easily.
Here’s how to slow down the recording:
- Step 1. Follow steps 1 to 4 from the step-by-step guide in Part 2.
Start by following the first to fourth steps from the guide in Part 2 above.
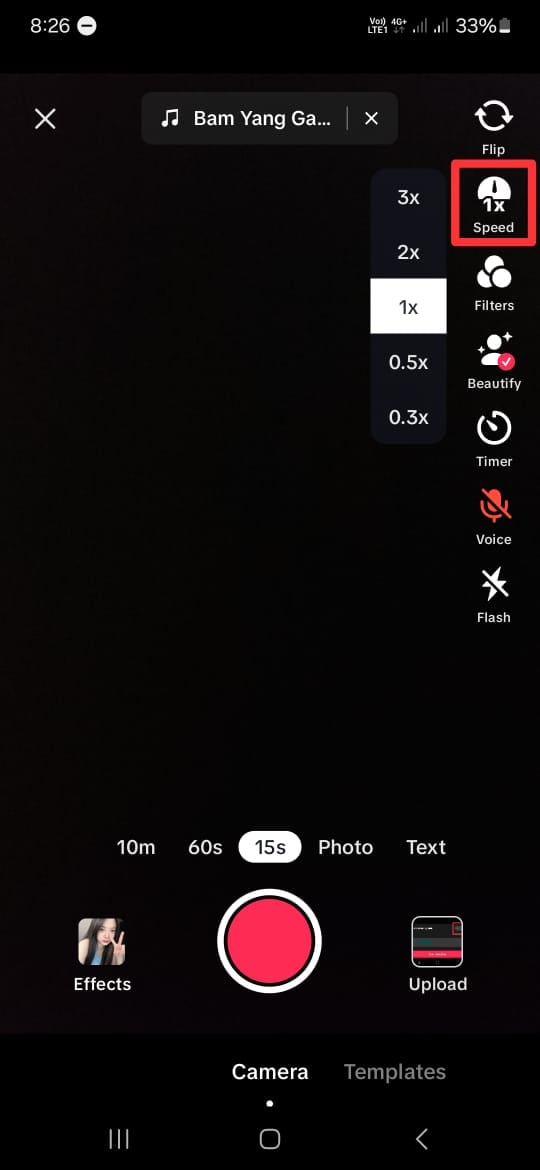
- Step 2. Set the speed record slower.
On the recording screen, click on the Speed icon on the right side of the screen. To make it slower, choose 2x or 3x. This step will make your recording time 2 or 3 times longer than it should be.
- Step 3. Tap on the red button.
Once you tap the red button, TikTok will play the song slower and record your lip-sync simultaneously. Repeat this step to help you memorize the lyrics and the beat of the songs.
Once you’re comfortable, switch back to normal speed for the final recording. This method will save time and improve accuracy.
Method 2: Purposely delay mouthing the words
While lip-syncing videos may vary in style and pacing, this technique can prove particularly useful for slower rhythms. Moreover, mastering the art of mouth sync on TikTok can elevate the overall production value of lip-syncing videos.
Using the timer feature will give you a slight lag between lip movements and audio playback. Then, it lets creators ensure more precise synchronization during editing. Here’s how to lip-sync on TikTok more easily:
- Step 1. Follow steps 1 to step 4 from the step-by-step guide in Part 2.
Like Method 1, you can start by following the first to fourth steps from the guide in Part 2 above.
- Step 2. Delay the recording
On the recording screen, click on the Timer icon on the right side of the screen. Here, you can set the timer to 3 to 10 seconds to delay the recording’s start. You can also drag and set the recording limit if you want.
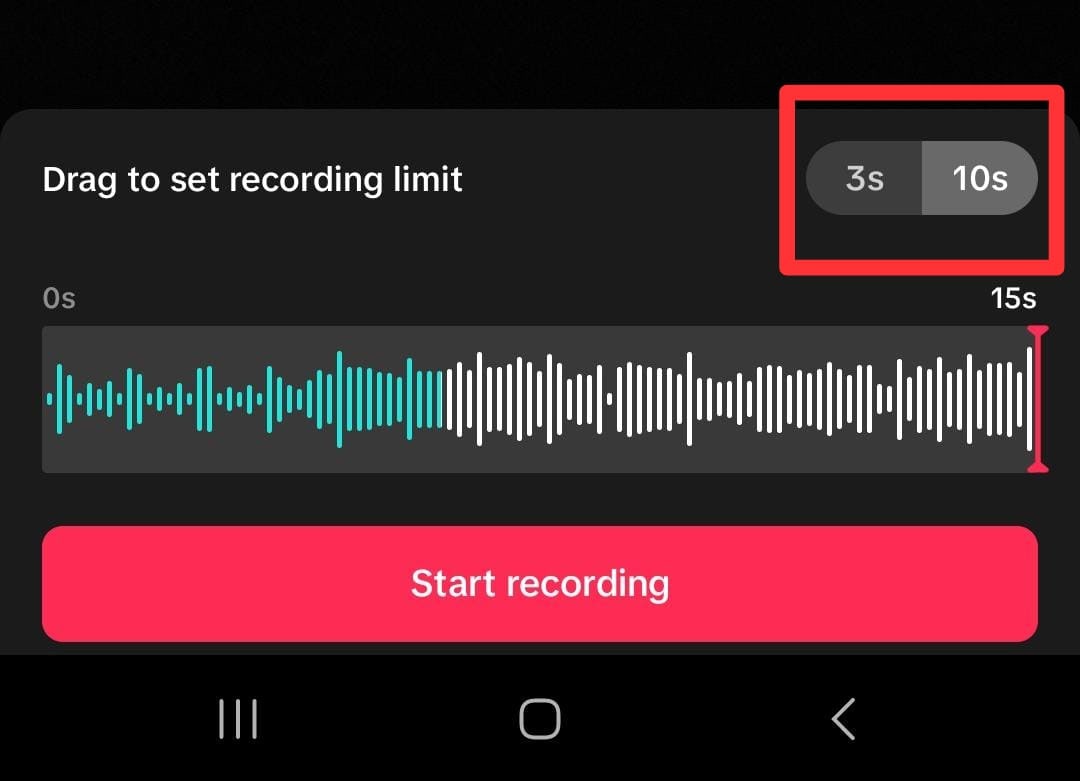
- Step 3. Start the recording
Then click “Start recording” to record the video with the timer on.
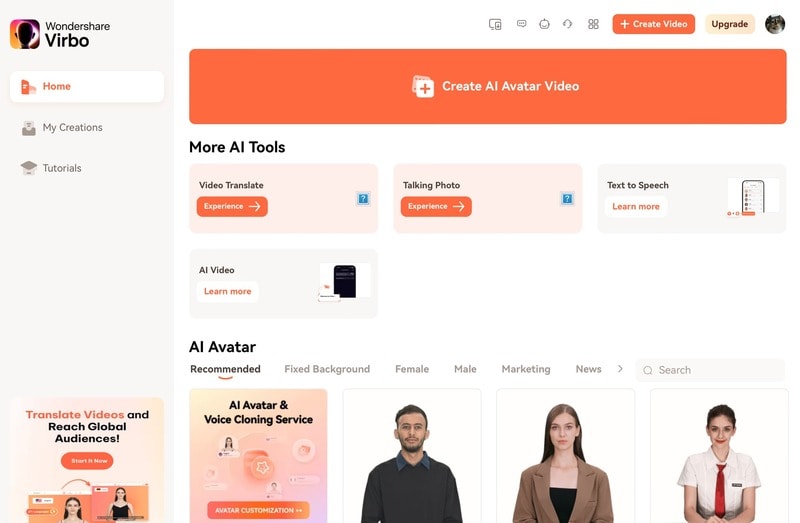
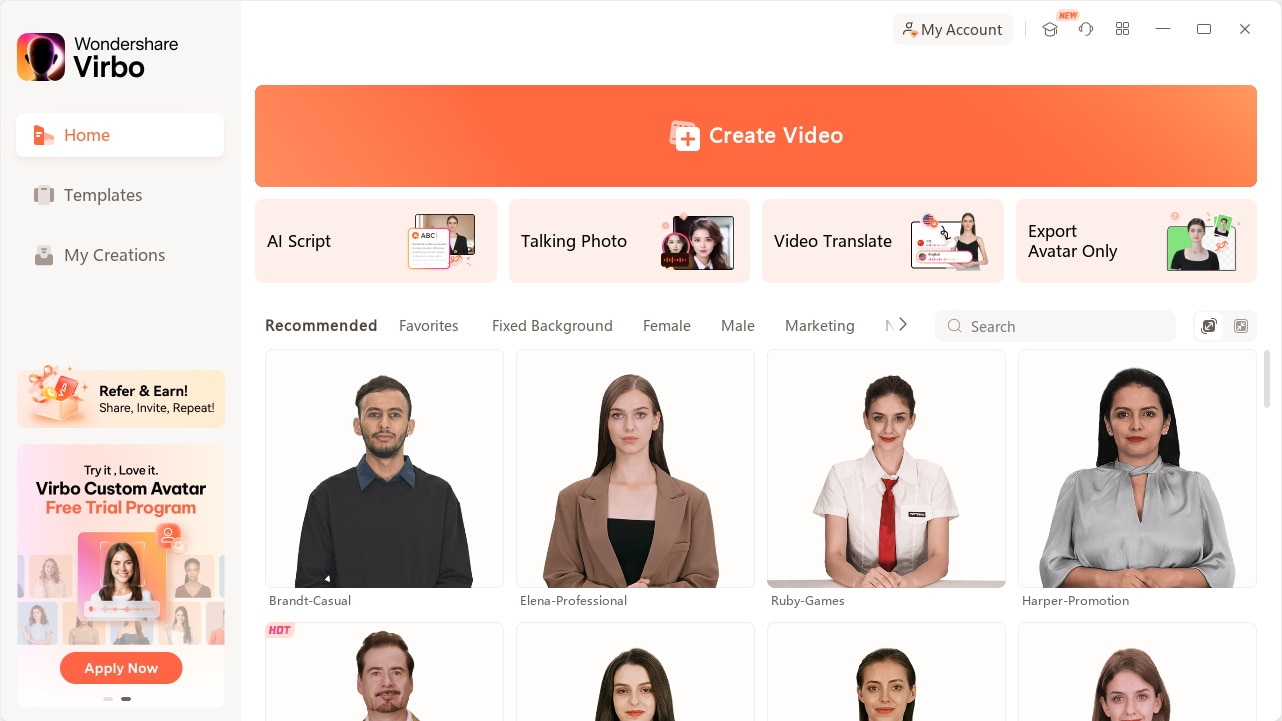
Method 3: Use a Photo Talking Tool
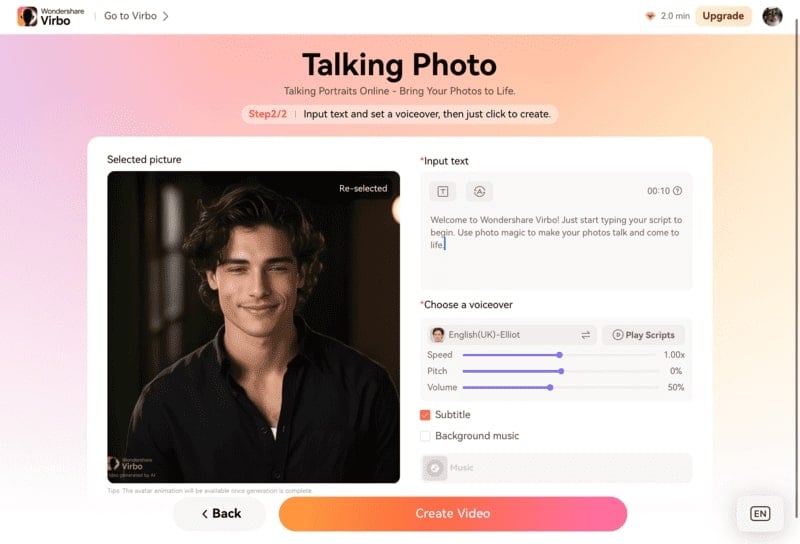
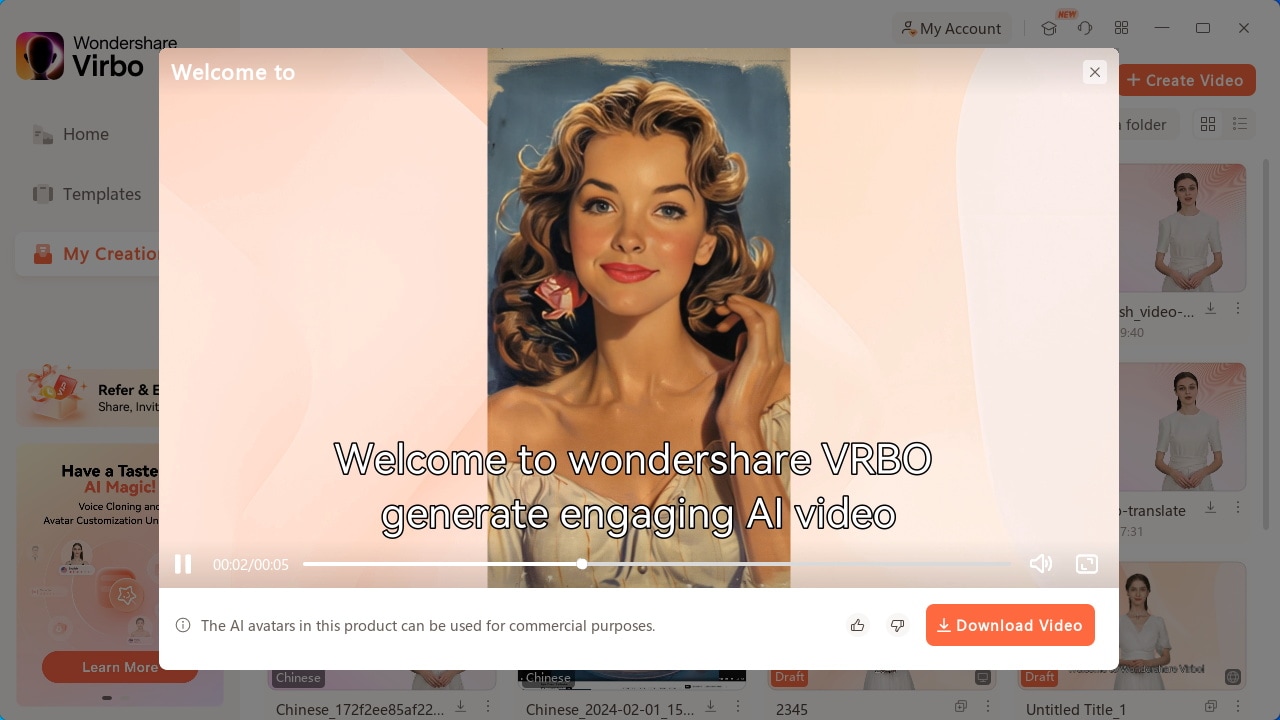
Next, consider using a Talking Photo feature by Wondershare Virbo. This method is for you who want to create engaging TikTok lip-sync videos without memorizing the words.
Virbo’s Talking Photo feature tool lets you upload a portrait of your photo and then make it appear as though it is speaking along with the audio. You do not have to install the app because you can use this feature online on their official website.
Here’s how to use Wondershare Virbo - Photo Talking feature to create a TikTok lip-sync video:
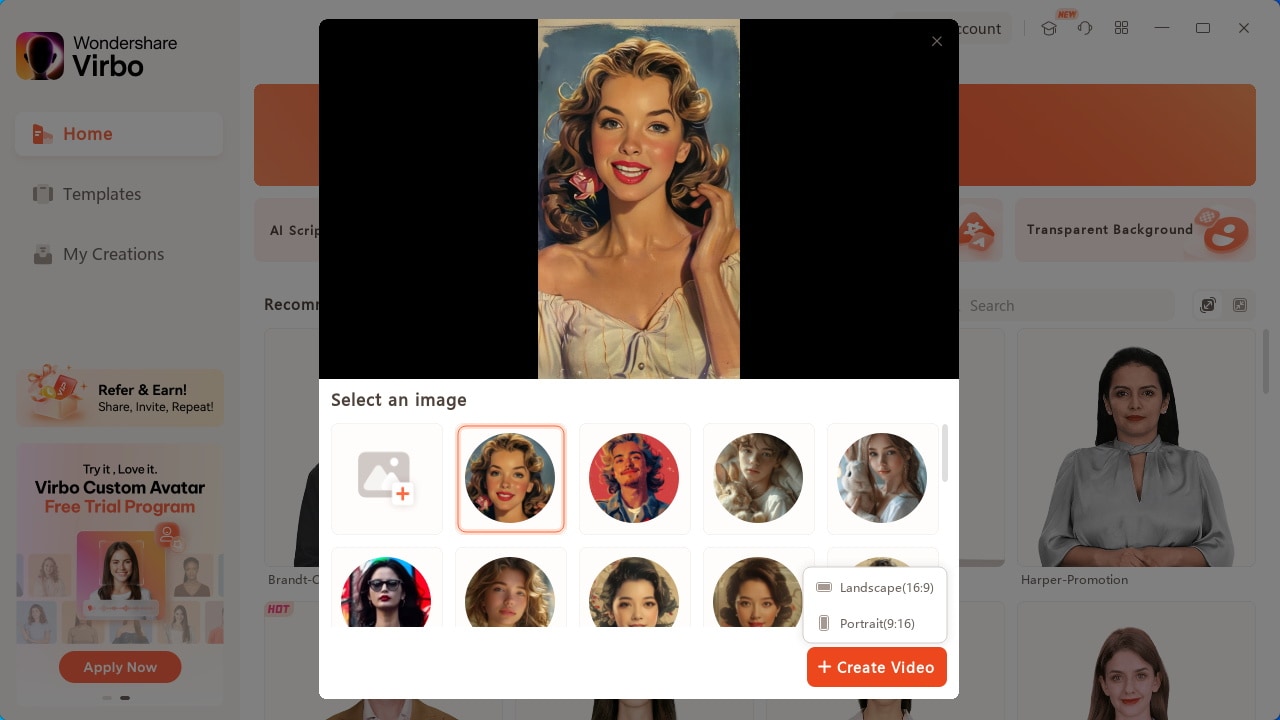
- Step 1. Start a new project.
Open the Wondershare Virbo website and tap the talking photo function to start a new project.
Get Started Online Free Download
- Step 2. Upload a portrait.
Tap “Upload Photo”, then upload a picture you want to use by following the instructions.
- Step 3. Edit and export.
Insert the text and adjust the voice settings. If you want to insert your own audio, you can use Wondershare Virbo for mobile or Desktop to upload or record your audio. Then, tap “Generate Video” to export.
Now, you have successfully made your own TikTok lip-sync video. You can upload it to TikTok and share it with your followers. For more detailed instructions, you can see how to useVirbo’s Photo Talking tool .
Part 4: How To Lipsync Your Video to Any Language Using AI Video Translator
In today’s globalized world, reaching audiences in different languages is important for effective communication. Thanks to technological advancements, there is a tool that can help you translate video content.
Wondershare Virbo – Video Translator offers seamless solutions to translate video content into various languages with AI. Virbo ensures high-quality translations that maintain the integrity and impact of your original message.
How to lipsync TikTok videos to any language with Wondershare Virbo - Video Translator:
- Step 1. Go to Virbo’sofficial website , then click Generate AI Video Online.

Get Started Online Free Download
- Step 2. Log in or create an account.

- Step 3. Then, navigate to the Video Translator tool on the Virbo’s homepage.
- Step 4. Upload the video.
Once inside the Video Translator interface, upload the video file you wish to translate. Select the original video language and the preferred target language from the available options. Additionally, enable the Lip Sync feature to ensure that the translated audio aligns perfectly with the lip movements in the video.
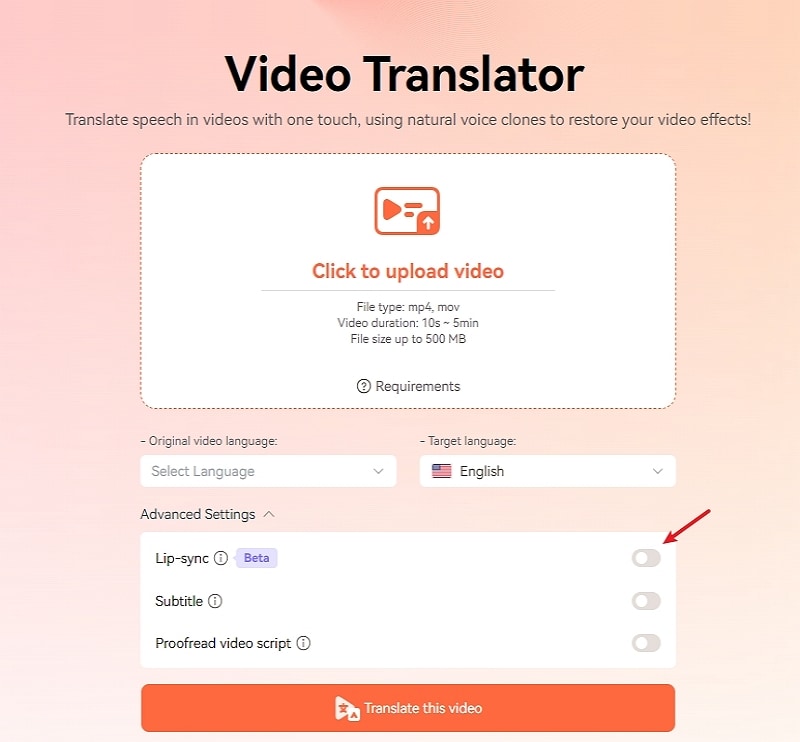
- Step 5. Click “Translate this video” to start translating the video.
Virbo’s Video Translator will use its advanced algorithms to translate the audio and synchronize it with the video seamlessly. Depending on the length and complexity of the video, the translation process may take some time.
Conclusion
Lip-syncing on TikTok has become a significant aspect of TikTok culture. It helps users show their creativity, entertain people, and maybe even become famous. Making**mouth sync TikTok videos usually means remembering lines and matching them to music, but there’s an easier way with Wondershare Virbo’s Talking Photo tool. This tool allows you to upload a portrait and sync it with audio without remembering the lines.
Also, Wondershare Virbo has a Video Translator tool that allows you to translate videos seamlessly into any language. This translator tool helps you communicate with people worldwide and maintain the original message.
Realistic AI Avatars
Realistic AI Avatars
Do you need a virtual person to appear in your videos? Don’t worry, Virbo is here for you. Powered by AI, Virbo’s can easily create a video for you using digital avatar. Just make some adjustments and add the text you need, and the video will be generated instantly.
Get To Know Our Realistic AI Avatars
- 300+ Real Human Avatars
- Natural Human Voice
- 300+ Voices & Languages
- All Age Ranges
- Various Attires
- Diverse Ethnicities


Click here to learn more about AI Avatar >>
Realistic AI Avatars
Do you need a virtual person to appear in your videos? Don’t worry, Virbo is here for you. Powered by AI, Virbo’s can easily create a video for you using digital avatar. Just make some adjustments and add the text you need, and the video will be generated instantly.
Get To Know Our Realistic AI Avatars
- 300+ Real Human Avatars
- Natural Human Voice
- 300+ Voices & Languages
- All Age Ranges
- Various Attires
- Diverse Ethnicities
Click here to learn more about AI Avatar >>
How to Stream on Twitch: The Ultimate Guide
Live streaming has become a regular source of enjoyment for many people in recent years, especially on a platform like Twitch. In the first quarter of 2023 alone, Twitch users watchedover 5.3 billion hours of video.
If you’re a content creator, you should definitely consider leveraging this power of Twitch video streaming, as it tends to have higher levels of engagement compared to pre-recorded content. But with so many Twitch streamers out there, standing out from the crowd can be challenging.
If you’re new to the scene, we can help you start your Twitch streaming journey off right with the right gear and some useful tips.

Part 1: Essential Preparations Before Beginning Your Twitch Streaming Journey
Whether you’re playing games, hosting events, or just chatting, streaming on Twitch is an exciting and rewarding way to engage with your audience in real-time. But to do well on Twitch, you need to prepare properly so your viewers can enjoy watching your content.
To start streaming on Twitch, here’s what you’ll need:
Twitch Streaming Software
First, you need to download streaming software for your Twitch video streaming. OBS Studio is the popular one, but Twitch has released its Twitch Studio, which is more beginner-friendly.
- OBS Studio
OBS Studio is a free streaming software that works on any device. You can use it to make your Twitch streams live more attractive by adding alerts, creating starting screens, and using different audio and video sources.
- Twitch Studio
Twitch Studio is the official free streaming application developed to simplify the streaming process for new streamers on Twitch. It offers an intuitive interface and pre-made scenes designed to streamline the user experience.
Streaming equipment
- A device to stream from
To kickstart your Twitch streaming journey, the first step you need to take is selecting the device from which you’ll broadcast. You can use your desktop, mobile phone, or gaming console. Your choice will depend on your existing equipment and the nature of your intended content.
If you plan to make gaming content for your Twitch Live, we recommend using a PC with these specifications:
- CPU
When streaming and gaming, it’s crucial to have a powerful CPU to minimize lagging. The number of cores in a CPU determines its processing power, ranging from dual to eight cores. Some good options to consider are the AMD Ryzen 9 5900X, Intel i9 – 12900K, or the more budget-friendly Intel Core i5-12400.
- GPU or graphic cards
Nvidia RTX graphics cards come equipped with built-in hardware encoders, which can lighten the CPU’s workload when used with OBS Studio. Alternatively, you can consider the Radeon RX 570 and the GeForce GTX 1660 Ti for quality GPU options.
- Microphone
Although you might get by using a gaming headset’s built-in microphone for a bit, it’s better to invest in a standalone mic from the start. Some top microphone options for Twitch streaming include the Elgato Wave:3, HyperX QuadCast S, Audio-Technica AT2020, Razer Seiren Mini, and Blue Yeti X.
- Webcam
If your Twitch stream content involves showcasing your reactions or facial expressions, investing in a camera is a wise choice. Webcams are convenient as they can easily connect to your computer or laptop.
You can consider some popular webcam choices like the Logitech HD Pro C920, Logitech StreamCam, Logitech BRIO, Microsoft LifeCam HD-3000, and Razer Kiyo.

Understanding Twitch Streaming Rules
Aside from preparing your streaming gear, you must also understand Twitch streaming rules to avoid any potential violations that could result in penalties or even suspension of your account. Twitch’s community guidelines cover a wide range of topics, including harassment, hate speech, copyright infringement, and mature content. You can read the full Twitch streaming ruleshere .
Part 2: Comprehensive Guide To Stream Live on PC, Mac, or Smartphone on Twitch
Once you’ve gathered all the necessary equipment, you can proceed with the following steps to start your Twitch stream.
How to stream Twitch live on PC or Mac
Step 1: Download and installTwitch Studio on your PC or Mac. Then, launch Twitch Studio and log in to your Twitch account. You’ll receive a prompt to connect your microphone and webcam.
Step 2: Use Twitch Studio to customize your Twitch stream with different scenes and settings. Experiment with these features to find what works best for your livestream.

Step 3: When you’re ready to start broadcasting, click “Start Stream” at the bottom of the Twitch Studio. Then, select your stream category and enter your live stream title. Hit “Go Live” to begin streaming.

How to stream Twitch live on a smartphone
Starting Twitch streaming from your smartphone is a bit different, as the app primarily allows broadcasting from your device’s camera. Here’s how to live stream on Twitch from your smartphone:
Step 1: Download and install theTwitch App .
Step 2: Log in to the Twitch app. Then, go to your profile and tap “Go Live.” If you are using newer version of the Twitch app, you can tap “Create.”

You’ll then have two options: “Stream Games” or “Stream IRL.” The “Stream IRL” will allow you to live stream on Twitch using your phone’s camera, while the first option lets you stream mobile games.

Step 3: Grant access to your camera and/or microphone before starting your stream.
Step 4: Set up the stream and Go Live. Give your stream a name, choose a content category, and select the camera you want to use.
Once you’ve completed these steps, press the “Start Stream” button, and you’ll be live on Twitch.
Key elements of success for streaming on Twitch
While the process for starting Twitch streaming may be similar for all streamers, what makes a streamer successful? Based on reports, there are a few key elements of success for streaming on Twitch.
- Engaging content
Successful Twitch streamers captivate their audience with compelling content that resonates with viewers. This could include entertaining gameplay, informative discussions, or engaging activities. If people like your stream, they might subscribe or donate their money.
- Make use of the interactive features
Twitch stream labs offer unique features like chat rooms and special emojis, fostering interaction between streamers and viewers. Streamers actively engaging with their audience tend to cultivate a loyal and enthusiastic community.
- Consistency and persistence
This is often the toughest part. On Twitch, consistency is crucial. Successful streamers usually maintain regular schedules to make sure their audience knows when to expect new content. If you are new, continuous live streaming can be an effective strategy to engage with your audience consistently and increase your channel’s visibility.
Part 3: Best AI-Powered Tool for You To Set Up a 24/7 Live Stream on Twitch
If you want to make your Twitch channel stand out and automate the live streaming process, you can use Wondershare Virbo Live. With this tool, you can set up a 24/7 live stream on Twitch without needing to be present all the time.
Additionally, the Virbo live stream feature seamlessly integrates with major live-streaming platforms supported by OBS. You can also use it on numerous other platforms, such as TikTok Live, 1688 Live Platform, Alibaba International, Kwai, and more.
How to live stream 24/7 on Twitch with Wondershare Virbo Live
To live stream 24/7 on Twitch with Virbo, you will first need to prepare your AI avatar on Virbo Live to broadcast continuously on Twitch. Once you have customized your avatar, you can obtain the streaming key from Twitch. This key will enable OBS to connect with Twitch’s streaming platform.
Follow the detailed steps on how to live stream 24/7 on Twitch:
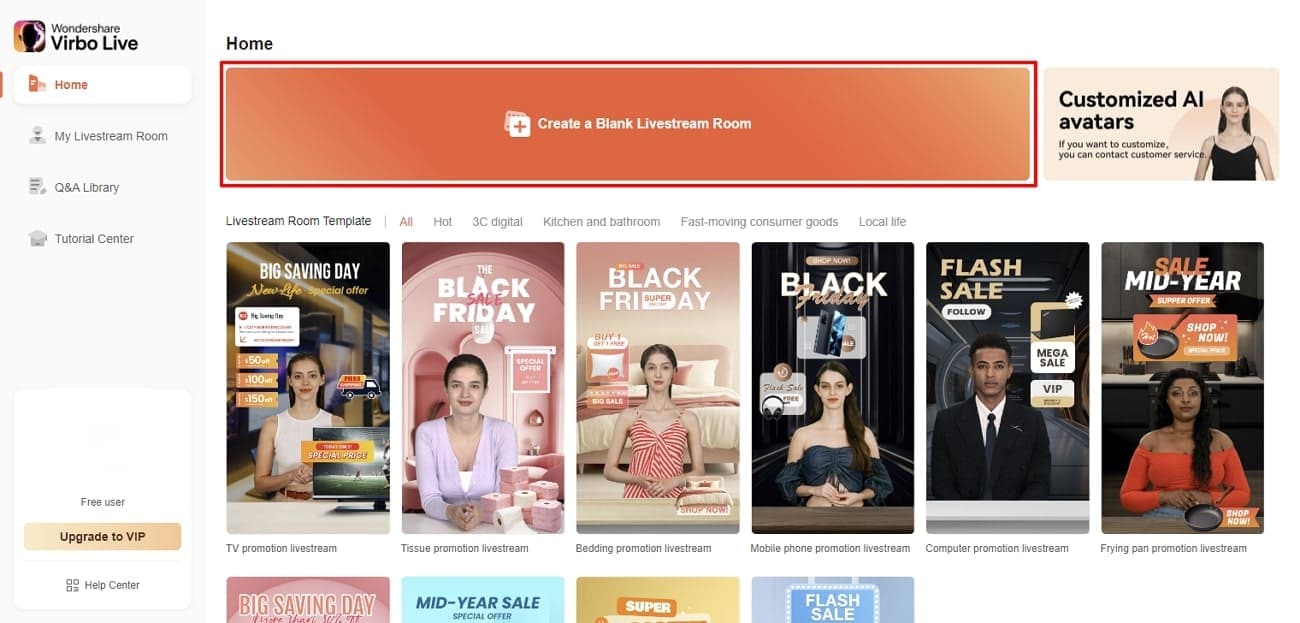
Step 1: Access Wondershare Virbo Live and create a live streaming room.
Go toWondershare Virbo Live and select “Create Stream Room Now” > “Create a Blank Live Stream Room” to initiate the setup process.

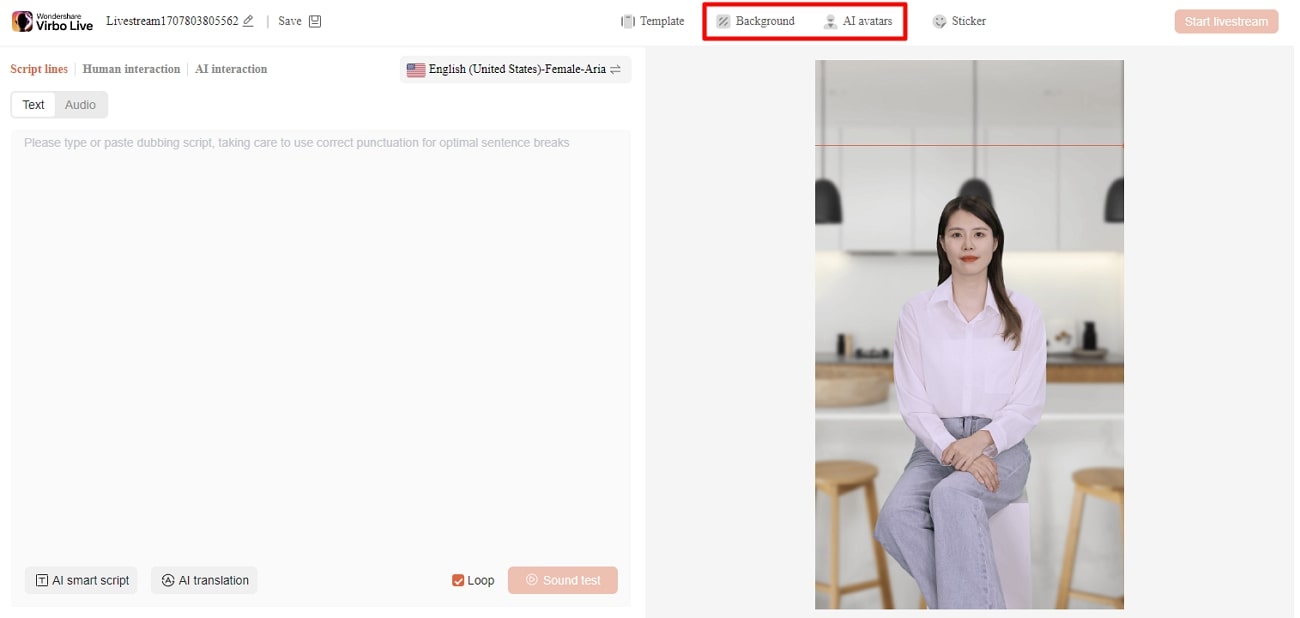
Step 2: Write your content script or upload audio recordings.
Within the Virbo Live interface, you can either compose the script for your live stream or upload pre-recorded audio content by selecting “Upload local file.”

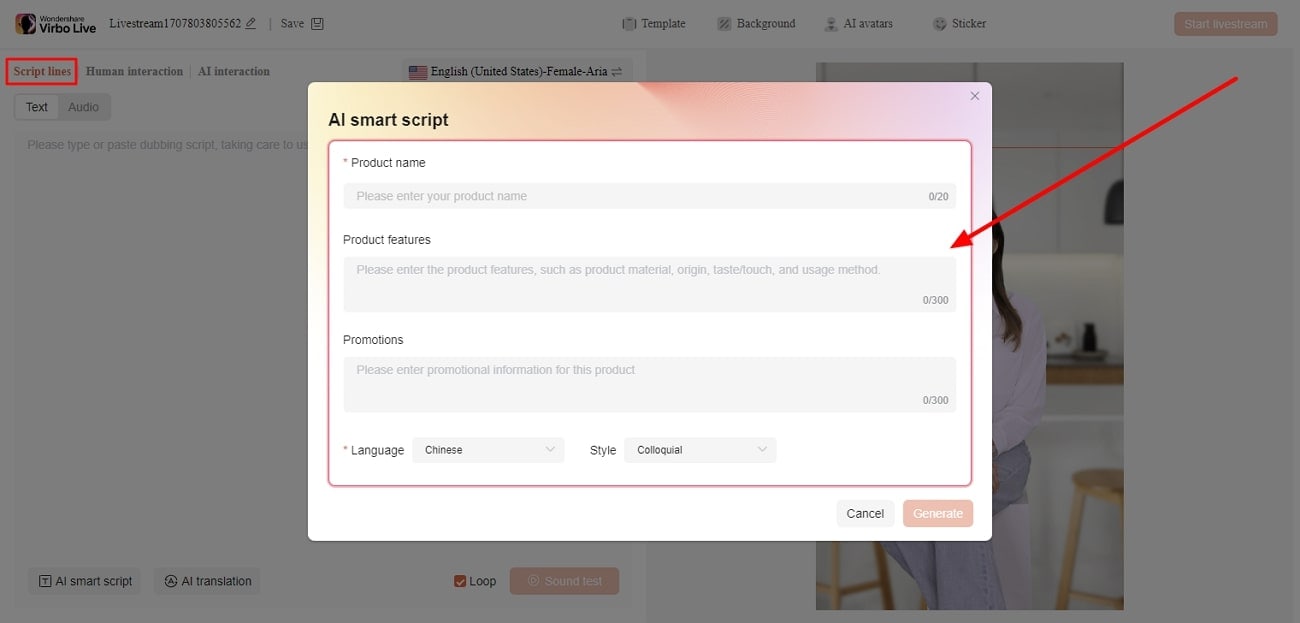
Pro Tip: You can use Virbo’s AI Script Writer for inspiration. Click on “AI Smart Script” and provide topic details, language preferences, and stylistic choices. Click “Generate” to create a script. Then, you can refine it as needed.
Step 3: Customize your AI avatar and background.
Navigate to “AI Avatars” to select an avatar for your live stream. Additionally, you can customize the background, incorporate stickers, or use available templates.

Step 4: Start the live stream.
Once your AI avatar and background are set, click “Start Livestream” to commence broadcasting. The next step should be acquiring the Twitch streaming key to put into the OBS.

Once everything is ready, click “Start Streaming” in OBS Studio, and your stream will broadcast on Twitch.
Conclusion
With billions of hours of video watched and many content creators vying for attention, streaming on Twitch can be exciting and challenging. However, by following the essential preparations outlined in this guide, you’ll be able to kickstart your Twitch live stream ahead of others.
You can use Wondershare Virbo Live to make an automated streaming experience 24/7. This helps you maintain a consistent presence on the platform even when you’re not around.
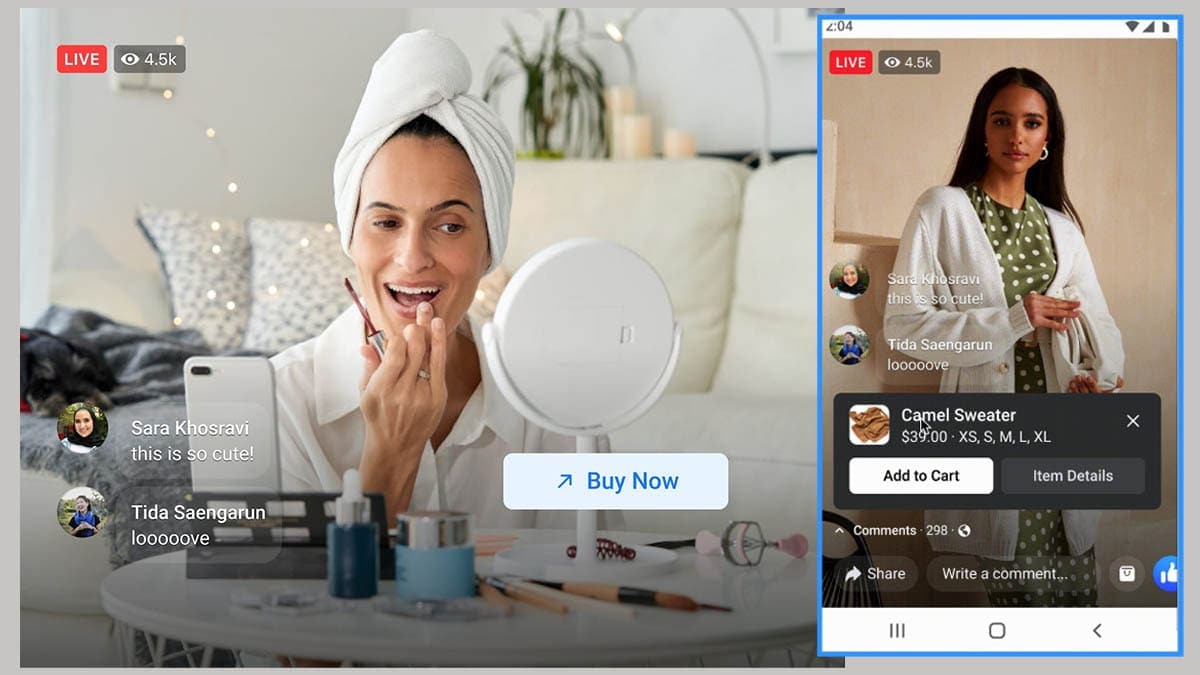
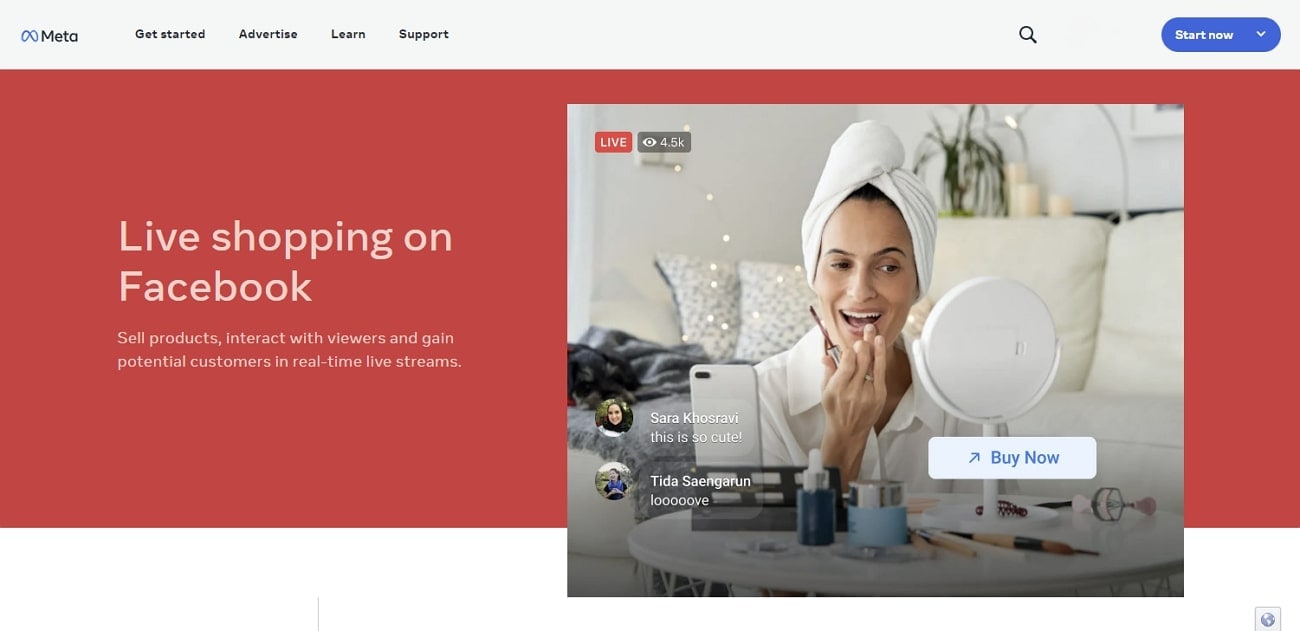
Facebook Live Shopping: A Comprehensive Guide
After the COVID-19 pandemic, people started trusting online shopping. Therefore, a live shopping trend emerged, which felt like a one-on-one conversation between shopkeepers and buyers. In this regard, different platforms developed and facilitated live shopping. Yet, many features and options need to be introduced for an evener shopping experience.
Considering this scenario, major tech giants like Meta entered the market. They released aFacebook live shopping feature and pushed the boundaries of e-commerce. If you are new to this tech-based shopping or selling, this guide is for you. However, read it by the end to get comprehensive insights on Facebook live selling and shopping.
Part 1. A Brief Introduction to Facebook Live Shopping
Facebook live shopping is a free tool to interact directly with sellers during a live video. It is among the top livestream shopping platforms in the US, and it was launched in 2021. Retailers connect with buyers while showing their items in real-world scenarios through this service. Facebook lets them tag their product in live streaming, containing website links to place orders.
According tostatistics , 82% of consumers prefer livestream content from brands. Besides, 80% of the brands prefer Facebook to market their product through live videos. Still, the e-commerce market continues to develop and address loopholes in live selling with care. Anyhow, look into the perks ofFacebook live selling features discussed ahead:
1. Facebook Live Shopping Notification
To bring viewer traffic, Facebook sends notifications to customers. People get notified via Messenger or Facebook notifications about their favorite brand’s live selling. This way, merchants can attract the maximum number of customers.
2. Product Demonstration
Live shopping has completely changed traditional online shopping. Unlike static photos of a product,selling live on Facebook live shopping allows you to see how the product works. In the live session, potential customers can see how it looks, in which size it is available, and its exact color.
3. Easy Product Management
Before going live, the host can set up a shopping playlist with categories. Also, they can tag product details and website links before going live. As a result, people can easily navigate to the product, add it to their cart, and purchase directly. During the session, anyone can ask questions through the live chat feature.
Part 2. A Beginner’s Guide to Setting Up a Facebook Live Shopping for Your Product
After understanding these features, sellers can set up their shop. For this purpose, review this section and learn to set up your Facebook shop. Below are some details on how to create a shopping profile on Facebook:
Requirements : Firstly, check your business location, which must be based in the USA. Plus, your business can be located in 21 exempt countries in America, Europe, and Asia. Afterward, create a Facebook business page where you carry an admin role. Then, ensure that Facebook supports your country’s currency. Later, verify your product is complying with Facebook’s commerce policies.
- Step 1. Sign in or create a Facebook page containing all information about your brand. Then, go directly to the Meta Business page and hit the “Live” button in the “Create” section.
- Step 2. From the top bar of your Meta Business page, tap the “Live Shopping” option. There, toggle the “Enable Live Shopping” option and go to stream your first shopping session.

Upon creating an account and choosing a suitable product niche, it’s time to feature them. To learn how sellers feature products, review these steps and make your items visible to viewers:
- Step 1. As you enable the live shopping option earlier, click the “Commerce Manager” to discover the Live Shopping feature in the “Promotions” tab. Continue to select the “Create Playlist” button for setting up a product playlist for live shopping.
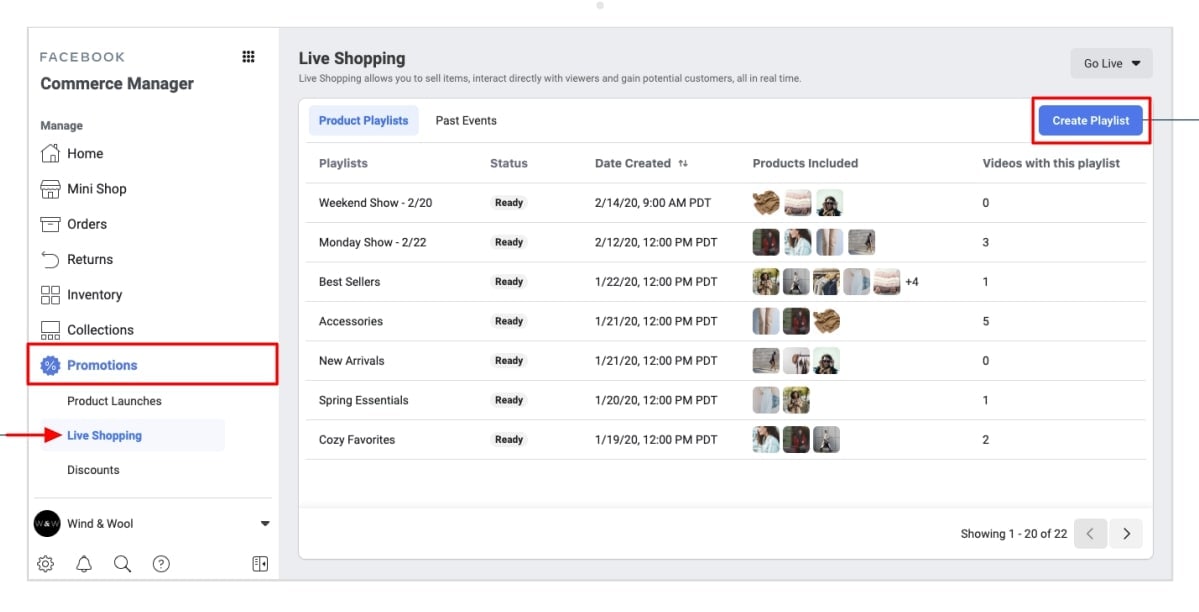
- Step 2. This opens up a new window where you have to provide all the details involving the product. Add the product and their respective details, and review the result in the playlist. After you’ve created the playlist, select where you wish to go live on Facebook, i.e., desktop or mobile app. On selecting the right option, click the “Go Live” button to conclude the process.

What Products Are Suitable for Facebook Live?
Determining the top-selling product would help retailers to increase sales. Notably, clothing and accessories are the most selling products of 2022 on Facebook. Meanwhile, self-grooming products stand second, followed by furniture and electronic appliances. Provided is a list of the products that seem suitable forFacebook live shopping :
- Electronics
- Home and Garden
- Vehicles
- Clothing and Accessories
- Furniture
- Mobile Accessories
Part 3. Some Progressive Tips To Excel in Facebook Live Shopping
After learning about setting up a Facebook shop, you should look into some tips for settling down in the market. Thus, the following are some strategies that you need to focus on beforeselling live on Facebook :
1. Promote Your Shopping Event
Build anticipation of your event a couple of days before. Following that, announce or promote your event and encourage people to subscribe to your page. You can invite them via other channels like Instagram posts, blogs, and social media groups.
2. Keep It Short and Engaging
Consider the first few minutes of the live event important. Show an energetic attitude and grab the audience’s attention initially. According to research, social media users prefer to watch videos in under 1 minute.
3. Plan Things and Be Organized
It is better to plan your points of discussion before the event. You should write the outline and transition lines to shift from one product to another. Besides, keep your surroundings organized to give viewers a good impression.
4. Energetically Communicate
Make your audience as much involved in the event as you can. For this, it is suggested that they respond to their questions and ask them to comment. You can show your product trials and ask a friend or family to create more engaging discussions.
5. Don’t Let Your Work Wasted
You should not let yourFacebook live online selling sessions be wasted. Save it in your timeline for people to watch anytime and get information about items. It will also attract new audiences who couldn’t join the live session.
Part 4. Sell Better With Simplicity: Wondershare Virbo Live
Live selling on Facebook seems easy, but you need effective tools to attract the most customers. In this regard, people still don’t have enough knowledge to plan and execute live streaming. Therefore, usingWondershare Virbo Live is the ultimate solution to perform the entire process in one place. It is an AI tool that offers multilingual AI-driven avatars for seamless shopping broadcasting.
You can set up a customized Q/A database for automatic queries using this tool. Plus, it is compatible with almost all social media platforms, such as YouTube, Facebook, and Instagram. Not only that, but you can also dive into its prominent features, which are explained below for more insights:
- AI Live Script Generation: Are you unable to brainstorm engaging pinpoints for your product selling? Use the AI Script feature of Wondershare Virbo Live and get a compelling script by describing your needs. You can even select a script tone from marketing to specialization options.
- AI Translation: To attract a diverse audience, you need videos in different languages. Therefore, Virbo Live offers a feature to translate your script into another language. Apart from that, a dubbing option holds AI voices of different languages and accents.
- AI Avatars: If you are a camera-shy person but live selling is a need of your business, use AI Avatars as a dynamic shift to progress. They can mimic real-life nuances while showing various ethnicities and attires. You pick one via scrolling, standing, or sitting pose avatars.
Get Started Online Free Download
Steps To Sell Better With Wondershare Virbo Live
Another notable option is that Wondershare Virbo Live lets you import an image or video background for effective enhancement. To explore that option, follow these steps and use Wondershare Virbo Live to the maximum:
- Step 1. Access Virbo Live and Create a Blank Live Stream Room
Enter the official Virbo Live website and proceed to select the “Create Stream Room Now” button. Select the “Create a Blank Livestream Room” button to initiate the live stream system as you lead into the main interface.
Get Started Online Free Download
- Step 2. Customize Your AI Avatar for Streaming
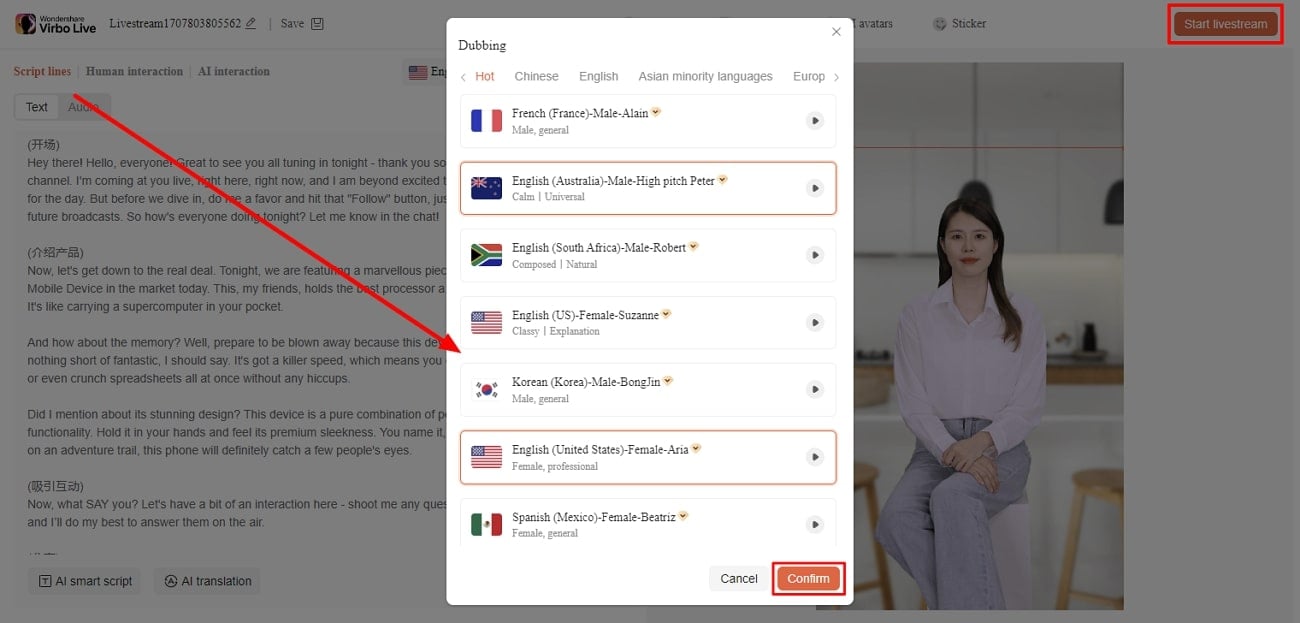
From the editing screen of Virbo Live, press the “AI avatars” option from the top bar. Scroll and pick one avatar that suits you best. Then, hit the “Background” option next to AI Avatar and choose one background.
- Step 3. Add Script for Livestream Video
Move to the left and enter the words you want the AI Avatar to speak under the “Script lines” section. Alternatively, you can choose the “AI Smart Script” button from the bottom left corner. You can describe your product, set a Style, and adjust other parameters to get an AI script there.
- Step 4. Pick a Dubbing Voice for Avatar To Live Stream
After customizing the avatar, head to the “Dubbing” option from the top. Using it, pick one language and accent of the AI voice to proceed with the “Confirm” button. Finally, your live-selling video is ready to post via the “Start livestream” button at the top right corner.
Conclusion
To summarize, livestream selling is becoming a competition between platforms. Meta isn’t behind in this situation and offerslive shopping on Facebook , which is highlighted in this guide. Undoubtedly, Facebook is setting trends, but it is difficult for many users to comprehend. Therefore, Wondershare Virbo Live is a perfect solution to plan and execute live selling seamlessly in one place.
What Is an AI Art Generator? | Wondershare Virbo Glossary
Part 1. What is an AI art generator?
An AI art generator is a software or system that utilizes artificial intelligence techniques to create or assist in creating art. It uses machine learning algorithms, and intense learning models, to analyze and understand various artistic styles, designs, and patterns. By training on large datasets of existing artwork, an AI art generator learns to generate new, original artwork that imitates or extends upon the available styles.
AI art generators can produce various art forms, including paintings, drawings, digital art, and multimedia installations. They can generate artwork from scratch or assist artists by providing suggestions, enhancing creative workflows, and exploring new possibilities. AI art generators can also be used as tools for artistic exploration, enabling artists to experiment with different styles, combinations, and variations.
The generated art results from a collaboration between the AI system and the artist or user. The AI provides suggestions and inspirations or even autonomously creates art pieces based on given parameters or prompts. The artist or user can refine, modify, or incorporate the generated artwork into their creative process.
AI art generators have sparked new debates and discussions around the definition of art, creativity, and the role of machines in artistic expression. They are a fascinating example of how artificial intelligence can be applied in artistic creation, pushing the boundaries of traditional artistic practices and opening up new avenues for creative exploration and innovation.
Part 2. What are the applications and development directions for AI art generators?
The usage types of AI art generators encompass a wide range of creative applications and possibilities. Some of the notable usage types include:
01of 07 Artistic Assistant
AI art generators can serve as creative companions, providing artists with artistic styles, techniques, and suggestions to expand and explore their creative endeavors.
02of 07 Style Transfer
AI art generators can apply the style of one artwork to another, creating unique synthesized pieces that showcase style transformation and fusion.
03of 07 Artwork Generation
AI art generators can generate entirely new artworks from scratch, leveraging learned patterns and features from an extensive collection of existing artworks to produce unique creations.
04of 07 Creative Inspiration
AI art generators can inspire artists with generated artwork, sparking new ideas and encouraging artistic exploration and experimentation.
05of 07 Art Education and Learning
AI art generators can be utilized in art education and learning, offering sample artworks, practice exercises, and learning resources to help students understand and study different artistic styles and techniques.
06of 07 Art Evaluation and Research
AI art generators can be used for the evaluation and research of artworks, generating a large volume of artwork to aid in assessing quality, style, and trends.
07of 07 Digital Art and Virtual Reality
AI art generators can combine digital art and virtual reality technologies, creating interactive digital artworks and immersive virtual reality experiences.
These usage types demonstrate the diverse applications of AI art generators in art, driving artistic innovation, exploration, and the fusion of art and technology.
Part 3. Which AI art generators are available on the market?
Those mentioned above are just a few examples of their application directions. Here are some well-known specific AI art generators that have gained recognition and popularity in the field:
1. Midjourney
Midjourney is a groundbreaking AI art generator that pushes the boundaries of artistic expression. Powered by advanced machine learning algorithms, Midjourney combines artificial intelligence and creativity to produce mesmerizing artwork. With it, artists and enthusiasts can embark on a unique artistic journey. By simply providing a starting point, such as a basic sketch or a written description, Midjourney’s intelligent algorithms take over, transforming the input into a stunning piece of art. Whether it’s a painting, illustration, or even a digital sculpture, Midjourney’s AI generates astonishing visual creations that captivate and inspire.
2. Deep Dream
Developed by Google, Deep Dream is an AI art generator that uses deep neural networks to generate surreal and abstract images. It has gained attention for its ability to produce visually mesmerizing and dream-like compositions.
3. Prisma
Prisma is a popular mobile app that utilizes AI algorithms to transform photos into artistic renditions. With its wide range of artistic filters and styles, Prisma has become a favorite among users who want to effortlessly add a creative touch to their photos.
4. Runway
Runway is a versatile AI art generator tool that offers a wide range of models and functionalities for artists and creators. From generating unique visuals to exploring style transfer and animation, Runway empowers users to experiment and push the boundaries of their artistic creations.s
These well-known AI art generators exemplify AI technology’s capabilities and impact on art. They have opened up new avenues for artistic expression, allowing artists and enthusiasts to explore and create with greater creativity and innovation.
5. DeepArt.io
DeepArt.io is a widely recognized AI art generator that allows users to transform their photos into artistic styles inspired by renowned artists and various artistic movements. It has become a go-to platform for individuals looking to create unique and visually captivating artworks.
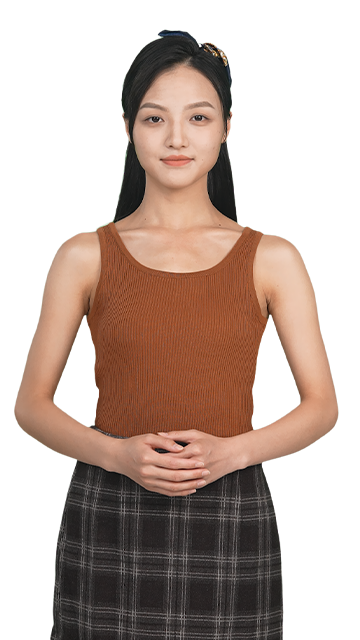
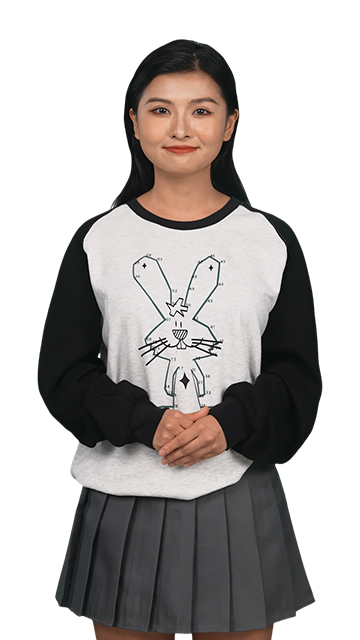
[Top 6] Free Talking Stock Photo Sites
Ever heard oftalking stock photo s? If you have seen magic/sorcery/ wizardry-themed movies, you might have come across the idea of moving photos or motion photos where photo frames are shown to have motion pictures. In real life, you have what’s called Live Photos by Apple, a technology that captures a couple of seconds’ worth of motion. These are essentially just GIFs. But this is 2024, and today, we introduce you to talking photos or talking stock images. Literally, photos that speak. What! Read more about it below!
Part 1: What Are Talking Stock Photos and What Can You Do With Them?
Let’s answer the most pressing question on your mind first. What are talking photos? Talking photos, simply put, are photos brought to life with video and voice. No longer are your photos just images – they can now include voice along with motion. That is one of the several uses of generative artificial intelligence that’s taking the world by storm. With talking photos, not only do you have a memory as image, but you can have the memory with voice and video to make it more life-like. In some uses, this can be deeply comforting to us.
1.1: Uses of Talking Photos
What can talking photos be used for? Talking photos can be used for fun as well as for interactive education. Here are some uses of talking photos, in a gist:
- An interactive and more engaging learning experience for children.
- Convey emotions better.
- Send personalized messages with voice!
- Capture viewer attention right from the start.
- Create memories by adding voice to photos for a more vivid memory experience!
- Your social media shares can become that much more interesting and engaging.
- Presentations and financial charts and graphs could be made easier to understand.
Part 2: Where Can You Download Talking Stock Photos For Free?
“Okay, I’m sold on talking photos! Where can I get them?”
Glad you asked! We have collated a repository of 6 portals that offer quality talking stock photos and talking stock images that you can choose and use!
Difference Between Talking Stock Photos and Talking Stock Images
What is the difference between talking stock photos and talking stock images? Photos are images taken from a camera system. Images could be anything – from actual photos to graphics created on a computer.
2.1: Getty Images
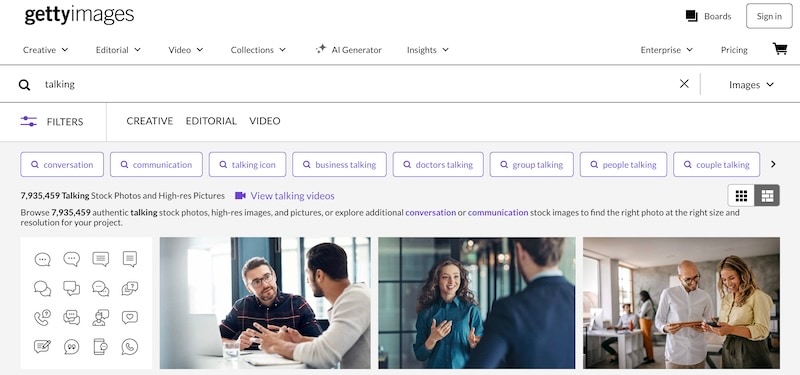
What self-respecting journalist or newsreader does not know about Getty Images? Getty has a repertoire of over 7,935,000 high-quality talking photos for you to choose from. That all but guarantees that you will be able to find the ones you want and like.
2.2: Shutterstock
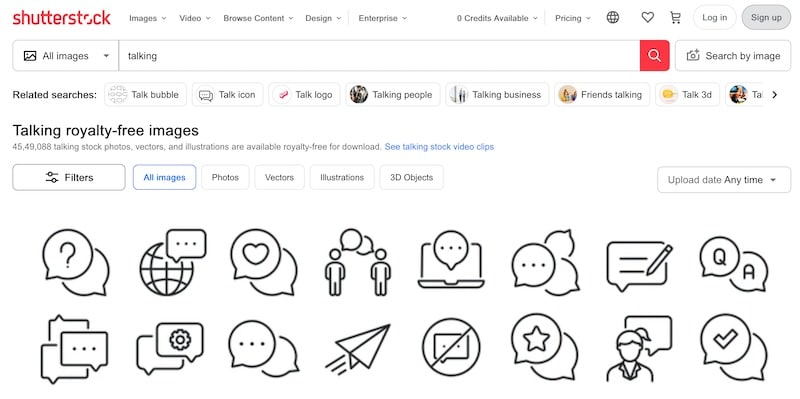
If Getty’s 7,935,000 talking photos didn’t fit the bill, maybe Shutterstock is for you. You can search from a database of over 4,549,000 talking photos. Certainly, something will catch your fancy with Shutterstock!
2.3: Unsplash
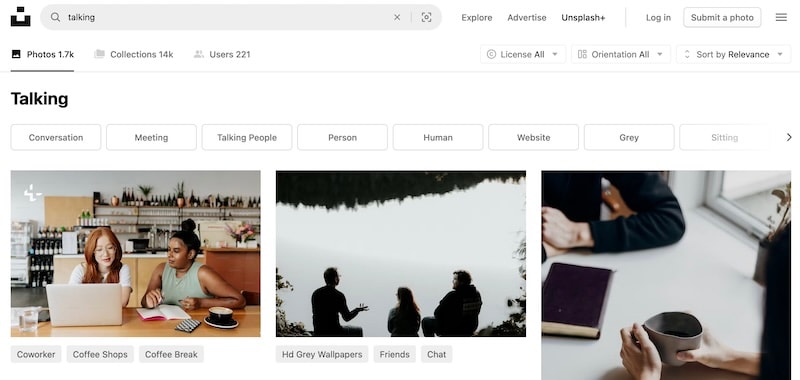
Unsplash has been making a splash since 2013 with high-quality stock imagery for everyone. So much so, that in 2021, it was acquired by Getty Images. Unsplash users will not have a lot to work with in terms of talking photos, though. The repository seems to be somewhat small at the moment at over 1700 talking photos only.
2.4: Pexels
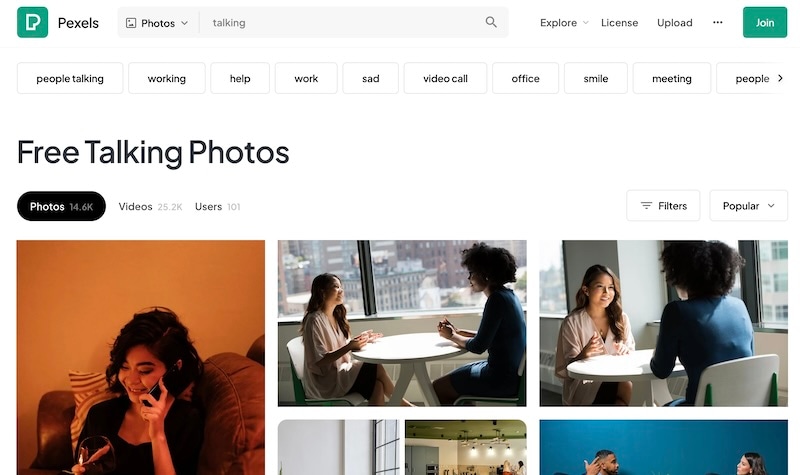
Pexels was founded in Germany just about a decade ago in 2014 and has since grown to house over 3.2 million free stock photos and videos. The platform features over 411,000 talking photos for you to choose from. Pexels is part of Canva since 2018, just 4 years since its release. Must be doing something great, right?
2.5: Pixabay
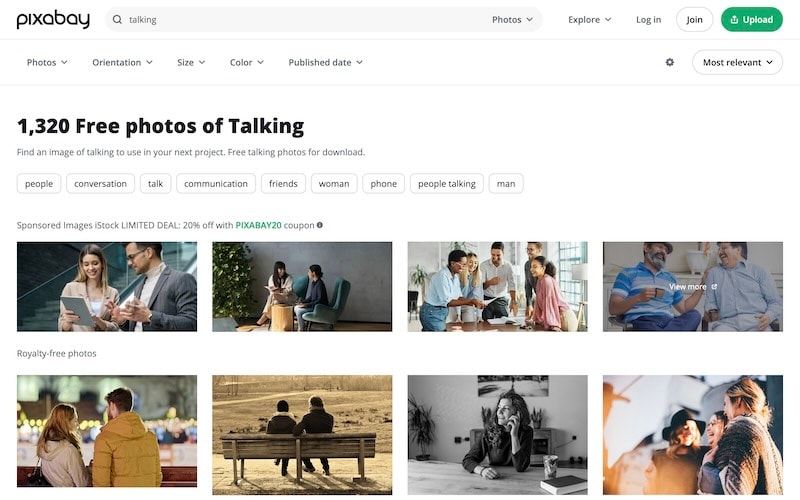
Pixabay is another German startup that has been serving the internet community since 2010. Pixabay houses over 4.4 million photos and stock imagery, out of which over 3000 are talking photos. Not a great database, admittedly, but still worth a look if you are not satisfied with the others! Pixabay, like Pexels in 2018, was acquired by Canva in 2019.
2.6: Freepik
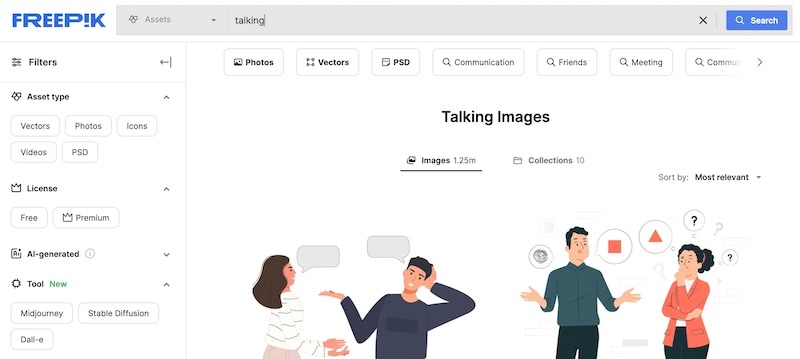
Freepik has been around since 2010 and is part of the Freepik Company that features other brands such as Flaticon, Slidesgo and Wepik. Freepik has over 1,052,000 talking photos for you to choose from.
Part 3: Learn How To Create Talking Photos Yourself
And now, let’s get to the fun part – creating a talking photo yourself! We could tell you of a few tools to do so, but how about we save you some time and get right to the best talking photo creator we could find on the internet?
Creating Talking Photos With Wondershare Virbo
Wondershare Virbo is the ultimate talking photo creator tool you could find on the internet today. It is the easiest and the fastest way to create talking photos that are ultra-realistic.
VERSATILITY
Wondershare Virbo is the most flexible and versatile talking photo creator tool available on the internet. There are so many ways you can create talking photos with. You can choose a voiceover, record your own audio online or upload a recording yourself to create a unique, fully customized talking photo unlike any other in the world! What’s more, using Wondershare Virbo, you can not only create talking photos but add subtitles to videos, translate videos, and do so much more with just one single app!
Generate Video Online Download APP Now Free Download
Step 1: We start with creating a project. Simply download Wondershare Virbo to your computer and click Talking Photo.
You can use the add button (with the plus symbol) to upload an image or choose from one of the several options within the software and click Create Video.
Step 2: Now, we edit the video to add our audio. Click Audio Upload to record your own audio/ upload your own audio as video script, or type/ paste a video script in the Text Script pane.
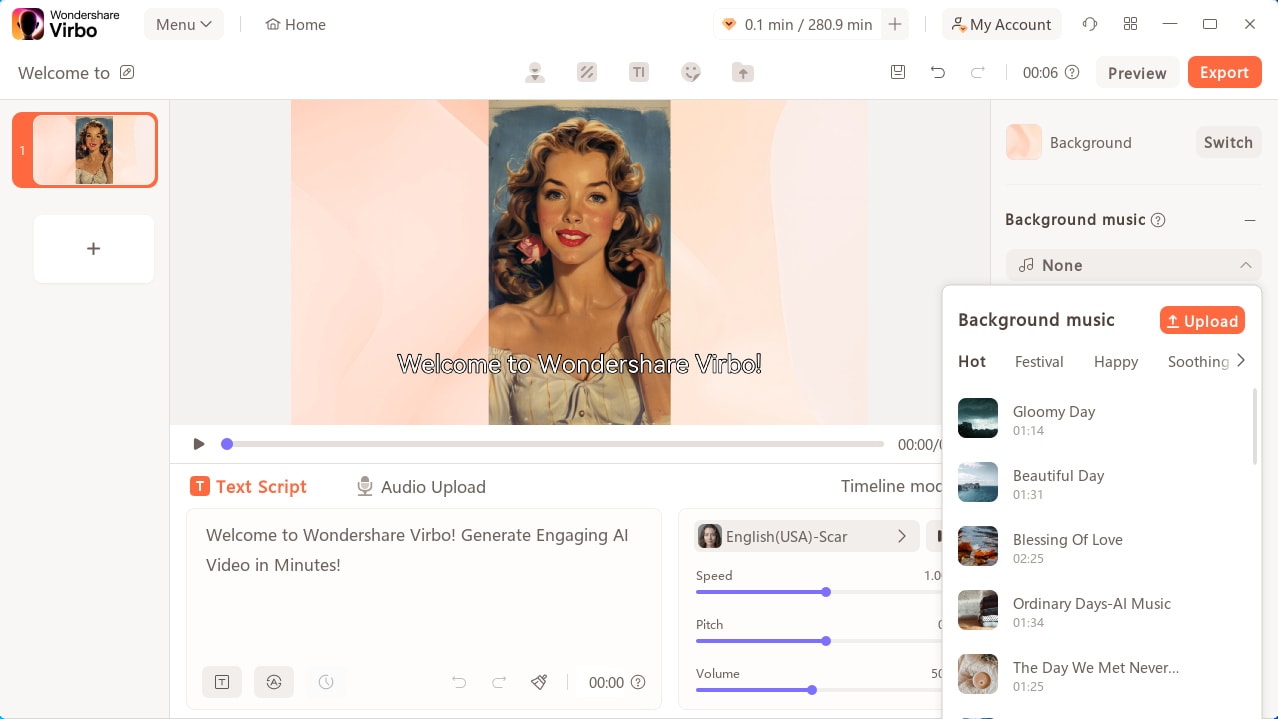
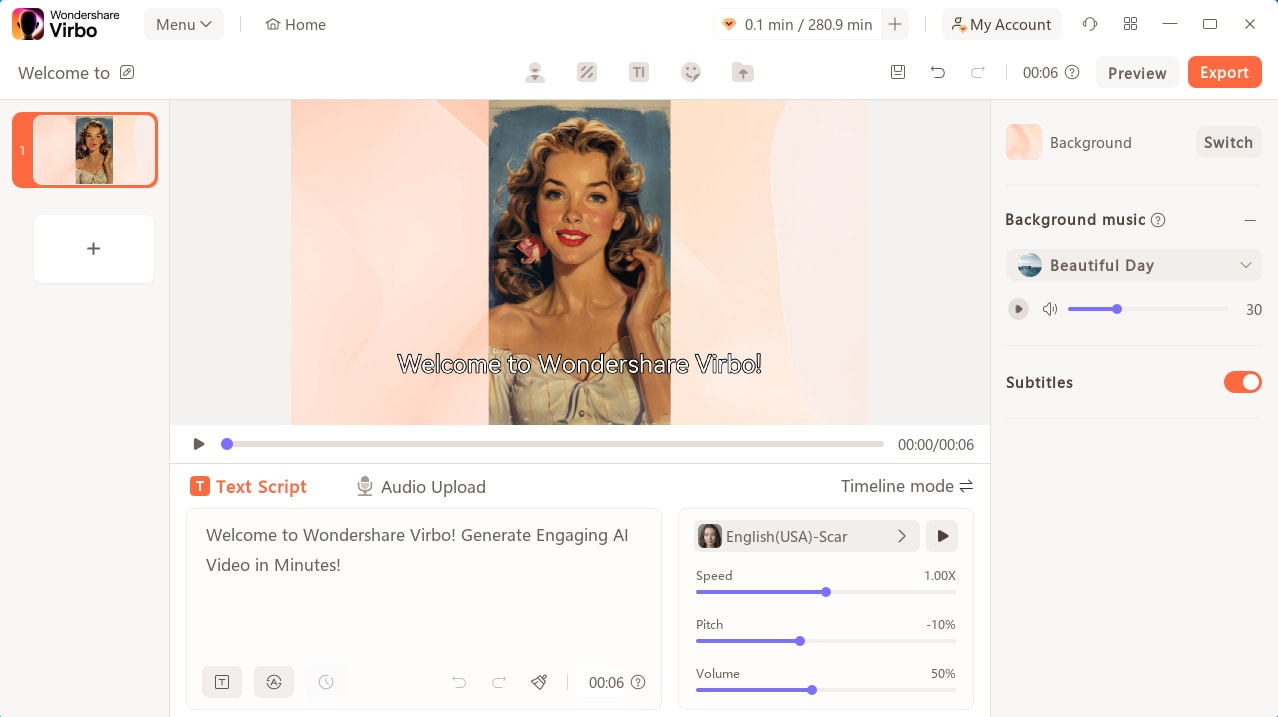
There are options you can use to customize your output. Choose from several languages, change the speed of speech, even adjust pitch and volume, right here, easily! You can even add subtitles, change background music or switch the background!
Step 3: It is now time to preview the video and export it! Click the Preview button to view the magic of Wondershare Virbo. If everything is to your liking, simply click Export.
The talking photo will be saved under My Creations.
You can view it there and download to your disk by clicking Download Video.
Generate Video Online Download APP Now Free Download
Closing Words
Talking photos are the next frontier in digital communication and expression. Harnessing the power of generative artificial intelligence, talking photos present never-before opportunities to not only engage people but engage with people. The education sector can use talking photos to make comprehension easier for children by making interactive, expressive talking photos that can explain complex concepts in a fun new way while corporates and businesses can use the power of talking photos to better engage with their audiences in a new way that captures and retains their interest. Inter-personally, talking photos can be used to have fun with friends and family in a completely new way! No more drab images, talking photos are the fun new way to express!
Voicemod AI Review: Transforming Your Voice in Real Time
Voice modulation tools like Voicemod AI have become trendy nowadays. With voice-changing software, you can transform your voice into a celebrity, monster, or any other character and prank your friends online. This technology can also be helpful with video narrations and gaming, where you don’t need to reveal your voice. But to achieve that, you must research the best voice modulation program. So, in this post, we want to introduce you to how to useVoicemod AI voices to sound differently on video games, VoIP apps, video narrations, and more. You’ll also know the best alternative to this AI-powered program.
Part I. A Quick Overview of Voicemod AI
Voicemod AI is a Windows/Mac program designed to change your voice in real-time. This software packs a range of AI voices to change your persona in your online interactions. With this program, you can sound almost like anything, including monsters, chipmunks, males, females, children, celebrities, and more. Even better, Voicemod has frequent updates with new AI voices.
So, where can you use the AI voices on this program? Voicemod is a pretty flexible program that allows you to achieve quite a lot. That’s because this program will modulate your voice in real-time, allowing you to shake things up on Discord group chats, Skype video calls, Steam gaming sessions, and other applications. You can even use it to create unique YouTube content and carve out your brand.
Part II. Features and Capabilities
You must be asking yourself why we singled out Voicemod AI of all the AI voice modulation programs out there. The thing is that Voicemod comes with special features that can make your voice stand out in the group. Also, this tool is designed to give you a seamless voice-changing session. Let’s look at some of its shining points!
1. Real-time voice modulator
Voicemod allows you to process voices in real-time, making it the ideal software for streaming on Twitch or making fun calls on Zoom. The AI voice generator has been extensively trained by voices from professional actors to give you human-like narrations. You only need to connect your mic to stream content withVoicemod AI voice . We’ll show you how to do that in this guidepost.
2. Extensive variety of voice effects
Voicemod comes with more than 100 voice effects, with this voice-changing software adding more voices with new updates. The massive library of voice effects and sound modification features means you’ll get unlimited experience with Voicemod. It’s one of the few programs that allows you to modify your voices with reverb, pitch, chorus, vocoder, and other customization features.
3. Create custom voices on VoiceLab
You can exploit the VoiceLab tool on your Voicemod Pro account to generate custom voices. With it, you can create voices from scratch by combining different audio effects and processors like reverb, pitch shifter, filter, and more. Once you have made a custom voice, proceed to name it, add an avatar, and add it to the voice control panel. This is an excellent way to create unique voices you cannot find anywhere else.
Below is how to change your voice with Voicemod AI:
Step 1. Install Voicemod on your Windows 7/10/11 PC or Mac computer and run it.

Step 2. Once you have installed the program successfully, open the sound settings to choose your input and output sound devices.

Step 3. Ensure that theVoice Changer toggle at the bottom of the Voicemod home window is enabled. Then, click theVoicebox tab and choose one of the sound effects. Speak to your microphone to listen, preview, and possibly change the new voice.

Step 4. If the voice is working, head to the application or browser tab where you want to apply the voice effect to start streaming. That’s it!
Note: Remember to select the “Voicemod Virtual Audio Device (WDMI)” on the application on which you’ll stream the sound effect. For example, if you’re using Twitch, click Settings, choose Audio, then select this sound input device.
Part III. Real User Experience
So, what was our user experience withAI Voicemod ? To be honest, Voicemod is one of the best if not the best, voice modulator programs. We were impressed by how easily it picks up sounds on our microphone. The range of voice effects and customization options is also impressive, to say the least. And yes, the platform itself looks stylish and modern.
But this program’s main drawback comes from its major strength. Although Voicemod is a feature-rich program, beginners might feel intimidated at first. You may need to follow the developer’s guide to connect your microphone appropriately and customize the sound settings. Overall, Voicemod isn’t for green hands, although it’s fun to use once you get the hang of it.
Part IV. Pricing and Plans
Although Voicemod is free, you must upgrade to the Pro version to unlock all the voice effects and capabilities. Thankfully, the Voicemod subscription plan is one of the most competitive. You can opt for the One-Time Payment at**$59.00** , although the program often has50% off for new installations. You can also choose the Annual plan of**$23.88** or the 3-month plan of**$11.97** .
Below are some of the advantages you’ll get with Voicemod Pro:
- Design your unique voices from scratch with VoiceLab.
- Unlimited MP3 and WAV audio uploads.
- Complete Voicebox with 80+ pre-made voice effects.
- Receive new voices and themed soundboards every month.
- Unlock all AI voice filters.

Bonus Tips: Try the Best Alternative to Voicemod AI - Virbo
Voicemod might stand out as one of the best voice-changing software around. But, this program has a few drawbacks, primarily complex usability. Also, Voicemod only works with audio files and live microphone recordings. This begs the question: what if you want to add a voice effect to a video and share it online?
In that case, Wondershare Virbo is the best alternative to Voicemod AI. With this AI-backed desktop program, you can create video templates with 150+ free avatars and 120+ voiceovers. It’s the best tool for creating videos with unique voice effects for digital marketing, online classes, tutorials, and other uses. This tool also supports tens of languages and can convert texts to audio overlays.
Follow these steps to create a video with AI voiceover on Wondershare Virbo:
Step 1. Download and install Wondershare Virbo on your PC, then click theAvatar button. The installation process should take just a few seconds.

Get Started Online Free Download
Step 2. After choosing a video template, proceed to select the narration language. This program supports English, Arabic, French, Portuguese, and more.

Step 3. Next, tap theAudio Scripts button, then chooseOnline Recording to begin recording live voiceover on your video template. You can also upload a pre-recorded MP3/WAV file or extract audio from MP4.

Step 4. Preview the video and change the sound effects by choosing a new avatar if needed. If satisfied, tapExport to save your video template with AI voice. That was easy, right?

Note: Virbo transforms texts into voice overlays by simply entering your Text Scripts. This makes it an excellent tool to create unique videos if you have voice problems.
Final Words
Now it’s time to try everything you have learned in this guidepost. WithVoicemod , you can transform your live voices on multiple gaming and voice apps. However, we advise you to upgrade to the Pro plan to unlock this tool’s full capabilities. And don’t forget to check outWondershare Virbo to create videos with unique AI voices. Give it a try!
Also read:
- 2024 Approved Best YouTube Video Into Text Converters A Comprehensive Guide
- New In 2024, Installation and Registration | Wondershare Virbo
- New Best 5 TikTok Voice Generators You Should Try for 2024
- 2024 Approved How To Translate Video From Japanese to English Online?
- New What Is an AI Video Generator, In 2024
- Updated Create Video with PPT | Wondershare Virbo
- 2024 Approved AI Video Translation
- Tips for Perfecting Your Talking Face Content A Complete Guide for 2024
- 2024 Approved Download/Install/Register/Uninstall
- New 2024 Approved The Most Efficient Tools to Convert Text to MP3 With the Best Natural Voices
- In 2024, RTMP Streaming on Instagram A Comprehensive Tutorial
- In 2024, Top 10 Robotic Voice Generators
- New Top 4 Ways of Instagram Video Promotion for 2024
- Updated Mastering Facebook Live Your Complete Guide to Successful Streaming
- How To Get More NFL Viewers For Your Sports Live Streaming Channel
- New In 2024, 5 Best Apps for Voice Translation From English to Bangla
- Updated 2024 Approved The Most Direct Guide to Learning How to Clone Your Voice
- New Latest Top Darth Vader Voice Generators for All Platforms
- What Is an AI Text Generator?
- Ultimate Guide How to Live Stream on Facebook?
- In 2024, Exploring The Best Text-to-Speech Online Tools To Use
- In 2024, The Best Text-to-Audio Converters of All Times
- Best 10 Free and Best Text-to-Speech Generators
- New Download/Install/Register/Uninstall | Wondershare Virbo
- Updated 2024 Approved Free MSNBC Live Online Stream for the Latest Shows for All Devices
- New What Is AI API for 2024
- Real-Time AI Voice Changer Revolutionizing Communication
- Best 5 AI-Powered Script to Video Makers for 2024
- New 2024 Approved 5 Best Apps for Voice Translation From English to Bangla
- New In 2024, 7 Best Real Time Video Translation Apps
- Updated Best 4 Ways of Instagram Video Promotion
- The Most Direct Guide to Learning How to Clone Your Voice
- Updated In 2024, Best 8 AI Title Generators for Creating Catchy Titles For All Platform
- New Latest Top Darth Vader Voice Generators for All Platforms for 2024
- New What Is an AI Editor? | Wondershare Virbo Glossary
- Updated What Is AI Advertising for 2024
- What Is an AI Voice Generator, In 2024
- New 2024 Approved A Comprehensive Guide for Free Video Translator Downloading
- New AI Avatar | Wondershare Virbo Online
- In 2024, What Is ChatGPT?
- Updated Talking Photo Feature
- New Create AI Avatar Video with AI Script for 2024
- RTMP Streaming on Instagram A Comprehensive Tutorial
- Fixing Persistent Pandora Crashes on Xiaomi Redmi A2 | Dr.fone
- How do I reset my OnePlus Ace 2V Phone without technical knowledge? | Dr.fone
- How to recover deleted contacts from Tecno Pop 8.
- Will iSpoofer update On Samsung Galaxy F04 | Dr.fone
- 4 solution to get rid of pokemon fail to detect location On Infinix Note 30 VIP Racing Edition | Dr.fone
- In 2024, Unova Stone Pokémon Go Evolution List and How Catch Them For Oppo Reno 10 5G | Dr.fone
- Looking For A Location Changer On Apple iPhone 7 Plus? Look No Further | Dr.fone
- Complete guide for recovering contacts files on Vivo Y100i.
- In 2024, A Comprehensive Guide to iPhone 6 Blacklist Removal Tips and Tools
- 4 Solutions to Fix Unfortunately Your App Has Stopped Error on OnePlus Nord CE 3 Lite 5G | Dr.fone
- In 2024, Guide to Mirror Your Realme GT 5 Pro to Other Android devices | Dr.fone
- Fix App Not Available in Your Country Play Store Problem on Samsung Galaxy M34 | Dr.fone
- Free electronic signature - For .txt file
- 3 Ways to Track Meizu 21 Pro without Them Knowing | Dr.fone
- In 2024, The Ultimate Guide to Unlocking Your Apple iPhone 11 on MetroPCS
- Oppo Data Retrieval tool – restore lost data from Oppo Reno 10 5G
- Complete guide for recovering video files on Vivo
- In 2024, Top 10 AirPlay Apps in Samsung Galaxy F04 for Streaming | Dr.fone
- In 2024, How To Change Your SIM PIN Code on Your Vivo V27 Pro Phone
- 4 Solutions to Fix Unfortunately Your App Has Stopped Error on Oppo Find X6 Pro | Dr.fone
- How to Find iSpoofer Pro Activation Key On Samsung Galaxy M14 4G? | Dr.fone
- Recover your contacts after OnePlus Open has been deleted.
- How to identify missing hardware drivers with Windows Device Manager on Windows 10 & 7
- How to share/fake gps on Uber for Xiaomi 14 Ultra | Dr.fone
- Life360 Learn How Everything Works On Honor Magic 5 Pro | Dr.fone
- Best Free iPhone 12 IMEI Checker
- Top Apps and Online Tools To Track Poco F5 5G Phone With/Without IMEI Number
- Two Ways to Track My Boyfriends Samsung Galaxy A15 4G without Him Knowing | Dr.fone
- In 2024, 4 Most-Known Ways to Find Someone on Tinder For OnePlus 11R by Name | Dr.fone
- Bypass/Reset Oppo Reno 11 Pro 5G Phone Screen Passcode/Pattern/Pin
- In 2024, How to Unlock iPhone X, Apples New iPhone | Dr.fone
- Complete Fixes To Solve iPhone XS Randomly Asking for Apple ID Password
- Title: In 2024, How to Make Lip Sync Video Without Installing Any App
- Author: Sam
- Created at : 2024-05-19 03:34:55
- Updated at : 2024-05-20 03:34:55
- Link: https://ai-voice-clone.techidaily.com/in-2024-how-to-make-lip-sync-video-without-installing-any-app/
- License: This work is licensed under CC BY-NC-SA 4.0.
