
:max_bytes(150000):strip_icc():format(webp)/the-17-best-graphic-design-software-2024-1dd6c15b34124b25b65e4b096e4e6ba4.jpg)
In 2024, Cloning Voices in Real-Time With Top GitHub Repositories
Cloning Voices in Real-Time With Top GitHub Repositories
The advancements in AI technology have gone beyond our imagination. The AI can generate realistic images and read text aloud with the TTS tool. Also, real-time voice cloning technology has made a significant impact in today’s world. You can transform plain text into lifelike AI-generated speech in various languages. It perfectly mimics the voice of another person and can read the text with accuracy.
Moreover, it uses neural networks and speech synthesis that can assist in complex domains. In this article, we’ll explore some repositories of real-time voice cloning GitHub.
Part 1: An Introduction to Real-Time Voice Cloning
Real-time voice cloning uses generative models to create real human voices. The building blocks are speech synthesis, voice embedding, and waveform generation. Also, the AI is trained to gather data on a set of human voice samples to generate authentic results. It gathers and learns how we talk - our pitch, rhythm, and voice quirks.
This voice cloning technology works on four models that enable real-time voice cloning. These models are text-to-Mel coder, speaker encoder, synthesizer, and vocoder. Real-time voice cloning software has been integrated into various tools and platforms.
Generate Engaging
AI Video in Minutes!
Easily convert text into professional spokesperson videos in over 120+ voices & languages in minutes.
Generate AI Video Free Generate AI Video Now


Functions of Real-Time Voice Cloning
- Real-time voice clone AI as a virtual assistant can sound like your desired celebrity. You can customize your assistant’s voice with voices like Lady Terresa or Elon Musk.
- Entertainment industries use real-time voice cloning softwareto create character voiceovers. From video games to animated movies, this technology makes it easy. Also, this creates an immersive and engaging environment for players and viewers.
- This technology provides a voice to all the speech-disabled people. The tool can provide a synthetic voice to these people and improve their lives. Also, people with speech impairment can regain their confidence by having the ability to communicate.
- Businesses can improve their customer service by using real-time voice cloning online. They can strengthen their brand name by giving their chatbot a synthetic voiceover. This way, your customers will be engaged with the chatbot and can relate to it.
Part 2: Finding The Best Real-Time Voice Cloning from GitHub
GitHub has many repositories that can help users perform various tasks. You can find different projects to reshape real-time voice creation. It offers one-shot cloning, better style transfer, and smooth text-to-speech models. Now, let’s explore a repository for real-time voice cloning to make voices sound natural.
Top-Rated Real-Time Voice Cloning Tools From GitHub
- Real-Time Voice Cloning (CorentinJ)
- PaddleSpeech
- Multi-Tacotron Voice Cloning
- Coqui TTS
- Multilingual Text-to-Speech (Tomiinek)
- One-Shot Voice Cloning CMsmartvoice
- Voice-Synthesis (smoke-trees)
- VoiceSmith (dunky11)
- Voice Cloning App by BenAAndrew
- Unet-TTS
Get Started Online Download APP Now Free Download
1. Real-Time Voice Cloning (CorentinJ)
Users can explore this repository to clone their voice within 5 seconds. This real-time voice cloning GitHub repository is an implementation of the SV2TTS framework. SV2TTS uses a three-stage deep learning process to carry out voice cloning. This implementation creates a digital voice representation from a brief audio sample. Then, it utilizes this sample to generate diverse speech from the given text.
- Install Requirements:
To install it on your system, it’s better to have a stable GPU for a smooth experience. Other than this, you should have at least Python 3.5 for the repository to function properly. Also, it is necessary to install ffmpeg files to process audio files.
2. PaddleSpeech
It is an exceptional open-source toolkit on the Paddle-Paddle platform. With this simple toolkit, you can perform a variety of audio-related tasks. It employs new cutting-edge technology and production-ready streaming ASR and TTS systems. Plus, this repository provides fast-processing models to the users. PaddleSpeech also utilizes self-defined linguistics to adapt to the Chinese context.
This repository aims to inspire industrial and academic fields through its several modules. These may include Automatic Speech Recognition, Keyword Spotting, Speech Translation, etc. PaddleSpeech also combines its task with various other fields, including NLP and Computer Vision.
3. Multi-Tacotron Voice Cloning
Multi-Tacotron is the ultimate in voice cloning with multilingual implementation. You can make use of this repository for Russian and English languages. This repository builds upon real-time voice cloning online with a four-stage learning framework. With a few seconds of audio, it crafts a numerical representation of a voice. Furthermore, it uses this audio to condition a text-to-speech model.
For cloning the English language, the original implementation is enough. You don’t require a high-tier GPU to run this toolbox; even a low-tier one will work well. There are also some pre-trained models for datasets that you can download with ease.
4. Coqui TTS
You can explore the finest text-to-speech toolkit with Coqui. Boasting high-performance models, it covers TTS tasks effortlessly. This repository extends its ability with speaker encoder for various Vocoder models. With swift model training and multi-speaker TTS support, it stands out for efficiency. TTS version 2 now has 16 more languages and better overall performance.
Moreover, TTS can now work smoothly with even less than 200ms latency. More than 1100 languages are supported with pre-trained models of this repository. Plus, all TTS models are ready to use with efficient model training.
5. Multilingual Text-to-Speech (Tomiinek)
This repository available on GitHub is an implementation of Tacotron 2. It supports code-switching, voice cloning, and parameter-sharing for versatile experiments. You can utilize training data and source code for optimized voice cloning. Also, it compares three models for multilingual synthesis. This repo also has samples generated by a monolingual vanilla Tacotron.
Additionally, multilingual Text-to-Speech comes with a convolutional encoder with parameters that are language-specific. There are also some interactive demos that introduce code-switching abilities and provide multilingual training on the model.
6. One-Shot Voice Cloning CMsmartvoice
One-shot voice cloning with Unet-TTS features a powerful speaker and style transfer capabilities. The repository generates text sounds with provided inferencing code and pre-training models. Its model training focuses on neutral emotion to avoid strong emotional speech. Also, it addresses the challenges of out-of-domain style using the Unet network and AdaIN layer.
Users are not required to use reference speech if they plan to do one-shot voice cloning. Also, the requirement to manually enter statistics of duration is no longer essential. Only Linux users can install it with the correct TensorFlow and TensorFlow-addons versions.
7. Voice-Synthesis (smoke-trees)
This approach creates a numerical representation of a voice from a few seconds of audio. Then, it uses this audio for text-to-speech synthesis. SV2TTS excels with deep learning and uses a speaker encoder, synthesizer, and voice coder. It clones voices in real time with zero-shot learning. The repository identifies voices, and the synthesizer generates Mel-spectrograms from the text. Finally, the vocoder turns them into lifelike waveforms.
All you need to do is feed this repository your voice sample or custom voice, and it can synthesize a clone of it for you. You can also use a microphone to input your text commands through speech. There are also instructions given if you want to work with your own models on different datasets and language mediums.
8. VoiceSmith (dunky11)
VoiceSmith is an easy-to-use repository requiring no coding experience. It fine-tunes a pipeline based on Delightful TTS and UnivNet for single or many speakers. Users can opt from a proprietary 5000 speaker dataset with automatic text normalization. Windows and Linux are supported, and an NVIDIA GPU with CUDA support is for faster training. Docker is essential for seamless operation for users exploring real-time voice cloning online.
- Install Requirements:
A RAM of less than 8GB may not work well with it, so it’s better to use at least 8GB RAM. To use this repository on Linux, you are advised to install Docker Engine. Users also get to play around with an emotional 60-speaker dataset-trained model.
9. Voice Cloning App by BenAAndrew
This Python or Pytorch repository empowers users for effortless voice synthesis. You can enjoy automatic dataset creation, multi-language support, and easy remote training. It allows you to build datasets and proceed further by using a training model. The tool offers new datasets and lets you extend existing datasets for voice cloning. This simple approach elevates your experience of real-time voice cloning on GitHub.
In future improvements, this repository is expected to support AMD GPU for better performance. Also, it claims to improve its batch size estimation. You can run it on Windows 10 or Ubuntu 20.04 operating system with at least 5GB of required disk space.
10. Unet-TTS
Unet-TTS excels in unseen speaker and style transfer for one-shot voice cloning. It works in seconds to produce target audio through voice synthesis without fine-tuning. There are various speaking styles embedded in a seamless way. Its algorithm works on a skip-connected structure to capture speaker and utterance features. Users can get precise inferences of complex voice characteristics and speaking styles.
However, it’s still a challenging task to perform out-of-domain transfer. According to the similarity evaluation, the new model excels in speaker embedding and style modeling. The new model can also discover utterance-level details from the reference audio.
Part 3: Master the Art of AI Voice with Wondershare Virbo
If you want to create AI voices for your content creation purpose, there is a solution. Wondershare Virbo provides real-time voice cloning services to you. With the help of this tool, you can create lifelike AI voices from text. You can create AI voices in different languages for your podcast with this tool.
The tool is diverse as it allows you to choose the gender of your created voice. Users can easily input text to generate the AI voices. It is cost-effective and provides high-quality audio. An influencer or a content creator can engage viewers through this real-time voice clone tool. This tool matches all your needs related to voice clone services.
Key Features of Wondershare Virbo
- AI Streamer: You can increase the sales of your online shop with the newly released live streaming tool. It provides AI-avatar to increase revenue during live shopping. With 24/7 AI streaming and multilingual avatars, you can transform the live experience.
- AI Script Generator:The user can use this feature of the tool to generate a script for the video. With this auto-generated script functionality, users can generate scripts instantly. Also, it provides the option to select the language of the video script.
- AI Video Translator: Virbo allows you to break the language barrier with this feature. The AI video translator feature can translate video content into 20+ languages. This is an affordable way to convert the content to other languages.
- AI Talking Photo: Social media influencers can impress their follower with AI talking photo features. It allows you to add voice clips to any photo to make them interactive. You can use this new way of storytelling to engage your viewers.
Comprehensive Step Guide to Use Virbo’s AI Voice Feature
Now, you get familiar with all the features of the tool besides voice cloning. The tool is an all-in-one platform to generate and share content. Let’s go through the following easy steps to use this tool.
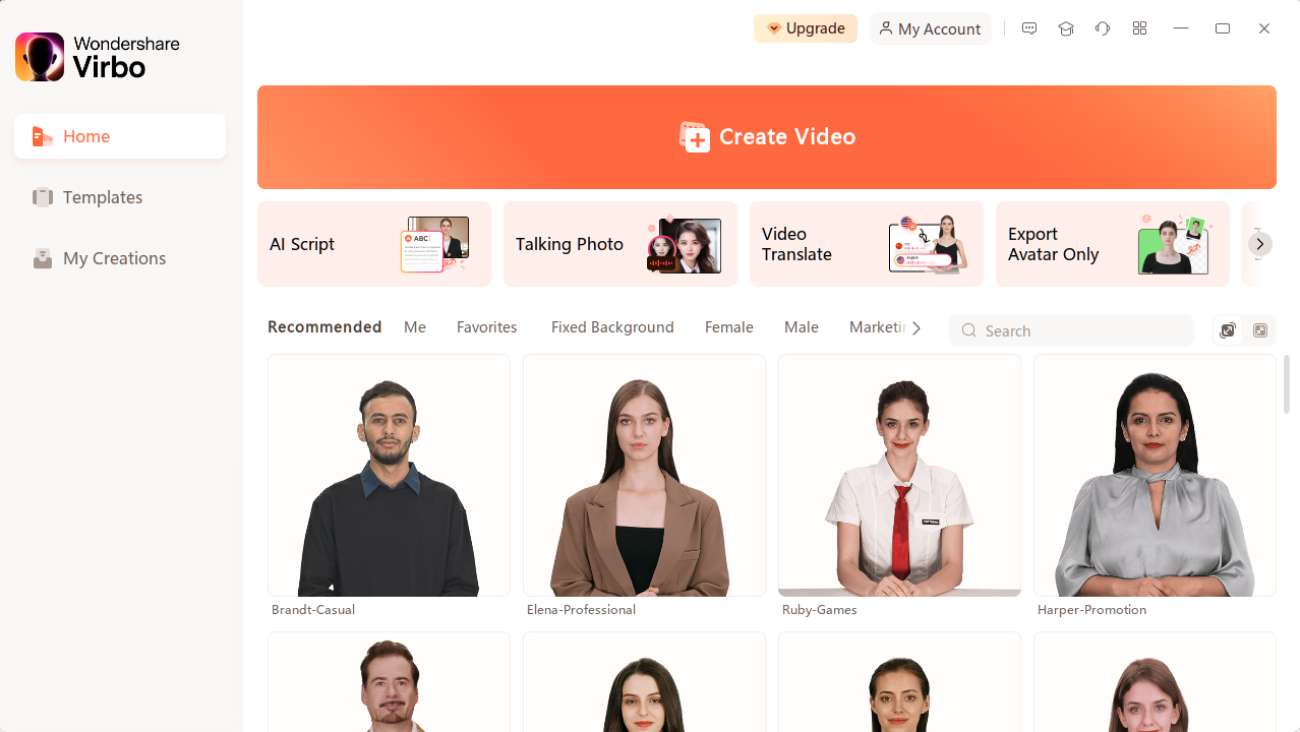
Step 1 Install Wondershare Virbo and Create a Video
Start the process by launching and installing Virbo on your desktop. You can also get direct access to Virbo’s exceptional platform online through a browser. Then, click the “Create Video” button on the main interface of this tool. Afterward, choose the video aspect ratio of the video and press the “Create Video” button again.

Get Started Online Download APP Now Free Download
Step 2 Add the Text Script for the Video Setting
Now, with your chosen avatar, you get access to a new window. After this, in the “Text Script” section, write your personalized narrative. Then, you can adjust the volume, pitch, and speed of your cloned voice.

Get Started Online Download APP Now Free Download
Step 3 Change the Voiceover Setting and Export the Video
Afterward, press the “Language” button over the volume setting to change the AI avatar voice. Next, you get the pop-up window to choose the gender, language, and narrator of the video. Once you are done with these changes, click the “OK” button. Finally, save the video with cloned voice by hitting the “Export” button on the top right corner.

Get Started Online Download APP Now Free Download
Conclusion
In the end, we have learned that real-time voice cloning software can help you in various areas of life. This AI technology is used in business industries and for personal experience. For this purpose, it is only a matter of finding the best software for voice cloning. Wondershare Virbo is your best option for real-time voice cloning online to generate human-like voices.
Master Deepface Live: Download and Train Your Live Model
DeepFace Live offers you an opportunity to swap your face for someone else’s when streaming or making video calls. By swapping your face in real-time, you can present yourself in videos in any way you like. With the recent development made by DeepFaceLab, you get accurate and quality face-swapping, create realistic live models, and live up to the hype withDeepFace Live . In this article, we provide an overview ofDeeepFace Live and provide simple guides for downloading the application to your PC and creating your first live model.
Part 1: What is DeepFace Live
Deepface Live refers to a real-time face-swapping application, which allows you to swap faces during video calls and streaming.
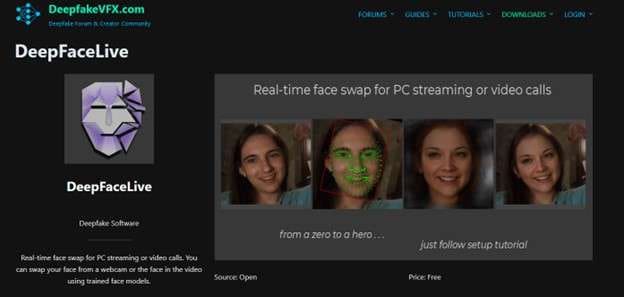
Using Deepface Live allows you to superimpose your face onto someone else’s in real-time. With Deepface Live, you can:
- Swap your face with that of a celeb: Quickly and easily have a conversation with your friends and family while looking like your favorite actor or actress.
- Create Prank or Funny Videos: WIth Deepface Live, you can create all sorts of prank or funning videos, such as giving a speech or singing a song.
- Make it Look Like You Are in a Different Place: Deepface Live allows you to superimpose your face onto the body of someone else so you can appear like you are in a different location.
Part 2: Download DeepFace Live the Easy Way: A Step-by-Step Guide
Downloading and installing DeepFace Live is quite straightforward. Make sure you have Python installed on your system, and follow the steps in any of the two methods to download DeepFace Live.
Method 1: Access from the official website
Step 1 Visit theofficial Deepfakevfs website with your browser

Step 2 Scroll down to the Download section
Then locate the section with the Face Swap download links. From the available download options select the version that suits your operating system the best. You can the option to download a Windows or Linux version.
Step 3 Click the Download button to initiate the process
Install the software by running the downloaded file by locating the installation file on your PC and running it to start the installation process. Then follow the on-screen instructions until you complete the installation process.
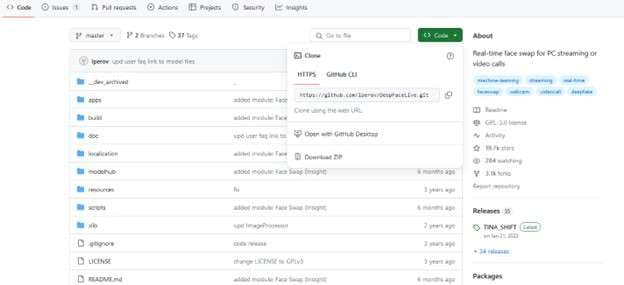
Method 2: Access from Github
An alternative process to installing Deepface Live is accessing it from GitHub. The process is pretty much simple and involves only a few steps.
Step 1 Visit the GitHub repository
Using a browser on your PC, visit the GitHub repository and navigate toDeepFace Live.
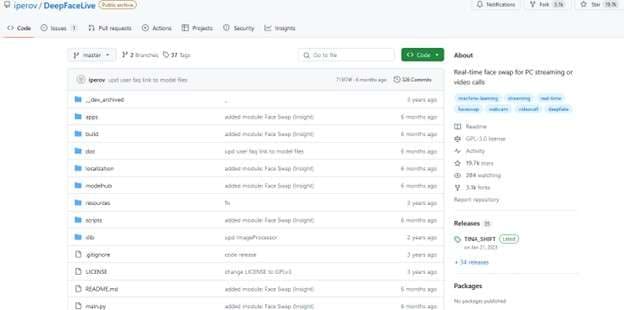
Step 2 Click the Code Button
Found on the top right corner of the repository page, the greed Code button allows you to select what you want to do with the code. On the pop-up menu that appears, select the “Download Zip” option. This will allow you to download the compressed file that contains the Deepface Live code.
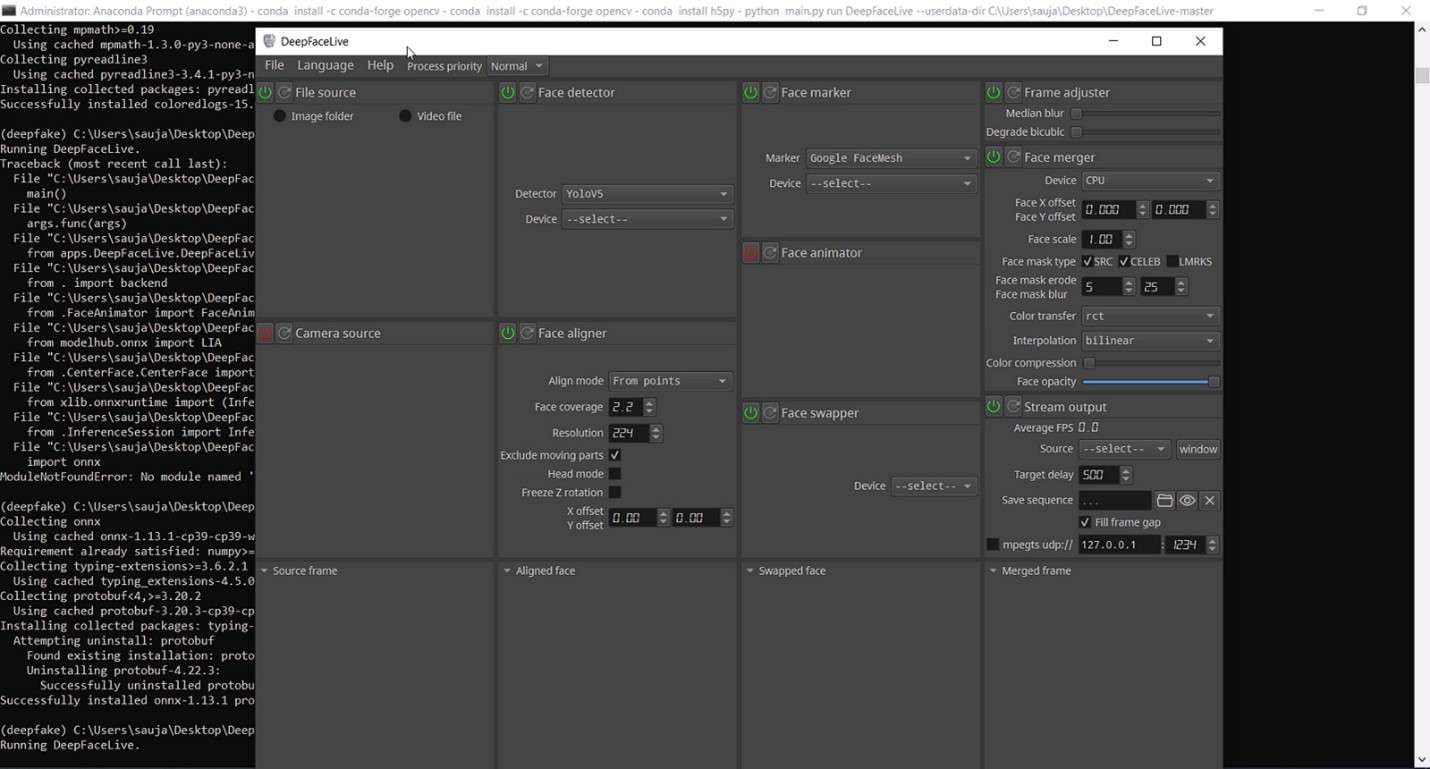
Step 3 Install and Rin the Application
After downloading the Zip file to your PC, extract its content to a desired location. Open the command prompt or a terminal and navigate to the extruded Deepface Live direction. Then, use the command “pip install -r requirements.txt” to install the required dependencies on your PC. After installing all the dependencies, run DeepFace Live on your PC using the command “python main.py. ”
Part 3: Build Your Live Model: Easy Tutorial
Creating customizedDeepFace Live models can be an exciting experience. It allows you to bring your imagination with real-time interaction. However, with the Deepfake issues and concerns among viewers, you may need a safe alternative to engage your audience with. You will want to engage your audience while assuring them that the information they are getting is authentic.
![]()
Get Started Online Free Download
Virbo Live is designed to give users the ultimate AI streamer experience. You can host live shopping with an AI streamer, saving the time and cost of generating such content or hiring a human streamer. With Virbo, you get access to multi-lingual AI-driven avatars or Vtubers that will interact with your viewers in real time. Transform their live experience while boosting your revenue.
Virbo Live allows you to broadcast your stream on platforms like Facebook Live and YouTube using OBS on each platform. In some platforms like TikTok and Shopee, you can use the official live tools like TikTok Live Studio to stream your Avatar.
01 Equipment Requirement:
You can use Virbo Live with any device that supports live streaming. This can be your PC or mobile device with decent storage and access to high-speed internet. The major equipment requirements include:
- Computer Requirements : Make sure your computer is properly configured with Stereo Mix or other virtual sound cards.
- Network Requirements: Your internet speed should be at least 5Mbps for smooth live streaming.
- Browser Requirements : While most browsers are supported, it is recommended to use the latest Chrome browser for optimal and stable performance.
Once you have checked on all theequipment requirements , you can go ahead to create your first AI-powered stream. Here are the steps to follow to create an AI streamer and set it up for interactions with your viewers:
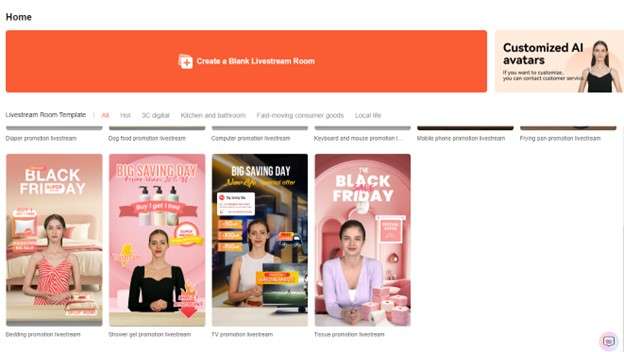
Step 1 Create a Live Shopping Rooms
On theVirbo Live page , select “Create a Blank Livestream Room” or choose a template of choice from the available options to create a new livestream room.
Get Started Online Free Download
Step 2 Choose AI Streamers and Background
Add a virtual streamer of choice to your live stream room from the virtual host library.Virbo Live provides a wide range of AI avatars and backgrounds to suit your needs. You can also customize the avatar and background the way you like, and add stickers to enhance your viewers’ experience.
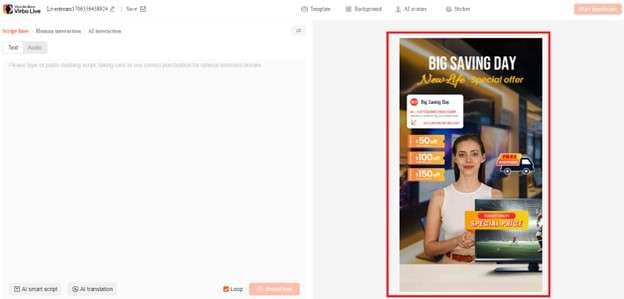
Step 3 Enter Text or Voice
With the avatar set, you need to upload your audio or enter a script with all the necessary details. Virbo Live allows you to automate this step with the AI smart scriptwriter and AI translator. Simply enter basic details about your product, and the Smart AI Scriptwriter will generate a fully detailed script for the avatar. Be sure to specify the language that you want to use and the desired tone for a more accurate script.
Step 4 Start Live Streaming
After choosing your AI Avatar and generating or adding a script, click “Start Live Streaming”. This allows you to AI stream your Avatar through OBS software, and allow the Avatar to interact with your audience on platforms like Facebook Live and YouTube.
Step 5 Interact With the Audience
AI streamer from Virbo Live will do more than present your information to the audience. It will also interact with them seamlessly by responding to questions and providing additional information.
Conclusion
Deepface Live allows you to experiment with different faces when streaming live videos. You can present your videos as a celeb or even appear as if you are in a different location. While theDeepFace Live application can give you an incredible experience, you may have to deal with some ethical issues associated with Deepfake scandals. For this reason, we highly recommend usingVirbo Live as a safe alternative. It allows you to create AI-powered avatars that can seamlessly interact with your audience without negative repercussions.
Revolutionizing Communication: Real-Time AI Voice Changer
AI (Artificial Intelligence) has become part and parcel of our lives these days. Communication is one of the industries that this revolutionary technology has dramatically impacted. Nowadays, you can harness the power of AI to create professional videos and audio narrations to pass your message effectively. So, in this post, we will help you find the best real time AI voice changer and some possible uses for this program. Let’s dig in!
Part 1. How real time AI voice changers work
Areal time voice changer AI is a program that has been extensively trained using deep machine learning algorithms to create a virtual clone of human voices. These programs work by creating a large data set of diverse audio clips, allowing them to analyze your live voice and transform it into your input prompt.
Usually, AI voice changers use machine learning algorithms to transform live voices recorded using your microphone easily. However, sometimes, you may need to enter a text data prompt using speech-to-text AI voice cloning services. Whichever model you choose, the speech training model can take a few minutes or hours to clone your voice.
But AI voice cloners don’t work independently. Instead, these tools allow you to make post-processing adjustments to make your AI voice sound how you want it. For example, you can make sound adjustments like pitch, tone, emotion, etc. Overall, the AI voice cloning process is pretty complex, although the process on your side may take just a few clicks.
Part 2. Popular applications of real-time AI voice changers
As said at the beginning, AI has been a vital cog in our lives for a while. Today, you can use anAI voice changer real time in multiple industries, including entertainment, communication, accessibility, and more. Let’s briefly overview how to use a real-time AI voice cloning app.
1. Entertainment industry
Voice changers are now widespread in the movie and gaming industries. This tool can clone your voice to sound like your favorite gaming character or celebrity. For instance, you can use voice modulation software to sound like a monster in a gaming scene and make the whole experience more immersive.
2. Communication and privacy
Using an avatar profile picture or a fake photo isn’t the only way to maintain privacy while gaming online or creating content. With a real time AI voice changer, you can clone your voice online to sound like Donald Trump, Joe Biden, Will Smith, and other celebrities. Some AI voice changers also have voices that are ideal for video documentaries.
3. Accessibility
Did you know that non-native speakers create some of the videos and audio you find online? We have AI to thank for that! This technology allows people to create unique content in English, Spanish, Portuguese, and other languages. Besides breaking language barriers, AI allows people with speech disabilities to create online content using speech-to-text converters.
Part 3. 3 popular real-time AI voice changer software
Now that we know the uses of AI voice cloning let’s list some of the best voice cloning programs to use.
1. FineShare Online Voice Cloner

FineShare Online Voice Cloner is an incredible program for vloggers, gamers, filmmakers, and video content creators. It can transform your voice into characters like demons, robots, older men, kids, ghosts, and anyone else. FineShare Online Voice Cloner has multiple celebrity voices like Morgan Freeman, Donald John Trump, Kim Kardashian, Barack Obama, and more.
Pros:
- Multiple AI celebrity characters.
- Record live voices with AI effects.
Cons:
- You must sign up to use it.
2. Metavoice Studio

MetaVoice Studio is another excellent online voice app to help you create engaging, unique, and high-quality AI voices. This tool can integrate into your connected microphone to transform your voice in real time without sacrificing human emotions. It can change your identity on 800+ platforms, including DAW, Zoom, Google Meet, Discord, and more.
Pros:
- Speak to your mic and change your voice in real time.
- It’s compatible with 800+ platforms.
Cons:
- Limited voice customization options.
3. Voice.ai

Voice.io is an online voice changer that also has a dedicated desktop program. It’s a simple-to-use voice changer where you only need to upload your WAV, FLAC, or MP3 file to customize it with a unique voice filter. As expected, you can connect your live microphone and transform voices in real time. Overall, it’s a simple and effective tool for podcasting, content creation, and sending audio messages.
Pros:
- Simple and free to use.
- Multiple audio input formats.
Cons:
- Limited voice effect options.
Bonus Tips: Delve into the authentic AI voiceover generator
Using AI real time voice changer could even be more fun withWondershare Virbo . With this online voice changer, content creators can effortlessly transform into 180+ avatar characters with 120+ unique voice effects. It offers numerous advantages, including multiple audio inputs and text-to-speech conversion, making it an excellent tool for all content creators who want to achieve their desired voice sound. Excitingly, content creators can explore the talking photo feature to add an AI voice overlay into a picture. Of course, you can upload an image or choose the available picture templates.
Without further ado, let’s learn how to create a life-like AI voice using Wondershare Virbo:
Step 1. Install Wondershare Virbo on a computer, then choose a video template under theAvatars section.

Get Started Online Free Download
Step 2. Next, enter the text script that you want to convert to audio. You can enter up to 2,000 characters.

Step 3. Choose the audio output language. This program supports English, Spanish, Hindi, and other languages. Now change the audio speed, pitch, and volume. You can also add background music, image templates, and subtitles.

Step 4. Lastly, preview your video before exporting to 720p or 1080p. That’s it!

Final Words
We hope that you enjoyed reading this post. You can harness endless possibilities with areal-time AI voice changer , as we have discussed here. Most of these apps are available to use for free. Remember to try outWondershare Virbo ’s brand-new Talking Photo feature. Have fun!
How to Create Marketing Videos?
Marketing videos are the type of videos that has the potential to market a specific product or service through video content. One can use marketing videos on multiple types of digital channels to engage a high number of people. The auto-visual content of marketing videos has the power to engage customers and boost revenue for you.
However,creating a marketing video that has the capabilities to attract anyone all across the globe can be challenging. For this reason, this article will provide you with beneficial information aboutmarketing video production .
Part 1: What is the Importance of Marketing Videos?
In this content-driven world, people can share their products and services in any part of the world with virtual assistance. Marketing videos can function as a reliable medium for this. Brands, organizations, and other businesses don’t rely onmarketing video production .
This is because they are unaware of the benefits of marketing videos. In this section, we will discuss some of the topmost benefits of marketing videos.
1. Engagement and Information Retention
The content of marketing videos tends to grab the users’ attention effectively. Moreover, people also prefer to watch videos over reading lengthy texts. There are several informational visual and auditory elements embedded in the videos. Through this, you can also improve information retention.
2. Brand Awareness and Conversion
Withmarketing video production and sharing, you can create awareness of your brand. It also helps showcase the professional side of your brand worldwide. In addition, you can also get reliable exposure which can boost your sales. It can help you in driving conversions and generating leads. You can also get a chance to rank higher in search engines.
3. SEO and Reach
The best-in-class marketing videos can help you with search engine optimization. This also opens the gates for having more organic traffic in a limited time. You can also get beneficial social media reach and interact with your clients easily. This also helps in expanding the reach to build credibility.
4. Effective Storytelling and Results
Bycreating marketing videos , you are not only marketing your products or services but also telling the story of your brand. You can also personalize the audience you want and can effectively target them. Above all, it can provide measurable results for you through which you can achieve several conversion metrics.
5. Conversion and Credibility
Luckily, you can also create marketing videos to achieve reliable conversion and credibility. With an engaging video, you can convert the viewers into customers and generate revenue. Along with this part, it also builds a trustworthy relationship between a seller and a buyer. Thus, you can show yourself as a more credible brand on social media.
Part 2: How Many Types Of Marketing Videos Are There?
Initially, you need to consider your brand’s niche and then jump to creating the marketing videos. Several types of marketing videos are presented on the web, and you can select the one that suits your preferences. The understated points will further guide you about this:
1. Business Marketing Videos
It is a category of marketing videos that helps promote and represent a business. With these types of videos, you can engage ladies and foster customer loyalty. There are several formats and styles of creatingmarketing videos for business ; you can select the one as per your preferences. Moreover, this also helps in highlighting your professionalism to the viewers.
2. Real-Estate Marketing Videos
It is important to tell the client about the benefits of buying a property. With real- estate marketing video marketing, you can market the property and picture yourself as a dependable agent. In the real estate marketing videos, you can show the property to the viewers, tell them about the pros of buying these properties, and can also give an overview of the terms and conditions.
3. Healthcare Marketing Videos
Did you finish your doctorate degree and are now establishing a clinical setup? Know that it is important to market it through videos so many people can know about it. Besides this, be keen enough to show how skilled you are. You can also do healthcareYouTube video marketing to show your dedication to your duty as a doctor.
4. Restaurants Marketing Videos
There are tons of restaurants in any country, so why will someone choose your restaurant? Yes, they will choose your restaurant because you know how to market what you have. Also, add mouth-watering visuals and offer exclusive offers for the customers. You can also present the cooking demos and chef interviews in the restaurant video marketing.
5. Animated Marketing Videos
Animated marketing videos are known to be more visually appealing. It can also offer a simplified explanation of a product and service as there are no such limitations on imagination, so you can market your products as you wish with this type of video marketing. You can also update and change the videos as much as you want.
6. Dental Marketing Videos
By using dental marketing videos, you can not only showcase your skills but can also educate people. It also helps in building credibility along with concise demonstrations. You can also address the myths about dentistry and clear them for the ease of dental patients. Having the best professional practice, along with highlighting the offers, is also a part of this.
7. Promotional Marketing Videos
This specific category ofmarketing video production helps you to promote your products engagingly. You can tell about your products and guide the viewers about their usability. Moreover, it also helps persuade the targeted audience to buy what you are selling. The chances to get a higher conversion rate are also a benefit.
8. Brand Story Marketing Videos
It is essential to tell the back story of your brand to the viewers. This not only helps in establishing an emotional connection but also helps in getting more customers. Some users can also use your story as an example of success. You can also get several competitive advantages along with measurable results with this.
Part 3: What Strategies Can You Implement To Create Best-In-Class Marketing Videos?
There are diversified strategies that you can implement whilecreating a marketing video . This will help you to attract more organic traffic and boost the client ratio. Some of these strategies are discussed here for you:
1. Target Your Audience
Before anything else, you need to identify your targeted audience. Make sure youcreate marketing videos in such a way that they can attract more users. Your targeted audience should know you are making videos on your desired content.
It helps in optimizing relevancy and gain competitive advantages. You can also ensure flexibility in your content so there can be perfect segmentations. Opening the gates of communication is also possible with this.
2. Find a Creative Idea For Your Video
For creatingproduct videos for marketing , you have to make your videos creative. Try to add music that can attract the user’s attention in no time. Moreover, for getting creative ideas, you can also explore several platforms. Make sure your primary goal is attracting users and having community-based initiatives.
In addition, you can also follow the ongoing trends to create trendy videos. Not only this, but you can start your trends to get more popular.
3. Make A Script For The Marketing Video You Are Making
For effectivemarketing video production , you must ensure you are not missing out on any point. Try to embed all the creative elements in one video. Above all, try to make a script so nothing is missing out. You can create the scripts manually, or you can either use AI power tools to create the scripts.
Additionally, you can get the outlines of the script to create customized layouts for scripts. You can also add specialized keywords to ensure the engagement of the scripts.
4. Use Proper Tools To Edit Your Video
Editing is the key factor in maximizing the efficiency of your videos. With optimized editing, you can give the perfect and innovative outlook for the videos. With proper editing, you can make the simple-looking videos more studio friendly. Don’t fret if you have no idea about the tool that can help you edit the videos.
Virbo is a specializedYouTube video marketing tool through which you can not only edit videos but can also make videos from scratch. This software can also add virtual YouTubers in the videos that can express the key points of your videos.
Get Started Online Free Download
Key Features
- You can use Virbo on major operating systems such as Windows, Android, or iOS. Moreover, you can also use the premium version on several devices without any issues.
- There are more than 150 AI Avatars in it through which you can make videos more engaging. You also have a chance to select customized avatars as per your need.
- It also incorporates versatile commercial stocks. You can access more than 180 templates along with royalty-free music.
- Using the AI voices of Virbo, you can create quality-oriented text-to-speech videos. Moreover, you can also select the language and accents.
- The AI script feature of Virbo can create innovative scripts for you with its AI powers. You can even optimize the scripts on Windows computers.
6. Upload Your Video On Platforms
Never stop with just one social media platform. You need to share your marketing videos on versatile platforms. This will help in boosting the reach and visibility of your videos. Make sure if you are making aYouTube marketing video , you share it on other platforms such as TikTok, Instagram, and more.
Furthermore, you can paste the shareable link in descriptions so viewers can share the video with a link. Do ask your friends and family members to share and like the videos.

Conclusion
In a nutshell, you have to create perfect-levelproduct videos for marketing . Creating and sharing marketing videos has many benefits, which you can learn from the above discussion. In addition to this, the strategies through which you can get the desirable outcomes from the videos are mentioned above.
As all the strategies are easy to follow and effective, you can use them without confusion. Other than this, the top-notch tool through which you can create the best-in-class videos is Virbo. You can use this innovative AI tool to create engaging marketing videos.
You May Also Ask
1. What is the best strategy for video marketing?
There are tons of strategies but not all strategies are for every user. It depends solely on your business and target audience. You just have to make sure that you do everything in your power to make videos optimized. It includes adding effects, integrating sounds and visuals, and more.
2. How can video marketing increase sales?
With video marketing, customers can understand and learn about your business in a better way. This further leads to increased marketing sales. You can also connect emotionally with the customers and attract more organic traffic.
3. How Long Should a Marketing Video Be?
If you are new to making video marketing, you need to know the duration of the videos. Here are some of the video durations which you need to know:
- Explainer Videos: 1-2 minutes
- Product Demos: 2-3 minutes.
- Testimonials: 1-2 minutes.
- Live Streams: It can vary, but shorter streams (30 minutes or less) are more engaging.
- Brand Videos: 2-3 minutes.
- How-to Videos: 2-5 minutes (Depending upon the topic)
- Animated Videos: 1-2 minutes.
Essential Tools for Creating Dynamic Talking Avatars
Avatars have become crucial in many different industries in the last few years. Whether it is customer support or entertaining people, avatars connect businesses with their audience in a better way. As technology gets better, we’re witnessing a remarkable evolution in avatars.
Read this article to learn some freetalking avatar makers you can use. Also, we’ll explore the finest tool to use this innovative technology while joining in the fun for diverse purposes.
![]()
Part 1. Recommended: Finest Talking Avatar Creation With Wondershare Virbo
Wondershare Virbo stands out as an exceptional tool for creating talking avatars. It offers a comprehensive solution for crafting high-quality avatars on a single platform. The tool is versatile, showing compatibility with various devices and operating systems. This groundbreaking tool lets you bring your static photo into a dynamic storyteller.
Plus, it lets you add voice clips to your photos to make them interactive. Its talking feature adds emotion, explanation, or personalized messages to your visual content. Users can transform old pictures into captivating stories with personalized voice clips. With the support of a wide range of accents, you can create talking avatars that resonate with the global audience.
Highlighted Features of Wondershare Virbo
- The text-to-speech feature converts text into spoken language for smooth
- Users can elevate the mood and atmosphere with personalized background music within the Talking Photo feature.
- Its versatile AI avatars and clear audio quality ensure that your voiceovers are crisp and clear.
Pricing Plans
- Monthly Plan: $9.9
- Essential Yearly Plan: $19.9
- Pro Yearly Plan: $199
Step-by-Step Guide to Using the Talking Photo Feature in Wondershare Virbo
Wondershare Virbo ensures a seamless experience for its users in talking avatar creation. The process is as simple as it can customize your talking photos. Follow the below-mentioned detailed steps to use thisAI-speaking avatar creator :
Step 1. Download Virbo and Access Its Talking Photo Feature
Begin by downloading and installing this AItalking avatar maker on your devices. Afterward, launch the tool on your system and access its dashboard. Click the “Talking Photo” button among the available options here.
![]()
Get Started Online Free Download
Step 2. Select AI Avatar or Import Your Photo
A mini window will pop up on the screen, allowing you to select from preset images. You can also import the picture by browsing your system. Once you’ve selected, you’ll be directed toward a new window.
![]()
Step 3. Generate Script Using AI
Head to the bottom left in the upcoming window and hit the “AI Script” icon. Type the script in the text box and optimize it with AI features. Afterward, press the “Apply” button from the right bottom to use it for talking avatar.
![]()
Step 4. Make Adjustments in Language and Gender
After creating a script, it is time to customize its language. Tap on the “Language” button, which opens a pop-up window. Clicking on the “Language” dropdown menu allows you to choose your preferred language. You can opt for either male or female by choosing the “Gender” dropdown menu. Later, click on the “OK” button to proceed with the process.
![]()
Step 5. Modify the Voiceover Characteristics and Export the Video
Next, personalize the qualities of voiceover under the language section. Here, you can modify the “Speed,” “Pitch,” and “Volume” as needed. You can preview the video you’ve customized by tapping on the “Play” icon. Finally, navigate toward the top left corner of the window and press the “Export” button to save it.
![]()
Pricing Plans
- Monthly Plan: $9.9
- Essential Yearly Plan: $19.9
- Pro Yearly Plan: $199
Part 2. Alternatives: Other Talking Avatar Creator Tools for Enhanced Content
Previously, we have discussed the best tool to generate talking AI avatars. However, if you want to try out some alternatives to Wondershare Virbo, we have a solution. For this purpose, we’ve enlisted some othertalking avatar creators to help you in getting results to your satisfaction:
1.Akool
Akool is a comprehensive generative AI platform available for creators and innovators. Its intuitive features allow users to materialize ideas quickly for diverse marketing and advertising needs. You can upload JPEG and PNG images of less than 30MB for each picture on the tool. Plus, the picture should be clear as it does not detect blurry, overexposure, and side faces.
![]()
Pros
- With film-level quality outputs, it ensures high-quality visuals and videos.
- Thetalking avatar creator achieves up to 8k resolution for pictures and 4k.
Cons
- One problem is that talking avatars can’t sound entirely natural yet.
Pricing Plans
- Professional Plan: $30 per month (600 credits)
- Studio Plan: $500 per month (12000 credits)
Steps To Create Talking Avatars With Akool
As discussed before, Akool lets its users customize their talking avatars. Let’s discuss the steps tocreate a talking avatar online for free using this tool:
Step 1. Get the online tool through your preferred web browser and open its homepage. Now, hover over the “Platform” dropdown menu and select the “Talking Photo” feature.
![]()
Step 2. Within the upcoming window, click the “Choose File” button from the center to upload the image. Also, you can choose an example offered by the tool. After making a selection, you can also revert changes.
![]()
Step 3. After uploading the picture, head to the “Text” section on the right side and type in the script. Then, under the “Voice” section, make adjustments in gender, language, and speed. Later, preview your generated talking avatar and tap the “Results” at the top right. Finally, the tool will process it and provide you with the final results.
![]()
2.Yepic AI
If you also want to createan AI talking avatar , Yepic AI is your go-to preference. You can create a lifelike digital version of yourself with just a headshot. Users can uniquely present their videos by choosing from over 40 preset avatars. It boasts many actors, languages, and voices, with over 450 options available to personalize your avatar.
![]()
Pros
- The tool personalizes every aspect of your videos, from backgrounds and transitions to actors and voices.
- You can scale and localize your content across different countries, languages, and accents.
Cons
- It offers only 20 video credits per month, and one credit equals a 60s video, limiting extensive use.
Pricing Plans
- Consumer Plan: £5.75 /month
- Standard Plan: £24.16/month
- Plus Plan: £65.83/month
- Premium Plan: £415.83/month
- Infinite Plan: £665.83/month
Steps To Create Talking Avatars with Yepic AI
Users can utilize the capabilities of this tool to create talking avatars seamlessly. Here are the steps to carry out the process of makingAI-speaking avatars to engage viewers.
Step 1. To start the process, tap the “Get Started” button on the main website page and access the editing window. The tool lets you choose avatars or talking photos within this editing interface.
Step 2. Afterward, in the text box, type your script and hit the “Listen” button. Alternatively, you can upload your voiceover to the tool to make it personalized.
Step 3. Upon uploading the voiceover, select the voice and the desired language for your written words. Then, select the desired background and add shapes to modify the outlook of your talking avatar. Finally, preview the video and download it to share with others.
3.Speechify
Speechify Studio serves as the premier AI Video and AI Voice Platform. This site empowers anyone to create professional videos in just one minute, with no skills required. You can quickly produce captivating content using AI-generated talking faces. It lets youcreate a talking avatar online for free to save your valuable resources and time.
![]()
Pros
- Speechify Studio offers a user-friendly interface that makes video production quick and effortless.
- Users can combine high-quality text-to-speech synthesis with lifelike avatars for an interactive audiovisual experience.
Cons
- The narration of this tool lacks human-like empathy and emotions.
Pricing Plans
Talk to the sales team.
Steps To Create Talking Avatars with Speechify
With Speechify’s intuitive interface, you can easily perform various tasks. In the following section, you’re given the simple steps to create anAI talking avatar using this online tool.
Step 1. First, access the “AI-Generated Talking Face” page from the main interface of Speechify. Proceed by hitting the “Try for Free” button and log in using a Google account. After entering the editing interface, press “Create AI Avatar,” which leads you to a new window.
![]()
Step 2. Now, opt for the desired avatar from a vast library. Upon selecting this avatar, it will appear on the right side of the editing window. Afterward, you can adjust “Avatar Style” and the “Layout” settings.
![]()
Import your script from a media file or paste a URL from YouTube. Afterward, choose the voiceover among the available options and preview the video. Once satisfied, tap the “Export” button at the top right to download this from this tool.
![]()
4.HitPaw Online AI Face Animator
This online AI face animator is an easy-to-use AI-based tool that brings your still images to life with animated faces. You can choose from various funny templates to animate your photos with a simple upload and a click. It allows you to add humor and personality to your images. The tool supports JPG, PNG, JPEG, and WEBP formats for pictures and animates them with customization.
![]()
Pros
- Users can animate various photos, from individual portraits to group shots, with many templates available.
- It emphasizes safety and security and ensures your photos are protected.
Cons
- Weekly Plan: $0.57/Day
- Monthly Plan: $0.27/Day
- Yearly Plan: $0.13/Day
Steps To Create Talking Avatars With HitPaw Online AI Face Animator
HitPaw Online is another onlinetalking avatar maker with a straightforward approach. The following are the steps to animate a photo using this online tool:
Step 1. Visit the tool’s official website and access the main user interface. You can place your cursor over the “Photo AI” dropdown menu and click “AI Face Animator.”
![]()
Step 2. Next, hit the “Upload Image” button from the left side. This action will move you to the main editing window to create talking avatars.
![]()
Step 3. Select the “Drag and drop or click to upload image” option from the left panel in the new window. Under the “Choose a Template” section, select the category of style and expression for your uploaded photo. Then, press the “Animate” button at the bottom. Now, you can see your animated image in the middle of the screen after processing.
![]()
Step 4. Once satisfied with the results, download it on your system. You can save it with the HitPaw logo or as a GIF for fun.
Image name: best-tools-for-creating-talking-avatars-20.jpg
Image alt: download final product from hitpaw
![]()
Conclusion
We conclude that there are variousspeaking avatar creator platforms with different features. These tools make it easy to create avatars that talk to use for different functions. However, the one that stands out among these options is Wondershare Virbo. You can customize your avatars in just a few clicks on different devices.
Get Started Online Free Download
The Power of AI Thumbnail Generators
Part 1. What is an AI Thumbnail Generator?
An AI thumbnail generator is a sophisticated tool that employs artificial intelligence algorithms, often based on machine learning and deep neural networks, to create captivating and eye-catching thumbnails for various digital media content. These generators analyze content features, layout principles, and user preferences to craft thumbnails that entice and engage audiences.
Part 2. Top Benefits of AI Thumbnail Generators
Enhanced Visual Appeal
AI thumbnail generators harness data-driven insights to craft visually striking thumbnails. They ensure that images are attention-grabbing, which can lead to higher click-through rates and audience engagement.
Time Efficiency
Creating thumbnails manually can be time-consuming. AI generators automate this process, enabling content creators to save valuable time that can be allocated to other creative tasks.
A/B Testing Optimization
Many AI tools offer A/B testing capabilities, allowing creators to experiment with different thumbnail variations and identify which ones resonate best with their audience.
Part 3. Common Applications of AI Thumbnail Makers
Video Content
AI thumbnail generators excel in creating thumbnails for videos, helping creators encapsulate the essence of their content and encourage viewership.
Social Media Posts
Eye-catching thumbnails on social media platforms can significantly boost content visibility and user engagement.
Blog Posts and Articles
Thumbnails play a crucial role in enticing readers to explore articles and blog posts, making them an essential component of content marketing.
Part 4. Top AI Tools That Deserve a Try
Canva
Canva’s AI-powered platform offers intuitive thumbnail design capabilities, making it a go-to choice for both beginners and professionals.
Adobe Sensei
Adobe’s AI technology seamlessly integrates with Creative Cloud applications, enhancing the thumbnail creation process.
Visme
Visme’s AI-driven features empower users to effortlessly design captivating thumbnails for a variety of digital content.
In an era where visual appeal can make or break digital content’s success, AI thumbnail generators emerge as indispensable assets for content creators and marketers.
Conclusion
AI thumbnail generators are revolutionizing the way we present digital content. Their ability to craft visually compelling thumbnails with precision and efficiency is transforming the digital landscape. As the demand for engaging visuals continues to rise, these AI-powered tools stand as invaluable allies for creators seeking to make a lasting impact in the digital realm.
Launching Your Live Room | Virbo AI Live Stream
Launching Your Live Room
Explore step-by-step instructions on decorating your space, uploading local images and videos, adding engaging AI interactions, etc. Elevate your streaming experience and captivate your audience with a seamlessly executed live room. Dive into our comprehensive guide now!
02Uploading Local Images and Videos
07AI Intelligent Script Generation
11Starting/Ending the Live Broadcast
Decorating Your Live Room
Decoration Guidance
- Click on the product homepage and create a blank live room to initiate a new live session.

Create a blank live room
- Upon creating a blank live room, the live room editing page will open. The left side serves as the operation area, the right side as the canvas area, and the materials area is located above.

Livestream room navigation
- Click on the templates to use pre-designed combinations of background, virtual hosts, and stickers.

Select a template
- Customize the background from the background library. During the live broadcast, only one background can be used.

Livestream room customization
- Choose a virtual host from the virtual host library. Only one virtual host can be used during the live session.
![]()
Choose a virtual host
- Add stickers from the sticker library. Multiple stickers can be used during the live broadcast.
- After selecting materials, adjust their position and size in the canvas area. Right-click to modify layers, copy, or delete materials.
Uploading Local Images and Videos
Upload background images or videos
- Upload: Click Background -> Upload Background -> Select file to upload. Materials will be displayed in “My Background” after uploading.

Upload Background
- Apply: Click Background -> My Background, then click on the material to use it on the canvas.
- Delete: Hover over the material and click the delete icon to remove it.

Delete Background
Note
Background upload requirements:
- Image and video dimensions should be 9:16
- Image formats: JPG/JPEG/PNG
- Video formats: MP4/MOV
- Resolution should not exceed 1080P
- Video duration should not exceed 30 minutes
- File size should not exceed 1GB
Upload sticker images or videos
- Upload: Click Sticker -> Upload Sticker -> Select file to upload. Materials will be displayed in “My Sticker” after uploading.

Upload Sticker
- Apply: Click Sticker -> My Sticker, then click on the material to use it on the canvas.
- Delete: Click Sticker -> My Sticker, hover over the material, click the delete icon to remove it.

Delete Sticker
Note
Sticker upload requirements:
- Image and video dimensions are flexible.
- Image formats: JPG/JPEG/PNG
- Video formats: MP4/MOV
- Resolution should not exceed 1080P
- Video duration should not exceed 30 minutes
- File size should not exceed 1GB
Text-Driven Live Room
Script Guidance
- Input script text: Copy and paste your script into the script dialogue box.

Text Scripts Inset
- Choose a matching tone: Click the voice-over entrance above, select a suitable tone, and preview it.
- Preview: Click the “Preview” button below the text to listen.
Audio-Driven Live Room
Audio Guidance
- Upload audio: Click Script -> Audio -> Upload local voice and upload the local file.

Upload Audio
- Preview audio: After uploading, click to preview the audio.

Preview Audio
- Audio sorting: Hold and drag to sort the audio files.

Audio sorting
- Audio sorting: Hold and drag to sort the audio files.

Modifying Live Room Name
Method Guidance
- Method 1: Click the edit button in the upper-left corner of the edit page to rename the live room.

Rename Livestream Room
- Method 2: Product homepage -> My Live Rooms -> Click on the more options for an individual live room -> Choose Rename.
Adding AI Identification
Step Guidance
- On the live room editing page, click on the checkbox before the AI identification to enable or disable it.
AI Intelligent Script Generation
Generation Guidance
- Click the “AI Intelligent Script” button below the script, a popup will appear.
- Enter your product name (mandatory), selling points (optional), promotional information (optional), select language and style, then click generate.

AI Script
- The generated result can be further modified, click “Use” to add it to the script dialogue box.
AI Translation
Translation Guidance
- Click the “AI Translation” button below the script, a popup will appear.
- Place the text to be translated on the left, click the middle arrow to select the language for translation (e.g., English), and click translate.

AI Translation
- The generated result can be further modified, click “Use” to add it to the script dialogue box.

AI Translation Result
Manual Interaction
Microphone Interaction
- Operational Flow:
- Click Manual Interaction -> Microphone, and select the microphone device.
- Speak into the microphone and observe the sound wave status.
- Open “Start Live,” wait for the appearance of the virtual host image, and click “Open Mic Takeover.” The virtual host’s mouth will be closed, and your voice will drive the virtual host to speak.
- After speaking, click “End Takeover,” and the virtual host will resume reading the scripted dialogue.
- Click Manual Interaction -> Microphone, and select the microphone device.
- Grant Browser Microphone Access:
- Google Chrome:
*Open Chrome, click the settings icon in the top right.
* Click “Settings,” open the settings page. Select “Privacy and Security” and then click “Site Settings.”
*Enter the site settings page, click “Microphone.”
* On the microphone authorization page, select that the site can request the use of your microphone.
* After these settings, when the browser needs to use the camera or microphone, a device request box will pop up on the page. Select “Allow.” - Mozilla Firefox:
*Open Firefox, click the settings icon in the top right, and click “Settings.”
* Open the settings page, click “Privacy & Security,” and find “Microphone Permissions.” Click “Settings” next to “Microphone.”
*Enter the settings page, add the site that requests the use of your microphone to the list, and click “Save Changes.”
* After these settings, when the browser needs to use the camera or microphone, a device request box will pop up on the page. Select “Allow.” - Sogou Browser:
*Open Sogou Browser, click the settings icon in the top right, and click “Options.”
* Open the options page, click “Advanced,” find “Privacy - Browsers on the Mac System:
*Locate “System Preferences” on your Mac dock and click the icon. Once opened, find “Security & Privacy” and click to open.
* On the “Security & Privacy” page, select “Privacy,” then click on “Microphone” and set the applications that need to use the microphone to “Allow.”
- Google Chrome:
Text Interaction
- Click on “Artificial Interaction” and enter interaction scripts in the input box below.
- Click “Add Text” to add it to the interaction list. After starting the live broadcast, each interaction script will have a send button.

Text Interactionn
- Click “Send” to trigger the AI to speak according to the interaction script.
Intelligent Interaction
Note
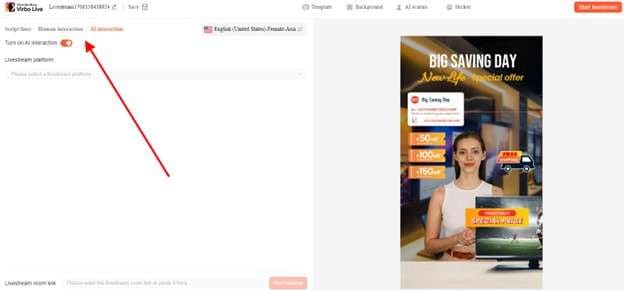
The current intelligent interaction feature only supports Alibaba International. If you are streaming on other platforms, you can skip this step.
Setting Entrance
- On the live broadcast page, click on “Intelligent Interaction,” select the live platform, and the supported intelligent interaction features will be randomly displayed.
Q&A Library Settings
- Creating a New Q&A:
- On the product homepage, click on Q&A Library - Add Q&A, and a popup window will appear.
- Fill in the rule name, keywords, reply text, and upload a reply video. Click Save.
Note
Rule Name: Name the rule for easy identification.
Keywords: If a viewer’s question in the live room contains any of these keywords, it will trigger the AI to answer.
Reply Content: You can add up to 5 replies. Include variables like [Viewer’s Nickname] and [Viewer’s Country] for personalized responses.
Sequential Reply: Replies in sequence when triggered.
Random Reply: Randomly selects a reply when triggered.
Reply Video: If configured, the video will be displayed at the specified position until the AI’s reply ends.
- Adjusting Q&A Activation Status:
- Click Q&A Library - Switch to close or open the Q&A rule. When closed, the Q&A rule will not take effect after the live broadcast starts.
- Turning on Q&A Library Switch in the Live Room:
- On the live broadcast editing page, click Intelligent Interaction - Platform, select “Alibaba International,” and turn on the Q&A Library switch. This must be done after starting the live broadcast and capturing the barrage for the function to work.
Greeting Rules Settings
- Greeting Content: You can add up to 5 replies, including variables like [Viewer’s Nickname] and [Viewer’s Country].
- Sequential Reply: Replies in sequence when triggered.
- Random Reply: Randomly selects a reply when triggered.
- On the live broadcast editing page, click Intelligent Interaction - Platform, select “Alibaba International,” turn on the Greeting switch, and click the edit icon to open the editing window. Fill in the reply text and click Save.
Sending Business Cards and Product Catalogs
- On the live broadcast editing page, click Intelligent Interaction - Platform, select “Alibaba International,” turn on the “Send Business Cards” switch, and turn on the “Send Product Catalogs” switch.
Note
These functions will only take effect after starting the live broadcast and capturing the barrage.
How to Start Live Barrage Capture
- Start Broadcasting in Virbo Live
- Follow the steps for “Start/End Broadcast” on the live broadcast editing page.
- Install the Plugin in Chrome
- Ensure Chrome is up to date, then download the plugin from the provided link . After downloading, unzip locally.
- Configure the Plugin in Chrome
- Open Chrome, go to Settings - Extensions - Manage Extensions, enable Developer mode, click “Load Unpacked,” and select the unzipped folder. Enable “Allow in incognito mode” in the plugin details.
- Copy the Live Control Page Link
- Copy the link of your live control page (web version) from the live platform. Paste the link into the live broadcast editing page under Intelligent Interaction - Live Room Link Input, then click “Start Capturing.”
Note
Alibaba International currently supports automatic Q&A, automatic greetings, automatic business card sending, and automatic product catalog sending. You can turn on the corresponding switches and then configure the detailed settings for each item.
Starting/Ending the Live Broadcast
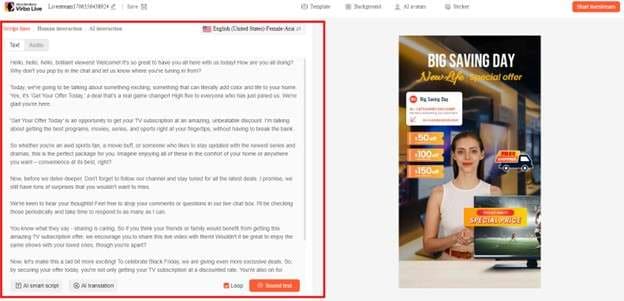
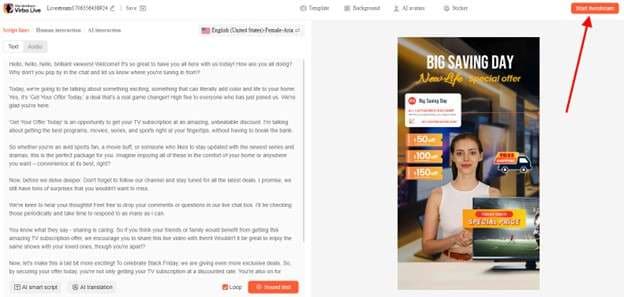
Starting the Live Broadcast
- On the live broadcast editing page, click “Start Broadcasting.”
- The AI live broadcast window will appear shortly after, displaying the AI live broadcast.
Using Your Broadcasting Partner or OBS
Note
Keep the AI live broadcast window open on the desktop during the broadcast, or it will not broadcast properly.
- Open your broadcasting partner or OBS, add a window, select the Wondershare VVB (Live Version) live window.
- Click “Start Broadcasting.” Use Alt + mouse to crop out the web bar or use the zoom function to remove it.
- During the live broadcast, you can only modify the “Artificial Interaction” function; other broadcast settings cannot be changed.
Ending the Broadcast
- When concluding the live broadcast, initiate the termination of the live stream on the platform’s broadcasting partner first, followed by clicking the “End Live” button on Virbo Live to finalize the shutdown process.
02Uploading Local Images and Videos
07AI Intelligent Script Generation
11Starting/Ending the Live Broadcast
Decorating Your Live Room
Decoration Guidance
- Click on the product homepage and create a blank live room to initiate a new live session.
Create a blank live room
- Upon creating a blank live room, the live room editing page will open. The left side serves as the operation area, the right side as the canvas area, and the materials area is located above.
Livestream room navigation
- Click on the templates to use pre-designed combinations of background, virtual hosts, and stickers.
Select a template
- Customize the background from the background library. During the live broadcast, only one background can be used.
Livestream room customization
- Choose a virtual host from the virtual host library. Only one virtual host can be used during the live session.
![]()
Choose a virtual host
- Add stickers from the sticker library. Multiple stickers can be used during the live broadcast.
- After selecting materials, adjust their position and size in the canvas area. Right-click to modify layers, copy, or delete materials.
Uploading Local Images and Videos
Upload background images or videos
- Upload: Click Background -> Upload Background -> Select file to upload. Materials will be displayed in “My Background” after uploading.
Upload Background
- Apply: Click Background -> My Background, then click on the material to use it on the canvas.
- Delete: Hover over the material and click the delete icon to remove it.
Delete Background
Note
Background upload requirements:
- Image and video dimensions should be 9:16
- Image formats: JPG/JPEG/PNG
- Video formats: MP4/MOV
- Resolution should not exceed 1080P
- Video duration should not exceed 30 minutes
- File size should not exceed 1GB
Upload sticker images or videos
- Upload: Click Sticker -> Upload Sticker -> Select file to upload. Materials will be displayed in “My Sticker” after uploading.
Upload Sticker
- Apply: Click Sticker -> My Sticker, then click on the material to use it on the canvas.
- Delete: Click Sticker -> My Sticker, hover over the material, click the delete icon to remove it.
Delete Sticker
Note
Sticker upload requirements:
- Image and video dimensions are flexible.
- Image formats: JPG/JPEG/PNG
- Video formats: MP4/MOV
- Resolution should not exceed 1080P
- Video duration should not exceed 30 minutes
- File size should not exceed 1GB
Text-Driven Live Room
Script Guidance
- Input script text: Copy and paste your script into the script dialogue box.
Text Scripts Inset
- Choose a matching tone: Click the voice-over entrance above, select a suitable tone, and preview it.
- Preview: Click the “Preview” button below the text to listen.
Audio-Driven Live Room
Audio Guidance
- Upload audio: Click Script -> Audio -> Upload local voice and upload the local file.
Upload Audio
- Preview audio: After uploading, click to preview the audio.
Preview Audio
- Audio sorting: Hold and drag to sort the audio files.
Audio sorting
- Audio sorting: Hold and drag to sort the audio files.
Modifying Live Room Name
Method Guidance
- Method 1: Click the edit button in the upper-left corner of the edit page to rename the live room.
Rename Livestream Room
- Method 2: Product homepage -> My Live Rooms -> Click on the more options for an individual live room -> Choose Rename.
Adding AI Identification
Step Guidance
- On the live room editing page, click on the checkbox before the AI identification to enable or disable it.
AI Intelligent Script Generation
Generation Guidance
- Click the “AI Intelligent Script” button below the script, a popup will appear.
- Enter your product name (mandatory), selling points (optional), promotional information (optional), select language and style, then click generate.
AI Script
- The generated result can be further modified, click “Use” to add it to the script dialogue box.
AI Translation
Translation Guidance
- Click the “AI Translation” button below the script, a popup will appear.
- Place the text to be translated on the left, click the middle arrow to select the language for translation (e.g., English), and click translate.
AI Translation
- The generated result can be further modified, click “Use” to add it to the script dialogue box.
AI Translation Result
Manual Interaction
Microphone Interaction
- Operational Flow:
- Click Manual Interaction -> Microphone, and select the microphone device.
- Speak into the microphone and observe the sound wave status.
- Open “Start Live,” wait for the appearance of the virtual host image, and click “Open Mic Takeover.” The virtual host’s mouth will be closed, and your voice will drive the virtual host to speak.
- After speaking, click “End Takeover,” and the virtual host will resume reading the scripted dialogue.
- Click Manual Interaction -> Microphone, and select the microphone device.
- Grant Browser Microphone Access:
- Google Chrome:
*Open Chrome, click the settings icon in the top right.
* Click “Settings,” open the settings page. Select “Privacy and Security” and then click “Site Settings.”
*Enter the site settings page, click “Microphone.”
* On the microphone authorization page, select that the site can request the use of your microphone.
* After these settings, when the browser needs to use the camera or microphone, a device request box will pop up on the page. Select “Allow.” - Mozilla Firefox:
*Open Firefox, click the settings icon in the top right, and click “Settings.”
* Open the settings page, click “Privacy & Security,” and find “Microphone Permissions.” Click “Settings” next to “Microphone.”
*Enter the settings page, add the site that requests the use of your microphone to the list, and click “Save Changes.”
* After these settings, when the browser needs to use the camera or microphone, a device request box will pop up on the page. Select “Allow.” - Sogou Browser:
*Open Sogou Browser, click the settings icon in the top right, and click “Options.”
* Open the options page, click “Advanced,” find “Privacy - Browsers on the Mac System:
*Locate “System Preferences” on your Mac dock and click the icon. Once opened, find “Security & Privacy” and click to open.
* On the “Security & Privacy” page, select “Privacy,” then click on “Microphone” and set the applications that need to use the microphone to “Allow.”
- Google Chrome:
Text Interaction
- Click on “Artificial Interaction” and enter interaction scripts in the input box below.
- Click “Add Text” to add it to the interaction list. After starting the live broadcast, each interaction script will have a send button.
Text Interactionn
- Click “Send” to trigger the AI to speak according to the interaction script.
Intelligent Interaction
Note
The current intelligent interaction feature only supports Alibaba International. If you are streaming on other platforms, you can skip this step.
Setting Entrance
- On the live broadcast page, click on “Intelligent Interaction,” select the live platform, and the supported intelligent interaction features will be randomly displayed.
Q&A Library Settings
- Creating a New Q&A:
- On the product homepage, click on Q&A Library - Add Q&A, and a popup window will appear.
- Fill in the rule name, keywords, reply text, and upload a reply video. Click Save.
Note
Rule Name: Name the rule for easy identification.
Keywords: If a viewer’s question in the live room contains any of these keywords, it will trigger the AI to answer.
Reply Content: You can add up to 5 replies. Include variables like [Viewer’s Nickname] and [Viewer’s Country] for personalized responses.
Sequential Reply: Replies in sequence when triggered.
Random Reply: Randomly selects a reply when triggered.
Reply Video: If configured, the video will be displayed at the specified position until the AI’s reply ends.
- Adjusting Q&A Activation Status:
- Click Q&A Library - Switch to close or open the Q&A rule. When closed, the Q&A rule will not take effect after the live broadcast starts.
- Turning on Q&A Library Switch in the Live Room:
- On the live broadcast editing page, click Intelligent Interaction - Platform, select “Alibaba International,” and turn on the Q&A Library switch. This must be done after starting the live broadcast and capturing the barrage for the function to work.
Greeting Rules Settings
- Greeting Content: You can add up to 5 replies, including variables like [Viewer’s Nickname] and [Viewer’s Country].
- Sequential Reply: Replies in sequence when triggered.
- Random Reply: Randomly selects a reply when triggered.
- On the live broadcast editing page, click Intelligent Interaction - Platform, select “Alibaba International,” turn on the Greeting switch, and click the edit icon to open the editing window. Fill in the reply text and click Save.
Sending Business Cards and Product Catalogs
- On the live broadcast editing page, click Intelligent Interaction - Platform, select “Alibaba International,” turn on the “Send Business Cards” switch, and turn on the “Send Product Catalogs” switch.
Note
These functions will only take effect after starting the live broadcast and capturing the barrage.
How to Start Live Barrage Capture
- Start Broadcasting in Virbo Live
- Follow the steps for “Start/End Broadcast” on the live broadcast editing page.
- Install the Plugin in Chrome
- Ensure Chrome is up to date, then download the plugin from the provided link . After downloading, unzip locally.
- Configure the Plugin in Chrome
- Open Chrome, go to Settings - Extensions - Manage Extensions, enable Developer mode, click “Load Unpacked,” and select the unzipped folder. Enable “Allow in incognito mode” in the plugin details.
- Copy the Live Control Page Link
- Copy the link of your live control page (web version) from the live platform. Paste the link into the live broadcast editing page under Intelligent Interaction - Live Room Link Input, then click “Start Capturing.”
Note
Alibaba International currently supports automatic Q&A, automatic greetings, automatic business card sending, and automatic product catalog sending. You can turn on the corresponding switches and then configure the detailed settings for each item.
Starting/Ending the Live Broadcast
Starting the Live Broadcast
- On the live broadcast editing page, click “Start Broadcasting.”
- The AI live broadcast window will appear shortly after, displaying the AI live broadcast.
Using Your Broadcasting Partner or OBS
Note
Keep the AI live broadcast window open on the desktop during the broadcast, or it will not broadcast properly.
- Open your broadcasting partner or OBS, add a window, select the Wondershare VVB (Live Version) live window.
- Click “Start Broadcasting.” Use Alt + mouse to crop out the web bar or use the zoom function to remove it.
- During the live broadcast, you can only modify the “Artificial Interaction” function; other broadcast settings cannot be changed.
Ending the Broadcast
- When concluding the live broadcast, initiate the termination of the live stream on the platform’s broadcasting partner first, followed by clicking the “End Live” button on Virbo Live to finalize the shutdown process.
Also read:
- New How To Translate Video From Japanese to English Online, In 2024
- New Talkshoplive Reviews & Pro Tips Is This the Live Commerce Tool You Need for 2024
- New In 2024, Top 10 Hindi Video Translators with Step-by-Step Guidance
- New 2024 Approved Easy Tutorial How to Record and Send Talking Emoji for iPhone
- New Top 8 Live Selling Platforms & Beginners Tool Suggestion for 2024
- The Most Efficient Tools to Convert Text to MP3 With the Best Natural Voices
- 2024 Approved What Is an AI Tool? | Wondershare Virbo Glossary
- Updated Diverse Template | Online
- New 2024 Approved Top 5 AI-Integrated AI Cartoon Video Generators to Use
- Updated In 2024, Live Deepfakes Made Easy How to Download and Make Your Own Live Model
- New Best 5 Quandale Dingle Voice Generators for 2024
- New Guide on How to Enable the Text to Speech Function on iPhone
- Updated Breakthrough How to Make A Picture Speak for 2024
- Updated Review of LazLive Live Selling Platform With Guide
- Video Translator | Wondershare Virbo Online for 2024
- The Power of YouTube Live Selling Unlock Your Sales Potential for 2024
- New 2024 Approved What Is an AI Text Generator?
- Your Account Has Been Disabled in the App Store and iTunes On iPhone 12 mini?
- In 2024, The Magnificent Art of Pokemon Go Streaming On Xiaomi Redmi Note 12 4G? | Dr.fone
- In 2024, Full Guide to Fix iToolab AnyGO Not Working On Realme GT 5 Pro | Dr.fone
- 9 Solutions to Fix Process System Isnt Responding Error on Vivo S18 Pro | Dr.fone
- In 2024, Ultimate Guide on Apple iPhone 6s iCloud Activation Lock Bypass
- How to Delete iCloud Account From Apple iPhone 15 without Password?
- In 2024, How Can We Bypass Xiaomi Redmi Note 13 Pro 5G FRP?
- How To Recover Data from Apple iPhone 6s? | Dr.fone
- The Complete Guide to Vivo S17 FRP Bypass Everything You Need to Know
- In 2024, Best Pokemons for PVP Matches in Pokemon Go For Vivo S17e | Dr.fone
- In 2024, The Ultimate Guide to Bypassing iCloud Activation Lock on Apple iPhone 15
- How to Reset your Xiaomi Redmi A2 Lock Screen Password
- How to Delete iCloud Account with or without Password from your Apple iPhone XS Max/Windows/Mac
- Title: In 2024, Cloning Voices in Real-Time With Top GitHub Repositories
- Author: Sam
- Created at : 2024-05-19 03:35:00
- Updated at : 2024-05-20 03:35:00
- Link: https://ai-voice-clone.techidaily.com/in-2024-cloning-voices-in-real-time-with-top-github-repositories/
- License: This work is licensed under CC BY-NC-SA 4.0.
