
In 2024, AI Voice | Online
AI Voice | Online
AI Voice
Virbo’s cutting-edge AI capabilities offer a transformative solution to your copywriting needs. With the prowess of our advanced artificial intelligence, rewriting, translating, and refining your content becomes a seamless and efficient endeavor, alleviating you from the burdensome challenges often accompanying these tasks.

Get To Know Our AI Voice Feature
- Cost-effectiveness: Budget-friendly AI voiceovers for video creation
- Clear Audio Quality: Provide an immersive experience with high-quality audio
- Spoken by Realistic Avatars: Engage viewers with Avatars’ natural voices in videos
- Diverse Accents & Languages: Elevate video editing experiences with multilingual avatars

Click here to learn more about AI Voice >>
AI Voice
Virbo’s cutting-edge AI capabilities offer a transformative solution to your copywriting needs. With the prowess of our advanced artificial intelligence, rewriting, translating, and refining your content becomes a seamless and efficient endeavor, alleviating you from the burdensome challenges often accompanying these tasks.
Get To Know Our AI Voice Feature
- Cost-effectiveness: Budget-friendly AI voiceovers for video creation
- Clear Audio Quality: Provide an immersive experience with high-quality audio
- Spoken by Realistic Avatars: Engage viewers with Avatars’ natural voices in videos
- Diverse Accents & Languages: Elevate video editing experiences with multilingual avatars
Click here to learn more about AI Voice >>
How To Make Your Memoji Talk? Get Creative With Your Messaging
If you are an iPhone user, you must have been familiar with Memoji – the digital avatars you often see in your messages. iPhone users usually use Memoji to match their personality and mood, then send them to their contacts.
While Memojis are often seen as static images, you can also record a message using animated Memojis. This will give your friends a delightful surprise when they receive a video of your voice synced perfectly with your Memoji’s expressions.
So, next time you want to send a message to your friends, try to use animated Memojis. First,learnhow to make your Memoji talk here.
Part 1. What is Memoji on iPhone?
Memoji is a digital avatar feature introduced by Apple, available on iPhone and iPad models as long as they support FaceID. You can create your own personalized Memoji that closely resembles your appearance, down to specific details like facial features, hairstyles, accessories, and more.
Once you’ve crafted your Memoji, you can use it across various Apple platforms and apps. For instance, you can use them in FaceTime calls to replace your face with your Memoji or in Messages to send either Memoji ortalking Memoji recordings.
Memoji compatibilities:
Memoji’s compatibility is supported on iOS 12 and newer operating systems, including the iPhone X, iPhone 11, iPhone 12, and later. As for iPads, Memoji functionality is available on the iPad Pro 11-inch or the iPad Pro 12.9-inch (3rd generation) and newer models.

Part 2. How To Easily Make Your Own Memoji on iPhone
Before we get intohow to make your Memoji talk , let’s prepare and make your own Memoji on iPhone first. To create your own Memoji that truly captures your essence, you’ll want to customize it to closely resemble yourself or any characters you had in mind.
Here’s how to make and customize your own Memoji on iPhone:
Step 1: Open the Messages app on your iPhone. Then, compose a new message or open a conversation.
Step 2: In the message, tap the Plus button located to the left of the text field and tap “More” from the list of options.
Step 3: Now, tap the Memoji button and select “New Memoji” from the next menu.
Step 4: This is where the fun begins! Customize the various features of your Memoji to your heart’s content. You have the flexibility to adjust elements such as skin tone, hairstyle, eyes, facial hair, accessories, and more to ensure that your Memoji is a true reflection of yourself.

Take your time to fine-tune each detail until you’re satisfied with the result. Once you’ve completed customizing your Memoji, you’re ready to show its charm across your Apple devices.
Part 3. How To Record and Send Your Memoji on iPhone
Now that you’ve created my personalized Memoji, you may want to ask “how do I make my Memoji talk ”. You can do so by recording with your Memoji and sharing it with your friends. Recording with Memoji can be a fun and creative way to express yourself in your communication.
Follow these straightforward steps on how to record and send your Memoji on iPhone:
Step 1: Make sure that you have a compatible iPhone device as mentioned in Part 1 to access the Memoji feature.
Step 2: Open the Messages app on your iPhone device, and start a new message by tapping Compose. You can also locate and select an existing conversation.
Step 3: While composing your message, tap the Plus button and select “More” from the menu.
Step 4: Locate and tap the Memoji button (which looks like a smiling face). Swipe left to choose the Memoji you want to use for recording.
Step 5: After selecting your Memoji, tap the Record button to start recording your message. You have up to 30 seconds to express yourself. Tap Stop when finished, then send it to your friend. They will receive your Memoji message as an animated video, complete with your voice recording.

But if you want to share yourtalking Memoji outside of the Messages app, you can save the recording to your camera roll and then share it through other messaging apps or social media platforms.
Part 4. How To Make Your Memoji Image Talks
Besides recording your Memoji, you can also animate and maketalking Memoji from a photo using Wondershare Virbo. This is the perfect way if you find recording and sending your own Memoji awkward. Just toss in your Memoji image, and Virbo will do the rest.
Virbo is a multi-purpose video editing tool tailored for producing short videos featuring lifelike avatars using AIGC technology. One of its key features is the ability to generate speaking avatars from images with its Photo Talking feature.
Virbo Photo Talking features include:
- Extensive collection of more than 300 AI avatars for free
- A diverse selection of more than 300 AI voices
- Take advantage of user-friendly tutorials
- Cross-platform compatibility on online, desktop, and mobile applications
- Natural animation and lip synchronization
How to make Memoji talk on iPhone with Wondershare Virbo:
Step 1: Create a new project
After installing Wondershare Virbo , launch the application and select the Talking Photo feature to make yourtalking Memoji .

Get Started Online Free Download
Step 2: Import your Memoji photo
Tap on “Upload a photo” and select the Memoji picture saved on your camera roll.

Step 3: Customize and export your talking Memoji video
Input your desired text and select a voiceover from the options provided below to generate the audio for your video. Alternatively, you can also record your own voice by selecting “record audio”. After completing the video editing process, click on “Generate Video” to export your creation.

If you need help with how to make your Memoji talk , you can refer to the video tutorial.
Conclusion
Memoji is a feature introduced by Apple that allows you to create personalized animated characters, or “Memoji,” which can your facial expressions and movements. These Memojis can be created to resemble you or any character you desire. You can use it in Messages, FaceTime calls, and even as stickers in other apps.
In case you wonder, “How to make my Memoji talk ?” you can achieve it by either recording a video with the Memoji while speaking or you can turn your Memoji image and make it talk using Wondershare Virbo. Virbo’s Photo Talking feature is a user-friendly tool that lets you animate your Memoji image with ease by syncing it with recorded audio.
Get Started Online Free Download
Easy Guide: How To Make Talking Head Videos
Photos and videos always add more power to your marketing campaigns. From presentations to promotional videos, every visual helps to captivate the audience. So, why not make them more creative to generate maximum leads? This article presents an AI-powered tool that allows the creation oftalking head videos for different purposes. Using anAI talking head video can assist in delivering your message with fun.
Moreover, you can also learn tips to make your interactive videos even more professional. Other than that, a dedicated section unveils some major types of talking head videos.

Part 1. Getting To Know the Major Types of Talking Head Videos
Atalking head video features a person talking directly in front of a camera. It can also include the shoulders or even the entire body of the speaker. You can generate these AI talking head videos by animating your pictures for more engagement. This type of video is mainly intended for tutorials, interviews, product reviews, and training. Most importantly, they help to improve your interactions with viewers.
Now, it’s time to explore the major types of talking head videos that serve different purposes. Let’s explore them one by one and learn how they are beneficial for you.
1. Explainer Talking Head Videos
An explainer video is the most commontalking head video example . These videos are made to explain concepts or topics related to different subjects. Content creators use this type of video to make connections with their audiences. Moreover, some businesses use explainer videos on their landing pages for marketing purposes.

2. Business Talking Head Videos
Employees and shareholders can communicate throughAI talking head videos in a corporation. They can also interact with customers to provide them with a personalized experience. Also, this type of video increases the engagement rate to grow your business.

3. Interview Talking Head Videos
Using a talking head video strategy is helpful for interviews. In these videos, the speaker usually captures the face and some parts of the body while talking to the camera. Therefore, both sides can remain focused on what they are discussing. Moreover, one-to-one interactions help to understand the personality and skills in a better manner.

4. Product Review Talking Head Videos
Customers or content creators make product review videos to share their opinions about products or services. Thisexample of a talking head video helps demonstrate a product to the audience with different perspectives. Business owners can create engaging videos to assist their viewers in understanding their products and services.

Part 2. Create Perfect Talking Head Videos for Impressive Results Using Wondershare Virbo
If you have a query abouthow to create talking head videos , this section provides the best solution. Here, we will introduce you to the best AI talking video creator,Wondershare Virbo . It provides an AI Talking Photo feature to make dull pictures come alive. Also, this tool facilitates both online and offline users to create content for marketing and other purposes.
There is a whole variety of AI avatars with different outfits and poses. You can choose your favorite avatar or picture to engage with the audience. Moreover, you can add text to convert it into a speech for your talking video. This tool even allows you to upload voice clips and customize them according to your needs.
Prominent Features of Wondershare Virbo
- AI Talking Photo feature allows you to add background music to your talking head videos for a personalized experience.
- Users can make creative talking heads videos in offline mode. Therefore, you can download the tool and use it without the internet.
- It has an AI script feature that can optimize the content of yourAI talking head video .
Comprehensive Guide to Creating Talking Photo Videos Using Wondershare Virbo
You can generate dozens of videos within no time through Wondershare Virbo. Its AI features provide a next-level experience for crafting videos, which is explained as follows:
Step 1. Launch the Tool and Move To Create a Video
Download the Wondershare Virbo tool and launch it to access the functionality. Select the “Talking Photo” feature on the main interface to create a new project. After this, a pop-up screen with a wide range of avatars will appear.

Get Started Online Free Download
Step 2. Import a Photo To Generate a Talking Head Video
Upon accessing the pop-up screen, hit the “Import Photo” icon to add your headshot to this tool. Once you import the picture, click the “Create Video” button to create your video.

Step 3. Add Text To Make Your Photo Talk
After that, select the “Text Script” option to type or paste the text. This text turns into a speech for your talking photo. You can also click on the “AI Script” feature to add text and try the smart optimizations that are given on the right side of the window.

Step 4. Choose the Desired Language and Accent
You can click on the languages menu to access a new pop-up window. In this window, you can choose the required language and accent. Next, click “Gender” from the drop-down you want to use for the voiceover. After selecting these options, hit the “OK” button to proceed.

Step 5. Adjust the Voiceover Features
Once you have selected the language and gender, it is time to adjust the voiceover properties. Drag the “Volume” bar to increase or decrease the volume. You can also change the pitch by adjusting the “Pitch” bar.

Step 6. Export Your Talking Head Video
After making all the selections, you are ready to take your masterpiece out. For that, you can select the “Export” option. Then, you can also adjust the resolution for the final output. Afterward, it takes you to the “My Creations” window to check yourAI talking head video .

Part 3. Where Can a Talking Head Video Be Put To Use?
In the current digital market, animated and whiteboard videos have their worth. However, talking head videos have emerged as the new way to market products. They offer more authenticity and credibility while building connections for your company. Also, these videos help emotionally attach the presenter and the viewer.
As discussed before, you can make explainer videos to deliver your thoughts about a subject or concept. The corporate videos keep employees, customers, and stakeholders attached. Moreover, users can create product review videos to help others understand products or reviews better. Overall,talking head videos are fruitful for marketing, engagement, lead generation, and more.
Tips To Make Professional Talking Head Videos
Learning the right strategy for making talking head videos is essential. A high-quality video helps to deliver a message precisely without distraction. Here are some authentic tips that help you understandhow to make talking head videos more interesting and professional:
1. Plan the Script for Your Video
Going anywhere without preparation is always a disaster; the same goes for creating videos. You should make a rough outline with a concise subject. The video’s intent should be clear so you can deliver it to the right audience. Also, pre-planning can help to craft a professional script and shoot videos accordingly.
2. Adjust Lighting for a Better View
Lighting plays a pivotal role in shooting videos. So, you should focus on lighting adjustments and clarity. Also, you need to avoid overexposure, harsh shadows, and lousy lighting resources. You can also use natural light that doesn’t throw shadows.
3. Improve Audio Quality
Undoubtedly, audio is half of your content and delivers your message to the audience. Therefore, low audio quality is unacceptable when creating professionaltalking head videos. Using a camera microphone might not be a good choice as it doesn’t provide high quality. Therefore, you can use a lapel or boom mic to enhance voice quality.
4. Make Your Setup Decent
You can work on your setup to make your videos more professional and exciting. Your environment reflects a picture of the viewers’ minds. Making your setup look better is a good strategy for engagement. For this purpose, you can use some visually appealing props in your room.
5. Use Two Cameras or More
You can try shooting videos from different angles with more than one camera. This dynamic video looks interesting to viewers, so they can boost engagement. With this advance, you get more flexibility to adjust each frame. Moreover, you can also use this technique to make your video creative and professional.
6. Make Use of AI Tools
With technological advancement, AI can now help you optimize the quality of these videos. You can use AI tools to create engaging talking head videos. Moreover, these tools even allow you to optimize the content ofAI talking head videos.
Conclusion
Throughout this article, we have provided all the essential information abouttalking head videos . There are dedicated sections to understand all major types and tips to improve your videos. Also, we have introduced a recommended tool—Wondershare Virbo to create high-qualityAI talking head videos . Its “Talking Photo” feature allows you to produce magical videos.
Get Started Online Free Download
Top 5 Udemy Subtitle Translation Tools for Seamless Auto Translations
One of the most common problems Udemy users encounter is that a course is not in their native language. However, even though Udemy provides captions, many courses might not provide subtitles in your language.
That’s why you need aUdemy subtitle translator that will allow you to watch a course or video in your native language with subtitles that you can actually understand. So, let’s discover the top five best Udemy subtitle translators and how they work.
Part 1. Can YouTranslate the Udemy Subtitle?
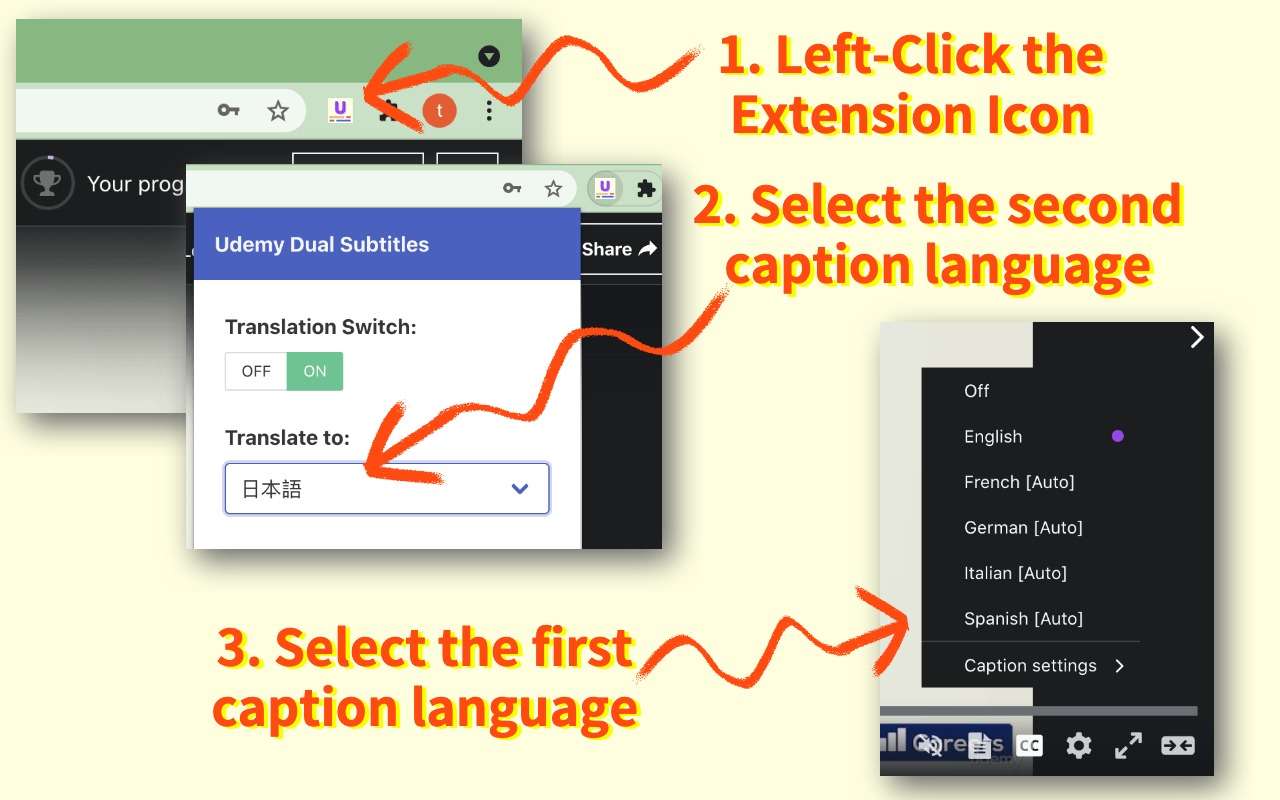
Translating subtitles on Udemy might not be directly possible, but there are workarounds. As long as you are using Google Chrome and watching courses on the website, you can use Udemy dual subtitle apps from the Chrome app store and incorporate them in your browser to get auto-translation of whatever video you are watching.
Many dual subtitle tools are available on the market, but in this blog, we are covering the top five totranslate Udemy subtitles . Let’s say that you have bought a course on Web Development.
With the right use of AI, Machine Learning, and advanced algorithms, these tools set you up for success so you can learn any course of your liking, regardless of which language it is in. So, let’s uncover these tools and their key features.
Part 2. 5 Best Udemy Subtitle Translators
1. Udemy Dual Subtitles - Subtitles Translator
When it comes toUdemy translating subtitles , there are a lot of things you might have a problem with. First, you might not even have the language you are looking for. Secondly, the format isn’t the most pleasing. And lastly, you cannot display bilingual subtitles to take your learning to the next level.
That’s where Udemy Dual Subtitles comes in. It is a Chrome extension that will work on Google Chrome and Microsoft Edge. Its main prowess is displaying bilingual subtitles so you can learn in the most optimal way possible.
Moreover, Udemy Dual Subtitles expands Udemy’s original subtitles to show duals so you can easily understand what’s going on the screen. It can translate Udemy’s official subtitles into all widely used languages; switching them is a piece of cake.
Here are some of the features it offers:
Key Features
- Versatile Translation: Translate Udemy subtitles in most languages that are commonly used around the globe
- Easy-To-Use: No need to set up every time. Just install the plugin to Chrome and get started right away
- Custom Styling: Udemy subtitle translator with custom styling abilities
- Bilingual Languages: Supports and displays dual subtitles to make learning easier and more effective
- Downloading Subtitles: You can download subtitles by using the Udemy Dual Subtitles tool
Pros
- Makes understanding courses easier
- Supports a plethora of languages
- Allows custom styling for better viewing
- Very good customer support
Cons
- Can cause occasional glitches
2. Udemy Subtitles Translator - Yakuu

Yakuu is another popular Udemy subtitle translator that enables learning from anywhere in the world. It virtually features all the languages and does real-time translation in a way that feels natural and easier to look at.
Moreover, just like other subtitle translating tools, it enables Udemy’s subtitles to be translated and to be shown in dual-subtitle mode, meaning learning will be easier than ever. It also supports all display modes including full screen and paging, without breaking down or messing up the subtitles.
All the features specified in Yakuu cater to the needs of users who are looking for a translation of subtitles. Moreover, it easily lets you translate the subtitles with three simple steps and doesn’t even require a bit of setup like many other services.
Key Features
- Responsive Subtitles: Allows responsible subtitles to be displayed in full or auto-paging mode
- Bilingual Subtitle Support: You can seamlessly switch between single and dual language subtitles at the same time
- Three-Step-Process: Download the tool, install it on Chrome, and simply pin to the toolbar to leverage the benefits
Pros
- Automatically display translated subtitles in the local language
- No need for a hierarchical menu selection
- Learn anywhere in any language for free
Cons
- It doesn’t support custom styling of subtitles
3. Udemy Subtitles Translator with Custom Style

When it comes to subtitles, some people like custom styling to make them easier to read. While you can adjust Udemy’s default subtitles, they are quite limited. With the Udemy Subtitles Translator tool, you have the ability to leverage Google Translate, which will show real-time updates.
All you need to do is install the subtitle, open the Udemy course, click Transcript, and click the Google Translate plugin that will translate everything to you in real time so you can enjoy your favorite course in your language.
Being a tool that is run by Google Translate, you have a lot of accuracy. Google Translate supports most languages available in the world with precision that we have never seen before. So, if you want one of the best Udemy subtitle translators, then this tool will give you the feature to enjoy your favorite course while understanding it a bit better.
Key Features
- Google Translate Support: Has Google Translate in the background to do the translation
- Custom Subtitles: You can stylize the subtitles according to your need
- Fast and Lightweight: Provides enhanced accessibility to Udemy users
Pros
- Great tool for non-English speaker people
- Quite accurate and on-point
- Allows customization of subtitles so you can customize colors, positioning, and the next
Cons
- Sometimes it doesn’t work properly
4. Udemy Double Subtitle

Double subtitles are quite popular when it comes to learning something new. Thankfully,Udemy Double Subtitle is one of the best tools to provide you with dual subtitles and translations that would make learning easier for you.
Let’s say that you already know some English but you are a Korean native. By using Udemy Double Subtitle, you can add both English and Korean to make everything even easier for you.
One thing to note is that whenever you enable a subtitle, you might need to reload the webpage for the tool to work. Overall, it is a great tool for you if you are looking to translate subtitles and learn in a way that’s more immersive.
Here are some of the features of the Udemy Double Subtitle tool.
Key Features
- Dual Subtitles: Supports dual subtitles to be displayed at once
- Fast and Efficient: The tool is lightweight and can display accurate results
- Privacy Protection: The developer doesn’t take your data, which means it is protected
Pros
- Great for learning and enhancing accessibility
- Works fastly and efficiently
- Enabling the tool takes less time
Cons
- Less languages available
5. SubTrans
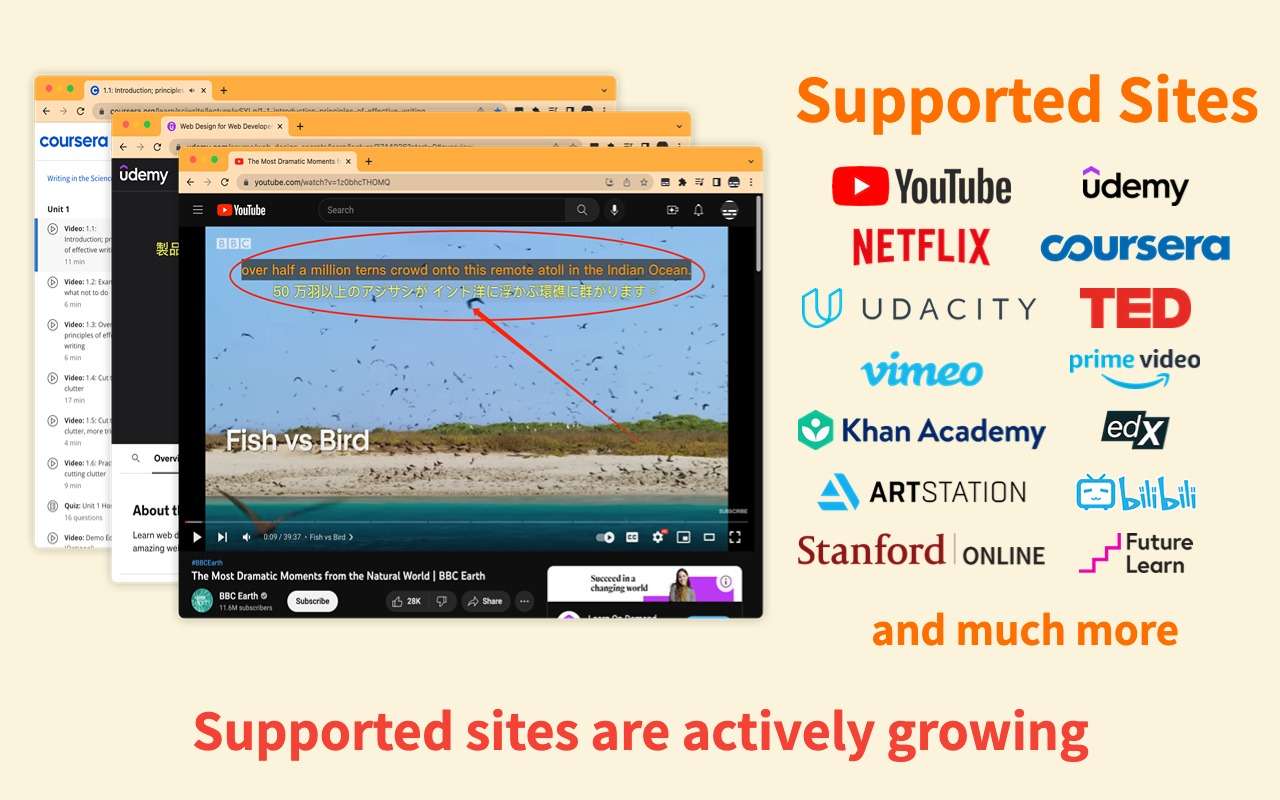
SubTrans is a general subtitle translator for a plethora of sites. Aside from Udemy, it can work on YouTube, Netflix, Coursera, TED, Khan Academy, and many more. The list of sites they support is ever-growing, and the developers are actively working to enhance the functionality of their tools.
SubTrans displays bilingual subtitles and can be used for as many video sites as possible. It can translate subtitles into almost all languages and also allows customization that is at the next level. From font size, colors, weight, and opacity to background, you can change anything in SubTrans.
Moreover, one of the best features of SubTrans is its ability to delay the subtitles. Hence, even if you feel like the subtitles don’t match, you can manually adjust them.
Key Features
- External Subtitles Support: You can also import external subtitles to be displayed on the videos
- Timestamp Control: In case the subtitles don’t go well, you can advance or delay them
- Styling Options: You can stylize almost every aspect of the subtitles
Pros
- No need to set every time
- Supports external subtitles
- Adjustable timestamp
- Display bilingual languages
Cons
- Only 30 minutes is free per month
Part 3. Translate Videos in Another Language using Virbo
Do you want to translate the entire video into another language besides subtitles? If so,Wondershare Virbo can help you as it’s an AI-powered video translator. It can be used as anUdemy subtitle translator and provides perfect video translations. It’s a cross-compatible platform that is available to use on online browsers and desktop applications. You can upload videos of up to 500MB within 10 seconds to 5-minute duration for smooth video translation.
Prominent Features of Virbo - Video Translation
- Diverse Languages: This software supports more than 20 diverse languages for video translation. This means you can learn any language course.
- Subtitles: Apart from translating videos, Virbo has anUdemy translate subtitles While translating videos, you can effortlessly enable this feature to get subtitles in videos. Notably, it is preferred to upload videos without subtitles to ensure the quality of the output video.
Translate Video Online Download APP Now Free Download
3.1 Why Choose Wondershare Virbo
Several platforms are available for video translation, some of which are discussed above. Now, let us help you make your selection by highlighting some of the benefits of Virbo. Delve into this part and learn why choosing Virbo will significantly assist you in learning courses.
- Breaking Language Barrier: International students with language difficulties in learning can get relief from Virbo. You can download your course content and translate it into your native language.
- Language Learning: Subtitles in the videos that Virbo provides can help you learn a new language. It enables you to understand the pronunciation of words and take notes while watching.
- Research Students: Virbo may help research students accurately quote or rephrase key points of the video. By translating, you understand the speakers’ intended meaning to cite in your research.
- Cross-Platform Support: Virbo is available for Windows, Web, and Mobile.
3.2 How to Translate the Udemy Subtitles Using Virbo?
To learn the Udemy course in a non-native language, follow these simplified instructions to translate the subtitles with the highest accuracy:
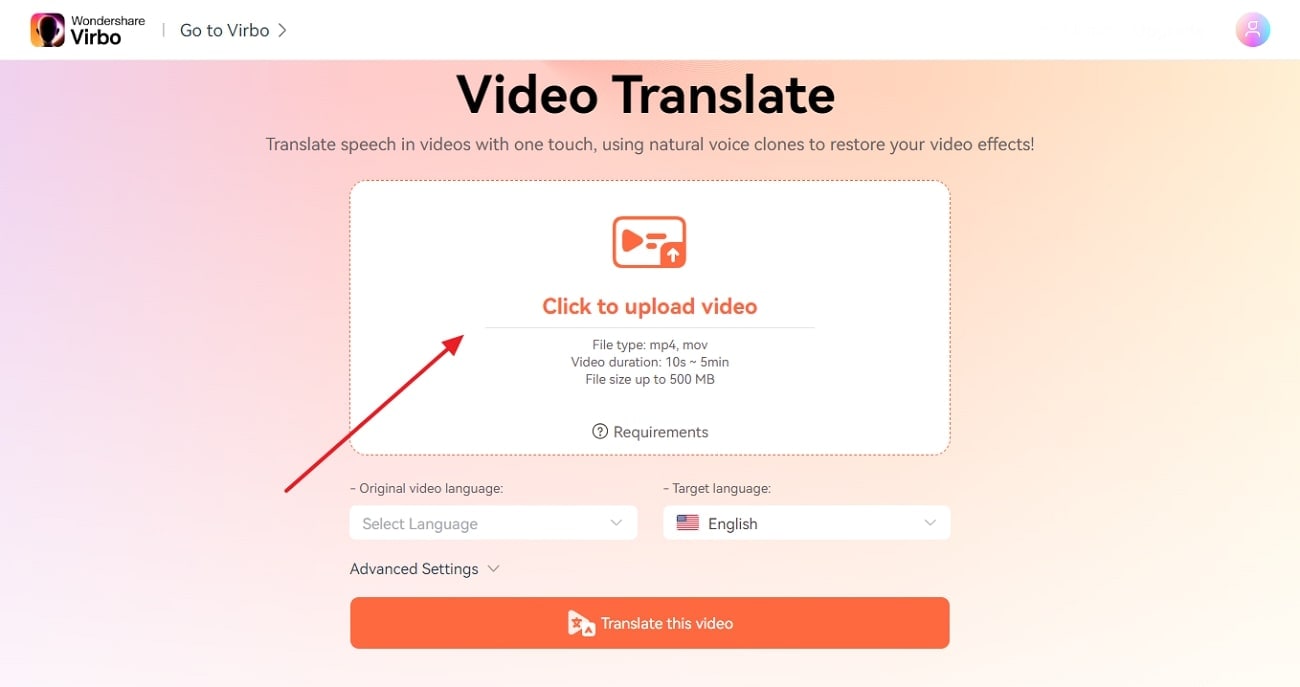
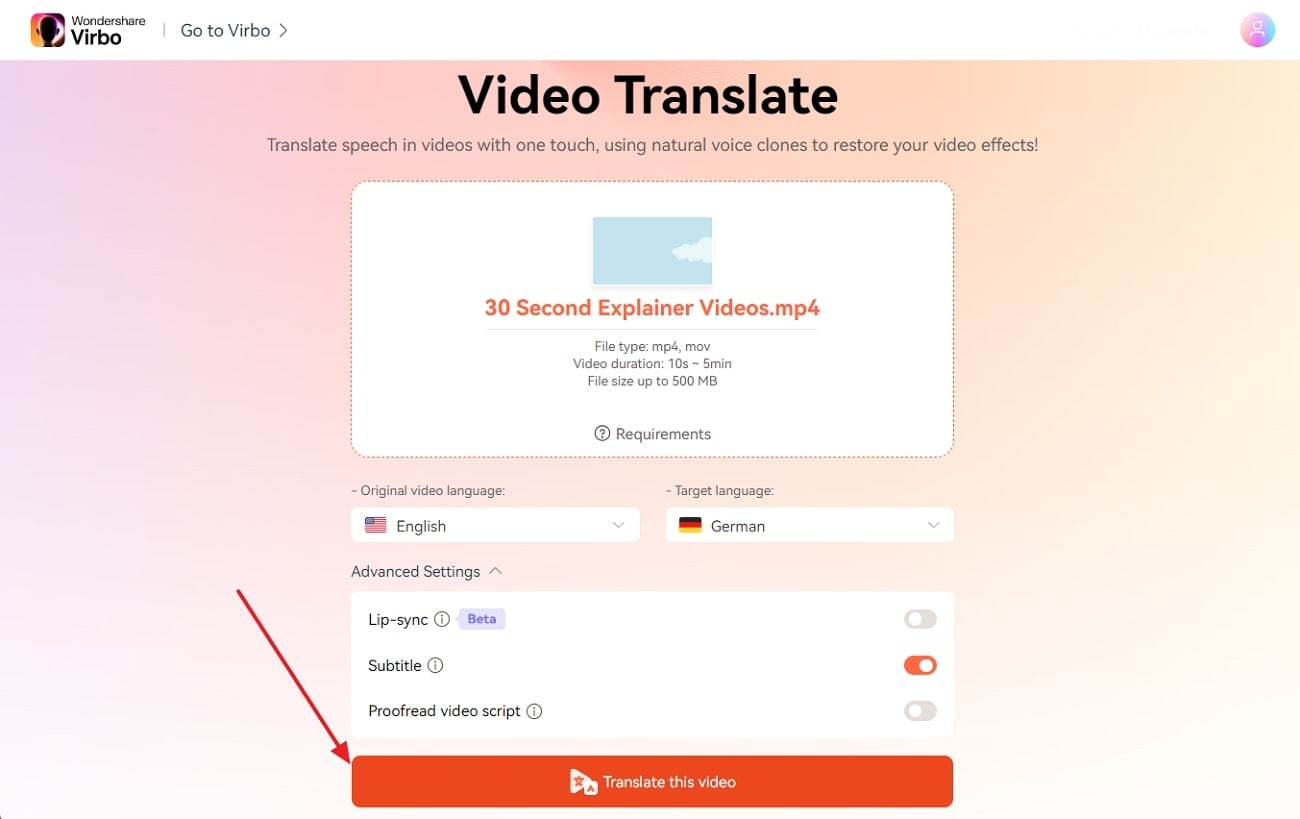
Step 1: Upload Your Udemy Course Video
Open the online version of Wondershare Virbo - Video Translator on your web browser. Hit the “Click to Upload Video” option and upload your Udemy video in Virbo.
Translate Video Online Download APP Now Free Download
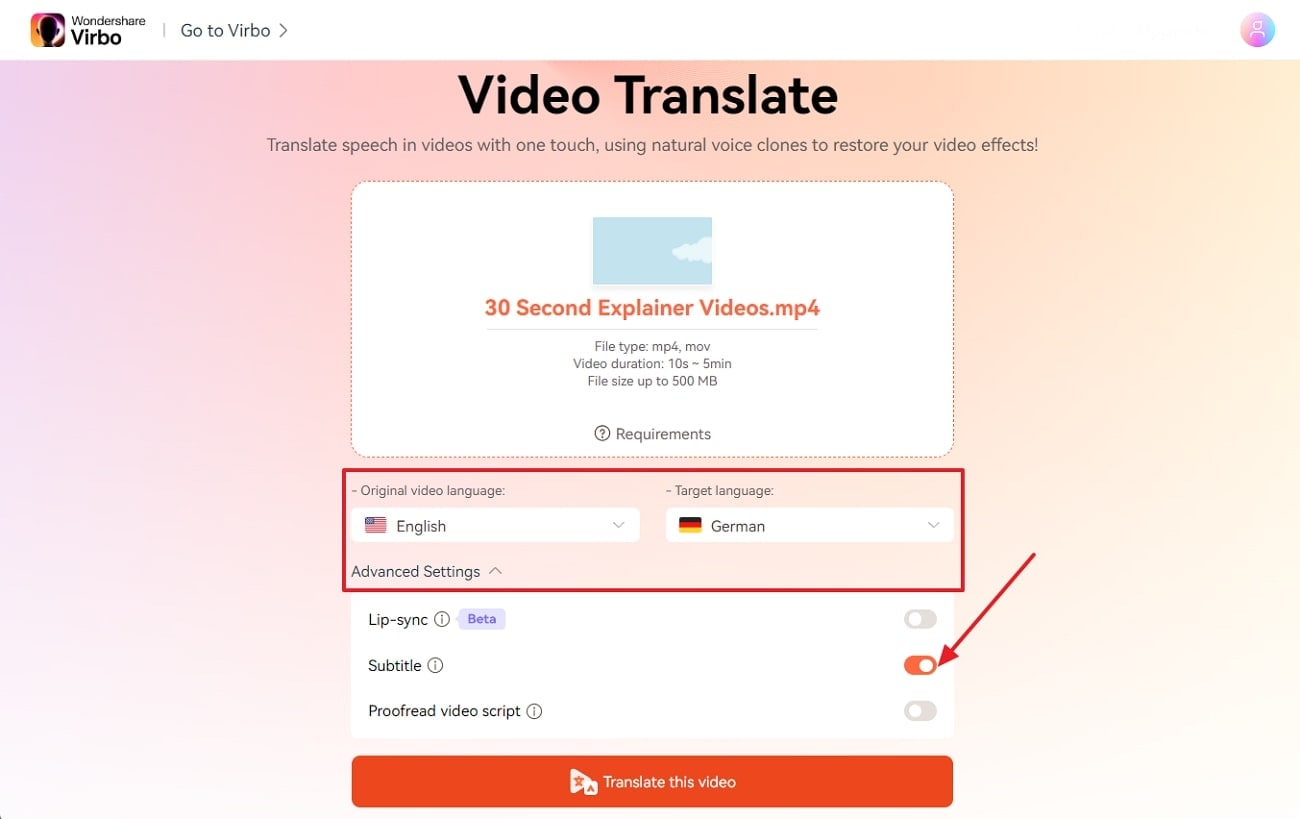
Step 2: Customize the Translation Settings
Move down and choose “Original Video Language” and “Target Language” using their lists. Then, tap the downward icon of “Advanced Settings” and get multiple options later. From there, toggle the “Subtitles” option to generate translated subtitles in the video.
Step 3: Initiate the Udemy Video Subtitles Translation
Upon setting the video translation parameters, press the “Translate the Video” button and let AI analyze. Finally, you will get your Udemy course video with translated subtitles in your target language.
Translate Video Online Download APP Now Free Download
Bonus Tip: What Virbo Can Do If You Want to Create a Udemy Course You Own?
- AI Script Generator: If you lack some course creation ideas, Virbo has an AI script generator. It can help you brainstorm ideas about Udemy courses by providing compelling scripts within seconds. All you need to do is provide text instructions and set certain parameters for exact results.
- AI Avatar: Virbo eliminates the need for human presenters, cameras, and equipment to create a course. It has AI avatars from diverse ethnicities, genders, regions, attire, and ages. These life-like avatars can create educational videos with the script you provided and AI voices.
- AI Voice: This feature of Virbo works as a text-to-speech converter that has expressive AI-generated voices. It can narrate your Udemy course with captivating voiceovers in different accents and tones. Hence, enjoy high-quality audio in various languages from thisUdemy subtitle translator .
Create Video Online Download APP Now Free Download
Part 4. FAQs about Udemy Subtitle Translator
1. How do I add subtitles to the Udemy course?
You can create subtitles from scratch using a simple text editor like Notepad or TextEdit. You need to follow the .vtt format for subtitles, which involves specifying the timing and text of each subtitle line. This option requires more effort but gives you complete control over the accuracy and style of your subtitles. You can also use Wondershare Virbo, which can generate subtitles automatically when you use this tool to translate videos.
2. How to add auto translate on any video
Auto translation can be achieved by using various tools. One of the best tools for auto-translation is Wondershare’s Virbo. It allows you to add translated captions in various languages to any video of your choice. Upload your video, choose the translation option and then select “Translate” and choose the desired language. You can also edit the generated subtitles before exporting them.
3. Is there any AI tool for translation?
There are many AI tools for translation. Tools like Google Translate, DeepL, Virbo, and Veed IO help you translate videos, audio, or text to generate new media. The accuracy of these tools is high, which can help companies generate AI videos to further target the international market.
4. How to generate AI videos for educational content?
The first step is scripting, where you need to get the script ready for your educational video. Secondly, you need an AI-powered tool for generating the voice-over. You can use Virbo which will not only generate voice but video as well. Lastly, once you add the script, the software will create a video for you that you can test and then roll out in the digital world.
Final Verdict
Udemy is one of the largest e-learning platforms with hundreds of thousands of high-quality courses catering to audiences from all over the world. However, most courses will be in English since it is predominantly an English service.
But use Udemy subtitle translation tools like the ones we have mentioned above. You can easily and effectively learn courses in your own language by translating the subtitles into your native tongue.
Translate Video Online Download APP Now Free Download
[Ultimate Guide] How to Live Stream on Facebook?
A lot of people consume Facebook Live content as it provides a fun experience for the audience. Today, Facebook Live is being displayed across all genres. From gaming, vlogging, and sports, to basically anything under the Sun, going live on Facebook has become a new trend.
However, even to this date, a lot of users are confused about how to livestream on Facebook. That is why we have created this guide so you canlivestream on Facebook without any hassle.
Part 1: Easy-to-follow Step Guidance to Start Facebook Live
Facebook Live video is one of the most sought-after features of all time. Not only does it help creators connect with their audience but it lets them generate more revenue, ultimately bringing more money to their account.
Moreover, it is an awesome way to reach a broader audience and let people discover your content in real-time. A lot of people are confused abouthow to use Facebook Live because the methods to use it on the mobile app, the web, and Creator Studio are all different.
So, let’s talk about how togo live on Facebook. Before you start, you should understand that you can live stream to your page, group, profile, and event using the Facebook app or using a camera and streaming software.
01 How to go live on Facebook using a phone
As we have already discovered, you can go live on your Facebook page, group, profile, and event from anywhere in the world. The best way to go about life in the modern world is to use the Facebook app which is available on both Android and iOS.
Here is a complete guide on how to useFacebook Live streaming services on your mobile.
Step 1 Choosing where to go live (Personal Profile, Group, or Page)
The first step is choosing where you want to live. Ask yourself where are you trying to go live. Is it on your personal profile, a Facebook page that you own, or in some group? Navigate to wherever you want to go live.
Step 2 Going live
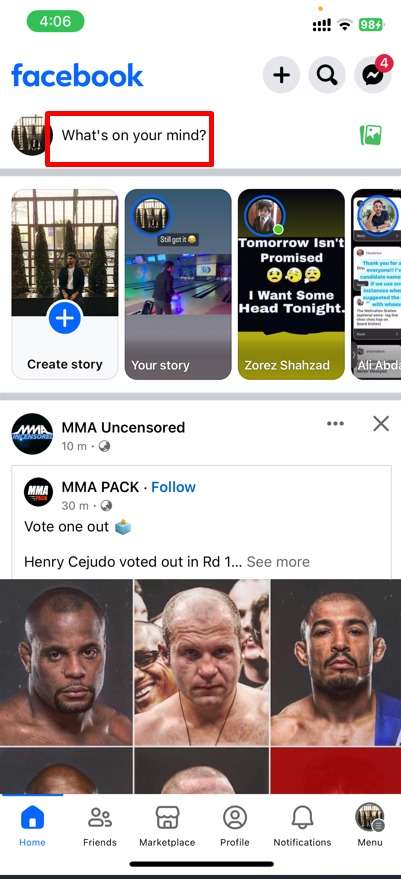
Let’s say that you want to go live on your personal Facebook profile. Then, you need to click on the Facebook app, and click onWhat’s on your mind? SelectLive Video which will be an option available. Now, you will start to see that new features will appear and you will need to set details about your livestreams in the next step.
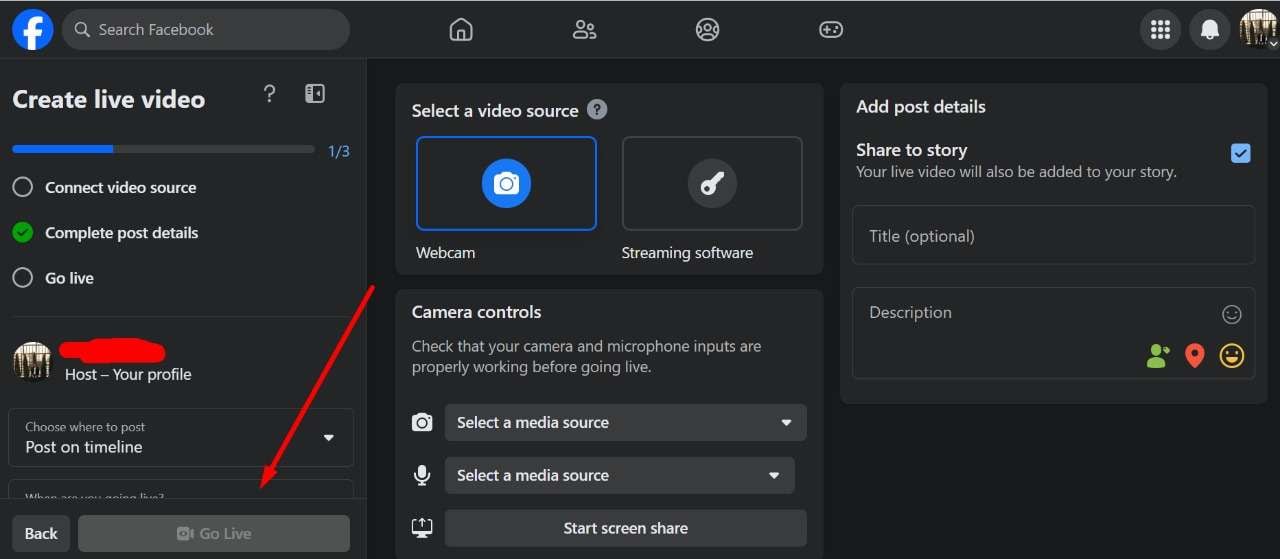
Step 3 Setting live stream details and going live
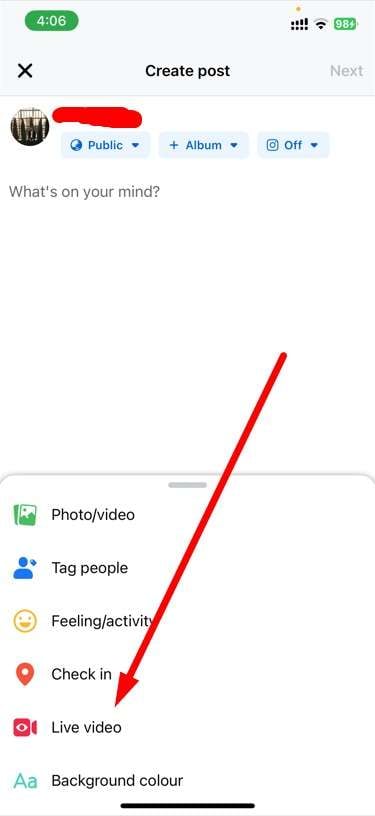
Now you will need to give Facebook access to your camera and microphone, add a description to your video, set effects of your liking, and adjust everything accordingly. You can also invite your friends to join and watch the live video. So set those options and click onGo Live.
Step 4 Finishing the live stream
Once you have completed the live stream, simply click theFinish button to end your broadcast. In just a couple of minutes, your livestream will be ready in the form of a video.
02 How to go live on Facebook using the web
When you use the web version of Facebook, you will be redirected toLive Producer , which is a tool that allows you to use higher-end production equipment and streaming software. This happens on both laptops and PCs.
If you are aFacebook live streamer and want to go live using the web, then follow these steps.
Step 1 Find the Live video option on Facebook
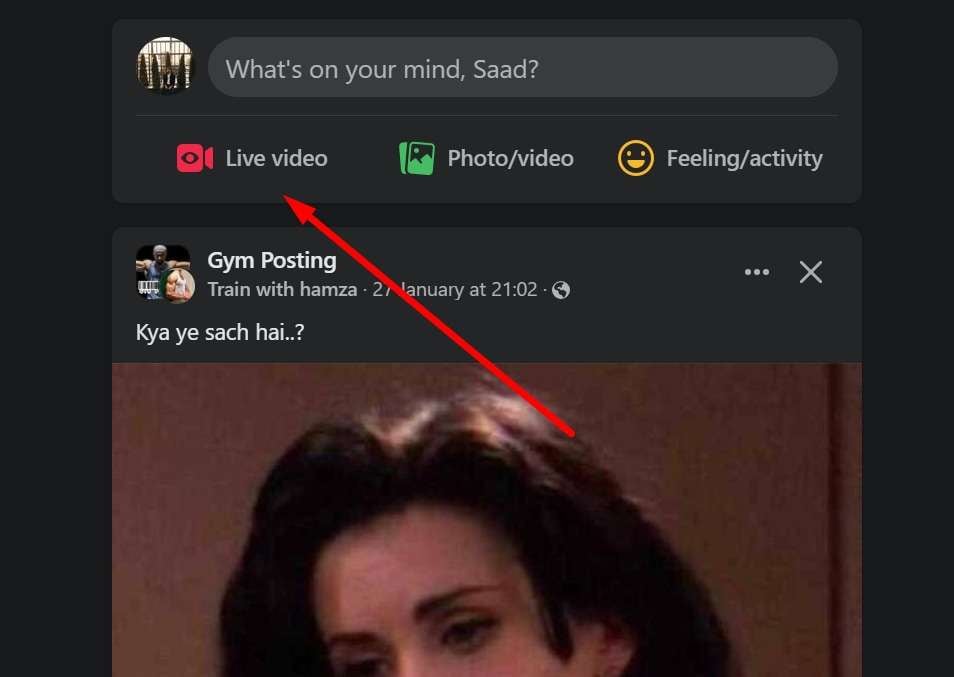
Firstly, you will need to be logged in to your Facebook account. Once you are logged in, at the top of the News Feed, click on theWhat’s on your mind section and click on the three dots action button. There, you will findLive Video which will ultimately redirect you to Live Producer. So click on it.
Step 2 Setting up livestream
Once you are on Facebook Live Producer, you can add your title, and description, choose the equipment, and set a lot of things right on your Facebook account. You can do this before the live stream starts which is great because you can start live in a professional manner.
Step 3 Start your live stream on Web
Once everything is good to go, simply click onGo Live and you will be able to share your story with the rest of the world. You can also end the live stream whenever you like.
Part 2: Selected Tool to Elevate Your Facebook Live Experience
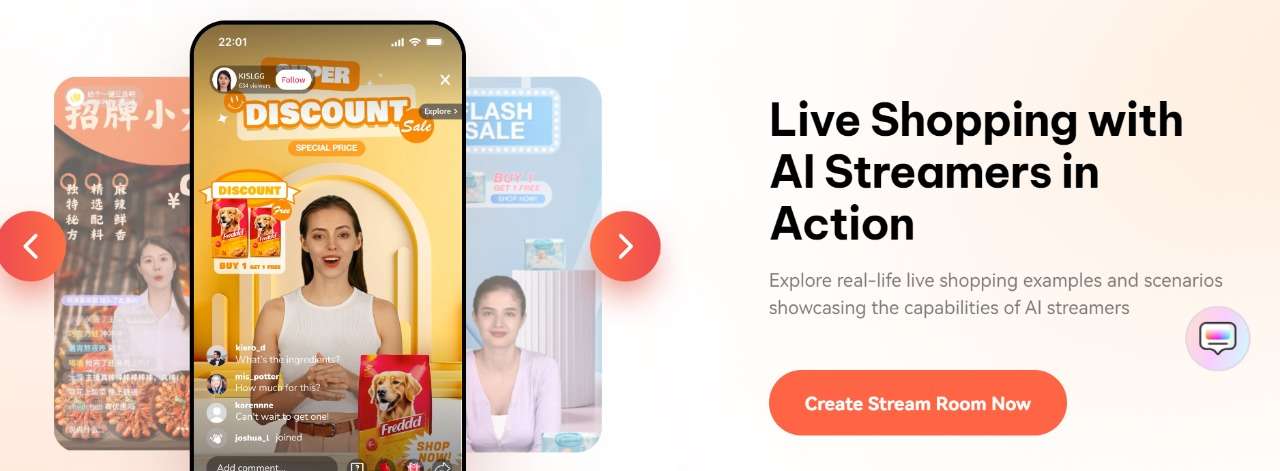
If you want to take yourFacebook streaming to the next level, then you should try Virbo Live . Virbo is an all-in-one AI platform that allows users to create high-quality content with 300+ voices and a plethora of powerful features.
Virbo Live aims to transform the live experience by adding AI into play and improving traditional Facebook live streaming. Using Virbo Live is simple. You need to create a live shopping room where you can create a room or simply select a template. Then, you can choose the AI models and background. You can also choose the text and the voice that you want to be played during the live stream. And lastly, you can interact with your audience in the most user-friendly way possible.
For Facebook live streaming,Virbo Live is one of the most amazing tools that is transforming traditional boring live shopping into an AI-driven shopping experience. Let’s discover some of the features related to Facebook Live.
Features of Virbo Live
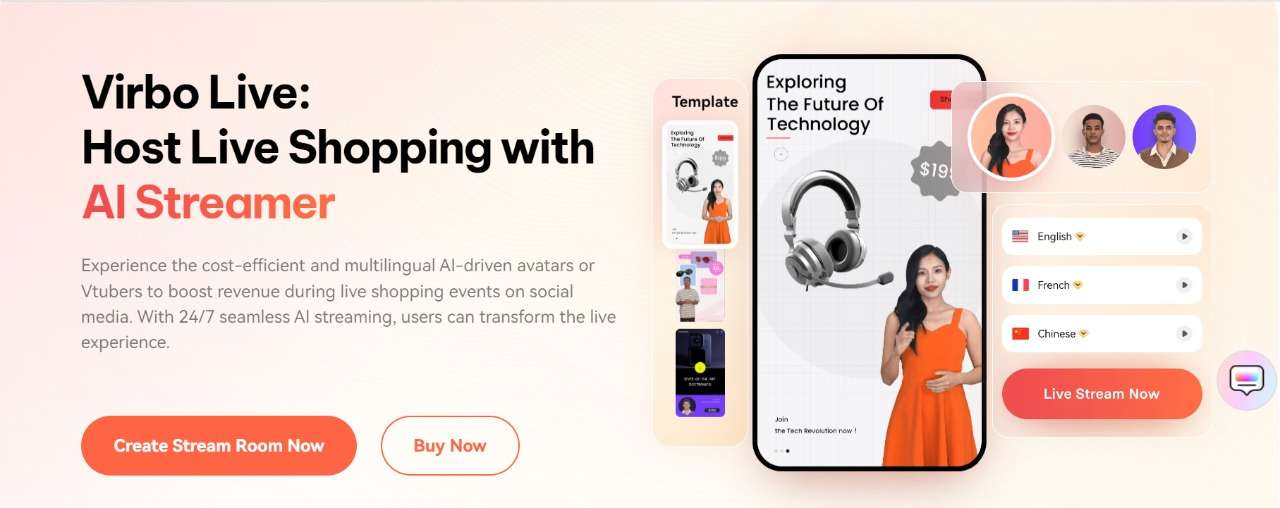
- Cost-effective: When it comes to going live on Facebook using the traditional method, you will need a lot of equipment like a camera, mic, and more. With Virbo Live, you don’t need anything because everything is handled by AI.
- 24/7 broadcasting: The regular Facebook live stream can be interrupted but with Virbo Live, you get continuous 24/7 broadcasting without interruptions.
- Live shopping made it easier: Virbo Live makes it easier for brands to showcase their products in the most user-friendly way possible. You can have the AI describe everything as your product gets bought by the audience.
Part 3: FAQs about Facebook Live
1. How do you get to Facebook Live?
You geta live stream on Facebook by using the live streaming feature. To do that, you either need to have a PC, Android, or iOS device. If you are on PC, you can simply log in to Facebook Web. But on mobile devices, you need to have the Facebook app or the Creators app downloaded to go live.
2. Can you watch Facebook Live without an account?
Facebook live videos are public, meaning you can watch them on any device as long as you have the internet. Moreover, Facebook live videos don’t require an active Facebook account to be played as they are usually public.
3. Is Facebook Live stream free?
Yes,Facebook live streaming is 100% free, meaning you don’t have to pay a penny to use any of the features. However, if you use a third-party tool, then you might need to pay to get some features unlocked.
4. Is YouTube Live better than Facebook Live?
Both YouTube Live and Facebook Live are perfect for streaming. However, if your goal is monetization and making money, then using YouTube Live would be better. However, if you want to interact with your audience and make your community grow, then Facebook Live is the best choice.
Conclusion
Facebook streams are a fun and engaging way to interact with the audience. In this guide, we have covered a complete guide that you can follow to get live on your Facebook and reach a broader audience.
And if you want to take your Facebook live streaming to the next level, then a tool like Virbo AI will be perfect for businesses that want to bring in more revenue and reach a bigger audience.
Device/Network/Browser Requirements
Device/Network/Browser Requirements
Explore our concise User Guide for Device/Network/Browser Requirements, tailored for seamless compatibility with our innovative product, Virbo AI Live Streaming.
Elevate your streaming experience by seamlessly meeting these requirements.
Computer Requirements
1Whether desktop or laptop, a properly configured and smoothly running computer is required.
2For optimal functionality, it is recommended that the computer is outfitted with audio devices featuring “Stereo Mix” capability or other virtual sound cards. These components contribute to an enhanced audio experience and facilitate versatile sound management on the system.
Network Requirements
1The average network speed in the computer’s environment should not be lower than 5Mbps to ensure smooth live streaming.
2 If possible, it is recommended to use a dedicated network for more stability in internet speed.
Browser Requirements
1We highly recommend using the Chrome browser and updating it to the latest version for optimal and stable performance.
What Is an AI Script Generator?
Part 1. What is an AI script generator?
An AI script generator is a tool or system that uses artificial intelligence techniques, such as natural language processing and machine learning, to generate scripts or text content. It can be used in various domains, including movies, television shows, video games, chatbots, virtual assistants, and more.
AI script generators analyze large amounts of existing script data to learn patterns, language structures, and dialogue styles. They can then generate new scripts based on this learned knowledge. The generated scripts may include dialogue, scene descriptions, character actions, and other elements typically found in scripts.
These tools can be helpful for writers, content creators, and developers who need to generate scripts quickly or seek inspiration for their creative projects. However, it’s important to note that while AI script generators can provide valuable suggestions and assistance, they may not replace the creative input and human touch required for crafting high-quality scripts. Human oversight and editing are usually necessary to refine and tailor the generated content to specific needs and artistic visions.
Part 2. How can an AI script generator revolutionize your work?
An AI script generator can be a valuable tool in several ways to help with your work:
1. Idea generation
If you’re experiencing writer’s block or struggling to come up with ideas, an AI script generator can provide fresh concepts, dialogue prompts, or scene suggestions to spark your creativity. It can offer new perspectives and help you explore different directions for your script.
2. Efficiency and productivity
AI script generators can save time by automating the initial drafting process. They can quickly generate dialogue, scene descriptions, or even entire scripts based on your input or parameters. This can be especially useful when working on projects with tight deadlines or when you need to generate multiple script iterations.
3. Collaboration and feedback
AI script generators can facilitate collaboration by providing a starting point for discussions and feedback. You can share the generated scripts with your team or colleagues, enabling them to provide input, make revisions, or further develop ideas. It can serve as a collaborative tool to streamline the scriptwriting process.
4. Inspiration and experimentation
AI script generators can offer unique and unexpected ideas you may not have considered otherwise. They can introduce unconventional plot twists, character interactions, or narrative arcs, encouraging you to explore new creative possibilities and push the boundaries of your work.
5. Learning and improvement
By using an AI script generator, you can gain insights into writing techniques, storytelling structures, and dialogue patterns. Studying the generated scripts can help you identify strengths and weaknesses in your writing style, providing opportunities for growth and improvement as a writer.
However, it’s important to remember that an AI script generator should be seen as a tool to assist and enhance your work rather than replace human creativity and expertise. Reviewing, editing, and refining the generated content to align it with your artistic vision and ensure its quality is crucial.
Also read:
- [New] Perfecting Your Images with Cleared Backdrops
- [New] The Perfect Pixel A Guide to Captivating PC Gaming Moments for 2024
- [Updated] Elevate Your Online Sound Experience with These 5 Steps
- 2024 Approved Real-World Applications of Magix Video Pro X
- 2024 Approved The Ever-Changing Era of AI Video Translation A Reality to Be Fulfilled
- Championing Enhancement: Unveiling 9 Compelling Reasons for Upgrading to Chabt GTP Plus
- Defender Cleanup Procedures for a Secure and Streamlined PC
- Eliminating Latency in Outriders: My Step-by-Step Solution
- How to Fake GPS on Android without Mock Location For your Realme 11X 5G | Dr.fone
- In 2024, Guide to Generating Speech in Different Languages With the Best Tools
- In 2024, What is the best Pokemon for pokemon pvp ranking On Realme C67 4G? | Dr.fone
- New 2024 Approved Translate Video From English to Arabic with Ease
- New AI Avatar | Wondershare Virbo User Guide
- New In 2024, Handling Exceptions
- New In 2024, How to Translate YouTube Videos Without CC
- New Top 7 Online Auto Subtitle Translators for Content Creators
- New Translate Live Video Making It Possible With The Best Tool for 2024
- Updated Talkshoplive Reviews & Pro Tips Is This the Live Commerce Tool You Need, In 2024
- Winning at TikTok Actions for More Views & Favorites for 2024
- Title: In 2024, AI Voice | Online
- Author: Sam
- Created at : 2024-10-07 19:02:55
- Updated at : 2024-10-08 17:01:50
- Link: https://ai-voice-clone.techidaily.com/in-2024-ai-voice-online/
- License: This work is licensed under CC BY-NC-SA 4.0.