
:max_bytes(150000):strip_icc():format(webp)/hexadecimal-code-security-key-krzysztof-zmij-e-plus-getty-images-57c76b825f9b5829f4bd185e.jpg)
How to Make Explainer Videos—Step by Step Guide
How to Make Explainer Videos—Step by Step Guide
Explainer Videos are a key tool that companies are using to spread brand awareness and get prospective consumers closer to making a purchase. Social media explainer videos may be among the most effective of the many kinds of marketing videos. This kind of instructional video production might seem like a difficult endeavor.

Many people believe that in order to complete it, they must engage a explainer video services. Although it is always a possibility, it is not necessary. Most of the time, anybody can make a fantastic animated explainer video with a little bit of know-how, perseverance, and, of course, a video editor.
Part 1: Purpose of Making Explainer Videos
A short-form video that presents a company’s product, service, or business concept in an effective and appealing manner is known as an explainer video. These videos are often used for marketing or sales objectives. Explainer videos are often hosted by companies on their landing pages or shown on the front page of their websites.
Simplify Complex Concepts
Explainer videos are a terrific method to briefly present a topic or idea. This might be a brief description of your firm, product, or service. In any case, it provides a simple point of entry for those who are unfamiliar with your brand. The greatest explainer videos are often shorter, lasting between one and two minutes, but they are generally under three minutes long. Explainer videos need to make it clear what they want the viewers to do after seeing.
Increase Brand Awareness and Reach
Explainer videos are designed to solve a particular issue, describe a product or service, and explain why they are the best option. They’re an essential component of content marketing since they let you to convey key information quickly and leave an impression that sticks.
Enhance Audience Engagement and Retention
Nobody likes to search for information or read a handbook. Explainer videos might provide simple explanations, detailed instructions, or other courses. The best explainer videos are those whose tone and style reflect both the brand and the target audience.
Drive Conversions and Sales
Explainer video is a triumph grounded on actual achievements. For explainer videos to successfully convey a brand’s value proposition, they must be of high quality in both production and content. That’s why explainer video creators are in demand for contemporary business marketing.
Part 2: How to Make Explainer Videos
In a presentation, there is a time constraint. An explainer video might assist provide background knowledge or convey key points up front so you can quickly access additional pertinent information. You’ve come to the perfect spot whether you’re just beginning to research explainer videos for your company or considering updating your current ones. We’ll go over all you need to know about them in this article, as well as how you can use them to build your brand.
1. Define Your Target Audience and Goal
Understand why you are doing the video. Make sure you are offering your consumers genuine value. Give them excellent stuff that they won’t be able to resist. It takes careful planning and thinking to create great video content. It involves being aware of your objectives and what you want to accomplish with your explainer video. A quality video production firm will make sure that the strategy they use for an explainer video is consistent with the business’s brand and culture.
You should be aware of your audience and make sure your TA finds your message engaging and clear. Find out what essential knowledge they need, then include it within the video. Anywhere it is accessible, the material is successful due to its clarity and simplicity. It has the same effect whether it is seen on a firm website’s home page, shared on a smartphone, or even broadcast on a huge digital billboard.
2. Draft a Compelling Script
Just as vital as the video’s graphics is an interesting screenplay. Your viewers won’t respond as you need them to if your video doesn’t present a captivating tale. It may be used into a presentation or the onboarding process for new employees. It could be used as a component of a crowdsourcing initiative or as material for client and contract bids.
You must carefully consider your options since you will inevitably fail without a solid script. Include all pertinent information: a description of the product, its advantages, lead magnets (features that will draw prospective consumers), a target audience message, and a call to action. Your strategy should be in line with how you want your clients and consumers to see you. This might be done in a manner that exudes inventiveness and humor or in a reassuringly professional manner.
3. Design Visually Appealing Illustrations or Animations
Since the majority of people believe that a website ought to be enormous when it is designed. Include all of the elements and features in it. It must have a lot of content, a lot of pictures, and a lot of eye-catching graphics. However, nowadays, a lot of companies and brands use “minimalist” or straightforward online content. Make sure, nevertheless, that the viewers of the video are not diverted.
For this reason, animated explanation videos are a wonderful complement to websites. They are concise and simple to distribute. Not to mention that they are a great technique to increase the number of visitors to your website or page. Keep the animation basic and focus on the overall message of the video rather than the animation. Additionally, the audience should understand the message. Its objective is to clearly and concisely communicate your product or concept.
4. Choose Suitable Voiceover or Soundtrack
An explainer video’s purpose is to describe a certain product or service. Because of this, using the proper voice is essential. The narrator’s voice should be audible and understandable. But to swiftly capture your audience’s interest, address their problems right away in your video.
Make sure the narrators speak plainly and without using any fancy language. They must to be able to talk easily and spontaneously about your product. To ensure all of these voice instructions implemented carefully, you need an all-in-one AI explainer video maker andVirbo provides you a way to do that effortlessly.
Get Started Online Free Download
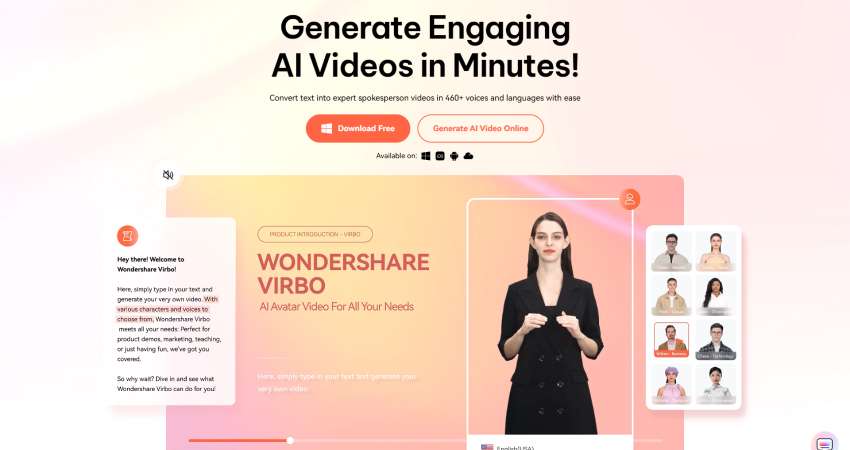
Use Virbo to narrate a captivating tale while adding sound effects, comedy, and accent variations. Of course, a lot relies on the storyteller. Avoid monotony at all costs to avoid the video being disliked. Virbo gives you the customization ability so the narrator must be able to modulate their speech’s intonation, tone, and speed in addition to having a pleasing and lively voice. Here’s why you should consider having this explainer video maker:
AI-Powered Explainer:

Creating explainer films does not have to be expensive or time-consuming, and Virbo ensures that it is not. Virbo can let you produce live action videos with only a script.
Easy Compatibility:
Whether you’re using PC or Mobile, Virbo is a good option for creating explanatory videos as it works seamlessly on both the devices. The good part is, Virbo is also available online so you can access it on your browser with a single account.
Automated Voiceovers:
Choose from a broad range of AI-generated voiceovers to pick the ideal one for your business explainer films.
AI-Generated Avatars:
![]()
Virbo has 150 or more AI avatars and attributes from many locations and ethnicities throughout the world.
Customizable Template Collection:
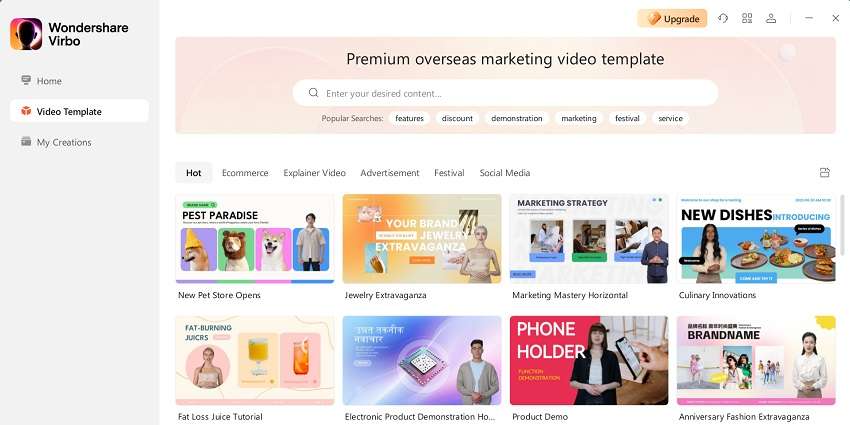
With this professional explainer video creator, all you have to do is use the 180+ Virbo themes and royalty-free music to add originality to your explainer films.
4. Use Appropriate Timing and Pacing
The viewers will be able to decide within the first eight seconds of the video whether they want to keep viewing the full thing or not. Most likely, it will be sufficient to persuade them to buy the product or service.
By relating to the viewers and grabbing their attention right away, a superb explainer video makes the most of the available time. Naturally, your video has to be focused and brief. The buyer will grasp your product after viewing even just the first 10 or 15 seconds, even if they are unaware of what it does now.
5. Add Captions or Subtitles for Accessibility
A tangible product is necessary for live action, and for the majority of kinds, a screen recording and product presentation are also necessary. The explainer video creation phase will be much simplified if all assets are organized and in one location. At this point, it’s important to gather additional components like photos, company logos, and music.
6. Optimize for Various Platforms and Devices
You must optimize your video before posting it to guarantee that the intended audience will watch it through. The best place to accomplish this is on YouTube, but if you work in a certain industry, you may also try Virbo.
Don’t forget to optimize your site for mobile devices as well. Verify that the video player works on various devices, such as smartphones and tablets.
7. Test and Gather Feedback
Innovation is encouraged by a digital process’s ability to be cost-effective. It enables you to test things out with the ability to quickly make adjustments or revisions if something doesn’t work correctly. And if it succeeds, it may elevate a decent explanation video to outstanding status. This increases consumer confidence in your brand or goods. And if you want to connect with your audience, it is crucial.
An effective explainer video may serve as a contemporary business card. It’s a fast and simple approach to engage with people, to communicate your values and your ability to assist them. At the start and conclusion of the video, make sure to clearly explain what your product is about and how it functions. Your objective is to get people to break down or explain your merchandise in order to ensure that they comprehended your explainer video.
8. Iterate and Refine Your Video
Explainer videos must to be simple to comprehend and explain. Making sure it makes sense is the greatest approach to do this. Returning to your message and the purpose of your explainer video, let’s discuss. Make sure to explain every aspect of your product and how it functions to them, regardless of how pricey or well-known the product is to them. They will then be able to tell others about your product and how well it functions.
This phase is included into the production process if you’re using a video creator like Virbo. If you’re recording, on the other hand, now is the moment to export your material to an editing program and assemble the video. Use Virbo to remove any poor takes, extraneous information, create transitions, and add any additional elements like music.
Conclusion:
We really hope that this tutorial has aided in your comprehension of the explainer video production process and inspired you to give it a go. You’re in luck if you find yourself looking up a new product you just learned about and want to see a video about it.
Therefore, a good explainer video is essential to grab the attention of the target audience. Because of this, the most effective ones are created with an AI based tool and that’s where you need Virbo to make it happen. Create your video using Virbo to put your planning into action. You may either use a video-making tool or it’s built-in editing features to enhance your explainer videos productivity.
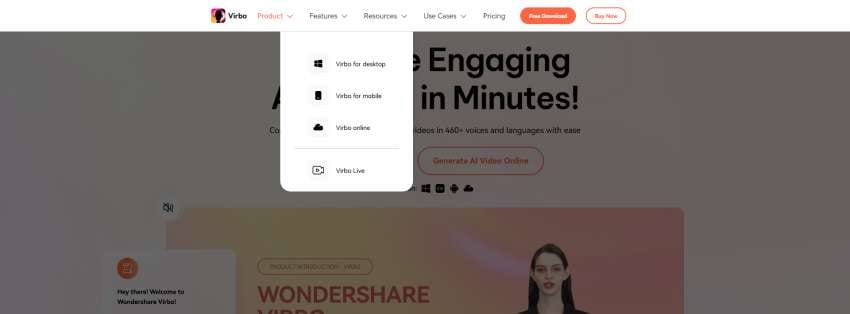
Create AI Avatar Videos | Wondershare Virbo Online
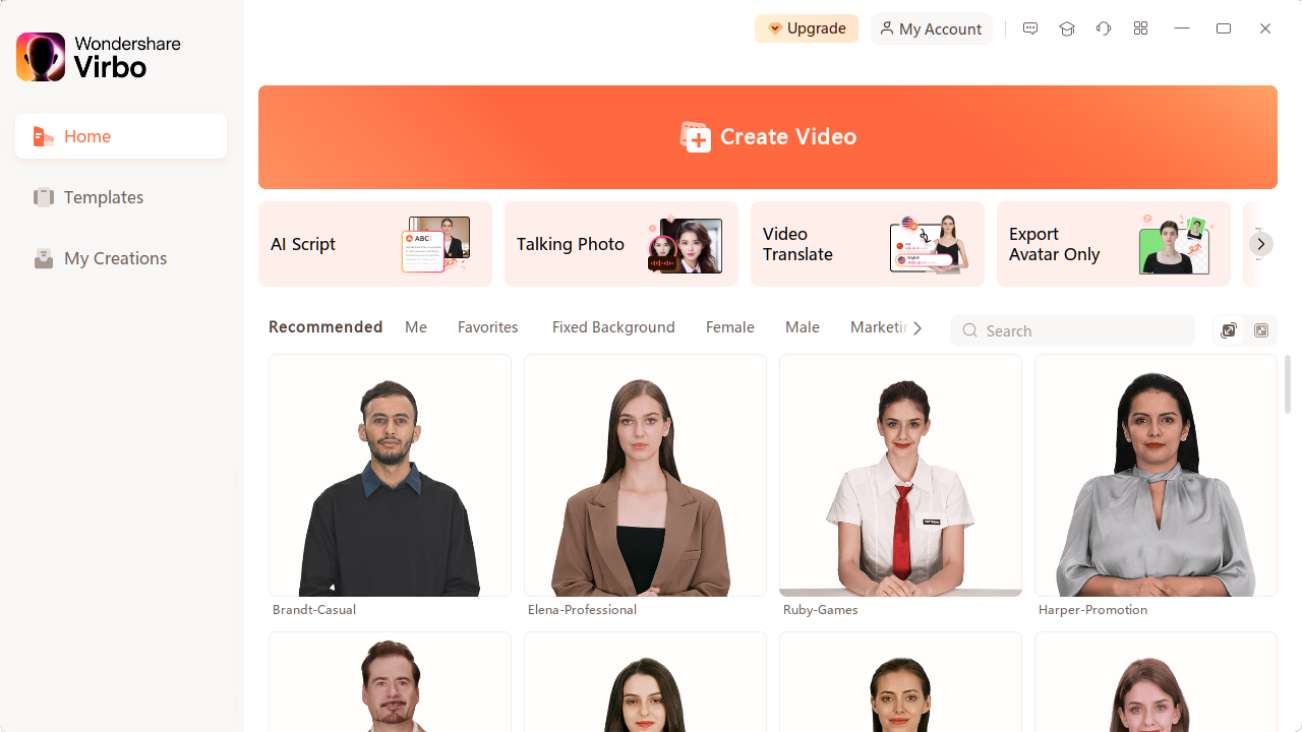
Create AI Avatar Videos
To begin crafting your AI avatar video, simply click the “Create Video” button found on the homepage.
Step 1. Create a Project
Click “Create Video” to start creating a new video.
![]()
Create a Project
Choose your preferred video aspect ratio: opt for a landscape or portrait video, depending on your requirements. Then, click on “Create Video.”
![]()
Choose Aspect Ratio
Step 2. Choose Avatar & Voiceover
After entering the user interface, select “Avatars” to choose an AI avatar for your video. Click on the displayed avatar on the screen, and an action bar will appear on the left side, allowing you to customize the style and placement of your video persona.
![]()
Choose Avatar
Input the text you plan to include in the video. You can modify the avatar’s speed, pitch, and volume using the controls displayed on the right-hand side.
![]()
Play Scripts
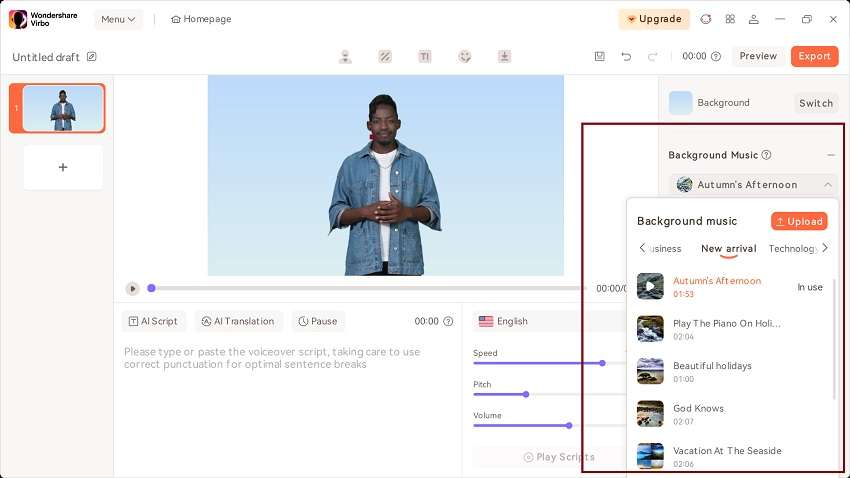
Step 3. Edit Video
You can also modify the background, select text style, or add adorable sticker to the video.
![]()
Edit Video
Moreover, click on “Music” to select the soundtrack for your video. You can choose from extensive music library and customize the volume to suit your preferences.
![]()
Choose Background Music
Step 4. Export Video
When you’ve achieved the desired video effect, simply click on the “Export” button to generate your video. This straightforward process results in the creation of a brand new video featuring the Virbo AI avatar.
![]()
Export Video
Step 1. Create a Project
Click “Create Video” to start creating a new video.
![]()
Create a Project
Choose your preferred video aspect ratio: opt for a landscape or portrait video, depending on your requirements. Then, click on “Create Video.”
![]()
Choose Aspect Ratio
Step 2. Choose Avatar & Voiceover
After entering the user interface, select “Avatars” to choose an AI avatar for your video. Click on the displayed avatar on the screen, and an action bar will appear on the left side, allowing you to customize the style and placement of your video persona.
![]()
Choose Avatar
Input the text you plan to include in the video. You can modify the avatar’s speed, pitch, and volume using the controls displayed on the right-hand side.
![]()
Play Scripts
Step 3. Edit Video
You can also modify the background, select text style, or add adorable sticker to the video.
![]()
Edit Video
Moreover, click on “Music” to select the soundtrack for your video. You can choose from extensive music library and customize the volume to suit your preferences.
![]()
Choose Background Music
Step 4. Export Video
When you’ve achieved the desired video effect, simply click on the “Export” button to generate your video. This straightforward process results in the creation of a brand new video featuring the Virbo AI avatar.
![]()
Export Video
Best 5 Udemy Subtitle Translator (Auto Translation)
One of the most common problems Udemy users encounter is that a course is not in their native language. However, even though Udemy provides captions, many courses might not provide subtitles in your language.
That’s why you need aUdemy subtitle translator that will allow you to watch a course or video in your native language with subtitles that you can actually understand. So, let’s discover the top five best Udemy subtitle translators and how they work.
Part 1. Can YouTranslate the Udemy Subtitle?
Translating subtitles on Udemy might not be directly possible, but there are workarounds. As long as you are using Google Chrome and watching courses on the website, you can use Udemy dual subtitle apps from the Chrome app store and incorporate them in your browser to get auto-translation of whatever video you are watching.
Many dual subtitle tools are available on the market, but in this blog, we are covering the top five totranslate Udemy subtitles . Let’s say that you have bought a course on Web Development.
With the right use of AI, Machine Learning, and advanced algorithms, these tools set you up for success so you can learn any course of your liking, regardless of which language it is in. So, let’s uncover these tools and their key features.
Part 2. 5 Best Udemy Subtitle Translators
1. Udemy Dual Subtitles - Subtitles Translator
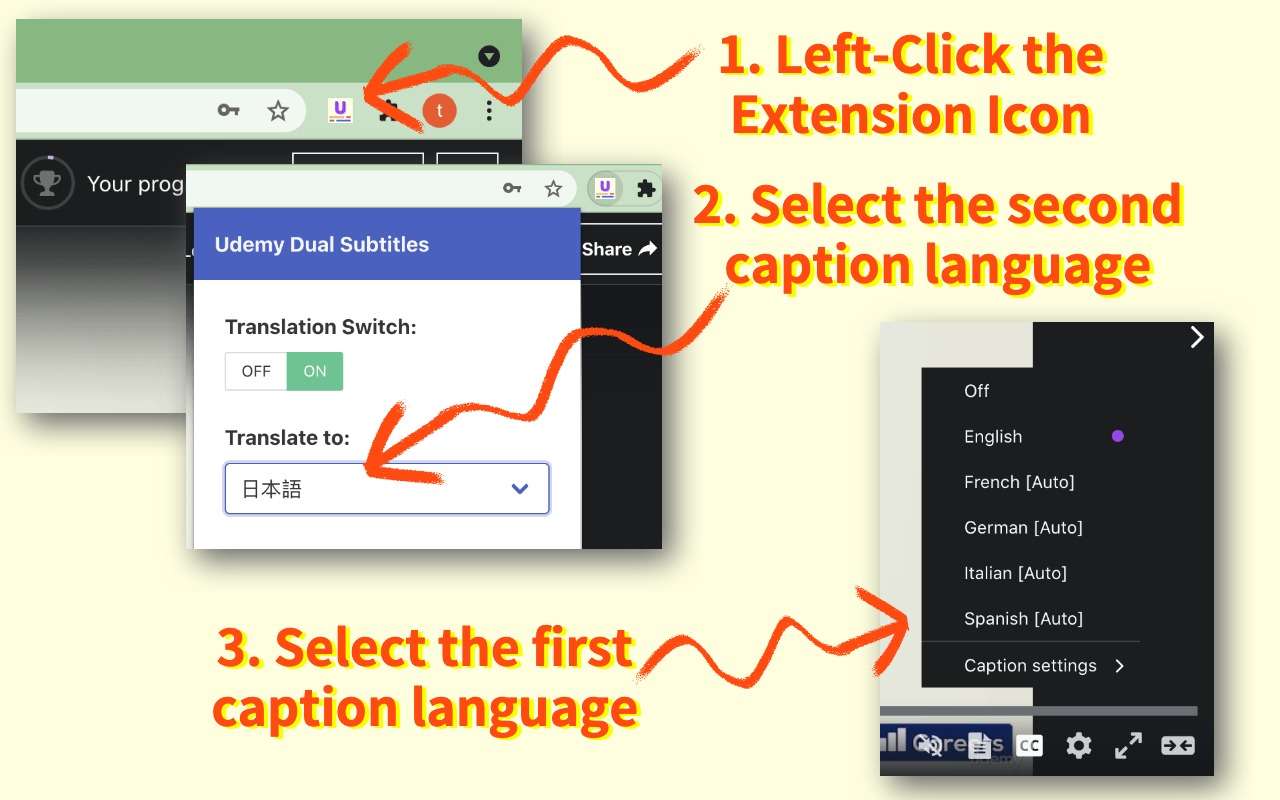
When it comes toUdemy translating subtitles , there are a lot of things you might have a problem with. First, you might not even have the language you are looking for. Secondly, the format isn’t the most pleasing. And lastly, you cannot display bilingual subtitles to take your learning to the next level.
That’s whereUdemy Dual Subtitles comes in. It is a Chrome extension that will work on Google Chrome and Microsoft Edge. Its main prowess is displaying bilingual subtitles so you can learn in the most optimal way possible.
Moreover, Udemy Dual Subtitles expands Udemy’s original subtitles to show duals so you can easily understand what’s going on the screen. It can translate Udemy’s official subtitles into all widely used languages; switching them is a piece of cake.
Here are some of the features it offers:
Key Features
- Versatile Translation: Translate Udemy subtitles in most languages that are commonly used around the globe
- Easy-To-Use: No need to set up every time. Just install the plugin to Chrome and get started right away
- Custom Styling: Udemy subtitle translator with custom styling abilities
- Bilingual Languages: Supports and displays dual subtitles to make learning easier and more effective
- Downloading Subtitles: You can download subtitles by using the Udemy Dual Subtitles tool
Pros
- Makes understanding courses easier
- Supports a plethora of languages
- Allows custom styling for better viewing
- Very good customer support
Cons
- Can cause occasional glitches
2. Udemy Subtitles Translator - Yakuu

Yakuu is another popular Udemy subtitle translator that enables learning from anywhere in the world. It virtually features all the languages and does real-time translation in a way that feels natural and easier to look at.
Moreover, just like other subtitle translating tools, it enables Udemy’s subtitles to be translated and to be shown in dual-subtitle mode, meaning learning will be easier than ever. It also supports all display modes including full screen and paging, without breaking down or messing up the subtitles.
All the features specified in Yakuu cater to the needs of users who are looking for a translation of subtitles. Moreover, it easily lets you translate the subtitles with three simple steps and doesn’t even require a bit of setup like many other services.
Key Features
- Responsive Subtitles: Allows responsible subtitles to be displayed in full or auto-paging mode
- Bilingual Subtitle Support: You can seamlessly switch between single and dual language subtitles at the same time
- Three-Step-Process: Download the tool, install it on Chrome, and simply pin to the toolbar to leverage the benefits
Pros
- Automatically display translated subtitles in the local language
- No need for a hierarchical menu selection
- Learn anywhere in any language for free
Cons
- It doesn’t support custom styling of subtitles
3. Udemy Subtitles Translator with Custom Style
When it comes to subtitles, some people like custom styling to make them easier to read. While you can adjust Udemy’s default subtitles, they are quite limited. With theUdemy Subtitles Translator tool, you have the ability to leverage Google Translate, which will show real-time updates.
All you need to do is install the subtitle, open the Udemy course, click Transcript, and click the Google Translate plugin that will translate everything to you in real time so you can enjoy your favorite course in your language.
Being a tool that is run by Google Translate, you have a lot of accuracy. Google Translate supports most languages available in the world with precision that we have never seen before. So, if you want one of the best Udemy subtitle translators, then this tool will give you the feature to enjoy your favorite course while understanding it a bit better.
Key Features
- Google Translate Support: Has Google Translate in the background to do the translation
- Custom Subtitles: You can stylize the subtitles according to your need
- Fast and Lightweight: Provides enhanced accessibility to Udemy users
Pros
- Great tool for non-English speaker people
- Quite accurate and on-point
- Allows customization of subtitles so you can customize colors, positioning, and the next
Cons
- Sometimes it doesn’t work properly
4. Udemy Double Subtitle

Double subtitles are quite popular when it comes to learning something new. Thankfully,Udemy Double Subtitle is one of the best tools to provide you with dual subtitles and translations that would make learning easier for you.
Let’s say that you already know some English but you are a Korean native. By using Udemy Double Subtitle, you can add both English and Korean to make everything even easier for you.
One thing to note is that whenever you enable a subtitle, you might need to reload the webpage for the tool to work. Overall, it is a great tool for you if you are looking to translate subtitles and learn in a way that’s more immersive.
Here are some of the features of the Udemy Double Subtitle tool.
Key Features
- Dual Subtitles: Supports dual subtitles to be displayed at once
- Fast and Efficient: The tool is lightweight and can display accurate results
- Privacy Protection: The developer doesn’t take your data, which means it is protected
Pros
- Great for learning and enhancing accessibility
- Works fastly and efficiently
- Enabling the tool takes less time
Cons
- Less languages available
5. SubTrans
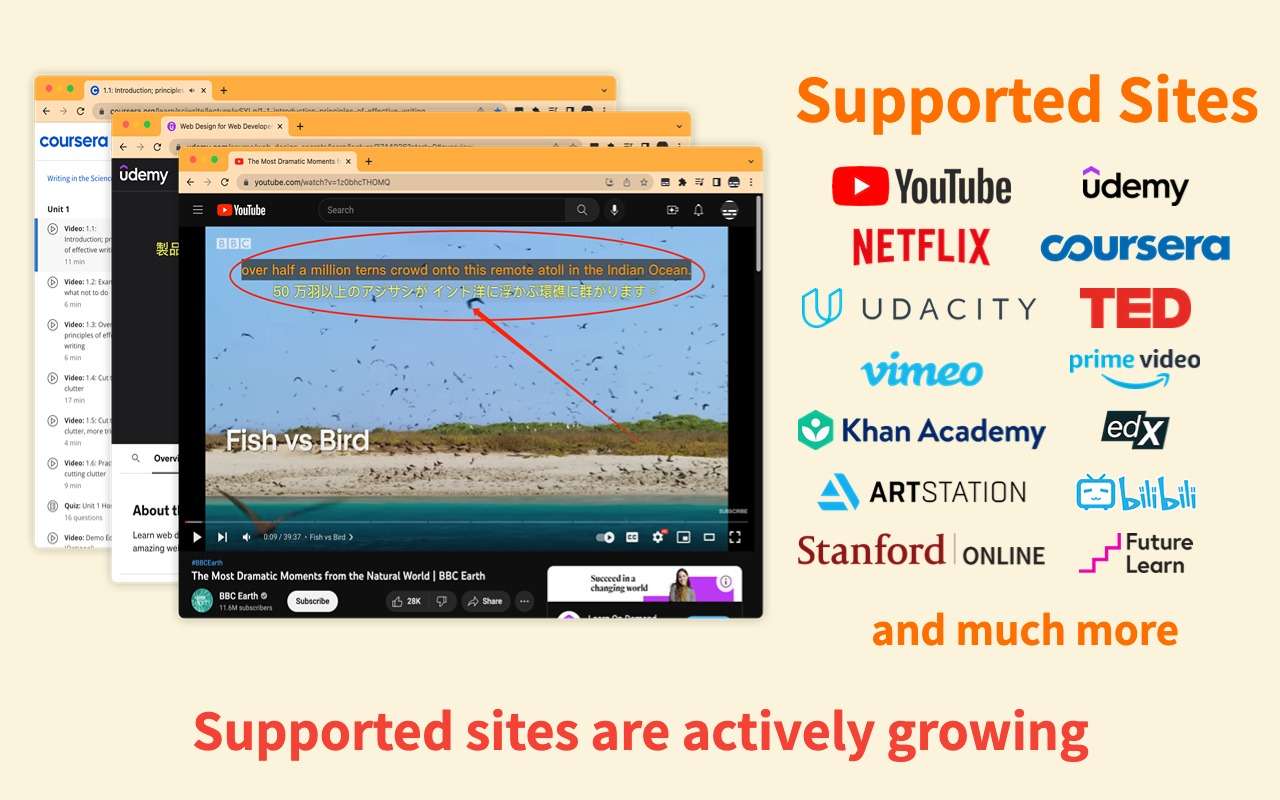
SubTrans is a general subtitle translator for a plethora of sites. Aside from Udemy, it can work on YouTube, Netflix, Coursera, TED, Khan Academy, and many more. The list of sites they support is ever-growing, and the developers are actively working to enhance the functionality of their tools.
SubTrans displays bilingual subtitles and can be used for as many video sites as possible. It can translate subtitles into almost all languages and also allows customization that is at the next level. From font size, colors, weight, and opacity to background, you can change anything in SubTrans.
Moreover, one of the best features of SubTrans is its ability to delay the subtitles. Hence, even if you feel like the subtitles don’t match, you can manually adjust them.
Key Features
- External Subtitles Support: You can also import external subtitles to be displayed on the videos
- Timestamp Control: In case the subtitles don’t go well, you can advance or delay them
- Styling Options: You can stylize almost every aspect of the subtitles
Pros
- No need to set every time
- Supports external subtitles
- Adjustable timestamp
- Display bilingual languages
Cons
- Only 30 minutes is free per month
Part 3. Translate Videos in Another Language using Virbo
Do you want to translate the entire video into another language besides subtitles? If so,Wondershare Virbo can help you as it’s an AI-powered video translator. It can be used as anUdemy subtitle translator and provides perfect video translations. It’s a cross-compatible platform that is available to use on online browsers and desktop applications. You can upload videos of up to 500MB within 10 seconds to 5-minute duration for smooth video translation.
Prominent Features of Virbo - Video Translation
- Diverse Languages: This software supports more than 20 diverse languages for video translation. This means you can learn any language course.
- Subtitles: Apart from translating videos, Virbo has anUdemy translate subtitles While translating videos, you can effortlessly enable this feature to get subtitles in videos. Notably, it is preferred to upload videos without subtitles to ensure the quality of the output video.
Translate Video Online Download APP Now Free Download
3.1 Why Choose Wondershare Virbo
Several platforms are available for video translation, some of which are discussed above. Now, let us help you make your selection by highlighting some of the benefits of Virbo. Delve into this part and learn why choosing Virbo will significantly assist you in learning courses.
- Breaking Language Barrier: International students with language difficulties in learning can get relief from Virbo. You can download your course content and translate it into your native language.
- Language Learning: Subtitles in the videos that Virbo provides can help you learn a new language. It enables you to understand the pronunciation of words and take notes while watching.
- Research Students: Virbo may help research students accurately quote or rephrase key points of the video. By translating, you understand the speakers’ intended meaning to cite in your research.
- Cross-Platform Support: Virbo is available for Windows, Web, and Mobile.
3.2 How to Translate the Udemy Subtitles Using Virbo?
To learn the Udemy course in a non-native language, follow these simplified instructions to translate the subtitles with the highest accuracy:
Step 1: Upload Your Udemy Course Video
Open the online version of Wondershare Virbo - Video Translator on your web browser. Hit the “Click to Upload Video” option and upload your Udemy video in Virbo.
Translate Video Online Download APP Now Free Download
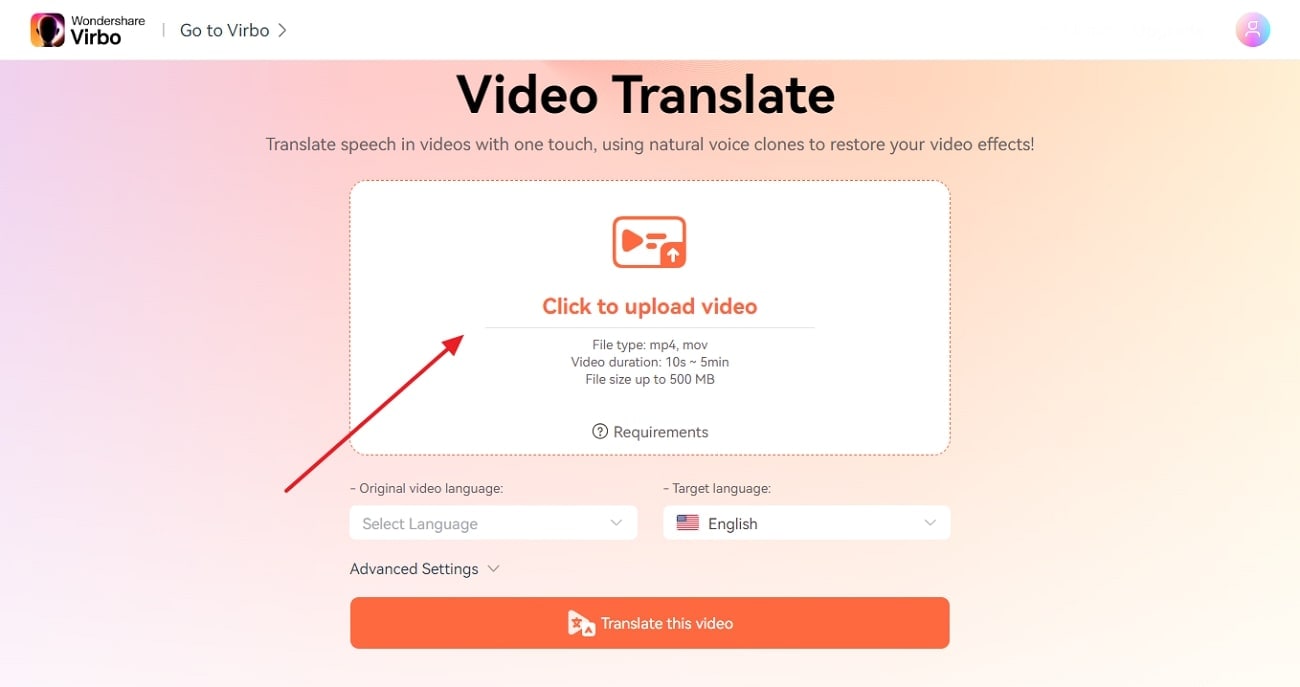
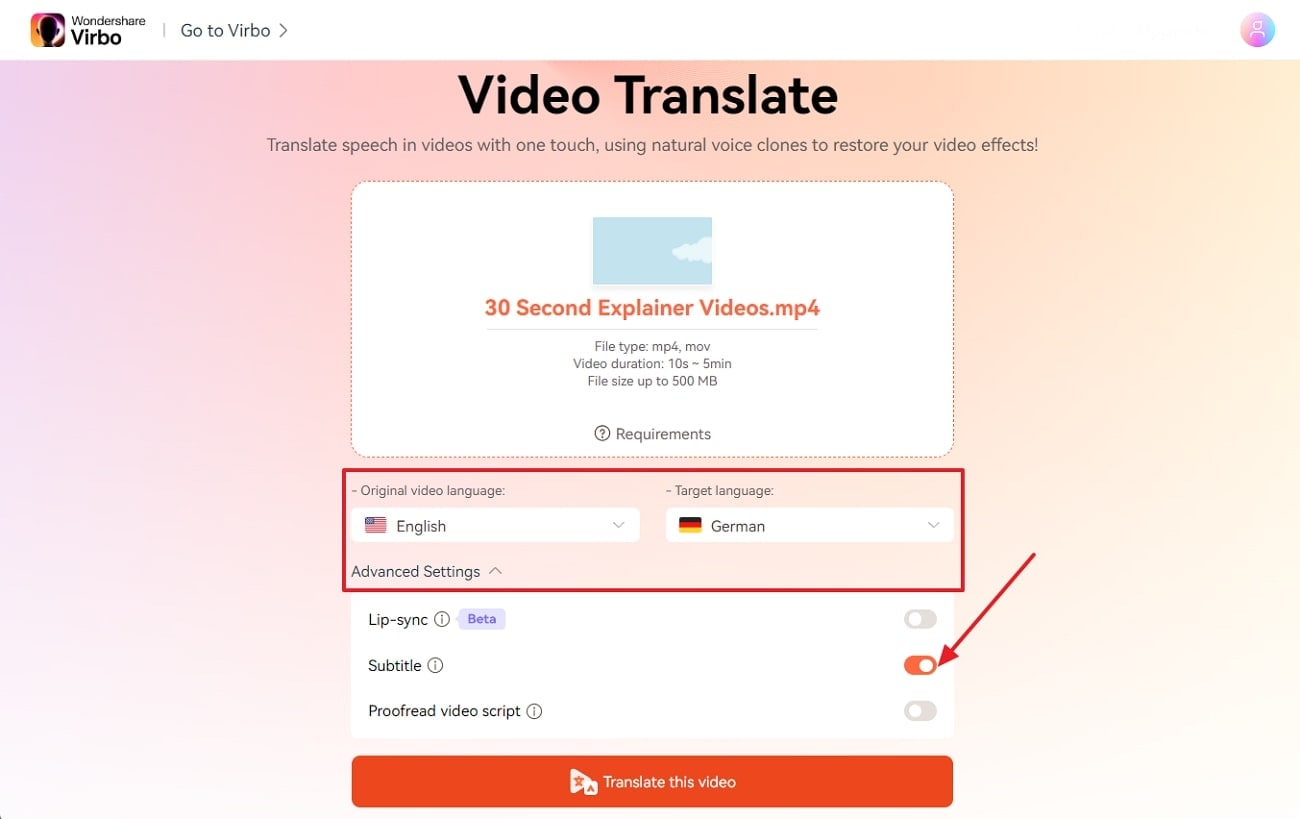
Step 2: Customize the Translation Settings
Move down and choose “Original Video Language” and “Target Language” using their lists. Then, tap the downward icon of “Advanced Settings” and get multiple options later. From there, toggle the “Subtitles” option to generate translated subtitles in the video.
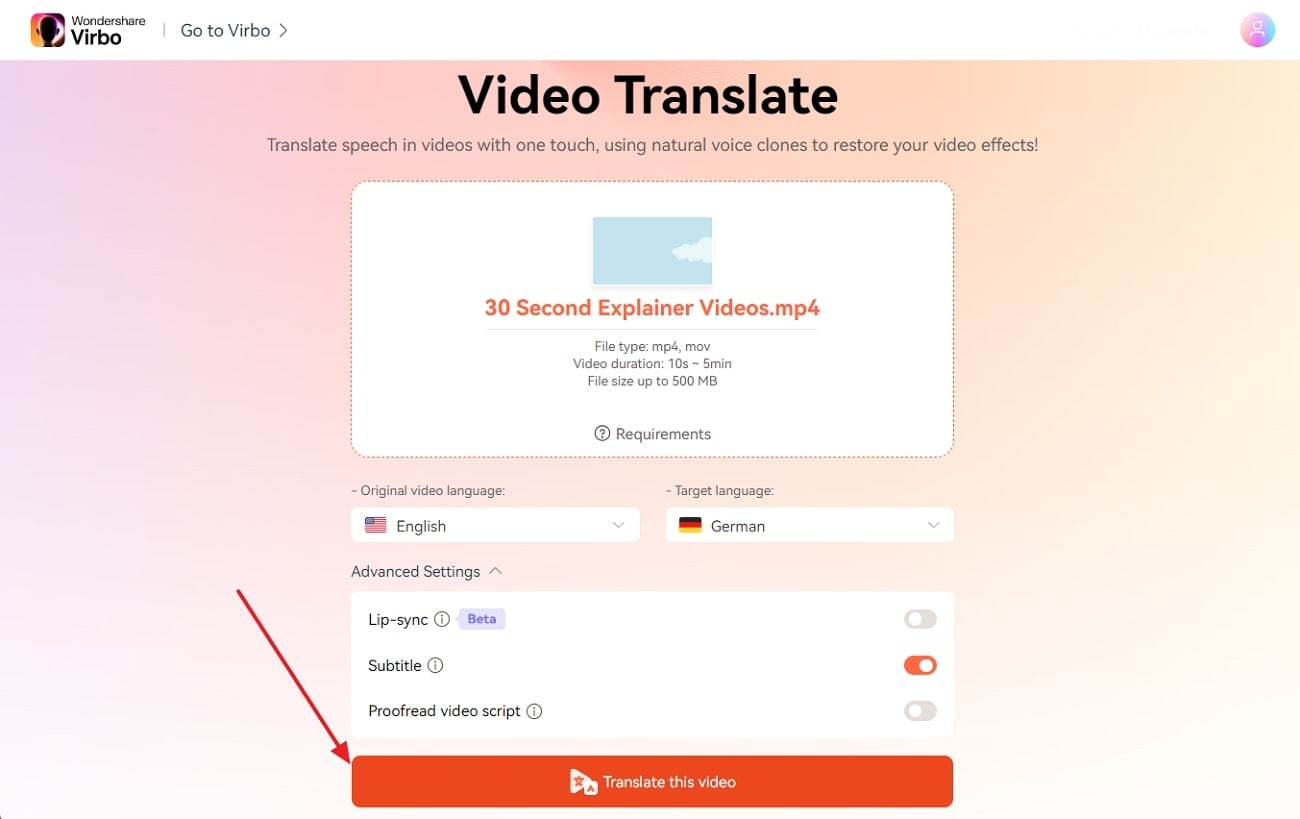
Step 3: Initiate the Udemy Video Subtitles Translation
Upon setting the video translation parameters, press the “Translate the Video” button and let AI analyze. Finally, you will get your Udemy course video with translated subtitles in your target language.
Translate Video Online Download APP Now Free Download
Bonus Tip: What Virbo Can Do If You Want to Create a Udemy Course You Own?
- AI Script Generator: If you lack some course creation ideas, Virbo has an AI script generator. It can help you brainstorm ideas about Udemy courses by providing compelling scripts within seconds. All you need to do is provide text instructions and set certain parameters for exact results.
- AI Avatar: Virbo eliminates the need for human presenters, cameras, and equipment to create a course. It has AI avatars from diverse ethnicities, genders, regions, attire, and ages. These life-like avatars can create educational videos with the script you provided and AI voices.
- AI Voice: This feature of Virbo works as a text-to-speech converter that has expressive AI-generated voices. It can narrate your Udemy course with captivating voiceovers in different accents and tones. Hence, enjoy high-quality audio in various languages from thisUdemy subtitle translator .
Create Video Online Download APP Now Free Download
Part 4. FAQs about Udemy Subtitle Translator
1. How do I add subtitles to the Udemy course?
You can create subtitles from scratch using a simple text editor like Notepad or TextEdit. You need to follow the .vtt format for subtitles, which involves specifying the timing and text of each subtitle line. This option requires more effort but gives you complete control over the accuracy and style of your subtitles. You can also use Wondershare Virbo, which can generate subtitles automatically when you use this tool to translate videos.
2. How to add auto translate on any video
Auto translation can be achieved by using various tools. One of the best tools for auto-translation is Wondershare’s Virbo. It allows you to add translated captions in various languages to any video of your choice. Upload your video, choose the translation option and then select “Translate” and choose the desired language. You can also edit the generated subtitles before exporting them.
3. Is there any AI tool for translation?
There are many AI tools for translation. Tools like Google Translate, DeepL, Virbo, and Veed IO help you translate videos, audio, or text to generate new media. The accuracy of these tools is high, which can help companies generate AI videos to further target the international market.
4. How to generate AI videos for educational content?
The first step is scripting, where you need to get the script ready for your educational video. Secondly, you need an AI-powered tool for generating the voice-over. You can use Virbo which will not only generate voice but video as well. Lastly, once you add the script, the software will create a video for you that you can test and then roll out in the digital world.
Final Verdict
Udemy is one of the largest e-learning platforms with hundreds of thousands of high-quality courses catering to audiences from all over the world. However, most courses will be in English since it is predominantly an English service.
But use Udemy subtitle translation tools like the ones we have mentioned above. You can easily and effectively learn courses in your own language by translating the subtitles into your native tongue.
Translate Video Online Download APP Now Free Download
Easy Steps To Create Talking Memoji on iPhone [Free]
If you are an iPhone user, you must have been familiar with Memoji – the digital avatars you often see in your messages. iPhone users usually use Memoji to match their personality and mood, then send them to their contacts.
While Memojis are often seen as static images, you can also record a message using animated Memojis. This will give your friends a delightful surprise when they receive a video of your voice synced perfectly with your Memoji’s expressions.
So, next time you want to send a message to your friends, try to use animated Memojis. First,learnhow to make your Memoji talk here.
Part 1. What is Memoji on iPhone?
Memoji is a digital avatar feature introduced by Apple, available on iPhone and iPad models as long as they support FaceID. You can create your own personalized Memoji that closely resembles your appearance, down to specific details like facial features, hairstyles, accessories, and more.
Once you’ve crafted your Memoji, you can use it across various Apple platforms and apps. For instance, you can use them in FaceTime calls to replace your face with your Memoji or in Messages to send either Memoji ortalking Memoji recordings.
Memoji compatibilities:
Memoji’s compatibility is supported on iOS 12 and newer operating systems, including the iPhone X, iPhone 11, iPhone 12, and later. As for iPads, Memoji functionality is available on the iPad Pro 11-inch or the iPad Pro 12.9-inch (3rd generation) and newer models.

Part 2. How To Easily Make Your Own Memoji on iPhone
Before we get intohow to make your Memoji talk , let’s prepare and make your own Memoji on iPhone first. To create your own Memoji that truly captures your essence, you’ll want to customize it to closely resemble yourself or any characters you had in mind.
Here’s how to make and customize your own Memoji on iPhone:
Step 1: Open the Messages app on your iPhone. Then, compose a new message or open a conversation.
Step 2: In the message, tap the Plus button located to the left of the text field and tap “More” from the list of options.
Step 3: Now, tap the Memoji button and select “New Memoji” from the next menu.
Step 4: This is where the fun begins! Customize the various features of your Memoji to your heart’s content. You have the flexibility to adjust elements such as skin tone, hairstyle, eyes, facial hair, accessories, and more to ensure that your Memoji is a true reflection of yourself.

Take your time to fine-tune each detail until you’re satisfied with the result. Once you’ve completed customizing your Memoji, you’re ready to show its charm across your Apple devices.
Part 3. How To Record and Send Your Memoji on iPhone
Now that you’ve created my personalized Memoji, you may want to ask “how do I make my Memoji talk ”. You can do so by recording with your Memoji and sharing it with your friends. Recording with Memoji can be a fun and creative way to express yourself in your communication.
Follow these straightforward steps on how to record and send your Memoji on iPhone:
Step 1: Make sure that you have a compatible iPhone device as mentioned in Part 1 to access the Memoji feature.
Step 2: Open the Messages app on your iPhone device, and start a new message by tapping Compose. You can also locate and select an existing conversation.
Step 3: While composing your message, tap the Plus button and select “More” from the menu.
Step 4: Locate and tap the Memoji button (which looks like a smiling face). Swipe left to choose the Memoji you want to use for recording.
Step 5: After selecting your Memoji, tap the Record button to start recording your message. You have up to 30 seconds to express yourself. Tap Stop when finished, then send it to your friend. They will receive your Memoji message as an animated video, complete with your voice recording.

But if you want to share yourtalking Memoji outside of the Messages app, you can save the recording to your camera roll and then share it through other messaging apps or social media platforms.
Part 4. How To Make Your Memoji Image Talks
Besides recording your Memoji, you can also animate and maketalking Memoji from a photo using Wondershare Virbo. This is the perfect way if you find recording and sending your own Memoji awkward. Just toss in your Memoji image, and Virbo will do the rest.
Virbo is a multi-purpose video editing tool tailored for producing short videos featuring lifelike avatars using AIGC technology. One of its key features is the ability to generate speaking avatars from images with its Photo Talking feature.
Virbo Photo Talking features include:
- Extensive collection of more than 300 AI avatars for free
- A diverse selection of more than 300 AI voices
- Take advantage of user-friendly tutorials
- Cross-platform compatibility on online, desktop, and mobile applications
- Natural animation and lip synchronization
How to make Memoji talk on iPhone with Wondershare Virbo:
Step 1: Create a new project
After installingWondershare Virbo , launch the application and select the Talking Photo feature to make yourtalking Memoji .

Get Started Online Free Download
Step 2: Import your Memoji photo
Tap on “Upload a photo” and select the Memoji picture saved on your camera roll.

Step 3: Customize and export your talking Memoji video
Input your desired text and select a voiceover from the options provided below to generate the audio for your video. Alternatively, you can also record your own voice by selecting “record audio”. After completing the video editing process, click on “Generate Video” to export your creation.

If you need help withhow to make your Memoji talk , you can refer to the video tutorial.
Conclusion
Memoji is a feature introduced by Apple that allows you to create personalized animated characters, or “Memoji,” which can your facial expressions and movements. These Memojis can be created to resemble you or any character you desire. You can use it in Messages, FaceTime calls, and even as stickers in other apps.
In case you wonder, “How to make my Memoji talk ?” you can achieve it by either recording a video with the Memoji while speaking or you can turn your Memoji image and make it talk using Wondershare Virbo. Virbo’s Photo Talking feature is a user-friendly tool that lets you animate your Memoji image with ease by syncing it with recorded audio.
Get Started Online Free Download
Voice Translation English to Bangla [Online and Offline Apps]
Want to order authentic Bengali food but unsure how to check the menu? Or traveling to Bangladesh and excited to learn more about their culture? Maybe you want to expand your professional network and connect with Bengali speakers.
Whatever reason you have, apps forvoice translation from English to Bangla make it all possible. Since there are plenty of options in the market, we know it’s hard to choose which suits your needs. That’s why we’ve created this guide. Here, you’ll find the best translation apps for various user needs, plus tips for better results. Let’s start.

Part 1: Best Apps for Voice Translation From English to Bangla
Need voice translation from an audio file or text? Whether traveling, creating content, or teaching, there are amazing apps to help. We’ve compiled the best ones, free, offline, AI-powered, or human-assisted. Explore this list below to find the perfect voice translation app for you.
Google Translate: Free English to Bangla Voice Online Translator

Visiting Bengali-speaking areas? Need help with basic directions or ordering food? Google Translate is a free smartphone app perfect for real-time conversations. It won’t turn you into a Bengali pro overnight, but it’ll get you by. And the best part? You can eventranslate English to Bengali using your voice . Just speak, and it does the rest.
Pros
- Free and user-friendly
- Can listen to the translated words
Cons
- Accuracy can be low due to accents, noise, and complexity
- Translations might not capture nuanced meanings or cultural context
- Need to download the language packs for offline use
VideoDubber: Best for Multilingual Voiceovers From English to Bengali

YouTubers and presenters, listen up. Want to reach a wider audience? VideoDubber takes voice translation from English to Bangla (and many other languages!) to the next level. Simply upload your video, and VideoDubber will do the rest with its audio translation feature.
Even better, you can review and edit the generated transcript to ensure everything sounds perfect. Finally, choose your voice or a custom voice to deliver your message in Bangla, keeping your video’s original charm. Let VideoDubber take your content global.
Pros
- Provides free use for the first minute without file limits
- Can translate any number of languages to translate to simultaneously
Cons
- Not ideal for on-the-go translation
- Requires uploading audio files
Gglot: Best English to Bengali Voice Translation Online for Meetings

Need to translate English to Bengali voice recordings but worried about various speakers? Gglot’s multiple speaker recognition feature makes it possible, saving you hours of work. Unlike many tools, it can transcribe up to 10 speakers at once.
No more scrambling to understand who’s saying what. So if you have an English lecture, interview, or discussion you need translating into spoken Bengali, Gglot can handle it all, no problem. This innovative feature makes Gglot perfect for educators seeking a seamless translation experience.
Pros
- Easy to use
- Has a vocabulary filter
- Can download the transcript in several file formats (SRT, SBV, and VTT)
Cons
- Some advanced features might require a paid subscription
- Might not always be 100% accurate
Stepes: Best on the Go Mobile Voice Translation From English to Bangla

Need someone to translate spoken Bengali to English on the go? While AI apps are handy, sometimes you might prefer a human touch. Stepes offers Bengali to English voice translation through professional translators. Simply record your voice, and the professionals will translate it for you. You’ll hear the translated message in English and can even play it back for clarification. Stepes makes real-time communication with Bengali speakers easier.
Pros
- Real-time translation for conversations
- Intuitive interface
- Choose to receive the translated message in voice or text format
Cons
- Limited device compatibility
- Likely more expensive than using free AI translation apps
Flixier: Best Natural Sounding Voice Translator English to Bangla

Impress your audience with professional-grade presentations. Flixier uses AI to translate the voice of Bengali to English and other languages. Just upload the audio file; it will deliver Bengali translations that sound smooth and human-like. That makes Flixier the perfect option for adding voiceovers to educational videos, presentations, or marketing materials. If you want more, Flixier also has a text-to-speech tool you can use to generate audio from Bengali to English.
Pros
- Cloud-based platform
- Drag-and-drop interface
- Pre-built assets
Cons
- Need to upgrade with a subscription for more features
- Some users might find the interface overwhelming
Part 2: How To Choose the Right Voice and Audio Translator App?
Still weighing your options? Choosing the perfect voice translation app from English to Bangla can be tricky. Here are some key factors to consider helping you make the final call:
Accuracy
If clear communication is your priority, choose apps known for their precision. It ensures you’re understood correctly and avoids any awkward blunders. Download a few that caught your eye and experiment. See which one feels most comfortable and translates accurately. Remember, the best app is the one that works best for you.
Features
Consider your travel needs and think about what else you might need. Does the app translate offline in case you lose your internet connection? Does it offer a conversation mode for real-time back-and-forth translation? Pick the Bengali-to-English voice translation app that offers the features you’ll use most.
Ease of Use
A user-friendly interface is crucial, especially in dynamic situations. Look for clear buttons and intuitive navigation. Don’t let a complex app add stress – choose one that’s simple.

Price
Weigh the free versions against premium features. Consider your trip length and usage needs. Will free features suffice, or do you need advanced functionalities? Free apps might suffice for a short trip, while premium features might be valuable for frequent travelers.
Part 3: Tips for Effective Voice Translation
Found the perfect app for voice translating Bengali to English or vice versa, but still facing challenges? Here’s how to get better translation results:
Speak Clearly and Slowly
Enunciate each word clearly and maintain a moderate pace. Avoid mumbling or rushing through sentences. It helps the app accurately understand your speech patterns and translate them effectively.
Use Proper Grammar and Pronunciation
While some apps can handle informal language, proper grammar and pronunciation generally lead to better results. This is especially true for complex sentences or technical terms.
Minimize Background Noise
Background noise can be a real enemy of voice translation. Find a quiet place to speak, away from loud music, traffic, or conversations. You can also try using headphones with a built-in microphone in noisy environments. It ensures the app focuses on your voice and delivers the best possible translation.

Break Down Complex Sentences
Long, winding sentences can be tricky for voice translation apps to decipher. Try breaking down your thoughts into shorter and simpler phrases. It makes it easier for the app to understand the context and translate the file accurately.
Proofread the Translated Text
Even the best apps can make mistakes. Take a moment to review the translated text and make sure it reflects what you intended to say. Look for any awkward phrasing or missing words, just like you would proofread an important email. It helps you to catch any errors and make necessary corrections before using the translated content.
When To Seek Professional Translation Services
When you need to translate English to Bengali using voice for something crucial or formal, these pros have got your back. They bring expertise that guarantees your message is spot on, no matter how complex or sensitive the subject is.
You’re familiar with the bestvoice translation apps from English to Bangla . But you might also need to translate videos when you’re in a foreign place. These could be local news, announcements, or business practices. While regular translation apps are great for spoken words, video translation needs a different approach, especially if you want to do it faster.
That’s where AI video translation comes in. Please keep reading to learn how it can improve your video translation experience.
Bonus: AI-Powered Bangla to English Video Translation With Wondershare Virbo
Ever dreamed of your videos talking in different languages? Well,Wondershare Virbo turns that dream into reality. Using AI, it translates videos into 20+ languages, including Bangla to English. Whether you’re a travel vlogger sharing your adventures or a business expanding your reach, Virbo makes it happen. Now, you can connect with a broader audience effortlessly.

Get Started Online Free Download
Even if you’re staying local, Virbo can be your best AI video translation tool for:
- Global advertising: Target new markets and increase brand awareness with multilingual video ads.
- Social media influencers: Reach a global following and engage with diverse communities.
- Corporations: Facilitate seamless communication across remote and international teams.
Start Your Free Trial Today
Experience the power of Virbo for free online. You can export a multilingual video of up to 2 minutes with 512MB of storage space. You can also edit the generated subtitles and export them. For more extensive projects, flexible upgrade options cater to your needs.
Key Features
Virbo goes beyond basic video translation, offering powerful features to enhance your videos:
- Lip-Sync Precision: Match lip movements to the translated audio with no awkward pauses. It creates a natural and engaging viewing experience.
- AI Cloning Voices: Create realistic voices that capture the speaker’s emotions with AI. Virbo helps you captivate viewers by the natural delivery, regardless of the language.
- Soundtrack Reserved: No need to sacrifice the impact of your original music! Virbo lets you keep your soundtrack intact while adding translated subtitles.
- Auto-Generate Script: Save time and effort with Virbo’s auto-generate script feature. Upload the video and let Virbo generate a script of its content in the translated language. Plus, you can use this script for further editing or marketing purposes.
- Affordable Excellence: Enjoy high-quality video translation at budget-friendly prices.
- Versatile Compatibility: Take your video content globally. Access Virbo as a desktop app for Windows, mobile apps for iOS and Android, or through your web browser. This flexibility allows you to translate videos on the go whenever inspiration strikes, or your workflow demands it.

Get Started Online Free Download
Conclusion
Connecting with Bengali speakers doesn’t have to be tough. With voice translation from English to Bangla apps, you can chat without language hurdles, all in real time.
By now, you can easily understand other languages with one of the apps listed in this guide. Remember to check out Virbo for its impressive AI video translation capabilities. The world of language learning and cultural exchange is just a conversation away.
Download/Install/Register/Uninstall
Download/Install/Register/Uninstall
02Register
03Update
1. Download & Install
If you don’t have Virbo yet, click the button below to download it, and then follow the instructions to finish the installation process.
Download to try now:
For Win 7 or later(64-bit)
2. Register
❶ Install and open the program. Click the Login button in the upper right corner.
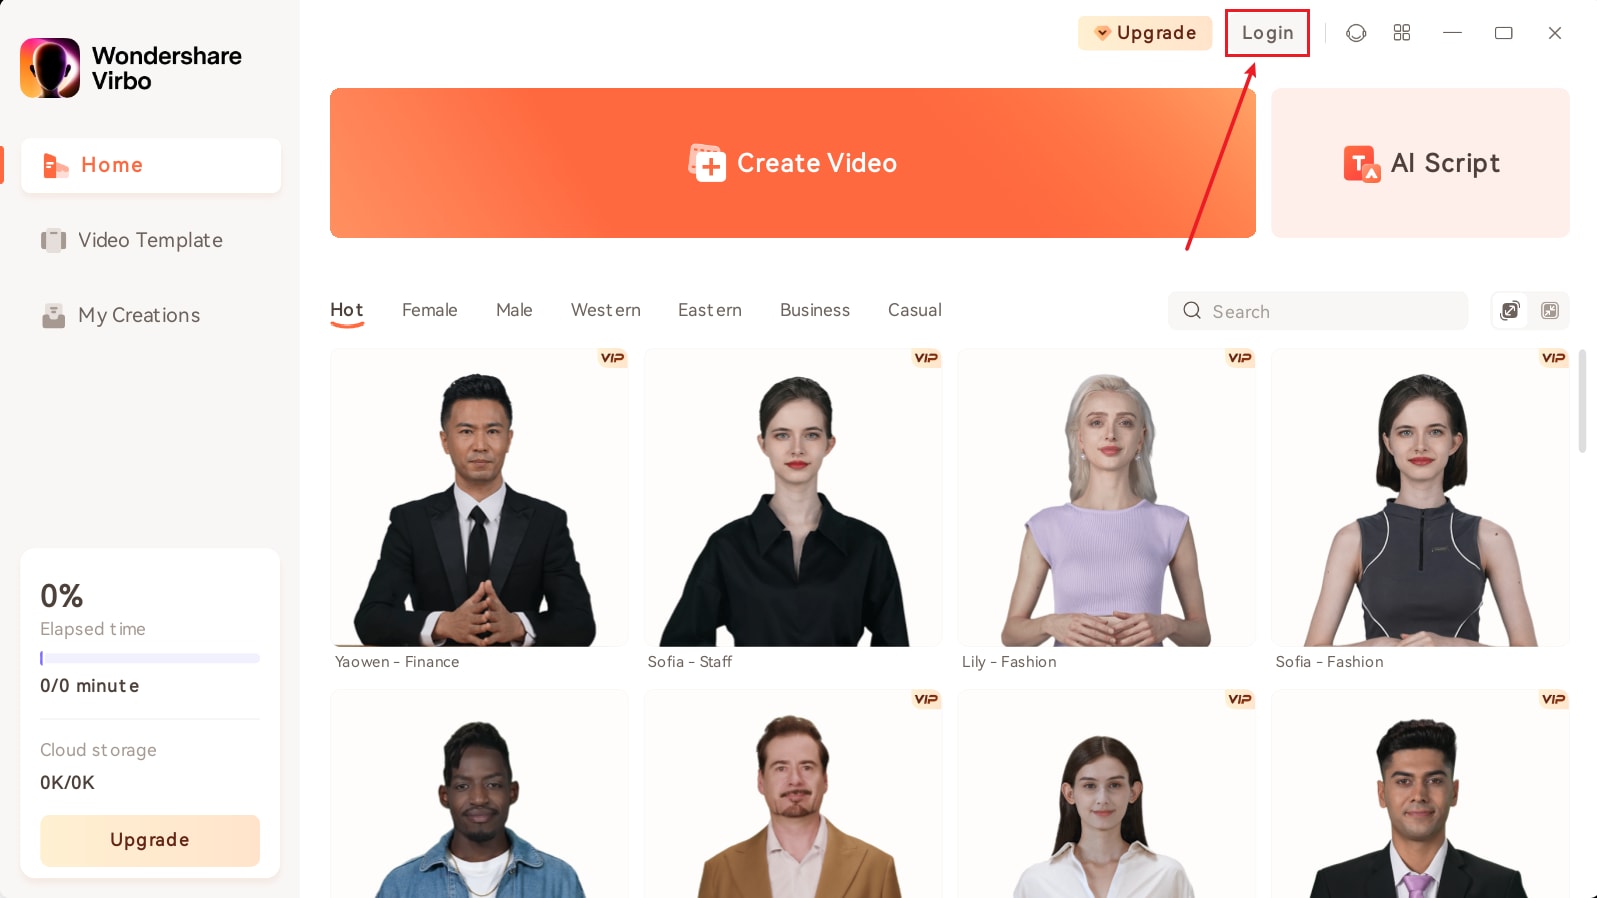
Login Virbo
❷ Log in with your Wondershare ID (the email you used to place the order) and your password in the pop-up login panel. Find your Wondershare account and password in the confirmation email you receive after the purchase. You can also sign up and log in with your Google account.
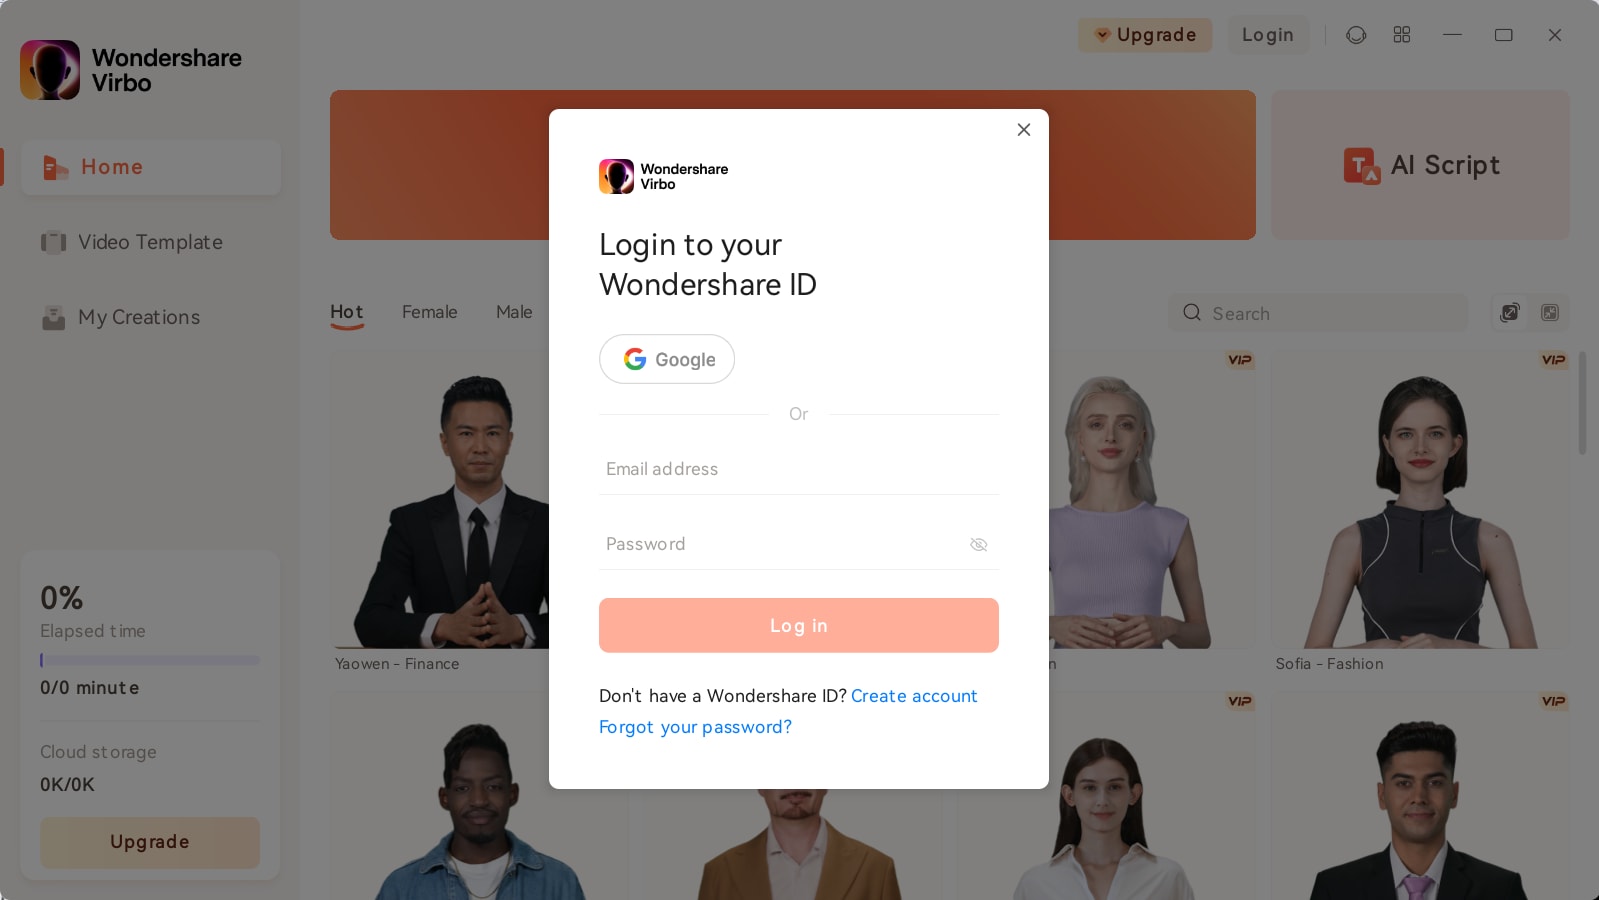
Log in with Wondershare ID
❸ After a successful login, click the Avatar icon to verify your activation status.
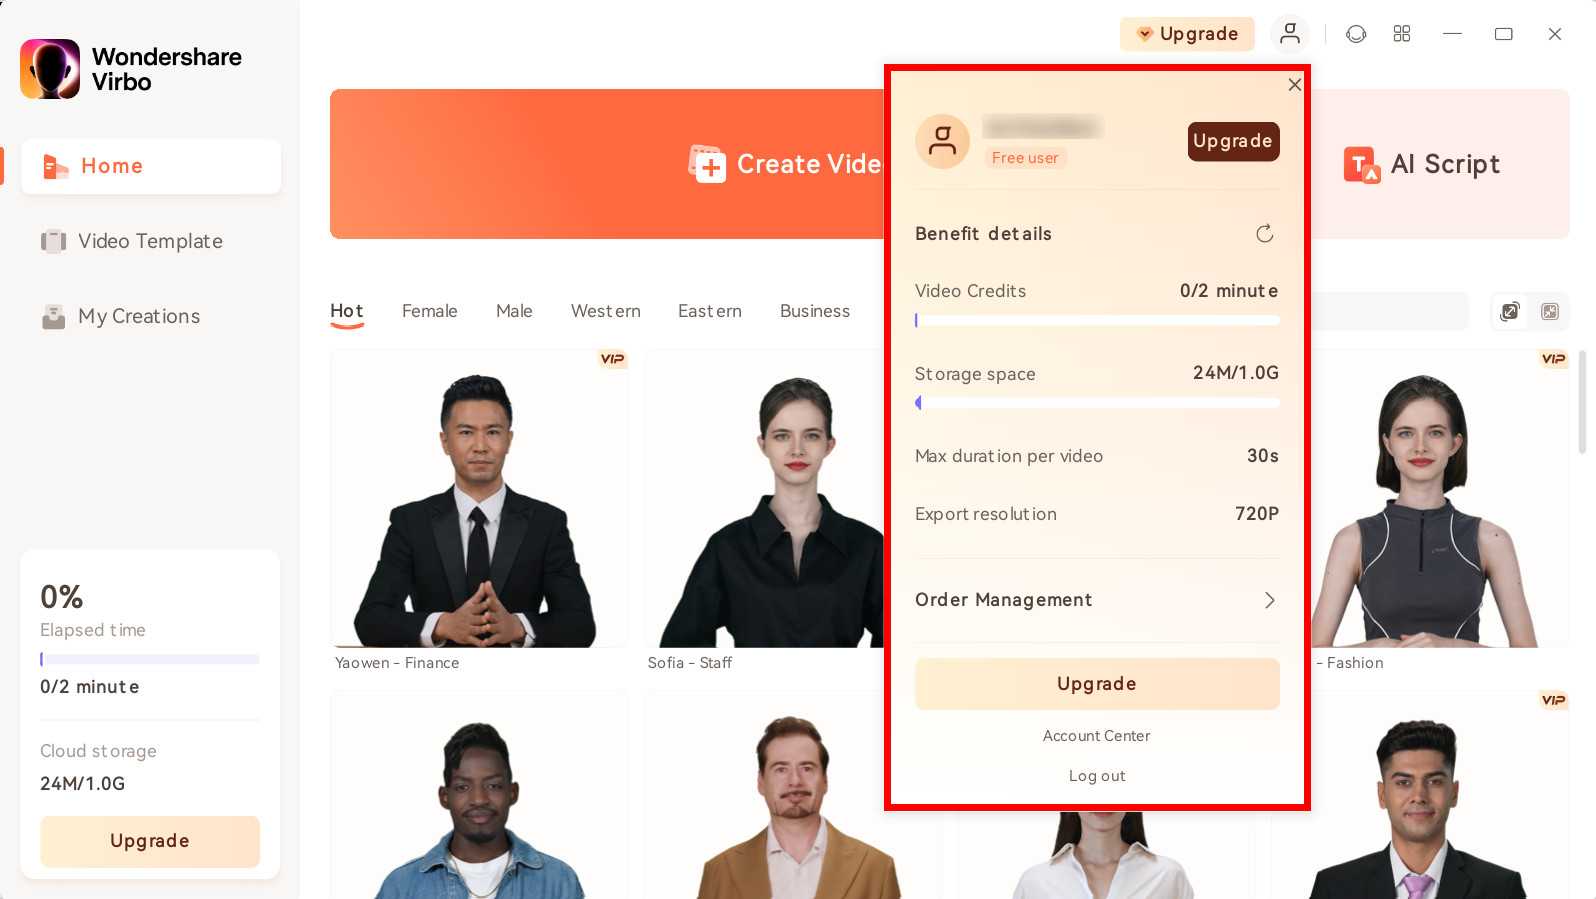
Check Your Activation Status
3. Update
If you want to keep Virbo up to date, click Help Center at the upper right corner, and then click Check for Updates.
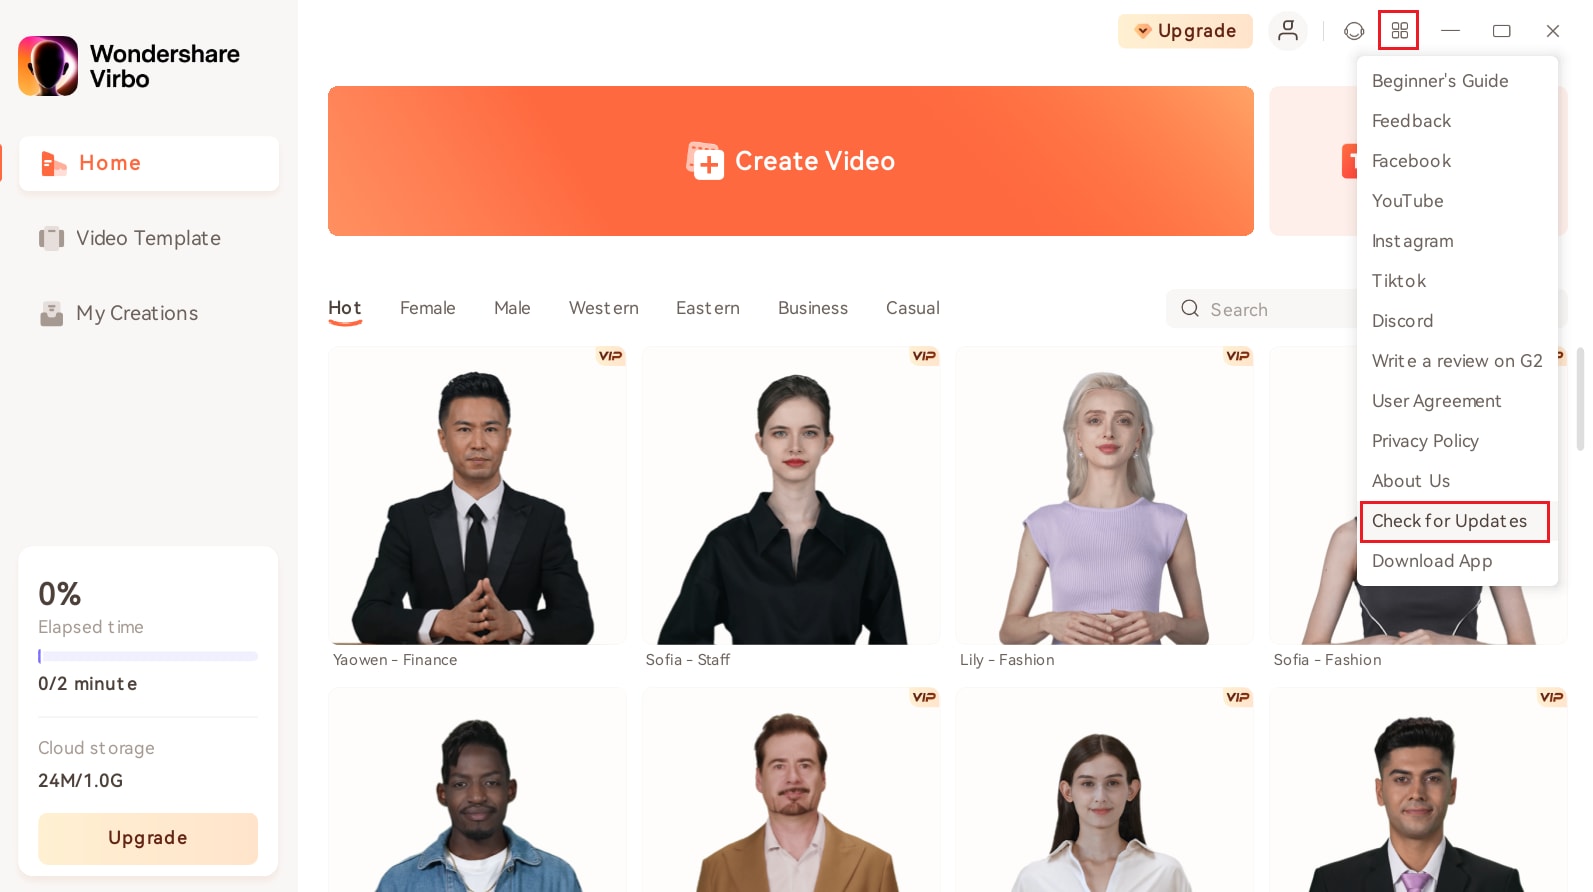
Check for Updates
4. Uninstall
Right-click Virbo icon, click Open File Location and double-click unins000.exe to uninstall.

Uninstall Virbo
02Register
03Update
1. Download & Install
If you don’t have Virbo yet, click the button below to download it, and then follow the instructions to finish the installation process.
Download to try now:
For Win 7 or later(64-bit)
2. Register
❶ Install and open the program. Click the Login button in the upper right corner.
Login Virbo
❷ Log in with your Wondershare ID (the email you used to place the order) and your password in the pop-up login panel. Find your Wondershare account and password in the confirmation email you receive after the purchase. You can also sign up and log in with your Google account.
Log in with Wondershare ID
❸ After a successful login, click the Avatar icon to verify your activation status.
Check Your Activation Status
3. Update
If you want to keep Virbo up to date, click Help Center at the upper right corner, and then click Check for Updates.
Check for Updates
4. Uninstall
Right-click Virbo icon, click Open File Location and double-click unins000.exe to uninstall.
Uninstall Virbo
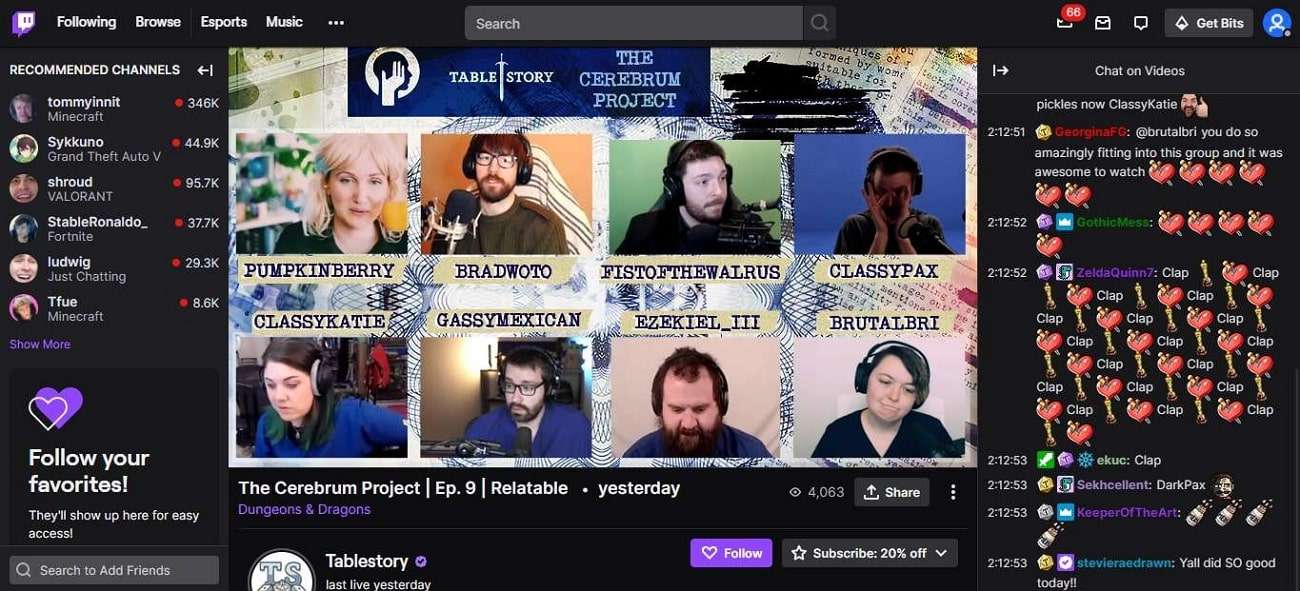
Best 7 Ways to Promote Twitch Stream
Twitch is one of the biggest platforms where people can come live and stream whatever they want. There are tons ofTwitch-promoted channels on the web that never fail to amaze users with their higher functionality. This lets you interact with others and makes your life more entertaining.
Whether you want to stream games, talk shows, travel, food, or events, this streaming service can help you. If you are getting bored, you can also watch other people’s streams to get entertained. In this article, we will guide you on how you canadvertise Twitch streams .
Part 1: Why is Promoting Twitch Stream Important?
There are tons of benefits that you can accomplish throughTwitch stream promotions . Don’t worry if you have no idea about these benefits. The below-given discussion will help you in this matter:

1. Reach a Wider Audience
With Twitch stream promotions, you can attract a huge array of viewers. It may also attract strangers that can be turned into your followers. By this, your channel will be discovered by tons of people in time. It will not only enhance the exposure of your videos but can also grow your viewer base.
2. Connect with the Community
It is one of the greatest ways to connect with other community members. This will engage the Twitch community actively and build collaborative relationships with streamers. Viewers and influencers can also collaborate with you for better opportunities. You can also rely on this for a supportive network and overall growth.
3. Better Visibility and Community
You can also rely onTwitch-promoted channels to get better visibility. Twitch has millions of users, so you don’t have to worry about anything. Moreover, it also opens the way for attracting viewers that can turn into potential users. It can also build a credible community for you. Above all, you can also meet people with the same interests as yours.
4. Networking and Brand Awareness
With improved networking, you can experience better brand awareness. Above all, with better networking, you can get on the better side of viewers. It also helps in giving unique ideas about the content creators. With the algorithm of Twitch, you can get famous and achieve your dreams of being famous in a limited time.
Part 2: How to Promote Twitch Stream?
Now that you know that Twitch holds unlimited benefits, you must be curious to promote your content on Twitch. Don’t lose hope here because it is not as difficult as you think. Some of the ways through which you canadvertise Twitch stream s are listed here:
1. Social Media Engagement
You have to ensure the beneficial usability of social media platforms. This may include Facebook, Twitter, and Instagram. It also opens the way for profitable interaction, which helps in conversions. You can also share details about your streaming to get organic users.
Moreover, creating eye-catching content to entice viewers to your channel is also possible with this. Thus, social media engagement is the critical element for driving organic traffic to your streams. With this, you can also generate considerable revenue.
2. Networking with Other Streamers
There are obviously other streamers than you that have tons of organic followers. However, you can connect and collaborate with them to get more viewers on your streams. You can also collaborate with fellow streamers to experience multiplayer games.
Furthermore, higher exposure to your streaming videos can also be achieved with it. Not only Twitch, but you can also share your videos on other platforms with this type of networking. It also helps in increasing the likelihood of gaining a higher number of viewers in a natural way.
3. Consistency and Quality
Consistency and quality are the key elements of creating the bestTwitch stream promotions . You have to ensure consistency in the videos to optimize professionalism. In addition, you can create a schedule of streaming and offer collaboration beforehand. This will help in building anticipation and opening gates for potential customers and subscribers.
To create consistent and high-quality AI videos, you can useVirbo . It is an AI-powered tool that can generateTwitch-promoted channel videos for you. Above all, you can even addvirtual YouTubers to the videos with this. In addition, it is a very reliable and easy-to-use tool, so you can even use it without mastering any skill.
Virbo is available on several platforms, such as Windows, Android, and iOS, and you can use its single premium account on all devices. Moreover, it provides cloud storage to store your work that you can access and edit from any device.
Get Started Online Free Download
Key Features
- There are more than 150+ AI Avatars in Virbo, and you can also select them by age or ethnicity.
- Virbo also offers commercial stock for users, which includes 180+ templates and royalty-free music.
- The AI Voice of Virbo can optimize the quality and usability of text-to-speech videos. You can also customize the language and accent.
- With the AI Script feature, you can create and optimize scripts for generating the best video content.
4. Engage with Chat
You have to enhance your engagement on chats to boost your streaming engagement. You can also do live chats with streaming, which can help you show your intuitive side. This also keeps the viewer engaged with your content for effective results.
By chatting, you can resolve the viewers’ queries and invite them to your streaming channel. Furthermore, real-time interaction with viewers also encourages community building. It also makes the viewers feel valued and preferred.
5. Utilizing Twitch Features Effectively
Twitch is a feature-rich tool, and you have to use the features effectively to get the most out of it. For example, you can personalize the titles to show the theme of streaming in an interactive way. You can also use tags and other categories to optimize the discoverability of streaming videos.
Above all, Twitch can help you in adding relevant keywords. Through the relevant keywords, you can enhance the reach of streaming videos to a further extent. The chances of visibility of your content with potential subscribers also increase with this.
6. Cross-Platform Promotion
One of the best and most effective things about Twitch is it lets you optimize cross-platform video sharing. By this, you will be able to extend the reach of your videos on other platforms. Moreover, this often includes Discord, YouTunbe, personal websites, and more.
Additionally, you can create compelling highlights of your streaming videos and share them on other social platforms. It will entice the viewers to visit yourTwitch-promoted channels .
7. Participating in Twitch Communities and Events
You can engage with the Twitch community to show yourself as an approachable streamer. Find the communities relevant to your streams and share your streaming videos with them. This also helps you to participate in another event. Moreover, it often incorporates collaboration, charity streams, etc.
Adopting this technique also opens the way for establishing connections with like-minded streamers to improve and enhance streaming. You can also increase the number of views of your streams with this.
Conclusion
In a nutshell, you can use theTwitch streaming promotion to stream whatever you want. Twitch is a feature-rich and optimized quality platform. You can also use this streaming platform for promotional purposes because it has endless benefits.
A few of them are given above for your easy understanding. Alongside this, we have also provided the steps for conducting Twitch streams. You can follow them to remove any complications. If you want to create videos with virtual YouTuber assistance, consider using Virbo.
You May Also Ask
1.How much does it cost to be promoted on Twitch?
The rates of Twitch promotion can vary accordingly. It also helps you with nontraditional marketing strategies, which encompass Twitch influencers. However, the rate of Twitch promotion can range from $2 to $10 per impression.
2.How much does a streamer make per Twitch bit?
In an estimated value, the Twitch streamer earns $0.01 for every Twitch bit. This can convert into great revenue if you have a considerable number of followers.
3.Do people generally donate bits or subs to Twitch channels?
You can expect donations of bits in the live streams. Moreover, Twitch bits will act as almost 50% of your total earnings. Through this, you can also achieve a greater number of followers and grow your channel. You can even gain more subscribers and viewers, which can work as your primary source of income.
Also read:
- 2024 Approved Tips for Perfecting Your Talking Face Content A Complete Guide
- In 2024, A Detailed Guide To Stream to Instagram With an RTMP
- In 2024, Download/Install/Register/Uninstall
- Updated Best 10 Free Video Translators to Mitigate Translation Risks
- New Top 4 Ways of Instagram Video Promotion for 2024
- Updated Top 11 Deepfake Voice Apps and Software You Need to Know About for 2024
- Updated 2024 Approved The Best English Voice Generator To Convert Text Into Desired Accent
- Updated 2024 Approved The Best Tools to Convert Text to MP3 With the Best Natural Voices
- New In 2024, Exploring the Finest Text-to-Speech Male Voice Tools for Natural Output
- New In 2024, Perfect Guide To Excel in TikTok Live Shopping
- How to Create Funny Talking Avatars Using Oddcast Text to Speech Tech for 2024
- New In 2024, How to Translate TikTok Videos? All You Want to Know
- New 2024 Approved In-Depth Review of Ivona Text to Speech Converter
- 2024 Approved Want to Clone Voices in Real-Time? Explore These GitHub Repositories
- New 2024 Approved AI Voice | Online
- New In 2024, A Brief Review of CapCut Translate With Alternative
- New In 2024, Best Toolbox to Translate YouTube Videos to English Subtitles
- New In 2024, Introduction | Online
- Video Translator
- New 2024 Approved Introduction of Wondershare Virbo
- New What Is an AI Video Editor?
- New Best Tool to Translate YouTube Video to Arabic for 2024
- 2024 Approved Best 6 Celebrity Text to Speech AI Voice Generators You May Like
- Amazon Live for Beginners Features, Pro Tips & Future Trends
- New In 2024, What Are AI Tools?
- New In 2024, Live Chat With WooCommerce Your Gateway to Successful Live Selling
- New 2024 Approved Best 4 Ways of Instagram Video Promotion
- New Make Your Pictures Speak Online With the Best Tools Recommended for 2024
- Updated Chrome Video Translator Select the Perfect Platform
- Updated 10 Best Free AI Video Generators with Innovative and Advanced Algorithms for 2024
- 7 Best Whiteboard Explainer Videos to Inspire You for 2024
- In 2024, Hassle-Free Ways to Remove FRP Lock on Xiaomi Redmi 12with/without a PC
- How To Repair System Issues of Apple iPhone 12 mini? | Dr.fone
- In 2024, Three Ways to Sim Unlock Motorola Moto E13
- In 2024, How to Unlock iCloud lock on your iPhone 11 and iPad?
- In 2024, A Working Guide For Pachirisu Pokemon Go Map On Vivo Y100i | Dr.fone
- Unlocking the Power of Smart Lock A Beginners Guide for Nokia C32 Users
- Apple ID Unlock On Apple iPhone X? How to Fix it?
- Restore Missing App Icon on Vivo T2x 5G Step-by-Step Solutions | Dr.fone
- In 2024, Complete Tutorial to Use GPS Joystick to Fake GPS Location On Realme C67 5G | Dr.fone
- In 2024, Top 10 Telegram Spy Tools On Samsung Galaxy S23 FE for Parents | Dr.fone
- Full Guide to Hard Reset Your Honor X50i+ | Dr.fone
- Simple ways to get lost music back from Y78+
- Best Android Data Recovery - Undelete Lost Messages from Infinix Smart 8
- In 2024, Does Apple iPhone 6s Have Find My Friends? | Dr.fone
- 5 Best Route Generator Apps You Should Try On Poco C51 | Dr.fone
- In 2024, How to Move Custom Ringtones from Apple iPhone XR to Android? | Dr.fone
- Full Guide to Hard Reset Your Vivo X100 | Dr.fone
- In 2024, 7 Top Ways To Resolve Apple ID Not Active Issue For Apple iPhone 14 Plus
- 4 Ways to Transfer Messages from Apple iPhone 12 to iPhone Including iPhone 15 | Dr.fone
- Title: How to Make Explainer Videos—Step by Step Guide
- Author: Sam
- Created at : 2024-05-19 03:34:48
- Updated at : 2024-05-20 03:34:48
- Link: https://ai-voice-clone.techidaily.com/how-to-make-explainer-videosstep-by-step-guide/
- License: This work is licensed under CC BY-NC-SA 4.0.
