

Best 5 Udemy Subtitle Translator (Auto Translation)
Best 5 Udemy Subtitle Translator (Auto Translation)
One of the most common problems Udemy users encounter is that a course is not in their native language. However, even though Udemy provides captions, many courses might not provide subtitles in your language.
That’s why you need aUdemy subtitle translator that will allow you to watch a course or video in your native language with subtitles that you can actually understand. So, let’s discover the top five best Udemy subtitle translators and how they work.
Part 1. Can YouTranslate the Udemy Subtitle?
Translating subtitles on Udemy might not be directly possible, but there are workarounds. As long as you are using Google Chrome and watching courses on the website, you can use Udemy dual subtitle apps from the Chrome app store and incorporate them in your browser to get auto-translation of whatever video you are watching.
Many dual subtitle tools are available on the market, but in this blog, we are covering the top five totranslate Udemy subtitles . Let’s say that you have bought a course on Web Development.
With the right use of AI, Machine Learning, and advanced algorithms, these tools set you up for success so you can learn any course of your liking, regardless of which language it is in. So, let’s uncover these tools and their key features.
Part 2. 5 Best Udemy Subtitle Translators
1. Udemy Dual Subtitles - Subtitles Translator
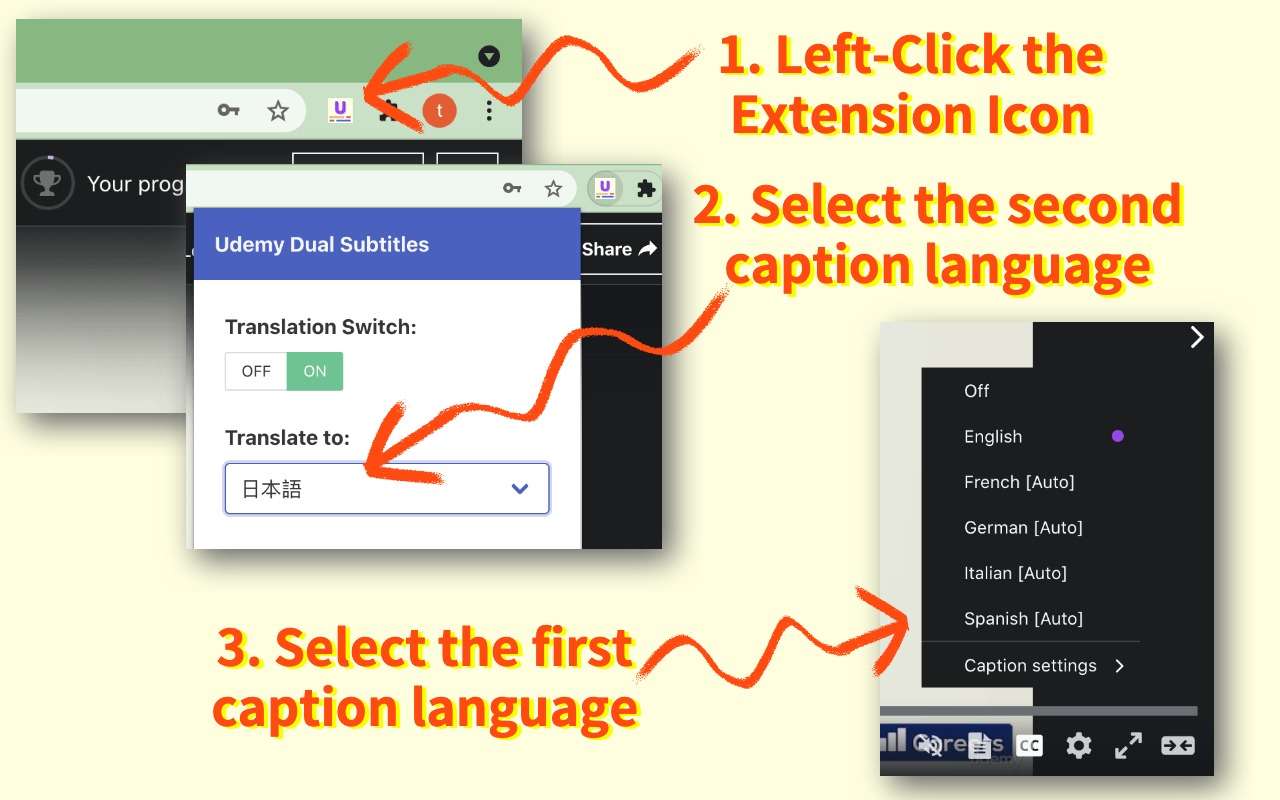
When it comes toUdemy translating subtitles , there are a lot of things you might have a problem with. First, you might not even have the language you are looking for. Secondly, the format isn’t the most pleasing. And lastly, you cannot display bilingual subtitles to take your learning to the next level.
That’s whereUdemy Dual Subtitles comes in. It is a Chrome extension that will work on Google Chrome and Microsoft Edge. Its main prowess is displaying bilingual subtitles so you can learn in the most optimal way possible.
Moreover, Udemy Dual Subtitles expands Udemy’s original subtitles to show duals so you can easily understand what’s going on the screen. It can translate Udemy’s official subtitles into all widely used languages; switching them is a piece of cake.
Here are some of the features it offers:
Key Features
- Versatile Translation: Translate Udemy subtitles in most languages that are commonly used around the globe
- Easy-To-Use: No need to set up every time. Just install the plugin to Chrome and get started right away
- Custom Styling: Udemy subtitle translator with custom styling abilities
- Bilingual Languages: Supports and displays dual subtitles to make learning easier and more effective
- Downloading Subtitles: You can download subtitles by using the Udemy Dual Subtitles tool
Pros
- Makes understanding courses easier
- Supports a plethora of languages
- Allows custom styling for better viewing
- Very good customer support
Cons
- Can cause occasional glitches
2. Udemy Subtitles Translator - Yakuu

Yakuu is another popular Udemy subtitle translator that enables learning from anywhere in the world. It virtually features all the languages and does real-time translation in a way that feels natural and easier to look at.
Moreover, just like other subtitle translating tools, it enables Udemy’s subtitles to be translated and to be shown in dual-subtitle mode, meaning learning will be easier than ever. It also supports all display modes including full screen and paging, without breaking down or messing up the subtitles.
All the features specified in Yakuu cater to the needs of users who are looking for a translation of subtitles. Moreover, it easily lets you translate the subtitles with three simple steps and doesn’t even require a bit of setup like many other services.
Key Features
- Responsive Subtitles: Allows responsible subtitles to be displayed in full or auto-paging mode
- Bilingual Subtitle Support: You can seamlessly switch between single and dual language subtitles at the same time
- Three-Step-Process: Download the tool, install it on Chrome, and simply pin to the toolbar to leverage the benefits
Pros
- Automatically display translated subtitles in the local language
- No need for a hierarchical menu selection
- Learn anywhere in any language for free
Cons
- It doesn’t support custom styling of subtitles
3. Udemy Subtitles Translator with Custom Style
When it comes to subtitles, some people like custom styling to make them easier to read. While you can adjust Udemy’s default subtitles, they are quite limited. With theUdemy Subtitles Translator tool, you have the ability to leverage Google Translate, which will show real-time updates.
All you need to do is install the subtitle, open the Udemy course, click Transcript, and click the Google Translate plugin that will translate everything to you in real time so you can enjoy your favorite course in your language.
Being a tool that is run by Google Translate, you have a lot of accuracy. Google Translate supports most languages available in the world with precision that we have never seen before. So, if you want one of the best Udemy subtitle translators, then this tool will give you the feature to enjoy your favorite course while understanding it a bit better.
Key Features
- Google Translate Support: Has Google Translate in the background to do the translation
- Custom Subtitles: You can stylize the subtitles according to your need
- Fast and Lightweight: Provides enhanced accessibility to Udemy users
Pros
- Great tool for non-English speaker people
- Quite accurate and on-point
- Allows customization of subtitles so you can customize colors, positioning, and the next
Cons
- Sometimes it doesn’t work properly
4. Udemy Double Subtitle

Double subtitles are quite popular when it comes to learning something new. Thankfully,Udemy Double Subtitle is one of the best tools to provide you with dual subtitles and translations that would make learning easier for you.
Let’s say that you already know some English but you are a Korean native. By using Udemy Double Subtitle, you can add both English and Korean to make everything even easier for you.
One thing to note is that whenever you enable a subtitle, you might need to reload the webpage for the tool to work. Overall, it is a great tool for you if you are looking to translate subtitles and learn in a way that’s more immersive.
Here are some of the features of the Udemy Double Subtitle tool.
Key Features
- Dual Subtitles: Supports dual subtitles to be displayed at once
- Fast and Efficient: The tool is lightweight and can display accurate results
- Privacy Protection: The developer doesn’t take your data, which means it is protected
Pros
- Great for learning and enhancing accessibility
- Works fastly and efficiently
- Enabling the tool takes less time
Cons
- Less languages available
5. SubTrans
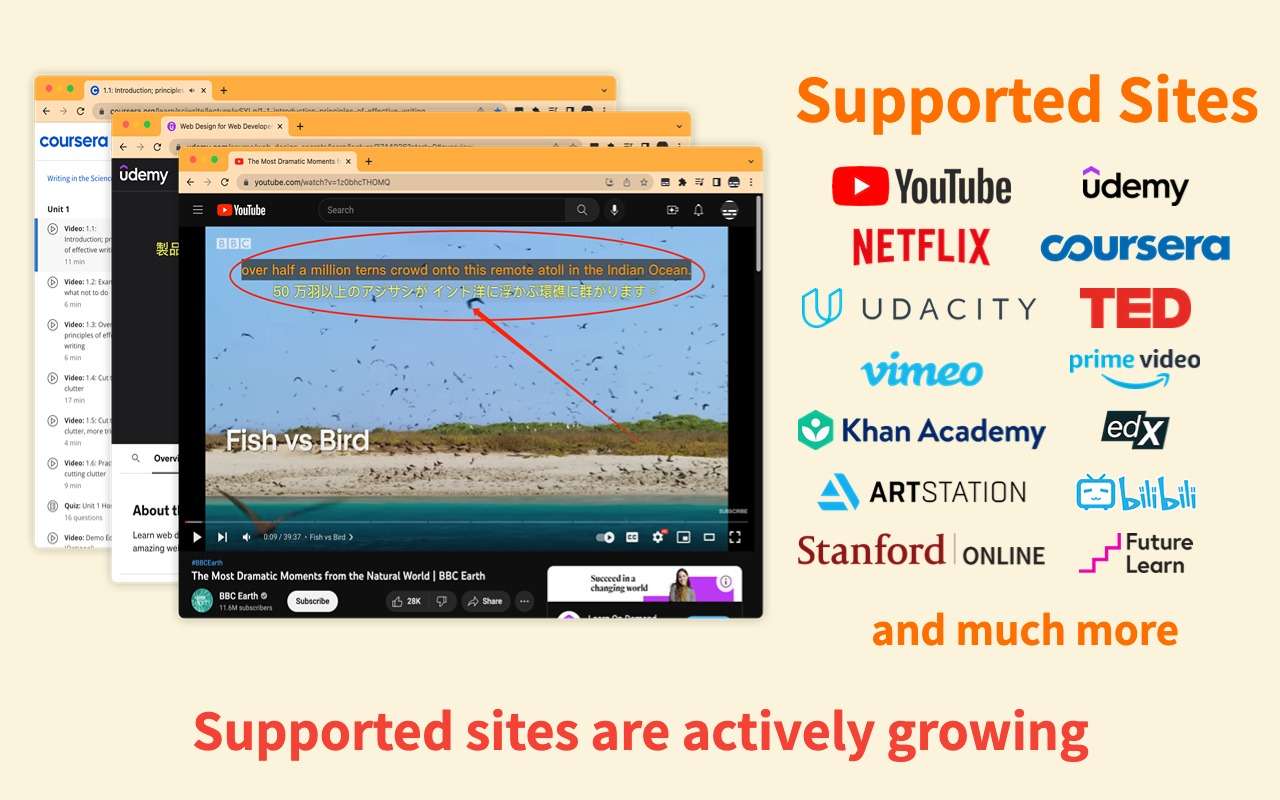
SubTrans is a general subtitle translator for a plethora of sites. Aside from Udemy, it can work on YouTube, Netflix, Coursera, TED, Khan Academy, and many more. The list of sites they support is ever-growing, and the developers are actively working to enhance the functionality of their tools.
SubTrans displays bilingual subtitles and can be used for as many video sites as possible. It can translate subtitles into almost all languages and also allows customization that is at the next level. From font size, colors, weight, and opacity to background, you can change anything in SubTrans.
Moreover, one of the best features of SubTrans is its ability to delay the subtitles. Hence, even if you feel like the subtitles don’t match, you can manually adjust them.
Key Features
- External Subtitles Support: You can also import external subtitles to be displayed on the videos
- Timestamp Control: In case the subtitles don’t go well, you can advance or delay them
- Styling Options: You can stylize almost every aspect of the subtitles
Pros
- No need to set every time
- Supports external subtitles
- Adjustable timestamp
- Display bilingual languages
Cons
- Only 30 minutes is free per month
Part 3. Translate Videos in Another Language using Virbo
Do you want to translate the entire video into another language besides subtitles? If so,Wondershare Virbo can help you as it’s an AI-powered video translator. It can be used as anUdemy subtitle translator and provides perfect video translations. It’s a cross-compatible platform that is available to use on online browsers and desktop applications. You can upload videos of up to 500MB within 10 seconds to 5-minute duration for smooth video translation.
Prominent Features of Virbo - Video Translation
- Diverse Languages: This software supports more than 20 diverse languages for video translation. This means you can learn any language course.
- Subtitles: Apart from translating videos, Virbo has anUdemy translate subtitles While translating videos, you can effortlessly enable this feature to get subtitles in videos. Notably, it is preferred to upload videos without subtitles to ensure the quality of the output video.
Translate Video Online Download APP Now Free Download
3.1 Why Choose Wondershare Virbo
Several platforms are available for video translation, some of which are discussed above. Now, let us help you make your selection by highlighting some of the benefits of Virbo. Delve into this part and learn why choosing Virbo will significantly assist you in learning courses.
- Breaking Language Barrier: International students with language difficulties in learning can get relief from Virbo. You can download your course content and translate it into your native language.
- Language Learning: Subtitles in the videos that Virbo provides can help you learn a new language. It enables you to understand the pronunciation of words and take notes while watching.
- Research Students: Virbo may help research students accurately quote or rephrase key points of the video. By translating, you understand the speakers’ intended meaning to cite in your research.
- Cross-Platform Support: Virbo is available for Windows, Web, and Mobile.
3.2 How to Translate the Udemy Subtitles Using Virbo?
To learn the Udemy course in a non-native language, follow these simplified instructions to translate the subtitles with the highest accuracy:
Step 1: Upload Your Udemy Course Video
Open the online version of Wondershare Virbo - Video Translator on your web browser. Hit the “Click to Upload Video” option and upload your Udemy video in Virbo.
Translate Video Online Download APP Now Free Download
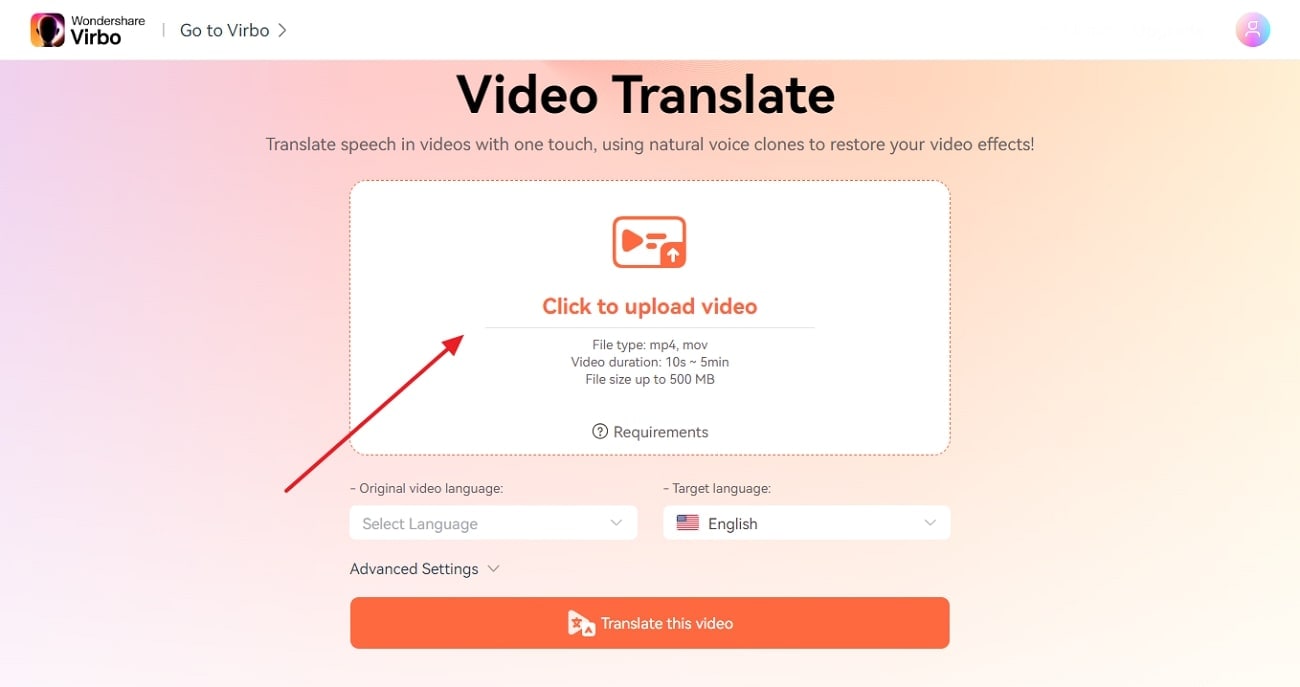
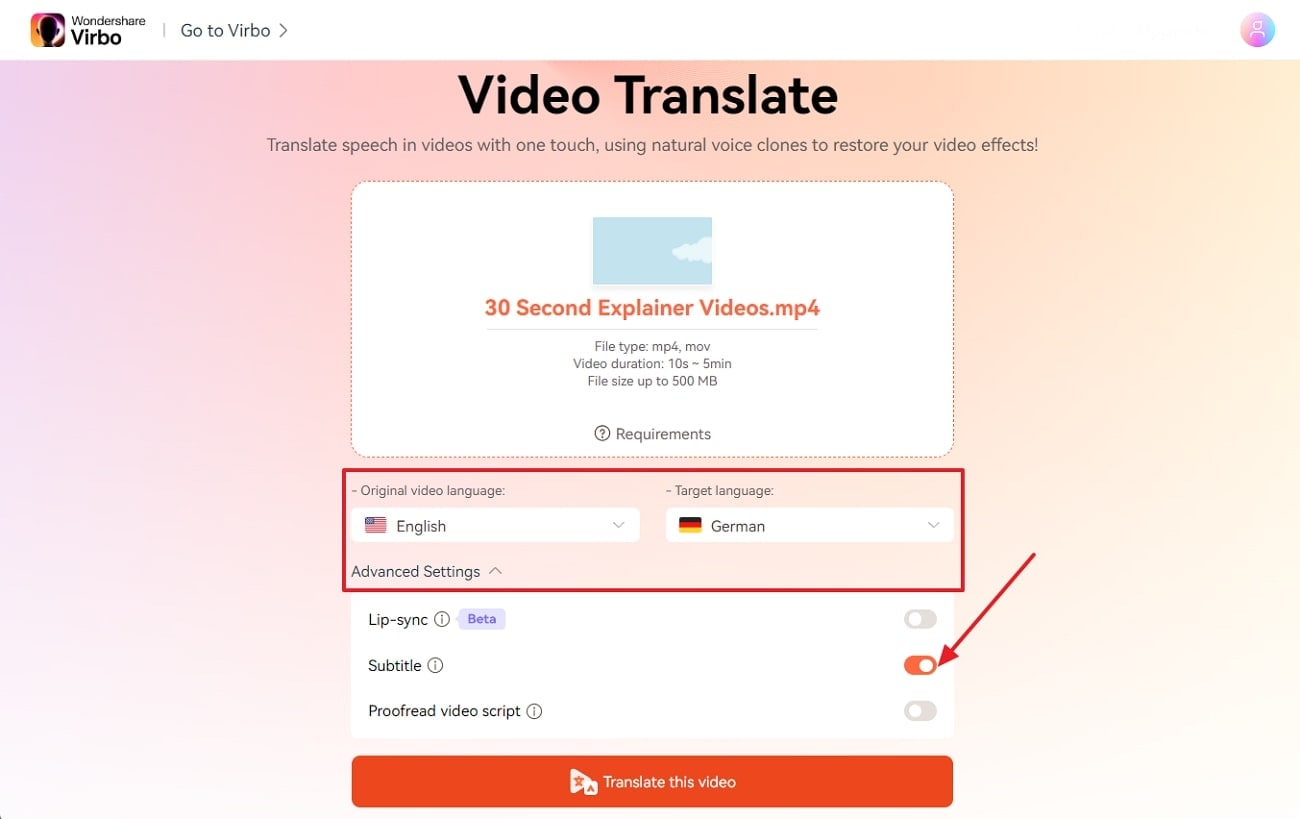
Step 2: Customize the Translation Settings
Move down and choose “Original Video Language” and “Target Language” using their lists. Then, tap the downward icon of “Advanced Settings” and get multiple options later. From there, toggle the “Subtitles” option to generate translated subtitles in the video.
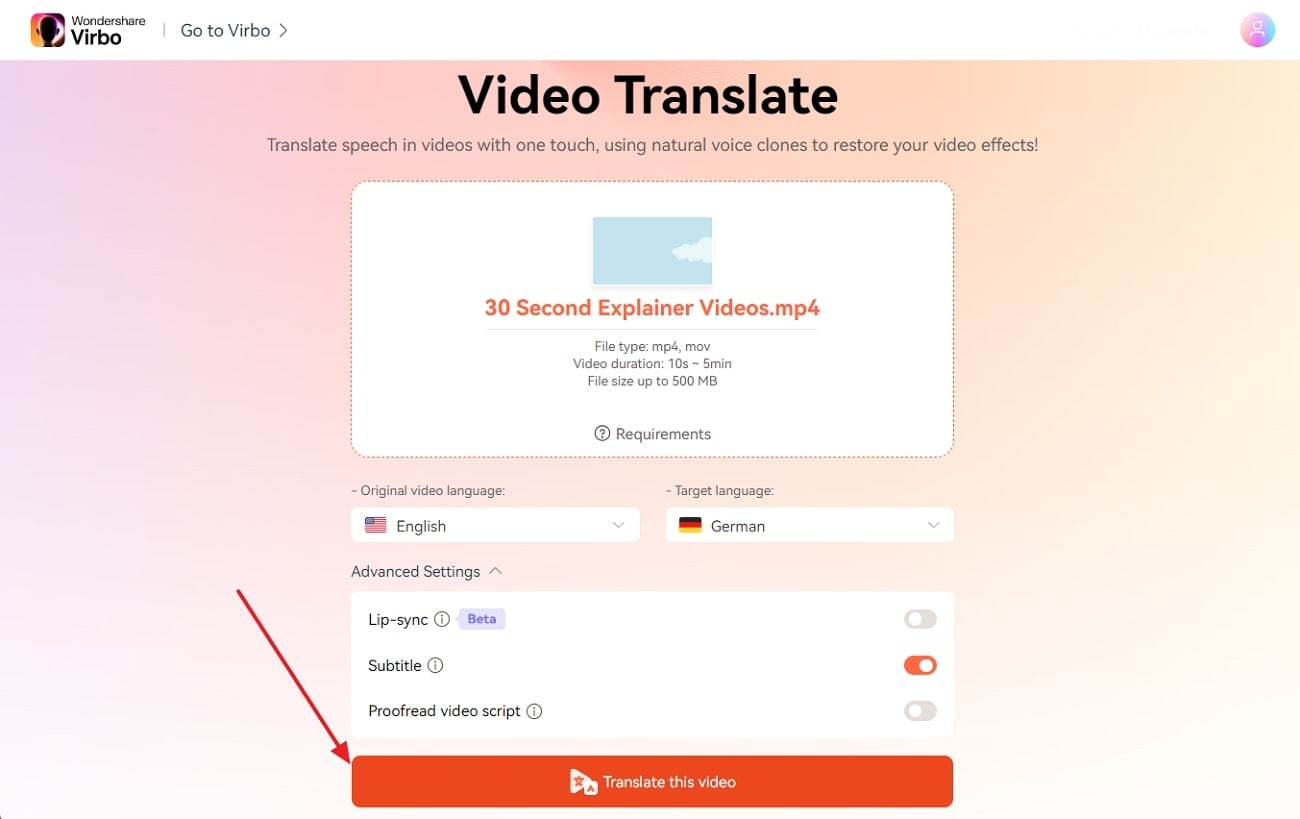
Step 3: Initiate the Udemy Video Subtitles Translation
Upon setting the video translation parameters, press the “Translate the Video” button and let AI analyze. Finally, you will get your Udemy course video with translated subtitles in your target language.
Translate Video Online Download APP Now Free Download
Bonus Tip: What Virbo Can Do If You Want to Create a Udemy Course You Own?
- AI Script Generator: If you lack some course creation ideas, Virbo has an AI script generator. It can help you brainstorm ideas about Udemy courses by providing compelling scripts within seconds. All you need to do is provide text instructions and set certain parameters for exact results.
- AI Avatar: Virbo eliminates the need for human presenters, cameras, and equipment to create a course. It has AI avatars from diverse ethnicities, genders, regions, attire, and ages. These life-like avatars can create educational videos with the script you provided and AI voices.
- AI Voice: This feature of Virbo works as a text-to-speech converter that has expressive AI-generated voices. It can narrate your Udemy course with captivating voiceovers in different accents and tones. Hence, enjoy high-quality audio in various languages from thisUdemy subtitle translator .
Create Video Online Download APP Now Free Download
Part 4. FAQs about Udemy Subtitle Translator
1. How do I add subtitles to the Udemy course?
You can create subtitles from scratch using a simple text editor like Notepad or TextEdit. You need to follow the .vtt format for subtitles, which involves specifying the timing and text of each subtitle line. This option requires more effort but gives you complete control over the accuracy and style of your subtitles. You can also use Wondershare Virbo, which can generate subtitles automatically when you use this tool to translate videos.
2. How to add auto translate on any video
Auto translation can be achieved by using various tools. One of the best tools for auto-translation is Wondershare’s Virbo. It allows you to add translated captions in various languages to any video of your choice. Upload your video, choose the translation option and then select “Translate” and choose the desired language. You can also edit the generated subtitles before exporting them.
3. Is there any AI tool for translation?
There are many AI tools for translation. Tools like Google Translate, DeepL, Virbo, and Veed IO help you translate videos, audio, or text to generate new media. The accuracy of these tools is high, which can help companies generate AI videos to further target the international market.
4. How to generate AI videos for educational content?
The first step is scripting, where you need to get the script ready for your educational video. Secondly, you need an AI-powered tool for generating the voice-over. You can use Virbo which will not only generate voice but video as well. Lastly, once you add the script, the software will create a video for you that you can test and then roll out in the digital world.
Final Verdict
Udemy is one of the largest e-learning platforms with hundreds of thousands of high-quality courses catering to audiences from all over the world. However, most courses will be in English since it is predominantly an English service.
But use Udemy subtitle translation tools like the ones we have mentioned above. You can easily and effectively learn courses in your own language by translating the subtitles into your native tongue.
Translate Video Online Download APP Now Free Download
What Is AI Generated Text?
Part 1: What is AI Generated Text?
AI generated text refers to content produced by artificial intelligence-powered text generators. These tools utilize advanced algorithms and language models to create written content automatically, ranging from articles and product descriptions to creative writing and more.
Part 2: Applications of AI Generated Text
AI generated text finds applications in various domains:
1. Content Creation: It streamlines content production for blogs, websites, and marketing materials, saving time and effort.
2. E-commerce: AI generated product descriptions and reviews help e-commerce platforms manage large product catalogs efficiently.
3. Creative Writing: AI can assist authors and writers in generating plot ideas, dialogues, and creative pieces.
4. Data Entry: Automating text generation is valuable for tasks like generating reports and summaries.
Part 3: Advantages of AI Generated Text Over Traditional Solutions
AI generated text offers several advantages:
1. Speed and Efficiency: AI text generators can produce content at a much faster rate compared to human writers, increasing productivity.
2. Consistency: AI-generated content maintains a consistent style and tone, even across large volumes of text.
3. Scalability: It’s easily scalable, enabling the creation of massive amounts of content quickly.
4. Resource Savings: AI-generated text reduces the need for hiring and managing a large writing team, resulting in cost savings.
5. Creativity Boost: AI can suggest novel ideas and perspectives, enhancing the creative process.
Conclusion
AI generated text is reshaping content creation across industries. Its efficiency, scalability, and potential for enhancing creativity make it a valuable tool for businesses and creators alike. As technology continues to advance, AI text generators are likely to play an increasingly significant role in content production.
Make Your Pictures Speak Online With the Best Tools [Recommended]
People are constantly looking for creative ways to make their photos stand out and communicate messages effectively. One popular trend is tomake pictures talk online . By animating your photos and adding audio, they can be more captivating and leave a lasting impression.
While it can be overwhelming to find the best one, we’ve narrowed down the top 10talking photo online tools that let your photos talk. Plus, we’ve included easy-to-follow guides on how to use them.
Part 1. Best 10 Talking Photo Online Tools in 2024
1. Wondershare Virbo
Wondershare Virbo is one of the best versatile video production tools specifically designed for crafting AI human avatar videos. Using artificial intelligence-generated content (AIGC) technology, Virbo excels at creatingtalking photos online for free .
WithTalking Photos feature , you have the flexibility to choose from existing AI avatar templates or upload your own pictures. These avatars can then speak based on your script or synchronize their lip movements with recorded audio.
Virbo’s Talking Photos features:
- A library of more than 300 free AI avatars.
- Over 300 AI voices to choose from
- Easy tutorials with a step-by-step guide
- Compatible across platforms
- Natural animation and lip sync
Pricing: Free trial available. The monthly plan starts from US$9.9 /mo.
Pros
- Language accessibility with a selection of over 300 AI voices
- Virbo AI gives natural animation and accurate lip synchronization
- Equipped with easy-to-follow tutorials, so users can quickly learn and make the most of its features
- The AI video generation process is very fast
Cons
- Although you can use it for free, users may need to pay for a subscription fee for unlimited usage

Get Started Online Free Download
2. Veed.io
VEED.io is an all-purpose online video editing platform that enables creators to easily improve their videos. Packed with various features, this web-based editor simplifies the video editing journey, includingmaking picture talk online with Veed.io Talking Avatar.
Veed.io features:
- Customizable AI avatars
- Allows for audio input or uploading a prerecorded voiceover
- Create talking characters and edit videos in one app
Pricing: Free plan available. The monthly plan starts at $24/month.
Pros
- User-friendly interface
- Extensive format support
- Users can add watermarks to their videos to protect their content
Cons
- Relying on internet connectivity
- Some users have experienced difficulties uploading their personal videos and audio files to the platform

3. Elai.io
Elai.io’s AI Talking Photo works as aphoto speak online tool that uses advanced AI to animate your photos. Once you upload your portrait photo to Elai.io, you have the option to add a live microphone recording or use pre-recorded audio. You can also input text and see your photo talks in a video.
Elai.io features:
- Create videos from a URL link
- Add voiceovers using a microphone
- Explore over 100 talking head templates
- Choose from a selection of more than 80 avatars
Pricing: One minute free for first timers. Monthly subscription starts from $23/month.
Pros
- Maintain user privacy
- Works with Chat GPT to help generate videos
Cons
- Beginners may face challenges when trying for the first time

4. Dupdub
DupDub is a multifaceted platform that provides a range of AI-powered tools that help you with voiceover, writing, painting, avatar creation, and video editing. By using AI technology, Dupdub canmake your photo speak online and simplify your creative workflows.
Dupdub features:
- Sync your avatar’s lips to match the script
- Personalize voiceover for your avatar
- Enjoy an easy-to-use interface.
Pricing: 3 days free trial with 10 credits after registration. The monthly subscription starts at $11/month.
Pros
- You can pay based on credits which can last for a lifetime
- No complicated setups
Cons
- The lip-syncing quality doesn’t look very natural
- There are still pixelation issues around the avatar’s mouth area

5. Tokking Heads
Tokking Heads is a funtalking photo online tool that can also add human expressions to your photo. It uses advanced technology to recognize faces and offers a variety of facial animations. You can customize your talking photos with filters, music, animated texts, and sound effects to make them even more exciting.
Tokking Heads features:
- Add expressions to your photos
- Use facial recognition technology to integrate expressions into images
- Personalize your talking photos with filters, music, animated texts, and sound effects.
- Available on iOS, Android, and online
Pricing: Free trial is available. The monthly subscription starts from $9.99/month.
Pros
- A wide range selection of avatar templates
- Versatile for creating different content types such as talking avatars and animated videos
Cons
- The performance is a bit sluggish

6. Vidnoz
Vindoz offers a robust solution to make photo speak online. Using this platform, users can animate their static images and add voiceovers. The process begins by either uploading a local photo or selecting from a wide array of available templates. Additionally, Vindoz incorporates AI capabilities to generate animated images with speech capabilities in various languages.
Vidnoz photo talking features:
- Support personalized talking photos
- Accommodate various languages
- Offer both female and male voice options
- Generate videos from photos quickly
Pricing: Free to generate 1-minute video per day. Monthly plan starts at $22.49/mo.
Pros
- Generate talking head MP4 videos for free
- Access over 20 avatar characters at no cost
- Choose from over 100 speaking head languages
Cons
- Include a watermark for the free version
- Standard quality

7. Blabberize
Blabberize is another photo editing tool that enables you tomake pictures talk online . While it’s mainly used in education, you can use Blabberize’s talking photo to announce, teach, and tell stories for student projects.
Blabberize features:
- Students can play back their recordings and see their photos talking
- Manually select a specific portion of the picture as the “mouth”
- Simple and easy to use
Pricing: One-week free trial. Yearly plans start from $26/year.
Pros
- Great for educational use
Cons
- Outdated interface
- No clear security and privacy measures
- Limited features and options

8. Good Trust
Good Trust’s Singing Portraits is atalking photo online free to use. This tool offers an enjoyable and interactive method to enrich your photo memories. Simply take a selfie or upload a photo, select a song, and witness the individual lip-syncing to your chosen tune! It’s a delightful way to add a personal touch to your pictures.
Good Trust features:
- Makes your photos sing
- Allows users to take photos directly using their webcam
- Drag-and-drop feature
- Offers a selection of available music tracks to choose from
Pricing: Free.
Pros
- Transforms both human and non-human photos into talking images
- Free to use
Cons
- Limited features and customization
- Not suitable for advanced video editing
- Mainly designed for music-related tasks

9. Yepic AI
Yepic AI’s Talking Photos is a professional talking head AI tool designed to transform your scripts into videos. It provides a variety of AI capabilities to assist in creating creative and captivating videos for social media, presentations, marketing materials, and more.
Yepic AI features:
- Various AI avatars
- Support for multiple languages
- Customizable talking heads
Pricing: 14-day free trial. Monthly subscriptions start from £6.98/user/month.
Pros
- Realistic avatar
- Good quality lipsync
Cons
- Potential for occasional glitches in lipsync quality
- Video quality may not be the best from other options

10. DeepBrain AI
DeepBrain AI is an innovative artificial intelligence dedicated to creating high-quality visual content. Their AI talking head video generator produces lifelike AI portraits,makes picture talk online , and allows you to transform text into video in only 5 minutes.
DeepBrain AI features:
- Simplify the video process with a variety of templates
- Support for over 80 languages
- A ChatGPT-like interface capable of generating and refining your video script
Pricing: Monthly subscriptions start at $29/month.
Pros
- Hyper-realistic AI technology
- Access to a free demo for AI video creation without a credit card
Cons
- Users with the Starter Plan may be insufficient by the 10-minute video limit

Author’s Verdict
After reviewing the various AI-powered tools for creatingtalking photo online , Wondershare Virbo stands out as a versatile and user-friendly option. With its impressive library of over 300 free AI avatars and features such as natural animation and accurate lip synchronization, Virbo excels in making realistic and high-quality AI photo-talking videos.
While some features may require a subscription, the pricing plan is reasonable considering the robust set of functionalities it offers.
Part 2. How To Make Picture Talk Online With the Best Free Tool
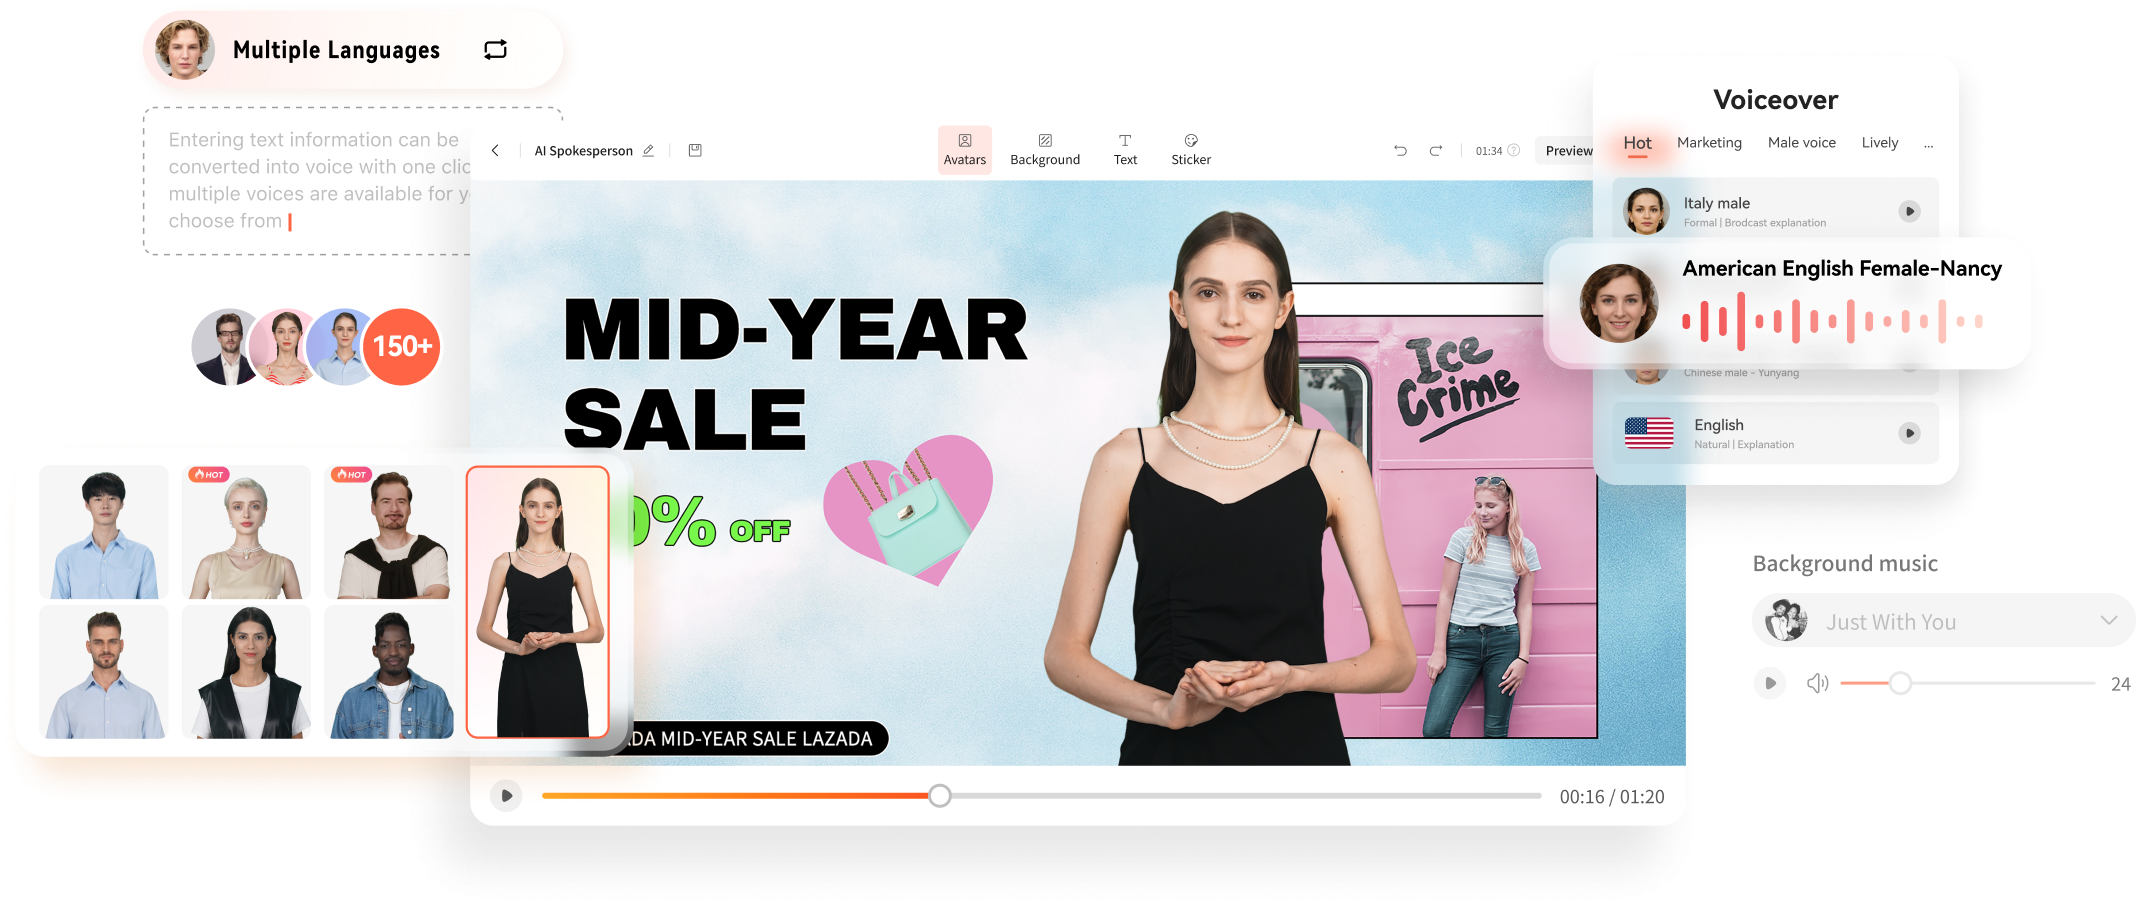
Now, let’s put the claim to the test and dive into the process ofmaking picture talk online using Wondershare Virbo. Virbo’s Photo Talking feature can be a great tool for marketing advertisements, online lesson presentations, and content creation for social media posts.
How tomake my photo talk free online with Wondershare Virbo:
Step 1: Go to the Wondershare Virbo website
Visit theWondershare Virbo website and click “Generate AI Video Online” > “Talking Photo.”

Get Started Online Free Download
Step 2: Upload a portrait photo or opt for an AI avatar template
If you prefer to use your own photo, click on “Upload Photo” and pick the portrait you want to use as your talking avatar. Proceed by clicking next.

Step 3: Customize your video
After selecting the talking avatar, input text and choose a voiceover option from the available choices to generate the voiceover for your video. Adjust the accent, speed, pitch, and volume to your liking. You also have the option to include subtitles and background music.
If you’d rather use your own voice, utilize the Wondershare Virbo mobile app and tap “record audio.”

Step 4: Download the talking avatar
Finally, after completing the editing process, export your talking avatar video by clicking on “Create Video.” Allow a few minutes for the export process to finalize, and your talking avatar videos will then be available for download.
Conclusion
Photo talking online refers to the innovative capability of generating animated videos featuring speaking avatars or characters based on static photos. This feature, often powered by artificial intelligence (AI), enables users to make their photos “talking” by animating the subject’s mouth movements and syncing them with recorded or generated audio.
One popular platform that offers photo talking online capabilities is Wondershare Virbo. Through its online interface or mobile app, users can upload a portrait photo or select from a variety of ultra-realistic AI avatars.
Get Started Online Free Download
Detailed Review & Alternatives of VOCALOID6 Voice Generator
Creating music to share emotions and ideas with the world is a never-ending thing. However, the change in today’s world is, you don’t have to put in all the manual effort and hire professional singers for this. If you have lyrics and melody in mind, try to make a song through them with the help of AI voice generators.
Don’t worry if you don’t know any AI voice generator tools. In this article, we will be discussing theVOCALOID voice generator . Not only this, but we will also discuss some of its premium-grade alternatives. So, let’s initiate the discussion without dragging it any further.
Part 1: A Brief Overview of What is VOLCALOID6
VOCALOID6 is an AI-powered music generator created by Yamaha. Through this, you can generate expressive music by adding lyrics and rhythm. By using VOCALOID6, you can inspire the world with your music. It helps amplify the music wave and generates the music you like. Moreover, it has the potential to generate music with natural singing voices.
The interface of theVOCALOID voice changer is appreciative and straightforward. Thus, you will not face any difficulty while exploring and using this tool. Above all, it incorporates innovative algorithms along with blazing-fast processing speed. Through this, you can accomplish your task at a faster speed without adjusting everything manually.
Compatibility of VOCALOID6
VOCALOID voice generator free is a tool that always places the needs of users before anything else. For this reason, it supports compatibility with major operating systems. The below-given table will help you understand the compatibility of VOCALOID 6:
| OS | Supported Versions |
|---|---|
| Windows | Windows 10 version 21H2 (and above), Windows 11 version 21H2 (and above). |
| Mac | macOS 10.15 (Catalina), macOS 11 (Big Sur), macOS 12 (Monterey), macOS 13 (Ventura). |
Pricing of VOCALOID6
Luckily, VOCALOID software offers reliable and cost-efficient pricing plans for users. You can also discover the budget-friendly pricing plans of VOCALOID6 here:
- VOCALOID6 for Windows/macOS: $225
Part 2: What are the Features Offered by VOCALOID6
VOCALOID synthesizer is a tool that is packed with amazing features. This tool’s top-grade features can help you generate music in natural singing voices with few taps. You must be eager to discover the features of VOCALOID6 that can set it apart from its competitors. A few are discussed here for your better understanding of the tool:
1. Direction and Vocal Work
With this optimized quality tool, you can edit the music’s accents, rhythmic feel, and vibrato. Above all, you also have a chance to double the music to generate music harmony. This also helps you in giving a personalized outlook to your music tracks.
You can also mute and solo the parts with the in-built switches. Moreover, it also has buttons to view TimeSig, Main Tracks, and Tempos. One of the best things is you can easily repeat the desired part of the song in a loop with a few taps.
2. VOCALO CHANGER and VOCALOID:AI
This software has the potential to produce new tracks for you. It can also replicate your singing style, so you don’t have to compromise on your style. There are over 100 singing styles in it, and you can select one of your choices.
In addition, it can generate naturally expressive tracks for the ease of the users. The VOCALO CHANGER lets you add your voice to its interface and change it as needed. You can also add it to the voice bank. Moreover, you can also zoom in on the projects to see the generated tracks.
3. Language, Effects, and Customization
One of the best things about the VOCALOID voice generator is it has over 11 audio effects that can give a more natural look to your music. It can also make the music more pleasurable to hear. Above all, you can also generate music in multiple languages with this. The languages it supports include English, Spanish, Chinese, Korean, and Japanese.
VOCALOID synthesizer includes 4 voicebanks which give flexibility for music creation. There is the latest synthesis engine in it which lets you create realistic music with a natural tone. You can customize several audio metrics and join multiple sounds together.
4. ARA 2 and SMF EXPORTING
There is a specialized integration in VOCALOID6, which is known as ARA2. It can also work as a replacement for rewiring. ARA2 is compatible with DAWs which is very convenient. Through SMF EXPORTING, you can export your MIDI files from VOCALOID6.
Moreover, you can also export every single MIDI file individually without compromising quality. You can further use the MIDI files as a template and edit them as needed.
5. Voices and Phrases
In VOCALOID, you can access over 2000 editable phrases along with the audio samples. You can also use them via drag-and-drop action. Moreover, there is no restriction on the type of voice as it supports both male and female voices. You can access both male and female voices in all the languages supported bythe VOCALOID voice changer .
Moreover, you can edit the music with its effective line tool. This helps in accomplishing smooth and consistent editing. There is a specialized note-editing tool that can make editing music notes easier than ever.
Part 3: How to Use VOCALOID6 VOICE Changer | Step-by-Step Instructions
Using VOCALOID6 is not as complicated as it seems. The procedure for using the VOCALOID6 voice changer without any mistakes is listed here for you:
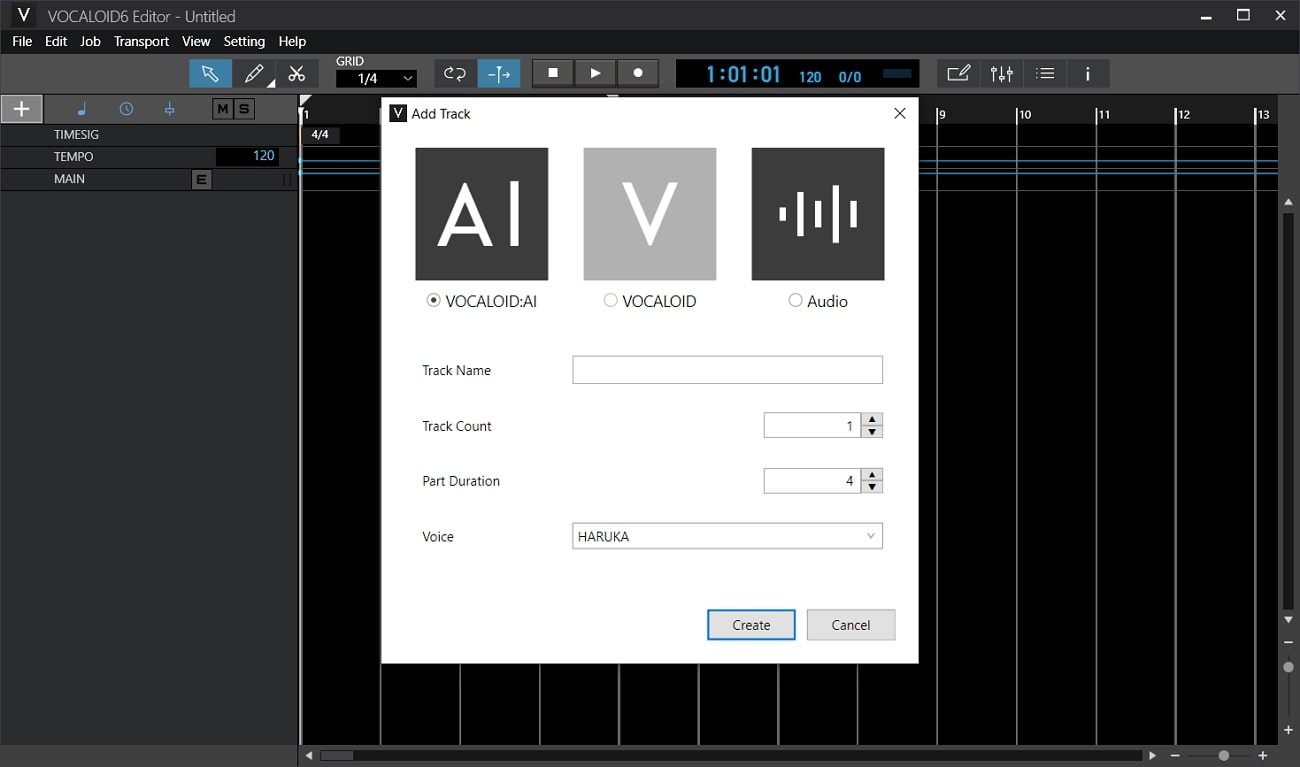
Step 1: Initially, install and launch VOCALOID6 on your device and hit the “New Project” button. Next, select the “VOCALOID.AI” option and add “Track Name” in the box present next to this option. You can also add the “Track Count” along with “Part Duration”.
Step 2: Following this, select the “Voice” drop-down menu and select the AI voice of your choice. Once done, click the “Create” button. Open up your “Editor” and right-click on it. Next, hit the “Add VOCALOID:AI Track” option and add a vocal track of your choice.
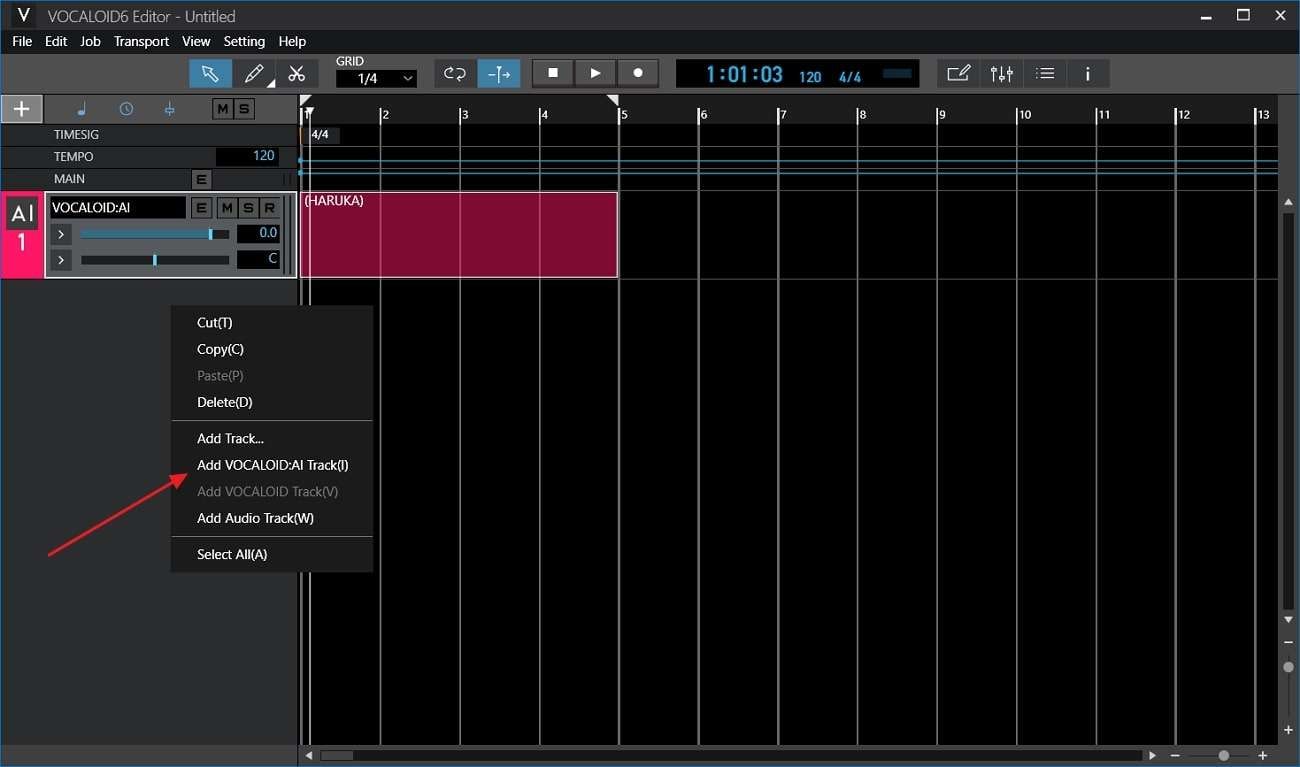
Step 3: Once it’s completely loaded, click on “Track” and locate the “Voice” and “Style” drop-down menu. Choose a voice and style of your choice and play it to have a preview. Afterward, go to the “File” tab and hit the “Save” button. Hereafter, select the “Destination Folder” and again choose “Save.”

Part 4: The Best Alternatives to VOCALOID6 Voice Changer
Undoubtedly, theVOCALOID voice generator is an optimized quality tool. However, it is better to know its alternatives. Through this, you can experience reliable innovation and upgrades. It also gives a comparative analysis along with flexibility.
No worries if you have no idea about the reputable alternatives of theVOCALOID synthesizer . The below-discussed tools can serve as the best alternatives for VOCALOID software:
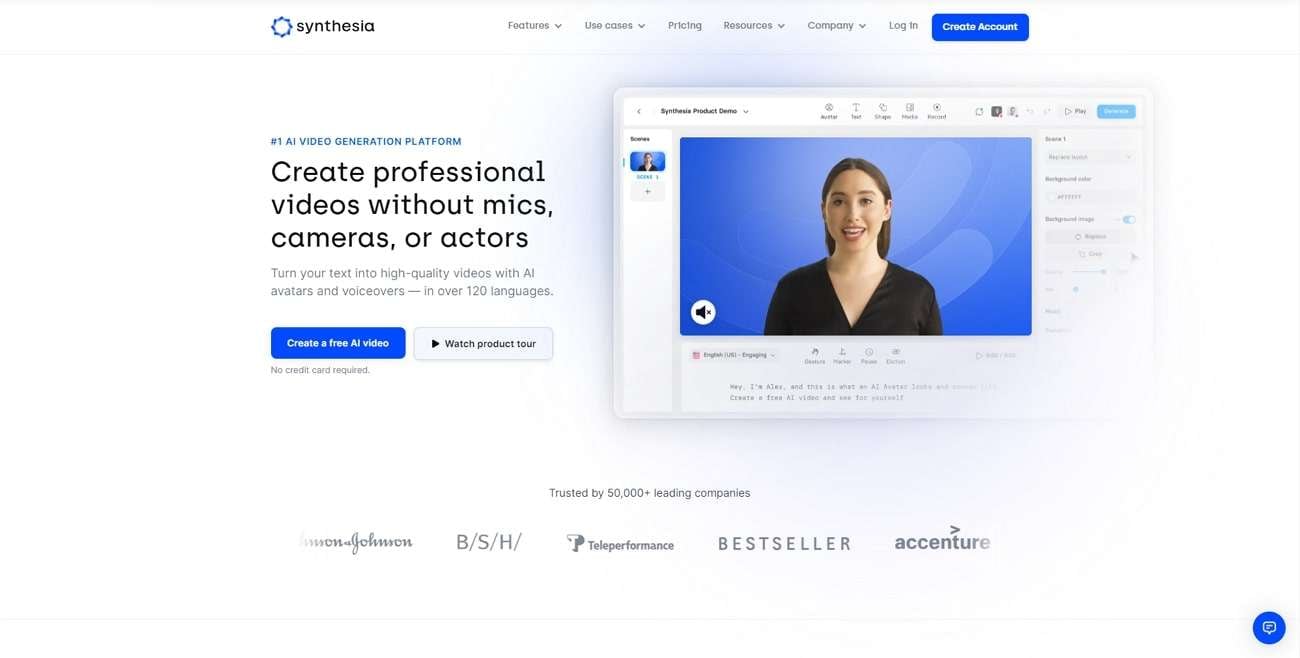
1. Virbo
Virbo is a quality-optimized tool through which you can generate AI videos with AI avatar integration. The interface of thisVOCALOID voice generator alternative is beyond amazing, and it also incorporates blazing-fast processing speed. Virbo supports 150+ real human avatars, along with 120+ voices and languages. You can also select the avatars based on their age and ethnicity.
Get Started Online Free Download
It also allows you to select languages based on gender and accent. Moreover, Virbo integrates a text-to-speech feature that helps you convert written text into expressive speech. You can also access professionally made video templates in Virbo, making your work easier than ever. In addition, it supports the royalty-free music track, which you can use in the videos.
It shows compatibility on diversified platforms such as Online, Windows, Android, and iOS. You can even use its premium version on multiple devices without any problem. With the help of Virbo, you can also generate AI scripts for social media content. Furthermore, you can also optimize the script on a Windows computer.
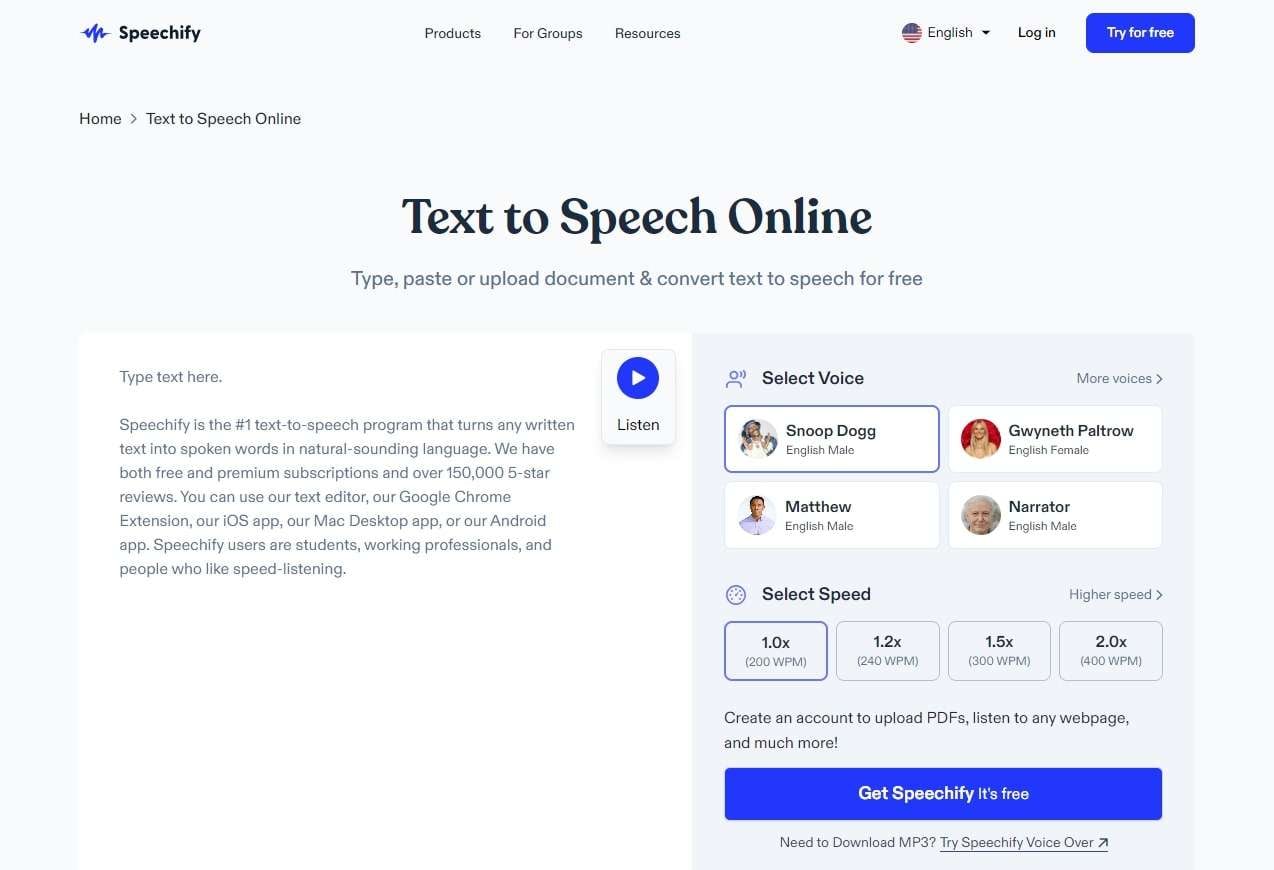
2. Speechify
Speechify is one of the popular AI voice generators on the web. Through this amazing quality tool, you can generate the voices with full customization. It also helps you listen to voices at any speed on both mobile and desktop devices. You can also generate the content in natural human voices to make it more accessible and understandable for the users.
Speechify can also turn Docs, articles, or PDF files into speech without any mistakes. You can also use this for generating voiceovers, doing voice cloning, and dubbing existing files. It also has an extensive catalog of audiobooks that you can narrate in high-quality.
3. SpeechGen.io
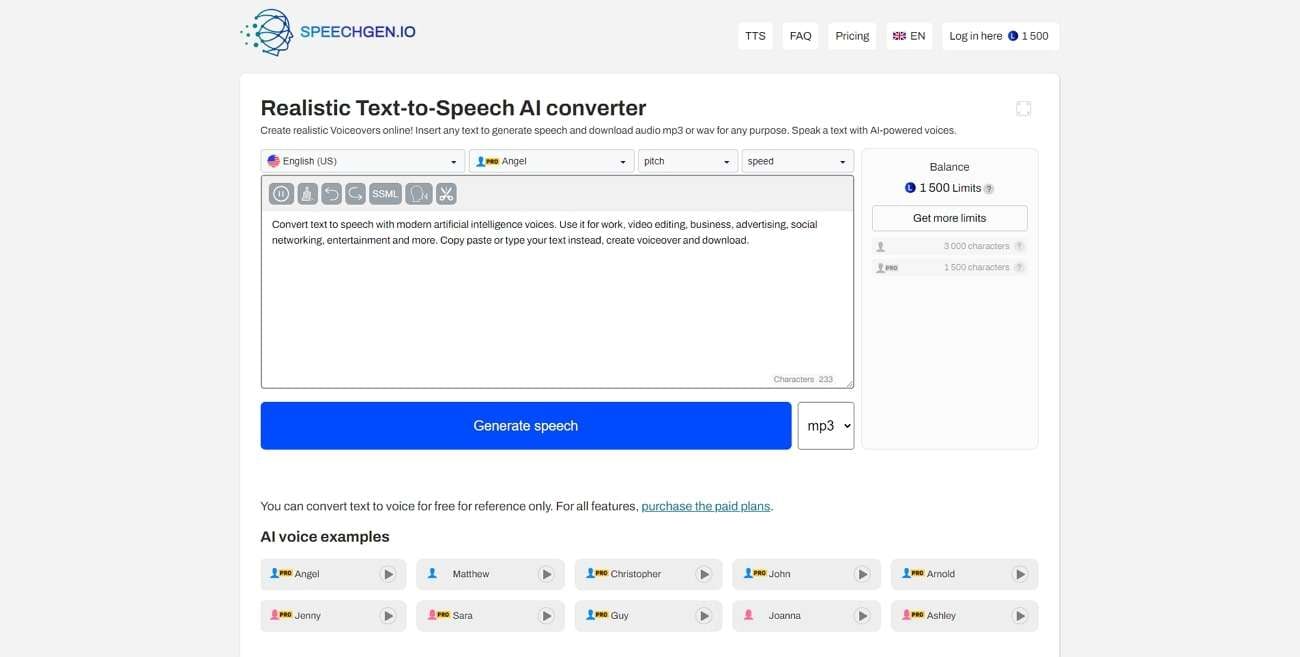
This innovativeVOCALOID software alternative holds the potential for generating realistic AI voices. Through this, we can create realistic quality voices without any pronunciation mistakes. It also supports various languages, such as Persian, Basque, Irish, Greek, Spanish, English, Gujarati, and more. You can also select the AI voice of your choice from the options of Bart, Guy, Eric, Jack, and more.
Before selecting the voices, you can also hit the play icon to preview them. Besides this, it also lets you manage the audio metrics as you can customize the pitch of audio through this. It also has several built-in pitch options, including -20, -16, -8, -4, +2, +18, +20, and many more. The speed of audio can also be customized through this tool.
Conclusion
As discussed in this article, you can useVOCALOID software to generate AI voices. You can find significantly descriptive information about this amazing tool in the above article. The features of VOCALOID6, along with compatibility and pricing, are also described above.
If you want to use this tool for generating AI voices, the steps are also mentioned above. The top 3 alternatives of VOCALOID6, which can help you generate realistic voices, are described above. If you need to learn about the tool with the most recommendations, the answer is Virbo.
The Most Recommended Natural AI Hindi Voice Generator
In this content-centric era, everyone needs a one-stop solution for their problems. The most effective medium to share content phenomenally is to convert the written text into listenable speeches. However, you can go with a popular language like Hindi to attract a broader audience.
The number ofHindi voice generator s is not limited. Yet, you need to use trust your important information with visionary tools. To help you, this article will discuss some of theAI Hindi voice generator tools. Continue reading to get into these tools without any delay.
Part 1: How To Select a Natural and Innovative AI Hindi Voice Generator
Before anything else, you need to know the factors that can help you select a persuasiveHindi voice generator . You may need to learn these profitable factors if you are new to the text-to-voice generation journey. For this reason, we will discuss some of the authentic points that will help you select the best tool. Look below to know these factors:
1. Quality and Pronunciation
First, you need to select a tool that can give you results in optimized quality. There is no rush to select anAI voice generator in Hindi . Look at the templates and exemplary content to learn about the quality of the voices. Moreover, you also need to ensure the tool can pronounce the Hindi words accurately.
2. Expression and Controls
The voices you are generating should have humane emotions touch in them. It should be capable enough to convey the emotions as per your need. Above all, you should be able to manage several audio metrics. This may include speed, pitch, and other metrics of the generated audio. This will make your AI-generated voices more natural and human-like.
3. Language and Feature Support
While selecting a tool, make sure you select the one that offers a wide array of language support. A good Hindi tool shouldn’t stop with the Hindi language. It should let you generate speeches in several languages to ensure flexibility.
In addition to this, always go with the tool that comprehends a wide array of features. With many features, you will be able to manage the audio and make it more personalized. It can also help in adding uniqueness to the AI-generated voices.
4. Integration and Adaptability
If the tool you are selecting supports integration, it can be beneficial for you. It should have well-documented APIs that can help you streamline your workflow efficiency. With this, you can ensure real-time collaboration with ease. You can also fine-tune it to make it adaptable as per your need.
Part 2: The Free Hindi AI Voice Generator To Convert Text into Realistic Hindi Voice
As mentioned above, there are a considerable number ofHindi AI voice generator tools. Getting confused about selecting the best one is possible. You can rely on the tools introduced here to cater to this issue.
1. Virbo
Getting started with the most reliable and recommended tool is a wise choice. Virbo is a premium-gradeAI Hindi voice generator . Through Virbo, you can also add a human touch to your voices to make them more listenable. It can help you in making speech-integrated videos on diversified topics. This may include educational, explainers, campaigns, and more.
Above all, it also supports multi-lingual support and has 120+ languages. You can also select the gender and attire for the AI Voices. It has 2 Hindi voices which you can use as per your need. You can also add text of your choice, and it can efficiently convert it into natural speech.
Get Started Online Free Download
Key Features
- Virbo offers cross-platform support, where you can use its single premium account on multiple devices.
- With the AI script feature of Virbo, you can generate scripts on any topic and use them to make videos directly.
- Virbo offers 150+ human avatars, which you can select based on age or ethnicity. You can also use the avatars for commercial purposes.
- In Virbo, you can find endless commercial stock. This includes over 180 templates and royalty-free music files.
Compatibility
- Online
- Windows
- Android
- iOS
2. Murf.AI
With over 5 Hindi voices, thisvoice maker Hindi never fails to amaze users with its higher functionality. It incorporates revolutionary working metrics which can help you in getting desirable results. Before selecting the voices, you can tap the preview button to ensure it is what you need. It also lets you add more depth and intonation to the speeches to make them more effective.
You also got an opportunity to customize pitch, speed, or add pause anywhere you want. Once satisfied with the output, you can export the TTS in MP3, FLAC, AAC, and other formats.

Key Features
- You can edit or change the gender of the voice you are selecting and can also create a custom voice for your brand.
- It also supports many other languages, such as Dutch, Turkish, Japanese, Romanian, Finnish, Italian, and more.
- AI has the potential to create pitch-perfect voice videos, which you can use in voice-over videos and songs.
Compatibility
- Online
3. Notevibes
NotevibesHindi voice generator has 4 Hindi voices for creating Hindi speeches. This amazing tool allows you to create quality-oriented speeches by adding intuitive text. You can also customize the playback speed as per your requirement. Above all, you can preview and listen to the voice to ensure efficiency.
Moreover, it has 200+ natural-sounding voices, which is more than enough. Other than Hindi, there are 25 other languages that you can use to create speeches with flexibility.

Key Features
- With Notevibes, you can add pauses in the speech and change its pitch or speed.
- It also helps the users to save the audio file in MP3 or WAV formats with lossless volume control.
- You can redistribute the audio files, track audio conversion history, and ensure SSML tag support.
Compatibility
- Online
4. Synthesia
Synthesia also ranks higher in the AIHindi voice-over generators list. You can also use its built-in Hindi voices in both male and female gender. Whether you want to access Hindi melodic, animated, casual, conversation, or friendly voices, this tool can help you.
It comprehends 8 Hindi-based voices, which is more than enough for the users. Along with selecting the voices, you can add narrators to make speeches more engaging.
Key Features
- There are over 85+ AI presenters in it, through which you can make effective videos.
- You can customize the pre-built avatars and access 55-plus templates to make effective videos.
- Both AI Avatars and AI Voices are natural in Synthesia, so you can use them even professionally.
Compatibility
- Online
5. PlayHT
This tool can help you in converting plain text into Indian Hindi without facing any issues. There are two types of voice qualities in it, such as Standard voices and Premium voices. Other than this, you can also play these realistic voices to get a preview. For adding text, you can either import the text or write text in real time.
PlayHT has the potential to generate high-quality voices to accelerate productivity. You can even create podcasts or YouTube voice-over videos with this.
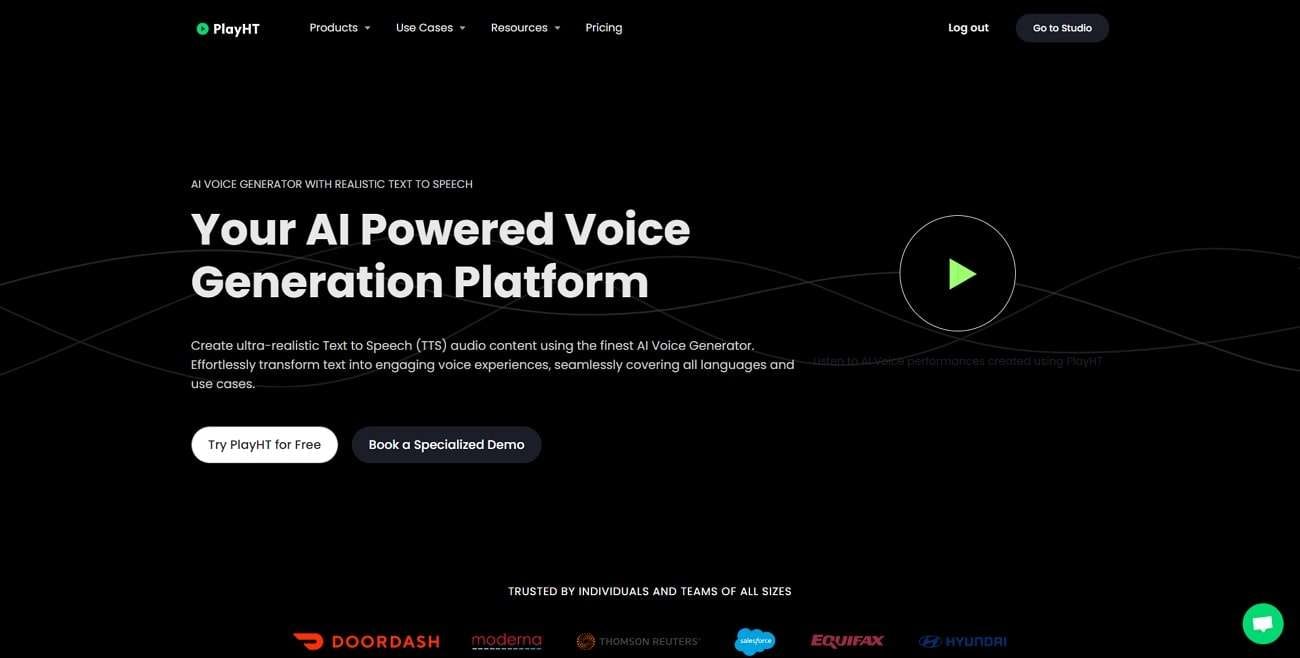
Key Features
- It has over 800 AI Voices and 100+ languages through which you can generate unique speeches.
- You can also edit through audio comments with this amazing quality tool. Managing audio frequencies is also possible with this.
- This tool can potentially create voice clones in unparallel quality along with 99% accuracy.
Compatibility
- Online
Conclusion
Considering everything, it can be said that you can use thefree Hindi voice-over generators for converting text into Hindi through this. You can make speeches accessible to a huge array of users. However, you need to ensure you are selecting the best tool for this purpose.
You can follow the preventive and mindful tool selection factors discussed above to select the tool. Some of theHindi voice generator tools are also discussed above. If you want to know the tool with the most recommendations, the answer is Virbo.
How To Start a Private Live Stream on YouTube
In today’s digital age, live streaming has become a powerful tool for connecting with audiences in real-time. This method has especially been crucial for businesses looking to get into live selling or gamers wanting to stream their games. But say, for example, that you want to keep your stream private, accessible only to select viewers; how do you do that?
Here’s where private live streaming comes in. This option allows you to share your content with specific individuals, ensuring a more intimate and controlled environment. This guide will teach you how to set upprivate YouTube streams and give you special tips to let AI help you with your streams with Wondershare Virbo.

Part 1: What Do You Need To Get Started With YouTube Private Live Streaming?
Before diving into the exciting world of private live streaming, here is the equipment to ensure a smooth and seamless experience.
- YouTube account. First things first, you’ll need a YouTube account. This is your gateway to the platform and your key to unlock the world of live streaming.
- A capable PC. Next, prepare your PC and the command center for your private stream. While specific requirements vary depending on the complexity of your stream, here are some general recommendations:
- Processor: Intel Core i5 or equivalent (or newer)
- RAM: 8GB or more
- Graphics Card: Dedicated GPU recommended for enhanced performance
- Internet Connection: A stable and fast internet connection with sufficient upload bandwidth (consider at least 3 Mbps for standard definition)
- A streaming tool. Now, you’ll need a streaming tool to capture your video and audio and send it live to YouTube.Wondershare Virbo is recommended, especially for live-selling purposes. Other options include OBS and similar stream apps for other purposes.
With these essential elements in place, you’re on your way to launching your private YouTube adventure.
Part 2: How To Start a Private YouTube Live Stream?
Ready to share your talents or ideas with a select audience? Dive into the steps to create aprivate live stream on YouTube by following the guide below. It’s pretty straightforward.
- Step 1: Access YouTube Studio.Head to your YouTube Studio page (studio.youtube.com) and log in using your Google account linked to your YouTube channel.
- Step 2: Prepare for live streaming**.** ClickCreate in the top left corner of the Studio dashboard, and selectGo Live from the dropdown menu. Alternatively, click the camera icon next to your profile picture and chooseGo Live.

- Step 3: Now, set your visibility. Before starting your broadcast, ensure your stream is private. Under theVisibility setting, click the dropdown menu and choosePrivate . This option restricts viewership to individuals you specifically invite.

- Step 4: There are two methods existing for inviting viewers:
- Email Invitations: Click onShare Privately and enter the email addresses of individuals you wish to grant access. You can also choose to notify them via email.
- Link sharing: Although not recommended for complete privacy, you can copy the stream link and share it directly with trusted individuals. Remember, anyone with the link can access the stream, even uninvited guests.

- Step 5: Once everything is set and your viewers are invited, clickGo Live to launch your private YouTube stream. Remember, only invited individuals using their YouTube accounts can view your content.
Additional Tips for Private YouTube Live Streams
Here are some additional tips that you can follow before starting aprivate YouTube stream :
- Test streaming. Consider using a test stream before inviting viewers to ensure everything runs smoothly.
- Giving guidelines to your viewers. Encourage guests to use their YouTube accounts for optimal viewing experience and security. Further, you can add house rules, especially for more intimate streams or live selling/auctions.
- Exploring advanced privacy settings. Explore advanced privacy settings within YouTube Studio for further control over viewer permissions.
- Using AI . Tools like Wondershare Virbo can help integrate AI into your private YouTube streams. This way, you won’t always have to glue your eyes on your stream. Discover more about this feature in the following section.
By following these steps and keeping privacy in mind, you can effectively host engaging live streams on YouTube, connecting with your chosen audience in a controlled and intimate setting. Remember to personalize your content, interact with your viewers, and enjoy the unique experience of private live streaming.
Part 3: Breaking the Limitations of Live Streams With Wondershare Virbo
Live streaming constantly evolves, offering creators new ways to connect with audiences. While traditional live streams require your physical presence, imagine having an engaging and interactive stream running 24/7, even when you’re not there. This is great, especially forprivate YouTube streams , where the need to engage the select viewers becomes more apparent.
EnterWondershare Virbo , a revolutionary tool that leverages AI to create realistic and captivating live streams around the clock.
Introducing Wondershare Virbo
Gone are the days of relying solely on manual effort to keep your audience engaged. Virbo Live transcends these limitations, offering:
Get Started Online Free Download
- 24/7 content delivery. Whether taking a break or focusing on other tasks, Virbo Live ensures your stream continues with AI-powered content, keeping viewers entertained and informed.
- Virtual host template library. No more scrambling for guest hosts or struggling with solo presentations. Virbo Live’s diverse library of 150+ customizable AI avatars can be your virtual co-host, presenter, or even a captivating character, interacting with viewers, answering questions, and conducting interviews.
- Content creation is made easy with templates. Forget starting from scratch. Virbo Live provides 180+ professionally designed video templates across various themes and styles, saving you time and effort. Plus, enjoy a library of royalty-free music to add the perfect soundtrack.
- Engaging AI voices. Bring your content to life with 120 AI voices, offering a variety of tones and accents, ensuring your message resonates with a global audience.
Integrating AI into Your Live Stream
Adding Virbo Live to your existing setup is simple and intuitive. Add Virbo as a live OBS window and use the YouTube stream key. Here’s a step-by-step guide:
- Step 1: InstallWondershare Virbo or access the web app.
Get Started Online Free Download
- Step 2: ClickCreate a Blank Livestream Room to customize your stream’s interface.

- Step 3: Choose from templates, backgrounds, AI avatars, and stickers to create a visually engaging environment.

- Step 4: UnderScript Lines , write the script your AI host will deliver throughout the stream. UseAI Interaction to set responses for specific questions andHuman interaction for actual responses from your end.

- Step 5: Once everything is set, clickStart Livestream and connect it to your preferred platform through OBS. Paste your streaming key for seamless integration.
Use-Cases for Wondershare Virbo and Private YouTube Live Streaming
Virbo Live empowers you to explore new avenues in content creation. Imagine using it for:
- E-commerce shopping. Showcase products with AI hosts demonstrating their features and answering customer questions in real-time, even outside business hours.
- Educational live tutorials. Host interactive learning experiences with AI tutors delivering engaging lectures and responding to student inquiries.
- Live Q&A sessions. Let your AI host manage large-scale Q&A sessions and field questions and keep the conversation flowing smoothly.
With Wondershare Virbo Live, the possibilities are endless. Unleash your creativity, explore new ways to connect with your audience, and experience the power of 24/7private YouTube streams . Remember, this is just a starting point – personalize your content, experiment with different features, and discover the unique potential Virbo Live brings to your streaming journey.
Conclusion
In today’s digital age, live streaming has become a powerful tool for connecting with audiences in real-time. YouTube live streaming offers a versatile platform to share your passions and connect with a select group of viewers. This article has guided you through setting up aprivate live stream on YouTube , ensuring your content reaches only your guests.
Remember, key considerations include enabling private streaming within YouTube Studio, inviting viewers via email or link sharing, and personalizing your content to create an engaging experience. If you want to take your live streams to the next level, consider Wondershare Virbo, a user-friendly tool designed to simplify private live streaming on YouTube with the help of AI.
Material Preparation | Virbo AI Live Stream
Material Preparation for Live Streaming
Elevate your content and captivate your audience effortlessly with our comprehensive insights. Dive into the details for a seamless and professional live-streaming experience.
By meticulously preparing these materials, you are setting the stage for a captivating and interactive digital live-streaming experience. Get started now!
Live Streaming Script
1 Word Count: Suggested minimum of 5,000 words, with a maximum limit of 50,000 words.
2 Live Script Framework Reference: Structure each round with “Interactive Dialogue + Company Introduction + Product Introduction + Promotion Dialogue + Closing Dialogue” and script multiple rounds.
Greeting Dialogues
1 Craft authentic greeting dialogues to establish a more genuine live-streaming atmosphere and enhance interactive engagement.
Q&A Dialogues
1 Prepared Q&A dialogues ensure timely interaction with users when questions arise during the live stream, enhancing retention and conversion in the live stream room.
Product Images or Videos
1 To provide audiences with a better understanding of the products, it is advised to prepare clear product usage videos or images to create an immersive experience.
Live Stream Room Background
1 Please upload images or videos in a 9:16 ratio.
2 Image formats supported include JPG/JPEG/PNG, and video formats supported include MP4/MOV.
3 The maximum duration for video backgrounds is 30 minutes, with a file size limit of 1GB.
Also read:
- In 2024, Top 5 AI Voice Generators Online (Supports All Browsers)
- Updated In 2024, Best Live Streaming Platforms To Engage Audiences and Increase Viewership
- In 2024, Device/Network/Browser Requirements
- The Best Text-to-Video AI Generator Tools Alternative to Sora for 2024
- Ultimate Guide How to Live Stream on Facebook for 2024
- Updated Create AI Avatar Video with Template | Wondershare Virbo
- New Best 7 Whiteboard Explainer Videos to Inspire You
- Best 10 Free Video Translators to Mitigate Translation Risks
- 2024 Approved Becoming a Pro in TikTok Live Shopping Your Complete Guide
- New In 2024, Video Translator | Wondershare Virbo Online
- 2024 Approved Introduction of Wondershare Virbo
- Updated Top 5 AI YouTube Shorts Generators to Create Diverse and Engaging Videos
- New In 2024, Top 8 Multi-Subtitles Translators You Can Use
- New 2024 Approved What Is an AI Video Generator? | Wondershare Virbo Glossary
- In 2024, Create AI Avatar Video with AI Avatar | Wondershare Virbo Online
- 2024 Approved Easy Tutorial How to Record and Send Talking Emoji for iPhone
- In 2024, What Are AI Tools? | Wondershare Virbo Glossary
- New 2024 Approved What Is an AI Tool? | Wondershare Virbo Glossary
- Updated 2024 Approved What Is an AI Video Generator? | Wondershare Virbo Glossary
- New In 2024, 7 Best Real Time Video Translation Apps
- What Is AI Voice Over?
- Top 5 TikTok Voice Generators You Should Try for 2024
- New In 2024, Material Preparation
- Updated How to Make Animated Explainer Videos
- Updated Top AI Rap Voice Generators Upgrade Your Rap for 2024
- New In 2024, Easy Guide How To Make Talking Head Videos
- Guide Learning the Right Ways To Start Facebook Live Shopping for 2024
- Updated How To Reach More Users by Using Instagram Live Shopping for 2024
- New Best Options Top Live Streaming Platforms According to Types
- New Narakeet Review Text to Speech Convenient Voice Maker
- Updated 2024 Approved Top 10 Talking Photo Online Tools You Have To Try
- New AI Translation | Wondershare Virbo Online
- Updated How to Create Marketing Videos, In 2024
- Updated Real-Time AI Voice Changer Revolutionizing Communication for 2024
- New Generate Video with Talking Photo Feature
- Google Translate Video A Complete Guide To Translate Video With Google
- Top 7 Video Language Converter Online Free
- Updated In 2024, How to Translate Instagram Videos for Global Engagement
- New 2024 Approved Easy Guide How To Make Talking Head Videos
- Updated Exploring AI Face Generators | Wondershare Virbo Glossary for 2024
- 2024 Approved Introduction | Online
- New Maximizing Yandex Translate in Video Translation and Beyond for 2024
- New Power of AI Thumbnail Generators for 2024
- Updated 2024 Approved What Is Talking Avatar?
- New How To Generate Speech From Text | The Best Text-to-Speech Converters
- Updated In 2024, Top 5 AI YouTube Shorts Generators to Create Diverse and Engaging Videos
- Updated Realistic AI Avatars
- In 2024, How to Unlock Apple ID Activation Lock On iPhone SE (2022)?
- In 2024, Top 5 Car Locator Apps for Samsung Galaxy F54 5G | Dr.fone
- Additional Tips About Sinnoh Stone For Realme Narzo N53 | Dr.fone
- Additional Tips About Sinnoh Stone For Motorola Moto G24 | Dr.fone
- Solved Warning Camera Failed on Poco X5 Pro | Dr.fone
- How to recover lost data from Motorola Moto G Stylus 5G (2023)?
- 5 Hassle-Free Solutions to Fake Location on Find My Friends Of Honor 90 Pro | Dr.fone
- What You Need To Know To Improve Your Itel S23 Hard Reset | Dr.fone
- What is Geo-Blocking and How to Bypass it On Samsung Galaxy A54 5G? | Dr.fone
- In 2024, 2 Ways to Transfer Text Messages from Motorola Moto G24 to iPhone 15/14/13/12/11/X/8/ | Dr.fone
- In 2024, The Ultimate Guide to Get the Rare Candy on Pokemon Go Fire Red On Samsung Galaxy A14 5G | Dr.fone
- Open and Repair Doesnt Work in MS Excel
- How To Transfer WhatsApp From iPhone 11 Pro to other iPhone 11 Pro devices? | Dr.fone
- How To Restore a Bricked Motorola Moto G73 5G Back to Operation | Dr.fone
- How Can I Catch the Regional Pokémon without Traveling On Xiaomi Civi 3 | Dr.fone
- In 2024, 5 Ways to Transfer Music from Motorola Moto G24 to Other Android Devices Easily | Dr.fone
- In 2024, Hacks to do pokemon go trainer battles For Oppo Reno 8T 5G | Dr.fone
- In 2024, What Pokémon Evolve with A Dawn Stone For Asus ROG Phone 7 Ultimate? | Dr.fone
- New Multiple Ways How To Remove iCloud Activation Lock On your Apple iPhone 12
- Complete Guide to Hard Reset Your Vivo V27e | Dr.fone
- The Updated Method to Bypass Vivo V30 FRP
- Bypass Tools to Bypass Lock Screen(14 Pro)
- In 2024, Unlock Apple iPhone SE (2020) With Forgotten Passcode Different Methods You Can Try | Dr.fone
- Issues playing MOV videos on Samsung Galaxy Z Fold 5
- Troubleshooting Guide How to Fix an Unresponsive Itel S23+ Screen | Dr.fone
- Getting the Pokemon Go GPS Signal Not Found 11 Error in Tecno Camon 20 | Dr.fone
- The 10 Best Tools to Bypass iCloud Activation Lock On iPhone 6 You Should Try Out
- 7 Solutions to Fix Chrome Crashes or Wont Open on Vivo Y100t | Dr.fone
- Easy Guide How To Bypass Nokia C300 FRP Android 10/11/12/13
- 5 Ways to Restart Vivo X100 Without Power Button | Dr.fone
- In 2024, Three Ways to Sim Unlock Nokia C210
- 6 Fixes to Unfortunately WhatsApp has stopped Error Popups On Tecno Spark 10 4G | Dr.fone
- In 2024, Unlock Your Vivo V29 Pro Phone with Ease The 3 Best Lock Screen Removal Tools
- In 2024, Detailed guide of ispoofer for pogo installation On Realme 10T 5G | Dr.fone
- Title: Best 5 Udemy Subtitle Translator (Auto Translation)
- Author: Sam
- Created at : 2024-06-23 02:57:10
- Updated at : 2024-06-24 02:57:10
- Link: https://ai-voice-clone.techidaily.com/best-5-udemy-subtitle-translator-auto-translation/
- License: This work is licensed under CC BY-NC-SA 4.0.
