
:max_bytes(150000):strip_icc():format(webp)/Nightbooks-93aa15da6f37406fa34e8c155b1067b3.jpg)
2024 Approved Unveiling the Secrets of Shopee Livestream Selling System
Unveiling the Secrets of Shopee Livestream Selling System
Live videos are becoming crucial for promoting and selling stuff in today’s online market. This trend is especially prevalent in Southeast Asian countries like China, Singapore, and Malaysia. People in these regions utilize live-streaming platforms and tools to promote their products. This guide explores one of these platforms called**Shopee Livestream .
We will explain how Shopee’s live videos work to help you create content that will interest people. Keep reading to learn how to be aShopee live seller to sell things better with this platform and other live-streaming tools.

Part 1. A Review on Shopee Livestream: Learning the Basics
Shopee offers a platform for sellers to host interactive video streaming sessions within its app. This feature lets sellers connect with their audience in real-time to build a stronger bond. It is functional in the Philippines, Indonesia, Thailand, and other Southeast Asian countries. With millions of active users on this forum, sellers have the opportunity to boost sales.
Through this platform, users can get their orders delivered to their door without paying any extra shipping fees. This shopping platform allows you to talk directly to sellers while you shop. You can enjoy fun playing games and free stuff for an exciting shopping experience. Also, sellers and buyers get safe payment choices to ensure reliability.

Live Shopping Features Available on Shopee
With Shopee’s live-streaming service, there are many cool features to improve online shopping. Let’s explore the features oflive selling in Shopee to see how this platform works:
- Livestream call lets the host answer viewer questions and stream with others using audio or video.
- It has business insights that show live stream data to improve your live selling based on clicks and orders.
- Different prize popups throughout the stream encourage viewers to follow your shop.
- The orange bag icon lets the host show products during the stream.
- Hosts can open a sharing panel to share the live stream on Instagram, WhatsApp, or Facebook.
It’s essential to note that you also need to use the smartphone app to operate theShopee live show fully. This way, you can get a seamless and optimized experience across Shopee. It makes it easy to watch live streams and buy/sell things whenever you want.

Part 2. Some Basic Guidelines To Perform Live Shopping in Shopee
When startinglive shopping at Shopee , it is essential to follow the rules to have a good time. This means you have to do what Shopee says when you’re selling things or buying them on the platform. Let’s explore theseguidelines to ensure a better shopping experience:
- You can only add up to 500 products to the orange bag during one livestream.
- Sellers can’t use phrases like “Add to Orange Bag” or “Send PM” to share links. It is prohibited during the stream or on social media outside the Shopee app.
- If you have multiple shops, each shop needs its livestream. Also, ensure the items you promote fit within the live stream frame.
- Do not upload content with sensitive information, harassment, or cyberbullying.
- Users can’t use music they don’t own the rights to during their live shopping. Instead, you should use music that is free for anyone to use.
- You can rearrange the products and edit details like price discounts before you go live.
Part 3. The Simple Guide to Using the Live Shopping Service of Shopee
With the rise of online shopping, Shopee streamlines the process for its users. Users can performlive selling in Shopee through mobile apps and desktops. The friendly interface allows you to showcase things in real-time. Let’s discuss a step-by-step guide to elevate your online shopping experience.
Steps of Live Shopping in the Shopee Mobile App
Before starting the process, download the Shopee mobile app on your smartphone. Afterward, pass the eligibility test for being the seller. Next, you need to prepare the required equipment to go for a livestream. To start your Shopee Live, you can follow these steps.
- Step 1. After launching the app on your phone, head to the “Me” tab. Within this tab, press the “Live Streaming” option and then tap on the “Create Stream” feature.

- Step 2. In the upcoming screen, tap “Add a Title” to type in the label. You can also add a description as desired. Next, click the “Add Cover” button below the shopping bag to upload an image of 500x500. Then, hit “Add Related Products” to feature the desired products during a live session.

- Step 3. Once you’ve made changes, press the “Next” button at the bottom. This action will give you a 3-second preview of your video. Proceed by clicking on “Go Live” to stream your video. Now, all your followers get a notification to join the session.

Steps of Live Shopping on Shopee Live Desktop
In addition to the mobile app, you can also utilizeShopee live commerce on your Desktop. In the following section, you’ll find detailed instructions for live streaming on PCs:
- Step 1. First, launch your livestream software, such as OBS, on your desktop. Then, make the required changes for live streaming in the tool settings.
- Step 2. Then, head to the Shopee Live website and sign in with your relevant country page. To create streaming, provide all the details, including the cover photo and title. Now, hit the “Add Related Products” button to insert your desired ones in a live stream. Finally, click the “Next” button to proceed with this livestream generation.

- Step 3. Upon reaching a new window, copy the generated link and Stream key through the app and paste it into OBS. This facilitates the transition of streaming between the software and the Shopee website. After adjusting the settings, select the “Go Live” button to start showcasing your products.

Part 4. Make Livestreaming Selling Efficient With Wondershare Virbo Live
LikeShopee’s live selling tool, many other platforms offer live shopping. However, not all of them provide the comprehensive features needed to set up livestream events across multiple channels. This is whereWondershare Virbo Live stands out. It offers an all-in-one solution to manage a livestream selling system online with exclusive tools. Users can benefit from its ability to carry out continuous 24/7 broadcasting without interruptions.
Its AI-driven avatars or VTubers reduce the dependence on large human teams. You can customize your own AI avatar in different outfits and poses to build a unique identity. The customizable feature of the Q&A repository responds to customer’s queries quickly to engage them. Its compatibility with social platforms makes it the perfect tool to create videos to sell across any platform.
Features of Wondershare Virbo Live You Should Consider
- AI translation allows users to talk to viewers in their preferred language without a language barrier.
- You can also utilize AI for script generation to create interactive live streams.
- Users can simply write text or speak during the live stream to stimulate the AI streamer to respond accordingly.
Get Started Online Free Download
Steps of Creating a Stream Room via Wondershare Virbo Live
If you want to optimizethe Shopee live stream, Wondershare Virbo Live can help you with its diverse features. Here are the simple steps to follow for boosting sales through AI-generated avatars:
- Step 1. Get the Tool Online To Create a Blank Livestream Room
First, access the Wondershare Virbo Live website online to enter the primary interface. Now, hit the “Create Stream Room Now” button from the left side to enter a new window. Here, head to the top and press the “Create a Blank Livestream Room” button.

Get Started Online Free Download
- Step 2. Pick and Personalize Your Preferred AI Avatars and AI Backgrounds
In the next step, you’ll be directed to a new window. Click on the “AI avatars” tab, which opens a dialogue box. You’ll find presets of avatars to choose from according to your needs. Afterward, switch the tab by tapping “Background” to modify the product’s outlook. Also, add “Stickers” according to the promotion you are offering against your product.

- Step 3. Generate Scripts for Your Livestreaming Session
After picking the avatar and background, locate the text box on the left side of the window. Now, type in the preferred text or utilize AI-generated scripts. Conversely, you can also use the services of “Human Interaction,” where you only have to add a microphone for live interaction in the “Microphone” section.

- Step 4. Initiate Live Streaming To Display Your Products on Any Platform
Once you’ve made your desired changes, hit the “Start livestream” button from the top right. By doing so, you can livestream on your preferred platform, such as Shopee.

Conclusion
All in all,Shopee’s live selling is changing how businesses reach customers. Throughout the article, we provide you with a genuine review of Shopee and how it operates. However, to streamline your livestreams, you need an AI tool like Wondershare Virbo Live. It is perfect for businesses looking to boost their sales through engaging live streams.
Create AI Avatar Videos | Wondershare Virbo Online
Create AI Avatar Videos
To begin crafting your AI avatar video, simply click the “Create Video” button found on the homepage.
Step 1. Create a Project
Click “Create Video” to start creating a new video.
![]()
Create a Project
Choose your preferred video aspect ratio: opt for a landscape or portrait video, depending on your requirements. Then, click on “Create Video.”
![]()
Choose Aspect Ratio
Step 2. Choose Avatar & Voiceover
After entering the user interface, select “Avatars” to choose an AI avatar for your video. Click on the displayed avatar on the screen, and an action bar will appear on the left side, allowing you to customize the style and placement of your video persona.
![]()
Choose Avatar
Input the text you plan to include in the video. You can modify the avatar’s speed, pitch, and volume using the controls displayed on the right-hand side.
![]()
Play Scripts
Step 3. Edit Video
You can also modify the background, select text style, or add adorable sticker to the video.
![]()
Edit Video
Moreover, click on “Music” to select the soundtrack for your video. You can choose from extensive music library and customize the volume to suit your preferences.
![]()
Choose Background Music
Step 4. Export Video
When you’ve achieved the desired video effect, simply click on the “Export” button to generate your video. This straightforward process results in the creation of a brand new video featuring the Virbo AI avatar.
![]()
Export Video
Exploring AI Face Generators | Wondershare Virbo Glossary
Part 1. Understanding AI Face Generators
AI face generators are at the forefront of cutting-edge technology, enabling the creation of remarkably authentic and diverse facial images through the ingenious application of deep learning techniques. At the heart of these generators lie concepts like Generative Adversarial Networks (GANs) and Convolutional Neural Networks (CNNs), which synergize to produce digital faces indistinguishable from real individuals’ photographs.
Deep Learning Techniques At the core of AI face generators are GANs, a revolutionary approach to artificial intelligence. GANs consist of two neural networks the generator and the discriminator. The generator crafts synthetic images while the discriminator assesses them for authenticity. Through a cyclic process of creation and evaluation, these networks continuously improve, resulting in ever-more convincing faces.
Data Dynamics A diverse and comprehensive dataset of facial images serves as the training ground for AI face generators. This dataset encompasses faces of different ethnicities, ages, genders, and expressions, allowing the generator to grasp the subtleties contributing to an authentic appearance. Preprocessing techniques, like normalization and augmentation, refine the data, ensuring consistency and enhancing the generator’s ability to create coherent faces.
The Latent Space The concept of a “latent space” is pivotal to the functioning of AI face generators. A latent space represents a multi-dimensional area where vectors carry information that the generator transforms into facial features. By skillfully navigating this space, the generator can produce an array of facial characteristics, ranging from the eyes’ shape to the lips’ curl.
Part 2. Four Key Components of AI Face Generators
AI face generators are complex systems that harness deep learning capabilities to craft lifelike facial images. Understanding their key components is essential to appreciating how these systems create convincing synthetic faces.
1. Generator Network
At the heart of an AI face generator is the generator network. This network learns to transform random noise or latent vectors into detailed and coherent facial images. The generator deciphers patterns in the latent space through layers of neural connections to generate different facial features like eyes, nose, and mouth. As the network refines its understanding through training, it becomes increasingly adept at producing realistic faces.
2. Discriminator Network
The discriminator network acts as the critic in the AI face generator setup. It learns to distinguish between authentic images and those generated by the generator. This adversarial dynamic between the generator and discriminator drives the overall improvement of the generated images. The generator strives to create images that can “fool” the discriminator into classifying them as accurate while the discriminator hones its ability to tell the difference.
3. Latent Space and Noise Vector
The latent space is a multidimensional mathematical space where the generator operates. It’s a representation of all possible facial features that the generator can create. A noise vector, often random values, serves as the starting point in the latent space. As the generator refines these noise vectors through its network layers, they transform into intricate facial characteristics, creating diverse and unique faces.
4. Loss Functions
Loss functions are crucial in training AI face generators, particularly in the context of Generative Adversarial Networks (GANs). The generator’s loss function encourages it to create images convincing to the discriminator. The discriminator’s loss function aims to correctly classify authentic and generated images. The interplay between these loss functions compels both networks to improve iteratively, resulting in increasingly realistic facial photos.
5. Training Data and Preprocessing
The quality of training data significantly impacts the AI face generator’s output. Diverse and representative datasets containing images of various ages, ethnicities, and expressions contribute to more realistic results. Preprocessing techniques like normalization and augmentation ensure consistency and enhance the generator’s capacity to generate coherent faces.
6. Styling and Customization
Advanced AI face generators can incorporate styling and customization options. These allow users to influence specific attributes of the generated faces, such as hairstyle, facial hair, or accessories. This customization capability enhances the generator’s versatility for various applications, from character design in gaming to creating unique avatars.
Understanding these key components provides insight into the inner workings of AI face generators. These systems leverage the interplay of networks, data, and mathematical spaces to achieve their remarkable ability to generate facial images that blur the line between natural and synthetic.
[Must-Read] Top 10 AI Realistic Avatar Generators
In this content-driven world, everyone needs to market their videos effectively. The AI avatar generators are the commonly used tools for this purpose. We aim to provide reliable information on AI avatar tools in today’s discussion.
You will discover the 10 top-rated tools for creating realistic-looking avatar videos in this article. Along with this, you will also get to know the benefits of using AI avatar creators. Thus, read this enriched article and get the information you wish to know.
Generate AI Avatar Online Generate AI Avatar Now Generate AI Avatar Now
Part 1: What is AI Avatar?
Day by day, the trend of creating AI avatar-integrated videos is increasing drastically. These avatars are making significant contributions to various videos. It is essential for businesses to keep up with the pace of technological incorporations. AI avatars are part of this tech revolution. You can represent your business and industry in several fields with the help of avatars powered by artificial intelligence.
In today’s world, AI avatars are human-like bots powered by technical AI algorithms. They also comprehend natural language understanding along with stimulation technologies. These avatars learn, communicate, and behave like humans. Moreover, they can also realistically mimic human expressions. You can get assistance from an AI avatar maker to create the best avatars.
These computer-generated characters can work like humans, and you can also use them as your virtual assistant. Other than this, there are several forms of AI-generated avatars. This may include voice assistance, chatbots, and animated characters. They are a true example of leveraging the powers of artificial intelligence.
Generate AI Avatar Online Generate AI Avatar Now Generate AI Avatar Now
Part 2: Benefits and Applications of AI Avatar Generators
You must be wondering why it’s important to use AI-generated avatars in videos. These avatars hold profitable benefits and can boost the productivity of your videos. To know more about the benefits and applications of avatars, jump below:
1. Realistic and Customizable Avatars
With AI avatar generators, you can create realistic-looking avatars. Moreover, several tools let you customize the avatars as per your needs and demands. You can also use avatars to represent your personality on virtual platforms. Accessibility, stimulation, and research inclusivity are also part of AI avatars.
2. Enhanced User Engagement and Personalization
AI avatars let you boost user engagement in several ways. You can personalize their impression and gestures and can build community with them. Besides this, you can also use avatars for social interaction along with personalized recommendations. It also helps in ensuring your personality is private and maintaining psychological well-being.
3. Diversified Industrial Applications
You can also get benefits from AI-generated avatars in multiple applications and fields. Marketing, customer support, and advertising are among the most common platforms for the usability of AI avatars. The avatars can also help you in teaching something new to other people.
Virtual conferences and events are also commonly taking assistance from AI avatars. Moreover, healthcare, communication, social media, marketing research, testing, fashion, and other e-commerce industries rely on avatars.
4. Virtual and Augmented Reality
AI-generated avatars hold significant potential when it comes to virtual and augmented reality. You can give an immersive, realistic experience to the users and make the user experience more upgraded. In addition to this, you can also stimulate guidance and manage meetings and conferences with this. Storytelling and entertainment are also part of this.
Part 3: Top 10 AI Avatar Generators in 2024
Many AI avatar generators claim to be the best when it comes to creating realistic avatars. However, you need to be aware of the best AI avatar generator tools. For this reason, this section will introduce and discuss the optimistically impressive tools for creating AI-generated avatars.
Top 10 AI Avatar Generators
1. Virbo
Virbo is an AI-powered AI avatar generator that you can use on several platforms. The interface of Virbo is quite aesthetic, along with the highlighted features and buttons. With this navigable interface, you can use Virbo without facing complexities. It also comprehends the blazing fast processing speed through which you can accomplish your task in minimum time.
It also offers 100 GB of cloud storage that allows users to store their projects. With this built-in cloud storage, you can also synchronize your projects into several devices. In addition to this, you can also export videos in 1080p quality with this.
Compatibility of Virbo
- Windows, Android, iOS
Key Features of Virbo
- As it supports all the major operating systems, you can use it on several devices without issues. You can also use its paid version on several platforms easily.
- This tool also integrates multinational AI avatars. You can also select avatars based on age and ethnicity.
- It also integrates the versatility of commercial stock and templates. You can select from 180 plus templates and royalty-free music.
- There is a diversified range of natural AI voices, which are present in more than 120 languages. This is also very helpful for using the text-to-speech feature.
- Virbo also shows incorporation with ChatGPT, which lets you use the script generator in the most advanced manner. Moreover, you can also optimize the script in its Windows version.
Pros
- It has 24/7 customer support, so you can get your queries solved at any time without issues.
- You can even create a 2-minute-long video by using this intuitive tool.
Cons
- The VIP assets are limited to the paid version, so you cannot use them without buying the premium version.
Generate Engaging
AI Video in Minutes!
Easily convert text into professional spokesperson videos in over 120+ voices & languages in minutes.
Generate AI Video Free Generate AI Video Now


2. Dawn AI – Avatar Generator [Android | iOS ]
Do you want to create your mesmerizing avatars? No worries because this AI Avatar tool lets you make realistic avatars of yourself. With this avatar AI generator, you can customize your avatar’s looks. Whether you want to have a vampire, curly, clown, mermaid, or cowboy avatar, this mobile can help you.
![]()
Compatibility of Dawn AI
- Android: 6.0 and above
- iPhone: 14.0 and above
Key Features of Dawn AI
- It has a huge array of avatar templates, and you can also search for the templates using keywords.
- You can also create avatars of yourself as the opposite gender. For example, a female can create a male avatar of herself.
- This app has an endless avatar style, often including anime, kodak films, fine art, impressionism, Pixar, and more.
Pros
- It creates avatars of optimized quality, and all the avatars created with this tool are riveting.
- It has a delightful user interface along with straightforward procedures. This is quite a beneficial thing for users.
Cons
- This app has a few bugs and sometimes works slowly. It can be a major lagging factor for the users.
3. Facetune – AI Photo/Video Editor [Android | iOS ]
With this premier-grade photo and video editor, you can generate optimized quality AI avatars without issues. Not only this, but it can also edit or retouch your media content. You can apply the effect to all the video frames by editing one frame. In addition, you can remove all the scars, blemishes, and spots from the face of the generated avatar.
![]()
Compatibility of Facetune – AI Photo/Video Editor
- Android: 7.0 and above
- iPhone: 14.0 and above
Key Features of Facetune – AI Photo/Video Editor
- With Facetune – AI Photo/Video Editor, you can reshape your face, add virtual makeup, and smoothen the skin.
- If you have any unwanted object, pet, or stranger in the photo, you can use this tool to remove that from the pictures and videos.
- It also lets you change your hair color in photos and videos. You can also enhance your selfies with its pro selfie editing feature.
Pros
- This AI avatar creator allows you to customize every bit of your picture and video visuals.
- There are tons of effects and filters in it which can make your media content more innovative and trendier.
Cons
- This app has uncountable irritating ads that can interrupt your workflow efficiency.
4. Photoleap – AI Art Photo Editor [Android | iOS ]
Using this innovative app, you can let your imagination run wild and create outclass AI avatars. Just add the text prompt on whatever you want, and it will create that for you. With this AI avatar maker, you can also turn your selfies into avatars. Moreover, it also lets you manage the style of the avatars. You can also animate yourself with paintings and cartoons.
![]()
Compatibility of Photoleap – AI Art Photo Editor
- Android: 8.0 and above
- iPhone: 15.0 and above
Key Features of Photoleap – AI Art Photo Editor
- Enhancing picture quality by adding refreshing colors and bright smiles is also possible.
- It has the potential to replace boring backdrops with attractive photos. You can also add 3D motions in the background.
- You can also use this feature to enhance the quality of old pictures and deblurring them effectively.
Pros
- You can also use this tool for transforming interior and landscape pictures into intuitive art.
- If you have a pencil sketch, you can convert it into real-life pictures without any issues.
Cons
- This app frequently crashes, especially when the load is quite heavy. So, you can face problems in this part.
5. Voi – AI Avatar Portrait Maker [Android | iOS ]
This is one of the most popular applications for creating AI avatars because you can even create a couple of avatars with this. It lets you work on multiple pictures to create and share art with the world. There are endless avatar styles in this, which gives you diversified options. You can even select the theme of your avatar from the options of hero, fantasy, anime, etc.
![]()
Compatibility of Voi – AI Avatar Portrait Maker
- Android: 7.0 and above
- iPhone: 12.0 and above
Key Features of Voi – AI Avatar Portrait Maker
- It accepts prompt instructions so you can write about how you want your avatar to look.
- Using this innovative tool, you can turn yourself into a movie or a video game character.
- Changing background as per the theme of the avatar is also a specialty of Voi – AI Avatar Portrait Maker.
Pros
- The interface of this tool is quite navigable, so you can use it without complications.
- It integrates the blazing fast processing speed through which you can turn pictures into avatars in a limited time.
Cons
- Some features are limited to the paid version, which can be a major limitation of Voi – AI Avatar Portrait Maker.
6. Arta – AI Art & Avatar Maker [Android | iOS ]
You can turn your ideas into reality using this pro-level AI avatar maker. It can turn prompt instructions into breathtaking pictures in no time. For making personalized AI avatars, you can also use your images. Moreover, it can also turn the sketches into Picasso-level paintings.
![]()
Compatibility of Arta – AI Art & Avatar Maker
- Android: 10.0 and above
- iPhone: 15.0 and above
Key Features of Arta – AI Art & Avatar Maker
- It can turn simple clips into outclass videos that blur the lines between reality and fantasy.
- There are tons of AI styles to choose from. You can go with the style that can express your true idea.
- The specialized AI art gallery never lets you get demotivated. By visiting this library, you can get inspiration from other artists.
Pros
- Not only humans, but you can also turn pictures of your pets into avatars.
- You can search for trendy styles, and if you like the style, click the Try This Prompt button to use it directly.
Cons
- This app sometimes compromises the quality of the AI pictures, so you cannot rely on it for professional use.
7. DemoCreator AI Avatar
Whether you want to create interactive presentations or YouTube videos, this tool can help you. You can create avatars that mimic your facial expressions and movements using this AI avatar creator. It also has tastefully designed AI models, so you do not have to invest much time in it.
![]()
Compatibility of DemoCreator AI Avatar
- Windows, Mac
Key Features of DemoCreator AI Avatar
- Using its video editor, you can modify your video to several extents. This includes resizing, cropping, splitting, merging, batch processing, and more.
- This tool can create presentations, online video courses, and live-stream presentations.
- It can also record screen, voice, webcam, and other things. You can also schedule recordings and draw on the screen.
Pros
- This tool can create market-level videos, and you can also highlight your professionalism through this.
- You can access this tool on various platforms like GoToMeeting, Google Meet, Skype, and more.
Cons
- Android and iPhone devices cannot download this software from Play Store or App Store.
8. Media.io AI Avatar Generator
Do you wish to create the most realistic-looking avatar of yourself? No need to worry because you can use this exceptional avatar AI generator. With this, you can create avatars from simple pictures in dozens of styles. Moreover, it also lets you manage facial expressions that fit your needs. You can create various avatars with it, such as Disney, Barbie, Simpson, Glacier Bay, and League of Legends.
![]()
Compatibility of Media.io AI Avatar Generator
- Online
Key Features of Media.io AI Avatar Generator
- It has several video tools, such as a watermark remover, video converter, video editor, etc. You can use them to make videos more proficient.
- The AI image enhancer lets you enhance the overall quality of an image without compromising its context and layouts.
- You can also remove the irritating backgrounds from the picture with its AI watermark remover.
Pros
- You can create avatars with this tool and compress their sizes without compromising the quality.
- The image sharpener lets you sharpen the quality of an image, and you can also use them to sharpen AI avatar pictures.
Cons
- It is an online based platform, so you cannot use it without any internet access.
9. Prequel – AI Avatar Editor [Android | iOS ]
Prequel – AI Avatar Editor is also a famous AI avatar generator. You can add several looks to one picture with the help of this tool. It also encompasses many templates that make your work easier than ever. Not only an avatar, but you can also turn your pictures into cartoons with this.
![]()
Compatibility of Prequel – AI Avatar Editor
- Android: 7.0 and above
- iPhone: 13.0 and above
Key Features of Prequel – AI Avatar Editor
- It has 800+ effects along with 30+ custom fonts. You can use the stock library of this app according to your desired goal.
- This app also supports D3D effects for creating the best pictures. You can also adjust the tune and contrast of your image.
- You can also create Giphy text and animated stickers. The built-in music can also help you in making media files more attractive.
Pros
- It lets you adjust and control every parameter of both photos and videos.
- You can create authentic intros with this and add retro effects without issues.
Cons
- Some users have complained that the developers are removing most of their favorite effects.
10. Fotor
This amazing AI avatar maker also holds its name higher in the list of avatars making tools. It has diversified professionally made avatars that can make your work easier. You can also use these avatars to represent your brand and services. In addition, it can create avatars on several domains, such as gaming and VTuber.
![]()
Compatibility of Fotor
- Online, Windows, Mac, Android, iOS
Key Features of Fotor
- By using Fotor, you can crop, sharpen, and resize images. It also helps you crop photos and add borders to them.
- You can also blur the background of the photos, merge images, and make intuitive colleges in no time.
- This tool can generate social media content such as Instagram posts, Facebook cover, etc.
Pros
- Fotor has several AI tools such as AI Art Generator, AI Face Generator, AI Image Generator, and more.
- With Fotor, you can make avatars in all domains. This may include movies, gaming, and other things.
Cons
- This tool can be pretty slow sometimes and compromise the users’ productivity.
Conclusion
To wrap things up, it can be said that you can take assistance from the AI avatar maker to create realistic avatars. In this article, we have discussed the top tools for creating AI avatars. You also discovered the compatibility, pros, cons, and features above. In short, using AI avatars can help increase your online presence and boost user engagement in no time.
Generate Engaging
AI Video in Minutes!
Easily convert text into professional spokesperson videos in over 120+ voices & languages in minutes.
Generate AI Video Free Generate AI Video Now
FAQs About AI Avatar Generators
1. How do AI avatar generators work?
The AI avatars work on artificial intelligence in addition to machine learning; It integrates large data sets to be trained upon. Several deep-learning models are utilized to train the avatars. After this comes the creation of 3D models that represent the visuals of avatars, the developer then works on fine-tuning the model and improvises details. Furthermore, refinement helps eliminate errors and mistakes.
2. What are the future prospects for AI avatars?
Regarding the prospect of AI avatars, it can be said that they are quite promising. Day by day, the avatars are enhancing personalization and details to understand user preferences. Emotional intelligence, along with multimodal interaction, is also getting refined. The AI avatars will also be able to work on several industry-standard applications and understand human emotions.
3. Are AI avatars capable of natural language processing?
Luckily, the answer is yes. The AI avatars have deep learning models that help them in training about how to process natural language. They also encompass an NLP technique that allows them to analyze the meaning and context behind the user statement. The avatars can interpret multiple forms of languages with increased accuracy and sophistication.
4. How do AI avatars improve customer service?
As you know, AI avatars can ensure 24/7 availability. This helps in having improved customer service along with reassuring prompts. Users can also get instantaneous responses from the AI avatars, enhancing scalability.
Best Video Language Changers to Make Your Videos Accessible
A language barrier can come between the videos or people due to not understanding the language. In this case, avideo language changer comes in. If you wisely choose the language changer, you can get accurate translations of videos. If you are searching for the best online video language changer, then this article is for you. We will suggest you the top 5 video language changers.
Part 1. Video Language Changers are Essential to Remove Language Barriers
Video language changers play an essential role in changing the audio of the video from its original language to another language. If you want to get the attention of a large audience, then you have to check their preferences.
1. Promote Your Brand Through Video Language Changer
Promotional videos are a great way to grab the attention of the viewers. A video can help sell services or products because we can transform it into various languages. Add voice-overs, subtitles, and captions to make it more accessible.
2. Add Subtitles to Your YouTube Videos
Subtitles also help people to understand the content of the video. They are best for deaf people who cannot listen to the conversation but understand it through captions or subtitles. YouTube provides the facility of a built-in subtitles option where users can select their desired language.
Part 2: Meet Wondershare Virbo – The Easiest Video Language Changer Ever
Are you looking for an all-in-one software that translates your video or provides a creative look to your video? No worries! Wondershare Virbo is here to assist you. It uses advanced artificial intelligence tochange video languages , or even generate engaging videos. It is an online tool, but also available for desktop or iOS/Android. You can translate your videos into more than 20+ languages.

Change Video Language Online Download APP Now Free Download
To change video languages, all you need is to go to the online interface of Virbo and upload your MP4 file. Select the original language of the video and your desired language for translation. It is simple to use, and you can use its features for free.
It also offers 300+ video templates that allow you to create engaging videos. If you are making a marketing video, then you can try the AI avatar features of Virbo. This feature enables you to select the gender, accents, tone, style, and language of the avatar.
This tool will help you to boost your creativity in creating videos and transforming them into a masterpiece. Whether you are a beginner, it assists you in effectively using the built-in templates and editing features.
Key Features of Virbo:
- It can translate videosinto 20+ languages, and breaks the language barrier easily!
- It offers to export Full HD formats such as MP4 or WebM.
- Convert your written text to speech in multiple languages. Virbo supports 120+ languages to transform your text into engaging audio.
- It provides a royalty-free stock of music that users can use in their videos without any hassle.
2.1: How to Use Wondershare Virbo Video Translator Online
How to translate videos online? Directly over the internet, using the Wondershare Virbo Online version. Here’s how to use Wondershare Virbo to translate videos online.
Step 1: Visit theWondershare Virbo Online website and, if you are not already signed in, click the Sign Up/ Login button at the top right. You will be asked to sign in with any of your login credentials for Google, Facebook, Twitter, or Apple ID. If you have a Wondershare Account already, use that, else sign in with any of those to associate that email and create a Wondershare Account.
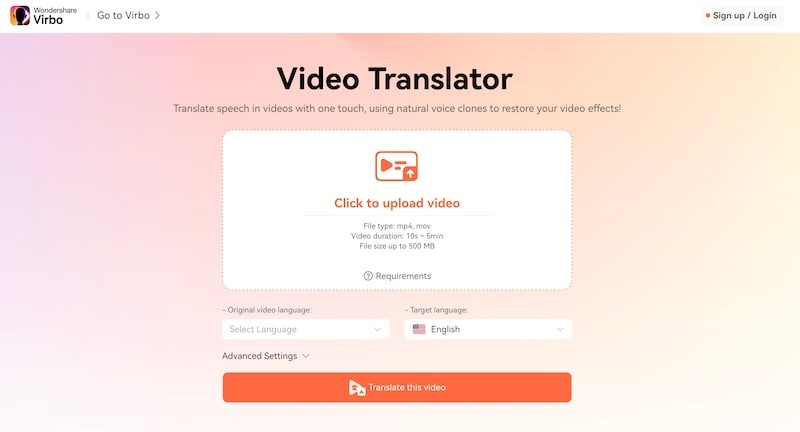
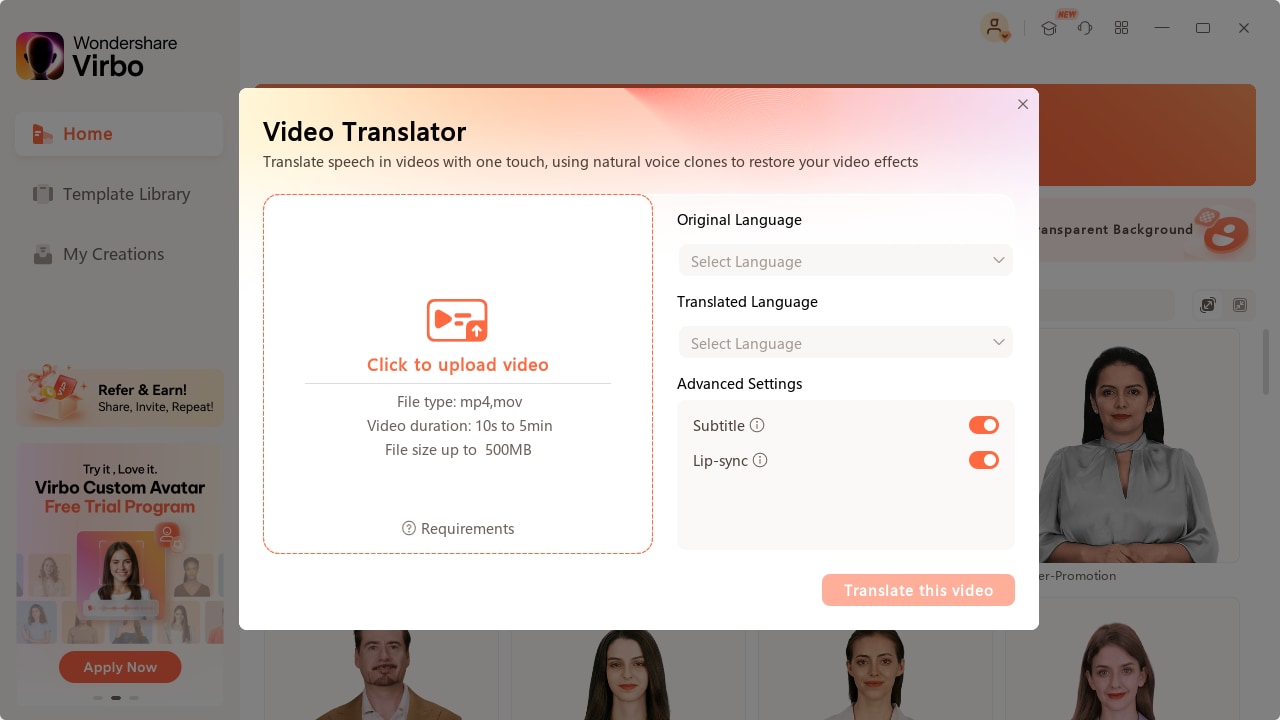
Step 2: Then, add a video, noting the input requirements mentioned. You can either drop the video into the app or click to add. Select the original language and the language you want to translate into.
Step 3: Click Translate and when the video is translated, you can save it to disk.
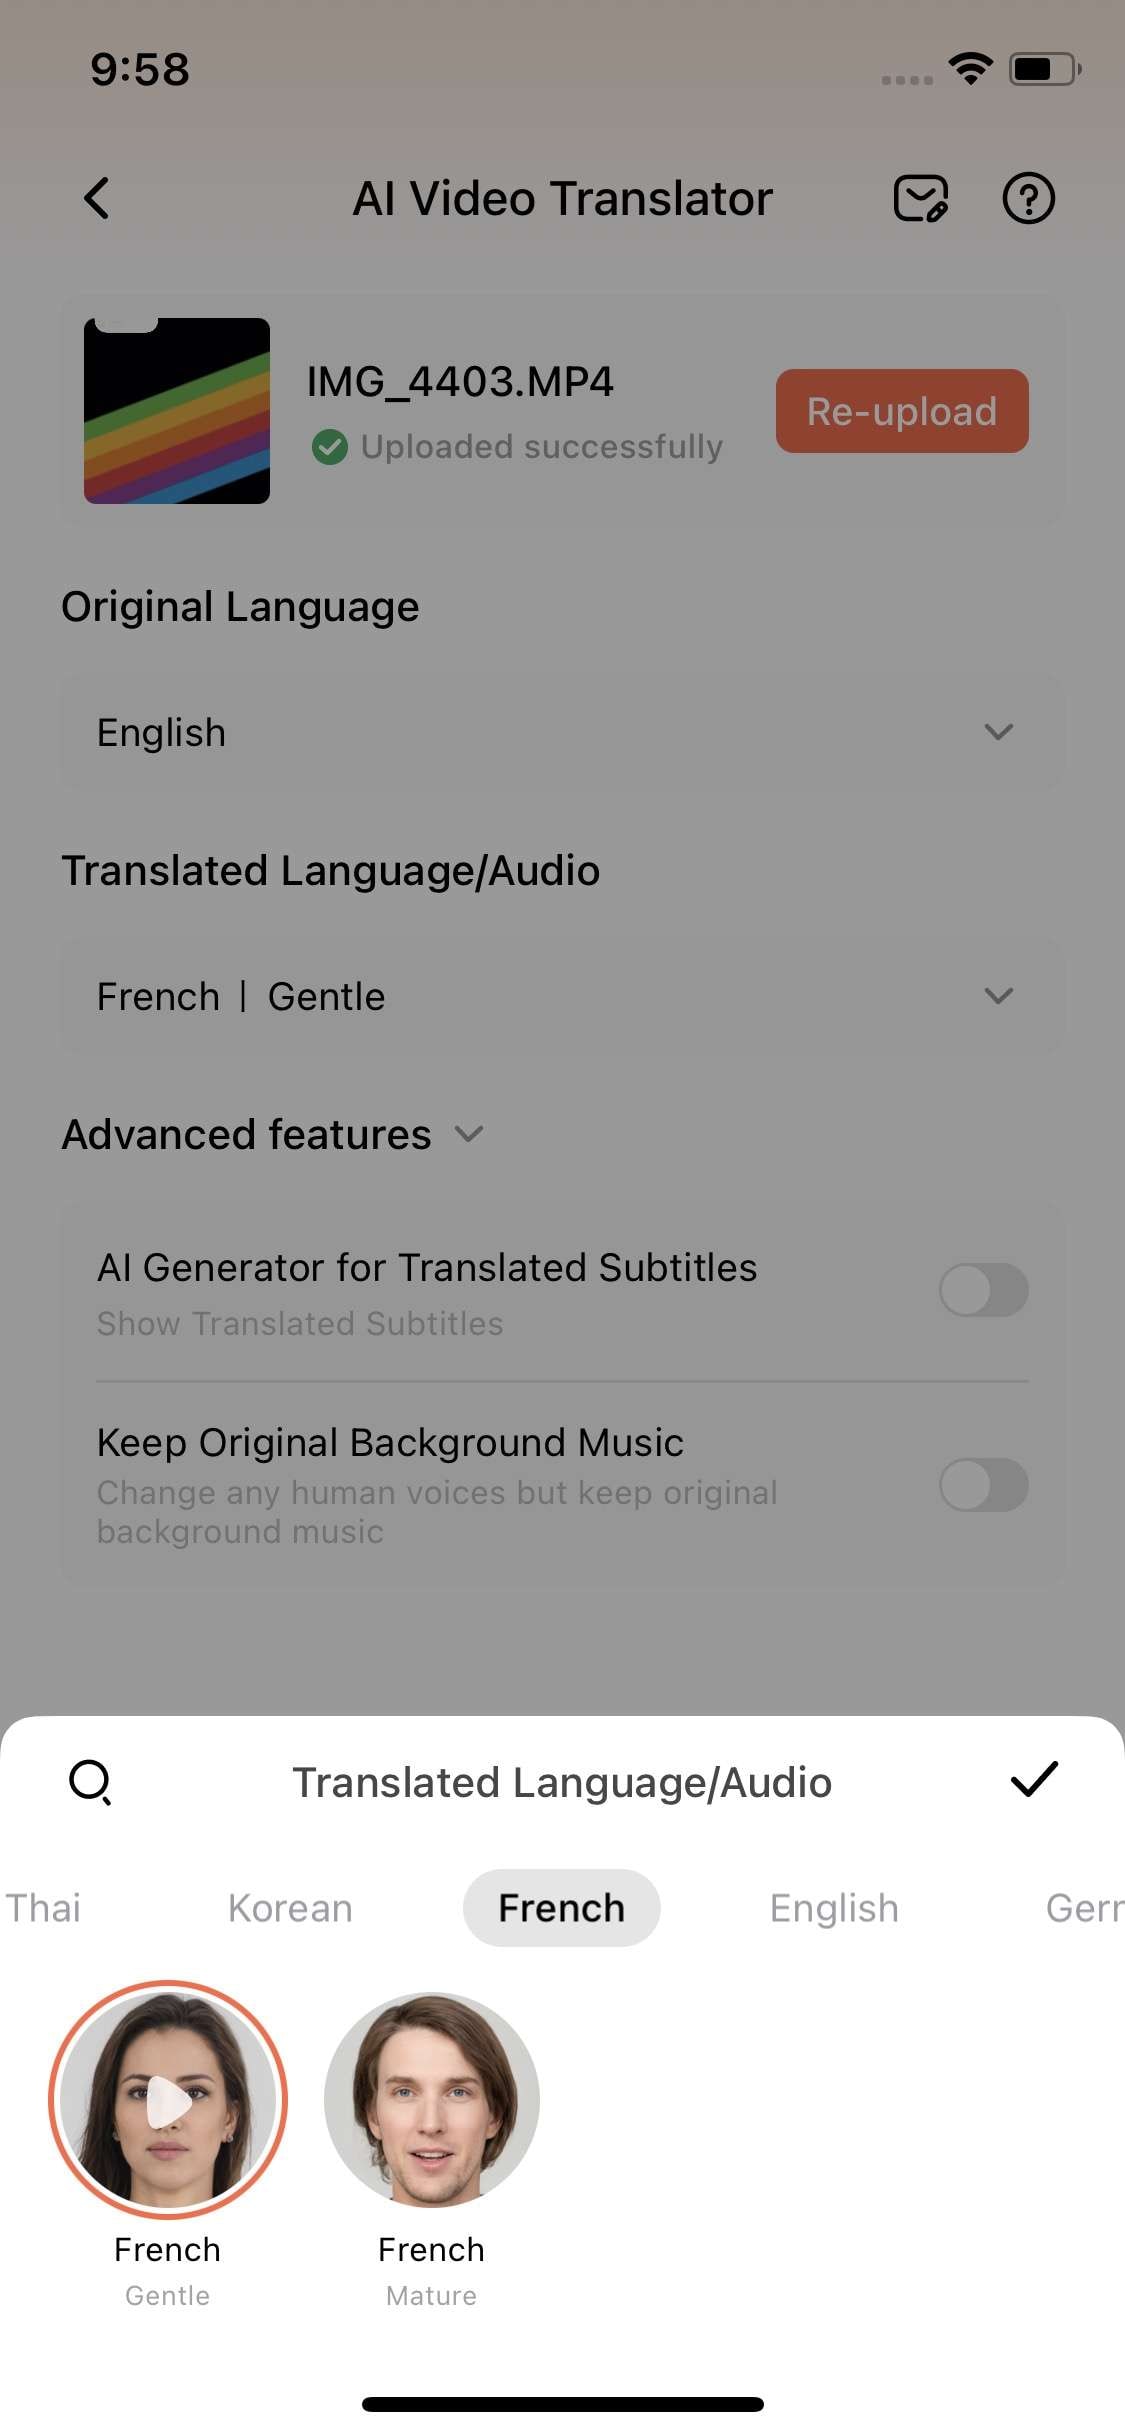
ADVANCED FEATURES
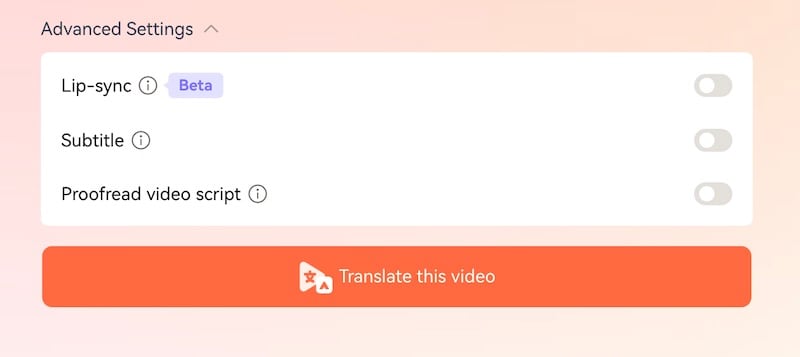
- You can add subtitles in the translated language to the video, provided there are no subtitles already existing in the video, by enabling Subtitles.
- Under some conditions, you can even have the video lip-synced to the translated audio!
2.2: How to Use Wondershare Virbo Video Translator on Windows PC
Using Wondershare Virbo to translate videos is a simple, 3-step process. Just like all other Wondershare software, it is the easiest video translator you could find on the internet. Here’s how to use Wondershare Virbo to translate videos.
Step 1: Download Wondershare Virbo and select the Video Translator option.
Change Video Language Online Download APP Now Free Download
Step 2: A popup will appear for you to upload your videos.
INPUT REQUIREMENTS
There are certain input requirements to the videos you can upload and translate.
- Video resolution must be between 360p x 360p and 1920p x 1920p.
- The minimum playback duration of the video is 10 seconds and the maximum is 5 minutes. This means that you can translate a video under 5 minutes and over 10 seconds.
- Only authentic human voices will be translated. You cannot translate songs, music, or any other sound.
Check the original language and choose the language to translate into from the dropdown menus.
ADVANCED FEATURES
Wondershare Virbo is sprinkled with thoughtful features throughout the video translation experience. One such feature is translating subtitles.
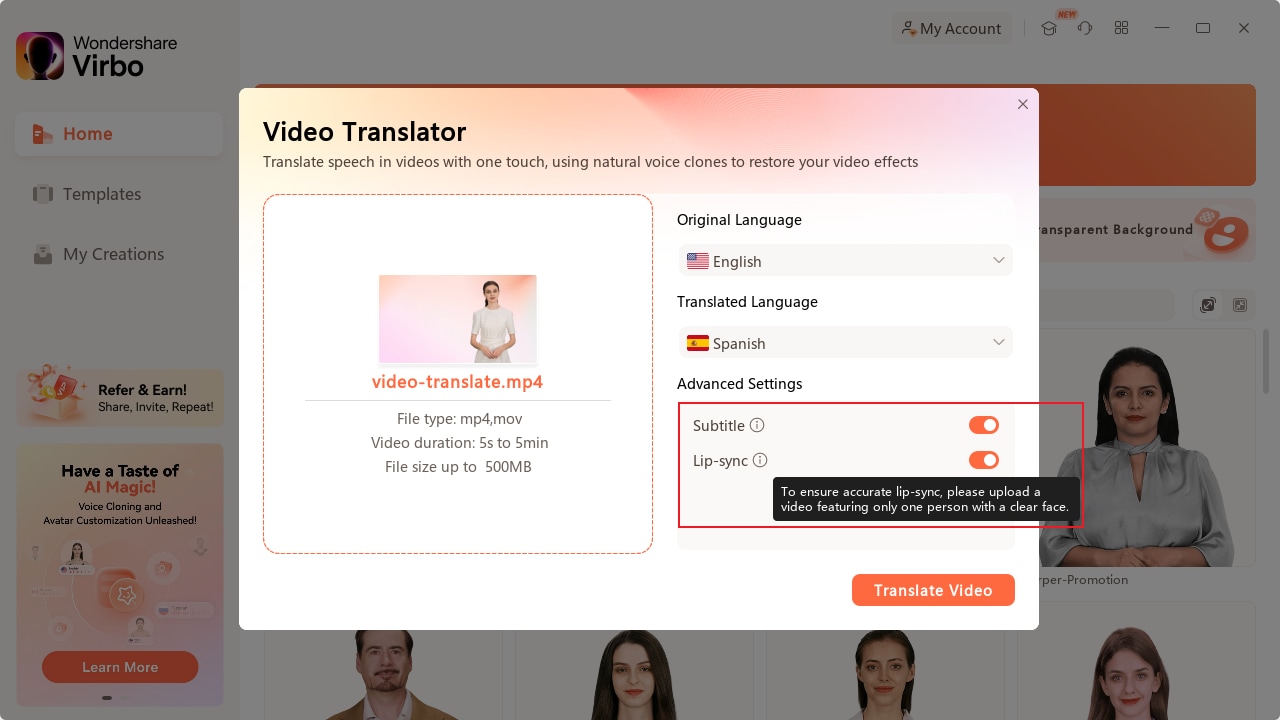
Tick Subtitles if you want video subtitles to be translated. Also, it will keep the background music intact while translating any human voice detected in the video.
Step 3: Click Translate this video and once the video is translated, click Export and save to a location of your choice.
2.3: How to Use Wondershare Virbo Video Translator Mobile App
Wondershare has always been about convenience, and so, you can use Wondershare Virbo even on your smartphone, both iOS and Android! Here’s how to use the Wondershare Virbo app to translate videos on iOS or Android.
Step 1: Download Wondershare Virbo on your smartphone from your corresponding app store (App Store/ Play Store) and sign in/ sign up for an account.
Change Video Language Online Download APP Now Free Download

Wondershare Virbo on iOS allows Guest Login in case you do not want to sign up/ sign in with any of your credentials.
Step 2: Tap AI Video Translator.

Step 3: Upload your video.
INPUT REQUIREMENTS
There are certain input requirements to the videos you can upload and translate.
- Video resolution must be between 480p x 480p and 1920p x 1920p.
- The minimum playback duration of the video is 10 seconds and the maximum is 5 minutes. This means that you cannot translate a video under 10 seconds and over 2 minutes.
- Only authentic human voices will be translated. You cannot translate songs, music, or any other sound.
Step 4: Select the original language and the target language to translate to.
ADVANCED FEATURES
Wondershare Virbo comes with certain advanced features such as translated subtitles and the ability to keep background music intact during translation.
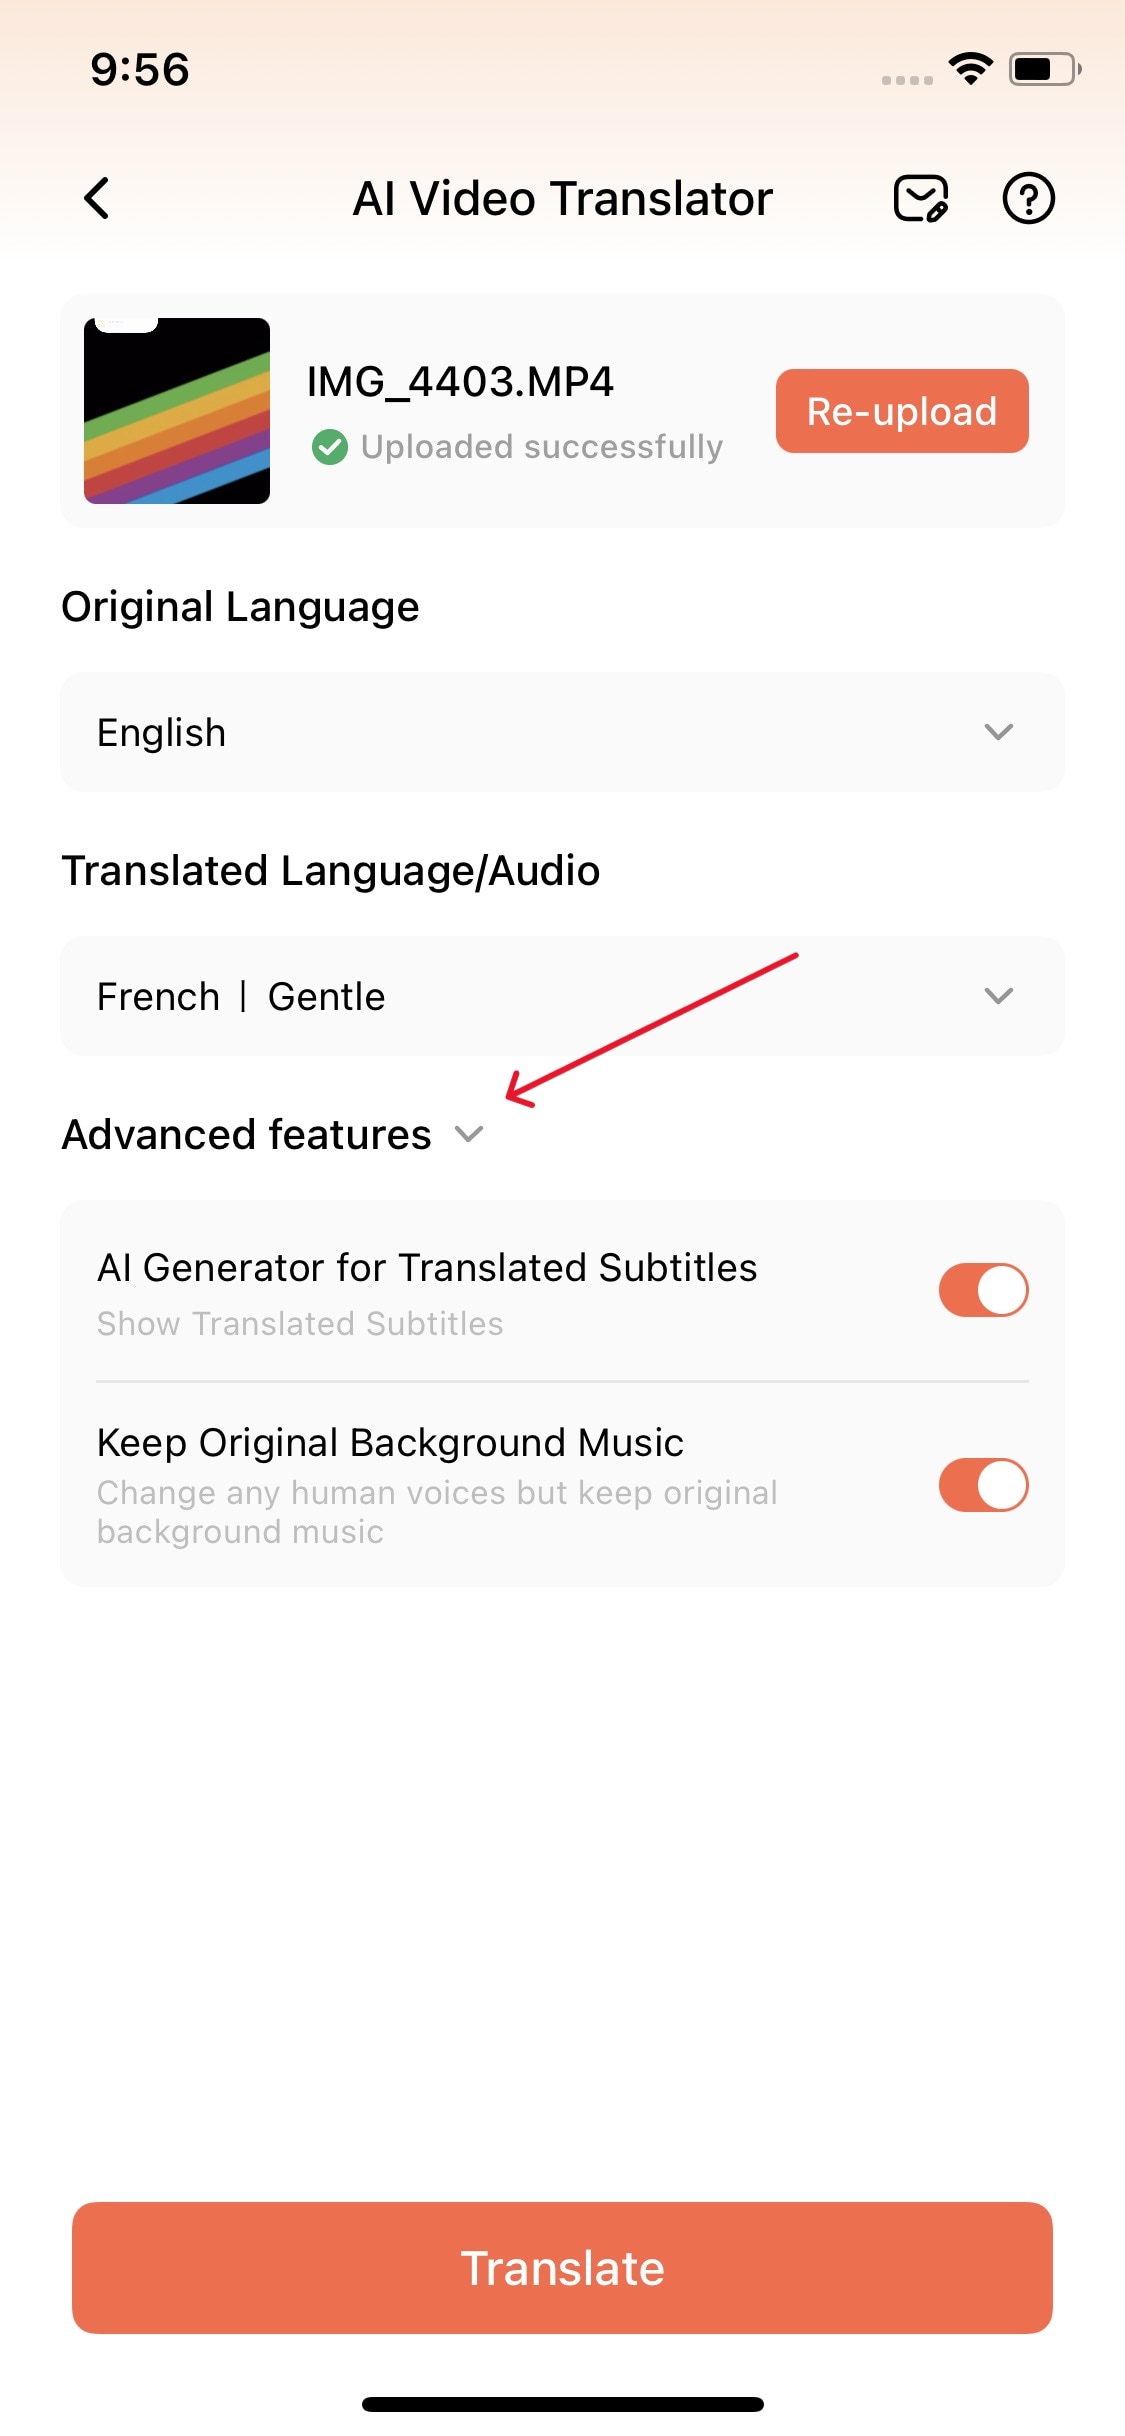
TapAI Generator for Translated Subtitles to translate video subtitles as well. If you want to keep the background music intact, tapKeep Original Background Music and Virbo will only translate the human voice.
Step 5: Click Translate and when the translation is complete, export the video to a location of your choice.
Change Video Language Online Download APP Now Free Download
Part 3. 4 Other Video Language Changers Online
Unlock the best video language changer, Wondershare Virbo, which allows everyone to translate videos into any language. Creators or marketers can use it to enhance accessibility and connect with audiences across the globe. Here are 4 other online video language changers, exploring their features and functionalities in comparison to Wondershare Virbo.
1.Flixier
Flixier is a freeonline video language changer that offers to translate videos in 30+ languages. Users only need a good Internet connection to use the features of Flixier. You only need to import the video file, generate subtitles according to your video, and translate them into your desired language. It allows you to export the video within 3 minutes and post it on various platforms.

Flixier allows real-time collaboration with 50+ transitions. As we have discussed, it is a web-based tool, but also allows recording screens and webcams. Its built-in stock library contains thousands of music, videos, and images.
Key Features of Flixier:
- Flixier helps you in customizing the style of your translation. Change the font, color, and size of the translated video according to your preferences.
- It is compatible with all internet browsers and does not require investment to translate videos.
- It enables various importing options such as Google Drive, Dropbox, and Twitch.
2.VEED.IO
The best video language changer always provides accuracy in translating videos.Veed.IO is a language translator that provides instant results with 98.6% accuracy. Users can translate many videos into more than 125 languages. It enables to import of both audio and video to perform the translation process. Transcribe your video first, then transform it into other languages.

It offers a user-friendly interface where users can create videos for the brand effectively. Users can edit the videos on the cloud so that the user can access their files whenever they want. It also allows us to eliminate the background noise and background of the video to make it captivating.
Key Features of VEED.IO:
- Its intuitive timeline adds audio, music, and sound effects to the video. Its stock media library offers a variety of audio tracks that can be added to videos easily.
- Users can also add images to the videos, crop them, add stickers, text, emojis, and more.
- It is free to try and available online on browsers.
3.Kapwing
Kapwing is an online video editor that is powered by artificial intelligence. It is a fast and cost-effective tool that does not require downloading. Users can translate their videos from source languages to more than 70 languages. Due to the latest technology, it saves time to translate the videos and transform them automatically. Translate your videos in various languages, such as Spanish, English, Arabic, Hindi, and more.

It not only translates your videos but can also translate the audio files. Convert multiple videos into text. It exports the text files in SRT, VTT, or TXT formats. Translate your videos and post them on social media platforms to expand your community.
Key Features of Kapwing:
- It does not show you ads while translating videos. It ensures that your information is secure.
- It is a cloud-based video language changer so that users can access it everywhere via the internet.
- It automatically resizes your video according to social media platforms.
4.TYPITO
TYPITO is also anonline video language changer that automatically translates every type of video into 100+ languages. You can also download the file of subtitles in SRT format. You can directly translate your videos into web browsers. Generate subtitles and select the language you want to translate your video. Edit the subtitles if necessary, but TYPITO works with 95% of accuracy.

If you want to create YouTube videos and add translation inside the video, you can also try TYPITO. It helps to burn the subtitles files into your video. Adjust the font, size, color, layout, and position of the subtitles before downloading the file. If you are creating an educational video, then you can use styled themes to make your subtitles more attractive.
Key Features of TYPITO:
- It offers more than 20 formats of video and various forms of aspect ratios.
- TYPITO provides an intuitive interface where users can drag and drop the files.
- Generate instant captions for the videos and share them on your favorite social media platform.
- Users can find 200+ templates of various categories such as sports, education, business, etc.
Conclusion
Video language changer is essential in almost every category of videos. Whether you are creating lecture videos, advertising a brand, promoting your business, or creating video content, language changer plays a crucial role in all fields.
What is the best video language changer? Virbo stands with advanced AI technology and ensures the accuracy of the results. Whether you want to translate videos, generate scripts, create voice clones, or add soundtracks, go for Virbo.
Change Video Language Online Download APP Now Free Download
Convert Video Voice to Text Online for Free: Fast and Easy Ways
Do you ever struggle to understand or keep up with long videos? Maybe you need the information in text format for easier note-taking or sharing. However, transcribing the video content manually can be a time-consuming task.
The good news is that you can easilyconvert video voice to text online for free . In this guide, you’ll explore several ways to do it using the best tools and some tips if you encounter any issues. So, whether you’re dealing with online meetings, e-learning content, or working on global campaigns, this article has a solution for you. Let’s start.
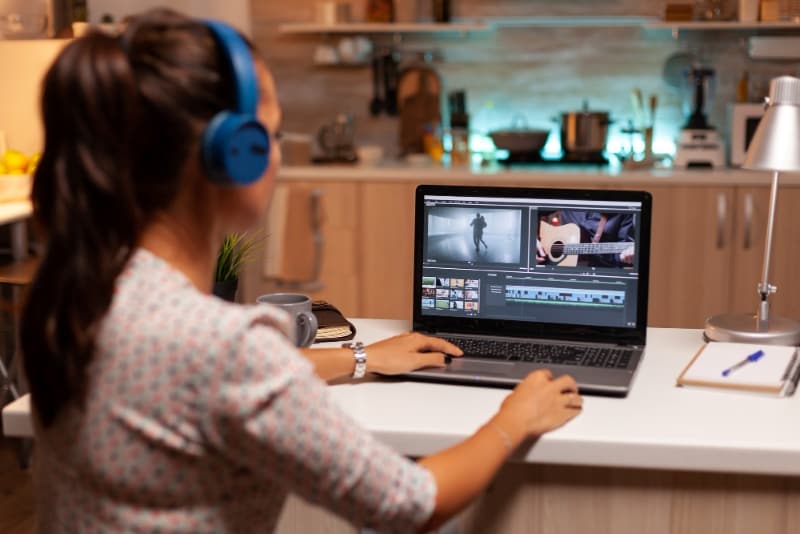
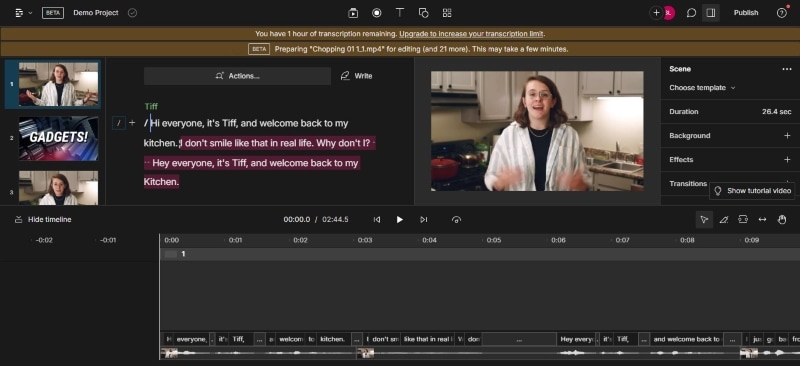
Part 1. For Online Meetings on Desktop: Convert Video Voice to Text by Descript
Joining online meetings might get tricky when crucial details slip by because of fast speakers or background noise. Don’t worry – Descript has your back. It is a versatile video recorder that doubles as avideo voice-to-text converter online .
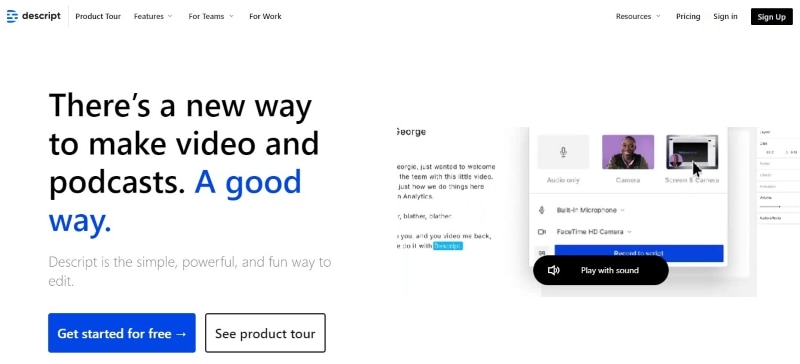
With Descript, you can easily review key points, find specific moments, and share the transcript with colleagues who couldn’t make it. Say goodbye to missed details and hello to smoother online meetings with Descript.
How To Convert Video Voice to Text Automatically Using Descript?
With Descript, online meetings become active and focused. Ready to give it a try? Follow these steps below to convert your recorded video to text files online with Descript:
- Step 1: Launch Descript from your web browser and create an account.
- Step 2: Click+ New in the top right corner of theProjects on the home page. Then, go toVideo project >Add file , and select your video file from the pop-up window.
- Step 3: Descript will automatically begin transcribing your video once it’s uploaded.
- Step 4: You’ll see the converted text on the left. Just click on it to make any changes you need.
Tips:
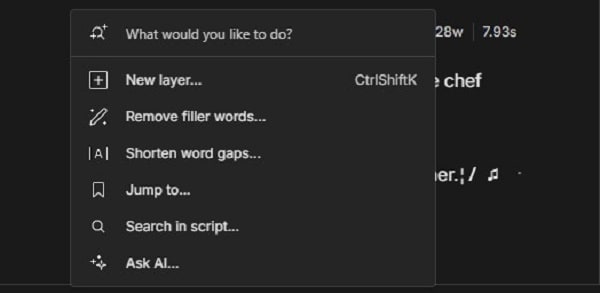
Click the “Actions… ” button on the text editor and select “Remove filler words… ” to search and delete filler words in the text automatically.
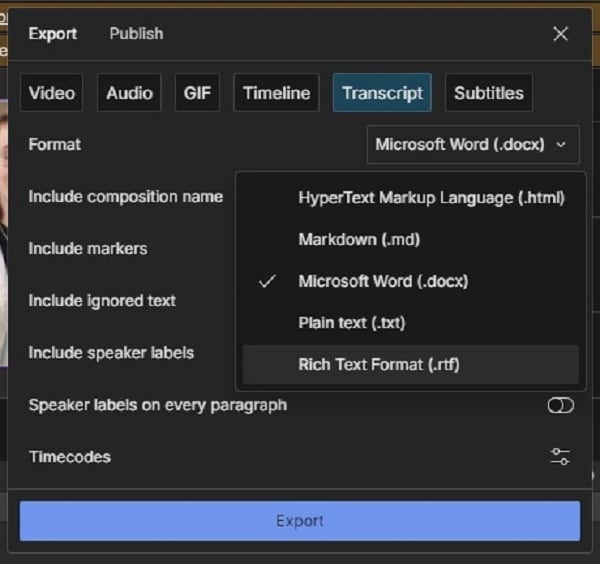
- Step 5: Once you’re happy with the transcript, you can export it in various formats. Go toFile in the top navigation pane and selectExport .
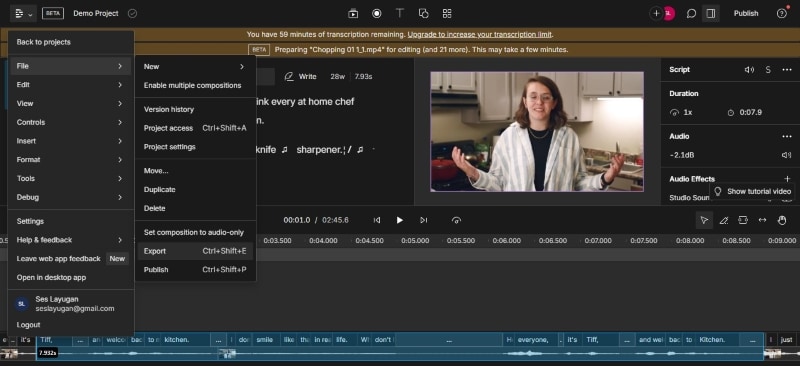
- Step 6: Go to theTranscript tab bar from the pop-up window. Choose the desired format (TXT, DOCX, etc.) and customize the export settings.
Part 2. For E-Learning Online: Convert Video Voice to Text by Happy Scribe
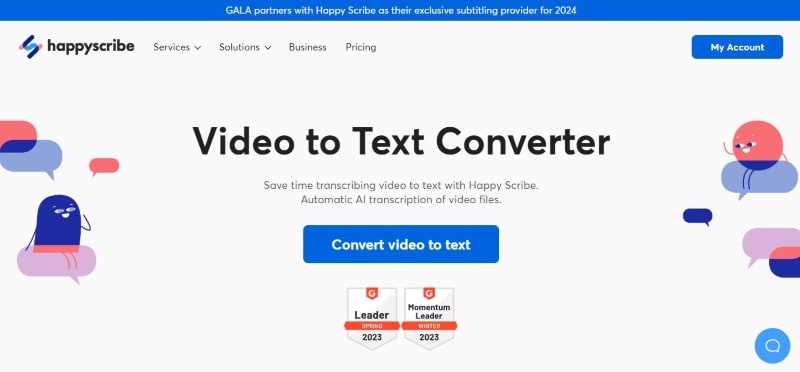
Getting new skills through e-learning is great, but listening to long video lectures can be tiresome. But with AI tools like Happy Scribe, it is easier to study. It has an intuitive interface and lets you convert video voice to text online for free.
Happy Scribe’s AI transcribes your video, whether pre-recorded or from YouTube, giving you a text version of the lecture. Now, you can review the important things at your speed and find specific info faster.
How To Convert Video Voice to Text Using AI With Happy Scribe?
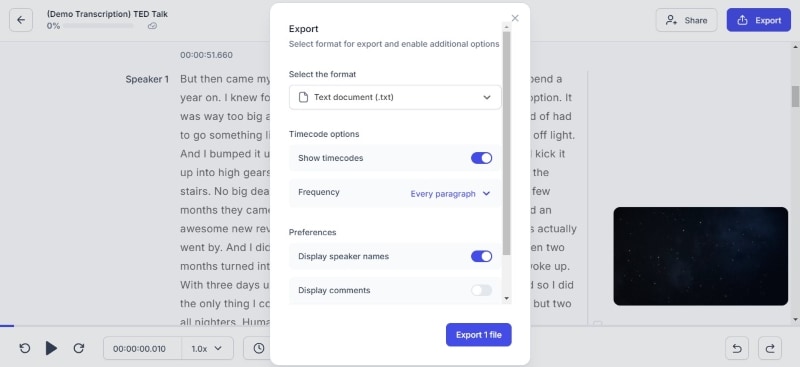
You can use Happy Scribe as aYouTube video voice-to-text converter online . The first 10 minutes are free; you can try it out for short videos or snippets. Here’s how to use Happy Scribe for video transcription online:
- Step 1: Head to Happy Scribe’s website and log in to your existing account. If you’re a new user, sign up for a free account.
- Step 2: Choose the upload source:
- ClickUpload a file and select your video from your desktop folders.
- Paste the public video URL from YouTube, Google Drive, and more into the designated field.

- Step 3: A pop-up window will appear once you’ve chosen the upload source. Choose the language spoken in your video from the dropdown menu. Then, selectMachine generated as the transcription method.
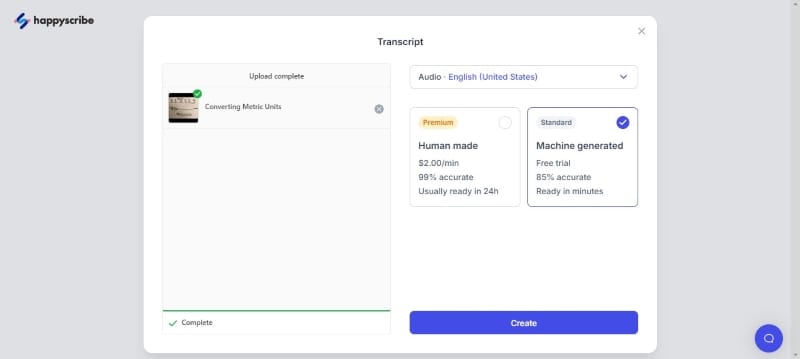
- Step 4: ClickCreate after setting your options. Happy Scribe YouTube video voice-to-text converter online will upload and process your video.
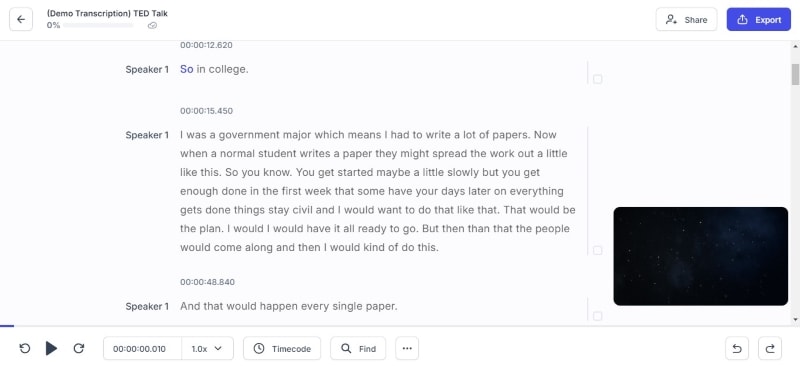
- Step 5: Happy Scribe will automatically generate a transcript. Use the built-in editor to click on any section of text to edit and correct mistakes. You can also control playback speed to make editing easier.
- Step 6: Once done editing the transcript, clickExport from the upper right navigation pane. Since you are using the app for free, you can download it in text document and SRT file formats. ClickExport 1 file to save the transcript to your computer.
Moving beyond desktop meetings and e-learning, businesses often need an easier and faster way to translate video content for a global audience. That is where AI video translation can help you. In the next part, you’ll explore howWondershare Virbo can help you efficiently translate video voice to text in multiple languages. Read on to make your marketing materials accessible to a wider audience.
Part 3. Virbo: Best Video Voice-to-Text Translator Online for Global Marketing
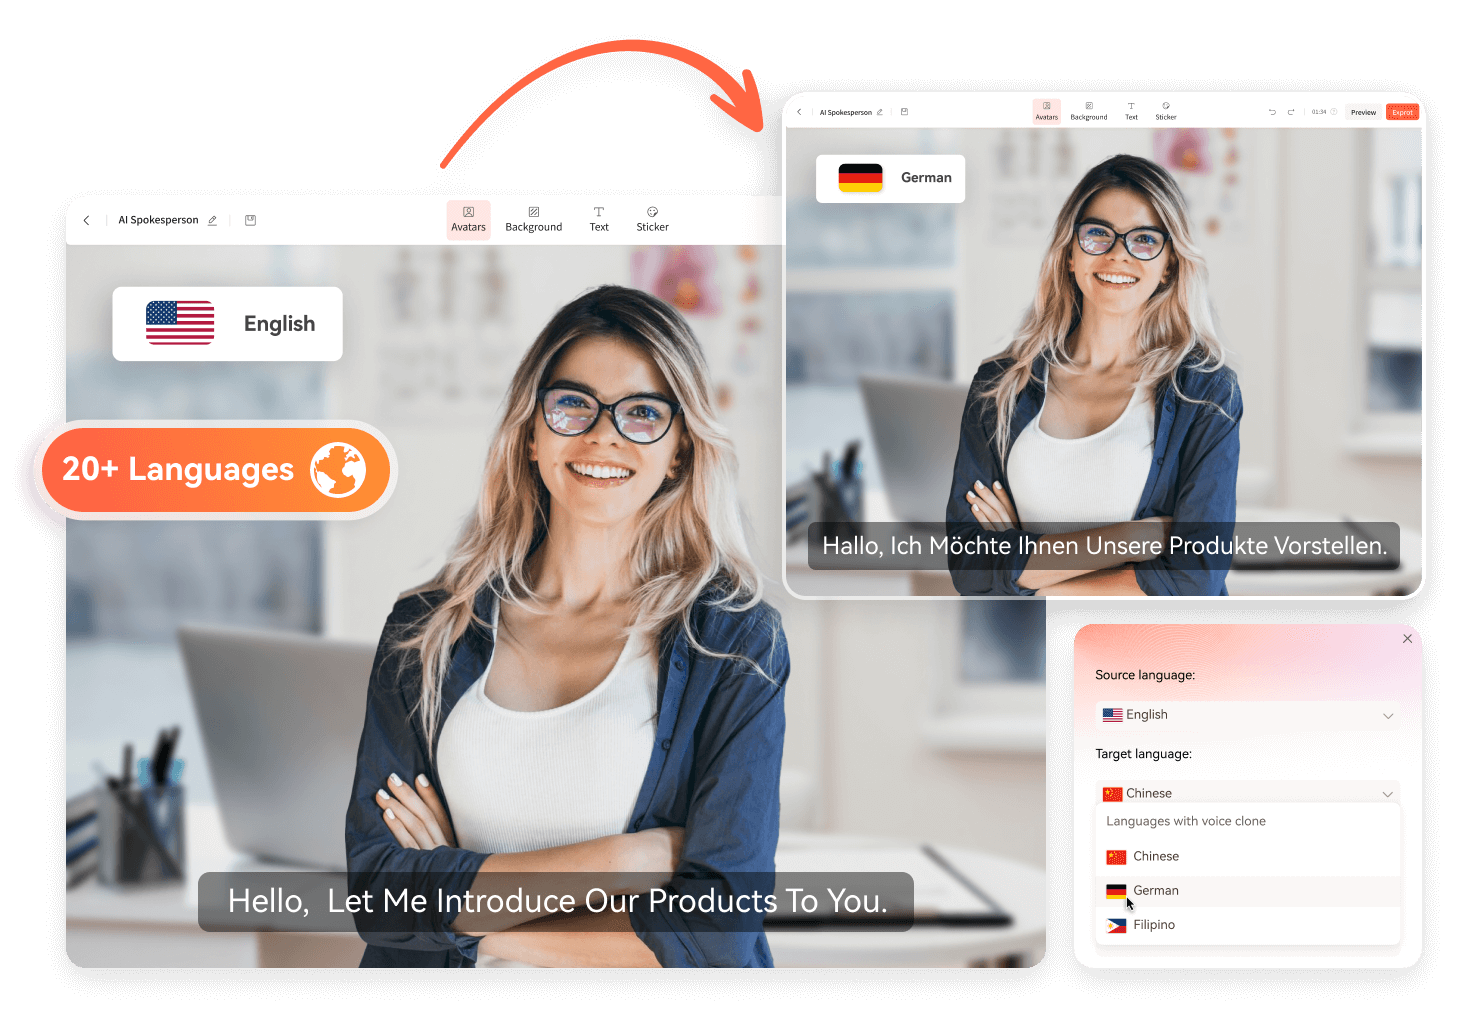
When taking your brand global, language barriers can be a challenge. But here’s the good news: with Virbo, it’s doable. One of its highlights is the ability to accurately translate video voice to text.
Virbo makes global marketing easier.
Get Started Online Free Download
This app uses AI to transcribe your video’s audio into text. Then, it lets you translate that text into different languages. Want to go the extra mile? Add these translated captions to your video, and voila! You’ve made your content accessible to viewers worldwide. This way, you can create professional, multilingual video content that expands your reach and increases brand recognition across borders, all within a single platform.
Here’s what makes Virbo the best video voice-to-text translator online for your global marketing endeavors:
- Support for 20+ Languages: With Virbo, you cantranslate video voice to text in different languages, including popular choices like Spanish, English, Chinese, and more.
- Cross-Platform Compatibility: Marketing knows no borders, and neither does Virbo. Whether you’re a seasoned techie or a casual user, Virbo seamlessly adapts to your workflow. It works on Windows desktops, iOS, and Android devices and even directly on your web browser.
- Easy To Use: Virbo understands that time is precious, especially in business. That’s why it boasts an intuitive interface that anyone can navigate easily.
- High-Quality Output: When it comes to your brand message, clarity is paramount. Virbo ensures your translated content maintains its original meaning and impact. Its high-quality translation output guarantees your message resonates with your global audience just as intended.
- Budget-Friendly App: Reaching a global audience shouldn’t break the bank. Virbo offers its powerful features at an affordable price, making it an excellent choice for businesses of all sizes. Now, you can translate video voice to text without worrying about hefty costs.
How To Translate Video Voice to Text Automatically Using Virbo AI?
Virbo offers free video translation with subtitles, up to 2 minutes per video. Here’s how to translate video voice to text online in a few easy steps:
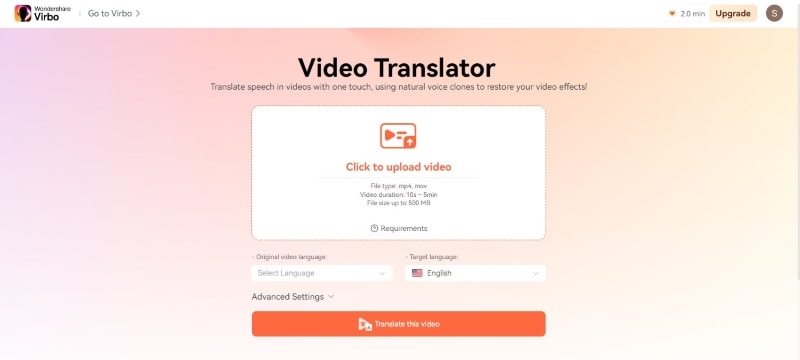
- Step 1: ClickTranslate Video Online from the Virbo video translator webpage. You can also download the app on your desktop. Then, create or login to an account.
Get Started Online Free Download
- Step 2: Upload your video file in MP4 or MOV format. Select the language spoken in your video from the dropdown menu. Then, choose the language you want the subtitles for and translate the text into. ClickTranslate this video to continue.
Tips:
Advanced Settings (Optional):
- Subtitle: Enable this to generate subtitles in the target language based on the transcribed text.
- Proofread video script: This allows reviewing and editing the transcribed text before translation.
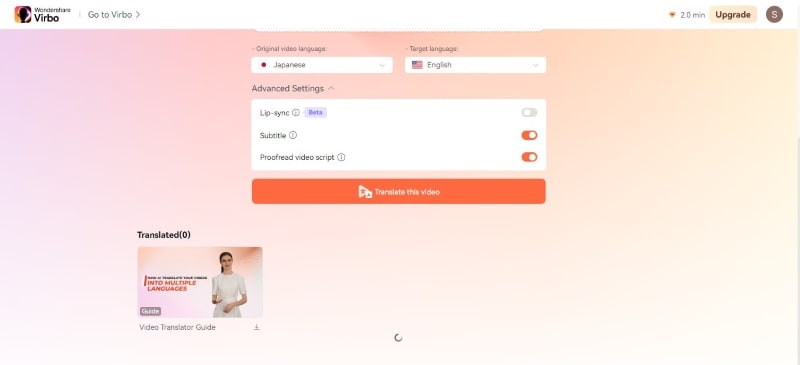
- Step 3: Virbo will process your video. This may take some time depending on the video length.
- Step 4: Review and edit any errors on the text editor before proceeding. Once satisfied, download the subtitles file (SRT format).
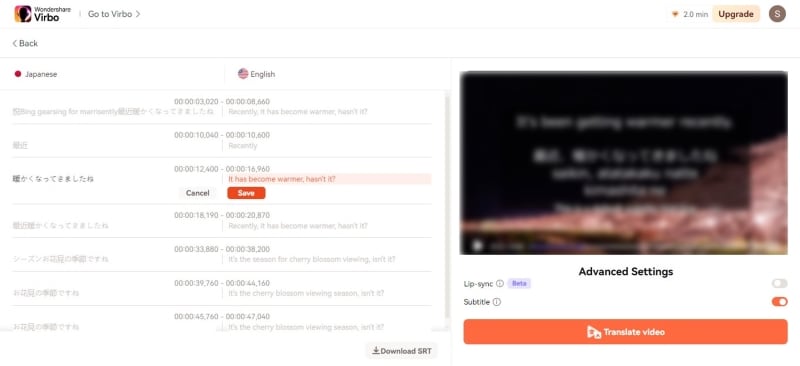
- Step 5: ClickTranslate video to add the translated text or subtitle to your original video. After processing is complete, Virbo will provide you with a preview of the translated video with subtitles (if enabled). If you’re satisfied with the results, click theDownload icon to save the translated video with subtitles to your computer.
Part 4. Troubleshooting Issues When Converting Video Voice to Text
Creating clear and accurate transcripts is essential for professional settings. Here’s how to avoid common pitfalls that can impact transcription quality:
Issue 1: Background Noise
Solution: Noisy recordings can cause problems with transcription accuracy. Luckily, many video editing programs have noise-reduction features. Running your audio through one of these before conversion can make a big difference.
Issue 2: Accents or Dialects
Solution: Most speech recognition software is good these days, but accents and dialects can still trip them up. Check your software’s settings for options to adjust the recognition model. Some programs even let you upload a sample of the speaker’s voice to improve accuracy.
Issue 3: Punctuation Errors
Solution: Some software offers built-in punctuation correction you can use. If unavailable, find a separate grammar tool after conversion. Always proofread the transcript yourself for any missing punctuation.
Issue 4: Overlapping Voices of Speakers
Solution: If the video has multiple speakers, try software that can differentiate voices. This includes interviews and panel discussions. You can always transcribe each speaker’s section if that’s not an option. Then, add timestamps to identify speaker changes in the transcript.
Issue 5: Inconsistent Transcription Format
Solution: Most video-to-text software allows you to format after the converter generates the transcript. You can adjust fonts, add paragraph breaks, and even format speaker identification within the program. Also, you can always export the transcript to a word processor for in-depth formatting.
Conclusion
You learned several ways to convert video voice to text online for free and the best apps for it. These tools make videos easier to understand, whether recorded or uploaded from websites like YouTube.
Now, you also know the best app to translate video voice to text. Virbo allows you to translate your videos into different languages using AI, making your content global. So, explore these tools, see how video text conversion helps, and choose the app that fits you best.
Launching Your Live Room
Launching Your Live Room
Explore step-by-step instructions on decorating your space, uploading local images and videos, adding engaging AI interactions, etc. Elevate your streaming experience and captivate your audience with a seamlessly executed live room. Dive into our comprehensive guide now!
02Uploading Local Images and Videos
07AI Intelligent Script Generation
11Starting/Ending the Live Broadcast
Decorating Your Live Room
Decoration Guidance
- Click on the product homepage and create a blank live room to initiate a new live session.

Create a blank live room
- Upon creating a blank live room, the live room editing page will open. The left side serves as the operation area, the right side as the canvas area, and the materials area is located above.

Livestream room navigation
- Click on the templates to use pre-designed combinations of background, virtual hosts, and stickers.

Select a template
- Customize the background from the background library. During the live broadcast, only one background can be used.

Livestream room customization
- Choose a virtual host from the virtual host library. Only one virtual host can be used during the live session.
![]()
Choose a virtual host
- Add stickers from the sticker library. Multiple stickers can be used during the live broadcast.
- After selecting materials, adjust their position and size in the canvas area. Right-click to modify layers, copy, or delete materials.
Uploading Local Images and Videos
Upload background images or videos
- Upload: Click Background -> Upload Background -> Select file to upload. Materials will be displayed in “My Background” after uploading.

Upload Background
- Apply: Click Background -> My Background, then click on the material to use it on the canvas.
- Delete: Hover over the material and click the delete icon to remove it.

Delete Background
Note
Background upload requirements:
- Image and video dimensions should be 9:16
- Image formats: JPG/JPEG/PNG
- Video formats: MP4/MOV
- Resolution should not exceed 1080P
- Video duration should not exceed 30 minutes
- File size should not exceed 1GB
Upload sticker images or videos
- Upload: Click Sticker -> Upload Sticker -> Select file to upload. Materials will be displayed in “My Sticker” after uploading.

Upload Sticker
- Apply: Click Sticker -> My Sticker, then click on the material to use it on the canvas.
- Delete: Click Sticker -> My Sticker, hover over the material, click the delete icon to remove it.

Delete Sticker
Note
Sticker upload requirements:
- Image and video dimensions are flexible.
- Image formats: JPG/JPEG/PNG
- Video formats: MP4/MOV
- Resolution should not exceed 1080P
- Video duration should not exceed 30 minutes
- File size should not exceed 1GB
Text-Driven Live Room
Script Guidance
- Input script text: Copy and paste your script into the script dialogue box.

Text Scripts Inset
- Choose a matching tone: Click the voice-over entrance above, select a suitable tone, and preview it.
- Preview: Click the “Preview” button below the text to listen.
Audio-Driven Live Room
Audio Guidance
- Upload audio: Click Script -> Audio -> Upload local voice and upload the local file.

Upload Audio
- Preview audio: After uploading, click to preview the audio.

Preview Audio
- Audio sorting: Hold and drag to sort the audio files.

Audio sorting
- Audio sorting: Hold and drag to sort the audio files.

Modifying Live Room Name
Method Guidance
- Method 1: Click the edit button in the upper-left corner of the edit page to rename the live room.

Rename Livestream Room
- Method 2: Product homepage -> My Live Rooms -> Click on the more options for an individual live room -> Choose Rename.
Adding AI Identification
Step Guidance
- On the live room editing page, click on the checkbox before the AI identification to enable or disable it.
AI Intelligent Script Generation
Generation Guidance
- Click the “AI Intelligent Script” button below the script, a popup will appear.
- Enter your product name (mandatory), selling points (optional), promotional information (optional), select language and style, then click generate.

AI Script
- The generated result can be further modified, click “Use” to add it to the script dialogue box.
AI Translation
Translation Guidance
- Click the “AI Translation” button below the script, a popup will appear.
- Place the text to be translated on the left, click the middle arrow to select the language for translation (e.g., English), and click translate.

AI Translation
- The generated result can be further modified, click “Use” to add it to the script dialogue box.

AI Translation Result
Manual Interaction
Microphone Interaction
- Operational Flow:
- Click Manual Interaction -> Microphone, and select the microphone device.
- Speak into the microphone and observe the sound wave status.
- Open “Start Live,” wait for the appearance of the virtual host image, and click “Open Mic Takeover.” The virtual host’s mouth will be closed, and your voice will drive the virtual host to speak.
- After speaking, click “End Takeover,” and the virtual host will resume reading the scripted dialogue.
- Click Manual Interaction -> Microphone, and select the microphone device.
- Grant Browser Microphone Access:
- Google Chrome:
*Open Chrome, click the settings icon in the top right.
* Click “Settings,” open the settings page. Select “Privacy and Security” and then click “Site Settings.”
*Enter the site settings page, click “Microphone.”
* On the microphone authorization page, select that the site can request the use of your microphone.
* After these settings, when the browser needs to use the camera or microphone, a device request box will pop up on the page. Select “Allow.” - Mozilla Firefox:
*Open Firefox, click the settings icon in the top right, and click “Settings.”
* Open the settings page, click “Privacy & Security,” and find “Microphone Permissions.” Click “Settings” next to “Microphone.”
*Enter the settings page, add the site that requests the use of your microphone to the list, and click “Save Changes.”
* After these settings, when the browser needs to use the camera or microphone, a device request box will pop up on the page. Select “Allow.” - Sogou Browser:
*Open Sogou Browser, click the settings icon in the top right, and click “Options.”
* Open the options page, click “Advanced,” find “Privacy - Browsers on the Mac System:
*Locate “System Preferences” on your Mac dock and click the icon. Once opened, find “Security & Privacy” and click to open.
* On the “Security & Privacy” page, select “Privacy,” then click on “Microphone” and set the applications that need to use the microphone to “Allow.”
- Google Chrome:
Text Interaction
- Click on “Artificial Interaction” and enter interaction scripts in the input box below.
- Click “Add Text” to add it to the interaction list. After starting the live broadcast, each interaction script will have a send button.

Text Interactionn
- Click “Send” to trigger the AI to speak according to the interaction script.
Intelligent Interaction
Note
The current intelligent interaction feature only supports Alibaba International. If you are streaming on other platforms, you can skip this step.
Setting Entrance
- On the live broadcast page, click on “Intelligent Interaction,” select the live platform, and the supported intelligent interaction features will be randomly displayed.
Q&A Library Settings
- Creating a New Q&A:
- On the product homepage, click on Q&A Library - Add Q&A, and a popup window will appear.
- Fill in the rule name, keywords, reply text, and upload a reply video. Click Save.
Note
Rule Name: Name the rule for easy identification.
Keywords: If a viewer’s question in the live room contains any of these keywords, it will trigger the AI to answer.
Reply Content: You can add up to 5 replies. Include variables like [Viewer’s Nickname] and [Viewer’s Country] for personalized responses.
Sequential Reply: Replies in sequence when triggered.
Random Reply: Randomly selects a reply when triggered.
Reply Video: If configured, the video will be displayed at the specified position until the AI’s reply ends.
- Adjusting Q&A Activation Status:
- Click Q&A Library - Switch to close or open the Q&A rule. When closed, the Q&A rule will not take effect after the live broadcast starts.
- Turning on Q&A Library Switch in the Live Room:
- On the live broadcast editing page, click Intelligent Interaction - Platform, select “Alibaba International,” and turn on the Q&A Library switch. This must be done after starting the live broadcast and capturing the barrage for the function to work.
Greeting Rules Settings
- Greeting Content: You can add up to 5 replies, including variables like [Viewer’s Nickname] and [Viewer’s Country].
- Sequential Reply: Replies in sequence when triggered.
- Random Reply: Randomly selects a reply when triggered.
- On the live broadcast editing page, click Intelligent Interaction - Platform, select “Alibaba International,” turn on the Greeting switch, and click the edit icon to open the editing window. Fill in the reply text and click Save.
Sending Business Cards and Product Catalogs
- On the live broadcast editing page, click Intelligent Interaction - Platform, select “Alibaba International,” turn on the “Send Business Cards” switch, and turn on the “Send Product Catalogs” switch.
Note
These functions will only take effect after starting the live broadcast and capturing the barrage.
How to Start Live Barrage Capture
- Start Broadcasting in Virbo Live
- Follow the steps for “Start/End Broadcast” on the live broadcast editing page.
- Install the Plugin in Chrome
- Ensure Chrome is up to date, then download the plugin from the provided link . After downloading, unzip locally.
- Configure the Plugin in Chrome
- Open Chrome, go to Settings - Extensions - Manage Extensions, enable Developer mode, click “Load Unpacked,” and select the unzipped folder. Enable “Allow in incognito mode” in the plugin details.
- Copy the Live Control Page Link
- Copy the link of your live control page (web version) from the live platform. Paste the link into the live broadcast editing page under Intelligent Interaction - Live Room Link Input, then click “Start Capturing.”
Note
Alibaba International currently supports automatic Q&A, automatic greetings, automatic business card sending, and automatic product catalog sending. You can turn on the corresponding switches and then configure the detailed settings for each item.
Starting/Ending the Live Broadcast
Starting the Live Broadcast
- On the live broadcast editing page, click “Start Broadcasting.”
- The AI live broadcast window will appear shortly after, displaying the AI live broadcast.
Using Your Broadcasting Partner or OBS
Note
Keep the AI live broadcast window open on the desktop during the broadcast, or it will not broadcast properly.
- Open your broadcasting partner or OBS, add a window, select the Wondershare VVB (Live Version) live window.
- Click “Start Broadcasting.” Use Alt + mouse to crop out the web bar or use the zoom function to remove it.
- During the live broadcast, you can only modify the “Artificial Interaction” function; other broadcast settings cannot be changed.
Ending the Broadcast
- When concluding the live broadcast, initiate the termination of the live stream on the platform’s broadcasting partner first, followed by clicking the “End Live” button on Virbo Live to finalize the shutdown process.
02Uploading Local Images and Videos
07AI Intelligent Script Generation
11Starting/Ending the Live Broadcast
Decorating Your Live Room
Decoration Guidance
- Click on the product homepage and create a blank live room to initiate a new live session.
Create a blank live room
- Upon creating a blank live room, the live room editing page will open. The left side serves as the operation area, the right side as the canvas area, and the materials area is located above.
Livestream room navigation
- Click on the templates to use pre-designed combinations of background, virtual hosts, and stickers.
Select a template
- Customize the background from the background library. During the live broadcast, only one background can be used.
Livestream room customization
- Choose a virtual host from the virtual host library. Only one virtual host can be used during the live session.
![]()
Choose a virtual host
- Add stickers from the sticker library. Multiple stickers can be used during the live broadcast.
- After selecting materials, adjust their position and size in the canvas area. Right-click to modify layers, copy, or delete materials.
Uploading Local Images and Videos
Upload background images or videos
- Upload: Click Background -> Upload Background -> Select file to upload. Materials will be displayed in “My Background” after uploading.
Upload Background
- Apply: Click Background -> My Background, then click on the material to use it on the canvas.
- Delete: Hover over the material and click the delete icon to remove it.
Delete Background
Note
Background upload requirements:
- Image and video dimensions should be 9:16
- Image formats: JPG/JPEG/PNG
- Video formats: MP4/MOV
- Resolution should not exceed 1080P
- Video duration should not exceed 30 minutes
- File size should not exceed 1GB
Upload sticker images or videos
- Upload: Click Sticker -> Upload Sticker -> Select file to upload. Materials will be displayed in “My Sticker” after uploading.
Upload Sticker
- Apply: Click Sticker -> My Sticker, then click on the material to use it on the canvas.
- Delete: Click Sticker -> My Sticker, hover over the material, click the delete icon to remove it.
Delete Sticker
Note
Sticker upload requirements:
- Image and video dimensions are flexible.
- Image formats: JPG/JPEG/PNG
- Video formats: MP4/MOV
- Resolution should not exceed 1080P
- Video duration should not exceed 30 minutes
- File size should not exceed 1GB
Text-Driven Live Room
Script Guidance
- Input script text: Copy and paste your script into the script dialogue box.
Text Scripts Inset
- Choose a matching tone: Click the voice-over entrance above, select a suitable tone, and preview it.
- Preview: Click the “Preview” button below the text to listen.
Audio-Driven Live Room
Audio Guidance
- Upload audio: Click Script -> Audio -> Upload local voice and upload the local file.
Upload Audio
- Preview audio: After uploading, click to preview the audio.
Preview Audio
- Audio sorting: Hold and drag to sort the audio files.
Audio sorting
- Audio sorting: Hold and drag to sort the audio files.
Modifying Live Room Name
Method Guidance
- Method 1: Click the edit button in the upper-left corner of the edit page to rename the live room.
Rename Livestream Room
- Method 2: Product homepage -> My Live Rooms -> Click on the more options for an individual live room -> Choose Rename.
Adding AI Identification
Step Guidance
- On the live room editing page, click on the checkbox before the AI identification to enable or disable it.
AI Intelligent Script Generation
Generation Guidance
- Click the “AI Intelligent Script” button below the script, a popup will appear.
- Enter your product name (mandatory), selling points (optional), promotional information (optional), select language and style, then click generate.
AI Script
- The generated result can be further modified, click “Use” to add it to the script dialogue box.
AI Translation
Translation Guidance
- Click the “AI Translation” button below the script, a popup will appear.
- Place the text to be translated on the left, click the middle arrow to select the language for translation (e.g., English), and click translate.
AI Translation
- The generated result can be further modified, click “Use” to add it to the script dialogue box.
AI Translation Result
Manual Interaction
Microphone Interaction
- Operational Flow:
- Click Manual Interaction -> Microphone, and select the microphone device.
- Speak into the microphone and observe the sound wave status.
- Open “Start Live,” wait for the appearance of the virtual host image, and click “Open Mic Takeover.” The virtual host’s mouth will be closed, and your voice will drive the virtual host to speak.
- After speaking, click “End Takeover,” and the virtual host will resume reading the scripted dialogue.
- Click Manual Interaction -> Microphone, and select the microphone device.
- Grant Browser Microphone Access:
- Google Chrome:
*Open Chrome, click the settings icon in the top right.
* Click “Settings,” open the settings page. Select “Privacy and Security” and then click “Site Settings.”
*Enter the site settings page, click “Microphone.”
* On the microphone authorization page, select that the site can request the use of your microphone.
* After these settings, when the browser needs to use the camera or microphone, a device request box will pop up on the page. Select “Allow.” - Mozilla Firefox:
*Open Firefox, click the settings icon in the top right, and click “Settings.”
* Open the settings page, click “Privacy & Security,” and find “Microphone Permissions.” Click “Settings” next to “Microphone.”
*Enter the settings page, add the site that requests the use of your microphone to the list, and click “Save Changes.”
* After these settings, when the browser needs to use the camera or microphone, a device request box will pop up on the page. Select “Allow.” - Sogou Browser:
*Open Sogou Browser, click the settings icon in the top right, and click “Options.”
* Open the options page, click “Advanced,” find “Privacy - Browsers on the Mac System:
*Locate “System Preferences” on your Mac dock and click the icon. Once opened, find “Security & Privacy” and click to open.
* On the “Security & Privacy” page, select “Privacy,” then click on “Microphone” and set the applications that need to use the microphone to “Allow.”
- Google Chrome:
Text Interaction
- Click on “Artificial Interaction” and enter interaction scripts in the input box below.
- Click “Add Text” to add it to the interaction list. After starting the live broadcast, each interaction script will have a send button.
Text Interactionn
- Click “Send” to trigger the AI to speak according to the interaction script.
Intelligent Interaction
Note
The current intelligent interaction feature only supports Alibaba International. If you are streaming on other platforms, you can skip this step.
Setting Entrance
- On the live broadcast page, click on “Intelligent Interaction,” select the live platform, and the supported intelligent interaction features will be randomly displayed.
Q&A Library Settings
- Creating a New Q&A:
- On the product homepage, click on Q&A Library - Add Q&A, and a popup window will appear.
- Fill in the rule name, keywords, reply text, and upload a reply video. Click Save.
Note
Rule Name: Name the rule for easy identification.
Keywords: If a viewer’s question in the live room contains any of these keywords, it will trigger the AI to answer.
Reply Content: You can add up to 5 replies. Include variables like [Viewer’s Nickname] and [Viewer’s Country] for personalized responses.
Sequential Reply: Replies in sequence when triggered.
Random Reply: Randomly selects a reply when triggered.
Reply Video: If configured, the video will be displayed at the specified position until the AI’s reply ends.
- Adjusting Q&A Activation Status:
- Click Q&A Library - Switch to close or open the Q&A rule. When closed, the Q&A rule will not take effect after the live broadcast starts.
- Turning on Q&A Library Switch in the Live Room:
- On the live broadcast editing page, click Intelligent Interaction - Platform, select “Alibaba International,” and turn on the Q&A Library switch. This must be done after starting the live broadcast and capturing the barrage for the function to work.
Greeting Rules Settings
- Greeting Content: You can add up to 5 replies, including variables like [Viewer’s Nickname] and [Viewer’s Country].
- Sequential Reply: Replies in sequence when triggered.
- Random Reply: Randomly selects a reply when triggered.
- On the live broadcast editing page, click Intelligent Interaction - Platform, select “Alibaba International,” turn on the Greeting switch, and click the edit icon to open the editing window. Fill in the reply text and click Save.
Sending Business Cards and Product Catalogs
- On the live broadcast editing page, click Intelligent Interaction - Platform, select “Alibaba International,” turn on the “Send Business Cards” switch, and turn on the “Send Product Catalogs” switch.
Note
These functions will only take effect after starting the live broadcast and capturing the barrage.
How to Start Live Barrage Capture
- Start Broadcasting in Virbo Live
- Follow the steps for “Start/End Broadcast” on the live broadcast editing page.
- Install the Plugin in Chrome
- Ensure Chrome is up to date, then download the plugin from the provided link . After downloading, unzip locally.
- Configure the Plugin in Chrome
- Open Chrome, go to Settings - Extensions - Manage Extensions, enable Developer mode, click “Load Unpacked,” and select the unzipped folder. Enable “Allow in incognito mode” in the plugin details.
- Copy the Live Control Page Link
- Copy the link of your live control page (web version) from the live platform. Paste the link into the live broadcast editing page under Intelligent Interaction - Live Room Link Input, then click “Start Capturing.”
Note
Alibaba International currently supports automatic Q&A, automatic greetings, automatic business card sending, and automatic product catalog sending. You can turn on the corresponding switches and then configure the detailed settings for each item.
Starting/Ending the Live Broadcast
Starting the Live Broadcast
- On the live broadcast editing page, click “Start Broadcasting.”
- The AI live broadcast window will appear shortly after, displaying the AI live broadcast.
Using Your Broadcasting Partner or OBS
Note
Keep the AI live broadcast window open on the desktop during the broadcast, or it will not broadcast properly.
- Open your broadcasting partner or OBS, add a window, select the Wondershare VVB (Live Version) live window.
- Click “Start Broadcasting.” Use Alt + mouse to crop out the web bar or use the zoom function to remove it.
- During the live broadcast, you can only modify the “Artificial Interaction” function; other broadcast settings cannot be changed.
Ending the Broadcast
- When concluding the live broadcast, initiate the termination of the live stream on the platform’s broadcasting partner first, followed by clicking the “End Live” button on Virbo Live to finalize the shutdown process.
Also read:
- New 2024 Approved Talking Photo | Wondershare Virbo
- 2024 Approved How To Auto Translate YouTube Videos Into Different Languages
- Updated What Is an AI Avatar for 2024
- AI Script | Online
- New Best 7 Whiteboard Explainer Videos to Inspire You
- Updated Must-Read Learn From Deepfake Scandals & Protect Your Stream
- New Best 5 Viral Video Marketing Techniques For Big Sellers for 2024
- 2024 Approved Live Selling A Comprehensive Starters Guide
- Updated In 2024, Create AI Video with AI Avatar | Wondershare Virbo
- Unlocking TalkShopLive Pros and Tips for Live Shopping Success
- Updated In 2024, What Is an AI Headshot Generator?
- Updated In 2024, Translate Audio/Video Content From Spanish to English and Vice Versa
- Updated 2024 Approved Get To Know OpenAIs Sora and How To Use It
- Updated In 2024, Chrome Video Translator Select the Perfect Platform
- New What Is AI Generated Text, In 2024
- In 2024, Breaking Language Barriers Elevate Your Content with the Best Free Video Translator Apps
- In 2024, Voice Cloning in Descript Features, Guide & Alternatives
- New What Is AI Pixel Art Generator, In 2024
- Updated In 2024, User Choice Top Free Streaming Sites for Sports
- New In 2024, Video Translator
- Updated Ready To Dive Into Photo Talking Videos? Heres What You Need To Know
- Best 7 Photo Talking AI for 2024
- New 2024 Approved Must-Read Top 10 AI Realistic Avatar Generators
- Guide Learning the Right Ways To Start Facebook Live Shopping for 2024
- Updated In 2024, Best YouTube Video Into Text Converters A Comprehensive Guide
- New Elevate Your Content with the Best Free Video Translator Apps for 2024
- Top 7 Online Auto Subtitle Translators for Content Creators
- New Easy Tutorial How to Record and Send Talking Emoji for iPhone
- Updated In 2024, Create AI Avatar Video with Template | Wondershare Virbo Online
- Updated What Is AI Text to Video? | Wondershare Virbo Glossary
- Updated How to Enable the Text to Speech Function on iPhone
- Diverse Template
- Updated 2024 Approved YouTube Live Selling Boost Your Sales With These Tips
- New Tips for Perfecting Your Talking Face Content A Complete Guide
- New 2024 Approved How to Translate TikTok Videos? All You Want to Know
- In 2024, AI Script | Wondershare Virbo Online
- How Can I Use a Fake GPS Without Mock Location On Oppo A79 5G? | Dr.fone
- How to Reset a Locked Itel A60s Phone
- 6 Fixes to Unfortunately WhatsApp has stopped Error Popups On Gionee F3 Pro | Dr.fone
- Cellular Network Not Available for Voice Calls On Honor Magic V2 | Dr.fone
- In 2024, Guide to Mirror Your Poco M6 Pro 4G to Other Android devices | Dr.fone
- Full Guide to Hard Reset Your Tecno Phantom V Flip | Dr.fone
- Forgotten The Voicemail Password Of Samsung Galaxy M34? Try These Fixes
- 10 Best Fake GPS Location Spoofers for Oppo A18 | Dr.fone
- In 2024, How Can OnePlus Nord N30 SEMirror Share to PC? | Dr.fone
- In 2024, Unlock Your Xiaomi Redmi Note 12 4Gs Potential The Top 20 Lock Screen Apps You Need to Try
- How to Screen Mirroring Huawei Nova Y71? | Dr.fone
- In 2024, How to Track Motorola Moto G 5G (2023) Location by Number | Dr.fone
- How To Recover Apple iPhone 12 mini Data From iTunes? | Dr.fone
- In 2024, 9 Mind-Blowing Tricks to Hatch Eggs in Pokemon Go Without Walking On Apple iPhone 6 | Dr.fone
- How To Remove Passcode From Apple iPhone 7 Plus? Complete Guide | Dr.fone
- In 2024, Downloading SamFw FRP Tool 3.0 for Infinix Smart 7 HD
- Reasons why Pokémon GPS does not Work On Tecno Spark Go (2023)? | Dr.fone
- Title: 2024 Approved Unveiling the Secrets of Shopee Livestream Selling System
- Author: Sam
- Created at : 2024-05-19 03:34:57
- Updated at : 2024-05-20 03:34:57
- Link: https://ai-voice-clone.techidaily.com/2024-approved-unveiling-the-secrets-of-shopee-livestream-selling-system/
- License: This work is licensed under CC BY-NC-SA 4.0.
