
:max_bytes(150000):strip_icc():format(webp)/inside-impero-cinema--central-region--asmara--eritrea----1174900385-f49e10d112a6451c89a8310bdb0ecc4e.jpg)
2024 Approved Ultimate Guide to Translating YouTube Videos Without CC
Ultimate Guide to Translating YouTube Videos Without CC
We are living in the age of social media, and YouTube is the world’s most popular video-sharing social platform. People use it to share knowledge, entertainment, and their views on diverse subjects. As it’s a global platform, people from all over the world can upload their content. This can, sometimes, create problems, particularly if the content is in a foreign language. Unfortunately, the language barrier hinders our understanding of a topic more often than we admit. While the YouTube Closed Captions (CC) feature offers some respite, not all videos have this option. In this article, we will discusshow to translate YouTube video without CC on your personal computer, so that you can explore and enjoy any content you want. Let’s dive in!
Part 1. Tool Introduction for Translating YouTube Videos Without CC
In this section, we will introduce you to software that can help you translate YouTube video without cc. And the tool is Wondershare Virbo.
What is Wondershare Virbo for YouTube Translation
Many people know Wondershare’s Virbo as the leading platform forAI Avatar video creation . But, recently, it unveiled some new features to further simplify the Avatar video creation process. If you don’t know, one of the fantastic new features isAI video translation .
It automatically detects and translates your voiceover in video content into different languages. All you need to do is upload your video and select the target language. That’s all. Virbo’s AI algorithm automatically translates and synchronizes the dubbing in your videos. This eliminates the need to manually add overdubs in post-production. This tool is available on Windows PC and Mobile Apps, and you can also use it online.
Translate Online Download APP Now Free Download
Unique Features of Virbo Auto Translate
As highlighted above, Wondershare Virbo can translate your videos with automation. In this regard, let’s explore its auto-translate feature to understand how it turns out to be a helpful option:
- Extensive Language Support: Virbo can translate videos into more than 20 languages. You can generate respective AI-cloned voices by selecting the appropriate source and target languages.
- Subtitle Generation: While you can translate a video, it can also generate translated subtitles. However, ensure that the origial video that you want to translate does not have subtitles, it would help achieve optimal accuracy and quality of the generated subtitles.
- Advanced Lip-Sync Option: The lip-sync feature changes the lips’ movement according to the words spoken after being translated into the target language. For the successful execution of this feature, you need to ensure a proper clip is added according to the tool’s requirements.
- Retains Background Music: The background music from the original video can be retained after the translation process is concluded. It will replace the human voice for translation, and the music will be the same.
Additional Features of Wondershare Virbo
Wondershare Virbo isn’t limited to an AI video translation feature; it is a comprehensive AI video generator. Without a camera and crew, anyone can make engaging videos. The following are some incredible features of Virbo that you should go through for a clear picture:
- AI Script: If you fail to describe your story through appropriate words, try this feature of Wondershare Virbo. It can write a compelling script based on your prompts and requirements. You can enter the topic in 2000 characters and choose a script tone using smart optimization.
- AI Avatar: As stated earlier, you don’t need a crew to make videos with Virbo. This AI software offers hundreds of AI avatars to cut the need for actors and artists. Wondershare Virbo has avatars from diverse ethnicities, attire, races, age groups, and regions.
- AI Talking Photos: To make funny videos of your friends, Wondershare Virbo offers a talking photo feature. In this regard, upload a straight-looking image of your friend and choose the video layout. Add a script in audio or text format so the picture can start talking.
Translate Online Download APP Now Free Download
Part 2. Step-by-Step Guide: Auto-Translating YouTube Videos Without Closed Captions
Below is a simple step-by-step guide to translate Youtube video to English without cc. You can also use the same steps to translate your video into other languages like Chinese, German, Hindi, etc.
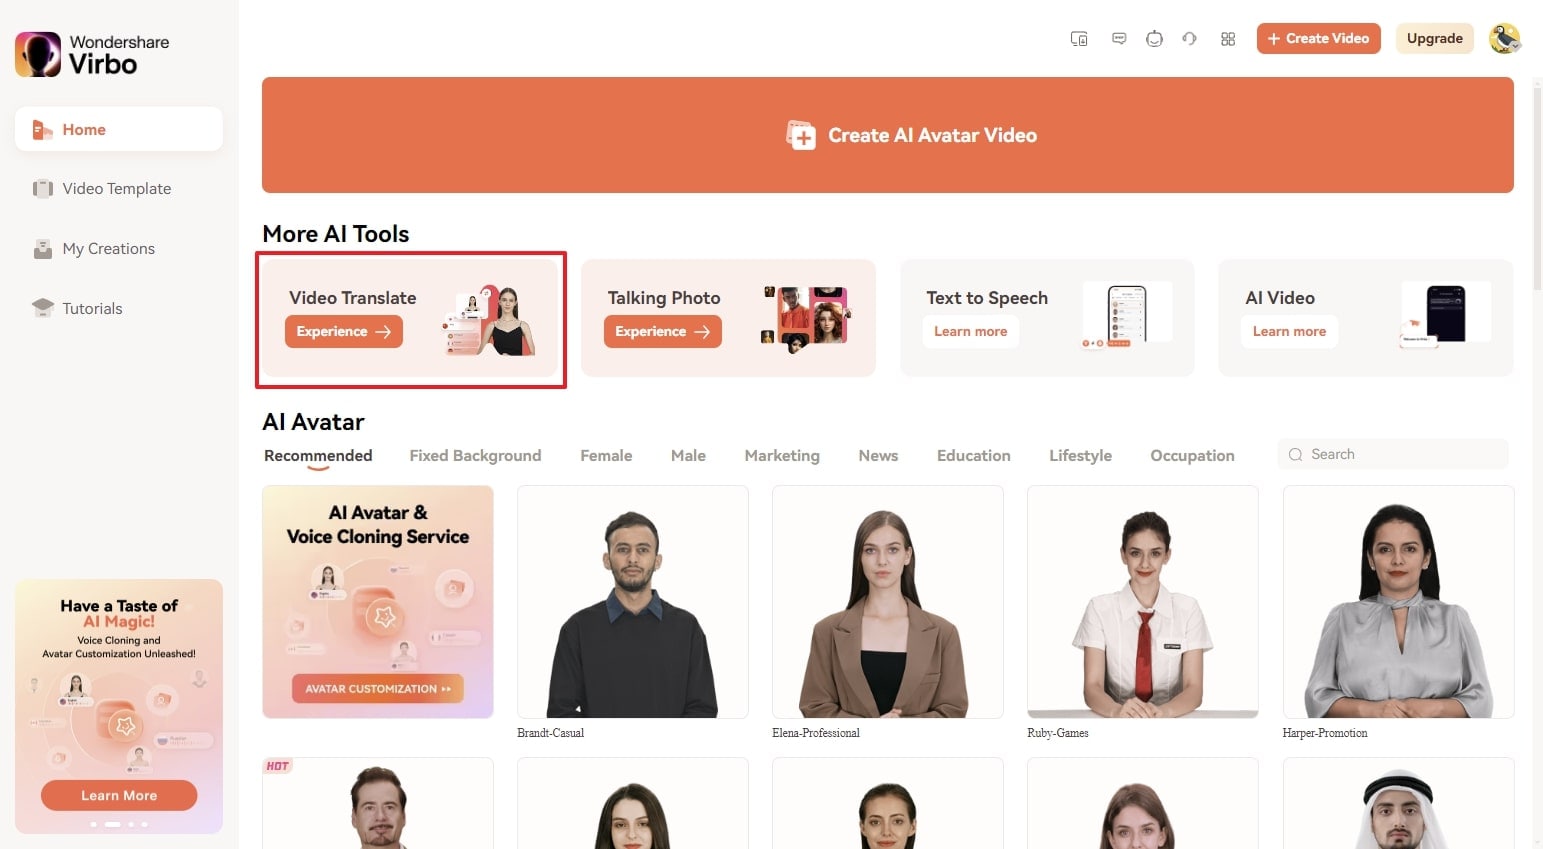
Step1 Download Virbo and launch its video translator
Go to the official Virbo link and download its latest version (or you can directly click the following download button). Install it on your computer. Once the setup finishes, launch Virbo and go to Video Translator as seen above.
Translate Online Download APP Now Free Download
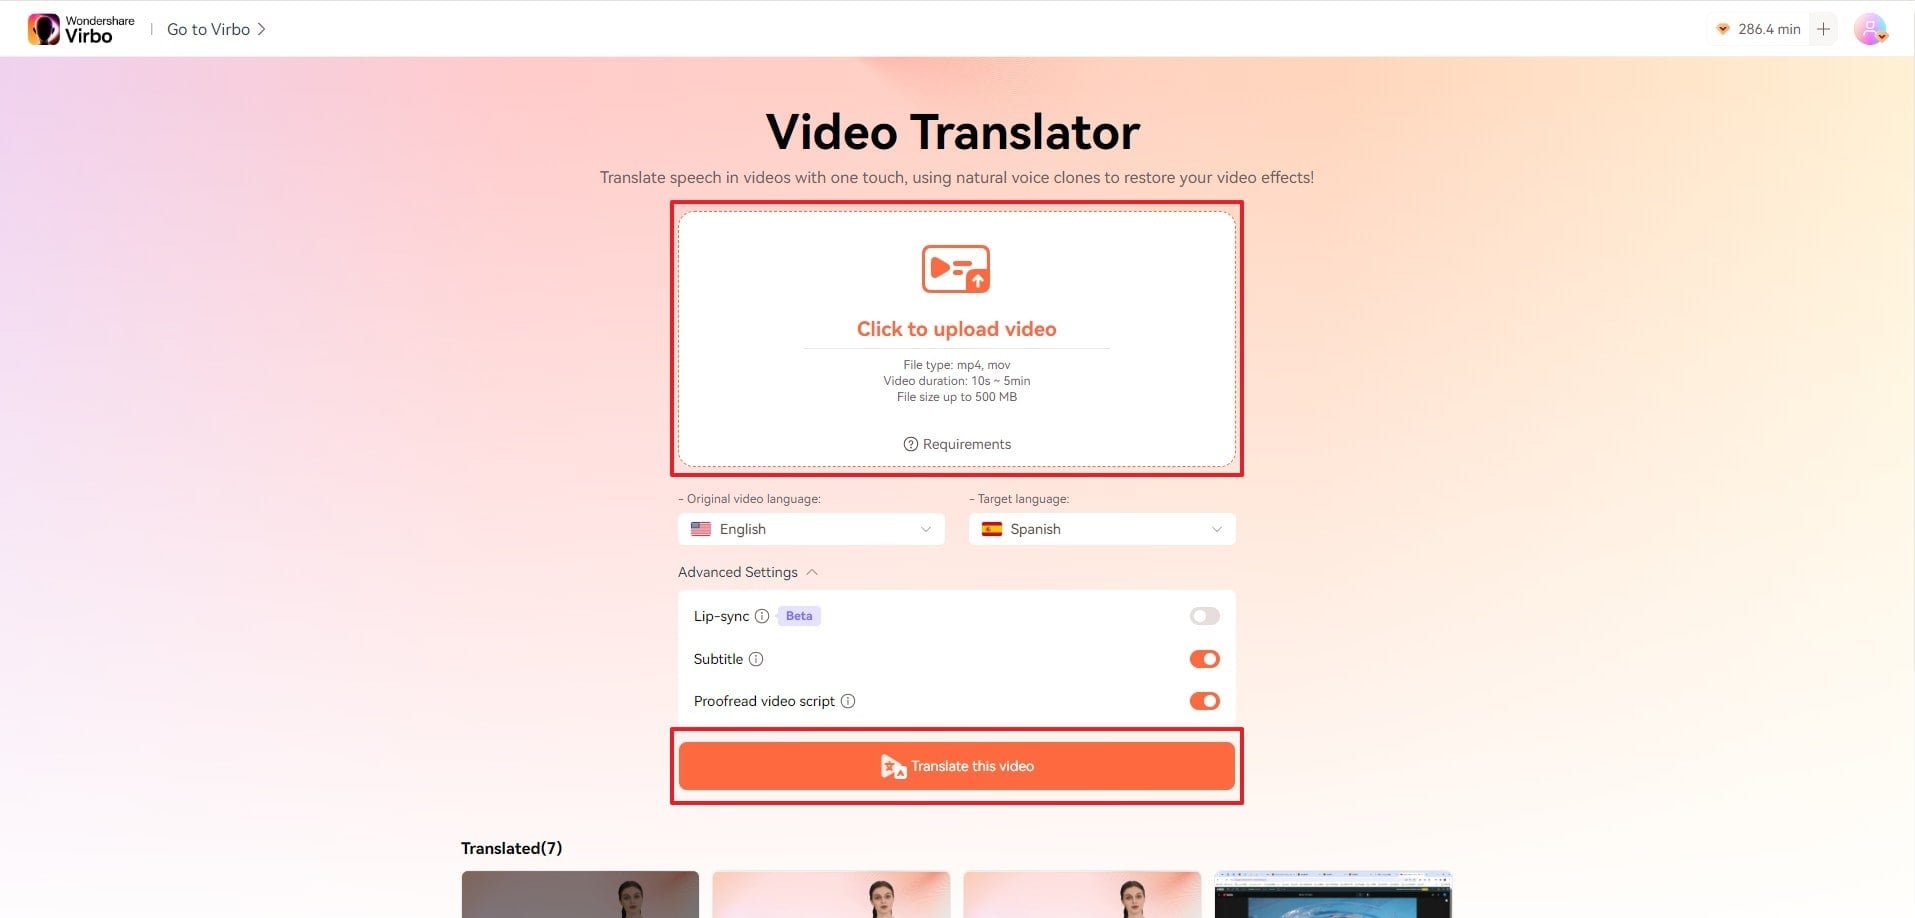
Step2 Set your preferences and start translating videos
Upload a video, set its original language and the language you want it translated into. Now select the rest of the settings as per your requirements. Finally, Click the Translate this video button to begin translation.

Step3 Preview the translated video, make changes, and download
When the auto translation completes, preview the translated content. Check for any mistakes and correct them if necessary. If everything is good, then click the Download button at the bottom to save it on your device.

Translate Online Download APP Now Free Download
Part 3. Tips for Effective Translation - How To Translate Correctly With AI Tools
AI tools are just as good as people using them. If you’re not vigilant and don’t review the output, chances are you will get inaccurate or bad translations. Below are our tips to effectivelytranslate YouTube video without cc that can help you get the most out of any AI translation tool.
01 Understand the Context
AI tools often lack a complete understanding of the context. Writing a sentence out of context can totally change the message being conveyed. Therefore, you understand the overall meaning before finalizing a translation draft.
02 Clear Up any Ambiguities
Ambiguous phrases are words in a language that convey more than one meaning, which can lead to inaccurate translations. So, clear up any ambiguous terms or expressions. Selecting a particular meaning of a phrase for your translation requires a keen eye for detail.
03 Consider the Cultural Nuances
Every two cultures are different. This is particularly true if the two are from vastly different geographical regions of the world. So, you have to take into account the cultural nuances of both languages to ensure the translation doesn’t convey unintended meaning.
04 Use Reputable & Accurate Tools
Always use reputable names for your transactions. There’s a good reason why some tools are more popular than others. Take Wondershare Virbo as an example. Virbo provides accurate and better translations for YouTube Videos than most other tools in the market.
05 Don’t Be Afraid To Customize
Sometimes, the translation doesn’t need to be accurate word for word. You can customize the translation to convey the message in a better way. Some AI tools allow customization. You can adjust settings or provide additional context to improve the accuracy of a translation.
06 Handle Idioms With Care
AI tools don’t translate idiomatic expressions in a good way. They translate in a literal way, which destroys the entire message. So, you should be aware of idiomatic expressions and always ready to find their best equivalents in a target language.
07 Hire A Human Editor
If possible, have a human editor take a look and review the translation. The human eye can catch certain nuances that AI might miss. With a human editor, you have the confidence that they will be updated about translations and how to improve the message being conveyed.
FAQs
Before concluding the discussion, let’s clarify some common queries in this section. Continue reading to get your answer onhow to translate YouTube videos without CC :
- How do you watch YouTube videos in another language?
Watching YouTube videos in another language is not directly supported by YouTube. If you want to translate it, download the video using any third-party service. Consequently, upload it on Wondershare Virbo and translate it into any language you want.
- How to translate YouTube comments?
If any comment on your video is in another language, translate it to respond to them. For this purpose, copy that comment and head to Google Translate on your browser. There, choose languages, and the comment will be automatically translated. For more precise results, you can use the AI Translation feature of Wondershare Virbo.
- How do you download YouTube SRT files?
YouTube has no built-in option to provide you with an SRT file of subtitles. Instead, you can use Virbo - AI Video Translator (Online Version) to download the YouTube video SRT File. It even allows you to proofread the script of the video before exporting it to your device.
Translate Online Download APP Now Free Download
Conclusion
All said, Wondershare Virbo emerges as an indispensable solution for transcending language barriers for YouTube video translation. Its unique features, as outlined in the step-by-step guide, empower you to effortlessly translate youtube video without cc into any language of your choice. For effective translation, the tool ensures not just convenience but also accuracy, addressing the nuances of language with finesse. With Wondershare Virbo, the future of multilingual content creation on YouTube becomes not just a possibility but a seamless reality. So, try Virbo’s new features and let us know what you think!
Translate Online Download APP Now Free Download
Live Selling: A Comprehensive Starter’s Guide
The spread of the internet has changed consumer purchasing habits in recent years. Now, social media platforms are the growing digital marketplaces for products. The COVID-19 pandemic accelerated the trend of online shopping, and people now prefer buying online. This digital shopping mode eliminates the struggle to leave physical spaces in their busy routines.
The same goes for the marketing field, which has revolutionized with live sales. Venders prefer to sell items online to generate the greatest sales without physical systems. If that interests you, get more insights onlivestream selling through this article.

Part 1. A Basic Preview To “Live Shopping”
Livestream selling or live shopping refers to live product demonstrations on digital platforms. The retailer or host has to introduce themselves, their store, and sale before describing products. They explain each detail of the products and their prices while holding them in a direct video call. During that, ensure that followers can see the product and interact through comments.
Customers perceive it as a lively shopping experience instead of websites loading products. It creates a sense of connection as people feel like shopping in physical stores. Aslive selling has a core element of being in real time, people can question and know about the product. Compared with traditional shopping, one can place an order through links mentioned in the livestream.

Is It Beneficial To Sell Live in This Digital Industry?
Live selling is an emerging way to attract customers to shop on online marketplaces. According toresearch , 76% of US adults prefer shopping online for clothes and groceries. It focuses on customers’ desire to know about products that generate sales. Thus, it proves beneficial in many terms, among which a few are elaborated below:
1. Engaging and Updating Communication
Businesses can directly engage with a broader audience by entering the live selling industry. They get knowledge about current product trends to introduce similar things. Besides, this method eliminates the need to target customers in-store or via e-mails. Now, businesses can market their product and live sales simultaneously.
2. Reduced Return Rates and Customer Satisfaction
Before live selling, people need to search for what they want by visiting the official sites of brands. Also, they scroll to read honest product reviews for the validity of products. With live selling, customers can view the products and ask questions during the live sessions. Therefore, it lowers the return rates to 40% while increasing customer satisfaction and trust.
3. Potential Growth and Virtual Demonstrations
This online shopping mode has the potential to upscale your business. According to a survey, companies can see top-line growth upward of 25% through live selling. Apart from upscaling, they can see their digital competitors and define new ways to stand out. Sellers can compete by providing discount coupons and virtual demonstrations of products.
Part 2. What’s the Core Elements of a Live Video
Selling products via online videos is a marketing technique that is rapidly growing. Already, 80% of marketers confess that livestream shopping is integral to boosting sales online. If you are going tosell live as a seller, you should read this part for some insights. Here, you will learn the core elements of a live video to make your sale successful:
1. Livestream Selling Platform
To expand the product’s reach, it is essential to carefully select anonline live selling platform. It could be a native live shopping platform, social media, or merchant website. As Gen Z and millennials are more attracted to live streaming, social media platforms would be ideal hosts. Many brands are integrating social media with e-commerce to cut the need for two separate apps.
2. Real-Time Session With Host
Upon choosing a suitable platform, a live video session is arranged. For that purpose, you need a host who should seem trustworthy and relatable to the product. There could be more than one person in the live sale to demonstrate products and share tips and benefits. Besides, the host needs to interact with the customers and share thoughts about the product.
3. Points of Product or Video Content
The main object of live selling is to sell products, but the best way is to create hype. In this regard, brands offer special discounts and giveaways valid only during live streams. It increases the tendency of customers to make purchases during the live sessions. The live session must be 20-30 minutes and include click-on links for easy buying.
Significant Statistics To Support Increasing Influence of Live Selling
The concept of livestream sales emerged decades ago but gained aspotlight in 2016 in China. Afterward, it flourished worldwide and grew to 171 billion USD in 2020. An estimation of the US livestream shopping market reveals worth $35 billion by 2024.Live selling is evolving not only in the US but also in other regions of the globe.
| Live Streaming Sales in Regions | |
|---|---|
| China | 4.9 trillion yuan in 2023 |
| The United States | $17 billion in 2023 |
| Europe | Influenced 50% more than physical or online Purchasing |
| Livestream shopping Platforms (US 2022) | |
| Facebook Live | 55% |
| YouTube Live | 52% |
| 46% | |
| Amazon Live | 30% |
Part 3. Live Selling Strategies To Boost Revenue
Anyone canlive sale online because you have to explain products and respond to queries. Yet not everyone generates the same revenue and gets immense popularity. The reason is operative strategies and tips, which you can use in the below discussion to gear up your shopping stream.
1. Use 24/7 Hours Seamless AI Live Streaming Software
Most sellers are unaware of current digital trends and the right actions for live selling. In that context, you need a platform to provide everything from script to selling videos. However, usingWondershare Virbo Live and staying in a single place is suggested to plan and execute the live shopping. Virbo Live is an AI tool that connects sellers with customers through streaming videos.
- AI Avatar: Wondershare Virbo Live offers an AI avatar feature for start-ups and small business owners. It eliminates the need for a well-groomed host or managing crew. AI avatars can perfectly mimic your actions with natural movements to engage the audience.
- Q&A Library: The platform allows the creation of automatic responses with a personalized library of questions. The major advantage of having such an option is that it helps users connect better with the audience.
- Text Interaction: The quality of content can be easily manipulated and managed across Wondershare Virbo Live. You can provide text to trigger your AI streamer to speak within the live stream.
Compatibility with Platforms: YouTube, LinkedIn, Facebook, Instagram, TikTok, Twitch, Alibaba, and X(Twitter).
Get Started Online Free Download
Steps To Create a Complete Livestream Room With Wondershare Virbo Live
Wondershare Virbo Live is available online and offers a cloud-based service. To fully utilize this live selling strategy, follow these steps and explore this all-in-one tool:
- Step 1. Access the Main Interface of Virbo Live
Start the process on Wondershare Virbo Live by clicking the “Create Stream Room Now” button. You need to select the “Create a Blank Livestream Room” button to initiate the livestream room creation.

Get Started Online Free Download
- Step 2. Customize the Live Stream Video in Virbo Live
Once you find yourselves in the editing section, add a script you want to use in your live-stream video. While staying in the “Script lines” section, you can add a script in the form of text or audio. If you wish to add an audio script, go to the “Audio” tab and select “Upload local voice.” This voice will then be used across the live stream video in Virbo Live.

- Step 3. Set Avatar and Other Elements Before Starting Livestreaming
Following this, you can add your required avatars, background, and stickers to the video with the options at the top of the window. Finally, when you are done exploring, hit the “Start livestream” option and live sell on any of the supported platforms.

2. Pick an Appropriate Date and Time
Another tip to consider is choosing the right time and date for the maximum viewers. In this regard, retailers should avoid a popular shopping period such as Black Friday. In contrast, it is suggested to pick weekends or holidays where customers must be free to join. Also, never choose the working hours of any day and consider the time zones for a global audience.
3. Keep the Conversation Engaging and Funny
Customers can read the product details and see how it looks, so what difference will they get from a live sale? Considering this perspective, sellers should bring something unique to the shopping stream. For this purpose, they can explain the product’s benefits and use cases. Furthermore, they should keep their tone friendly and humorous for the targeted audience.
Conclusion
To summarize,livestream sale s is an emerging concept to boost revenue and sales. As shown in this article, it is fruitful for retailers and significantly contributes to generating sales. Like China’s ever-changing live selling industry, Wondershare Virbo Live is also an emerging tool. It is emerging to change virtual selling dynamics by providing seamless live-stream videos.
Launching Your Live Room
Launching Your Live Room
Explore step-by-step instructions on decorating your space, uploading local images and videos, adding engaging AI interactions, etc. Elevate your streaming experience and captivate your audience with a seamlessly executed live room. Dive into our comprehensive guide now!
02Uploading Local Images and Videos
07AI Intelligent Script Generation
11Starting/Ending the Live Broadcast
Decorating Your Live Room
Decoration Guidance
- Click on the product homepage and create a blank live room to initiate a new live session.

Create a blank live room
- Upon creating a blank live room, the live room editing page will open. The left side serves as the operation area, the right side as the canvas area, and the materials area is located above.

Livestream room navigation
- Click on the templates to use pre-designed combinations of background, virtual hosts, and stickers.

Select a template
- Customize the background from the background library. During the live broadcast, only one background can be used.

Livestream room customization
- Choose a virtual host from the virtual host library. Only one virtual host can be used during the live session.
![]()
Choose a virtual host
- Add stickers from the sticker library. Multiple stickers can be used during the live broadcast.
- After selecting materials, adjust their position and size in the canvas area. Right-click to modify layers, copy, or delete materials.
Uploading Local Images and Videos
Upload background images or videos
- Upload: Click Background -> Upload Background -> Select file to upload. Materials will be displayed in “My Background” after uploading.

Upload Background
- Apply: Click Background -> My Background, then click on the material to use it on the canvas.
- Delete: Hover over the material and click the delete icon to remove it.

Delete Background
Note
Background upload requirements:
- Image and video dimensions should be 9:16
- Image formats: JPG/JPEG/PNG
- Video formats: MP4/MOV
- Resolution should not exceed 1080P
- Video duration should not exceed 30 minutes
- File size should not exceed 1GB
Upload sticker images or videos
- Upload: Click Sticker -> Upload Sticker -> Select file to upload. Materials will be displayed in “My Sticker” after uploading.

Upload Sticker
- Apply: Click Sticker -> My Sticker, then click on the material to use it on the canvas.
- Delete: Click Sticker -> My Sticker, hover over the material, click the delete icon to remove it.

Delete Sticker
Note
Sticker upload requirements:
- Image and video dimensions are flexible.
- Image formats: JPG/JPEG/PNG
- Video formats: MP4/MOV
- Resolution should not exceed 1080P
- Video duration should not exceed 30 minutes
- File size should not exceed 1GB
Text-Driven Live Room
Script Guidance
- Input script text: Copy and paste your script into the script dialogue box.

Text Scripts Inset
- Choose a matching tone: Click the voice-over entrance above, select a suitable tone, and preview it.
- Preview: Click the “Preview” button below the text to listen.
Audio-Driven Live Room
Audio Guidance
- Upload audio: Click Script -> Audio -> Upload local voice and upload the local file.

Upload Audio
- Preview audio: After uploading, click to preview the audio.

Preview Audio
- Audio sorting: Hold and drag to sort the audio files.

Audio sorting
- Audio sorting: Hold and drag to sort the audio files.

Modifying Live Room Name
Method Guidance
- Method 1: Click the edit button in the upper-left corner of the edit page to rename the live room.

Rename Livestream Room
- Method 2: Product homepage -> My Live Rooms -> Click on the more options for an individual live room -> Choose Rename.
Adding AI Identification
Step Guidance
- On the live room editing page, click on the checkbox before the AI identification to enable or disable it.
AI Intelligent Script Generation
Generation Guidance
- Click the “AI Intelligent Script” button below the script, a popup will appear.
- Enter your product name (mandatory), selling points (optional), promotional information (optional), select language and style, then click generate.

AI Script
- The generated result can be further modified, click “Use” to add it to the script dialogue box.
AI Translation
Translation Guidance
- Click the “AI Translation” button below the script, a popup will appear.
- Place the text to be translated on the left, click the middle arrow to select the language for translation (e.g., English), and click translate.

AI Translation
- The generated result can be further modified, click “Use” to add it to the script dialogue box.

AI Translation Result
Manual Interaction
Microphone Interaction
- Operational Flow:
- Click Manual Interaction -> Microphone, and select the microphone device.
- Speak into the microphone and observe the sound wave status.
- Open “Start Live,” wait for the appearance of the virtual host image, and click “Open Mic Takeover.” The virtual host’s mouth will be closed, and your voice will drive the virtual host to speak.
- After speaking, click “End Takeover,” and the virtual host will resume reading the scripted dialogue.
- Click Manual Interaction -> Microphone, and select the microphone device.
- Grant Browser Microphone Access:
- Google Chrome:
*Open Chrome, click the settings icon in the top right.
* Click “Settings,” open the settings page. Select “Privacy and Security” and then click “Site Settings.”
*Enter the site settings page, click “Microphone.”
* On the microphone authorization page, select that the site can request the use of your microphone.
* After these settings, when the browser needs to use the camera or microphone, a device request box will pop up on the page. Select “Allow.” - Mozilla Firefox:
*Open Firefox, click the settings icon in the top right, and click “Settings.”
* Open the settings page, click “Privacy & Security,” and find “Microphone Permissions.” Click “Settings” next to “Microphone.”
*Enter the settings page, add the site that requests the use of your microphone to the list, and click “Save Changes.”
* After these settings, when the browser needs to use the camera or microphone, a device request box will pop up on the page. Select “Allow.” - Sogou Browser:
*Open Sogou Browser, click the settings icon in the top right, and click “Options.”
* Open the options page, click “Advanced,” find “Privacy - Browsers on the Mac System:
*Locate “System Preferences” on your Mac dock and click the icon. Once opened, find “Security & Privacy” and click to open.
* On the “Security & Privacy” page, select “Privacy,” then click on “Microphone” and set the applications that need to use the microphone to “Allow.”
- Google Chrome:
Text Interaction
- Click on “Artificial Interaction” and enter interaction scripts in the input box below.
- Click “Add Text” to add it to the interaction list. After starting the live broadcast, each interaction script will have a send button.

Text Interactionn
- Click “Send” to trigger the AI to speak according to the interaction script.
Intelligent Interaction
Note
The current intelligent interaction feature only supports Alibaba International. If you are streaming on other platforms, you can skip this step.
Setting Entrance
- On the live broadcast page, click on “Intelligent Interaction,” select the live platform, and the supported intelligent interaction features will be randomly displayed.
Q&A Library Settings
- Creating a New Q&A:
- On the product homepage, click on Q&A Library - Add Q&A, and a popup window will appear.
- Fill in the rule name, keywords, reply text, and upload a reply video. Click Save.
Note
Rule Name: Name the rule for easy identification.
Keywords: If a viewer’s question in the live room contains any of these keywords, it will trigger the AI to answer.
Reply Content: You can add up to 5 replies. Include variables like [Viewer’s Nickname] and [Viewer’s Country] for personalized responses.
Sequential Reply: Replies in sequence when triggered.
Random Reply: Randomly selects a reply when triggered.
Reply Video: If configured, the video will be displayed at the specified position until the AI’s reply ends.
- Adjusting Q&A Activation Status:
- Click Q&A Library - Switch to close or open the Q&A rule. When closed, the Q&A rule will not take effect after the live broadcast starts.
- Turning on Q&A Library Switch in the Live Room:
- On the live broadcast editing page, click Intelligent Interaction - Platform, select “Alibaba International,” and turn on the Q&A Library switch. This must be done after starting the live broadcast and capturing the barrage for the function to work.
Greeting Rules Settings
- Greeting Content: You can add up to 5 replies, including variables like [Viewer’s Nickname] and [Viewer’s Country].
- Sequential Reply: Replies in sequence when triggered.
- Random Reply: Randomly selects a reply when triggered.
- On the live broadcast editing page, click Intelligent Interaction - Platform, select “Alibaba International,” turn on the Greeting switch, and click the edit icon to open the editing window. Fill in the reply text and click Save.
Sending Business Cards and Product Catalogs
- On the live broadcast editing page, click Intelligent Interaction - Platform, select “Alibaba International,” turn on the “Send Business Cards” switch, and turn on the “Send Product Catalogs” switch.
Note
These functions will only take effect after starting the live broadcast and capturing the barrage.
How to Start Live Barrage Capture
- Start Broadcasting in Virbo Live
- Follow the steps for “Start/End Broadcast” on the live broadcast editing page.
- Install the Plugin in Chrome
- Ensure Chrome is up to date, then download the plugin from the provided link . After downloading, unzip locally.
- Configure the Plugin in Chrome
- Open Chrome, go to Settings - Extensions - Manage Extensions, enable Developer mode, click “Load Unpacked,” and select the unzipped folder. Enable “Allow in incognito mode” in the plugin details.
- Copy the Live Control Page Link
- Copy the link of your live control page (web version) from the live platform. Paste the link into the live broadcast editing page under Intelligent Interaction - Live Room Link Input, then click “Start Capturing.”
Note
Alibaba International currently supports automatic Q&A, automatic greetings, automatic business card sending, and automatic product catalog sending. You can turn on the corresponding switches and then configure the detailed settings for each item.
Starting/Ending the Live Broadcast
Starting the Live Broadcast
- On the live broadcast editing page, click “Start Broadcasting.”
- The AI live broadcast window will appear shortly after, displaying the AI live broadcast.
Using Your Broadcasting Partner or OBS
Note
Keep the AI live broadcast window open on the desktop during the broadcast, or it will not broadcast properly.
- Open your broadcasting partner or OBS, add a window, select the Wondershare VVB (Live Version) live window.
- Click “Start Broadcasting.” Use Alt + mouse to crop out the web bar or use the zoom function to remove it.
- During the live broadcast, you can only modify the “Artificial Interaction” function; other broadcast settings cannot be changed.
Ending the Broadcast
- When concluding the live broadcast, initiate the termination of the live stream on the platform’s broadcasting partner first, followed by clicking the “End Live” button on Virbo Live to finalize the shutdown process.
02Uploading Local Images and Videos
07AI Intelligent Script Generation
11Starting/Ending the Live Broadcast
Decorating Your Live Room
Decoration Guidance
- Click on the product homepage and create a blank live room to initiate a new live session.
Create a blank live room
- Upon creating a blank live room, the live room editing page will open. The left side serves as the operation area, the right side as the canvas area, and the materials area is located above.
Livestream room navigation
- Click on the templates to use pre-designed combinations of background, virtual hosts, and stickers.
Select a template
- Customize the background from the background library. During the live broadcast, only one background can be used.
Livestream room customization
- Choose a virtual host from the virtual host library. Only one virtual host can be used during the live session.
![]()
Choose a virtual host
- Add stickers from the sticker library. Multiple stickers can be used during the live broadcast.
- After selecting materials, adjust their position and size in the canvas area. Right-click to modify layers, copy, or delete materials.
Uploading Local Images and Videos
Upload background images or videos
- Upload: Click Background -> Upload Background -> Select file to upload. Materials will be displayed in “My Background” after uploading.
Upload Background
- Apply: Click Background -> My Background, then click on the material to use it on the canvas.
- Delete: Hover over the material and click the delete icon to remove it.
Delete Background
Note
Background upload requirements:
- Image and video dimensions should be 9:16
- Image formats: JPG/JPEG/PNG
- Video formats: MP4/MOV
- Resolution should not exceed 1080P
- Video duration should not exceed 30 minutes
- File size should not exceed 1GB
Upload sticker images or videos
- Upload: Click Sticker -> Upload Sticker -> Select file to upload. Materials will be displayed in “My Sticker” after uploading.
Upload Sticker
- Apply: Click Sticker -> My Sticker, then click on the material to use it on the canvas.
- Delete: Click Sticker -> My Sticker, hover over the material, click the delete icon to remove it.
Delete Sticker
Note
Sticker upload requirements:
- Image and video dimensions are flexible.
- Image formats: JPG/JPEG/PNG
- Video formats: MP4/MOV
- Resolution should not exceed 1080P
- Video duration should not exceed 30 minutes
- File size should not exceed 1GB
Text-Driven Live Room
Script Guidance
- Input script text: Copy and paste your script into the script dialogue box.
Text Scripts Inset
- Choose a matching tone: Click the voice-over entrance above, select a suitable tone, and preview it.
- Preview: Click the “Preview” button below the text to listen.
Audio-Driven Live Room
Audio Guidance
- Upload audio: Click Script -> Audio -> Upload local voice and upload the local file.
Upload Audio
- Preview audio: After uploading, click to preview the audio.
Preview Audio
- Audio sorting: Hold and drag to sort the audio files.
Audio sorting
- Audio sorting: Hold and drag to sort the audio files.
Modifying Live Room Name
Method Guidance
- Method 1: Click the edit button in the upper-left corner of the edit page to rename the live room.
Rename Livestream Room
- Method 2: Product homepage -> My Live Rooms -> Click on the more options for an individual live room -> Choose Rename.
Adding AI Identification
Step Guidance
- On the live room editing page, click on the checkbox before the AI identification to enable or disable it.
AI Intelligent Script Generation
Generation Guidance
- Click the “AI Intelligent Script” button below the script, a popup will appear.
- Enter your product name (mandatory), selling points (optional), promotional information (optional), select language and style, then click generate.
AI Script
- The generated result can be further modified, click “Use” to add it to the script dialogue box.
AI Translation
Translation Guidance
- Click the “AI Translation” button below the script, a popup will appear.
- Place the text to be translated on the left, click the middle arrow to select the language for translation (e.g., English), and click translate.
AI Translation
- The generated result can be further modified, click “Use” to add it to the script dialogue box.
AI Translation Result
Manual Interaction
Microphone Interaction
- Operational Flow:
- Click Manual Interaction -> Microphone, and select the microphone device.
- Speak into the microphone and observe the sound wave status.
- Open “Start Live,” wait for the appearance of the virtual host image, and click “Open Mic Takeover.” The virtual host’s mouth will be closed, and your voice will drive the virtual host to speak.
- After speaking, click “End Takeover,” and the virtual host will resume reading the scripted dialogue.
- Click Manual Interaction -> Microphone, and select the microphone device.
- Grant Browser Microphone Access:
- Google Chrome:
*Open Chrome, click the settings icon in the top right.
* Click “Settings,” open the settings page. Select “Privacy and Security” and then click “Site Settings.”
*Enter the site settings page, click “Microphone.”
* On the microphone authorization page, select that the site can request the use of your microphone.
* After these settings, when the browser needs to use the camera or microphone, a device request box will pop up on the page. Select “Allow.” - Mozilla Firefox:
*Open Firefox, click the settings icon in the top right, and click “Settings.”
* Open the settings page, click “Privacy & Security,” and find “Microphone Permissions.” Click “Settings” next to “Microphone.”
*Enter the settings page, add the site that requests the use of your microphone to the list, and click “Save Changes.”
* After these settings, when the browser needs to use the camera or microphone, a device request box will pop up on the page. Select “Allow.” - Sogou Browser:
*Open Sogou Browser, click the settings icon in the top right, and click “Options.”
* Open the options page, click “Advanced,” find “Privacy - Browsers on the Mac System:
*Locate “System Preferences” on your Mac dock and click the icon. Once opened, find “Security & Privacy” and click to open.
* On the “Security & Privacy” page, select “Privacy,” then click on “Microphone” and set the applications that need to use the microphone to “Allow.”
- Google Chrome:
Text Interaction
- Click on “Artificial Interaction” and enter interaction scripts in the input box below.
- Click “Add Text” to add it to the interaction list. After starting the live broadcast, each interaction script will have a send button.
Text Interactionn
- Click “Send” to trigger the AI to speak according to the interaction script.
Intelligent Interaction
Note
The current intelligent interaction feature only supports Alibaba International. If you are streaming on other platforms, you can skip this step.
Setting Entrance
- On the live broadcast page, click on “Intelligent Interaction,” select the live platform, and the supported intelligent interaction features will be randomly displayed.
Q&A Library Settings
- Creating a New Q&A:
- On the product homepage, click on Q&A Library - Add Q&A, and a popup window will appear.
- Fill in the rule name, keywords, reply text, and upload a reply video. Click Save.
Note
Rule Name: Name the rule for easy identification.
Keywords: If a viewer’s question in the live room contains any of these keywords, it will trigger the AI to answer.
Reply Content: You can add up to 5 replies. Include variables like [Viewer’s Nickname] and [Viewer’s Country] for personalized responses.
Sequential Reply: Replies in sequence when triggered.
Random Reply: Randomly selects a reply when triggered.
Reply Video: If configured, the video will be displayed at the specified position until the AI’s reply ends.
- Adjusting Q&A Activation Status:
- Click Q&A Library - Switch to close or open the Q&A rule. When closed, the Q&A rule will not take effect after the live broadcast starts.
- Turning on Q&A Library Switch in the Live Room:
- On the live broadcast editing page, click Intelligent Interaction - Platform, select “Alibaba International,” and turn on the Q&A Library switch. This must be done after starting the live broadcast and capturing the barrage for the function to work.
Greeting Rules Settings
- Greeting Content: You can add up to 5 replies, including variables like [Viewer’s Nickname] and [Viewer’s Country].
- Sequential Reply: Replies in sequence when triggered.
- Random Reply: Randomly selects a reply when triggered.
- On the live broadcast editing page, click Intelligent Interaction - Platform, select “Alibaba International,” turn on the Greeting switch, and click the edit icon to open the editing window. Fill in the reply text and click Save.
Sending Business Cards and Product Catalogs
- On the live broadcast editing page, click Intelligent Interaction - Platform, select “Alibaba International,” turn on the “Send Business Cards” switch, and turn on the “Send Product Catalogs” switch.
Note
These functions will only take effect after starting the live broadcast and capturing the barrage.
How to Start Live Barrage Capture
- Start Broadcasting in Virbo Live
- Follow the steps for “Start/End Broadcast” on the live broadcast editing page.
- Install the Plugin in Chrome
- Ensure Chrome is up to date, then download the plugin from the provided link . After downloading, unzip locally.
- Configure the Plugin in Chrome
- Open Chrome, go to Settings - Extensions - Manage Extensions, enable Developer mode, click “Load Unpacked,” and select the unzipped folder. Enable “Allow in incognito mode” in the plugin details.
- Copy the Live Control Page Link
- Copy the link of your live control page (web version) from the live platform. Paste the link into the live broadcast editing page under Intelligent Interaction - Live Room Link Input, then click “Start Capturing.”
Note
Alibaba International currently supports automatic Q&A, automatic greetings, automatic business card sending, and automatic product catalog sending. You can turn on the corresponding switches and then configure the detailed settings for each item.
Starting/Ending the Live Broadcast
Starting the Live Broadcast
- On the live broadcast editing page, click “Start Broadcasting.”
- The AI live broadcast window will appear shortly after, displaying the AI live broadcast.
Using Your Broadcasting Partner or OBS
Note
Keep the AI live broadcast window open on the desktop during the broadcast, or it will not broadcast properly.
- Open your broadcasting partner or OBS, add a window, select the Wondershare VVB (Live Version) live window.
- Click “Start Broadcasting.” Use Alt + mouse to crop out the web bar or use the zoom function to remove it.
- During the live broadcast, you can only modify the “Artificial Interaction” function; other broadcast settings cannot be changed.
Ending the Broadcast
- When concluding the live broadcast, initiate the termination of the live stream on the platform’s broadcasting partner first, followed by clicking the “End Live” button on Virbo Live to finalize the shutdown process.
Best Toolbox to Translate YouTube Videos to English Subtitles
As we all know, English is the universal language spoken by the majority of people. If you are looking for the best translator that helps you to translate YouTube videos into English , stick to the article. This guide will help you to translate YouTube videos or any type of video in multiple languages. If we talk about YouTube videos, you can translate the captions, titles, descriptions, and videos without any hassle.
Part 1: Best Tool to Translate YouTube Videos to English Subtitles - Virbo
If you want to create catchy YouTube videos with less time and effort and make them accessible to people, then go for Wondershare Virbo . Expand your connectivity bytranslating YouTube videos into English and adding subtitles to them. Subtitles will help deaf people who can’t listen to your videos. Virbo is cross-platform which means you can access its functionality online also on desktop and mobile devices.

All-In-One Platform to Translate Videos
Have you ever wondered why you need a translator to translate the videos? People are living across the world and speak multiple languages. If you are creating YouTube videos, you must know it requires a lot of time to edit videos. You cannot translate videos manually because it is difficult to do.
Here, we add a plus point that Virbo offers you to upload your video to its interface and select its original and desired language to translate the video. As we know, English is the only language spoken by many people. Virbo also allows you totranslate YouTube videos into English subtitles or in other languages.

Key Features of Wondershare Virbo
- Translate Video with a few clicks: Easily translate your videos, which replicates your authentic voice and mannerisms, ensuring smooth delivery in different languages.
- Generate Script for Your Video: Generate AI scripts in a few seconds in various languages and tones.
- Generate Voice in Multiple Languages: Virbo allows you to select the accent, language, and gender according to your video.
- Cost-effective in Multiple Languages: Virbo offers a user-friendly interface under the budget. You can translate YouTube videos to English subtitles for free.
- Add AI avatars to the Video to Promote Your Brand: It provides 300+ real human avatars’ voices and languages.
Pros of Wondershare Virbo - Video Translator
- Accurate Translation: Virbo uses advanced translation technology to ensure accurate and reliable translation of video content from one language to another.
- Multiple Language Support: Virbo supports translation into multiple languages, allowing you to reach global audiences and expand your reach across different language-speaking regions.
- Ease of Use: The platform is designed to be user-friendly, with intuitive interfaces and simple controls, making it easy for you to upload, translate, and manage your video content.
- Quick Turnaround: Virbo offers fast turnaround times for video translation, allowing you to efficiently localize your content and reach international audiences in a timely manner.
- Proofread Video Script: Virbo supports proofreading for both the original and translated video scripts to ensure accuracy.
Translate Video Online Download APP Now Free Download
Part 2: Step Guidance to Translate YouTube Video to English
If you are watching YouTube videos in another language and you only understand the English language, what will happen? You will miss the overall conversation from the YouTube video. This step-by-step guidance will help you to translate YouTube videos into English.
1.Auto-translate YouTube video
Step 1: Open the YouTube and play your desired video
When you play your favorite video, go to the right bottom of the video. You will see an icon of CC that helps to translate YouTube videos into English . YouTube translate captions will automatically generate them in the English language.

Step 2: Go to the settings of the YouTube video to translate it
If CC( closed-caption) does not generate the captions in English language, then go to the settings in the bottom right corner.

Step 3: Change the language of your subtitles
You will see an option of subtitles, click on the auto-translate option. A list of languages appears, and select the English language to translate a YouTube video to English subtitles for free.

2.Translate YouTube Video to English Without CC
Sometimes, YouTube auto-translate does not provide accurate results. Due to lack of accuracy, it produces wrong translations. In this case, you will need a trusted translation service that will ensure you translate error-free translations. Whether it’s about translating titles, videos, and subtitles of YouTube videos in English or any other language, try Virbo. We will look at a few simple steps that translate your video in a few seconds.
Step 1: Open the software or download it
Virbo is available online, on desktop, and on iOS/Android devices, which means you can access it on almost various devices. Create an account on it to translate your YouTube videos.
Get Started Online Free Download
Step 2: Open the interface of Virbo
After the installation process, open the interface of Virbo. Go to the Home tab and select the option of Video translator .

Step 3: Upload the YouTube video or choose a language
You will see a new box will appear where you have to upload your desired video from the device. Make sure the voice-overs are clear in the video.
Select the original language of the video and the translated video. You can also enable the option of subtitles, its advanced AI technology will show subtitles along with the video.

Step 4: Go to My Creations to download the video
Click on the translate button to translate your video. You will see your video in the My Creations tab. Click on the download icon and choose the location to download the video to your device.

Translate Video Online Download APP Now Free Download
3. A Video Guide to Translate YouTube Video to English With A Few Clicks
Translate Video Online Download APP Now Free Download
Part 3: FAQs related to Translating YouTube Videos into English
1. Is there any tool available that translates YouTube videos to English without requiring technical expertise?
Yes, Wondershare Virbo is one of the best AI video generators that provides a user-friendly interface to translate YouTube videos into English. Beginners and professionals can easily enjoy its latest features.
2. How to translate YouTube videos into English with accuracy for free?
Accurate results are the main thing that a user wants. The video translator feature of Virbo ensures the perfect delivery of the translation of the video. This tool is integrated with the latest machine learning algorithms to enhance the quality of overall video.
3. Which software offers translations in multiple languages for free?
Virbo provides a variety of languages to the users for free, so they can choose the original language of the video or translated languages.
Original Video Languages: English, Chinese, Spanish, Arabic, Portuguese, Indonesian, French, Russian, German, Japanese, Italian, Korean, Thai, Filipino, Bengali, Turkish, Dutch, Swedish, Croatian, Romanian, Czech, Hindi, Ukrainian, Vietnamese, Malay, Slovak, Danish, Tamil, Polish, Greek, Finnish, Burmese, Urdu
Translated Languages: English, Spanish, German, Portuguese, Italian, Indonesian, Chinese, Japanese, Arabic, Filipino, Korean, Hindi, Russian, French, Dutch, Turkish, Polish, Swedish, Bulgarian, Romanian, Czech, Greek, Finnish, Malay, Slovak, Danish, Tamil, Ukrainian.
More features and languages for translations will be updated in the future.
Conclusion
Whether you are watching YouTube videos or creating them, sometimes you may need to translate your videos into a specific language to remove the communication barrier. YouTube allows users to enjoy the original video with subtitles and captions. Sometimes, it produces the wrong subtitles of the videos because of the distortions. The best way to avoid this problem is to choose the best tool that allows you to translate the video into your desired language.
Virbo is an AI video generator that provides high-quality videos in specific languages. If you are a content creator and your viewers understand English, give Virbo a try to Virbo. It will translate YouTube videos into English or many other languages.
Translate Video Online Download APP Now Free Download
AI Video Translator | Online
AI Video Translator
It can be challenging and expensive for content creators to create a single video in multiple languages. To overcome this problem, Virbo has an innovative AI Video Translator feature that you can also use online.
02Perform the Video Translation
04Download the Translated Video
Step 1. Choose the Video Translate Feature
From the dashboard of Wondershare Virbo Online , choose the “Video Translator” feature under the “More AI Tools” section.
Choose Video Translator
Step 2. Perform the Video Translation
- To upload the video file for translation, press the “Click to upload video“ button, or you can use the drag-and-drop feature.
- Specify the “Original Video Language” and the “Target Language” and enable the required “Advanced Settings,” which are Lip-Sync, Subtitles, and Proofread Video Script.
- Finally, click the “Translate this video” button to change your video voice in the target language.
Perform Video Translation
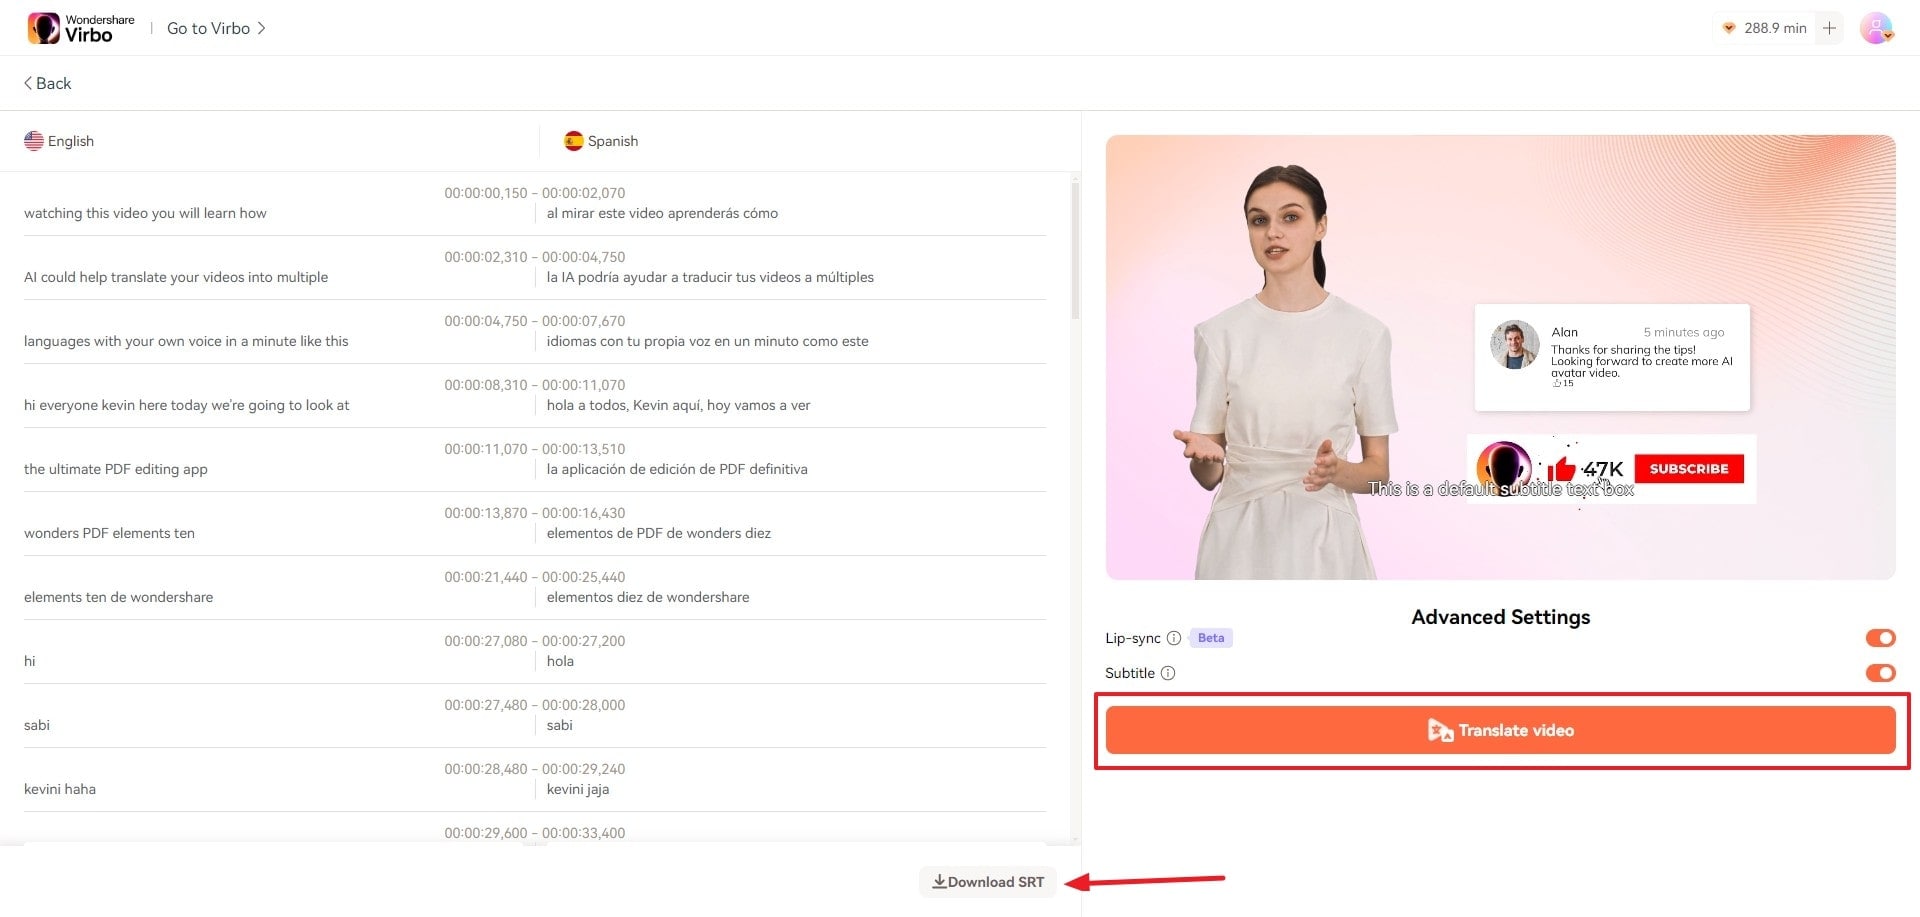
Step 3. Proofread the Video Script
Proofread the translated video script to avoid any mistakes in the video. You can also export the subtitles file by tapping the “Download SRT” button. And then, click “Translate Video“
Proofread Script
Step 4. Proofread the Video Script
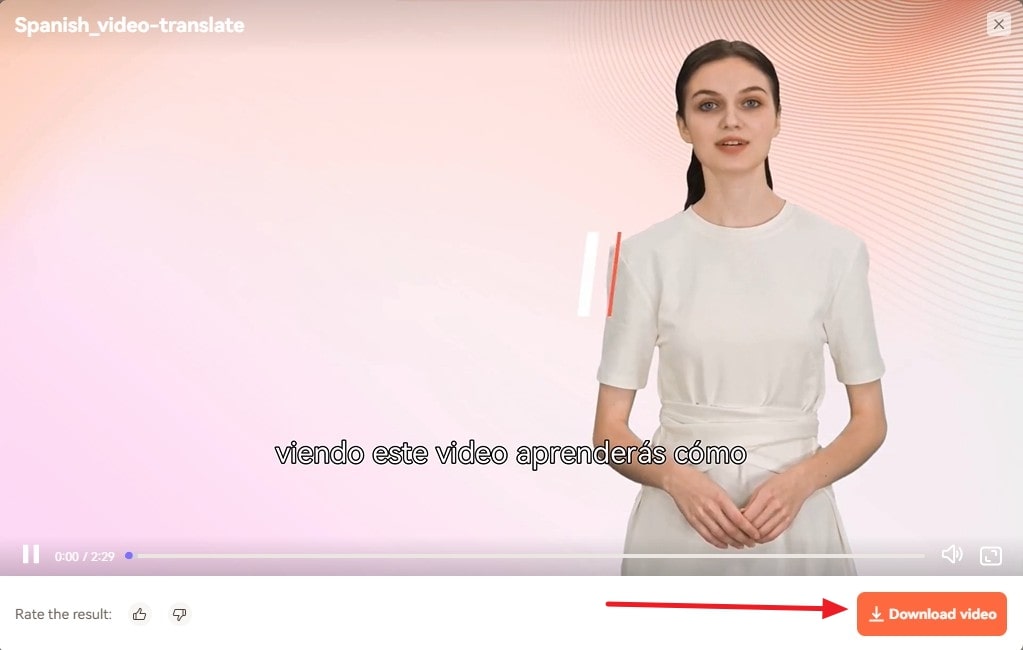
Preview the final version of the translated video and press the “Download Video” button to get it exported to your device.
Download Video
FAQs about Video Translator
1Can I edit and export auto-generated subtitles?
Of course! You have the flexibility to modify and customize the generated subtitles to suit your preferences, and once done, you can seamlessly export the edited subtitle file.
2Is there a fee for using the Video Translator feature?
The Video Translator feature follows the Virbo subscription plan. This means that unsubscribed users can export a multilingual video of up to 2 minutes for free within 512MB storage space. For more information, please refer to the Virbo Subscription Plan>
3How accurate is the translation output?
The translation accuracy delivered by the Video Translator feature is remarkably high, thanks to the empowering capabilities of AI technology. The system utilizes advanced algorithms and machine learning to ensure precise and contextually relevant translations, enhancing the overall quality of the translated content.
02Perform the Video Translation
04Download the Translated Video
Step 1. Choose the Video Translate Feature
From the dashboard of Wondershare Virbo Online , choose the “Video Translator” feature under the “More AI Tools” section.
Choose Video Translator
Step 2. Perform the Video Translation
- To upload the video file for translation, press the “Click to upload video“ button, or you can use the drag-and-drop feature.
- Specify the “Original Video Language” and the “Target Language” and enable the required “Advanced Settings,” which are Lip-Sync, Subtitles, and Proofread Video Script.
- Finally, click the “Translate this video” button to change your video voice in the target language.
Perform Video Translation
Step 3. Proofread the Video Script
Proofread the translated video script to avoid any mistakes in the video. You can also export the subtitles file by tapping the “Download SRT” button. And then, click “Translate Video“
Proofread Script
Step 4. Proofread the Video Script
Preview the final version of the translated video and press the “Download Video” button to get it exported to your device.
Download Video
FAQs about Video Translator
1Can I edit and export auto-generated subtitles?
Of course! You have the flexibility to modify and customize the generated subtitles to suit your preferences, and once done, you can seamlessly export the edited subtitle file.
2Is there a fee for using the Video Translator feature?
The Video Translator feature follows the Virbo subscription plan. This means that unsubscribed users can export a multilingual video of up to 2 minutes for free within 512MB storage space. For more information, please refer to the Virbo Subscription Plan>
3How accurate is the translation output?
The translation accuracy delivered by the Video Translator feature is remarkably high, thanks to the empowering capabilities of AI technology. The system utilizes advanced algorithms and machine learning to ensure precise and contextually relevant translations, enhancing the overall quality of the translated content.
Breakthrough : How to Make A Picture Speak
In today’s digital era, visual communication flourishes as a highly effective way to convey messages across diverse contexts. With smartphones and social media on the rise, the demand for engaging visual content has surged.
Visual communication effectively shares information with diverse audiences. When combined with audio, it enhances the experience even more. Audio adds depth and emotion, guiding attention to details. Whether it’s music or someone speaking, the audio complements the visuals seamlessly.
Adding audio strengthens visual communication and fosters a stronger connection with audiences through their senses. In this article, we’ll explore how to use visual communication effectively. We aim to provide you with a guide on how tomake your pictures talk .
Part 1. AI Talking Photo Technology Benefits
AI-talking photos are revolutionizing how we communicate visually, merging images with audio narration to create immersive storytelling experiences. These photos offer personalized interactions that meet the preferences of users and enhance accessibility for all.
Thus, talking photos has become a cornerstone in modern communication across various industries, from advertising to education. With technology continually advancing, the potential for AI talking photos to deliver impactful messages is ever-expanding.
For a more comprehensive understanding, here’s a breakdown of the benefits of AI talking photo technology. Below are the following:
● Enriched Narratives
With AI-talking photos, storytelling reaches new heights that enable photographs to articulate themselves. Bymaking your pictures talk , the stories they tell become more engaging and immersive.
● Customization and Personalization
Users can now personalize their storytelling experience by narrating the stories behind their AI-generated photos using their voices.
● Accessibility and Inclusivity
AI talking photos also address the needs of individuals with visual impairments by providing audio descriptions of the images. This feature significantly enhances the accessibility of visual content, ensuring that everyone, regardless of their visual abilities, can engage with and enjoy the stories being told through the photos.
● Creating Lasting Memories
Throughmaking your image talk , they possess the ability to transform fleeting moments into enduring memories. The addition of audio narration enhances the emotional resonance of the images, making them more vivid and memorable.
● Facilitating Artistic Expression
AI talking photos provide a versatile platform for artistic expression, allowing users to experiment with various narratives, voices, and styles. The possibilities are endless, from personal storytelling to creative projects.

Part 2. Difficulties in Talking Photo Technology

Despite its potential,making your photos talk encounters numerous challenges that hinder its seamless integration and effectiveness. Here, we outline some difficulties you might encounter:
● Unnatural Mouth Shape
Despite advancements in facial recognition and animation, creating natural-looking mouth movements in talking photos remains a significant challenge. The technology often struggles to accurately replicate the intricate movements and subtleties of human speech.
● Unnatural AI Voice
Another obstacle lies in the synthesis of natural-sounding AI voices. While text-to-speech (TTS) technology has advanced significantly, AI-generated voices can still sound robotic or unnatural. They often lack the nuances and inflections of human speech. Crafting a voice that is clear and emotionally resonant poses a significant challenge, as it involves capturing human expression and intonation nuances.
● Lack of Lip Non-Actuation in Multi-Person Conversation Photos
In multi-person conversation photos, accurately synchronizing lip movements poses a complex challenge. Coordinating lip movements and distinguishing speakers is challenging, especially in dynamic group settings with diverse expressions and speech patterns.
● Technical Limitations
Real-time lip-syncing and audio processing require a lot of computer power. Handling large amounts of data while keeping quality needs efficient algorithms. Additionally, it’s hard to balance performance and resources in talking photo technology.
● Ethical and Privacy Concerns
Besides technical hurdles, ethical and privacy issues arise with talking photo technology. Manipulating visual and auditory content raises concerns about misinformation, privacy breaches, and potential misuse of digital media.
Part 3. How to Create a Talking Picture with A Powerful Tool - Wondershare Virbo on Mobile/Online
In the current dynamic digital landscape, the merging of visuals and audio has reshaped our methods of communication and connection. Talking photos, with their capability to infuse images with voices and feelings, lead this transformative shift.
Wondershare Virbo stands as a testament to innovation in visual storytelling that offers a powerful platform that redefines how we engage with images and sound. With its cutting-edge technology, it effortlessly merges audio with visuals and surpasses the constraints of traditional static imagery. This breakthrough allows creators to transform ordinary photos into captivating narratives that resonate with depth and emotion.
Enter the realm of visionary storytellers and explore Virbo—a tool worth discovering to enhance your storytelling to new heights! Users can utilize it for mobile or online which ensures accessibility and convenience for their needs. Moreover, exploring Virbo online offers the same excitement and fluidity as using it on a desktop that guarantees an engaging experience on either platform. To create a talking photo on mobile/online, follow the steps outlined below:
Get Started Online Free Download
For Mobile
To create a talking photo on mobile, follow the steps outlined below:
- Download and open the Wondershare Virbo app and select the talking photo feature to access the operational interface.
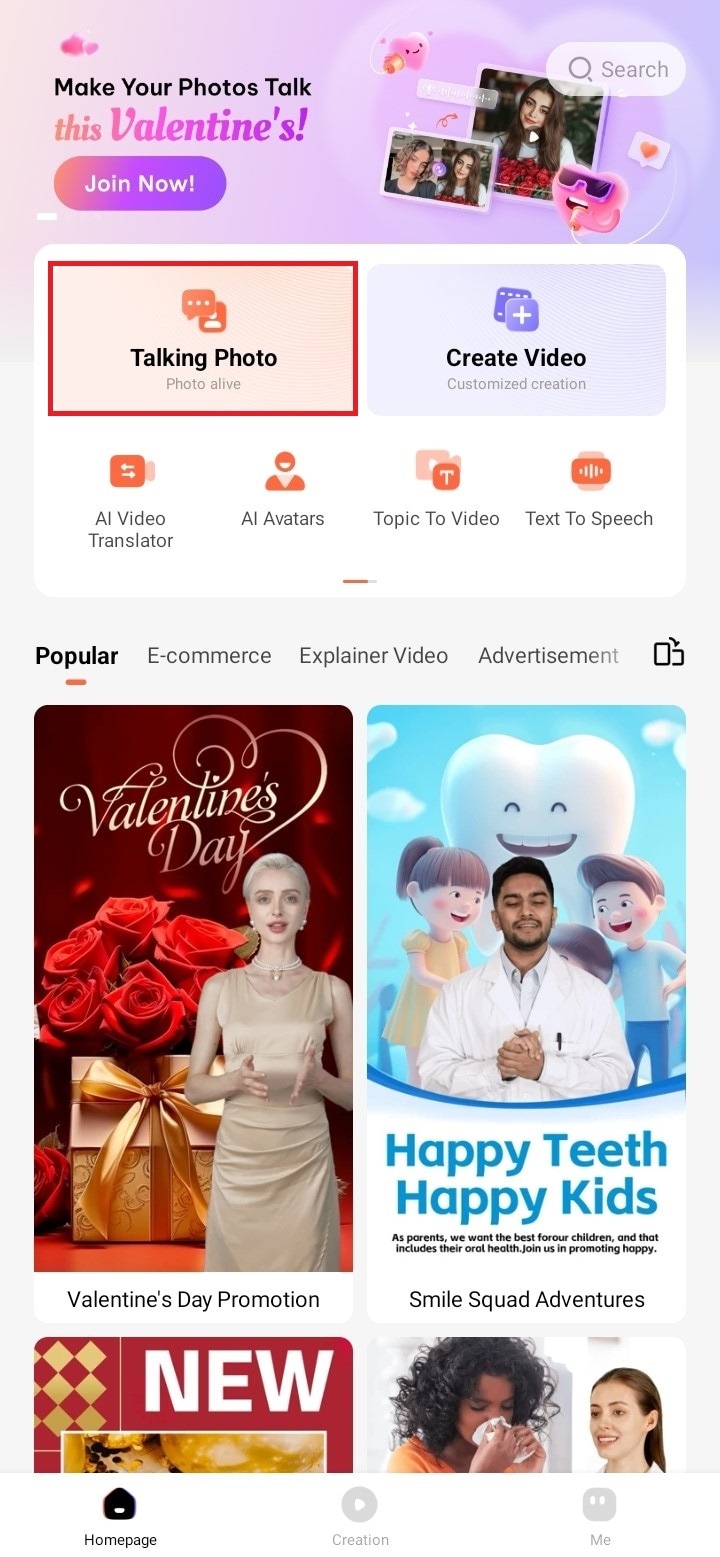
- Choose the AI-generated talking photo that best suits your preference, or you can select to upload your image.
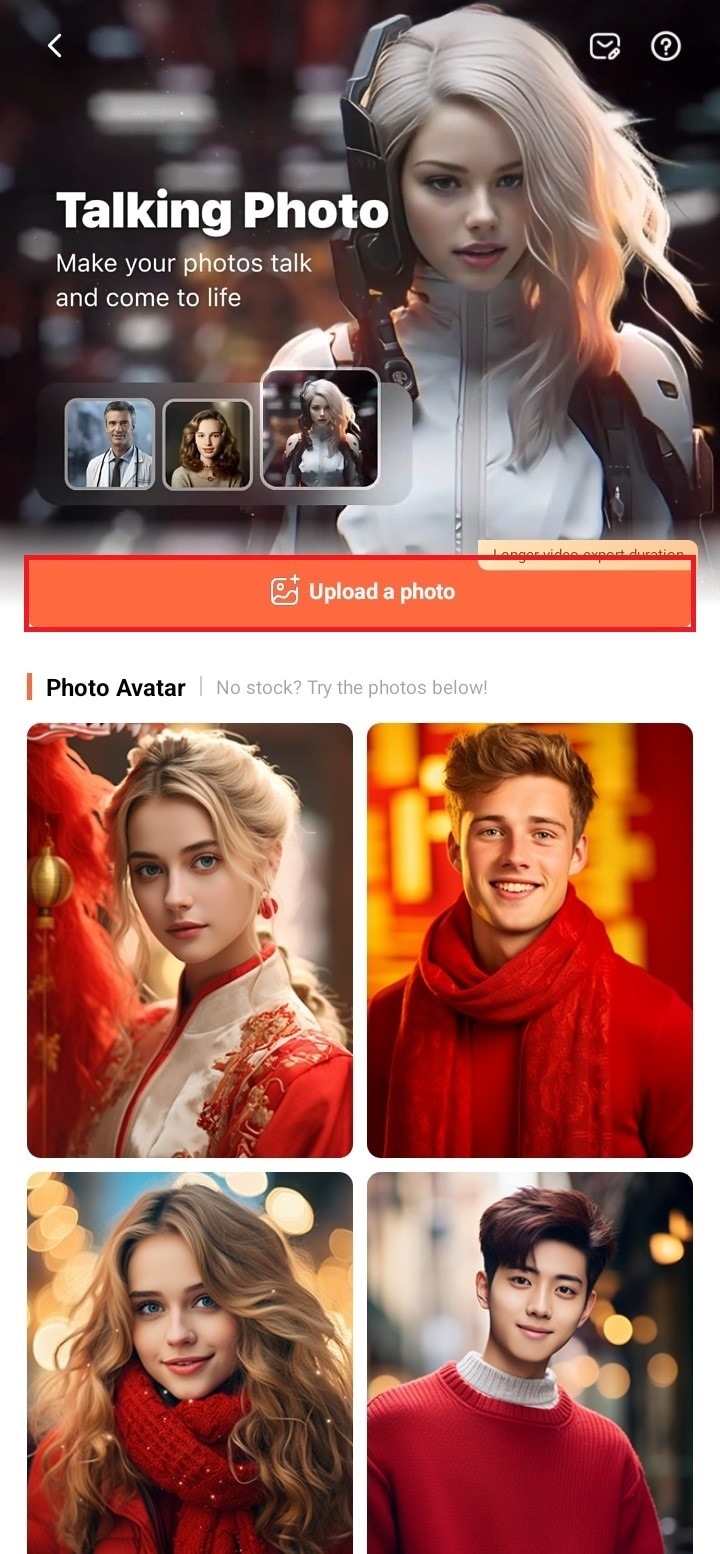
- Once you’ve chosen the AI talking photo you prefer, simply click on theCreate Video button located below.
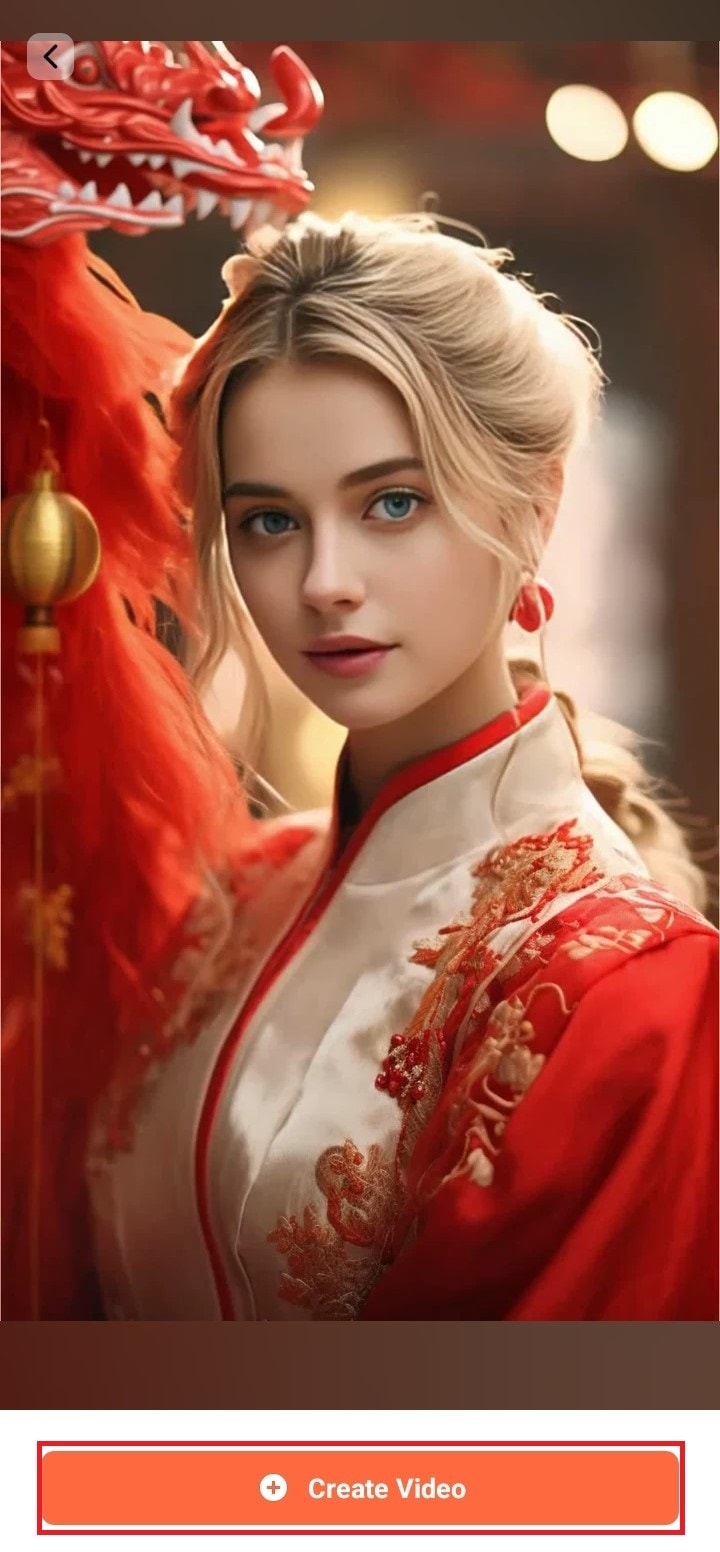
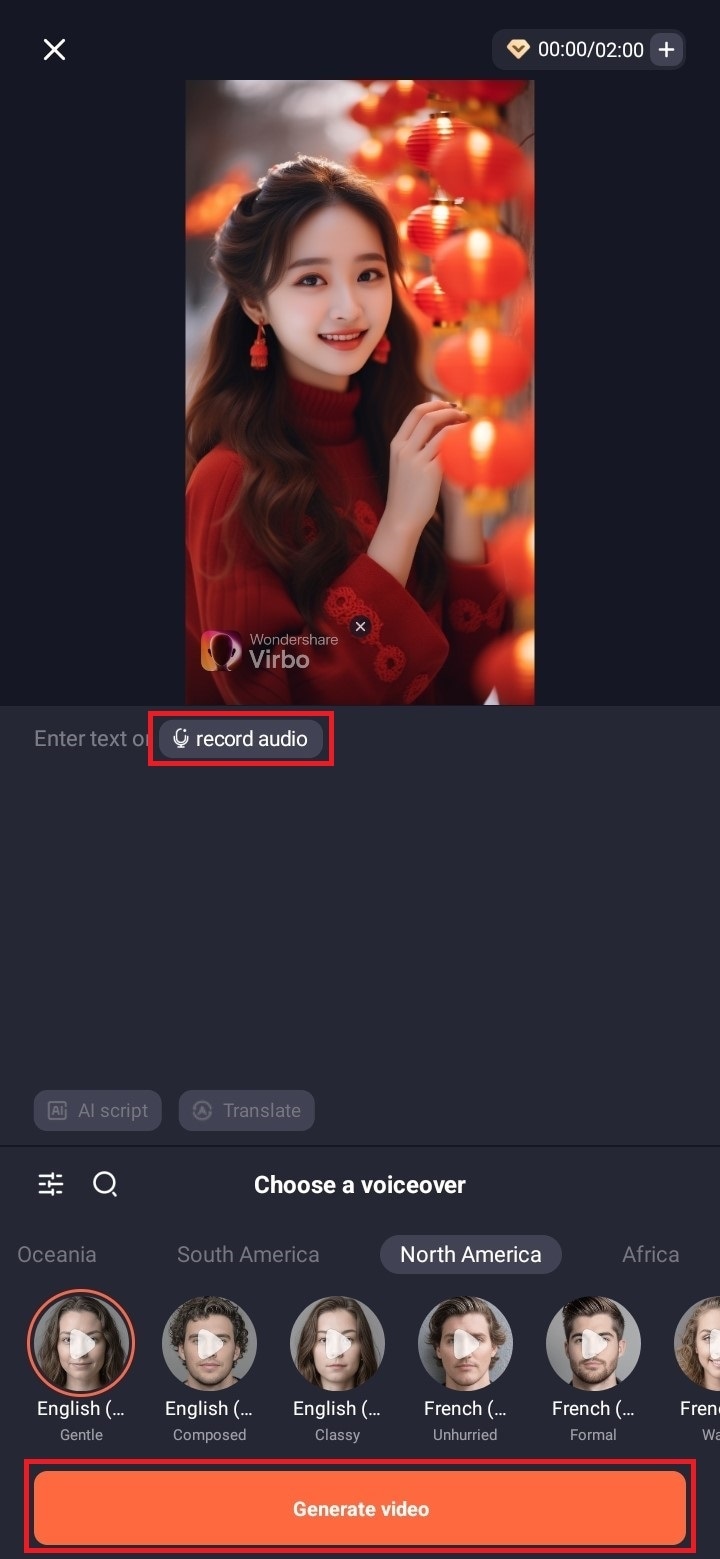
- Input your text and select a voiceover from the options below to create the audio for your video. Alternatively, you can record your voice by selectingrecord audio . When finished editing, tapGenerate Video to export it.
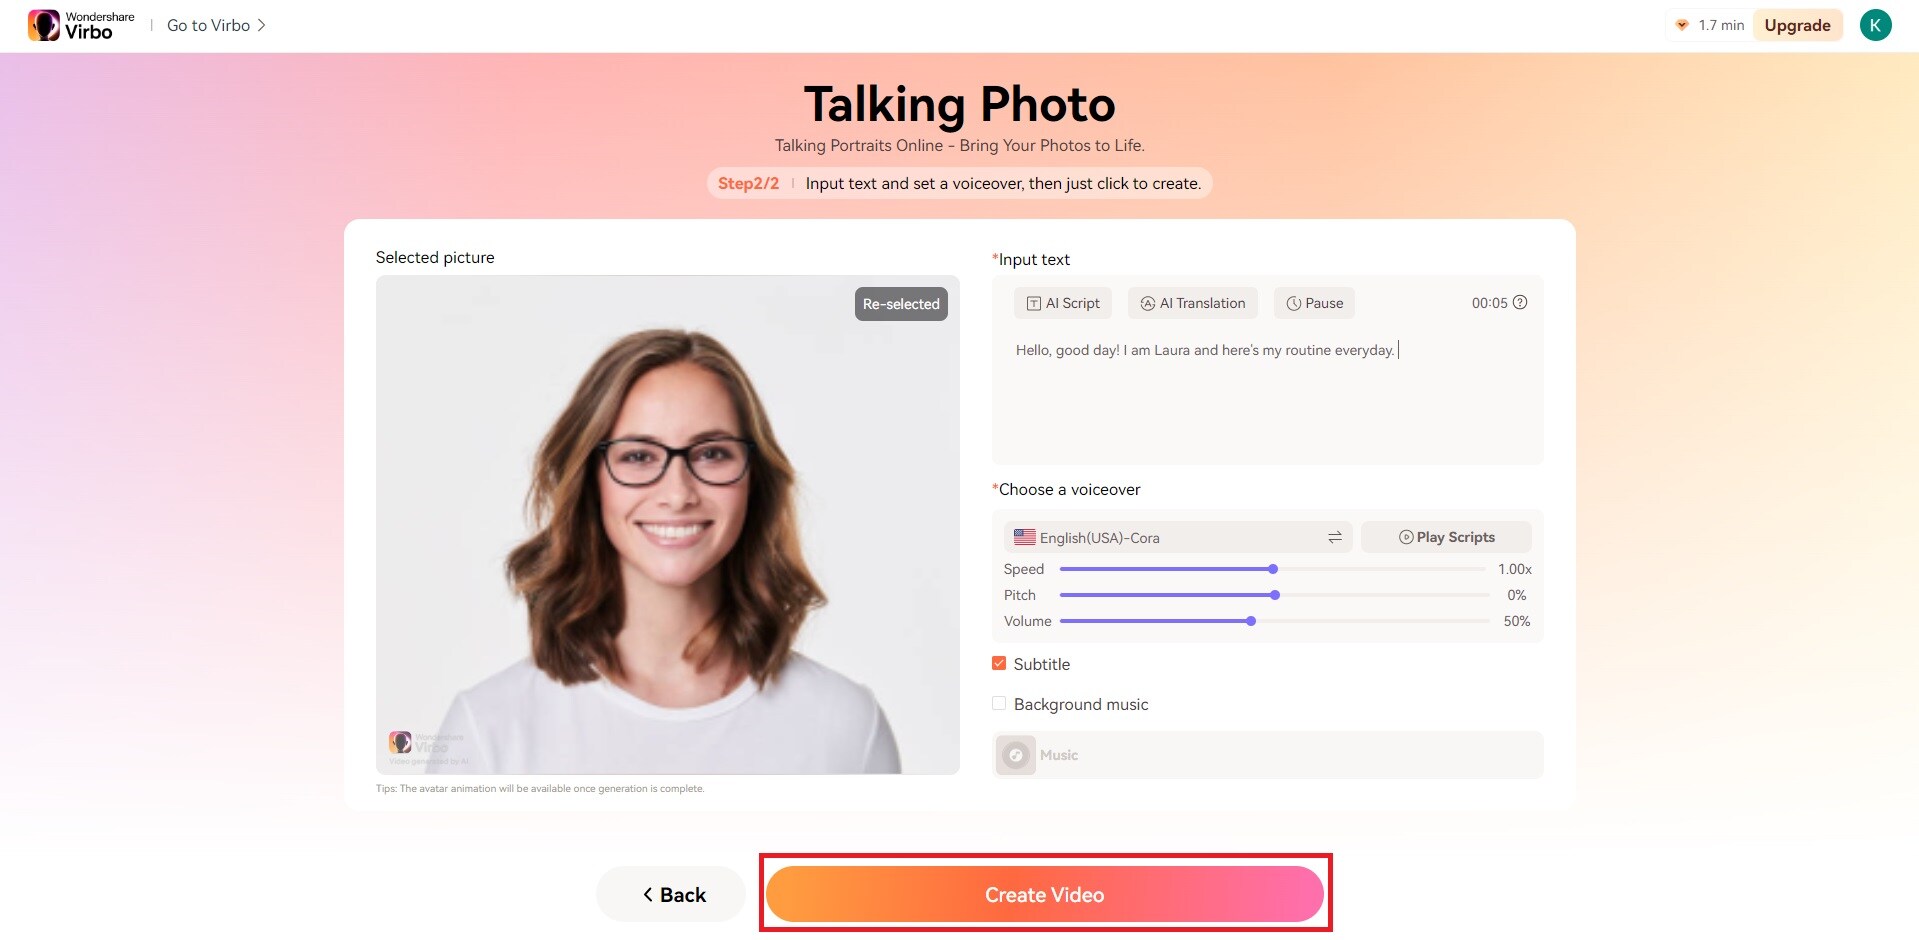
For PC
Tomake pictures talk online or on your PC, here are the following steps:
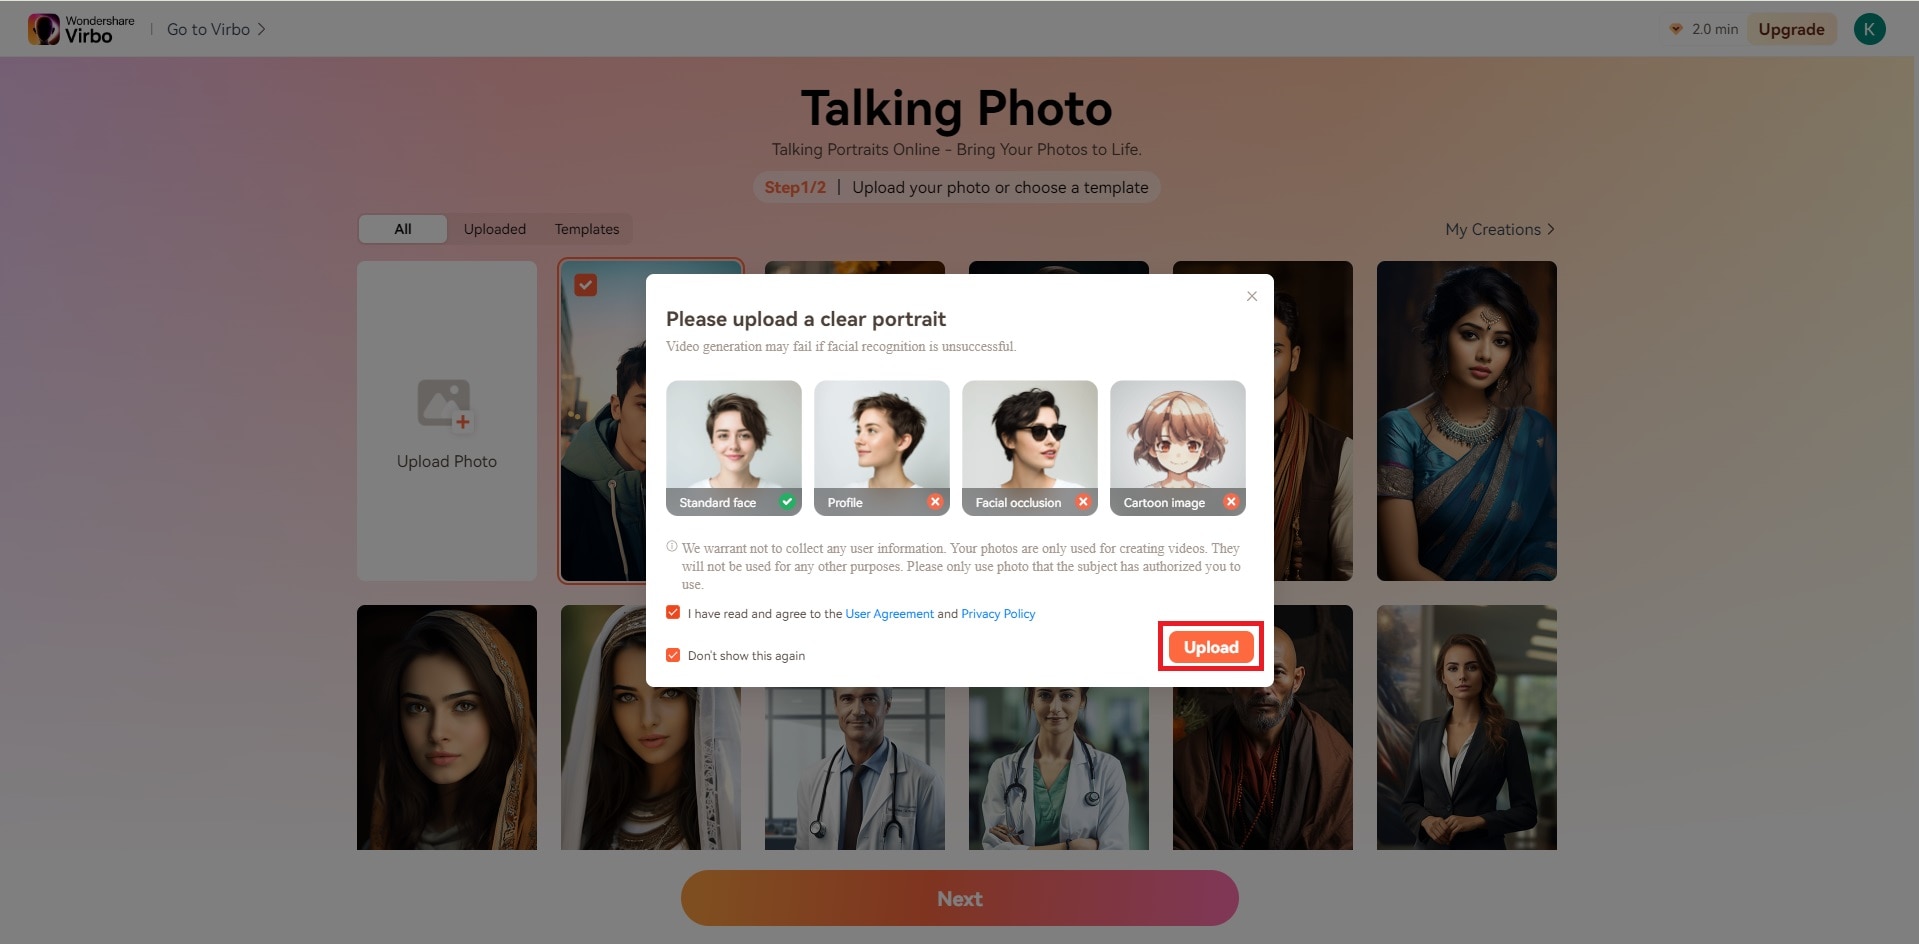
- Launch the Virbo on itswebsite and click the Talking Photo option.
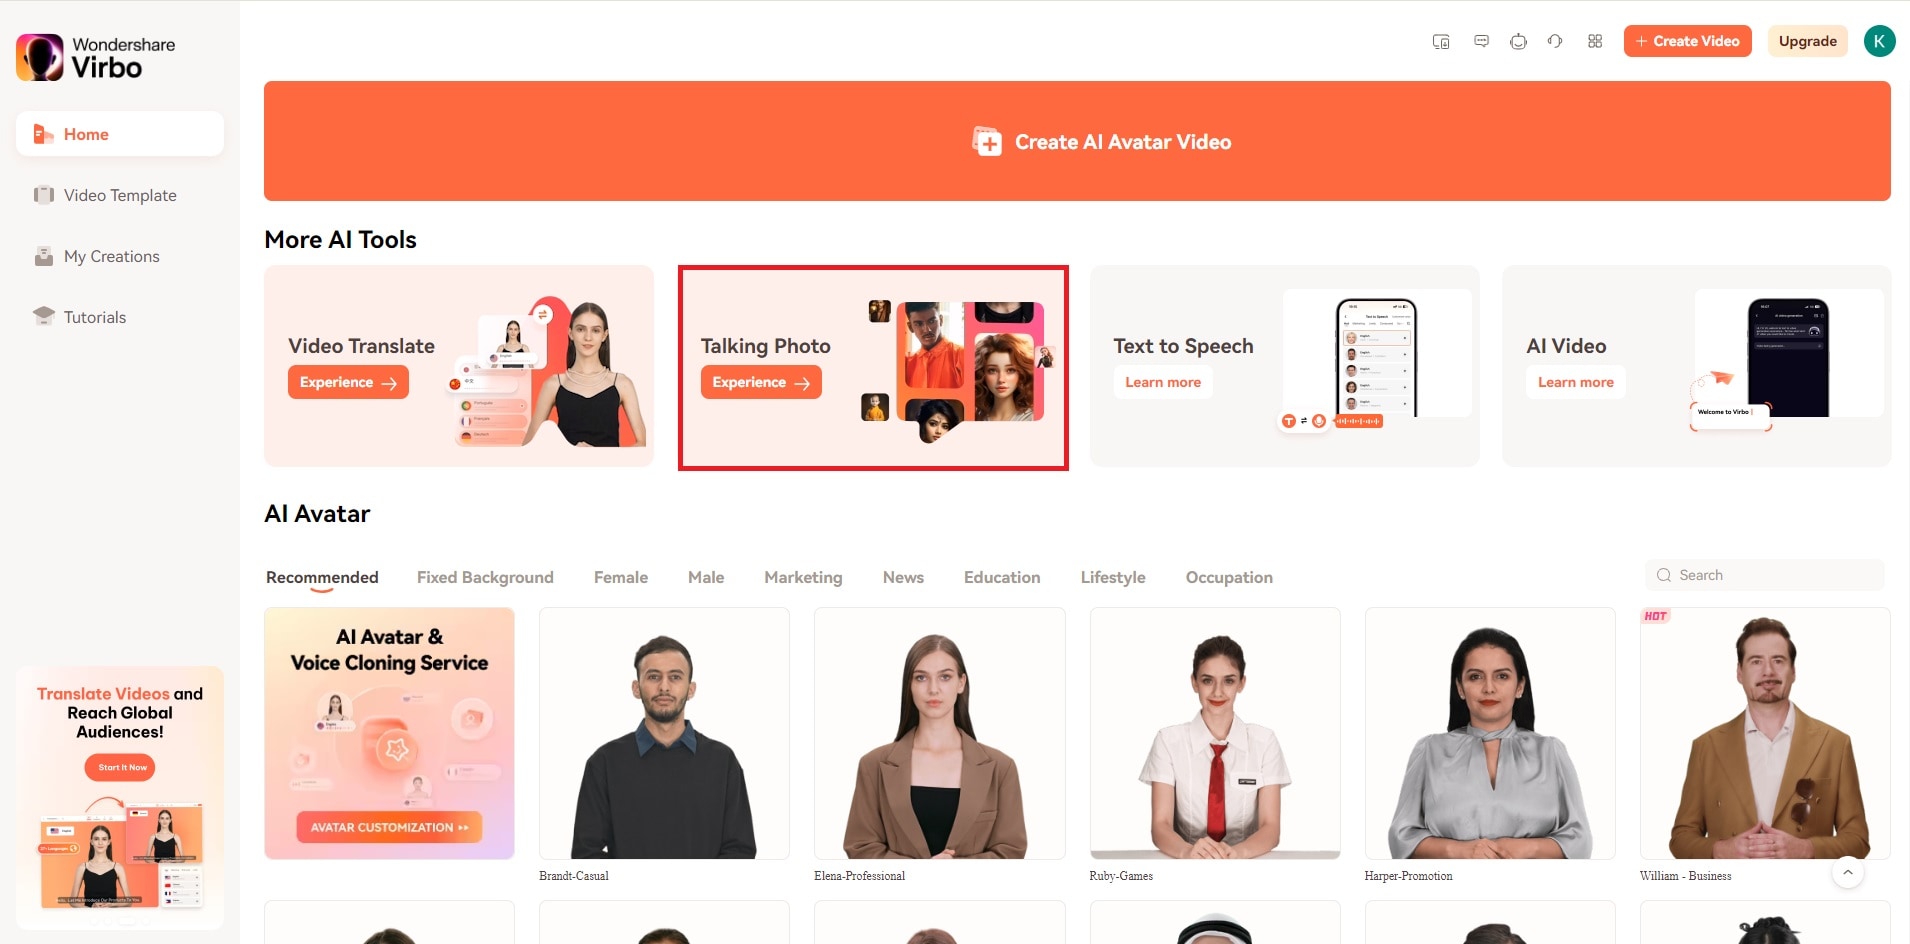
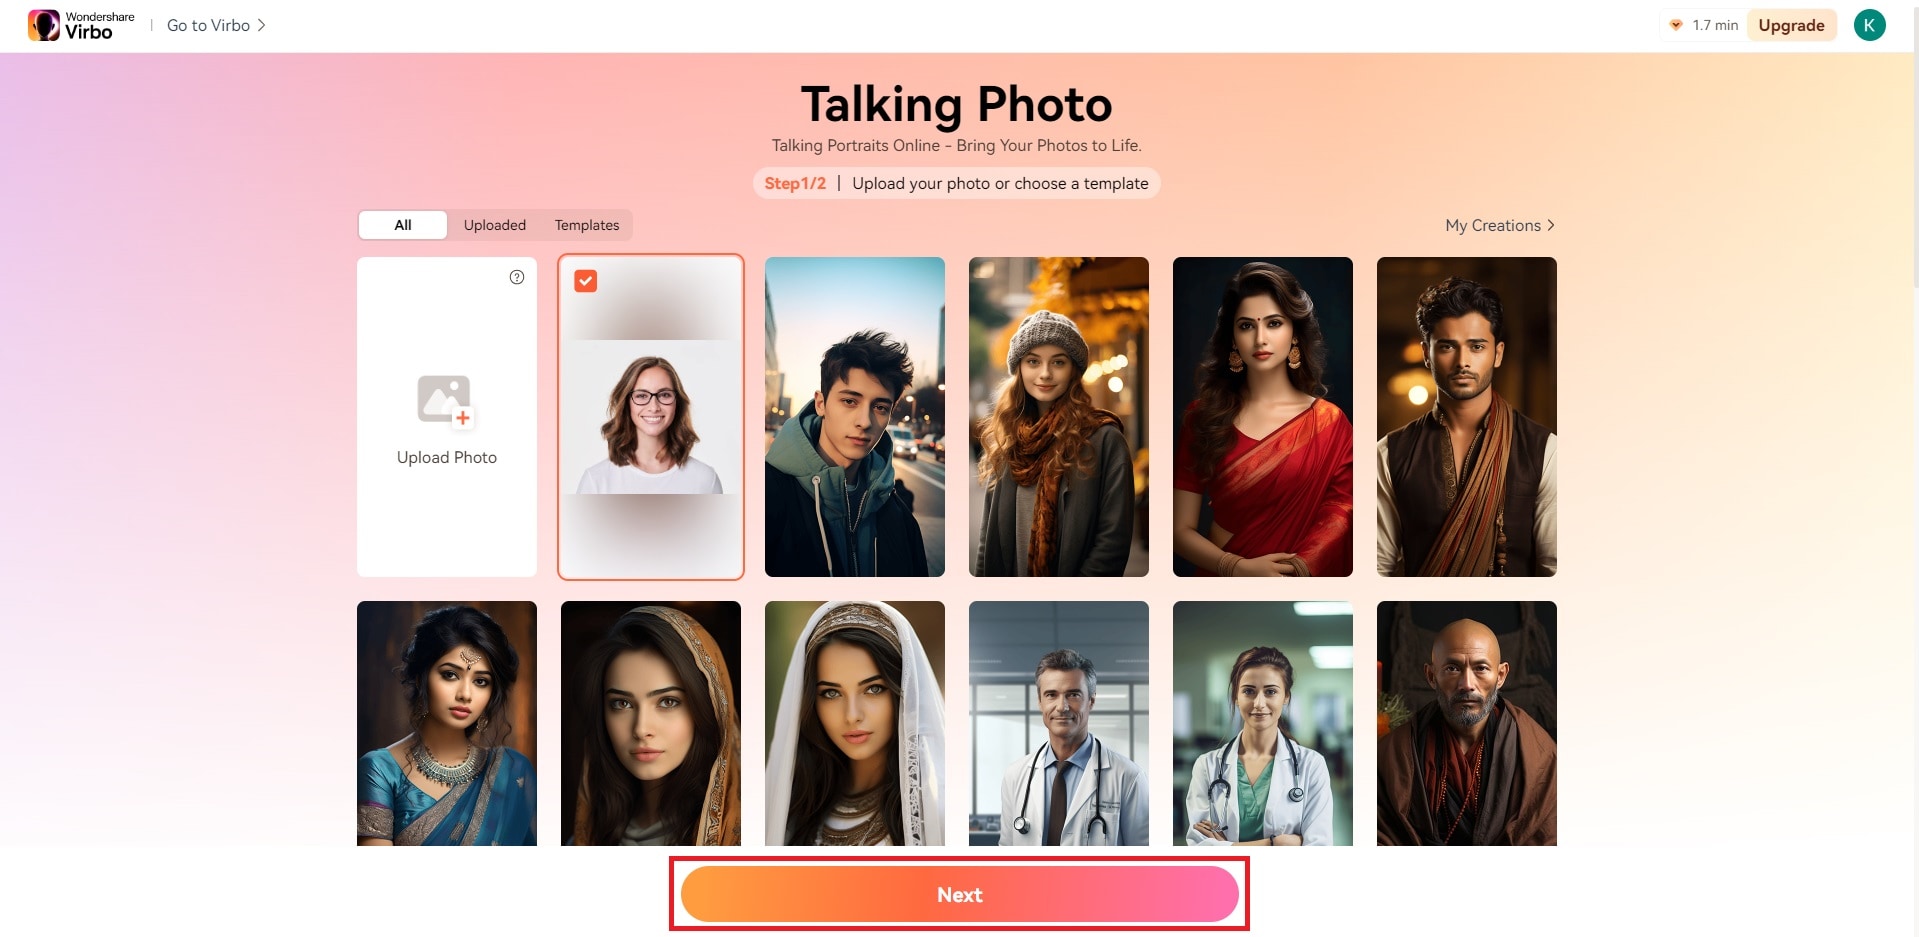
- You’ll encounter two options: either select from the images provided by this talking photo app or upload an image from your computer.
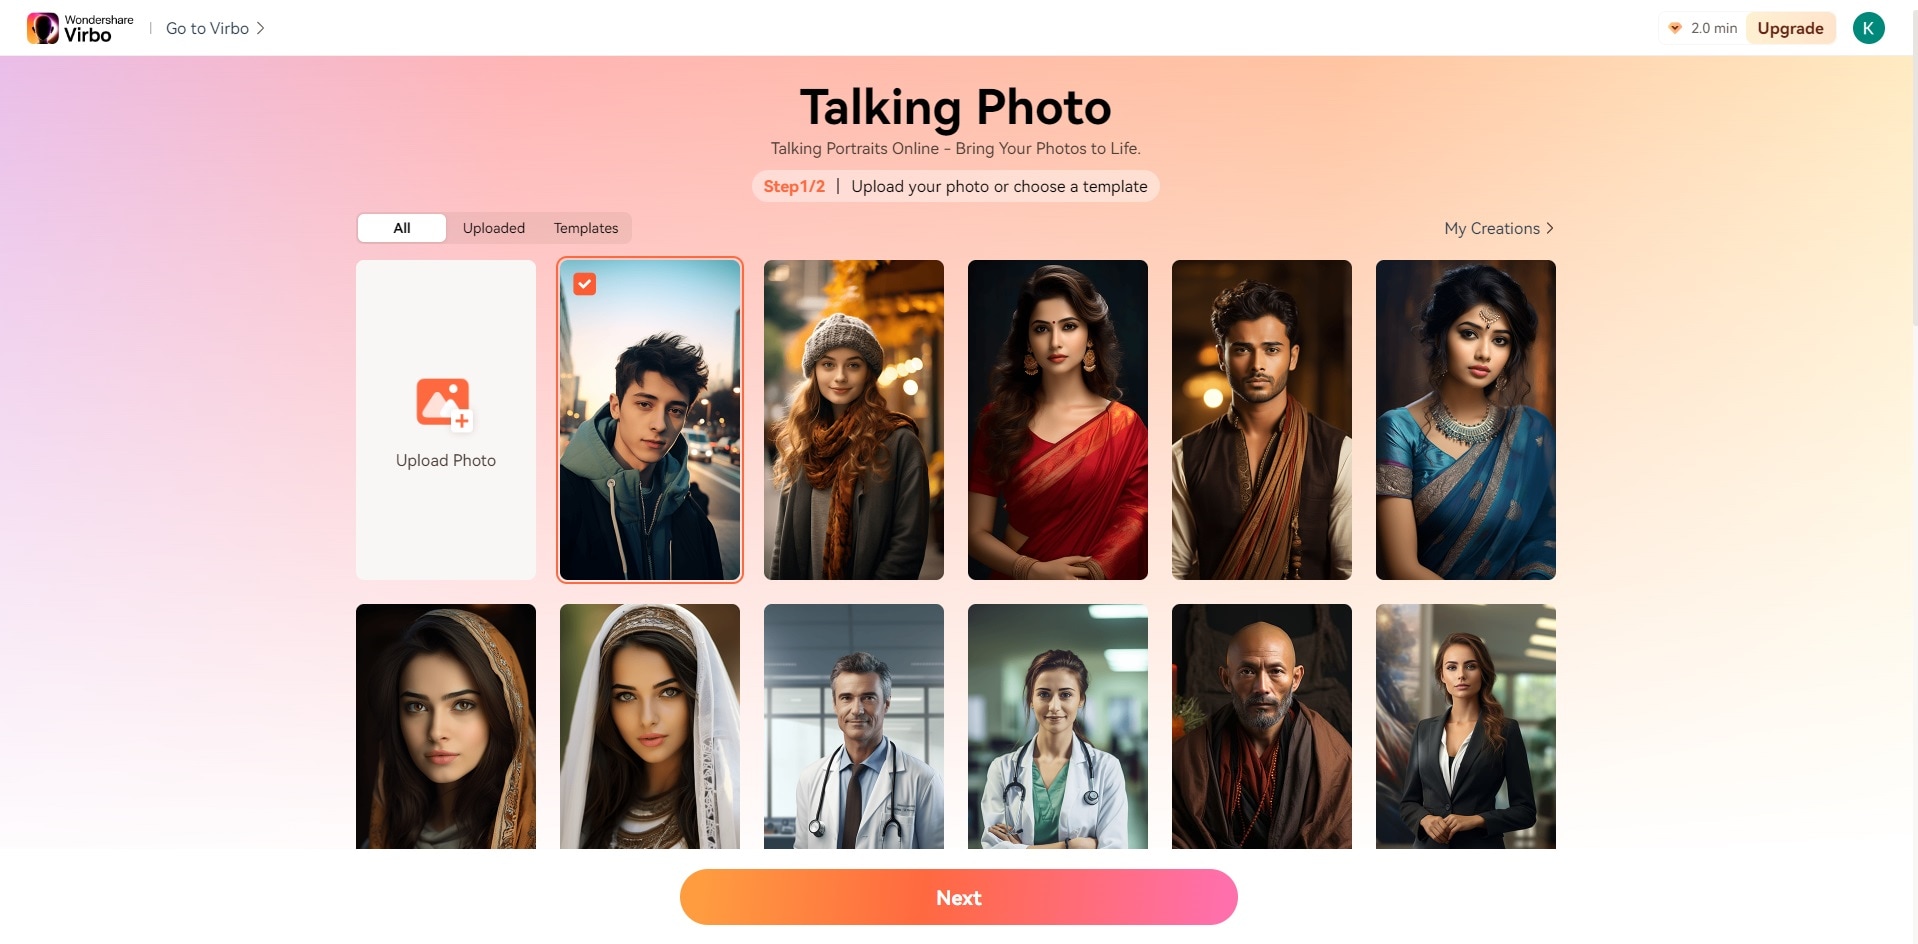
- To upload an image, click on theupload photo icon and review the User Agreement and Privacy Policy of Wondershare Virbo. Check the box to agree with the terms.
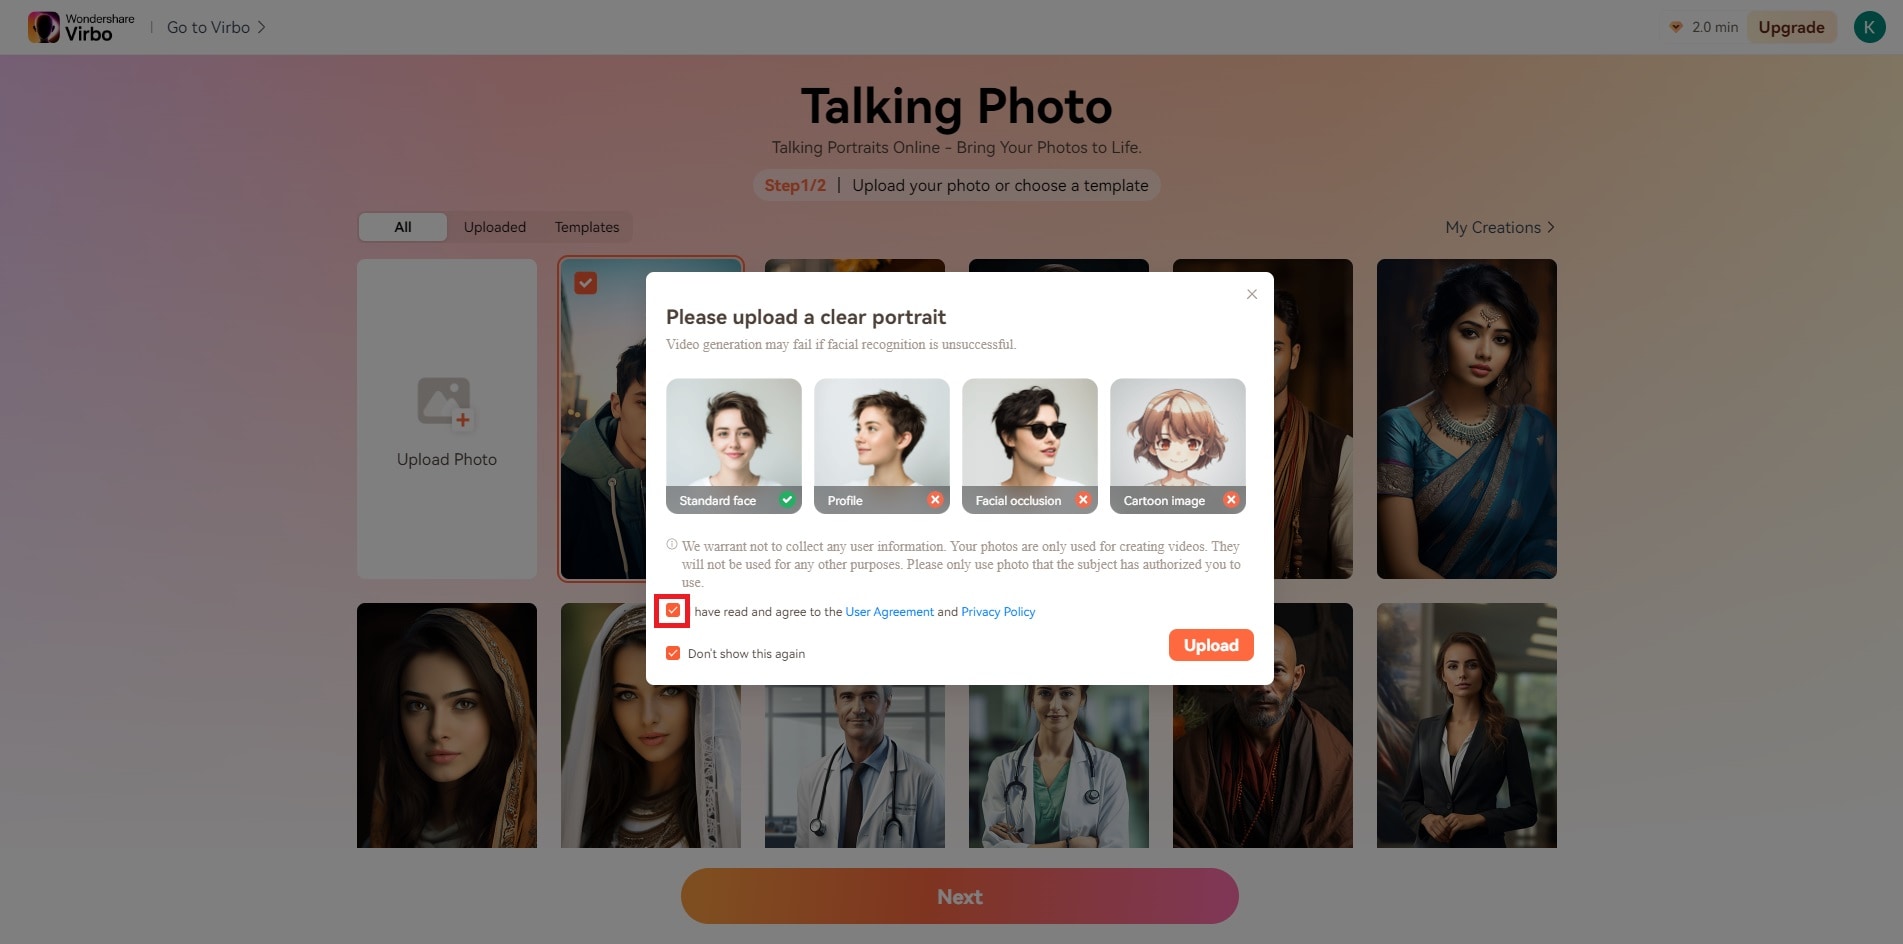
- Click the Upload button to select your image from the computer and open it. Tip: Choose a photo with just one person’s face in it.
- Once uploaded, move your cursor to the Next button. Allow the app to set up your studio.
- When ready, enter the text you wish your photo to speak within the Text Script section. After inputting your script, adjust your voiceover settings from the section located at the bottom right of the page.
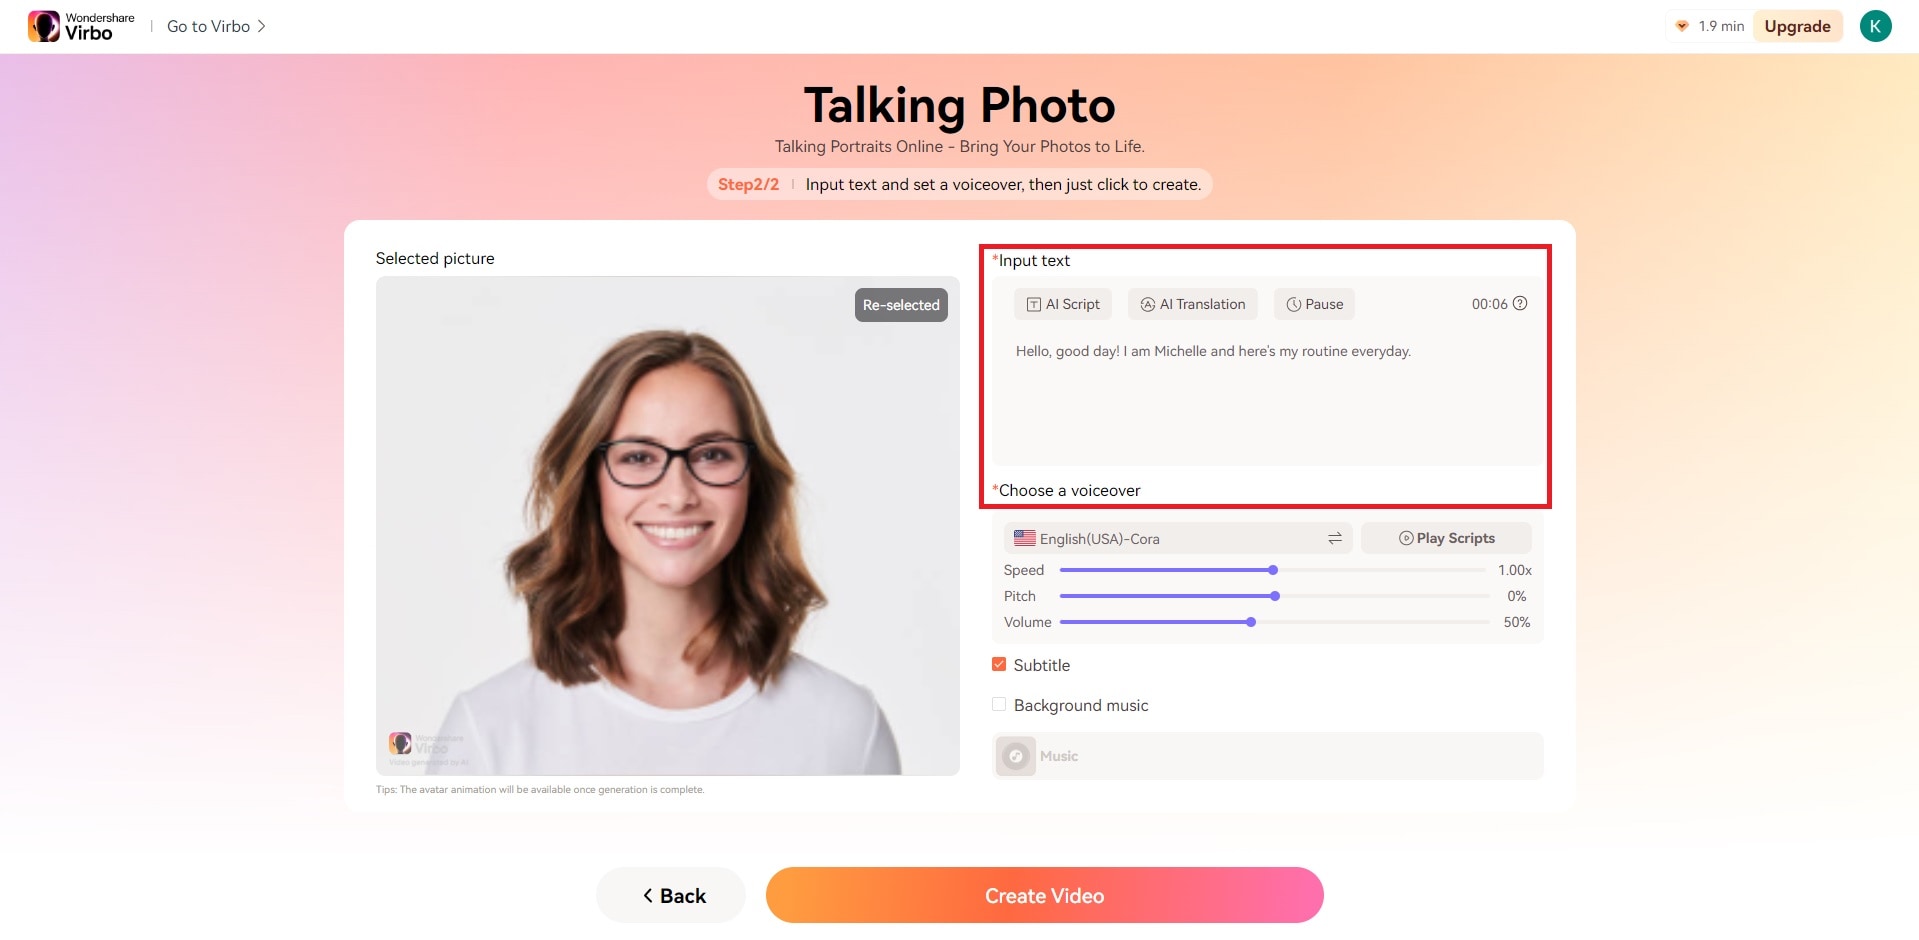
- Here, you can modify the speed, pitch, and volume of the audio. Select the language and gender of your voice and then click OK.
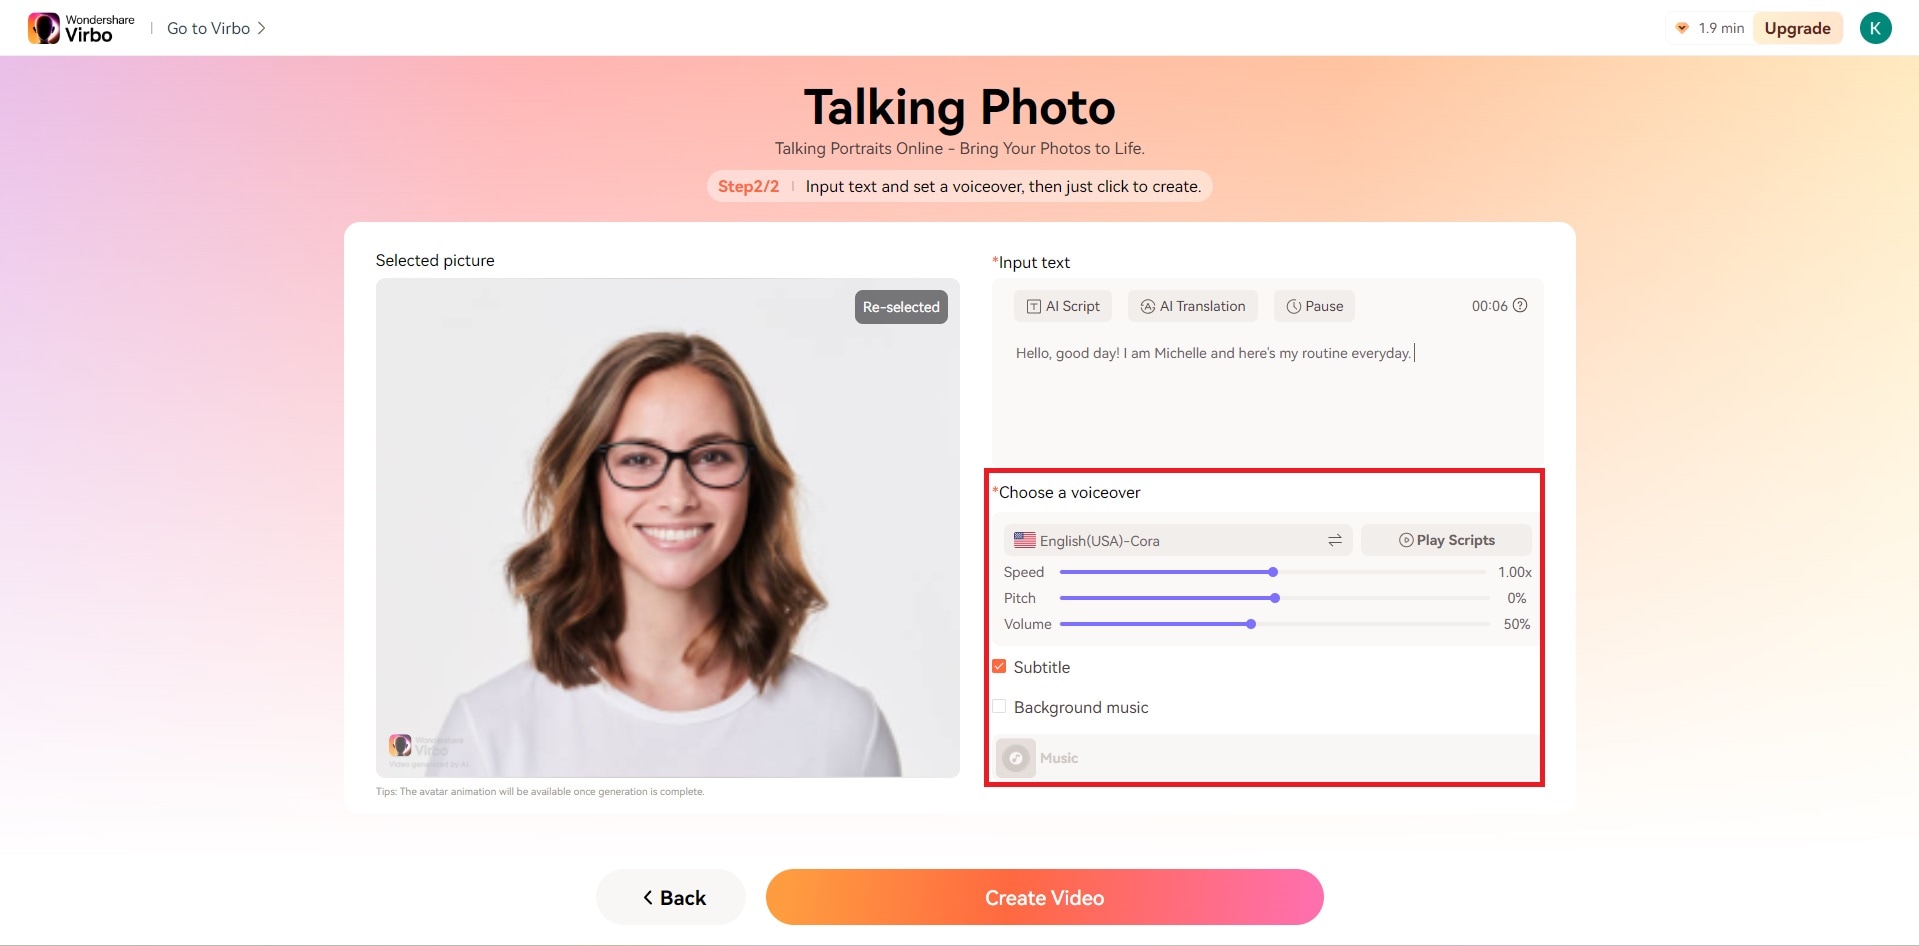
- Experiment with various voices and scripts to discover the perfect match for your photo. When finished editing, click the Create Video button.
Conclusion
Recognizing the importance of embracing new technology is vital in today’s fast-paced environment. We must acknowledge and integrate these advancements into our lives seamlessly.
One standout feature worth highlighting is Virbo’s Talking Photo functionality. This feature not only adds an extra layer of depth to capturing memories but also enhances communication by incorporating audio into images. By incorporating Virbo’s Talking Photo feature into our daily routines, we can enhance our interactions and experiences, underscoring the significance of embracing cutting-edge technologies.
AI Portrait Generator: Getting Closer to the Artistic Marvels
Part 1. What is an AI Portrait Generator?
An AI portrait generator is a cutting-edge application of artificial intelligence that employs advanced algorithms, often based on deep learning and neural networks, to create portraits that mimic the intricacies of human faces. These generators analyze patterns, features, and artistic styles from vast datasets of portraits, enabling them to produce awe-inspiring images that capture the essence of their subjects.
Part 2. Applying AI-Generated Portraits: Scenes of Transformation
Bridging Historical Gaps
Imagine breathing life into historical figures with AI-generated portraits. By analyzing written descriptions and historical records, AI portrait generators can create visual representations that connect us to the past, offering a glimpse into the visages of bygone eras.
Artistic Collaboration
Contemporary artists and designers are embracing AI-generated portraits as tools for creative collaboration. These artists infuse their unique visions with the AI’s capabilities, resulting in innovative artworks that blend human creativity with AI-powered ingenuity.
Hyperrealism and Futuristic Aesthetics
The hyperrealism achievable through AI portrait generators blurs the line between reality and art. Moreover, these generators can delve into futuristic aesthetics, crafting portraits that are otherworldly and fantastical, pushing the boundaries of imagination.
Part 3. Are AI-Generated Portraits Worth It?
The debate surrounding the value of AI-generated portraits rages on. Critics argue that these creations lack the emotional depth of human-made art, labeling them as soulless reproductions. However, proponents highlight the novelty and potential of AI-generated art as a means to augment human creativity. These portraits can serve as sparks of inspiration, freeing artists from the constraints of traditional techniques.
In the age of rapid technological advancement, AI portrait generators challenge our perceptions of creativity and artistry. They beckon us to consider the ever-evolving landscape of human-AI collaboration and innovation.
Conclusion
AI portrait generators stand as testament to the incredible capabilities of artificial intelligence in the realm of artistic expression. As they usher in a new era of creativity and exploration, these generators push the boundaries of what is possible and encourage us to embrace the fusion of technology and art. The question of whether AI-generated portraits are worth it isn’t just about the images they produce, but about the broader implications they hold for the future of human creativity.
Also read:
- New Best 7 Talking Photo AI You Must Try (Online & Download) for 2024
- Updated What Is an AI Voice Generator for 2024
- Translate Videos with Subtitle Cat Your Essential Guide
- New 2024 Approved Top 5 Best Tools to Convert Text to Audio Online for Free
- New Top 5 AI-Powered Script to Video Makers for 2024
- How To Get More NFL Viewers For Your Sports Live Streaming Channel for 2024
- New In 2024, Create AI Avatar Video with AI Script
- In 2024, Revolutionize Creative Tasks With Proficiency AI Voice Cloning
- What Is an AI Video Editor, In 2024
- New In 2024, What Is AI Marketing?
- How To Create Video From Text Easily Step-by-Step for 2024
- New Selected Overdub Voice with AI Virbo At Its Finest for 2024
- Mastering Facebook Live Your Complete Guide to Successful Streaming
- Updated Maximize Your User Engagement With Instagram Live Shopping Expert Tips for 2024
- New Best 8 AI Title Generators for Creating Catchy Titles For All Platform for 2024
- Updated Best 10 Animated Explainer Video Examples for 2024
- Updated Top 10 Robotic Voice Generators (with Comparison Table) for 2024
- Best 8 AI Title Generators for Creating Catchy Titles For All Platform for 2024
- New 2024 Approved Exploring the Finest Text-to-Speech Male Voice Tools for Natural Output
- Best 5 AI-Powered Script to Video Makers
- Updated Top 10 Hindi Video Translators with Step-by-Step Guidance for 2024
- Updated What Is an AI Text Generator? | Wondershare Virbo Glossary for 2024
- New Top 4 Elon Musk Voice Generator Programs to Make You Sound Like the Billionaire
- New The Most Straightforward Guide to Learning How to Clone Your Voice
- Updated In 2024, What Is Sora by OpenAI Everything You Need To Know
- Updated Best 4 Elon Musk Voice Generators to Make You Sound Like the Billionaire for 2024
- New Realistic AI Avatars for 2024
- Updated What Is an AI Text Generator, In 2024
- New Transform YouTube Live with These Must-Know Secrets
- New How To Convert Video Voice to Text Online for Free?
- 2024 Approved AI Script | Wondershare Virbo
- New 2024 Approved Reaching a Wider Audience Using Video Translation in Tamil
- 2024 Approved How to Make an Explainer Video Step by Step Guide
- Updated 2024 Approved What Is AI Advertising?
- Updated An Exhaustive List of Lip Sync Apps for Vibrant Video Creation for 2024
- New In 2024, Generate Video with Talking Photo Feature
- How to Quickly Fix Bluetooth Not Working on Realme C53 | Dr.fone
- In 2024, How Can I Catch the Regional Pokémon without Traveling On Meizu 21 Pro | Dr.fone
- Best Fixes For Samsung Galaxy A54 5G Hard Reset | Dr.fone
- Does Life360 Notify When You Log Out On Vivo Y200e 5G? | Dr.fone
- The Magnificent Art of Pokemon Go Streaming On Vivo Y56 5G? | Dr.fone
- In 2024, Best 3 Software to Transfer Files to/from Your Poco X5 via a USB Cable | Dr.fone
- Change Location on Yik Yak For your Xiaomi Redmi Note 12T Pro to Enjoy More Fun | Dr.fone
- In 2024, 3 Methods to Mirror Oppo Reno 11F 5G to Roku | Dr.fone
- Complete guide for recovering music files on Play 8T
- How to Cast Samsung Galaxy S23 FE Screen to PC Using WiFi | Dr.fone
- Top 12 Prominent Oppo A18 Fingerprint Not Working Solutions
- In 2024, How To Unlink Your iPhone 13 Pro From Your Apple ID
- In 2024, How to Turn Off Find My iPhone 8 Plus when Phone is Broken? | Dr.fone
- Complete Tutorial Sending Photos From Apple iPhone 12 Pro Max to iPad | Dr.fone
- In 2024, How to Unlock Disabled Apple iPhone 6/iPad Without Computer
- In 2024, Top 5 Car Locator Apps for OnePlus Nord CE 3 Lite 5G | Dr.fone
- In 2024, Forgot Locked Apple iPhone 12 Pro Password? Learn the Best Methods To Unlock
- How to Downgrade Apple iPhone 15 to the Previous iOS System Version? | Dr.fone
- In 2024, 3 Effective Methods to Fake GPS location on Android For your Tecno Pova 5 | Dr.fone
- How to Change Netflix Location to Get More Country Version On Apple iPhone 6s | Dr.fone
- Title: 2024 Approved Ultimate Guide to Translating YouTube Videos Without CC
- Author: Sam
- Created at : 2024-05-19 03:35:00
- Updated at : 2024-05-20 03:35:00
- Link: https://ai-voice-clone.techidaily.com/2024-approved-ultimate-guide-to-translating-youtube-videos-without-cc/
- License: This work is licensed under CC BY-NC-SA 4.0.
