
:max_bytes(150000):strip_icc():format(webp)/mothersday_NataliaCampbell_Getty-5a4baef6c7822d00371e56cd.jpg)
2024 Approved Guide Learning the Right Ways To Start Facebook Live Shopping
[Guide] Learning the Right Ways To Start Facebook Live Shopping
After the COVID-19 pandemic, people started trusting online shopping. Therefore, a live shopping trend emerged, which felt like a one-on-one conversation between shopkeepers and buyers. In this regard, different platforms developed and facilitated live shopping. Yet, many features and options need to be introduced for an evener shopping experience.
Considering this scenario, major tech giants like Meta entered the market. They released aFacebook live shopping feature and pushed the boundaries of e-commerce. If you are new to this tech-based shopping or selling, this guide is for you. However, read it by the end to get comprehensive insights on Facebook live selling and shopping.
Part 1. A Brief Introduction to Facebook Live Shopping
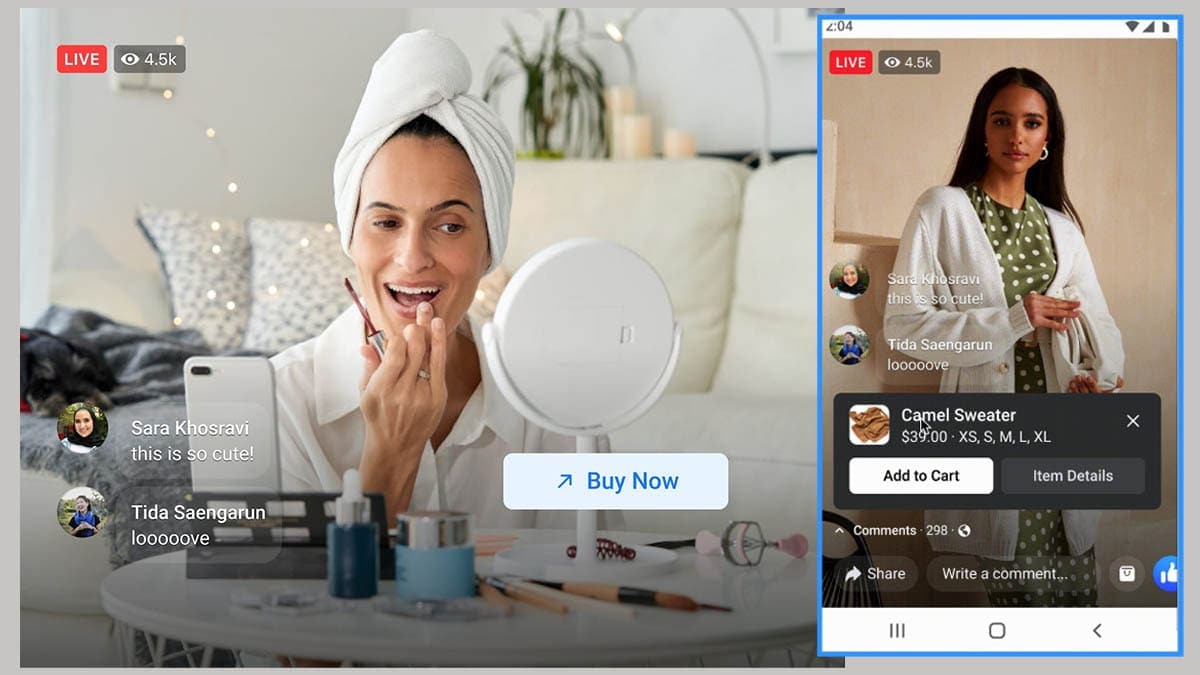
Facebook live shopping is a free tool to interact directly with sellers during a live video. It is among the top livestream shopping platforms in the US, and it was launched in 2021. Retailers connect with buyers while showing their items in real-world scenarios through this service. Facebook lets them tag their product in live streaming, containing website links to place orders.
According tostatistics , 82% of consumers prefer livestream content from brands. Besides, 80% of the brands prefer Facebook to market their product through live videos. Still, the e-commerce market continues to develop and address loopholes in live selling with care. Anyhow, look into the perks ofFacebook live selling features discussed ahead:
1. Facebook Live Shopping Notification
To bring viewer traffic, Facebook sends notifications to customers. People get notified via Messenger or Facebook notifications about their favorite brand’s live selling. This way, merchants can attract the maximum number of customers.
2. Product Demonstration
Live shopping has completely changed traditional online shopping. Unlike static photos of a product,selling live on Facebook live shopping allows you to see how the product works. In the live session, potential customers can see how it looks, in which size it is available, and its exact color.
3. Easy Product Management
Before going live, the host can set up a shopping playlist with categories. Also, they can tag product details and website links before going live. As a result, people can easily navigate to the product, add it to their cart, and purchase directly. During the session, anyone can ask questions through the live chat feature.
Part 2. A Beginner’s Guide to Setting Up a Facebook Live Shopping for Your Product
After understanding these features, sellers can set up their shop. For this purpose, review this section and learn to set up your Facebook shop. Below are some details on how to create a shopping profile on Facebook:
Requirements : Firstly, check your business location, which must be based in the USA. Plus, your business can be located in 21 exempt countries in America, Europe, and Asia. Afterward, create a Facebook business page where you carry an admin role. Then, ensure that Facebook supports your country’s currency. Later, verify your product is complying with Facebook’s commerce policies.
- Step 1. Sign in or create a Facebook page containing all information about your brand. Then, go directly to the Meta Business page and hit the “Live” button in the “Create” section.
- Step 2. From the top bar of your Meta Business page, tap the “Live Shopping” option. There, toggle the “Enable Live Shopping” option and go to stream your first shopping session.

Upon creating an account and choosing a suitable product niche, it’s time to feature them. To learn how sellers feature products, review these steps and make your items visible to viewers:
- Step 1. As you enable the live shopping option earlier, click the “Commerce Manager” to discover the Live Shopping feature in the “Promotions” tab. Continue to select the “Create Playlist” button for setting up a product playlist for live shopping.
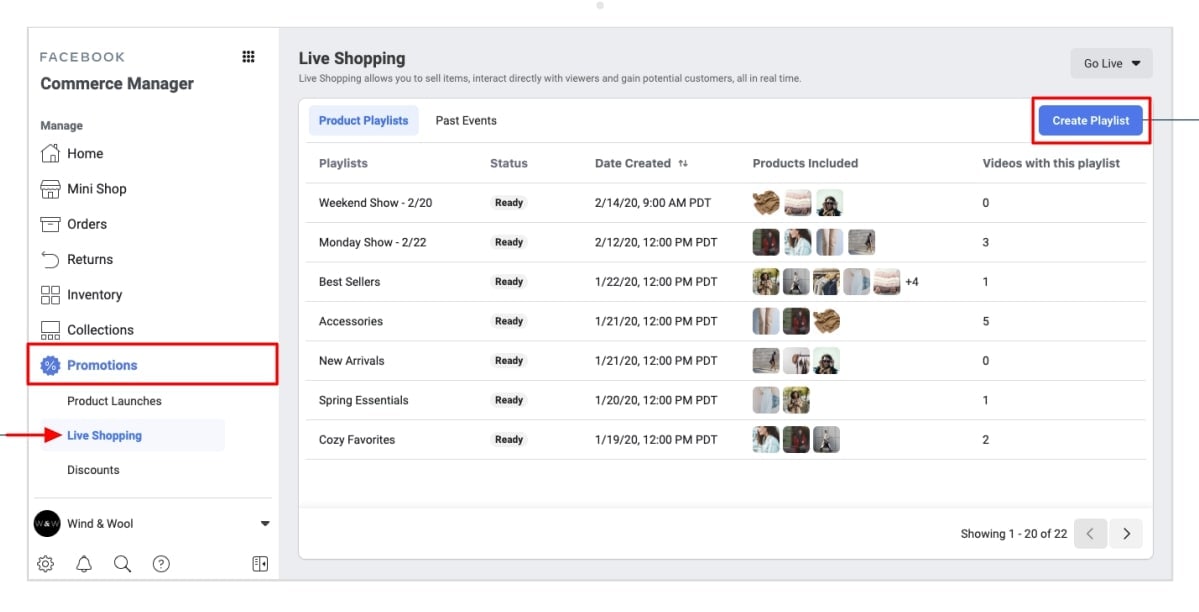
- Step 2. This opens up a new window where you have to provide all the details involving the product. Add the product and their respective details, and review the result in the playlist. After you’ve created the playlist, select where you wish to go live on Facebook, i.e., desktop or mobile app. On selecting the right option, click the “Go Live” button to conclude the process.

What Products Are Suitable for Facebook Live?
Determining the top-selling product would help retailers to increase sales. Notably, clothing and accessories are the most selling products of 2022 on Facebook. Meanwhile, self-grooming products stand second, followed by furniture and electronic appliances. Provided is a list of the products that seem suitable forFacebook live shopping :
- Electronics
- Home and Garden
- Vehicles
- Clothing and Accessories
- Furniture
- Mobile Accessories
Part 3. Some Progressive Tips To Excel in Facebook Live Shopping
After learning about setting up a Facebook shop, you should look into some tips for settling down in the market. Thus, the following are some strategies that you need to focus on beforeselling live on Facebook :
1. Promote Your Shopping Event
Build anticipation of your event a couple of days before. Following that, announce or promote your event and encourage people to subscribe to your page. You can invite them via other channels like Instagram posts, blogs, and social media groups.
2. Keep It Short and Engaging
Consider the first few minutes of the live event important. Show an energetic attitude and grab the audience’s attention initially. According to research, social media users prefer to watch videos in under 1 minute.
3. Plan Things and Be Organized
It is better to plan your points of discussion before the event. You should write the outline and transition lines to shift from one product to another. Besides, keep your surroundings organized to give viewers a good impression.
4. Energetically Communicate
Make your audience as much involved in the event as you can. For this, it is suggested that they respond to their questions and ask them to comment. You can show your product trials and ask a friend or family to create more engaging discussions.
5. Don’t Let Your Work Wasted
You should not let yourFacebook live online selling sessions be wasted. Save it in your timeline for people to watch anytime and get information about items. It will also attract new audiences who couldn’t join the live session.
Part 4. Sell Better With Simplicity: Wondershare Virbo Live
Live selling on Facebook seems easy, but you need effective tools to attract the most customers. In this regard, people still don’t have enough knowledge to plan and execute live streaming. Therefore, usingWondershare Virbo Live is the ultimate solution to perform the entire process in one place. It is an AI tool that offers multilingual AI-driven avatars for seamless shopping broadcasting.
You can set up a customized Q/A database for automatic queries using this tool. Plus, it is compatible with almost all social media platforms, such as YouTube, Facebook, and Instagram. Not only that, but you can also dive into its prominent features, which are explained below for more insights:
- AI Live Script Generation: Are you unable to brainstorm engaging pinpoints for your product selling? Use the AI Script feature of Wondershare Virbo Live and get a compelling script by describing your needs. You can even select a script tone from marketing to specialization options.
- AI Translation: To attract a diverse audience, you need videos in different languages. Therefore, Virbo Live offers a feature to translate your script into another language. Apart from that, a dubbing option holds AI voices of different languages and accents.
- AI Avatars: If you are a camera-shy person but live selling is a need of your business, use AI Avatars as a dynamic shift to progress. They can mimic real-life nuances while showing various ethnicities and attires. You pick one via scrolling, standing, or sitting pose avatars.
Get Started Online Free Download
Steps To Sell Better With Wondershare Virbo Live
Another notable option is that Wondershare Virbo Live lets you import an image or video background for effective enhancement. To explore that option, follow these steps and use Wondershare Virbo Live to the maximum:
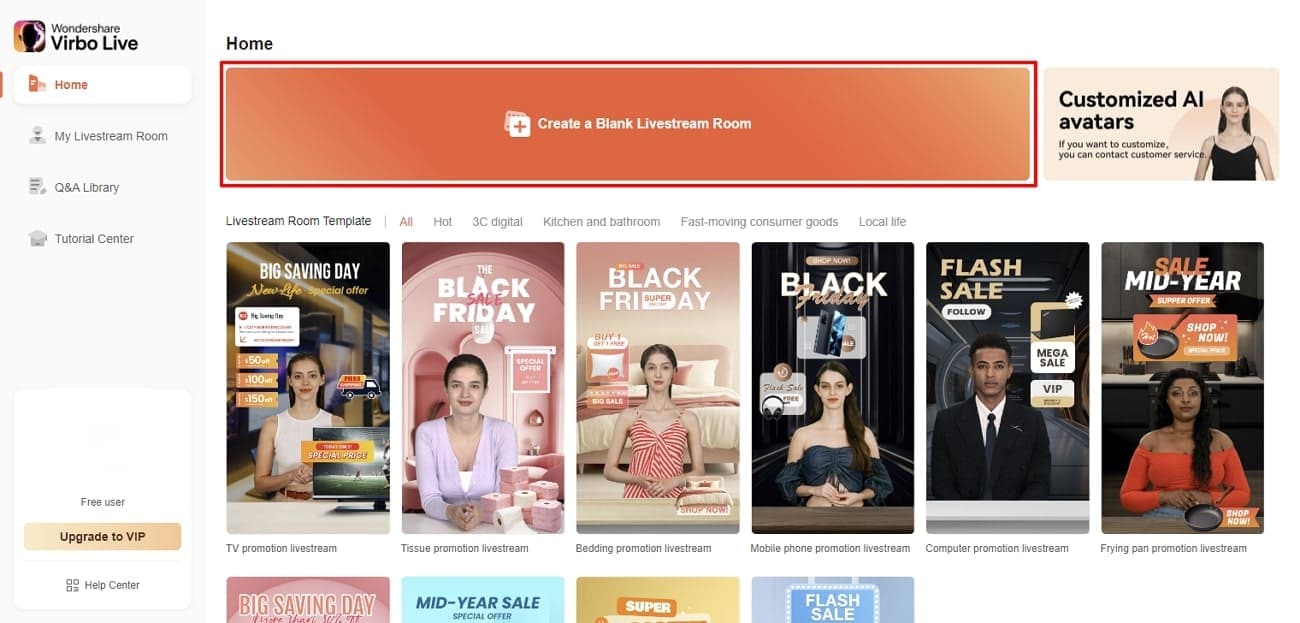
- Step 1. Access Virbo Live and Create a Blank Live Stream Room
Enter the official Virbo Live website and proceed to select the “Create Stream Room Now” button. Select the “Create a Blank Livestream Room” button to initiate the live stream system as you lead into the main interface.
Get Started Online Free Download
- Step 2. Customize Your AI Avatar for Streaming
From the editing screen of Virbo Live, press the “AI avatars” option from the top bar. Scroll and pick one avatar that suits you best. Then, hit the “Background” option next to AI Avatar and choose one background.
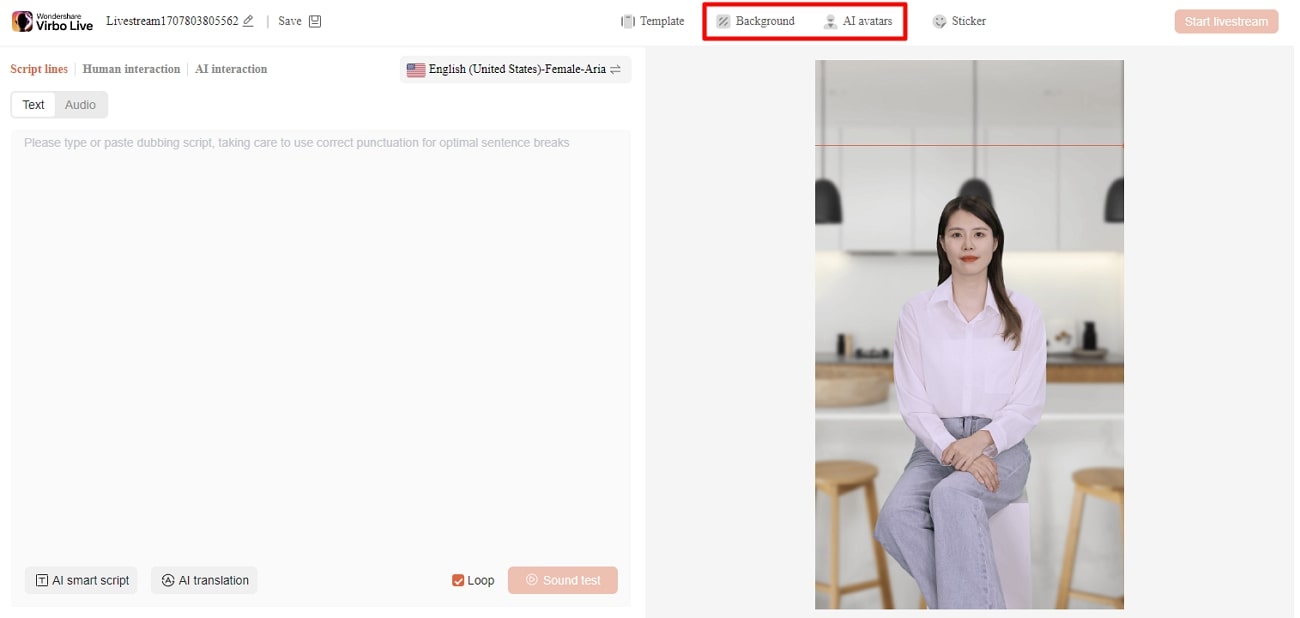
- Step 3. Add Script for Livestream Video
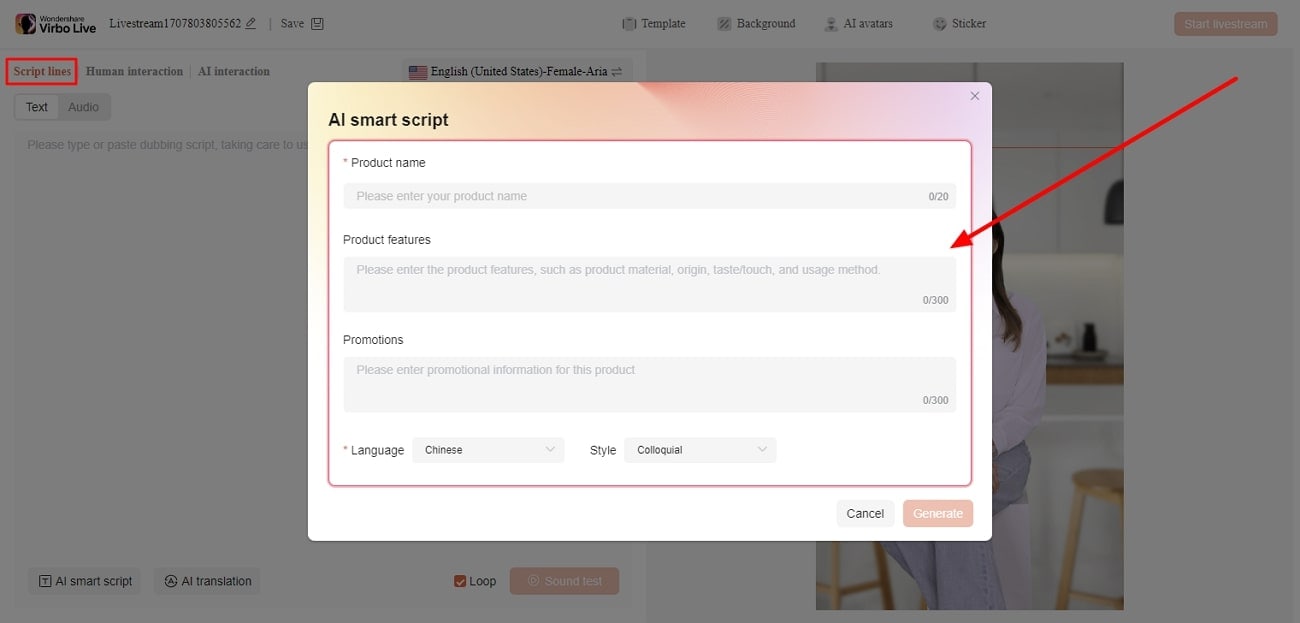
Move to the left and enter the words you want the AI Avatar to speak under the “Script lines” section. Alternatively, you can choose the “AI Smart Script” button from the bottom left corner. You can describe your product, set a Style, and adjust other parameters to get an AI script there.
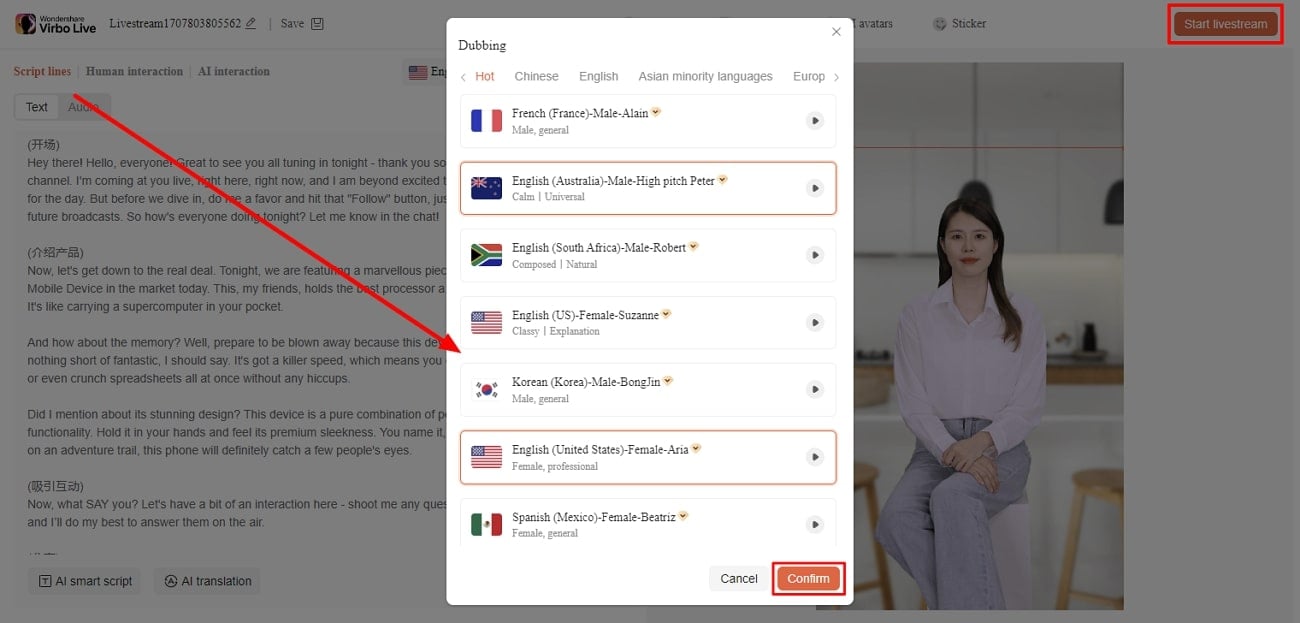
- Step 4. Pick a Dubbing Voice for Avatar To Live Stream
After customizing the avatar, head to the “Dubbing” option from the top. Using it, pick one language and accent of the AI voice to proceed with the “Confirm” button. Finally, your live-selling video is ready to post via the “Start livestream” button at the top right corner.
Conclusion
To summarize, livestream selling is becoming a competition between platforms. Meta isn’t behind in this situation and offerslive shopping on Facebook , which is highlighted in this guide. Undoubtedly, Facebook is setting trends, but it is difficult for many users to comprehend. Therefore, Wondershare Virbo Live is a perfect solution to plan and execute live selling seamlessly in one place.
AI Avatar | Wondershare Virbo Online
AI Avatar
Are you currently seeking to incorporate a digital avatar into your video content? You can set aside any concerns because Virbo has the perfect solution to meet your needs and provide the ideal digital avatar for your videos.
Get To Know Our Realistic AI Avatars
- 300+ Real Human Avatars
- Natural Human Voice
- 300+ Voices & Languages
- All Age Ranges
- Various Attires
- Diverse Ethnicities
With the power of AI, Virbo can effortlessly produce a video for you using a digital avatar. Simply make the necessary adjustments and add your desired text, and the video will be instantly generated.
![]()
Click here to learn more about AI Avatar >>
A Detailed Review & Alternatives of VOCALOID6 Voice Generator
Creating music to share emotions and ideas with the world is a never-ending thing. However, the change in today’s world is, you don’t have to put in all the manual effort and hire professional singers for this. If you have lyrics and melody in mind, try to make a song through them with the help of AI voice generators.
Don’t worry if you don’t know any AI voice generator tools. In this article, we will be discussing theVOCALOID voice generator . Not only this, but we will also discuss some of its premium-grade alternatives. So, let’s initiate the discussion without dragging it any further.
Part 1: A Brief Overview of What is VOLCALOID6
VOCALOID6 is an AI-powered music generator created by Yamaha. Through this, you can generate expressive music by adding lyrics and rhythm. By using VOCALOID6, you can inspire the world with your music. It helps amplify the music wave and generates the music you like. Moreover, it has the potential to generate music with natural singing voices.
The interface of theVOCALOID voice changer is appreciative and straightforward. Thus, you will not face any difficulty while exploring and using this tool. Above all, it incorporates innovative algorithms along with blazing-fast processing speed. Through this, you can accomplish your task at a faster speed without adjusting everything manually.
Compatibility of VOCALOID6
VOCALOID voice generator free is a tool that always places the needs of users before anything else. For this reason, it supports compatibility with major operating systems. The below-given table will help you understand the compatibility of VOCALOID 6:
| OS | Supported Versions |
|---|---|
| Windows | Windows 10 version 21H2 (and above), Windows 11 version 21H2 (and above). |
| Mac | macOS 10.15 (Catalina), macOS 11 (Big Sur), macOS 12 (Monterey), macOS 13 (Ventura). |
Pricing of VOCALOID6
Luckily, VOCALOID software offers reliable and cost-efficient pricing plans for users. You can also discover the budget-friendly pricing plans of VOCALOID6 here:
- VOCALOID6 for Windows/macOS: $225
Part 2: What are the Features Offered by VOCALOID6
VOCALOID synthesizer is a tool that is packed with amazing features. This tool’s top-grade features can help you generate music in natural singing voices with few taps. You must be eager to discover the features of VOCALOID6 that can set it apart from its competitors. A few are discussed here for your better understanding of the tool:
1. Direction and Vocal Work
With this optimized quality tool, you can edit the music’s accents, rhythmic feel, and vibrato. Above all, you also have a chance to double the music to generate music harmony. This also helps you in giving a personalized outlook to your music tracks.
You can also mute and solo the parts with the in-built switches. Moreover, it also has buttons to view TimeSig, Main Tracks, and Tempos. One of the best things is you can easily repeat the desired part of the song in a loop with a few taps.
2. VOCALO CHANGER and VOCALOID:AI
This software has the potential to produce new tracks for you. It can also replicate your singing style, so you don’t have to compromise on your style. There are over 100 singing styles in it, and you can select one of your choices.
In addition, it can generate naturally expressive tracks for the ease of the users. The VOCALO CHANGER lets you add your voice to its interface and change it as needed. You can also add it to the voice bank. Moreover, you can also zoom in on the projects to see the generated tracks.
3. Language, Effects, and Customization
One of the best things about the VOCALOID voice generator is it has over 11 audio effects that can give a more natural look to your music. It can also make the music more pleasurable to hear. Above all, you can also generate music in multiple languages with this. The languages it supports include English, Spanish, Chinese, Korean, and Japanese.
VOCALOID synthesizer includes 4 voicebanks which give flexibility for music creation. There is the latest synthesis engine in it which lets you create realistic music with a natural tone. You can customize several audio metrics and join multiple sounds together.
4. ARA 2 and SMF EXPORTING
There is a specialized integration in VOCALOID6, which is known as ARA2. It can also work as a replacement for rewiring. ARA2 is compatible with DAWs which is very convenient. Through SMF EXPORTING, you can export your MIDI files from VOCALOID6.
Moreover, you can also export every single MIDI file individually without compromising quality. You can further use the MIDI files as a template and edit them as needed.
5. Voices and Phrases
In VOCALOID, you can access over 2000 editable phrases along with the audio samples. You can also use them via drag-and-drop action. Moreover, there is no restriction on the type of voice as it supports both male and female voices. You can access both male and female voices in all the languages supported bythe VOCALOID voice changer .
Moreover, you can edit the music with its effective line tool. This helps in accomplishing smooth and consistent editing. There is a specialized note-editing tool that can make editing music notes easier than ever.
Part 3: How to Use VOCALOID6 VOICE Changer | Step-by-Step Instructions
Using VOCALOID6 is not as complicated as it seems. The procedure for using the VOCALOID6 voice changer without any mistakes is listed here for you:
Step 1: Initially, install and launch VOCALOID6 on your device and hit the “New Project” button. Next, select the “VOCALOID.AI” option and add “Track Name” in the box present next to this option. You can also add the “Track Count” along with “Part Duration”.
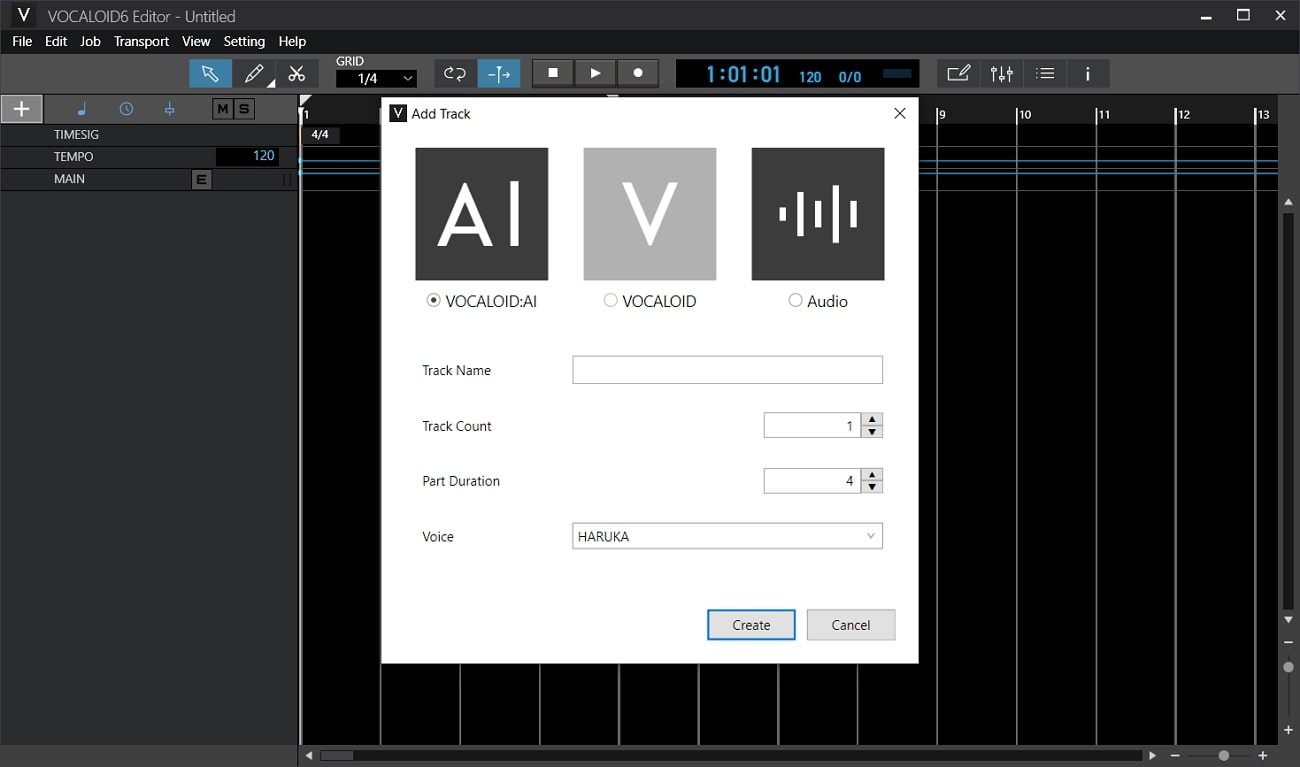
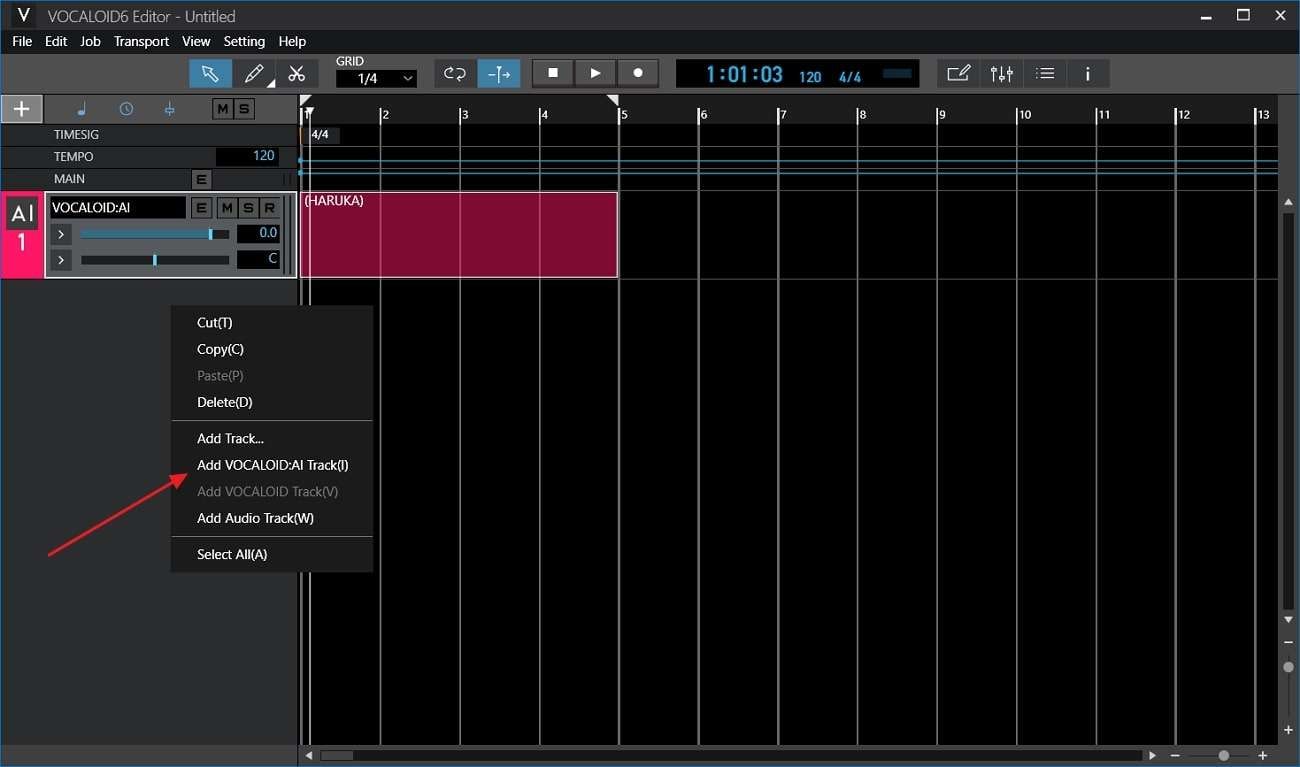
Step 2: Following this, select the “Voice” drop-down menu and select the AI voice of your choice. Once done, click the “Create” button. Open up your “Editor” and right-click on it. Next, hit the “Add VOCALOID:AI Track” option and add a vocal track of your choice.
Step 3: Once it’s completely loaded, click on “Track” and locate the “Voice” and “Style” drop-down menu. Choose a voice and style of your choice and play it to have a preview. Afterward, go to the “File” tab and hit the “Save” button. Hereafter, select the “Destination Folder” and again choose “Save.”

Part 4: The Best Alternatives to VOCALOID6 Voice Changer
Undoubtedly, theVOCALOID voice generator is an optimized quality tool. However, it is better to know its alternatives. Through this, you can experience reliable innovation and upgrades. It also gives a comparative analysis along with flexibility.
No worries if you have no idea about the reputable alternatives of theVOCALOID synthesizer . The below-discussed tools can serve as the best alternatives for VOCALOID software:
1. Virbo
Virbo is a quality-optimized tool through which you can generate AI videos with AI avatar integration. The interface of thisVOCALOID voice generator alternative is beyond amazing, and it also incorporates blazing-fast processing speed. Virbo supports 150+ real human avatars, along with 120+ voices and languages. You can also select the avatars based on their age and ethnicity.
Get Started Online Free Download
It also allows you to select languages based on gender and accent. Moreover, Virbo integrates a text-to-speech feature that helps you convert written text into expressive speech. You can also access professionally made video templates in Virbo, making your work easier than ever. In addition, it supports the royalty-free music track, which you can use in the videos.
It shows compatibility on diversified platforms such as Online, Windows, Android, and iOS. You can even use its premium version on multiple devices without any problem. With the help of Virbo, you can also generate AI scripts for social media content. Furthermore, you can also optimize the script on a Windows computer.
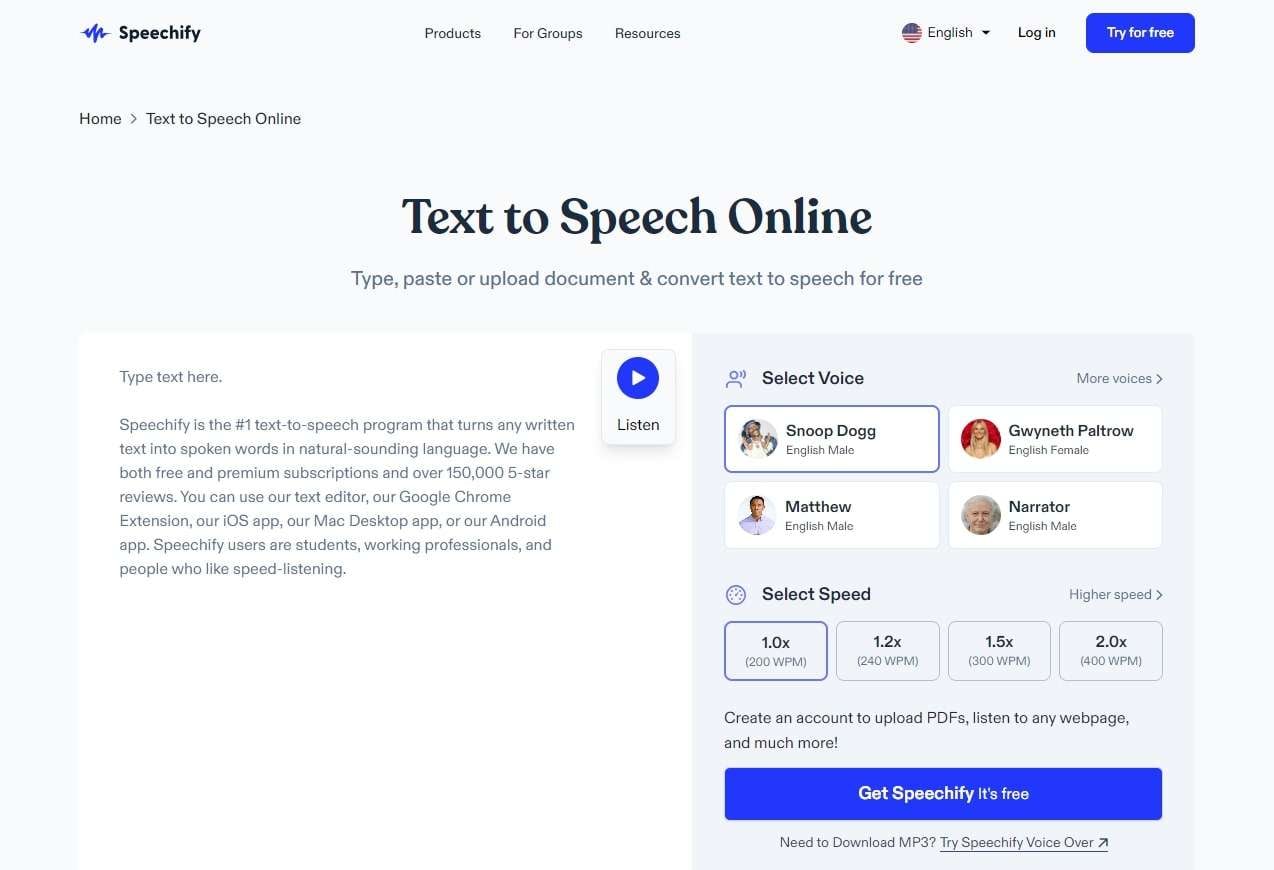
2. Speechify
Speechify is one of the popular AI voice generators on the web. Through this amazing quality tool, you can generate the voices with full customization. It also helps you listen to voices at any speed on both mobile and desktop devices. You can also generate the content in natural human voices to make it more accessible and understandable for the users.
Speechify can also turn Docs, articles, or PDF files into speech without any mistakes. You can also use this for generating voiceovers, doing voice cloning, and dubbing existing files. It also has an extensive catalog of audiobooks that you can narrate in high-quality.
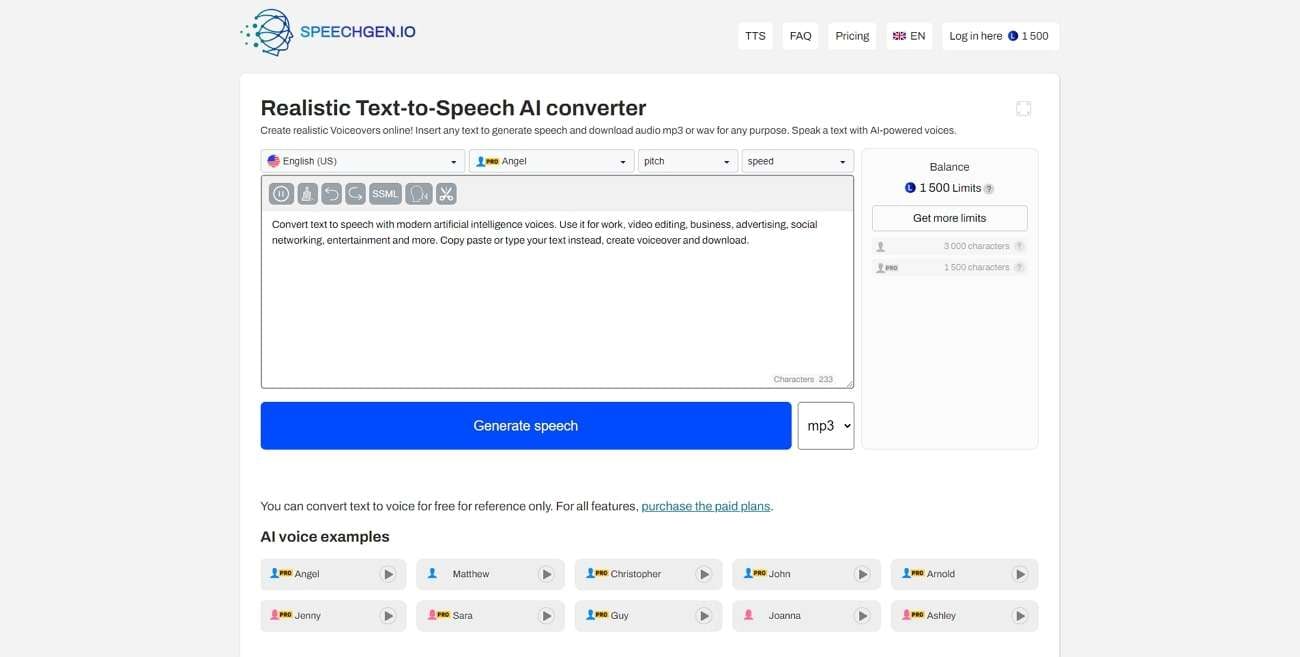
3. SpeechGen.io
This innovativeVOCALOID software alternative holds the potential for generating realistic AI voices. Through this, we can create realistic quality voices without any pronunciation mistakes. It also supports various languages, such as Persian, Basque, Irish, Greek, Spanish, English, Gujarati, and more. You can also select the AI voice of your choice from the options of Bart, Guy, Eric, Jack, and more.
Before selecting the voices, you can also hit the play icon to preview them. Besides this, it also lets you manage the audio metrics as you can customize the pitch of audio through this. It also has several built-in pitch options, including -20, -16, -8, -4, +2, +18, +20, and many more. The speed of audio can also be customized through this tool.
Conclusion
As discussed in this article, you can useVOCALOID software to generate AI voices. You can find significantly descriptive information about this amazing tool in the above article. The features of VOCALOID6, along with compatibility and pricing, are also described above.
If you want to use this tool for generating AI voices, the steps are also mentioned above. The top 3 alternatives of VOCALOID6, which can help you generate realistic voices, are described above. If you need to learn about the tool with the most recommendations, the answer is Virbo.
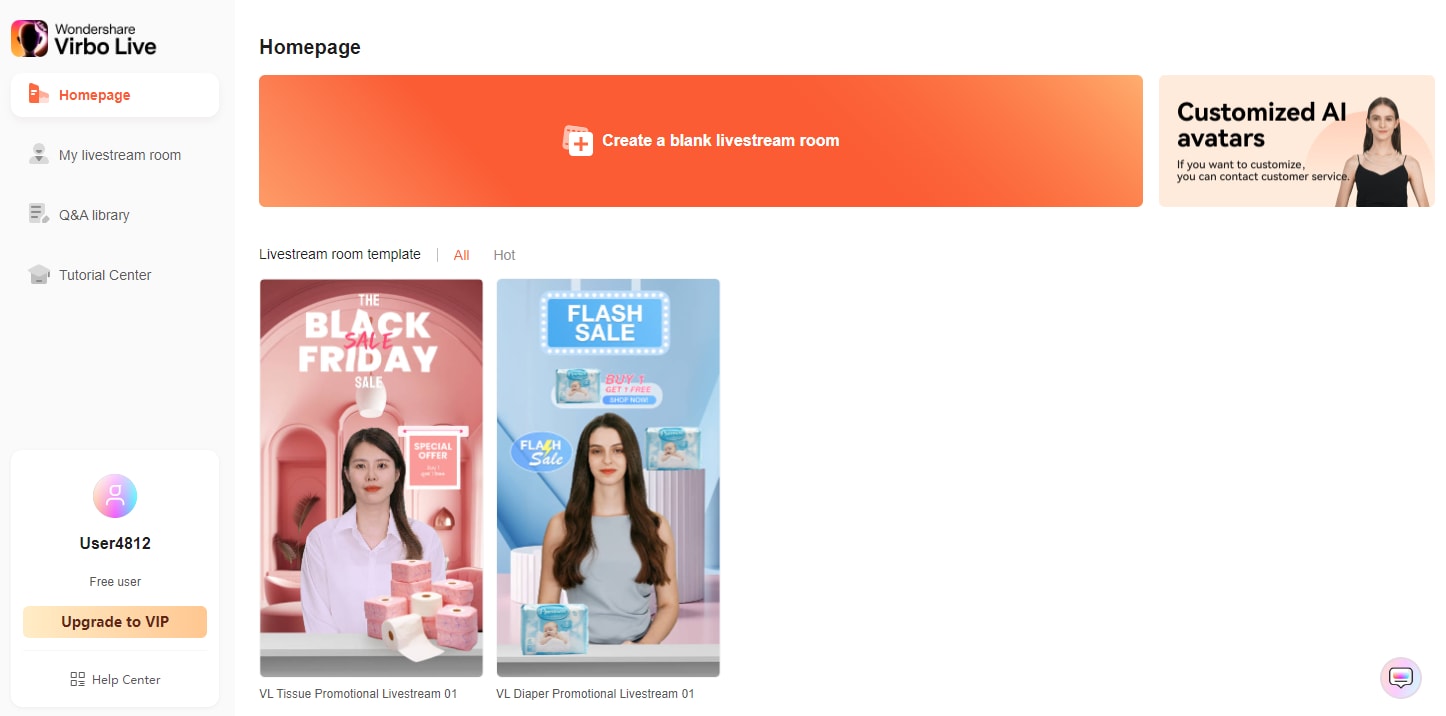
Launching Your Live Room
Launching Your Live Room
Explore step-by-step instructions on decorating your space, uploading local images and videos, adding engaging AI interactions, etc. Elevate your streaming experience and captivate your audience with a seamlessly executed live room. Dive into our comprehensive guide now!
02Uploading Local Images and Videos
07AI Intelligent Script Generation
11Starting/Ending the Live Broadcast
Decorating Your Live Room
Decoration Guidance
- Click on the product homepage and create a blank live room to initiate a new live session.

Create a blank live room
- Upon creating a blank live room, the live room editing page will open. The left side serves as the operation area, the right side as the canvas area, and the materials area is located above.

Livestream room navigation
- Click on the templates to use pre-designed combinations of background, virtual hosts, and stickers.

Select a template
- Customize the background from the background library. During the live broadcast, only one background can be used.

Livestream room customization
- Choose a virtual host from the virtual host library. Only one virtual host can be used during the live session.
![]()
Choose a virtual host
- Add stickers from the sticker library. Multiple stickers can be used during the live broadcast.
- After selecting materials, adjust their position and size in the canvas area. Right-click to modify layers, copy, or delete materials.
Uploading Local Images and Videos
Upload background images or videos
- Upload: Click Background -> Upload Background -> Select file to upload. Materials will be displayed in “My Background” after uploading.

Upload Background
- Apply: Click Background -> My Background, then click on the material to use it on the canvas.
- Delete: Hover over the material and click the delete icon to remove it.

Delete Background
Note
Background upload requirements:
- Image and video dimensions should be 9:16
- Image formats: JPG/JPEG/PNG
- Video formats: MP4/MOV
- Resolution should not exceed 1080P
- Video duration should not exceed 30 minutes
- File size should not exceed 1GB
Upload sticker images or videos
- Upload: Click Sticker -> Upload Sticker -> Select file to upload. Materials will be displayed in “My Sticker” after uploading.

Upload Sticker
- Apply: Click Sticker -> My Sticker, then click on the material to use it on the canvas.
- Delete: Click Sticker -> My Sticker, hover over the material, click the delete icon to remove it.

Delete Sticker
Note
Sticker upload requirements:
- Image and video dimensions are flexible.
- Image formats: JPG/JPEG/PNG
- Video formats: MP4/MOV
- Resolution should not exceed 1080P
- Video duration should not exceed 30 minutes
- File size should not exceed 1GB
Text-Driven Live Room
Script Guidance
- Input script text: Copy and paste your script into the script dialogue box.

Text Scripts Inset
- Choose a matching tone: Click the voice-over entrance above, select a suitable tone, and preview it.
- Preview: Click the “Preview” button below the text to listen.
Audio-Driven Live Room
Audio Guidance
- Upload audio: Click Script -> Audio -> Upload local voice and upload the local file.

Upload Audio
- Preview audio: After uploading, click to preview the audio.

Preview Audio
- Audio sorting: Hold and drag to sort the audio files.

Audio sorting
- Audio sorting: Hold and drag to sort the audio files.

Modifying Live Room Name
Method Guidance
- Method 1: Click the edit button in the upper-left corner of the edit page to rename the live room.

Rename Livestream Room
- Method 2: Product homepage -> My Live Rooms -> Click on the more options for an individual live room -> Choose Rename.
Adding AI Identification
Step Guidance
- On the live room editing page, click on the checkbox before the AI identification to enable or disable it.
AI Intelligent Script Generation
Generation Guidance
- Click the “AI Intelligent Script” button below the script, a popup will appear.
- Enter your product name (mandatory), selling points (optional), promotional information (optional), select language and style, then click generate.

AI Script
- The generated result can be further modified, click “Use” to add it to the script dialogue box.
AI Translation
Translation Guidance
- Click the “AI Translation” button below the script, a popup will appear.
- Place the text to be translated on the left, click the middle arrow to select the language for translation (e.g., English), and click translate.

AI Translation
- The generated result can be further modified, click “Use” to add it to the script dialogue box.

AI Translation Result
Manual Interaction
Microphone Interaction
- Operational Flow:
- Click Manual Interaction -> Microphone, and select the microphone device.
- Speak into the microphone and observe the sound wave status.
- Open “Start Live,” wait for the appearance of the virtual host image, and click “Open Mic Takeover.” The virtual host’s mouth will be closed, and your voice will drive the virtual host to speak.
- After speaking, click “End Takeover,” and the virtual host will resume reading the scripted dialogue.
- Click Manual Interaction -> Microphone, and select the microphone device.
- Grant Browser Microphone Access:
- Google Chrome:
*Open Chrome, click the settings icon in the top right.
* Click “Settings,” open the settings page. Select “Privacy and Security” and then click “Site Settings.”
*Enter the site settings page, click “Microphone.”
* On the microphone authorization page, select that the site can request the use of your microphone.
* After these settings, when the browser needs to use the camera or microphone, a device request box will pop up on the page. Select “Allow.” - Mozilla Firefox:
*Open Firefox, click the settings icon in the top right, and click “Settings.”
* Open the settings page, click “Privacy & Security,” and find “Microphone Permissions.” Click “Settings” next to “Microphone.”
*Enter the settings page, add the site that requests the use of your microphone to the list, and click “Save Changes.”
* After these settings, when the browser needs to use the camera or microphone, a device request box will pop up on the page. Select “Allow.” - Sogou Browser:
*Open Sogou Browser, click the settings icon in the top right, and click “Options.”
* Open the options page, click “Advanced,” find “Privacy - Browsers on the Mac System:
*Locate “System Preferences” on your Mac dock and click the icon. Once opened, find “Security & Privacy” and click to open.
* On the “Security & Privacy” page, select “Privacy,” then click on “Microphone” and set the applications that need to use the microphone to “Allow.”
- Google Chrome:
Text Interaction
- Click on “Artificial Interaction” and enter interaction scripts in the input box below.
- Click “Add Text” to add it to the interaction list. After starting the live broadcast, each interaction script will have a send button.

Text Interactionn
- Click “Send” to trigger the AI to speak according to the interaction script.
Intelligent Interaction
Note
The current intelligent interaction feature only supports Alibaba International. If you are streaming on other platforms, you can skip this step.
Setting Entrance
- On the live broadcast page, click on “Intelligent Interaction,” select the live platform, and the supported intelligent interaction features will be randomly displayed.
Q&A Library Settings
- Creating a New Q&A:
- On the product homepage, click on Q&A Library - Add Q&A, and a popup window will appear.
- Fill in the rule name, keywords, reply text, and upload a reply video. Click Save.
Note
Rule Name: Name the rule for easy identification.
Keywords: If a viewer’s question in the live room contains any of these keywords, it will trigger the AI to answer.
Reply Content: You can add up to 5 replies. Include variables like [Viewer’s Nickname] and [Viewer’s Country] for personalized responses.
Sequential Reply: Replies in sequence when triggered.
Random Reply: Randomly selects a reply when triggered.
Reply Video: If configured, the video will be displayed at the specified position until the AI’s reply ends.
- Adjusting Q&A Activation Status:
- Click Q&A Library - Switch to close or open the Q&A rule. When closed, the Q&A rule will not take effect after the live broadcast starts.
- Turning on Q&A Library Switch in the Live Room:
- On the live broadcast editing page, click Intelligent Interaction - Platform, select “Alibaba International,” and turn on the Q&A Library switch. This must be done after starting the live broadcast and capturing the barrage for the function to work.
Greeting Rules Settings
- Greeting Content: You can add up to 5 replies, including variables like [Viewer’s Nickname] and [Viewer’s Country].
- Sequential Reply: Replies in sequence when triggered.
- Random Reply: Randomly selects a reply when triggered.
- On the live broadcast editing page, click Intelligent Interaction - Platform, select “Alibaba International,” turn on the Greeting switch, and click the edit icon to open the editing window. Fill in the reply text and click Save.
Sending Business Cards and Product Catalogs
- On the live broadcast editing page, click Intelligent Interaction - Platform, select “Alibaba International,” turn on the “Send Business Cards” switch, and turn on the “Send Product Catalogs” switch.
Note
These functions will only take effect after starting the live broadcast and capturing the barrage.
How to Start Live Barrage Capture
- Start Broadcasting in Virbo Live
- Follow the steps for “Start/End Broadcast” on the live broadcast editing page.
- Install the Plugin in Chrome
- Ensure Chrome is up to date, then download the plugin from the provided link . After downloading, unzip locally.
- Configure the Plugin in Chrome
- Open Chrome, go to Settings - Extensions - Manage Extensions, enable Developer mode, click “Load Unpacked,” and select the unzipped folder. Enable “Allow in incognito mode” in the plugin details.
- Copy the Live Control Page Link
- Copy the link of your live control page (web version) from the live platform. Paste the link into the live broadcast editing page under Intelligent Interaction - Live Room Link Input, then click “Start Capturing.”
Note
Alibaba International currently supports automatic Q&A, automatic greetings, automatic business card sending, and automatic product catalog sending. You can turn on the corresponding switches and then configure the detailed settings for each item.
Starting/Ending the Live Broadcast
Starting the Live Broadcast
- On the live broadcast editing page, click “Start Broadcasting.”
- The AI live broadcast window will appear shortly after, displaying the AI live broadcast.
Using Your Broadcasting Partner or OBS
Note
Keep the AI live broadcast window open on the desktop during the broadcast, or it will not broadcast properly.
- Open your broadcasting partner or OBS, add a window, select the Wondershare VVB (Live Version) live window.
- Click “Start Broadcasting.” Use Alt + mouse to crop out the web bar or use the zoom function to remove it.
- During the live broadcast, you can only modify the “Artificial Interaction” function; other broadcast settings cannot be changed.
Ending the Broadcast
- When concluding the live broadcast, initiate the termination of the live stream on the platform’s broadcasting partner first, followed by clicking the “End Live” button on Virbo Live to finalize the shutdown process.
02Uploading Local Images and Videos
07AI Intelligent Script Generation
11Starting/Ending the Live Broadcast
Decorating Your Live Room
Decoration Guidance
- Click on the product homepage and create a blank live room to initiate a new live session.
Create a blank live room
- Upon creating a blank live room, the live room editing page will open. The left side serves as the operation area, the right side as the canvas area, and the materials area is located above.
Livestream room navigation
- Click on the templates to use pre-designed combinations of background, virtual hosts, and stickers.
Select a template
- Customize the background from the background library. During the live broadcast, only one background can be used.
Livestream room customization
- Choose a virtual host from the virtual host library. Only one virtual host can be used during the live session.
![]()
Choose a virtual host
- Add stickers from the sticker library. Multiple stickers can be used during the live broadcast.
- After selecting materials, adjust their position and size in the canvas area. Right-click to modify layers, copy, or delete materials.
Uploading Local Images and Videos
Upload background images or videos
- Upload: Click Background -> Upload Background -> Select file to upload. Materials will be displayed in “My Background” after uploading.
Upload Background
- Apply: Click Background -> My Background, then click on the material to use it on the canvas.
- Delete: Hover over the material and click the delete icon to remove it.
Delete Background
Note
Background upload requirements:
- Image and video dimensions should be 9:16
- Image formats: JPG/JPEG/PNG
- Video formats: MP4/MOV
- Resolution should not exceed 1080P
- Video duration should not exceed 30 minutes
- File size should not exceed 1GB
Upload sticker images or videos
- Upload: Click Sticker -> Upload Sticker -> Select file to upload. Materials will be displayed in “My Sticker” after uploading.
Upload Sticker
- Apply: Click Sticker -> My Sticker, then click on the material to use it on the canvas.
- Delete: Click Sticker -> My Sticker, hover over the material, click the delete icon to remove it.
Delete Sticker
Note
Sticker upload requirements:
- Image and video dimensions are flexible.
- Image formats: JPG/JPEG/PNG
- Video formats: MP4/MOV
- Resolution should not exceed 1080P
- Video duration should not exceed 30 minutes
- File size should not exceed 1GB
Text-Driven Live Room
Script Guidance
- Input script text: Copy and paste your script into the script dialogue box.
Text Scripts Inset
- Choose a matching tone: Click the voice-over entrance above, select a suitable tone, and preview it.
- Preview: Click the “Preview” button below the text to listen.
Audio-Driven Live Room
Audio Guidance
- Upload audio: Click Script -> Audio -> Upload local voice and upload the local file.
Upload Audio
- Preview audio: After uploading, click to preview the audio.
Preview Audio
- Audio sorting: Hold and drag to sort the audio files.
Audio sorting
- Audio sorting: Hold and drag to sort the audio files.
Modifying Live Room Name
Method Guidance
- Method 1: Click the edit button in the upper-left corner of the edit page to rename the live room.
Rename Livestream Room
- Method 2: Product homepage -> My Live Rooms -> Click on the more options for an individual live room -> Choose Rename.
Adding AI Identification
Step Guidance
- On the live room editing page, click on the checkbox before the AI identification to enable or disable it.
AI Intelligent Script Generation
Generation Guidance
- Click the “AI Intelligent Script” button below the script, a popup will appear.
- Enter your product name (mandatory), selling points (optional), promotional information (optional), select language and style, then click generate.
AI Script
- The generated result can be further modified, click “Use” to add it to the script dialogue box.
AI Translation
Translation Guidance
- Click the “AI Translation” button below the script, a popup will appear.
- Place the text to be translated on the left, click the middle arrow to select the language for translation (e.g., English), and click translate.
AI Translation
- The generated result can be further modified, click “Use” to add it to the script dialogue box.
AI Translation Result
Manual Interaction
Microphone Interaction
- Operational Flow:
- Click Manual Interaction -> Microphone, and select the microphone device.
- Speak into the microphone and observe the sound wave status.
- Open “Start Live,” wait for the appearance of the virtual host image, and click “Open Mic Takeover.” The virtual host’s mouth will be closed, and your voice will drive the virtual host to speak.
- After speaking, click “End Takeover,” and the virtual host will resume reading the scripted dialogue.
- Click Manual Interaction -> Microphone, and select the microphone device.
- Grant Browser Microphone Access:
- Google Chrome:
*Open Chrome, click the settings icon in the top right.
* Click “Settings,” open the settings page. Select “Privacy and Security” and then click “Site Settings.”
*Enter the site settings page, click “Microphone.”
* On the microphone authorization page, select that the site can request the use of your microphone.
* After these settings, when the browser needs to use the camera or microphone, a device request box will pop up on the page. Select “Allow.” - Mozilla Firefox:
*Open Firefox, click the settings icon in the top right, and click “Settings.”
* Open the settings page, click “Privacy & Security,” and find “Microphone Permissions.” Click “Settings” next to “Microphone.”
*Enter the settings page, add the site that requests the use of your microphone to the list, and click “Save Changes.”
* After these settings, when the browser needs to use the camera or microphone, a device request box will pop up on the page. Select “Allow.” - Sogou Browser:
*Open Sogou Browser, click the settings icon in the top right, and click “Options.”
* Open the options page, click “Advanced,” find “Privacy - Browsers on the Mac System:
*Locate “System Preferences” on your Mac dock and click the icon. Once opened, find “Security & Privacy” and click to open.
* On the “Security & Privacy” page, select “Privacy,” then click on “Microphone” and set the applications that need to use the microphone to “Allow.”
- Google Chrome:
Text Interaction
- Click on “Artificial Interaction” and enter interaction scripts in the input box below.
- Click “Add Text” to add it to the interaction list. After starting the live broadcast, each interaction script will have a send button.
Text Interactionn
- Click “Send” to trigger the AI to speak according to the interaction script.
Intelligent Interaction
Note
The current intelligent interaction feature only supports Alibaba International. If you are streaming on other platforms, you can skip this step.
Setting Entrance
- On the live broadcast page, click on “Intelligent Interaction,” select the live platform, and the supported intelligent interaction features will be randomly displayed.
Q&A Library Settings
- Creating a New Q&A:
- On the product homepage, click on Q&A Library - Add Q&A, and a popup window will appear.
- Fill in the rule name, keywords, reply text, and upload a reply video. Click Save.
Note
Rule Name: Name the rule for easy identification.
Keywords: If a viewer’s question in the live room contains any of these keywords, it will trigger the AI to answer.
Reply Content: You can add up to 5 replies. Include variables like [Viewer’s Nickname] and [Viewer’s Country] for personalized responses.
Sequential Reply: Replies in sequence when triggered.
Random Reply: Randomly selects a reply when triggered.
Reply Video: If configured, the video will be displayed at the specified position until the AI’s reply ends.
- Adjusting Q&A Activation Status:
- Click Q&A Library - Switch to close or open the Q&A rule. When closed, the Q&A rule will not take effect after the live broadcast starts.
- Turning on Q&A Library Switch in the Live Room:
- On the live broadcast editing page, click Intelligent Interaction - Platform, select “Alibaba International,” and turn on the Q&A Library switch. This must be done after starting the live broadcast and capturing the barrage for the function to work.
Greeting Rules Settings
- Greeting Content: You can add up to 5 replies, including variables like [Viewer’s Nickname] and [Viewer’s Country].
- Sequential Reply: Replies in sequence when triggered.
- Random Reply: Randomly selects a reply when triggered.
- On the live broadcast editing page, click Intelligent Interaction - Platform, select “Alibaba International,” turn on the Greeting switch, and click the edit icon to open the editing window. Fill in the reply text and click Save.
Sending Business Cards and Product Catalogs
- On the live broadcast editing page, click Intelligent Interaction - Platform, select “Alibaba International,” turn on the “Send Business Cards” switch, and turn on the “Send Product Catalogs” switch.
Note
These functions will only take effect after starting the live broadcast and capturing the barrage.
How to Start Live Barrage Capture
- Start Broadcasting in Virbo Live
- Follow the steps for “Start/End Broadcast” on the live broadcast editing page.
- Install the Plugin in Chrome
- Ensure Chrome is up to date, then download the plugin from the provided link . After downloading, unzip locally.
- Configure the Plugin in Chrome
- Open Chrome, go to Settings - Extensions - Manage Extensions, enable Developer mode, click “Load Unpacked,” and select the unzipped folder. Enable “Allow in incognito mode” in the plugin details.
- Copy the Live Control Page Link
- Copy the link of your live control page (web version) from the live platform. Paste the link into the live broadcast editing page under Intelligent Interaction - Live Room Link Input, then click “Start Capturing.”
Note
Alibaba International currently supports automatic Q&A, automatic greetings, automatic business card sending, and automatic product catalog sending. You can turn on the corresponding switches and then configure the detailed settings for each item.
Starting/Ending the Live Broadcast
Starting the Live Broadcast
- On the live broadcast editing page, click “Start Broadcasting.”
- The AI live broadcast window will appear shortly after, displaying the AI live broadcast.
Using Your Broadcasting Partner or OBS
Note
Keep the AI live broadcast window open on the desktop during the broadcast, or it will not broadcast properly.
- Open your broadcasting partner or OBS, add a window, select the Wondershare VVB (Live Version) live window.
- Click “Start Broadcasting.” Use Alt + mouse to crop out the web bar or use the zoom function to remove it.
- During the live broadcast, you can only modify the “Artificial Interaction” function; other broadcast settings cannot be changed.
Ending the Broadcast
- When concluding the live broadcast, initiate the termination of the live stream on the platform’s broadcasting partner first, followed by clicking the “End Live” button on Virbo Live to finalize the shutdown process.
What Is an AI Art Generator?
Part 1. What is an AI art generator?
An AI art generator is a software or system that utilizes artificial intelligence techniques to create or assist in creating art. It uses machine learning algorithms, and intense learning models, to analyze and understand various artistic styles, designs, and patterns. By training on large datasets of existing artwork, an AI art generator learns to generate new, original artwork that imitates or extends upon the available styles.
AI art generators can produce various art forms, including paintings, drawings, digital art, and multimedia installations. They can generate artwork from scratch or assist artists by providing suggestions, enhancing creative workflows, and exploring new possibilities. AI art generators can also be used as tools for artistic exploration, enabling artists to experiment with different styles, combinations, and variations.
The generated art results from a collaboration between the AI system and the artist or user. The AI provides suggestions and inspirations or even autonomously creates art pieces based on given parameters or prompts. The artist or user can refine, modify, or incorporate the generated artwork into their creative process.
AI art generators have sparked new debates and discussions around the definition of art, creativity, and the role of machines in artistic expression. They are a fascinating example of how artificial intelligence can be applied in artistic creation, pushing the boundaries of traditional artistic practices and opening up new avenues for creative exploration and innovation.
Part 2. What are the applications and development directions for AI art generators?
The usage types of AI art generators encompass a wide range of creative applications and possibilities. Some of the notable usage types include:
01of 07 Artistic Assistant
AI art generators can serve as creative companions, providing artists with artistic styles, techniques, and suggestions to expand and explore their creative endeavors.
02of 07 Style Transfer
AI art generators can apply the style of one artwork to another, creating unique synthesized pieces that showcase style transformation and fusion.
03of 07 Artwork Generation
AI art generators can generate entirely new artworks from scratch, leveraging learned patterns and features from an extensive collection of existing artworks to produce unique creations.
04of 07 Creative Inspiration
AI art generators can inspire artists with generated artwork, sparking new ideas and encouraging artistic exploration and experimentation.
05of 07 Art Education and Learning
AI art generators can be utilized in art education and learning, offering sample artworks, practice exercises, and learning resources to help students understand and study different artistic styles and techniques.
06of 07 Art Evaluation and Research
AI art generators can be used for the evaluation and research of artworks, generating a large volume of artwork to aid in assessing quality, style, and trends.
07of 07 Digital Art and Virtual Reality
AI art generators can combine digital art and virtual reality technologies, creating interactive digital artworks and immersive virtual reality experiences.
These usage types demonstrate the diverse applications of AI art generators in art, driving artistic innovation, exploration, and the fusion of art and technology.
Part 3. Which AI art generators are available on the market?
Those mentioned above are just a few examples of their application directions. Here are some well-known specific AI art generators that have gained recognition and popularity in the field:
1. Midjourney
Midjourney is a groundbreaking AI art generator that pushes the boundaries of artistic expression. Powered by advanced machine learning algorithms, Midjourney combines artificial intelligence and creativity to produce mesmerizing artwork. With it, artists and enthusiasts can embark on a unique artistic journey. By simply providing a starting point, such as a basic sketch or a written description, Midjourney’s intelligent algorithms take over, transforming the input into a stunning piece of art. Whether it’s a painting, illustration, or even a digital sculpture, Midjourney’s AI generates astonishing visual creations that captivate and inspire.
2. Deep Dream
Developed by Google, Deep Dream is an AI art generator that uses deep neural networks to generate surreal and abstract images. It has gained attention for its ability to produce visually mesmerizing and dream-like compositions.
3. Prisma
Prisma is a popular mobile app that utilizes AI algorithms to transform photos into artistic renditions. With its wide range of artistic filters and styles, Prisma has become a favorite among users who want to effortlessly add a creative touch to their photos.
4. Runway
Runway is a versatile AI art generator tool that offers a wide range of models and functionalities for artists and creators. From generating unique visuals to exploring style transfer and animation, Runway empowers users to experiment and push the boundaries of their artistic creations.s
These well-known AI art generators exemplify AI technology’s capabilities and impact on art. They have opened up new avenues for artistic expression, allowing artists and enthusiasts to explore and create with greater creativity and innovation.
5. DeepArt.io
DeepArt.io is a widely recognized AI art generator that allows users to transform their photos into artistic styles inspired by renowned artists and various artistic movements. It has become a go-to platform for individuals looking to create unique and visually captivating artworks.
Top 8 Multi-Subtitles Translators You Can Use
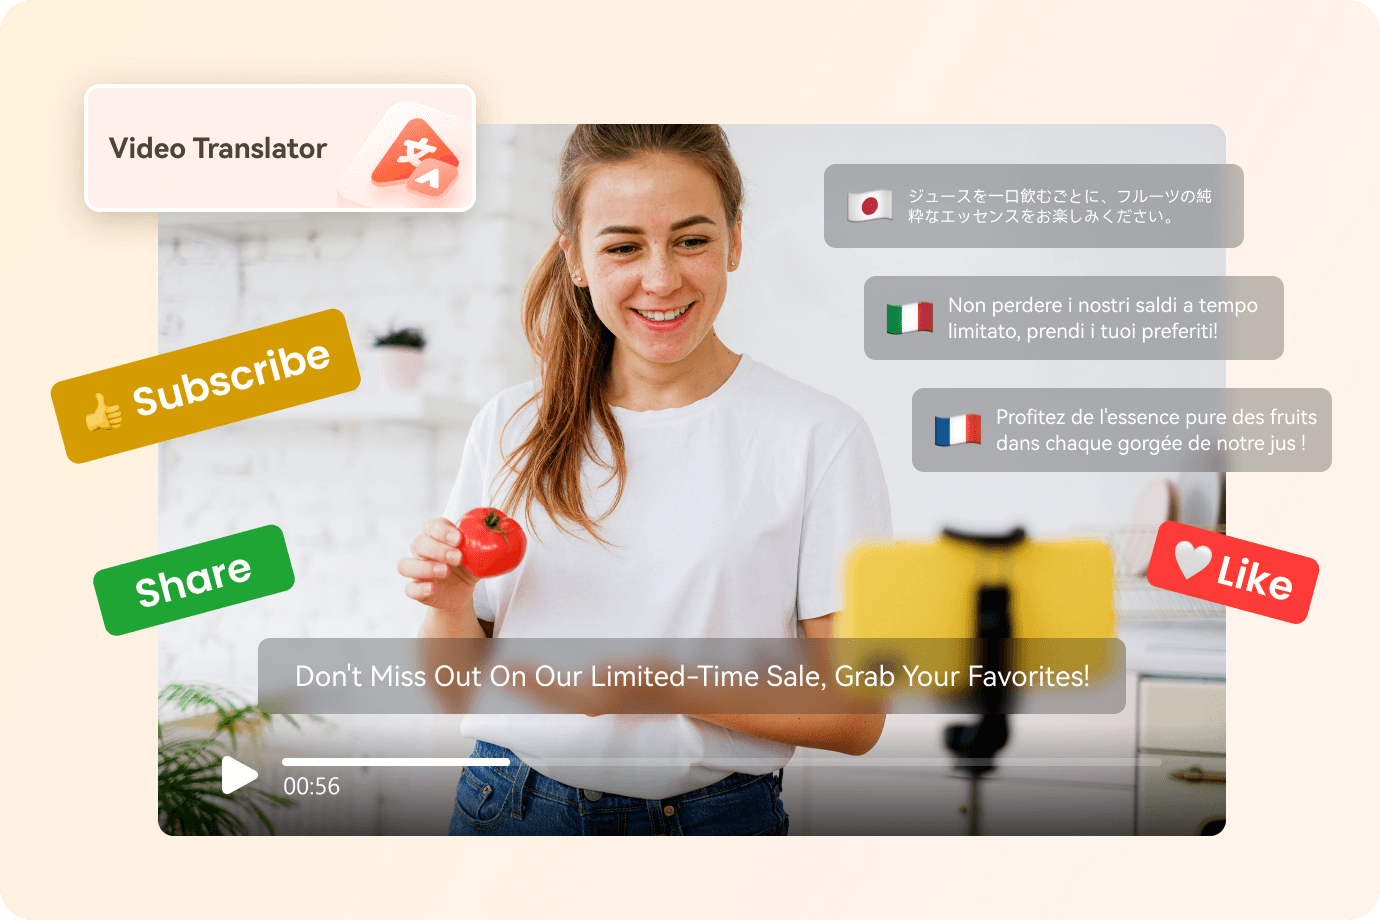
Reaching a global audience depends on having a reliablemulti-subtitle translator . It ensures inclusivity and accessibility across diverse cultures and languages. It plays a role in bridging linguistic gaps. They make content understandable and relatable.
By using such tools, creators can broaden their viewer base. You can also foster connection and understanding worldwide. The following section delves into a curated list of 8 potent apps that excel in translating multiple subtitles. Each app helps create seamless communication and engagement across linguistic barriers. Read on to learn more.

Part 1. Top 8 Multi-Subtitles Translators for a Wider Reach
Discover the ultimate tools to expand your content’s global impact. These translators unlock the potential to increase your reach with audiences. Here are the top 8 apps that cantranslate multiple subtitles , starting with a powerful AI-assisted app.
Wondershare Virbo – AI-Powered Video Translator
Wondershare Virbo takes advantage of cutting-edge AI technology to revolutionize video translations. It’s one of the top multi-subtitle translators in 2024, empowering creators to reach global audiences easily. Here are its key features:
Get Started Online Free Download
- AI Video Translations. Virbo translates video content into over 20 languages. It can easily translate your videos into English, Spanish, Mandarin, French, German, and more.
- AI Avatars. The app uses 300+ realistic avatars to personalize your video presentations and translations.
- AI Voice. Virbo provides natural-sounding voiceovers in many languages, ensuring an immersive viewing experience.
- AI Script . It simplifies the translation process by transcribing and translating video scripts in real time.
Virbo caters to various use cases, including:
- Building stronger customer loyalty
You can tailor marketing messages to specific language demographics. It’s easy to create deeper connections and loyalty among diverse customer bases.
- Standing out in social media
You can create attention-grabbing content thanks to multilingual subtitles. The tool allows you to differentiate from competitors and expand your reach globally.
- Boosting digital marketing
Virbo enhances the effectiveness of your digital marketing campaigns. It helps you deliver localized content that resonates.
Translate Subtitles – Free Translation Service
Subtitles Translator is an easy-to-use free online tool. The app is designed to transform subtitle files into different languages with ease. It’s one of the top solutions for seamless subtitle translation available today. Here’s what themulti-subtitle translator app offers:

- Subtitle language transformation. You can convert subtitle files into various languages. Translate Subtitles allows you to translate in various languages. It includes Danish, Dutch, Hindi, Hebrew, and more.
- Multi-language translation services. Enjoy more translation options for converting subtitle files between different languages. You can edit translated text and download in-progress files for easy editing.
VEED.IO – Free Subtitle Converter
VEED.IO is another solution for expanding your video’s reach to a global audience. It offers a seamless online platform that automates the translation process. With its intuitive interface, reaching diverse viewers has never been easier. Here’s why it’s a game-changer:

- Automated transcription tool. Achieve 95% accuracy with VEED.IO’s automated transcription tool. It ensures precise subtitles for your videos.
- Flexible translation options . The app offers multilingual subtitles in over 100 languages. It includes English, Spanish, French, and Chinese, catering to diverse audiences worldwide.
- Easy customization. You can change the text translations as needed. Either add them as subtitles or download them as TXT files for offline editing.
Nikse – Subtitle Edit Online
Nikse Subtitle Edit Oline is a free multi-subtitle translator. The free online platform simplifies the process of translating subtitles into many languages. Below are the key features of the app:

- Translation and synchronization . You can translate subtitles into different languages. Use Google Translate, Yandex Translate, or other integrated tools to convert subtitle languages.
- Many output formats. Save your subtitle files in various formats, including STL, XML, TXT, and more.
SubtitleBee – Automatic Translator
SubtitleBee is an AI-powered solution for effortless transcription and translation of video content. The app focuses on enhancing your reach and global engagement. With its intuitive interface, SubtitleBee simplifies the process of translating multiple subtitles. Here’s what makes it stand out:

- Automated subtitling . Add subtitles to your videos with SubtitleBee’s automated tool for improved accessibility.
- Customizable styling. Elevate your subtitles with super-titles and customize font styles. Include various font choices and colors, ensuring visual consistency with your brand.
- Personalized branding. Enhance your video’s identity by customizing subtitles with your brand’s logo.
Flixier – Fast and Simple Subtitle Translator
Flixier is your ultimate online video editing and collaboration platform. The app is designed to help you create and translate subtitles. This multi-subtitle translator empowers you to enhance accessibility for your global audience. Let’s delve into its features:

- Automated subtitle generation . Take advantage of Flixier’s automated subtitle generation feature to save time and effort.
- Precise manual adjustments. Fine-tune your subtitles by making manual adjustments, ensuring optimal readability.
- Google Fonts integration. Enhance the visual appeal of your subtitles by integrating Google Fonts.
Nova AI – Multilingual Translator
Nova AI is a trusted companion for automatic transcription and translation services. It changes the way you engage with audio and video content. Nova AI ensures accurate translations. It can translate multiple subtitles in one go, making it effortless to expand the reach of your content. Here’s what sets it apart:

- Extensive language support . Translate subtitles between 75 different languages. Connect with diverse audiences worldwide.
- Convenient download options. Access your translated text in TXT and SRT formats. Easily integrate them with your video content.
- Video editing and subtitle sync. Use Nova AI’s video editing and subtitle sync features to fine-tune your content.
Subly – AI Subtitle Translator
Subly allows you to create and translate subtitles in minutes. With Subly’s AI subtitle translator, you can easily translate multiple subtitles into many languages. Here’s why Subly stands out:

- Seamless subtitle translation. Translate subtitles into 73 languages with ease.
- Automatic video translation. Experience automated video translation, simplifying the process of creating multilingual content.
- Secure online access. Enjoy peace of mind with Subly’s secure online access. It protects your data throughout the translation process.
Part 2. How To Use the Best Multi-Subtitle Translator
This section guides you through the process of using amulti-subtitle translator . With the top 8 translator tools outlined above, Virbo is the most suitable example. The platform offers streamlined and speedy translations, making applying the same principles to other tools easy. Follow the steps to simplify all your multi-translation needs:
- Step 1: Start by downloading and installing Virbo on your device. Log in with your Wondershare, Google, Facebook, Twitter, or Apple account. Or, use theVirbo online tool if downloading is not your ideal option. Click theVideo Translator button to start the process.
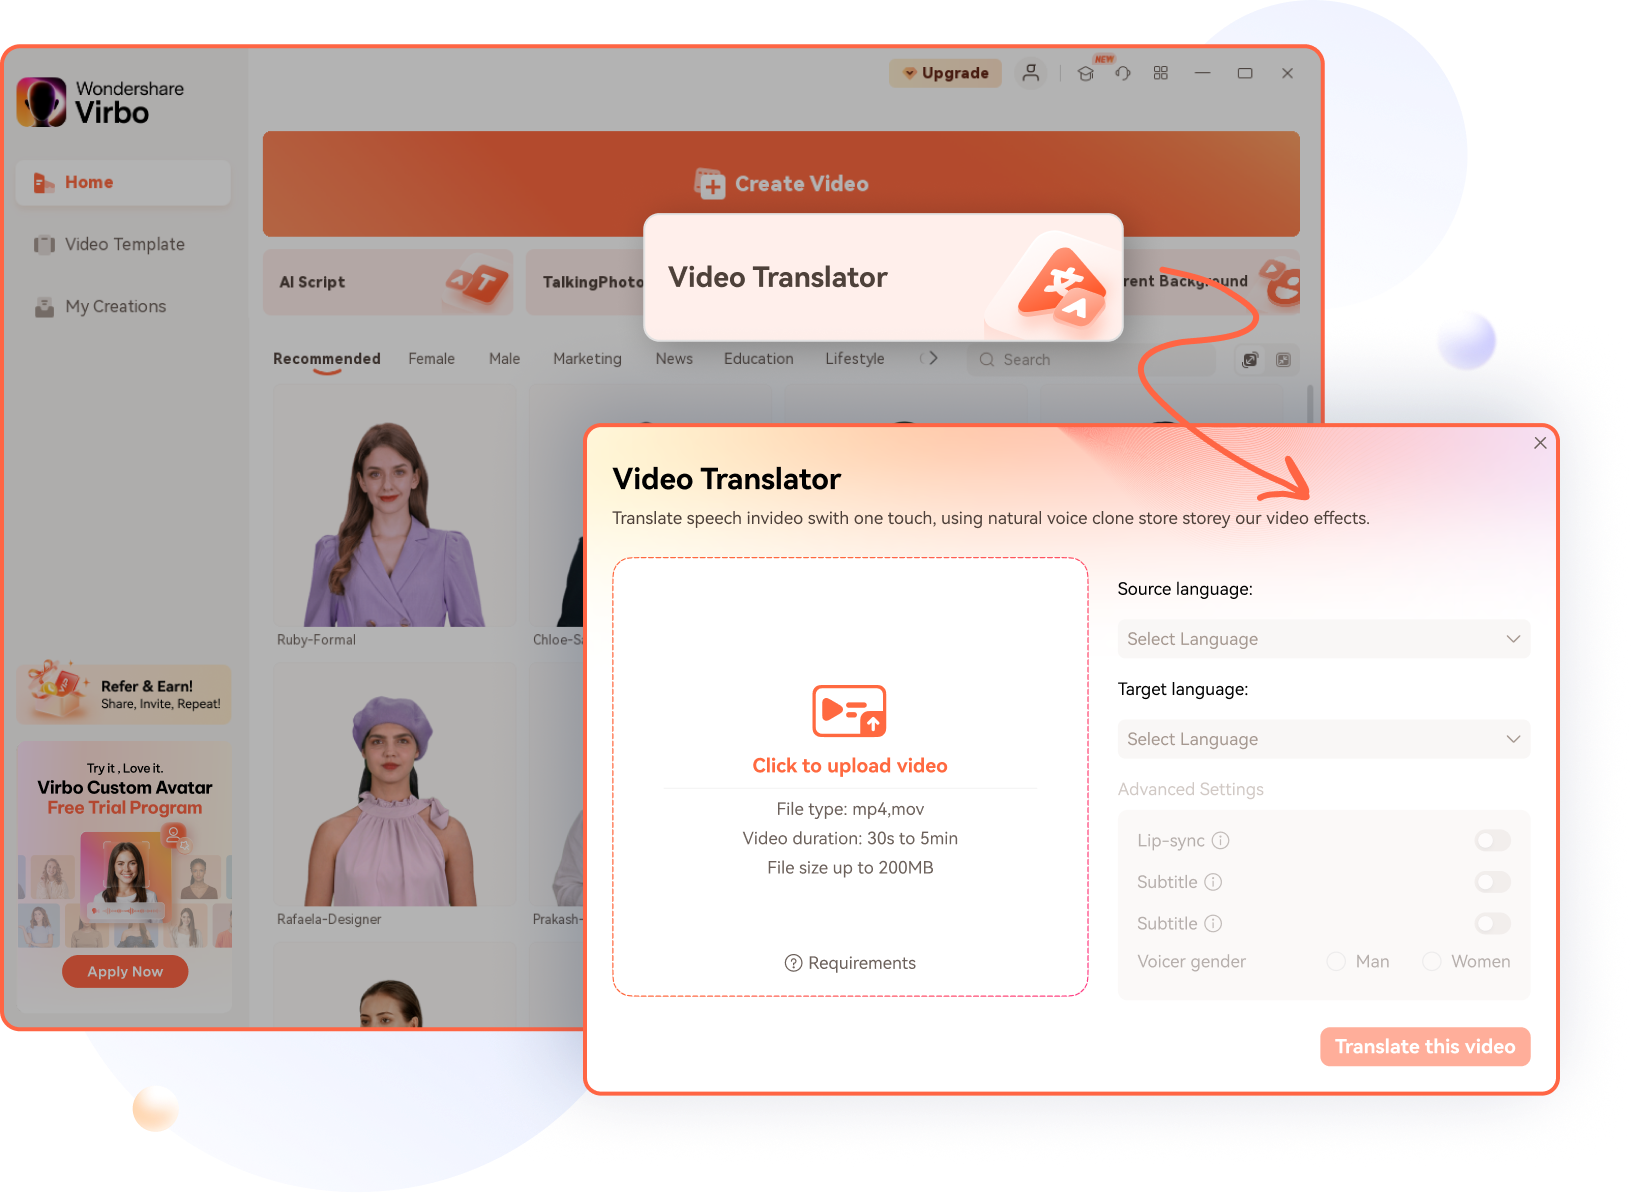
Get Started Online Free Download
- Step 2: Upload the video that you want to translate. Configure the translation settings according to your preferences. Choose the target languages and subtitle format. You can also add lip-sync if you prefer. Next, click onTranslate Video .

- Step 3: Once Virbo finishes generating translated subtitles, you can preview the AI-translated video. When you’re satisfied, download or export the translated video with subtitles.

These simple steps in Virbo can expand your reach to a global audience. The straightforward process makes it easy to use. Mastering Virbo will prepare you to use other translators if needed.
Conclusion
Using a multi-subtitle translator will separate you from the pack. It enhances content accessibility and global reach for you to find success. With tools like Virbo, creators can effortlessly translate many subtitles. You can make sure your content reaches diverse audiences worldwide.
By embracingmultilingual subtitles , creators can break language barriers. It can foster inclusivity and allow you to connect on a deeper level. For impactful, multilingual content creation, consider Virbo as your go-to solution. It empowers you to unlock the full potential of your videos and engage audiences across the globe.
Registration and Login
Registration and Login
Streamline your access and enhance your user experience with step-by-step guides on seamless registration and secure login processes. Elevate your streaming journey with Virbo AI Live Streaming. Get started now!
02Logout
Registration and Login
1 To commence your journey, kindly navigate to the product homepage where you can initiate the process by completing your account login.
Login
2 Embrace the convenience of multiple login methods available, encompassing traditional email login and the seamless integration of Google authentication.
Logout
1Click on the user profile picture at the bottom left corner of the product homepage.
2In the pop-up window, simply click on “Logout.”
Logout
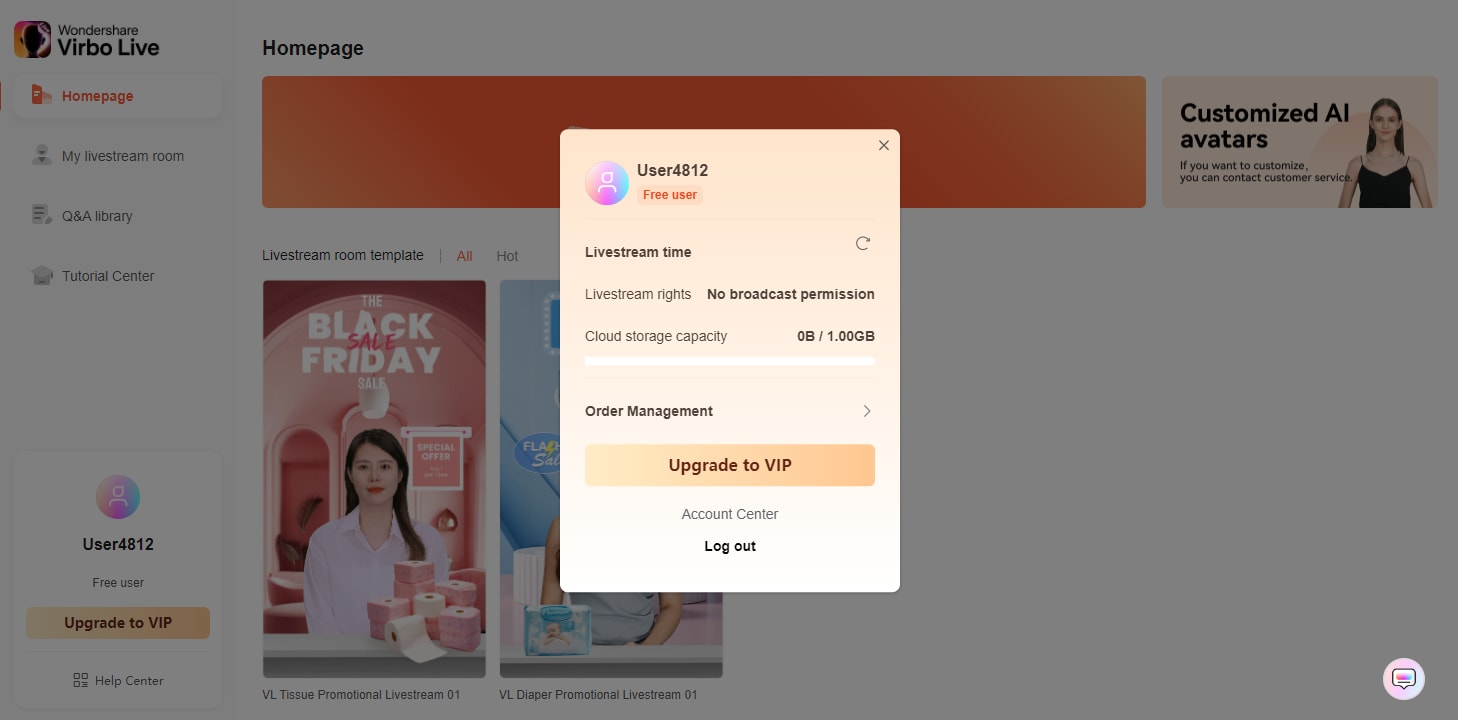
Authorization Refresh
1To refresh your authorization, click on the user profile picture at the bottom left corner of the product homepage. In the pop-up window, next to “Rights Details,” click on the “Refresh” icon. This will renew your authorization.
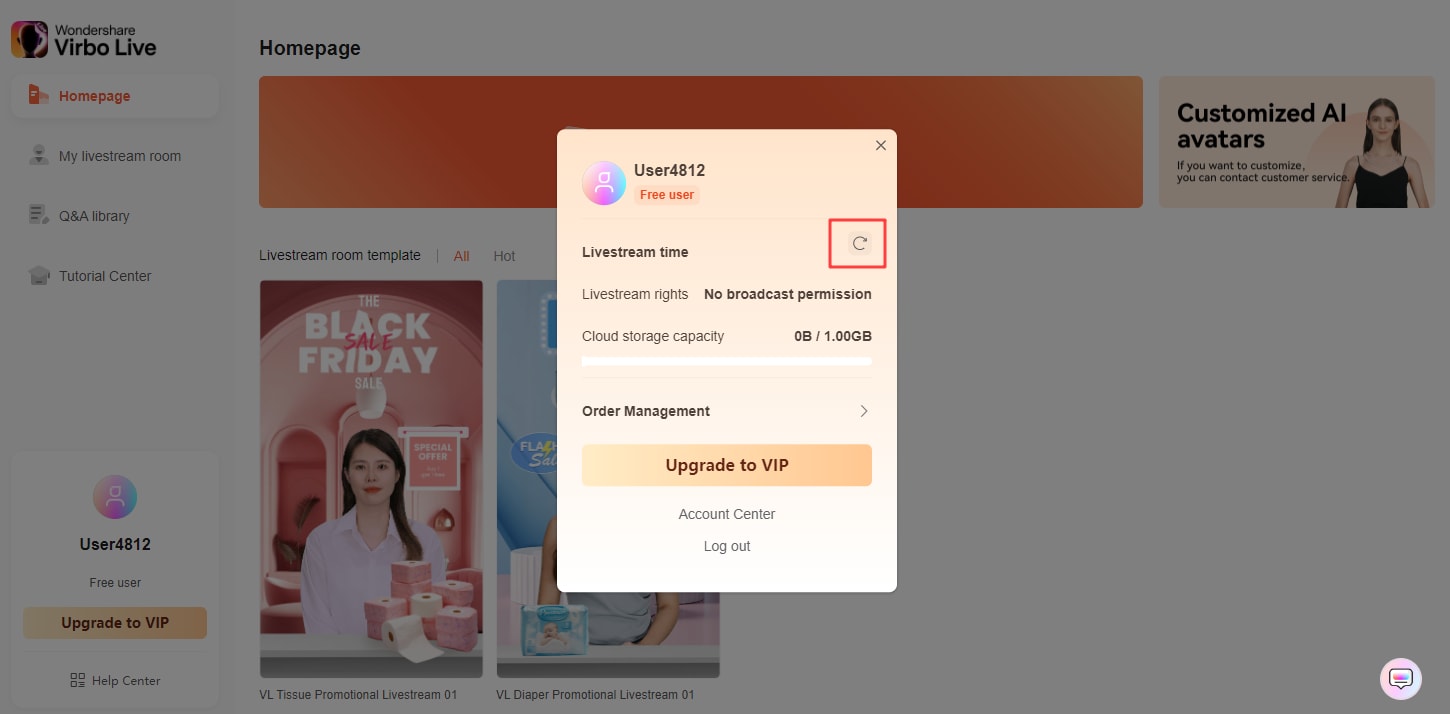
Authorization Refresh
02Logout
Registration and Login
1 To commence your journey, kindly navigate to the product homepage where you can initiate the process by completing your account login.
Login
2 Embrace the convenience of multiple login methods available, encompassing traditional email login and the seamless integration of Google authentication.
Logout
1Click on the user profile picture at the bottom left corner of the product homepage.
2In the pop-up window, simply click on “Logout.”
Logout
Authorization Refresh
1To refresh your authorization, click on the user profile picture at the bottom left corner of the product homepage. In the pop-up window, next to “Rights Details,” click on the “Refresh” icon. This will renew your authorization.
Authorization Refresh
Also read:
- 2024S Top 10 Streaming Video Services Free Ones Available
- Updated Top 5 AI Voice Generators Online (Supports All Browsers) for 2024
- New Device/Network/Browser Requirements for 2024
- New In 2024, Top Voice Cloning Apps for Android & iOS Devices
- New In 2024, Create Video with AI Avatar
- New 2024 Approved Best 10 Chinese Video to English Translators
- Updated A List of The Top SpongeBob Voice Generators for 2024
- New Best Voice Generators & Changers with The Most Anime Voices Supported
- New In 2024, How to Promote Your TikTok Videos Best 8 Strategies
- AI Voice | Wondershare Virbo Online
- Updated In 2024, Best YouTube Video Into Text Converters
- In 2024, Download/Install/Register/Uninstall | Wondershare Virbo
- Updated In 2024, AI Streaming Mastery A Quick Guide and Recommended Tool
- Updated 2024 Approved Top 10 Robotic Voice Generators (with Comparison Table)
- New In 2024, The Top English Voice Generator To Convert Text Into Desired Accent
- Level Up Your AI Streaming Game A Quick Guide and Tool Recommendation for 2024
- Updated Easy Tutorial How To Make a Talking Cartoon Video Step-by-Step for 2024
- Updated In 2024, A Comprehensive Guide to Video and Subtitle Translation with Veed.io
- New In 2024, Voicemod AI Review Transforming Your Voice in Real Time
- How to Generate Videos From Text with AI
- Updated 2024 Approved A Comprehensive Guide to Video and Subtitle Translation with Veed.io
- New 2024 Approved Best 4 Elon Musk Voice Generators to Make You Sound Like the Billionaire
- Updated Guide Learning the Right Ways To Start Facebook Live Shopping
- Updated In 2024, Unlocking TalkShopLive Pros and Tips for Live Shopping Success
- What Is an AI Video Editor? | Wondershare Virbo Glossary
- Video Translator | Wondershare Virbo
- New Live Selling A Comprehensive Starters Guide
- In 2024, How To Use Korean to English Video Translators for Creators
- Updated In 2024, What Is AI Pixel Art Generator?
- Updated 2024 Approved Launching Your Live Room
- Updated In 2024, The Ultimate Guide to B2B Video Marketing
- New 2024 Approved The Top 10 AI Avatar Generators
- New 2024 Approved How to Define AI Video?
- New Device/Network/Browser Requirements | Virbo AI Live Stream for 2024
- Updated In 2024, Create AI Avatar Video with AI Avatar | Wondershare Virbo Online
- New The Best Text Voice Generators for All Platforms for 2024
- New How to Make a Talking AI Avatar From Photos Easy Guide for 2024
- The Ultimate Guide How to Bypass Swipe Screen to Unlock on Realme 12 Pro 5G Device
- In 2024, How to Unlock Infinix Smart 8 HD Phone without PIN
- Read This Guide to Find a Reliable Alternative to Fake GPS On Nokia G42 5G | Dr.fone
- In 2024, What is the best Pokemon for pokemon pvp ranking On Oppo A78 5G? | Dr.fone
- In 2024, Bypass iCloud Activation Lock with IMEI Code On your iPhone 14 Pro Max
- Fix Unfortunately Settings Has Stopped on Poco X6 Pro Quickly | Dr.fone
- Effective Ways To Fix Checkra1n Error 31 From Apple iPhone 11 Pro Max
- In 2024, How to Transfer Contacts from Xiaomi Redmi Note 13 5G to Outlook | Dr.fone
- Best Solutions for Oppo Network Unlock
- In 2024, A Quick Guide to Vivo G2 FRP Bypass Instantly
- 3 Methods to Mirror Itel P55 5G to Roku | Dr.fone
- How to restore wiped messages on Edge+ (2023)
- Title: 2024 Approved Guide Learning the Right Ways To Start Facebook Live Shopping
- Author: Sam
- Created at : 2024-05-19 03:34:55
- Updated at : 2024-05-20 03:34:55
- Link: https://ai-voice-clone.techidaily.com/2024-approved-guide-learning-the-right-ways-to-start-facebook-live-shopping/
- License: This work is licensed under CC BY-NC-SA 4.0.
