
:max_bytes(150000):strip_icc():format(webp)/sb10069770n-003-56a104403df78cafdaa7dd48-ba41d70c51114343aaa38409d9cdfc3f.jpg)
2024 Approved AI Voice | Online
AI Voice | Online
AI Voice
Virbo’s cutting-edge AI capabilities offer a transformative solution to your copywriting needs. With the prowess of our advanced artificial intelligence, rewriting, translating, and refining your content becomes a seamless and efficient endeavor, alleviating you from the burdensome challenges often accompanying these tasks.
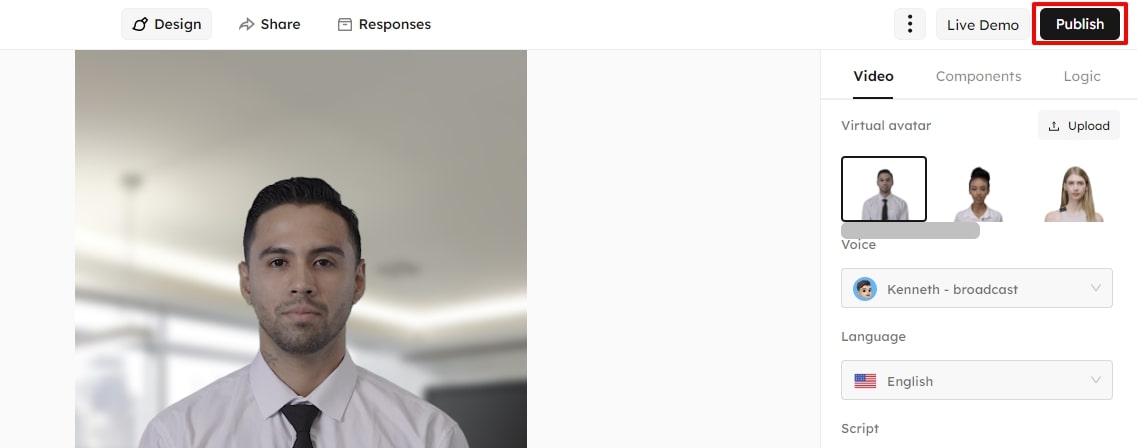
Get To Know Our AI Voice Feature
- Cost-effectiveness: Budget-friendly AI voiceovers for video creation
- Clear Audio Quality: Provide an immersive experience with high-quality audio
- Spoken by Realistic Avatars: Engage viewers with Avatars’ natural voices in videos
- Diverse Accents & Languages: Elevate video editing experiences with multilingual avatars

Click here to learn more about AI Voice >>
AI Voice
Virbo’s cutting-edge AI capabilities offer a transformative solution to your copywriting needs. With the prowess of our advanced artificial intelligence, rewriting, translating, and refining your content becomes a seamless and efficient endeavor, alleviating you from the burdensome challenges often accompanying these tasks.
Get To Know Our AI Voice Feature
- Cost-effectiveness: Budget-friendly AI voiceovers for video creation
- Clear Audio Quality: Provide an immersive experience with high-quality audio
- Spoken by Realistic Avatars: Engage viewers with Avatars’ natural voices in videos
- Diverse Accents & Languages: Elevate video editing experiences with multilingual avatars
Click here to learn more about AI Voice >>
How to Translate Instagram Videos for Global Engagement
Instagram has over one billion active users. With that, Instagram has become a powerhouse platform for reaching audiences worldwide. Video content plays an important role in captivating viewers and expanding your reach. Along with visuals, language is also essential. Both are vital in opening new markets and interacting with users from different cultures.
Bytranslating Instagram videos , you can engage with users from different cultures. In this article, we’ll discuss the process of translating Instagram videos. Whether you’re a brand owner or an influencer looking to connect with followers worldwide, translating Instagram videos will ensure your content resonates with global audiences. Let’s jump right in!

Part 1. The Power of Video Content on Instagram
Short-form videos on Instagram are popular in today’s fast-paced digital world. People prefer quick, easy-to-watch content that is shareable. Given Instagram’s status as a leading video-sharing platform, it’s crucial to make effective social media strategies.
To make your videos stand out, you need creativity, technical skills, and an understanding of what engages audiences. Here are some tips to enhance your Instagram video content:
- Choose the Right Video Format
Pick the format that suits your content best, whether it’s square, vertical, IGTV, or story. Understanding each format’s strengths helps you choose the one that aligns with you and appeals to your audience.
- Craft Compelling Stories
Create narratives that draw viewers in and leave a lasting impression. A strong story structure can engage your audience and keep them interested.
- Cater to Diverse Audiences
Instagram’s video content has facilitated connections with diverse audiences worldwide. You can leverage this platform to reach a global audience and enhance inclusivity by translating your videos. For brands and content creators, translating Instagram videos can help them break language barriers and make their content accessible to a wider range of viewers. For Instagram users, they can understand and relate to the content in their preferred language.
Part 2. How to Translate Instagram Video Captions into Other Languages?
“Can Itranslate videos on Instagram automatically?” Many users are curious about whether Instagram can do it or not. Instagram offers translation features for captions, comments on posts, and bios in profiles. But currently, Instagram cannot translate videos automatically.
To translate video captions, you can follow the steps:
- Step 1. Open Instagram app
- Step 2. Go to the desired video post. If your language is available as a translation, “See Translation” will appear below the post.
- Step 3. Tap “See Translation” to translate the caption and comments of that post.

If you want to translate the video’s audio, you must use third-party software. There are several applications and online tools that specialize in translating video, such as Wondershare Virbo – Video Translator tool. Using this tool, you can translate Instagram videos and enjoy them hassle-free.
Part 3. How to Translate Instagram Video to English with an AI Video Translator
If you want totranslate Instagram videos to English or other languages, consider using Wondershare Virbo. Virbo provides an AI Translation tool that surpasses Instagram’s built-in features. The tool helps users translate their Instagram videos into different languages.
You can access this tool by going toVirbo’s official website . You don’t need to install any app. Users can also insert subtitles into the videos.
Follow this step-by-step guide on how to translate Instagram videos usingVirbo’s AI Video Translator :
- Step 1. Go to Wondershare Virbo > Generate AI Video Online.

Get Started Online Free Download
- Step 2. Create an account or log in

- Step 3. Open Video Translate

Step 4. Upload the video
First, upload the video file you want to translate. Next, select the original video language and choose the target language. You can also activate the Lip Sync feature to ensure the accuracy of audio translation with the video’s lip movements or toggle on the Subtitle features.

- Step 5. Click “Translate this video”.Virbo AI will translate the audio and synchronize it with the video. The duration and complexity of the video may affect the processing time.
Using Virbo’s Translation tool simplifies the process of translating Instagram videos. Connecting you to a wider audience and overcoming the language barriers. With Virbo’s AI technology, connecting with a worldwide audience is simple and impactful.
Part 4. How To Prepare Instagram Video That Is Easy To Translate
If you decide to translate an Instagram video using Virbo’s Translation tool. Several tips can enhance the process to follow while preparing for easy translation.
- Avoid background music and noises
Before translation, make sure that the video is free from background music and unnecessary noises. This helps maintain clarity and focus on the spoken content.
- Avoid multiple speakers to avoid confusion during translation
If possible, avoid videos with multiple speakers or overlapping dialogue. Clear, single-speaker content facilitates more accurate and efficient translation.
- The video resolution must be of good quality
Aim for a video resolution ranging between 360x360 and 1920x1920 pixels. This ensures optimal visual clarity and compatibility with the translation process.
- Upload videos without subtitles initially
When uploading your video, refrain from including subtitles initially. It helps to create a more precise and tailored translation and ensures that the text aligns with the video content.
Conclusion
Translating videos in Instagram opens up opportunities for connecting with diverse audiences globally. By embracing translation, users can expand their reach and foster inclusivity on the platform. Wondershare Virbo’s AI Video Translator simplifies this process. It offers seamless translation and subtitle insertion without installing any apps.
Virbo helps you connect with more people, breaking down language barriers and gaining better engagement. You can ensure accurate translations by following the guidelines while preparing the video. Basically, translation strengthens engagement and turns Instagram into a platform open to everyone.
Finest Text-to-Speech Male Voice Tools for Natural Output
In recent years, mostly female voices were utilized in the text-to-speech feature. However, male voices are also reliable options to utilize in the text-to-speech features. This can help you in ensuring preferences and inclusivity. In this article, we will discuss top-class text-to-speech male voice tools. In addition, we will guide you about using the built-in voice-to-text feature of Mac.
Part 1: Innovative Online Tools for Text-to-Speech Male Voice
Getting confused while selecting a reliable text-to-speech male tool is still here. After careful evaluation, we have gathered the best-in-class tools for converting text to speech. Jump below to get into the tools right away:
1. Speechify
If you want to make readings more efficient and accessible, this online tool covers you. With it, you can listen to your choice’s content rather than read it. This text-to-speech male tool incorporates AI algorithms through which you can easily listen to various music. Above all, it has some fantastic features that enhance your reading experience.
You can also use its voice-over studio to create human-quality voices with customization. You can use this tool to turn any type of text into speech. It also comprehends 30+ premium voices along fastest listening speed, which is 1.1 and more. It can also skip ads, citations, or footers automatically in speech.
How to Convert Text into Speech with Speechify
The procedure of converting text into speech with Speechify is not as complicated as you think. You can even turn Telugu text-to-speech male voice online with this. Feel free to follow the steps instructed below to accomplish this task:
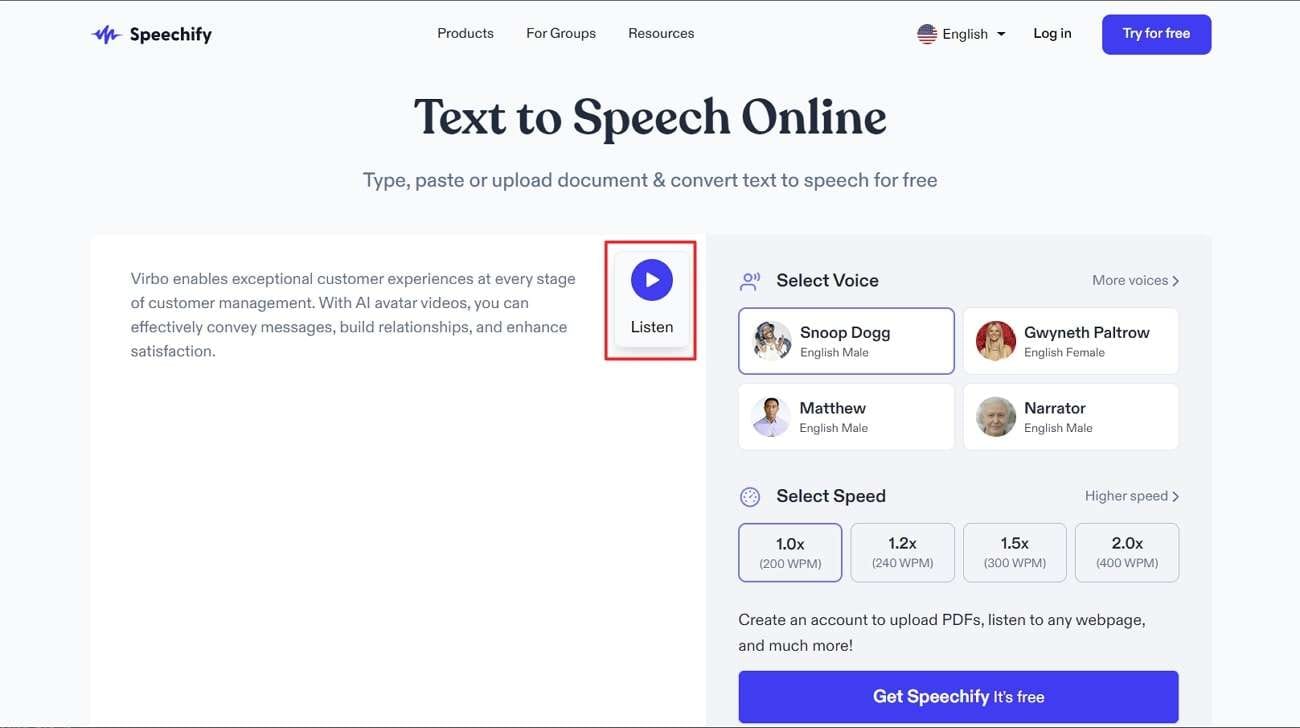
Step 1: Initially, launch Speechify text-to-speech online tool on your browser and import the text of your choice. Following this, go to “Select Speed” and manage it accordingly.
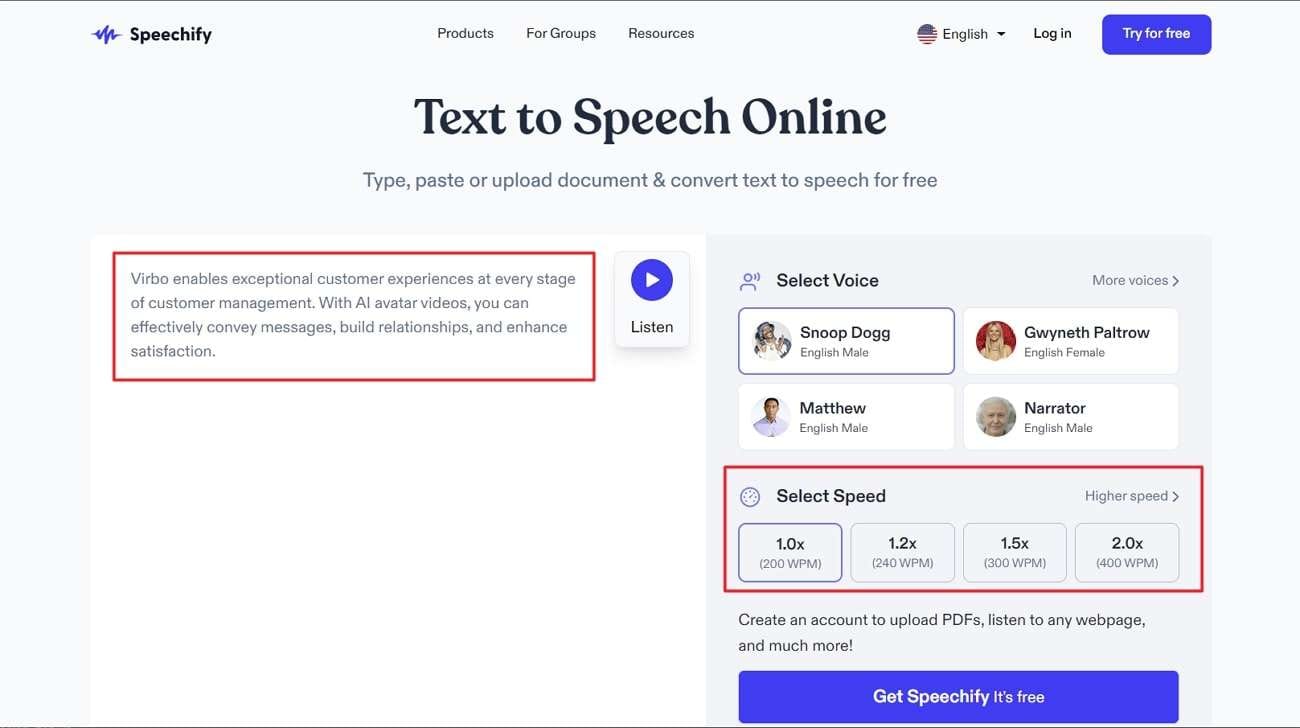
Step 2: Next, choose “Select Voice” and choose a male voice that fits your need. To convert speech into text, click the “Listen” icon and listen to your text as speech.
2. Speakatoo
With this advanced text-to-speech male voice tool, you can convert text into 120+ languages. It can also generate high-quality text in multiple formats, such as OGG, MP3, and MP4. Moreover, it also has a wide array of AI-based features and API integrations. You can also get SSML support with this exclusive tool.
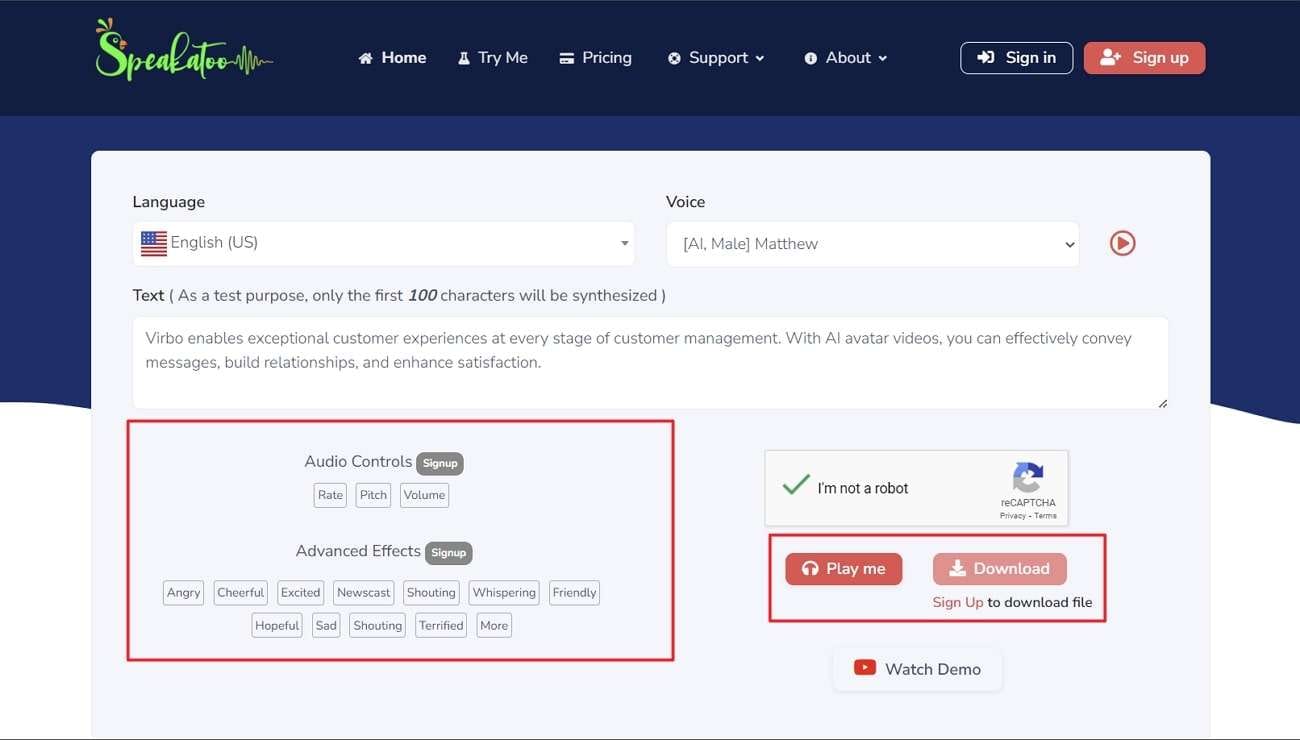
The audio control lets you control several metrics of audio to optimize functionality. In addition, it also incorporates the breathing pause, which makes your speech more realistic. One of the best things is it has 700+ male and female voices.
What is the Procedure to Turn Text to Speech with Speakatoo
Speakatoo has an optimized quality procedure to turn text into voice. To accomplish this task with ease, you can follow the steps given here:
Step 1: Open your browser and search for Speakatoo. Once you are on the main page, go to “Language” and select the language of your choice. Next, click “Voice” and choose the voice you like. In the “Text” section, you can enter text in the text box.
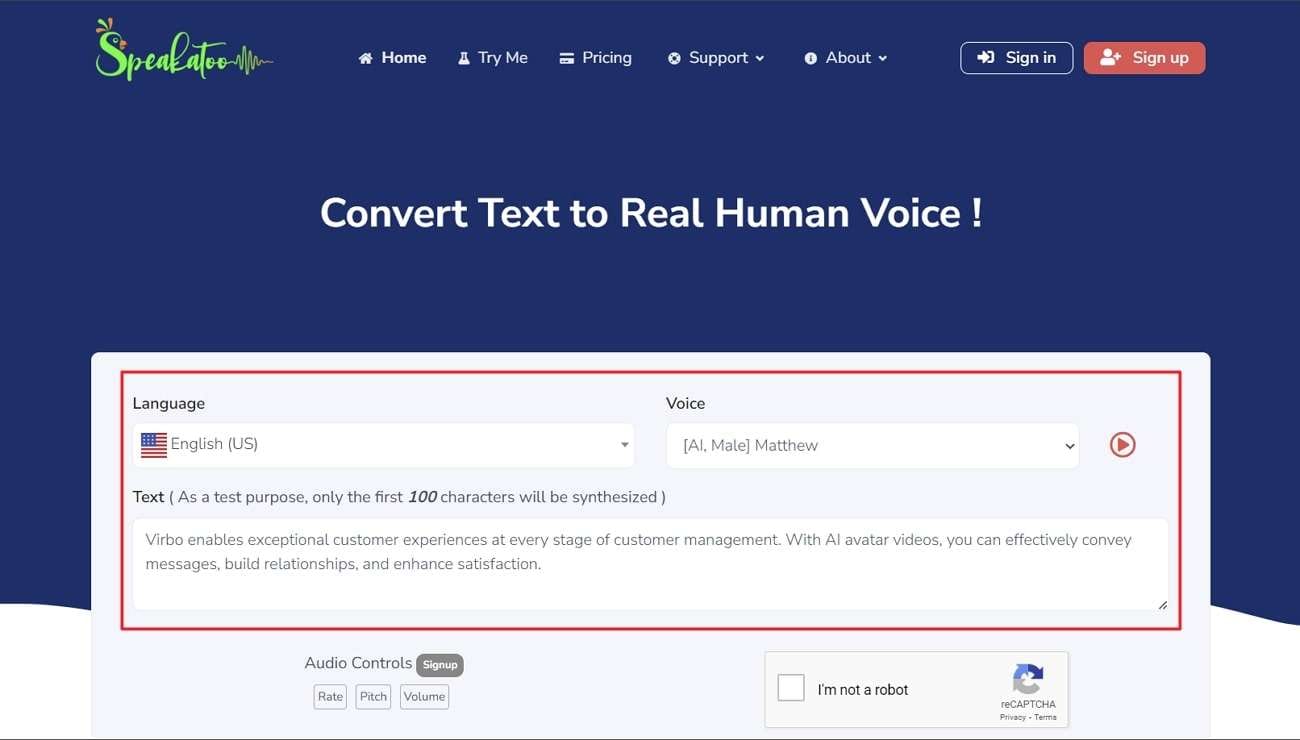
Step 2: To proceed, manage the “Audio Controls” and “Advanced Effects”. Finally, hit the “Play me” button. You can also click “Download” to download the speech.
Part 2: Powerful and Advanced AI Voices Generator for Windows, Android, and iOS
Virbo is an amazing AI voice tool through which you can convert text into 120+ voices and languages. All the voices are realistically humane, so you don’t have to worry about that. Besides that, the interface of Virbo is quite optimistic, making your work easier.
It also has blazing-fast data processing speech, which also streamlines your workflow efficiency. You can also use this tool on multiple devices without any restrictions.
Generate Engaging
AI Video in Minutes!
Easily convert text into professional spokesperson videos in over 120+ voices & languages in minutes.
Generate AI Video Free Generate AI Video Now


Key Features of Virbo
- It supports multinational AI avatars to make impressive videos. You can also select both male and female avatars.
- There are endless assets in Virbo which include royalty-free music and templates. You can use them at your convenience.
- Using its AI Script feature, you can generate impressive scripts for best-in-class videos.
How to Convert Text to Speech with Virbo
By following the straightforward steps listed below, you can convert text to speech male without any issues:
Step 1: Open Virbo and Access Feature
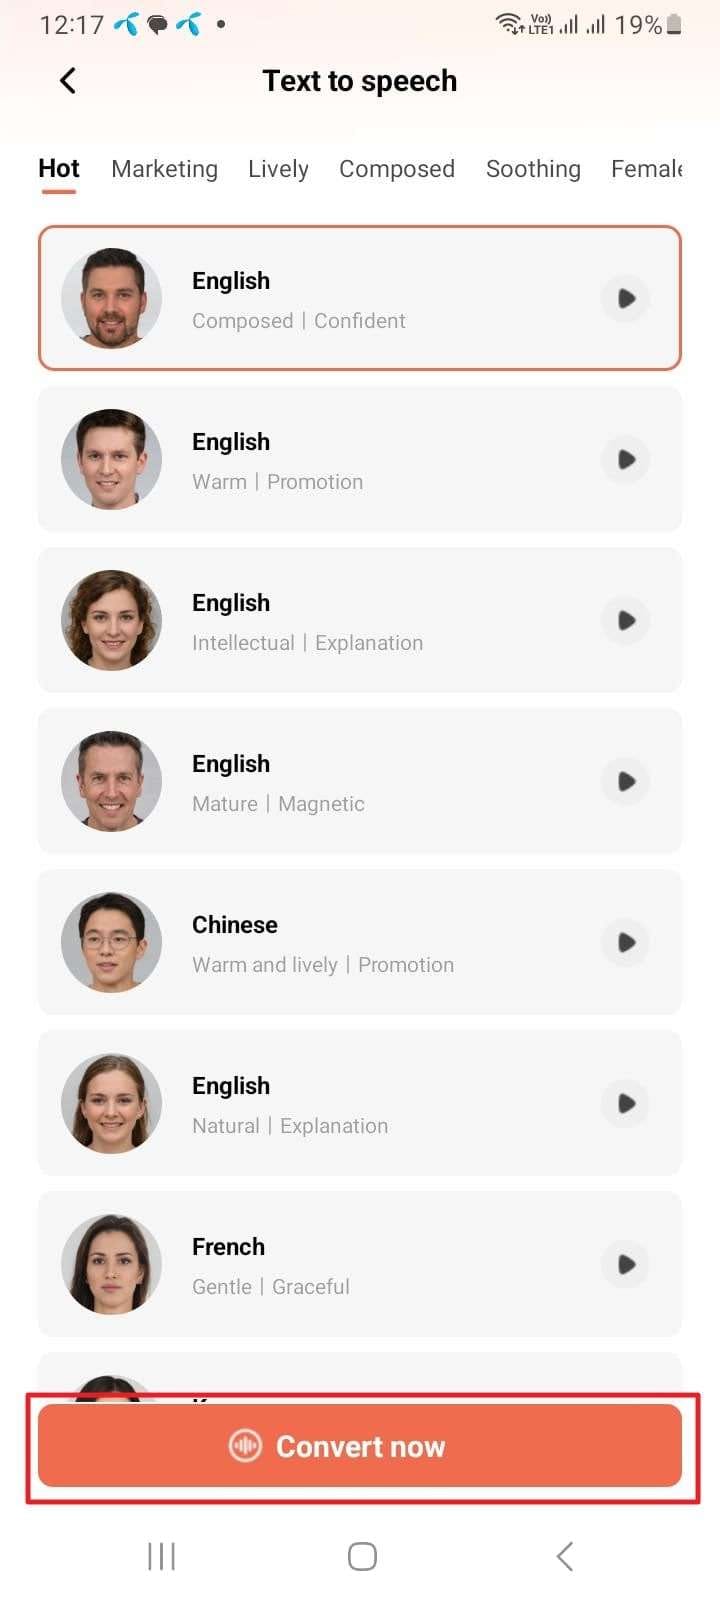
To start, open Virbo on your device and select the “Text to Speech” feature from the main interface. Next, select the style and voice for a speech from the next screen and hit the “Convert Now” button.
Step 2: Start Convert Text to Speech
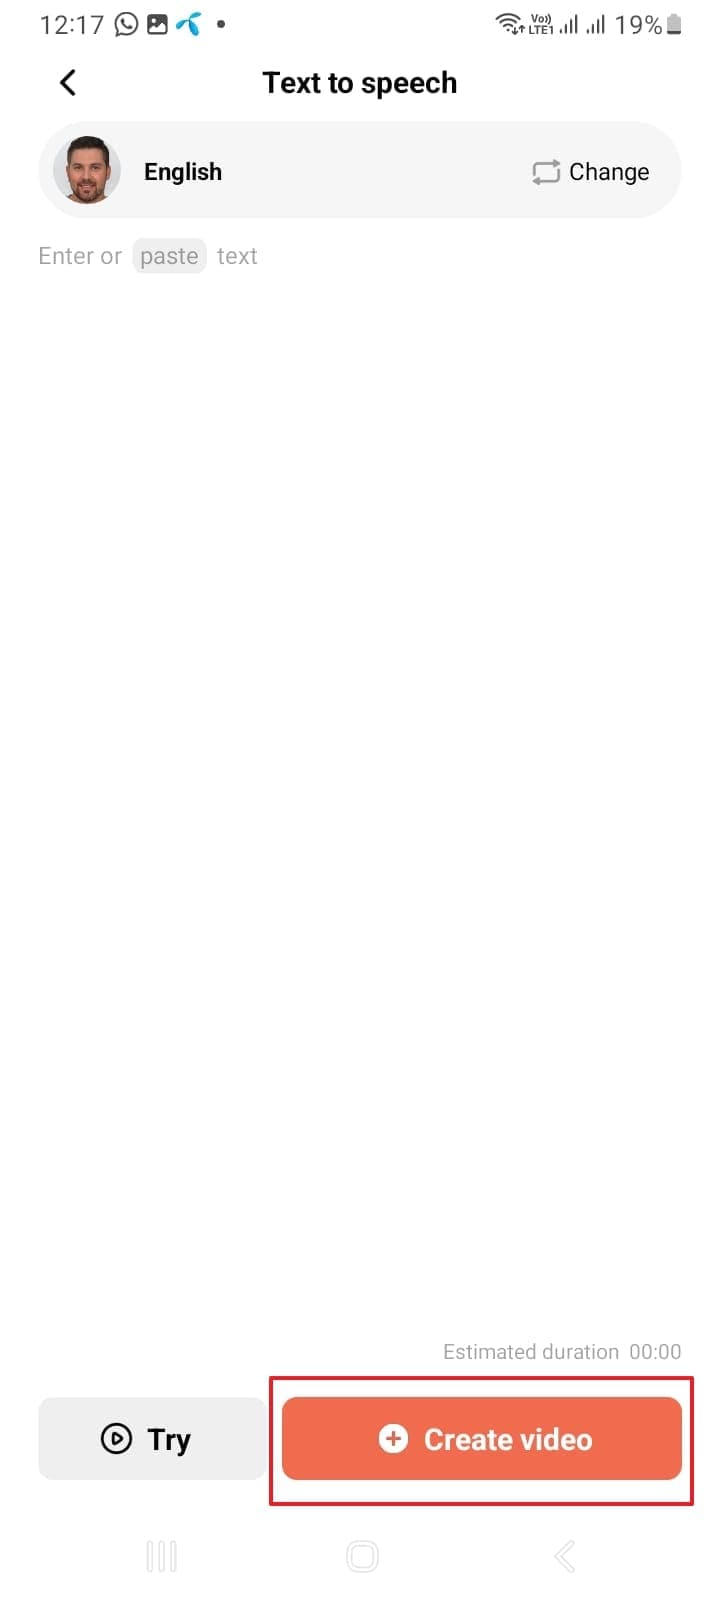
To proceed, paste the text in the “Text to Speech” interface and tap the “Create Video” button. Select the dimension from the orientation options of Virbo, such as Portrait Video and Landscape Video, and hit the “Create Now” button. Wait a few moments and then download the video on the device.
Part 3: How to Use the In-Built Text-to-Voice Feature of MacBook
Mac users mainly have no idea that they can use the in-built text-to-speech male feature of Mac. If you are a Mac user that also has no idea about using this feature, this part is for you. Follow the instructions given below to use this amazing feature with ease:
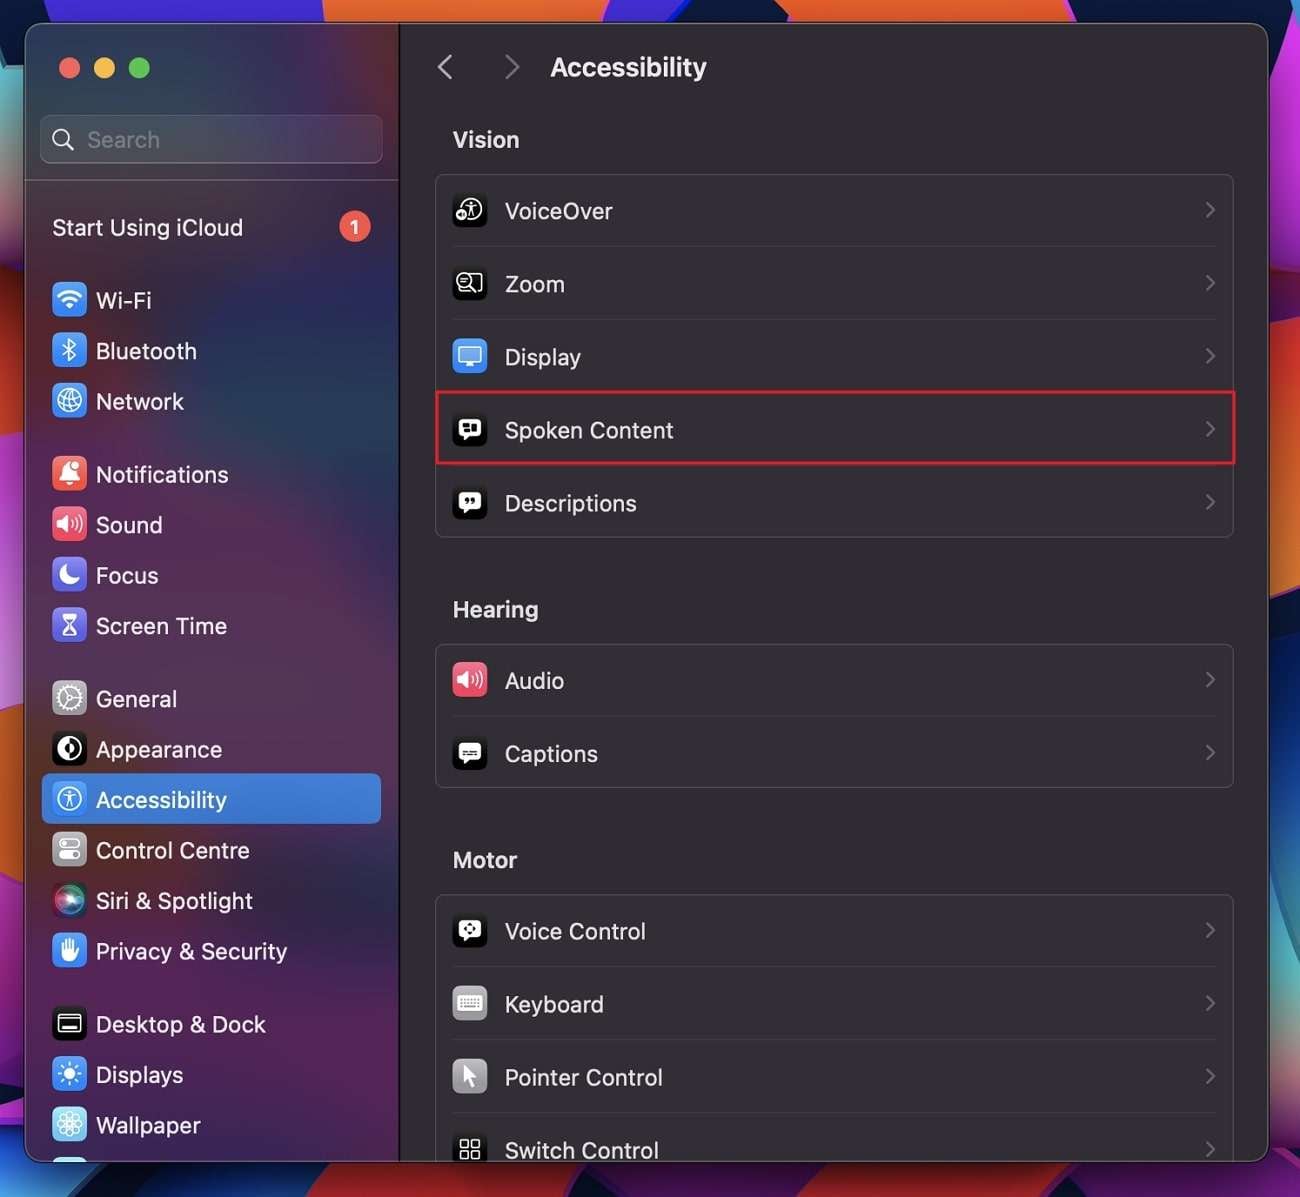
**Step 1:**Start your Mac and click the “Apple” icon to locate and access the System Settings. Afterward, go into the “Accessibility” settings and click the “Spoken Content” option.
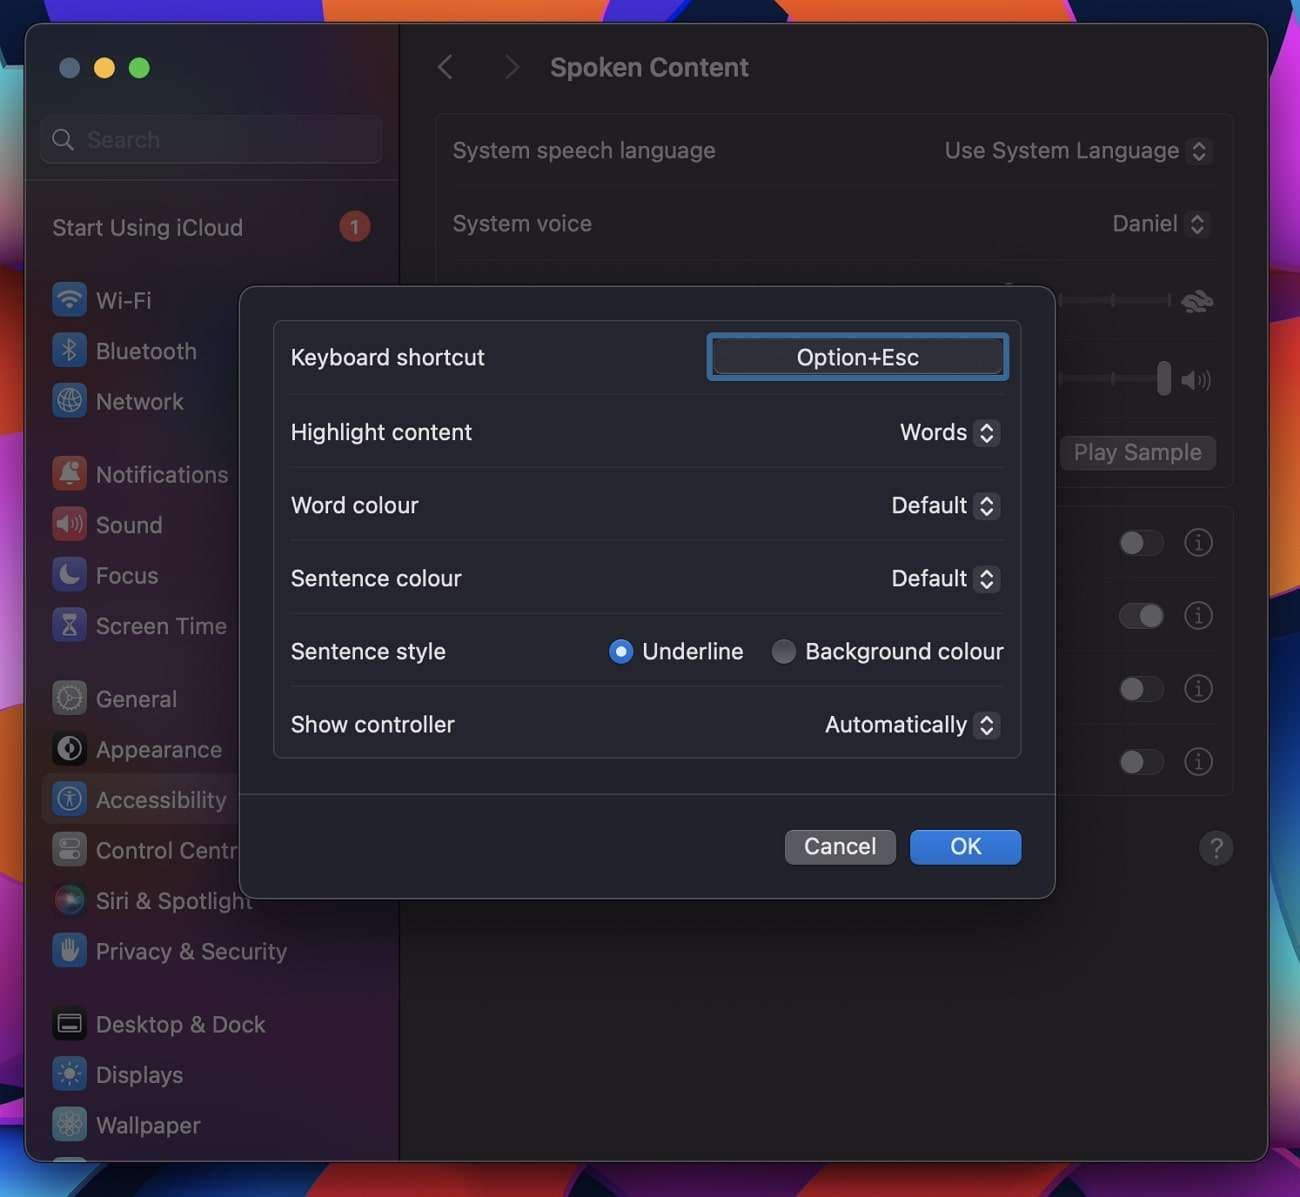
**Step 2:**Next, locate “Speak Selection” and enable it. You can also select the “Info” icon for managing settings such as Highlight Content, Word Content, Show Controller, and more. Finally, confirm the settings by pressing the “OK” button.
Wrapping Up
As stated in this article, you can easily use the innovative text-to-speech male voice software. This can turn any type of text into male voices without any issue. The online tools that can help you with this are Speechify and Speakatoo.
You can also use the most recommended Windows, Android, or iOS tool, Virbo. It has some fantastic features you can learn from the above discussion. Moreover, if you are a Mac user, you can use its built-in text-to-speech feature by following the steps discussed in this article.
Ultimate Guide to Translating YouTube Videos Without CC
We are living in the age of social media, and YouTube is the world’s most popular video-sharing social platform. People use it to share knowledge, entertainment, and their views on diverse subjects. As it’s a global platform, people from all over the world can upload their content. This can, sometimes, create problems, particularly if the content is in a foreign language. Unfortunately, the language barrier hinders our understanding of a topic more often than we admit. While the YouTube Closed Captions (CC) feature offers some respite, not all videos have this option. In this article, we will discusshow to translate YouTube video without CC on your personal computer, so that you can explore and enjoy any content you want. Let’s dive in!
Part 1. Tool Introduction for Translating YouTube Videos Without CC
In this section, we will introduce you to software that can help you translate YouTube video without cc. And the tool is Wondershare Virbo.
What is Wondershare Virbo for YouTube Translation
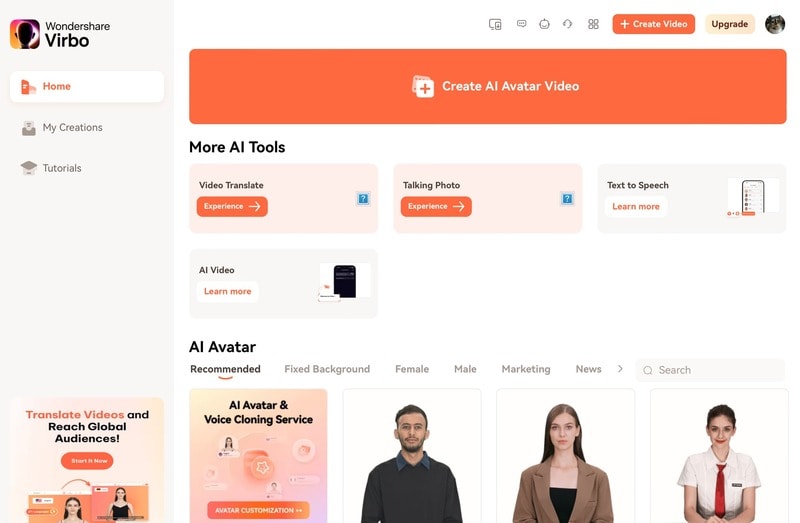
Many people know Wondershare’s Virbo as the leading platform forAI Avatar video creation . But, recently, it unveiled some new features to further simplify the Avatar video creation process. If you don’t know, one of the fantastic new features isAI video translation .
It automatically detects and translates your voiceover in video content into different languages. All you need to do is upload your video and select the target language. That’s all. Virbo’s AI algorithm automatically translates and synchronizes the dubbing in your videos. This eliminates the need to manually add overdubs in post-production. This tool is available on Windows PC and Mobile Apps, and you can also use it online.
Translate Online Download APP Now Free Download
Unique Features of Virbo Auto Translate
As highlighted above, Wondershare Virbo can translate your videos with automation. In this regard, let’s explore its auto-translate feature to understand how it turns out to be a helpful option:
- Extensive Language Support: Virbo can translate videos into more than 20 languages. You can generate respective AI-cloned voices by selecting the appropriate source and target languages.
- Subtitle Generation: While you can translate a video, it can also generate translated subtitles. However, ensure that the origial video that you want to translate does not have subtitles, it would help achieve optimal accuracy and quality of the generated subtitles.
- Advanced Lip-Sync Option: The lip-sync feature changes the lips’ movement according to the words spoken after being translated into the target language. For the successful execution of this feature, you need to ensure a proper clip is added according to the tool’s requirements.
- Retains Background Music: The background music from the original video can be retained after the translation process is concluded. It will replace the human voice for translation, and the music will be the same.
Additional Features of Wondershare Virbo
Wondershare Virbo isn’t limited to an AI video translation feature; it is a comprehensive AI video generator. Without a camera and crew, anyone can make engaging videos. The following are some incredible features of Virbo that you should go through for a clear picture:
- AI Script: If you fail to describe your story through appropriate words, try this feature of Wondershare Virbo. It can write a compelling script based on your prompts and requirements. You can enter the topic in 2000 characters and choose a script tone using smart optimization.
- AI Avatar: As stated earlier, you don’t need a crew to make videos with Virbo. This AI software offers hundreds of AI avatars to cut the need for actors and artists. Wondershare Virbo has avatars from diverse ethnicities, attire, races, age groups, and regions.
- AI Talking Photos: To make funny videos of your friends, Wondershare Virbo offers a talking photo feature. In this regard, upload a straight-looking image of your friend and choose the video layout. Add a script in audio or text format so the picture can start talking.
Translate Online Download APP Now Free Download
Part 2. Step-by-Step Guide: Auto-Translating YouTube Videos Without Closed Captions
Below is a simple step-by-step guide to translate Youtube video to English without cc. You can also use the same steps to translate your video into other languages like Chinese, German, Hindi, etc.
Step1 Download Virbo and launch its video translator
Go to the official Virbo link and download its latest version (or you can directly click the following download button). Install it on your computer. Once the setup finishes, launch Virbo and go to Video Translator as seen above.
Translate Online Download APP Now Free Download
Step2 Set your preferences and start translating videos
Upload a video, set its original language and the language you want it translated into. Now select the rest of the settings as per your requirements. Finally, Click the Translate this video button to begin translation.

Step3 Preview the translated video, make changes, and download
When the auto translation completes, preview the translated content. Check for any mistakes and correct them if necessary. If everything is good, then click the Download button at the bottom to save it on your device.

Translate Online Download APP Now Free Download
Part 3. Tips for Effective Translation - How To Translate Correctly With AI Tools
AI tools are just as good as people using them. If you’re not vigilant and don’t review the output, chances are you will get inaccurate or bad translations. Below are our tips to effectivelytranslate YouTube video without cc that can help you get the most out of any AI translation tool.
01 Understand the Context
AI tools often lack a complete understanding of the context. Writing a sentence out of context can totally change the message being conveyed. Therefore, you understand the overall meaning before finalizing a translation draft.
02 Clear Up any Ambiguities
Ambiguous phrases are words in a language that convey more than one meaning, which can lead to inaccurate translations. So, clear up any ambiguous terms or expressions. Selecting a particular meaning of a phrase for your translation requires a keen eye for detail.
03 Consider the Cultural Nuances
Every two cultures are different. This is particularly true if the two are from vastly different geographical regions of the world. So, you have to take into account the cultural nuances of both languages to ensure the translation doesn’t convey unintended meaning.
04 Use Reputable & Accurate Tools
Always use reputable names for your transactions. There’s a good reason why some tools are more popular than others. Take Wondershare Virbo as an example. Virbo provides accurate and better translations for YouTube Videos than most other tools in the market.
05 Don’t Be Afraid To Customize
Sometimes, the translation doesn’t need to be accurate word for word. You can customize the translation to convey the message in a better way. Some AI tools allow customization. You can adjust settings or provide additional context to improve the accuracy of a translation.
06 Handle Idioms With Care
AI tools don’t translate idiomatic expressions in a good way. They translate in a literal way, which destroys the entire message. So, you should be aware of idiomatic expressions and always ready to find their best equivalents in a target language.
07 Hire A Human Editor
If possible, have a human editor take a look and review the translation. The human eye can catch certain nuances that AI might miss. With a human editor, you have the confidence that they will be updated about translations and how to improve the message being conveyed.
FAQs
Before concluding the discussion, let’s clarify some common queries in this section. Continue reading to get your answer onhow to translate YouTube videos without CC :
- How do you watch YouTube videos in another language?
Watching YouTube videos in another language is not directly supported by YouTube. If you want to translate it, download the video using any third-party service. Consequently, upload it on Wondershare Virbo and translate it into any language you want.
- How to translate YouTube comments?
If any comment on your video is in another language, translate it to respond to them. For this purpose, copy that comment and head to Google Translate on your browser. There, choose languages, and the comment will be automatically translated. For more precise results, you can use the AI Translation feature of Wondershare Virbo.
- How do you download YouTube SRT files?
YouTube has no built-in option to provide you with an SRT file of subtitles. Instead, you can use Virbo - AI Video Translator (Online Version) to download the YouTube video SRT File. It even allows you to proofread the script of the video before exporting it to your device.
Translate Online Download APP Now Free Download
Conclusion
All said, Wondershare Virbo emerges as an indispensable solution for transcending language barriers for YouTube video translation. Its unique features, as outlined in the step-by-step guide, empower you to effortlessly translate youtube video without cc into any language of your choice. For effective translation, the tool ensures not just convenience but also accuracy, addressing the nuances of language with finesse. With Wondershare Virbo, the future of multilingual content creation on YouTube becomes not just a possibility but a seamless reality. So, try Virbo’s new features and let us know what you think!
Translate Online Download APP Now Free Download
How to Make Lip Sync Video Without Installing Any App
TikTok has transformed the social media landscape through its short-form video content. They encourage users to make creative content using popular audio clips. Which enables them to entertain, gain recognition, and contribute to the platform.
Lip-syncing is a big part of what makes TikTok popular. Many users post lip-syncing videos that imitate voices from songs, movies, or trending audio clips. This art of lip-syncing has become an essential element of TikTok’s culture. Now, you might wonder**how to lip-sync on TikTok videos. This article will teach us how to make it effortlessly.
Part 1. Why Do People Lip Sync on TikTok?
Lip-syncing involves mimicking the words or vocals of an existing audio track. TikTok users take this concept to new heights by lip-syncing popular songs or clips. Lip-sync is appealing because it lets people get creative and reach a large audience.
Here are a few reasons why people engage in**lip sync TikTok :
- Self-expression: Lip-sync allows users to embody their favorite artists or characters by showcasing their personality and creativity.
- Entertainment: Many users lip-sync to entertain followers. They offer comedic performances, heartfelt renditions, or engaging storytelling.
- Virality: TikTok’s algorithm favors engaging content and well-executed lip-sync videos. They have the potential to go viral, rapidly gaining likes, shares, and followers.
Part 2. How to Make Lip Sync Video on TikTok
Here’s the step-by-step guide on how to lip sync on TikTok and captive your followers:
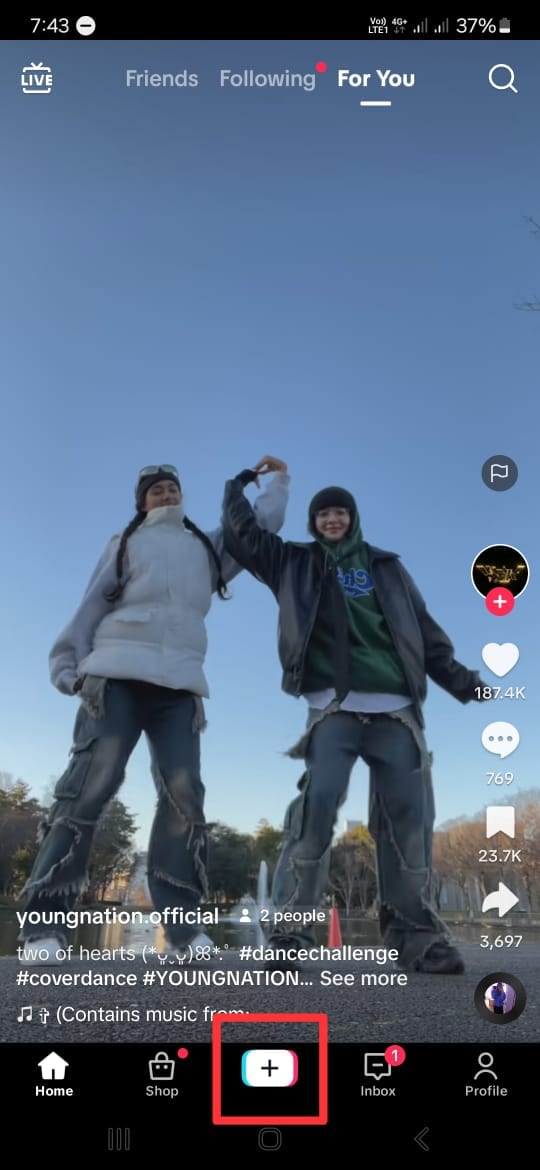
- Step 1. Open the TikTok app and tap the “+” button.
Start with opening the TikTok app on your phone. Then, tap the “+” button at the bottom of your screen to make a new video.
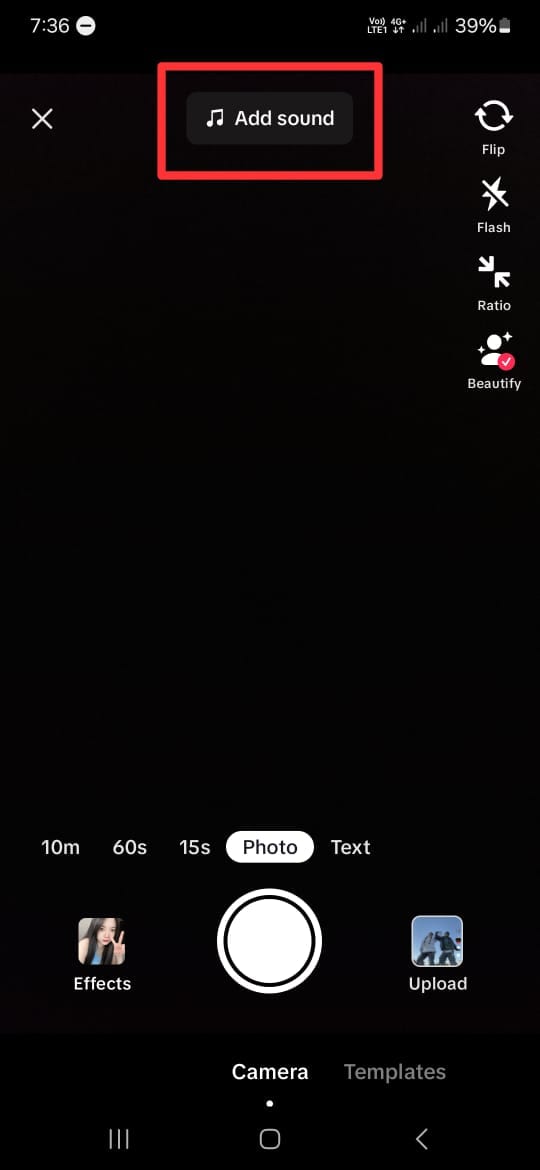
- Step 2. Add a song that you want to lip-sync to.
Next, click “Add Sound” with the musical note icon at the top of the screen. If you have a specific song in mind, you can find it by searching it on the search tab. Then, tap the song and click the check icon beside it.
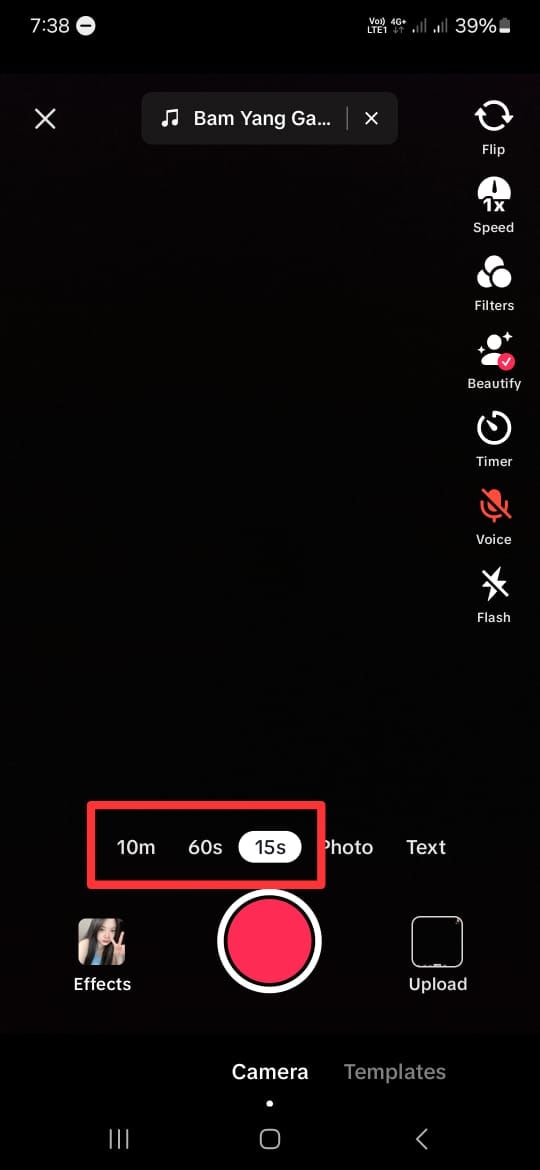
- Step 3. Choose the duration and the part of the song.
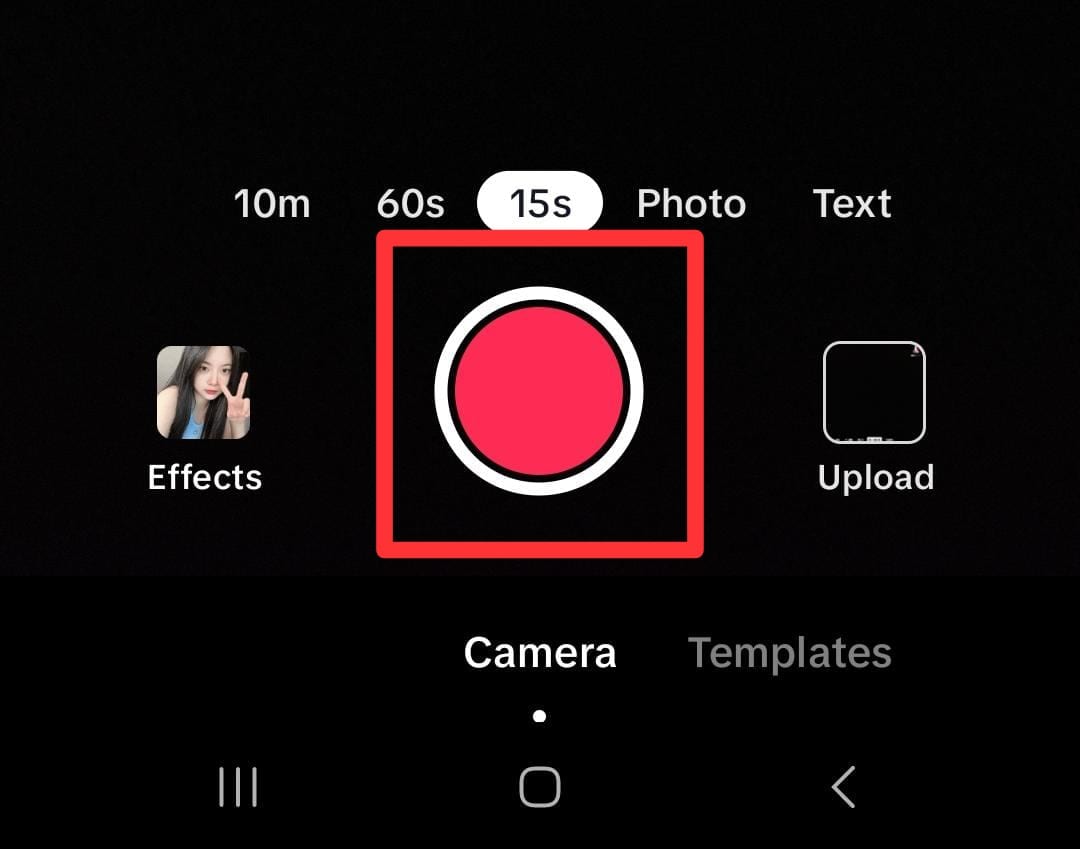
After choosing the song you want, you will return to the recording screen. Here, select your video duration at the bottom of the screen. You can choose between 10 minutes, 60 seconds, and 15 seconds. Remember that the duration of the songs on TikTok is usually only 30 to 60 seconds.
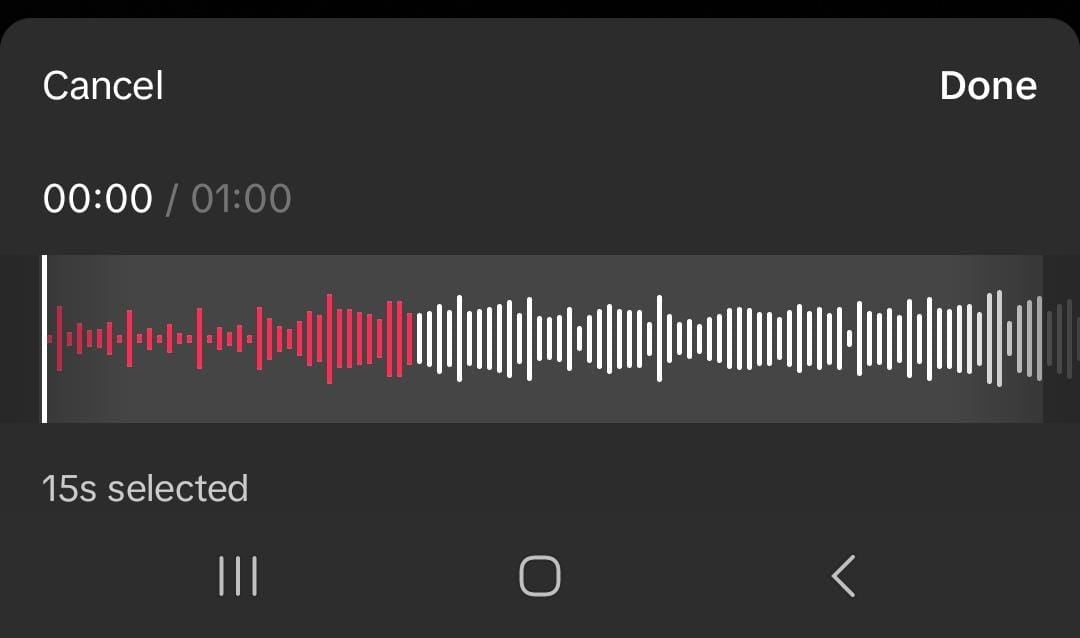
- Step 4. Choose the part of the song.
TikTok allows you to change the part of the song when lip-sync. However, the duration of the video should be less than the duration of the chosen song.
To do this, click on the song’s name at the top of your screen. Then, the bottom of your screen will display your chosen song. Tap the scissor icon and slide the playback to change the part of the song. Click “Done” once you have finished editing.
- Step 5. Tap on the red button.
If you are ready to record, tap the red button at the bottom of your screen. Then TikTok will play the chosen part of the song and record your lip-sync simultaneously. You can pause and continue the recording by clicking the same red button.
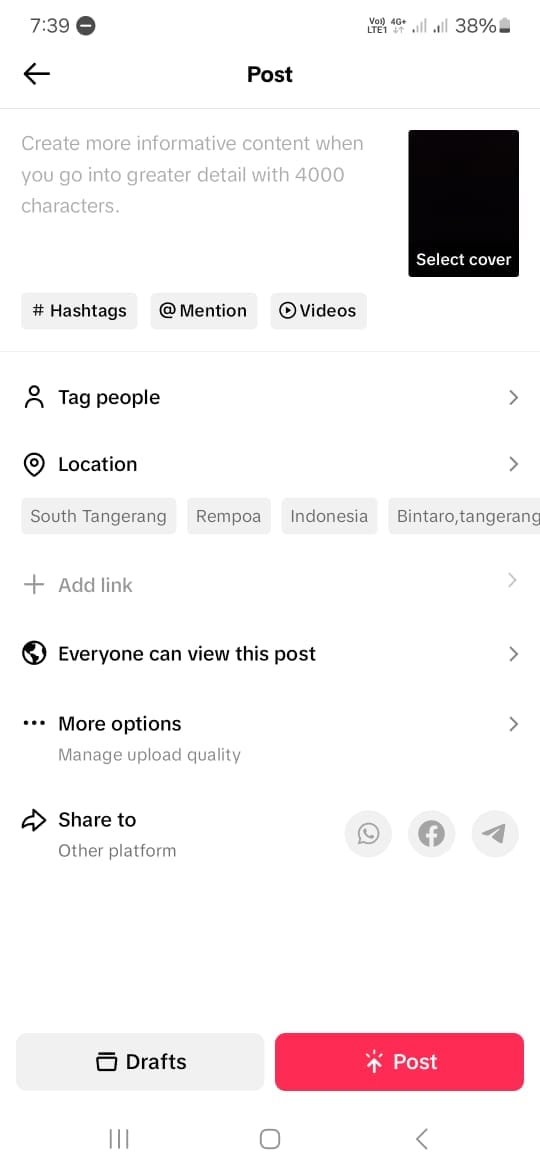
- Step 6. Post the video.
If you are satisfied with the results of your edits, click Next to proceed to the posting stage. Here, you can write a description and any other information you want. Click Post to share your lip-sync video to TikTok.
Creating a video on TikTok by lip-syncing is a fun and creative way to express yourself and connect with others. By following the steps above, you can create a lip-sync video on the TikTok app with ease. Keep in mind that by using these steps, you need to memorize the sentences and understand the beat of the chosen songs.
Part 3. How to Make Lip Sync Video Without Memorizing the Words
Making a**TikTok lip-sync video can be challenging because you must remember and match the words with the music. But there are three simple methods to make it easier.
Method 1: Record at slower speed
You can slow the speed down while recording instead of trying to keep up with the song. This technique lets you hear, understand, and follow the words more easily.
Here’s how to slow down the recording:
- Step 1. Follow steps 1 to 4 from the step-by-step guide in Part 2.
Start by following the first to fourth steps from the guide in Part 2 above.
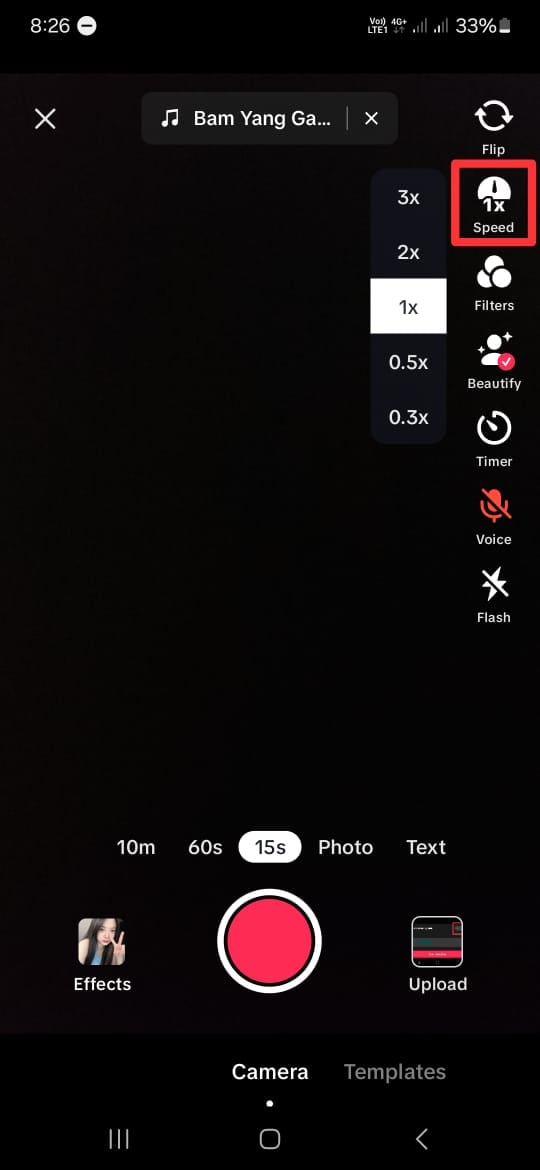
- Step 2. Set the speed record slower.
On the recording screen, click on the Speed icon on the right side of the screen. To make it slower, choose 2x or 3x. This step will make your recording time 2 or 3 times longer than it should be.
- Step 3. Tap on the red button.
Once you tap the red button, TikTok will play the song slower and record your lip-sync simultaneously. Repeat this step to help you memorize the lyrics and the beat of the songs.
Once you’re comfortable, switch back to normal speed for the final recording. This method will save time and improve accuracy.
Method 2: Purposely delay mouthing the words
While lip-syncing videos may vary in style and pacing, this technique can prove particularly useful for slower rhythms. Moreover, mastering the art of mouth sync on TikTok can elevate the overall production value of lip-syncing videos.
Using the timer feature will give you a slight lag between lip movements and audio playback. Then, it lets creators ensure more precise synchronization during editing. Here’s how to lip-sync on TikTok more easily:
- Step 1. Follow steps 1 to step 4 from the step-by-step guide in Part 2.
Like Method 1, you can start by following the first to fourth steps from the guide in Part 2 above.
- Step 2. Delay the recording
On the recording screen, click on the Timer icon on the right side of the screen. Here, you can set the timer to 3 to 10 seconds to delay the recording’s start. You can also drag and set the recording limit if you want.
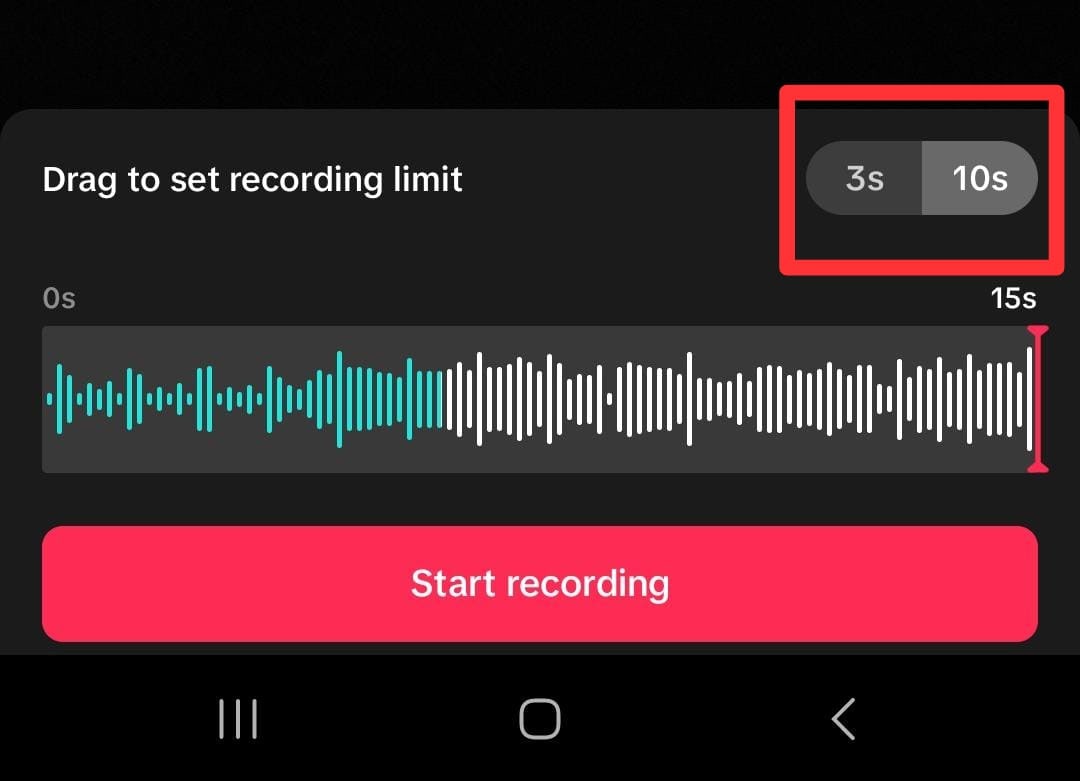
- Step 3. Start the recording
Then click “Start recording” to record the video with the timer on.
Method 3: Use a Photo Talking Tool
Next, consider using a Talking Photo feature by Wondershare Virbo. This method is for you who want to create engaging TikTok lip-sync videos without memorizing the words.
Virbo’s Talking Photo feature tool lets you upload a portrait of your photo and then make it appear as though it is speaking along with the audio. You do not have to install the app because you can use this feature online on their official website.
Here’s how to use Wondershare Virbo - Photo Talking feature to create a TikTok lip-sync video:
- Step 1. Start a new project.
Open the Wondershare Virbo website and tap the talking photo function to start a new project.
Get Started Online Free Download
- Step 2. Upload a portrait.
Tap “Upload Photo”, then upload a picture you want to use by following the instructions.
- Step 3. Edit and export.
Insert the text and adjust the voice settings. If you want to insert your own audio, you can use Wondershare Virbo for mobile or Desktop to upload or record your audio. Then, tap “Generate Video” to export.
Now, you have successfully made your own TikTok lip-sync video. You can upload it to TikTok and share it with your followers. For more detailed instructions, you can see how to useVirbo’s Photo Talking tool .
Part 4: How To Lipsync Your Video to Any Language Using AI Video Translator
In today’s globalized world, reaching audiences in different languages is important for effective communication. Thanks to technological advancements, there is a tool that can help you translate video content.
Wondershare Virbo – Video Translator offers seamless solutions to translate video content into various languages with AI. Virbo ensures high-quality translations that maintain the integrity and impact of your original message.
How to lipsync TikTok videos to any language with Wondershare Virbo - Video Translator:
- Step 1. Go to Virbo’sofficial website , then click Generate AI Video Online.

Get Started Online Free Download
- Step 2. Log in or create an account.

- Step 3. Then, navigate to the Video Translator tool on the Virbo’s homepage.
- Step 4. Upload the video.
Once inside the Video Translator interface, upload the video file you wish to translate. Select the original video language and the preferred target language from the available options. Additionally, enable the Lip Sync feature to ensure that the translated audio aligns perfectly with the lip movements in the video.
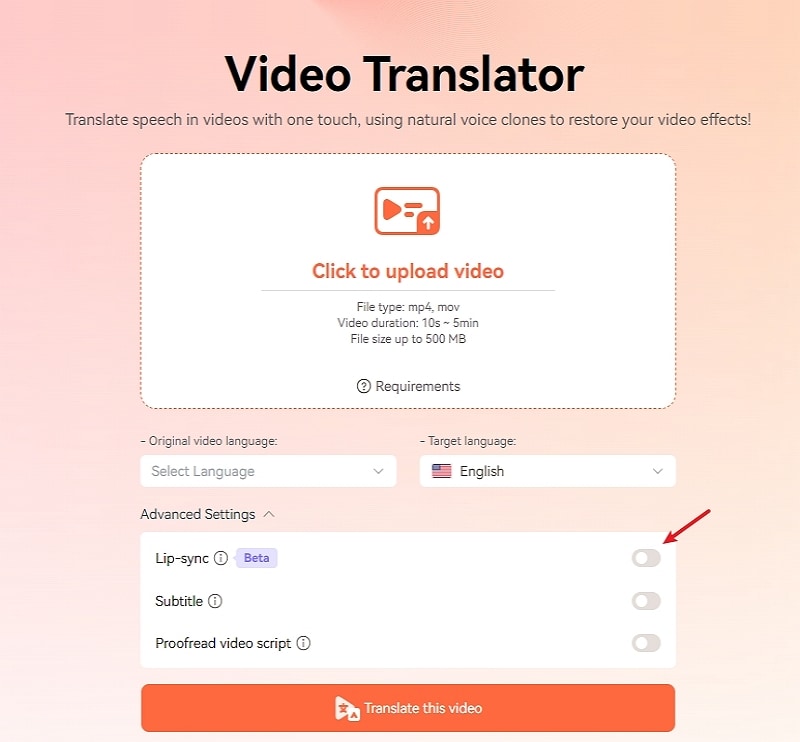
- Step 5. Click “Translate this video” to start translating the video.
Virbo’s Video Translator will use its advanced algorithms to translate the audio and synchronize it with the video seamlessly. Depending on the length and complexity of the video, the translation process may take some time.
Conclusion
Lip-syncing on TikTok has become a significant aspect of TikTok culture. It helps users show their creativity, entertain people, and maybe even become famous. Making**mouth sync TikTok videos usually means remembering lines and matching them to music, but there’s an easier way with Wondershare Virbo’s Talking Photo tool. This tool allows you to upload a portrait and sync it with audio without remembering the lines.
Also, Wondershare Virbo has a Video Translator tool that allows you to translate videos seamlessly into any language. This translator tool helps you communicate with people worldwide and maintain the original message.
How to Stream on Twitch: The Ultimate Guide
Live streaming has become a regular source of enjoyment for many people in recent years, especially on a platform like Twitch. In the first quarter of 2023 alone, Twitch users watchedover 5.3 billion hours of video.
If you’re a content creator, you should definitely consider leveraging this power of Twitch video streaming, as it tends to have higher levels of engagement compared to pre-recorded content. But with so many Twitch streamers out there, standing out from the crowd can be challenging.
If you’re new to the scene, we can help you start your Twitch streaming journey off right with the right gear and some useful tips.

Part 1: Essential Preparations Before Beginning Your Twitch Streaming Journey
Whether you’re playing games, hosting events, or just chatting, streaming on Twitch is an exciting and rewarding way to engage with your audience in real-time. But to do well on Twitch, you need to prepare properly so your viewers can enjoy watching your content.
To start streaming on Twitch, here’s what you’ll need:
Twitch Streaming Software
First, you need to download streaming software for your Twitch video streaming. OBS Studio is the popular one, but Twitch has released its Twitch Studio, which is more beginner-friendly.
- OBS Studio
OBS Studio is a free streaming software that works on any device. You can use it to make your Twitch streams live more attractive by adding alerts, creating starting screens, and using different audio and video sources.
- Twitch Studio
Twitch Studio is the official free streaming application developed to simplify the streaming process for new streamers on Twitch. It offers an intuitive interface and pre-made scenes designed to streamline the user experience.
Streaming equipment
- A device to stream from
To kickstart your Twitch streaming journey, the first step you need to take is selecting the device from which you’ll broadcast. You can use your desktop, mobile phone, or gaming console. Your choice will depend on your existing equipment and the nature of your intended content.
If you plan to make gaming content for your Twitch Live, we recommend using a PC with these specifications:
- CPU
When streaming and gaming, it’s crucial to have a powerful CPU to minimize lagging. The number of cores in a CPU determines its processing power, ranging from dual to eight cores. Some good options to consider are the AMD Ryzen 9 5900X, Intel i9 – 12900K, or the more budget-friendly Intel Core i5-12400.
- GPU or graphic cards
Nvidia RTX graphics cards come equipped with built-in hardware encoders, which can lighten the CPU’s workload when used with OBS Studio. Alternatively, you can consider the Radeon RX 570 and the GeForce GTX 1660 Ti for quality GPU options.
- Microphone
Although you might get by using a gaming headset’s built-in microphone for a bit, it’s better to invest in a standalone mic from the start. Some top microphone options for Twitch streaming include the Elgato Wave:3, HyperX QuadCast S, Audio-Technica AT2020, Razer Seiren Mini, and Blue Yeti X.
- Webcam
If your Twitch stream content involves showcasing your reactions or facial expressions, investing in a camera is a wise choice. Webcams are convenient as they can easily connect to your computer or laptop.
You can consider some popular webcam choices like the Logitech HD Pro C920, Logitech StreamCam, Logitech BRIO, Microsoft LifeCam HD-3000, and Razer Kiyo.

Understanding Twitch Streaming Rules
Aside from preparing your streaming gear, you must also understand Twitch streaming rules to avoid any potential violations that could result in penalties or even suspension of your account. Twitch’s community guidelines cover a wide range of topics, including harassment, hate speech, copyright infringement, and mature content. You can read the full Twitch streaming ruleshere .
Part 2: Comprehensive Guide To Stream Live on PC, Mac, or Smartphone on Twitch
Once you’ve gathered all the necessary equipment, you can proceed with the following steps to start your Twitch stream.
How to stream Twitch live on PC or Mac
Step 1: Download and installTwitch Studio on your PC or Mac. Then, launch Twitch Studio and log in to your Twitch account. You’ll receive a prompt to connect your microphone and webcam.
Step 2: Use Twitch Studio to customize your Twitch stream with different scenes and settings. Experiment with these features to find what works best for your livestream.

Step 3: When you’re ready to start broadcasting, click “Start Stream” at the bottom of the Twitch Studio. Then, select your stream category and enter your live stream title. Hit “Go Live” to begin streaming.

How to stream Twitch live on a smartphone
Starting Twitch streaming from your smartphone is a bit different, as the app primarily allows broadcasting from your device’s camera. Here’s how to live stream on Twitch from your smartphone:
Step 1: Download and install theTwitch App .
Step 2: Log in to the Twitch app. Then, go to your profile and tap “Go Live.” If you are using newer version of the Twitch app, you can tap “Create.”

You’ll then have two options: “Stream Games” or “Stream IRL.” The “Stream IRL” will allow you to live stream on Twitch using your phone’s camera, while the first option lets you stream mobile games.

Step 3: Grant access to your camera and/or microphone before starting your stream.
Step 4: Set up the stream and Go Live. Give your stream a name, choose a content category, and select the camera you want to use.
Once you’ve completed these steps, press the “Start Stream” button, and you’ll be live on Twitch.
Key elements of success for streaming on Twitch
While the process for starting Twitch streaming may be similar for all streamers, what makes a streamer successful? Based on reports, there are a few key elements of success for streaming on Twitch.
- Engaging content
Successful Twitch streamers captivate their audience with compelling content that resonates with viewers. This could include entertaining gameplay, informative discussions, or engaging activities. If people like your stream, they might subscribe or donate their money.
- Make use of the interactive features
Twitch stream labs offer unique features like chat rooms and special emojis, fostering interaction between streamers and viewers. Streamers actively engaging with their audience tend to cultivate a loyal and enthusiastic community.
- Consistency and persistence
This is often the toughest part. On Twitch, consistency is crucial. Successful streamers usually maintain regular schedules to make sure their audience knows when to expect new content. If you are new, continuous live streaming can be an effective strategy to engage with your audience consistently and increase your channel’s visibility.
Part 3: Best AI-Powered Tool for You To Set Up a 24/7 Live Stream on Twitch
If you want to make your Twitch channel stand out and automate the live streaming process, you can use Wondershare Virbo Live. With this tool, you can set up a 24/7 live stream on Twitch without needing to be present all the time.
Additionally, the Virbo live stream feature seamlessly integrates with major live-streaming platforms supported by OBS. You can also use it on numerous other platforms, such as TikTok Live, 1688 Live Platform, Alibaba International, Kwai, and more.
How to live stream 24/7 on Twitch with Wondershare Virbo Live
To live stream 24/7 on Twitch with Virbo, you will first need to prepare your AI avatar on Virbo Live to broadcast continuously on Twitch. Once you have customized your avatar, you can obtain the streaming key from Twitch. This key will enable OBS to connect with Twitch’s streaming platform.
Follow the detailed steps on how to live stream 24/7 on Twitch:
Step 1: Access Wondershare Virbo Live and create a live streaming room.
Go toWondershare Virbo Live and select “Create Stream Room Now” > “Create a Blank Live Stream Room” to initiate the setup process.

Step 2: Write your content script or upload audio recordings.
Within the Virbo Live interface, you can either compose the script for your live stream or upload pre-recorded audio content by selecting “Upload local file.”

Pro Tip: You can use Virbo’s AI Script Writer for inspiration. Click on “AI Smart Script” and provide topic details, language preferences, and stylistic choices. Click “Generate” to create a script. Then, you can refine it as needed.
Step 3: Customize your AI avatar and background.
Navigate to “AI Avatars” to select an avatar for your live stream. Additionally, you can customize the background, incorporate stickers, or use available templates.

Step 4: Start the live stream.
Once your AI avatar and background are set, click “Start Livestream” to commence broadcasting. The next step should be acquiring the Twitch streaming key to put into the OBS.

Once everything is ready, click “Start Streaming” in OBS Studio, and your stream will broadcast on Twitch.
Conclusion
With billions of hours of video watched and many content creators vying for attention, streaming on Twitch can be exciting and challenging. However, by following the essential preparations outlined in this guide, you’ll be able to kickstart your Twitch live stream ahead of others.
You can use Wondershare Virbo Live to make an automated streaming experience 24/7. This helps you maintain a consistent presence on the platform even when you’re not around.
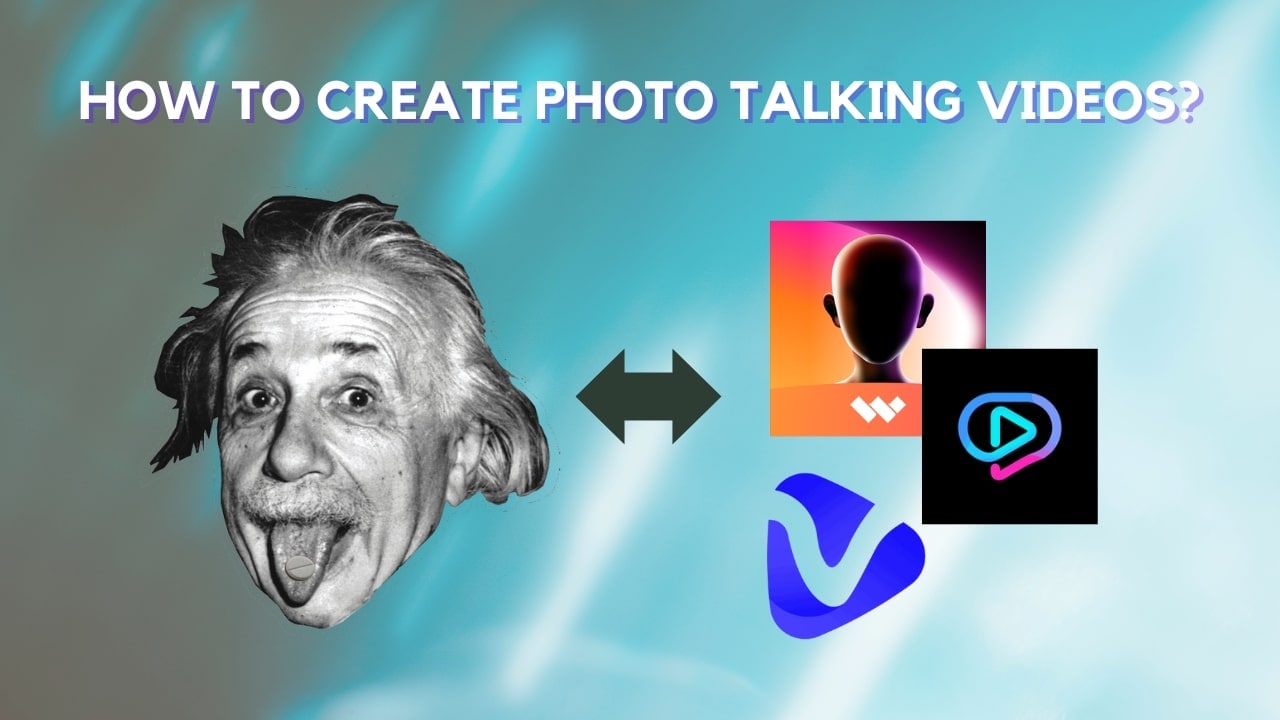
[User’s Guide] How To Create Photo Talking Videos With the Best Tools?
Pictures and videos are crucial for preserving memories; companies also use them for promotional purposes. However, technology has now created an innovative and engaging way to use pictures. For example, you can now put life into your photos and make them a talking video.
If you are wonderinghow to make a photo-talking video , this article presents a complete guide. We will share some of the best tools for creating photo-talking videos. Simply follow it to the end to learn about it in detail.
Part 1. What Is a Photo Talking Video?
Atalking-photo video is like a magic trick for making pictures engaging. You can take still pictures and make them move or talk like they are alive. It represents a captivating merge of photography and animation for an interactive experience. Moreover, new and creative ideas are always invented to make photo-talking videos even better.
No doubt this creativity takes your entertainment to the next level, but there’s more to it. These photos also change how companies talk to us about their products. It is like giving a voice to photos and using them to tell stories in a way that grabs customers’ attention. That’s why photo-talking videos are becoming a big deal in today’s market dynamics.
Innovations in Picture-to-Talking Video
People use various tools and techniques to convert images to talking videos. These techniques may include mobile applications or computer software, which keep getting innovations:
- Integration of artificial intelligence for more realistic movements.
- Use of facial recognition technology for accurate lip-syncing.
- Implementation of voice synthesis to generate lifelike speech.
- Introduction of interactive features allowing user engagement.
Part 2. How To Create Talking Video With Reliable Desktop Tool—Wondershare Virbo
In the above sections, we have introduced the concept and importance oftalking photo videos . Let’s head to the part where you will know how you can create them with tools. One of the most straightforward methods to generate such talking photos isWondershare Virbo . Whether you want to market a product or deliver a presentation, using this tool is a good idea.
With its AI-powered Talking Photo feature, you can bring life to your pictures. Not only can you make them move, but you can also add voice clips for a better and more engaging experience. You can count on this diversified tool with variating compatibility for integrating your pics with social media platforms. It even allows users to create such content online and offline.
Top-Rated Features of Wondershare Virbo
- Wondershare Virbo can convert the text you provided to speech for use in your talking photos.
- You can customize your uploaded voice in talking pictures to make it more interesting.
- Using the versatile AI avatars of this tool, you can attract and engage a broader audience.
- This tool allows users to add background music to their content for personalization.
Step-by-Step Guideline To Create Talking Photo Videos Using Virbo
Wondershare Virbo provides a smooth and simple process for creating such art. This section will explain how to make a photo-talking video with the help of this tool:
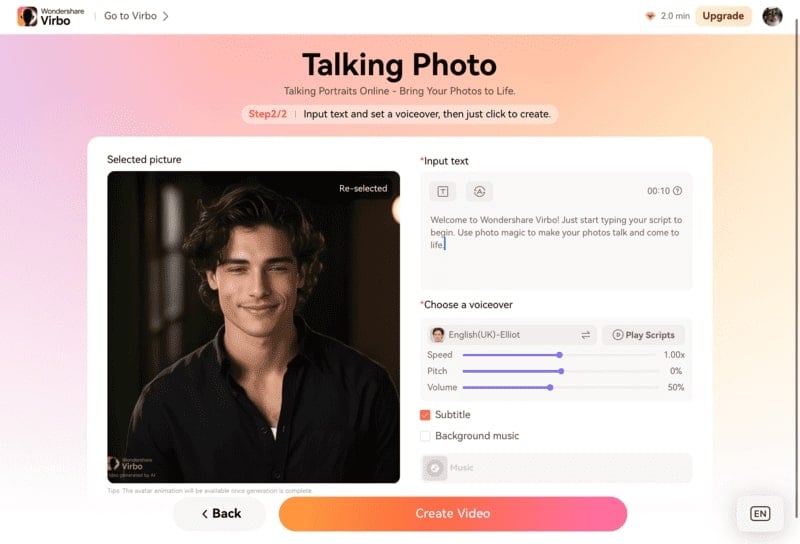
Step 1. Initiate the Creation Process With Virbo
First, download and launch the Wondershare Virbo application on your system. From its main interface, tap the “Talking Photo” feature from its home screen.
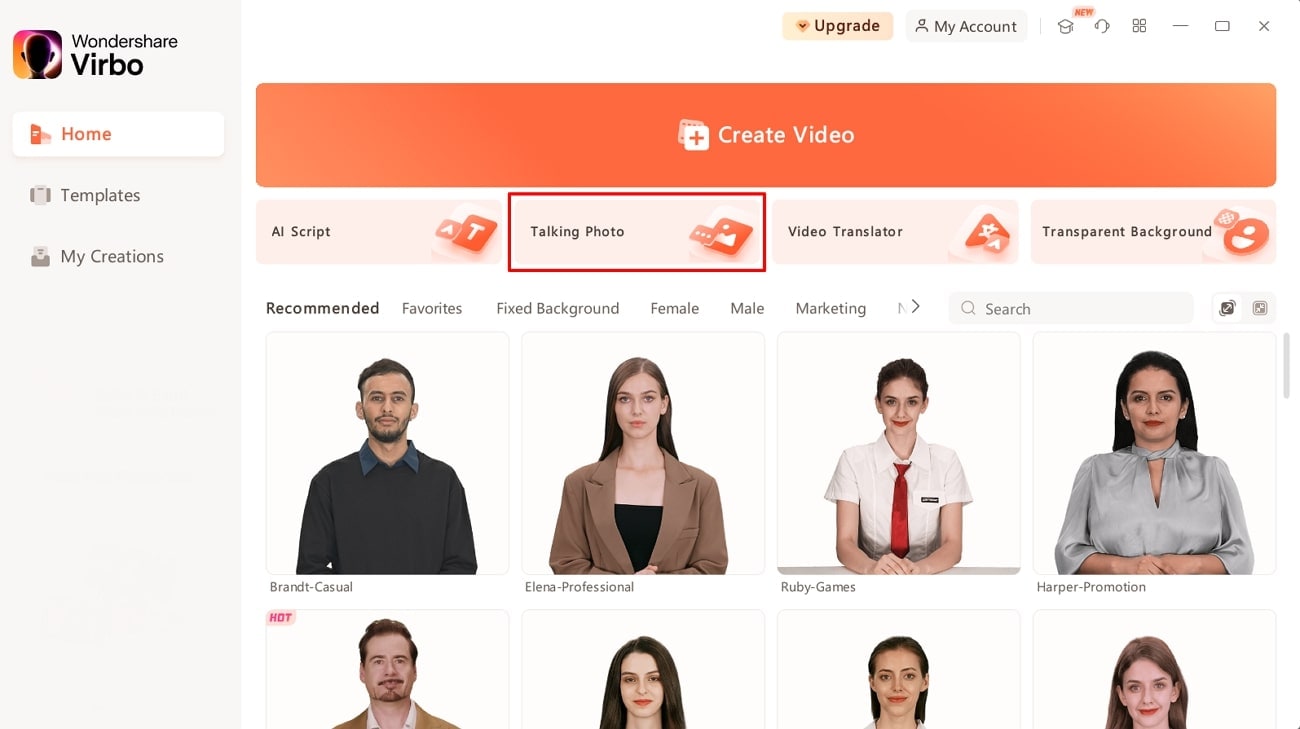
Get Started Online Free Download
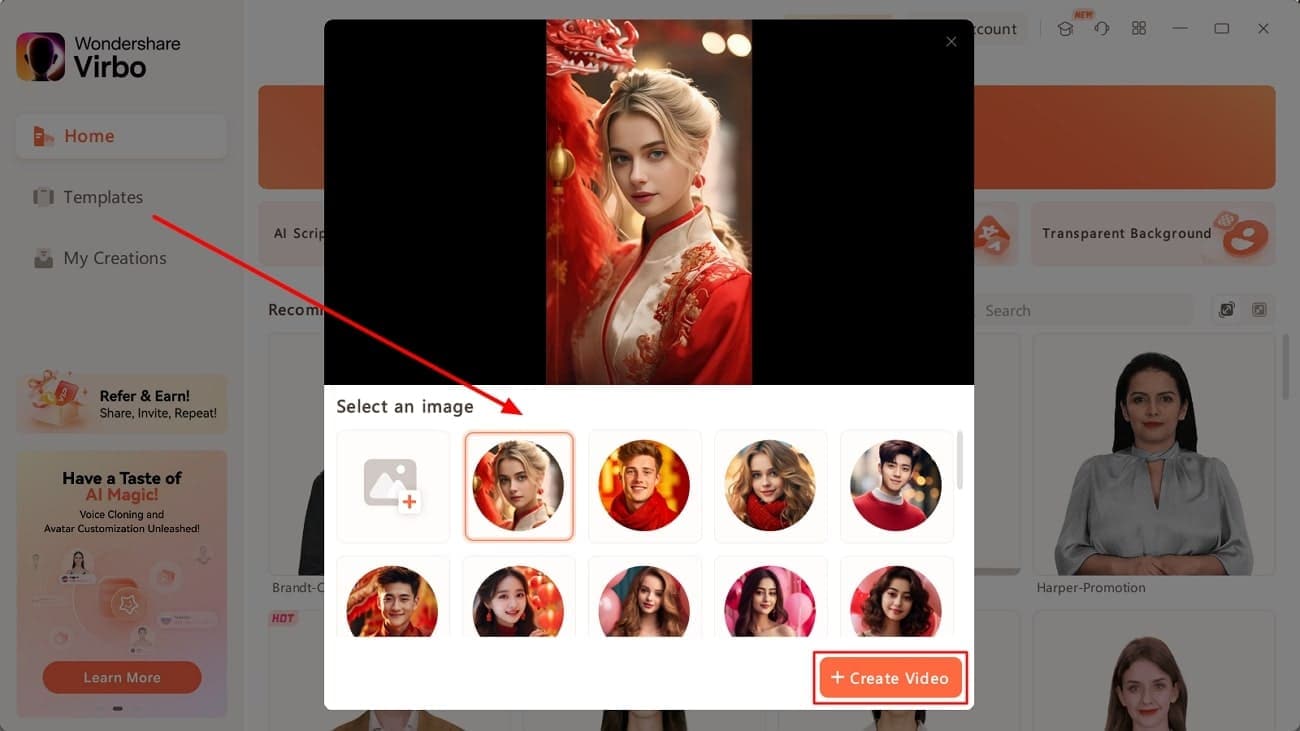
Step 2. Choose an Image To Create Talking-Photo Video
You will access a new pop-up window with different preset image avatars by clicking on this feature. Select your desired avatar and click the “Create Video” button to initiate the process.
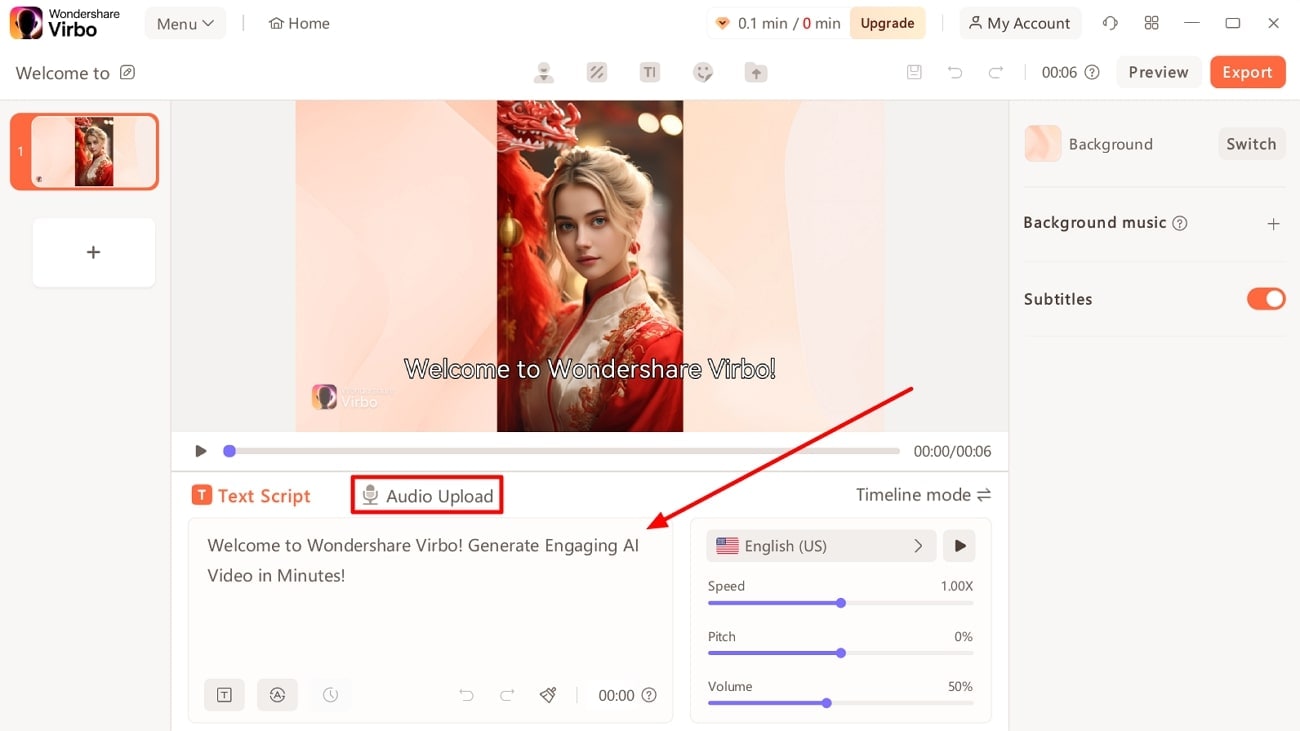
Step 3. Input the Text or Recorded Audio for AI Speech
Enter the text you want to use in your talking photo. You also have the option to shift to the “Audio Script” tab to upload your audio to convert your picture to a talking video.
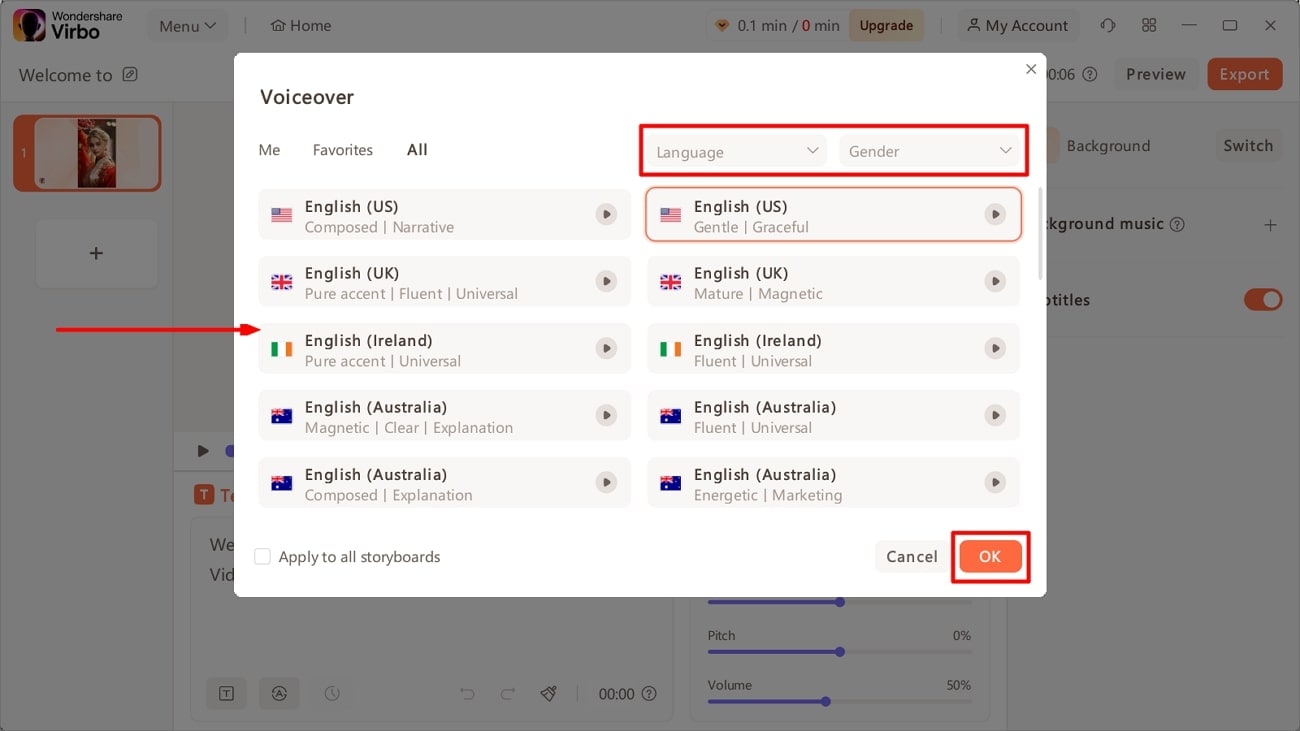
Step 4. Select the Language and Accent for Your Video
After that, scroll to the “Language” portion and click on it. A new pop-up window will appear where you can choose any language and accent. Hit the “Gender” dropdown menu to select your desired gender, and finally, tap the “OK” button.
Step 5. Customize Voice Features and Export Talking Photo
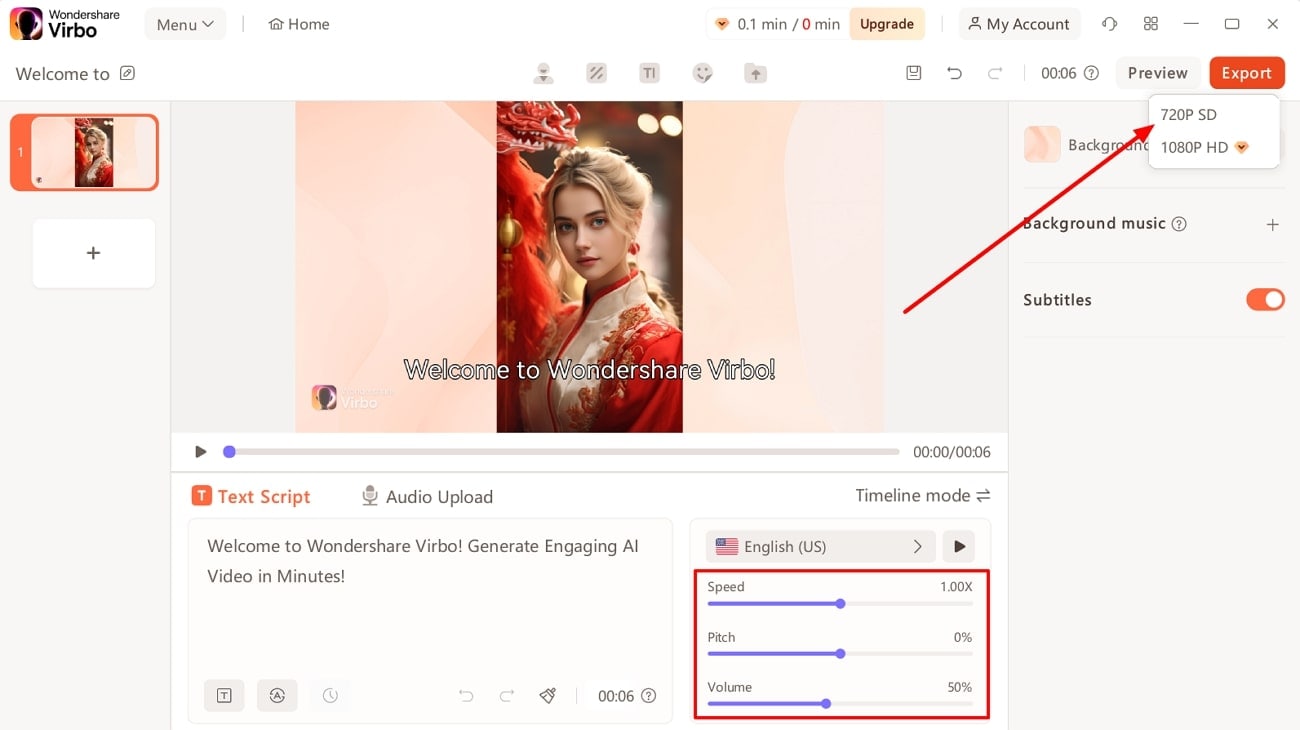
Now, set the speed of delivery voice as per your requirement. You can also customize the volume and pitch of it. Finally, click the “Export” button in the upper right corner. After selecting the resolution for the output file, you will be redirected to the “My Creations” section with saved files.
Part 3. How To Create Photo Talking Videos With Some Top Online Tools
Wondershare Virbo is the ultimate choice for making your photo into a talking video. However, we will mention alternative online tools if you are still looking for them. Go through this section to learnhow to make a talking picture video using the top online tools besides Virbo:
1.Vidnoz
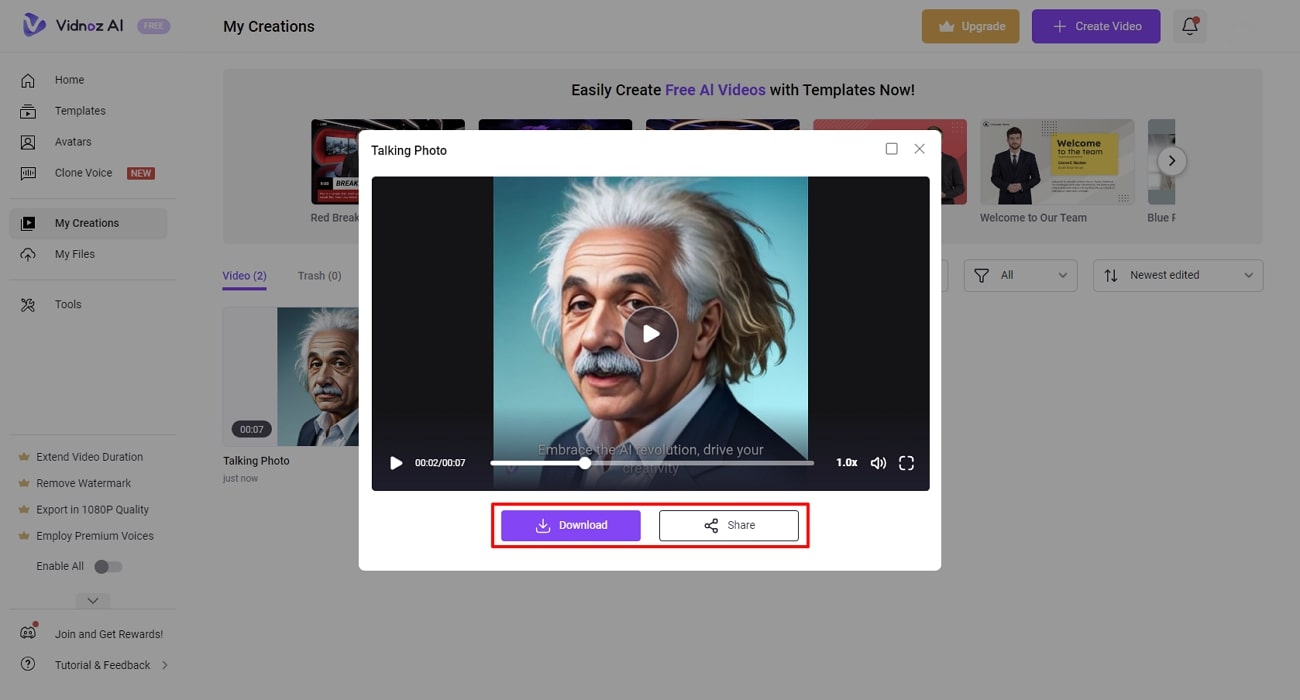
Vidnoz is an online AI-powered tool that can create talking photos within minutes. It can convert your still picture into a realistic talking avatar that you can use for various purposes. You can also choose between built-in avatars for this creativity. Additionally, Vidnoz allows users to perform a face swap operation, where you can swap the face in a picture with any other face. If you intend to use this tool to convert images to talking videos, walk through these steps.
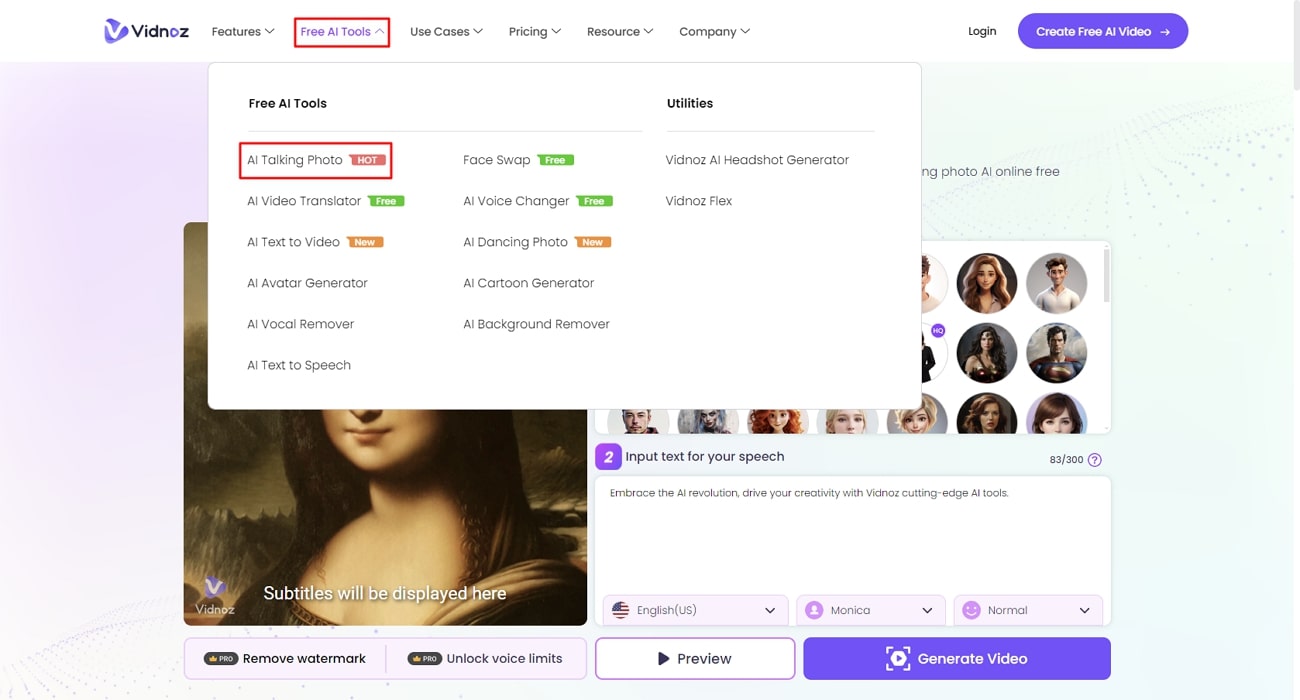
Step 1. First, access the official site of the Vidnoz tool and scroll to the “Free AI Tools” section. In the list of features, look for the “AI Talking Photo” feature from there to get started.
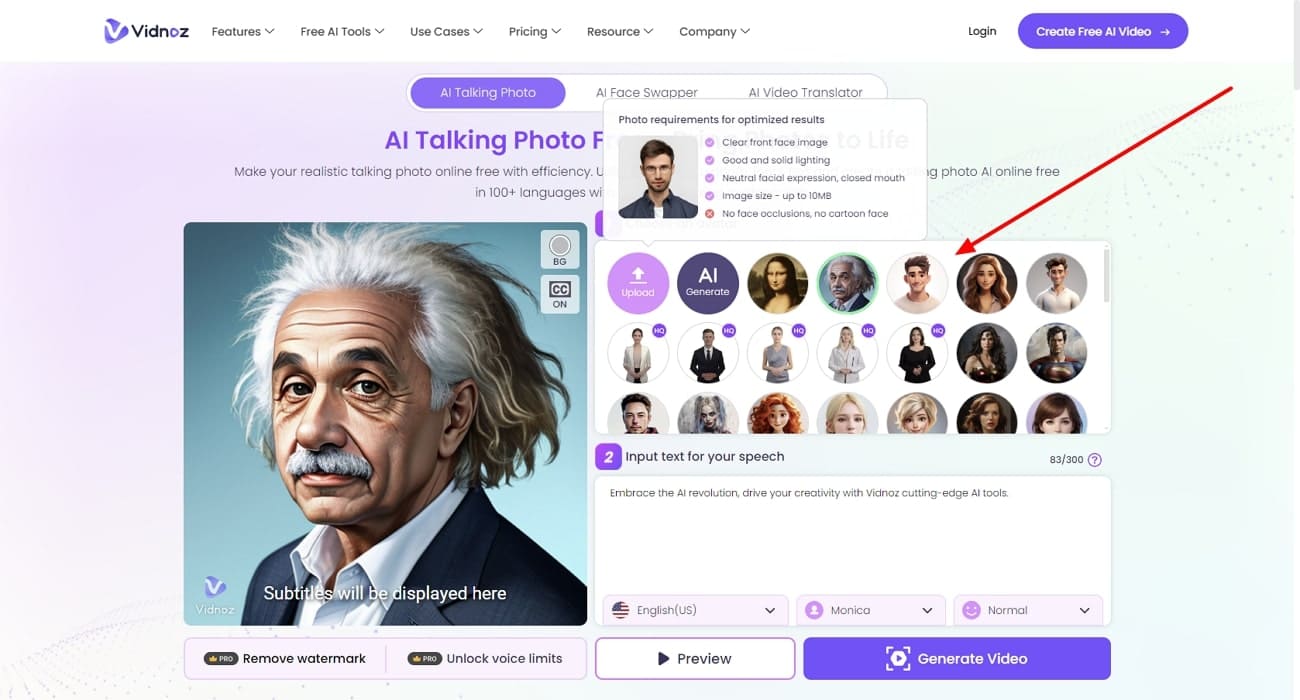
Step 2. After that, select the avatar from pre-available options. You can also upload your own desired picture for this purpose.
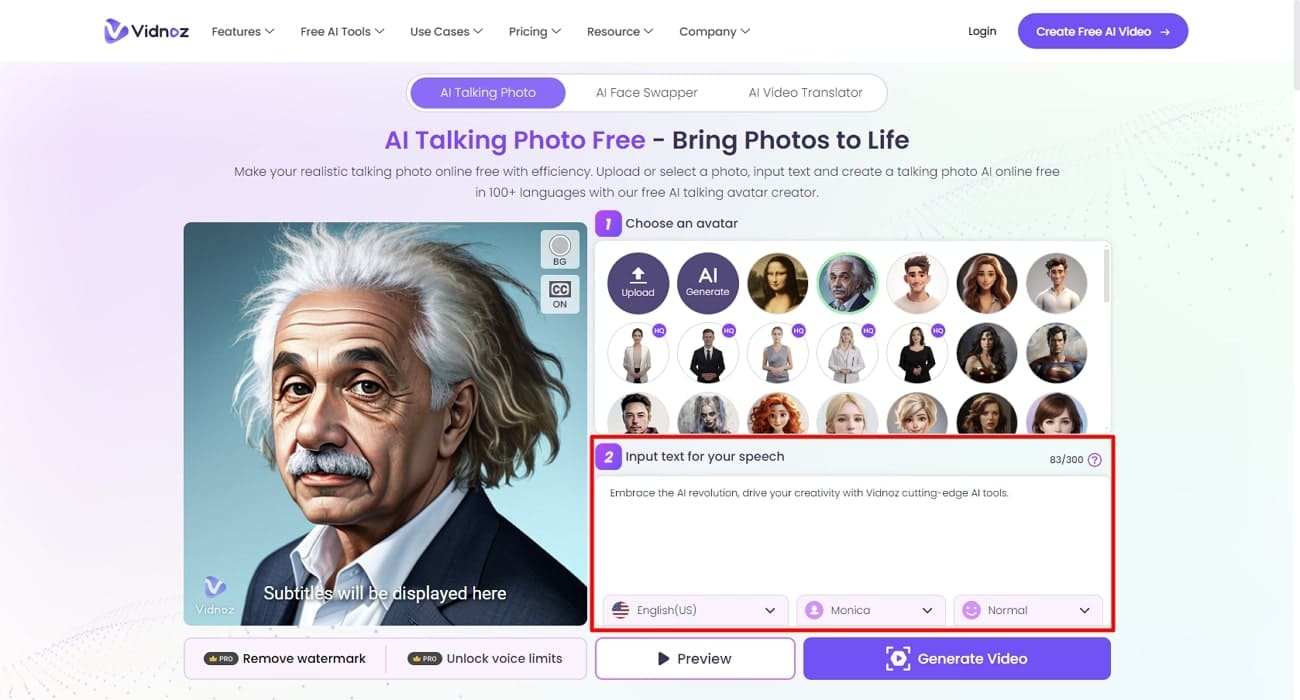
Step 3. Then, go to the text box section and input any text you want to convert to speech. Also, select any preferred language, voice, or mood from the below dropdown menus.
Step 4. Once everything is set, click on the “Generate Video” button to finalize the creation of a talking-photo video. A pop-up window then appears on the “My Creations” page. You can download it to your device or share it directly on social media platforms from that window.
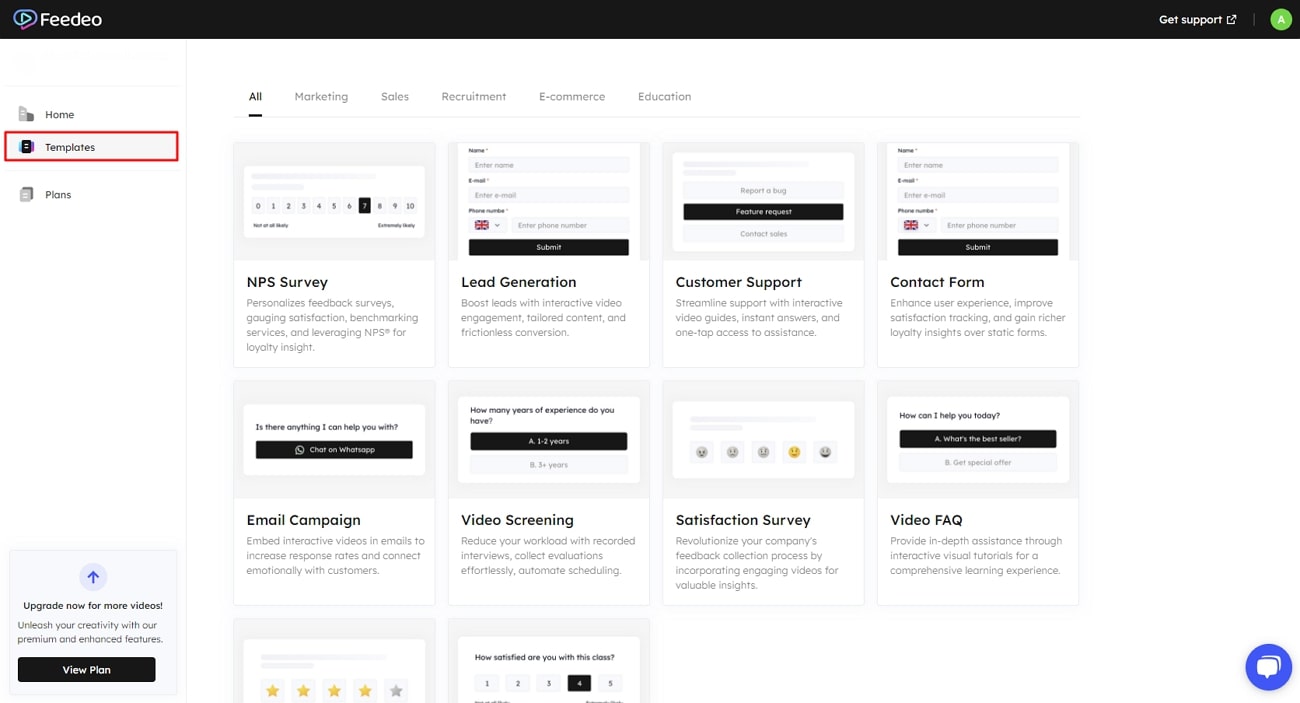
2.Feedeo
Feedeo is also an online talking photo creator that enables users to make interactive content. With its wide range of AI avatars and voices, you can have a customizable and versatile experience. In addition, you can also use your pic to showcase yourself in the talking photo. To convert your photo to a talking video with Feedeo, apply this guide below:
Step 1. Go to the Feedeo website and log in through your account. Once done, you will be shifted to the dashboard page. Then, select the “Templates” section from the left sidebar and choose any template you want.
Step 2. After that, you will reach the editing interface of this tool. Select a virtual avatar you want to use for your talking photo or upload your photo.
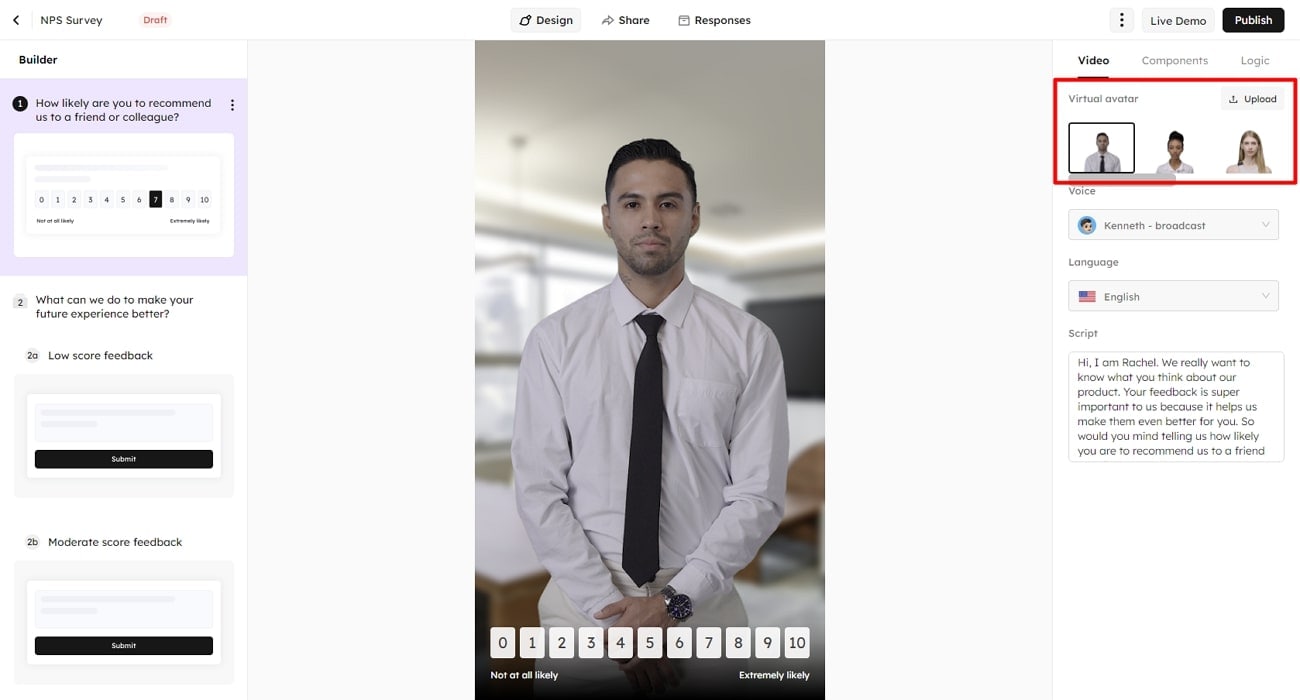
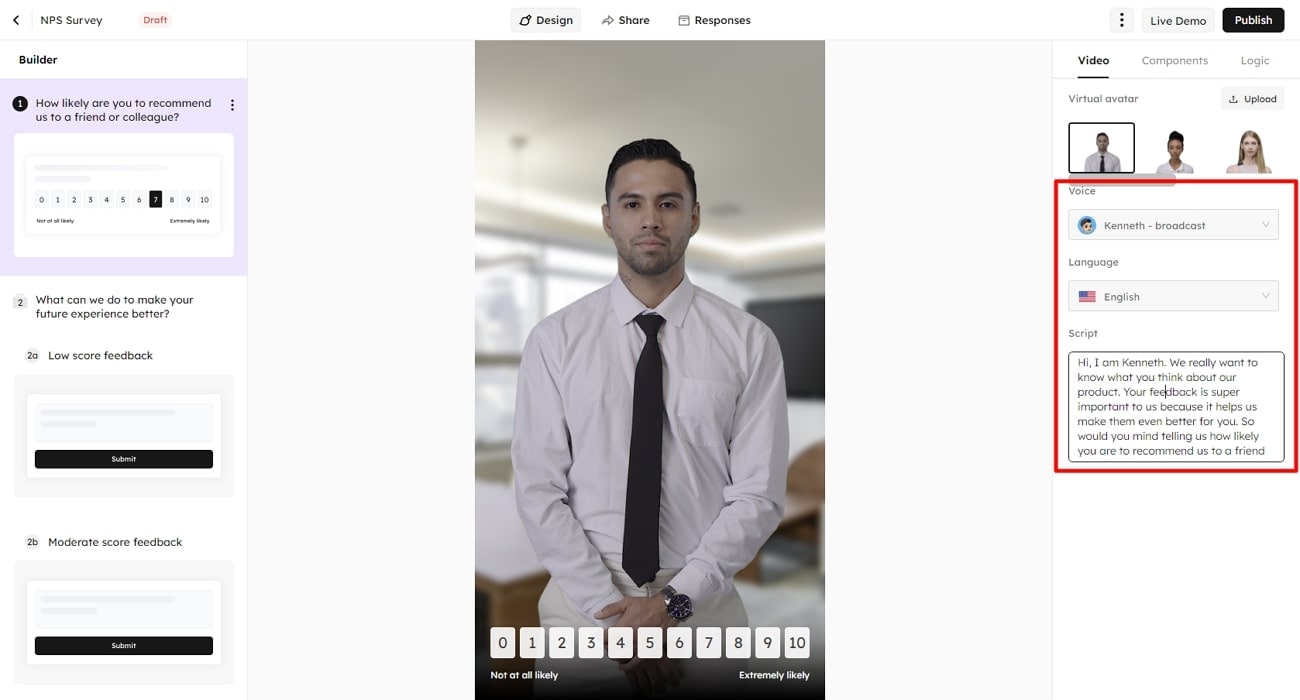
Step 3. Go to the “Voice” dropdown menu and choose any voice and its tone. Afterward, select your desired language from the “Language” dropdown menu. In the section below, you can type any text as the script of your talking photo.
Step 4. Now, hit the “Publish” button, and it will start processing in a new pop-up window. A message will then appear for successful publishing, from where you can share the output file to multi-platforms.
Conclusion
It is incredible how AI-powered tools can transformimages into talking video s. We have shared information on some of the best tools to create such art. However, if you are confused about choosing the best one, Wondershare Virbo is the clear choice. With multiple AI avatars and different language dialects, Wondershare Virbo can surely make your talking photos more fun.
Get Started Online Free Download
Also read:
- Updated 2024 Approved Top 4 Ways of Instagram Video Promotion
- New In 2024, Best Hatsune Miku AI Voice Generators for All Times
- 2024 Approved Maximize Your User Engagement With Instagram Live Shopping Expert Tips
- 2024 Approved 7 Top Explainer Video Makers You May Like
- In 2024, The Most Efficient Tools to Convert Text to MP3 With the Best Natural Voices
- Updated In 2024, Top 8 Text-to-Video AI Generators to Produce Video Easily
- Descript AI Voice Enhancing Your Content Through Voice Replication
- New 2024 Approved 5 Smart Tips About YouTube Shorts to Grow Your Business
- In 2024, How to Generate Videos From Text with AI
- 2024 Approved Ultimate Guide How to Live Stream on Facebook?
- In 2024, Generate Video with Talking Photo Feature
- Updated Top 10 AI Script Writers to Choose
- New 2024 Approved 10 Best Text-to-Video AI Generators to Create Engaging Videos
- New Live Shopping in China Major Changes in the Industry for 2024
- New 2024 Approved Unlocking Global Audiences Top Video Language Converters
- New 2024 Approved Top 10 AI Script Generators
- Updated Exploring The Best Text-to-Speech Online Tools To Use
- New 2024 Approved What Is AI Voice? | Wondershare Virbo Glossary
- 2024 Approved Top 5 AI-Integrated AI Cartoon Video Generators to Use
- New YouTube Live Selling Boost Your Sales With These Tips for 2024
- Updated Translate Live Videos With The Best Video Translator
- Updated In 2024, Top 10 AI Script Generators
- New In 2024, Top 5 Udemy Subtitle Translation Tools for Seamless Auto Translations
- Updated 2024 Approved Introduction of Virbo Online | Wondershare Virbo
- Comprehensive Guide for Free Video Translator Downloading
- Updated In 2024, Revealing Translation Methods Netflix Subtitle Software Comprehensive Guide
- Updated A Comprehensive Review of Descript Overdub AI Feature
- Updated Convert Video Voice to Text Online for Free Fast and Easy Ways for 2024
- Introduction of Virbo Windows | Wondershare Virbo
- Updated 2024 Approved Essential Tools for Creating Dynamic Talking Avatars
- How to Change Credit Card from Your iPhone 15 Plus Apple ID and Apple Pay
- Possible solutions to restore deleted music from S17e
- How to Cast Xiaomi Redmi Note 12 5G to Computer for iPhone and Android? | Dr.fone
- In 2024, Detailed Review of doctorSIM Unlock Service For Apple iPhone 14 Pro | Dr.fone
- Troubleshooting Guide How to Fix an Unresponsive Vivo X100 Pro Screen | Dr.fone
- Unova Stone Pokémon Go Evolution List and How Catch Them For OnePlus Nord N30 5G | Dr.fone
- A Detailed Guide on Faking Your Location in Mozilla Firefox On Itel S23 | Dr.fone
- Will iSpoofer update On Poco C65 | Dr.fone
- In 2024, How to Transfer Contacts from Realme C67 4G to iPhone XS/11 | Dr.fone
- Dose Life360 Notify Me When Someone Checks My Location On Itel A05s? | Dr.fone
- Hassle-Free Ways to Remove FRP Lock on Itel A60with/without a PC
- All Must-Knows to Use Fake GPS GO Location Spoofer On Nubia Red Magic 8S Pro+ | Dr.fone
- A Comprehensive Guide to iCloud Unlock On Apple iPhone 6 Online
- The Best 8 VPN Hardware Devices Reviewed On Honor Play 7T | Dr.fone
- Title: 2024 Approved AI Voice | Online
- Author: Sam
- Created at : 2024-05-19 03:34:52
- Updated at : 2024-05-20 03:34:52
- Link: https://ai-voice-clone.techidaily.com/2024-approved-ai-voice-online/
- License: This work is licensed under CC BY-NC-SA 4.0.
