

2024 Approved A Step-by-Step Guide on How to Promote YouTube Channel
A Step-by-Step Guide on How to Promote YouTube Channel
YouTube channel marketing plays an important role in the life of content creators. Promoting your personalized YouTube channel can increase visibility and gather better monetization opportunities. It also helps in ensuring your long-term growth, which is quite convenient. If you are a YouTuber, but your YouTube channel is nothing but a waste, this article is for you.
By the end of this article, you will know substantial information aboutYouTube channel marketing . We will also discuss some of the reliable ways through which you can ensure the promotion of your YouTube channel in no time.
Part 1: What Are The Benefits of YouTube Channel Promotion?
YouTube channel marketing holds tons of profitable benefits for users. Some of the considerable benefits of YouTube promotion, which every person should know, are discussed here:
1. Reach and Visibility
Before anything else,YouTube channel promotion can help you improve your reach and visibility. You can get famous in no time. Moreover, reaching a wider audience all across the globe is also possible with this. This automatically leads to views and subscriber boosting.
2. Higher Subscriber Ratio
A YouTube channel is nothing without subscribers. Thus, you need to have a large number of subscribers on your channel. To have more subscribers, the key beneficial strategy is marketing. So, with reliable YouTubechannel promotion , you can instantly attract many subscribers.
3. Effective Collaboration
If your channel grows continuously, people will automatically contact you for collaborations. From influencers to companies, you can collaborate with everyone without any restrictions. Along with this, you can also do paid partnerships with brands that will help you get financially stable.
4. Growth and Fulfillment
This can give you beyond tangible benefits for growth and fulfillment. It can ensure the personal fulfillment of the users. You can also motivate other viewers and earn rewards for your hard work. This can also help you contribute to the authorities’ establishments.
5. Longevity and Community Support
There is no restriction to remove the videos after a specific period on YouTube. Thus, with the help ofYouTube channel marketing , you can also ensure the longevity of your content. It also helps in ensuring reliable community support for you.
Part 2: What Are The Strategies For Promoting YouTube Channel?
YouTube channel marketing strategies are a must-have for having a famous YouTube channel. With the help of YouTube marketing strategies, you can get a wider reach and show your content visually appealingly.
Along with this, improving the SEO of videos along with interacting online visibility is also possible with this. Some of the marketing strategies for YouTube are also discussed here:
1. Optimize Video Titles and Descriptions
Before anything else, viewers will read the title of your video. Thus, you have to ensure that your video’s title is well-expressive and exquisite. Try to add a keyword in the title because it can boost your engagement ratio. Along with this, you have to add catchy descriptions in the title.
This will help the users to understand your videos in a better way. Boosting searchability is also a unique benefit of adding catchy titles and descriptions. You can also insert the key points and advantages of the video in the description.
2. Share on Social Media Platforms
You are aware that no one is free from the universe of social media. It is essential for you to create the perfect quality videos and share them on social media platforms. Moreover, try to choose a platform with enormous numbers of users. Moreover, market the videos in such a manner that they can have organic traffic and views.
Don’t just stop with YouTube but also try to share YouTube videos with friends and family. Copy the link from uploaded YouTube videos and share it on WhatsApp, Instagram, and other platforms. This will help the users to access your videos with a few taps.
3. Collaborate with Other YouTubers
No one likes a dry and unfriendly YouTuber. You have to entertain the viewers so they can rely on your friendly nature. You can also collaborate with other YouTubers to showcase your friendly nature. This will also make you more visible to the subscribers of other YouTubers. Above all, if you present yourself as an approachable and friendly person, then it will motivate the viewers.
They can request you to make a video on some specific topic. Thus, remember to ensure your friendly behavior and collaborate with multiple YouTubers. There is no restriction to collaborate for professional videos, as you can also plan a meetup and share vlog-type videos on YouTube. It is a hidden yet significantYouTube channel marketing strategy.
4. Optimize Your Video Content
If you want to attract a considerable number of viewers and subscribers, you can embed a virtual YouTuber in your videos. This not only helps in channel promotion, but you can also keep anonymity. Moreover, you don’t have to worry about a tool that can help you create videos with virtual YouTuber integrations.
This is becauseVirbo can aid you effectively in this part. With the help of Virbo, you can create optimized quality videos in no time. Whether you want to make explainers or marketing videos, this innovative tool can help you with everything. Along with this, Virbo is compatible with Windows, Android, and iOS platforms. This ensures the optimized usability of this tool.

Above all, Virbo comprehends the AI powers which can make your work easier than ever. You can also use this fantastic tool to generate scripts without manual writing. It also has the potential to write scripts on versatile topics for multiple social media platforms. After getting the scripts, you can directly make videos with this.
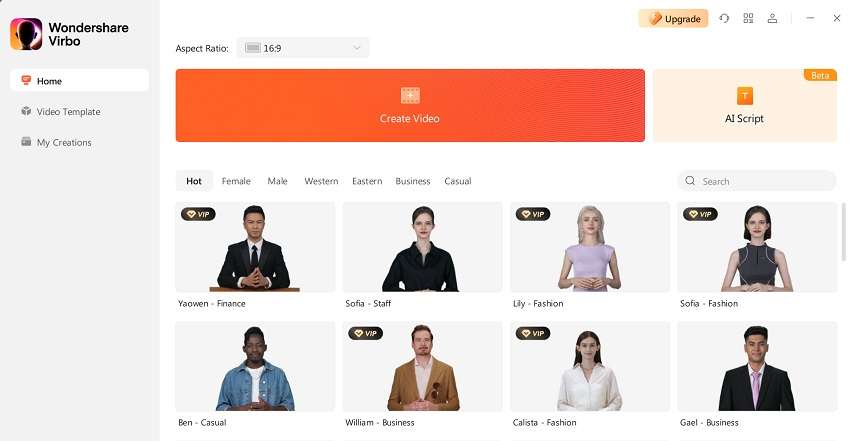
Key Features
- Virbo supports versatile operating systems, so you don’t have to worry about anything. You can even use its single premium account on multiple devices.
- It integrates 150+ AI Avatars, which can assist you as virtual YouTubers. You can also select the avatars as per their age, style, and ethnicity.
- Virbo integrates a considerable amount of commercial stock. This includes more than 180 video templates along with royalty-free music.
- Up to 120 AI Voices in Virbo can add life to lifeless videos. You can also use them while creating text-to-speech videos.
5. Engage With Your Audience
Engaging with your audience is essential to have a reliable YouTube channel. You can respond to their comments and call out their names in videos to engage with the subscribers. Moreover, you can use their comments as a reference point for creating videos and encouraging natural subscriptions.
At the end of the video, you can call your subscribers and ask them to provide feedback and suggestions. This not only enhances user engagement but also helps in making more user-friendly videos. It is also reliable for establishing connections and loyalty among subscribers.
6. Utilize SEO Techniques
It’s a procedure through which you can optimize your channel and videos and get a chance to rank higher in YouTube searches. Several techniques and strategies can help you with this. It often includes keyword research and keyword incorporation.
You can also learn how to naturally add keywords in YouTube video descriptions and titles. By this, you can get more visible in search engines and boost your organic traffic ratio. Besides, you can naturally use the keywords in your YouTube video script to optimize the video’s SEO.
Conclusion
As discussed in this article, promoting YouTube videos is very important. You can effectivelypromote your YouTube channel to attract clients and customers all across the globe. In addition, you can also discover the benefits of YouTube channel promotion from the above discussion. Don’t worry if you don’t knowhow to promote your YouTube channel .
The strategy-friendly and effective ways to easily accomplish this task are also given above. Moreover, if you want to create videos along with AI Voices and AI Avatars, consider using Virbo. Using Virbo, you can create highly engaging content for YouTube to attract more subscribers and clients.
You May Also Ask
1. What are the requirements for YouTube monetization?
Half of the Youtubers make videos to get their channel to monetize. They aim to get more financially stable with YouTube video creation. If you also want to monetize your YouTube channel, there are a few factors that you need to keep in mind. YouTube monetization helps in defining your ability to attract viewers.
The monetization requirement is a minimum of 1000 subscribers and 4000 watch hours in the past month. Moreover, you have to link to the AdSense account, and your location must be YouTube Partner Program supported.
2. How to select a niche for a YouTube channel?
One of the basic yet irritating confusions YouTubers face is selecting a niche for their YouTube content. It is quite a big decision, and you have to be very careful on this part. Identify your interests initially for selecting the niche you can rely on without boredom.
Following this, make sure you gain considerable knowledge about your niche. Knowing your competitors and discovering the tactics that can influence you to get better than them is also crucial. Take a deep breath, relax, and invest time while selecting a niche, because your YouTube carrier will depend on this.
Generate Engaging
AI Video in Minutes!
Easily convert text into professional spokesperson videos in over 120+ voices & languages in minutes.
Generate AI Video Free Generate AI Video Now
google-play ](https://app.adjust.com/1187btki%5F11xz9mlt ) app-store ](https://app.adjust.com/1187btki%5F11xz9mlt )

9 Best French Video Translators: Online and Download Options
Nowadays, brands focus more on global reach than ever. Creators like Mr Beast have YouTube channels catering to non-English speaking countries. So what if you want to convert English to French or the French language into another?
In this blog, we are coveringFrench video translators that you can use to reach a global audience and not miss out on any potential.
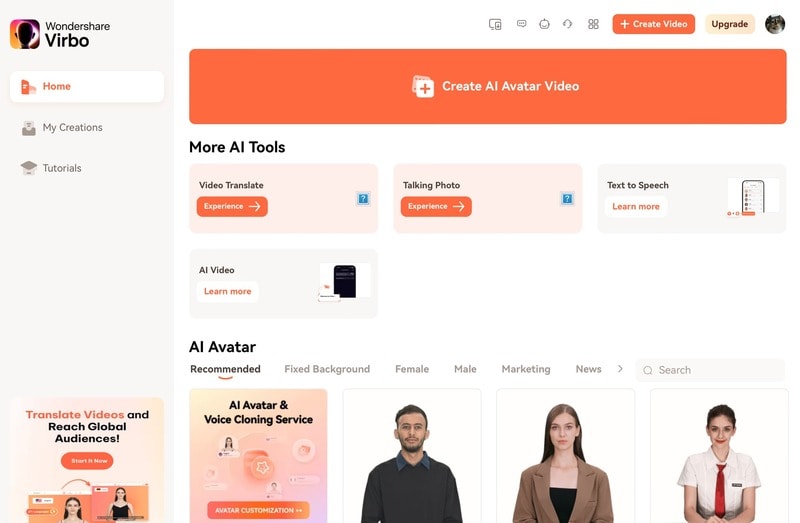
Part 1. Virbo - Translate French video to English in Seconds
Get Started Online Free Download
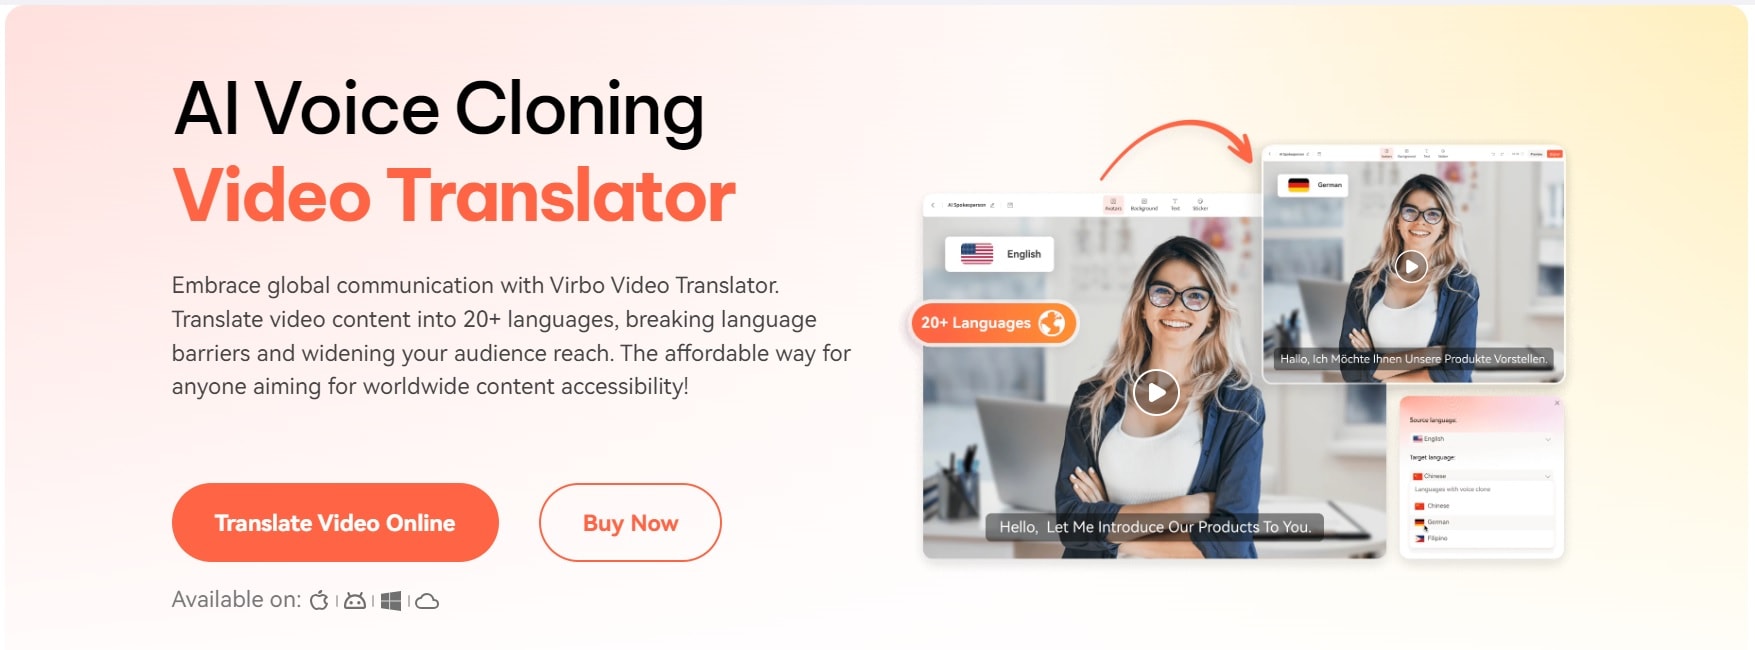
Are you looking for the most effective yet easy way totranslate French video to English ?Wondershare’s Virbo is a tool that achieves the same but with a twist. Virbo is an AI tool that lets you generate AI videos in minutes.
One of its most powerful features is the ability to translate videos from one language to another. For example, in our case, if you want French to be translated into English or vice versa, Virbo offers that feature as well.
Moreover, Virbo also has an advantage over many competitors because it offers both online tools and Windows applications. Virbo also lets you create multinational AI avatars with a range of natural voices so you can reach your global audience easily and effectively.
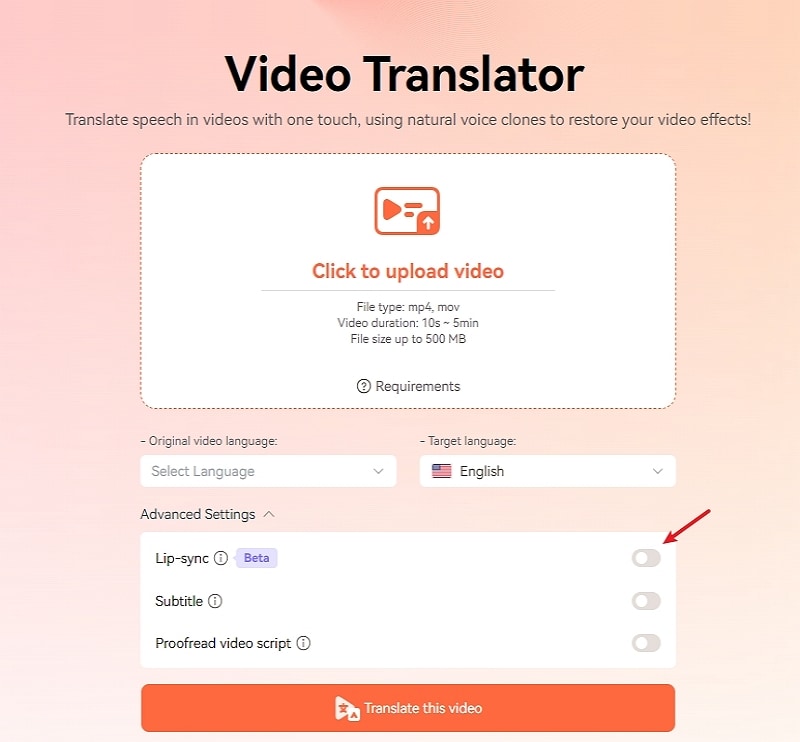
3-Step Guidance to Translate French Video to English
- The first step is to sign up for Virbo. You can visit the officialVirbo Video Translate App page and select “Login ” in the right-hand corner.
- Once you are officially in Virbo’s Video Translator tool, you need to select the file that you want to translate and select the original video language and target language. Tap on “Translate this video ” to start.
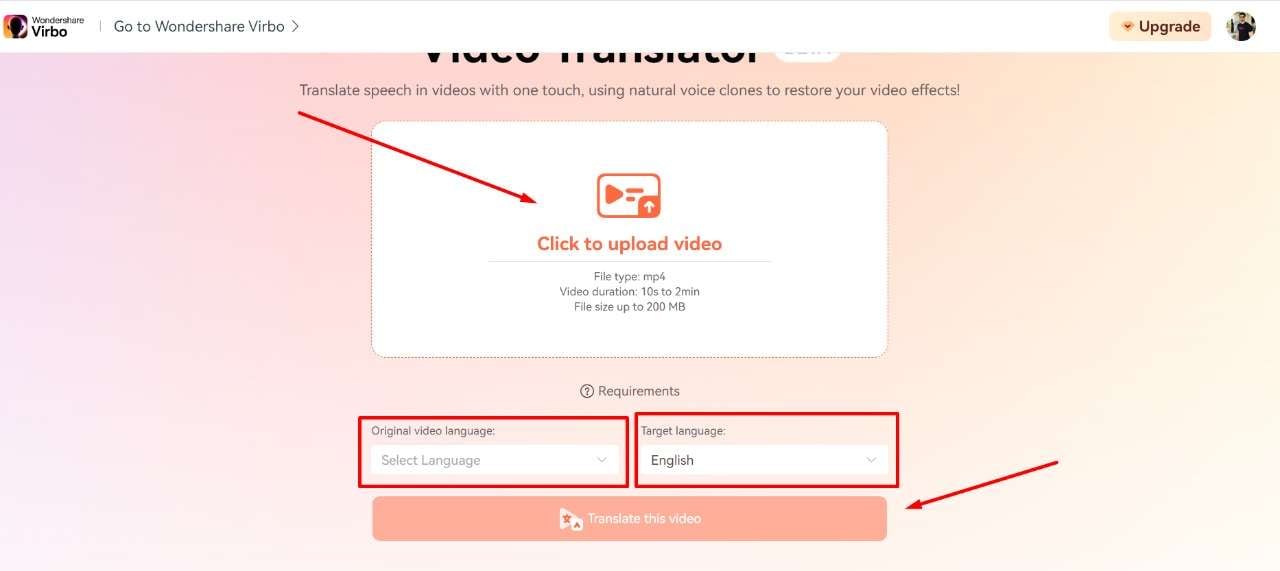
- Now wait for the file to be successfully completed, and you will see your translated video that you can download and see the final result.

Pros of Virbo
- Great video creation tools like (AI avatars ,AI voice , andAI script generation ).
- Video translation in speed.
- Easy to use and understand.
Cons of Virbo
- Some features can be too complex for beginners.
Why is Virbo the Best Video Translator?
Virbo offers an easy-to-use interface that is perfect for beginners. If you’re a company that is not quite knowledgeable about technology, then using a video translator like Virbo will save you hours in translation.
Aside from that, the ease of uploading and downloading translated videos makes it even better for beginners to leverage and make their workspace more efficient. You can choose various languages like English, Chinese, Japanese, Korean, Spanish, Russian, and French to convert them into many other languages according to your liking.
Overall, Virbo makes the best video translator due to its versatility, the use cases, and how much time it saves companies, influencers, and YouTubers.
Part 2. Other 8 Recommend French Video Translator
1. Happy Scribe

Happy Scribe is one of the best ways totranslate French YouTube videos to English . The translator can convert French video into English, but that’s not all. It is used by some of the world’s biggest companies like BBC, Forbes, Spotify, United Nations, and many more.
It is also a great tool because of various video and audio format support. For example, Happy Scribe allows 3GP, AVI, FLV, M4V, MP4, and dozens of other formats to be used and exported. Hence, no matter which device you have, you can view your translated video on them.
Key Features:
- Extended Formats: Happy Scribe supports 50+ audio and video formats.
- Subtitles Export: The tool allows you to download your subtitles in a matter of seconds.
- Easy to use: You can convert videos from French to English within just three simple steps.
2. Translate.Video
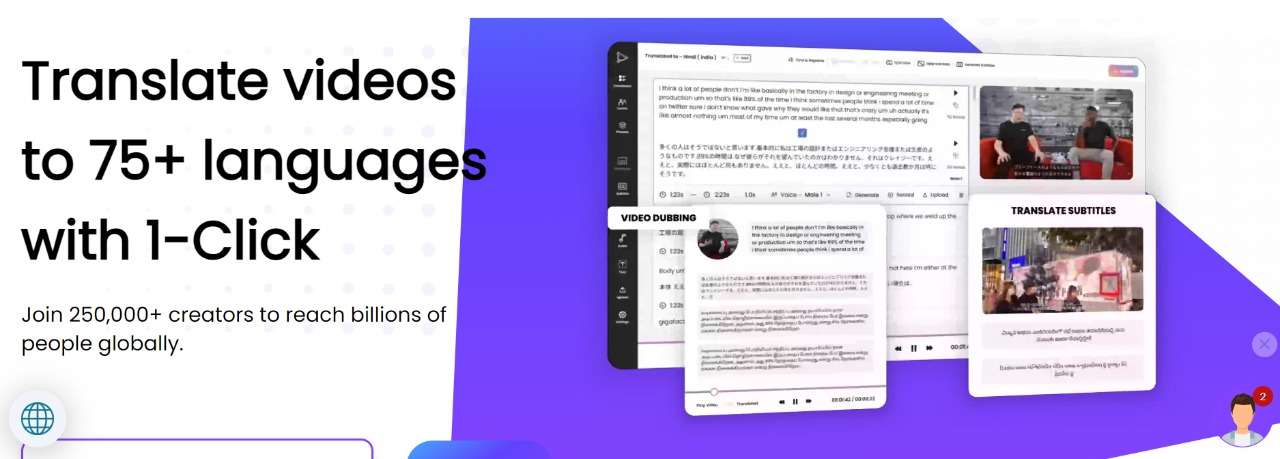
Translate.Video is one of the few tools that allow you to convert videos into 75+ languages with just a single click. More than 250,000+ creators are globally using this service, and the quality speaks volumes about the success of this brand.
If you want a tool that has some of the best reviews online and is known for its amazing translation abilities, then Translate.Video would be your best friend. You can do video caption, instant subtitles, dubbing, editing, video translation, and a lot more.
All in all, when it comes to translating videos from French to English, Translate.Video will be a perfect tool for you.
Key Features:
- Plethora of Features: Instant subtitles, dubbing, video translation, captions, and more.
- Language Support : Supports over 75+ languages with 1-click.
- Good Reputation: Great reviews on Capterra, GetApp, and Software Advice
3. Synthesia

Synthesia offers video content in over 70+ languages in just a few clicks. Not only can you generate a video from 70+ languages, but Synthesia’s strong point is automatically translating audio from video.
For example, you can take the audio in the original language, and the software will create a voiceover in the target language in seconds. There are many other features included in Synthesia, too.
Another popular feature is being able to translate on-screen text, which makes it easier for you to translate everything that is going on screen. Moreover, translating a video online can be done within a matter of seconds.
Key Features:
- AI Avatars: Synthesia offers 140+ avatars with various backgrounds, ethnicities, and voices.
- AI Video Translator: Synthesia offers video translation in 70+ languages in just a few clicks.
- Automatically Translation: Automatically translate on-screen text for better narration.
4. Vidby
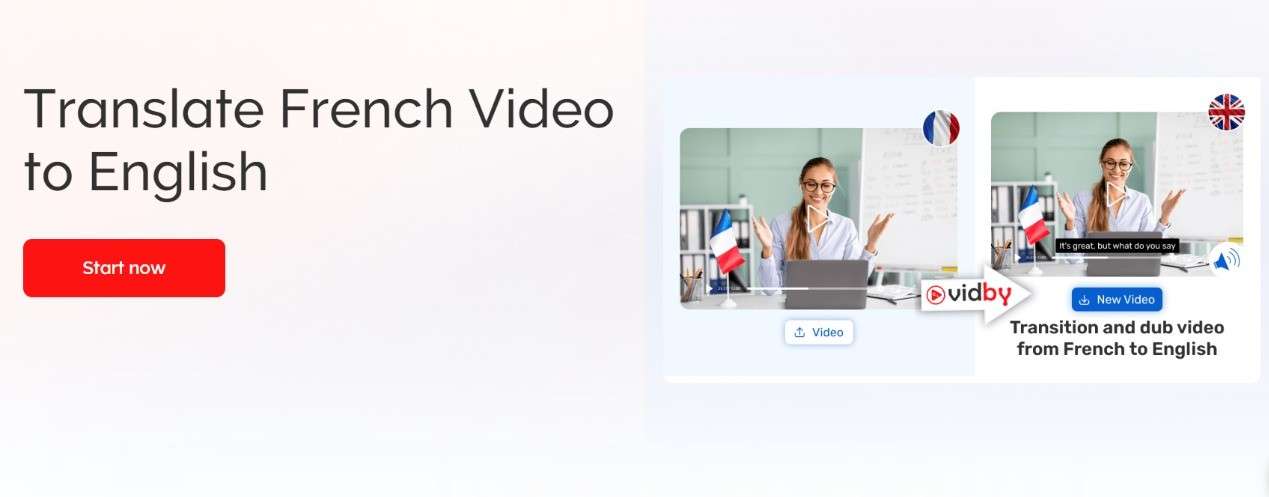
Vidby is a recommended vendor on YouTube and for a good reason. When it comes totranslating French Youtube videos to English , it is a champ. French-to-English pairs are trendy, which is why Vidby even made a full page dedicated to the translation of these languages.
The translator is fairly simple to use, and the way translation works, you get a lot of other features like being able to add emotions to the translations and more. Here are some of the key features that it offers.
Key Features:
- Speed Synthesizer: Translate to another language with a natural tone.
- Low Cost: The software comes with low cost compared to a lot of other competitors.
- Editing Options: At every step of the way, you can edit the desired outcome.
5. VEED.IO
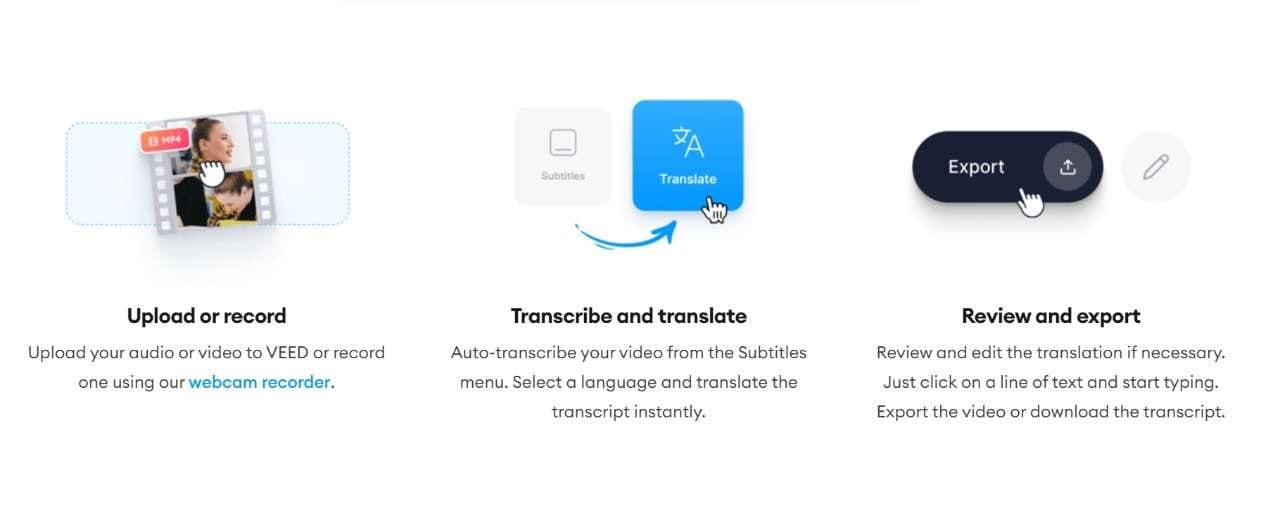
Veed.IO is one of the most popular tools for French-to-English video translation. With Veed, you get to translate videos instantly with a whopping 98.5% accuracy. This is precisely why companies like Facebook, VISA, Booking.com, and a lot more use Veed to fulfill their business demands and stay ahead of the curve.
With just three simple steps, Veed IO allows you to translate videos from one language to another, and it also helps in accurate and contextually relevant translation, making it one of the best replacements for tools like Google Translate.
Key Features:
- Advanced Subtitles: With Veed, you can download a manuscript of your translations for easy content repurposing.
- Accuracy: In AI video translations, 98.5% accuracy is no joke. Veed is one of the few translators to achieve this accuracy.
- Big Portfolio: With some of the biggest brands using Veed, it has the credibility to become your next tool.
6. WeAreNova
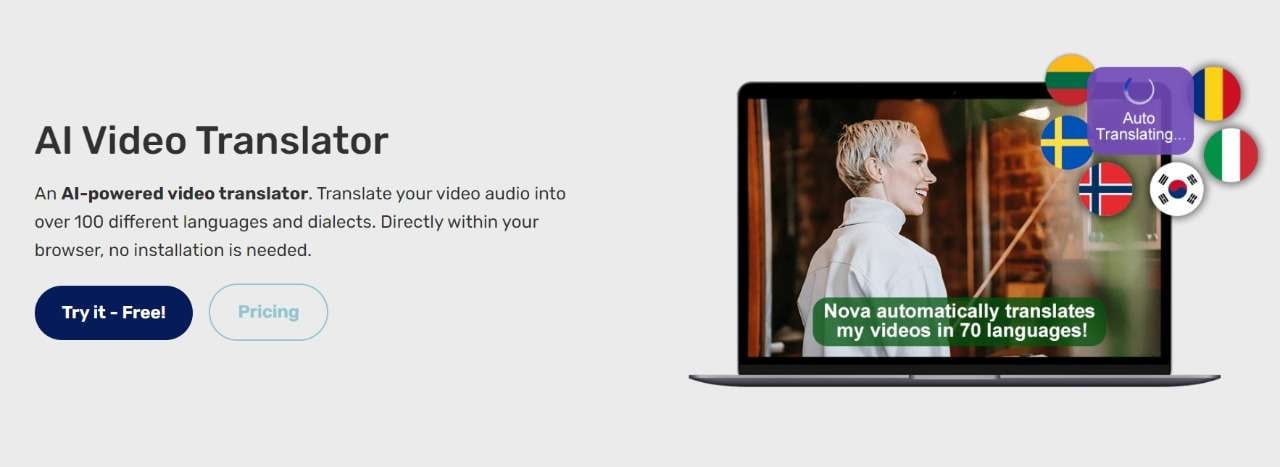
Nova AI video translator is amongst the most versatile tools you will come across. It translates your video audio into over 100 different languages and dialects. Moreover, it doesn’t even need to be installed on your computer as it works purely on your internet browser.
WeAreNova is popular with media companies who are looking for advanced video production and other AI-centric tools. Just like many other tools, Nova AI isn’t complex to use. All you need to do is add your videos, select the source and translation language, and within a few moments, you will get your newly translated video.
Key Features:
- Save time and resources: With Nova Ai, you can save hundreds of hours by directly translating without having the need to hire a full-time translator.
- Language support: Aside from French-to-English, you have over 100+ languages to translate into.
7. VoiceOverMaker
But what if there was a tool built specifically for voice-over, transcription, and translation? EnterVoiceOverMaker . It is a straightforward tool that allows you to translate videos without having to go through the complex features and setup process.
You can easily translate your YouTube video from French to English, making your content reach a wider audience. With over 600 languages, VoiceOverMaker makes it easier for you to pick and choose.
Key-Features:
- Video and Audio Transcription: You can automatically transcribe videos and audio, download them as text files, or even create .WebVTT subtitle files.
- Easy to edit: At every step of the process, VoiceOverMaker makes it easier for you to edit simply.
8. Maestra
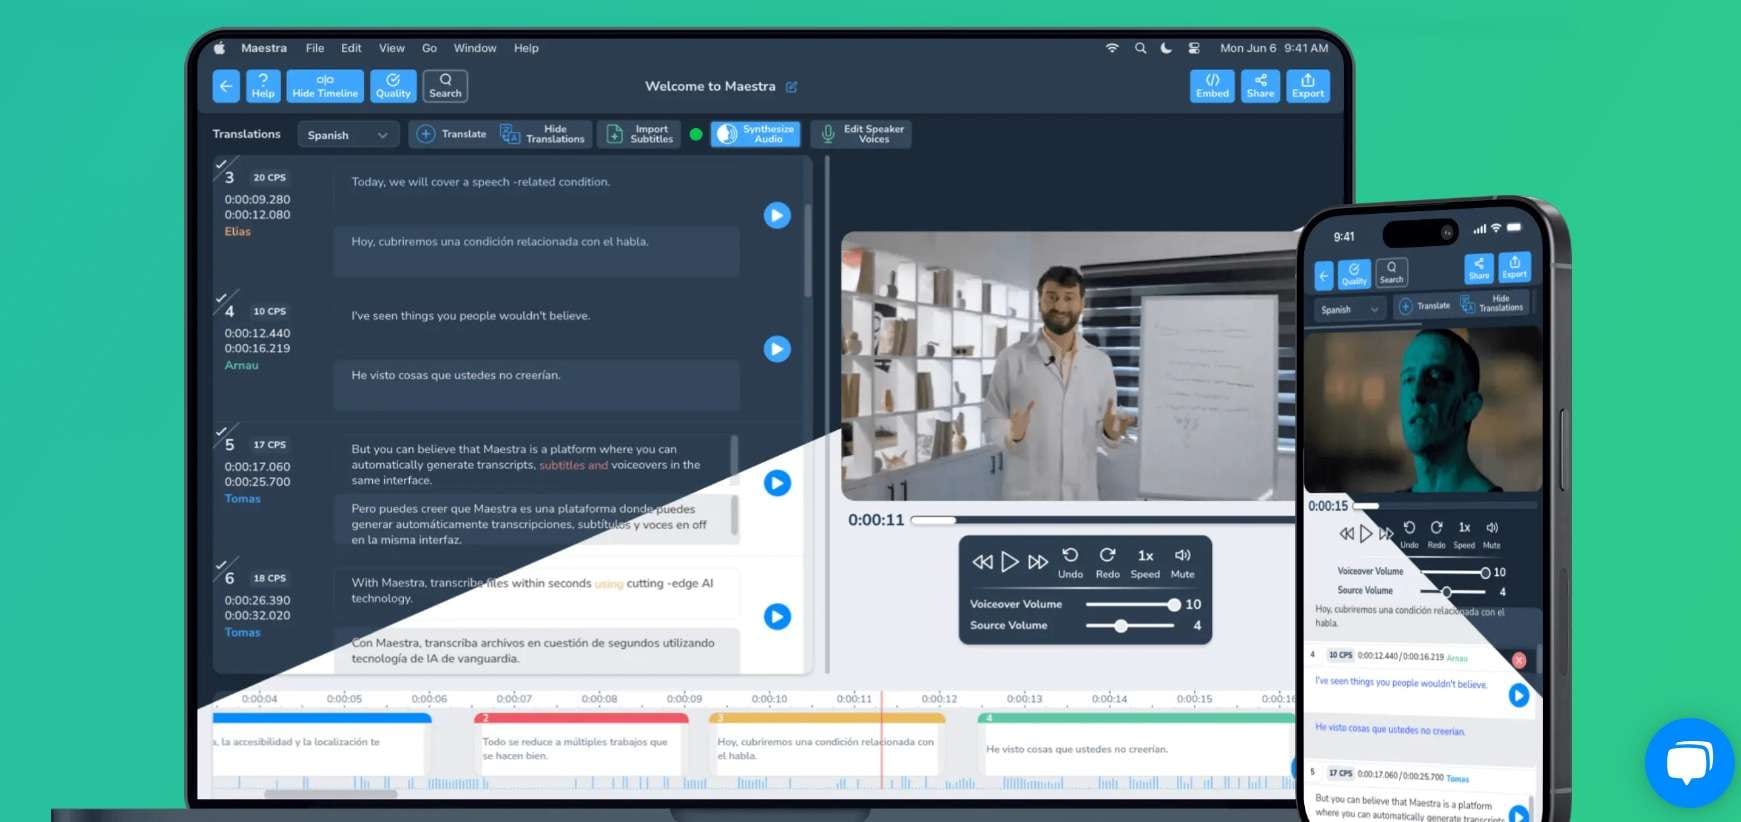
When it comes to the simplest French-to-English video translator, we haveMaestra . A tool that is used by companies like HP, it can translate video using advanced AI in a manner that is editable and presentable.
The software also has instant subtitles that are also editable. So, even after your translation, if you want to have a complete subtitle in another language, Maestra offers that too. It is one of the best tools for you if you want to translate videos into different languages.
Key-Features:
- Automatic AI Voiceovers: AI voice overs in 100+ languages for easy dubbing and effective audience targeting.
- Instant Subtitles: The software also has instant subtitles that could work on any video.
- Accurate Transcription: Maestro even has an accurate transcription option where transcribing takes less than half of the duration of the video file.
Final Verdict
There is a plethora ofFrench-to-English translations on the market, but some are better than others. If you are looking for a tool that will provide you with the perfect French-to-English and vice versa translation, you should tryVirbo .
It also features other AI features like AI cloning, AI voiceovers, and script generation. Lastly, we have also mentioned other French-to-English translation tools that you can try and see which suits you best.
Get Started Online Free Download
Easy Steps to Create AI Twitch Streamer with Animated Avatars
The rise ofAI streamers has transformed how people consume content. With AI slowly becoming a normal part of life, many tasks can now easily be automated. Among the key players in this resolution is Twich AI. Originally launched in 2001, Twitch has been a go-to for streaming live videos. However, the recent development allows users to stream with realistic avatars. In this article, we explore the evolution of AI Twitch streamers and how Virbo can help you become a better streamer.
Part 1: Create Better AI Shows on Twitch With Virbo’s AI Streamer
AI-powered shows on Twitch have great potential, but they require effort to stand out. You must understand the needs of your audience and create a streamer they can resonate with. It is also important to consider how viewers will be interacting with the AI streamer.
01 What is a Twitch AI streamer?
Twitch AI streamer is a live stream on the Twitch platform where the person on the screen is an AI-powered avatar rather than a human. The AI streamer Twitch platform is known to be engaging and allows viewers to interact with an avatar of their choosing.
![]()
The AI avatar in Twitch can be manifested in several ways:
- Virtual AI Streamers : An animated 2D or 3D avatar is controlled by an AI program to play games or respond to chat messages in real-time. The avatar can engage in basic conversations either in text messages or synthesized voice. Common examples include AtheneLive and Neuro-sama.
- AI-Powered Stream Assistants: The A avatar acts as a co-host or helper alongside a human streamer. They can analyze chat messages and offer insights, play music, generate live graphs, respond to cues, and add overlays to enhance the stream.
- Deepfake Streamers: This option uses Deepfake technology to create virtual avatars that mimic the voice and appearance of specific human streamers. Although still considered a controversial approach with some ethical concerns, Deepfake streamers offer an exceptional experience to twitch streamer AI viewers.
The AI streamers on Twitch have become quite popular within a short time because of several reasons. The novelty of watching an AI interact and entertain is one of the reasons people are so curious about the platform. They get a glimpse into the future content creation and just how much AI will offer. AI streamers are also more engaging and can interact heavily with the chat without tiring. They can respond to questions and adapt their content based on viewer feedback. Some viewers find this to be a unique way of consuming content and creating a dynamic experience.
02 How can Virbo become your AI Twitch streamer?
The use of AI in streaming videos has become popular and widely accepted. Creators who leverage the power of AI can produce content that is more relevant and valuable to their audience. Virbo Live has put in place vital features needed to become a successful AI Twitch streamer. You can create your AI streamer with less effort and offer your audience quality content.
![]()
Get Started Online Free Download
Powerful Features of Virbo asAI Twitch streamer
- Realistic AI-driven Avatars : Keep your audience engaged with AI streamers or Vtubers that mimic natural movements perfectly.
- Multiple Languages and Accents : Integrate the right language and accent for your specific audience
- AI Translation : Effortlessly translate your text into multiple languages and appropriate voices to match various audiences
- AI Live Shopping Script Generation : Generate a script for your AI streamer automatically to make sure it does not miss a thing
- Customizable Q&A Repository : Create a personalized Q&A database to allow AI streamer to connect with your audience in a smarter way
- Microphone Integration for Voice-Driven AI : Get your AI-powered avatar to speak in real-time by connecting and speaking into the microphone
- Interaction Through Text : Trigger and get your AI streamer to speak what is in your text
Part 2: Creating AI Streamers on Twitch: Step-by-Step Guide
Creating AI streamers on Twitch can be an exciting experience. You can create content on the go and keep your viewers engaged at all times. However, Virbo Live offers you an easy way to create AI streamers that will keep your Twitch audience engaged. With Virbo, the process is faster and requires less effort because most steps are automated.
Equipment requirement
Before creating your AI show Twitch, you need to make sure your equipment can stream effectively and that your internet speed is fast enough. Some of theequipment requirements for building your AI streamer include:
- Computer Requirements : Make sure your computer is configured well with Stereo Mix or other virtual sound cards and is running smoothly
- Network Requirements: Make sure your average network speed is at least 5Mbps for smooth live streaming.
- Browser Requirements : It is recommended that you use the latest Chrome browser for optimal and stable performance.
Once you have confirmed that your computer is in a good state, you can head over to Virbo Live and create an AI streamer for your Twitch show. The process is easy and takes only a few steps.
Step 1 Create a Live Shopping Rooms
Visit the Virbo Live and log in. Click “Create a Black Livestream Room” to get started. Alternatively, you can select a template of choice from the available ones to create a new live room.
![]()
Get Started Online Free Download
Step 2 Choose AI Streamers and Background
From the virtual host library, choose an AI avatar that you would like to use as your virtual streamer. Add the avatar to your live room and customize it as desired. You can change the avatar’s position, appearance, and even the background to match your Twitch show.
![]()
Step 3 Enter Text or Voice
With the AI streamer ready, it is time to add in the content. You can upload your audio or enter a script that the AI Avatar for the avatar. Virbo Live also allows you to automatically generate a script using the AI smart scriptwriter. On the other hand, the AI translator allows you to effortlessly translate your script to match your audience.
![]()
Step 4 Start Live Streaming
After preparing your AI Avatar with the content, you can go ahead and live stream it on Twitch. Click Start Live Streaming in the top right corner and choose the OBS software to live stream on Twitch.
![]()
Step 5 Interact With the Audience
Virbo Live allows your AI streamer to actively interact with your audience. Make sure you turn on this feature once your avatar has gone live.
![]()
Part 3: Future Integrations of Virbo Live and Twitch to Elevate Streaming Experience
The integration of Virbo Live and Twitch creates an opportunity to elevate the streaming experience. The fusion of AI streamers and Twitch will likely revolutionize the streaming landscape. By creating immersive and interactive experiences. Both viewers and creators will benefit from the exciting possibilities brought about by this integration:
For Viewers:
- Personalized Content Curation: AI will analyze viewing habits and recommend streams tailored to the viewer’s interests by predicting what you’ll enjoy before you know it.
- Interactive AI Companions: The AI co-host will analyze chats and offer witty commentary alongside the streamer.
- Dynamic Stream Overlays: AI will generate real-time overlays that react to viewer interactions and emotions, adding a layer of dynamism and personalization to the viewing experience.
- Immersive Virtual Worlds: AI will power dynamic virtual environments that react to the stream’s content.
For Streamers:
- AI-powered Production Assistant: An AI assistant will handle scene transitions and managing overlays freeing up streamers to focus on creating engaging content.
- AI-driven Content Generation: AI will generate creative in-game challenges, adding an element of improvisation and keeping the stream fresh.
- Enhanced Audience Engagement: AI will analyze chat sentiment to suggest conversation starters or engaging activities based on viewer interests.
- Stream Performance Insights: AI will analyze viewer engagement metrics and provide actionable insights to streamers.
Conclusion
The rise of AI streamers has significantly affected the way creators produce content and viewers receive it. AsAI Twitch streamers become more popular, Virbo Live is helping content creators develop more engaging content for their audience. It is important to ensure that the AI streamer can engage effectively with the audience and offer them valuable experience. WithVirbo Live , you can create a highly responsive AI streamer that will leave your audience entertained and engaged.
Get Started Online Free Download
Create Lip Sync TikTok Videos Without Installing Any App
TikTok has transformed the social media landscape through its short-form video content. They encourage users to make creative content using popular audio clips. Which enables them to entertain, gain recognition, and contribute to the platform.
Lip-syncing is a big part of what makes TikTok popular. Many users post lip-syncing videos that imitate voices from songs, movies, or trending audio clips. This art of lip-syncing has become an essential element of TikTok’s culture. Now, you might wonder**how to lip-sync on TikTok videos. This article will teach us how to make it effortlessly.
Part 1. Why Do People Lip Sync on TikTok?
Lip-syncing involves mimicking the words or vocals of an existing audio track. TikTok users take this concept to new heights by lip-syncing popular songs or clips. Lip-sync is appealing because it lets people get creative and reach a large audience.
Here are a few reasons why people engage in**lip sync TikTok :
- Self-expression: Lip-sync allows users to embody their favorite artists or characters by showcasing their personality and creativity.
- Entertainment: Many users lip-sync to entertain followers. They offer comedic performances, heartfelt renditions, or engaging storytelling.
- Virality: TikTok’s algorithm favors engaging content and well-executed lip-sync videos. They have the potential to go viral, rapidly gaining likes, shares, and followers.
Part 2. How to Make Lip Sync Video on TikTok
Here’s the step-by-step guide on how to lip sync on TikTok and captive your followers:
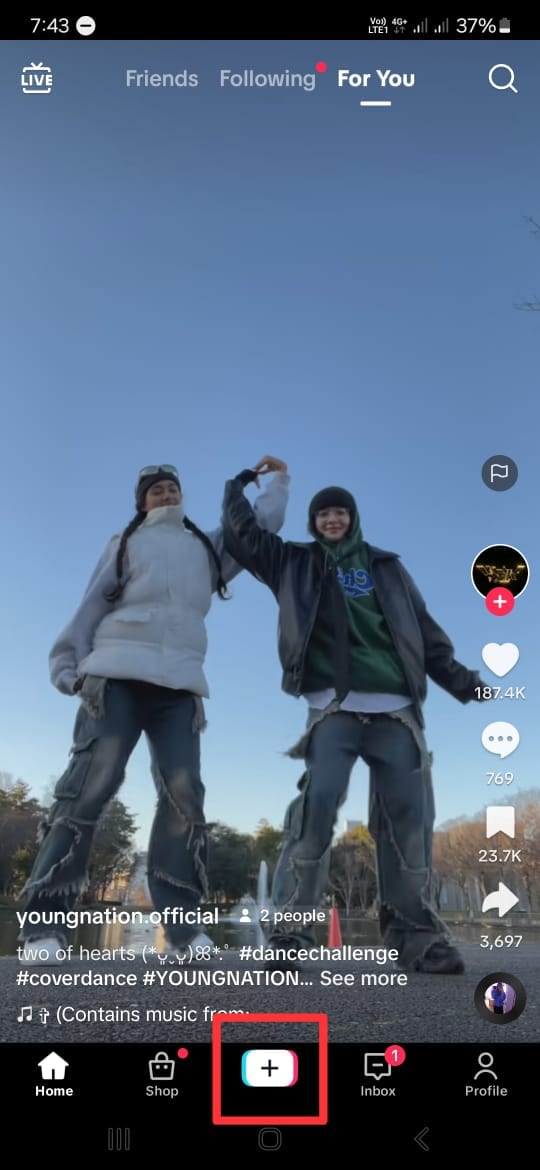
- Step 1. Open the TikTok app and tap the “+” button.
Start with opening the TikTok app on your phone. Then, tap the “+” button at the bottom of your screen to make a new video.
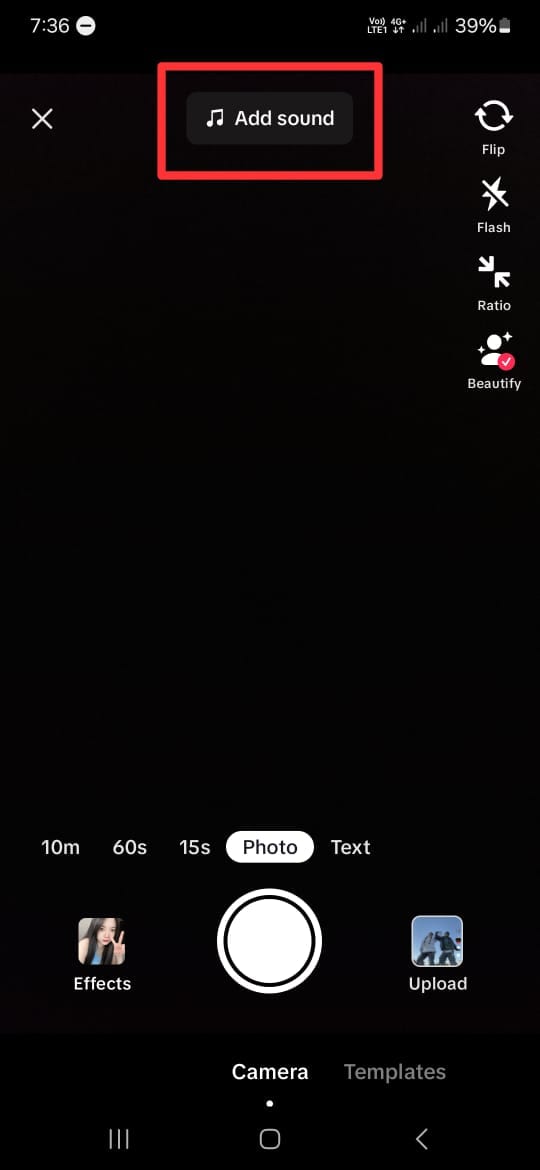
- Step 2. Add a song that you want to lip-sync to.
Next, click “Add Sound” with the musical note icon at the top of the screen. If you have a specific song in mind, you can find it by searching it on the search tab. Then, tap the song and click the check icon beside it.
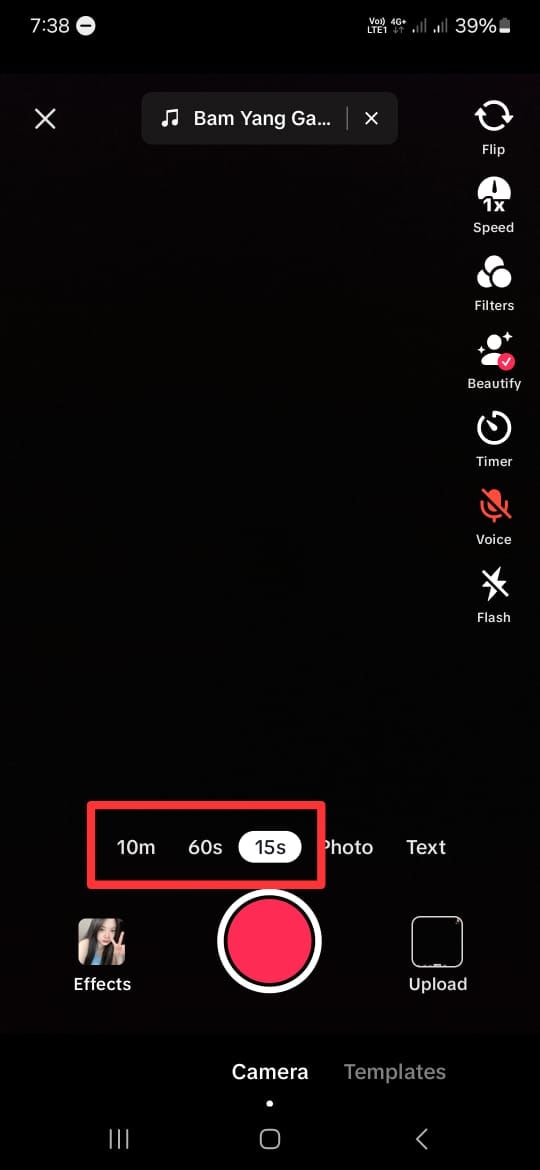
- Step 3. Choose the duration and the part of the song.
After choosing the song you want, you will return to the recording screen. Here, select your video duration at the bottom of the screen. You can choose between 10 minutes, 60 seconds, and 15 seconds. Remember that the duration of the songs on TikTok is usually only 30 to 60 seconds.
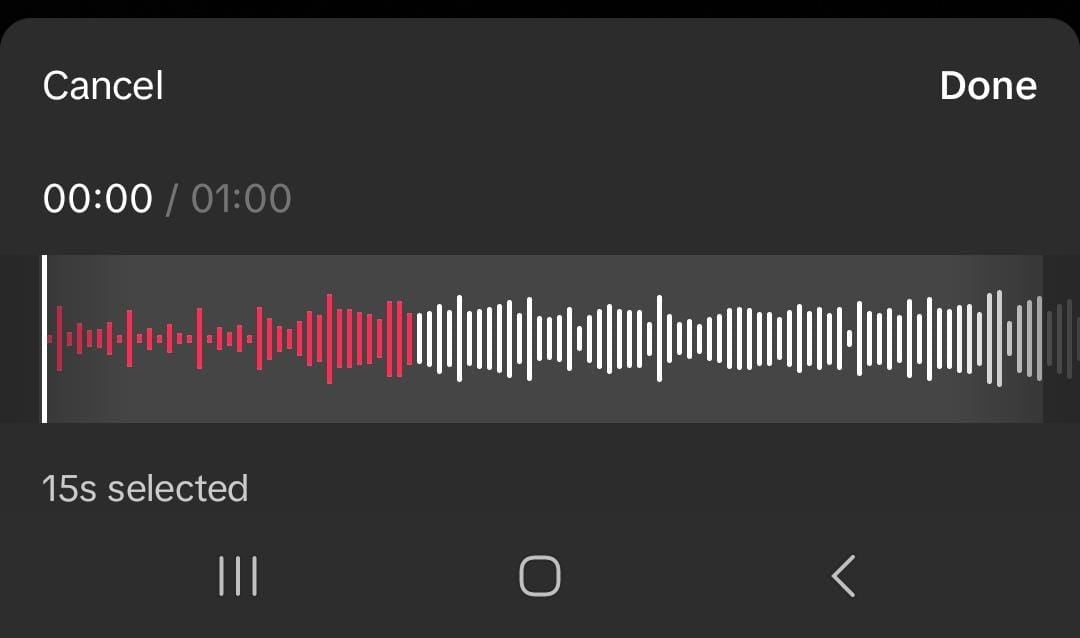
- Step 4. Choose the part of the song.
TikTok allows you to change the part of the song when lip-sync. However, the duration of the video should be less than the duration of the chosen song.
To do this, click on the song’s name at the top of your screen. Then, the bottom of your screen will display your chosen song. Tap the scissor icon and slide the playback to change the part of the song. Click “Done” once you have finished editing.
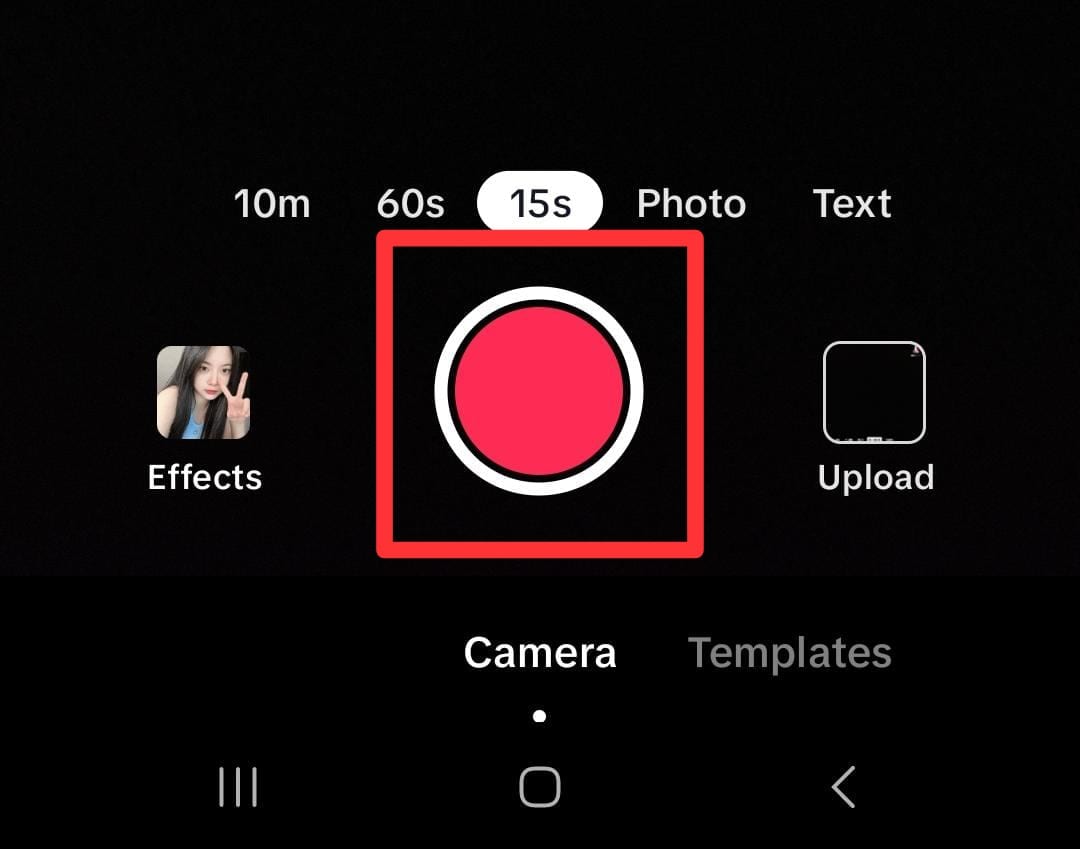
- Step 5. Tap on the red button.
If you are ready to record, tap the red button at the bottom of your screen. Then TikTok will play the chosen part of the song and record your lip-sync simultaneously. You can pause and continue the recording by clicking the same red button.
- Step 6. Post the video.
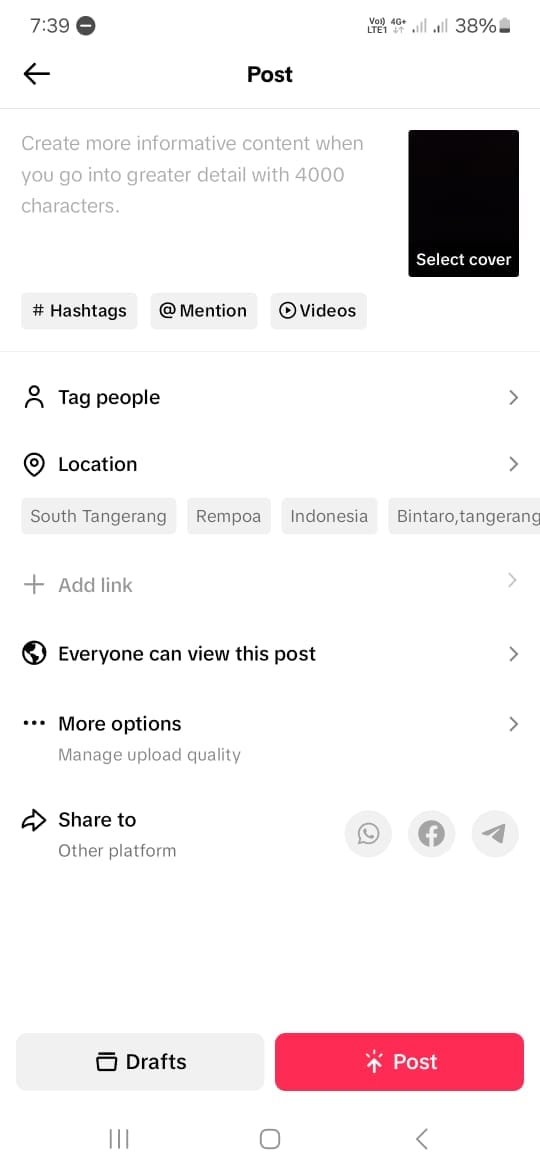
If you are satisfied with the results of your edits, click Next to proceed to the posting stage. Here, you can write a description and any other information you want. Click Post to share your lip-sync video to TikTok.
Creating a video on TikTok by lip-syncing is a fun and creative way to express yourself and connect with others. By following the steps above, you can create a lip-sync video on the TikTok app with ease. Keep in mind that by using these steps, you need to memorize the sentences and understand the beat of the chosen songs.
Part 3. How to Make Lip Sync Video Without Memorizing the Words
Making a**TikTok lip-sync video can be challenging because you must remember and match the words with the music. But there are three simple methods to make it easier.
Method 1: Record at slower speed
You can slow the speed down while recording instead of trying to keep up with the song. This technique lets you hear, understand, and follow the words more easily.
Here’s how to slow down the recording:
- Step 1. Follow steps 1 to 4 from the step-by-step guide in Part 2.
Start by following the first to fourth steps from the guide in Part 2 above.
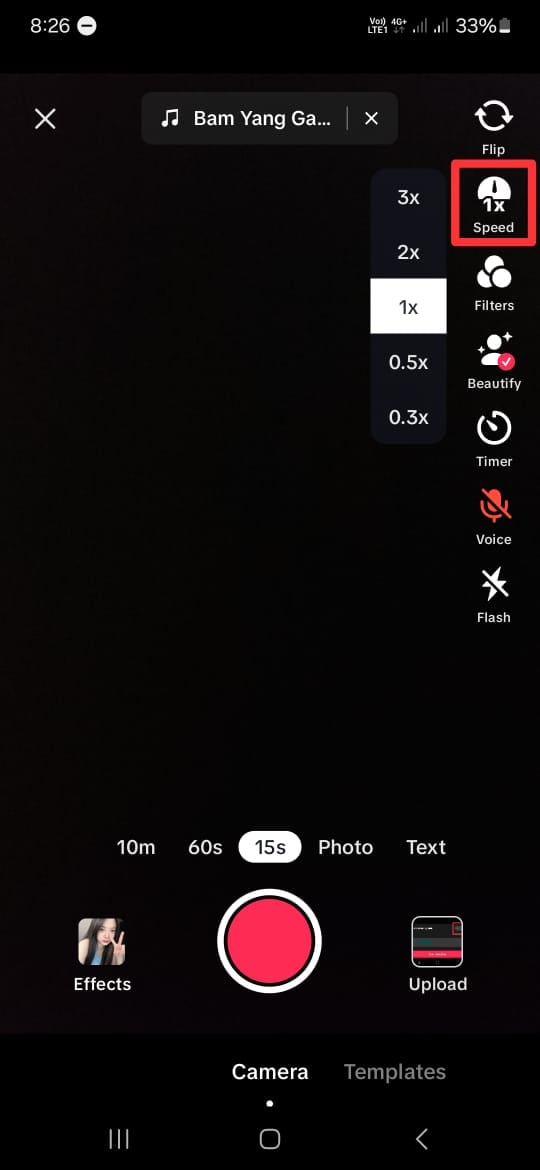
- Step 2. Set the speed record slower.
On the recording screen, click on the Speed icon on the right side of the screen. To make it slower, choose 2x or 3x. This step will make your recording time 2 or 3 times longer than it should be.
- Step 3. Tap on the red button.
Once you tap the red button, TikTok will play the song slower and record your lip-sync simultaneously. Repeat this step to help you memorize the lyrics and the beat of the songs.
Once you’re comfortable, switch back to normal speed for the final recording. This method will save time and improve accuracy.
Method 2: Purposely delay mouthing the words
While lip-syncing videos may vary in style and pacing, this technique can prove particularly useful for slower rhythms. Moreover, mastering the art of mouth sync on TikTok can elevate the overall production value of lip-syncing videos.
Using the timer feature will give you a slight lag between lip movements and audio playback. Then, it lets creators ensure more precise synchronization during editing. Here’s how to lip-sync on TikTok more easily:
- Step 1. Follow steps 1 to step 4 from the step-by-step guide in Part 2.
Like Method 1, you can start by following the first to fourth steps from the guide in Part 2 above.
- Step 2. Delay the recording
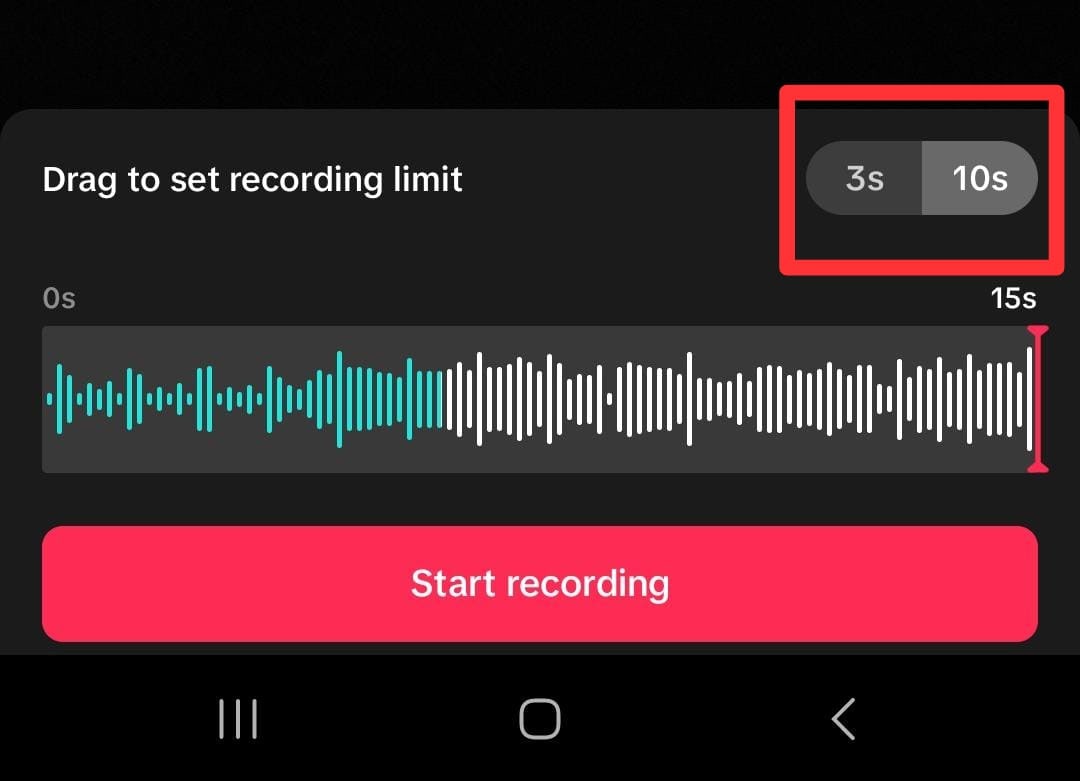
On the recording screen, click on the Timer icon on the right side of the screen. Here, you can set the timer to 3 to 10 seconds to delay the recording’s start. You can also drag and set the recording limit if you want.
- Step 3. Start the recording
Then click “Start recording” to record the video with the timer on.
Method 3: Use a Photo Talking Tool
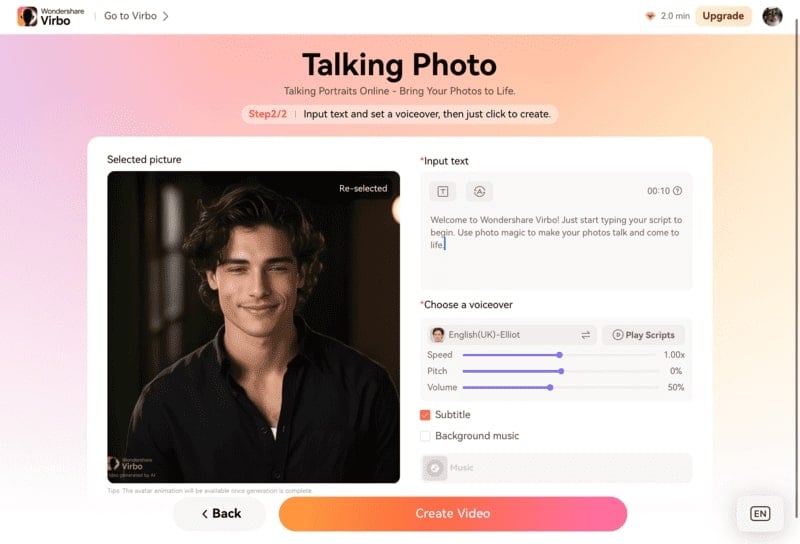
Next, consider using a Talking Photo feature by Wondershare Virbo. This method is for you who want to create engaging TikTok lip-sync videos without memorizing the words.
Virbo’s Talking Photo feature tool lets you upload a portrait of your photo and then make it appear as though it is speaking along with the audio. You do not have to install the app because you can use this feature online on their official website.
Here’s how to use Wondershare Virbo - Photo Talking feature to create a TikTok lip-sync video:
- Step 1. Start a new project.
Open the Wondershare Virbo website and tap the talking photo function to start a new project.
Get Started Online Free Download
- Step 2. Upload a portrait.
Tap “Upload Photo”, then upload a picture you want to use by following the instructions.
- Step 3. Edit and export.
Insert the text and adjust the voice settings. If you want to insert your own audio, you can use Wondershare Virbo for mobile or Desktop to upload or record your audio. Then, tap “Generate Video” to export.
Now, you have successfully made your own TikTok lip-sync video. You can upload it to TikTok and share it with your followers. For more detailed instructions, you can see how to useVirbo’s Photo Talking tool .
Part 4: How To Lipsync Your Video to Any Language Using AI Video Translator
In today’s globalized world, reaching audiences in different languages is important for effective communication. Thanks to technological advancements, there is a tool that can help you translate video content.
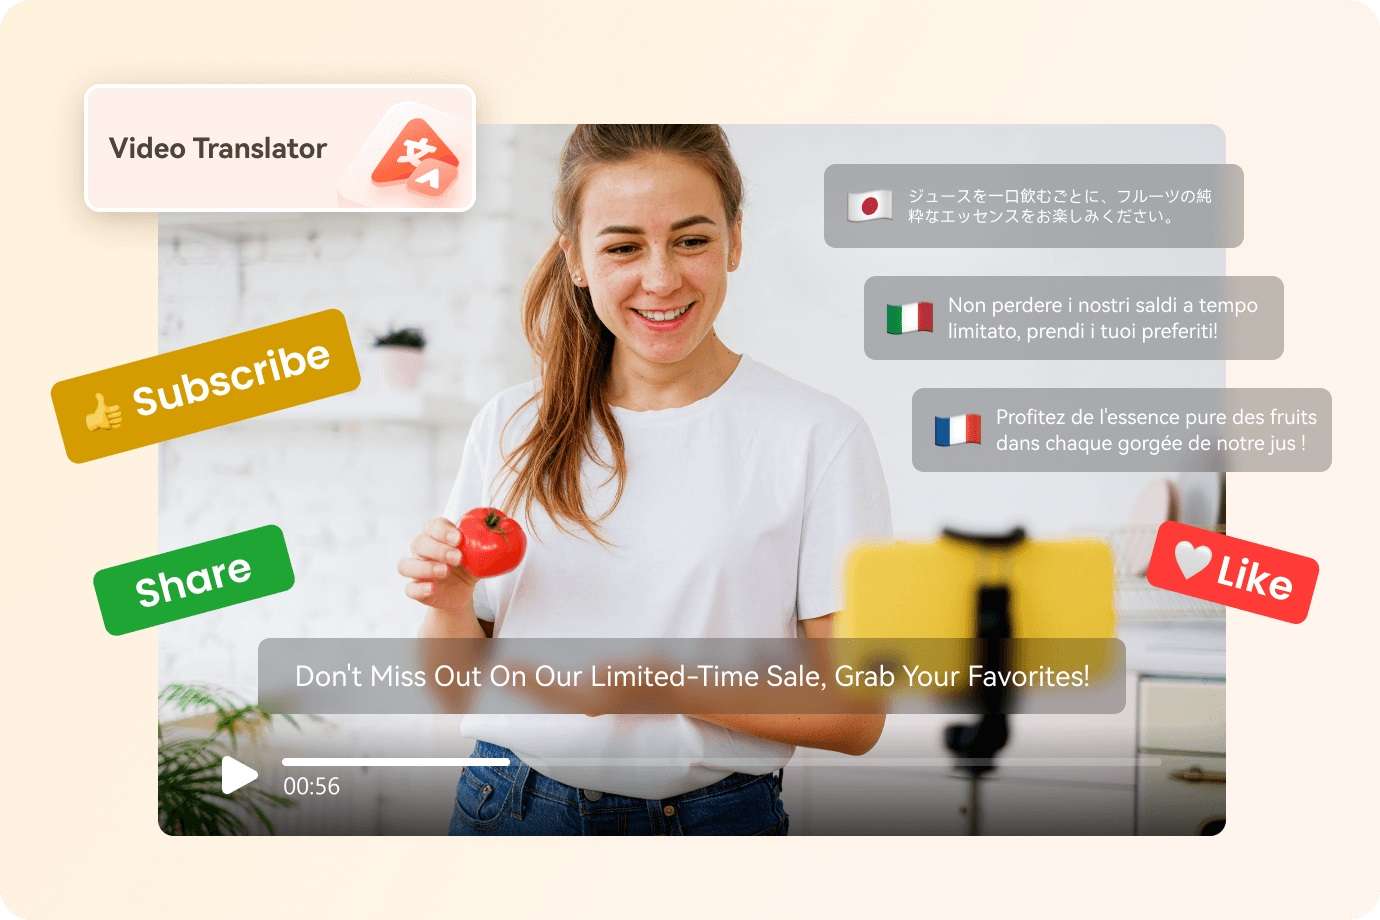
Wondershare Virbo – Video Translator offers seamless solutions to translate video content into various languages with AI. Virbo ensures high-quality translations that maintain the integrity and impact of your original message.
How to lipsync TikTok videos to any language with Wondershare Virbo - Video Translator:
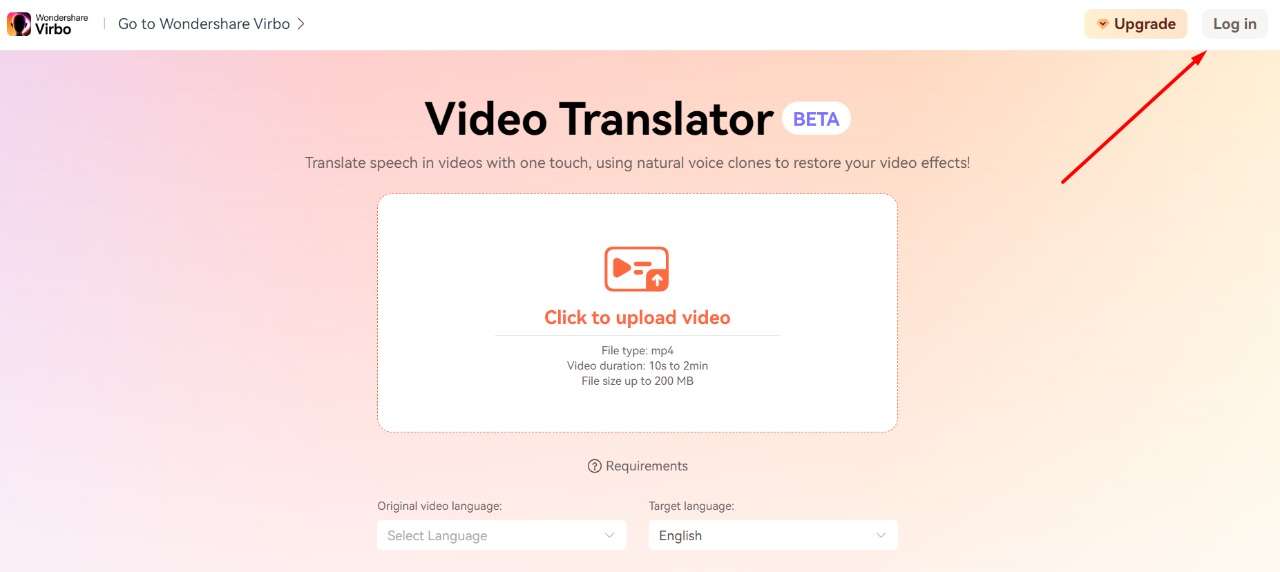
- Step 1. Go to Virbo’sofficial website , then click Generate AI Video Online.

Get Started Online Free Download
- Step 2. Log in or create an account.

- Step 3. Then, navigate to the Video Translator tool on the Virbo’s homepage.
- Step 4. Upload the video.
Once inside the Video Translator interface, upload the video file you wish to translate. Select the original video language and the preferred target language from the available options. Additionally, enable the Lip Sync feature to ensure that the translated audio aligns perfectly with the lip movements in the video.
- Step 5. Click “Translate this video” to start translating the video.
Virbo’s Video Translator will use its advanced algorithms to translate the audio and synchronize it with the video seamlessly. Depending on the length and complexity of the video, the translation process may take some time.
Conclusion
Lip-syncing on TikTok has become a significant aspect of TikTok culture. It helps users show their creativity, entertain people, and maybe even become famous. Making**mouth sync TikTok videos usually means remembering lines and matching them to music, but there’s an easier way with Wondershare Virbo’s Talking Photo tool. This tool allows you to upload a portrait and sync it with audio without remembering the lines.
Also, Wondershare Virbo has a Video Translator tool that allows you to translate videos seamlessly into any language. This translator tool helps you communicate with people worldwide and maintain the original message.
Translate Any Hindi Video Into English With AI
Breaking language barriers is key to effective communication. Whether you’re a language enthusiast, a traveler, or simply want to reach a diverse audience, the ability to translate Hindi videos into English seamlessly can open up new possibilities. In this article, we explore the power of AI in language translation, revealing the best online tool for translating Hindi into English. We will also share some common Hindi phrases and their English equivalents to help you understand both languages for a more approachable global conversation. So read on!
Part 01. Best Online Tool to Translate Hindi Into English
While many people turn to Google Translate for Hindi to English translation, it isn’t always accurate. Yes, it works great for one or two sentences, trivia, Q&As, with no complex structure. But that is all. If you are translating a longer video, it gives out terrible results.
Translate Online Download APP Now Free Download
The best tool to translate Hindi videos into English or English content into Hindi isWondershare’s Virbo . Virbo is a fantastic new tool that can seamlessly convert any video content into 20+ languages. Hindi is among these languages, offering easy translation between to and from English.
What makes Virbo better than others?
Below are some reasons we prefer Virbo over other AI video translation services:
- Lets you translate video content from 20 different languages of the world
- Multiple fantastic AI tools to streamline your content creation process
- Offers options to translate videos in bulk
- Has a free version that works great with videos smaller than 5 minutes
- The free version supports files up to a size of 500MB
- Convenient and easy-to-use service
How to translate any Hindi video to English Easily?
Let’s take a look now at how you can translate a Hindi video into English or an English video into Hindi. For this tutorial, we will be using Virbo’s Windows software to translate an English video into Hindi. Let’s get started.
Translate Online Download APP Now Free Download
Step 1 - Launch Virbo and start the Video Translator Tool
First of all, you need to download and install Virbo on your PC/Laptop. You can get the virbo software from official website and get it installed.
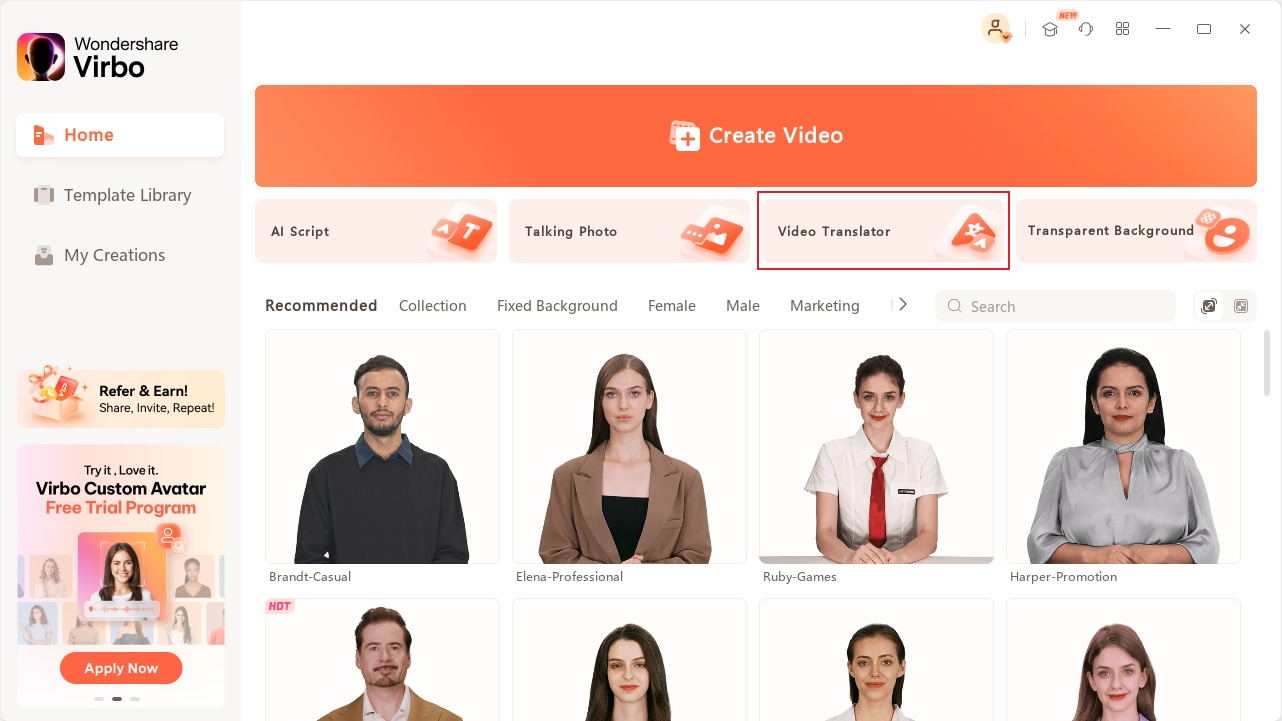
Once the installation is complete, launch the software and go to theVideo Translator option at the top, as you can see in the screenshot below.
Step 2 - Upload your video

You can drag and drop a video on this window or just link your video the old-school way.
Step 3 - Select your original (source) and translated languages
Next, you have to select your languages. If you are translating from Hindi to English, select Hindi as the original language and English as the Translated language, as you can see in the screenshot below.
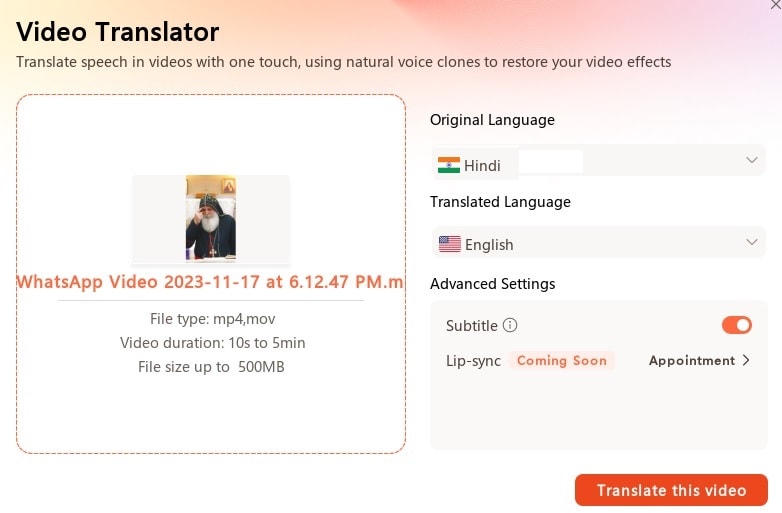
Step 4 - Translate your video
Finally, hit the orange “Translate this video” button at the bottom. You can also select some other options like lip sync and subtitles (for direct download).
That’s all you need to do. Leave the rest to Virbo. Virbo will take some time, depending on the length, to translate the entire video and present your translation.
Translate Online Download APP Now Free Download
Part 02. 10 Common Hindi Phrases Translated Into English
We have translated some common Hindi phrases into English for your quick reference. Check how slight variations can change the entire translation!
| Hindi Phrases | English Translation |
|---|---|
| Aap video call karo | Please video call |
| Aap mujhe video call karo | Please video call me! |
| Main aapko video call kar sakta hun | I can video call you |
| Aap mujhe video call kar saktay ho | You can video call me |
| Aap mujhe video call kiya karo | Video call me, sometimes |
| Aap mujhe video call na karo | Don’t video call me |
| Kya aap video call kar sakte ho | Can you video call? |
| Kya aap mujhe video call kar sakte ho | Can you video call me? |
| Kya aap abi video call kar dakte ho | Can you video call right now? |
| Kya main aapko video call kar sakta hun | Can I video call you? |
Part 03. Frequently Asked Questions (FAQs)
1. What is the best AI tool to translate a video from Hindi to English
As we previously discussed, Wondershare’s Virbo is the best AI tool to convert any Hindi video into English. It’s simple to use, provides accurate translations and comes with a host of other AI tools that make content creation really easy.
2. Can AI really help with translating a video from Hindi to English
Yes, AI can really supercharge your content creation by providing you with a basic translation of the content, as we demonstrated in this article.
3. What is the best AI Translation Tool?
Well, there are some great options in the market, and each of them comes with its own strengths and weaknesses. However, we love Wondershare Virbo because of how simple it is to use. Even a non-techie can handle it with ease and get content translated.
4. Can I get Hindi subtitles with Virbo?
Yes absolutely. With Virbo, you can get subtitles in any of the 20 and more languages it supports. You can download the SRT file and then use it for your project if you want.
5. What languages does Virbo support besides Hindi?
Other languages Virbo supports for translation are:
English, French, Spanish, German, Portuguese, Italian, Japanese, Indonesian, Chinese, Arabic, Filipino, Korean, Russian
Conclusion
Hindi is a complex language. So, when it comes to translating a Hindi video into English, it’s not always about getting the most word-to-word translation. The best AI translation tools, like Wondershare Virbo, always come up with a translation that’s the closest and most accurate representation of the context without losing the message. But tools like Virbo really supercharge your content creation efforts. You can always get a professional translator to have a quick look at the generated text and align it with your project. Try Virbo now and let us know what you think!
Translate Online Download APP Now Free Download
Launching Your Live Room
Launching Your Live Room
Explore step-by-step instructions on decorating your space, uploading local images and videos, adding engaging AI interactions, etc. Elevate your streaming experience and captivate your audience with a seamlessly executed live room. Dive into our comprehensive guide now!
02Uploading Local Images and Videos
07AI Intelligent Script Generation
11Starting/Ending the Live Broadcast
Decorating Your Live Room
Decoration Guidance
- Click on the product homepage and create a blank live room to initiate a new live session.

Create a blank live room
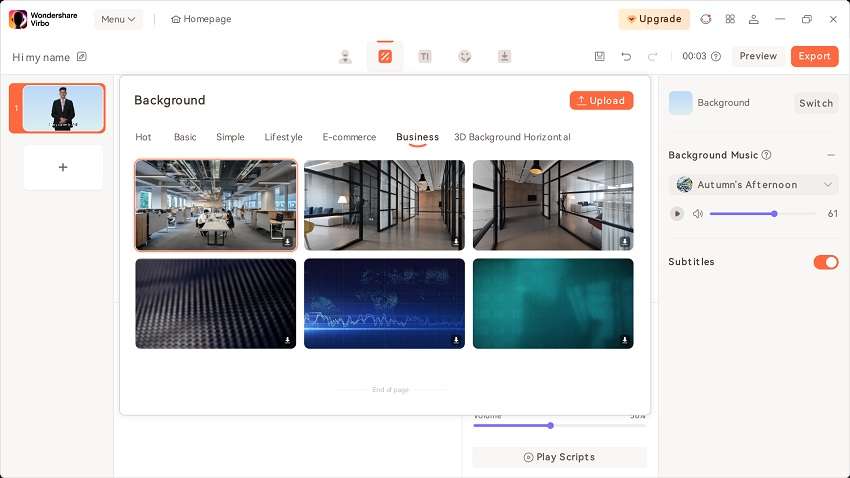
- Upon creating a blank live room, the live room editing page will open. The left side serves as the operation area, the right side as the canvas area, and the materials area is located above.

Livestream room navigation
- Click on the templates to use pre-designed combinations of background, virtual hosts, and stickers.

Select a template
- Customize the background from the background library. During the live broadcast, only one background can be used.

Livestream room customization
- Choose a virtual host from the virtual host library. Only one virtual host can be used during the live session.
![]()
Choose a virtual host
- Add stickers from the sticker library. Multiple stickers can be used during the live broadcast.
- After selecting materials, adjust their position and size in the canvas area. Right-click to modify layers, copy, or delete materials.
Uploading Local Images and Videos
Upload background images or videos
- Upload: Click Background -> Upload Background -> Select file to upload. Materials will be displayed in “My Background” after uploading.

Upload Background
- Apply: Click Background -> My Background, then click on the material to use it on the canvas.
- Delete: Hover over the material and click the delete icon to remove it.

Delete Background
Note
Background upload requirements:
- Image and video dimensions should be 9:16
- Image formats: JPG/JPEG/PNG
- Video formats: MP4/MOV
- Resolution should not exceed 1080P
- Video duration should not exceed 30 minutes
- File size should not exceed 1GB
Upload sticker images or videos
- Upload: Click Sticker -> Upload Sticker -> Select file to upload. Materials will be displayed in “My Sticker” after uploading.

Upload Sticker
- Apply: Click Sticker -> My Sticker, then click on the material to use it on the canvas.
- Delete: Click Sticker -> My Sticker, hover over the material, click the delete icon to remove it.

Delete Sticker
Note
Sticker upload requirements:
- Image and video dimensions are flexible.
- Image formats: JPG/JPEG/PNG
- Video formats: MP4/MOV
- Resolution should not exceed 1080P
- Video duration should not exceed 30 minutes
- File size should not exceed 1GB
Text-Driven Live Room
Script Guidance
- Input script text: Copy and paste your script into the script dialogue box.

Text Scripts Inset
- Choose a matching tone: Click the voice-over entrance above, select a suitable tone, and preview it.
- Preview: Click the “Preview” button below the text to listen.
Audio-Driven Live Room
Audio Guidance
- Upload audio: Click Script -> Audio -> Upload local voice and upload the local file.

Upload Audio
- Preview audio: After uploading, click to preview the audio.

Preview Audio
- Audio sorting: Hold and drag to sort the audio files.

Audio sorting
- Audio sorting: Hold and drag to sort the audio files.

Modifying Live Room Name
Method Guidance
- Method 1: Click the edit button in the upper-left corner of the edit page to rename the live room.

Rename Livestream Room
- Method 2: Product homepage -> My Live Rooms -> Click on the more options for an individual live room -> Choose Rename.
Adding AI Identification
Step Guidance
- On the live room editing page, click on the checkbox before the AI identification to enable or disable it.
AI Intelligent Script Generation
Generation Guidance
- Click the “AI Intelligent Script” button below the script, a popup will appear.
- Enter your product name (mandatory), selling points (optional), promotional information (optional), select language and style, then click generate.

AI Script
- The generated result can be further modified, click “Use” to add it to the script dialogue box.
AI Translation
Translation Guidance
- Click the “AI Translation” button below the script, a popup will appear.
- Place the text to be translated on the left, click the middle arrow to select the language for translation (e.g., English), and click translate.

AI Translation
- The generated result can be further modified, click “Use” to add it to the script dialogue box.

AI Translation Result
Manual Interaction
Microphone Interaction
- Operational Flow:
- Click Manual Interaction -> Microphone, and select the microphone device.
- Speak into the microphone and observe the sound wave status.
- Open “Start Live,” wait for the appearance of the virtual host image, and click “Open Mic Takeover.” The virtual host’s mouth will be closed, and your voice will drive the virtual host to speak.
- After speaking, click “End Takeover,” and the virtual host will resume reading the scripted dialogue.
- Click Manual Interaction -> Microphone, and select the microphone device.
- Grant Browser Microphone Access:
- Google Chrome:
*Open Chrome, click the settings icon in the top right.
* Click “Settings,” open the settings page. Select “Privacy and Security” and then click “Site Settings.”
*Enter the site settings page, click “Microphone.”
* On the microphone authorization page, select that the site can request the use of your microphone.
* After these settings, when the browser needs to use the camera or microphone, a device request box will pop up on the page. Select “Allow.” - Mozilla Firefox:
*Open Firefox, click the settings icon in the top right, and click “Settings.”
* Open the settings page, click “Privacy & Security,” and find “Microphone Permissions.” Click “Settings” next to “Microphone.”
*Enter the settings page, add the site that requests the use of your microphone to the list, and click “Save Changes.”
* After these settings, when the browser needs to use the camera or microphone, a device request box will pop up on the page. Select “Allow.” - Sogou Browser:
*Open Sogou Browser, click the settings icon in the top right, and click “Options.”
* Open the options page, click “Advanced,” find “Privacy - Browsers on the Mac System:
*Locate “System Preferences” on your Mac dock and click the icon. Once opened, find “Security & Privacy” and click to open.
* On the “Security & Privacy” page, select “Privacy,” then click on “Microphone” and set the applications that need to use the microphone to “Allow.”
- Google Chrome:
Text Interaction
- Click on “Artificial Interaction” and enter interaction scripts in the input box below.
- Click “Add Text” to add it to the interaction list. After starting the live broadcast, each interaction script will have a send button.

Text Interactionn
- Click “Send” to trigger the AI to speak according to the interaction script.
Intelligent Interaction
Note
The current intelligent interaction feature only supports Alibaba International. If you are streaming on other platforms, you can skip this step.
Setting Entrance
- On the live broadcast page, click on “Intelligent Interaction,” select the live platform, and the supported intelligent interaction features will be randomly displayed.
Q&A Library Settings
- Creating a New Q&A:
- On the product homepage, click on Q&A Library - Add Q&A, and a popup window will appear.
- Fill in the rule name, keywords, reply text, and upload a reply video. Click Save.
Note
Rule Name: Name the rule for easy identification.
Keywords: If a viewer’s question in the live room contains any of these keywords, it will trigger the AI to answer.
Reply Content: You can add up to 5 replies. Include variables like [Viewer’s Nickname] and [Viewer’s Country] for personalized responses.
Sequential Reply: Replies in sequence when triggered.
Random Reply: Randomly selects a reply when triggered.
Reply Video: If configured, the video will be displayed at the specified position until the AI’s reply ends.
- Adjusting Q&A Activation Status:
- Click Q&A Library - Switch to close or open the Q&A rule. When closed, the Q&A rule will not take effect after the live broadcast starts.
- Turning on Q&A Library Switch in the Live Room:
- On the live broadcast editing page, click Intelligent Interaction - Platform, select “Alibaba International,” and turn on the Q&A Library switch. This must be done after starting the live broadcast and capturing the barrage for the function to work.
Greeting Rules Settings
- Greeting Content: You can add up to 5 replies, including variables like [Viewer’s Nickname] and [Viewer’s Country].
- Sequential Reply: Replies in sequence when triggered.
- Random Reply: Randomly selects a reply when triggered.
- On the live broadcast editing page, click Intelligent Interaction - Platform, select “Alibaba International,” turn on the Greeting switch, and click the edit icon to open the editing window. Fill in the reply text and click Save.
Sending Business Cards and Product Catalogs
- On the live broadcast editing page, click Intelligent Interaction - Platform, select “Alibaba International,” turn on the “Send Business Cards” switch, and turn on the “Send Product Catalogs” switch.
Note
These functions will only take effect after starting the live broadcast and capturing the barrage.
How to Start Live Barrage Capture
- Start Broadcasting in Virbo Live
- Follow the steps for “Start/End Broadcast” on the live broadcast editing page.
- Install the Plugin in Chrome
- Ensure Chrome is up to date, then download the plugin from the provided link . After downloading, unzip locally.
- Configure the Plugin in Chrome
- Open Chrome, go to Settings - Extensions - Manage Extensions, enable Developer mode, click “Load Unpacked,” and select the unzipped folder. Enable “Allow in incognito mode” in the plugin details.
- Copy the Live Control Page Link
- Copy the link of your live control page (web version) from the live platform. Paste the link into the live broadcast editing page under Intelligent Interaction - Live Room Link Input, then click “Start Capturing.”
Note
Alibaba International currently supports automatic Q&A, automatic greetings, automatic business card sending, and automatic product catalog sending. You can turn on the corresponding switches and then configure the detailed settings for each item.
Starting/Ending the Live Broadcast
Starting the Live Broadcast
- On the live broadcast editing page, click “Start Broadcasting.”
- The AI live broadcast window will appear shortly after, displaying the AI live broadcast.
Using Your Broadcasting Partner or OBS
Note
Keep the AI live broadcast window open on the desktop during the broadcast, or it will not broadcast properly.
- Open your broadcasting partner or OBS, add a window, select the Wondershare VVB (Live Version) live window.
- Click “Start Broadcasting.” Use Alt + mouse to crop out the web bar or use the zoom function to remove it.
- During the live broadcast, you can only modify the “Artificial Interaction” function; other broadcast settings cannot be changed.
Ending the Broadcast
- When concluding the live broadcast, initiate the termination of the live stream on the platform’s broadcasting partner first, followed by clicking the “End Live” button on Virbo Live to finalize the shutdown process.
02Uploading Local Images and Videos
07AI Intelligent Script Generation
11Starting/Ending the Live Broadcast
Decorating Your Live Room
Decoration Guidance
- Click on the product homepage and create a blank live room to initiate a new live session.
Create a blank live room
- Upon creating a blank live room, the live room editing page will open. The left side serves as the operation area, the right side as the canvas area, and the materials area is located above.
Livestream room navigation
- Click on the templates to use pre-designed combinations of background, virtual hosts, and stickers.
Select a template
- Customize the background from the background library. During the live broadcast, only one background can be used.
Livestream room customization
- Choose a virtual host from the virtual host library. Only one virtual host can be used during the live session.
![]()
Choose a virtual host
- Add stickers from the sticker library. Multiple stickers can be used during the live broadcast.
- After selecting materials, adjust their position and size in the canvas area. Right-click to modify layers, copy, or delete materials.
Uploading Local Images and Videos
Upload background images or videos
- Upload: Click Background -> Upload Background -> Select file to upload. Materials will be displayed in “My Background” after uploading.
Upload Background
- Apply: Click Background -> My Background, then click on the material to use it on the canvas.
- Delete: Hover over the material and click the delete icon to remove it.
Delete Background
Note
Background upload requirements:
- Image and video dimensions should be 9:16
- Image formats: JPG/JPEG/PNG
- Video formats: MP4/MOV
- Resolution should not exceed 1080P
- Video duration should not exceed 30 minutes
- File size should not exceed 1GB
Upload sticker images or videos
- Upload: Click Sticker -> Upload Sticker -> Select file to upload. Materials will be displayed in “My Sticker” after uploading.
Upload Sticker
- Apply: Click Sticker -> My Sticker, then click on the material to use it on the canvas.
- Delete: Click Sticker -> My Sticker, hover over the material, click the delete icon to remove it.
Delete Sticker
Note
Sticker upload requirements:
- Image and video dimensions are flexible.
- Image formats: JPG/JPEG/PNG
- Video formats: MP4/MOV
- Resolution should not exceed 1080P
- Video duration should not exceed 30 minutes
- File size should not exceed 1GB
Text-Driven Live Room
Script Guidance
- Input script text: Copy and paste your script into the script dialogue box.
Text Scripts Inset
- Choose a matching tone: Click the voice-over entrance above, select a suitable tone, and preview it.
- Preview: Click the “Preview” button below the text to listen.
Audio-Driven Live Room
Audio Guidance
- Upload audio: Click Script -> Audio -> Upload local voice and upload the local file.
Upload Audio
- Preview audio: After uploading, click to preview the audio.
Preview Audio
- Audio sorting: Hold and drag to sort the audio files.
Audio sorting
- Audio sorting: Hold and drag to sort the audio files.
Modifying Live Room Name
Method Guidance
- Method 1: Click the edit button in the upper-left corner of the edit page to rename the live room.
Rename Livestream Room
- Method 2: Product homepage -> My Live Rooms -> Click on the more options for an individual live room -> Choose Rename.
Adding AI Identification
Step Guidance
- On the live room editing page, click on the checkbox before the AI identification to enable or disable it.
AI Intelligent Script Generation
Generation Guidance
- Click the “AI Intelligent Script” button below the script, a popup will appear.
- Enter your product name (mandatory), selling points (optional), promotional information (optional), select language and style, then click generate.
AI Script
- The generated result can be further modified, click “Use” to add it to the script dialogue box.
AI Translation
Translation Guidance
- Click the “AI Translation” button below the script, a popup will appear.
- Place the text to be translated on the left, click the middle arrow to select the language for translation (e.g., English), and click translate.
AI Translation
- The generated result can be further modified, click “Use” to add it to the script dialogue box.
AI Translation Result
Manual Interaction
Microphone Interaction
- Operational Flow:
- Click Manual Interaction -> Microphone, and select the microphone device.
- Speak into the microphone and observe the sound wave status.
- Open “Start Live,” wait for the appearance of the virtual host image, and click “Open Mic Takeover.” The virtual host’s mouth will be closed, and your voice will drive the virtual host to speak.
- After speaking, click “End Takeover,” and the virtual host will resume reading the scripted dialogue.
- Click Manual Interaction -> Microphone, and select the microphone device.
- Grant Browser Microphone Access:
- Google Chrome:
*Open Chrome, click the settings icon in the top right.
* Click “Settings,” open the settings page. Select “Privacy and Security” and then click “Site Settings.”
*Enter the site settings page, click “Microphone.”
* On the microphone authorization page, select that the site can request the use of your microphone.
* After these settings, when the browser needs to use the camera or microphone, a device request box will pop up on the page. Select “Allow.” - Mozilla Firefox:
*Open Firefox, click the settings icon in the top right, and click “Settings.”
* Open the settings page, click “Privacy & Security,” and find “Microphone Permissions.” Click “Settings” next to “Microphone.”
*Enter the settings page, add the site that requests the use of your microphone to the list, and click “Save Changes.”
* After these settings, when the browser needs to use the camera or microphone, a device request box will pop up on the page. Select “Allow.” - Sogou Browser:
*Open Sogou Browser, click the settings icon in the top right, and click “Options.”
* Open the options page, click “Advanced,” find “Privacy - Browsers on the Mac System:
*Locate “System Preferences” on your Mac dock and click the icon. Once opened, find “Security & Privacy” and click to open.
* On the “Security & Privacy” page, select “Privacy,” then click on “Microphone” and set the applications that need to use the microphone to “Allow.”
- Google Chrome:
Text Interaction
- Click on “Artificial Interaction” and enter interaction scripts in the input box below.
- Click “Add Text” to add it to the interaction list. After starting the live broadcast, each interaction script will have a send button.
Text Interactionn
- Click “Send” to trigger the AI to speak according to the interaction script.
Intelligent Interaction
Note
The current intelligent interaction feature only supports Alibaba International. If you are streaming on other platforms, you can skip this step.
Setting Entrance
- On the live broadcast page, click on “Intelligent Interaction,” select the live platform, and the supported intelligent interaction features will be randomly displayed.
Q&A Library Settings
- Creating a New Q&A:
- On the product homepage, click on Q&A Library - Add Q&A, and a popup window will appear.
- Fill in the rule name, keywords, reply text, and upload a reply video. Click Save.
Note
Rule Name: Name the rule for easy identification.
Keywords: If a viewer’s question in the live room contains any of these keywords, it will trigger the AI to answer.
Reply Content: You can add up to 5 replies. Include variables like [Viewer’s Nickname] and [Viewer’s Country] for personalized responses.
Sequential Reply: Replies in sequence when triggered.
Random Reply: Randomly selects a reply when triggered.
Reply Video: If configured, the video will be displayed at the specified position until the AI’s reply ends.
- Adjusting Q&A Activation Status:
- Click Q&A Library - Switch to close or open the Q&A rule. When closed, the Q&A rule will not take effect after the live broadcast starts.
- Turning on Q&A Library Switch in the Live Room:
- On the live broadcast editing page, click Intelligent Interaction - Platform, select “Alibaba International,” and turn on the Q&A Library switch. This must be done after starting the live broadcast and capturing the barrage for the function to work.
Greeting Rules Settings
- Greeting Content: You can add up to 5 replies, including variables like [Viewer’s Nickname] and [Viewer’s Country].
- Sequential Reply: Replies in sequence when triggered.
- Random Reply: Randomly selects a reply when triggered.
- On the live broadcast editing page, click Intelligent Interaction - Platform, select “Alibaba International,” turn on the Greeting switch, and click the edit icon to open the editing window. Fill in the reply text and click Save.
Sending Business Cards and Product Catalogs
- On the live broadcast editing page, click Intelligent Interaction - Platform, select “Alibaba International,” turn on the “Send Business Cards” switch, and turn on the “Send Product Catalogs” switch.
Note
These functions will only take effect after starting the live broadcast and capturing the barrage.
How to Start Live Barrage Capture
- Start Broadcasting in Virbo Live
- Follow the steps for “Start/End Broadcast” on the live broadcast editing page.
- Install the Plugin in Chrome
- Ensure Chrome is up to date, then download the plugin from the provided link . After downloading, unzip locally.
- Configure the Plugin in Chrome
- Open Chrome, go to Settings - Extensions - Manage Extensions, enable Developer mode, click “Load Unpacked,” and select the unzipped folder. Enable “Allow in incognito mode” in the plugin details.
- Copy the Live Control Page Link
- Copy the link of your live control page (web version) from the live platform. Paste the link into the live broadcast editing page under Intelligent Interaction - Live Room Link Input, then click “Start Capturing.”
Note
Alibaba International currently supports automatic Q&A, automatic greetings, automatic business card sending, and automatic product catalog sending. You can turn on the corresponding switches and then configure the detailed settings for each item.
Starting/Ending the Live Broadcast
Starting the Live Broadcast
- On the live broadcast editing page, click “Start Broadcasting.”
- The AI live broadcast window will appear shortly after, displaying the AI live broadcast.
Using Your Broadcasting Partner or OBS
Note
Keep the AI live broadcast window open on the desktop during the broadcast, or it will not broadcast properly.
- Open your broadcasting partner or OBS, add a window, select the Wondershare VVB (Live Version) live window.
- Click “Start Broadcasting.” Use Alt + mouse to crop out the web bar or use the zoom function to remove it.
- During the live broadcast, you can only modify the “Artificial Interaction” function; other broadcast settings cannot be changed.
Ending the Broadcast
- When concluding the live broadcast, initiate the termination of the live stream on the platform’s broadcasting partner first, followed by clicking the “End Live” button on Virbo Live to finalize the shutdown process.
How to Make an Animated Explainer Video
Explainer films are among the easiest and most inventive methods to present a project, a product, a service, or pretty much anything else you can imagine. In reality, the demand for an explanation film increases with product complexity. Fortunately, with the help of some of the fantastic explainer video software tools available online, you may be able to accomplish it yourself.
You’ll find a few tools in this article that will let you sit down and make whatever kind of explainer film you want. An overview of the key components required for a successful explainer video is provided at the bottom.
Part 1: The Preparation Stage of Animated Explainers
An explainer video’s primary goal is to improve the company’s marketing plan. They are so distinctive and ultimately successful because of this. However, for the creation process to be successful, it must also include all participants and be open and transparent. The process may sometimes be full of intriguing and surprising answers at any point, or it might reach a dead end. Actually, the whole creative process is quite orderly and transparent. Here is a list of the actions you need to do to complete it successfully.
Define Your Target Audience and Purpose:
The process often begins with project research, which includes gathering data from the customer, doing a market study, and completing product research.
The key is clarity since it will enable you to precisely explain your requirements for team members and resources. Your explainer video’s success depends on careful preparation. You must work together without hurrying or falling behind since there will be several connected jobs.
Craft a Compelling Script:
The screenplay describes all the video’s spoken words, whether you’re using voiceovers, dialogue, or a mix of the two. During the pre-production phase, we devote a significant amount of time and effort to scriptwriting.
Consequently, the next and most crucial phase in the creation of animated videos is scriptwriting. It determines if a marketing message will be conveyed to the target audience clearly and, more broadly, whether the video will convert.
Select the Right Animation Style and Tools:
After the script has been polished and completed, style and formatting are needed. This phase also aids in giving you a general idea of the character that will appear in the video, the color schemes that will be used, the tone, etc. Start by gathering supporting materials for the final film, such as images, videos, and other elements. Referencing your storyboard and keeping a list of the materials your video needs is a smart idea. Animated characters, icons, and images are examples of assets.
Make the spectator feel as if they are a part of the universe you have created. This is a challenging step since you must coordinate all the animations to get the ideal outcome! Along with speech and other significant notes, they often contain instructions for camera angles, tips and changes for lighting, and transitions between scenes.
Choose an Appropriate Voice-Over or Narration:
Like the majority of experienced writers, brilliant marketers start their videos with voice-over narrations. It’s crucial to remember that before the animation process can begin, the voice-over must be recorded.
The majority of video editing programs provide you access to stock music that you may use in your productions. As an alternative, you may search through a variety of websites with royalty-free music to locate the ideal song for your film.
Part 2: The Operation Procedure to Create Animated Explainer Videos
Some people may believe that making animated explanation films is simple. The misunderstanding is mostly caused by how brief and uncomplicated many animated videos on social media are. From consulting with customers, selecting ideas, and developing a storyboard to accomplishing business objectives, video production is complicated.
Design Captivating Characters or Visual Elements :
For many years, the customer journey has been heavily influenced by brand identification and brand trust. Finding a simple technique to easily convey your brand to a target demographic is the difficult part. Animated explainer videos excel in this situation. A useful tool for promoting goods, services, concepts, and companies is an animated explainer film. Explainer videos are an innovative marketing strategy that many forward-thinking companies actively include into their operations.
There are several techniques to animate your films since there is no one approach that works perfectly. Be original and imaginative. You could be unsure about what style to utilize as a result. You should create many instances of the same character because of this. It aids in better appreciating the mood of the video. In this manner, you can choose which fashions suit your brand and the tone of the film the most!
Animate the Scenes Using Motion Graphics or Traditional Animation Techniques:
The second piece of advice is to make sure your animated film appears just as stunning without sound as it does with it. An animated figure often follows a script in an explainer film, utilizing objects and other visual elements to guide viewers through a process or explain a topic. When developing mascots for a family-oriented product offering, live-action videos may have a significant influence.
The most enjoyable part is undoubtedly the illustrations! You get to choose and create your characters’ environments. Users will be interested and more inclined to watch the video due to the animation. Because of this, it’s preferable to employ titers in the film or make your animation seem catchy from the very beginning.
Incorporate Suitable Background Music and Sound Effects:
The audience won’t be interested in the product if the voice-over isn’t up to par. If they can’t even hear what you have to say due to voice quality issues, how can they be interested? It’s time to concentrate on the sound now. It is where you put together the narration, music, and sound effects to provide the audience the best experience possible.
If you’re just starting off, this step could seem a little intimidating. Consider employing a professional with built-in tools to achieve it effectively if you’re searching for someone with expertise and experience using editing software. Furthermore, background music may provide pacing, intrigue, and a sense of setting to the film.
Part 3: Utilize Professional Video Editing Software for Post-Production
When making an explainer video, choosing the correct editing program may make all the difference. Different explainer video creators will provide you access to effects and asset libraries, which will make creating your video easier. To make the process of producing animated images easier,Virbo provides hundreds of pre-made designs. The user-friendly design and selection of free tools make it simple for novices to produce animated films of high quality.
Get Started Online Free Download
Virbo animated explainer video maker can create captivating explainer videos with customizations. Businesses can create interesting, interactive content that can be shared on many different web channels because to its extensive feature set and simple interface. Because the graph editor makes it simple to create seamless transitions and add fascinating effects, it is a fantastic option for animated explainer movies.
Key Features:
Enriched Effects:
Compositing for motion pictures, animated explainer videos, and visual effects are all done using Virbo. Utilizing a wide variety of hundreds of one-of-a-kind effects, this program is utilized in the post-production stage to allow users to alter the final result.
User-friendly Interface:
You may quickly clip and construct a timeline using the drag-and-drop tool. That is why Virbo is considered the top-notch choice of beginners and expert animated video production companies. It has an organized set of tools on ready-to-utilize basis.
AI-Based Scripting:

The program automatically creates a storyboard based on the screenplay and explainer video template that you’ve selected. As opposed to starting from scratch, you now simply need to tweak your flow, substantially simplifying the process.
Automated Avatars:
![]()
With its simple interface, you may choose your preferred animated figure, infographic, or effect before editing the animated text. You can mix characters, effects, and video with this animation creator to create engaging animated videos.
Creative Templates:

With the help of built-in presets and other templates, Virbo may combine your individual shots or composite footage into a single, seamless piece that will help your explainer video stand out from the competition. The platform has around 180+ templates that can be utilized on a single drag-and-drop basis.
Animation Customization:
You have greater control over animated features because to the seamless blending of 2D and 3D parts, and character creation is made simple by the abundance of rigging and animation tools. Also, Virbo has around 150+ avatars that are AI-backed so all you need to do is bring your favorite to the scene and create your animated explainers.
Export and Share Your Animated Explainer Video Across Various Platforms:
In a culture where people have short attention spans and a need for eye-catching graphics and material, animated explainers are also very helpful for spreading ideas. A captivating animated film posted with your fans on social media will aid in promoting your business across the whole network. There is no one size fits all when it comes to explanation videos. You must be aware at this point of the complexity of explainer videos.
Having said that, it’s simply a lot to absorb; both the procedure and the kinds! You must present your explainer videos effectively if you want to be heard and seen. For this reason, we advise immediately posting your video clip to a social media website. Talking of which, Virbo comes in as a great option as it provides seamless integration of various platforms where you can share your animated explainer videos single-handedly.
To do that, simply go to the export button and explore the plethora of sharing and saving options available to you with regard to your explainer videos.
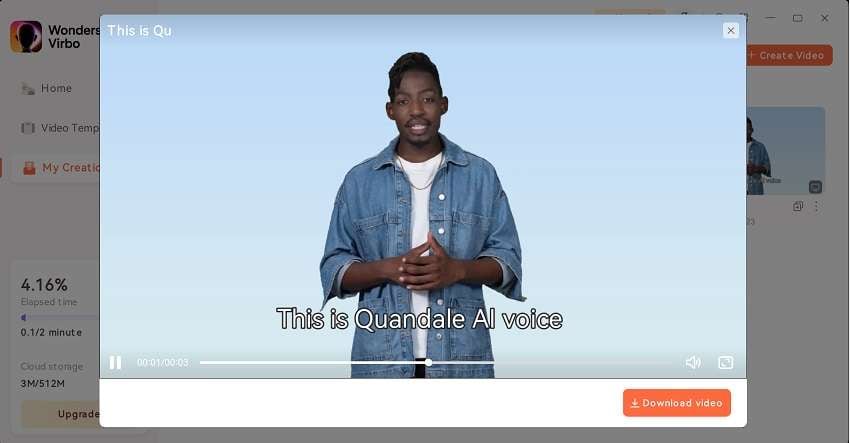
Conclusion:
Explainer videos that are animated are a fantastic method to sell your goods or services. They may aid in fostering greater consumer knowledge and are entertaining and educational. They assist in raising awareness while also assisting organizations in achieving productivity objectives. By simplifying complex ideas into enticing motion graphics, brief and effective animated movies may clearly communicate ideas, goods, and services.
It might be overwhelming for a newbie to navigate the many stages involved in making an animated film. Every stage of the creation process—from gathering materials to recording voiceovers—requires the creator to pay close attention to the little things and keep the end result in mind. In that spectrum, consider using Virbo as your all-in-one partner to create animated explainer films if you’re unsure that you have the time, energy, or expertise to do it yourself. Try it now and experience the creative world on your own.
s just as stunning without sound as it does with it. An animated figure often follows a script in an explainer film, utilizing objects and other visual elements to guide viewers through a process or explain a topic. When developing mascots for a family-oriented product offering, live-action videos may have a significant influence.
The most enjoyable part is undoubtedly the illustrations! You get to choose and create your characters’ environments. Users will be interested and more inclined to watch the video due to the animation. Because of this, it’s preferable to employ titers in the film or make your animation seem catchy from the very beginning.
Also read:
- New What Is an AI Script Generator? | Wondershare Virbo Glossary for 2024
- Updated Ever-Changing Era of AI Video Translation A Reality to Be Fulfilled for 2024
- Updated What Is an AI Avatar for 2024
- The Most Efficient Tools to Convert Text to MP3 With the Best Natural Voices for 2024
- 2024 Approved The Best Text-to-Speech Online Tools To Use
- How to Enable the Text to Speech Function on iPhone for 2024
- Updated In 2024, How To Translate Videos in Tamil for a Wider Reach
- New Essential Tools for Creating Dynamic Talking Avatars
- In 2024, Best 10 Free AI Voice Generators to Use in Daily Life
- New In 2024, Translate Videos and Subtitles with Veed.io
- In 2024, Best 10 Hindi Video Translators with Step-by-Step Guidance
- New How To Start a Private Live Stream on YouTube
- 2024 Approved Diverse Template
- New Top 8 Text-to-Video AI Generators to Produce Video Easily for 2024
- Updated Step-by-Step Guide How to Translate TikTok Videos for 2024
- 2024 Guide How to Attract More NFL Viewers for Your Sports Live Streaming Channel
- What Is an AI Headshot Generator? | Wondershare Virbo Glossary for 2024
- In 2024, Talkshoplive Reviews & Pro Tips Is This the Live Commerce Tool You Need?
- New Top 10 Free Football Streaming Websites for Live Matches for 2024
- New Speech-to-Speech Voice Cloning A Breakthrough in AI Voice Industry
- Updated In 2024, Top 5 AI Voice Generators Online (Supports All Browsers)
- New 2024 Approved Comprehensive Guide for Free Video Translator Downloading
- Updated 2024 Approved Top 10 Hindi Video Translators with Step-by-Step Guidance
- New What Is an AI Video Generator for 2024
- Introduction of Wondershare Virbo for 2024
- Updated In 2024, Introduction | Online
- 2024 Approved Chrome Video Translator Select the Perfect Platform
- New 2024 Approved In-Depth Review of Ivona Text to Speech Converter
- New 2024 Approved Translate Instagram Videos Easily A Step-by-Step Guide
- What Is an AI Presentation Maker? | Wondershare Virbo Glossary for 2024
- Updated In 2024, 12 Must-Try Best Voice Cloning Tools to Use
- Updated Top List Best 5 Tools for Creating Talking Avatars
- Creating AI Videos With AI Avatars for 2024
- In 2024, 8 Safe and Effective Methods to Unlock Your iPhone 14 Pro Without a Passcode | Dr.fone
- How To Get the Apple ID Verification Code From Apple iPhone X in the Best Ways
- In 2024, How to Sign Out of Apple ID On Apple iPhone XS Max without Password?
- In 2024, Unlock Your Infinix Hot 40 Pro Phone with Ease The 3 Best Lock Screen Removal Tools
- 4 Ways to Mirror Apple iPhone 12 Pro Max to Laptop via USB or Wi-Fi | Dr.fone
- Remove 11 Pro+ unlock screen
- In 2024, How can I get more stardust in pokemon go On Vivo Y56 5G? | Dr.fone
- What You Want To Know About Two-Factor Authentication for iCloud On your Apple iPhone SE
- In 2024, 5 Ways to Move Contacts From Motorola G54 5G to iPhone (13/14/15) | Dr.fone
- Solved Bad and Corrupt Videos that won't Play on OnePlus Nord N30 SE
- In 2024, Unlock Your Infinix Note 30 VIPs Potential The Top 20 Lock Screen Apps You Need to Try
- In 2024, How to Detect and Remove Spyware on Vivo S17? | Dr.fone
- How to convert AVCHD .mts files for Redmi K70?
- How To Stream Anything From ZTE Nubia Z60 Ultra to Apple TV | Dr.fone
- In 2024, Apple ID is Greyed Out From Apple iPhone SE (2022) How to Bypass?
- In 2024, How To Fix OEM Unlock Missing on Samsung Galaxy M34?
- In 2024, How to Mirror PC Screen to Honor 90 Phones? | Dr.fone
- Can I Bypass a Forgotten Phone Password Of Vivo V30 Lite 5G?
- How to Transfer Photos from Itel P55+ to Laptop Without USB | Dr.fone
- In 2024, How Do You Get Sun Stone Evolutions in Pokémon For Lava Blaze 2 5G? | Dr.fone
- How to Transfer Data from Vivo Y100A to Any iOS Devices | Dr.fone
- Oppo A58 4G ADB Format Tool for PC vs. Other Unlocking Tools Which One is the Best?
- Set Your Preferred Job Location on LinkedIn App of your Honor X50 GT | Dr.fone
- Android Screen Stuck General Realme GT Neo 5 Partly Screen Unresponsive | Dr.fone
- Title: 2024 Approved A Step-by-Step Guide on How to Promote YouTube Channel
- Author: Sam
- Created at : 2024-06-08 05:32:42
- Updated at : 2024-06-09 05:32:42
- Link: https://ai-voice-clone.techidaily.com/2024-approved-a-step-by-step-guide-on-how-to-promote-youtube-channel/
- License: This work is licensed under CC BY-NC-SA 4.0.
